

Page 1
83950500 1091®
LEF-C MUSIC CENTER SYSTEM
® AlPHONE
Models;
LEF-3C
LEF-5C
LEF-10C
OPERATION MANUAL
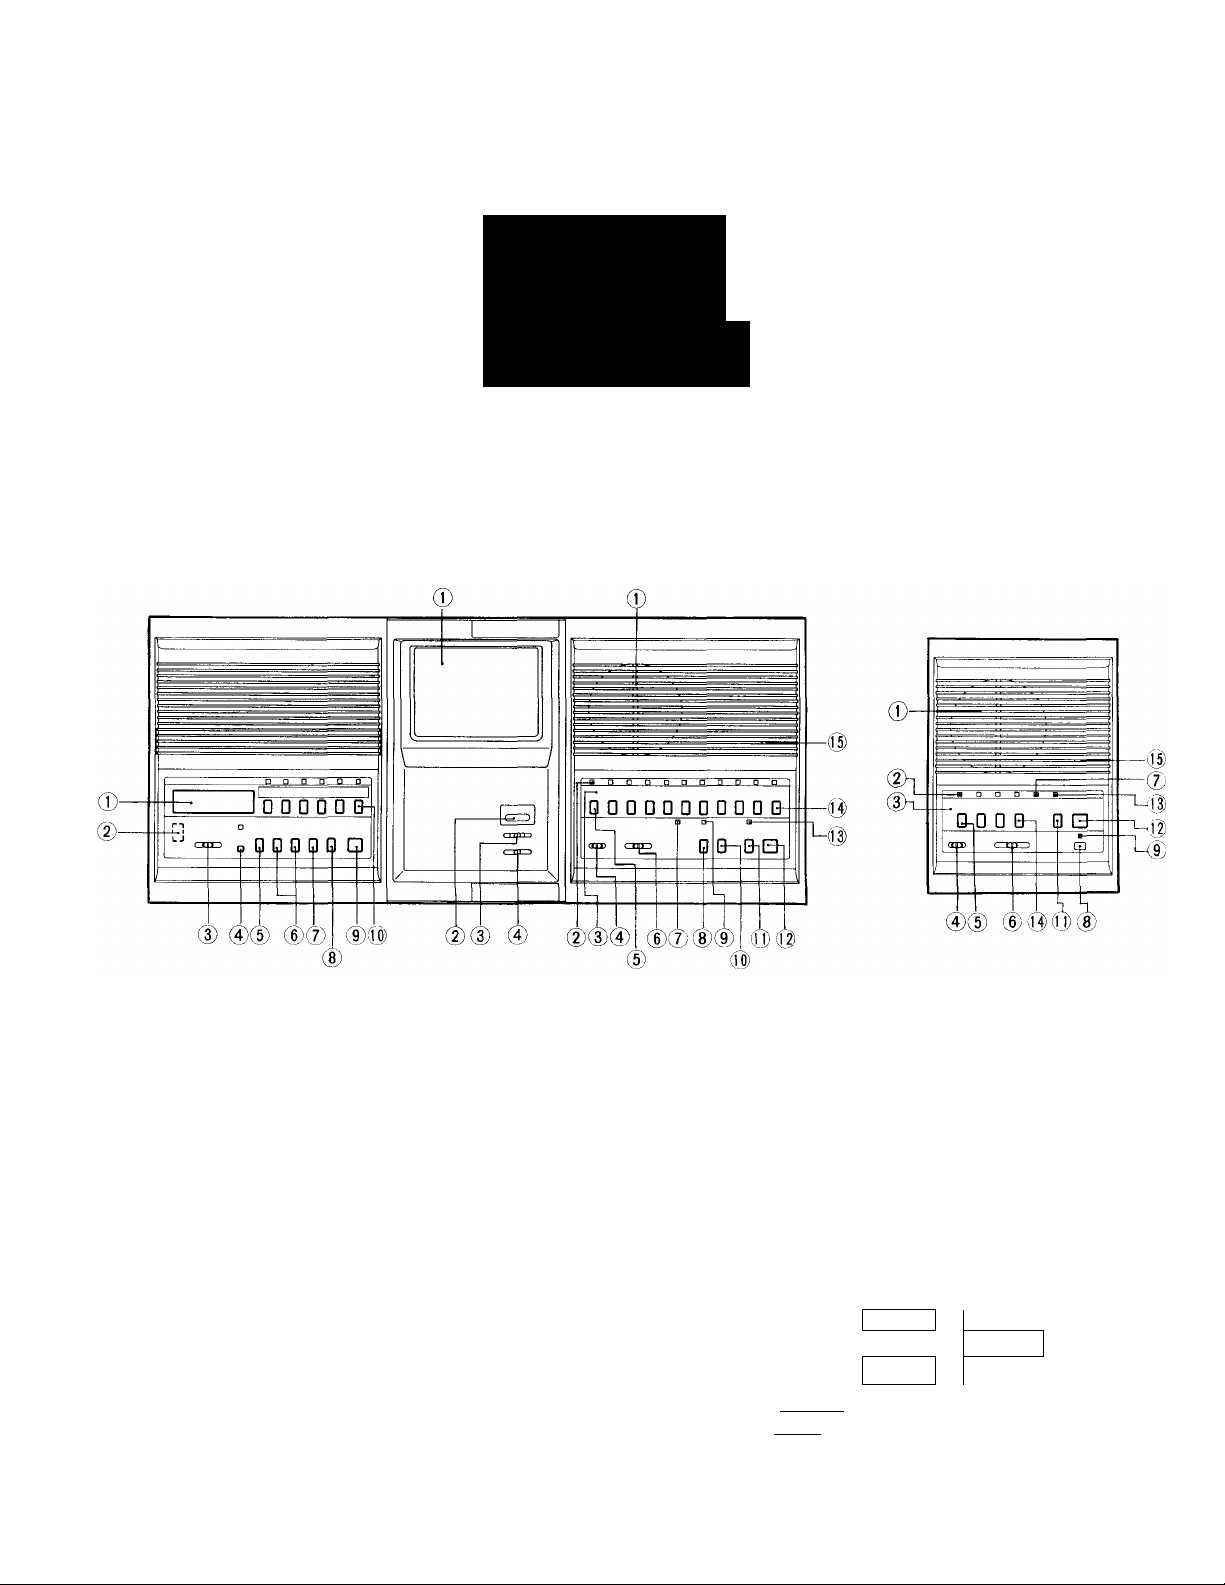
NAMES AND FUNCTIONS
BGR-10A
MFH-UB
LEF-10C
(3-call master)
(5-call master)
(10-call master)
LEF-3C
BGR-10A
(D LCD
(D LOCAL/DX selector switch (under the plate)
(3) Background music volume control
0 Background music ON/OFF switch & ON LED
® STN/CLK display changeover switch
® Manual UP/DOWN tuning switch
@ SEEK switch
® MEMORY switch
@ AM/FM selector switch
(0) Pre-set channel selector switch (6)
MFH-UB
® Video monitor
(2) Video monitor button
@ Contrast switch (3-level)
0 Brightness control
— I —
LEF-10C, LEF-5C, LEF-3C
fj Speaker
2J Sub call-in annunciator LED (also illuminates on master to
indicate station selected).
Directory card & button identification plate
Music volume control
Station selector button
Communication volume control
OCCUPIED LED
ALL CALL button
ALL CALL mode indicator LED
0) Door release butte
0) PRIVACY button
(0) TALK button
Privacy-mode indicator LED
® OFF button I OFF
(>i) Microphone (ECM)
NOTE; LEF-5C appearance is the same as LEE-IOC,
except 5 selector buttons less.
ALL CALL
PRIV.
CALL
TALK
Page 2

opi
OPERATIONS
1. AUDIO COMMUNICATION
u u u
BEFORE OPERATION,
SEE IF OCCUPIED
OCCUPIED ALL CALL ;
LED IS NOT LIT.
(1) Calling;
\1/
ROOD P„D 0 □ □ D 0
.L CALL .irw.-. .v.-.-.-. HHIV. . . .-. l ALKv. .-.
1® To call by tone;
Depress a selector button of station desired.
(call annunciator LED is lit as well as selection indicator
LED is lit above OEF button)
To call by tone, depress both PRIVACY and TALK buttons.
Call tone sounds while two buttons are being depressed.
To call by voice, depress TALK button and speak to the
microphone.
Depress TALK button to talk, and release to listen.
After communication, depress OFF button.
(2) Receiving a call from other master;
■\ /
sOs:
□ □
Ij
VOLUME ADJUSTMENT
BGM VOL.
dDD
Slide the switch to the right for higher volume.
Background music volume can be cut off.
VOICE VOL.
c cl: )
(4) Receiving a call from door station;
\l/
□ □ □ □ R D O D D O O
!tiv!v!tv!v/!v!v’ v'vliiivlvlvlv/lv I ‘ I S.'.v.v.v./.'.'.v.v.v.'.v.'.'ìacmLL^'' -*''
BGM VOL.i'voicE vol. :-:-:! IÌ'all call >i>r>R,y'.v.vTÀLK v-
....................
it CALL •##>>>>r:v>R,y'.-.'.VTALKvr:
>;C53^
‘<TJ
A call is announced by chime tone and LED.
Depress a corresponding selector button.
Depress TALK button to talk, and release to listen.
To activate electric door release, depress and hold ■—0 button
Depress OFF button for standby.
\l/
(5) All call
□ □ □ □ □ □ □ □ Q,D □
To release privacy mode;
A call is announced by electronic mono tone or voice.
Just reply handsfree (or depress TALK button to release
privacy mode).
After communication, depress PRIVACY button for standby.
Privacy-mode indicator LED is lit when PRIVACY button is
in depressed position.
(3) Receiving a call from sub;
M/
OFF
DDORDODDDDO DDQDDPDDDaO
: BGM voL.xxxivoicE i icupiEo. ALL CALLiiii#-::T::-: privotalk-:
' 'I y.y.‘.'.'.'iii*CA*LL«^‘.'.'.*.'
SliiS: Jilin
Select and control
communications.
A call is announced by both electronic mono tone and LED.
Depress a selector button below the illuminated LED.
Depress TALK button to talk, and release to listen.
After communication, depress OEE button.
The call annunciator LED and selection indicator LED go off.
1
-
□ □ D P □ □ D □ □ □ □
.L CALL .ttw.- :• priv talk
viC3IO-:LL
HOiOffli
® @
Depress ALL CALL button. The all call mode indicator LED
is lit. Depress TALK button while making announcement.
After announcement, release ALL CALL button by
depressing the button again.
(6) Monitoring;
\l/ \l/
•:bgw VOL.voice vol. : :: :-occui l:ALL:#fli-:-:-privtalk-:-:-;-:-:-:
\l/
OFF
IHliilBiiil ¿iQiinQI
Select a station to be monitored
Depress a selector button of station to be monitored (baby's
room, etc.).
If chime or mono tone sounds, it is a call from door or another
sub station (No. 5 in the illustration).
Depress a corresponding selector button.
— 2-
Page 3

2. VIDEO COMiWÜNrcATION
(1) Receiving a caii from video door station;
\i/ \i/
□ GGGDDODD-gD
BGM VOL voice' vól 'occupied:’all ’calí.’:##':
Door station call-in is announced by chime tone and the
image of a caller appears on all video monitors.
Depress a selector button below the illuminated LED.
Depress TALK button to talk and release to listen.
(1) Reply within 20 seconds after chime tone sounds.
Sub call-in annnciator LED goes off in 20 seconds.
(2) After called, the picture remains for approx. 45 seconds.
If picture goes off, depress MONITOR button to have
the picture for approx. 2 minutes and half.
(3) Chime tone is available only when BGR-lOA is used.
(2) Video monitoring;
! !
■
!
Depress
MONITOR-
button.
:
1,^^ - 'xi
MFH-UB LEF-10C
i,D_DDDGDDDOCrtr
! : i
” G G 0 □
When multiple camera adaptor is used;
Depress MONITOR button on MFH-UB to turn on door
station/camera No. I.
Depress MONITOR button again to have the picture of door
station/camera No.2.
If a door station/camera No.3 is installed, depress MONITOR
button third time (if not installed, picture goes off).
The fourth pressing MONITOR button turns off the picture.
The fifth pressing returns to the No. 1 picture.
- :
When video
door station is
connected to
No. 10.
Upon depressing
No. 10 button,
you can have
both audio and
video.
Notes;
( I ) The picture goes off approximately 2 minutes and half after MONITOR button is pressed.
The picture which comes on after last time MONITOR button is pressed, starts from the door station/camera last monitored
If door station calls in after last monitoring, the next video monitoring starts from the door station/camera No.l.
(2) To monitor the other door station(s);
While communicating with one video door station, you can switch to the picture of the next door station, by pressing
MONITOR button on MFH-UB.
(3) When door station calls in while monitoring, the picture is switched to that of calling door station.
L.
1
3. MUSIC CENTER (BQR-10A)
Wnen AUX IS us^ for BGM e^cKGROUND MUSIC
INSIDE SETTING
SWITCH SECTION CH,ME TONE
B VOLUME
CONTROL
AUX/TUNER selector switch-
FRONT
PANEL
A
LOCAL7DX SWITCH-
BGM VOL-
BGM ON/OFF -
(1) BACKGROUND MUSIC
1. Set the BGM ON/OFF switch to upper ON position. A
2. Set the individual BGM ON/OFF switch for each B
room station.
3. Adjust the MUSIC TREBLE/BASS switch as desired. B
4. Adjust music volume by BGM VOL. switch A
as desired.
source instead TONE CONTROL
oaaaoooQDO
oaaoaaooaa
LCD-
s g D □ □ D □
DISPLAY CHANGEOVER -
□ □□ □ □
MIN HR r
--------------------------
-ALL CALL VOLUME CONTROL
-BACKGROUND MUSIC DISTRIBUTION
CHIME CALL RECEIVE MASTER SETTING
-RADIO PRESET CHANNEL SELECTION
-TIME SETTING
-RADIO TUNING
(2) CHIME CALL
1. Set the individual CHIME ON/OFF switch for each B
room station.
2. Adjust CHIME VOLUME switch to the level desired. B
(3) ALL CALL
1. Adjust pre-tone volume to the level desired. B
2. Adjust all call announcement volume to the level B
desired.
Page 4

(4) RADIO TUNING (5) CLOCK
1. To program up to 6 pre-set frequencies/channels, press
MANUAL UP/DOWN button until the required
frequency is tuned in, press MEMORY button, then
press channel button (1 ~ 6).
2. Search the channel by pressing SEEK button, to either
UP or DOWN direction last used.
3. Press AM/FM button to changeover band (band
selection).
4. While in RADIO mode, press STN/CLK button to
show either TIME or FREQUENCY in non-priority
mode for 8 seconds and returns to display in priority
mode. To reverse display in priority mode, press
both MEMORY button and STN/CLK button at the
same time.
5. Set LOCAL/DX switch to LOCAL position in areas
of strong electric field.
* General notes;
1. On BGR-IOA, each volume of background music, all call and chime call can he adjusted. Music volume can also be
adjusted on each LEF-C master & sub stations.
2. When a room station enters communication, background music is muted temporarily.
3. When BGR-IOA .system is powered off, the pre-set 6 channel memories and time are erased, after 10 to 30 minutes
back-up is consumed.
4. BGR-IOA is equipped with power amplifier and its .surface temperature can be a little higher than LEF-5C, -IOC.
1.
To set HOUR, press UP/HR button, holding down
MEMORY/TIME button.
2.
To set MINUTE, press DOWN/MIN button, holding
down MEMORY/TIME button.
SPECIFICATIONS
LEF-C;
* Power source:
* Current consumption: Maximum 300mA per station.
* Power output: Maximum 800mW at 20 ohm (reception).
* Communication:
* Calling: From master to master/sub; by voice or electronic mono tone.
DC 12V. Use PS-12C power supply, (in North America only).
Maximum 500mW at 20 ohm (transmission).
Push button station selection. Press-to-talk operation at calling master.
Occupied LED illuminates when the system is in use.
From sub to master; by electronic mono tone and timed LED illumination for max. 20 seconds.
Sub's call-in can be signaled by tone even during master is communicating.
BGR-10A;
* Power source:
* Current consumption: DC l.OA (max.), 0.25A (standby).
* No. of door station connectable: Max. 3 door stations.
* No. of master station connectable:
Aiphone warrants its products to be free from defects of material and workmanship under normal use and service for a period of
one year after delivery to the ultimate user and will repair free of change or replace at no charge, should it become defective
upon which examination shall disclose to be defective and under warranty. Aiphone reserves unto itself the sole right to make
the final decision whether there is a defect in materials and/or workmanship; and whether or not the product is within the
warranty.
This warranty shall not apply to any Aiphone product which has been subject to misuse, neglect, accident, or to use in violation
of instructions furnished, nor extended to units which have been repaired or altered outside of the factory.
This warranty does not cover batteries or damage caused by batteries used in connection with the product.
This warranty covers bench repairs only, and any repairs must be made at the shop or place designated in writing by Aiphone.
Aiphone will not be responsible for any costs incurred involving on site service calls.
' i i i i i i Î i i
Aiphone Co., Ltd. Nagoya, Japan
Aiphone Corporation, Bellevue, WA, USA
BGR-IOA; DC 24V. Use PS-24C power supply, (in North America only).
Max. 11 room stations.
WARRANTY
COMMUNICATION SYSTEMS
AIPHONE
LEF-C-OM(E) 1091B
— 4 —
e
HOME, BUSINESS, INDUSTRY
Printed in Japan (E)
 Loading...