

96501 0408
- INITIAL INSTALLATION INSTRUCTIONS -
Before proceeding with the installation of the AX system, please review these instructions.
1. The complete AX System Installation & Operation Manual is located on the CD included with the CEU.
2. The software program to set up the CEU is located on the CD as well. The CEU must be configured for
the system that you are installing in order for the system to function.
3. Included with the CEU is a USB to serial converter, along with a gender changer. This is supplied to
allow any PC with a USB port to be used to program the AX CEU.
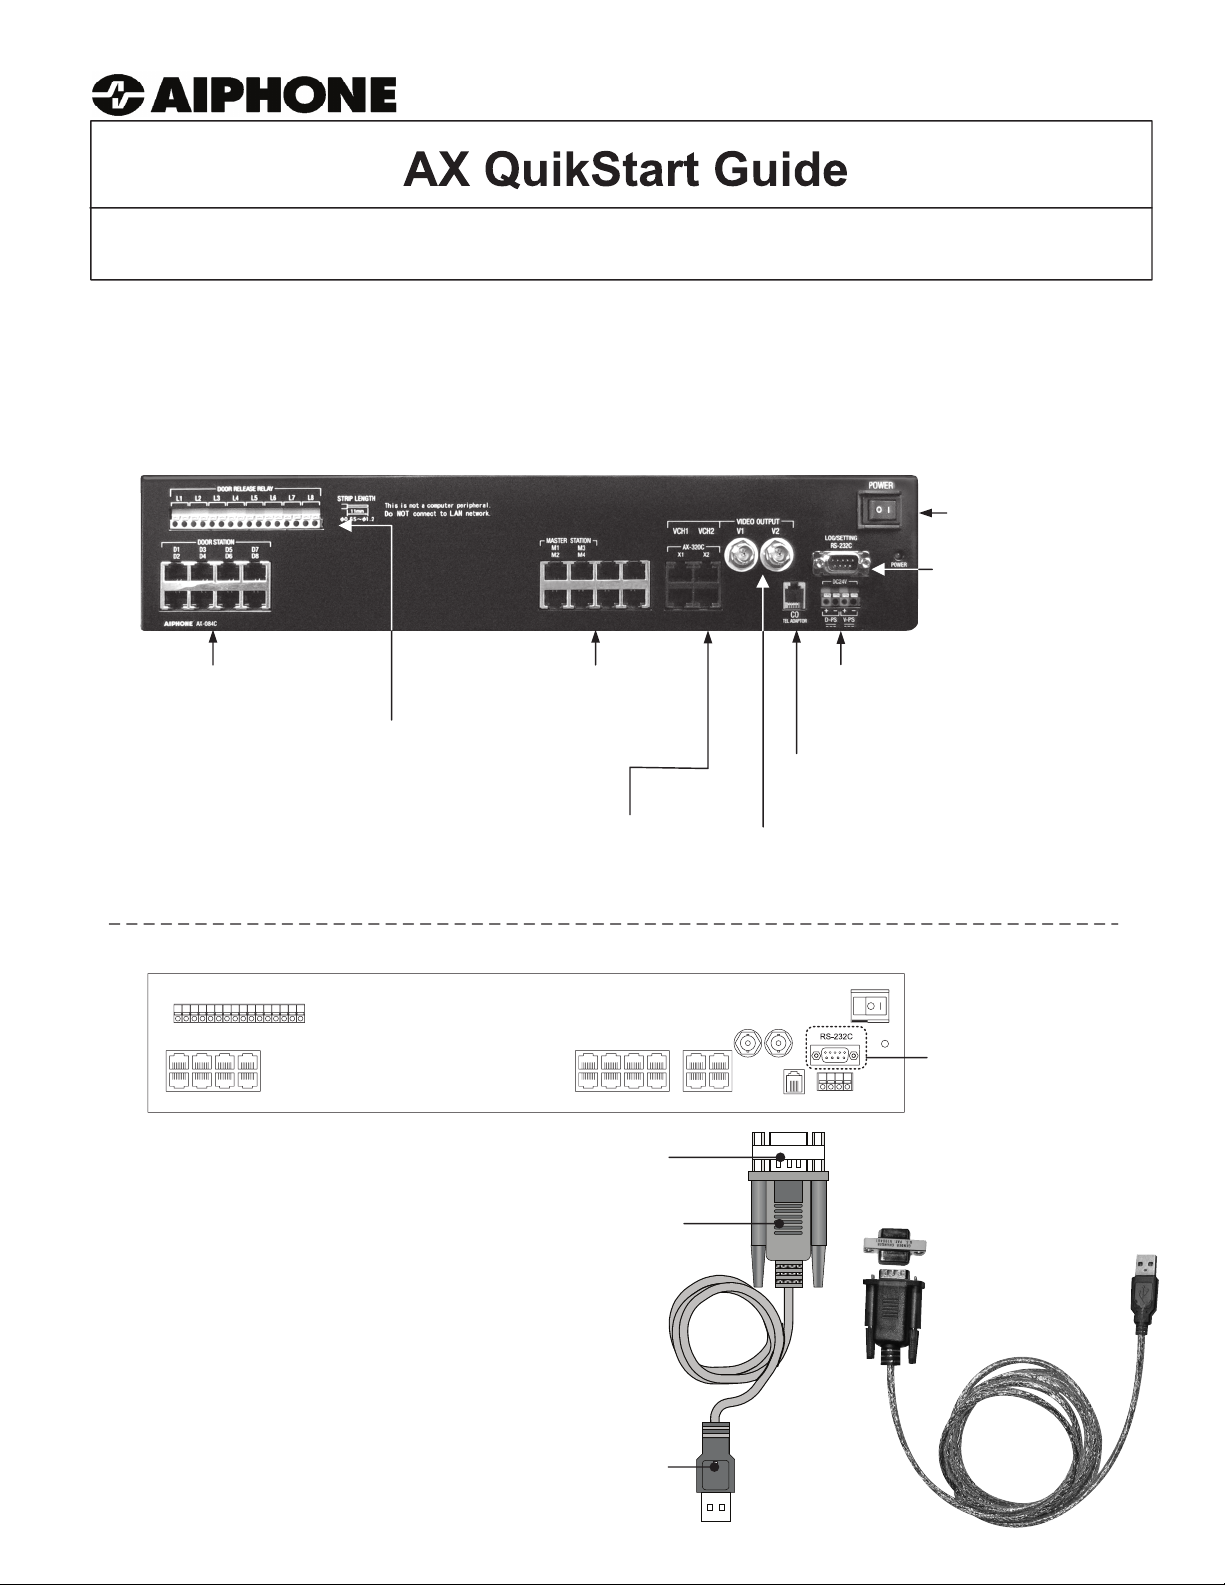
On/Off power switch
RS232 port
Used for programming
Door Station Ports
RJ-45 jacks
The AX-084C is illustrated
here. The AX-248C has
additional Door and Master
Station Ports and Door
Release Contacts.
Master Station Ports
RJ-45 jacks
Door Release Contacts
Each contact can be programmed
to be either N/O or N/C
Open collector outputs for video
signal trigger (top)
AX-320C Add-on CEU ports (bottom)
RJ-45 jacks
Video Outputs.
Each talk path has its own output.
When connecting to a DVR, two
channels must be used.
Two 24V DC inputs
Parallel inputs on 1 PS-2420UL
for audio-only systems
Telephone Output
Connects to Viking Model K-1900-5 Dialer
Connecting Central Exchange Unit to Computer via USB-to-Serial Converter:
+ - + -
D-PS V-PS
POWER
DOOR RELEASE RELAY
L1 L2 L3 L4 L5 L6 L7 L8
D1 D3 D5 D7
D2 D4 D6 D8
AIPHONE AX-084C
1. Connect power supplies and turn on CEU.
2. If a serial output is not available on your
PC: Install the USB driver that comes with
the converter onto your PC.
3. Attach the gender changer to the converter
and plug converter into the RS232 port on
the AX Exchange Unit.
4. Plug the other side of the USB converter
into the USB port on the computer.
M1 M3
M2 M4
DB9 F/F
Gender Changer
USB-to-Serial
Converter
VCH1 VCH2
X1 OUT X2
AX-320C
VIDEO OUT
V1 V2
CO
RS232C Port
Actual components
(supplied with AX CEU):
Cord length:
6’
This will allow you to upload and download
program information between the PC and
CEU via the AX Setup Tool program.
To USB Port
on PC
QUICK GUIDE TO CONFIGURING THE AX CENTRAL EXCHANGE UNIT:
The following describes the basics of the AX Setup Tool. Note that the CEU MUST be programmed
via PC in order for the system to work. Without programming, only Master 1 (M1) and Door 1 (D1)
will operate when connected to the CEU.
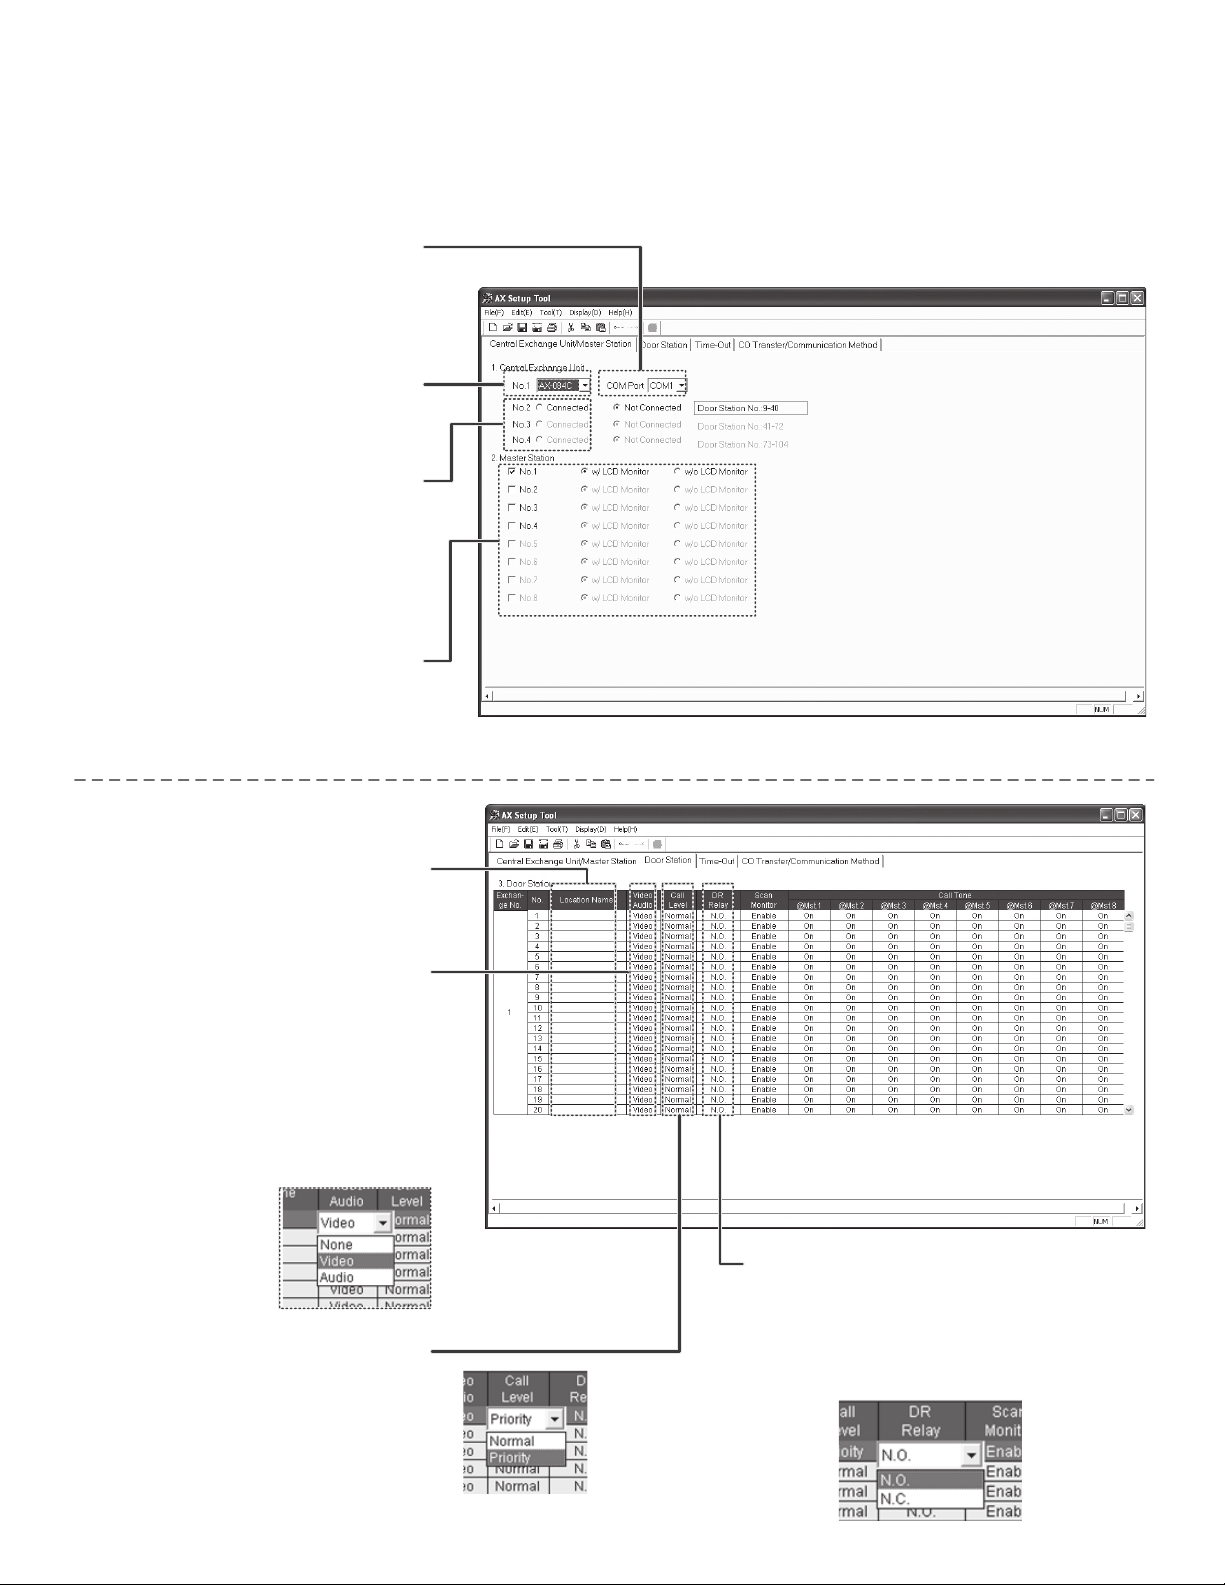
1) Central Exchange Unit
Step 1: Select the COM Port you
will be using. (Based on using
existing serial port or USB port
with converter. See Page 8 for
further information.)
Step 2: Select which model
CEU that you are using via the
dropdown box.
Step 3: If any AX-320C add-on
CEU’s are included, click
“Connected” for each one.
2) Master Station
Step 1: Select the number of
masters being used, and
whether it is a video master or
audio only master.
3) Door Station
Step 1: Fill in location name of
each door station if desired.
(Not required. Names are not
stored in CEU.)
Step 2: Select Video, Audio, or
None, depending on which type of
door station is connected to each
input. (If setting remains on Video
when an audio-only door station is
used, the AX-8MV’s LCD will
display a snowy picture when that
station is active.)
Step 3: Set call priority level by
selecting Priority or Normal from
the Call Level tab. Priority level
calls will have a faster call tone
and flashing LED on the master.
Step 4: Set the door release contact to
either Normally Open or Normally
Closed by selecting N.O. or N.C. on the
DR Relay tab. The default is N.O.
(N.O.= Normally Open, N.C. = Normally Closed)
Page 2
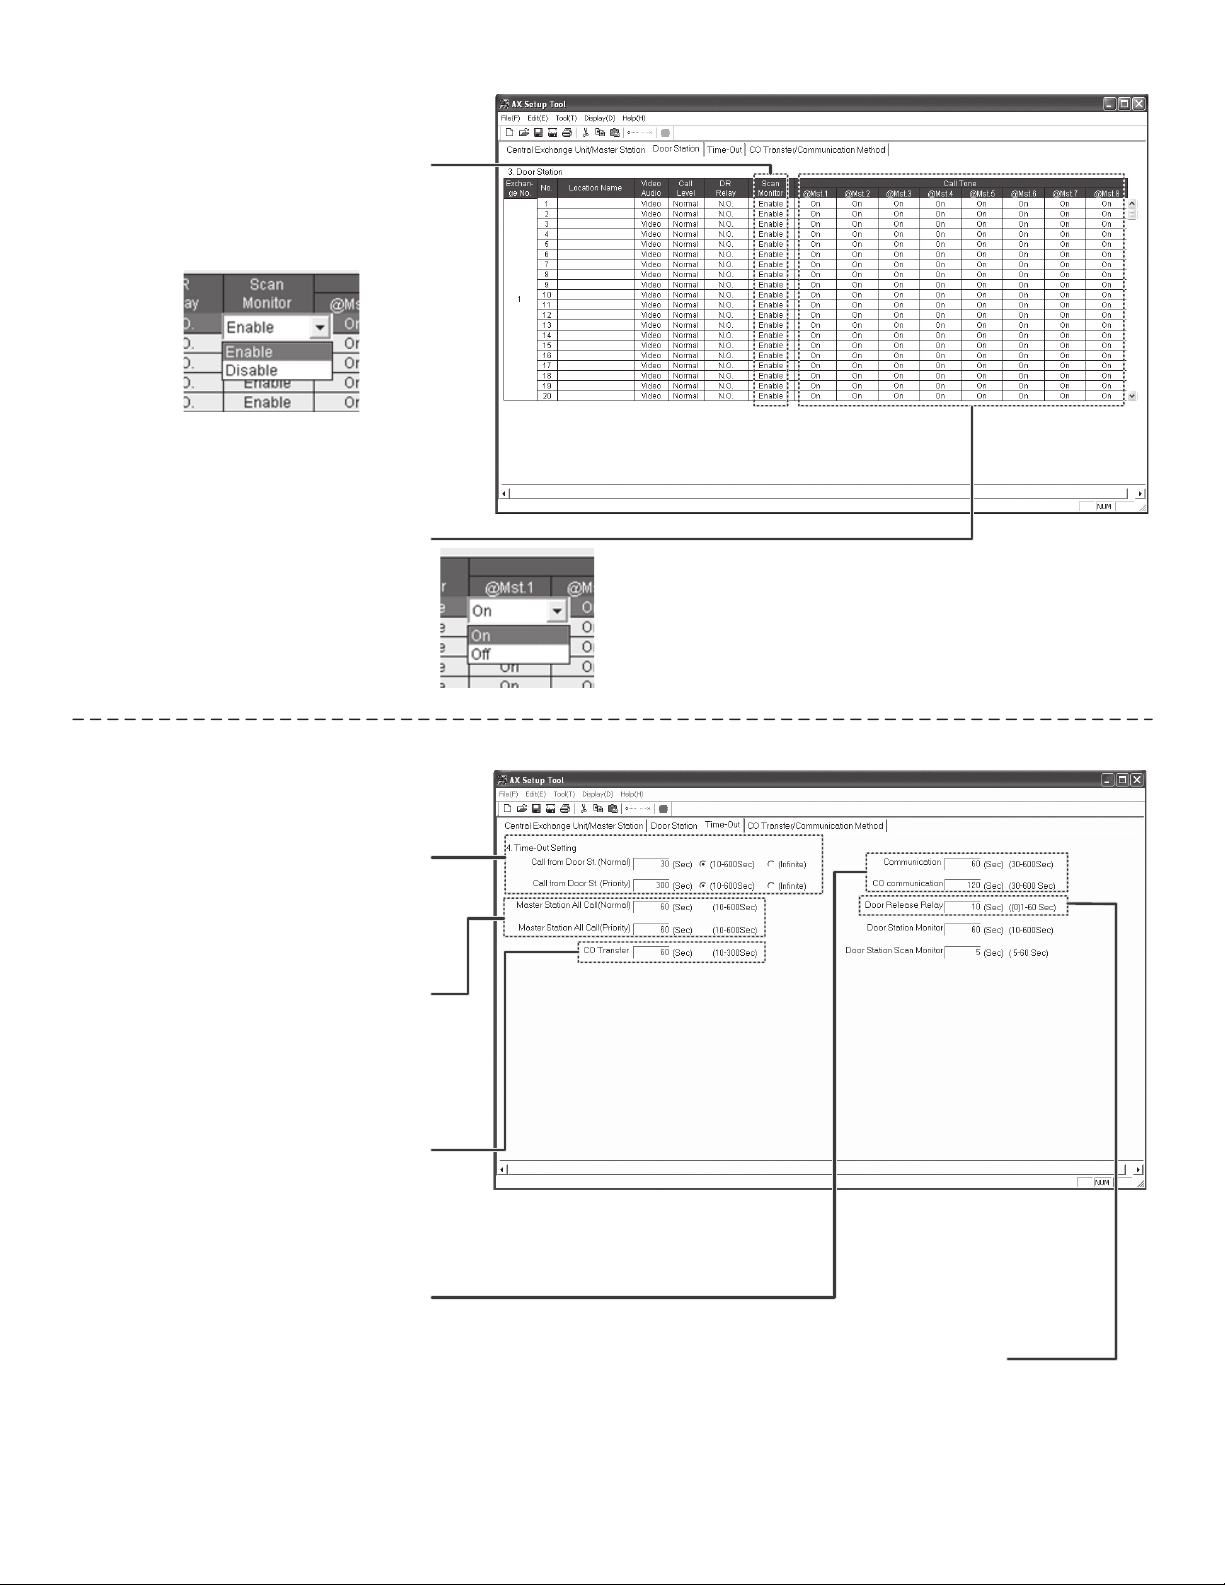
3) Door Station (continued)
Step 5: Enable or disable each
station for being eligible for
scanning by selecting Enable or
Disable from the Scan Monitor
Tab.
Step 6: Select if you want the
door station’s call tone to ring
on each master station by
selecting On or Off from the Call
Tone tab. Please note that
when set to “Off”, the LED and
monitor will still come on at the
master when the door calls in.
Only the call tone will be muted.
4) Time-Out
Step 1: Set Call-in time for door
stations from 10 to 600 seconds,
or to infinite if the call is to ring
until it is answered.
(Set for both Normal and Priority Calls.)
Step 2: Set the duration of an All
Call announcement from 10 to
600 seconds.
(Set for both Normal and Priority Calls.)
Step 3: Set the CO Transfer
time from 10 to 300 seconds for
how long a CO transferred call
will ring the outside telephone
line.
Step 4: Set the Communication
time for the maximum amount of
time allowed for an intercom
conversation (30 to 600 seconds).
Set the CO Communication time
for the maximum amount of time
allowed for a CO transferred call
(30 to 600 seconds).
Step 5: Set the Door
Release Relay setting for
the duration of time that the
contacts are to be activated.
Page 3

4) Time Out (continued)
Step 6: Set the Door Station
Monitor for the amount of time
that you want to be able to listen
in to a door station (10 to 600
seconds).
selected, the master will be in listen
mode for this length of time, then will
time out.
When a door station is
Step 7: Set the Door Station
Scan Monitor for the amount of
time that you want to listen to
each door station while in Scan
Monitor mode (5 to 60
seconds).
5) CO Transfer
Step 1: If using the CO
Transfer feature, click on the
Enable button. If not, skip to
section 6, Communication
Method.
Step 2: If Reverse Polarity
Detection is required for your
phone line, click on Detect.
This is sometimes required,
depending on the phone line.
Step 3: The Wait time for
Ring-Back-Tone can be
adjusted from 1-60 seconds.
6) Communication Method
Step 1: The Communication
Method can be switched from
“VOX or Press to Talk” to
“Press to Talk only”. If “Press
to Talk” is selected, hands free
VOX feature will be disabled
on all master stations.
Page 4

7) Saving / Uploading
Step 1: Connect PC / Laptop to
AX CEU as shown on page 1.
Use supplied USB-to-Serial
Converter and Gender Changer
if a Serial port is not available.
Step 2: Save the settings that you
have made by clicking on File, and
then Save As. Use the name of the
job, or something that describes the
job as the file name, so you can
refer back to it later.
Step 3: Click on Tool, then CEU,
then Upload to upload the system
settings to the AX CEU.
RS-232C
To PC / Laptop
USB port
RS-232C plug
on AX-CEU
Actual unit:
Step 4: Click Yes to the
confirmation message asking if you
want to overwrite the information in
the Central Exchange Unit.
Step 5: Enter the password to
authorize the upload. The default
password is 9999.
Click OK, and the new settings
will upload to the CEU.
Step 6: When upload is complete,
remove the connector cable from
the CEU and save in a secure
location. (This will be required
when any changes are to be
made to the system programming
in the future.)
Page 5

Typical Block Wiring Diagram:
System example includes 8 video door stations and 4 master stations, with selective door release.
All master stations and video door stations are wired via CAT-5e cable with RJ-45 jacks at each
end. Audio door stations are connected with two conductors at the door station end and an RJ-45
jack at the CEU.
t
u
p
t
u
O
o
e
d
i
V
e
t
i
s
o
p
m
o
C
e
r
o
c
o
t
+
V
6
#
e
s
5
a
#
e
l
e
e
s
R
a
e
l
e
R
t
u
p
t
2
u
1
l
e
)
n
n
m
a
h
h
O
C
/
5
7
h
t
,
a
p
-
p
p
k
l
V
a
1
(
T
d
i
a
r
b
o
t
V
7
#
e
s
a
e
l
e
R
n
l
O
o
e
d
i
V
e
t
i
s
o
p
m
o
C
)
e
a
n
c
)
n
o
n
i
S
m
t
a
r
h
a
h
r
o
f
O
e
C
d
p
/
5
e
o
7
h
s
r
t
,
u
o
a
p
t
-
i
p
o
p
n
k
s
l
l
V
o
a
A
1
M
(
(
T
e
r
o
d
i
c
a
r
o
t
b
+
o
t
V
V
R
E
W
O
P
C
2
3
2
S
R
T
U
2
V
O
O
E
D
I
1
V
V
8
#
e
s
a
e
l
e
R
T
P
3
M
1
M
L
U
0
2
-
+
4
2
S
P
-
+
S
P
-
V
+
S
P
-
D
+
O
C
2
2
H
X
C
V
1
H
C
V
C
T
0
U
2
3
O
X
1
A
X
4
M
2
M
V
M
8
X
A
V
M
8
X
A
e
n
i
L
e
n
)
o
S
h
T
P
O
o
P
(
T
L
U
0
2
4
2
S
P
3
#
r
e
t
s
a
M
1
#
r
e
t
s
a
M
5
-
g
0
n
0
i
k
9
i
1
V
K
4
#
V
r
M
e
t
8
s
a
X
M
A
2
#
V
r
M
e
t
8
s
a
X
M
A
089=UECXAotno
itatsretsamhcaemorfecnatsid.xaM .e5-TAChtiwteef
oitatsroodhcaemorfecnatsid.xa.Me5-TAChtiwteef089=UECXAotn
Page 6
*
8
#
8
L
7
L
Y
6
A
L
8
7
L
D
D
E
5
R
L
E
5
S
4
D
A
L
E
L
3
E
L
3
R
D
2
R
L
O
1
O
1
D
L
D
T
P
4
#
e
3
s
#
a
e
e
l
e
R
2
s
#
a
e
l
e
1
s
e
R
#
a
e
l
e
s
e
a
R
e
l
e
R
C
4
6
8
D
0
X
A
4
D
E
N
2
O
D
H
P
I
A
*
7
#
V
r
D
-
o
o
X
A
D
*
5
V
#
r
D
-
o
o
X
A
D
*
3
#
V
r
D
-
o
o
X
A
D
*
1
V
#
r
D
-
o
o
X
A
D
V
r
D
-
o
o
X
A
D
*
6
#
V
r
D
-
o
o
X
A
D
*
4
#
V
r
D
-
o
o
X
A
D
*
2
#
V
r
D
-
o
o
X
A
D

Wiring (continued):
AX-Series Audio
Only Sub*
TIA/EIA 568B Standard:
Connect 3/6 pair (green) to “1”
Connect 7/8 pair (brown) to “2”
1
CAT5e
2
Homerun each sub to
AX-084C, AX-248C, or
AX-320C CEU.
AX-Series sub stations include the following:
AX-DM, AX-A, AX-AN, AX-B, AX-BN, IF-DA, IE-DC, IE-JA, IE-SS,
IE-SSR, and IE-SSV.
You can use a standard 2-conductor cable when using an audio-only sub
station. At the CEU, splice the 2-conductor cable onto a CAT-5e cable with
the splicing method of your choice. Install an RJ-45 plug on CEU end of the
CAT-5e cable, then simply plug it into the AX Exchange Unit.
RJ-45 connectors for the door station ports are located on the left side of the
exchange. Please note that the odd numbers are located on top, and the
even numbers are located on the bottom. The master ports are in the center
of the CEU, with the odd numbers on top and even numbers on the bottom.
Illustration of converting from
2-conductor to CAT-5e cable.
DOOR RELEASE RELAY
L1 L2 L3 L4 L5 L6 L7 L8
AIPHONE AX-084C
The Door Release Contacts can be individually programmed to be either N/O
or N/C. The contacts are located above the door station ports. “L1” are the
contacts* for door station port “D1”, “L2” are the contacts for “D2”, etc. As the
“L#” connections are dry contacts, a separate power source is required for
the actual door strikes or magnetic locks.
*Note the dry contact rating: 24V AC/DC, 500mA.
The AX-084C and AX-248C units have a built-in composite video output, one
per talkpath. When tying to a recording device such as a DVR, connect each
output to separate inputs on the DVR. Each output also has a corresponding
trigger, via a normally open collector labeled VCH1 and VCH2. Pin 4 is the
trigger and pin 5 is the ground. Please note that the video signal is only
present when a video door station is active and there is an image on the
AX-8MV’s monitor.
The AX-084C and AX-248C both have the ability to connect to the AX-320C.
Connect outputs X1 and X2 with two CAT-5e cables. Both X1 and X2 must
be connected. The AX-320C must be with in 33 feet of the main CEU.
The AX-084C and AX-248C are powered by two PS-2420UL power
supplies. One power supply can be used for an audio-only system. When
using one power supply, jumper the two + terminals together and connect to
+ of power supply. Jumper two negative’s together and connect to – of power
supply. Power for AX-320C add-on CEU’s comes from the system power
supplies. Parallel connect power wires to all AX-320C’s in the system.
D1 D3 D5 D7
D2 D4 D6 D8
AIPHONE AX-084C
X1 OUT X2
AX-320C
VCH1 VCH2
VIDEO OUT
V1 V2
CO
CO
POWER
RS-232C
+ -
Page 7

Labeling the Master Station’s Directory Cards
Aiphone provides a template for creating professionally printed directory cards for the AX series
master stations.
Example: Directory cards when using template:
The template is located on the CD included
Master Stations Door Stations
with the CEU.
View CD contents using My Computer or
Windows Explorer.
- Open file folder called “DirectoryCard”
- Open PDF document “AX-8MV_DirectoryLetter”
- Type in location names of master and door stations.
- Print and cut strips to fit in directory slots on
master stations (replacing blank paper strips
included with the master). Replace plastic directory cover.
Determining the Appropriate COM Port
If you are utilizing the provided USB-to-Serial converter or have a computer with more than one
serial port, you will need to identify the port you are connecting to prior to selection inside the AX
Setup Utility. Ensure that the driver for the USB-to-Serial converter is installed (supplied on miniCD); otherwise the device may not be shown on the Device Manager.
To determine the COM ports on your computer, right-click on ‘My Computer’ either on the Windows
desktop or the Start menu and select ‘Properties’. When the Properties window appears, select
the ‘Hardware’ tab and click the button labeled ‘Device Manager.’
With the Device Manager open, scroll down to ‘Ports (COM & LPT).’ The Aiphone-supplied USBto-Serial converter will be shown as “Prolific USB-to-Serial Comm Port (COMX
);” the number
where the ‘X’ is indicates the COM port number to be chosen in the AX Setup Utility. Note that the
AX Setup Utility will only recognize COM ports numbered from COM1 to COM9. If the default COM
port is outside of that range, reassign COM port numbers using the advanced settings tab under the
COM port properties.
Aiphone Communication Systems
1700 130th Ave. N.E.
Bellevue, WA 98005
(425) 455-0510
FAX (425) 455-0071
TOLL FREE TECHNICAL SUPPORT:
(800) 692-0200
TOLL FREE FAX LINE:
(800) 832-3765
E-MAIL: tech-serv@aiphone.com
AX QuikStart Gd
Page 8
Stock # 96501
0408PHJS
 Loading...