

Aik RV7001 User Manual

User’s Manual
Welcome
Thank you very much for purchasing this product. Before you start, you are
recommended to read this manual step by step to obtain the best results with your
new Pico projector. We wish you enjoy it.
About the product
This is the latest generation of Pico projector with DLP technology inside. Known for
great cinema projectors, the DLP technology provides rich colors and enhances the
contrast of the image. Integrated with WLAN, the Pico projector provides cable-free
connection from your notebook, tablet, or smartphone to the Pico projector by
streaming pictures, videos, websites, and documents wirelessly and projecting the
images up to 120’’ (300 cm) in size. With its support to multiple media files, Office and
PDF documents, and versatile connection options including HDMI, MHL, AV-in, VGA,
USB and SD card slot, this Pico projector is the best solution for mobile use in
business and entertainment.
Safety Notice
1. Keep the device and packaging materials out of the reach of infants and children.
2. Avoid subjecting the power adapter and other contacts to dripping or splashing
water and dry your hands before you use it. Do not place objects filled with liquids
such as vases, etc. on or near the device.
3. Make sure that the used power outlet is always readily available and never hidden.
In case of emergency, use the power ad apt er to separate the device from the power
network.
4. Keep your device away from all flames such as candles and do not set them up in
the vicinity of the device.
5. Keep the unit at least 10 cm away from other objects. Make sure the ventilation is
not covered by newspapers, tablecloths, curtains, etc.
6. For your own safety, do not use the projector during thunderstorms or lightning.
7. Relative Humidity is 20% ~ 80%, non-condensing.
8. The battery is integrated with the device. Do not dissemble and modify. The battery
should be replaced by an authorized service center only.
9. Ensure that the ambient room temperature is within 5 ~ 35°C.
10. Wait before using if the dev ice has been moved from a cold l ocatio n into a war m one.
Any condensation that has formed may in certain circumstances destroy the device.
As soon as the device has reached room temperature it can be used without risk.
11. Handle the product with care. Avoid contact with sharp objects. Keep device away
from metallic objects.
12. Place the projector on a fla t surface. Any collision or falling to the ground is likely to
damage the product.
EN
Page 1

User’s Manual
13. Do not drop or disassemble the product otherwise the warranty voids. Opening or
removing covers may expose you to dangerous voltage or other hazards. Refer all
servicing to an authorized service center.
14. Use only the accessories supplied by the manufacturer.
EN
15. Both product and user’s manual are subject to further improvement or supplement
without further notice.
Care and Safety Information for Pico Projectors
1. Avoid facing directly into the projector’s lens.
2. During the operation, this product may heat
lightly, which is normal.
3. The device should not be used in a very
dusty environment. Dust particles and other
foreign objects may damage the unit.
4. Do not expose the device to extreme
vibrations. It may damage the internal
components.
5. Use the enclosed power adapter (see technical data):
Check whether the mains voltage of the power supply matches the mains voltage
available at the setup location. This equipment complies with the voltage type
specified on the unit.
Avoid Hearing Damage:
Listening at high volume for a
long period of time could cause
damage to your ears.
Notice for Long-time Projection
The built-in battery supports approximately 120 mins of projection. For long time
projection, you are recommended to use AC adapter.
When the battery is too weak to stay in operation, the low battery capacity icon ( )
will flash. You need to charge the product while the icon showed.
It’s normal that the projector will feel warm with continuous use due to its high
performance. If the projector runs for a long time and over-heated, the
High-Temperature icon ( ) will appear on the screen. The system will automatically
enter the standby mode.
Page 2

User’s Manual
FCC Compliance Statement:
This device complies with Part 15 of the FCC Rules. Operation is
subjected to the following two conditions: (1) this device may not cause
harmful interference, and (2) this device must accept any interference
received, including interference that may cause undesired operation.
This equipment has been tested and found to comply with limits for a Class B digital device,
pursuant to Part 15 of the FCC rules. These limits are designed to provide reasonable protection
against harmful interference in residential installations. This equipment generates, uses, and
can radiate radio frequency energy, and if not installed and used in accordance with the
instructions, may cause harmful interference to radio communications.
However, there is no guarantee that interference will not occur in a particular installation. If this
equipment does cause interference to radio or television equipment reception, which can be
determined by turning the equipment off and on, the user is encouraged to try to correct the
interference by one or more of the following measures:
-
Reorient or relocate the receiving antenna.
-
Move the equipment away from the receiver.
-
Plug the equipment into an outlet on a circuit different from that to which the receiver is
connected.
-
Consult the dealer or an experienced radio/television technician for additional suggestions.
For product available in the USA/Canada market, only channel 1~11 can be operated. Selection
of other channels is not possible.
This device and it's antennas(s) must not be co-located or operating in conjunction with any
other antenna or transmitter except in accordance with FCC multi-transmitter product
procedures.
FCC Radiation Exposure Statement:
This equipment complies with FCC radiation exposure limits set forth for an uncontrolled
environment. This equipment should be installed and operated with minimum distance 20cm
between the radiator & your body.
All cables used to connect peripherals must be shielded and grounded. Operation with cables
connected to peripherals that are not shielded and grounded may result in interference to radio
and television reception.
You are cautioned that any change or modifications to the equipment not expressly approved by
the party responsible for compliance could void your authority to operate such equipment.
If the time arises to throw away your
product, please recycle all the components
possible. Batteries and rechargeable
batteries are not to be disposed in your
domestic waste! Please recycle them at
your local recycling point.
Together we can help to protect the
environment.
EN
Page 3
User’s Manual
Table of Content
About the Product, Safety Notice
EN
Package Content
Knowing Your Device
Getting Started
Charging the product
Selecting the language
Projecting from External Video Input Source
HDMI, VGA, AV-IN
Smartphone & Tablets
Charging the external mobile devices
Projecting from Memory
Main Menu
Video
Photo
Document
Music
File Manager
MyFavorite
Setting
Enable Wirelss Connection
Wireless Driver for PC or Mac
Wireless App on Apple or Android devices
Trouble Shooting
Specifications
1
5
6
8
8
9
9
10
13
13
14
15
16
17
19
20
20
21
21
23
23
28
35
36
Page 4

User’s Manual
Package Content
Please check if the following items are located in your packaging:
Pico Projector
Power Adapter
Exchangeable Power Plug
Remote Control
HDMI Cable (A to A type)
MHL Cable (HDMI A to USB D type)
AV Cable
Micro USB Cable
Carry Bag
User’s Manual
EN
Page 5
A
User’s Manual
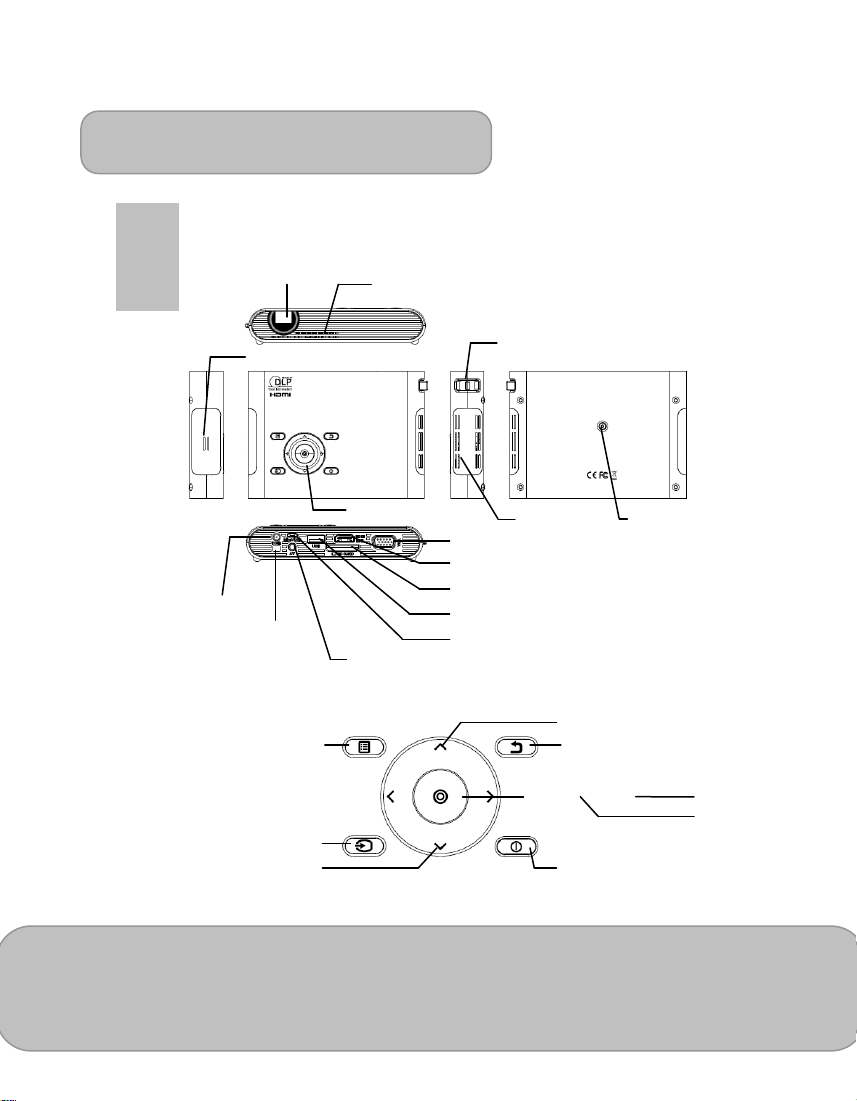
Knowing your Device
Projector
EN
Projection Lens
Speaker
DC IN
Infrared Receiver
Control Panel
Left / Previous
(External video input)
Source
Menu
Down
Ventilation
Keypad
V jack / Speaker Connector
Focus Lever
Ventilation
VGA Port
HDMI / MHL Connector
SD/ SDHC/ SDXC Card Slot
USB Connector
Micro USB Connector
Up
Exit
OK
Power
Tripod Socket
Right /Next
Page 6
User’s Manual
K
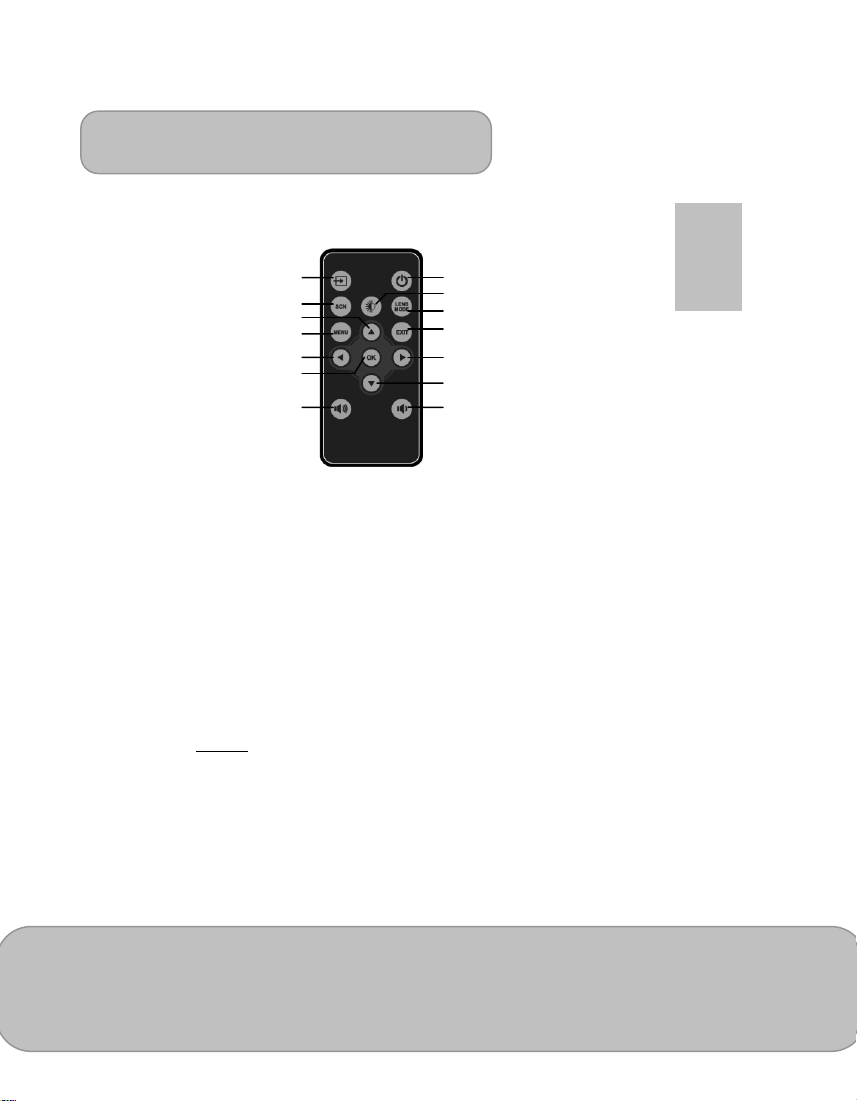
Remote Control
Source
Scene Mode
Up
Menu
Left/ Previous
O
Volume Up
Power
Brightness
Lens Mode
Exit (one menu step back)
Right/ Next
Down
Volume Down
EN
Installing the Remote Control Battery
1. Remove the battery holder by holdi ng dow n th e side releas e
firmly and pulling out the battery holder.
2. Insert a CR2025 coin cell battery and align the polarity
correctly according to the marking in the battery holder.
Note: When you use the remote control for the first time,
there is a plastic sheet between the battery and its
contact. Remove the sheet before use.
3. Insert the battery holder.
Warning:
Improper use of the battery may cause overheating, explosion or ignition, which can
result in an injury or a fire. Battery leakage may damage the remote controller.
Do not expose the remote controller unit to direct sunlight.
Do not expose the battery to fire or water.
Immediately replace the exhausted battery.
Take out battery when the remote is not in use for a long time.
Page 7

User’s Manual
Operating Range with Remote Control
EN
7m / 22.97 feet
Note: Actual operating range may slightly differ from the diagram. Additionally, a
weak battery reduces or eliminates the operating range of the remote control.
Getting Started
Charging the product
The projector is built in a Li-Polymer battery for
mobile use. Please charge the projector for 8
hours prior to its first use. Repeat charging will
take around 4 hours.
The battery will be charged only when the
projector is not in use (Power o ff). C on nect o ne end of the supplied AC adapt er to DC
IN jack and the other end to a power outlet to start charging.
Exchange the plug (EU, US and etc.) of AC adapter that accommodates the type of
power outlet in your country if it’s different.
Charging LED Indicator
During charging, the LED on Power button turns Orange. It turns to Green when the
battery is fully charged.
Turn On / Off the Projector
Push the Power button for 2 seconds to turn on the projector.
To turn off the projector, push the Power button downward for 2 seconds.
Standby mode: Push the Power button for 1 second to turn on/ off the projector lamp
for a short break to save the battery and system reboot time. (The
LED on buttons are still on when the projector is in standby mode.)
Page 8

User’s Manual
Adjusting the Focus according to distance
Place the projector on a flat surface and
toward a wall or a projection screen. The
projectional distance and projectional size
are:
Distance: 50 cm ~ 425 cm (20 ” ~ 167 ”)
Image size: 36 cm ~ 305 cm (14 ” ~ 120 ”)
Adjust the focus by turning the Focus Lever
upward or downward to get a sharp and clear picture.
Note: Use a tripod (not included) to increase the height of the projectional image
when necessary. The tripod socket is located under the projector.
Select the Language
Use the navigation keys to select ‘Setting’ and press ◎ (OK) to enter the
submenu. Select ‘Language’ and press ◎ (OK) to enter the language list. Select your
preferred language and confirm with ◎ (OK). Press (Exit) to return to Main Menu.
Projecting from External Video Input Source
The projector has built-in multiple interface on the rear side. You can connect your
external video Input source to the projector by using the appr opriate cable and pr ess the
Source key on the control panel of the projector to select the input source.
EN
Page 9

User’s Manual
HDMI
EN
Use the HDMI cable to connect the HDMI port
on the rear panel of the projector to the
external HDMI signal source. After connected,
the screen switches to HDMI source
automatically.
VGA
Use a VGA cable to connect the VGA port on
the rear panel of the projector to the external
VGA signal source. After connected, press
the Source button on the remote control or
control panel to select VGA source.
Note: VGA cable is not included in standard
AV IN
Follow the figure below to connect the external AV output device to the AV jack.
Connection is color-coded. After connection, press the Source button on the remote
control or control panel to select the AV-IN source.
package.
Page 10
User’s Manual
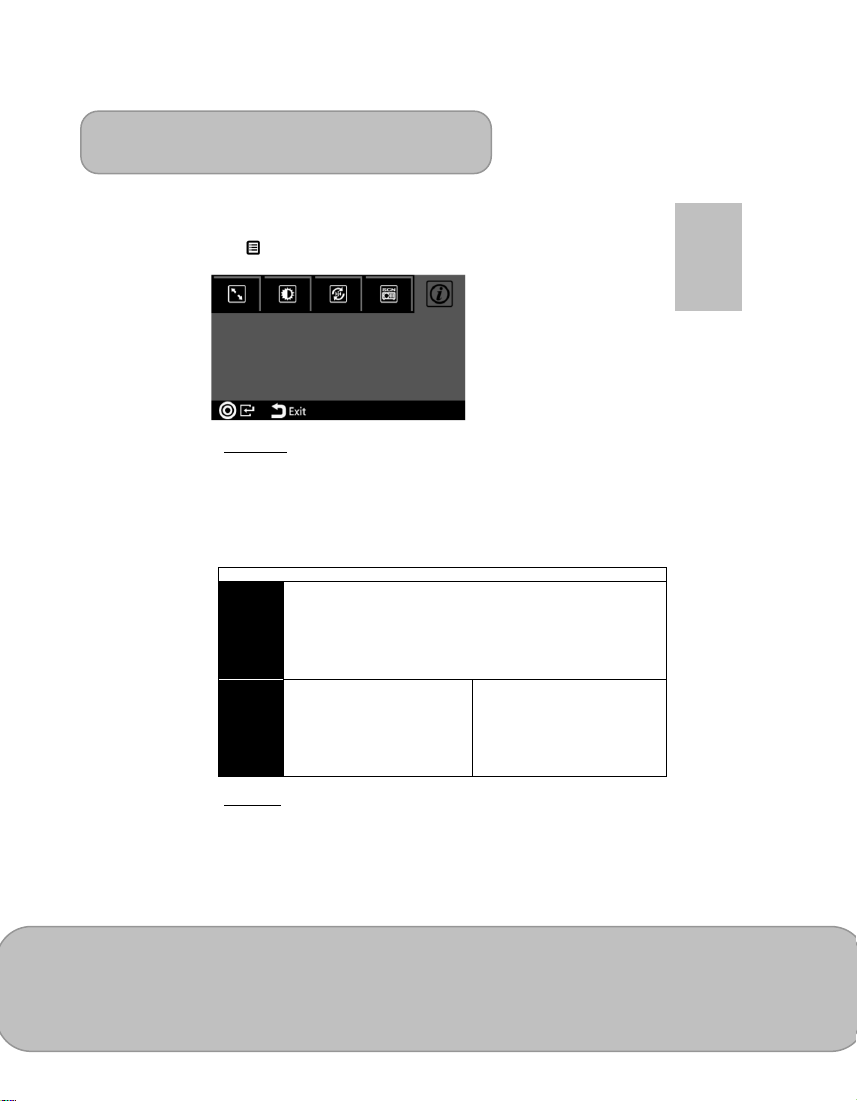
Changing Playback Setting for External Video Source
Press /Menu on control panel or remote control to enter the playback setting.
1. Aspect ratio
When the video file is in 4:3 aspect ratio, this function allows you to adjust how the
image should appear on the 16: 9 screen.
◎
Press
OK to display the options.
/
1) Pan & Scan: the image is scaled up to fit to 16:9 screen.
2) Letterbox: the image is displayed by original aspect ratio.
Illustration for the Aspect ratio setting:
4:3 Aspect Ratio
EN
Source
Screen
Pan & Scan (16:9)
Projection
Screen
2. Brightness
It allows you to change the brightness according to the environment and the power
consumption.
1) Enhanced: Select this mode when external power supply is available to
maximize the performance.
2) Normal: The default mode for optimizing the projection performance and
battery capacity.
Page 11
Letterbox (16:9)
 Loading...