

Aifro ICC818 User Manual
Aifro WaterEco
User Manual
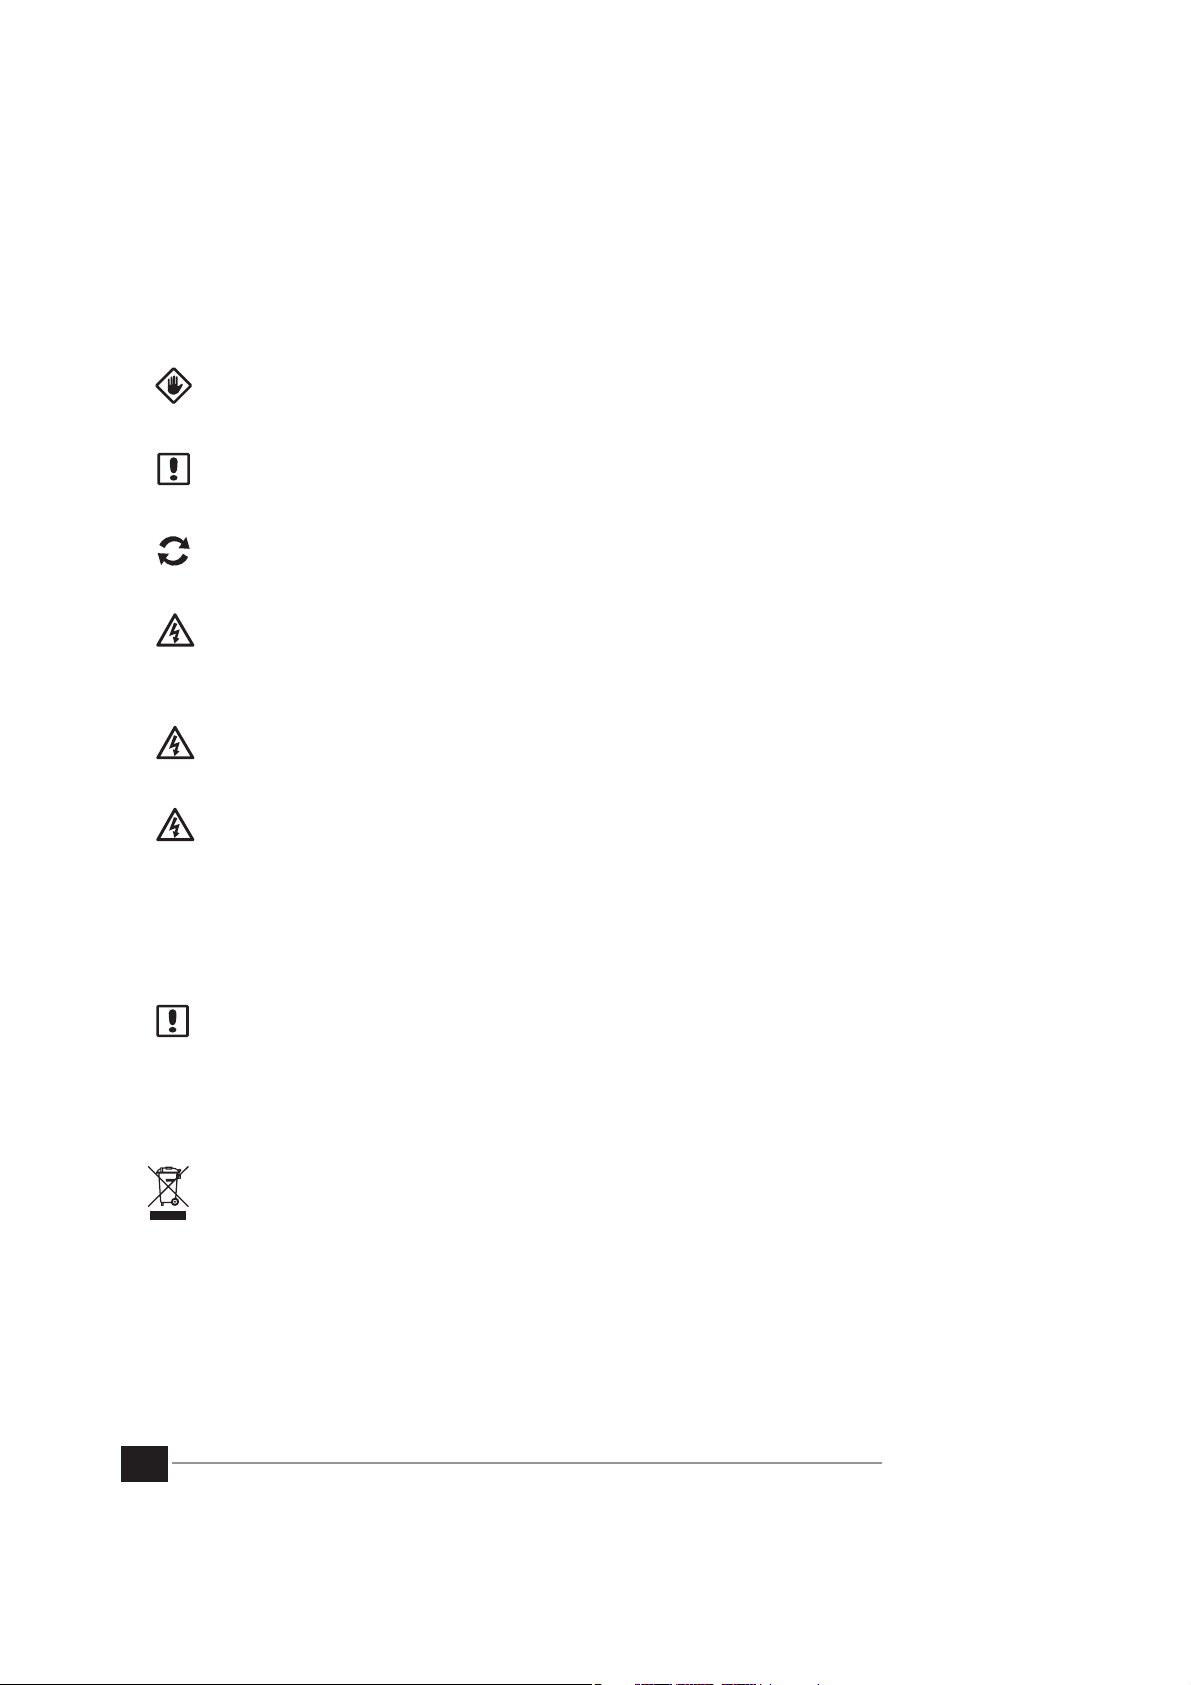
Symbols:
CAUTION: Symbol is intended to alert the user to important instructions or conditions
that could seriously aect irrigation eectivity or device operation.
NOTE: Symbol is intended to alert the user to important operating functionality,
installation or maintenance instructions.
Repeat: Symbol indicates that a repetition of previous steps or may be required in order
to continue or complete the device programming process.
WARNING: Symbol alerts the user to the presence of electricity or electromagnetic energy
which may constitute a risk of electric shock, radiation exposure or other hazard.
Safety Information
WARNING: Date and time are retained by a lithium battery which is to be disposed of in
accordance with local regulations.
WARNING: You must use special precautions when zone wires (also known as station or
solenoid wires) are located adjacent to or share a conduit with other wires, such as wires
used for landscape lighting, other
sure to separate and insulate all conductors carefully taking care not to damage wire
insulation during installation. An electrical
another source of power can damage the device and create a re hazard.
"low voltage" systems or other "high voltage" power. Be
"short"(contact) between the zone wires and
II
NOTE: This appliance is not intended for use by persons (including children) with reduced
physical, sensory or mental capabilities, or lack of experience and knowledge, unless they
have been given supervision or instruction concerning use of the appliance by a person
responsible for their safety. Children should be supervised to ensure that they do not play
with the appliance.
Disposal of Electronic waste
In compliance with European Directive 2002/96/CE and EURONORM EN50419:2005, this
device must not be thrown away with household garbage. This device must be the object
of an appropriate, selective removal procedure in order to recuperate it.
Aifro WaterEco User Manual

Contents
Symbols
Check Box Contents
Introduction
Aifro WaterEco Features
Control and Instructions
Installation
Gather Installation Tools
Select a Location
Mount Aifro WaterEco
Connect the Power Adapter
Wiring Connection
Connect Zones
Connect the Master Zone
Connect an Optional Rain Sensor (Wired or Wireless)
Connect the Temperature Sensor
Reserved Terminals of S1, S2, S3
Operation
Setup Wizard
Several Watering Methods
Manually Water One Zone
Manually Water All Zones
Manually Water Multiple Zones
Create a Program to Water at a Set Time
Advanced Options
Reports
Weather Forecast
Wi-Fi Setting
Restore the Factory Settings
Specifications
Hardware Features
Programming Features
Mechanical Specifications
Wireless Specifications
Troubleshooting
Solutions to Common Problems
Frequently Asked Questions
Company
FCC Standard
Contact Us
Copyright Statement
II
IV
1
1
3
4
4
5
6
6
7
8
9
9
10
15
15
17
19
21
26
27
31
32
32
33
33
33
34
35
35
37
38
38
III
Aifro WaterEco User Manual
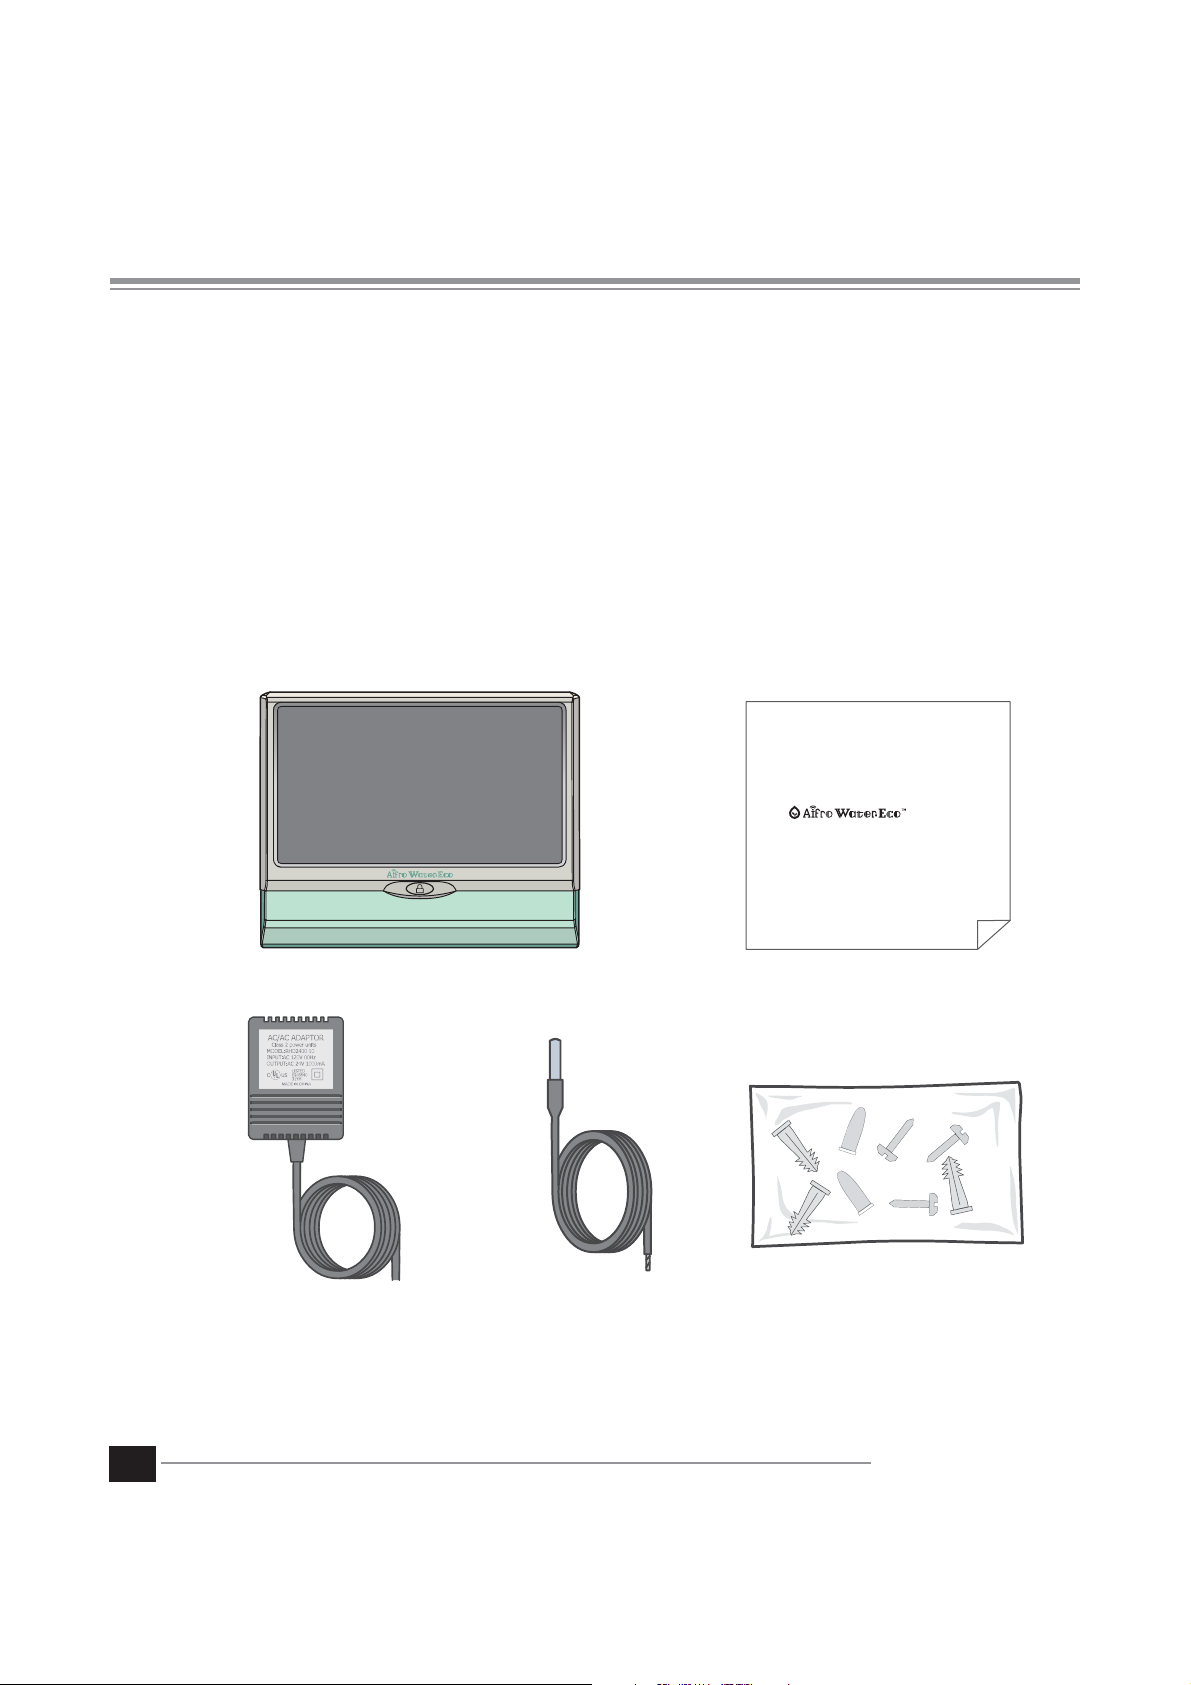
Check Box Contents
a. Aifro WaterEco
b. Quick Start
c. Power Adapter
d. Temperature Sensor
e. Mounting Screws
a.
c.
b.
Quick Start
d. e.
IV
Aifro WaterEco User Manual
Introduction
Aifro WaterEco Features
Aifro WaterEco is a smart garden sprinkler system with a 7-inch super big touch screen. It will be
automatically connected to the remote server after system booting, so the users can manage remotely
anywhere around the world. The iOS/Android app can be accessed through Aifro Cloud within 5 seconds to
control watering anywhere around the world. It can intelligently adjust the duration of each watering
according to the snatched weather data from the Internet. Through rain sensors which can induce whether
it will rain and rainfall, Aifro WaterEco will decide whether to stop watering. Besides, it has other functions
such as winter dormancy. Aifro WaterEco is a scientic and eective green household water saving system,
which can eectively guarantee safe and human-based garden management, and improves the overall
taste and prole of your garden, even also a reection of your intelligent and avant-grade lifestyle.
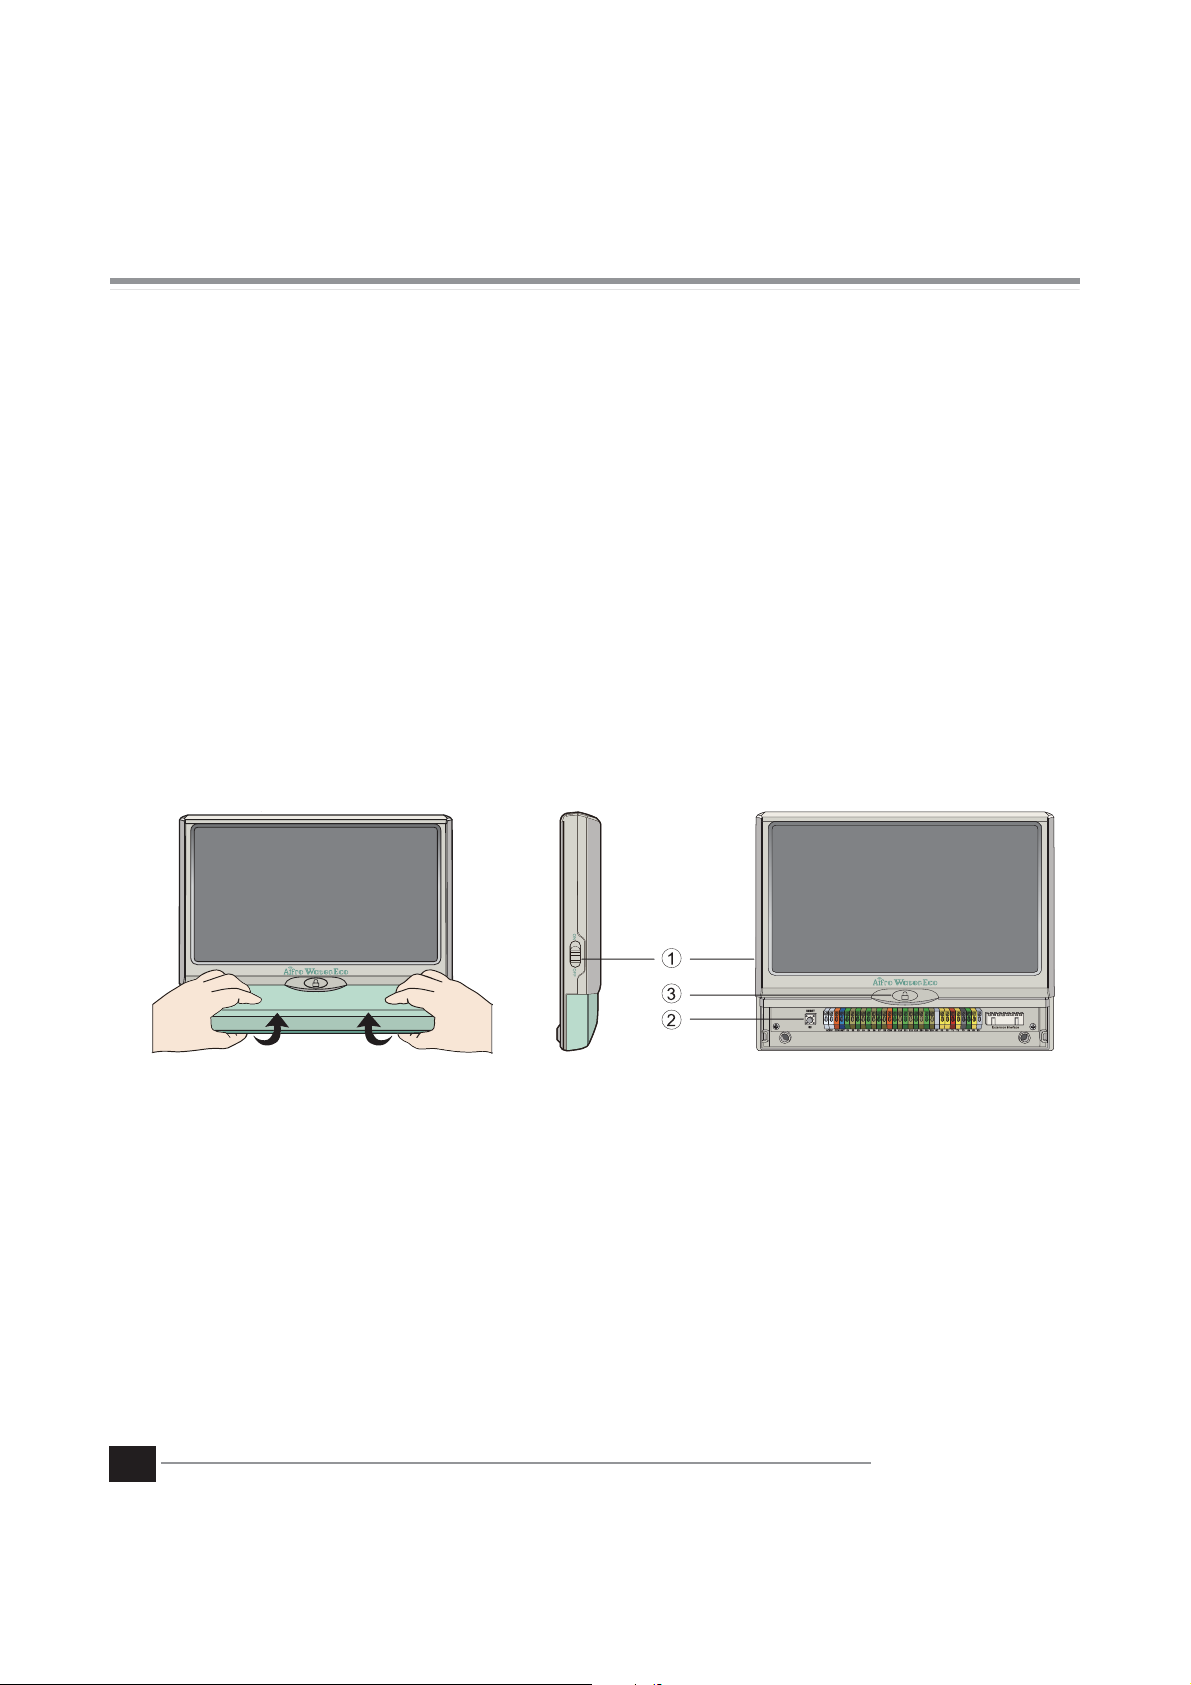
1. ON/OFF: Push it up/Push it down to turn on/turn o the power. It is located on the left side of the screen.
2. Reset: Hold the "Reset" button for about 5 seconds. Loosen when hearing three beeps to restore Aifro WaterEco
to the factory settings.
3. Lock/Unlock: Press the button to turn o/turn on the screen. When Aifro WaterEco is not operated within several
seconds, the screen will be o to save power. If you want to resume the operation, please press the button
and input the password. When you nish using Aifro WaterEco, you can also press the button to turn o the
screen to save power.
1
Aifro WaterEco User Manual
Introduction
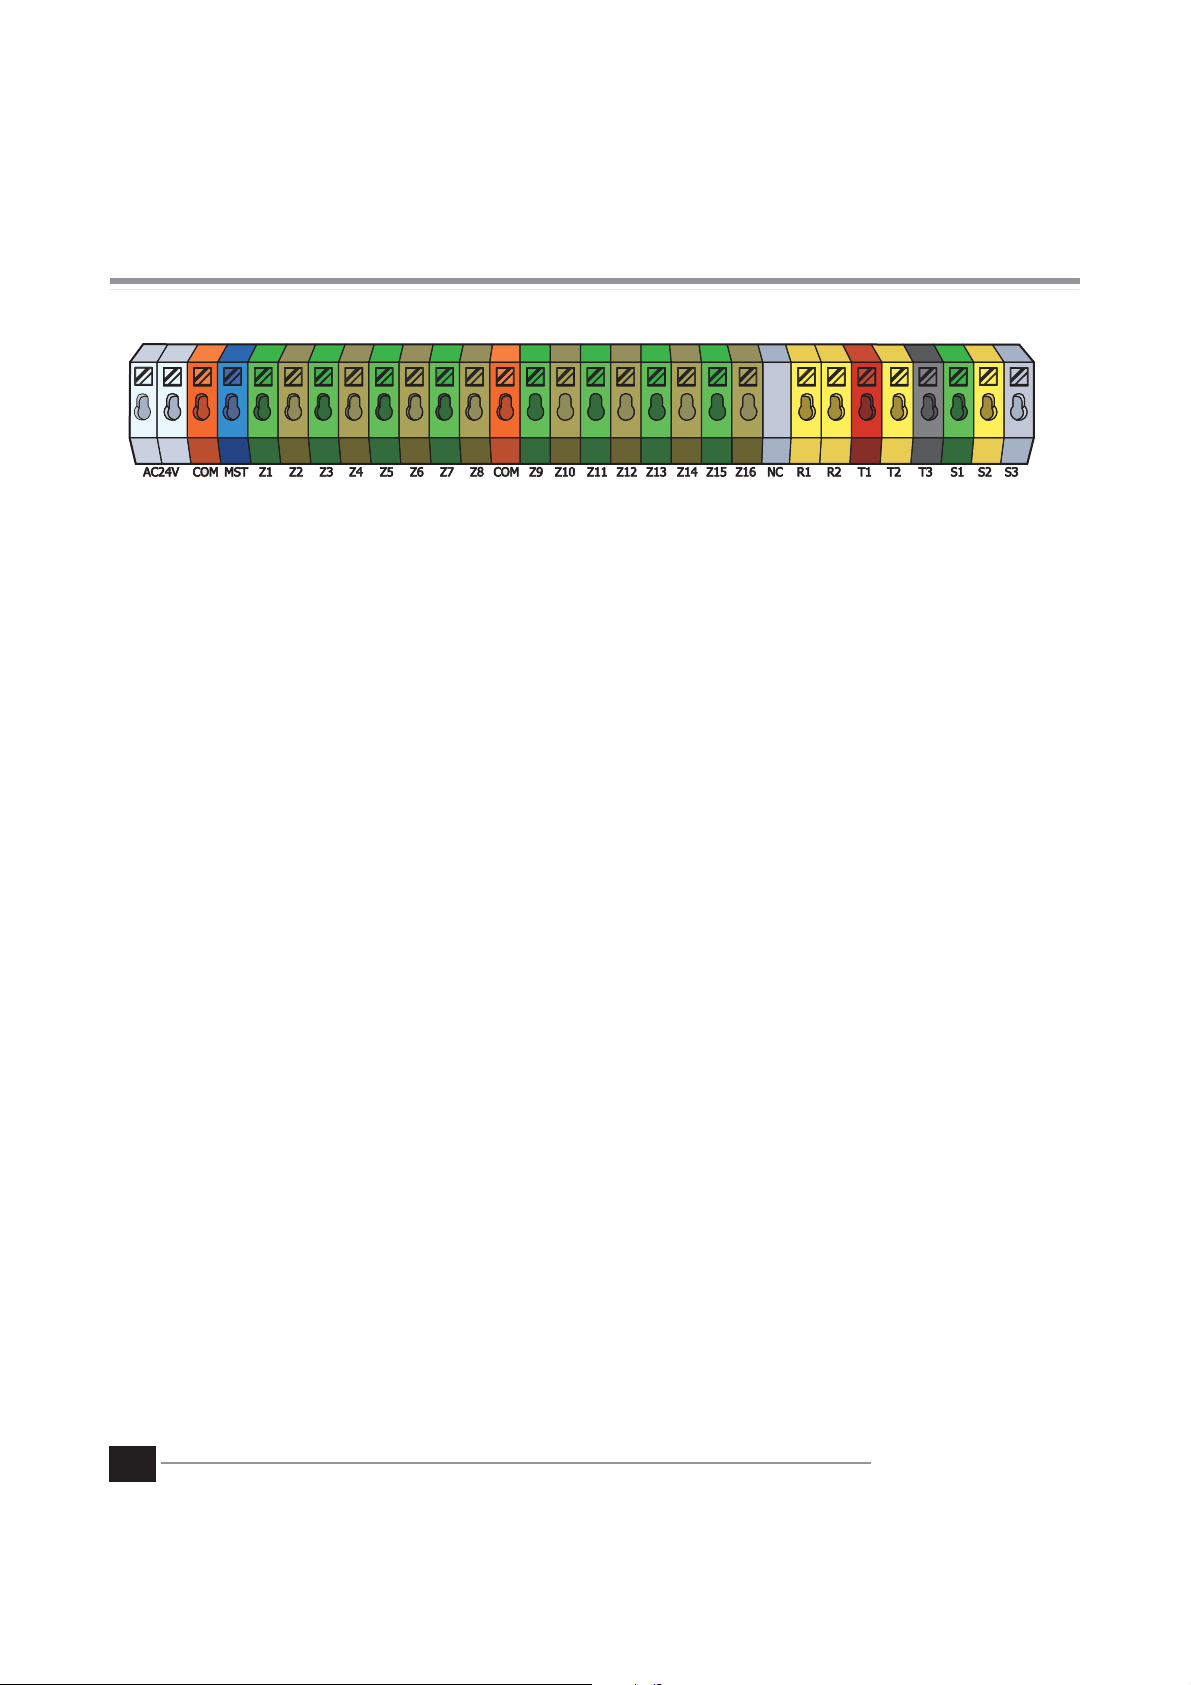
1, 2. AC 24V: AC 24V power input.
3. COM: Public terminal of power control wire for 17 zones; N terminal of AC 24V
4. MST: L terminal of power control wire for Master Zone.
5. Z1: L terminal of power control wire for Zone 1.
6. Z2: L terminal of power control wire for Zone 2.
7. Z3: L terminal of power control wire for Zone 3.
8. Z4: L terminal of power control wire for Zone 4.
9. Z5: L terminal of power control wire for Zone 5.
10. Z6: L terminal of power control wire for Zone 6.
11. Z7: L terminal of power control wire for Zone 7.
12. Z8: L terminal of power control wire for Zone 8.
13. COM: Public terminal of power control wire for 17 zones; N terminal of AC 24V
14. Z9: L terminal of power control wire for Zone 9.
15. Z10: L terminal of power control wire for Zone 10.
16. Z11: L terminal of power control wire for Zone 11.
17. Z12: L terminal of power control wire for Zone 12.
18. Z13: L terminal of power control wire for Zone 13.
19. Z14: L terminal of power control wire for Zone 14.
20. Z15: L terminal of power control wire for Zone 15.
21. Z16: L terminal of power control wire for Zone 16.
22. NC: Not used.
23. R1: Input signal Line 1 for Rain Sensor.
24. R2: Input signal Line 2 for Rain Sensor.
25. T1: Power positive end of 3-wire Temperature Sensor.
26. T2: Signal line terminal of 3-wire Temperature Sensor.
27. T3: Power negative end of 3-wire Temperature Sensor.
28. S1: Public terminal of 485 communication wire (Reserved).
29. S2: A terminal of 485 communication wire (Reserved).
30. S3: B terminal of 485 communication wire (Reserved).
2
Aifro WaterEco User Manual
Installation
When installing Aifro WaterEco for the first time, it is recommended
that you complete the following steps in order.
1. Check box contents
2. Gather installation tools (See below)
3. Select a location
4. Mount Aifro WaterEco
5. Connect the power adapter
6. Wiring connection
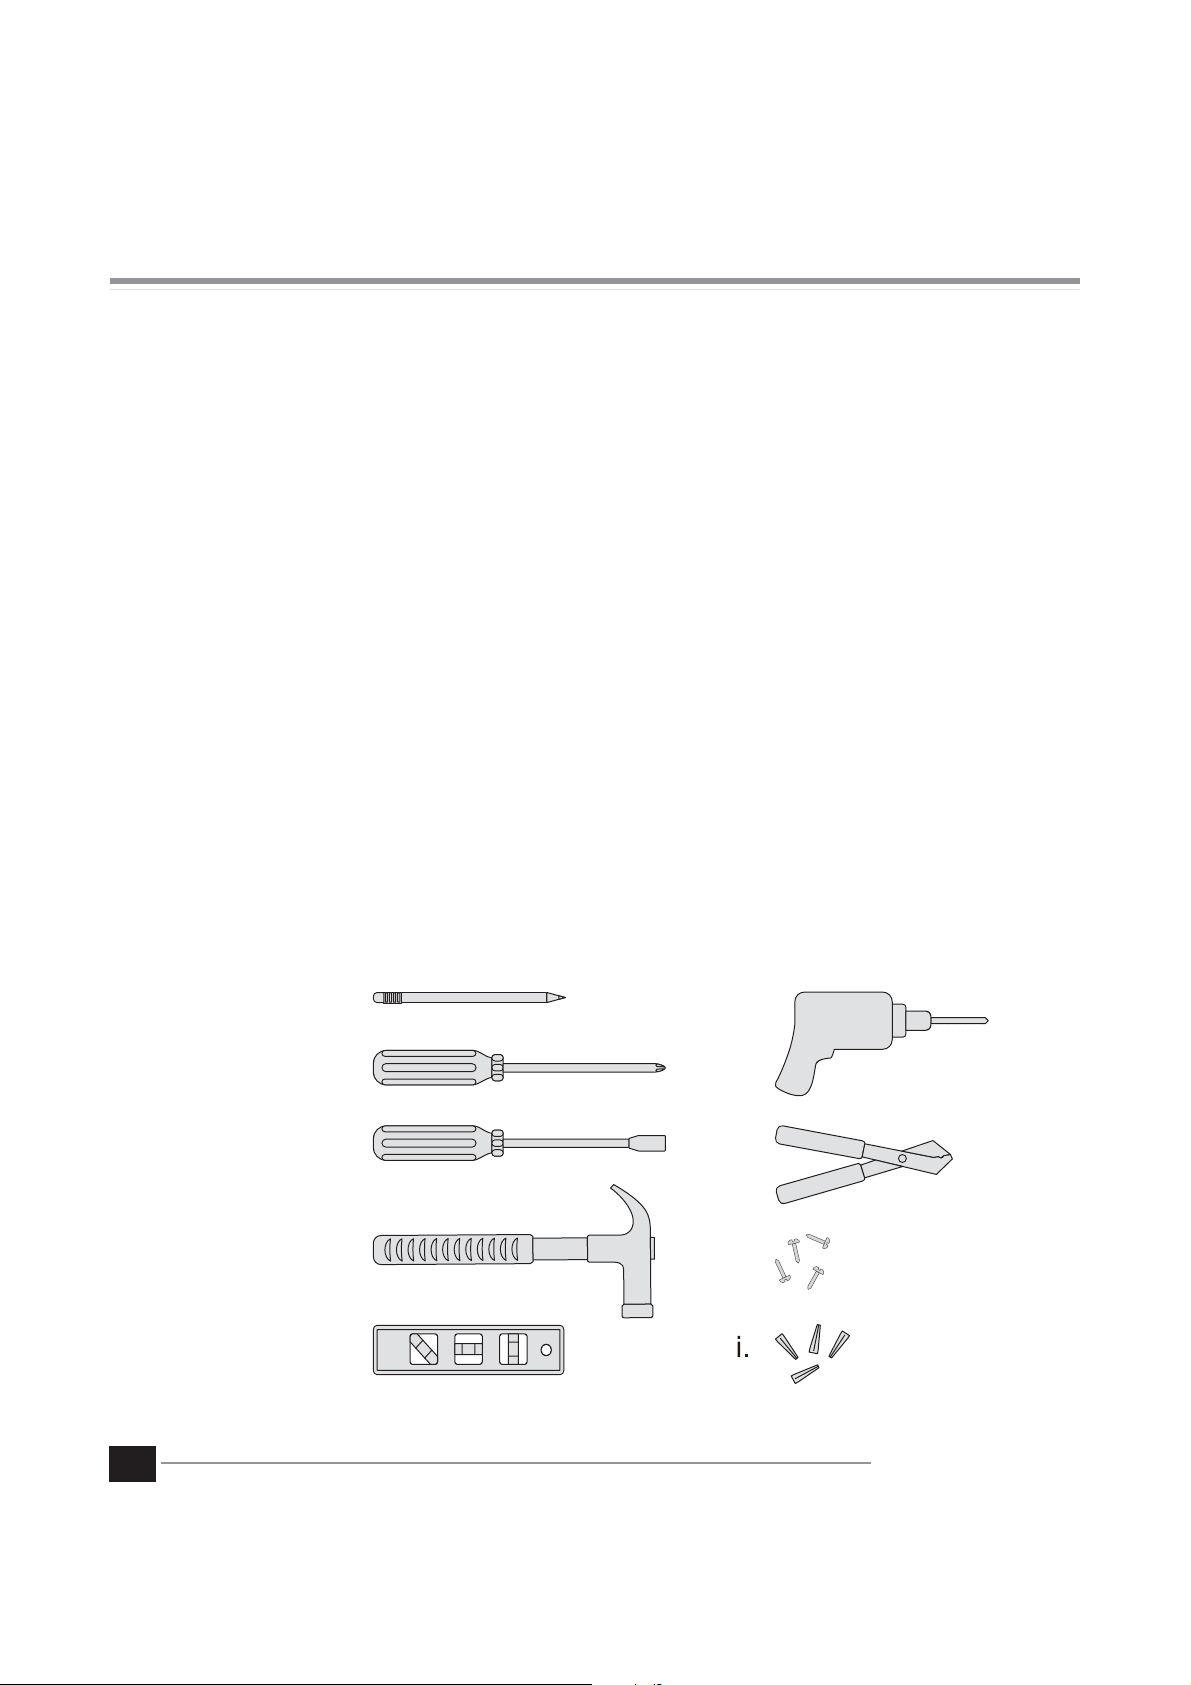
Gather Installation Tools
Before beginning the installation, gather the following tools and materials:
a. Marking pencil
b. Phillips screwdriver
(#1, #2, #3 tip)
c. Flathead screwdriver
d. Hammer
e. Level
a.
b.
c.
d.
f. Drill and drill bit
(for #6 screws)
g. Wire Stripper
h. Mounting Screws
(included)
i. Wall Anchors
(if needed)
f.
g.
h.
3
e.
Aifro WaterEco User Manual
Installation
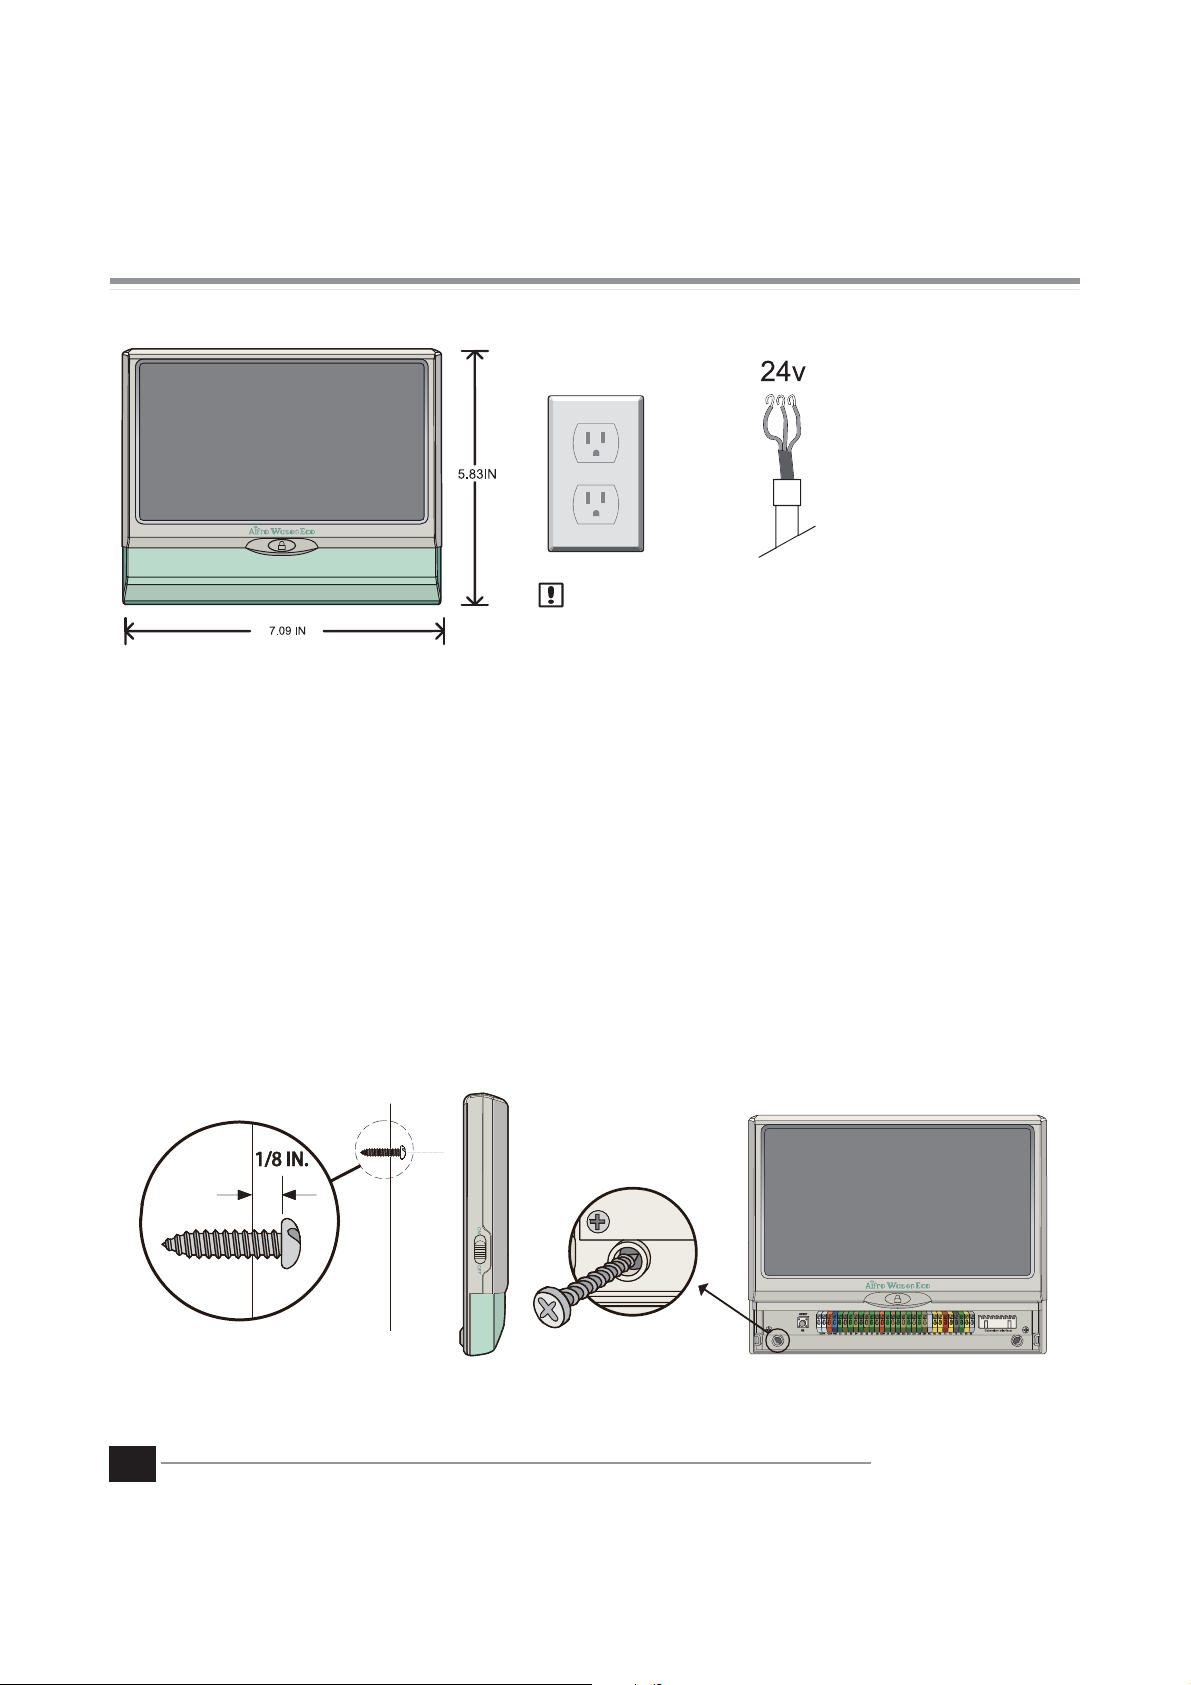
Select a Location
MOUNT AIFRO WATERECO
OR
NOTE: The operating temperature range is 14°F to
149°F (-10°C to +65°C).
NOTE: Please make sure Aifro WaterEco is not exposed to rain and direct sunlight.
Mount Aifro WaterEco
Method of hanging on the brick wall:
1. Measure the position, punch holes with a 6mm drill, insert the expansion plug, planish with the hammer and x the
attached screws with the cross-shaped screwdriver.
2. Align the back of Aifro WaterEco on the screws and hang it on the wall, record the hole location on the lower-left and
lower-right corner with the pencil. Remove Aifro WaterEco, drill holes on the recorded locations, insert the expansion
plug and planish.
3. Hang Aifro WaterEco again, x the screws into the lower-left and lower-right corner with the cross-shaped screwdriver.
IN PROXIMITY TO
ELECTRICAL POWER
SOURCE AS REQUIRED
Method of hanging on the wooden wall:
1. Measure the position, planish with the hammer and x the attached screws with the cross-shaped screwdriver.
2. Align the back of Aifro WaterEco on the screws and hang it on the wall, record the hole location on the lower-left and
lower-right corner with the pencil.
3. Hang Aifro WaterEco again, x the screws into the lower-left and lower-right corner with the cross-shaped screwdriver.
4
Aifro WaterEco User Manual
Installation
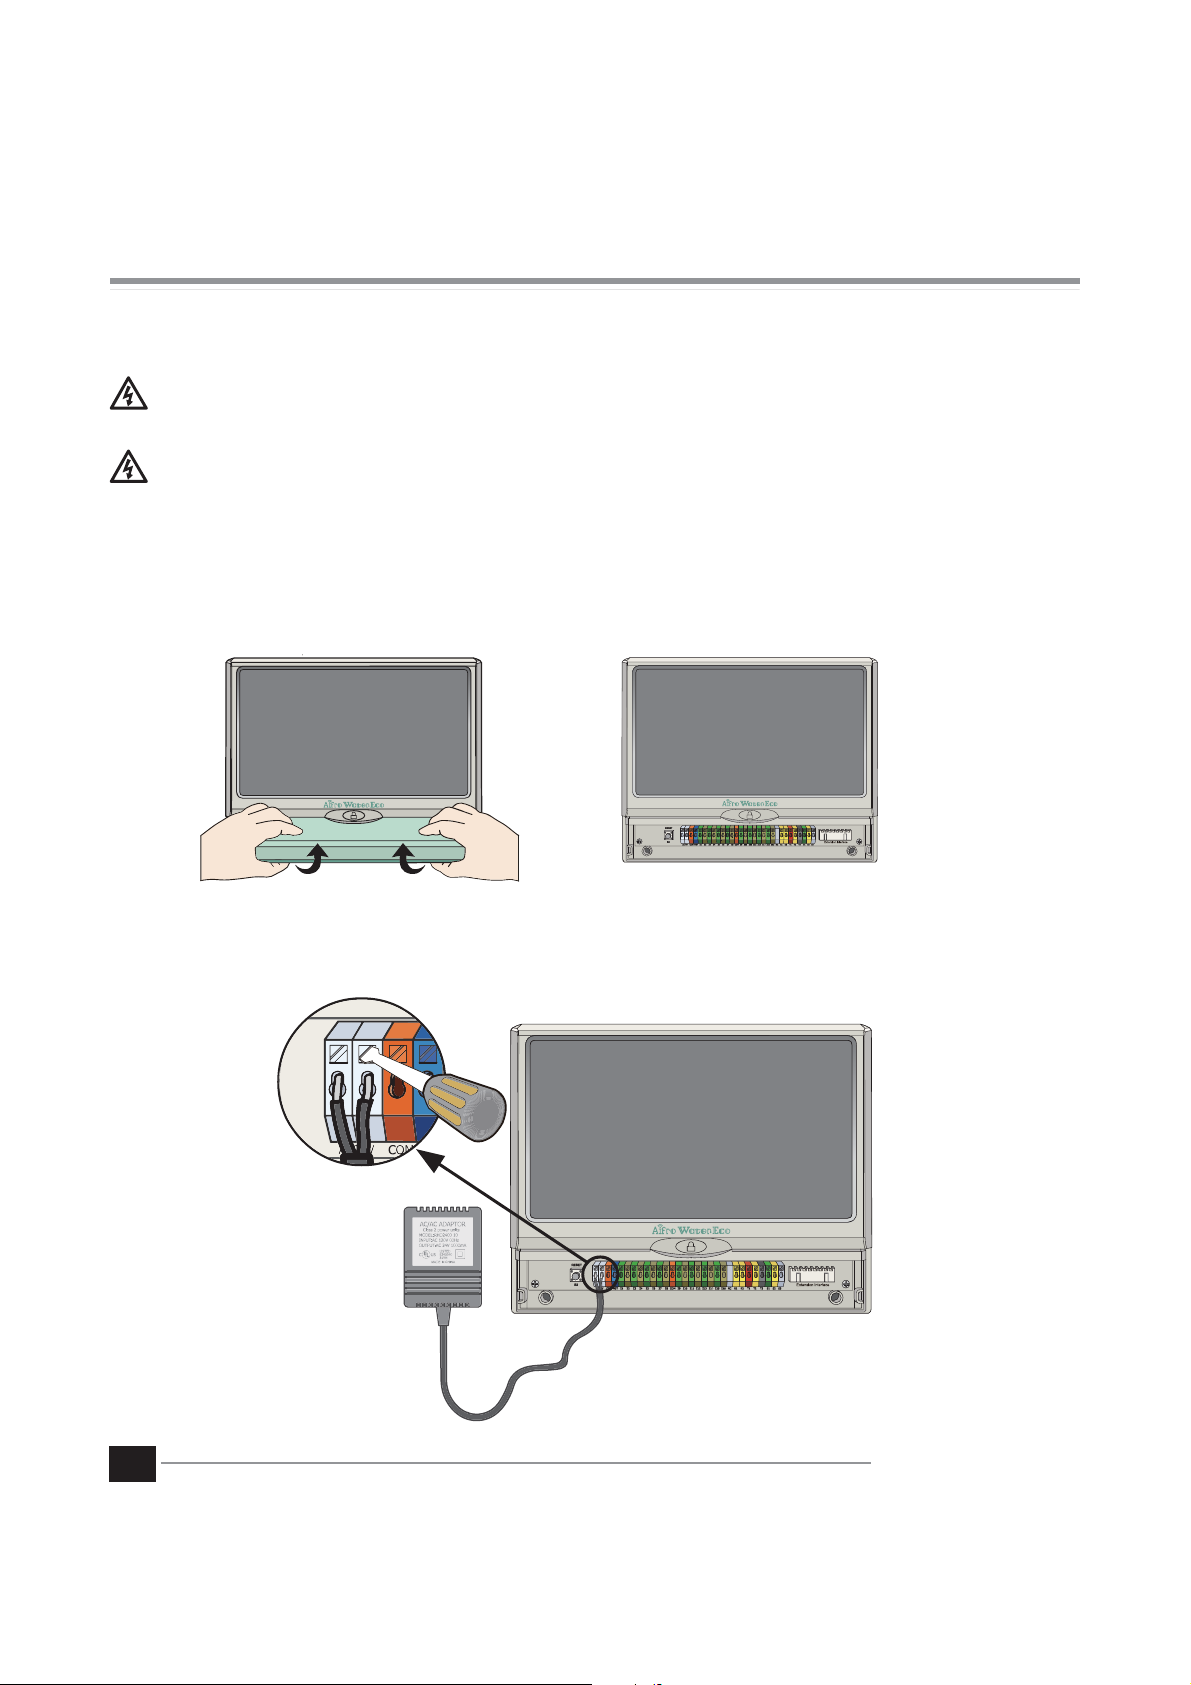
Connect the Power Adapter
WARNING: DO NOT plug in the power adapter or connect external power until you have completed
and checked all wiring connections.
WARNING: All electrical connections and wiring runs must comply with local building codes.
Some building codes require that only a licensed or certied electrician can make the power
connections. Please check with your local building code for guidance. Only professional personnel shall
install the device.
(1) Open the green waterproof cover under the screen.
(2) Connect the 24V AC power adapter to the terminals.
NOTE: A 24V AC power adapter is necessary. An adapter of other models may damage Aifro WaterEco.
5
Aifro WaterEco User Manual
Installation
Wiring Connection
Connect the zone wires for each station and for a (optional) Master Zone or Rain Sensor.
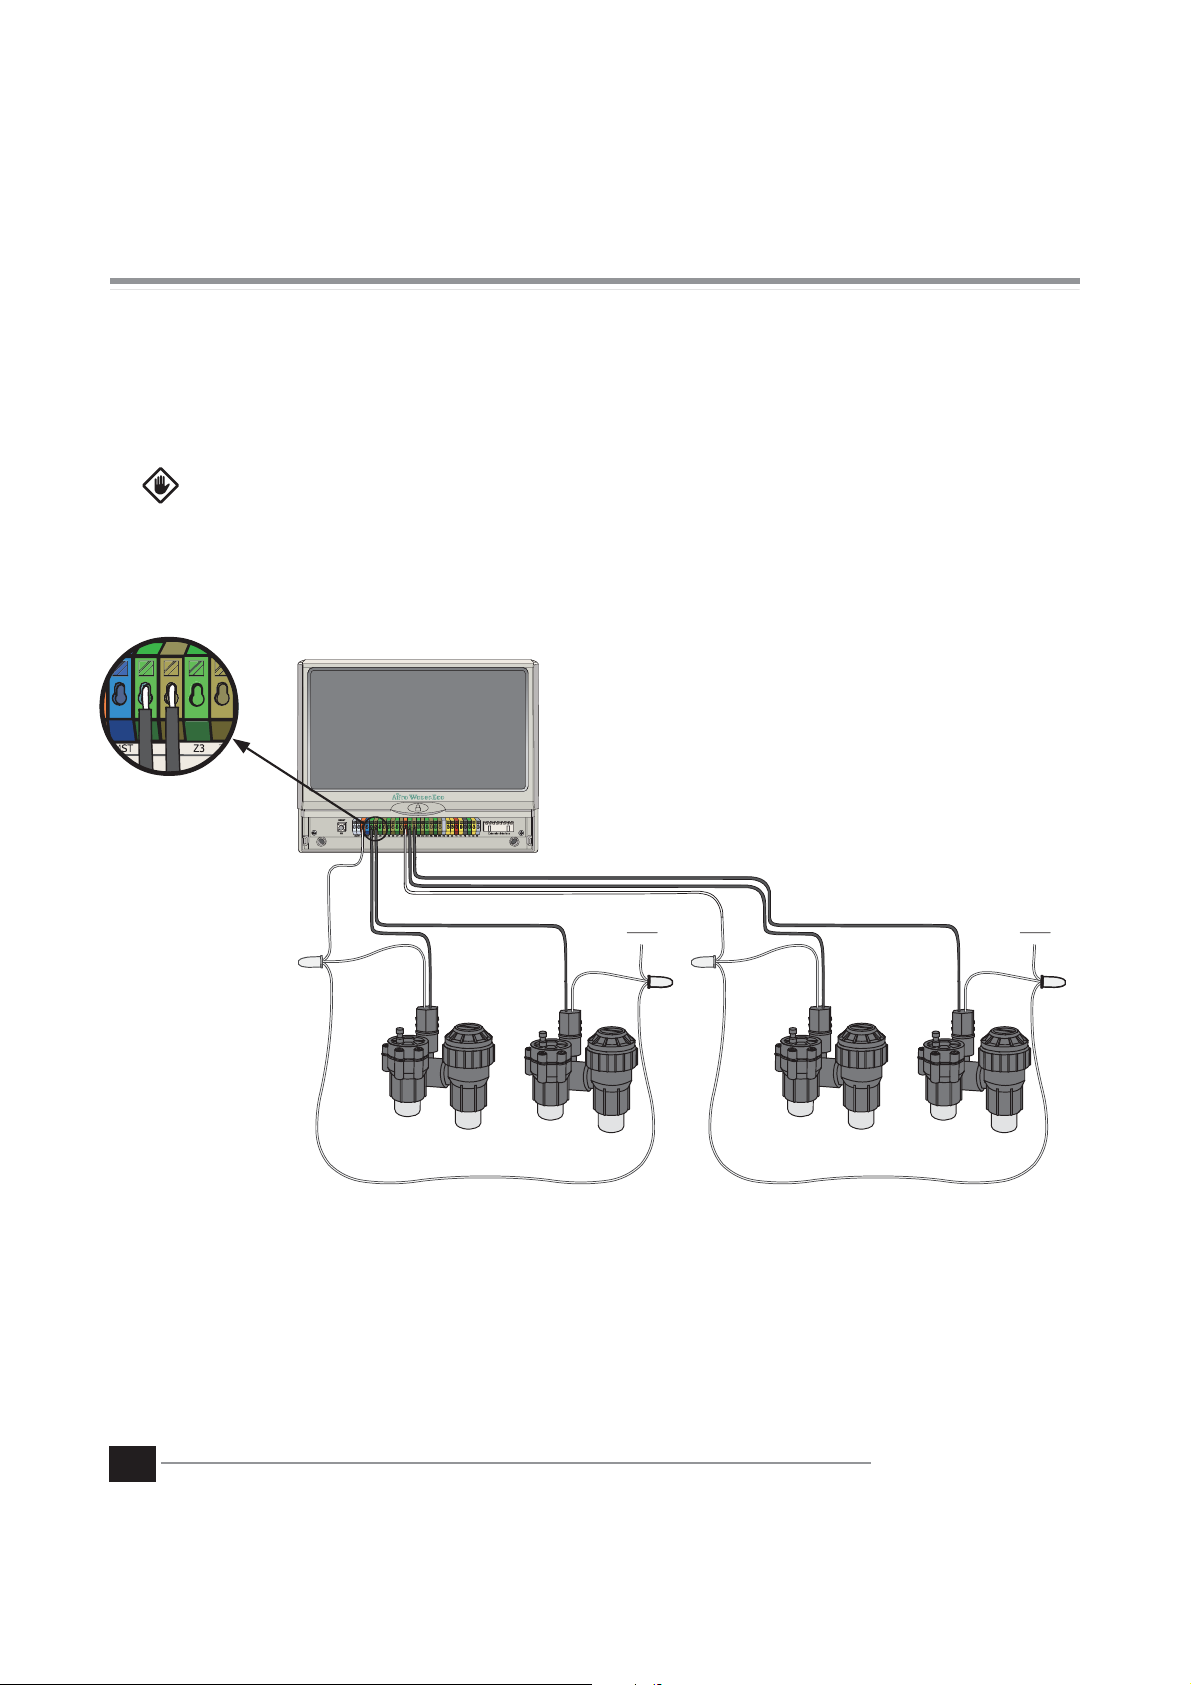
Connect Zones
CAUTION: Do not route the zone wires through the same opening as the power wiring.
Connect one end of the zone wires to the terminals of Z1 to Z16 and then connect the other
end to the "COM" terminal.
6
Aifro WaterEco User Manual
Installation
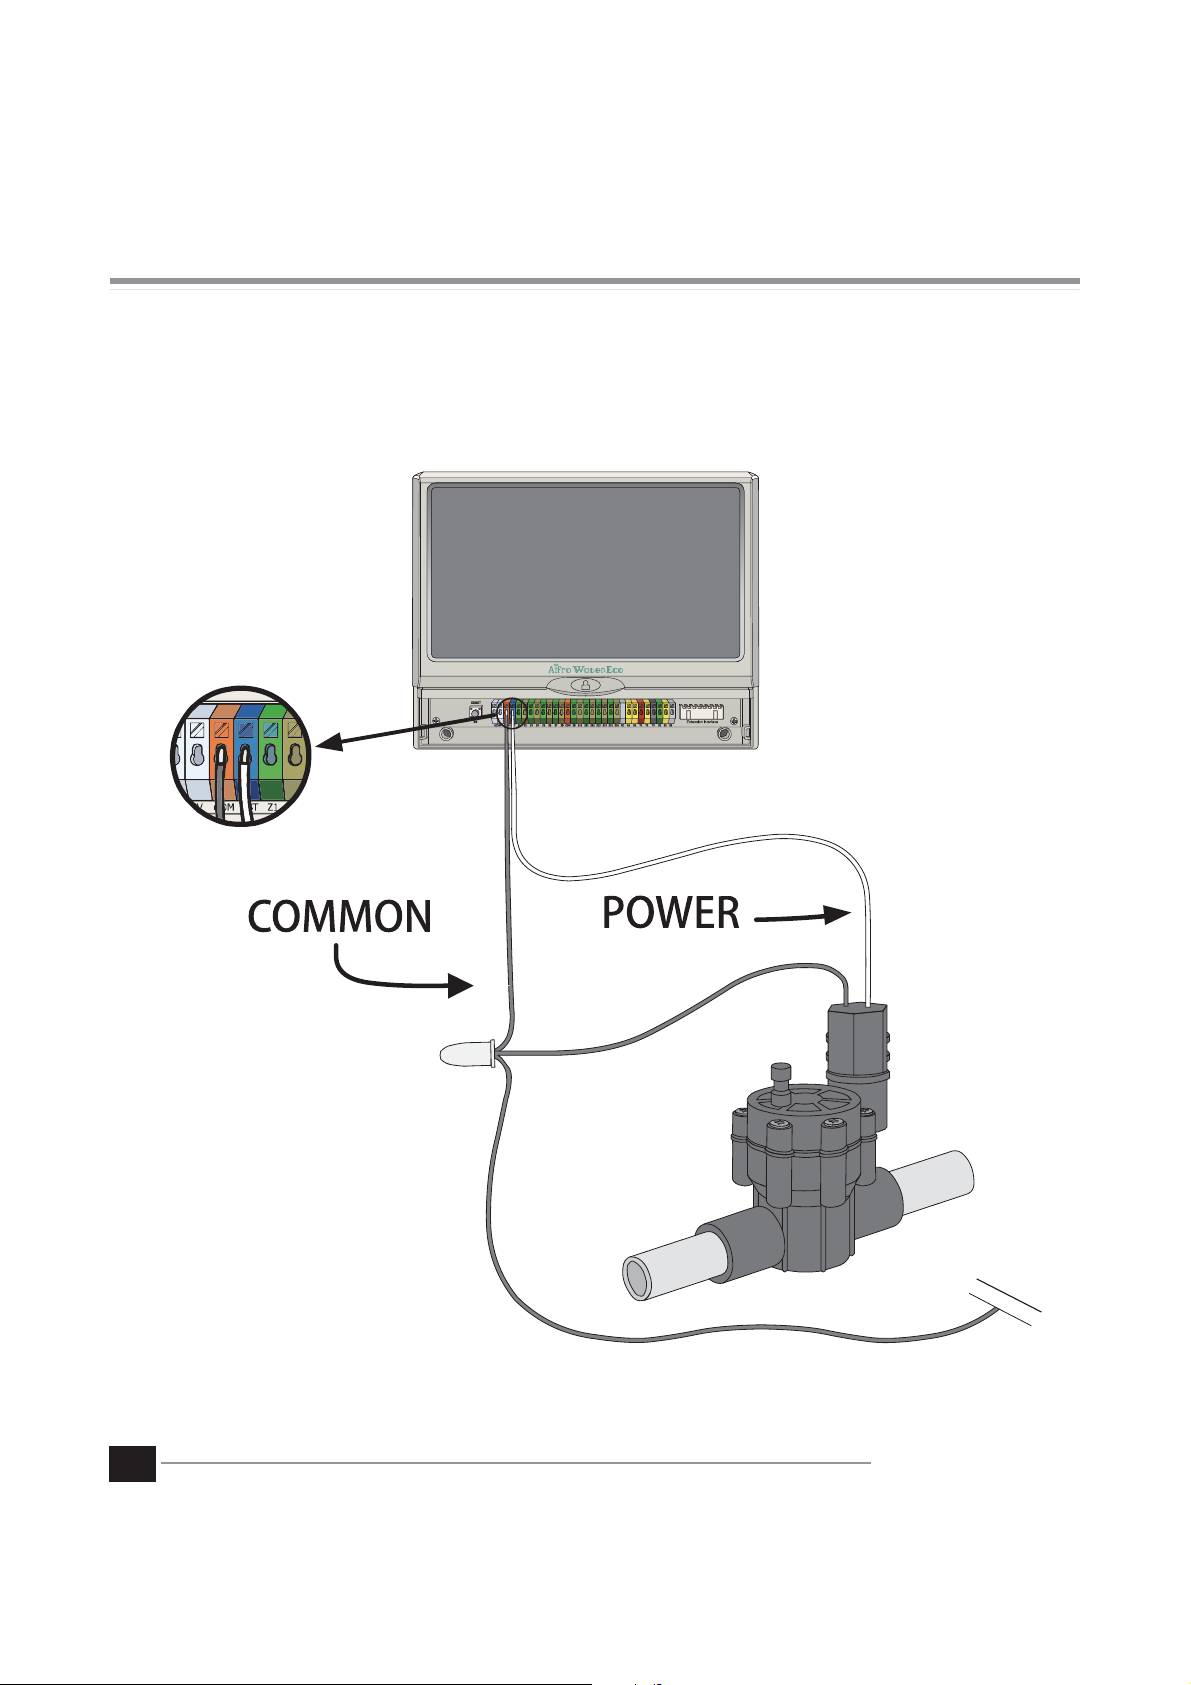
Connect the Master Zone
Connect an optional Master Zone to Aifro WaterEco
Connect one end of the zone wire to the "MST" terminal and then connect the other end to the "COM" terminal.
7
Aifro WaterEco User Manual
Installation
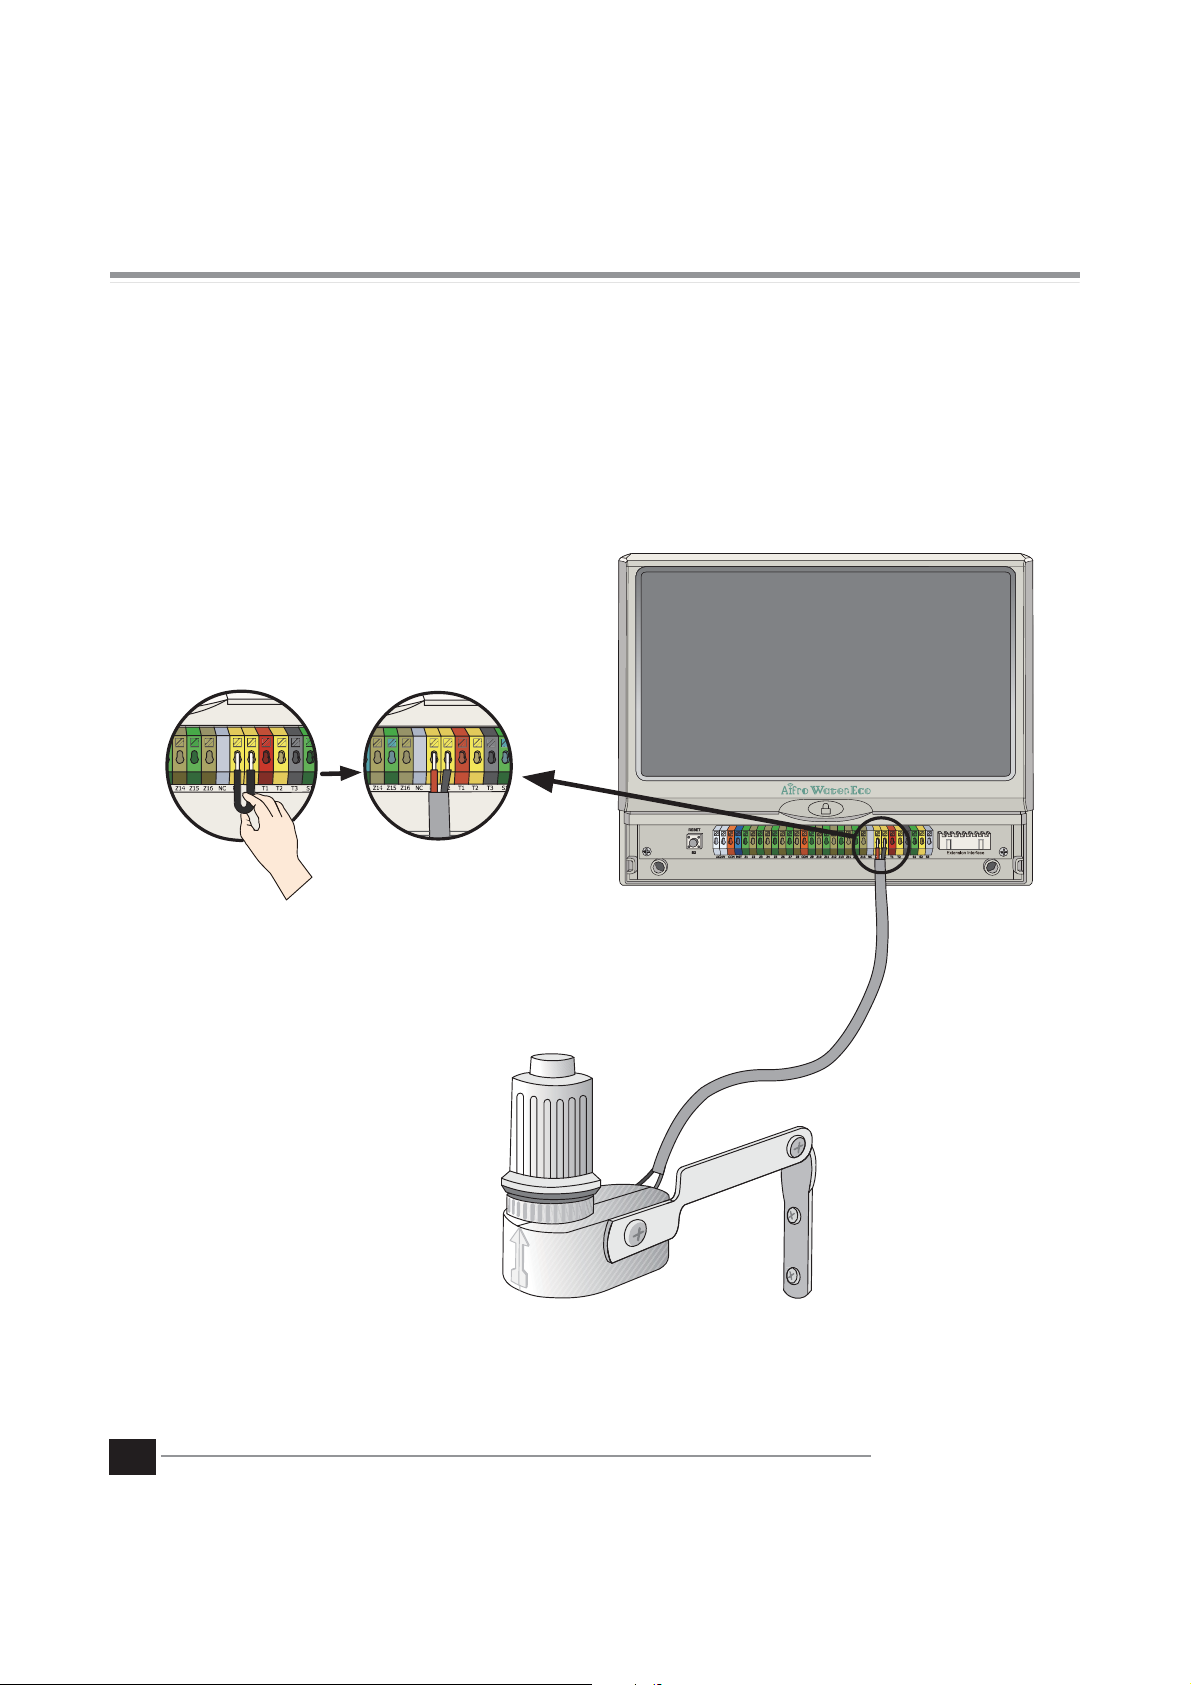
Connect an Optional Rain Sensor (Wired or Wireless)
Connect an optional rain sensor to Aifro WaterEco
NOTE: Aifro WaterEco is not compatible with a Normally Open rain sensor. It is designed
for use with a Normally Closed rain sensor.
8
Aifro WaterEco User Manual
Installation
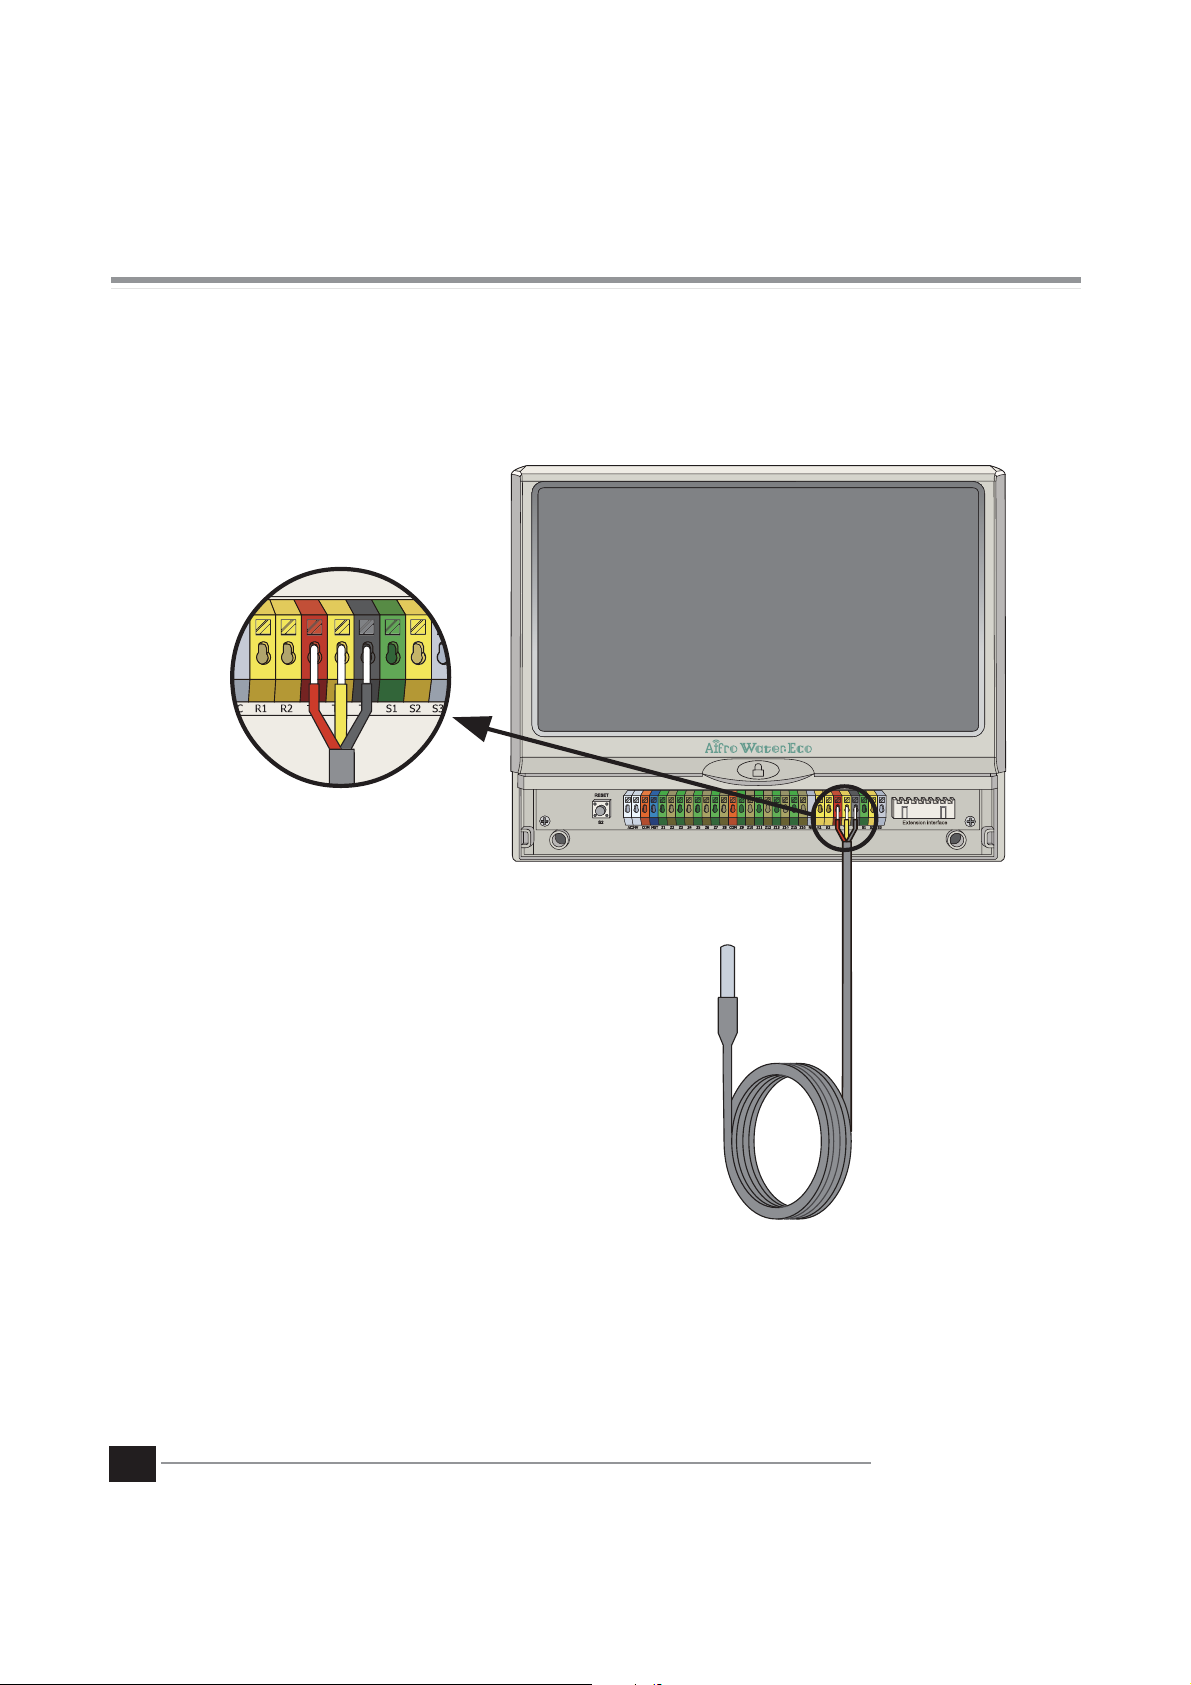
Connect the Temperature Sensor
Connect the temperature sensor to the terminals of T1 (red), T2 (yellow) and T3 (black) by color.
NOTE: Please connect wires strictly by color. Mismatched connection may damage the sensor.
Reserved terminals of S1, S2, S3
Currently, the terminals of S1, S2 and S3 are not active. Please do not connect wires onto them.
9
Aifro WaterEco User Manual
 Loading...