

Page 1
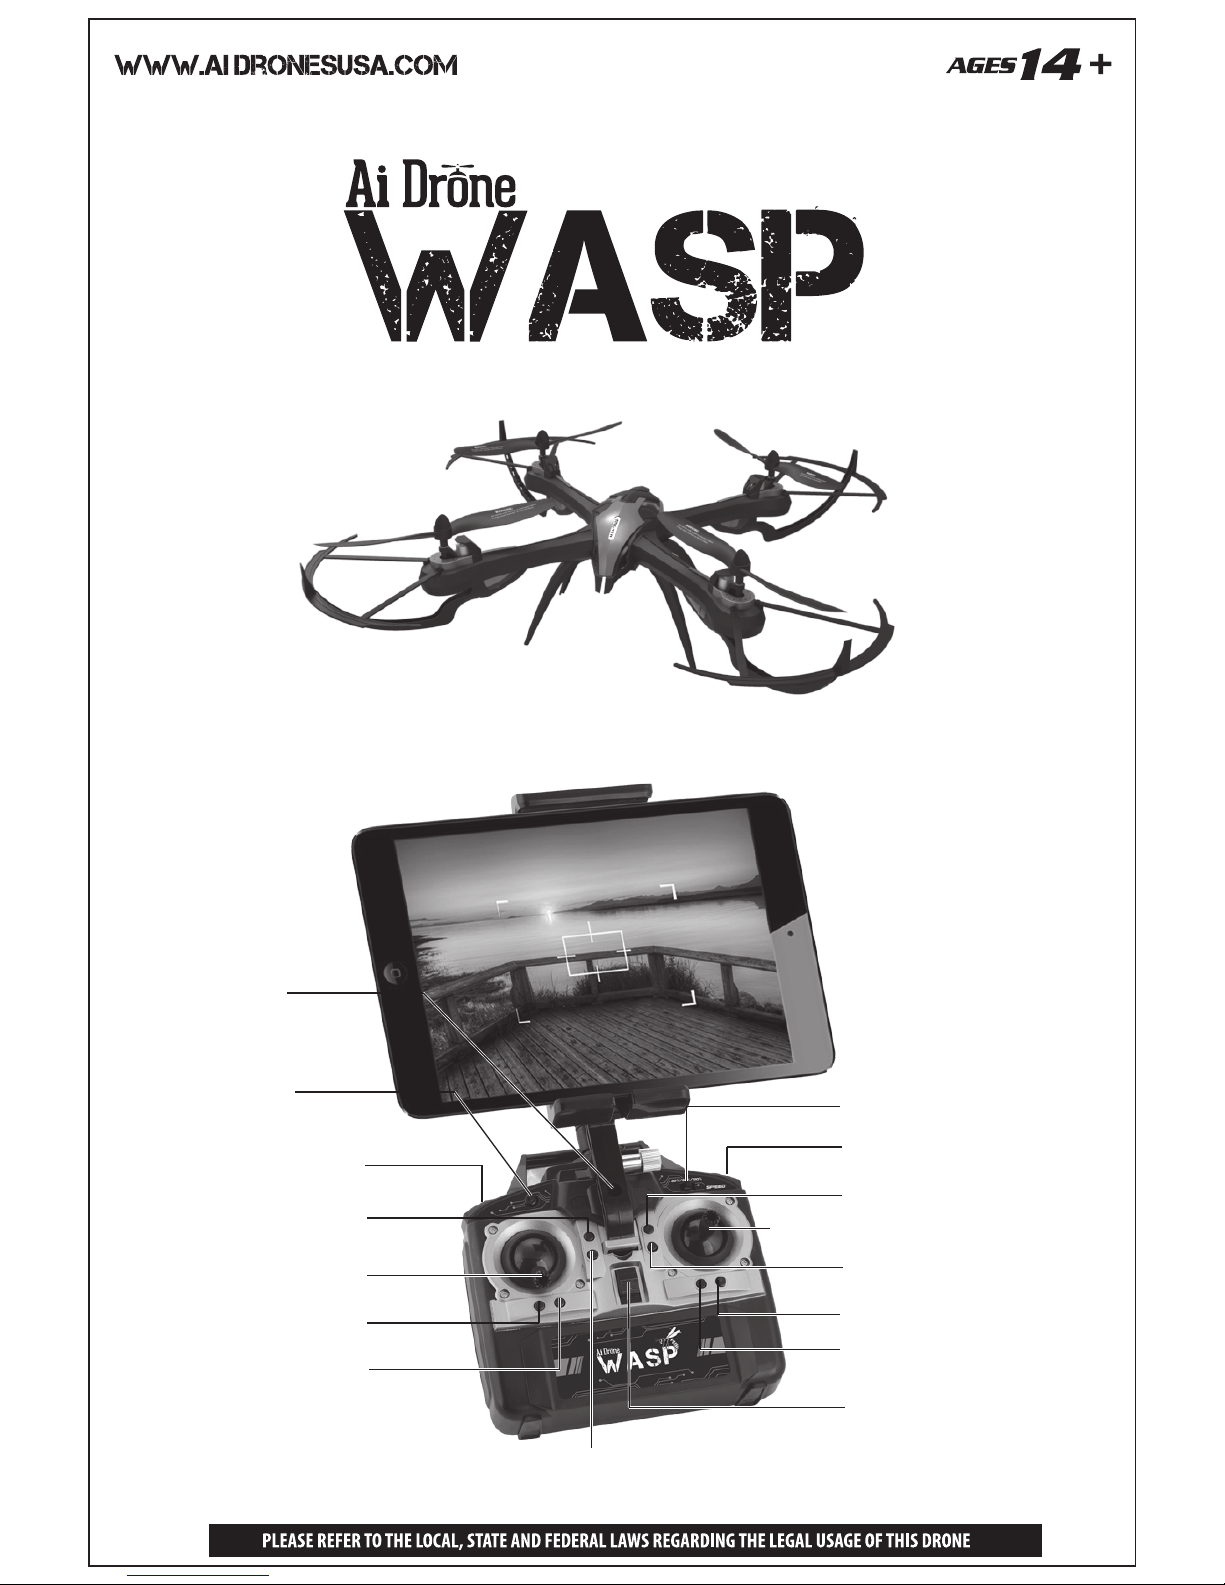
POWER INDICATOR
LIGHT
NO FUNCTION
HEADLESS MODE
TRIM UP
POWER ON/OFF SWITCH
TRIM DOWN
THRUST AND ROTATION
TRIM LEFT ROTATE
TRIM RIGHT ROTATE
TRIM LEFT
TRIM RIGHT
SPEED CONTROL SWITCH
TRIM BACKWARD
TRIM FORWARD
FORWARD/BACKWARD AND SIDEWAYS
SINGLE EVERSION
Page 2

SAFETY INSTRUCTIONS
- Before commissioning for the rst time, make sure that you have
read and understood the entire manual.
- Please keep this operating manual safe for later use.
- WASP Drone is suitable for use indoors and dry outdoor areas.
- WASP Drone is suitable for pilots who are age 14 years or above.
Adult supervision is required when ying.
- Keep your hands, face and loose clothing away from the WASP Drone
during operation.
- Do not y over private property owned by other people, crowds of
people, military property, hospitals, correctional facilities, airports,
power plants and similar. Please refer to the local, state and federal
laws regarding the legal usage of this drone.
- Always maintain visual contact with the WASP Drone in order to avoid
losing control of it. Careless use can lead to considerable damage.
- Swith o the remote control and WASP Drone when they are not in use.
- Remove the batteries from the remote control and WASP Drone when
they are not in use.
- Check that the contoller and WASP Drone are working correctly before
every ight.
- The product may only be repaired or modied with orginal parts.
Otherwise, the model can be damaged or pose a danger.
- In order to prevent risks, always operate the model from a position
which provides an easy line of retreat, if necessary.
- After landing, turn o the remote controller before handling the WASP
Drone.
1
Page 3
REMOTE CONTROL SAFETY INSTRUCTIONS
- We recommend new alkaline manganese batteries for the remote control.
One time use batteries and rechargeable batteries could also be used
for the remote contol. The combination of dierent types of batteries
as well as new and used batteries should be avoided. Only recommended
batteries or those of an equivalent type should be used.
- As soon as the remote control no longer functions reliably, new batteries
should be inserted and/or the batteries should be charged. Batteries
must be inserted according to the correct polarity (+) and (-). Do not use
damaged batteries.
- Rechargeable batteries must be removed from the remote control prior
to recharging. Rechargeable batteries should be charged under the
supervision of an adult.
- The connection terminals must not be short-circuited.
BATTERY REQUIREMENT FOR THE REMOTE CONTROL
Power Supply : DC 9 V
Batteries: 6 X 1.5V “AA” (Not Included)
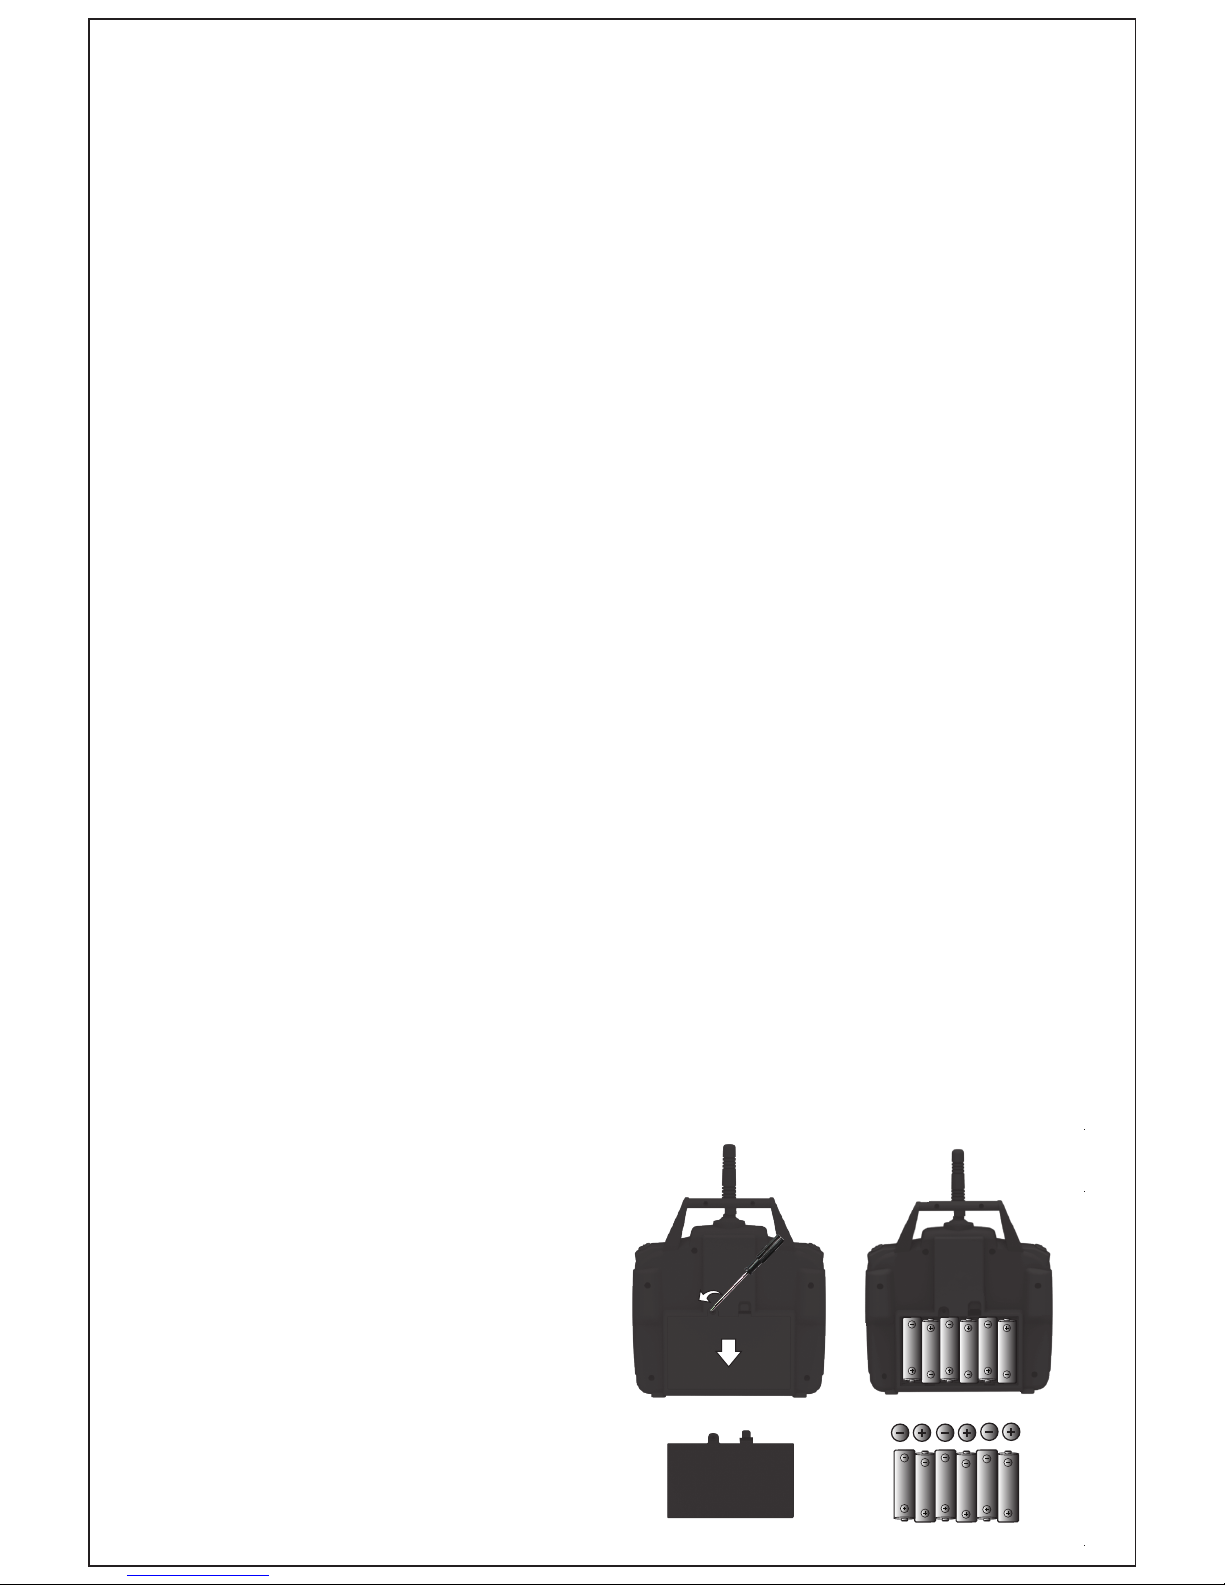
INSERTING THE BATTERIES FOR THE CONTROLLER
- Open the battery compartment cover as shown in A1 by unscrewing
the battery compartment securing screw in anti-clockwise motion.
- Insert the batteries as shown in A2.
- After inserting the batteries, close
the battery compartment cover by
screwing clockwise .
A1 A2
2
Page 4
WASP DRONE IS EQUIPPED WITH A RECHARGEABLE LITHIUM
POLYMER (LiPo) BATTERY. PLEASE FOLLOW THE BELOW SAFETY
INSTRUCTIONS
- Only use the supplied charger to charge the battery. Use of a dierent
charger may lead to the permanent damage of the battery and neigh bouring parts, as well as physical injury.
- Always ensure that the charging process takes place on a reproof
surface in a re-resistant environment. Never throw LiPo battery into
a re or store them in a hot area.
- Never disassemble or alter the battery contacts. Do not damage or
puncture the battery cells. There is a risk of explosion!
- The LiPo battery should be charged under the supervision of an Adult
and must be kept out of reach of children.
CHARGER
Power Supply: 110-240 V AC; 50-60 Hz;
Rated output: 7,4 V DC; 800mA
Continued on page 4
3
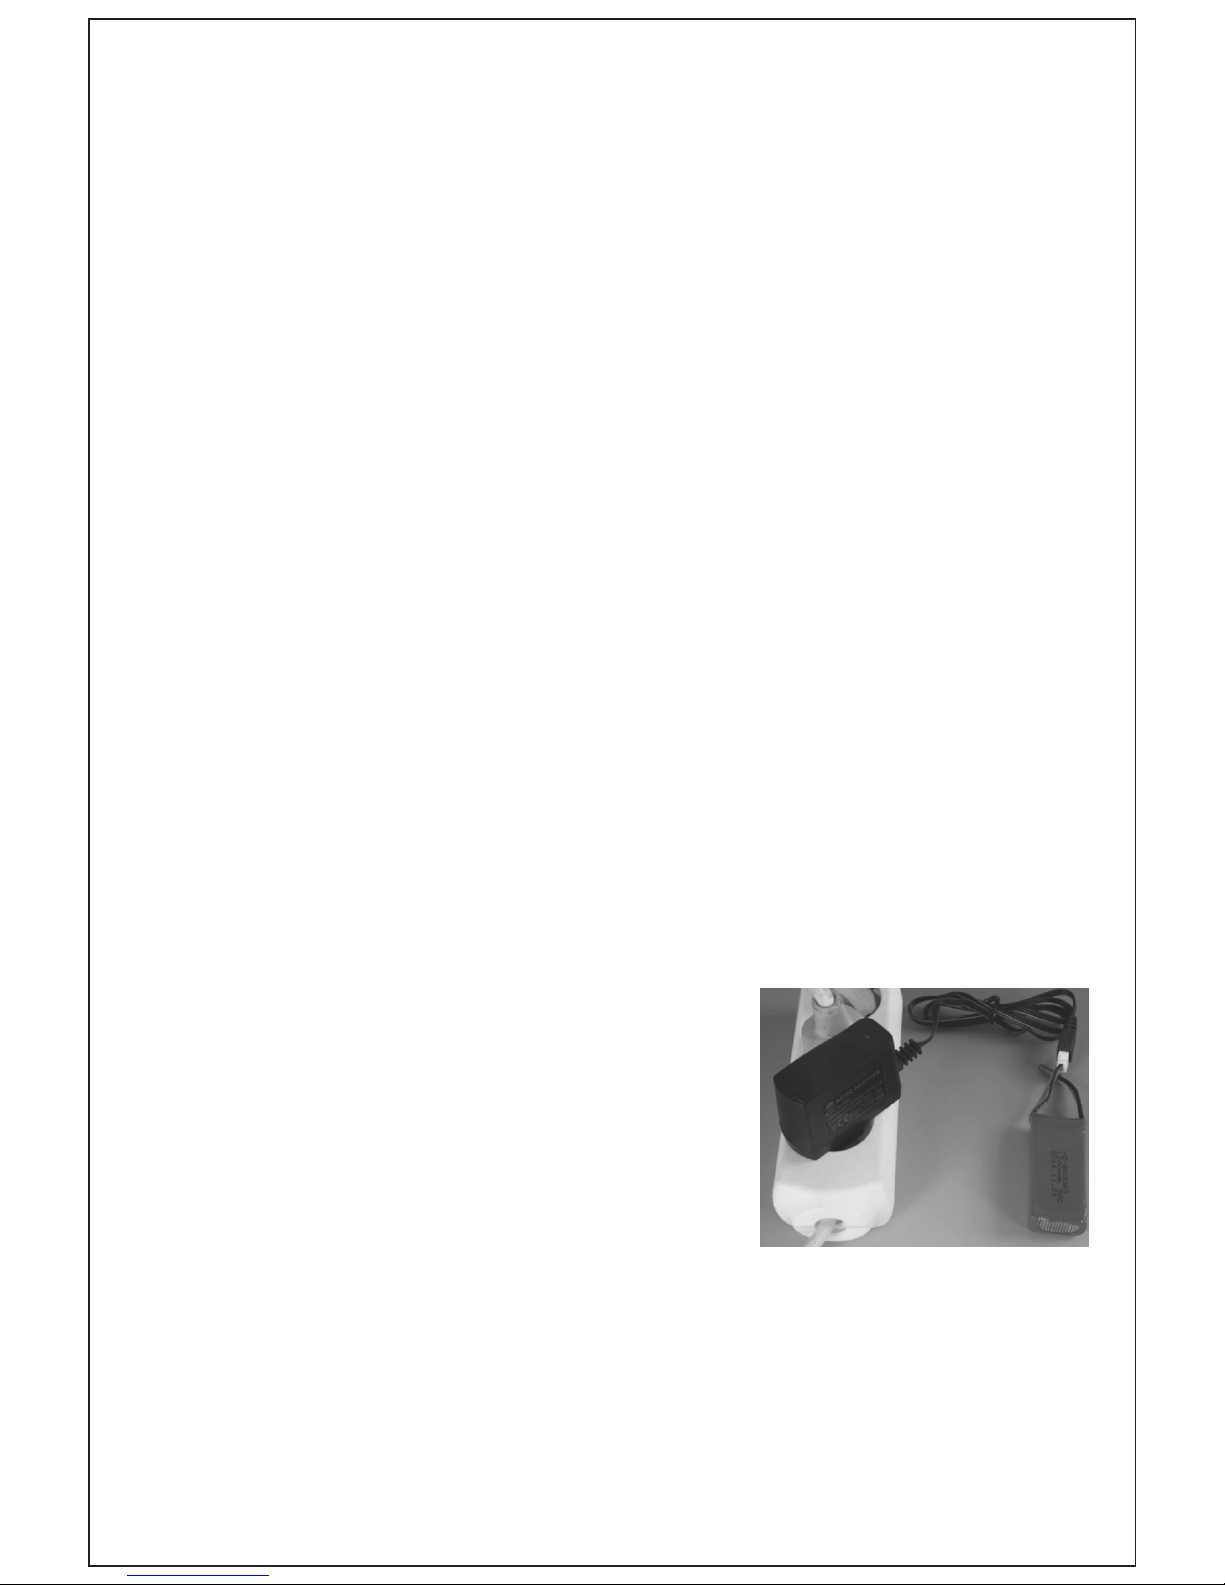
- Plug the charger into an unoccupied socket.
The status LED light on the charger should
illuminate.
- Gently plug the white balancer plug into the
charging socket as shown in B4. If the battery
is not correctly inserted into the charging
socket, the battery may become damage and,
under certain circumstances, cause injury.
- LED on the charger will light up red when charging begins. The color of the
LED on the charger changes from red to green when the charging process
is completed. Disconnect the battery from the charger and disconnect the
charger from the outlet after the charging is complete.
WASP Drone can y for approx. 8 minutes after a charge time of approx.
140 minutes.
B4
CHARGING THE LiPo BATTERY
Page 5
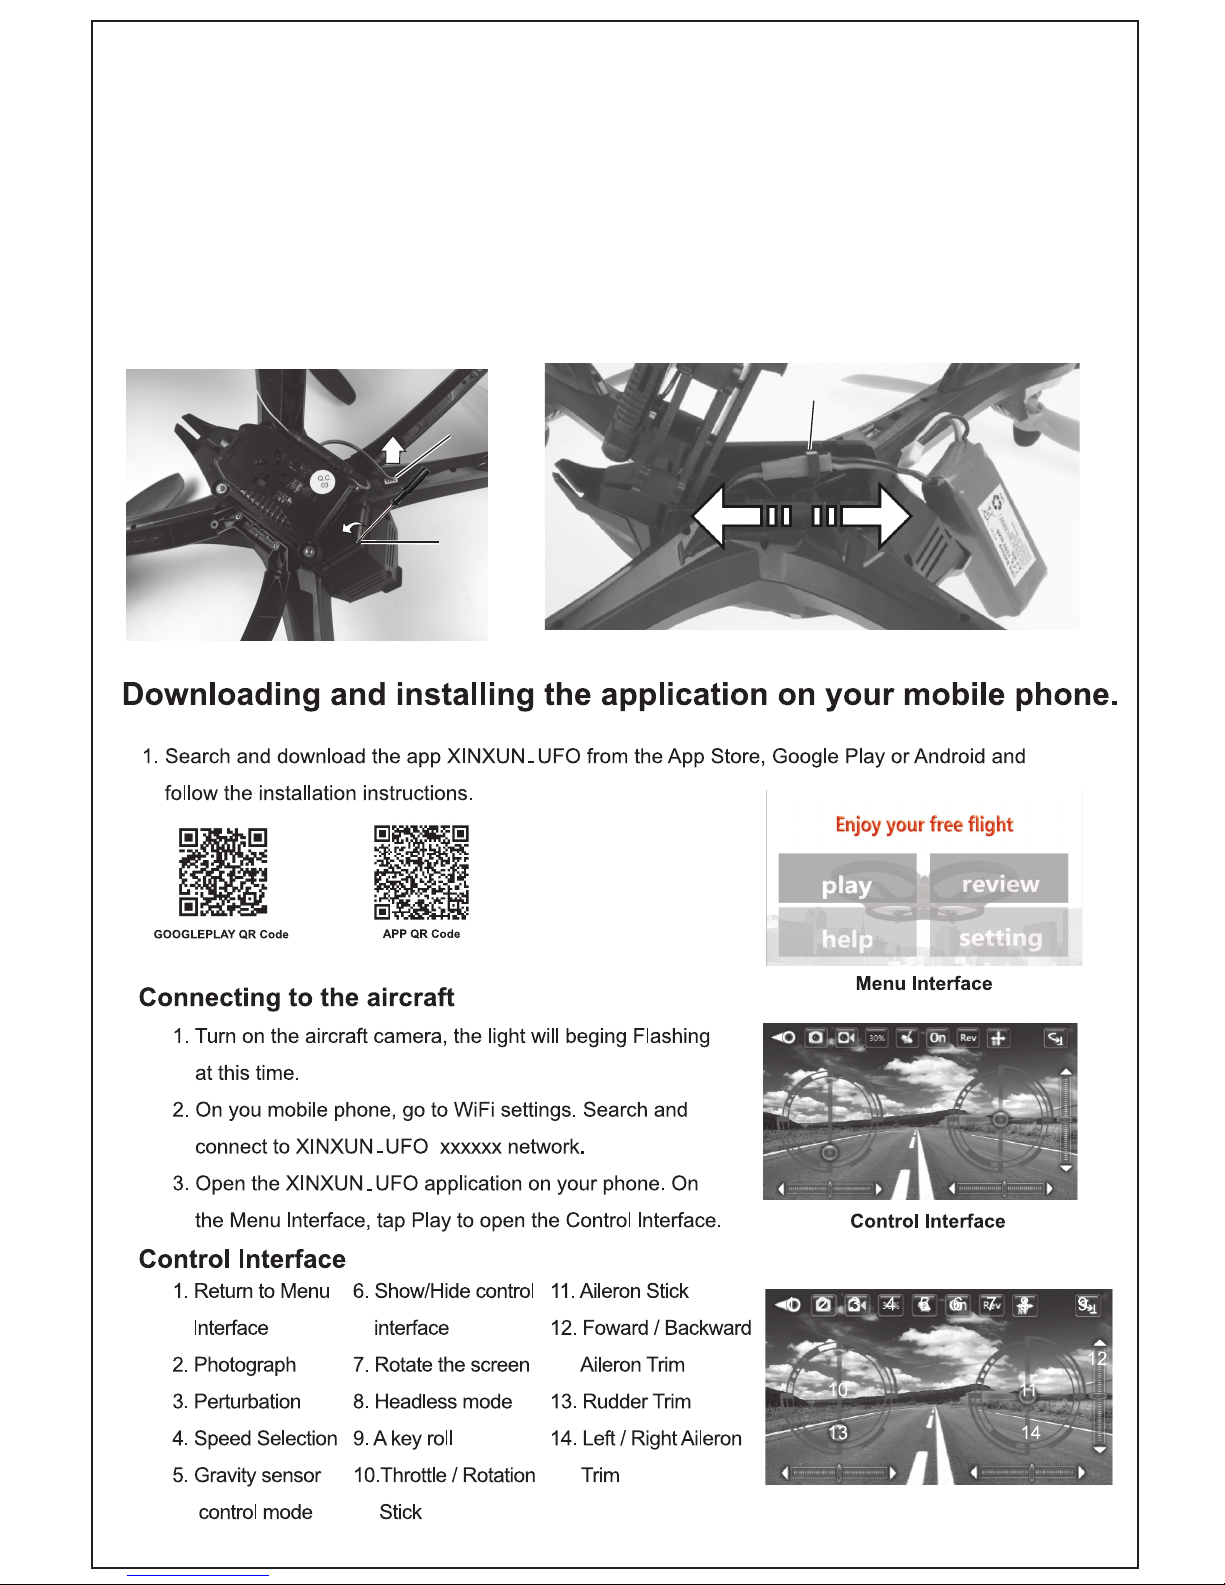
B1
B2
INSTALLING THE LiPo BATTERY
- Open the battery compartment cover by unscrewing the battery
compartment as show in B1 securing screw in anti-clockwise motion
and disconnect the plug from camera connection as shown in B2.
- Gently plug the red adapter on the LiPo battery to the red socket in battery
compartment as shown in B3.
- Be careful not to damage the circuit board under the battery compartment
while connecting or disconnecting the battery. There is a risk of re!
B3
4
Page 6
READY TO FLY?
- The WASP Drone must be switched on rst in order to connect to the
remote control. Open the battery cover as shown in page 3 B2, insert the
battery into the battery compartment as shown in page 3 B3. Plug the
battery into the socket and close the battery compartment.
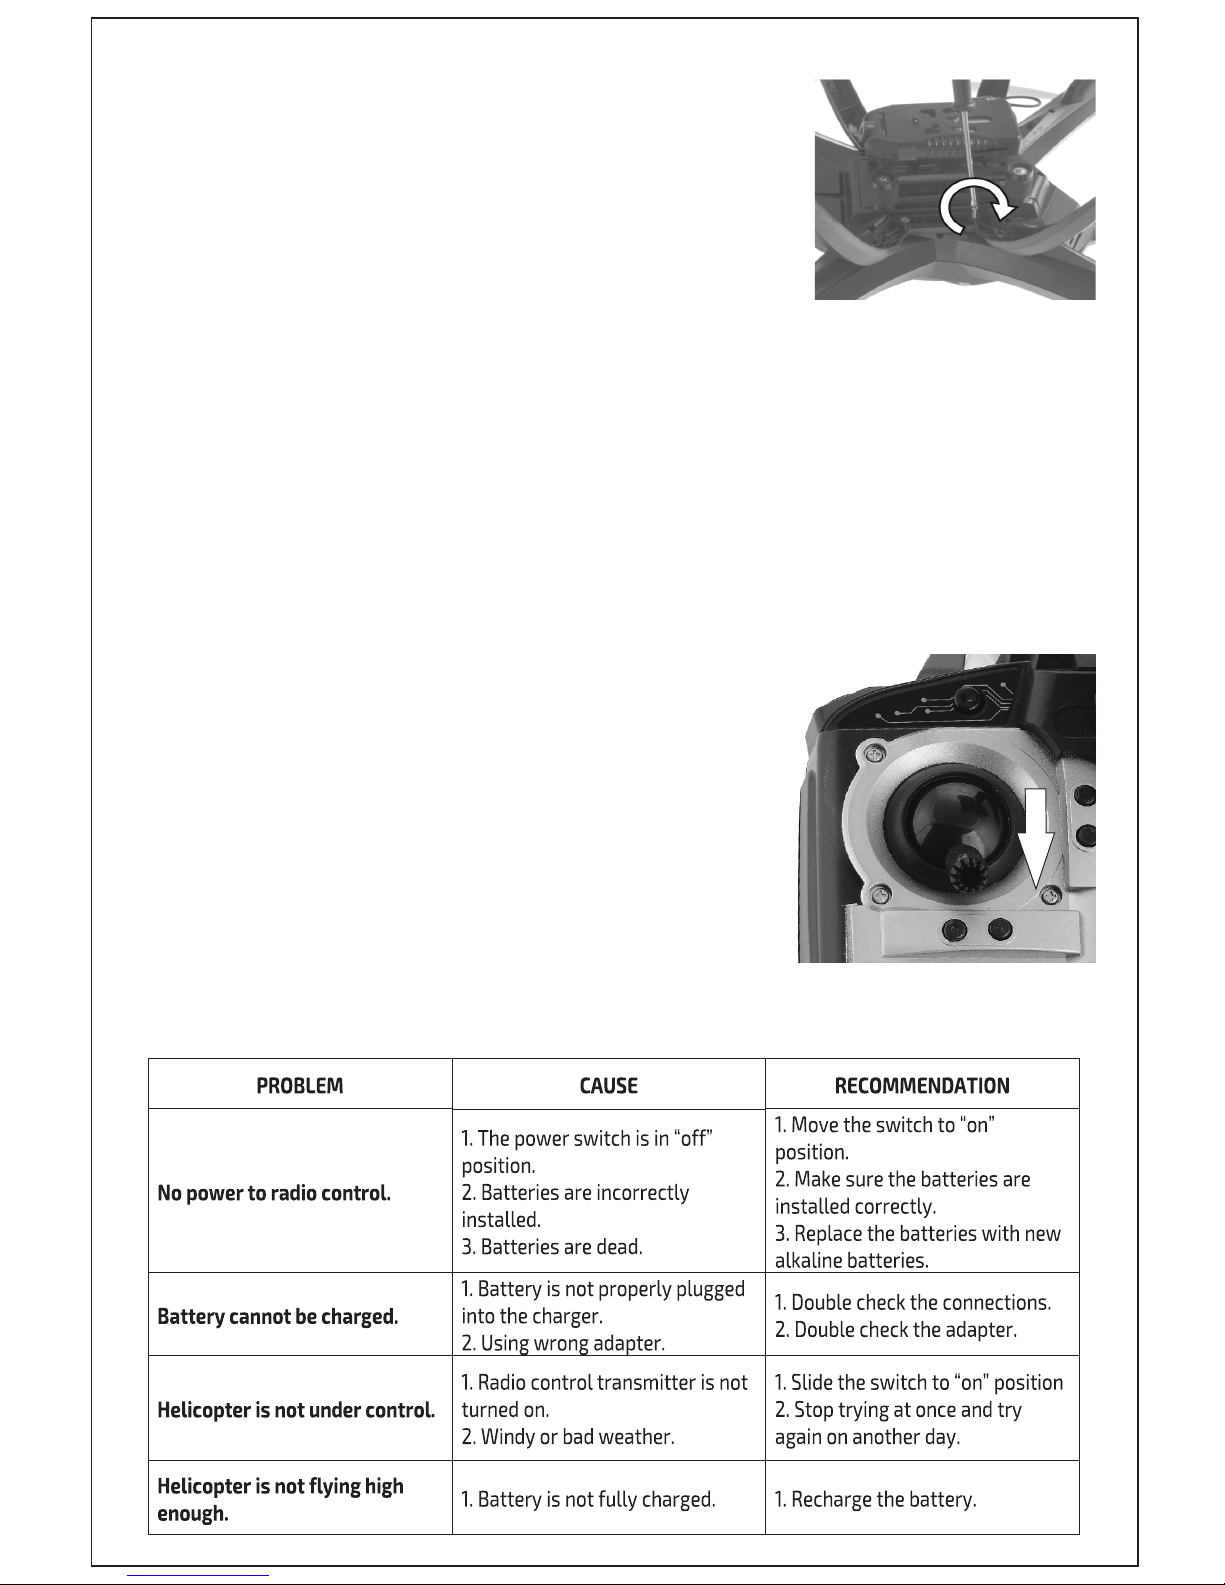
- Then set the switch on the WASP Drone to
the “ON” position.
- Before switching on the remote control, the
control for thrust and rotation must point
down as shown in D1. You may now switch
on the remote control and move the control
for thrust and rotation upwards for approx. 3
seconds , the WASP Drone activates and is ready
to use.
C1
A pair of landing skids are included with the
WASP Drone. These are to be placed on the
underside of the WASP Drone. Then carefully screw
in the two securing screws in each skid as shown
in C1.
INSTALLING LANDING SKIDS
D1
TROUBLESHOOTING
5
Page 7
TRIM ADJUSTMENT
WASP Drone must be switched on rst in order to connect it to the
remote control. WASP Drone adjustment is simple, but it requires some
patience and a feel for it. Please observe the following instructions
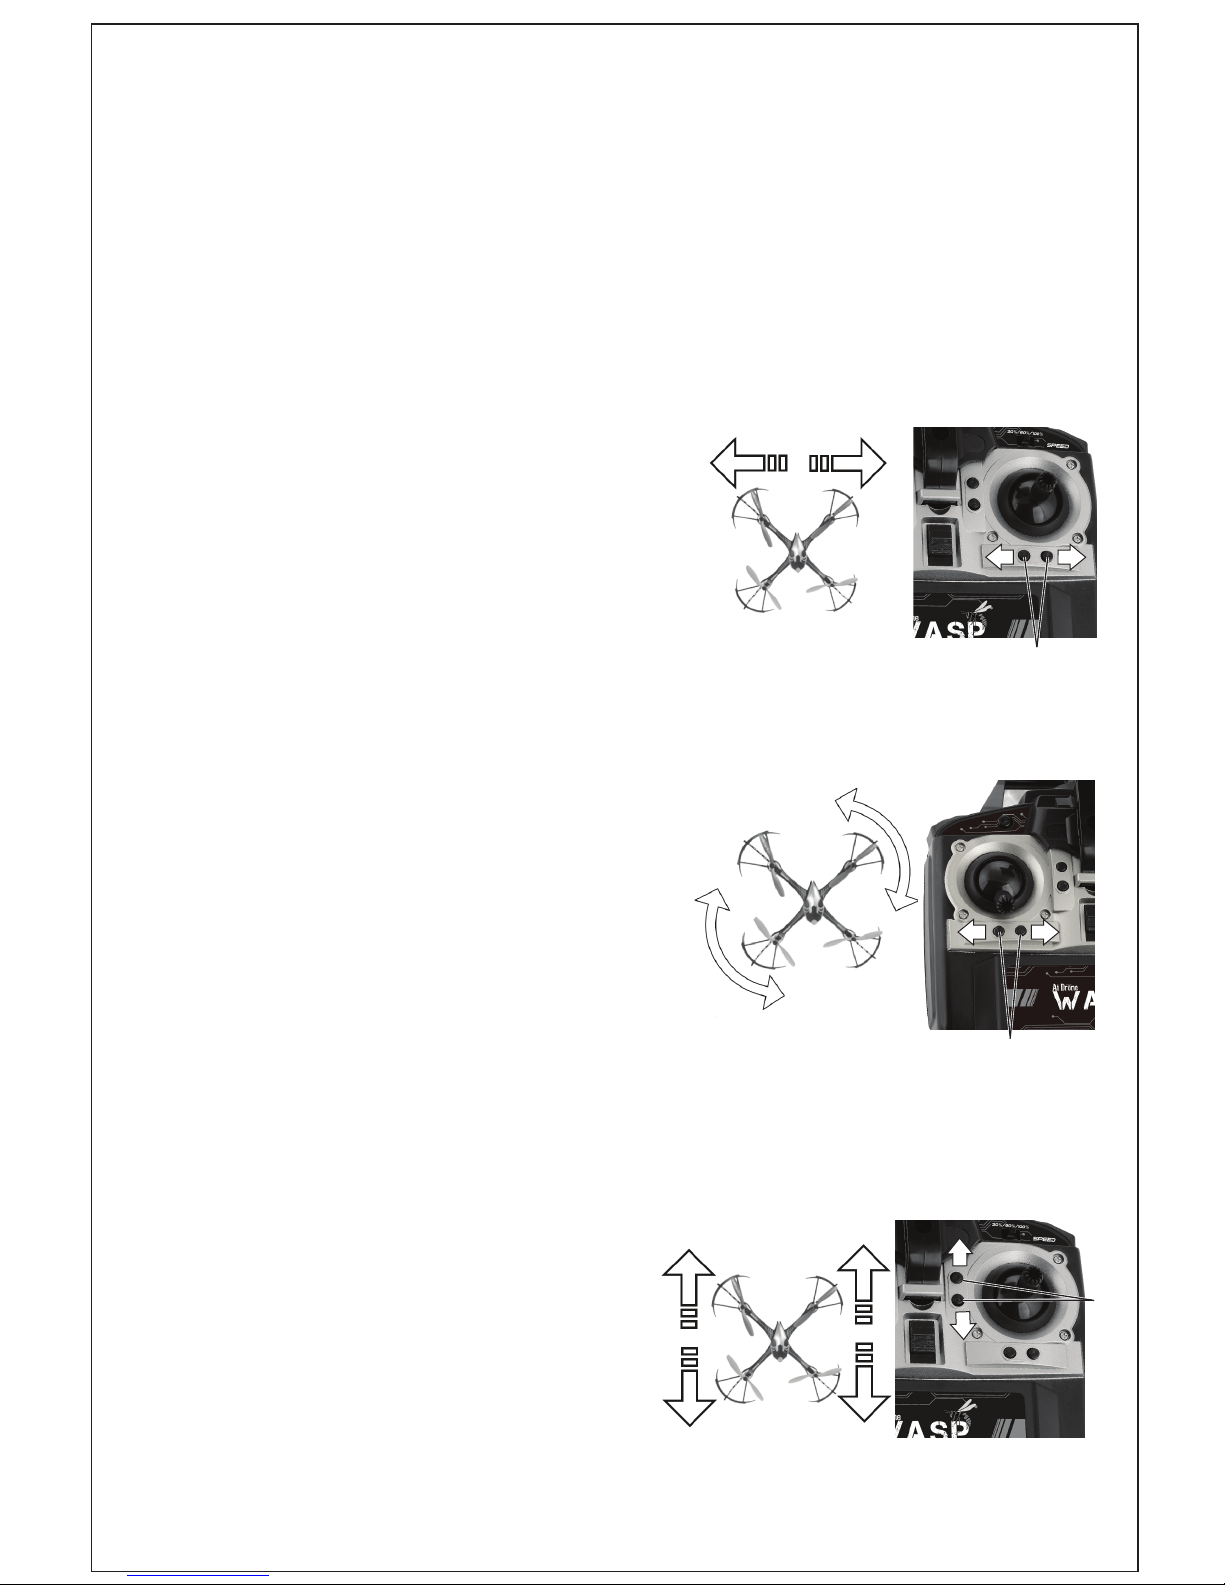
precisely: Carefully move the thrust control up and raise the WASP Drone
appox. 5 feet in alltitude.
If the WASP Drone automatically
moves slowly or quickly to the left
or right, gradually press the trim for
sideways ight in the opposite direction
as shown in E1.
E1
If the WASP Drone moves by itself
slowly or quickly around its own axis,
press the trim adjustment for rotation
incrementally in the opposite direction
as shown in E2.
E2
If the WASP Drone automatically
moves slowly or quickly forwards
or backwards, gradually press the
forward/backwards trim in the
opposite direction as shown in E3.
E3
6
Page 8
WHAT IS HEADLESS MODE?
Regardless of where the WASP Drone turns, the direction of the ight
always corresponds exactly to the direction specied with the control
for forward/backward and sideways movement. An example: If the
WASP Drone were to be turned 180 and own towards the operator, the
operator would have to convert the forward/backward and sideways
movement accordingly. This is no longer necessary if the headless mode is
is activated, as the internal processor converts the control directions
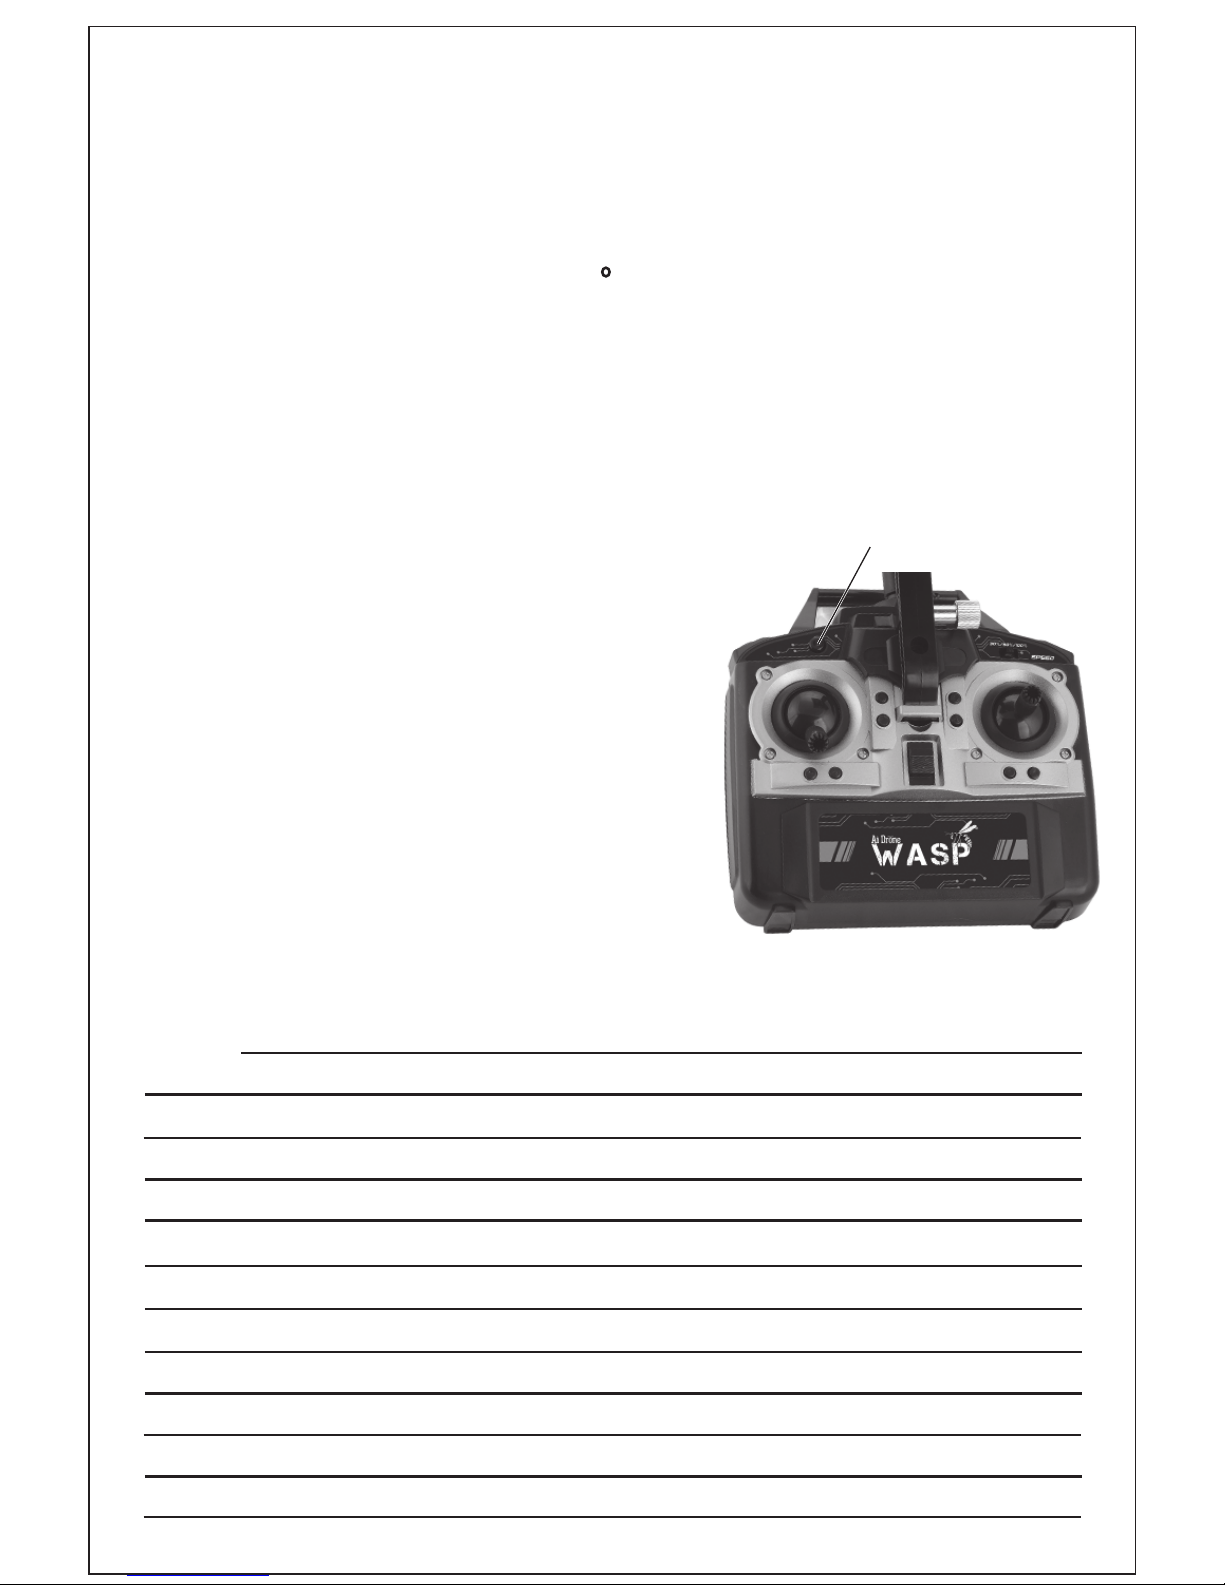
automatically. This feature supports beginners in the initial stages. Pressing
the headless mode button again deactivates the mode.
ATTENTION : WASP Drone notes the forward
direction each time the headless mode is
activated. This means that the operator
must not turn when controlling, as this
would change the concept of forwards/
backwards and right/ left in relation to
the WASP Drone. If the operator changes
position and wants to use headless mode
or if the control direction is no longer
correct due to a collision, the WASP Drone
must be restarted.
HEADLESS MODE
BUTTON
NOTES
7
Page 9

Imported and Distributed by: Action Imports, LP. 1100 Avenue S, Grand Prairie, TX 75050
 Loading...