

Page 1
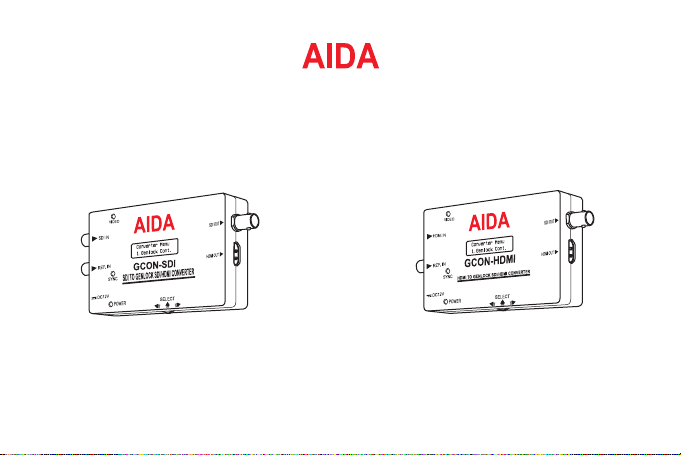
GENLOCK CONVERTER
GCON-SDI GCON-HDMI
Operation Guide
Ver. 0.5 / May 2016
VIDEO
Page 2
CAUTION
RISK OF ELECTRIC SHOCK.
DO NOT OPEN.
:
TO REDUCE THE RISK OF ELECTRIC SHOCK, DO NOT REMOVE COVER (OR BACK) NO USER SERVICEABLE
PARTS INSIDE. REFER SERVICING TO QUALIFIED SERVICE PERSONNEL.
Warning Precaution
This symbol indicates that dangerous voltage
consisting a risk of electric shock is present within
this unit.
CAUTION
This exclamation point symbol is intended to alert the
user to the presence of important operating and
maintenance (servicing) instructions in the literature
accompanying the appliance.
Warning
To prevent damage which may result in fire or electric shock hazard, do not expose this appliance to rain or moisture.
Be sure to use only the standard adapter that is specified in the specification sheet. Using any other adapter could
1.
cause fire, electrical shock, or damage to the product.
Incorrectly connecting the power supply or replacing battery may cause explosion, fire, electric shock, or damage to
2.
the product.
Do not connect multiple connectors to a single adapter. Exceeding the capacity may cause excessive heat or fire.
3.
Securely plug the power cord into the power receptacle. Insecure connection may cause fire.
4.
2
Page 3

Do not drop the converter to avoid the damage or personal injury.
5.
Do not place conductive objects (e.g. screw drivers, coins, metal items, etc.) or containers filled with water on top
6.
of the converter. Doing so may cause personal injury due to fire, electric shock, or falling objects.
Do not install the unit in humid, dusty, or sooty locations. Doing so may cause fire or electric shock.
7.
If any unusual smells or smoke come from the unit, stop using the product. Immediately disconnect the power source
8.
and contact the service center. Continued use in such a condition may cause fire or electric shock.
If this product fails to operate normally, contact the nearest service center. Never disassemble or modify this product
9.
in any way.
10.
When cleaning, do not spray water directly onto parts of the product. Doing so may cause fire or electric shock.
Precaution
Please read this Operation Guide before installing and using the converter & retain this copy for your reference.
Always follow the instructions in the operation guide when applying power. Fire and equipment damage can occur
1.
if power is applied incorrectly. For the correct power supply,refer to the specifications page.
.
Do not use converter if fumes, smoke or a strange odor is emitted from the camera, or if it seems not functional
2
correctly. Disconnect the power source immediately and consult with your supplier.
Do not use the converter in extreme environments where high temperatures or high humidity exists. Use the camera
3.
under conditions where temperatures are between 32°F ~ 104°F, and humidity is below 90%.
4.
If installed close to a TV, radio transmitter, magnet, electric motor transformer or audio speakers the magnetic field
generated may interfere with or distort the image.
5. To prevent damage, do not drop the converter or subject it to strong shock or vibration.
3
Page 4
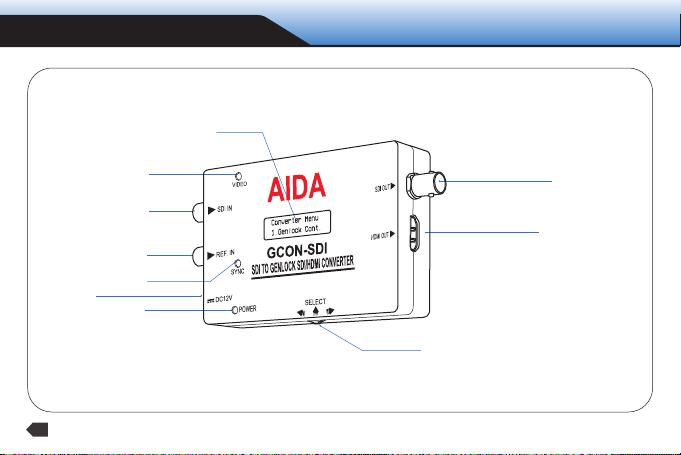
GCON-SDI
TEXT LCD
POWER IN
VIDEO LED
SDI IN
REF. IN
SYNC LED
POWER LED
MENU BUTTON
SDI OUT (Genlocked)
HDMI OUT (Genlocked)
4
Page 5
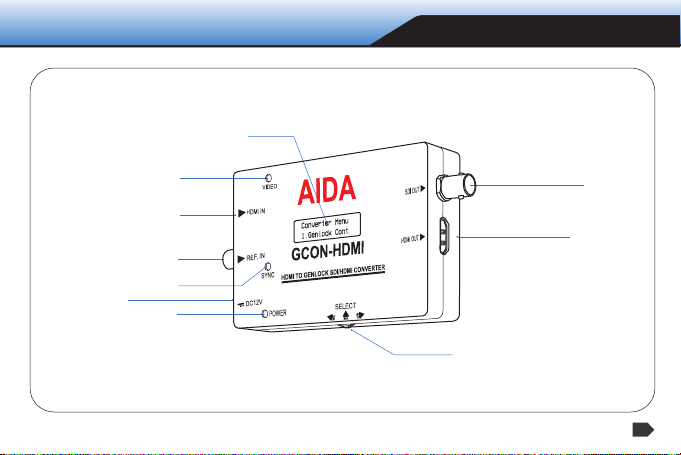
TEXT LCD
GCON-HDMI
POWER IN
VIDEO LED
HDMI IN
REF. IN
SYNC LED
POWER LED
SDI OUT (Genlocked)
HDMI OUT (Genlocked)
MENU BUTTON
5
Page 6
FEATURES
SMPTE 292M & 424M standard high denition video format including 59.94Hz.
SMPTE 352M Ancillary Data supported.
Highly compatible with Tri Level reference.
Adjustable V-sync & H-sync phases.
Divisional picture comparison.
Built in Pattern Generator.
Built in LCD menu screen.
Built in menu control button.
Versatile, compact and rugged design.
Embedded audio pass through via SDI & HDMI.
Simultaneous SDI and HDMI Output.
6
Page 7
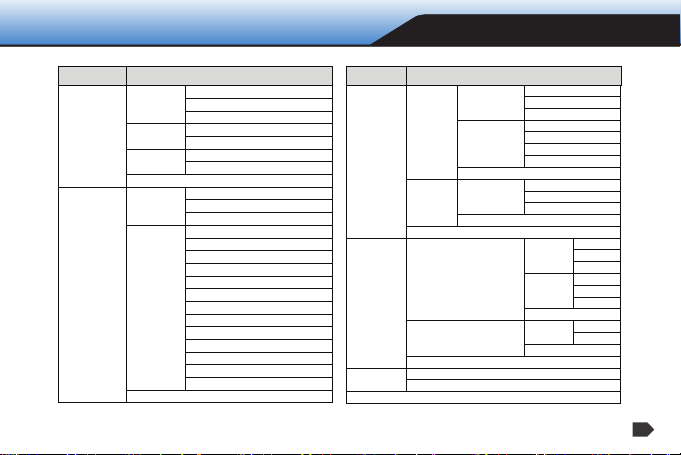
OSD MENU
MENU
SUB MENU
GENRUN: [OFF]
GENRUN: [ON]
CANCEL(BACK)
H_SYNC: 0000
CANCEL(BACK)
V_SYNC: 0000
CANCEL(BACK)
RETURN
PATTERN: [OFF]
PATTERN: [ON]
CANCEL(BACK)
PTN WHITE
PTN CROSS
PTN HATCH
PTN COLORBAR
PTN GRAY
PTN WINDOW
PTN H_RAMP
PTN WH_RAMP
PTN WV_RAMP
PTN DIAGONAL
PTN RED
PTN GREEN
PTN BLUE
RETURN
AUDIO [OFF]
AUDIO [ON]
CANCEL(BACK)
24 BITS
20 BITS
16 BITS
CANCEL(BACK)
RETURN
PAYLOAD [OFF]
PAYLOAD [ON]
CANCEL(BACK)
RETURN
RETURN
LCD [OFF]
LCD [ON]
CANCEL(BACK)
DYNAMIC
STATIC
CANCEL(BACK)
RETURN
2DIV [OFF]
2DIV [ON]
RETURN
RETURN
RESET RUN
RETURN
EXIT
MENU
SUB MENU
GENLOCK CONT.
PATTERN GEN..
GEN ON/OFF
H_SYNC ADJUST
V_SYNC ADJUST
PTN ON/OFF
PTN TYPE
MISC CONT.
DISPLAY CONT.
RESET
AUDIO CONT.
PAYLOAD CONT.
PAYLOAD ON/OFF
LCD CONT.
HD/3G CONT.
AUDIO ON/OFF
AUDIO BITS
LCD BL ON/OFF
DISP TYPE
2DIV COMPARE
7
Page 8
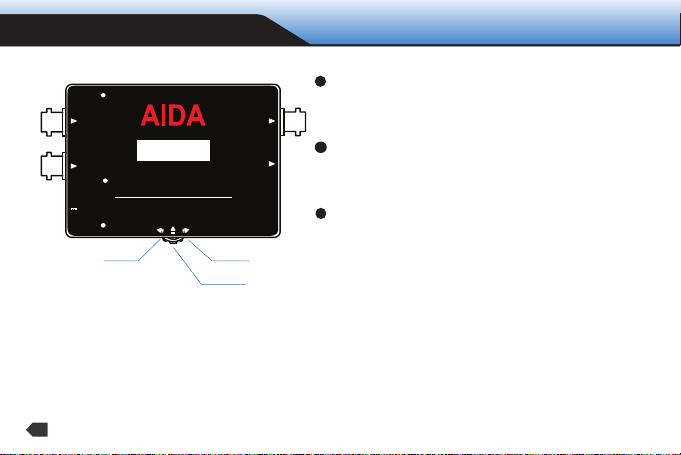
MENU OPERATION
VIDEO
SDI IN
Converter Menu
REF. IN
DC12V
8
1.Genlock Cont.
SYNC
GCON-SDI
SDI TO GENLOCK SDI/HDMI CONVERTER
POWER
POWER
LEFT
SELECT
RIGHT
SELECT
SDI OUT
HDMI OUT
1
Entering the main menu.
Press Enter button three times to enter the main menu.
2
Change the menu items.
Use Right or Left menu to toggle through the menu.
3
Select or enter the sub menu.
Use Enter button.
Page 9
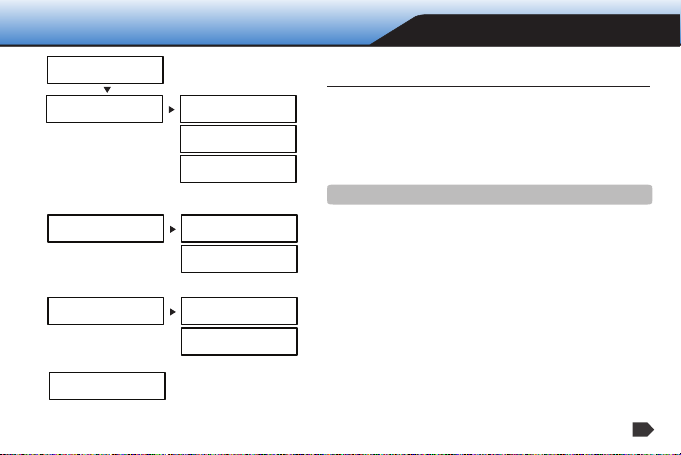
Converter Menu
1.Genlock Cont.
[Genlock Menu]
1.Gen On/Off
[Genlock Menu]
2.H_Sync Adjust
[Genlock Menu]
3.V_Sync Adjust
[Genlock Menu]
4.Return
[Genlock On/Off]
>Genrun : [ON]
[Genlock ON/OFF]
>Genrun : [OFF]
[Genlock ON/OFF]
>Cancel (BACK)
[Genlock H_Sync]
>H_Sync : 0000
[Genlock H_Sync]
>H_Sync : 0007
[Genlock V_Sync]
>V_Sync : 0000
[Genlock V_Sync]
>V_Sync : 0007
GENLOCK CONT.
GENLOCK CONT.
GEN ON/OFF
External reference input can be turned ON or OFF from this menu.
By using Left or Right button,
Select GENRUN[ON] to enable external reference input.
Select GENRUN[OFF]to disable external reference input.
Select CANCEL(BACK)to go back to the previous menu.
SDI input signal and reference signal needs to be matched.
H_SYNC ADJUST
H_Sync oset can be adjusted from this menu.
By using Left or Right button,
Select the right oset number on H_SYNC:0000
Press SELECT button to apply the changes and go back to the previous menu.
V_SYNC ADJUST
V_Sync oset can be adjusted from this menu.
By using Left or Right button,
Select the right oset number on V_SYNC:0000
Press SELECT button to apply the changes and go back to the previous menu.
RETURN
Press SELECT button to Return to the main menu.
9
Page 10
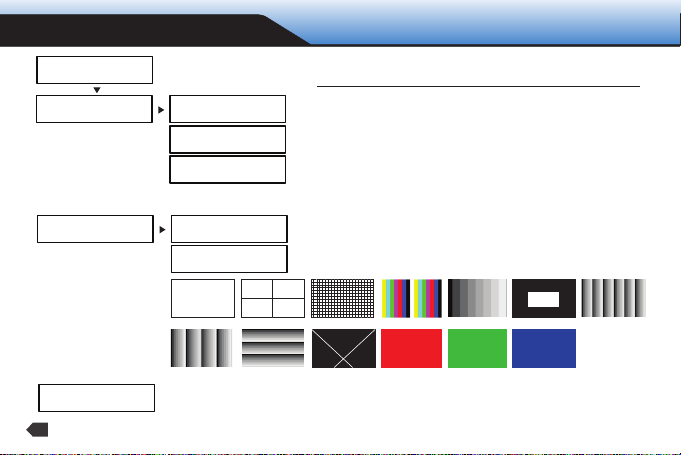
PATTERN GEN..
Converter Menu
2.Pattern Gen..
[Pattern Menu]
1.Ptn On/Off
[Pattern Menu]
2.Ptn Type
[Pattern On/Off]
>Pattern : [OFF]
[Pattern ON/OFF]
>Pattern : [ON]
[Pattern ON/OFF]
>Cancel (BACK)
[Pattern Type]
1.Ptn White
[Pattern Type]
14.Return
PATTERN GEN..
PATTERN ON/OFF
Both SDI and HDMI outputs will generate patterns and input video
will be disabled.
When GENLOCK is enabled, generated pattern will contain genlock signal.
By using Left or Right button,
Select PATTERN[ON] to enable pattern generation.
Select PATTERN[OFF] to disable pattern generation.
Select CANCEL(BACK) to go back to the previous menu.
PATTERN TYPE
Converter provides thirteen dierent patterns.
By using Left or Right button,
By using Left or Right button, select the proper pattern type.
[Pattern Menu]
3.Return
10
1. White 2. Cross 3.Hatch 4.Colorbar 5.Gray
8.Wh_Ramp 9.Wv_Ramp
10.Diagonal 11.Red
RETURN
Press SELECT button to Return to the main menu.
12.Green 13.Blue
6.Window
7.H_Ramp
Page 11
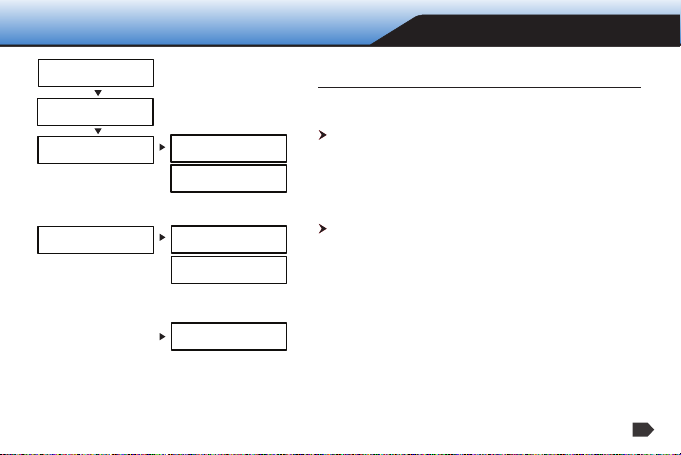
Converter Menu
3.Misc Cont.
[Misc.. Menu]
1.Audio Cont
[Audio Memu]
1.Audio On/Off
[Audio Menu]
2.Sample Bits
[Audio ON/OFF]
>Audio : [ON]
[Audio ON/OFF]
>Cancel (BACK)
[Sample Bits]
>Sample 24Bits
[Sample Bits]
>Cancel (BACK)
MISC CONT. AUDIO
MISC CONT.
AUDIO CONT
Audio can be turned ON or OFF, and AUDIO Sample Rate can be adjusted.
AUDIO ON/OFF
By using Left or Right button,
Select AUDIO[ON] to enable AUDIO to be passed through to SDI
and HDMI outputs.
Select AUDIO[OFF] to disable AUDIO.
Select CANCEL(BACK) to go back to the previous menu.
SAMPLE BITS :16 BITS, 20 BITS, 24 BITS
AUDIO sample rates can be adjusted from this menu.
[Audio Menu]
3.Return
RETURN
Press SELECT button to Return to the main menu.
11
Page 12
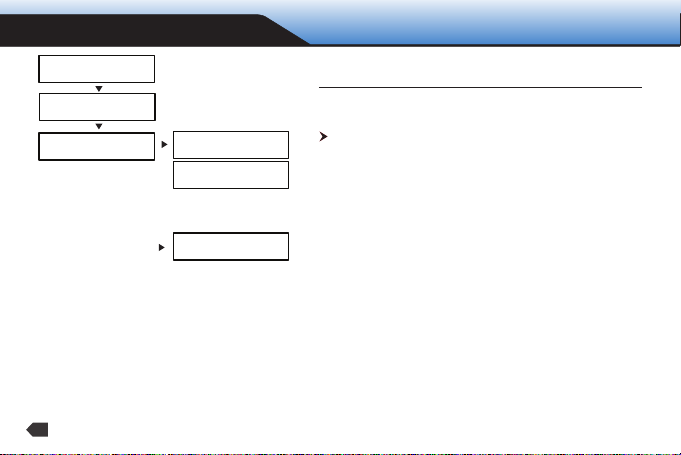
MISC CONT. PAYLOAD
Converter Menu
3.Misc Cont.
[Misc Menu]
2.Payload Cont
[Payload Menu
1.Payload On/Off
[Payload ON/OFF]
>Payload : [ON]
[Payload ON/OFF]
>Cancel (BACK)
MISC CONT.
PAYLOAD CONT
Payload ID can be turned ON or OFF can be adjusted.
PAYLOAD ON/OFF
By using Left or Right button,
Select PAYLOAD[ON] to enable Payload ID.
Select PAYLOAD[OFF] to disable Payload ID.
Select CANCEL(BACK) to go back to the previous menu.
[Payloado Menu]
3.Return
RETURN
Press SELECT button to Return to the main menu.
12
Page 13
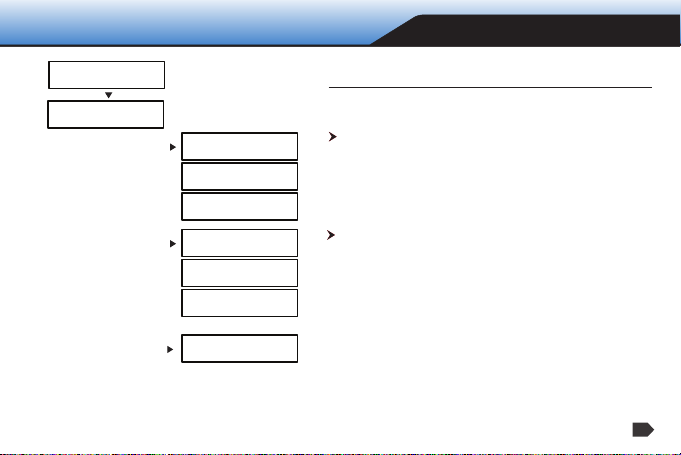
Converter Menu
4.Display Cont.
[Display Menu]
1.LCD Cont
[LCD Disp Menu]
1.LCD BL On/Off
[LCD BL ON/OFF]
>LCD BL : [ON]
[LCD BL ON/OFF]
>Cancel (BACK)
[LCD Disp Menu]
2.Display Type
[Display Type]
>Dynamic
[Display Type]
>Cancel (BACK)
[Display Menu]
3.Return
DISPLAY CONT. LCD
DISPLAY CONT.
LCD CONT
This menu can control built in LCD display.
LCD BL ON/OFF
LCD display backlight can be turned ON or OFF from this menu.
By using Left or Right button,
Select LCD[ON] to enable LCD backlight.
Select LCD[OFF] to disable LCD backlight.
Select CANCEL(BACK) to go back to the previous menu.
DISPLAY TYPE :DYNAMIC. STATIC
LCD display type can be adjusted from this menu.
Select DYNAMIC to display the current input status of SDI and
external reference.
Select STATIC to display the current external reference input and
video output status.
RETURN
Press SELECT button to Return to the main menu.
13
Page 14
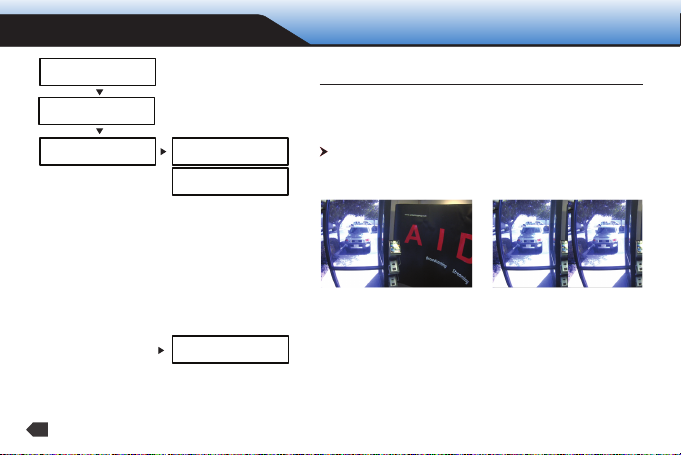
DISPLAYCONT. 2DIV
Converter Menu
4.Display Cont.
[Display Menu]
2.HD/3G Cont
[HD/3G Menu]
1.2DIV Capture
14
[2DIV Capture]
>2DIV : [OFF]
[2DIV Capture]
>Cancel (BACK)
[2DIV Capture]
3.Return
DISPLAY CONT.
HD/3G CONT
2 division comparison provides still image and live image for image
quality comparison.
2DIV CAPTURE
Converter will capture the left half of the live image.
The other half of the screen is the live video.
Live Image Live Image Captured mage
2DIV OFF 2DIV ON
RETURN
Press SELECT button to Return to the main menu.
Page 15
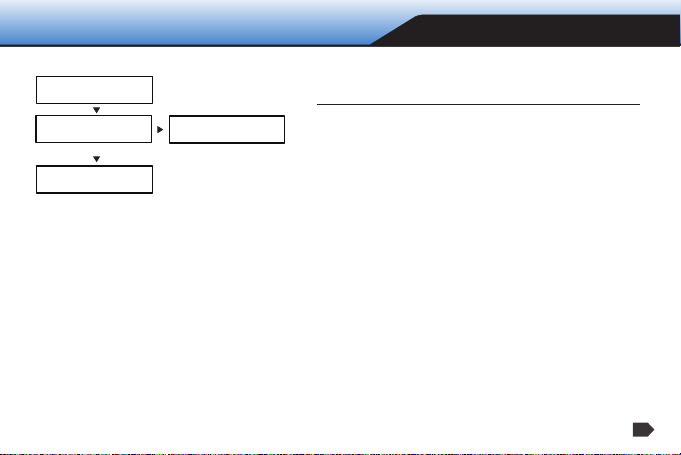
RESET
Converter Menu
5.Reset
[Reset Menu]
1.Reset Run
[Reset Menu]
2.Return
[Reset Menu]
Wait.. -> ->
RESET
Converter setting can be defaulted to the factory setting from this menu.
RESET RUN
Select this menu to load factory default setting.
RETURN
Press SELECT button to Return to the main menu.
15
Page 16
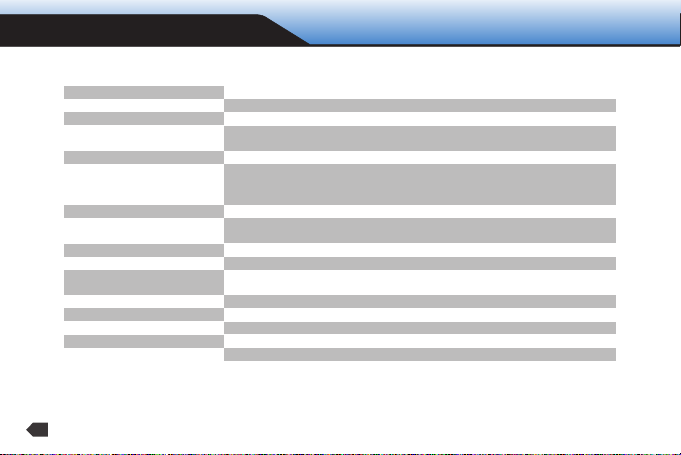
SPECIFICATION: GCON-SDI
Input
SDI Input Format
Audio Input
Input Resolution
Input Color Space
Input Frame Rate
SMPTE Standard
Video Signal Output
Output Resolution
Output Frame Rate
Audio Output
Synchronization
Control
Operation Temperature
Dimension & Weight
Power Requirements 6W at 12VDC (+9 ~ +15VDC)
SMPTE 292M, SMPTE 424M
1080p / 1080i: 1920 x 1080 Full HD
1080 60p / 59.94p / 50p / 30p / 29.97p / 25p
720 60p / 59.94p / 50p / 30p / 25p
SMPTE 292M, SMPTE 424M
Genlocked HD-SDI/3G-SDI Pass Through
Genlocked 10bit HDMI 1.3
16 Channel Embedded SDI Audio
8 Channel Embedded HDMI Audio
External Tri-Level Sync Input
Control Button & LCD Display
127 x 77 x 28mm & 108g
Specications are subject to change without notice
16
3G-SDI, HD-SDI
Embedded SDI Audio
720p: 1280 x 720
4:2:2(YCbCr) 10bit
1080 60i / 59.94i / 50i
Same as Input
Same as Input
15°F ~ 120°F
Page 17
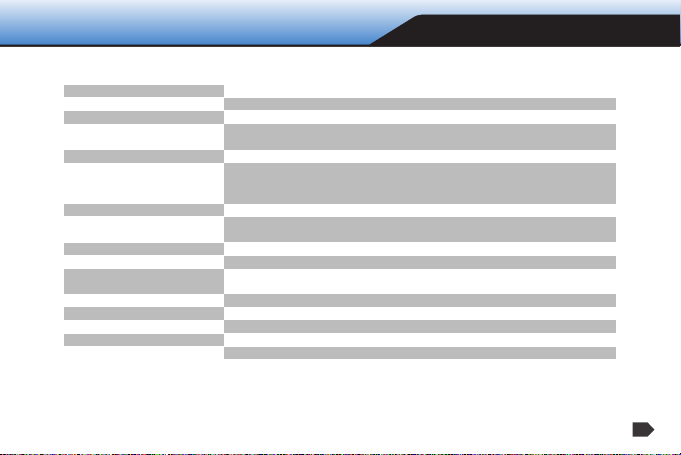
SPECIFICATION: GCON-HDMI
Input
SDI Input Format
Audio Input
Input Resolution
Input Color Space
Input Frame Rate
SMPTE Standard
Video Signal Output
Output Resolution
Output Frame Rate
Audio Output
Synchronization
Control
Operation Temperature
Dimension & Weight
Power Requirements 6W at 12VDC (+9 ~ +15VDC)
1080 60p / 59.94p / 50p / 30p / 29.97p / 25p
Genlocked 10bit HDMI 1.3 Pass Through
Full HD HDMI
SMPTE 292M, SMPTE 424M
Embedded SDI Audio
1080p / 1080i: 1920 x 1080 Full HD
720p: 1280 x 720
4:2:2(YCbCr) 10bit
1080 60i / 59.94i / 50i
720 60p / 59.94p / 50p / 30p / 25p
SMPTE 292M, SMPTE 424M
Genlocked HD-SDI/3G-SDI
Same as Input
Same as Input
16 Channel Embedded SDI Audio
8 Channel Embedded HDMI Audio
External Tri-Level Sync Input
Control Button & LCD Display
15°F ~ 120°F
127 x 77 x 28mm & 108g
Specications are subject to change without notice
17
Page 18
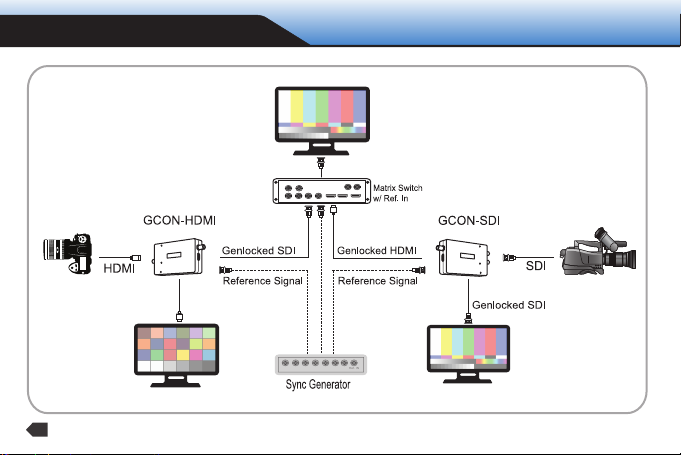
CONNECTION
Ref. IN
OUT 1
Ref. IN
OUT 2
18
Page 19
19
Page 20
Disposal of Old Appliances
1. When this crossed-out wheel bin symbol is attached to a product it means the product is covered by the European Directive 2002/96/EC.
2. All electrical and electronic products should be disposed of separately form the municipal waste stream stream in accordance to laws designated by the government or the local authorities.
3. The correct disposal of your old appliance will help prevent potential negative consequences for the environment and human health.
4. For more detailed information about disposal of your old appliance, please contact your city oce, waste disposal service or the shop where you purchased the product.
This equipment has been tested and found to comply with the limits for a Class A digital device, pursuant to part 15 of the FCC Rules.
These limits are designed to provide reasonable protection against harmful interference when the equipment is operated in a commercial environment.
This equipment generates, uses, and can radiate radio frequency energy and, if not installed and used in accordance with the instruction manual, may cause harmful interference to radio communications.
Operation of this equipment in a residential area is likely to cause harmful inte
rference in which case the user will be required to correct the interferenece at his own expense.
 Loading...