

Page 1
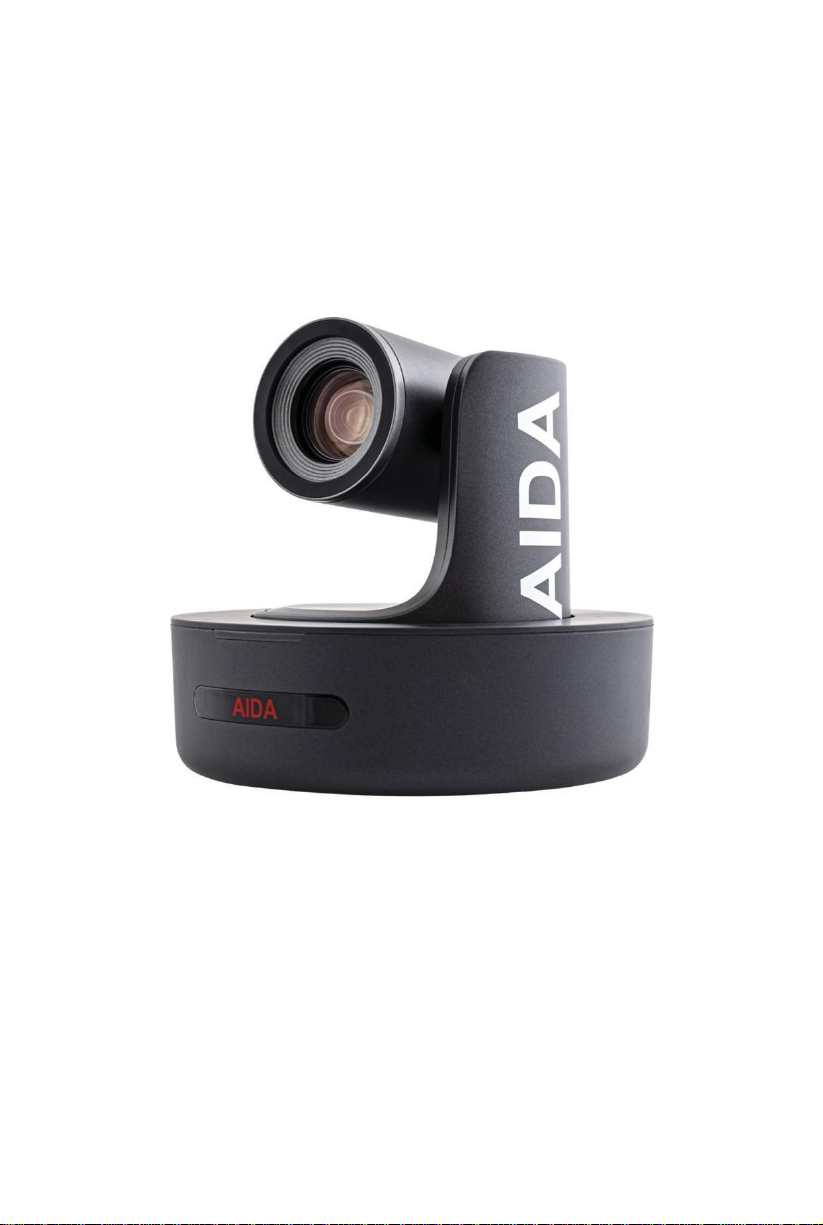
Full-HD Optical Zoom PTZ
PTZ-X12-IP | PTZ-NDI-X12 | PTZ-X20-IP | PTZ-NDI-X20 Manual
V2.1
AIDA
Page 2

Table of Contents
1
Safety Guides
2
Packing List & Quick Start
3
Product Highlights & Camera Specs
5
Camera Interface & Dimension
6
IR Remote Controller
8
OSD Menu
10
Web Settings
15
VISCA Over IP
16
VISCA (RS-232) Port
17
VISCA Protocol
26
UVC Control
27
Warranty & Support
The information within this manual is subject to change at any time without prior notice*
Page 3
Safety Guide
1
Before operation, please read all of the instructions in the manual carefully. For your convenience,
1.
please keep this manual.
2.
The camera power input range is 100-240VACv(50-60Hz). Ensure the power supply input is
within this
3.
Camera power voltage = 12VDC,rated currency= 2A.Wesuggestyou use it with the original power
supply adapter supplied by the factory.
4.
Please keep the power cable, video cable, and control cable in a safe place and out of
obstructions.
5.
0perationalenvironment: 0°C-50°C/32°F-122°F,with humidity levels less than 90%.To avoid
any
6.
Avoid weight stress, vibration, and pressure on the camera during transportation, storage,
and
7.
Do not remove the camera housing or cover. Doing so will void the warranty.
8.
Do not direct the camera towards strong/intensive light. Doing so could cause
irreversible
9.
Use a dry and soft cloth to clean the camera housing with a neutral cleaning agent, when needed. To
avoid damage on the camera lens, do not use strong or abrasive cleaning agents on the camera
housing.
10.
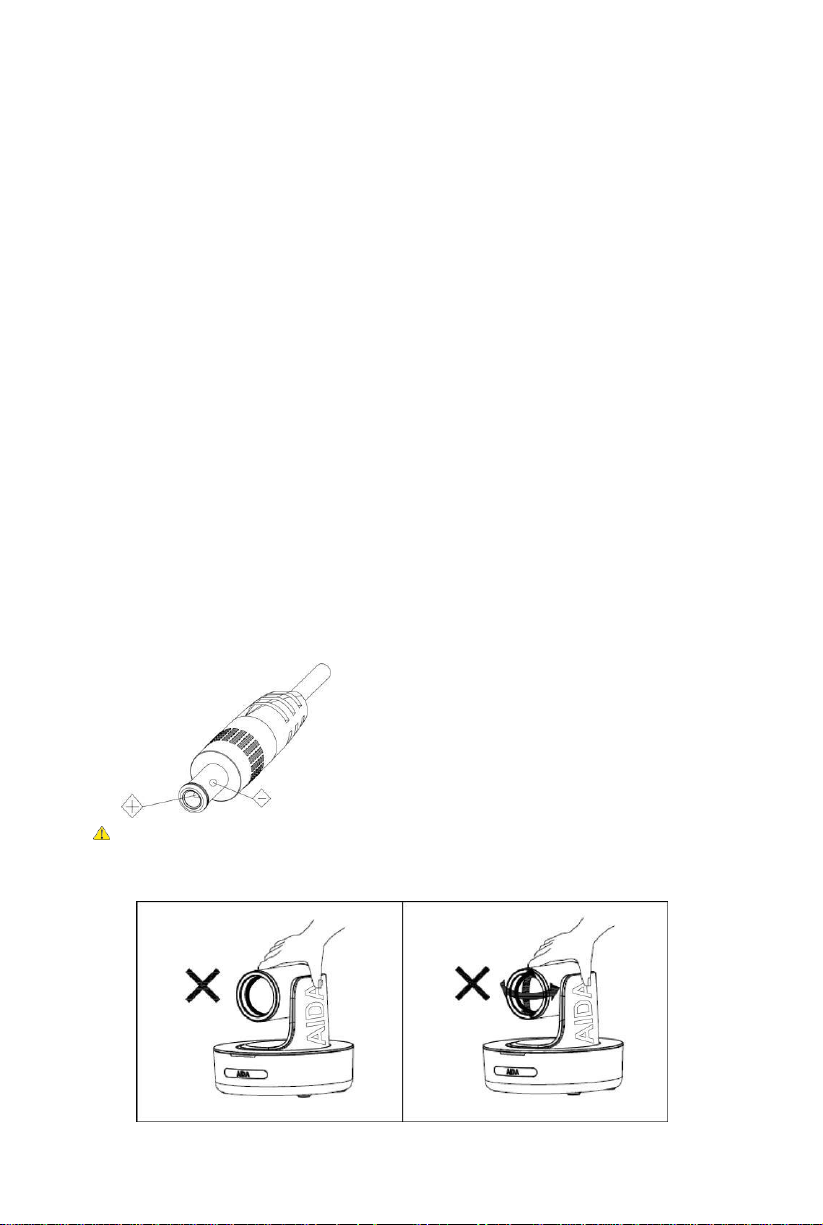
Do not move the camera by moving the camera head. To avoid mechanical trouble, do not rotate
the camera head by hand. Please refrain from moving the camera while it is in motion. Doing so
could
11.
Make sure the camera is on a fixed and balanced platform. Avoid any slanted
placements
12.
Power Supply Polarity Schematics:
rate before powering on.
damage, do no put or pour anything inside the camera.
installation.
damage to the camera and void warranty.
cause irreversible damage to the camera and void warranty.
.
Warning:
Video quality can be affected by specific frequencies of electromagnetic field.
Never grasp the head of the camera. Never move the camera by hand while is in
motion.
Doing so can damage the mechanism.
Page 4
Packing List
2
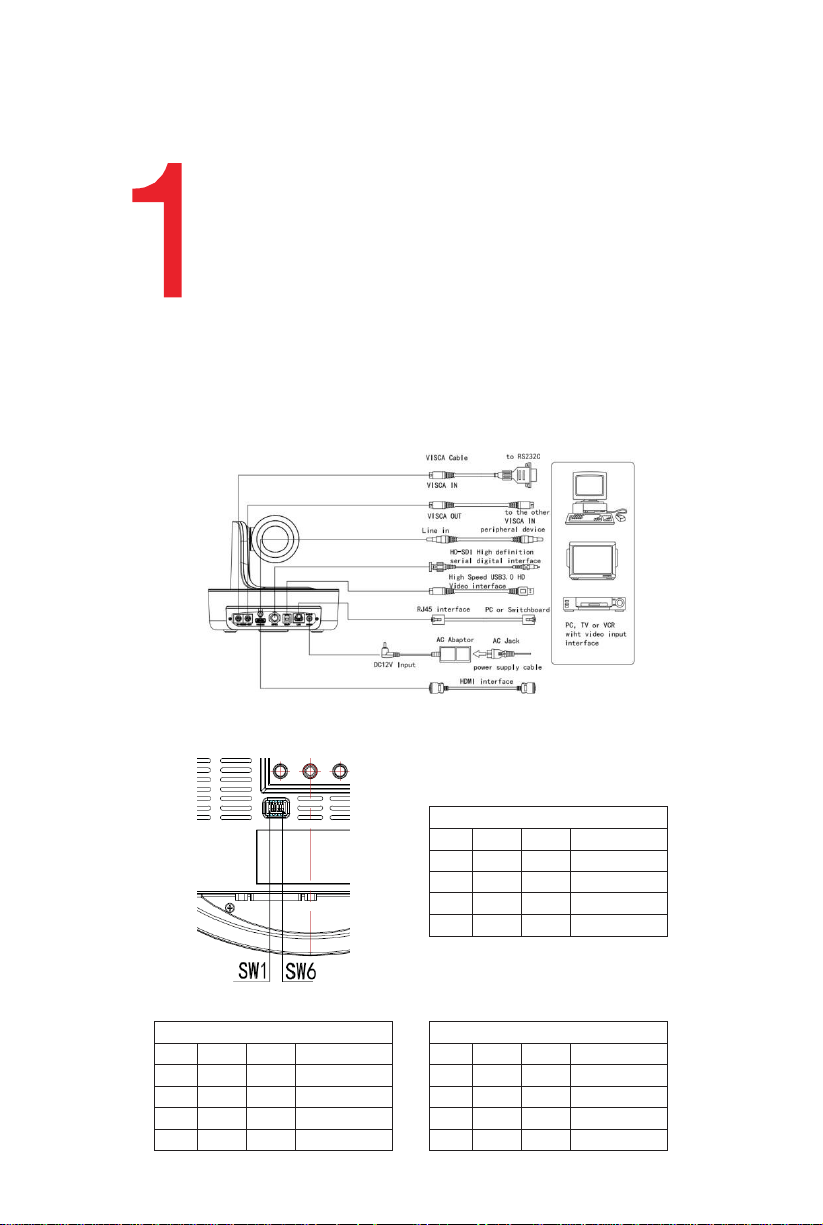
Dial Switch (ARM)
SW-1 SW-2 Mode
1
OFF OFF Updating Mode
2 ON
OFF Debugging Mode
3
OFF ON Undefined
4 ON ON
Working Mode
Dial Switch
SW-3 SW-4 Instruction
1
OFF OFF Reserve
2 ON
OFF Reserve
3
OFF ON
Reserve
4 ON
ON
Reserve
Dial Switch (USB)
SW-5 SW-6 Instruction
1
OFF OFF Undefined
2 ON
OFF Working Mode
3
OFF ON Updating Mode
4 ON ON
Undefined
Check the items below, when opening the package:
-
EA
AIDA PTZ
-
Power Adapter
-
Power Cable
-
RS-232 Control
Cable
-
USB 3.0 Cable
-
Remote Control
-
User Manual
-
Double Sided Adhesive
-
QC Certification
-
Wall Mount
Quick Start
1. Check that all cable connections are secure before powering on the camera.
2.
Dial Switch Setting (Used for Camera Updates):
Page 5

Product Highlights
3
•
Video
Format
HDMI
(V 1.4)
1920 x 1080 60p/59.94p/50p/30p/29.97p/25p/24p/23.98
1920 x 1080 60i/59.94i/50i
1280 x 720 60p/59.94p/50p/30p/29.97p/25p
SDI
1920 x 1080 60p/59.94p/50p/30p/29.97p/25p/24p/23.98
1920 x 1080 60i/59.94i/50i
1280 x 720 60p/59.94p/50p/30p/29.97p/25p
USB
1920 x 1080 60p/50p/30p/25p (USB 3.0)
1280 x 720 60p/50p/30p (USB 3.0)
1280x72025p(USB3.0&2.0)
1024x 576 30p(USB3.0 & 2.0)
960 x 540 30p (USB 2.0)
640 x 360 30p (USB 2.0)
512 x 28830p (USB 2.0)
RJ-45
1920 x 1080 @ 1~60 1280x 720 @ 1~60 (Main Stream)
1280x720@1~60/1027x576@1~60(SubStream)
Contains an advanced Sony Progressive CMOS Sensor providing 1920x1080 Ultra HD resolution.
•
Wide angle optical lens: 12x / 20xoptical zoom
•
Full HD video over IP, via H.264or H.265 encoding.
•
Contains traditional outputs such as HDMI, SDI, USB3.0, as well as RJ-45 for RTSP/RTMP
streaming.
•
Support line in function, supporting ACC and LPCM audio coding.
•
Fully adjustable camera settings, such as White Balance, Exposure Settings, and
Image
Parameters.
•
Supports P0E: use a single CAT 5/6 cable to control and output video via the RJ-45port.
•
Fast and precise focusing performance when zooming or moving the
•
Smooth PTZ movements, as well as little to no motor sound when moving.
•
Supports 10presets viaremoteor128presetsviaRS-232oronline interface.
•
Standard Sony Serial VISCA, IP VISCA protocol, as well as IP VISCA over UDP.
•
Daisy chain is supported via the RS-232 input and output, controlling a maximum
of 7 cameras.
•
Menu based image parameters, including image flip for ceiling mounted cameras.
•
Remote has multiple functions, such as fast switching video formats and ability to
change IP
•
•
control. UVC
•
•
address.
Free firmware updates to keep the camera up to date with the latest and greatest!
The USB3.0 port is compatible with USB2.0 and allows standard UVC1.5 protocol for local
PTZ Menu supports both English and Spanish
Supports NDI® | Hx transmission (PTZ-NDI-X12 and PTZ-NDI-X20) only.
control works seamlessly with many well-known conferencing software.
camera head.
Camera Specs
Page 6

Camera Specs (CONTD)
4
Video Interface
HDMI (V 1.4) 3G-SDI, RJ-45, USB 3.0
Sensor
SONY Progressive CMOS Sensor
Zoom
12x or 20x 0ptical Zoom
Lens
F4.9~98mm (20x), F1.5-3.0, View Angle:61°(Far)-3.2°(Near)
Rotation Angle
Pan: -170°~+170°; Tilt: -30°~+90°
Rotation Speed
Pan: 0°~120°/s; Tilt: 0°~80°/s
Preset
Remote Controller: 10 RS-232: 128
Control Port
RS-232, RJ-45 (VISCA over IP), USB 3.0 (UVC 1.5), USB 2.0 (UVC 1.1)
Network Speed
1000M
Video Encode
H.264/H.265 (default: H.264)
Bit Rate Control
Variable Bit Rate, Constant Bit Rate
Video Bit Rate
1024kbps(min)~20480 kbps(max)
IP Protocol
IP, HTTP, RTSP, RTMP, DCHP, 0NVIF, VISCA over IP (UDP)
P0E
Supported (IEEE802.3af)
Line in
Supporting ACC audio coding
Daisy Chain
Support RS-232 serial daisy chain
Minimum Lux
0.01 Lux
White Balance
Auto/Indoor/0utdoor/Manual/ATW/0ne Push/Fluorescent Lamp/Sodium Lamp
Exposure
Auto/Manual/Bright/Shutter/Iris
Focus
Auto/Manual
Iris
Auto/Manual
Gamma
Supported
WDR
Supported
BLC
Supported
2D Noise Reduction
Supported
3D Noise Reduction
Supported
Anti Flicker
0FF/50Hz/60Hz
Image Flip
Supported
Image Voltage
DC
12V / PoE (24W)
Dimension
220mm x 173mm x 190mm/8.66" x 6.81" x 7.48"
Net Weight
1.4kg/3.1lbs
Page 7
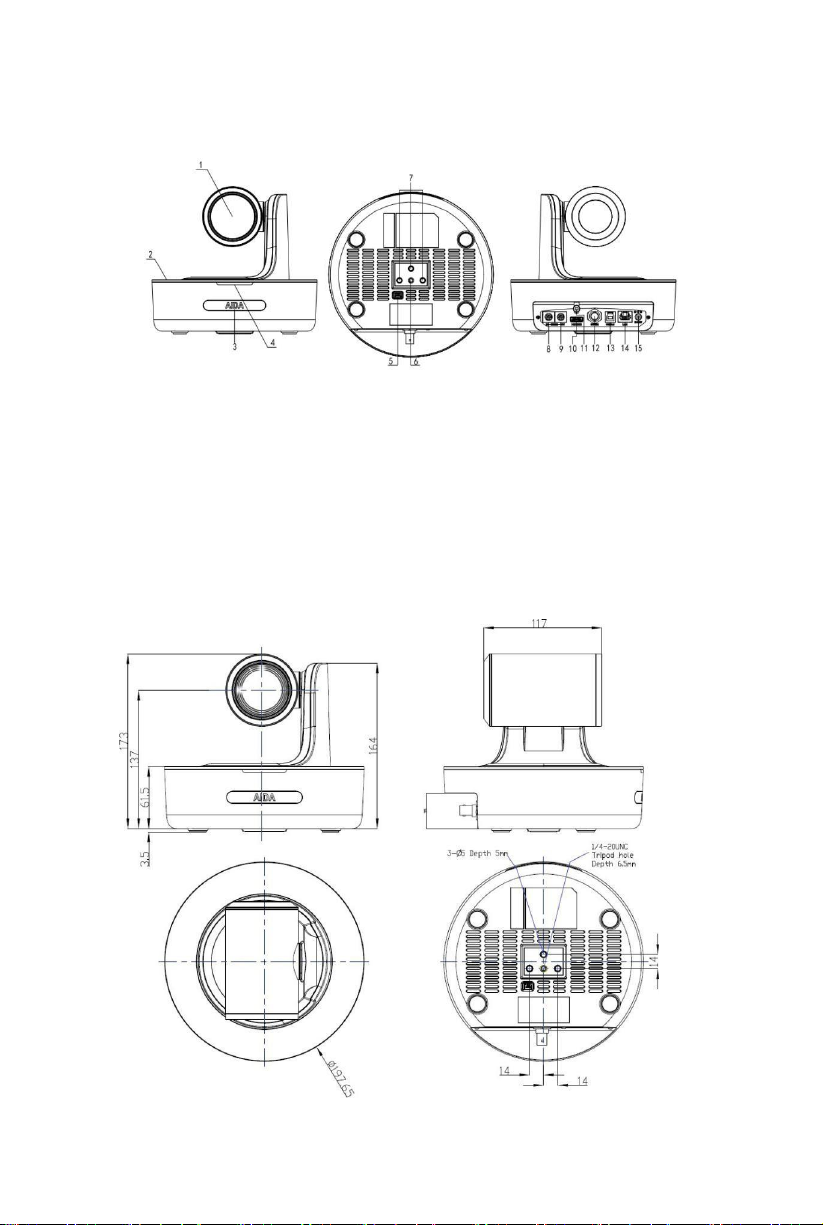
Camera Interface
5
1.
Camera Lens
2.
Camera Base
3.
IR Receiver Panel
4.
Power/Tally Light
5.
DialSwitch(Firmware)
6.
1/4"TripodScrewHole
7.
Installation Hole
8.
RS-232Control Port(Input)
9.
RS-232 Control Port(0utput)
10.
HDMI Port
Camera Dimensions (in mm)
11. Line in Port
12.
3G-SDI Port
13.
USB Port
14.
RJ-45 Port
15.
DC12V Plug
Page 8
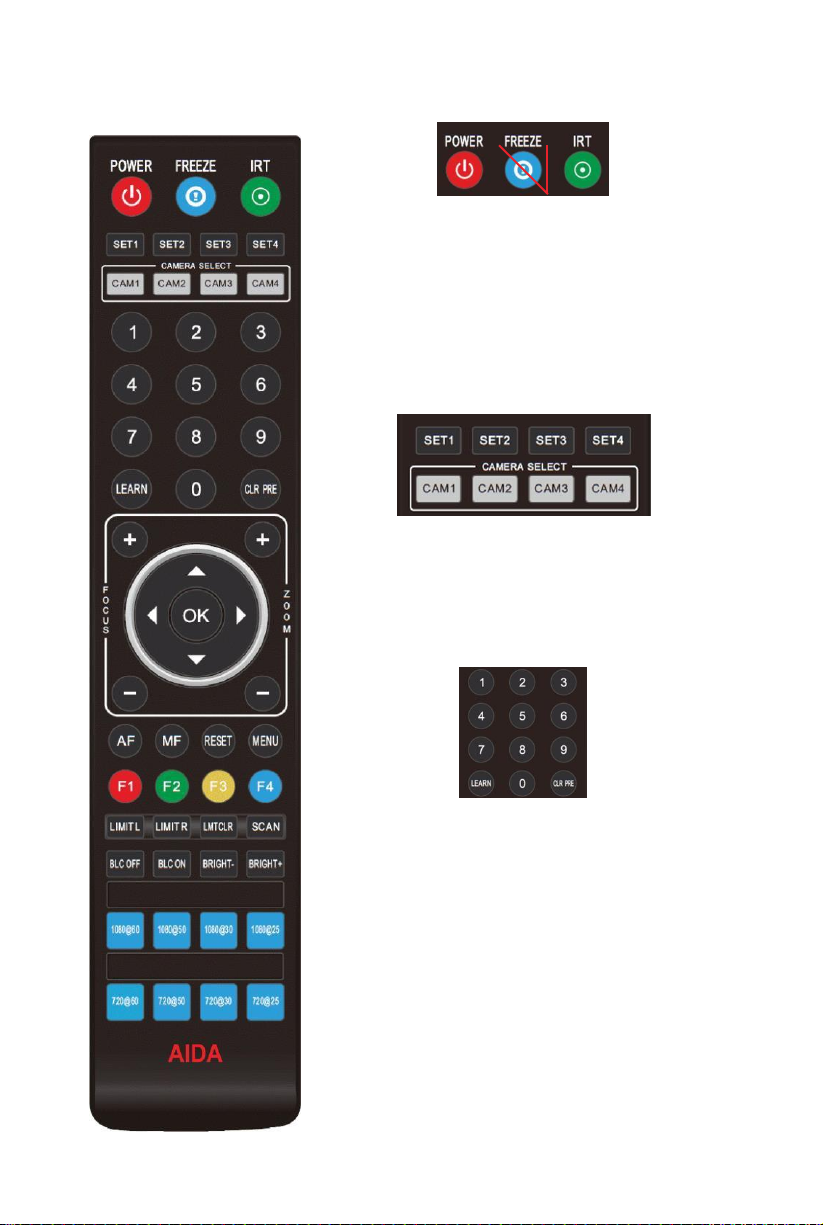
IR Remote Controller
6
Power
When powered on,pressing the power key enters standby
mode;
Pressing it again will start up the camera and display
normally.
Freeze (No Function)
The Freeze button has no function on the PTZ.
IRT (IR Transfer/IR Pass)
Enables IR transfer. 0nce pressed, the camera will receive and
pass IR
remote control signal (via VISCA IN Port).
SET 1~4 Address Setting
Hold the SET# button for 3 seconds to set the cameras IR address.
CAM 1~4 (Camera selecting)
Pressing the CAM# button will enable IR control of the selected
camera.
Number Key
Set Preset: To set preset, hold down a key (0-9) and wait 3 seconds.
0ncecomplete, the selected preset will be saved.
Run Preset: Pressing a key (0-9)will bring up the corresponding
saved preset.
(1-9)
CLR PRE (Clear Preset)
Clear a Preset :Press CLRPRE and key (0-9)simultaneously to
remove the corresponding saved preset.
Clear all Presets: Hold down CLRPRE button to remove all
saved
presets.
Learn
This button is used with other remote buttons. It has no function
when pressed alone.
Page 9
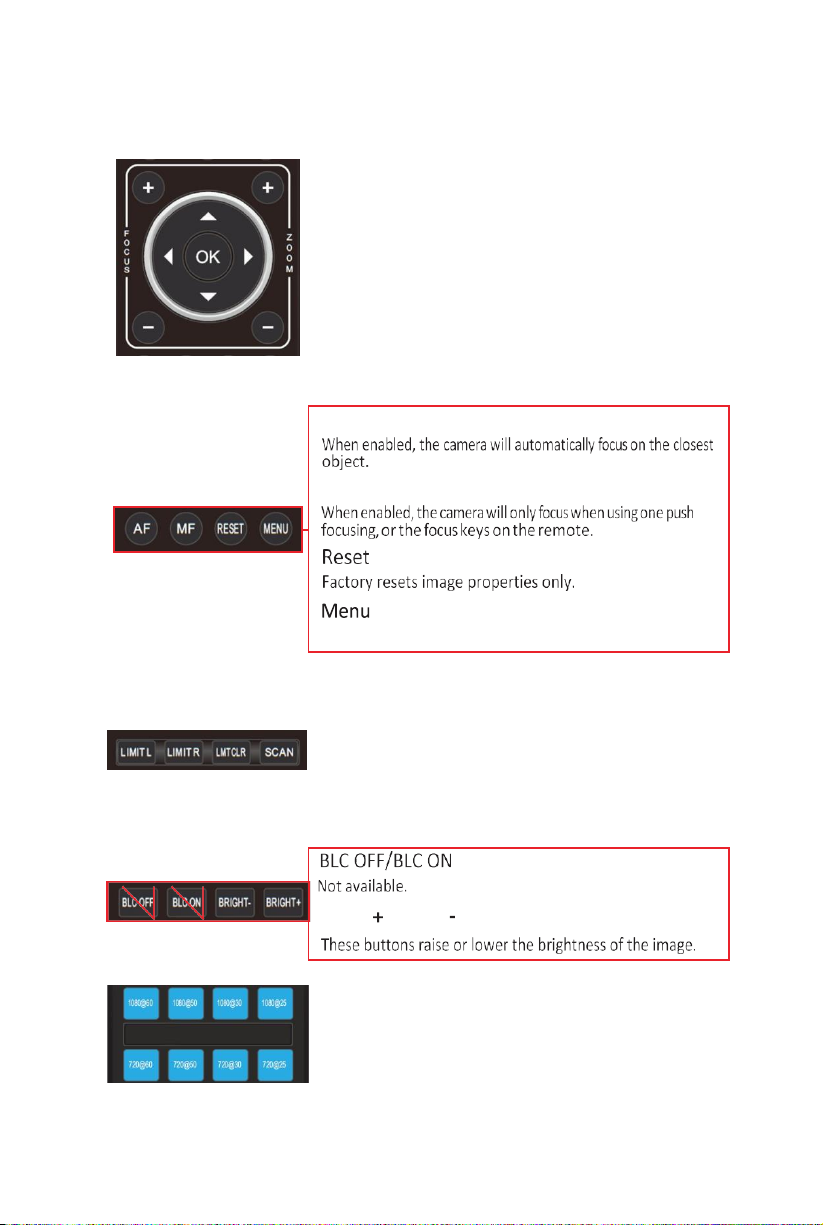
IR Remote Controller (CONTD)
7
AF (Auto Focus)
MF (Manual Focus)
Limit L
Press this key with the Learn key to set the max left position of the
camera.
Limit R
Press this key with the Learn key to set the max right position of
the camera.
LMT CLR
Press this key with the Learn key to remove set max positions.
Bright /Bright
Focus Key
Allows for precise focus change. Manual focus mode must be
enabled to use these keys.
Zoom Key
0ptically zooms the camera in up to 12x.
(+/-)
(+/-)
Navigate Key (Up/Down/Left/Right)
Normal mode: Allows for the camera head to pan and
tilt.
Menu mode: Allows for direction in the menu of the
camera.
OK/Home Key
Normal mode: Recalls to the home position of the camera.
Menu mode: Used to set functions in the menu and activate features.
Used to enter the OSD menu of the camera
Video Format Keys:
While directly pointing at the camera, please hold the desired
output button for 3 seconds. If done properly, the PTZ will do a
to the desired video output selected.
video
quick reset
Page 10
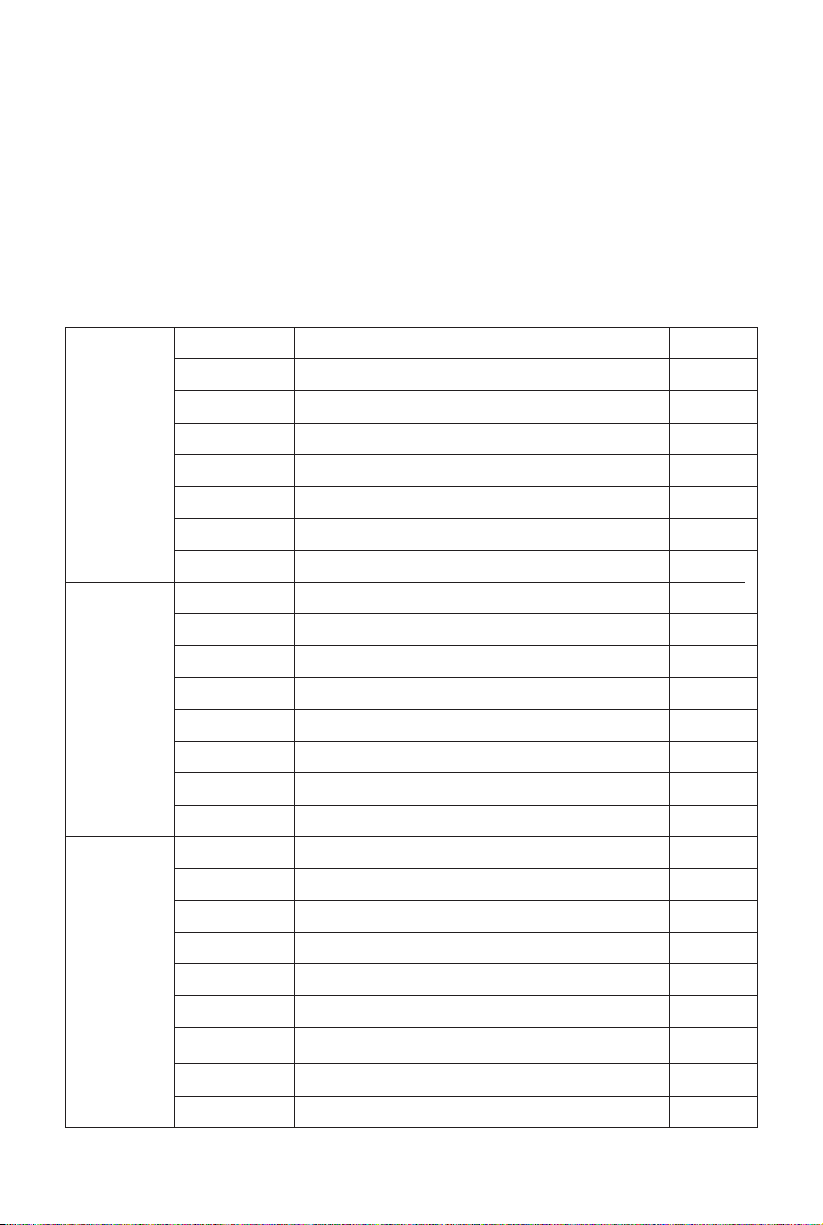
OSD MENU
8
W
PTZF
FOCUS MODE
AUTO/MANUAL: Ability to change from auto or manual focus
DEFAULT: AUTO
DIGITAL ZOOM
ON/OFF: Ability to digitally zoom 2X. (PTZ-X12-IP | PTZ-NDI-X12 only)
DEFAULT: OFF
RATIO DISPLAY
ON/OFF: Grants display of the zoom X module. Off by default.
DEFAULT: OFF
ZOOM SPEED
Zoom speed control IR remote: 7 changeable levels.
DEFAULT: 5
SPEED BY ZOOM
When zoomed into the max, the camera will slowly tilt
DEFAULT: ON
PAN/TILT SPEED
Pan/Tilt speed control by IR remote. Controllable at different levels
DEFAULT: 18
RETURN
Return to previous menu.
EXPOSURE MODE
AUTO/MANUAL/BRIGHT/SHUTTER/IRIS: Choose the current Exp. Mode
EXPOSURE
SHUTTER
Set shutter speed. 1/30-1/10000: Allows for tuning of the shutter speed
IRIS
Set Iris: CLOSE-F1.8: Allows for tuning of the Iris opening.
DEFAULT: AUTO
GAIN
Set gain: 0dB-28dB: Allows for tuning the gain of the camera
DEFAULT: AUTO
BRIGHTNESS
Set brightness: 0-15: Allows for tuning the brightness of the camera
DEFAULT: AUTO
FLICK
Allows for adjustment of the flickerless options on the camera
DEFAULT: 50Hz
BLACKLIGHT
Allows for the enabling of the blacklight or not.
GAMMA
Allows setting changes for the Gamma option of the camera
DEFAULT: 0
RETURN
Return to previous menu
IMAGE
WB MODE
AUTO/INDOOR/OUTDOOR/PUSH/ATW/MANUAL/SODIUM
DEFAULT: ATW
BLUE
Set red gain level: 0-255 (Allows for precise tuning of the blue setting)
DEFAULT: AUTO
RED
Set blue gain level: 0-255 (Allows for precise tuning of the red setting)
DEFAULT: AUTO
DEFOG
Set defog level: This setting allows you to clear up the hazy images
DEFAULT: 0
MIRROR
ON/OFF: Makes the image flip on the vertical plane
DEFAULT: OFF
FLIP
ON/OFF: (optional) Makes the image flip on the horizontal plane
DEFAULT: OFF
COLOR/B&W
COLOR/B&W: Allows for B&W color mode
DEFAULT:
COLOR
GAIN LIMIT
Allows you to cap the gain at a certain level
DEFAULT: 15
RETURN
Return to previous menu
hen the camera is on, press
1.
2.After entering
menu. As you scroll through the menu,the selection will be highlighted in blue.
3. Press
select within the sub menu. Use the LEFT/RIGHT navigate keys to enable or disable
parameters.
4.
To return to the previous menu, you need to press return in the sub menu or MENU on the remote.
To
fully leave the menu, press the MENU key again.
5.
OSD Menu S
the main menu, use the UP/
the RIGHT
navigate key to enter the highlighted sub menu. Use
etting List:
the MENU key on the IR remote controller to enter the OSD Menu
Down
navigate keys on the controller to select
the mai
the UP/DOWN navigate keys to
.
n
DEFAULT: AUTO
DEFAULT: AUTO
DEFAULT: OFF
Page 11

OSD MENU (CONTD)
9
QUALITY
2DNR
When enabled, image noise and sharpness is reduced
DEFAULT: OFF
3DNR
OFF/AUTO/0-4 optional: higher level = less image reduction happens
DEFAULT: AUTO
SHARPNESS
ON/OFF optional, 0-15 level: higher level = sharper edges of image
DEFAULT: 6
CONTRAST
Set contrast level: 0-15: Sets the contrast level
DEFAULT: 8
SATURATION
Set image saturation: 0-15: Sets the saturation level
DEFAULT: 8
BRIGHTNESS
Set brightness of auto exposure: 0-15: Sets the brightness level
DEFAULT: 8
WDR
ON/OFF: Enables better to light and dark images
DEFAULT: OFF
WDR LEVEL
1-6: Enables more control of WDR
DEFAULT: 1
RETURN
Return to previous menu
FORMAT
SIZE
1080p/1080i/720p (default resolution: 1080 30p)
After selecting
format, press
OK to switch
format.
FRAME RATE
60/59.94/50/30/29.97/25/24/23.98
RETURN
Return to previous menu
SYSTEM
ID
Set VISCA control address 1-7
DEFAULT: 1
BAUDRATE
Set RS-232 baud rate to 2400/4800/9600/115200
DEFAULT: 9600
LANGUAGE/IDIOMA
Set language: ENGLISH/SPANISH
DEFAULT: ENG
DHCP
IP address automatic acquisition switch: ON/OFF
DEFAULT: OFF
IP
Set camera IP
192.168.1.188
NET MASK
Set camera net mask
255.255.255.0
GATEWAY
Set camera gateway
192.168.1.1
RETURN
Return to previous menu
INFO
IP ADDRESS
Display the current IP address
RTSP URL
Display the current main stream RTSP URL
F/W VERSION
Display the current ISP firmware version
ARM VERSION
Display the current ARM firmware version
FPGA VERSION
Display the current FPGA firmware version
USB VERSION
Display the current USB firmware version
RESET
FACTORY RESET
Reset whole camera to factory parameters
USER SETTING
Save current parameters for User Reset use
USER RESET
Recalls the saved user settings
RETURN
Return to previous menu
Page 12
10
Web Settings
The cameras web interface supports Google Chrome, Firefox, IE, Safari, 0pera, and other major browsers.
1.
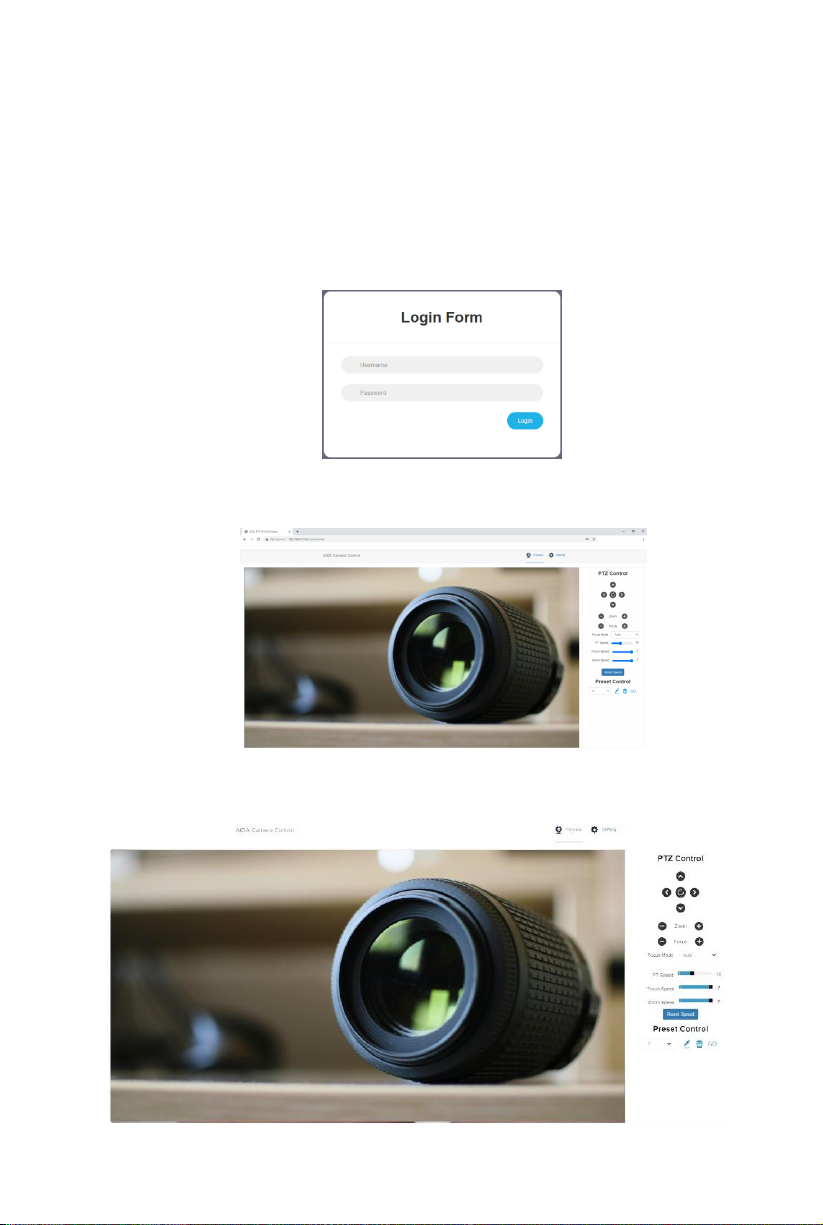
Login
0pen your browser and in the address bar, type in the camera's default IP address: 192.168.1.188
(If that doesn't work please check in the camera's menu to see the actual IP address under INF0)
Next, enter the username and password. The default for both is admin.
2.
Real-time Preview
When logging in, you will see the realtime preview of the camera.
As seen, the control interface is on the right. You can control the camera's movements with
the
movement pad at the top, as well as control zoom and focus. You can also set the movement,
focus, and
zoom speed, as well being able to control your presets.
Page 13
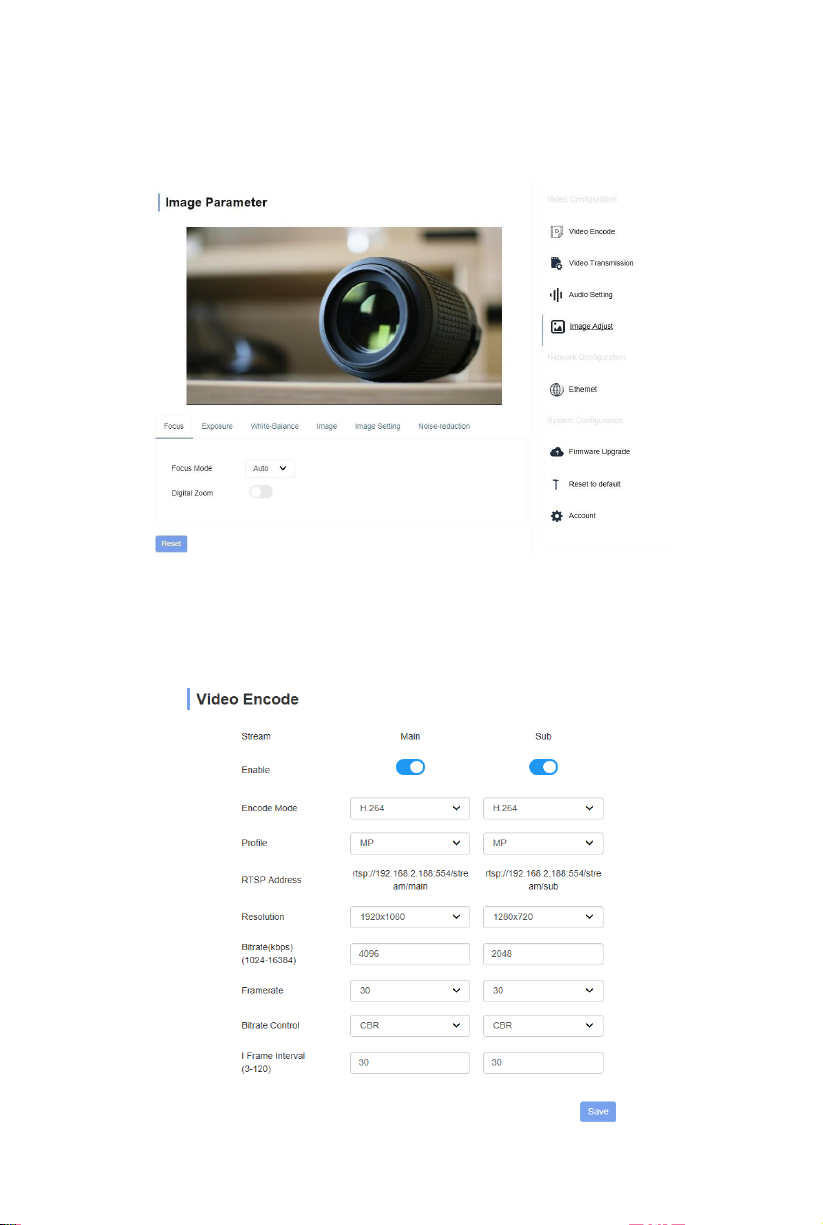
Web Settings (CONTD)
11
3.
Parameter Settings
Click "Setting" to enter the parameter setting interface as seen below:
Under “Video Encode", you can enable the RTSP/RTMP streams for both the main and sub
streams. You may also change the Encode mode, choosing betweenH.264orH.265.Lastly, you
can
change the framerate and bitrate for each stream on this menu.
Page 14
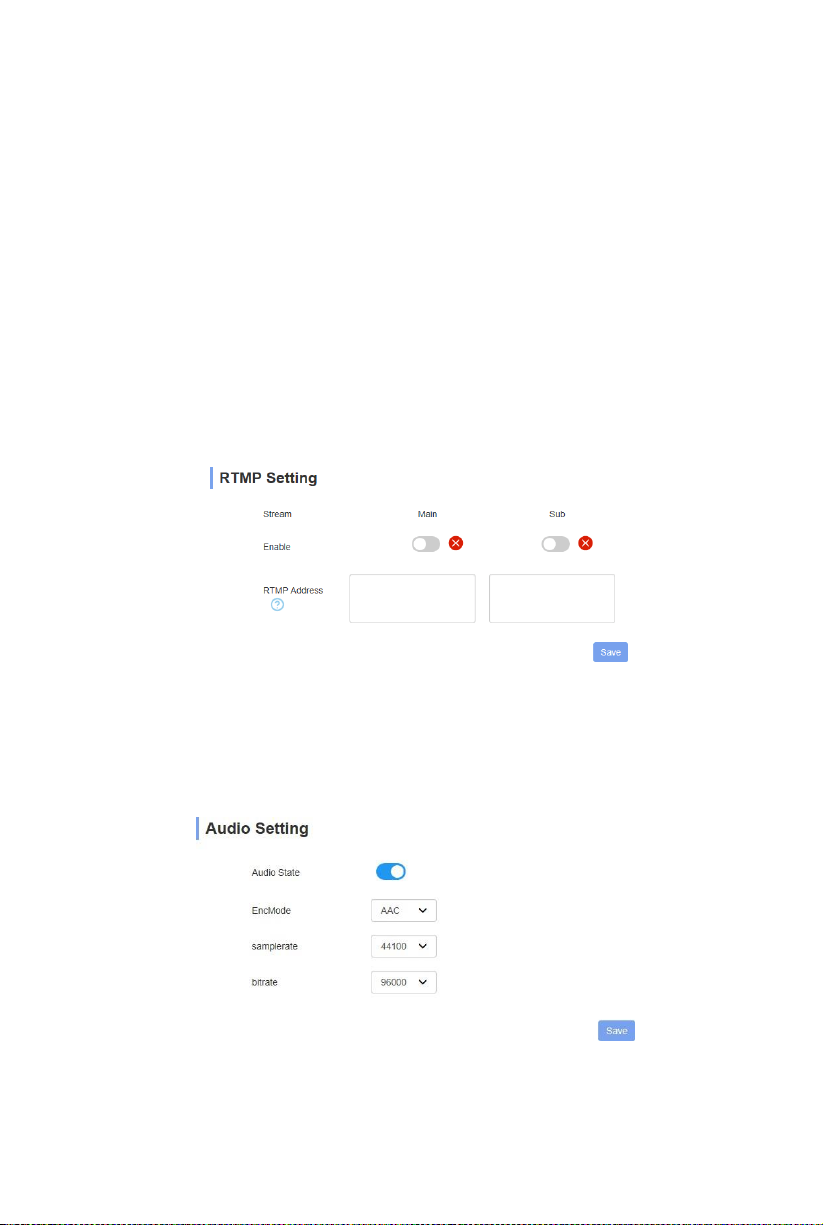
Web Settings (CONTD)
12
"
RTMP Setting
Here you can place the RTMP address, as well as enable the RTMP stream. To do this, you must:
0nce you complete these steps, your PTZ will immediately start uploading to your social
platforms
RTMP address is
Custom RTMP stream keys also allows you to make your own RTMP address and pull that stream from
other programs. If you are stuck on any of these steps, contact our support. They will be glad to assist
you
For NDI versions, you will also see t he NDI on and off button here.
" allows you to directly stream to many social platforms such as Youtube & Facebook Live.
1st: First obtain the live RTMP address (for youtube, it is rtmp://a.rtmp.youtube.com/live2). You
will also need your stream key.
2nd: Place the live RTMP address in the Main RTMP address box.
3rd: Next, ensure that there is a forward slash (/)after the RTMP address. If there is
already a forward slash, please skip this step.
4th: Lastly, paste your stream key after the forward slash (/).
5th: Click Save.
channel. You will see a blue checkmark next to the RTMP state, which will show if your
in any problems you may encounter.
correctly inputted. No reboot required!
In the "audio settings" tab, audio can be turned off or on.
mode, samplerate, and bitrate.
You are also able to adjust the encode
Page 15
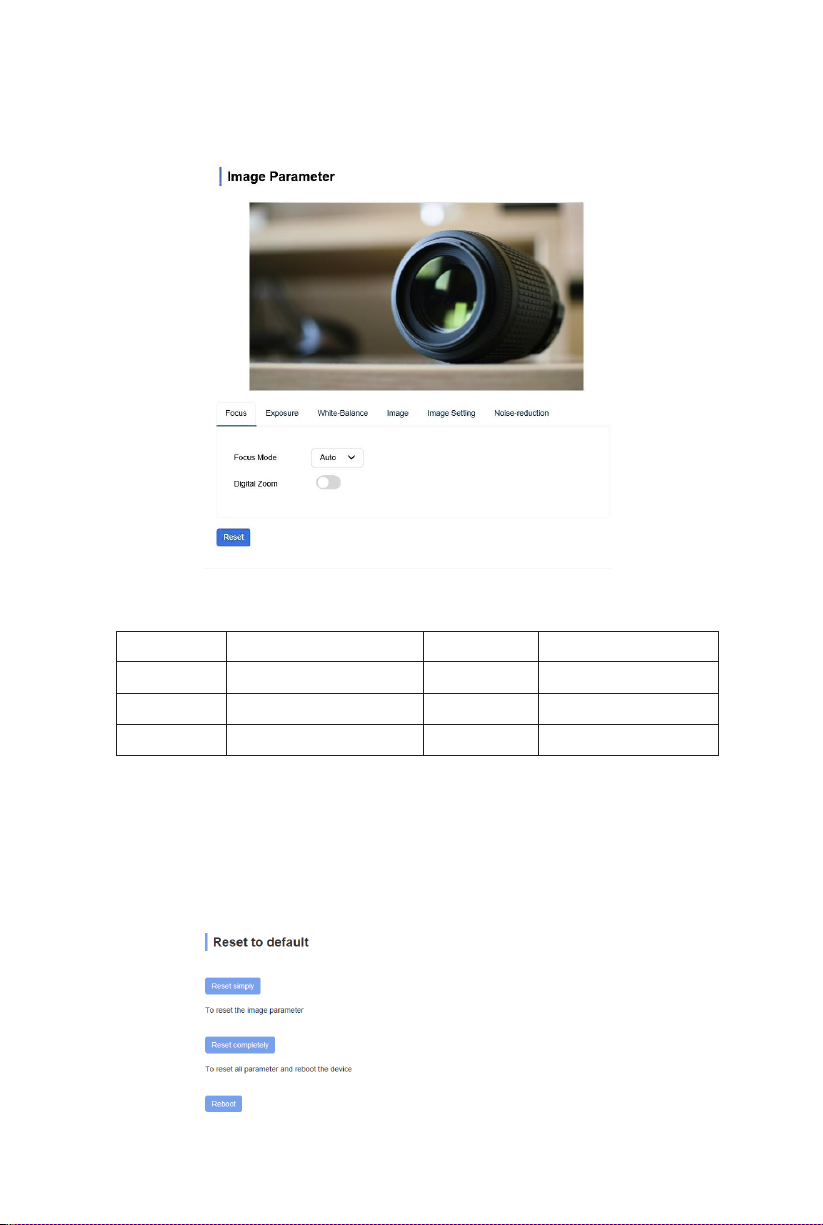
Web Settings (CONTD)
14
"Image Parameter" is
DHCP
OFF
DNS
192.168.1.1
IP Address
192.168.1.188
HTTP Port
80
Netmask
255.255.255.0
RTSP Port
554
Gateway
192.168.1.1
"
Ethernet
" allows for fine tuning if the IP portion of the camera. You can enable DHCP for auto IP
configuration.
the online version
of the OSD Menu. You can change
the same settings via browser.
To upgrade the firmware on our PTZ, head over to our website at aidaimaging.com/download and look for
the
latest PTZ firmware.
The "
Reset to default
" portion allows you to factory reset image parameter reset, or reboot the camera.
Simple Reset: 0nlyresets customizable camera options: AE, WB, Image Effects, etc.
Complete Reset: Factory resets the camera, including the IP address
Reboot: Reboot ISP portion of the camera.
Page 16

Web Settings (CONTD)
14
"
Account Settings
password here.
" is used to change the log in for the account. You can change the username and
Page 17
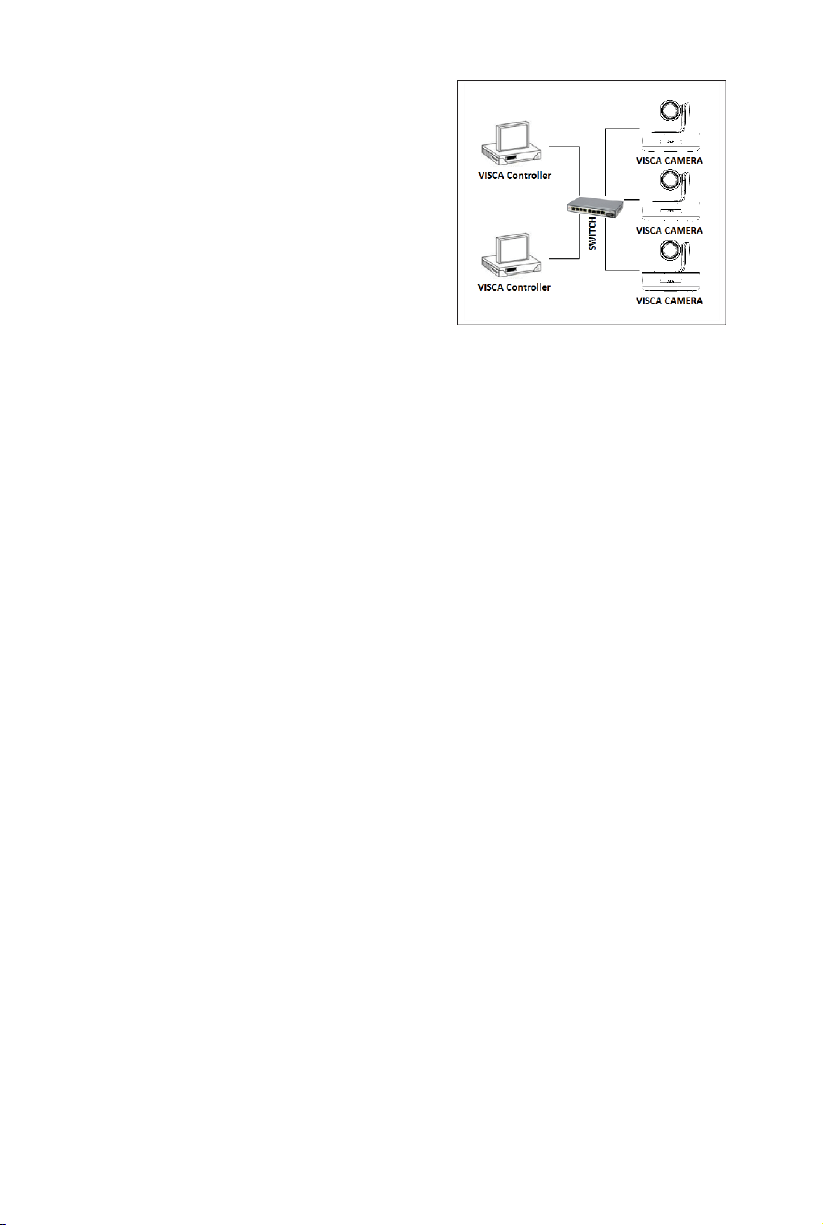
VISCA over IP
15
The AIDA PTZ's use VISCA over IP protocol to reliably send
and receive information from IP controllers.
Communication port specs:
•
Control port: RJ-45 Gigabit LAN
•
IP Protocol:IPv4
•
Transmit Protocol: UDP
• IP address:
•
Port address:52381
•
Confirm send/transmission control: Depends on software
Default 192.168.1.188 (Check OSD Menu)
What is VISCA over IP?
VISCA commands are the communication between the controller and the camera. These commands
are sent via UDP on the network. Since UDP transmission isn't that stable, a couple of steps must
happen before a movement is executed. The controller first sends out a VISCA command. The camera
equipment then receives the VISCA command and returns that message back to the controller. 0ncethe
commands are executed, the action will follow suit and the message will be complete. Each VISCA
command controls its own setting, so there are no overlaps in existing commands.
Page 18
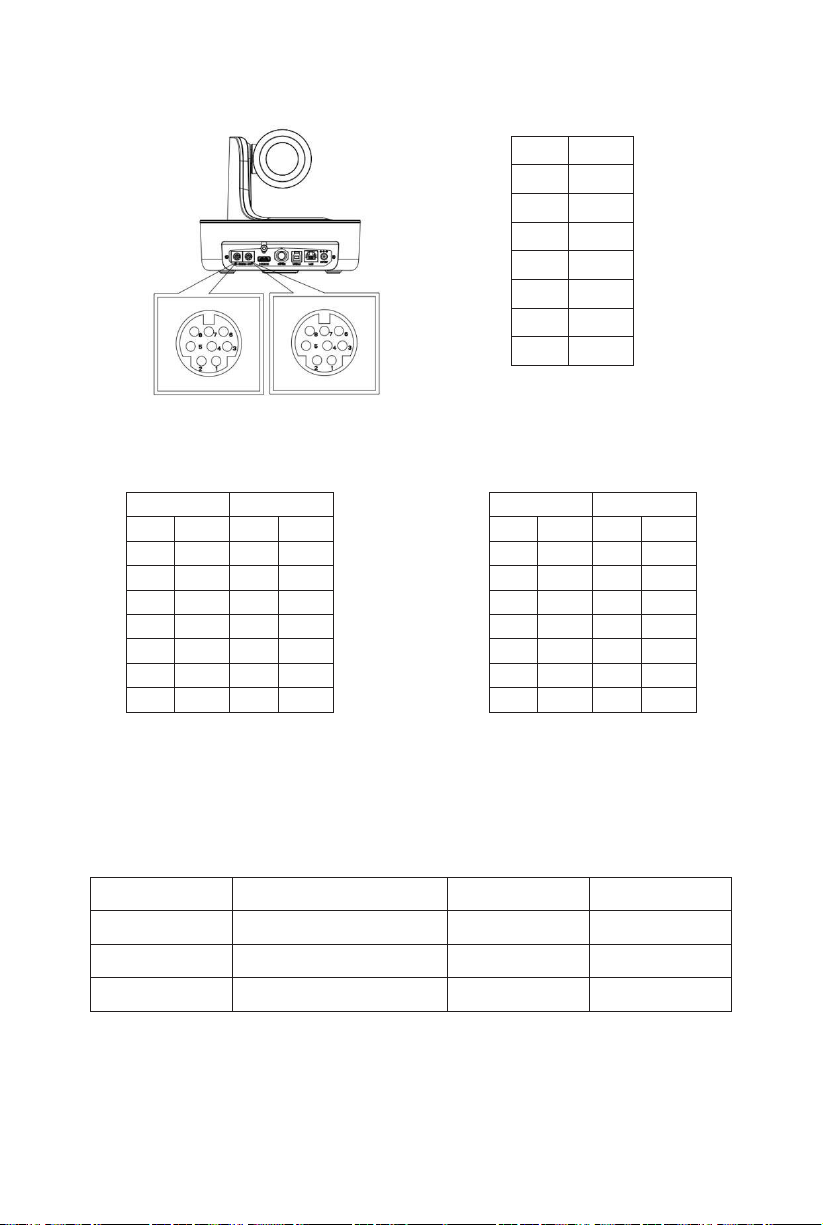
VISCA IN (RS-232 Port)
16
VISCA IN & Mini DIN Connection
Camera VISCA IN
Mini DIN
1 DTR 1
DSR
2
DSR
2
DTR 3
TXD 5
RXD
4
GND
4
GND
5 RXD 3
TXD 6
A(+) 6
NC
7 IR OUT 7
NC
8 B(-) 8
NC
Camera VISCA IN
Windows DB9
1 DTR 6
DSR
2
DSR
4
DTR 3
TXD 2
RXD
4
GND
5
GND
5 RXD 3
TXD 6
A(+)
7 IR OUT
8 B(-)
Parameter Value
Parameter
Value
Baud Rate
2400/4800/9600/115200
Stop Bit
1 Bit
Start Bit 1 Bit
Check Bit
None
Date Bit 8 Bit
1
DTR
2
DSR
3
TXD
4
GND
5
RXD
6
A
7
IR OUT
8
B
Serial Port Configuration
VISCA IN & DB9 Connection
Page 19
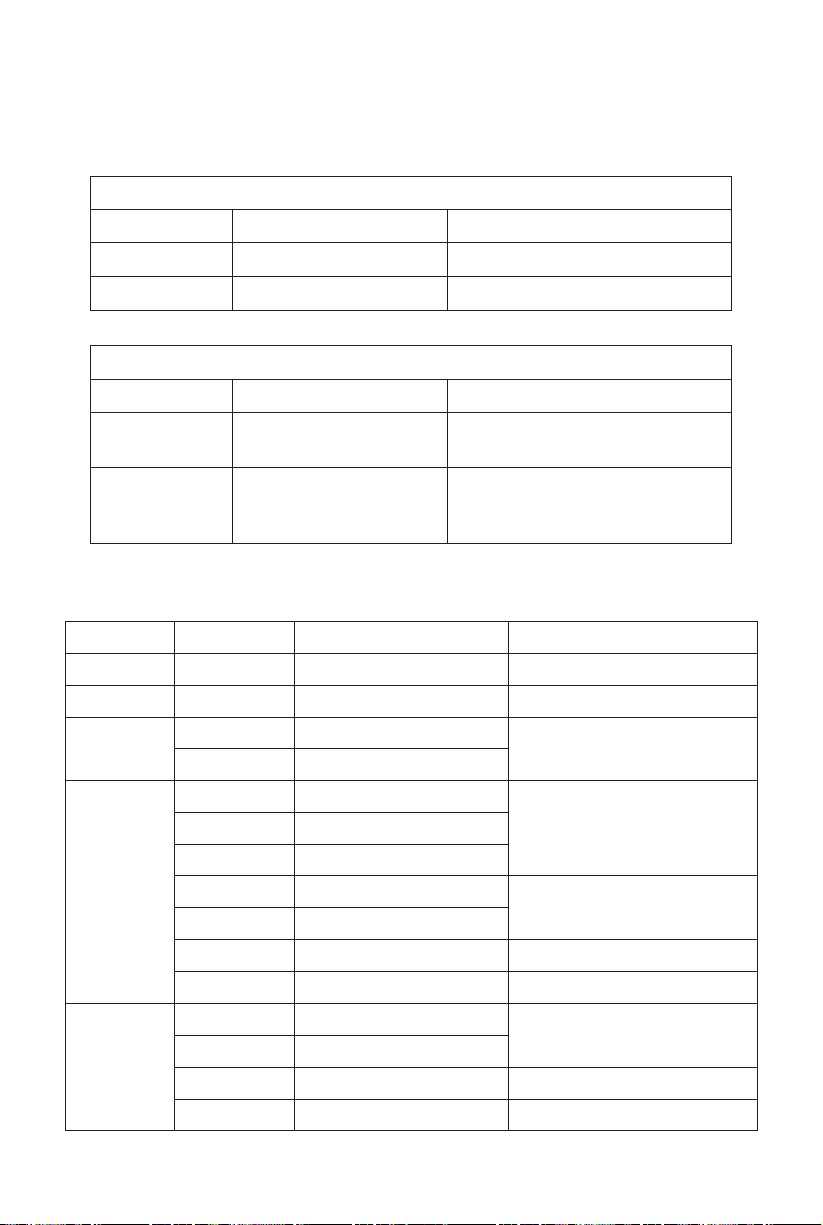
VISCA Protocol
17
Part 1: Camera Return Command
ACK/Completion Message
Command Packet
Note
ACK
z0 41 FF
Returned when the command is accepted
Completion
z0 51 FF
Returned when the command has been executed
Error Messages
Command Packet
Note
Syntax Error
z0 60 02 FF
Returned when the command format is different orwhen
a command with illegal command parameters is accepted
Command Not Executable
z0 61 41 FF
Returned when the command cannot be executed due to
current conditions. For example, when commands
controlling the focus manually are received during auto
focus.
AddressSet
Broadcast
88 30 01 FF
Address setting
IF_Clear
Broadcast
88 01 00 01 FF
I/F Clear
CommandCancel
8x 21 FF
CAM_Power
On
8x 01 04 00 02 FF
Power ON/OFF
Off
8x 01 04 00 03 FF
CAM_Zoom
Stop
8x 01 04 07 00 FF
Tele(Standard)
8x 01 04 07 02 FF
Wide(Standard)
8x 01 04 07 03 FF
Tele(Variable)
8x 01 04 07 2p FF
p=0(low)~7(high)
Wide(Variable)
8x 01 04 07 3p FF
Direct
8x 01 04 47 0p 0q 0r 0s FF
pqrs: Zoom Position (0 (wide)~0x4000(tele))
Direct with speed
8x 0A 04 47 0t 0p 0q 0r 0s FF
t: spd 0~7
pqrs: Zoom Position (0(wide)`0x4000(tele))
CAM_DZoom
ON
8x 01 04 06 02 FF
OFF
8x 01 04 06 03 FF
Combine Mode
81 01 04 36 00 FF
Combine with optical zoom control
Separate Mode
81 01 04 36 01 FF
Separate with optical zoom control
z= camera address +8
Part 2: Camera Control Command
Page 20
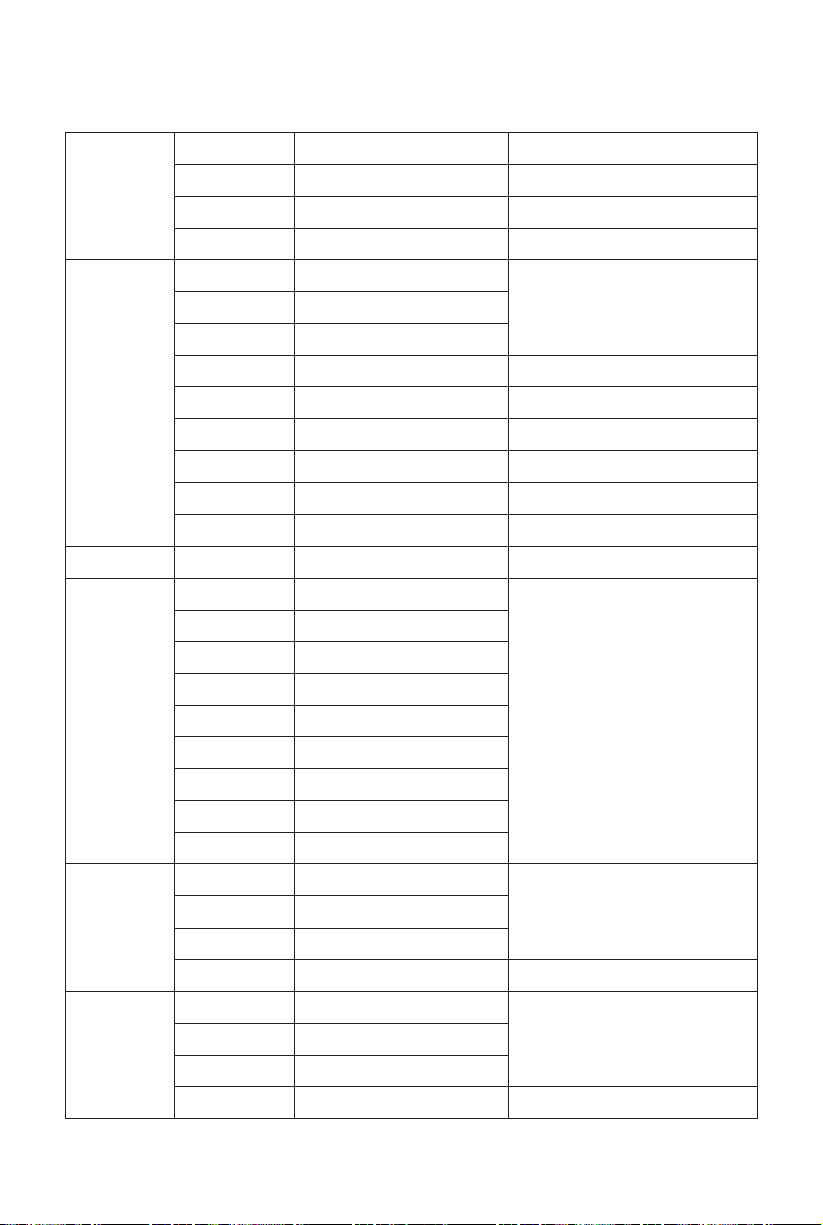
VISCA Protocol (CONTD)
18
CAM_DZoom
Stop
81 01 04 06 00 FF
Enable in separate mode
Tele(Variable)
81 01 04 06 2p FF
Enable in separate mode
Wide(Variable)
81 01 04 06 3p FF
Enable in separate mode
Direct
81 01 04 46 0p 0q 0r 0s FF
Enable in separate mode
CAM_Focus
Stop
8x 01 04 08 00 FF
Far(Standard)
8x 01 04 08 02 FF
Near(Standard)
8x 01 04 08 03 FF
Far(Variable)
81 01 04 08 2p FF
p=0 (Low) to 7 (High)
Near (Variable)
81 01 04 08 3p FF
p=0 (Low) to 7 (High)
Direct
8x 01 04 48 0p 0q 0r 0s FF
pqrs: Focus Position
Auto Focus
81 01 04 38 02 FF
Manual Focus
81 01 04 38 03 FF
One Push AF
8x 01 04 18 01 FF
CAM_ZoomFocus
Direct
8x 01 04 47 0p 0q 0r 0s 0t 0u 0v 0w FF
pqrs: Zoom Position (0(wide)~0x4000(tele)) tuvw:
Focus Position
CAM_WB
Auto
8x 01 04 35 00 FF
Indoor
8x 01 04 35 01 FF
Outdoor
8x 01 04 35 02 FF
One Push
8x 01 04 35 03 FF
ATW
8x 01 04 35 04 FF
Manual
8x 01 04 35 05FF
Sodium lamp
8x 01 04 35 08 FF
Flourescent
8x 01 04 35 09 FF
One Push Trigger
8x 01 04 10 05 FF
CAM_RGain
Reset
8x 01 04 03 00 FF
Manual Control of RGain
Up
8x 01 04 03 02 FF
Down
8x 01 04 03 03 FF
Direct
8x 01 04 43 00 00 0p 0q FF
pq: RGain (0~0xFF)
CAM_BGain
Reset
8x 01 04 04 00 FF
Manual Control of BGain
Up
8x 01 04 04 02 FF
Down
8x 01 04 04 03 FF
Direct
8x 01 04 44 00 00 0p 0q FF
pq: BGain (0-0xFF)
Page 21

VISCA Protocol (CONTD)
19
CAM_AE
Full Auto
81 01 04 39 00 FF
Automatic Exposure mode
Manual
81 01 04 39 03 FF
Manual Control mode
Shutter Priority
81 01 04 39 0A FF
Shutter Priority
Automatic Exposure mode
Iris Priority
81 01 04 39 0B FF
Iris Priority Automatic
Exposure mode
Bright
81 01 04 39 0D FF
Bright Mode (Manual control)
CAM_Shutter
Reset
8x 01 04 0A 00 FF
Shutter Setting
Up
8x 01 04 0A 02 FF
Down
8x 01 04 0A 03 FF
Direct
8x 01 04 4A 00 00 0p 0q FF
pq: Shutter Position (0~0x15)
CAM_Iris
Reset
8x 01 04 0B 00 FF
Iris Setting (0~0x0D)
Up
8x 01 04 0B 02 FF
Down
8x 01 04 0B 03 FF
Direct
8x 01 04 4B 00 00 0p 0q FF
pq: Iris Position (0~0x0D)
CAM_Gain
Reset
8x 01 04 0C 00 FF
Gain Setting (0~0x0E)
Up
8x 01 04 0C 02 FF
Down
8x 01 04 0C 03 FF
Direct
8x 01 04 0C 00 00 0p 0q FF
pq: Gain Position (0~0x0E)
CAM_Bright
Reset
8x 01 04 0D 00 FF
Bright Setting
Up
8x 01 04 0D 02 FF
Down
8x 01 04 0D 03 FF
Direct
8x 01 04 4D 00 00 0p 0q FF
pq: Bright Position (0~0x1B)
CAM_ImageBright
Direct
8x 01 04 A4 00 00 0p 0q FF
pq: Image Bright Position (0~0x0F)
AE_AUTO/AE_SHUTTER/AE_IRIS
CAM_WDR
On
8x 01 04 3D 02 FF
Exposure Compensation ON/OFF
Off
8x 01 04 3D 03 FF
Direct
8x 01 04 D3 pq FF
pq: ExpComp Position (0~0x6)
CAM_Backlight
(BLC)
On
8x 01 04 33 02 FF
Blacklight On
Off
8x 01 04 33 03 FF
Blacklight Off
CAM_Sharpness
Reset
8x 01 04 02 00 FF
Aperture Control
Up
8x 01 04 02 02 FF
Down
8x 01 04 02 03 FF
Direct
8x 01 04 42 00 00 0p 0q FF
pq: Aperture Gain (0~0x0F)
Page 22
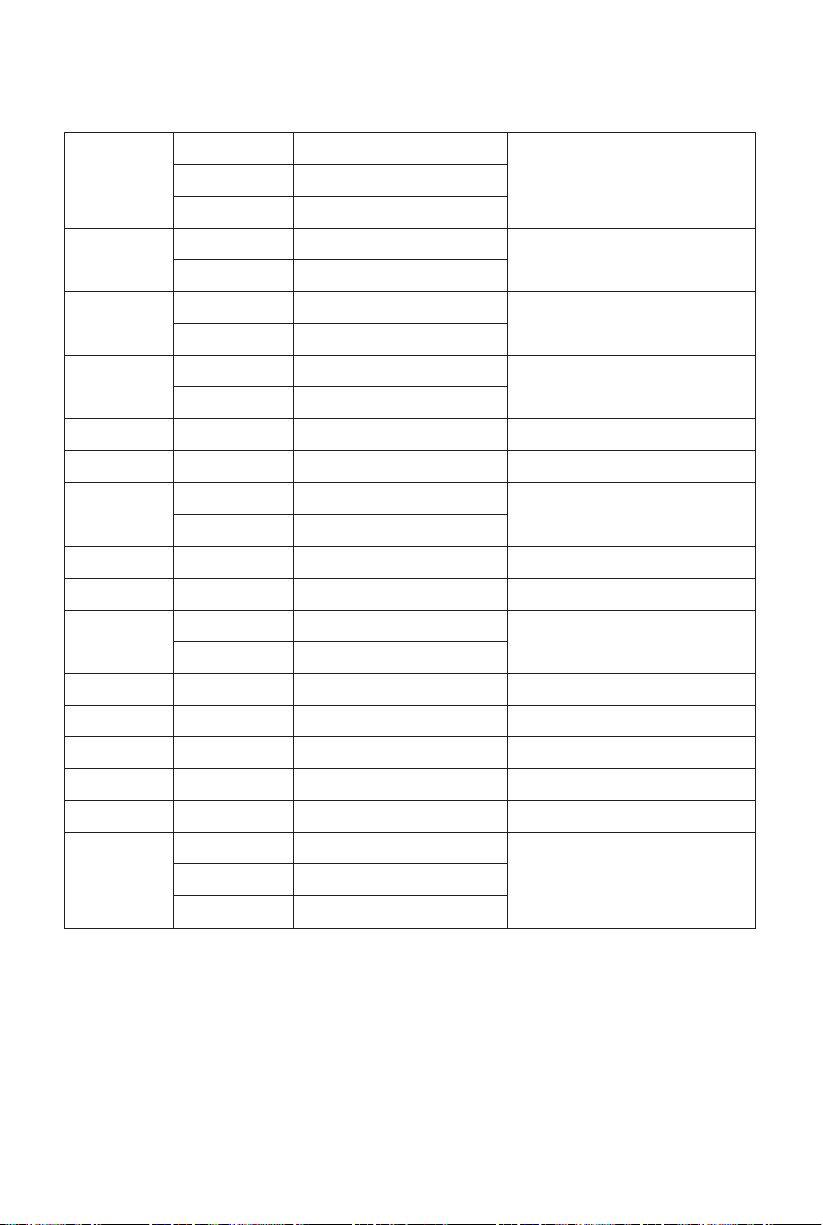
VISCA Protocol (CONTD)
20
CAM_Memory
(preset)
Reset
8x 01 04 3F 00 0p FF
p: Preset Number (=0 to 128)
Corresponds to 0-9 on the remote controller
Set
8x 01 04 3F 01 0p FF
Recall
8x 01 04 3F 02 0p FF
CAM_LR_Reverse
On
8x 01 04 61 02 FF
Image Flip Horizontal On/Off
Off
8x 01 04 61 03 FF
CAM_PictureFlip
On
8x 01 04 66 02 FF
Image Flip Horizontal On/Off
Off 8x 01 04 66 03 FF
CAM_RS485Ctl
On
8x 01 06 A5 02 FF
Off
8x 01 06 A5 03 FF
CAM_Saturation
Saturation
8x 01 04 A1 00 00 0p 0q FF
pq: Saturation Level 0x00~0xff
CAM_Contrast
Contrast
8x 01 04 A2 00 00 0p 0q FF
pq: Contrast Level 0x00~0xff
CAM_SpeedByZoom
On
8x 01 06 A0 02 FF
Off
8x 01 06 A0 03 FF
CAM_PTSpeed
PT Speed
8x 01 04 C1 00 00 0p 0q FF
pq: PT Speed 0x05~0x18
CAM_ZoomSpeed
Zoom Speed
8x 01 04 D1 00 00 0p 0q FF
pq: Zoom Speed 0x01~0x07
CAM_ZoomDisplay
On
8x 01 06 C2 02 FF
Off 8x 01 06 C2 03 FF
CAM_IRaddress
IR address
8x 01 06 D8 0p FF
p: IR address1~4
CAM_Gamma
Gamma set
81 01 04 5B 0p FF
p: Gamma No. (0~4)
CAM_ColorGain
Direct 8x 01 04 49 00 00 00 0p FF
(0~0x0E)
CAM_2DNR
Direct 8x 01 04 A5 0p FF
(0~0x1)
CAM_3DNR
Direct
8x 01 04 53 0p FF
(0~0x05)
FLICK
50Hz
81 01 04 23 01 FF
60Hz 81 01 04 23 02 FF
OFF 81 01 04 23 00 FF
Page 23

VISCA Protocol (CONTD)
21
VideoSystem Set
(AIDA)
8x 01 06 35 00 pp FF
pp: Video Format:
1080P60 0x00
1080P50 0x01
1080I60 0x02
1080I50 0x03
1080P30 0x 04
1080P25 0x05
720P60 0x 06
720P50 0x07
720P30 0x08
720P25 0x09
1080P5994 0x0E
1080I5994 0x0F
1080P2997 0x10
720P5994 0x13
720P2997 0x14
1080P24 0x11
1080P2398 0x12
VideoSystem Set
(Sony)
81 01 04 24 72 0p 0q FF
pp: Video Format:
1080P60 0x2e
1080P50 0x2f
1080I60 0x01
1080I50 0x04
1080P30 0x06
1080P25 0x08
720P60 0x09
720P50 0x0c
720P30 0x0e
720P25 0x11
1080P5994 0x13
1080I5994 0x02
1080P2997 0x07
720P5994 0x0a
720P2997 0x0f
1080P24 0x2a
1080P2398 0x2b
CAM_IDWrite
8x 01 04 22 0p 0q 0r 0s FF
pqrs: Camera ID (=0000 to FFFF)
DHCP control
DHCP off
8x 01 04 AE 00 FF
DHCP off
DHCP on
8x 01 04 AE 01 FF
DHCP on
Main Stream
Resolution
8x 01 04 C2 00 0p 0q 0r 0s 0m 0n 0x 0y FF
pqrs: Column(x size) mnxy: Line (y size)
only support: 1920x1080/1280x720
Rate
8x 01 04 C2 01 0p 0q 0r 0s 0m 0n 0x 0y FF
pqrsmnxy: bitrate (0~15360)
Sub Stream
Resolution
8x 01 04 C3 00 0p 0q 0r 0s 0m 0n 0x 0y FF
pqrs : Column(x size) mnxy: Line (y size) only
support: 1280x720/1024x576/640x360
Rate
8x 01 04 C3 01 0p 0q 0r 0s 0m 0n 0x 0y FF
pqrsmnxy: bitrate (0~15360)
Tally Control
Off
8x 01 7E 01 0A 00 0p FF
p: 0: OFF(LED off) 1: (LED green on)
2: (LED red on) 4: (LED blue on)
IP address control
IP Set
8x 01 04 AB 0p 0q 0r 0s 0m 0n 0x 0y FF
Set ip to :pq.rs.mn.xy
Mask
8x 01 04 AC 0p 0q 0r 0s 0m 0n 0x 0y FF
Set mask to :pq.rs.mn.xy
Gateway set
8x 01 04 AD 0p 0q 0r 0s 0m 0n 0x 0y FF
Set gateway to :pq.rs.mn.xy
Color adjust
Color Adjust OFF
8x 01 04 B6 00 FF
Color adjust off
Color Adjust ON
8x 01 04 B6 01 FF
Color adjust on
Brightness Balance
OFF
8x 01 04 B7 00 FF
Keep Brightness
Brightness Balance
ON
8x 01 04 B7 01 FF
Don’t Keep Brightness
Page 24
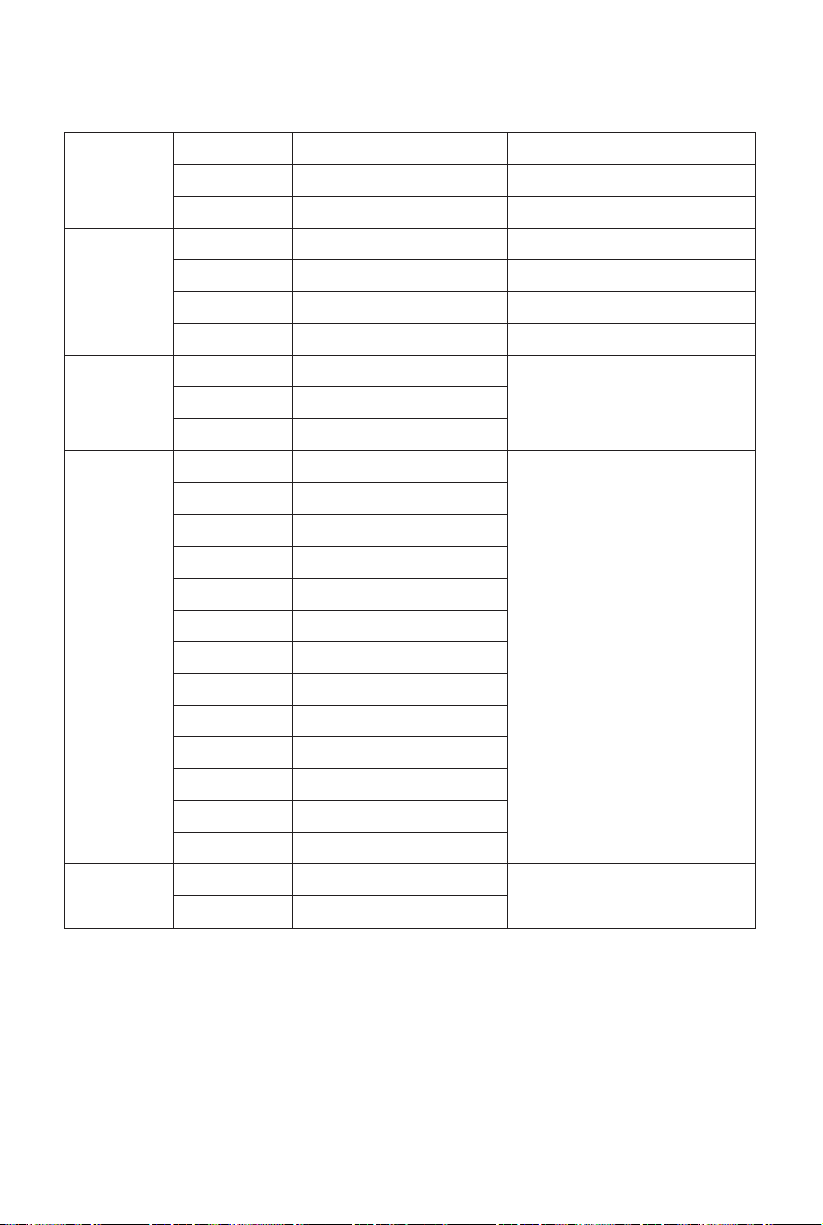
VISCA Protocol (CONTD)
22
Color adjust
Flare red
8x 01 04 B8 dat FF
Flare mode red value (Default=32)
Flare green
8x 01 04 B9 dat FF
Flare mode green value (Default=32)
Flare blue
8x 01 04 BA dat FF
Flare mode blue value (Default=32)
SYS_Menu
Menu On
8x 01 06 06 02 FF
Turn on menu
Menu Off
8x 01 06 06 03 FF
Turn off menu
Menu Back
8x 01 06 06 10 FF
Menu step back
Menu Ok
8x 01 7E 01 02 00 01 FF
Menu ok
IR_Receive
On
8x 01 06 08 02 FF
IR(remote commander)receive ON/OFF
Off
8x 01 06 08 03 FF
On/Off
8x 01 06 08 10 FF
Pan_TiltDrive
Up 8x 01 06 01 VV WW 03 01 FF
VV: Pan speed 0x01 (low speed) to
0x18 (high speed)
WW: Tilt speed 0x01 (low speed) to
0x14 (high speed)
YYYY: Pan Position(TBD)
ZZZZ: Tilt Position(TBD)
Down
8x 01 06 01 VV WW 03 02 FF
Left
8x 01 06 01 VV WW 01 03 FF
Right
8x 01 06 01 VV WW 02 03 FF
Upleft
8x 01 06 01 VV WW 01 01 FF
Upright
8x 01 06 01 VV WW 02 01 FF
Downleft
8x 01 06 01 VV WW 01 02 FF
Downright
8x 01 06 01 VV WW 02 02 FF
Stop
8x 01 06 01 VV WW 03 03 FF
Absolute Position
8x 01 06 02 VV WW 0Y 0Y 0Y 0Y 0Z
0Z 0Z 0Z FF
Relative Position
8x 01 06 03 VV WW 0Y 0Y 0Y 0Y
0Z 0Z 0Z 0Z FF
Home
8x 01 06 04 FF
Reset
8x 01 06 05 FF
Pan Tilt_LimitSet
Set
8x 01 06 07 00 0W
0Y 0Y 0Y 0Y 0Z 0Z 0Z 0Z FF
PW: 1: UpRight 0:DownLeft
YYYY: Pan Limit Position(TBD)
ZZZZ: Tilt Limit Position(TBD)
Clear
8x 01 06 07 01 0W
07 0F 0F 0F 07 0F 0F 0F FF
Page 25

VISCA Protocol (CONTD)
23
Part 3: Inquiry Command
Command Type Command Return Note
CAM_PowerInq
8x 09 04 00 FF
y0 50 02 FF
On y0 50 03 FF
Off (Standby)
CAM_ZoomPosInq
8x 09 04 47 FF
y0 50 0p 0q 0r 0s FF
pqrs: Zoom Position
CAM_Focus
ModeInq
8x 09 04 38 FF
y0 50 02 FF
Auto Focus
y0 50 03 FF
Manual Focus
CAM_FocusPosInq
8x 09 04 48 FF
y0 50 0p 0q 0r 0s FF
pqrs: Focus Position
CAM_WBModeInq
8x 09 04 35 FF
y0 50 00 FF
Auto
y0 50 01 FF
Indoor Mode
y0 50 02 FF
Outdoor Mode
y0 50 03 FF
OnePush Mode
y0 50 04 FF
ATW
y0 50 05 FF
Manual
CAM_RGainInq
8x 09 04 43 FF
y0 50 00 00 0p 0q FF
pq: R Grain
CAM_BGainInq
8x 09 04 44 FF
y0 50 00 00 0p 0q FF
pq: B Grain
CAM_AEModeInq
8x 09 04 39 FF
y0 50 00 FF
Full Auto
y0 50 03 FF
Manual
y0 50 0A FF
Shutter Priority
y0 50 0B FF
Iris Priority
y0 50 0D FF
Bright
CAM_Shutter
PosInq
8x 09 04 4A FF
y0 50 00 00 0p 0q FF
pq: Shutter Position
CAM_IrisPosInq
8x 09 04 4B FF
y0 50 00 00 0p 0q FF
pq: Iris Position
CAM_GainPosiInq
8x 09 04 4C FF
y0 50 00 00 0p 0q FF
pq: Gain Position
CAM_ BrightPosiInq
8x 09 04 4D FF
y0 50 00 00 0p 0q FF
pq: Bright Position
CAM_ ImageBright
PosiInq
8x 09 04 A4 FF
y0 50 00 00 0p 0q FF
pq: ImageBright Position
CAM_SaturationInq
8x 09 04 A1 FF
y0 50 00 00 0p 0q FF
pq: Saturation level 0x00~0x0f
CAM_DefogInq
8x 09 04 A3 FF
y0 50 0p FF
p: Defog level 0x00~0x0f
CAM_ContrastInq
8x 09 04 A2 FF
y0 50 00 00 0p 0q FF
pq: Contrast level 0x00~0x0f
CAM_WDRModeInq
8x 09 04 3D FF
y0 50 02 FF
On
y0 50 03 FF
Off
CAM_WDRPosInq
8x 09 04 2D FF
8x 01 04 02 03 FF
pq: WDR LEVEL Position 1~6
Page 26

VISCA Protocol (CONTD)
24
Command Type Command Return Note
CAM_ApertureInq
8x 09 04 42 FF
y0 50 00 00 0p 0q FF
p: Aperture Gain
CAM_FlickerInq
8x 09 04 AA FF
y0 50 0p FF
p: Flick mode 0:off 1:50Hz 2:60Hz
CAM_2DNRInq
8x 09 04 A5 FF
y0 50 0p FF
p: 2DNR: 0=OFF 1= AUTO 2
CAM_3DNRInq
8x 09 04 53 FF
y0 50 0p FF
p: 3DNR: 0=OFF 1= AUTO 2~5=Manual Level
CAM_GammaInq
8x 09 04 5B FF
y0 50 0p FF
p: Gamma Position
CAM_MemoryInq
8x 09 04 3F FF
y0 50 pp FF
pp: Memory number last operated
SYS_MenuModeInq
8x 09 06 06 FF
y0 50 02 FF
On
y0 50 03 FF
Off
CAM_LR_Reverse
Inq
8x 09 04 61 FF
y0 50 02 FF
On
y0 50 03 FF
Off
CAM_PictureFlipInq
8x 09 04 66 FF
y0 50 02 FF
On
y0 50 03 FF
Off
CAM_IDInq
8x 09 04 22 FF
y0 50 0p 0q 0r 0s FF
pqrs: Camera ID
CAM_DHCPInq
8x 09 04 AE FF
y0 50 pp FF
CAM_IPInq
8x 09 04 AB FF
y0 50 0p 0p 0q 0q 0r 0r 0s 0s FF
CAM_MASKInq
8x 09 04 AC FF
y0 50 0p 0p 0q 0q 0r 0r 0s 0s FF
CAM_GATEWAYInq
8x 09 04 AD FF
y0 50 0p 0p 0q 0q 0r 0r 0s 0s FF
CAM_FlareModeInq
8x 09 04 B6 FF
y0 50 pp FF
CAM_FlareBright
ModeInq
8x 09 04 B7 FF
y0 50 pp FF
CAM_FlareRed
8x 09 04 B8 FF
y0 50 pp FF
CAM_FlareGreen
8x 09 04 B9 FF
y0 50 pp FF
CAM_FlareBlue
8x 09 04 BA FF
y0 50 pp FF
CAM_VersionInq
8x 09 00 02 FF
y0 50 ab cd mn pq rs tu vw FF
VideoSystemInq
(AIDA)
8x 09 06 23 FF
y0 50 pp FF
pp: Video position
VideoSystemInq
(Sony)
8x 09 04 24 72 FF
y0 50 0p 0p FF
pp: Video position
IR_Transfer
8x 09 06 1A FF
y0 50 02 FF
On
y0 50 03 FF
Off
TallyInq
8x 09 7E 01 0A FF
y0 50 0p FF
p: tally state
IR_Receive
8x 09 06 08 FF
y0 50 02 FF
On
y0 50 03 FF
Off
IR_ReceiveReturn
y0 07 7D 01 04 00 FF
Power ON/OFF
Page 27
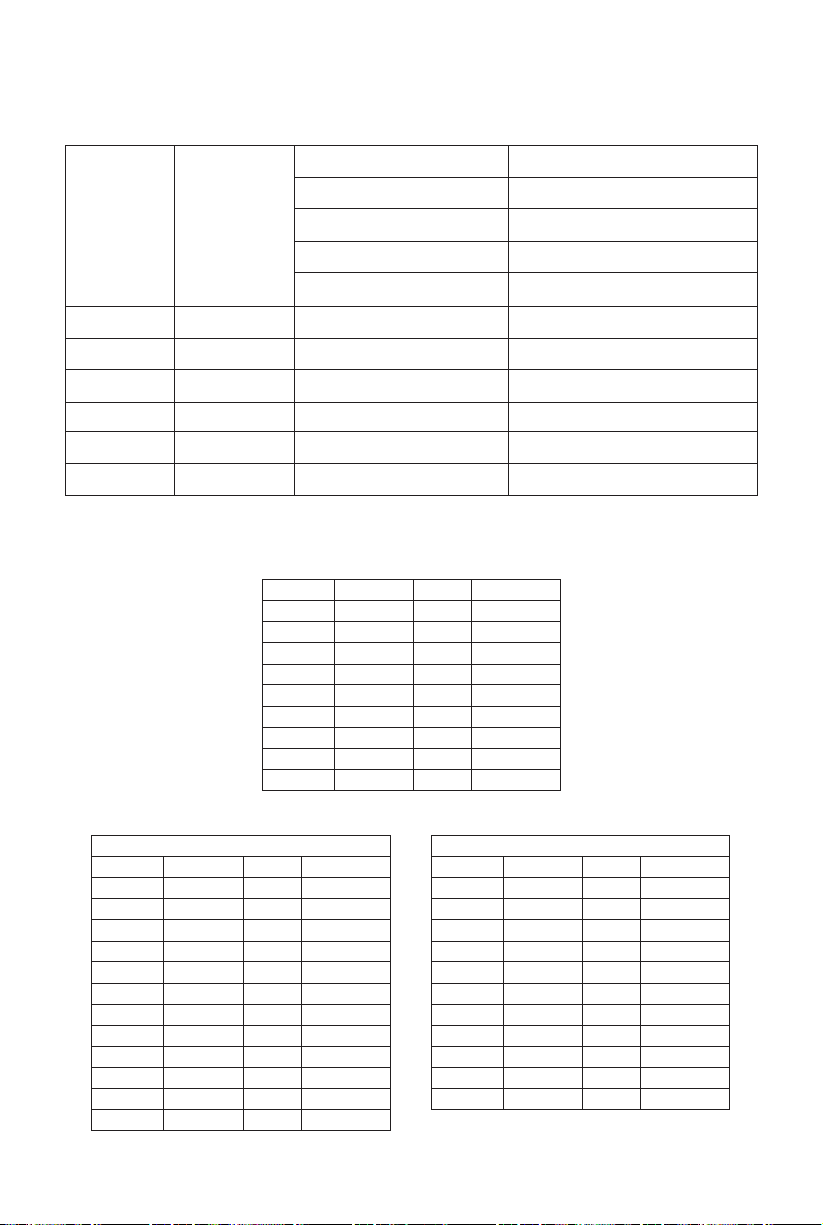
VISCA Protocol (CONTD)
25
Pan Degree/Second
0
0.3 0.3
.03
1
1
1
1
2
1.5
1.5
1.5 3
2.2
2.2
2.2
4
2.4 2.4 3.6 5
2.6
2.6
4.7
6
2.8
2.8
6
7
3.0
3.0
8
8
3.2 3.2
10
9
3.4 3.4 12
10 3.8
3.8
15
11 4.5
4.5
18
12 6
6
23
Pan Degree/Second
13 9
13 30
14 15 14 39 15 19 15 48 16 25 16 59
17 32 17 69 18 38 18 80
19 45
20 58
21
75
22
88
23 105
24 120
Command Type Command Return Note
IR_ReceiveReturn
y0 07 7D 01 04 00 FF
Zoom tele/wide
y0 07 7D 01 04 07 FF
AF On/Off
y0 07 7D 01 04 33 FF
CAM_Backlight
y0 07 7D 01 04 3F FF
CAM_Memory
y0 07 7D 01 06 01 FF
Pan_tiltDrive
Pan-tiltMaxSpeed
Inq
8x 09 06 11 FF
y0 50 ww zz FF
ww: PanMaxSpeed zz: Tilt Max Speed
Pan-tiltPosInq
8x 09 06 12 FF
y0 50 0w 0w 0w 0w 0z 0z 0z 0z FF
wwww: PanPosition zzzz: Tilt Position
Mainstream
ResolutionInq
8x 09 04 C2 00 FF
y0 50 0p 0q 0r 0s 0m 0n 0x 0y FF
pqrs : Column(x size) mnxy: Line (y size)
only supports: 1920x1080
MainstreamRate
Inq
8x 09 04 C2 01 FF
y0 50 0p 0q 0r 0s 0m 0n 0x 0y FF
pqrsmnxy: bitrate (0~15360)
Substream
ResolutionInq
8x 09 04 C3 00 FF
y0 50 0p 0q 0r 0s 0m 0n 0x 0y FF
pqrs : Column(x size) mnxy: Line (y size)
only supports: 1280x720/1024x576/640x360
SubstreamRateInq
8x 09 04 C3 01 FF
y0 50 0p 0q 0r 0s 0m 0n 0x 0y FF
pqrsmnxy: bitrate (0~15360)
Note: [x] refers to camera address; [y] = [x +8]
VISCA Pan Tilt Absolute Position Value
Pan Angle VISCA Value
Tilt Angle VISCA Value -170 0xF670 -30 0xFE50
-135 0xF868 0
0x0000
-90 0xFAF0 30 0x01B0 -45 0xFD78 60 0x0360 0
0x0000 90 0x510 45 0x0288
90 0x0510
135
0x0798
170
0x0990
VISCA Pan Tilt Speed Value
Page 28

UVC Control
26
AIDA PTZ's also support UVC interface.
PU_BRIGHTNESS_CONTROL
81 01 04 4d 00 00 0p 0q FF
PU_CONTRAST_CONTROL
81 01 04 A2 00 00 0p 0q FF
PU_SATURATION_CONTROL
81 01 04 A1 00 00 0p 0q FF
PU_SHARPNESS_CONTROL
8x 01 04 42 00 00 0p 0q FF
PU_GAMMA_CONTROL
8x 01 04 5B 0p FF
PU_WHITE_BALANCE_TEMPERATURE_CONTRO
L
8x 01 04 35 0X FF
PU_BLACKLIGHT_COMPENSATION_CONTROL
81 01 04 33 02/03 FF
PU_POWER_LINE_FREQUENCY_CONTROL
8x 01 04 AA 00/01/02 FF
CT_ZOOM_ABSOLUTE_CONTROL
8x 01 04 47 0p 0q 0r 0s FF
CT_PANTILT_ABSOLUTE_CONTROL
8x 01 06 02 VV WW 0Y 0Y 0Y 0Y OZ OZ 0Z 0Z F
CT_PANTILT_RELATIVE_CONTROL
8x 01 06 01 pp qq rr ss FF
CT_ZOOM_RELATIVE_CONTROL
8x 01 04 07 pp FF
Page 29

Warranty
27
AIDA Imaging warrants its cameras and items to be free from defects under normal use. Please refer to
our
website for more information at: aidaimaging.com/support
Support
If you would like additional support or explanation of anything on this manual, please feel free to go to our
FAQ page on our website at aidaimaging.com/support. If you are in need of additional help, or have
any
general questions, please feel free to contact us in these various ways:
Telephone: 909.333.7421
Email: [email protected]
Website: aidaimaging.com/support
We are open yearly, Mon-Fri 8A.M. to 5P.M. PST, excluding major holidays and events.
Also, keep up to date with firmwares and new releases from AIDA Imaging by signing up
for our
newsletter!
Page 30

AIDA
IMAGING
 Loading...