

Page 1
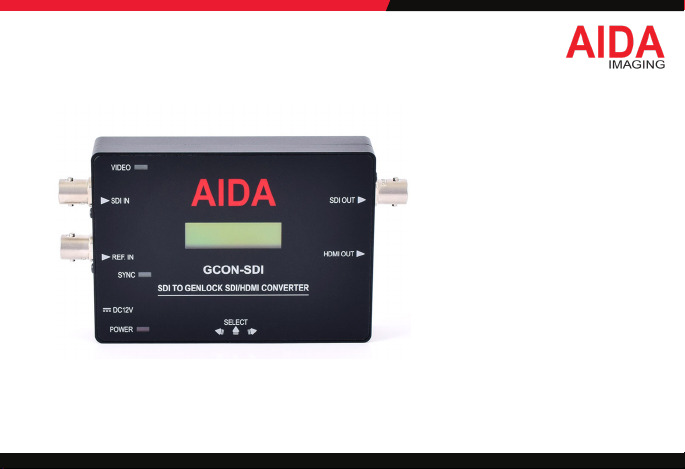
SDI to Gen-Lock
SDI/HDMI Converter
GCON-SDI
OPERATION GUIDE
Reproduction of this manual, in whole or in part, by any means, is prohibited.
Version 1.0 / Apr il 2020
Page 2
CAUTION:
RISK OF ELEC TRIC SHOCK.
DO NOT OPEN.
TO REDUCE THE RISK OF ELEC TRIC SHOCK, DO NOT REMOVE COVER (O R BACK)
NO USER SERVICE ABLE PARTS INSIDE. REFER SER VICING TO QUALIFIED SERV ICE PERSONNEL.
WARN ING
This sy mbol indica tes that dange rous
voltag e consistin g a risk of elect ric shock
is pres ent within thi s unit.
CAUTION:
PRECAU TION
This exc lamation poin t symbol is inte nded to aler t
the use r to the presenc e of importan t operating a nd
maintenance (servicing) instructions in the literature
accompanying the appliance.
WARNING
To prevent d amage wh ich may res ult in re or e lectric sho ck hazard, do no t expose this ap pliance t o rain or moi sture.
1. Be sure to u se only the stan dard adapter t hat is specied i n the specic ation sheet. Us ing any other ada pter could caus e re,
elect rical shock , or damage to the pr oduct.
2. Incorrec tly connec ting the power su pply or replaci ng battery m ay cause explos ion,cause exce ssive heat or re
3. Do not connec t multiple con nectors to a si ngle adapter. Exc eeding the cap acity may caus e excessive hea t or re.
4. Securely p lug the power cor d into the power re ceptacle. Ins ecure connec tion may cause r e.
5. Do not drop th e converter to avo id the damage or pe rsonal injur y.
Continu e on Next Page
2
Page 3

Warning co ntinues
6. Do not place co nductive obj ects (e.g. scre w drivers, coin s, metal items, e tc.) or containe rs lled with wat er on top of the conve rter. Doing so may
cause p ersonal injur y due to re, elec tric shock, o r falling objec ts.
7. Do n ot install the u nit in humid, dust y, or sooty loca tions. Doing so m ay cause re or ele ctric shoc k.
8. If any unusual s mells or smoke co me from the unit, s top using the pr oduct. Imme diately disco nnect the pow er source and con tact the ser vice
center. Con tinued use in su ch a condition ma y cause re or elec tric shock .
9. If this pro duct fails to oper ate normally, contac t the nearest ser vice center. Never di sassemble or mod ify this produc t in any way.
10. When cleaning, d o not spray water d irectly onto p arts of the pr oduct. Doin g so may cause re or e lectric sho ck.
PRECAUTION
Pleas e read this O peratio n Guide before i nstalling a nd using th e camera & reta in this copy for you r reference.
1. Always f ollow the instr uctions in th e operation gu ide when apply ing power. Fire and e quipment dama ge can occur if po wer is applied in correctly.
For the cor rect power s upply,refer to th e specicati ons page.
2. Do not use conve rter if fume s, smoke or a stra nge odor is emit ted from the ca mera, or if it seem s not functio nal correctl y. Disconnect t he power
source i mmediately an d consult with yo ur supplier.
3. Do not use the c onverter in ex treme environ ments where hig h temperatur es or high humidi ty exists. U se the camera un der conditio ns where
temper atures are bet ween 32°F ~ 104°F, and hu midity is belo w 90%.
4. If install ed close to a TV, radi o transmitt er, magnet, elect ric motor tran sformer or aud io speakers th e magnetic eld ge nerated may int erfere with
or disto rt the image.
5. To prevent damag e, do not drop the conv erter or subj ect it to stron g shock or vibra tion.
3
Page 4
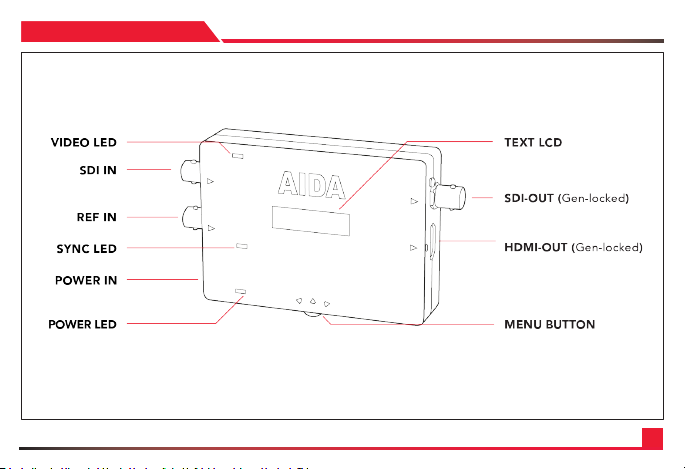
GCON-SDI
4
Page 5
FEATURES
• 3G-SDI up to 10 80p60 f ull HD Resol ution Input.
• Simultan eous HDMI and SDI L oop Output.
• Highly comp atible with Tri Lev el refere nce input S MPTE 292M & 424M C ompliant a nd multi-vide o format inclu ding 59.94Hz.
• SMPTE 352M Anc illary Data s uppor ted.
• Embedde d audio pass thr ough via SDI & H DMI.
• Adjusta ble V-sync & H- sync phas es.
• Division al pictu re compar ison.
• Built in Pattern Generator.
• Built in LCD men u screen.
• Built in men u control b utton.
• Versatile, c ompact , and rugged de sign.
MENU OPERATION
1. Entering the main menu
Press En ter button thr ee times to enter t he main menu.
2. Change the menu items
Use Right o r Left menu to to ggle through th e menu.
L- Left | U- Select | R- Right
3. Select or ente r the sub menu
Use Enter b utton.
5
Page 6
OSD MENU
GEN-LOCK CONT. MISC CONT.
• GEN ON/OFF
GEN-RU N: [OFF], GEN-RUN: [O N],
CANCEL(BACK)
• H_ SYNC ADJUST
H_SY NC: 0000, CANCEL (BACK)
• V_SYN C ADJUST
V_SYNC : 0000, CAN CEL(BACK)
• RETURN
PATTERN GEN . DISPL AY CONT.
• PTN ON /OFF
PATTERN: [OFF] , PATTERN: [ON], C ANCEL(BACK)
• PTN T YPE
PTN WHIT E, PTN CROSS, PTN WHIT E PTN HATCH
PTN COLOR BA R, PTN WINDOW, PTN H R AMP
PTN WH RA MP, PTN WV R AMP, PTN DIAGON AL
PTN RED, PTN GR EEN, PTN BLUE
• RETURN
• AUDIO CONT.
AUDIO ON/ OF F: AUDIO: [OFF], AUDIO: [ON ],
CANCEL(BACK) AUDIO BI TS : 24 BITS, 20 BITS,
16 BITS, CANCEL (BACK)
RETURN
• PAYLOAD CONT. : 24 BITS, 20 BI TS, 16 BITS,
CANCEL(BACK)
PAYLOAD ON/ OFF: PAYLOAD: [OFF ], PAYLOAD:
[ON], CAN CEL(BACK)
RETURN
• LC D CONT.
LCD BL ON/OFF: LC D [OFF], LCD: [ON], CANCE L(BACK)
DISP TY PE: DYNAMIC ], STATIC, CANCEL (BACK)
RETURN
• HD/3G CON T.
2DIV COMPARE : 2DIV [OFF], 2DIV: [ON]
• RETURN
• RESET: REST RUN, RE TURN
• EXIT
6
Page 7
GEN-LOCK CONT.
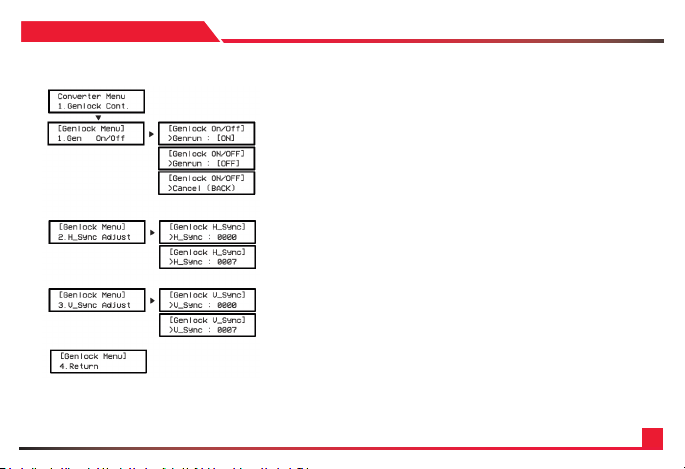
GEN ON/OFF
Exter nal reference in put can be turne d ON or OFF from this me nu.
By using Lef t or Right butt on,
Select G EN-RUN[ON] to e nable externa l reference inpu t.
Select G EN-RUN[OFF] t o disable exter nal reference in put.
Select C ANCEL(BACK) to go b ack to the previou s menu.
* SDI inpu t signal and ref erence signa l needs to be match ed.
H_SYNC ADJUS T
H_Syn c offset can be a djusted from t his menu.
By using Lef t or Right butt on,
Select t he right offs et number on H_ SYNC:0000
Press SELE CT button to appl y the changes and g o back to the previo us menu.
V_SYNC ADJUST
V_Sync of fset can be adj usted from this m enu.
By using Lef t or Right butt on,
Select t he right offs et number on V_SY NC:0000
Press SELE CT button to appl y the changes and g o back to the previo us menu.
RETURN
Press SELE CT button to Retu rn to the main menu.
7
Page 8
PATTERN GEN.
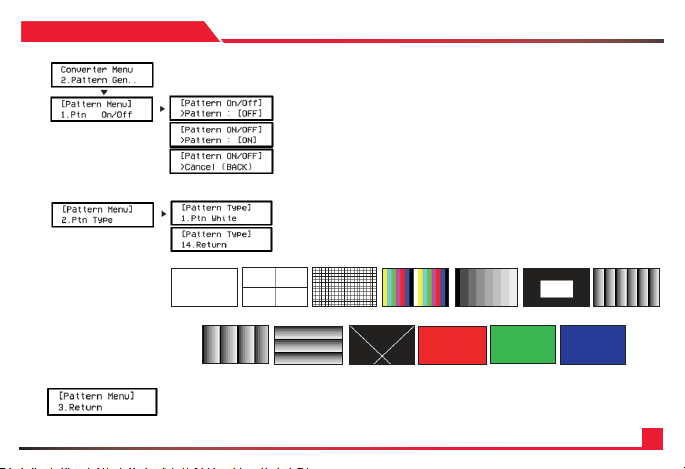
PATTERN ON/OFF
Both SDI an d HDMI outputs w ill generate pat terns and inpu t video will be dis abled.
When GEN- LOCK is enabled, g enerated patt ern will contai n gen-lock sig nal.
By using Lef t or Right butt on,
Select PATTE RN[ON] to enable p attern gener ation.
Select PATTE RN[OFF] to disab le pattern gen eration.
Select C ANCEL(BACK) to go b ack to the previou s menu.
PATT ERN TY PE
Converter provides thirteen different patterns.
By using Lef t or Right butt on,
By using Lef t or Right butt on, select the pr oper pattern t ype.
01. Whit e 02. Cross 03. Hatch 04. Color bar 05. Gray 05. Window 06. H_Ramp
07. W H_ Ram p 08. WV_Ramp 09. Di agon al 10. Red 11. G ree n 12. Blue
RETURN
Press SELE CT button to Retu rn to the main menu.
8
Page 9
MISC. CONT AUDIO
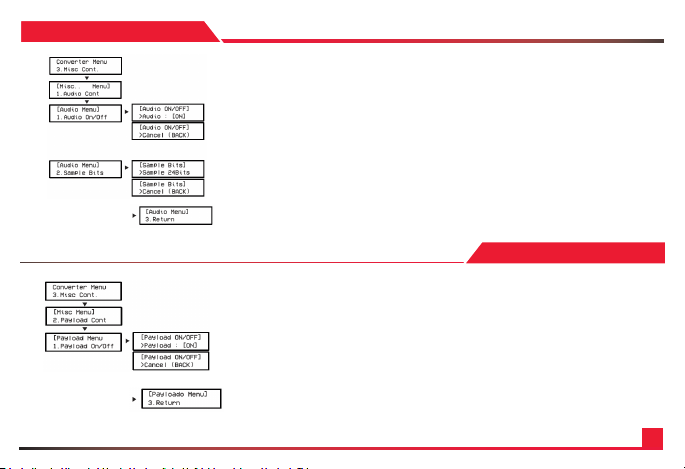
AUDIO CONT
Audio ca n be turned ON or OFF, an d AUDIO Sample Rate c an be adjusted.
• AUDIO ON/OFF
By using Le ft or Right but ton,
Selec t AUDIO[ON] to enable AU DIO to be passed thro ugh to SDI and HDMI outp uts.
Selec t AUDIO[OFF] to di sable AUDIO.
Selec t CANCEL( BACK) to go back to the previ ous menu.
• SAMPLE B ITS : 16 BITS, 20 BITS, 24 BITS
RETURN
Press SELE CT button to Retu rn to the main menu.
MISC. C ONT PAYLOAD
PAYL OAD CON T
Payload ID c an be turned ON or O FF can be adjuste d.
• PAY LOAD O N/OFF
By using Le ft or Right but ton,
• Sele ct PAYLOAD[ON] t o enable Pay load ID.
• Sele ct PAYLOAD[OFF] to dis able Payload ID.
• Sele ct CANCEL(BACK ) to go back to the pre vious menu.
RETURN
Press SELE CT button to Retu rn to the main menu.
9
Page 10
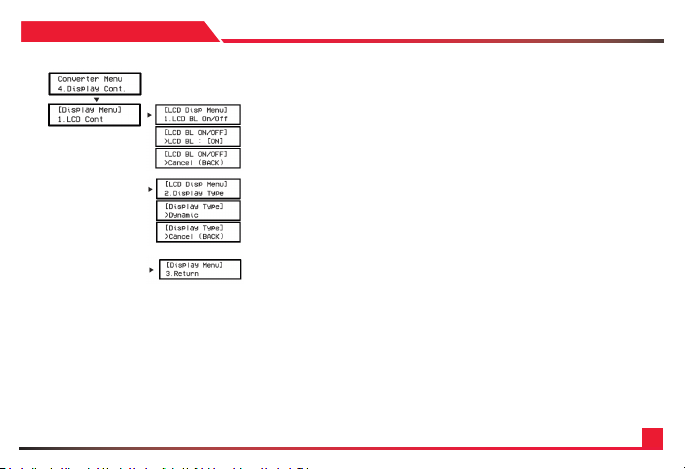
DISPLAY CONT LCD
LCD CONT
This menu c an control built i n LCD display.
• LCD BL ON /OFF
LCD displ ay back-light ca n be turned ON or OF F from this menu.
By using Le ft or Right but ton,
Selec t LCD[ON] to enable LCD bac k-light.
Selec t LCD[OFF] to disa ble LCD back-ligh t.
Selec t CANCEL( BACK) to go back to the previ ous menu.
• DISPL AY TYPE : DYNA MIC. STATIC
LCD displ ay type can be ad justed from th is menu.
Selec t DYNAMIC to dis play the curre nt input status of SDI and ex ternal referenc e.
Selec t STATIC to disp lay the curren t external ref erence input an d video output s tatus.
RETURN
Press SELE CT button to Retu rn to the main menu.
10
Page 11
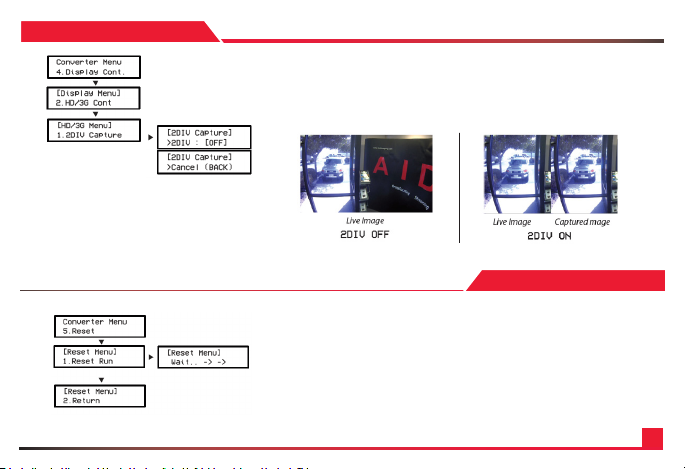
DI SP LAY- CON T. 2 DI V
HD/3G CONT
2 divisio n comparison p rovides still im age and live image fo r image quality c omparison
• 2DIV CAPTURE
Conver ter will captu re the left half o f the live image.
The othe r half of the scree n is the live video.
RETURN
Press SELE CT button to Retu rn to the main menu.
RESET
RESET
Conver ter setting ca n be defaulted to th e factory set ting from this m enu.
• RESET RUN
Selec t this menu to load f actory def ault settin g.
• RETURN
Press SEL ECT button to Re turn to the main m enu.
11
Page 12
SPECIFICATION
VIDEO
Video Input 3G-SDI / HD -SDI
Resolution/Rate 1080 60p/59.94p/50p/30p/29.97p/ 25p
1080 60i/59.94i/50i
720 60p/59.94p/50p/30p/25p
Color Space 4:2:2 (YCbCr) 10b it
Video Output Gen-locked HD-SDI/3G-SDI
Gen-l ocked HDMI 1.3a
FUNCTION
Gen-lock Control ON/OFF
H Sync & V Sync A djustment
Audio Control Audio Bit s (16, 20, 24 Bits)
Payloa d ID ON/OFF
Pattern Generate Thirteen Pa tterns
AUDIO INPUT
Audio Input 16 Channels Emb edded SDI Audi o
STANDARD
SMPTE SMPTE 292 M, SMPTE 424M
SYNCHRONIZATION
Gen-lock Ex ternal Tri-Level I nput
PHYSICAL
Control OSD Butt on & Text LCD
Operation Temp 32° F - 104° F
Dimension 130mm x 75m x 24mm / 5.11” x 2.95” x 0.94”
Weight 173g / 0. 38lbs
Power 6W at 12VDC (+9 - +15VDC)
*Specica tion are subjec t to change witho ut notice.
12
Page 13
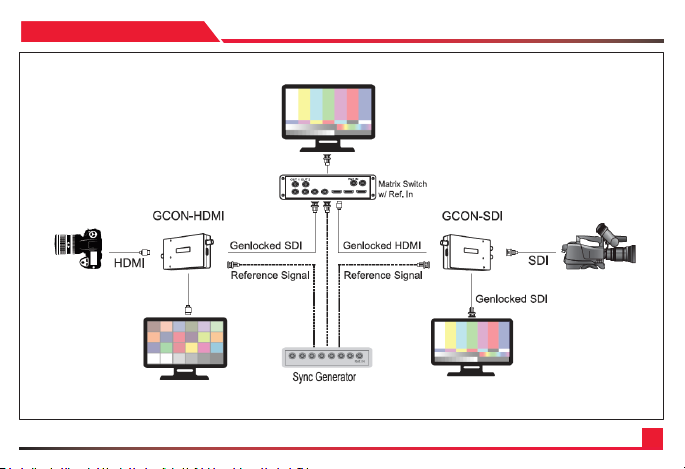
CONNECTION
13
Page 14

QUESTIONS
Visit us:
www.aidaimaging.com/support
E-mail us:
Give us a Ca ll:
Toll Free: 844.631.8367 | Tel: 90 9.333.7421
Operating Hours: Mon-Fr i | 8:00am – 5:00p m PST
14
Page 15
Disposal of Old Appliances
1. When this crossed-out wheel bin symbol is attached to a product it means the product is covered by the European Directive 2002/96/EC.
2. All electrical and electronic products should be disposed of separately form the municipal waste stream in accordance to laws designated by the government or the local authorities.
3. The correct disposal of your old appliance will help prevent potential negative consequences for the environment and human health.
4. For more detailed information about disposal of your old appliance, please contact your city ofce, waste disposal service or the shop where you purchased the product.
This equipm ent has been tes ted and found to co mply with the li mits for a Class A di gital device, pu rsuant to par t 15 of the FCC Rules. The se limits are de signed to provi de reasonable p rotection ag ainst
harmful int erference w hen the equipm ent is operate d in a commercial en vironment. Th is equipment ge nerates, use s, and can radia te radio frequ ency energy an d, if not install ed and used in acc ordance with
the instru ction manual, m ay cause harmf ul interfere nce to radio com munications . Operation of t his equipment i n a residential a rea is likely to cau se harmful inte r reference in w hich case the us er will be requir ed
to correc t the interfer ence at his own exp ense.
15
 Loading...