

Page 1
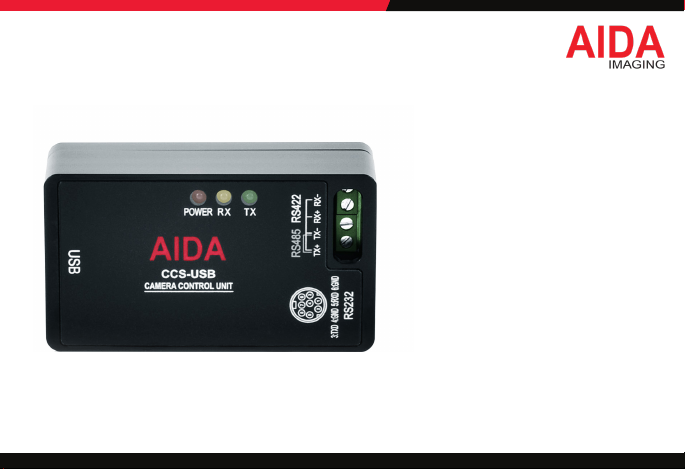
VISCA Camera Control
Unit & Software
CSS-USB
OPERATION GUIDE
Reproduction of this manual, in whole or in part, by any means, is prohibited.
Version 1.0 / Apr il 2020
Page 2
CAUTION:
RISK OF ELEC TRIC SHOCK.
DO NOT OPEN.
TO REDUCE THE RISK OF ELEC TRIC SHOCK, DO NOT REMOVE COVER (O R BACK)
NO USER SERVICE ABLE PARTS INSIDE. REFER SER VICING TO QUALIFIED SERV ICE PERSONNEL.
WARN ING
This sy mbol indica tes that dange rous
voltag e consistin g a risk of elect ric shock
is pres ent within thi s unit.
CAUTION:
PRECAU TION
This exc lamation poin t symbol is inte nded to aler t
the use r to the presenc e of importan t operating a nd
maintenance (servicing) instructions in the literature
accompanying the appliance.
Warning
To prevent d amage wh ich may result i n re or electr ic shoc k hazard, d o not expose thi s applia nce to rain or mois ture.
1. Be sure to u se only the stan dard cable tha t is specied in t he specica tion sheet. Usi ng any other cabl e or pin could caus e re,
elect rical shock , or damage to the pr oduct.
2. Incorrec tly connec ting the cable or o pening the hou sing may cause exc essive re, elec tric shock , or damage to the pr oduct.
3. Do not connec t external p ower source to th e product.
4. When conne cting VISCA c able, fasten it s ecurely and r mly. A falling unit ma y cause perso nal injury.
5. Do not place co nductive obj ects (e.g. scre w drivers, coin s, metal items, e tc.) or containe rs lled with wat er on top of the devi ce. Doing so may
cause p ersonal injur y due to re, elec tric shock, o r falling objec ts.
Continu e on Next Page
2
Page 3

Warning co ntinues
6. Do not insta ll the device in hu mid, dusty, or soo ty locations . Doing so may caus e re or electr ic shock.
7. If any unusual smells or smoke come from the unit, stop using the product. Immediately disconnect the power source and contact the service center.
Continued use in such a condition may cause re or electric shock.
8. If this produc t fails to operate nor mally, contact the nea rest ser vice center. Never disas semble or modif y this prod uct in any way.
9. When c leaning, do not sp ray water direc tly onto par ts of the produc t. Doing so may c ause re or elec tric shock.
Precaution
Pleas e read this O peration Gu ide befo re inst alling a nd using the ca mera & ret ain this copy for yo ur reference.
1. Always f ollow the instr uctions in th e operation gu ide when apply ing power. Fire and e quipment dama ge can occur if po wer is applied in correctly.
For the cor rect power s upply,refer to th e specicati ons page.
2. Do not use the d evice if fumes, s moke or a strang e odor is emitte d from the devic e, or if ii seems not fu nctional cor rectly. Disco nnect the pow er
source i mmediately an d consult with yo ur supplier.
3. Do not use the d evice in extrem e environment s where high tem peratures or hi gh humidity ex ists. Use the d evice under con ditions wher e
temper atures are bet ween 32° F - 104° F, and humid ity is below 90 %.
4. To prevent damag e, do not drop the conv erter or subj ect it to stron g shock or vibra tion.
3
Page 4
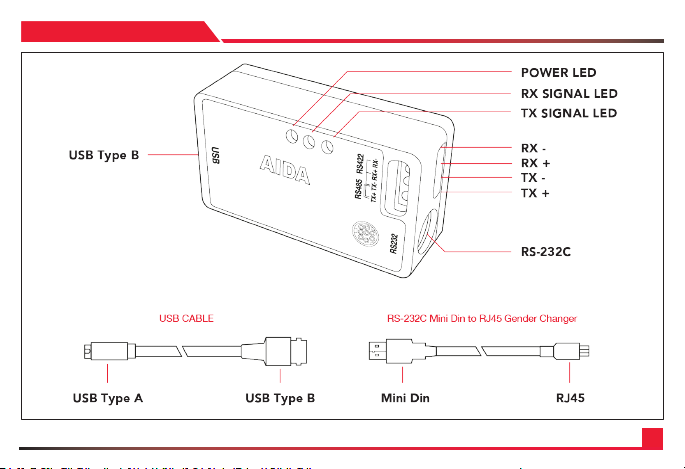
CCS-USB
4
Page 5
Features
• SONY VISCA Com patibl e and works wit h a majority of VIS CA protoc ol produc ts.
• Suppor ts PELCO Pan / Tilt / Zoo m / Focus protoco l.
• Control up t o 7 VISCA control c ameras and 255 t hird party co ntrol camer as.
• User frie ndly softw are interfa ce.
• Suppor t RS-232, RS-4 85, RS-422.
• USB inter face for e asy ins tallati on.
• Windows a nd MAC OS X comp atible.
• Compac t and rugg ed design.
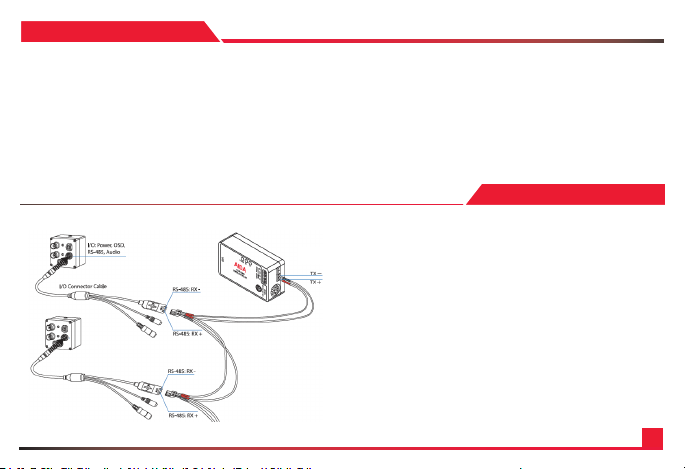
When con necting th rough RS-4 85 connectio n.
1. Connect TX+ of CC S-USB to RX+ o f GEN3G-20 0 and TX- of CCS- USB
to RX- of GEN3G- 200.
2. Connect a nother pair of 48 5 cable to the sam e connector wh en
connecting multiple cameras.
Connection: Using RS-485
5
Page 6
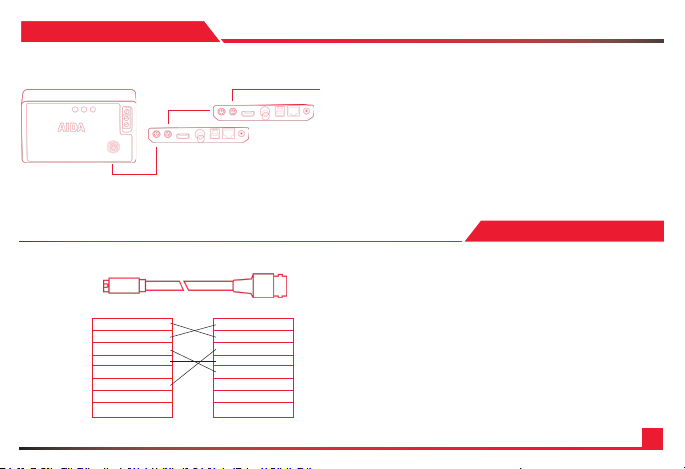
Connection: Using RS-232
RS-232C Di n 8 Cable
1. DTR
2. DSR
3. TXD
4. GND
5. RAD
6. GND
7. NOT USED
8. NOT USED
1. DTR
2. DSR
3. TXD
4. GND
5. RAD
6. GND
7. NOT USED
8. NOT USED
When connecting through RS-232 connection.
1. Use VISC A 8-pin Din ca ble to connect CC S-USB to 232 Inp ut.
2. Use VISCA RS -232C out on the ca mera to connec t to RS-232C
in on the ne xt camera. Dai sy-chainin g is up to 7 cameras .
3. When using t hird party c ameras, make su re the pin layout b efore
runnin g the RS-232C cab le
VISCA IN/OUT
RS-232 C DIN 8 cable Pin As signment
1. If you are us ing PTZ3-X 20L, follow the c able pin assig n shown in the tab le.
2. If you are usin g another camer as with RS-232, b e sure to check th e pin
assign ment. You may need to cu stomize the ca ble.
Continu e on Next Page
6
Page 7
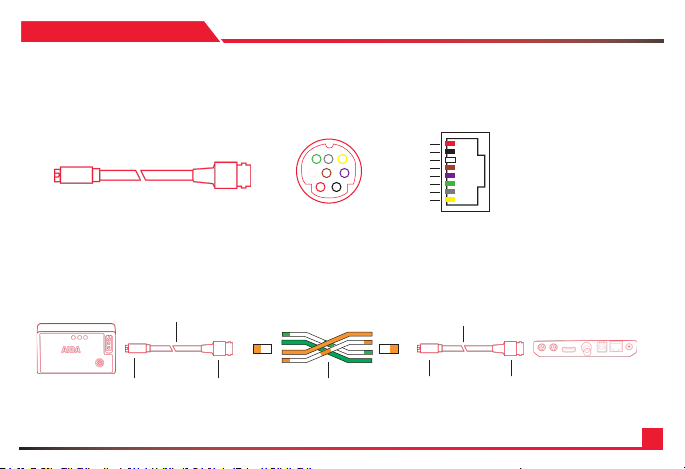
VISCA IN/OUT
RS-232 C Mini Din to RJ45 G ender Change r Pin Assignme nt
1. CCS-U SB comes with 8 pin m ini Din connec tor to RJ45 gende r changer.
If you nee d to customize ca ble pin assign ment, use CAT5/6 cabl e to change
the cab le layout.
6 7 8
3 4 5
1 2
Mini DinMini Din to RJ 45 Gender Chan ger
2. When us ing the gender c hanger in pairs , make sure to use cro ssover cable.
1. Red
2. Black
3. White
4. Brown
5. Purple
6. Green
7. Gray
8. Yellow
RJ45
Mini Din to RJ 45 Gender Chan ger
Mini Din to RJ 45 Gender Chan ger
RJ45 RJ45
Mini Din Mini Din
RJ45 RJ45
Crossover Cable
7
Page 8
SOFTWARE & DRIVER: MAC
1. Download Software
Mac Versi on of AIDA CCS is availa ble on AIDA websi te.
Downlo ad software f rom www.aid aimaging.com un der suppor t page.
2. Driver Installation
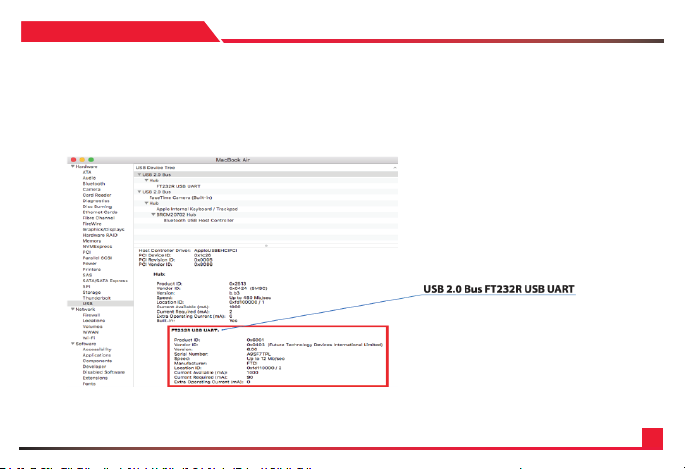
Most of th e recent Mac has bu ilt-in driver f ro CCS-USB.
If your Mac d oes not recogni ze CCS-USB, dow nload the drive r le from www.a idaimaging.co m under suppor t page.
When dr iver is properl y installed, CC S-USB will app ear as follow.
Continu e on Next Page
8
Page 9
SOFTWARE & DRIVER: MAC
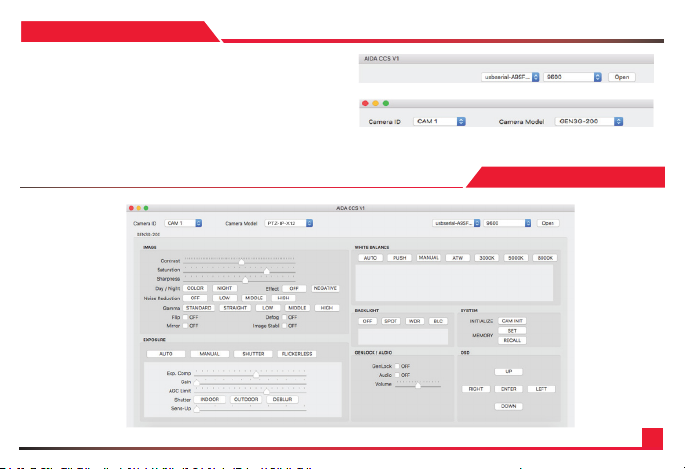
3. Laun ch AIDA CCS-USB so ftware.
4. Selec t CCS-USB devi ce which appea rs from System Rep ort.
5. Select Baudrate.
Make sure t he selected b audrate match es the baudrat e set
from the c amera.
6. Click O pen button to i nitiate comm unication .
7. Select Ca mera ID and choo se Camera Mode l.
PTZ-IP-X12 INTERFACE
9
Page 10
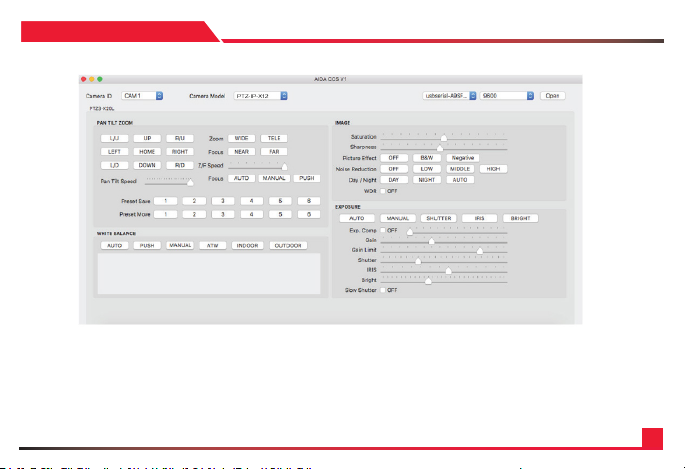
PTZ-IP-X12 INTERFACE
10
Page 11
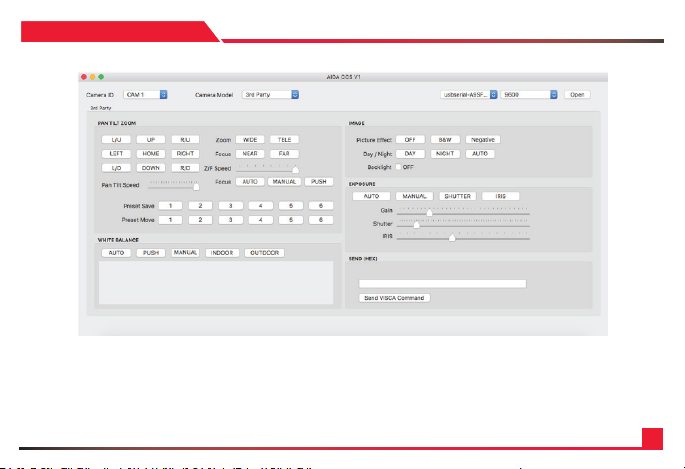
THIRD PARTY INTERFACE
11
Page 12
SOFTWARE & DRIVER: WIN
1. Download Software
Mac Versi on of AIDA CCS is availa ble on AIDA websi te.
Downlo ad software f rom www.aid aimaging.com un der suppor t page.
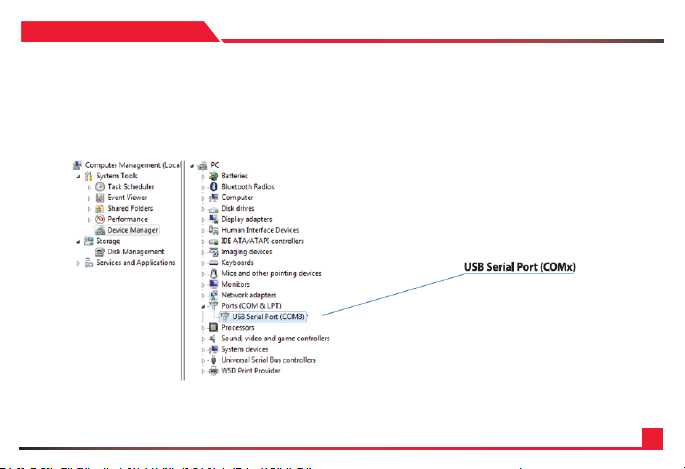
2. Driver Installation
Most of th e recent Windo ws has built-in dr iver fro CCS- USB.
If your PC do es not recogniz e CCS-USB, down load the driver le from www.ai daimaging.com u nder suppor t page.
When dr iver is properl y installed, CC S-USB will app ear as follow.
Continu e on Next Page
12
Page 13
SOFTWARE & DRIVER: WIN
3. Laun ch AIDA CCS-USB so ftware.
4. Selec t CCS-USB devi ce which appea rs from System Rep ort.
5. Select Baudrate.
Make sure t he selected b audrate match es the baudrat e set
from the c amera.
6. Click O pen button to i nitiate comm unication .
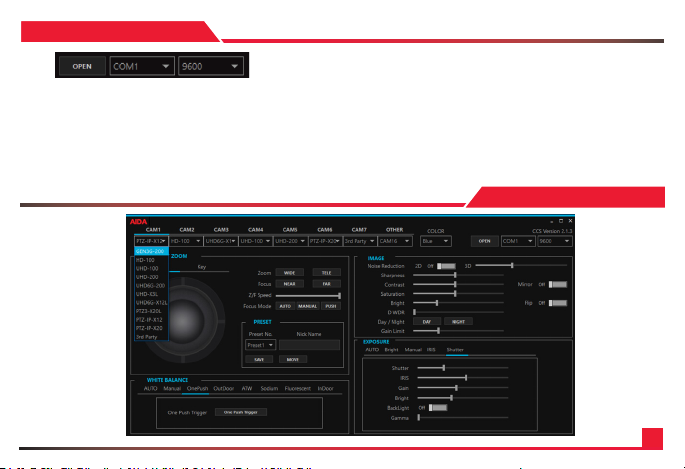
7. Click on ca mera model nam e to choose betwe en differen t camera model s.
8. Once th e drop-down m enu is open, cam era model can be a ssigned
from CAM 1 t hrough CAM 7.
GEN3G-200: INTERFACE
13
Page 14
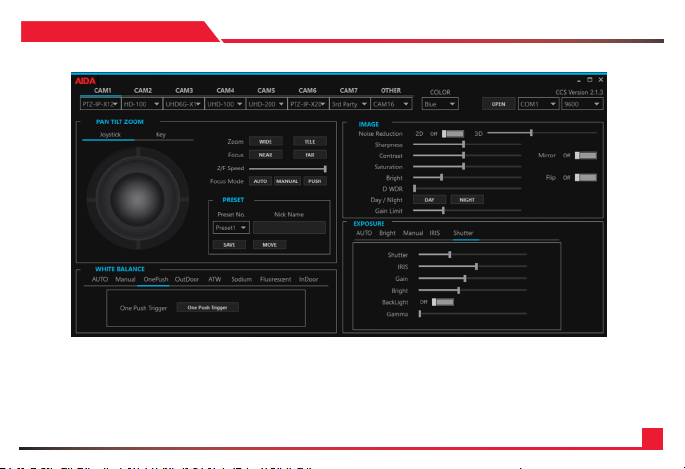
PTZ-IP-X12 INTERFACE
14
Page 15
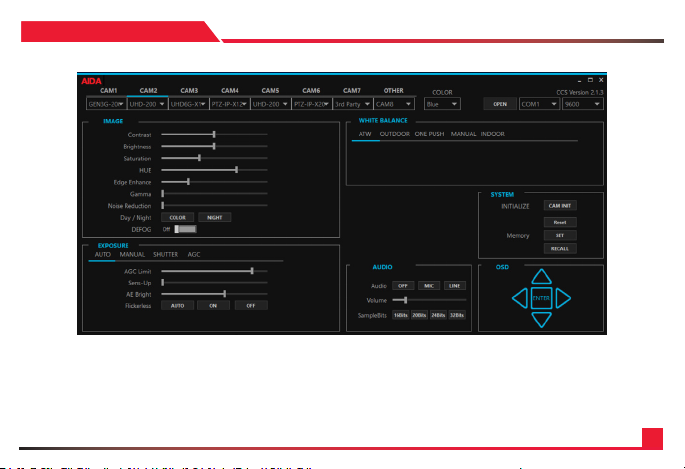
THIRD PARTY INTERFACE
15
Page 16
TROUBLESHOOTING
1. CCS-USB does n ot control my cam era.
• Ma ke sure driver is in stalled pro perly.
• Ch eck Camera ID a nd Baudrate.
• Ch eck if the conne cted camera s upports V ISCA protocol.
• Ch eck if Power LED is on.
• Ch eck cable conn ections and pi n assignment s.
2. Does CCS-USB re quire power ada pter?
• CC S-USB acquir es power throug h USB cable. Addi tional power is no t required.
3. How do I control mu ltiple Adapt er?
• Da isy chain conne ction is requi red to control mu ltiple camer as. Make sure that c amera suppo rt daisy chai n connectio n.
• CC S-USB allows up t o 7 VISCA devices .
4. Can I use AIDA soft ware with ot her control dev ices?
• AI DA software r equires CCS- USB to functi on properly.
5. What is the max imum cable di stance?
• S -232 standard i s limited up to 15 m(S0 f t). If the cable is l onger than the l imit, then CCS- USB may not respo nd properly.
• RS -485 stan dard is limited up t o 1,200 m(4,000 ft).
6. Does CCS-USB wor k with any VISCA c ompatible pr oducts?
• Mo st of VISCA comp atible produc ts will work w ith CCS-USB.
16
Page 17

QUESTIONS
Visit us:
www.aidaimaging.com/support
E-mail us:
Give us a Ca ll:
Toll Free: 844.631.8367 | Tel: 90 9.333.7421
Operating Hours: Mon-Fr i | 8:00am – 5:00p m PST
17
Page 18

Disposal of Old Appliances
1. When this crossed-out wheel bin symbol is attached to a product it means the product is covered by the European Directive 2002/96/EC.
2. All electrical and electronic products should be disposed of separately form the municipal waste stream in accordance to laws designated by the government or the local authorities.
3. The correct disposal of your old appliance will help prevent potential negative consequences for the environment and human health.
4. For more detailed information about disposal of your old appliance, please contact your city ofce, waste disposal service or the shop where you purchased the product.
This equipm ent has been tes ted and found to co mply with the li mits for a Class A di gital device, pu rsuant to par t 15 of the FCC Rules. The se limits are de signed to provi de reasonable p rotection ag ainst
harmful int erference w hen the equipm ent is operate d in a commercial en vironment. Th is equipment ge nerates, use s, and can radia te radio frequ ency energy an d, if not install ed and used in acc ordance with
the instru ction manual, m ay cause harmf ul interfere nce to radio com munications . Operation of t his equipment i n a residential a rea is likely to cau se harmful inte r reference in w hich case the us er will be requir ed
to correc t the interfer ence at his own exp ense.
18
 Loading...