

Page 1
1. Basic Information about your Smoke Alarm
A SmokeAlarm is an earlywarning device. Used correctly it cangive you
and your family valuable extra time to escape.
Push the power-on button (inside the cover) until it clicks to connect the
battery permanently. Close the cover and press the test button - horn
should sound. Note:Battery cannot be disconnected using the power on
button.
A Smoke Alarm does not prevent fires.
·
Install correctly, in the centre of the ceiling if possible.
·
Test weekly.
·
Plan your escape route.
·
Proper protection may require more than one Smoke Alarm.
·
If you have any doubtor query about Smoke Alarms consult the sup
·
plier or your local Fire Brigade.
Nuisance alarmscan be quicklysilenced for 8minutes by pressingthe
·
hush button on the cover.
The complete smoke alarm must be replaced by the year marked on
·
the unit.
The completeSmoke Alarm mustalso be replaced ifit beeps every 40
·
seconds for overan hour
the “end of life” red wire before discarding, to stop beeps.
Sufficient smoke must enter your Smoke Alarm before it will respond.
Your SmokeAlarm needsto be within10 paces (7.5metres/25 feet) ofthe
fire torespond quickly.It also needsto be ina position whereits alarm can
beheard throughout yourhome, so itcan wakeyou and yourfamily intime
for youall to escape. A single
is properly installed, but most homes will require two
that areliable early warning isgiven. For maximum protectionyou should
put individual Smoke Alarms in all the rooms where fire is most likely to
break out.
Your firstSmoke Alarm should belocated between the sleepingarea and
the most likely sources of fire (living room or kitchen for example). But it
should notbe more than 10paces (7.5 metres) fromthe door to anyroom
where a fire might start and block your escape from the house.
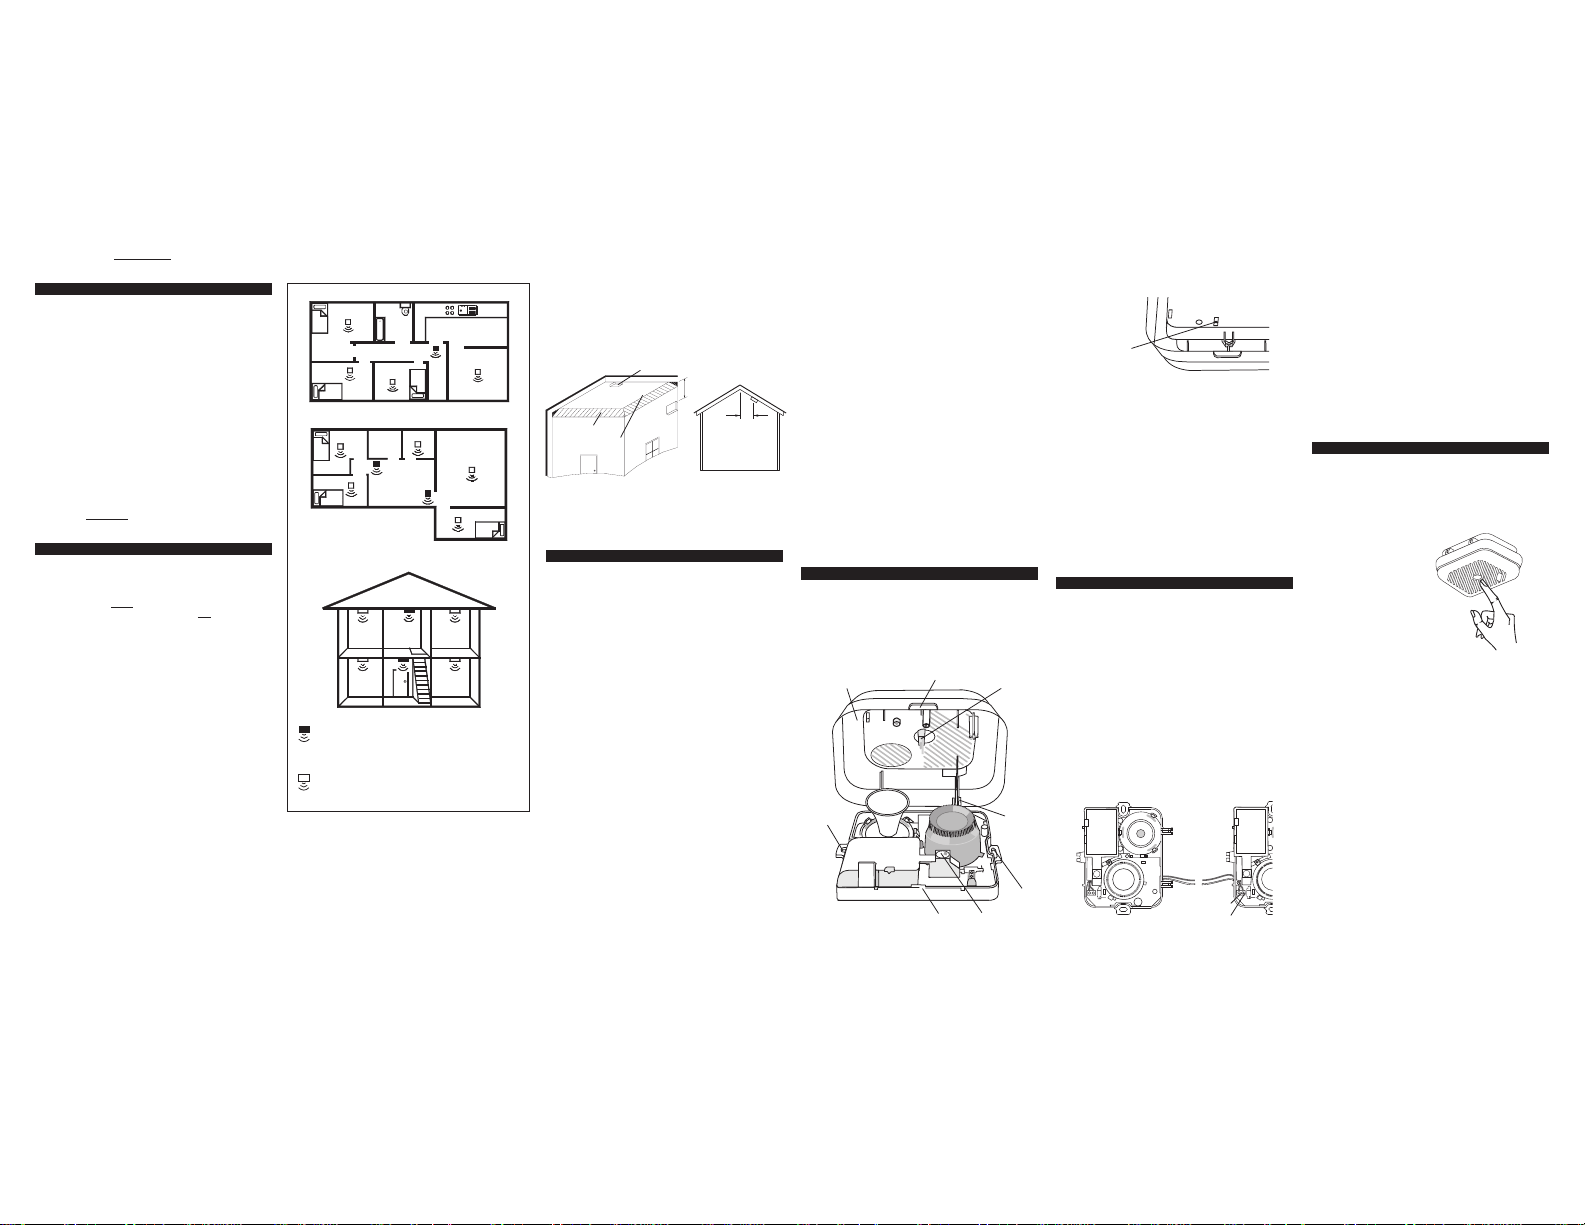
(a) Single Storey Dwelling.
Ifyour Home ison one level(a bungalow ormobile homefor example) you
should put your first Smoke Alarm in a corridor or hallway between the
sleeping and living areas. Place it as near to the living area as possible,
but makesure you can hearit loudly enough towake you in thebedroom.
(for example, see figure 1)
If yourbungalow is verylarge and thecorridor or hallwayis more than say
20 paces(15 metres) long, oneSmoke Alarm will notbe sufficient. Thisis
because nomatter where it is locatedit will be morethan 7.5 metres from
potential fires.
In houses with more than one sleeping area, Smoke Alarms should be
placed betweeneach sleeping area and theliving area (for example, see
figure 2).
(b) Multi Storey Dwellings.
Multi storey dwellings should have asmoke alarm at each level (see fig
ure 3).The best place foryour first Smoke Alarmis in the downstairs hall
way nearthe stairs. Thisis because smokeis likely to bedetectable in the
hallway before it reaches the upstairs landing and bedrooms. Your sec
ond Smoke Alarm should be upstairs, because the downstairs Smoke
Alarm is unlikely to detect the smoke from a fire in a bedroom upstairs.
as this indicatesthe battery is depleted. Cut
2. Locating your Smoke Alarm
Smoke Alarmwill give some protection ifit
or more to ensure
2
Figure 1: Single Storey Dwelling
BEDROOM
BEDROOM BEDROOM
Figure 2: Single Storey Dwelling with separate sleeping areas
-
-
-
-
BEDROOM
BEDROOM
Figure 3: Two Storey Dwelling
Recommended protection, Figures 1,2 & 3
Minimum protection
·
each storey.
·
each sleeping area.
·
every 7.5 metres (25 ft) of hallways and rooms.
Maximum protection
All rooms (except bathrooms & kitchens).
(c) Maximum Protection.
For maximum protection you should put individual Smoke Alarms in all
the roomswhere fire ismost likely tobreak out (apartfrom the locations to
avoid, mentionedon page 4). Theliving room isthe most likely placefor a
fire tostart at night, followedby the kitchenand then the diningroom. You
should also considerputting Smoke Alarms in any bedroomswhere fires
might occur, for instance, where there is an electrical appliance such as
an electric blanket or heater, or where the occupant is a smoker. You
should alsoconsider putting SmokeAlarms in anyrooms where theoccu
pantis unable torespond very wellto afire starting inthe room, suchas an
elderly or sick person or a very young child.
LIVING
KITCHEN
DINING
DININGKITCHEN
RECREATION
3
BEDROOM
(d) Checking you can hear your Smoke Alarm.
With the Smoke Alarm sounding in its intended location, check you are
able to hear itin each bedroom with the door closed, abovethe sound of
your radio. The radio should be set to a reasonably loud conversation
level. If you can’t hear it over your radio the chances are that it wouldn’t
wake you.
Figure 4
IDEAL IN CENTRE
OF CEILING
DEAD AIR SURFACES
NEVER WITHIN 300mm
OF ANY CORNER
If aSmoke Alarm is toofar away for itto wake you, itis best to linkit to an
other Smoke Alarm near the bedroom. The model
Alarms canbe interconnected so whenone alarm sensessmoke, all con
nected alarms respond. (see page 6 for further details).
3. Positioning your Smoke Alarm
(a) Ceiling Mounting.
Hot smoke rises andspreads out, so a central ceiling position is the preferred location.The air is “dead” and doesnot move in corners, therefore
Smoke Alarms must be mounted away from corners. Place the unit at
least 300mm (12 inches) from any light fittingor decorative object which
might obstruct smokeentering the Smoke Alarm. Keep at least300 mm
(12 inches) away from walls and corners. See figure 4.
(b) Wall Mounting.
When a ceiling position is not practical (for example on a ceiling having
exposed beams or joists, or built-in radiant heating) put the top edge of
your SmokeAlarm between 150 and300mm (6 and 12 inches)below the
ceiling. Keep at least 300mm (12 inches) from corners. (see figure 4).
(c) On a sloping Ceiling.
In areaswith sloping orpeaked ceilings install yourSmoke Alarm 900mm
(3 ft)from the highestpoint measured horizontally(see figure 5),because
“dead air” at the apex may prevent smoke from reaching the unit.
(d) Locations to Avoid.
Don’t place your Smoke Alarm in any of the following areas:
·
Bathrooms, kitchens, shower rooms, garages or other rooms
where the smoke alarm may be triggered by steam, condensation,
normal smoke or fumes. Keep at least 6 metre (20 ft) away from
sources of nuisance alarms - wall mounting if necessary.
·
Attics orother places where extremesof temperature may occur (be
low 4° C/34° For above 40° C/104° F).
·
Near a decorative object, door, light fitting, window molding etc.,
that may prevent smoke from entering the Smoke Alarm.
·
Surfaces thatare normally warmeror colder than therest of theroom
(for example attic hatches, uninsulated exterior walls etc). Tempera
ture differences might stop smoke from reaching the unit.
·
Next to or directly above heaters or air conditioning vents, win
dows, wall vents etc. that can change the direction of airflow.
-
·
In very high or awkward areas where it may be difficult to reach the
alarm (for testing, etc).
150 TO 300mm
(6 to 12")
Figure 5
Ei 100TYC Smoke
4
900mm
Locate unit at least 1.5m (5 feet) androute wiring at least 1m (3 feet)
·
away fromfluorescent light fittings as electrical “noise”and/or flick
ering may affect the unit.
Locate the unit at least 1 metre (3ft) from dimmer controlled lights
·
and wiring - some dimmers can cause interference.
Locate away from very dusty or dirty areas as dust build-up in the
·
chamber can make unit too sensitive and prone to alarm. It can also
block the insect screen mesh and prevent smoke from entering the
chamber.
Do not locatein insect infested areas. Small insectsgetting in to the
·
chamber can cause intermittent alarms.
(e) Nuisance/False Alarms.
(3 ft)
If, whenthe alarm goesoff, there is nosign of smoke heator noise toindi
cate thatthere isa fire, youshould get yourfamily into asafe place, before
you start investigating.
Check thehouse carefully in casethere is a smallfire smouldering some
where.
Check whether there is some source of smoke or fumes, for example
cooking fumes being drawn past the Smoke Alarm by an extractor.
If there are frequentnuisance/false alarms it may be necessary to re- lo
cate the device away from the source of the fumes.
This SmokeAlarm is designed formore difficult areas,as you can silence
the alarmfor 8 minutes. This gives timefor smoke or fumes toclear, (see
page 7 for more details).
4. Installing your Smoke Alarm
(a) Attaching to Ceiling or Wall.
(NB detailsof how tointerconnect the SmokeAlarm
on page 6).
The SmokeAlarm is battery operatedand needs no wiring, (exceptwhen
interconnecting). Use figure 6 below, as a help in mounting.
Figure 6
(1) COVER
(6) SCREW
-
HOLE
-
-
(2) TAB TO OPEN
COVER
(7) PLASTIC
CLIP
Ei 100TYCare given
(3) TEST BUTTON
(8) POWER-ON
PUSH BUTTON
(5) SNAP-IN
HINGES
(6) SCREW
5
Figure 6a
-
“END OF LIFE”
RED WIRE
1. PullCover open at Tab (2).Remove Cover from Base byseparating at
rear Snap-in Hinges (5).
2. Place the Baseon ceiling or wall exactly where you wantto mount the
-
unit. With a pencil, mark the location of the Screw Holes (6)
3. Taking care to avoid any electrical wiring in the ceiling or wall, drill a
hole throughthe centers of themarked locations. Push the plasticScrew
-
Anchors provided into the drilled holes. Screw in firmly.
(b) Connecting the built-in Lithium battery.
Push the power-on button (8), (see figure 6) until it clicks to connect the
battery permanently.Note: You may hear a loudchirp when pressing the
-
button. This is normal.
To close the cover match up the snap-in hinges (5) and gently press to
gether until they areattached. Press the test button (3) - the horn should
sound to show the Smoke Alarm is now working. If the horn does not
soundtry pushing thepower-on button (8)again. Note: Thepower-on but
ton cannot be used to disconnect the battery.
5. Interconnecting your Smoke Alarm
A maximumof twelve Ei 100TYC Smoke Alarms maybe wired together
such that when one unit senses smoke all other units sound a warning.
This helps ensure smoke alarms will be heard. (Model
100TYK can not be interconnected).
The
Ei 100TYC Ionisation Smoke Alarm may also be interconnected to
the Ei Optical Smoke Alarm, model number Ei 3105TYC.
Warning: Do not interconnect to any other Smoke Alarms
A maximum of250 metres (820 feet) of wire can beused, (maximum re
sistance betweendetectors 50 ohm).The unitsare interconnected bywir
ing all the terminals marked 1 together, and all the terminals marked 2
together, as shown in Figure 7. An opening should be made in the label
covering the wiringhole in the base, and the wires routedinto the unit as
shown. Note that the wiring inside the unit must be kept clear of the test
button contacts, but must not impede the air flow. Draughts from wiring
openings, conduit,or mounting boxes/holes, mayblow smoke away from
the sensing chamber, making it insensitive. It is essential that all such
openings are sealed by silicone sealant or similar.
Underside of Smoke Alarm
Figure 7
PUSH
HOLE
TERMINAL 2
TERMINAL 1
6
Ei 100TY & Ei
PUSH
After wiring togetherthe Interconnect Smoke Alarms, testthe first unit by
pressing the button. All the detectors should alarm within about 5 sec
onds. Check all the other units similarly.
These Smoke Alarms should be interconnected only within the confines
of a singlefamily living unit. If they areconnected between different units
there may be excessive nuisance alarms. Everybody may not be aware
that theyare being tested orthat it isa nuisance alarm causedby cooking
etc.
Indicator light
When interconnected units are inalarm the fast flashing red light behind
the testbutton indicatesthe unit initiatingthe alarm. Tosilence a nuisance
alarm, the hush button onthe unit with the fast flashing red light must be
pushed.(Pressing the hushbutton on anyof theother units willnot silence
the alarm.)
6. Looking after your Smoke Alarm
(a) Testing your Smoke Alarm
Itis recommended thatyou test yourSmoke Alarmonce a weekto besure
the unitis working. It will also helpyou and your familyto become familiar
with the sound of the Alarm.
Press and hold the test but
ton untilthe Alarm sounds (it
may take upto 10 seconds),
(Figure 8). The Alarm will
stop sounding shortly after
the button is released. If the
Alarm fails to sound, follow
this checklist.
1. Pressthe power onbutton
to connect the battery permanently.
2. Check the cover is correctly snapped on to its
hinge and that it is fully
closed.
3. Refer to “Cleaning Your Smoke Alarm” 6 (c) below.
WARNING: Do not test with flame.
-
-
This can set fire to your Smoke Alarm and damage your house.
We donot recommend testing with smoke asthe results can be mislead
ing unless special apparatus is used. Pressing the test button simulates
the effect of smoke during a real fire and is the best way to ensure the
Smoke Alarm is operating correctly.
Power Indicator Light.
Some SmokeAlarms (models Ei100TY andEi100TYC) have a PowerIn
dicator Lightwhich flashes once a minutethrough the test buttonto show
the SmokeAlarm is powered.Check regularly. Replacethe Smoke Alarm
if the flashing stops. (This does not apply to the Ei100TYK model)
(b) Hush Button
This model has a specialfalse Alarm silencer feature to help you control
nuisance false alarms.
1. To cancel a false Alarm, press the Hush Button located on the lower
right-hand corner.The Alarm willautomatically switch toa reduced sensi
tivitycondition. This conditionallows unwanted alarmsto be silencedfor a
period of approximately 8 minutes.
2. Theunit will resetto normal sensitivityat the end ofthe silenced period.
Ifadditional silenced timeis required,simply push theHush Buttonagain.
3. To quickly return to normal non-silenced operation, simply push the
Test Button;the Alarm willsound briefly andreturn to its normal,sensitive
Alarm mode.
-
Figure 8
7
-
H
HUS
-
-
-
Page 2

4. Ifthe cause ofthe Alarm is notclear, it shouldbe assumed that itis due
to an actual fire and the dwelling should be evacuated immediately.
If kitchenusage/layout is suchthat there arean unacceptable level ofnui
sance alarms, re-locate theSmoke Alarm whereit will be lessaffected by
cooking fumes etc.
(c) Cleaning your Smoke Alarm.
Clean your Smoke Alarm regularly. Use a soft bristle brush or the brush
attachment ofyour vacuumcleaner to removedust and cobwebsfrom the
sides and cover slots where the smoke enters. Keep cover closed while
cleaning. Do not vacuum orbrush inside the Smoke Alarm. To clean the
cover, removei tcompletely and use only mildsoap and water. Dry cover
thoroughly before replacing it.
WARNING: Do not paint your Smoke Alarm.
Other than the maintenance and cleaning described in this leaflet, no
other customer servicing of this product is required. Repairs, when
needed, must be performed by the manufacturer.
(d) End of life
The entire Smoke Alarm must be replaced if:-
(i)The unit isinstalled forover 10 years(check thereplace by datemarked
on the side of the base).
(ii) The unit is giving a short beep every 40 seconds for over 1 hour.
(iii)The unit failsto soundthe horn loudlywhen thetest button ispressed.
Before the Smoke Alarm is discarded, cut “end oflife” red wire shown in
figure 6awith a scissors tostop the low batterybeeps or the possibility of
the unit alarming. Do not put the Smoke Alarm into a fire.
We recommend that the unitis maintained (i.e. battery checked and unit
cleaned) as described above at least yearly.
When using household protective devices, basic safety precautions
should always be followed, including those listed below:
·
·
·
·
·
·
·
·
·
·
7. Important Safeguards
Please read all instructions.
Rehearse emergencyescape plans soeveryone at home knowswhat
to do in case the Alarm sounds.
NOTE:Constant exposure tohigh or freezingtemperatures orhigh hu
midity may reduce the life of the batteries.
Donot cut thepower lead tostop Alarmsounding as thebattery cannot
be reconnected.(Pressing the Hush Button orfanning vigorously with
a newspaper or similar will remove nuisance smoke from the Smoke
Alarm and stop it sounding.)
Dispose of the complete Smoke Alarm including the batteries inside.
Donot attempt torecharge orburn the batteries,as theymay explode.
To maintainsensitivity to smoke, donot paint or coversmoke Alarm in
any manner; do not permit any accumulation of cobwebs, dust or
grease.
The black chamber located in the Smoke Alarm contains a small
amount of radioactive material (0.9 Microcuries Americium 241). Do
not tamper with the chamber. You may safely install and clean the
Smoke Alarm following instructions in this leaflet.
If unithas been damaged in anyway or does not functionproperly, do
not attempt a repair.Return Smoke Alarm (see - Getting your Smoke
Alarm Serviced page 11.)
In theUnited Kingdom Ionisation SmokeAlarms can bedisposed of in
normalhousehold refuse, butdue tothe tiny amountof radioactive ma
terial contained in the unit, no more than one Alarm per dustbin.
In theRepublic of IrelandIonisation Smoke Alarmsshould be returned
for disposal to the nearest address at the end of this leaflet.
8
This appliance is intended for residential type environments only.
·
Thisis not aportable product. Itmust bemounted following theinstruc
·
tions in this instruction leaflet.
Smoke Alarmsare not asubstitute for insurance.The supplier orman
·
ufacturer is not your insurer.
(b) Limitations of Smoke Alarms.
SmokeAlarms have significantlyhelped to reducethe numberof fire fatal
ities in countries where they are widely installed.
Howeverindependent authorities havestated that theymay beineffective
in up to 35% of all fires. There are a number of reasons for this:
Smoke Alarms will not workif the batteries are depleted or if they are
·
not connected. Test regularly and replace entireSmoke Alarm when
battery is depleted.
Smoke Alarmswill notdetect fire ifsufficient smoke doesnot reach the
·
Alarm. Smoke may be prevented fromreaching the Alarm if thefire is
too faraway, for example,if thefire is onanother floor, behinda closed
door,in a chimney,in awall cavity, orif the prevailingair draughtscarry
the smoke away. Installing smoke alarms on both sides of closed
doors and installingmore than one smoke Alarm as recommended in
thisleaflet very significantlyimprove theprobability of earlydetection.
The Smoke Alarm may not be heard.
·
A smoke Alarm maynot wake a person who has taken drugs or alco
·
hol.
Smoke Alarmsmay not detect every typeof fire to givesufficient early
·
warning. They are particularly ineffectivewith: fires caused by smok
ing in bed, escapinggas, violent explosions. poor storage of flammable rags and/or liquids, (for example petrol, paint, spirits etc),
overloaded electrical circuits, arson, children playing with matches.
· The Smoke Alarm must be replaced after 10 years operation.
The SmokeAlarm hasbeen designed tooperate for 10years and itis covered by a 5 year limitedguarantee. The 10 year life is based on accelerated testing,as the actualSmoke Alarm hasnot been ontest for 10years.
Thebatteries in thisAlarm cannot bereplaced, and whenthe batteriesare
depleted, youmust replace thecomplete Smoke Alarmfor continued protection against fire.
8. Planning your Escape for when the Alarm goes
-
Use theSmoke AlarmTest Button tofamiliarize your familywith the Alarm
sound andto practice firedrills regularly withall family members.Draw up
a floor plan that will show each member at least 2 escape routes from
each roomin the house. Childrentend to hidewhen they don’t knowwhat
to do. Teach children how to escape, openwindows, and use roll up fire
ladders and stools without adulthelp. Make sure they know what to do if
the Alarm goes off - see below.
-
off
9
1. Checkroom doors forheat or smoke. Do
not open a hot door. Use an alternate es
cape route. Closedoors behind you as you
leave.
2. If smoke is heavy, crawl out, staying
close to floor. Take short breaths, if possi
ble, througha wet cloth orhold your breath.
Most people die from smoke inhalation
rather than from flames.
3. Getout asfast as youcan. Do notstop for
packing. Have a prearranged meeting
place outsidefor allfamily members. Check
everybody is there.
4. Call the Fire Brigade from a neighbour’s
house. Remember to give your name and
address.
5. NEVER re-enter a burning house.
-
FIRE SAFETY HINTS.
-
Store petrol and other flammable materials in proper containers.
Discard oily or flammable rags.
Always use a metal fireplace screen and have chimneys cleaned regularly.
Replace worn receptacles, switches, homewiring and cracked or frayed
electrical cords and plugs.
Do not overload electrical circuits.
Keep matches away from children.
Never smokein bed. In rooms where youdo smoke, always check under
cushions for smouldering cigarettes and ashes.
Service furnaces and heating systems regularly.
Be sure all electrical appliances and tools have a recognized approval
label.
This device cannot protect all persons at all times. It may not protect
against the three most common causes of fatal fires:
1. Smoking in bed.
2. Leaving children at home alone.
3. Cleaning with flammable liquids, such as petrol.
Further informationcan be obtainedfrom theHome Office Publicationen
titled “SmokeDetectors in theHome” (FB2) or fromyour local fire preven
tion officer.
Fit both Ionisation and Optical Sensor Smoke
Both typesrespond in all standardfires but each typemay respond faster
to particularfires asshown. Ei Electronicsmanufactures two complemen
tary 10 Year Smoke Alarms , Optical Smoke Alarm Ei3105TYC and
Ionisation Smoke Alarm Ei100TYC each with a built in Lithium battery.
protection install each type.
For dual
-
-
Alarms
10
Optical Sensor
Best for slow smouldering fires
- large smoke particles
The Home Office states (in FB2):
“If yourhome has more thanone floor , atleast one alarm should befitted
on eachlevel. In thiscase a combinationof Optical and Ionisationalarms,
preferably interconnected, will give the best protection.”
9. Getting your Smoke Alarm Serviced
If your Smoke Alarm fails to work after you have read the sections on
“Connecting the built-in Lithium battery” and “Looking after your Smoke
Alarm” contact Customer Assistanceat the nearest address given at the
end ofthis leaflet. If itneeds to be returnedfor repair or replacementput it
in a padded box,shipping pre-paid and send it to “Customer Assistance
and Information” at the nearest address given on the Smoke Alarmor in
this leaflet.State the nature ofthe fault, where theSmoke Alarm was purchased and the date of purchase.
Disconnect the batterypower by cutting the “end oflife” red wire (see figure 6a) as described on the labelon the side of the unit before shipping.
This is toprevent low battery beeps and/or the unit alarmingduring shipment.
-
-
-
Ionisation Sensor
Best for fast flaming fires
- small smoke particles
11
10. Five Year Guarantee (Limited)
Ei Electronicsguarantees this productagainst any defects thatare due to
faulty materialor workmanship fora five yearperiod after theoriginal date
of consumer purchaseor receipt as a gift. This guarantee onlyapplies to
normal conditions of use and service, and does not include damage re
sulting from accident, neglect, misuse,unauthorised dismantling or con
tamination howsoever caused. If this product has become defective it
must be returned toEi Electronics (see “Getting Your Smoke Alarm Ser
viced”) withproof of purchase.If the producthas become defectiveduring
the five year guarantee the manufacturer will repair or replace the unit
without charge. This guarantee excludes incidental and consequential
damages.
Do not interfere with the product or attempt to tamper with it. This will
invalidate the guarantee.
Ei Electronics. 9 Grundy Street, Liverpool L5-9SG, U.K.
Telephone: 0151 298 1588
Ei Electronics. Shannon, Co.Clare, Ireland.
www.eielectronics.com
Aico Ltd. Mile End Business Park, Maesbury Rd,
Oswestry, Shropshire SY10 8NN, U.K. www.aico.co.uk.
Telephone: 0870 758 4000
12
IMPORTANT NOTICE
-
-
-
the power-on button is pressed.
Complete Smoke Alarm must be
•
replaced after 10 years. The bat
tery is not replaceable.
© Ei Electronics 2001
B14464 Rev 1
Smoke Alarm will not work until
•
TEN YEAR
SMOKE ALARM
WITH 10 YEAR LITHIUM BATTERY BUILT-IN
INSTRUCTION LEAFLET
Contains vitalinformation on unit operationand installation. Readand re
tain carefully. Ifyou are just installing this unit this leaflet MUSTbe given
to the householder.
Please read the first short section containing basic information.
10YEARLITHIUM BATTERY
SMOKEALARM 100TY
EI
HUSH
IONISATION SMOKE ALARM
Models : Ei 100TY & Ei 100TYK
Ei 100TYC WITH INTERCONNECT
-
-
 Loading...