


TV Wall Bracket
TV-Wandhalterung
00118126
06127756
Operating Instructions
Bedienungsanleitung
Mode d‘emploi
Instrucciones de uso
Руководство по эксплуатации
Istruzioni per l‘uso
Gebruiksaanwijzing
Οδηγίες χρήσης
Instrukcja obsługi
Használati útmutató
Návod kpoužití
Návod na použitie
Manual de instruções
Kullanma kılavuzu
Manual de utilizare
Bruksanvisning
Käyttöohje
Ръководство за обслужване
GB
D
F
E
RUS
I
NL
GR
PL
H
CZ
SK
P
TR
RO
S
FIN
BG
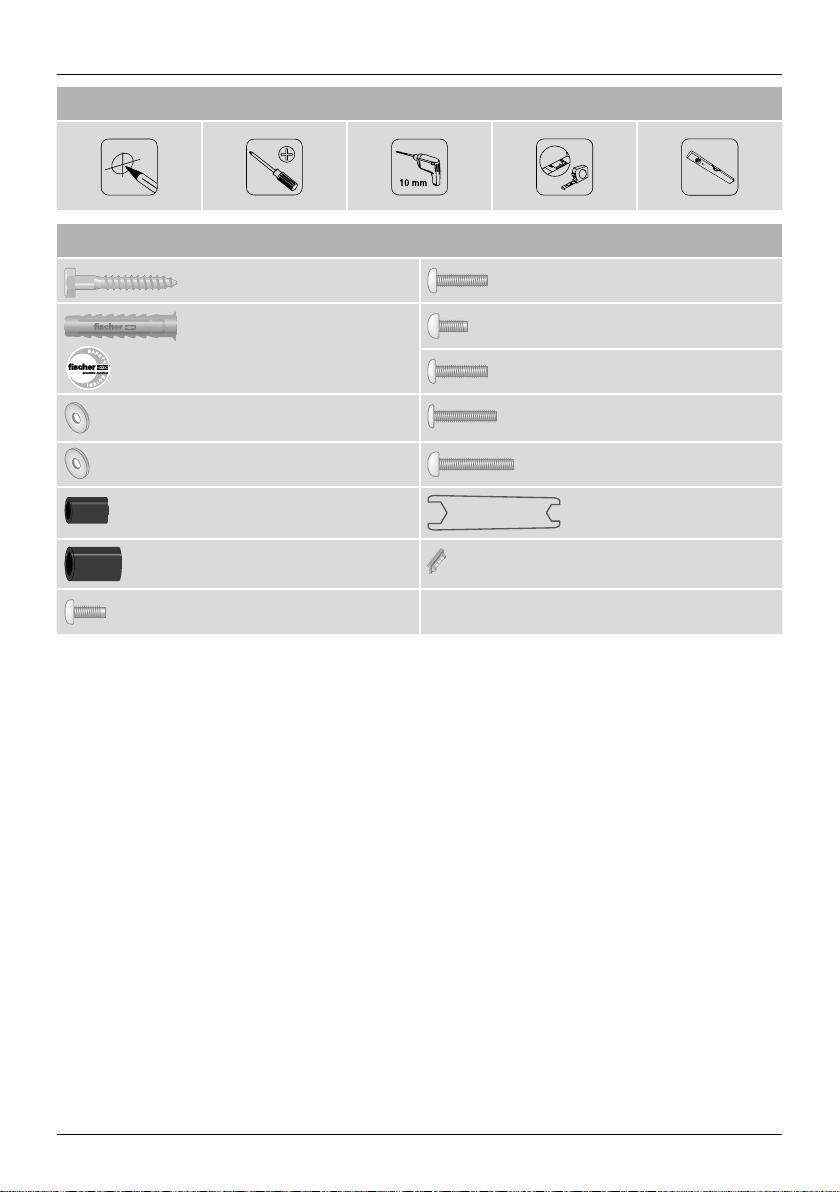
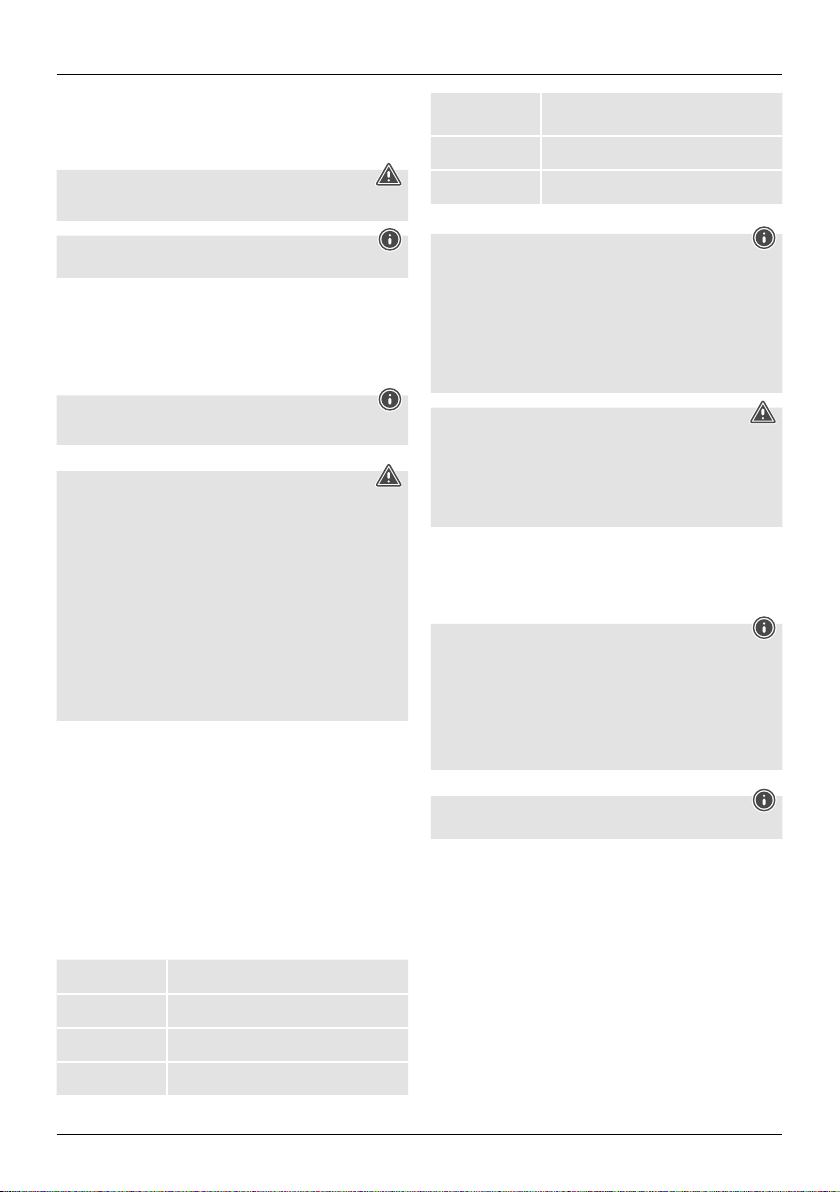
Required tools
Installation kit
(A1) 6x55 (x4)
(A2) Ø10x50 (x4)
(A3) M6 (x4)
(B1) M6 (x4)
(B2) Ø8x10 (x4)
(B3) Ø8x20 (x4)
(C1) M6x12 (x4)
(C2) M6x20 (x4)
(D1) M8x12 (x4)
(D2) M8x20 (x4)
(D3) M8x30 (x4)
(D4) M8x45 (x4)
(F1) (x1)
(F2) (x1)
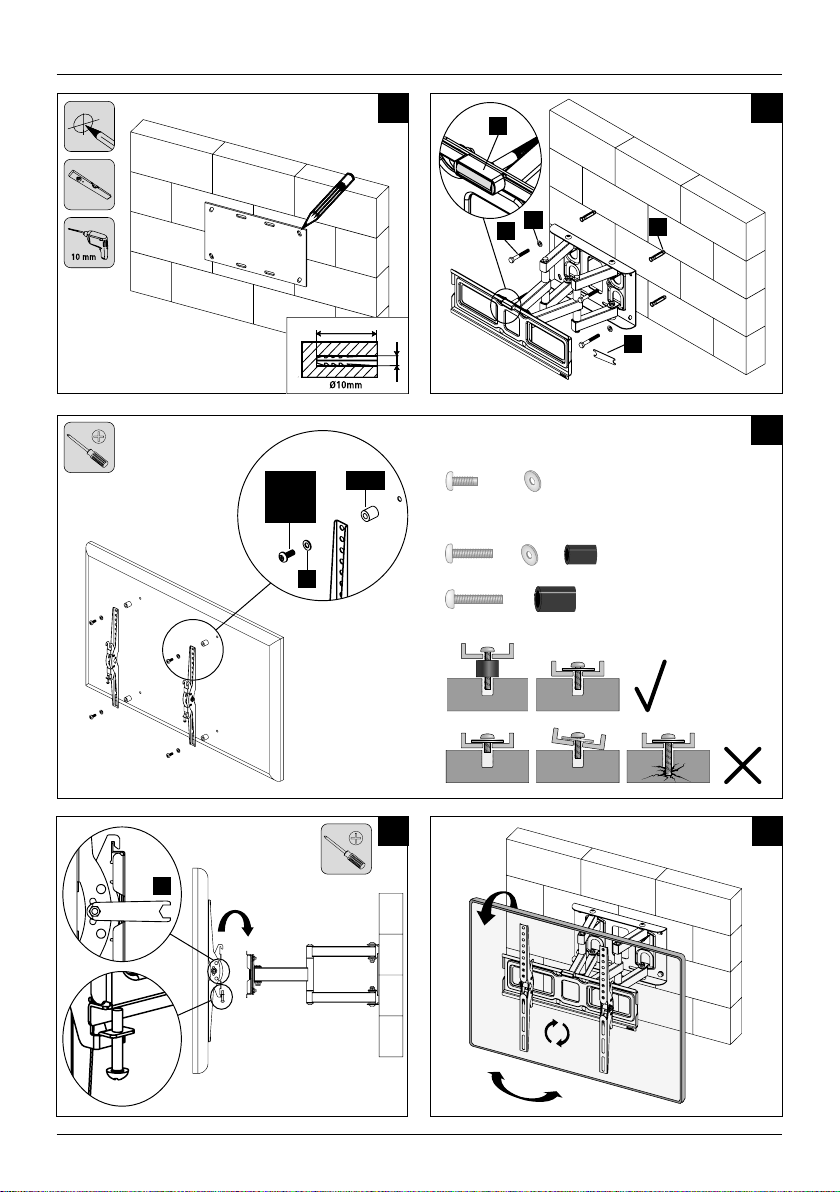
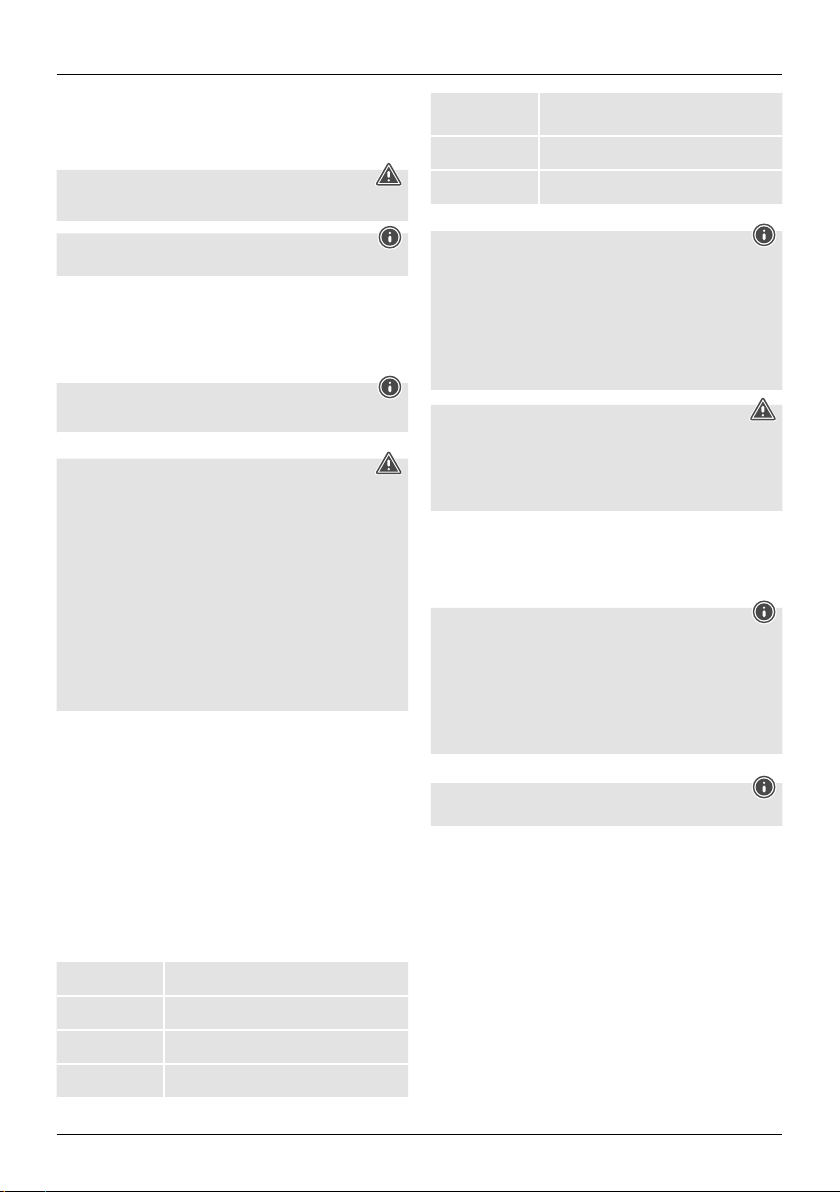
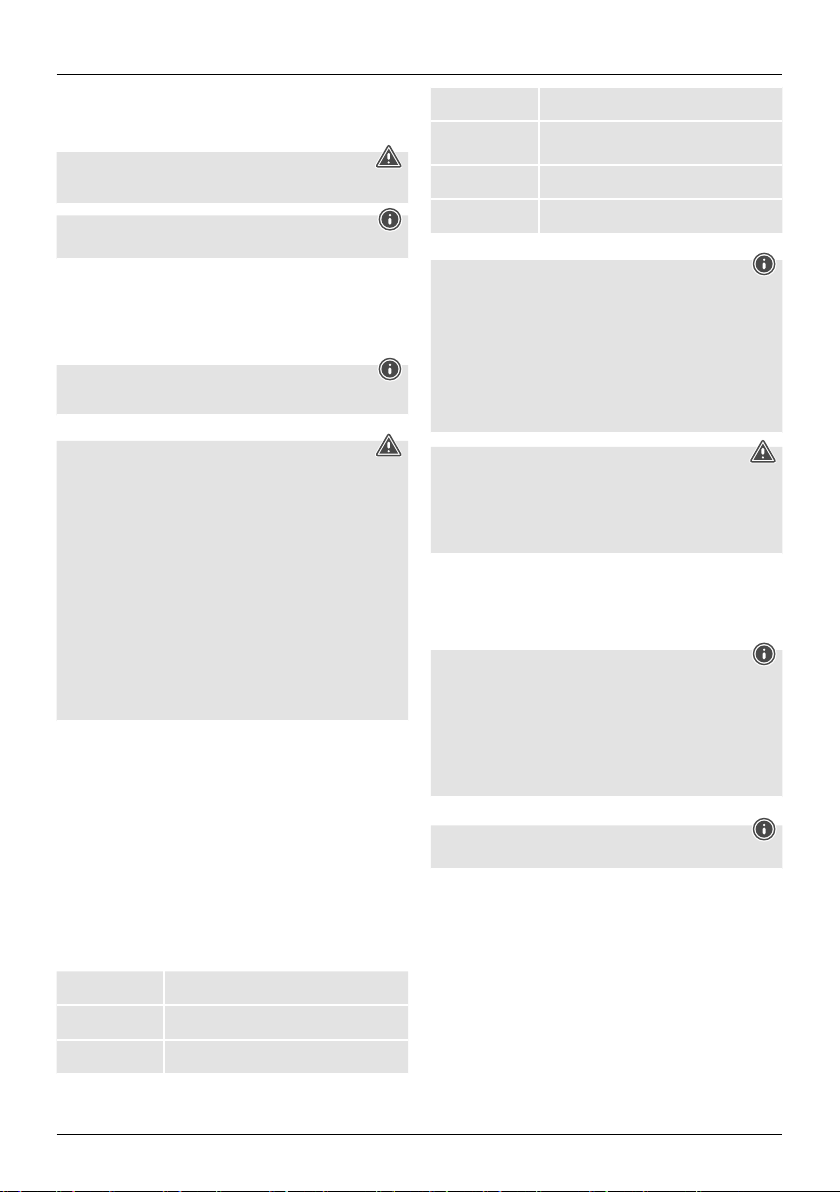
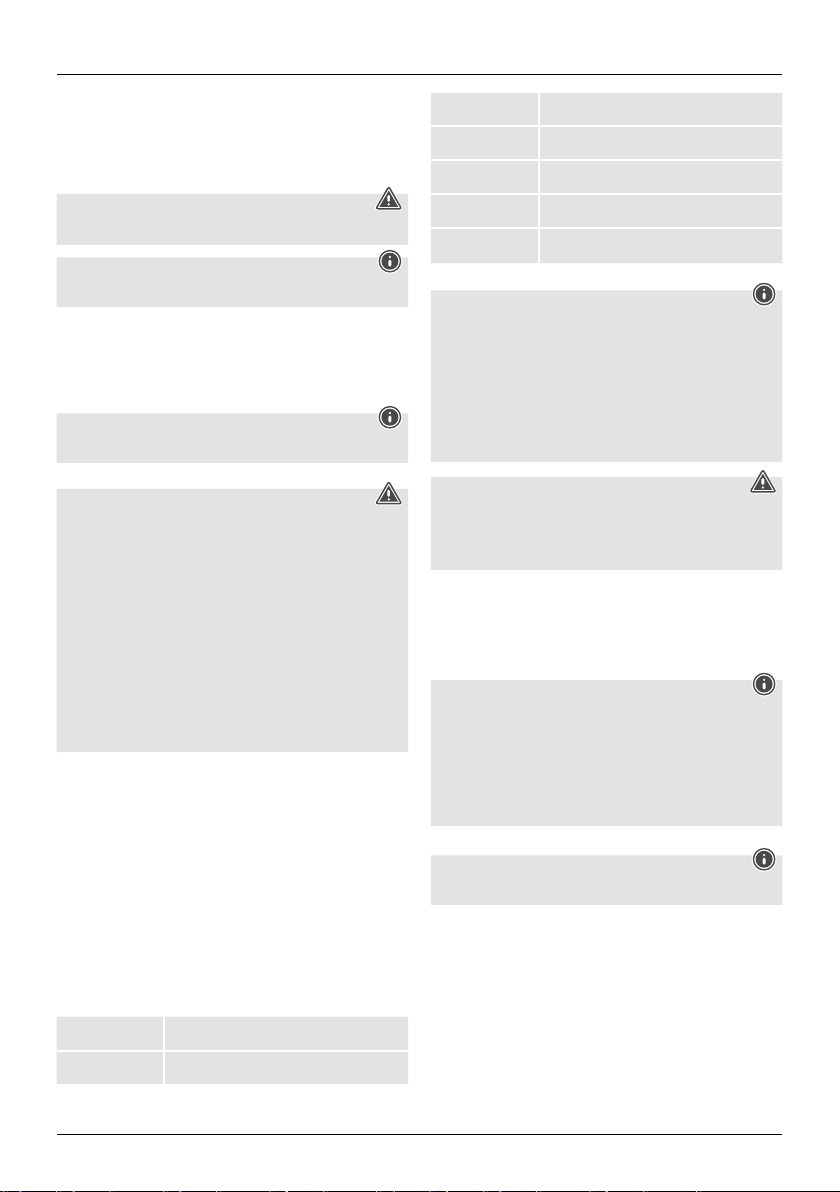
1 2
F2
C1, C2,
D1, D2,
D3, D4,
A3
A1
70mm
Flat TV backside / ache TV-Rückseite
B1C1, D1, D4
B2, B3
B1
+
Curved TV backside /gewölbte TV-Rückseite
B1 B2C2, D2, D4
++
B3D3, D4
+
A2
F1
3
4 5
F1
−/+15°
−/+3°
150°
G Operating instruction
Thank you for choosing aHama product.
Take your time and read the following instructions and information completely.Please keep
these instructions in asafe place for futurereference. If you sell the device, please pass
these operating instructions on to the new owner.
1. Explanation of Warning Symbols and Notes
Warning
This symbol is used to indicate safety instructions or to draw your attention to specic
hazards and risks.
Note
This symbol is used to indicate additional information or important notes.
2. Package Contents
• TV wall bracket
• TV support arms (2x)
• Drilling template
• Cable ties
• Installation kit (see contents, Fig. 1)
• These operating instructions
Note
Please check that the installation kit is complete beforeinstalling the
bracket and ensurethat none of the parts arefaulty or damaged.
3. Safety Notes
Warning
• Given the multitude of terminal devices and wall structures available on the market,
the supplied mounting kit is unable to cover every option.
• It occasionally happens that the screws for attaching the terminal device to the wall
bracket aretoo long.
• Please note that the supplied wall plugs arefor use with concrete brick and solid
brick walls only.
• Read the operating instructions for your terminal device beforeattempting to mount
it. The instructions provide information about the type and measurements of suitable
fastening materials.
• If the supplied mounting kit does not contain suitable fastening materials for
mounting the terminal device, purchase these from aspecialised dealer.
• If the wall on which the bracket is to be mounted is made of different material types
and construction types to those specied, purchase suitable mounting materials from
aspecialised dealer.
• Never apply force during mounting. This can damage your end device or wall
bracket.
• If in doubt, have this product mounted by aqualiedtechnician -donot attempt to
mount it yourself!
• Do not mount the product above locations wherepersons might linger.
• Once you have mounted the product and the attached load, check that they are
suciently secureand safe to use.
• Youshould repeat this check at regular intervals
(at least every three months).
• When doing so, ensurethat the product does not exceed its maximum permitted
carrying capacity and that no load exceeding the maximum permitted dimensions is
attached.
• Make surethat the product is loaded symmetrically.
• During adjustment, ensurethat the product is loaded symmetrically and that the
maximum permitted carrying capacity is not exceeded.
• Maintain the necessary safety clearance around the attached load (depending on the
model).
• In the event of damage to the product, remove the attached load and stop using the
product.
4. Intended use and specifications
• The bracket is used for wall mounting at panel displays for non-commercial, private
household use.
• The bracket is only intended for use within buildings.
• Use the bracket only for the intended purpose.
Maximum load bearing
capacity:
Screen size: 00118126/06127756:
00118126/06127756: 50 kg
81.0 -213.0 cm (US: 32" -84")
Depth: 00118126/06127756: 8.4 –42.0 cm
Angle: –/+ 15°
Pivoting range:
Wall mounting plate
dimensions:
Mounting holes:
5. Installation requirements and installation
Note
• Only mount the TV wall bracket with the help of asecondperson. Get the support
and help you need.
• Different end devices have different options for connecting cables and other devices.
Beforeinstallation, ensurethat the necessary connections will still be accessible
after installation.
• The same mounting kit is included with all of our TV wall brackets. Depending on
the product and mounting type, you may not need to use the entiremounting kit.
Unneeded screws and other small parts may be left over,even if the wall bracket
is properly mounted. Keep these leftover parts with the operating instructions in a
safe place, just in case you might need them later on (e.g. should you move, sell the
product, mount the wall bracket in adifferent location, buy anew TV,etc).
Warning
• This product is suitable for wall mounting only.
• Beforeinstalling the bracket, ensurethat the wall on which the television is to be
mounted is suitable for the weight and make surethat no electrical wires, water,gas
or other lines arelocated at the installation location.
• Please note that the provided wall anchors areonly approved for concrete and solid
brick walls.
• Observe the other warnings and safety instructions.
• Proceed step-for-step in accordance with the illustrated installation instructions (Fig.
1ff.).
• During installation, the hinges aretobeadjusted so that the TV can be moved sideto-side.
• Check whether your television is level using the included spirit level. If necessary,adjust
the television plate.
Note
• Given the multitude of terminal devices available on the market, we cannot describe
all possible mounting options here.
• Please ensurethat the bracket lays at and evenly on the back of the television.
• Use the enclosed spacer to even out any unevenness on the back of the television.
• Ensurethat all screws have the proper length and can be mounted until they are
hand-tight (see Fig. 3).
6. Setting and maintenance
Note
Only adjust the TV wall bracket with the help of asecond person. Get the support and
help you need.
• Screws do not have to be loosened for lateral movement.
• The resistance for the tilt adjustment and lateral movement can be adjusted using the
corresponding screws.
• To secure, insert the carrying arms into the TV plate and tighten both of the screws.
• Check that the bracket is secureand safe to use at regular intervals (at least every three
months). Only use water or standardhousehold cleaners for cleaning.
7. Warranty Disclaimer
Hama GmbH &CoKG assumes no liability and provides no warranty for damage resulting
from improper installation/mounting, improper use of the product or from failuretoobserve
the operating instructions and/or safety notes.
at 3hinges with 2double carrier arms
00118126/06127756: up to 150°
29.7 x17.8 cm
according to the VESA standarduntil
00118126/06127756: 600x400
2

D Bedienungsanleitung
Vielen Dank, dass Sie sich für ein Hama Produkt entschieden haben!
Nehmen Sie sich Zeit und lesen Sie die folgenden Anweisungen und Hinweise zunächst ganz
durch. Bewahren Sie diese Bedienungsanleitung anschließend an einem sicheren Ort auf,um
bei Bedarf darin nachschlagen zu können. Sollten Sie das Gerät veräußern, geben Sie diese
Bedienungsanleitung an den neuen Eigentümer weiter.
1. Erklärung von Warnsymbolen und Hinweisen
Warnung
Wirdverwendet, um Sicherheitshinweise zu kennzeichnen oder um Aufmerksamkeit auf
besondereGefahren und Risiken zu lenken.
Hinweis
Wirdverwendet, um zusätzlich Informationen oder wichtige Hinweise zu kennzeichnen.
2. Packungsinhalt
• TV Wandhalterung
• TV-Tragearme (2x)
• Bohrschablone
• Kabelbinder
• Montagesatz (Inhalt siehe Abb.1 )
• diese Bedienungsanleitung
Hinweis
Bitte prüfen Sie vor der Installation der Halterung den Montagesatz auf Vollständigkeit
und stellen Sie sicher,dass keine fehlerhaften oder beschädigten Te ile enthalten sind.
3. Sicherheitshinweise
Warnung
• Bei der Vielfalt der auf dem Markt erhältlichen Endgeräte und Wandkonstruktionen
kann der beigelegte Montagesatz nicht alle Möglichkeiten abdecken.
• In seltenen Fällen kann es vorkommen, dass die Schrauben zur Anbringung des
Endgerätes an der Wandhalterung zu lang sind.
• Beachten Sie, dass die mitgelieferten Dübel nur für Beton- und Vollziegelwände
zugelassen sind.
• Lesen Sie vor der Montage die Bedienungsanleitung Ihres Endgerätes. Diese
gibt in der Regel Informationen über die Art und die Maße der geeigneten
Befestigungsmaterialien.
• Beschaffen Sie sich geeignetes Befestigungsmaterial zur Montage des Endgerätes im
Fachhandel, sofern es kein Bestandteil des mitgelieferten Montagesatzes ist.
• Besorgen Sie sich geeignetes Montagematerial im Fachhandel bei anderen Materialund Konstruktionsarten der für die Installation vorgesehenen Wand.
• Wenden Sie bei der Montage niemals Gewalt oder hohe Kräfte an. Dies kann Ihr
Endgerät oder die Wandhalterung beschädigen.
• Im Zweifel wenden Sie sich für die Montage dieses Produkts an dazu ausgebildete
Fachkräfte und versuchen Sie es nicht selbst!
• Montieren Sie das Produkt nicht an Orten, unter denen sich Personen aufhalten könnten.
• Nach der Montage des Produktes und der daran befestigten Last sind diese auf
ausreichende Festigkeit und Betriebssicherheit zu überprüfen.
•
Diese Prüfung ist in regelmäßigen Abständen zu wiederholen (mindestens
vierteljährlich).
• Achten Sie darauf,dass die maximal zulässige Tr agfähigkeit des Produktes nicht
überschritten wirdund keine Last angebracht wird, die die maximal zulässigen Maße
hierfür überschreitet.
• Achten Sie darauf das Produkt nicht asymmetrisch zu belasten.
• Achten Sie beim Verstellen darauf,dass das Produkt nicht asymmetrisch belastet wird
und dabei die maximal zulässige Tragfähigkeit überschritten wird.
• Halten Sie einen Sicherheitsabstand um die angebrachte Last ein (abhängig vom
Modell).
• Entfernen Sie bei Beschädigungen des Produkts sofort die angebrachte Last und
benutzen Sie das Produkt nicht weiter.
• 4. Anwendungsbereich und Spezifikationen
• Die Halterung dient der Wandbefestigung von Flachbildschirmen für den privaten, nicht-
gewerblichen Haushaltsgebrauch.
• Die Halterung ist nur für den Gebrauch innerhalb von Gebäuden vorgesehen.
• Verwenden Sie die Halterung ausschließlich für den dazu vorgesehenen Zweck.
Maximale Tragekraft: 00118126/06127756: 50 kg
Bildschirmdiagonale: 00118126/06127756:
81,0 -213,0 cm (US: 32" -84")
Tiefe: 00118126/06127756: 8,4 –42,0 cm
Neigung: –/+ 15°
Schwenkbereich:
Abmessung der Wand
befestigungsplatte:
Aufnahme:
5. Montagevorbereitung und Montage
Hinweis
• Montieren Sie die TV-Wandhalterung nur zu zweit! Holen Sie sich Unterstützung
und Hilfe!
• Unterschiedliche Endgeräte haben unterschiedliche Anschlussmöglichkeiten
für Verkabelung und weitereGeräte. Prüfen Sie vor der Installation, ob sich die
benötigten Anschlüsse nach der Montage noch erreichen lassen.
• Sie benötigen je nach Produkt und Montageart nicht den kompletten Montagesatz.
Es ist daher möglich, dass auch bei korrekter Montage nicht benötigte Schrauben
und andereKleinteile übrig bleiben. Bewahren Sie diese zusammen mit dieser
Bedienungsanleitung an einem sicheren Platz für einen späteren Gebrauch (Verkauf
des Produktes, Umzug, Umbau der Wandhalterung, neuer TV etc.) auf.
Warnung
• Dieses Produkt ist ausschließlich für die Montage an Wänden geeignet.
• Prüfen Sie unbedingt vor der Installation die Eignung der vorgesehenen Wand
für das anzubringende Gewicht und vergewissern Sie sich, dass sich an der
Montagestelle in der Wand keine elektrischen Leitungen, Wasser-, Gas- oder
sonstige Leitungen benden.
• Beachten Sie, dass die mitgelieferten Dübel nur für Beton- und Vollziegelwände
zugelassen sind.
• Beachten Sie die übrigen Warn- und Sicherheitshinweise.
• Gehen Sie Schritt für Schritt nach der bebilderten Montageanleitung vor (Abb. 1ff. ).
• Während der Installation sind die Gelenke so einzustellen, dass eine seitliche Bewegung
• Überprüfen Sie mit der beigefügten Wasserwaage die horizontale Ausrichtung ihres
TV-Gerätes und justieren Sie gegebenenfalls an der TV-Platte nach. des TV-Gerätes
möglich ist.
Hinweis
• Bei der Vielfalt der auf dem Markt erhältlichen Endgeräte können nicht alle Varianten
der Montage beschrieben werden.
• Achten Sie darauf,dass die Halterung gerade und eben auf der Rückseite des
Fernsehgeräts auiegt.
• Nutzen Sie die beiliegenden Abstandhalter,umUnebenheiten der TV-Rückseite
auszugleichen.
• Beachten Sie, dass alle Schrauben die richtige Länge haben und handfest montiert
werden (siehe Abb. 3).
6. Einstellung &Wartung
Hinweis
Verstellen Sie die TV-Wandhalterung nur zu zweit! Holen Sie sich Unterstützung und
Hilfe!
• Für die Neigungseinstellung und die seitliche Bewegung müssen keine Schrauben
gelöst werden.
• Der Widerstand für die Neigungseinstellung und die seitliche Bewegung kann mithilfe
der entsprechenden Schrauben nachgestellt werden.
• Zur Sicherung die Tragearme in die TV-Platte einhängen und die beiden Schrauben
festdrehen.
• Die Festigkeit und Betriebssicherheit sind in regelmäßigen Abständen (mindestens
vierteljährlich) zu überprüfen. Reinigung nur mit Wasser oder handelsüblichen
Haushaltsreinigern.
7. Haftungsausschluss
Die Hama GmbH &CoKG übernimmt keinerlei Haftung oder Gewährleistung für
Schäden, die aus unsachgemäßer Installation, Montage und unsachgemäßem Gebrauch
des Produktes oder einer Nichtbeachtung der Bedienungsanleitung und/oder der
Sicherheitshinweise resultieren.
an 3Gelenken mit 2Doppel-Tragearmen (geräteabhängig)
00118126/06127756: bis zu 150°
29,7 x17,8 cm
nach VESA-Standardbis
00118126/06127756: 600x400
3

F Mode d‘emploi
Nous vous remercions d’avoir choisi un produit Hama.
Veuillez prendreletemps de lirel‘ensemble des remarques et consignes suivantes. Veuillez
conserver ce mode d‘emploi àportée de main andepouvoir le consulter en cas de besoin.
Transmettez-le au nouveau propriétaireavec l’appareil le cas échéant.
1.
Explication des symboles d‘avertissement et des remarques
Avertissement
Ce symbole est utilisé pour indiquer des consignes de sécurité ou pour attirer votre
attention sur des dangers et risques particuliers.
Remarque
Ce symbole est utilisé pour indiquer des informations supplémentaires ou des remarques
importantes.
2. Contenu de l‘emballage
• Support mural TV
• Bras porteurs TV (2 unités)
• Forage
• Serre-câbles
• Kit de montage (contenu, voir g. 1)
• Mode d‘emploi
Remarque
Avant d’entreprendrel’installation du support, veuillez vérier que le kit de montage
livré est complet et qu’il ne contient pas de pièces défectueuses ou endommagées.
3. Consignes de sécurité
Avertissement
• En raison de la quantité d‘appareils et constructions murales disponibles sur le
marché, le kit de montage fourni ne peut convenir àtoutes les possibilités.
• Dans certains cas rares, il est possible que les vis soient trop longues pour xer
l‘appareil au support mural.
• Te nez particulièrement compte du fait que les chevilles livrées conviennent
uniquement aux murs en béton ou en briques.
• Veuillez lirelemode d‘emploi de votreappareil avant le montage. Ce mode d‘emploi
vous fournit généralement des renseignements concernant le type et les dimensions
des matériaux de xation.
• Procurez-vous le matériel de xation adapté àvotreappareil dans un commerce
spécialisé dans où celui-ci n‘est pas inclus dans le kit de montage fourni.
• Procurez-vous le matériel d‘installation adéquat dans un commerce spécialisé si
la paroi sur laquelle vous envisagez installer votreappareil exige un autretype de
matériel ou de construction.
• N‘appliquez en aucun cas une force excessive lors du montage ;une force excessive
est susceptible d‘endommager votreappareil ou le support mural.
• En cas de doute, veuillez vous adresser àunspécialiste qualiéanderéaliser le
montage de ce produit et ne tentez par de l‘installer par vos propres moyens.
• N‘installez pas le produit àunendroit où des personnes sont susceptibles de se tenir.
• Une fois le montage du produit réalisé et la charge installée, vériez la solidité et la
sécurité d‘utilisation de l‘ensemble.
• Refaites ce contrôle àintervalles réguliers
(au moins trimestriels).
• Veillez ànepasdépasser la charge maximale autorisée du produit et àn‘y xer aucune
charge dépassant les dimensions maximales autorisées.
• Veillez ànepascharger le produit asymétri-quement.
• Lors de l‘ajustage, veillez ànepascharger le produit asymétriquement et ànepas
dépasser la charge maximale autorisée.
• Respectez une distance de sécurité autour de la charge installée (en fonction du
modèle).
• En cas de détérioration du produit, retirez immédiate-ment la charge installée et cessez
d‘utiliser le produit.
4. Domaine d'application et spécifications
• Ce support est utilisé pour le montage murald‘écransplats dans une installation domestique
non commerciale.
• Le support est destiné àune utilisation exclusivement àl‘intérieur d‘un bâtiment.
• Utilisez le support exclusivement en conformité avec l‘usage prévu.
Charge maximale: 00118126/06127756: 50 kg
Diagonale d‘écran: 00118126/06127756:
Profondeur: 00118126/06127756: 8,4 –42,0 cm
81,0 -213,0 cm (US: 32" -84")
Inclinaison: –/+ 15°
sur 3articulations avec 2brasporteursdoubles (dépend
Plage de pivotement:
Dimension de la plaque
de xation murale:
Fixation:
5. Préparatifs de montage et installation
Remarque
• Deux personnes sont nécessaires pour l‘installation du support mural TV.Assurezvous de l‘aide et de l‘assistance d‘une autrepersonne.
• Les différents terminaux disposent de différentes options de connexion de câblage
et de connexion àd‘autres appareils. Avant l‘installation, veuillez contrôler que vous
pouvez toujours bien accéder aux raccords nécessaires après le montage.
• Un kit de montage identique est fourni avec tous nos supports muraux TV.En
fonction du produit et du type de montage, vous n‘aurez pas besoin de l‘intégralité
du kit de montage pour installer le support. Il est donc possible qu‘il vous reste
des vis ou d‘autres petites pièces non utilisées, même en cas de montage correct.
Veuillez conserver ces pièces avec le mode d‘emploi en lieu sûr pour toute utilisation
ultérieure(vente du produit, déménagement, transformation du support mural,
nouveau téléviseur,etc.).
Avertissement
• Ce produit convient uniquement pour un montage mural.
• Avant l‘installation, vériez impérativement que le mur prévu pour recevoir le support
dispose d‘une force portante susante pour supporter le poids de l‘appareil et
qu‘aucune conduite d‘électricité, d‘eau, de gaz ni aucune autreconduite ne passe
dans cette partie de la cloison.
• Te nez bien compte du fait que les chevilles livrées conviennent uniquement aux murs
en béton ou en briques.
• Respectez tous les avertissements et les consignes de sécurité.
• Procédez étape par étape conformément àlanotice de montage (g. 1etsuivantes).
• Lors de l‘installation du support, réglez les articulations de telle sorte que le téléviseur
puisse êtreajusté latéralement.
• Veuillez contrôler l‘horizontalité de votretéléviseur àl‘a ide du niveau àbulle fourni et, le
cas échéant, ajuster la plaque TV.
Remarque
• En raison de la quantité d’appareils disponibles sur le marché, toutes les variantes de
montage ne peuvent êtredécrites ici.
• Veillez àceque le support soit bien droit et posé àplat sur la face arrièredu
téléviseur.
• Utilisez les écarteurs fournis pour compenser les inégalités de la face arrièredu
téléviseur.
• Veillez àceque toutes les vis présentent la bonne longueur et soient fermement
serrées (voir g. 3).
6. Réglage &entretien
Remarque
Deux personnes sont nécessaires pour ajuster le support mural TV.Assurez-vous de l‘aide
et de l‘assistance d‘une autrepersonne.
• Aucune vis ne doit êtredesserrée pour un ajustage latéral.
• La résistance prévue pour le réglage d’inclinaison et le mouvement latéral peut être
rajustée àl’aide des vis adéquates.
• Andesécuriser la xation, suspendez les deux bras porteurs dans le plateau TV et
serrez les deux vis.
• Contrôlez la solidité et la sécurité de fonctionnement de l‘installation àintervalles
réguliers (au moins trimestriels). Pour le nettoyage, utilisez uniquement de l‘eau ou un
détergent ménager courant.
7. Exclusion de garantie
La société Hama GmbH &CoKG décline toute responsabilité en cas de dommages
provoqués par une installation, un montage ou une utilisation non conformes du produit ou
encoreprovoqués par un non respect des consignes du mode d‘emploi et/ou des consignes
de sécurité.
de l’appareil)
00118126/06127756: jusqu‘à 150°
29,7 x17,8 cm
conforme au standardVESA
00118126/06127756: 600x400
4
E Instrucciones de uso
Le agradecemos que se haya decidido por un producto de Hama.
Tómese tiempo yléase primerolas siguientes instrucciones eindicaciones. Después,
guarde estas instrucciones de manejo en un lugar seguroparapoder consultarlas cuando
sea necesario. Si vende el aparato, entregue estas instrucciones de manejo al nuevo
propietario.
1. Explicación de los símbolos de aviso ydelas indicaciones
Aviso
Se utiliza paracaracterizar las indicaciones de seguridad oparallamarlaatención sobre
peligros yriesgos especiales.
Nota
Se utiliza paracaracterizar informaciones adicionales oindicaciones importantes.
2. Contenido del paquete
• Soporte mural paratelevisor
• Brazos portadores del televisor (2)
• Perforación
• Bridas
• Juego de montaje (contenido, véase g. 1)
• Estas instrucciones de manejo
Nota
Antes de proceder alainstalación del soporte, compruebe que el juego de montaje está
completo yque ninguna de las piezas está dañada opresenta defectos.
3. Instrucciones de seguridad
Aviso
• Debido alagranvariedad de terminales existentes en el mercado yalagran
variedad de construcciones de pared, el juego de montaje suministrado no puede
cubrir todas las posibilidades.
• En raroscasos puede ocurrir que los tornillos de montaje del terminal en el soporte
de pared sean demasiado largos.
• Te nga en cuenta que los tacos suministrados sólo se pueden aplicar en paredes de
hormigón ydeladrillo macizo.
• Antes de proceder al montaje, léase las instrucciones de manejo de su terminal.
Éstas suelen dar información sobreeltipo yeltamañode los materiales de jación
adecuados.
• Adquieramaterial de jación adecuado paraelmontaje del terminal en un
comercio especializado si dicho material no se incluye en el juego de montaje
suministrado.
• En el caso de que la pared en la que se va ainstalarel soporte sea de otros
materiales yotrotipo de construcción, adquieramaterial de montaje adecuado en
un comercio especializado.
• No ejerza nunca fuerza durante el montaje. Ello podría provocar daños al terminal o
al soporte de pared.
• En caso de duda, recurraapersonal especializado con la formación adecuada para
el montaje de este producto ynolointente por cuenta propia.
• No monte el producto en lugares por debajo de los cuales se puedan encontrar personas.
• Una vez nalizado el montaje del producto ydelacarga jada aél, se debe comprobar la
rmeza ylaseguridad de funcionamiento de ambos.
• Esta comprobación se debe repetir aintervalos regulares de tiempo (trimestralmente,
como mínimo).
• Asegúrese de no sobrepasar la capacidad de carga máxima admisible del producto yde
que no se colocarán en él cargas cuyas dimensiones sean mayores que las dimensiones
máximas admisibles.
• Asegúrese de no cargar el producto de forma asimétrica.
• Alahoradedesplazarlo, asegúrese de que el producto no se vea cargado de forma
asimétrica ydeque no se superelacapacidad de carga máx. admisible.
• Guarde una distancia de seguridad alrededor de la carga colocada (en función del
modelo).
• Si detecta deterioros en el producto, retiredeinmediato la carga colocada ynosiga
utilizando el producto.
4. Campo de aplicación yespecificaciones
• El soporte sirve para jar pantallas planas alapared paraeluso doméstico privado,
no comercial.
• El soporte está diseñado sólo paraeluso dentrodeedicios.
• Emplee el soporte exclusivamente paralafunción paralaque fue diseñado.
Capacidad de carga
máxima:
00118126/06127756: 50 kg
Diagonal de pantalla: 00118126/06127756:
Profundidad: 00118126/06127756: 8,4 –42,0 cm
Inclinación: –/+ 15°
en 3articulaciones con 2brazos portadores dobles
Área de inclinación:
Dimensiones de la placa
de jación alapared:
Alojamiento:
5. Preparativos de montaje ymontaje
Nota
• Monte el soporte mural paratelevisor sólo entredos personas. Procúrese apoyo
yayuda.
• Losdiversos terminales tienen diferentes posibilidades de conexión paraelcableado
yparaotros aparatos. Antes de proceder alainstalación, compruebe si las
conexiones necesarias seguirán estando accesibles después del montaje.
• Nuestros soportes murales paraTVseentregan siemprecon el mismo juego de
montaje. Dependiendo del producto ydel tipo de montaje, no necesitará el juego
de montaje completo. Porello, es posible que aunque el montaje se haya realizado
correctamente le sobren tornillos yotras piezas pequeñas. Guárdelos con estas
instrucciones de manejo en un lugar seguroparaunuso posterior (venta del
producto, traslado, remodelación del soporte mural, nuevo TV,etc.).
Aviso
• Este producto solo es apto paramontaje en pared.
• Antes de empezar con la instalación, es impres-cindible comprobar que la pared
puede soportar el peso que se va amontar yasegurarse de que por el punto de
montaje de la pared no pasan cables eléctricos ni tuberías de agua, gas odeotro
tipo.
• Te nga en cuenta que los tacos suministrados sólo se pueden aplicar en paredes de
cemento ydeladrillo macizo.
• Observe las demás instrucciones de aviso ydeseguridad.
• Proceda paso apasosiguiendo las instrucciones ilustradas de montaje (g. 1ss.).
• Durante la instalación, las articulaciones se deben ajustar de modo que el movimiento
lateral del televisor no sea posible.
• Para jar,cuelgue los dos brazos portadores en la placa de la pared yaprietelos dos
tornillos.
Nota
• Dada la variedad de dispositivos terminales disponibles en el mercado, no se pueden
describir todas las variantes de montaje.
• Asegúrese de que el soporte esté recto ynivelado en la parte posterior del televisor.
• Utilice los espaciadores incluidos paracompensar cualquier desnivel en la parte
posterior del televisor.
• Asegúrese de que todos los tornillos tengan la longitud correcta yestén apretados
amano. (véase g.3)
6. Ajuste ymantenimiento
Nota
Ajuste el soporte mural paratelevisor sólo entredos personas. Procúrese apoyo yayuda.
• Para el movimiento lateral no es necesario aojar tornillos.
• La resistencia paraelajuste de la inclinación yelmovimiento lateral puede reajustarse
mediante los tornillos correspondientes.
• Para jar,cuelguelos dos brazos portadores en la placa del TV yapriete los dos tornillos.
• Se debe comprobar la rmeza ylaseguridad de funcionamiento periódicamente
(trimestralmente como mínimo). La limpieza se debe realizar con agua ocon limpiadores
domésticos convencionales.
7. Exclusión de responsabilidad
Hama GmbH &CoKG no se responsabiliza ni concede garantía por los daños que surjan
por una instalación, montaje omanejo incorrectos del producto opor la no observación de
las instrucciones de manejo y/o de las instrucciones de seguridad.
(depende del aparato)
00118126/06127756: bis zu 150°
29,7 x17,8 cm
Conforme al estándar VESA hasta
00118126/06127756: 600x400
81,0 -213,0 cm (US: 32" -84")
5
R Руководство по эксплуатации
Благодарим за покупку изделия фирмы Hama.
внимательно ознакомьтесь снастоящей инструкцией. Храните инструкцию в
надежном месте для справок вбудущем. Вслучае передачи изделия другому лицу
приложите иэту инструкцию.
1. Предупредительные пиктограммы иинструкции
Внимание
Данным значком отмечены инструкции, несоблюдение которых можетпривести к
опасной ситуации.
Примечание
Дополнительная или важная информация.
2. Комплект поставки
• настенный кронштейн для телевизора
• Кронштейны (2х)
• бурение
• Кабельные стяжки
• набор монтажных принадлежностей
(комплект см. на рис.1)
• настоящая инструкция
Примечание
Перед началом работпроверьте комплектность монтажногонабора, а
такжеотсутствие дефектных иповрежденных деталей.
3. Техника безопасности
Внимание
• Всвязисбольшимколичеством оконечных устройств иконструкций стен
прилагаемые монтажные принадлежности могут не подойти кконкретным
условиям монтажа
• B некоторых случаях винты могут оказаться слишком длинными.
• Прилагаемые дюбели предназначены толькодля бетона иполнотелого
кирпича.
• Перед началом монтажа требуется внимательно ознакомиться синструкцией
оконечногоустройства. Винструкции обычно приводятся сведения отипе и
размерах крепежных материалов.
• Eсли прилагаемые монтажные принадлежности не подходят кконкретным
условиям монтажа, их необходимо приобрести вспециальном магазине.
• При необходимости следует приобрести соответствующие монтажные
принадлежности вмагазине
• При монтаженеприменять чрезмерных усилий. Впротивном случае это может
повредить оконечное устройство икрепление.
• При необходимости поручить монтаж квалифицированным специалистам.
• Запрещается производить монтаж над теми местами, гдемогутнаходиться люди.
• По окончании монтажа иустановки груза проверить безопасность ипрочность всей
конструкции.
• Такую проверку необходимо проводить регулярно, но не режеодногораза в
квартал.
• Запрещается превышать допустимую нагрузку иразмеры.
• Нагрузка должна распределяться равномерно.
• Проверить отсутствие асимметричногораспределения нагрузки, которое приводит к
превышению допустимых значений веса.
• Соблюдатьбезопасный зазор вокруг нагрузки (взависимости от модели).
• Вслучае повреждения изделия снять нагрузку ибольше не эксплуатировать.
4. Область применения ихарактеристики
• Кронштейн предназначен для настенногокрепления плоских мониторов тольков
жилых помещениях.
• Запрещается применять кронштейн вне помещений.
• Запрещается использовать кронштейн не по назначению.
Максимальная нагрузка:00118126/06127756: 50 кг
Диагональ экрана:00118126/06127756:
81,0 -213,0 см (US: 32" -84")
3 сочленения,2двойных кронштейна (взависимости
Зона поворота:
Размер стеновой панели:
Крепежные отверстия:
5. Подготовка кмонтажу имонтаж
Примечание
• Монтаж выполнять толькоспомощником!
• Оконечные устройства отличаютсядругот другаразъемами подключения.
Перед началом установки убедитесь всовместимости идоступности разъемов.
• Вкомплект телевизионных держателей всегда входит стандартный набор
монтажных приспособлений. Взависимости от условий монтажа иизделия
для крепления потребуется не весь монтажный набор. По этойпричине, втом
числе, после правильногомонтажа могут остаться неиспользованные болты и
другие мелкие детали. Сохраните этидетали, атакже настоящую инструкцию
для возможногоприменения вбудущем (например, всвязи спродажей
изделия, переезда, приобретения другоготелевизора ит.д.).
Внимание
• То лькодля настенногомонтажа.
• Убедитесь, чтостена, на которую предполагается монтировать кронштейн,
сможетвыдержать общий номинальный вес нагрузки ивес. Проверьте, чтобы
встене на месте монтажа не было электрической проводки, газопровода,
водопровода идругих трубопроводов.
• Имейте ввиду, чтоприлагаемые дюбели предназначены толькодля бетона и
полнотелогокирпича.
• Соблюдайте правила техники безопасности.
• Монтаж выполняется по порядку, согласно рисункам.
• При установкекронштейны устанавливаютсятак, чтобы они могли поворачиваться
встороны.
• Спомощью прилагаемоговкомплекте ватерпаса проверьте горизонтальность
расположения телевизора на панели ипри необходимости выполните юстировку.
Примечание
• Всвязисмножествомдоступных на рынке оконечных устройств описать все
варианты монтажа невозможно.
• Держатель на задней стенке телевизора должен располагаться прямо и
горизонтально.
• Чтобы компенсировать неровности задней панели телевизора, воспользуйтесь
распорками из комплекта поставки.
• Всекрепежные винты должны быть соответствующей длины. Винты
необходимо притянуть усилием руки (см. рис.3).
6. Настройка итехобслуживание
Примечание
Настройку выполнять толькоспомощником!
• Для поворота винты ослаблять не требуется.
• Уровень усилия для настройки наклона иповорота регулируется
соответствующими болтами.
• Для фиксации оба кронштейна насадить на ТВ-плату изатянуть два винта.
• Необходимо регулярно проверять всю конструкцию на прочность (не режеодного
раза вквартал). Чистку производить тольководой или бытовым чистящим
средством.
7. Отказ от гарантийных обязательств
Компания Hama GmbH &CoKGне несет ответственность за ущерб, возникший
вследствие неправильногомонтажа, подключения ииспользования изделия не
по назначению, атакжевследствие несоблюдения инструкции по эксплуатации и
техники безопасности.
от модели)
00118126/06127756: до 150°
29,7 x17,8 см
соответствуютстандартам VESA до
00118126/06127756: 600x400
Глубина:00118126/06127756: 8,4 –42,0см
Наклон:–/+ 15°
6
I Istruzioni per l‘uso
Grazie per avereacquistato un prodotto Hama!
Prima della messa in esercizio, leggete attentamente le seguenti istruzioni eavvertenze,
quindi conservatele in un luogo sicuroper una eventuale consultazione. In caso di cessione
dell‘apparecchio, consegnate anche le presenti istruzioni al nuovo proprietario.
1. Spiegazione dei simboli di avvertimento edelle indicazioni
Attenzione
Viene utilizzato per contrassegnareleindicazioni di sicurezza oppureper rivolgere
l‘attenzione verso particolari rischi epericoli.
Avvertenza
Viene utilizzato per contrassegnareinformazioni supplementari oindicazioni importanti.
2. Contenuto della confezione
• Supporto TV da parete
• Bracci portanti per TV (2)
• Perforazione
• Fascette
• Kit di montaggio (contenuto vedi g. 1)
• Queste istruzioni per l’uso
Avvertenza
Prima di procedereall’installazione del supporto, vericareilcontenuto completo della
confezione eaccertarsi che non vi siano pezzi difettosi odanneggiati.
3. Indicazioni di sicurezza
Attenzione
• Con la varietà di terminali ecostruzioni aparete presente sul mercato, il set di
montaggio in dotazione non può copriretutte le possibilità.
• In casi rari può accadereche le viti per il montaggio del terminale siano troppo
lunghe.
• Prestareattenzione che itasselli forniti in dotazione sono idonei esclusivamente per le
pareti in cemento emattoni.
• Prima del montaggio, consultareleistruzioni per l’uso del proprio terminale, che, di
regola, contengono informazioni sul tipo elemisuredelmateriale di ssaggio idoneo.
• Se non ècompreso nel kit montaggio, procurarsi il materiale di ssaggio idoneo per
il montaggio del terminale nel negozio specializzato
• Se la parete oiltipo di strutturaprevista per l’installazione èdiunmateriale diverso,
procurarsi il materiale di installazione idoneo presso irivenditori specializzati.
• Non usaretroppa forza, né violenza durante il montaggio per evitaredidanneggiare
il terminale oilsupporto da parete.
• In caso di dubbi, per il corretto montaggio del prodotto, rivolgersi apersonale
specializzato enon tentaredimontarlo da soli!
• Non montareilprodotto sopraluoghi in cui le persone potrebberostazionare
• Dopo il montaggio del prodotto edel carico ssato, vericarne la stabilità elasicurezza
di esercizio.
• Ripeterequesto controllo aintervalli regolari (almeno ogni tremesi).
• Prestareanon superarelacapacità massima ammessa del prodotto eanon caricarlo in
modo da superarelemisuremassime ammesse.
• Non caricareilprodotto in modo asimmetrico.
• Durante la regolazione, prestareattenzione che il prodotto non venga caricato in modo
asimmetrico eche non venga superato il carico massimo.
• Rispettareladistanza di sicurezza intorno al carico applicato (a seconda del modello).
• In caso di danni del prodotto, rimuovereimmediatamente il carico applicato enon
utilizzarepiù il prodotto.
4. Campo di applicazione especifiche tecniche
• Il supporto serve per il ssaggio aparete degli schermi piatti per l’uso domestico privato,
non commerciale.
• Il supporto èstato concepito solo per l‘utilizzo all‘interno degli edici.
• Utilizzareilsupporto esclusivamente per lo scopo previsto.
Carico massimo: 00118126/06127756: 50 kg
Diagonale schermo: 00118126/06127756:
81,0 -213,0 cm (US: 32" -84")
su 3giunti con 2bracci portanti doppi (dipendente
Campo di orientamento:
Misuredella piastradi
ssaggio aparete:
Alloggiamento:
Operazioni preliminari emontaggio
5.
Avvertenza
• MontareilsupportoTV solo in due! Richiederel‘aiuto di una seconda persona!
• Diversi terminali ediversepossibilità di collegamento per il cablaggio ediversi
apparecchi. Prima dell‘installazione, vericareche dopo il montaggio gli attacchi
necessari siano ancoraaccessibili.
• Ai nostri supporti da parete per TV èsempreallegato lo stesso kit di montaggio. A
seconda del prodotto edel tipo di montaggio non ènecessario il kit di montaggio
completo. Èpertanto possibile che, anche in caso di montaggio corretto, avanzino
delle viti ealtraminuteria. Conservarle insieme aqueste istruzioni d‘uso in un luogo
sicuroper un utilizzo successivo (vendita del prodotto, trasloco, smontaggio del
supporto da parete, nuova TV ecc.).
Attenzione
• Questo prodotto èindicato esclusivamente per il montaggio aparete.
• Prima di procedereall‘installazione, vericareche la parete sia idonea per il peso da
montareeaccertarsi che nel punto della parete dove si desideramontareilsupporto
non vi siano cavi elettrici, né tubazioni di acqua, gas oaltro.
• Prestareattenzione che itasselliforniti in dotazione sono idonei esclusivamente per
le pareti in cemento emattoni.
• Attenersi alle indicazioni di avvertimento esicurezza usuali.
• Procederepasso passo secondo le istruzioni di montaggio ragurate (g. 1ss.).
• Durante l’installazione, questi giunti devono essere ssati in modo che sia possibile un
movimento laterale della TV.
• Con la livella abolla d‘aria, vericareche l‘apparecchio TV sia perfettamente in
orizzontale ed eventualmente registrarelapiastraTV.
Avvertenza
• Con la varietà di terminali presenti sul mercato, il set di montaggio in dotazione non
può copriretutte le varianti.
• Fare attenzione che il supporto sia posto diritto ebenpiano sulla parte posteriore
del televisore.
• Utilizzareildistanziatorecompreso nella confezione per compensareeventuali
imperfezioni sulla parte posterioredel televisore.
• Fare attenzione che tutte le viti abbino la lunghezza giusta echevengano strette
bene amano (vedi g. 3).
6. Regolazione emanutenzione
Avvertenza
Regolareilsupporto TV solo in due! Richiederel‘aiuto di una seconda persona!
• Perilmovimento laterale non ènecessarioallentareleviti.
• La resistenza all’inclinazione ealmovimento laterale può essereregolata conle
rispettive viti.
• Pereffettuareilbloccaggio, agganciareidue bracci portanti al pannello TV eserrare
le due viti.
• Controllareaintervalli regolari (almeno ogni tremesi) che il supporto sia ssato in modo
sicuroeben saldo. Pulireesclusivamente con acqua ocon icomuni detergenti per uso
domestico.
7. Esclusione di garanzia
Hama GmbH &CoKG non si assume alcuna responsabilità per idanniderivati dal
montaggio ol‘utilizzo scorretto del prodotto, nonché dalla mancata osservanza delle
istruzioni per l‘uso e/o delle indicazioni di sicurezza.
dall‘apparecchio)
00118126/06127756: no a150°
29,7 x17,8 cm
secondo gli standardVESA no
00118126/06127756: 600x400
Profondità: 00118126/06127756: 8,4 –42,0cm
Inclinazione: –/+ 15°
7

N Gebruiksaanwijzing
Hartelijk dank dat uvoor een product van Hama heeft gekozen.
Neem de tijd om de volgende aanwijzingen en instructies volledig door te lezen. Bergdeze
gebruiksaanwijzing vervolgens op een goede plek op zodat uhem als naslagwerk kunt
gebruiken. Op zodat uhem als naslagwerk kunt gebruiken. Mocht uhet toestel verkopen,
geeft udan ook deze gebruiksaanwijzing aan de nieuwe eigenaar.
1. Verklaring van waarschuwingssymbolen en instructies
Waarschuwing
Wordtgebruikt voor veiligheidsinstructies of om de aandacht te trekken op bijzondere
gevaren en risico‘s.
Aanwijzing
Wordtgebruikt voor extrainformatie of belangrijke informatie.
2. Inhoud van de verpakking
• TV-wandhouder
• TV-draagarmen (2x)
• Boren
• Kabelbinders
• Montageset (inhoud, zie afb.1 )
• Deze gebruiksaanwijzing
Aanwijzing
Controleer voor het installeren van de houder of de montageset volledig is en of er geen
defecte of beschadigde onderdelen bij de verpakking zijn inbegrepen.
3. Veiligheidsinstructies
Waarschuwing
• Gelet op het veelvoud aan op de markt te verkrijgen eindapparatuur en
wandconstructies kan de meegeleverde montageset niet alle mogelijkheden
afdekken.
• In sporadische gevallen kan het voorkomen dat de schroeven voor het bevestigen
van de eindapparatuur op de wandhouder te lang zijn.
• Houd er rekening mee dat de meegeleverde pluggen alleen geschikt zijn voor
montage in betonnen en bakstenen wanden.
• Lees vóór de montage de bedieningsinstructies van uw eindapparatuur.Normaliter
vermelden deze instructies informatie over de soort en afmetingen van de geschikte
montagematerialen.
• Schaft uindevakhandel geschikt bevestigingsmateriaal aan voor de montage van de eindapparatuur,voor zover het geen bestanddeel van de meegeleverde montageset is.
• Schaft uindevakhandel geschikt bevestigingsmateriaal aan bij anderesoorten
materialen en constructies van de voor de installatie bedoelde wand.
• Tijdens de montage nimmer geweld of grote krachten aanwenden. Dit kan uw
eindapparatuur of de wandhouder beschadigen.
• Laat bij twijfel over de montage van dit product de werkzaamheden aan een
vakspecialist over en probeert uhetniet zelf!
• Monteer hetproduct niet op plaatsenwaaronder zich personen kunnen begeven.
• Na de montage van het productendedaaraan bevestigde last dienen deze op voldoende
stevigheid en veiligheidteworden gecontroleerd.
• Deze controle dient regelmatig te worden herhaald (ten minste elke drie maanden).
• Let erop dat de maximaaltoelaatbaredraagkracht van het productnietwordt
overschredenendat er geenlastwordt aangebracht, welke de maximaaltoelaatbare
afmetingenhiervoor overschreidt.
• Let erop het productniet asymmetrisch te belasten.
• Let erop bij het verstellen dat het productnietasymmetrisch wordt belastendaarbijde
maximaal toelaatbaredraagkracht van hetproductwordt overschreden.
• Neem eenveiligheidsafstand om de aangebrachte last in acht (afhankelijkvan het model).
• Verwijder bij beschadigingenaan het productdirect de aangebrachte last en gebruik het
product hetniet meer.
4. Toepassingsgebied en specificaties
• De houder dient voor de wandbevestiging van atscreens voor privé-en huishoudelijk
gebruik.
• De houder is alleen bedoeld voor gebruik ín gebouwen.
• Gebruik de houder uitsluitend voor het doel waarvoor hij gemaakt is.
Maximale belasting: 00118126/06127756: 50 kg
Beeldscherm-diagonaal: 00118126/06127756:
81,0 -213,0 cm (US: 32" -84")
Diepte: 00118126/06127756: 8,4 –42,0 cm
Hellingshoek: –/+ 15°
op 3scharnieren met 2dubbele draagarmen (afhankelijk van
Zwenkbereik:
Afmeting van de
wandbevestigingsplaat:
Houder:
5. Montagevoorbereiding en montage
Aanwijzing
• Monteer de tv-wandhouder alleen met zijn tweeën! Zorgvoor ondersteuning en
hulp!
• Verschillende eindapparatuur heeft verschillende aansluitmogelijkheden voor kabels
en overige apparatuur.Controleer voor de installatie of de benodigde aansluitingen
na de montage nog bereikbaar zijn.
• Bij onze tv-wandhouders wordt altijd dezelfde montageset meegeleverd. Uheeft
naargelang het product en de montagevariant niet de complete montageset nodig.
Het is dus mogelijk dat ook bij een correcte montage de niet benodigde schroeven
en anderekleine onderdelen overblijven. Bewaar deze onderdelen samen met deze
bedieningsinstructies op een veilige plaats voor gebruik op een later tijdstip (verkoop
van het product, verhuizing, wandhouder verplaatsen, nieuwe tv enz.).
Waarschuwing
• Dit product is uitsluitend geschikt voor wandmontage.
• Controleer altijd vóór de installatie of de wand, waaraan de houder wordt bevestigd
het gewicht van het toestel kan dragen en controleer of er bij de montageplaats
in de wand geen elektrische leidingen, water-engasleidingen of andereleidingen
zitten.
• De meegeleverde pluggen zijn alleen geschikt voor montage in beton- en massieve
baksteen wanden.
• Houdt ualtijd aan de overige waarschuwingen en veiligheidsinstructies.
• Werk stap voor stap aan de hand van de montagehandleiding met afbeeldingen (afb. 1ff.).
• Tijdens de installatie dienen scharnieren zodanig te worden ingesteld dat een zijdelingse
beweging van het tv-toestel mogelijk is.
• Controleer met de inbegrepen waterpas de horizontale uitrichting van uw tv en stel
indien nodig de positie bij de tv-plaat na.
Aanwijzing
• Gelet op het veelvoud aan op de markt te verkrijgen eindtoestellen kunnen niet alle
montagevarianten worden beschreven.
• Let erop dat de houder zich recht en vlak tegen de achterkant van het televisietoestel
bevindt.
• Maak gebruik van de meegeleverde afstandhouders om oneffenheden van de
achterkant van het televisietoestel te compenseren.
• Let erop dat alle schroeven de juiste lengte hebben en handvast worden
aangedraaid. (zie afb. 3)
6. Instelling &onderhoud
Aanwijzing
Verstel de tv-wandhouder alleen met zijn tweeën! Zorgvoor ondersteuning en hulp!
• Voor zijdelingse verstelling hoeven er geen schroeven losgedraaid te worden.
• De weerstand voor het instellen van de hellingshoek en de zijdelingse beweging kan met
behulp van de desbetreffende schroeven worden ingesteld.
mteborgen haakt ubeide draagarmen in de tv-plaat en draait de beide schroeven vast.
• O
• De houder moet regelmatig (minstens elke drie maanden) op goed vastzitten
en veiligheid gecontroleerdworden. Reinig alleen met water of een gangbaar
reinigingsmiddel.
7. Uitsluiting van garantie en aansprakelijkheid
Hama GmbH &CoKG aanvaardt geen enkele aansprakelijkheid of garantieclaims voor
schade of gevolgschade, welke door ondeskundige installatie, montage en ondeskundig
gebruik van het product ontstaan of het resultaat zijn van het niet in acht nemen van de
bedieningsinstructies en/of veiligheidsinstructies.
de apparatuur)
00118126/06127756: max.150°
29,7 x17,8 cm
conform VESA-standaardtot
00118126/06127756: 600x400
8

J Οδηγίες χρήσης
Σας ευχαριστούμε για την αγορά αυτού τουπροϊόντος. της Hama!
Διαβάστε προσεκτικάτις παρακάτω οδηγίες καιυποδείξεις. Στη συνέχεια, φυλάξτε αυτό
το εγχειρίδιο σε ασφαλές μέρος για μελλοντική χρήση. Σε περίπτωση που πουλήσετε της
συσκευή, παραδώστε αυτότοεγχειρίδιο στον επόμενοαγοραστή.
1. Επεξήγηση συμβόλων προειδοποίησης και υποδείξεων
Προειδοποίηση
Χρησιμοποιείται για τη σήμανση υποδείξεων ασφαλείας ήγια να επιστήσει την προσοχή
σε ιδιαίτερους κινδύνους.
Υπόδειξη
Χρησιμοποιείται για τη σήμανση επιπλέον πληροφοριών ήσημαντικών υποδείξεων.
2. Περιεχόμενα συσκευασίας
• Στήριγμα τοίχου για τηλεόραση
• Βραχίονες στήριξης τηλεόρασης (2x)
• γεώτρηση
• Καλώδιο μπάντα
• Σετ συναρμολόγησης (περιεχόμεναβλέπε εικ.1)
• Αυτό το εγχειρίδιο χρήσης
Υπόδειξη
Πριν την τοποθέτηση τουστηρίγματος ελέγξτε αν είναι πλήρες το σετ συναρμολόγησης
καιβεβαιωθείτε πως δεν περιλαμβάνει ελαττωματικάήχαλασμέναεξαρτήματα.
3. Υποδείξεις ασφαλείας
Προειδοποίηση
• Λόγω της ποικιλίας τελικών συσκευών καιτρόπων κατασκευής των τοίχων, το
παρεχόμενοσετ συναρμολόγησης δεν μπορεί να καλύψει όλες τις πιθανότητες.
• Σε σπάνιες περιπτώσεις μπορεί οι βίδες για την τοποθέτηση της τελικής συσκευής στο
στήριγμα τοίχου να είναι πολύ μακριές.
• Λάβετε υπόψη ότι τα παρεχόμεναούπα είναι κατάλληλαγια μπετόν καιγια τοίχους
με τούβλα.
• Πριν τη συναρμολόγηση διαβάστε τις οδηγίες χρήσης της συσκευής σας. Σε αυτές
υπάρχουν κατά κανόνα πληροφορίες για το είδος καιτις διαστάσεις των κατάλληλων
υλικών στερέωσης.
• Αν το κατάλληλουλικόστερέωσης για τη συναρμολόγηση της τελικής συσκευής δεν
υπάρχειστο παρεχόμενοσετ στερέωσης προμηθευτείτε το από ειδικόκατάστημα.
• Σε περίπτωση διαφορετικών υλικών καικατασκευής τουτοίχου από αυτήν που
προβλέπεται για την συναρμολόγηση, θα πρέπει να προμηθευτείτε από το εμπόριο τα
κατάλληλαυλικάτοποθέτησης.
• Μην χρησιμοποιείτε βία ήπολλή δύναμη κατά τη συναρμολόγηση τουπροϊόντος.
Αυτό μπορεί να προκαλέσει ζημιές στη συσκευή καιστο στήριγμα τοίχου.
• Αν δεν είστε σίγουροι για την τοποθέτηση αυτού τουπροϊόντος απευθυνθείτε σε
ειδικευμένους τεχνίτες καιμην επιχειρήσετε να την κάνετε μόνοι σας!
• Μην τοποθετείτε το προϊόν σε σημεία κάτω από τα οποία μπορεί να βρίσκονται άτομα.
• Μετάτην συναρμολόγηση τουπροϊόντος καιτου φορτίου που είναι στερεωμένοσεαυτό
πρέπει να ελέγξετε αν κάθονται σταθερά καιανλειτουργούν με ασφάλεια.
• Αυτόςοέλεγχος πρέπει να επαναλαμβάνεται σε τακτάχρονικάδιαστήματα (τουλάχιστον
κάθε τρίμηνο).
• Λάβετε υπόψη ότι δεν πρέπει να ξεπεραστεί ημέγιστη επιτρεπόμενη αντοχήτου
προϊόντος καιότι δεν πρέπει να τοποθετηθεί φορτίο, το οποίο να ξεπερνάτημέγιστη
επιτρεπόμενη τιμή.
• Προσέξτε ώστε το προϊόν να μην καταπονείται με ασύμμετρο τρόπο.
• Κατά την μετατόπιση φροντίστε ώστε το προϊόν να μην επιβαρυνθεί με ασύμμετρο τρόπο
προκαλώντας υπέρβαση τη μέγιστης αναφερόμενης αντοχής.
• Κρατήστε την απαραίτητη απόσταση ασφαλείας γύρω από το τοποθετημένοφορτίο
(ανάλογα με το μοντέλο).
• Σε περίπτωση που το προϊόν έχει υποστεί ζημιές αφαιρέστε κατευθείαν το τοποθετημένο
φορτίο καιμην συνεχίζετε να το χρησιμοποιείτε.
4. Πεδίο εφαρμογής και τεχνικά χαρακτηριστικά
• Το στήριγμα χρησιμοποιείται για την επιτοίχια στερέωση επίπεδων οθονών για σκοπούς
οικιακής χρήσης.
• Το στήριγμα προορίζεται για χρήση εντός κτιρίων.
• Το στήριγμα πρέπει να χρησιμοποιείται αποκλειστικάγια το σκοπό που προβλέπεται.
Μέγιστη αντοχή:00118126/06127756: 50 kg
Διαγώνιος οθόνης:00118126/06127756:
81,0 -213,0 cm (US: 32" -84")
Βάθος:00118126/06127756: 8,4 –42,0 cm
Κλίση:–/+15°
σε 3 αρθρώσεις με 2 διπλούς βραχίονες (ανάλογα με
Εύρος στρέψης:
Διαστάσεις της πλάκας τοίχου:
Υποδοχή:
5. Προετοιμασία τοποθέτησης και τοποθέτηση
Υπόδειξη
• Το στήριγμα τηλεόρασης πρέπει πάντανατοποθετείται από δύο άτομα! Ζητήστε
υποστήριξη καιβοήθεια!
• Οι διάφορες τελικές συσκευές έχουν διαφορετικές δυνατότητες σύνδεσης ως προς
την καλωδίωση καιάλλεςσυσκευές Ελέγξτε πριν την εγκατάσταση, αν υπάρχει
πρόσβαση στις απαραίτητες συνδέσεις μετάτην τοποθέτηση.
• Μαζίμεταστηρίγματατηλεόρασης παρέχεται πάντατοαντίστοιχοσετ τοποθέτησης.
Ανάλογα με το προϊόν καιτον τρόπο τοποθέτησης δεν είναι πάντααπαραίτητο
ολόκληρο το σετ στερέωσης. Επομένως. ενδέχεται να περισσέψουν βίδες καιάλλα
μικροεξαρτήματα, ακόμα καιότανητοποθέτηση έχει γίνει σωστάΦυλάξτε τα μαζί
με το εγχειρίδιο χειρισμού σε ασφαλές μέρος για μετέπειταχρήση (πώληση του
προϊόντος, μετακόμιση, μετατροπή τουστηρίγματος, νέα τηλεόραση κλπ.).
Προειδοποίηση
• Αυτό το προϊόν είναι κατάλληλομόνογια την τοποθέτηση σε τοίχο.
• Πριν από την τοποθέτηση ελέγξτε οπωσδήποτε την καταλληλότητατου τοίχου για το
βάρος που πρόκειται να τοποθετηθεί καιβεβαιωθείτε πως στασημεία τοποθέτησης
στον τοίχοδεν υπάρχουν ηλεκτρικάκαλώδια, σωλήνες νερού, αερίου ήάλλου
είδους αγωγοί.
• Λάβετε οπωσδήποτε υπόψη πως τα παρεχόμεναούπα είναι κατάλληλαμόνογια
μπετόν καιτοίχουςμετούβλα.
• Τηρείτε τις υπόλοιπες υποδείξεις προειδοποίησης καιασφαλείας.
• Ακολουθήστε βήμα προς βήμα τις εικονογραφημένες οδηγίες τοποθέτησης (από εικ.1
καιπαρακάτω).
• Κατά την τοποθέτηση οι αρθρώσεις πρέπει να ρυθμιστούν κατά τέτοιο τρόπο, ώστε να
είναι δυνατή ηπλευρικήκίνηση της τηλεόρασης.
• Ελέγξτε µετοπαρεχόµενοαλφάδιτην οριζόντια ευθυγράµµιση της τηλεόρασής σας και
αν χρειαστεί ξαναρυθµίστε την πλάκατηλεόρασης.
Υπόδειξη
• Λόγω της μεγάλης γκάμας συσκευών που κυκλοφορούν στην αγορά, δεν είναι
δυνατή ηπεριγραφή όλων των τρόπων τοποθέτησης.
• Προσέξτε ώστε το στήριγμα να τοποθετηθεί σε ίσια και επίπεδη θέση στην πίσω
πλευρά της τηλεόρασης.
• Χρησιμοποιήστε το παρεχόμενο στήριγμα απόστασης για να αντισταθμίσετε τυχόν
ανώμαλες επιφάνειες στην πίσω πλευρά της τηλεόρασης.
• Προσέξτε ώστε όλες οι βίδες να έχουν το σωστόμήκος καιτοποθετήστε τις με το
χέρι.(βλ. εικ.3)
6. Ρύθμιση & συντήρηση
Υπόδειξη
Το στήριγμα τηλεόρασης πρέπει πάνταναμετατοπίζεται από δύο άτομα! Ζητήστε
υποστήριξη καιβοήθεια!
• Γιατην πλευρική κίνηση δεν απαιτείται το λύσιµοβιδών.
• Ηαντίσταση για τη ρύθμιση της κλίσης καιτην πλευρική κίνηση μπορεί να ρυθμιστεί με
τις αντίστοιχες βίδες.
• Γιαασφάλεια περάστε τους δύο βραχίονες στήριξης στην πλάκατηλεόρασης καιβιδώστε
γεράτις δύο βίδες.
• Ηαντοχήκαι ηλειτουργική ασφάλεια πρέπει να ελέγχονται ανάτακτάχρονικά
διαστήματα (τουλάχιστον κάθε τρίμηνο). Γιατον καθαρισμό χρησιμοποιείτε μόνονερό ή
καθαριστικάοικιακής χρήσης τουεμπορίου.
7. Απώλεια εγγύησης
Ηεταιρεία Hama GmbH &CoKGδεν αναλαμβάνει καμία ευθύνη ήεγγύηση για ζη μιές, οι
οποίες προκύπτουν από λανθασμένη εγκατάσταση καισυναρμολόγηση ήλανθασμένη χρήση
τουπροϊόντος ήμητήρηση των οδηγιών λειτουργίας και/ήτων υποδείξεων ασφαλείας.
τη συσκευή)
00118126/06127756: μέχρι και 150°
29,7 x17,8 cm
κατά το πρότυπο VESA µέχρι
00118126/06127756: 600x400
9
P Instrukcja obsługi
Dziękujemy za zakup naszego produktu!
Przed pierwszym użyciem należydokładnie przeczytać instrukcję obsługi. Instrukcję należy
przechować,gdyż możebyćjeszcze potrzebna.
1. Objaśnienie symboli ostrzegawczych iwskazówek
Ostrzeżenie
Używane wcelu zwrócenia uwagi na szczególne niebezpieczeństwo lub ryzyko.
Wskazówki
Używane wcelu zwrócenia uwagi na szczególnie przydatne informacje.
2. Zawartość opakowania
• Uchwyt ścienny TV
• Uchwyty do TV (2x)
• Wiercenie
• Opaski
• Zestaw montażowy (zawartość patrz rys.1 )
• Instrukcja obsługi
Wskazówki
Przed montażem uchwytu należysprawdzić,czy zestaw montażowy jest
kompletny iczy nie zawierawadliwych bądź uszkodzonych części.
3. Wskazówki bezpieczeństwa
Ostrzeżenie
• Ze względu na różnorodność dostępnych na rynku urządzeń końcowych ikonstrukcji
ściennych możesięzdarzyć, żedołączony zestaw montażowy nie będzie się nadawał
do niektórych sposobów mocowania..
• Wniektórychrzadkich przypadkach możesięzdarzyć, że śruby do zamocowania
urządzenia końcowego na uchwycie ściennym będą za długie.
• Należypamiętać,żedołączone kołki rozporowe są dopuszczone do mocowania tylko
w ścianach zbetonu icegłypełnej.
• Przed montażem należyprzeczytać instrukcję obsługi urządzenia końcowego.
Informuje ona zazwyczaj orodzaju iwymiarach odpowiedniego materiału
mocującego.
• Jeżeli materiał mocujący nie należydozakresu dostawy dołączonego zestawu
montażowego, wspecjalistycznym sklepie należynabyć odpowiedni materiał do
mocowania urządzenia końcowego.
• Nabyć wspecjalistycznym sklepie odpowiedni materiał montażowy wprzypadku
innego rodzaju materiałuitypu konstrukcji ściennej do montażuurządzenia.
• Podczas montażunigdy nie wywierać nadmiernej siły. Możetouszkodzić urządzenie
końcowe bądź uchwyt ścienny.
• Wrazie wątpliwości zlecić montaż tego produktu wykwalikowanym specjalistom
oraz nie próbować wykonywać tych prac samodzielnie!
• Nigdy nie montować produktu wmiejscach, pod którymi mogą przebywać ludzie.
• Po montażuproduktu iprzymocowanego do niego ciężaru należysprawdzić dostateczną
wytrzymałość ibezpieczeństwo pracy.
• Należyregularnie powtarzać tę kontrolę (przynajmniej co kwartał).
• Zwrócić uwagę,aby nie przekroczyć maksymalnie dopuszczalnej nośności produktu ani
nie mocować ciężaru, który przekracza maksymalnie dopuszczalne wymiary.
• Nie obciążać produktu asymetrycznie.
• Podczas przestawiania zwrócić uwagę,aby nie obciążać produktu asymetrycznie ani nie
przekroczyć maksymalnie dopuszczalnej nośności.
• Zachować odstępbezpieczeństwa wokół przymocowanego ciężaru (zależnie od modelu).
• Wrazie uszkodzenia produktu natychmiast usunąć zamocowany ciężar inie stosować
więcej produktu.
4. Zastosowanie ispecyfikacja
• Uchwyt przeznaczony do montażutelewizoranaścianie. Uchwyt przeznaczony do użytku
domowego.
• Uchwyt należyużytkować tylko wzamkniętych pomieszczeniach.
• Uchwyt należyużytkować tylko iwyłączeniezjego przeznaczeniem.
Maksymalny udźwig: 00118126/06127756: 50 kg
Średnica telewizora: 00118126/06127756:
81,0 -213,0 cm (US: 32" -84")
Pochylenie: –/+ 15°
na 3przegubach z2ramieniem nośnym (w zależności od
Zakres obrotu:
Wymiary modułu
mocowanego do ściany:
Montaż:
5. Przygotowanie montażuimontaż
Wskazówki
• Montaż uchwytu należyprzeprowadzić w2osoby!
• Urządzenia końcowe mają różne gniazda do podłączania kabli iinnych urządzeń.
Przed instalacją należysprawdzić,czy po montażuzapewniony będzie jeszcze dostęp
do wymaganych przyłączy.
• Do naszych uchwytów ściennych do TV dołączony jest zawsze zestaw montażowy.
Zależnie od produktu irodzaju montażunie zawsze konieczny jest kompletny
zestaw montażowy.Dlatego możesięzdarzyć,żenawet po prawidłowym montażu
pozostaną niepotrzebne śruby iinne drobne części. Przechowywać je wraz z
niniejszą instrukcją obsługi wbezpiecznym miejscu do późniejszego użytku (sprzedaż
produktu, przeprowadzka, montaż uchwytu ściennego winnym miejscu, nowy
telewizor itp.).
Ostrzeżenie
• Niniejszy produkt jest przeznaczony wyłącznie do montażunaścianie.
• Przed montażem należysprawdzić,czy ściana nadaje się do zawieszenia uchwytu
oraz, czy w ścianie nie przechodzążadne przewody elektrycznie, wodociągowe,
gazowe, itp.
• UWAGA! Materiał montażowy dołączony do uchwytu przeznaczony jest do montażu
w ścianie wykonanej zpełnej cegłylub betonu.
• Podczas montażunależyuwzględnić wszelkie środki ostrożności.
• Podczas montażunależypostępowaćzgodnie zzałączoną instrukcją obsługi (rys. 1ff. ).
• Podczas montażuprzeguby należyustawić wten sposób, aby możliwa byłaregulacja
boczna uchwytu.
• Za pomocą poziomicy należysprawdzić czy TV został zawieszony wpoziomie; jeśli to
konieczne należyponownie ustawić moduł mocowany do ściany.
Wskazówki
• Ze względu na różnorodność dostępnych na rynku urządzeń końcowych, możesię
zdarzyć, żeopis nie uwzględnia wszystkich opcji montażu.
• Należyupewnićsię, żeuchwyt prosto ipłasko przylega do tylnej części odbiornika
telewizyjnego.
• Użyć dołączonych elementów dystansowych do wyrównania nierówności tylnej części
odbiornika TV.
• Należypamiętać,żewszystkieśruby mają odpowiednią długość inależyje
maksymalnie dokręcić (patrz rys. 3).
6. Regulacja uchwytu, konserwacja
Wskazówki
Regulację uchwytu należyprzeprowadzić w2osoby!
• Aby ustawić uchwyt wbok nie trzeba odkręcaćżadnych śrub.
• Opór dla regulacji nachylenia iprzesunięcia wbok możezostać wyregulowany za
pomocą odpowiednich śrub.
• Wcelu bezpieczeństwa oba ramiona zawiesić na module TV iskręcić mocno obie śruby.
• Konstrukcję uchwytu należykontrolować wstałych odstępach czasu (przynajmniej razna
kwartał)pod względem wytrzymałości. Uchwyt czyścić jedynie lekko zwilżoną szmatką.
7. Wyłączenie odpowiedzialności
Hama GmbH &CoKG nie udziela gwarancji ani nie odpowiada za szkody wskutek
niewłaściwej instalacji, montażuoraznieprawidłowego stosowania produktu lub
nieprzestrzegania instrukcji obsługi i/lub wskazówek bezpieczeństwa.
urządzenia)
00118126/06127756: do 150°
29,7 x17,8 cm
według standardu VESA do
00118126/06127756: 600x400
Głębokość:00118126/06127756: 8,4 –42,0 cm
10
H Használati útmutató
Köszönjük, hogy ezt aHama terméket választotta!
Kérjük, hogy felszerelés előtt szánjon rá időtésolvassa el végig az alábbi útmutatót. A
későbbiekben tartsa biztonságos helyen ezt afüzetet, hogy ha szükség van rá, bármikor
megtalálja. Ha eladja ezt aterméket, vele együtt adja tovább ezt az útmutatót is az új
tulajdonosnak.
1. Figyelmeztető szimbólumok és előírások ismertetése
Figyelmeztetés
Figyelmeztető jeleket használunk abiztonsági tényezőkbemutatására, ill. felhívjuk a
gyelmet akülönleges veszélyekreéskockázatokra.
Hivatkozás
Az itt látható gyelmeztető jeleket használjuk fel, ha kiegészítő információkat közlünk
vagy fontos tudnivalókrahívjuk fel a gyelmet.
2. Acsomag tartalma
• Tv fali tartó
• TV tartókar (2x)
• Fúrás
• Kábelkötegelők
• Szerelőkészlet (tartalmáért lásd 1. ábra)
• Ez ahasználati útmutató
Hivatkozás
Kérjük, atartó felszerelése előtt ellenőrizze, hogy aszerelési készlet teljese,
és hogy nem tartalmaz-e hibás vagy sérült elemeket.
3. Biztonsági és szerelési tudnivalók
Figyelmeztetés
• Apiaconkapható végberendezések és fali konstrukciók nagy választékának
következtében amellékelt szerelési készlet
nem fedheti le az összes lehetőséget.
• Ritka esetben előfordulhat, hogy acsavarok avégberendezés rögzítéséhez túl
hosszúak.
• Vegye gyelembe, hogy amellékelt tipli csak betonfalhoz és tömör téglafalhoz
alkalmas.
• Szerezzen be alkalmas rögzítőanyagot avégberendezés szereléséhez aszaküzletben,
amennyiben az nem része amellékelt szerelési készletnek.
• Szerezzen be alkalmas rögzítőanyagot aszaküzletben, ha aszerelésrekijelölt fal
egyéb anyagú és jellegű.
• Aszerelésnél ne alkalmazzon erőszakot vagy túlzott erőt. Emiatt megrongálódhat
végberendezése, vagy afalitartó.
• Kétség esetén forduljon szakemberhez atermék szereléséreésnepróbálkozzon
saját maga!
• Aszerelés előtt olvassa el avégberendezés kezelési útmutatóját. Ez általában
tájékoztat amegfelelő rögzítési eljárás módjáról és améretekről.
• Sohasem szerelje fel aterméket olyan helyen, amely alatt személyek tartózkodhatnak.
• Atermék és az arrarögzített teher felszerelése után ellenőrizni kellazok kellő
szilárdságát és üzembiztonságát.
• Ezt az ellenőrzést rendszeres időközökben (legalább negyedévenként) meg kell ismételni.
• Ügyeljen arra, hogy atermék maximálisan megengedett teherbírása ne legyen túllépve
és ne legyen olyan teher ráhelyezve, amelynek mérete meghaladja az erremaximálisan
engedélyezettet.
• Ügyeljen arra, hogy ne aszimmetrikusan terhelje aterméket.
• Az átállításnál ügyeljen arra, hogy ne aszimmetrikusan legyen atermék terhelve és
közben amaximálisan megengedett teherbírás ne legyen túllépve.
• Tartsa be abiztonsági távolságot az elhelyezett teher körül (modelltőlfüggően).
• Atermék megrongálódása esetén azonnal távolítsa el az elhelyezett terhet és ne
használja tovább aterméket.
4. Alkalmazhatóság és műszaki adatok
• Ez afali tartó szerelvény lapképernyőstv-készülékekhez készült, nem kereskedelmi,
hanem magán használati célra.
• Afali tartó szerelvény megbízhatóan csak beltéri használatraalkalmazható.
• Kérjük, hogy ezt atartót kizárólag arraacélrahasználja, amiretervezték.
Maximális terhelhetőség: 00118126/06127756: 50 kg
Képernyőátmérő:00118126/06127756:
81,0 -213,0 cm (US: 32" -84")
Mélysége: 00118126/06127756: 8,4 –42,0 cm
Dönthetőség: –/+ 15°
Elfordíthatóság:
Afali felerősítő lap
mérete:
Felrögzítési szabvány:
5. Szerelési előkészítés és összeszerelés
Hivatkozás
• Az állvány szerelését lehetőség szerint ketten végezzék. Ha támogatásravan
szüksége, kérjen segítséget!
• Különböző végberendezések különböző csatlakozási lehetőségeket nyújtanak a
kábelezés és egyéb végberendezések számára. Atelepítés előtt ellenőrizze, hogy a
szükséges csatlakozások aszerelés után elérhetők-e még.
• Fali TV-tartóinkhoz mindig ugyanazt aszerelési készletet mellékeljük. Aterméktől
és aszerelés jellegétőlfüggően nincs szüksége ateljes szerelési készletre. Ezért
lehetséges, hogy szabályos szerelésnél is kimarad néhány nem szükséges csavar
és más apró alkatrész. Ezeket biztonságos helyen őrizze meg ezzel akezelési
útmutatóval együtt későbbi felhasználásra(termék eladása, költözés, fali tartó
átépítése, új TV stb.).
Figyelmeztetés
• Ez atermék csak falraszerelésrealkalmas.
• Aszerelés előtt győződjön meg róla, hogy nincs afalban elektromos vezeték, víz-,
gáz- vagy egyéb közmű csővezeték, ami megsérülhet afúrás során.
• Vegye gyelembe, hogy atartozékként mellékelt tiplik csak abeton- és téglafalakban
tartanak erősen.
• Ahhoz, hogy atartó megbízhatóan legyen felszerelve, tartsa be abiztonsági feltételeket.
• Amíg nem tud minden részletet azonosítani, ne kezdje el aszerelést, és lépésrőllépésre
kövesse az illusztrált összeszerelési útmutatót, mielőtt (1 ábra).
• Atelepítés során alengőkarokat úgy kell beállítani, hogy atv-készülék ne akadályozza a
karok oldalirányú mozgását.
• Ellenőrizze amellékelt vízszint-beállítóval, hogy vízszintesen áll-e atv-készüléke és
szükség esetén után-állítással módosítsa atv-tartó lap helyzetét.
Hivatkozás
• Apiaconkapható végberendezések nagy választékának következtében amellékelt
szerelési készlet nem írhatja le az összes változatot.
• Győződjön meg arról, hogy akonzolegyenesen és nem billentve fekszik aTV
hátoldalán.
• Használja amellékelt távtartókat aTVhátulján lévő egyenlőtlenségek
kompenzálásához.
• Ne feledje, hogy minden csavarnak megfelelő hossza van és kézzel szerelhető.(lásd
3. ábra)
6. Beállítás és karbantartás
Hivatkozás
Az állvány beállítását lehetőség szerint ketten végezzék. Ha támogatásravan szüksége,
kérjen segítséget!
• Az oldalirányú elmozdításhoz acsavarokat nem kell megoldani.
• Az ellenállás beállítása adöntésbeállításhoz és az oldalsó mozgáshoz amegfelelő
csavarral végezhető el.
• Atv-alaplapot tartó mindkét kar biztosításához húzza meg arögzítő csavarokat.
• Felszerelés után szabályos időközönként (átlagban negyedévenként) ellenőrizze, hogy
afali tartó rögzítése nem lazult-e meg. Tisztításához vizet és háztartási tisztítószert
használjon.
7. Szavatosság kizárása
AHama GmbH &CoKG semmilyen felelősséget vagy szavatosságot nem vállal atermék
szakszerűtlen telepítéséből, szerelésébőlésszakszerűtlen használatából, vagy akezelési
útmutató és/vagy abiztonsági előírások be nem tartásából eredő károkért.
3csuklós karral és 2dbtartókarral (készüléktőlfüggően)
00118126/06127756: legfeljebb 150°
29,7 x17,8 cm
VESA-szabvány szerinti amíg
00118126/06127756: 600x400
11

C Návod kpoužití
Děkujeme, že jste si vybrali výrobek Hama.
Přečtěte si, prosím, všechny následující pokyny ainformace. Uchovejte tento text pro
případné budoucí použití. Pokud výrobek prodáte, předejte tento text novému majiteli.
1. Vysvětlení výstražných symbolů apokynů
Upozornění
Tento symbol označuje bezpečnostní upozornění, které poukazuje na určitá rizika a
nebezpečí.
Poznámka
Tento symbol označuje dodatečné informace nebo důležité poznámky.
2. Obsah balení
• TV držák
• Nosná ramena proTV(2x)
• Vrtání
• Kabelové svazky
• Instalační sada (obsah viz obr.1)
• Informace kpoužívání
Poznámka
Před instalací držáku zkontrolujte, zda je montážní sada kompletní, aujistěte se, že
neobsahuje žádné vadné nebo poškozené díly.
3. Bezpečnostní pokyny
Upozornění
• Vzhledem kvelkému množství koncových zařízení arůzným stavebním konstrukcím
nemusí být přiložená montážní sada vhodná provšechny možnosti.
• Vněkterých zvláštních případech se může stát, že jsou šrouby proinstalaci
koncového přístroje na nástěnný držák příliš dlouhé.
• Dbejte na to, že dodané hmoždinky jsou schváleny pouze probeton azdi zplných
cihel.
• Před montáží si přečtěte návod kobsluze vašeho koncového přístroje. Zde zpravidla
najdete informace odruhu arozměrech vhodného upevňovacího materiálu.
• Pokud není součástí dodané montážní sady vhodný upevňovací materiál, zakupte
upevňovací materiál vhodný kmontáži koncového přístroje vodborné prodejně.
• Vhodný montážní materiál zakupte vodborné prodejně vpřípadě jiného druhu
materiálu akonstrukce zdi, na kterou chcete přístroj instalovat.
• Přimontážinikdy nepoužívejte násilí nebo velkou sílu. Můžete tak poškodit vaše
koncové zařízení nebo nástěnný držák.
• Vpřípadě pochybností se za účelem montáže tohoto výrobku obraťte na vyškolený
odborný personál anezkoušejte to sami!
• Výrobek nikdy neinstalujte na místech, pod kterými by se mohly nacházet osoby.
• Po montáží výrobku azatížení, které je na němumístěno zkontrolujte jejich dostatečnou
pevnost aprovozní bezpečnost.
• Pevnost aprovozní bezpečnost kontrolujte pravidelně (nejméně jednou za čtvrt roku).
• Dbejte na to, aby nedošlo kpřekročení maximální přípustné nosnosti výrobku anebyla
umístěna zátěž, která překračuje maximální přípustné rozměry.
• Dbejte na to, aby byl výrobek zatěžován symetricky!
• Připřestavování dbejte na to, aby nedošlo kasymetrickému zatížení výrobku apřekročení
maximální přípustné nosnosti.
• Vblízkosti umístěné zátěže udržujte bezpečnostní odstup (v závislosti na modelu).
• Vpřípadě poškození výrobku ihned odstraňte umístěnou zátěžavýrobek již dále
nepoužívejte.
4. Oblast použití aspecifikace
• Držák je určen promontáž plochého televizoru na zeď pronekomerční, domácí použití.
• Držák je určen pouze propoužití vbudovách.
• Používejte držák pouze ke stanovenému účelu.
Rozměry upevňovací
desky:
Provedení:
5. Požadavky na instalaci ainstalace
Poznámka
• Držák instalujte spomocídruhé osoby.Zajistěte si potřebnou pomoc.
• Rozdílné koncové přístroje mají rozdílné možnosti připojení kabeláže adalších
přístrojů.Před instalací zkontrolujte, zda je možné dosažení potřebných přípojek
také po montáži.
• UnašichTV-nástěnných držáků se vždy nachází stejná montážní sada. Vzávislosti
na výrobku adruhu montáže se může stát, že nebudete potřebovat celou montážní
sadu. Proto je možné, že ipřisprávném provedení montáže zůstanou nepotřebné
šrouby ajiné malé součásti. Tyto součásti uskladněte společně stímto návodem
kpoužití na bezpečném místě propozdější použití (prodej výrobku, stěhování,
přestavba nástěnného držáku, nová TV apod.).
Upozornění
• Te nto produkt je určen výlučně kmontáži na stěnu.
• Před instalací ověřte vhodnost anosnostzdi. Ujistěte se, zda se ve zdi nenachází
elektrické vedení, vodní, nebo plynové potrubí atd.
• Dbejte na to, že dodané hmoždinky jsou schváleny pouze probeton azdi zplných
cihel.
• Přečtěte si bezpečnostní pokyny aupozornění.
• Postupujte krok za krokem podle ilustrovaných pokynů kinstalaci (obr.1ff).
• Během instalce nastavte klouby tak, aby bylo možné pohybovat televizorem do stran.
• Zkontrolujte pomocí přiložené vodováhy správné vyrovnání vašeho televizoru avpřípadě
potřeby upravte polohu držáku.
Poznámka
• Zdůvodu rozmanité nabídky koncových zařízení na trhu nelze popsat všechny
varianty montáže.
• Dbejte na to, aby byl držák rovně nasazen na zadní straně televizoru.
• Provyrovnání nerovností na zadní straně TV použijte přiložené rozpěrky.
• Upozorňujeme, že všechny šrouby mají správnou délku amontují se ručně (viz
obr.3).
6. Nastavení aúdržba
Poznámka
Držák instalujte spomocí druhé osoby.Zajistěte si potřebnou pomoc.
• Propohyb do stran není nutné uvolnit žádné šrouby.
• Odpor nastavení sklonu aboční pohyb je možné dodatečně nastavit pomocí příslušných
šroubů.
• Proupevnění zavěste obě ramena držáku na televizor autáhněte oba šrouby.
• Kontrolujte pravidelně pevnost abezpečnost instalace (nejméně 1x za 3měsíce). Pro
čištění používejte pouze vodu astandardní domácí čisticí přípravky.
7. Vyloučení záruky
Hama GmbH &CoKG nepřebírá žádnou odpovědnost nebo záruku za škody vzniklé
neodbornou instalací, montáží nebo neodborným použitím výrobku nebo nedodržováním
návodu kpoužití a/nebo bezpečnostních pokynů.
29,7 x17,8 cm
podle VESA-Standardaž
00118126/06127756: 600x400
Maximální nosnost: 00118126/06127756: 50 kg
Uhlopříčka obrazovky: 00118126/06127756:
Hloubka: 00118126/06127756: 8,4 –42,0 cm
Sklon: –/+ 15°
se třemi klouby advěma dvojitými nosnými rameny (v
Rozsah otočení:
závislosti na zařízení)
00118126/06127756: až do 150°
81,0 -213,0 cm (US: 32" -84")
12

Q Návod na použitie
Ďakujeme, že ste sa rozhodli prevýrobok Hama.
Prečítajte si všetky nasledujúce pokyny ainformácie. Uchovajte tento návod na použitie pre
prípadné budúce použitie. Pokiaľ výrobok predáte, dajte tento návod novému majiteľovi.
1. Vysvetlenie výstražných symbolov aupozornení
Upozornenie
Tento symbol označuje bezpečnostné upozornenie, ktoré poukazuje na určité riziká
anebezpečenstva.
Poznámka
Tento symbol označuje dodatočné informácie, alebo dôležité poznámky.
2. Obsah balenia
• TV držiak
• TV nosné ramená (2x)
• Vŕtanie
• Káblové zväzky
• Inštalačný set (obsah viď obr.1)
• Informácie na používanie
Poznámka
Pred inštaláciou držiaka skontrolujte, čijemontážny set kompletný, a
uistite sa, že neobsahuje žiadne zlé alebo poškodené diely.
3. Bezpečnostné upozornenia
Upozornenie
• Vzhľadom na veľ ké množstvo koncových zariadení arôznestavebné konštrukcie
nemusí byť priložený montážny set vhodný prevšetky možnosti.
• Vniektorýchšpeciálnych prípadoch sa môže stať,žesúskrutky preinštaláciu
koncového prístroja na nástenný držiak príliš dlhé.
• Myslite na to, že dodané hmoždinky sú schválené iba prebetón asteny zplných
tehál.
• Pred montážou si prečítajte návod na použitie ku koncovému zariadeniu. Ta m
spravidla nájdete informácie odruhu arozmeroch vhodného upevňovacieho
materiálu.
• Ak nie je súčasťou dodaného montážneho setu vhodný upevňovací materiál,
zaobstarajte si ho všpecializovanej predajni.
• Vprípadeiného druhu materiálu akonštrukcie steny,naktorú chcete prístroj
inštalovať,sivhodný montážny materiál zaobstarajte všpecializovanej predajni.
• Pri montáži nikdy nepoužívajte násilie alebo veľkú silu. Môžete tak poškodiť koncové
zariadenie alebo nástenný držiak.
• Vprípadepochybností ohľadne montáže tohto výrobku sa obráťte na vyškolený
odborný personál aneskúšajte to sami!
• Výrobok nikdy nemontujte na miesta, pod ktorými by sa mohli zdržiavať osoby.
• Po montáži výrobku snaňom upevnenou záťažou skontrolujte ich dostatočnú pevnosť a
prevádzkovú bezpečnosť.
• Táto kontrola sa musí opakovať vpravidelných odstupoch (najmenej štvrťročne).
• Dbajte na to, aby nedošlo kprekročeniu maximálne dovolenej nosnosti výrobku aaby na
ňom nebola umiestnená záťaž, ktorá prekračuje maximálne dovolené rozmery.
• Dbajte na to, aby výrobok nebol zaťažený asymetricky.
• Pri prestavovaní dbajte na to, aby výrobok nebol zaťažený asymetricky aabypri tom
nedošlo kprekročeniu maximálne dovolenej nosnosti výrobku.
• Dodržiavajte bezpečnú vzdialenosť vokolí umiestnenej záťaže (v závislosti od modelu).
• Vprípade poškodenia výrobku odstráňte okamžite umiestnenú záťaž avýrobok ďalej
nepoužívajte.
4. Oblasť použitia ašpecifikácia
• Držiak je určený na montáž plochého televízoranastenu prenekomerčné, domáce
použitie.
• Držiak je určený len prepoužitie vbudovách.
• Používajte držiak len kstanovenému účelu.
stroma kĺbmi advoma dvojitými nosnými ramenami (v
Rozsah otočenia:
Rozmery upevň-ovacej
dosky:
Prevedenie:
5. Požiadavky na inštaláciu ainštalácia
Poznámka
• Držiak inštalujte spomocoudruhej osoby.Zaistite si potrebnú pomoc.
• Rôzne koncové zariadenia majú rôzne možnosti pripojenia prekabeláž a ďalšie
prístroje/zariadenia. Pred inštaláciu skontrolujte, čipomontážiešte budú dostupné
potrebné prípojky.
• Našim TV nástenným držiakom je priložená vždy rovnaká montážna sada. Vzávislosti
od výrobku adruhumontáže nepotrebujete kompletnú montážnu sadu. Aj po
korektnej montáži preto môžu zostať nazvyš nepotrebné skrutky ainé drobné diely.
Uschovajte ich spolu stýmto návodom na používanie na bezpečnom mieste pre
neskoršie použitie (predaj výrobku, presťahovanie, rekonštrukcia nástenného držiaka,
nová TV atď.).
Upozornenie
• Te nto výrobok je vhodný výlučne na montáž na steny.
• Pred inštaláciou overte vhodnosť anosnosť steny.Uistite sa, čisavstene nenachádza
elektrické vedenie, vodné, alebo plynové potrubie atď.
• Myslite na to, že dodané hmoždinky sú schválené iba prebetón asteny zplných
tehál.
• Prečítajte si bezpečnostné pokyny aupozornenia.
• Postupujte krok za krokom podľailustrovaných pokynov na inštaláciu (obr.1ff).
• Počas inštalácie nastavte kĺby tak, aby bolo možné pohybovať televízorom do strán.
• Skontrolujte pomocou priloženej vodováhy čijetelevízor rovno avprípade potreby
upravte polohu držiaku.
Poznámka
• Zdôvodurozmanitosti koncových zariadení dostupných na trhu nie je možné opísať
všetky varianty montáže.
• Dbajte na to, aby držiak priliehal priamo arovno na zadnej strane televízneho
prijímača.
• Na vyrovnanie nerovností zadnej strany televízorapoužite priloženú dištančnú vložku.
• Dbajte na to, aby všetky skrutky mali správnu dĺžku aboli dotiahnuté rukou. (pozri
obr.3)
6. Nastavenie aúdržba
Poznámka
Držiak inštalujte spomocou druhej osoby.Zaistite si potrebnú pomoc.
• Prepohyb do strán nie je nutné uvoľniť žiadne skrutky.
• Pomocou príslušných skrutiek môžete nastaviť odpor pri nastavení uhla apohyb do
strán.
• Preupevnenie zaveste obe ramená držiaku na televízor autiahnite obe skrutky.
• Kontrolujte pravidelne pevnosť abezpečnosť inštalácie (najmenej 1x za 3mesiace). Na
čistenie používajte len vodu aštandardné domáce čistiace prípravky.
7. Vylúčenie záruky
Firma Hama GmbH &CoKGneručí/nezodpovedá za škody vyplývajúce zneodbornej
inštalácie, montáže alebo neodborného používania výrobku alebo znerešpektovania
návodu na používanie a/alebo bezpečnostných pokynov.
závislosti na zariadení)
00118126/06127756: až do 150°
29,7 x17,8 cm
podľaVESA štandardu až
00118126/06127756: 600x400
Maximálna nosnosť:00118126/06127756: 50 kg
Uhlopříčka obrazovky: 00118126/06127756:
Hĺbka: 00118126/06127756: 8,4 –42,0 cm
Sklon: –/+ 15°
81,0 -213,0 cm (US: 32" -84")
13

O Manual de instruções
Agradecemos que se tenha decidido por este produto Hama!
Antes de utilizar oproduto, leia completamente estas indicações einformações. Guarde,
depois, estas informações num local seguroparaconsultas futuras. Se transmitir oproduto
paraumnovo proprietário, entregue também as instruções de utilização.
Descrição dos símbolos de aviso edas notas
1.
Aviso
Éutilizado paraidenticar informações de segurança ou chamar aatenção paraperigos
eriscos especiais.
Nota
Éutilizado paraidenticar informações adicionais ou notas importantes.
2. Conteúdo da embalagem
• Suporte TV paraaparede
• Braços de suporte paratelevisor (2x)
• Perfuração
• Abraçadeiras
• Kit de montagem (ver g. 1paraitens)
• Estas instruções de utilização
Nota
Antes da instalação do suporte, verique se okit de montagem está completo e
certique-se de que não contém peças avariadas ou danicadas.
3. Indicações de segurança
Aviso
• Devido ao grande númerodevariantes de aparelhos econstruçõesde parede
disponíveis no mercado, éimpossível cobrir todas as possibilidades com okit de
montagem fornecido.
• Em casos extraordinários, pode acontecer que os parafusos de xação do aparelho
no suporte de parede sejam demasiado longos.
• Te nha em atenção que as buchas fornecidas são apenas permitidas paraparedes de
betão etijolo maciço.
• Leia estas instruções de uso antes de montar oseu aparelho. Em regra, estas
apresentam informações sobreotipo edimensões dos materiais de xação
adequados.
• Se omaterial de xação do aparelho não for incluído no kit de montagem fornecido,
adquiraeste material no comércio da especialidade.
• Em caso de outros tipos de materiais econstruções na parede dos previstos paraa
instalação, adquiramaterial de instalação adequado no comércio especializado.
• Ao montar oproduto, nunca aplique força exagerada. Se o zer,poderá danicar o
aparelho ou osuportede parede.
• Em caso de dúvida, entreemcontacto com técnicos especializados paraefectuar a
montagem enão tente montar oproduto!
• Não instale oproduto em locais sob os quais possam encontrar-se pessoas.
• Depois da montagem do produto edacarga nele xada, estes devem ser vericados
quanto a xação suciente esegurança operacional.
• Esta vericação deve ser repetida em intervalos regulares (pelo menos uma vez por
trimestre).
• Garanta que acarga máxima permitida paraoproduto não seja ultrapassada eque não
sejam colocadas cargas que excedam as dimensões máximas previstas.
• Certique-se de que não sobrecarrega oproduto assimetricamente.
• Ao ajustar,certique-se de que oproduto não écarregado assimetricamente eque a
carga máxima permitida não éexcedida.
• Mantenha uma distância de segurança relativamente àcarga colocada (variável em
função do modelo).
• Em caso de danicação, remova imediatamente acarga colocada enão continue a
utilizar oproduto.
4. Área de aplicação eespecificações
• Osuporte destina-se à xação na parede de ecrãs planos, utilizados para ns privados.
• Osuporte éadequado apenas parainstalação em interiores.
• Utilize osuporte apenas paraanalidade prevista.
Capacidade máxima
de carga:
Diagonal do ecrã: 00118126/06127756:
Profundidade: 00118126/06127756: 8,4 –42,0 cm
00118126/06127756: 50 kg
81,0 -213,0 cm (US: 32" -84")
Inclinação: –/+ 15°
em três articulações com dois braços de suporte duplos (em
Amplitude de oscilação:
Dimensão da placa de
xação na parede:
Suporte:
5. Trabalho preliminar einstalação
Nota
• Osuportede TV deve ser sempremontado por duas pessoas! Peça sempreajuda!
• Diferentes dispositivos têm diferentes opções de ligação paracabos eoutros
aparelhos. Antes da instalação, verique se as ligações necessárias continuam
acessíveis após amontagem.
• Os nossos suportes de parede paratelevisores são semprefornecidos com omesmo
conjunto de montagem. Dependendo do produto etipo de montagem, não necessita
de todo oconjunto de montagem. Sendo assim, épossível que mesmo tendo feito
uma montagem correcta, sobrem parafusos eoutras peças pequenas desnecessárias.
Guarde as mesmas juntamente com omanual de instruções num local seguropara
uma utilização posterior (venda do produto, mudança de casa, remontagem do
suporte de parede, novo televisor,etc.).
Aviso
• Este produto destina-se exclusivamente àmontagem em paredes.
• Antes da instalação, verique impreterivelmente aadequação da parede
relativamente ao peso aaplicar ecertique-se de que no local de montagem
na parede não se encontram cabos eléctricos ou tubos de água, gás ou outras
tubagens.
• Te nha em atenção que as buchas fornecidas são apenas permitidas paraparedes de
betão etijolo maciço.
• Observe os restantes avisos eindicações de segurança.
• Efectue todos os passos indicados nas guras das instruções de instalação (g. 1e
seguintes).
• Durante ainstalação, as articulações devem ser ajustadas de forma aque seja possível
uma deslocação lateral do televisor.
• Verique oalinhamento horizontal do seu televisor utilizando onívelde bolha de ar
fornecido e, se necessário, reajuste aplaca de TV.
Nota
• Devido ao grande númerodevariantes de aparelhos disponíveis no mercado, é
impossível cobrir todas as variantes de montagem.
• Preste atenção paraque os suportes estejam posicionados direitos enivelados na
parte traseiradotelevisor.
• Utilize os distanciadores fornecidos paracompensar as irregularidades na parte
traseiradotelevisor.
• Te nha em atenção paraque todos os parafusos tenham ocomprimento correto e
sejam apertados manualmente. (Ver g. 3)
6. Ajuste emanutenção
Nota
Efectue os ajustes no suporte de TV semprecom uma segunda pessoa! Peça sempreajuda!
• Para adeslocação lateral, não énecessário desapertar quaisquer parafusos.
• Aresistência paraoajuste da inclinação eomovimento lateral pode ser reajustada com
aajuda dos respetivos parafusos.
• Para xar,engate os dois braços de suporte na placa de TV eparte, rmemente, os
dois parafusos.
• Asolidez easegurança devem ser vericadas regularmente (pelo menos,
trimestralmente). Alimpeza deve ser efectuada somente com água ou detergentes
domésticos convencionais.
7. Exclusão de garantia
AHama GmbH &CoKG não assume qualquer responsabilidade ou garantia por danos
provocados pela instalação, montagem ou manuseamento incorrectos do produto enão
observação do das instruções de utilização e/ou das informações de segurança.
função do aparelho)
00118126/06127756: até 150°
29,7 x17,8 cm
de acordo com opadrão VESA a
00118126/06127756: 600x400
14
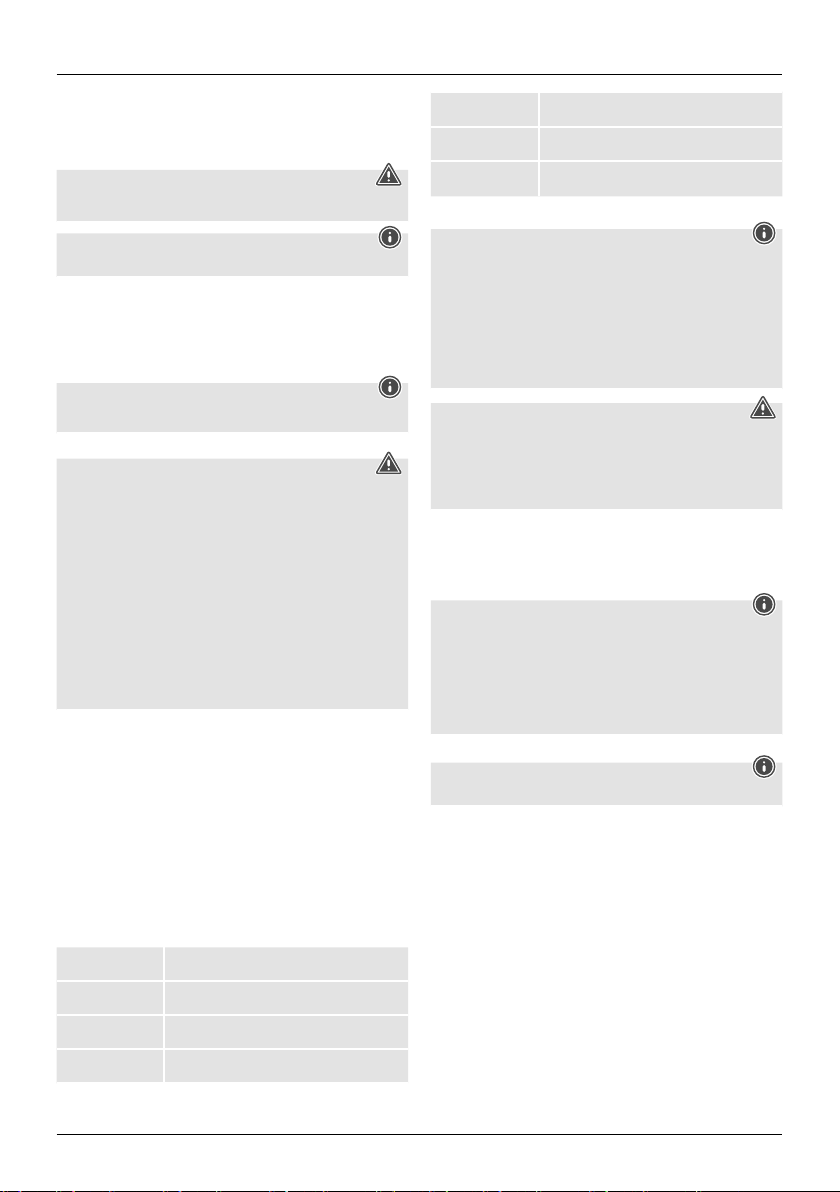
T Kullanma kılavuzu
Bir Hama ürünü satınaldığınıziçin teşekkür ederiz!
Biraz zaman ayırınveönce aşağıda verilen talimatları ve bilgileri iyice okuyun. Bu kullanım
kılavuzunu güvenli bir yerde saklayınvegerektiğinde yeniden okuyun. Bu cihazı başkasına
sattığınızda, bu kullanma kılavuzunu da yeni sahibine birlikte verin.
1. Uyarı sembollerinin ve uyarılarınaçıklanması
Uyarı
Güvenlik uyarılarını işaretlemek veya özellikle tehlikeli durumlaradikkat çekmek için
kullanılır.
Uyarı
Ek bilgileri veya önemli uyarıları işaretlemek için kullanılır
2. Paketin içindekiler
• TV duvar bağlantısı
• TV taşıma kolu (2x)
• Delme
• Kábelkötegelők
• Montaj seti (içeriğiiçin, bkz. Şekil 1)
• Bu kullanma kılavuzu
Uyarı
Montaj öncesi montaj setinin eksiksiz olduğunu kontrol edin ve içerisinde
hatalı veya hasarlı parça olmadığından emin olun.
3. Güvenlik uyarıları
Uyarı
• Piyasada çok sayıda farklı cihaz ve duvar konstrüksiyonu mevcut olduğundan, birlikte
verilen montaj setinin bağlantı olanaklarınınhepsinde kullanılması mümkün değildir.
• Bazı ender durumlarda cihazı monte etmek için duvar braketinde bulunan cıvatalar
çok uzun olabilir.
• Birlikte gelen dübellerin sadece beton ve tuğla duvarlarauygun olduğunu göz
önünde bulundurunuz.
• Montaj öncesi cihazınızınkullanımkılavuzunu okuyunuz. Bu kılavuzda genel olarak
uygun bağlantı elemanlarınıncinsleri ve ölçüleri ile ilgili bilgiler bulunur.
• Birlikte gelen montaj setinin kapsamına dahil olmayan uygun bağlantı elemanlarını
piyasadan temin ediniz.
• Montaj için öngörülen duvarınmalzemesi ve yapısı farklı ise, uzman satıcınızdan
uygun montaj malzemesi temin edin.
• Montaj esnasında asla zorlamayınveya çok fazla kuvvet kullanmayın. Bu durumda
cihazınıza veya duvar bağlantısına zarar verebilirsiniz.
• Emin olmadığınızdurumlarda bu ürünü kendiniz monte etmeyi denemeyin ve
eğitilmiş bir ustaya monte ettirin!
• Bu ürün altında insanlarınoturduğuyerleremonte edilmemelidir.
• Ürün ve bağlı olan yük monte edildikten sonrabağlantılarınsağlamlığı ve işletme
emniyeti kontrol edilmelidir.
• Bu kontrol düzenli aralıklarla tekrar edilmelidir (en az üç ayda bir).
• Ürünün maksimum taşıma kapasitesinin geçilmemesine ve izin verilen maksimum
ölçülerden daha büyük yükle yüklenmemesine dikkat ediniz.
• Ürün asimetrik olarak yüklenmemelidir.
• Ayarını değiştirirken ürünün asimetrik olarak yüklenmemesine ve izin verilen maksimum
taşıma kapasitesi değerinin geçilmemesine dikkat edin.
• Bağlanan yüke gerekli bir güvenlik mesafesin bırakın(modele göredeğişir).
• Üründe hasar oluştuğunda, üzerindeki yükü derhal kaldırınveürünü artıkkullanmayınız.
4. Uygulama alanı ve teknik özellikleri
• Bu duvar bağlantısı evlerde bulunan düz ekranları bağlamak için tasarlanmıştır, ticari
olarak kullanılmamalıdır.
• Bu duvar bağlantısı sadece bina içinde kullanmak için tasarlanmıştır.
• Duvar bağlantısını sadece amacına uygun olarak kullanınız.
Maksimum taşıma
kapasitesi:
Diyagonal ekran boyutu: 00118126/06127756:
00118126/06127756: 50 kg
81,0 -213,0 cm (US: 32" -84")
Dönme aralığı:
Duvar bağlantı plakasının
boyutu:
Yuva:
5. Montaj hazırlığı ve montaj
Uyarı
• TV duvar bağlantısını sadece iki kişimonte edin! Destek ve yardımalın!
• Farklı cihazlarınkablo ve başka cihazlarabağlanma şekilleri de farklıdır. Gerekli
bağlantılaramontajdan sonradaerişme olanağı olup olmadığını monte etmeden
önce kontrol edin.
• TV duvar bağlantılarımızla birlikte daima aynı montaj seti verilir.Ürüne ve montaj
türüne bağlı olarak montaj setinin tümünü kullanmanızgerekmez. Bu sebepten
montaj doğru yapıldığında da bazı vidalarınvediğer sarf malzemeleri artabilir.Bu
malzemeleri kullanımkılavuzu ile birlikte ileride kullanmak üzere(ürünün satılması,
taşınma, duvar bağlantısınınyerinin değiştirilmesi, yeni TV vb.) emin bir yerde
saklayın.
Uyarı
• Bu ürün yalnızca duvar montajına uygundur.
• Montaj öncesi duvarınbuağırlığı taşıyabilecek kapasitede olduğunu kontrol ediniz.
Monte edileceğiyerden elektrik kabloları,suyadagaz boruları vb. olmadığını
kontrol ediniz.
• Birlikte gelen dübellerin sadece beton ve tuğla duvarlarauygun olduğunu göz
önünde bulundurunuz.
• Ayrıca aşağıdaki ikaz ve emniyet uyarıları da göz önünde bulundurulmalıdır.
• Resimli montaj kılavuzuna bakarak adımadımmonte edin (Şekil 1vediğerleri).
• Montaj esnasında mafsallar,TVcihazını hareket ettirmek mümkün olacak şekilde
ayarlanmalıdır.
• Birlikte verilen su terazisi ile TV cihazınızınyatay hizasını kontrol edin ve gerektiğinde TV
plakası ile düzeltin.
Uyarı
• Piyasada bulunan uç cihazlarınınçeşitliliğinden dolayı montajıntümtürleri
tanımlanamıyor.
• Te levizyon cihazınınarka yüzünde braketin dik ve düz olarak dayanmasına dikkat
ediniz.
• Arka TV yüzünün pürüzleri gidermek için ekte bulunan mesafe tutucularını kullanın.
• Tüm vidalarındoğru uzunlukta olmasına ve el sıkılığında monte edilmelerine dikkat
ediniz. (bkz. Şek.3)
6. Ayar ve bakım
Uyarı
TV duvar bağlantısınınayarını sadece iki kişideğiştirin! Destek ve yardımalın!
• Yana hareket için herhangi bir vidanıngevşetilmesi gerekmez.
• Eğim ayarı direnci ve yan hareket ilgili vidalarınyardımıyla tekrar ayarlanabilir.
• Her iki taşıma kolunu da tespit etmek için, TV plakasına takınveher iki vidayı sıkın.
• Sağlamlığı ve işletme emniyeti belirli aralıklarla (en az üç ayda bir) kontrol edilmelidir.
Sadece su veya piyasada yaygınbulunan evsel deterjanlarla temizlenmelidir.
7. Garanti reddi
Hama GmbH &CoKG şirketi yanlış kurulum, montaj ve ürünün amacına uygun olarak
kullanılmaması durumunda veya kullanımkılavuzu ve/veya güvenlik uyarılarına uyulmaması
sonucu oluşan hasarlardan sorumluluk kabul etmez ve bu durumda garanti hakkı kaybolur.
kadar 3mafsallı,2çift taşıma kolu (cihaza bağlı)
00118126/06127756: maks. 150°
29,7 x17,8 cm
VESA normuna göredeğin
00118126/06127756: 600x400
Derinlik: 00118126/06127756: 8,4 –42,0 cm
Eğim: –/+15°
15
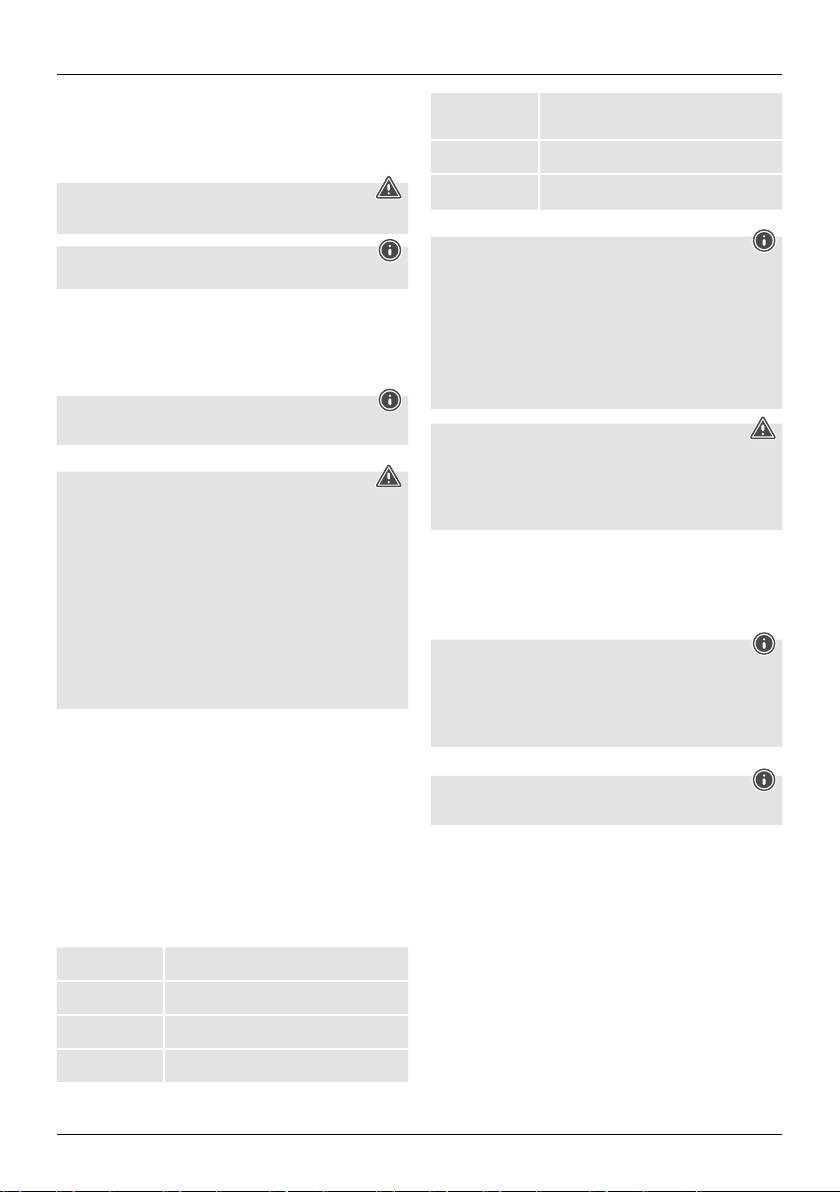
M Manual de utilizare
Vă mulţumim că aţioptat pentru un produs Hama.
Pentru început vă rugămsăvălăsațipuțin timp șisăcitițicomplet următoarele instrucțiuni
șiindicații. Vă rugămsăpăstraţimanualul de utilizarelaloc sigur pentru oconsultare
ulterioară în caz de nevoie. În caz de înstrăinareaaparatului vă rugămsăpredați șiacest
manual noului proprietar.
1. Explicarea simbolurilor de avertizare șiindicații
Avertizare
Se folosește la marcarea instrucțiunilor de siguranță sau la concentrarea atenției în caz
de pericol șiriscuri mari.
Instrucțiune
Se folosește pentru marcarea informațiilor șiinstrucțiunilor importante.
2. Paketin içindekiler
• Suport de perete pentru TV.
• Suport-consolă TV (2x)
• Foraj
• Cablu de banda
• Set de montare(pentru conținut vezi g. 1).
• Acest manual de utilizare.
Instrucțiune
Înaintea instalării suportului vericațiintegritatea setului șiasigurați-vă ca
nici ocomponentă livrată să nu edeteriorată sau defectă.
3. Instrucțiuni de siguranță
Avertizare
• La multitudinea de aparate nale șiinstalații de montat pe perete de pe piață,setul
de informații pentru montaj nu poate acoperi toată paleta acestora.
• În cazuri rare se poate întâmpla ca șuruburile de xareale aparatului nal la suportul
de perete săeprealungi.
• Vă rugămsăluațiînconsiderarecădiblurile livrate sunt aprobate numai pentru
perețidebeton șicărămidă plină.
• Înainte de montarecitiţicuatenţie manualul de utilizarealapratului. Aici găsiți
informații referitoarelafelul șicantitatea materialelor de xareadecvate.
• În cazul în carematerialul de xarenuface parte din setul de monaj livrat, procurați-
vă din comerțul de specialitate materialul adecvat.
• Dacă plafonul este din alte materiale decât cele prevăzute, procurați-vă pentru
instalarematerialele adecvate adaptate la caracteristicile plafonului respectiv..
• Nu folosiținiciodată forțalamontaj. Aceasta poate deteriorasuportul de perete
sau aparatul nal.
• Dacă nu vă pricepețivărugămsăvăadresaţiunui specialist șinuîncercațisingur!
• Nu montațiprodusul deasupralocurilor unde se găsesc oameni.
• După montarea produsului şiasarcinii xate vericaţistabilitatea şisiguranţaacestora.
• Această vericareseexecută periodic (cel puţin odată la trei luni).
• Vă rugămsăținețicont șisănu depășițicapacitatea maximă de încărcareaprodusului
șisănu aplicaținici osarcină suplimentară carepoate duce la depășirea încărcării
maxime aprobate.
• Aveţigrijă să nu încărcaţiasimetric produsul.
• La reglarevărugămsăavețigrijă să nu încărcaţiprodusul asimetric şisănu depăşiţi
astfel greutatea maximă admisă.
• Păstrațiodistanță de siguranță față de greutatea plasată (în funcție de model).
• În caz de deterioareîndepărtațiimediat greutatea plasată pe produs șinu-l mai folosiți.
4. Domeniu de aplicare șispecificații
• Suportul serveşte la xarea ecranelor plate numai în utilizarecasnică,utilizarea
industrialăind interzisă.
• Suportul este conceput numai pentru utilizarea în interiorul clădirilor.
• Folosiţisuportul numai în scopul pentru careafost conceput.
Forță portantă maximă:00118126/06127756: 50 kg
Diagonala ecranului: 00118126/06127756:
81,0 -213,0 cm (US: 32" -84")
la 3articulaţii cu 2braţedublu portante (în funcție de
Zonă de rotire:
Dimensiunile plăcii de
xarepeperete:
Asimilare:
5. Pregătirea montării șimontarea
Instrucțiune
• Suportul de perete pentru TV se montează numai în doi! La nevoie chemațipecineva
pentru ajutor șisprijin!
• Echipamentele terminale diferite au diferite modalitățideconectarelacabluri șialte
aparate. Înainte de instalarevericațidacă racordurile necesaremai sunt accesibile
după montare.
• Suporturile noastredeperete pentru TV au întotdeauna acelașiset de montare.
În funcție de produs șifelul montării nu se folosește mereu tot setul. De aceea
este posibil chiar șilamontarecorectășuruburi nefolosite șialtepiese mărunte să
rămână Păstrați-le împreună cu acest manual de utilizareîntr-un loc sigur pentru o
folosireulterioară (vânzarea produsului, mutare, modicarea suportului de perete,
televizor nou, etc.).
Avertizare
• Acest produs este adecvat exclusiv pentru montajul pe pereți.
• Înainte de instalarevericațidacă peretele este adecvat pentru greutatea respectivă
șiasigurați-vă ca la locul montajului să nu e re electrice, țevi de apă,gaz sau
alte cabluri.
• Vă rugămsăluațiînconsiderarecădiblurile livrate sunt aprobate numai pentru
perețidebeton șicărămidă plină.
• Respectațitoate instrucţiunile șiavertizările de siguranţă.
• Urmațipas cu pas indicațiile de montaj ilustrate
(g. 1ff.).
• În timpul instalării articulaţiile se xeaxă în aşafel ca mișcarea laterală atelevizorului
săeposibilă.
• Vericaţicuajutorul nivelei cu bulă de aer livrată poziţionarea orizontală atelevizorului
şidacă este nevoie reglaţi-l în funcţie de placa de perete.
Instrucțiune
• La multitudinea de aparate nale de pe piață nu pot descrise toate variantele
de montaj.
• Dispozitivul de xaretrebuie săeplasat plat șidreptpe spatele televizorului.
• Pentru compensarea denivelărilor spatelui televizorului folosițidistanțierele livrate.
• To ate șuruburile trebuie să aibă lungimea corectășixate solid (vezi Fig. 3).
6. Reglare &întreținere
Instrucțiune
Suportul de perete pentru TV se regelază numai în doi! La nevoie chemațipecineva pentru
ajutor șisprijin!
• Pentru mișcări laterale nu se desface nici un șurub.
• Rezistențapentru reglarea înclinării șimișcării laterale poate ajustată cu ajutorul
șuruburilor corespunzătoare.
• Pentru asigurareagăţaţicele 2cordoane în placa TV şiînşurubaţilamaxim cele două
şuruburi.
• Stabilitatea șisiguranțaînfuncționareseverică periodic (cel puțin .odată la trei luni).
Curățarenumai cu apă sau substanțedecurățat folosite în casă.
7. Excludere de garanție
Hama GmbH &CoKG nu îşiasumă nici orăspunderesau garanție pentru pagube cauzate
de montarea, instalarea sau folosirea necorespunzătoareaprodusului sau nerespectarea
instrucțiunilor de folosiresau/șiainstrucțiunilor de siguranță.
aparat)
00118126/06127756: până la 150°
29,7 x17,8 cm
conform standardului până VESA
00118126/06127756: 600x400
Lățime: 00118126/06127756: 8,4 –42,0 cm
Înclinație: –/+ 15°
16

S Bruksanvisning
Tack för att du valt att köpa en Hama produkt.
Ta dig tid och läs först igenom de följande anvisningarna och hänvisningarna helt och
hållet. Förvarasedan den här bruksanvisningen på en säker plats för att kunna titta iden
när det behövs. Om du gör dig av med apparaten ska du lämna bruksanvisningen till den
nya ägaren.
1. Förklaring av varningssymboler och hänvisningar
Varning
Används för att markerasäkerhetshänvisningar eller för att rikta uppmärksamheten mot
speciella faror och risker.
Hänvisning
Används för att markeraytterligareinformation eller viktiga hänvisningar.
2. Förpackningsinnehåll
• Tv-väggfäste
• TV-stödarmar (2x)
• Borrning
• Buntband
• Monteringssats (innehåll se bild 1)
• Den här bruksanvisningen
Hänvisning
Kontrolleraatt monteringssatsen är komplett och säkerställ att den inte
innehåller felaktiga eller skadade delar innan fästet installeras.
3. Säkerhetsanvisningar
Varning
• Mängden olika slutapparater och väggkonstruktioner som nns på marknaden gör
att den medföljande monteringssatsen inte kan omfatta alla möjligheter
• Vid sällsynta tillfäl len kan det förekomma att skruvarna till slutproduktens montering
på väggfästet är för långa.
• Tänk dessutom på att de medföljande pluggarna baraärgodkända för väggar av
betong och fulltegel.
• Läs bruksanvisningen till din slutapparat föremonteringen! Den informerar iregel
omvilka fästmaterialsorter som är lämpliga och deras mått.
• Skaffa lämpligt fästmaterial idetaljhandeln för monteringen av slutapparaten, om
det inte nns med iden medföljande monteringssatsen.
• Skaffa lämpligt monteringsmaterial idetaljhandeln när väggen, där installationen
ska göras, består av andramaterial- och konstruktionstyper.
• Du ska aldrig använda våld eller ta imed extrakraft vid monteringen. Det kan skada
din slutapparat eller väggfästet.
• Vid tveksamheter vänder du dig till fackpersonal som är utbildad imonteringen av
den här produkten. Försök inte själv!
• Monterainte produkten på platser som personer kan uppehålla sig under.
• När produkten och lasten som är fäst på den har monterats måste man kontrolleraatt
allt sitter fast ordentligt och fungerar korrekt.
• Detta måste kontrolleras regelbundet (minst varje kvartal).
• Varnoga med att produktens maximalt tillåtna belastning inte överskrids och att ingen
last läggs på som överskrider de maximalt tillåtna måtten för detta.
• Varnoga med att inte belasta produkten osymmetriskt.
• Vid justeringen är det viktigt att produkten inte belastas osymmetriskt och att den
maximalt tillåtna belastningen då överskrids.
• Håll ett säkerhetsavstånd runt den pålagda lasten (styrs av modellen).
• Ta genast bort den pålagda lasten när produkten är skadad och använd inte produkten mer.
4. Användningsområde och specifikationer
• Fästet är avsett för väggmontering av plattskärmar för privat bruk. icke-yrkesmässig
hushållsanvändning.
• Fästet är baraavsett för användning inne ibyggnader.
• Använd barafästet till det som det är avsett för.
Maximal bärkraft: 00118126/06127756: 50 kg
Bildskärmsmått
diagonalt:
Djup: 00118126/06127756:8,4 –42,0 cm
00118126/06127756:
81,0 -213,0 cm (US: 32" -84")
på treleder med två dubbel-stödarmar (beroende på
Svängområde:
Väggfästplattans mått: 29,7 x17,8 cm
Fäste:
5. Monteringsförberedelse och montering
Hänvisning
• Varalltid två när tv-väggfästet monteras! Skaffa stöd och hjälp!
• Olika slutapparater har olika anslutningsmöjlig-heter för kablar och andraapparater.
Kontrollera, föreinstallationen, om det fortfarande går att nå de nödvändiga
anslutningarna efter monteringen.
• Våratv-väggfästen följer alltid med isamma monteringssats. Du behöver inte den
kompletta monteringssatsen, beroende på produkt och monteringssätt. Det kan
därför hända att det blir kvar skruvar och andrasmådelar som inte behövs, även om
monteringen är korrekt. Sparadessa tillsammans med bruksanvisningen på en säker
plats för senarebehov (försäljning av produkten, ytt, omändring av väggfästet,
ny tv etc.).
Varning
• Den här produkten är endast avsedd för väggmontering.
• Innan installationen utförs är det mycket viktigt att du kontrollerar att den aktuella
väggen klarar vikten som ska monteras och säkerställ också att det inte nns el-,
gas- eller andraledningar och vattenrör iväggen där du avser att montera.
• Tänk dessutom på att de medföljande pluggarna baraärgodkända för väggar av
betong och fulltegel.
• Beakta de övriga varnings- och säkerhetsan-visningarna.
• Följ bilderna imonteringsanvisningen steg för steg.
• Under installationen ska lederna ställas in på sådant sätt att tv-apparaten kan föryttas
isidled.
• Använd det medföljande vattenpasset för att kontrolleradin tv-apparats horisontella
läge och efterjusterapåtv-plattan om det behövs.
Hänvisning
• Mängden olika slutapparater som nns på marknader gör att inte alla
monteringsvarianter kan beskrivas..
• Se till att hållaren ligger rakt och jämnt mot baksidan av TV-apparaten.
• Använd medföljande avståndshållareför att jämna ut ojämnheter på baksidan av
TV-apparaten.
• Se till att alla skruvar har korrekt längd och monteras för hand. (se bild 3)
6. Inställning &service
Hänvisning
Varalltid två när tv-väggfästet justeras! Skaffa stöd och hjälp!
• Inga skruvar behöver lossas för rörelsen isidled.
• Motståndet för lutningsinställningen och sidorörelsen kan justeras med hjälp av
motsvarande skruvar (bild 4och 5).
• Häng idebåda stödarmarna itv-plattan som säkerhet och drafast de båda skruvarna.
• Kontrolleraregelbundet att allt sitter fast ordentligt och fungerar säkert (minst varje
kvartal). Rengöring baramed vatten eller vanliga hushållsrengör.
7. Garantifriskrivning
Hama GmbH &CoKG övertar ingen form av ansvar eller garanti för skador som beror
på olämplig installation, montering och olämplig produktanvändning eller på att
bruksanvisningen och/eller säkerhetshänvisningarna inte följs.
apparat)
00118126/06127756: upp till 150°
enligt VESA-standardtill
00118126/06127756: 600x400
Lutning: –/+ 15°
17

L Käyttöohje
Suurkiitos, että valitsit Hama-tuotteen.
Varaaaikaa ja lue seuraavat ohjeet ensin kokonaan läpi. Säilytä sen jälkeen tämä
käyttöohje varmassa paikassa, jotta voit tarvittaessa tarkistaa siitä eri asioita. Jos luovut
laitteesta, anna tämä käyttöohje sen mukana uudelle omistajalle.
1. Varoitusten ja ohjeiden selitykset
Varoitus
Käytetään turvaohjeiden merkitsemiseen ja huomion kiinnittämiseen erityisiin vaaroihin
ja riskeihin.
Ohje
Käytetään lisätietojen tai tärkeiden ohjeiden merkitsemiseen
2. Pakkauksen sisältö
• Television seinäteline
• TV:n kannatinvarret (2x)
• Poraus
• Johdinsiteet
• Asennuspaketti (sisältö, ks. kuva 1)
• Tämä käyttöohje
Ohje
Tarkista ennen asennusta, ettei telineen asennuspaketista puutu mitään eikä mukana ole
viallisia tai vaurioituneita osia.
3. Turvaohjeet
Varoitus
• Koska markkinoilla on lukuisia päätelaitteita ja seinärakenteita, mukana tuleva
asennuspaketti ei voi kattaa kaikkia mahdollisia vaihtoehtoja
• Joskus voi käydä niin, että ruuvit, joilla päätelaite kiinnitetään seinätelineeseen,
ovat liian pitkiä.
• Huomaa, että toimitukseen kuuluvat vaarnat on hyväksytty ainoastaan betoni- ja
täystiiliseiniin tehtäviin asennuksiin.
• Lueennen asennusta päätelaitteen käyttöohje. Siinä annetaan yleensä tietoja
sopivien kiinnitysmateriaalien laadusta ja mitoista.
• Hanki päätelaitteen asennukseen sopivat kiinnitystarvikkeet erikoisliikkeestä, jos ne
eivät sisälly mukana tulevaan asennuspakettiin.
• Hanki sopivat asennustarvikkeet erikoisliikkeestä, jos seinän materiaalina tai
rakenteena on jokin muu.
• Älä käytä asennukseen koskaan väkivaltaa tai suuria voimia. Muuten päätelaite tai
seinäteline voi vaurioitua.
• Jos olet epävarma, anna tuotteen asennus siihen koulutetun henkilön tehtäväksi
äläkä yritä suoriutua siitä itse!
• Älä koskaan asenna tuotetta paikkaan, jonka alapuolella voi oleskella ihmisiä.
• Tuotteen ja siihen kiinnitetyn kuorman asennuksen jälkeen on varmistettava, että ne ovat
riittävän tukevia ja että niiden käyttö on turvallista.
• Tämä tarkistus on toistettava säännöllisin väliajoin (vähintään neljännesvuosittain).
• Varmista, ettei tuotteen suurin sallittu kuormitus ylity eikä siihen kiinnitetä kuormaa,
joka ylittää suurimmat sallitut mitat.
• Varo kuormittamasta tuotetta epäsymmetrisesti.
• Varmista säätöjä tehdessäsi, ettei tuotetta kuormiteta epäsymmetrisesti eikä sen suurin
sallittu kuormitus ylity.
• Säilytä turvaväli kiinnitetyn kuorman ympärillä (riippuu mallista).
• Jos tuote on vaurioitunut, poista kiinnitetty kuorma välittömästi äläkä käytä tuotetta
enää.
4. Käyttöalue ja tekniset eritelmät
• Telinettä käytetään litteiden näyttöjen seinäkiinnitykseen yksityisessä, ei-kaupallisessa
kotikäytössä.
• Telinettä ei ole tarkoitettu käyttöön sisätiloissa.
• Käytä telinettä ainoastaan ohjeiden mukaiseen tarkoitukseen.
Kestää enintään: 00118126/06127756: 50 kg
Kääntöalue:
Seinäkiinnityslevyn mitat: 29,7 x17,8 cm
Liitäntä:
5. Asennuksen valmistelu ja asennus
Ohje
• TV:n seinätelineen asennukseen tarvitaan aina kaksi! Varaaitsellesi tukea ja apua!
• Erilaisissa laitteissa on erilaisia liitäntävaihtoehtoja johdoille ja muille laitteille.
Tarkista ennen asennusta, että tarvittavat liitännät ovat asennuksen jälkeen edelleen
käytettävissä.
• Seinälle tarkoitettujen TV-telineidemme mukana tulee aina sama asennussarja.
Jokaiselle tuotteelle ja asennustavalle ei tarvita koko asennussarjaa. Siksi on
mahdollista, että oikein tehdyn asennuksen jälkeen jää yli tarpeettomia ruuveja ja
muita pieniä osia. Säilytä ne yhdessä tämän käyttöohjeen kanssa varmassa tallessa
myöhempää tarvetta (tuotteen myyntiä, muuttoa, seinätelineen siirtämistä, uutta
televisiota jne.) varten.
Varoitus
• Tu ote soveltuu ainoastaan seinäasennukseen.
• Ta rkista ennen asennusta ehdottomasti, että seinä kestää telineeseen tulevan
painon, ja varmista, ettei seinässä ole asennuskohdassa sähköjohtoja tai vesi-,
kaasu- tai muita putkia.
• Huomaa, että toimitukseen kuuluvat vaarnat on hyväksytty ainoastaan betoni- ja
täystiiliseiniin tehtäviin asennuksiin.
• Noudata muita varoituksia ja turvaohjeita.
• Noudata kuva kuvalta kuvitettua asennusohjetta (kuvat 1-).
• Asennuksen ajaksi nämä nivelet on säädettävä siten, että TV pääsee liikkumaan
sivusuunnassa.
• Tarkista mukana tulleella vesivaa’alla television vaakasuuntainen asetus ja säädä
tarvittaessa TV-levyn mukaisesti.
Ohje
• Johtuen siitä, että markkinoilla on useita erilaisia päätelaitteita, kaikkia
asennusvaihtoehtoja ei voida kuvata.
• Varmista, että pidike on suorassa ja tasaisesti televisiolaitten taustapuolella.
• Käytä oheista etäisyyspidikettä television taustapuolen epätasaisuuksien
tasaamiseksi.
• Varmista, että kaikki ruuvit ovat oikean pituisia ja että ne asennetaan
käsitiukkuuteen (ks. kuva 3).
6. Säätö ja huolto
Ohje
TV:n seinätelineen säätämiseen tarvitaan aina kaksi! Varaaitsellesi tukea ja apua!
• Sivuliikettä varten ruuveja ei tarvitse avata.
• Kallistuksen säädön vastusta ja sivuttaisliikettä voidaan säätää vastaavilla ruuveilla.
• Varmista kiinnitys kiinnittämällä molemmat kannatinvarret TV-levyyn ja kiristämällä
molemmat ruuvit.
• Sen riittävä tukevuus ja käytön turvallisuus on tarkistettava säännöllisin väliajoin
(vähintään neljä kertaa vuodessa). Puhdistus vain vedellä tai yleisesti myynnissä olevilla
kotipuhdistusaineilla.
7. Vastuun rajoitus
Hama GmbH &CoKG ei vastaa millään tavalla vahingoista, jotka johtuvat
epäasianmukaisesta asennuksesta tai tuotteen käytöstä tai käyttöohjeen ja/tai
turvaohjeiden vastaisesta toiminnasta.
3niveltä, 2kaksoiskannatinvartta (riippuu laitteesta)
00118126/06127756: enintään150°
VESA-standardin mukainen vasta
00118126/06127756: 600x400
Kuvaruudun halkaisija: 00118126/06127756:
Syvyys: 00118126/06127756: 8,4 –42,0 cm
Kallistus: –/+ 15°
81,0 -213,0 cm (US: 32" -84")
18

B Ръководство за обслужване
Благодарим Ви, че избрахте продукт Hama.
Отделете време ипрочетете инструкциите иинформацията. Моля, запазете
инструкциите на сигурно мястозабъдещи справки. Акопродавате устройството,
моля, предайте тези инструкции на новия собственик.
1. Erklärung von Warnsymbolen und Hinweisen
Вниманив
Символътсеизползва, за да Ви обърне внимание към специфична употреба или
възможни рискове.
Забележка
Символътсеизползва, за да Ви подскажедопълнителна информация или важби
бележки.
2. Съдържание на опаковката
• TV поставка за стена
• Носещи рамена за телевизор (2x)
• шаблон за пробиване
• Кабелни превръзки
Забележка
Моля, преди инсталациятанадържача, проверете монтажния комплект за липси и
се уверете, че не се съдържа дефектни или повредени части.
3. Забележки за безопасност
Вниманив
• Предвид многообразиетооттерминални устройства иструктури на стени, които
се предлагата на пазара, приложеният комплект за инсталация не може да
покрие всяка опция.
• Вредкислучаи евъзможно приложените вкомплектаболтове за закрепяне на
терминалното устройство към стойката да са твърде дълги.
• Съобразете се, че включените крепежни елементи за стена са за стени от бетон
или от солидни тухли.
• Прочетете внимателно ръководството за монтаж на Вашетотерминално
устройство, преди да се опитатедагомонтирате. Инструкциите дават
информация относно типа иразмерите на подходящите крепежни елементи.
• Акоприложеният инсталационен комплект не съдържа подходящи крепежни
елементи за Вашетотерминално устройство, необходимо едаси закупите
такива отделно от специализиран магазин.
• Акостената, на коятоискате да монтираре стойката енаправена от различен
материал иесразличен тип конструкция от описаните внастоящото
ръководство, необходимо едасикупите подходящи скрепителни елементи от
специализиран магазин.
• Никоганеупражвявайте сила при монтажа. Това може да повреди стойката
или Вашетоустройство.
• Акоимате съмнения, относно начина на монтаж, по-добре се обърнете към
квалифициран техник инесеопитвайте да го монтирате сами!
• Не монтирайте продуктанад места, къдетоевъзможно да се облягат хора.
• След монтажа на стойката итовара, уверете се, че са монтирани стабилно ие
безопасно да се работи стях.
• Проверявайте стойката регулярно (поне веднъж на три месеца).
• Когато проверявате, уверете се, че продуктанеенатоварен стегло над
допустимото или сразмери над допустимото.
• Уверете се, че продуктътемонтиран симетрично.
• По време на настройка ипроверка на монтажа, уверете се, че продуктъте
монтиран симетрично иненадвишава максимално допустимото тегло.
• Поддържайте чискомястото на монтаж (спрямо модела).
• Вслучай на повреда впродукта, премахнете товара, койтоемонтиран на негои
спрете да го използвате.
• 4. Uygulama alanı ve teknik özellikleri
• Стойката се използва за монтаж на стена на плски дисплеи за некомерсиална,
домашна употреба.
• Стойката епредназначена да се ползва всгради.
• Използвайте стойката само по предназначение.
Максимален капацитет
на товар:
Размер на дисплея:00118126/06127756:
Дълбочина:00118126/06127756: 8,4 –42,0 cm
• Инсталационенкомплект
(виж съдържанието, Фиг.1)
• Инструкции за употреба
00118126/06127756: 50 kg
81,0 -213,0 cm (US: 32" -84")
Ъгъл:–/+ 15°
втри фуги с 2 двойни оръжия превозвач (взависимост
Диапазон на въртене:
Размер на стойката
за стена:
Монтажни отвори:
5. Изискване за инсталация иинсталиране
Забележка
• Монтирайте стойката за стена за TV спомощтанавтори човек. Не се опитвайте
да монтирате сами.
• Различните крайни устройства иматразлични опции за свързване на кабели
идруги устройства. Преди монтаж, уверете се, че ще имате достъп до всички
необходими връзки, след като инсталирате устройството.
• Във всички наши стойки за стена за TV евключенедин исъщ инсталационен
комплектъ. Взависимост от продуктаиначина на монтаж, евъзможно да няма
нужда да използвате целия комплект. Ненужните болтове идруги малки части,
може да се окажатизлишни ивъпреки това, стойката за стена да емонтирана
правилно. Запазете тези излишни части, заедно синструкциите за работа,
вслучай, че Ви потрябватпо-късно.(например:акорешите да преместите
стойката, да продадете продукта, купите си нов телевизор идруги).
Вниманив
• То зи продукт епредназначенизключително за монтаж на стена.
• Преди да инсталирате стойката, уверете се, че тя еподходяща за телевизорът,
койтощемонтиране иченамястото за монтаж няма електрически кабели,
водни, газови или друг вид тръби, коитоможе да повредите..
• Вземете подвнимание, че приложените крепежни елеметни са подходящи за
бетонни стени или стени от солидни тухли.
• Съобразете се свсички предупреждения иинструкции за безопасност.
• Монтирайте стъпка по стъпка всъответствие силюстрованите инструкции за
монтаж.
• По време на иснталация, пантите следва да се настроят така, че телевизорът да
може да се мести странично.
• Проверете дали телевизорът енивелиран, спомоюта на включерния вкомплекта
течен нивелир. Акоенеобходимо, нагласете отново стойката.
Забележка
• Предвид голямото разнообразие от предлагани на пазара крайни устройства
не могат да бъдат описани всички варианти за монтаж.
• Уверете се, че държачът приляга право игладко към гърба на телевизора.
• Използвайте приложените уплътнителни вложки, за да компенсирате
неравности по гърба на телевизора.
• Уверете се, че всички винтове са сподходящадължина исадобре затегнати
при монтажа.(вж. Фиг.3)
6. Настройка иподдръжка
Забележка
Монтирайте стойката за стена за TV спомощтанавтори човек. Не се опитвайте да
монтирате сами.
• Не енеобходимо да разхлабвате болтовете, когато настройвате ъгъла или
странично движение.
• Съпротивлениетозанастройка на наклона изадвижение настрани може да бъде
допълнително регулирано спомощтанасъответните винтове.(Фиг.4и5).
• За фиксиране окачете носещите рамена вплоскосттанателевизора изатегнете
двата болта.
• Проверявайте стабилносттаицелосттанастойката регулярно (поне веднъж
на всеки три месеца). Почиствайте само сводаили стандартни домакински
препарати за почистване.
7. Ограничение на отговорността
Hama GmbH &CoKG не носи отговорност инеосигурява гаранционна поддръжка при
повреди, коитосарезултат от неправилна инсталация/ монтаж, неправилна употреба
на продуктаили неспазване на инструкциите за употреба ибезопасност.
от устройството)
00118126/06127756: до 150°
29,7 x17,8 cm
Според VESA стандартдо
00118126/06127756: 600x400
19

G Terms of waranty
HAMA GmbH &CoKGgrants you an extended manufacturer’swarranty for this product that covers the freedom from defects, usability,
workmanship and durability of the materials used for the specied period of 10 years. Compatibility of the product with futurestandards for further
developed hardwareisalso excluded.
At the discretion of Hama GmbH &CoKG, valid warranty claims in this period will be resolved at no cost either by repair or replacement. The
warranty period begins on the date of purchase of this product and is valid throughout the EU.
The warranty you areentitled to is in addition to your statutory rights and does not affect them. The warranty does not cover damage caused
by improper use, normal wear and tear,exposuretochemicals, force majeure, or modications or repairs performed by yourself or thirdparties.
Furthermore, this warranty does not cover accessories that arenot included with the product as standard(promotional parts).
In the event of awarranty claim please write to us, enclosing proof of purchase, at Hama GmbH &CoKG, Dresdner Str. 9, 86653 Monheim,
Germany.You arealso free to contact us at www.hama.de or by telephone on +49 (0)9091/502-0.
-----------------------------------------------------------------------------------------------------------------------------------------------------------
D Garantiebestimmungen
Für dieses Produkt gewährt Ihnen die HAMA GmbH &CoKGeine erweiterte Herstellergarantie auf die Mangelfreiheit, Nutzbarkeit, Verarbeitung
und die Haltbarkeit der verwendeten Materialien während eines Zeitraums von 10 Jahren. Ausgenommen von der Garantie ist die Kompatibilität des
Produktes mit künftigen Standards weiterentwickelter Hardware.
Im angegebenen Zeitraum wirddie Hama GmbH &CoKGeinen berechtigten Garantieanspruch nach eigenem Ermessen, kostenlos, entweder durch
Reparatur oder Austausch beheben.
Der Garantiezeitraum beginnt mit dem Datum des Kaufs dieses Produkts und gilt in der gesamten EU.
Die gewährte Garantie steht Ihnen neben den gesetzlichen Rechten zu und berührt diese nicht. Vonder Garantie ausgenommen sind Schäden, die
durch unsachgemäßen Gebrauch, normale Abnutzung, Einwirkung von Chemikalien oder höhereGewalt verursacht werden sowie bei Eingriffen oder
Reparaturen durch Sie oder Dritte.
Weiterhin ausgenommen von der Garantie sind Zubehörteile, die nicht zur Grundausstattung des Produkts gehören (Promotionteile).
Im Garantiefall wenden Sie sich bitte, unter Beilegung des Kaufnachweises, an uns unter Hama GmbH &CoKG, Dresdner Str. 9, 86653 Monheim.
Gerne können Sie uns auch unter www.hama.de oder telefonisch unter 09091/502-0 kontaktieren.
-----------------------------------------------------------------------------------------------------------------------------------------------------------
F Conditions de garantie
La société HAMA GmbH &Co. KG offreàceproduit, une garantie de fabricant étendue
quant àl‘absence de défauts, l‘utilisabilité, la fabrication et la durabilité des matériaux employés
pendant une période spéciée de 10 ans. La compatibilité de ce produit avec d’éventuels nouveaux standards, développés ultérieurement, ne sera
pas prise en compte par cette garantie.
Durant cette période, la société Hama GmbH &CoKGrépareraledéfaut de fabrication ou remplaceraleproduit gratuitement, après évaluation et si
les droits de garantie sont applicables. La période de garantie entreenvigueur àladate d’achat du produit, et ce, dans toute l‘UE.
La garantie accordée est complémentaireaux droits légaux du consommateur et ne leur porte nullement atteinte. Ne peut entrer en compte dans
l‘application des droits de garantie, tout dommage occasionné par une utilisation non conforme, une usurenormale, des produits chimiques,
l‘emploi excessif de la force ainsi que par des interventions ou réparations exécutées par le client ou par un tiers. Les droits de garantie ne pourront
pas non plus s‘appliquer aux accessoires ne faisant pas partie de l‘équipement de base du produit (pièces promotionnelles).
En cas de recours àlagarantie, veuillez vous adresser àHama GmbH &CoKG, Dresdner Str. 9, 86653 Monheim et fournir le justicatif d‘achat. Vous
pouvez également nous contacter via l’adresse www.hama.de ou par téléphone, au numéro09091/502-0.
-----------------------------------------------------------------------------------------------------------------------------------------------------------
E Condiciones de garantía
Poreste producto, HAMA GmbH &CoKGconcede una garantía extendida de fabricante de ausencia de defectos, utilidad, procesamiento y
durabilidad del material utilizado que se extiende durante el periodo de tiempo indicado de 10 años. La garantía tampoco cubrelacompatibilidad
del producto con los estándares futuros del hardwareque se siga desarrollando.
En este periodo de tiempo, Hama GmbH &CoKGsatisfará gratuitamente las reclamaciones de garantía justicadas mediante una reparación ouna
sustitución según su criterio. El periodo de garantía empieza con la fecha de la compradeeste producto ytiene validez en toda la UE.
Esta garantía tiene validez junto asus derechos legales ynoalteraéstos. La garantía no cubrelos daños provocados por un manejo incorrecto, por
el desgaste natural, por el efecto de sustancias químicas opor fuerza mayor,así como en el caso de que se realicen intervenciones yreparaciones
por cuenta propia opor terceros. Están también excluidos de la garantía los accesorios que no pertenezcan al equipamiento base del producto
(piezas promocionales).
En el caso de reclamación de garantía, diríjase con el comprobante de compraaHama GmbH &CoKG, Dresdner Str. 9, 86653 Monheim, Alemania.
También puede ponerse en contacto con nosotros en www.hama.de ollamando al teléfono 09091/502-0.
20

R Условия гарантии
На данное изделие компания Hama GmbH &CoKGвтечение 10 лет предоставляет расширенную гарантию. Исключение составляет
совместимость продуктасновыми стандартами оборудования более поздних версий.
Во время срока действия гарантии компания Hama GmbH &CoKG, взависимости от поломки, заменяет или ремонтирует неисправные
изделия бесплатно. Срок гарантии начинается от даты покупки. Гарантия действует на всей территории ЕС.
Гарантия дополняет соответствующее законодательство инеотменяетего. Гарантия не распространяется на повреждения, возникшие
вследствие использования изделия не по назначению, несанкционированноговмешательства вустройство, неквалифицированного
ремонта, атакженанормальный износ, действие химикатовичрезвычайное применение силы.
Гарантия такженераспространяется на принадлежности, которые не входят вбазовую комплектацию изделия (рекламные). По вопросам
гарантии, сприложением кассовогочека, обращайтесь по адресу Hama GmbH &CoKG, Dresdner Str. 9, 86653 Monheim, Germany Кроме
этого, спроизводителем можно связаться через вебсайт www.hama.de или по телефону 09091/502-0.
-----------------------------------------------------------------------------------------------------------------------------------------------------------
I Condizioni di garanzia
Perquesto prodotto la HAMA GmbH &CoKGconcede una garanzia del produttoreestesa per quello che riguarda l’assenza di difetti, l’utilizzabilità,
la lavorazione eladurata dei materiali usati, durante il periodo indicato di 10 anni. Èaltresì esclusa la compatibilità del prodotto con futuri standard
di sviluppi hardware.
In questo periodo di tempo, la Hama GmbH &CoKGoffreildiritto di garanzia giusticato apropria discrezione, gratuitamente, mediante
riparazione osostituzione. Il periodo di garanzia inizia con la data di acquisto di questo prodotto ed èvalido in tutta l‘Unione europea.
La concessione della garanzia èundiritto, oltreaidiritti di legge, iquali rimangono invariati. Sono esclusi dalla garanzia idanni iquali sono stati
causati da un impiego inappropriato, dalla normale usura, dall’effetto di prodotti chimici oppuredacause di forza maggiorecosì come da interventi
oriparazioni arbitrarie odaterzi.
Inoltre, sono esclusi dalla garanzia gli accessori, iquali non fanno parte dell’equipaggiamento di base del prodotto (componenti promozionali). In
caso di prestazioni di garanzia rivolgersi, fornendo anche lo scontrino di acquisto, alla Hama GmbH &CoKG, Dresdner Str. 9, 86653 Monheim.
Potete contattarci volentieri anche presso www.hama.de oppuretelefonicamente al numero09091/502-0.
-----------------------------------------------------------------------------------------------------------------------------------------------------------
N Garantievoorwaarden
Op dit product geeft HAMA GmbH &CoKGeen uitgebreide fabrieksgarantie op de afwezigheid van gebreken, de bruikbaarheid, de verwerking
en de houdbaarheid van de gebruikte materialen tijdens de aangegeven periode. Verder uitgesloten is de compatibiliteit van het product met
toekomstige standaards van verder ontwikkelde hardware.
In deze periode zal Hama GmbH &CoKGeen terechte garantieclaim redelijkerwijs, kosteloos, door reparatie of vervanging inwilligen. De
garantieperiode begint op de dag van aankoop van dit product en is geldig in de hele EU.
Naast de verleende garantie zijn de wettelijke rechten voor uvan toepassing en die worden door de garantie niet beroerd. Uitgesloten van de
garantie is schade die veroorzaakt wordt door ondeskundig gebruik, normale slijtage, inwerking van chemicaliën of overmacht evenals ingrepen of
reparaties door uofdoor derden.
Tevens uitgesloten van de garantie is toebehoren dat niet bij de basisuitvoering van het product hoort (reclame-artikelen) In een garantiegeval neemt
ucontact op met Hama GmbH &CoKG, Dresdner Str. 9, 86653 Monheim en voegt uhet aankoopbewijs bij. Ukunt ook onder www.hama.de of
telefonisch onder 09091/502-0 contact met ons opnemen.
-----------------------------------------------------------------------------------------------------------------------------------------------------------
J Όροι εγγύησης
Γι‘ αυτότοπροϊόν, ηεταιρεία HAMA GmbH &CoKGσας παρέχει διευρυμένη εγγύηση κατασκευαστή για την έλλειψη ελαττωμάτων, τη χρησιμότητα,
την κατεργασία καιτην ανθεκτικότητατων υλικών που έχουν χρησιμοποιηθεί κατά τη διάρκεια τουδιαστήματος των 10 χρόνων. Από την εγγύηση
εξαιρείται επιπλέον ησυμβατότητατου προϊόντος με μελλοντικάπρότυπα πιο εξελιγμένου υλικού εξοπλισμού.
Σε αυτότοδιάστημα ηεταιρεία Hama GmbH &CoKGθα ικανοποιήσει κατά την κρίσης της το αίτημα εγγύησης, δωρεάν, είτε με επισκευή είτε με
αλλαγή. Το διάστημα εγγύησης ξεκινάμετην ημερομηνία αγοράς αυτού τουπροϊόντος καιισχύεισεόλη την Ευρωπαϊκή Ένωση.
Ηπαρεχόμενη εγγύηση σας ανήκει μαζίμετανομικάδικαιώματακαι δεν τα θίγει. Από την εγγύηση εξαιρούνται ζημιές οι οποίες προκαλούνται από
λανθασμένη χρήση, φυσική φθορά, επίδραση χημικών ουσιών ήανωτέρα βία, καθώς καιαπό παρεμβάσεις ήεπισκευές τρίτων.
Από τη εγγύησης εξαιρούνται επιπλέον εξαρτήματα, τα οποία δεν ανήκουν στον βασικόεξοπλισμό τουπροϊόντος (εξαρτήματαδιαφήμισης). Σε
περίπτωση που θέλετε να κάνετε χρήση της εγγύησης απευθυνθείτε σε μας Hama GmbH &CoKG, Dresdner Str. 9, 86653 Monheim. Μπορείτε
επίσης να επικοινωνήσετε μαζίμας στη διεύθυνση www.hama.de ήτηλεφωνικάστο 09091/502-0.
21

P Warunki gwarancji
Hama Polska Sp. zo.o. udziela przedłużonej gwarancji dystrybutoranaten produkt, który obejmuje wolność od wad, użyteczność,jakość wykonania
itrwałość materiałów użytych na okres 10 lat. Zgodność produktu zprzyszłymi standardami dalszego rozwoju sprzętu jest takżewykluczona.
Według uznania Hama Polska Sp. zo.o., ważne roszczenia ztytuługwarancji wtym okresie zostaną rozwiązane bez żadnych dodatkowych kosztów
jako naprawa lub wymiana wprzypadku braku możliwości skutecznego usunięcia zgłaszanej usterki, atakżewówczas gdy produkt wokresie
gwarancyjnym był naprawiany 4razy inadal wykazuje wady uniemożliwiające jego używanie zgodne zprzeznaczeniem. Okres gwarancji rozpoczyna
się od daty zakupu tego produktu ijest ważny wcałej UE na podstawie dowodu zakupu (fakturalub paragon).
Gwarancja niniejsza nie wyłącza, nie ogranicza, ani nie zawiesza uprawnień kupującego wynikających zniezgodności towaru zumową.Gwarancja
nie obejmuje uszkodzeń spowodowanych niewłaściwym użytkowaniem, mechanicznym uszkodzeniem towaru, normalnym zużyciem, narażeniem na
substancje chemiczne, działanie siływyższej albo zmian lub napraw wykonywanych przez siebie lub strony trzecie.
Ponadto gwarancja nie obejmuje akcesoriów,którenie są dołączone do produktu wstandardzie (części promocyjne). Wprzypadku roszczeń
gwarancyjnych produktu nabywca zgłasza reklamację wautoryzowanym punkcie serwisowym wsklepie, wktórym produkt został zakupiony na
podstawie dowodu zakupu.
Hama Polska zobowiązuje się dokonać naprawy gwarancyjnej wterminie 14 dni od daty zgłoszenia reklamacji. Ewentualne sprawy sporne związane
zrealizacją obowiązków gwarancyjnych rozstrzyga sądwłaściwy dla siedziby Hama Polska Sp zo.o.
-----------------------------------------------------------------------------------------------------------------------------------------------------------
H Garancia-szolgáltatás
ErreatermékreaHama GmbH &CoKG10éves kibővített gyártói garanciát biztosít,
gyelembe véve az anyagminőség, afeldolgozás, ahasználhatóság és atartósság követelményét aszabad felhasználhatóság tekintetében. Továbbá,
kivéve akompatibilis aterméket, amely szabványosan illeszkedik atovábbfejlesztett hardverhez.
Ebben az időszakban, aHama GmbH &CoKGhivatalos garanciát vállal –haszükséges –adíjmentes javításravagy atermék cseréjére. Egy adott
termék esetében ajótállási időszak avásárlás napjától számítva kezdődik és az egész EU-ban érvényes. Arendelkezésreálló garanciális szolgáltatás
az egyéb jogokat, nem érinti.
Agarancia-szolgáltatás nem terjed ki asérülésekre, afelhasználó által okozott nem megfelelő használatból eredő hibákra, anormál kopásra, akáros
vegyi anyagok hatásáravagy természeti csapásokra, az illetéktelen beavatkozásból vagy javításból eredő károkozásraÖnáltal vagy egyéb személy
által. Továbbá nem terjed ki agarancia az olyan részegységekre, amelyek nem tartoznak atermék alapfelszereléséhez (külön vásárolhatók).
Agaranciaigény érvényesítése esetén kérjük, forduljon aszakkereskedőjéhez avásárlást igazoló számla és garanciajegy felmutatásával vagy vegye fel
akapcsolatot atermék gyártójának magyarországi képviselőjével, ill. forgalmazójával: HAMA KERESKEDELMI KFT.1181.BUDAPEST, Zádor utca 18.
Telefon: 297-10-45.
-----------------------------------------------------------------------------------------------------------------------------------------------------------
C Záruka
Uvybraných produktů Vám rma Hama GmbH &CoKGnabízí prodlouženou záruku. Na toto období obdržíte garanční kartu.
Vdobě této záruky vrámci reklamace rma Hama GmbH &CoKGpodle uvážení poskytne bezplatnou opravu nebo výměnu. Záruční doba začíná
běžet ode dne nákupu produktu ajeplatná vcelé EU.
Záruka se nevztahuje na škody způsobené nesprávným používáním, normálním opotřebením, působením chemikálií nebo neodborným zásahem
čiopravou. Do reklamace nelze zahrnout příslušenství, které nepatříkestandardnímu vybavení produktu. Kontaktujte nás na www.hama.de nebo
volejte 09091/502-0 kontakt.
-----------------------------------------------------------------------------------------------------------------------------------------------------------
Q Záruka
Na tento produkt vám poskytuje rma Hama GmbH &CoKGrozšírenú záruku na obdobie 10 rokov. Ďalšia výnimka je kompatibilita produktu
sbudúcim štandardom nového Hardware.
Vdobe tejto záruky vrámci reklamácie rma Hama GmbH &CoKGpodľauváženia poskytne bezplatnú opravu alebo výmenu. Záručná doba začína
plynúť odo dňanákupu produktu ajeplatná vcelej EU.
Záruka sa nevzťahuje na škody spôsobené nesprávnym používaním, normálnym opotrebovaním, pôsobením chemikálií alebo neodborným zásahom
čiopravou. Do reklamácie nie je možné zahrnúť príslušenstvo, ktoré nepatrí kštandardnému vybaveniu produktu. Kontaktujte nás na www.hama.de
alebo volajte 09091/502-0 kontakt.
22

O Condições da garantia
Para este produto, aHAMA GmbH &CoKGfornece uma garantia de fabricante ampliada paraisenção defeitos, utilidade, processamento e
durabilidade dos materiais utilizados durante operíodo indicado de 10 anos. Também excluída da garantia éacompatibilidade do produto com
padrões futuros de novo hardware.
Durante este período, aHama GmbH &CoKGeliminará em caso de solicitação justicada dos direitos àgarantia, gratuitamente eapós avaliação,
oproblema através da reparação ou substituição do produto. Operíodo de garantia começa na data de compradeste produto eéválido paratodos
os países da União Europeia.
Agarantia prestada está disponível adicionalmente aos direitos estipulados pela lei enão afecta estes direitos. Agarantia exclui danos provocados
pela utilização indevida do produto, desgaste normal, efeitos resultantes de produtos químicos ou circunstâncias de força maior,bem como
manipulações ou reparações pelo utilizador ou terceiros.
Da garantia estão também excluídos acessórios que não pertencem àversão básica do produto (componentes de promoção). Em caso de
reclamação dos direitos de garantia, contacte-nos Hama GmbH &CoKG, Dresdner Str. 9, 86653 Monheim, Alemanha, com ocomprovativo de
compra. Em alternativa, poderá também contactar-nos na Internet www.hama.de ou telefonicamente através do número+49 9091/502-0.
-----------------------------------------------------------------------------------------------------------------------------------------------------------
T Garanti koşulları
HAMA GmbH &CoKGbuürün için belirtilen tüm 10 yıllıksüreiçerisinde kusursuzluk, kullanabilme ve kullanılan malzemelerin dayanıklılığı için ek
üretici garantisi verir.Ayrıca, ürünün ileride geliştirilecek olan donanımstandartlarına uygunluğudagaranti edilemez.
Bu süreiçerisinde Hama GmbH &CoKGhaklı bir garanti hakkını,onarımveya ürünü değiştirerek (kendi kararına göre) ücretsiz olarak yerine getirir.
Garanti süresi ürünün satınalındığı tarihte başlar ve tüm AB içerisinde geçerlidir.
Verilen garanti yasal haklarınıza ek olarak verilir ve bu hakları engellemez. Yanlış kullanımsonucu oluşan hasarlar,normal aşınma, kimyasal madde
etkisi veya doğal afetler sonucu oluşan hasarlarla üçüncü kişiler tarafından içinin açılması veya onarılması sonucu oluşan hasarlar garanti kapsamının
dışındadır.
Ayrıca ürünün temel donanımına ait olmayan aksesuar parçaları da garanti dışındadır(promosyon parçaları). Garanti hakkınızı kullanmak için satın
alma belgenizi de ekleyerek bize başvurabilirisiniz, Hama GmbH &CoKG, Dresdner Str. 9, 86653 Monheim. Bizimle www.hama.de adresi veya
09091/502-0 telefon numarası üzerinden de irtibat kurabilirsiniz.
-----------------------------------------------------------------------------------------------------------------------------------------------------------
M Dispoziții de garanție:
Pentru acest produs HAMA GmbH &CoKGvăoferă ogaranţie de producător extinsă la folosirea fără defecte, utililatea, procesarea şiatermenului
de valabilitate amaterialelor folosite pe operioadă de 10 ani. Deasemenea este exceptată compatibilitatea produsului cu standarduri viitoareale
programelor dezvoltate ulterior.
În această perioadă de timp Hama GmbH &CoKGvaexecuta solicitările legate de garanţie conform estimărilor,gratuit, prin reparaţie sau înlocuire.
Perioada de garanţie începe cu data cumpărării acestui produs şieste valabilă în întreaga CE.
Garanţia oferită vă revine în completarea drepturilor legale şinuleinuenţează.Sunt excluse de la garanţie defecte cauzate de folosirea inadecvată,
uzuranormală,inuenţasubstanţelor chimice sau aforţei precum şireparaţii sau modicări executate de proprietar sau altă persoană.
Sunt excluse de la garanţie şiaccesorii carenufac parte din dotarea de bază aprodusului (componente promoţionale). În cazul solicitărilor de
garanţie adresaţi-vă,cuprezentarea contractului de cumpărare,laHama GmbH &CoKG, Dresdner Str. 9, 86653 Monheim. Ne puteţicontacta şila
www.hama.de sau telefonic la 0049/9091/502-0.
-----------------------------------------------------------------------------------------------------------------------------------------------------------
S Garantibestämmelser
För den här produkten lämnar HAMA GmbH &CoKGenutökad tillverkargaranti beträffande de använda materialens felfrihet, användbarhet,
bearbetning och hållbarhet under den angivna perioden på 10 år.Även produktens kompatibilitet med framtida standarder hos vidareutvecklad
maskinvaraärundantagen.
Under den här perioden kommer Hama GmbH &CoKGatt åtgärda ett berättigat garantianspråk efter eget gottnnande, utan kostnad, genom
reparation eller genom byte. Garantiperioden startar med datumet när produkten inhandlades och gäller inom hela EU.
Den utlovade garantin gäller vid sidan av de lagstadgade rättigheterna och berör inte dessa. Garantin gäller inte för skador som uppstår genom
olämplig användning, normalt slitage, påverkan av kemikalier eller force majeureoch inte heller vid ingrepp eller reparationer som utförs av dig eller
tredje part.
Likaså är tillbehörsdelar,som inte hör till produktens basutrustning (promotiondelar), undantagna från garantin. Vid garantifallvänder du dig till oss
på Hama GmbH &CoKG, DresdnerStr.9,86653 Monheim och bifogar kvittot. Kontakta oss också gärna på www.hama.de eller ring
+49 9091 502-0.
23

L Takuun rajoitus:
Hama GmbH &CoKGtakaa tietyille tuotteille kymmenen vuoden laajennetun valmistajan vakuuden tuotteen virheettömyydestä, käytöstä,
toiminnasta ja käytettyjen materiaalien kestävyydestä. Takuu ei koske myöskään tuotteen yhteensopivuutta edelleenkehitettyjen laitteiden tulevien
standardien kanssa.
Tällä aikavälillä Hama GmbH &CoKGkorjaa tuotteen tai vaihtaa sen uuteen maksuttomasti, kun todetaan, että takuu on voimassa. Takuuaika alkaa
tuotteen ostopäivästä ja on voimassa koko EU:n alueella.
Tämän takuun lisäksi kuluttajalla on laillisia oikeuksia, joihin tämä takuu ei vaikuta. Ta kuu ei kata vikoja, jotka johtuvat virheellisestä käytöstä,
normaalista kulumisesta, kemikaalien vaikutuksesta, kun vika on aiheutunut ylivoimaisen esteen takia tai kun tuotetta on yritetty korjata itse.
Takuu ei myöskään kata lisälaitteita, jotka eivät kuulu tuotteen perussarjaan (tarjoustuotteet). Takuuasioissa liitä mukaan ostokuitti ja ota yhteyttä
meihin osoitteessa Hama GmbH &CoKG, Dresdner Str. 9, 86653 Monheim Meidät tavoittaa myös internetistä osoitteesta www.hama.de tai
puhelimella numerosta 09091/502-0.
-----------------------------------------------------------------------------------------------------------------------------------------------------------
B Гаранционни условия
HAMA GmbH &CoKGВи дава удължена гаранция на производителя за продукта, коятопокрива липсата на дефекти, използваемост,
изработка идълготрайност на използваните материали за периодот10 години. Изключваме възможносттазасъвместимост сбъдещи
стандарти за разработване на хардуер.
По преценка на Hama GmbH &CoKG, валидни заявки за гаранционни рекламации презз този периодщебъдят разрешавани безплатно
или чрез ремонт на продуктаили чрез замяна. Га ранционният периодзапочва да тече от дататанадоставка иевалидна на територията
на ЕС.
Гаранциятаедопълнение към Вашите законови права инегизасяга. Гаранциятанепокрива повреди, причинени от неправилна употреба,
нормално износване, излагане на химикали, форсмажорни непреодолими сили, или модификации иремонти, предприети от клиентаили
третастрана. Освен това, гаранциятанепокрива аксесоари, коитонесавключени стандартно вкомплекта (промоционални части).
Вслучай на нужда от заявка за гаранционен сервиз, моля, пишете ни, като приложите документ /доказателство за покупка, на адрес:Hama
GmbH &CoKG, Dresdner Str. 9, 86653 Monheim, Germany. Можете да се свържете снас ина:www.hama.de или да ни позвъните на
+49 (0)9091/502-0.
24

252627


Distributed by Hama GmbH &CoKG
86652 Monheim /Germany
Service &Support
www.hama.com
+49 9091 502-0
DG
Alllistedbrands aretrademarksofthe correspondingcompanies.Errorsand omissions excepted,
andsubjec ttotechnical changes. Ourgeneral termsofdeliveryand paymentare applied.
00118126_06127756/01.20
 Loading...