


Montage- und Einstell-
C
anleitung
Radar 255: standard
Radar 256: richtungs-
16.863 C
erkennend
Mounting and adjustment
instructions
Radar 255: standard
Radar 256: directiondetection
1 Teilebezeichnung
1 Gehäuseboden
2 Haube
3 Radarprint
4 Antenne
5 Antennenhalterung
6 Befestigungsschraube für
Antenne
7 Anschlusskabel
8 Kontroll-LED
9 DIP-Schalter für Modus-
einstellung
1 Description
1 Bottom of housing
2 Cover
3 Printed board of radar
4 Antenna
5 Antenna fixture
6 Fixing screw for antenna
7 Connection wire
8 Controlling LED
9 DIP-switch for mode-
configuration
10 Sensitivity potentiometer
10 Poti für Empfindlichkeit
Instructions pour
montage et réglages
Radar 255: standard
Radar 256: reconnaissance
de la direction
1 Description
1 Support
2 Couvercle
3 Circuit imprimé radar
4 Antenne
5 Fixation de l’antenne
6 Vis pour fixation de l’antenne
7 Raccordement
8 LED de contrôle
9 Interrupteur DIP pour le
réglage du mode
10 Potentiomètre de sensibilité
Istruzioni di montaggio e
regolazione
RADAR 255: standard
RADAR 256: identificazione
della direzione
1 Descrizione dettagliata
1 Cassa
2 Coperchio
3 Print del RADAR
4 Antenna
5 Supporto dell'antenna
6 Vite di fissaggio per antenna
7 Cavo d'allacciamento
8 Lampadina LED di controllo
9 Interruttore DIP per il
riponimento del modo
10 Potenziometro per la regola-
zione della sensibilità
2 Technische Daten
Speisespannung: 16...26 VDC
Anschlussleistung: ca. 1.8 W
Max. Anschlussabsicherung bei
Fremdspeisung: 2.5 A
Temp. Bereich: –20...+50 °C
Betriebsfrequenz:
24.125 GHz (K-Band)
Ausgangsleistung: 5 mW
Anschlusskabellänge: 2.5 m
3 Zubehör
A Montagekonsole für
Befestigung an der Decke.
B Wetterhaube für
B
Wetterschutz des Radars.
C Montageplatte für
Befestigung an gewölbten
2 Technical data
Supply voltage: 16...26 VDC
Connected load: 1.8 W approx.
Max. fuse protection if separately
supplied : 2.5 A
Temp. range: –20...+ 50 °C
Frequency:
24.125 GHz (K-band)
Power output: 5 mW
Wire length: 2.5 m
3 Accessories
A Bracket for mounting to
ceiling.
B Weather shield.
C Mounting plate for fixing to
circular or rough surfaces.
oder rauhen Oberflächen.
2 Caractéristiques
2 Dati tecnici
techniques
Tension d’alimentation:
16...26 VDC
Consommation: 1.8 W environ
Protection de raccordement max.
lors d'une alimentation
externe: 2.5 A
Température.: –20...+50 °C
Fréquence:
24.125 GHz (bande K)
Puissance de sortie: 5 mW
Longueur du câble: 2.5 m
3 Accessoires
A Console pour fixation au
plafond.
B Protection pour protéger le
radar contre les intempéries.
C Plaque de montage pour
fixation aux surfaces courbes
ou rugueuses.
Tensione di alimentazione:
16...26 VDC
Potenza: ca. 1.8 W
Protezione di collegamento
massimo in occasione di un'
alimentazione esterna: 2.5 A
Campo di temp.: –20...+50 °C
Frequenza:
24.125 GHz (banda K)
Potenza di uscita: 5 mW
Lunghezza del cavo d'allacciamento: 2.5 m
3 Accessori
A Mensola per fissaggio al
soffitto.
B Calotta meteorologica.
C Piastra di montaggio per
montaggio su superfici non
piane o sferiche.
Radar 255/256 Standard
Erfassung aller Bewegungen im
Bereich der Antennenkeule.
Radar 255 standard
Detects all movements in the
range of the antenna cone.
Radar 255 standard
Détection de tous les
mouvements dans la zone de
RADAR 255 standard
Rilevamento di tutti i movimenti
nel settore dell'antenna.
déclenchement de l’antenne.
Radar 255/256
Querverkehrsausblendung
Verhindert die Erfassung von
parallel zur Türe verlaufenden
Radar 255/256 mask of
cross traffic
Movements parallel to the radar
are not detected.
Bewegungen.
Radar 256
richtungserkennend
(ohne Automode)
Erfassung nur Bewegungen
zum Radar hin im Bereich der
Antennenkeule. Bewegungen
vom Radar weg werden nicht
Radar 256 directiondetection (without automode)
Detects only movements
towards the radar in the range
of the antenna cone. Movements
away from the radar are not
detected.
erfasst.
Radar 256 richtungserkennend (mit Automode)
Automode: Zusatzfunktion bei
Radar 256 für höhere Sicherheit
im Tür-Nahbereich, da sie die
Vorteile des richtungserkennenden Radars 256 mit denen des
Radars 255 kombiniert.
Radar 256 directiondetection (with automode)
Automode: Supplementary
function with radar 256 for better
security in the door vicinity since
it combines the advantages of the
direction-detecting radar 256 with
those of the radar 255.
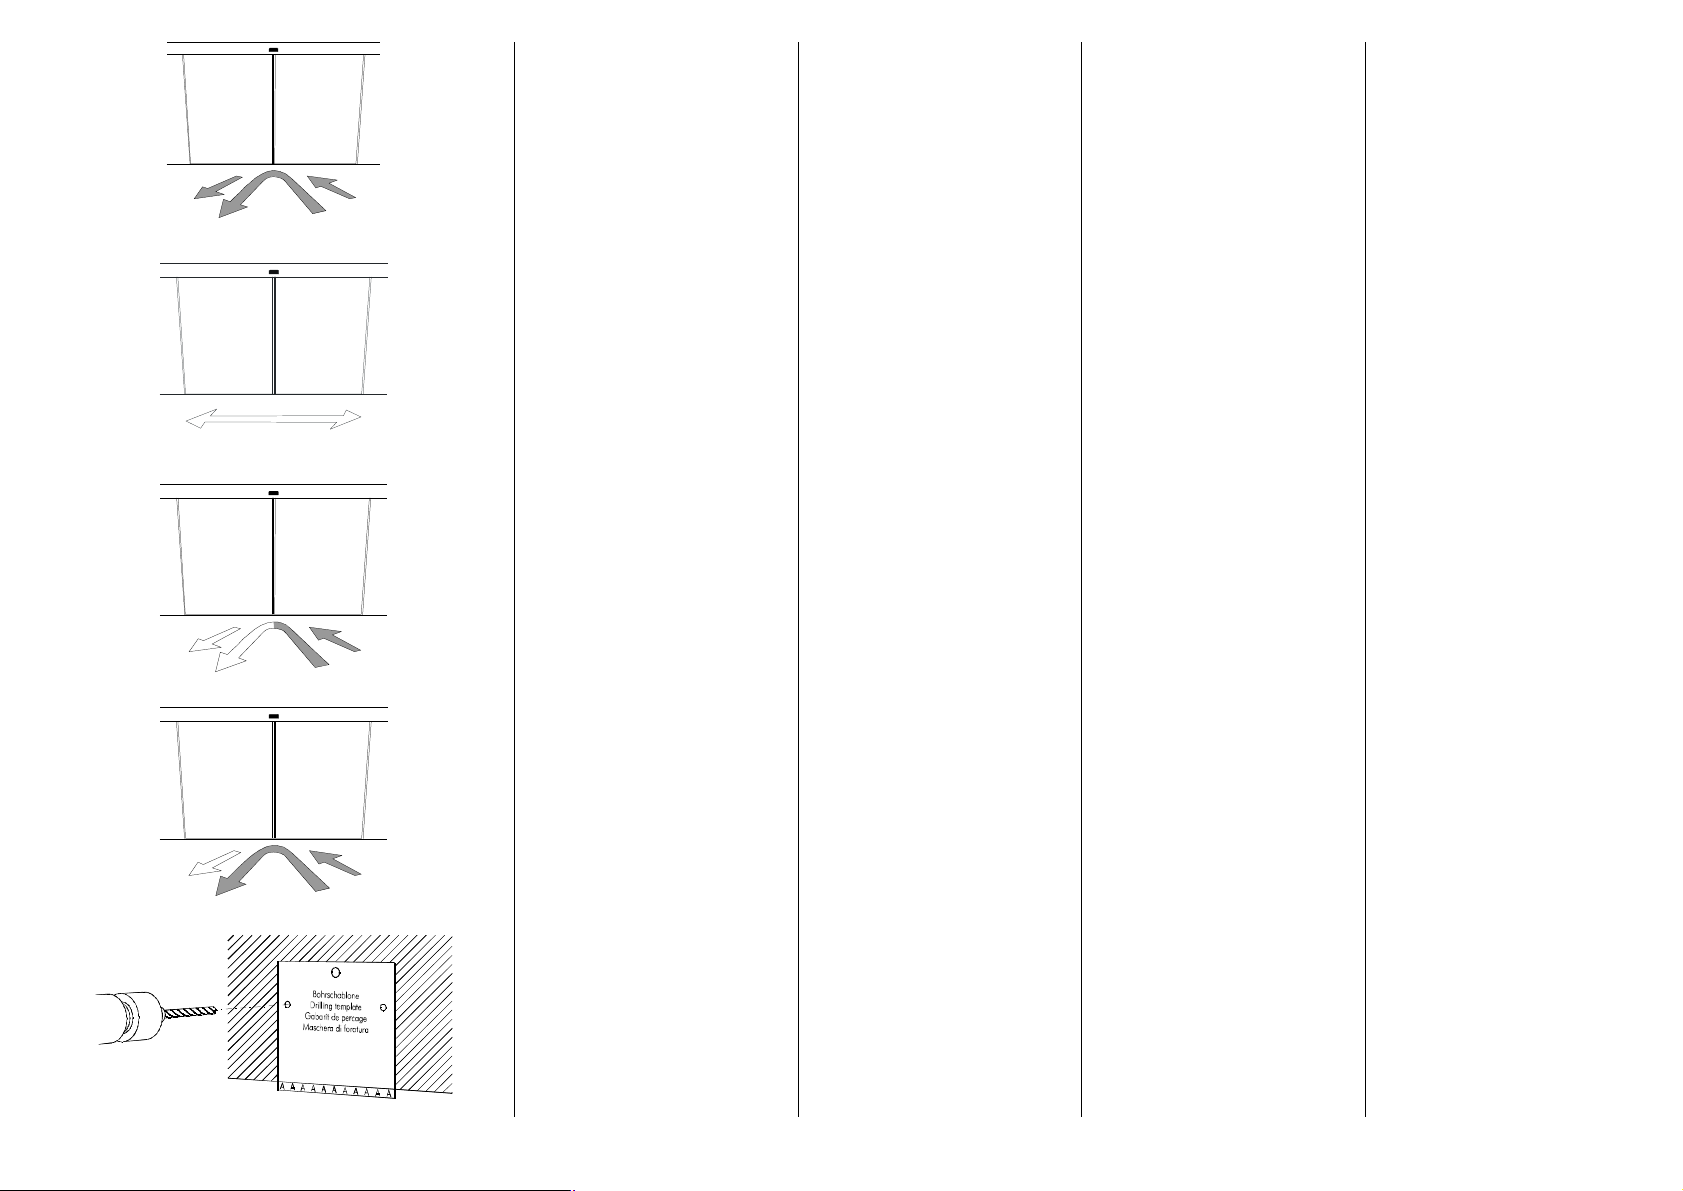
4 Montageanleitung
Hinweise: Stabile Befestigung,
keine vibrierenden Unterlagen
verwenden. Vor Witterungseinflüssen (Regen, Schnee etc.)
4 Mounting instructions
Notice: Do not mount onto
vibrating base. Protect against
influences of weather (rain, snow,
etc.).
schützen.
1 Bohren, Aussparen
1 Drill, cut out
Radar 255/256 Suppression
du trafic transversal
Des mouvements parallèles au
radar ne sont pas détectés.
RADAR 255/256 Soppressione del traffico transversale
Impediscé l’afferrata del
movimento parallelo della porta
Radar 256 reconnaissance
de la direction (sans
automode). Les mouvements
sont détectés uniquement
lorsqu’ils sont en direction du
radar dans la zone de
déclenchement de l'antenne. Les
mouvements dans la direction
RADAR 256 identificazione
della direzione (senza
automode)
Rilevamento dei movimenti nel
settore dell'antenna, ma
solamente dei movimenti verso
l'antenna e non nella direzione
contraria.
opposée du radar ne sont pas
détectés.
Radar 256 reconnaissance
de la direction (avec
automode). Automode: fonction
supplémentaire pour le radar 256
uniquement sécurité plus
importante dans la zone de
proximité de la porte, puisqu’elle
combine les avantages du radar
256 unidirectionnel avec ceux du
radar 255.
4 Instructions pour
RADAR 256 identificazione
della direzione (con
automode). Automode: Funzione
supplementare del RADAR 256
per maggiore sicurezza nel settore più vicino alla porta, per
combinare le proprietà di identificazione della direzione del
RADAR 256 a quelle del RADAR
255.
4 Istruzioni di montaggio
montage
Recommandation d’utilisation:
Fixation stable, ne pas utiliser
des supports vibrants. Protéger
contre les intempéries (pluie,
neige, etc.)
1 Percer, découper
Indicazioni: Non utilizzare sostegni vibranti. Proteggere dalle intemperie.
1 Forare e preparare il ritaglio
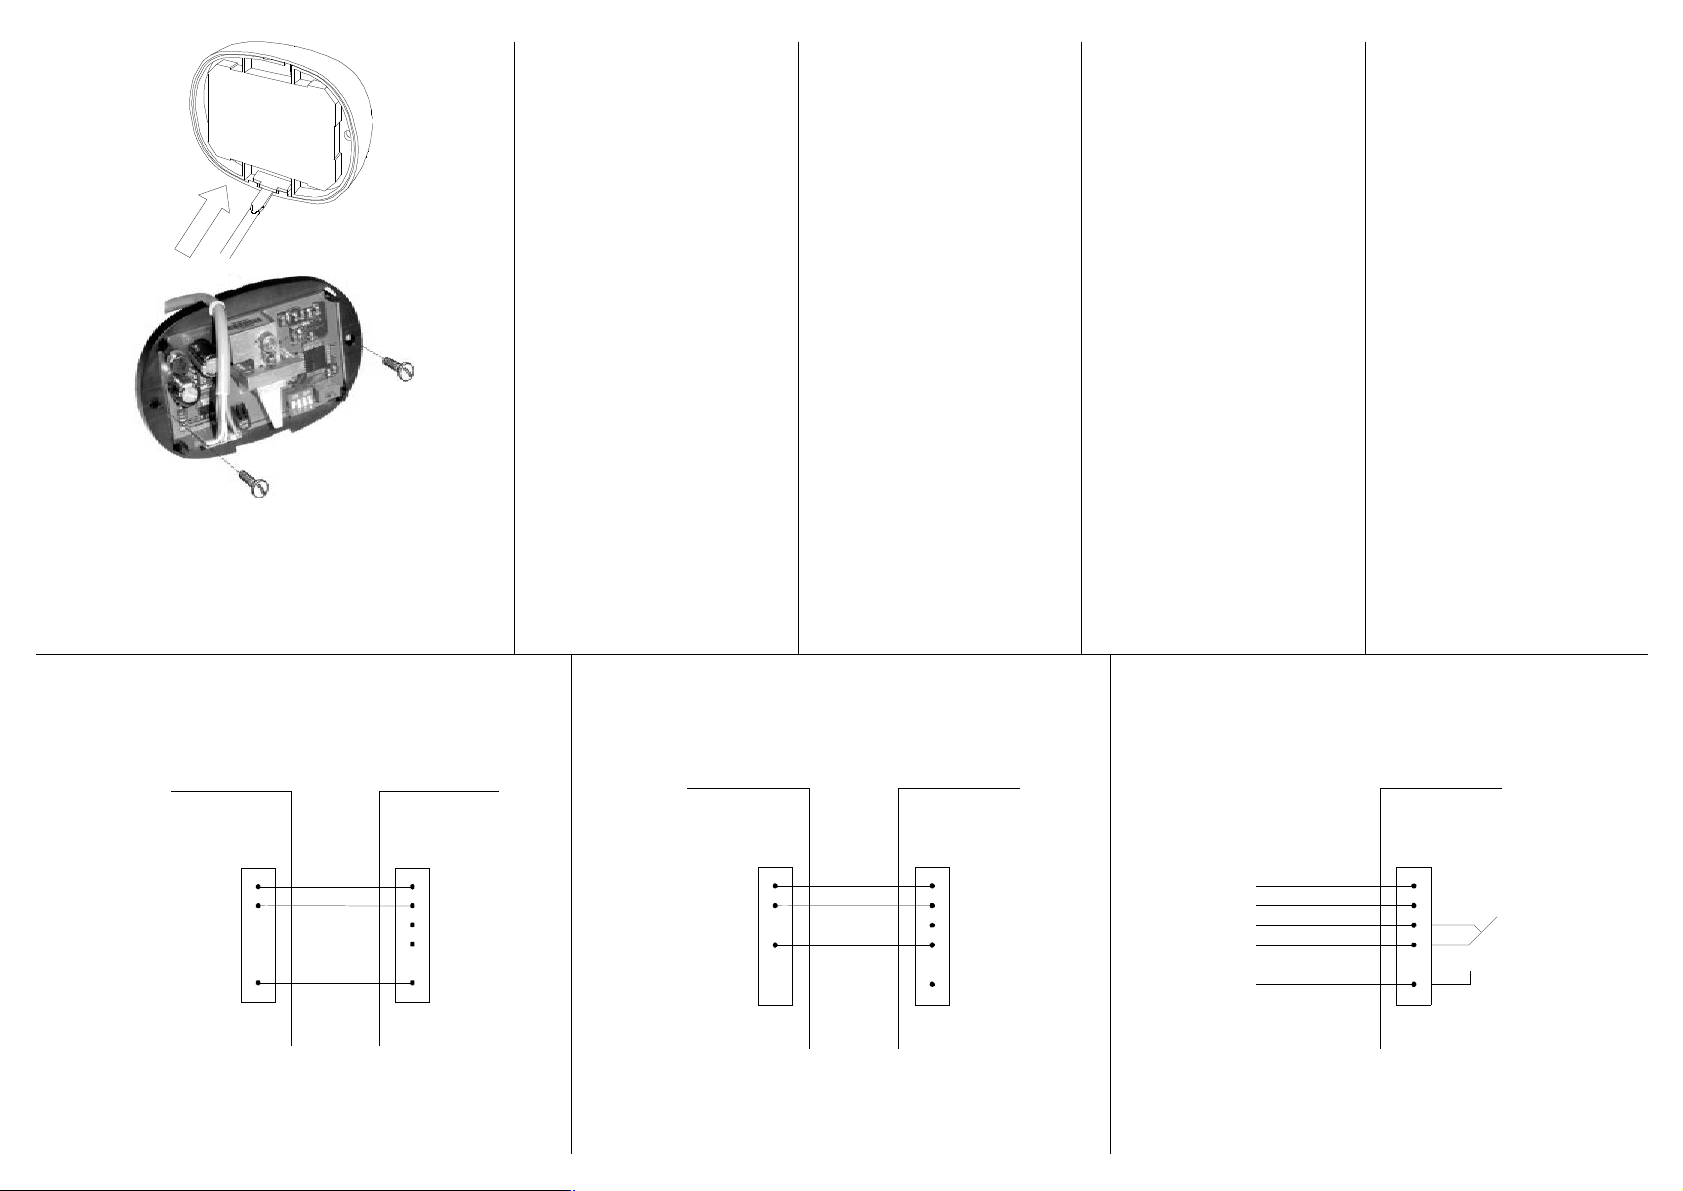
2 Haube abnehmen
A K I / A K A
w s
g u
+ 2 4 V
E
V G N D ( P N P ) N P N w s b r g e A K I / A K A
3 Radar befestigen
2 Remove cover
3 Fix radar
2 Retirer le couvercle
3 Fixer le radar
2 Togliere il coperchio
3 Fissare il RADAR
4 Elektrisch anschliessen
Drahtfarben:
br = braun
ge = gelb
ws = weiss
gn = grün
gu = grau
PNP
NPN
STG 16,17,18,126
R a d a r
S T G 1 4 , 1 5 , 1 2 5
4 Wiring
Wire colours:
br = brown
ge = yellow
ws = white
gn = green
gu = grey
R a d a r
E
G N D
+ 2 4 V
b r
G N D
+ 2 4 V
( N P N )
P N P
G N D
+ 2 4
4 Raccordement
Couleurs de câbles:
br = brun
ge = jaune
ws = blanc
gn = vert
gu = gris
4 Allacciamento
Colori cave:
br = bruno
ge = giallo
ws = bianco
gn = verde
gu = grigio
R: Relais / Relay / Relè
Radar
R
ws
br
gn
ge
gu
GND
+24V
N.C.
COM
N.O.
5 Antennenwahl
Standard Antenne
5 Choice of the antenna
Standard antenna
Asymmetrisch links
Asymmetric left
Asymmetrisch rechts
Asymmetric right
5 Choix de l’antenne
Antenne standard
Asymétrique à gauche
Asymétrique à droite
5 Scelta del tipo di antenna
Antenna standard
Asimmetrica sinistra
Asimmetrica destra
Gebündelte Antenne
Bunched antenna
Hornantenne
Horn antenna
Antenne faisceau
Antenne cornet
Antenna concentrata
Antenna a corno

123
1 Antennen richten (ausser
234
Hornantenne).
1 Adjust antenna (except horn
antenna).
1
2
3
2 Antenne fixieren
2 Fix antenna
1 Ajuster l’antenne (sauf
antenne «cornet»).
2 Fixer l’antenne
1 Aggiustrare l'antenna (all'infuori
dell'antenna a corno).
2 Fissare l'antenna
6 Einstellungen
Je nach verwendeter Antenne
und eingestellter Empfindlichkeit
ergibt sich für jede Anwendung
der optimale Auslösbereich. Bei
aufgesetzter Haube sind keine
Manipulationen möglich (Schutz
gegen Vandalismus).
Moduseinstellung mit
DIP-Schaltern:
Moduseinstellungen
mit dielektrischer Antenne
(Kunststoff-Antenne)
ON
1
Radar 255
Default
(Werkseinstellung)
Radar 256
Default
(Werkseinstellung)
6 Adjustment
According to the used antenna
and the adjusted sensitivity there
is for each application the best
trigger range. When the cover is
in place, no further manipulations
are possible (protection against
vandalism).
DIP-switch for modeconfiguration:
Mode configuration for
dielectric antenna
(Plastic antenna)
Radar 255
Default
(Factory settings)
Radar 255
Default
(Factory settings)
6 Réglages
La position du lobe devant la
porte est déterminée par
l'antenne, sa position et le
réglage de la sensibilité.
Lorsque le couvercle est mis,
des manipulations sont
impossibles (protection contre
le vandalisme).
6 Regolazione
A secondo del tipo di antenna impiegata e della relativa regolazione
di sensibilità viene ottenuto un
settore ottimale. Quando il coperchio è montato non è più possiblie
nessuna manipolazione (protezione
contro atti di vandalismo).
Interruttore DIP per il riponimento
del modo
Interrupteur DIP pour le
réglage du mode
Réglages du mode pour
l’antenne diélectrique
(Antenne de matière plastique)
Radar 255
(configuration d’usine)
Radar 256
(configuration d’usine)
Riponimento del modo per
l’antenna dielettrica
(Antenna di materia plastica)
RADAR 255
(configurazione d’uso)
RADAR 256
(configurazione d’uso)

234
e.
234
234
!
!
ON
1
!
ON
1
ON
1
ACHTUNG
ATTENTION
ATTENTION
ATTENZIONE
Radar 255
Erfassung langsamer
Bewegungen (slow-motion)
Radar 256
Automode / Slow-Motion
Wichtiger Hinweis
In diesem Modus können in
besonderen Fällen Selbstauslösungen auftreten. Empfindlichkeit reduzieren oder den Modus
ausschalten.
Radar 255
Empfindlichkeitsumschaltung
(höhere Empfindlichkeit nach
Radarauslösung)
Radar 256
Richtungsumkehr
(Auslösung bei von der Türe
weggehenden Bewegungen)
Radar 255
Querverkehrsausblendung
Der Auslösebereich wird kleiner.
Für die Detektion von kleinen
Kindern wird die Kombination mit
der Erfassung langsamer Bewegungen empfohlen.
Radar 256
Querverkehrsausblendung
DIP-Schalter 4 für einen Radar
255/256 mit dielektrischer
Antenne immer auf OFF stellen.
Diese Einstellung ist bei jeder
Installation zu überprüfen.
Radar 255
Detection of slow movements
(slow-motion)
Radar 256
Automode / Slow-motion
Important
In special cases automatic
releases can occur in this mode.
Reduce sensitivity or switch off
the mode.
Radar 255
Change of sensitivity after radar
activation
Radar 256
Direction dependent detection
(detects only movements away
from the radar)
Radar 255
Cross traffic suspension
The size of the detection field
becomes smaller.
Radar 256
Cross traffic suspension
For a radar 255/256 with
dielectric antenna please set
the DIP-switch no. 4 to OFF.
Check this configuration at every
installation.
Radar 256
Les mouvements lents sont
détectés.
Radar 256
Automode / mouvements lents
Indication importante
Dans ce mode et dans les cas
particuliers, des autodéclenchements peuvent se produir
Réduire la sensibilité ou
déactiver le mode.
Radar 255
Changement de la sensibilité
du radar après détection
Radar 256
Détection du mouvement
(mouvements dans la direction
opposée du radar sont
détectés)
Radar 255
Suppression du trafic
transversal.
La taille de la zone detection
sera diminuer.
Radar 256
Suppression du trafic transversal
Pour radar 255 / 256 avec
antenne diélectrique. Mettre
le N° 4 sur OFF
A faire à chaque installation
RADAR 255
Rilevamento dei movimenti lenti
RADAR 256
Automode / Slow-motion
Indicazione importante
In questo modo puo capitare un
disinnesto automatico.
Ridurre la sensibilità o deattivare il
modo.
RADAR 255
Commutazione la sensibilità in caso
di rilevamento
RADAR 256
Inversione di rilevamento della
direzione
(movimenti verso l'antenna nella
direzione contraria)
RADAR 255
Soppressione del traffico
transversale
La zona della rilevazione sará
ridotta
RADAR 256
Soppressione del traffico
transversale
L’interruttore DIP 4 per un RADAR
255/256 con l’antenna dielettrica
deve stare, sempre sull’ OFF.

234
234
234
234
!!!
!
Modi mit Hornantenne
Mode configuration for horn
antenna
ON
1
ON
1
ON
1
ACHTUNG
ATTENTION
ATTENTION
ATTENZIONE
ON
1
Radar 255
Default
(Werkseinstellung)
Radar 256
Default
(Werkseinstellung)
Radar 255
Erfassung langsamer
Bewegungen (slow-motion)
Radar 256
Automode / Slow-Motion
Radar 255
Empfindlichkeitsumschaltung
(höhere Empfindlichkeit nach
Radarauslösung)
Radar 256
Richtungsumkehr
(Auslösung bei von der Türe
weggehenden Bewegungen)
Der DIP-Schalter 3 für die
Querverkehrsausblendung kann
aber sollte nicht auf ON geschaltet werden. Ist dieser Schalter auf
ON, so ist das Auslösefeld sehr
stark eingeschränkt.
DIP-Schalter 4 für einen Radar
255/256 mit Hornantenne immer
auf ON stellen.
Diese Einstellung ist bei jeder
Installation zu überprüfen.
Radar 255/256
Hochempfindlichkeitseinstellung
- ohne Störungsunterdrückung
gegen EMV-Störungen, Schock,
Vibration und Witterungsein flüsse
Radar 255
Default
(Werkseinstellung)
Radar 256
Default
(Werkseinstellung)
Radar 255
Detection of slowly movements
(slow-motion)
Radar 256
Automode / Slow-motion
Radar 255
Change of sensitivity after radar
activation
Radar 256
Direction dependent detection
(detects only movements away
from the radar)
The DIP-switch no. 3 should be in
OFF position. Otherwise the
detection area is very restricted.
For a radar 255/256 with horn
antenna please set the DIPswitch no. 4 to ON.
Check this configuration at every
installation.
Radar 255/256
Settings for higher sensitivity
- worse immunity against EMC,
not proof against shock,
vibrations and atmospheric
influences
Réglages du mode pour
l’antenne cornet
Radar 255
Default
(configuration usine)
Radar 255
Default
(configuration usine)
Radar 256
Les mouvements lents sont
détectés.
Radar 256
Automode / Mouvement lent
Radar 255
Changement de la sensibilité
du radar après détection
Radar 256
Détection du mouvement
(mouvements dans la direction
opposée du radar sont
détectés)
.
Le N°3 Doit être sur OFF
Autrement la détection est très
réduite.
Pour un radar 255 / 256 avec
antenne cornet , mettre le
N° 4 sur ON.
Faire cette configuration sur
chaque installation.
Radar 255/256
Réglage pour une sensibilité
plus élevée
- une plus mauvaise immunité
contre EMC et insensibilité
aux coups, chocs, vibrations
et influences atmosphériques
Riponimento del modo per
l’antenna a corno
RADAR 255
(configurazione d’uso)
RADAR 256
(configurazione d’uso)
RADAR 255
Rilevamento dei movimenti lenti
RADAR 256
Automode / Slow-motion
RADAR 255
Commutazione la sensibilità in caso
di rilevamento
RADAR 256
Inversione di rilevamento della
direzione
(movimenti verso l'antenna nella
direzione contraria)
L’interruttore DIP 3 per la
soppressione del traffico
transversale é meglio che stá sull’
OFF.
L’interruttore DIP 4 per un RADAR
255/256 con una antenna a corno
deve stare, sempre sull’ ON.
RADAR 255/256
Regolazioni per più alta sensibilità
- immunità più difettosa contro
EMC, non prova contro scossa,
vibrazioni e influenze atmosferiche

7 Anlage einschalten
LED leuchtet schwach.
Der Radar ist unter
Spannung.
Der Radar startet auf und der
Selbsttest wird durchgeführt.
Erlischt die LED nach 4s
nicht, so ist der Radar defekt.
Die Software ermittelt, ob es
sich um einen Mono- oder
Stereoradar handelt.
Feststellung eines Fehlers im
Speicher des Mikrocontrol lers. Neustart des Radars.
Erlischt die LED nach 4s
nicht, so ist der Radar defekt.
Solange die LED hell
leuchtet, erfasst der Radar
ein Objekt.
1 Empfindlichkeit einstellen
dielektrische Antenne
7 Switch on power
LED lights up faintly.
The radar is powered.
The radar boots up and
starts a self-diagnostic.
If the LED doesn’t switch off
after 4 seconds, the radar is
defective.
The software checks if the
radar is a mono or stereo
type.
Detection of a memory failure
in the micro-controller.
If the LED doesn’t switch off
after 4 seconds, the radar is
defective.
The radar detects an object
while the LED lights up
bright..
1 Adjust sensitivity
dielectric antenna
7 Mettre sous tension
LED lumière faible.
le radar est alimenté.
Le radar démarre un auto
test.
Si le LED ne s’éteint pas
après 4 s , le radar est
défectueux.
Le software controle si le
radar est mono ou stéreo.
Détection de panne
mémoire dans le micro.
Si le LED ne s’éteint pas
après 4 s , le radar est
défectueux.
Le radar détecte un objet
durant que le LED brille
7 Inserire la tensione
LED lumina debole il RADAR
stá sotto tensione.
Il RADAR parte e il controllo
automatico viene eseguito. Se
non spegne la LED dopo 4
secondi, il RADAR è difettoso.
La SOFTWARE scopre se si
tratta di un RADAR -MONO o
STEREO.
Constatazione di un errore nella
memoria del MICRO-CON TROLLER in RADAR riparte.
Se non spegne la LED dopo
4 secondi, il RADAR è difettoso.
Se la LED lumina forte, in
RADAR afferra un oggetto.
fort.
1 Régler la sensibilité
Antenne diélectrique
1 Regolare la sensibilità
Antenna dielettrica
2 Empfindlichkeit einstellen
Hornantenne
2 Adjust sensitivity
horn antenna
2 Régler la sensibilité
Antenne cornet
2 Regolare la sensibilità
Antenna a corno

min.
max.
3 Test der optimalen
Einstellung
Mit aktivierter Querverkehrs-
ausblendung ist die Hand-
auslösung nicht möglich!
3 Check adjustments
A tripping by main is impos-
sible with activ cross traffic
suspension.
3 Tester le réglage optimal
Le test avec une déclan-
chement à la main n’est
pas possible.
(suppression du traffic
transversal est active)
3 Test e regolazione della sensi-
bilità ottimale
Con la soppressione del traffico
transversale attiva, il scatto a
mano non è possibile.
4 Haube aufsetzen und
Auslösebereich nochmals
4 Replace cover and check
detection area again
kontrollieren
8 Mögliche Störeinflüsse
A Regen, Schnee
B Pflanzen, Ventilatoren,
8 Possible interferences
A Rain, snow
B Plants, fans, trees etc.
Bäume etc.
C Starke Vibrationen
C Strong vibrations
4 Remettre le couvercle et
contrôler la fonction du
4 Montare il coperchio e ricon-
trollare la zona di rilevazione
radar
8 Pertubations possible
8 Cause di disturbo
possibili
A Pluie, neige
B Plantes, ventilateurs,
arbres
C Vibrations très fortes
A Piogga, neve
B Piante, ventilatori, alberi
C Vibrazione troppo forte

9 Störungsbehebung
Symptom / Fehler Mögliche Ursache Massnahmen
Türe öffnet nicht, Leuchtdiode funktioniert nicht: Radar erhält keine Spannung. Verdrahtung überprüfen.
Radar ist defekt. Radar wechseln.
Türe öffnet und schliesst fortwährend: Radar «sieht» Bewegung der Türflügel. Neigungswinkel der Antenne anpassen (von der Türe weg).
Stabilität der Befestigung überprüfen. Türe erzeugt beim Schliessen Vibrationen, die eine Neuöffnung
auslösen.
Türe öffnet und schliesst von Zeit zu Zeit ohne Grund: Radar erfasst Fahrzeugverkehr ausserhalb des Fussgänger-
Erfassungsbereiches.
Radar erfasst Störsignale. Störquelle ermitteln, entfernen lassen oder Filter einsetzten lassen.
Türe schliesst nicht mehr. Radar ist immer ausgelöst:
(LED leuchtet hell)
9 Error elimination
Feststellung eines Fehlers im Speicher des Mikrocontrollers.
Erlischt die LED 4s nach Aufstarten nicht, so ist der Radar defekt.
Schliessgeschwindigkeit herabsetzen
Neigungswinkel der Antenne oder Empfindlichkeit verstellen.
Radar wechseln.
Symptom / error Possible cause Remedy
The door does not open, LED does not function: Radar is not powered. Check connections.
Radar is defective. Exchange radar.
The door keeps opening and closing: Radar «picks up» movement of door wing. Adjust angle of inclination of antenna (away from door).
Door produces vibrations when closing, causing it to reopen. Check stability of fixing.
Reduce closing speed
The door opens and closes after a certain time, without
reason:
Radar detects interference signals. Determine source of interference, remove source or have filter fitted.
The door doesn’t close. Radar is permanent active:
(LED lights up bright)
9 Dépannage
Radar detects vehicle movement outside pedestrian detection range. Adjust angle of inclination or sensitivity.
Detection of a memory failure in the micro-controller. If the LED after
start doesn’t switch off after 4 seconds, the radar is defective.
Exchange radar.
Symptôme / erreur Cause probable Mesures à prendre
La porte ne s’ouvre pas, le LED ne fonctionne pas: Le radar n’est pas alimenté. Vérifier le câblage.
Radar défectueux. Remplacer le radar.
La porte s’ouvre et se ferme sans fin (auto-allumage): Le radar «perçoit» les mouvements du vantail. Régler l’orientation de l’antenne (l'écrier de la porte).
Vérifier la stabilité de la fixation. A la fermeture, la porte produit des vibrations qui déclenchent une
nouvelle ouverture.
La porte s’ouvre et se ferme sans raison au bout d’un
certain temps:
Le radar capte des parasites. Définir la source de parasites, ou monter un filtre.
La porte ne se ferme pas. Le Radar est toujours en
fonctionne (LED être allumé clair)
9 Malfunzionamenti e contromisure
Le radar capte les mouvements de véhicules passant hors de la
zone de détection des piétons.
Détection de défaut mémoire ? Si le LED ne s’éteint pas après 4 s
le radar est défectueux
Réduire la vitesse de fermeture
Régler l’orientation de l’antenne ou sa sensibilité.
Remplacer le radar.
Sintomo / malfunzionamento Possiblie causa Provvedimenti
La porta non si apre: il diodo luminescente non funziona: Il RADAR non riceve tensione. Controllare il cablaggio.
Il RADAR è guasto. Sostituire il RADAR.
La porta si apre e si chiude in continuazione: Il RADAR «vede» il movimento del battente della porta. Adattare l'angolazione dell'antenna (allontanandola dalla porta).
Controllare la stabilità del fissaggio. Quando si chiude, la porta genera delle vibrazioni che la fanno
riaprire di nuovo.
Di tanto in tanto la porta si apre e si chiude senza motivo: Il RADAR reagisce al traffico di veicoli al di fuori della zona di
rivelazione dei passanti.
Il RADAR riceve dei segnali di disturbo. Identificare la sorgente dei disturbi, toglierla o mettere un filtro.
La porta non si chiude. Il RADAR è sempre acceso la LED
lumina forte.
Constatazione di un errore nella memoria del MICRO-CONTROLLER. Se non spegne la LED dopo 4 secondi, il RADAR è difettoso.
Ridurre la velocità di chiusura.
Regolare l'inclinazione dell'antenna o la sensibilità.
Sostituire il RADAR.

Important hints, when using the radar RAD255/256 in the US
210 of Industry
Warning: Changes or modifications made to this equipment not expressly approved by
Class B digital
device, pursuant to Part 15 of the FCC Rules. These limits are designed to provide reasonable
protection against harmful interference in a residential installation. This equipment generates,
, if not installed and used in accordance with
the instructions, may cause harmful interference to radio communications. However, there is no
guarantee that interference will not occur in a particular installation. If this equipment does
terference to radio or television reception, which can be determined by turning
the equipment off and on, the user is encouraged to try to correct the interference by one or
15.19 : This device complies with Part 15 of the FCC Rules and with RSSCanada. Operation is subject to the following two conditions:
(1) this device may not cause harmful interference, and
(2) this device must accept any interference received, including interference that may
cause undesired operation.
15.21 :
agtatec ag may void the FCC authorization to operate this equipment.
15.105 : This equipment has been tested and found to comply with the limits for a
uses and can radiate radio frequency energy and
cause harmful in
more of the following measures:
· Reorient or relocate the receiving antenna.
· Increase the separation between the equipment and receiver.
· Connect the equipment into an outlet on a circuit different from that to which the receiver is
connected.
· Consult the dealer or an experienced radio/TV technician for help.
 Loading...