

Agri-Fab 45-02934 Owner’s Manual
45-02934
================================================================== 2
ENGLISH .......................................................... 5
DEUTSCH ........................................................ 6
FRAN(_,AiS ....................................................... 7
ITALIANO ......................................................... 8
NEDERLANDS ................................................. 9
ESPANOL ...................................................... 10
PORTUGUi_S ................................................. 11
EAAH NIKA ..................................................... 12
DANSK ........................................................... 13
NORSK ........................................................... 14
SVENSKA ...................................................... 15
SUOM! ............................................................ 16
POLSK! .......................................................... 17
v v
CESTINA ........................................................ 18
MAGYAR ........................................................ 19
PYCCKH_ ...................................................... 20
SLOVENSKO ................................................. 21
PRINTED IN USA FORM NO. 42700 (10/03/14)

JB
×2 46980
46677
47810
42702
43081
44180
712-0421
43840
43682
47623
42767
45180
jO
44732
47397
45072
×1
736-0722
46754
.-I Q
43009
43343
43093
×2
j R
46524
23917
L
6
L
LL
A
9
1
!
F
\
/@
\
R
Q
H
L
L
A
A
G
J
C
D I P
\
ENGLISH
SAFETY
1. Read this owners manual and the vehicle owners manual before
using this sprayer.
2. Never allow children to operate this sprayer.
3. Do not allow anyone to ride on or sit on this sprayer.
4. Keep the area clear of all persons, especially small children.
5. Read the chemical label before handling or mixing chemicals.
6. Wear eye and hand protection and protective clothing when
handling and applying lawn chemicals.
7. Do not spray on windy days.
8. Be aware of your tractor's capabilities. Attaching this sprayer
may affect your tractor's braking and stability.
9. STAY OFF STEEP SLOPES. Refer to the vehicle owner's
manual concerning safe operation on slopes.
10. Operate at reduced speed on rough terrain, along ditches and
on hillsides to prevent loss of control.
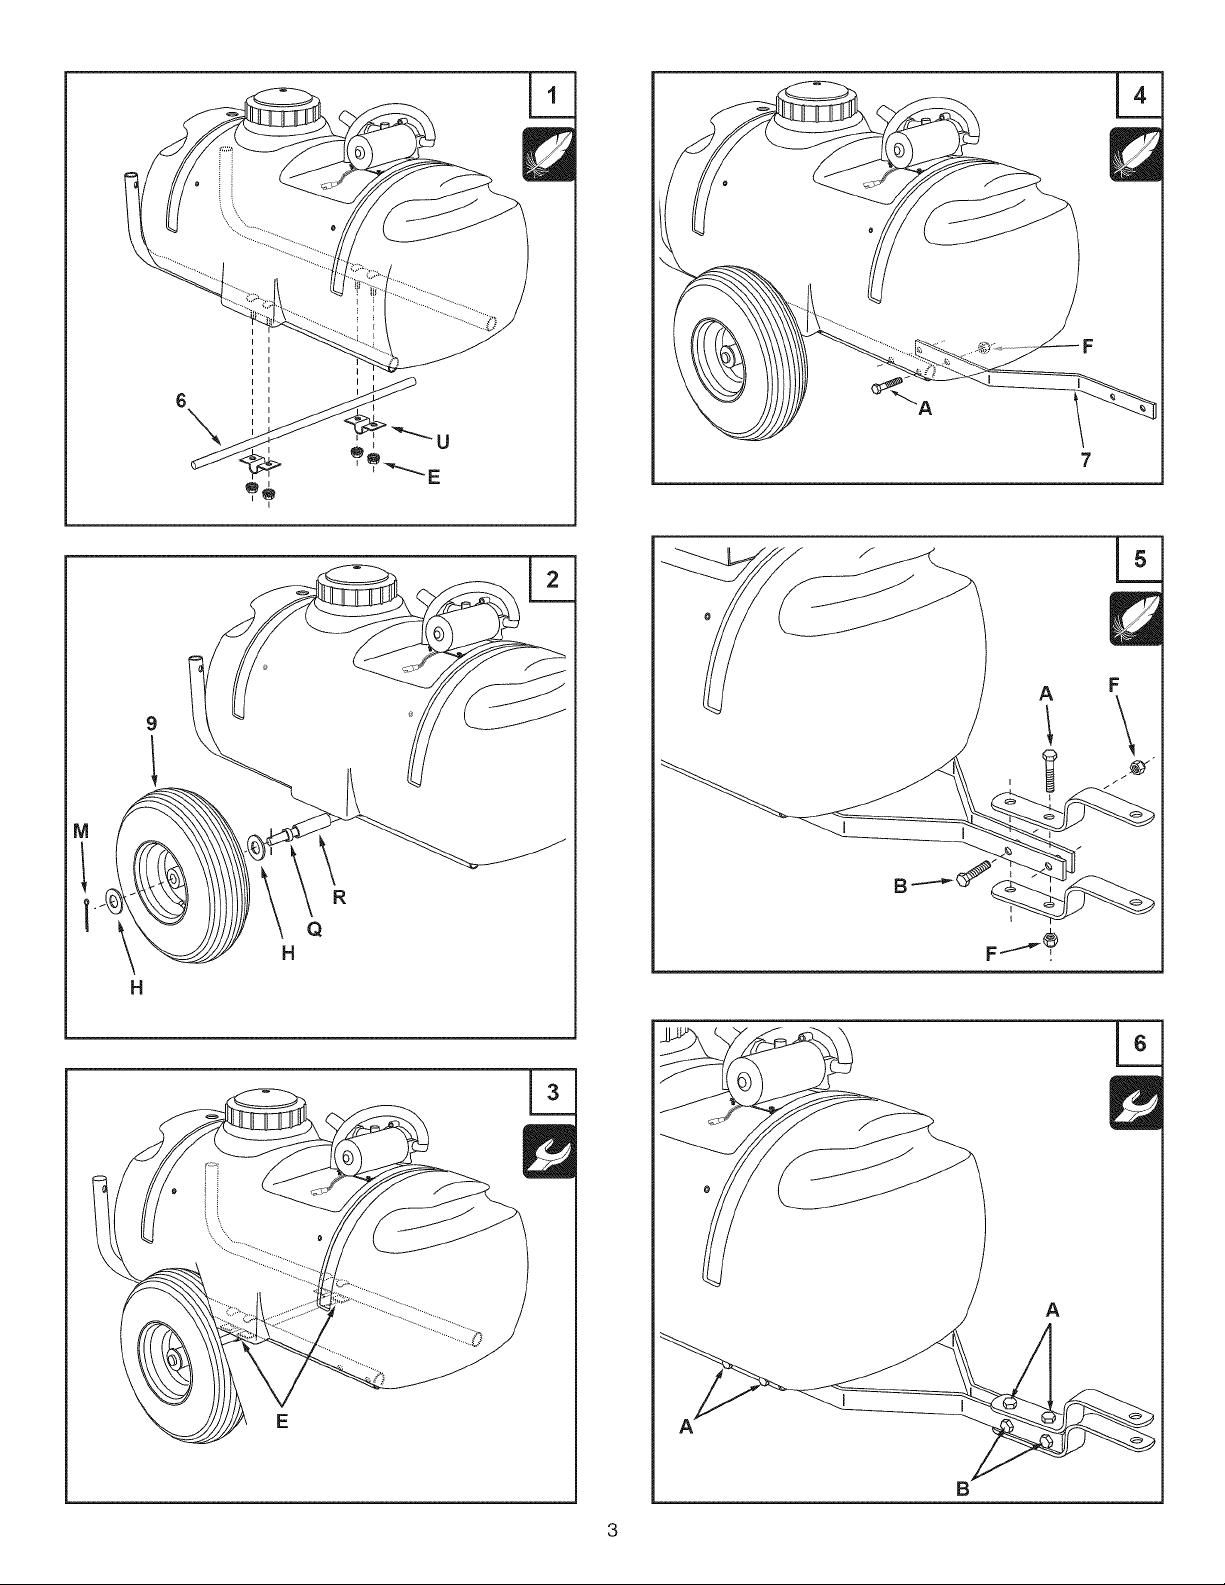
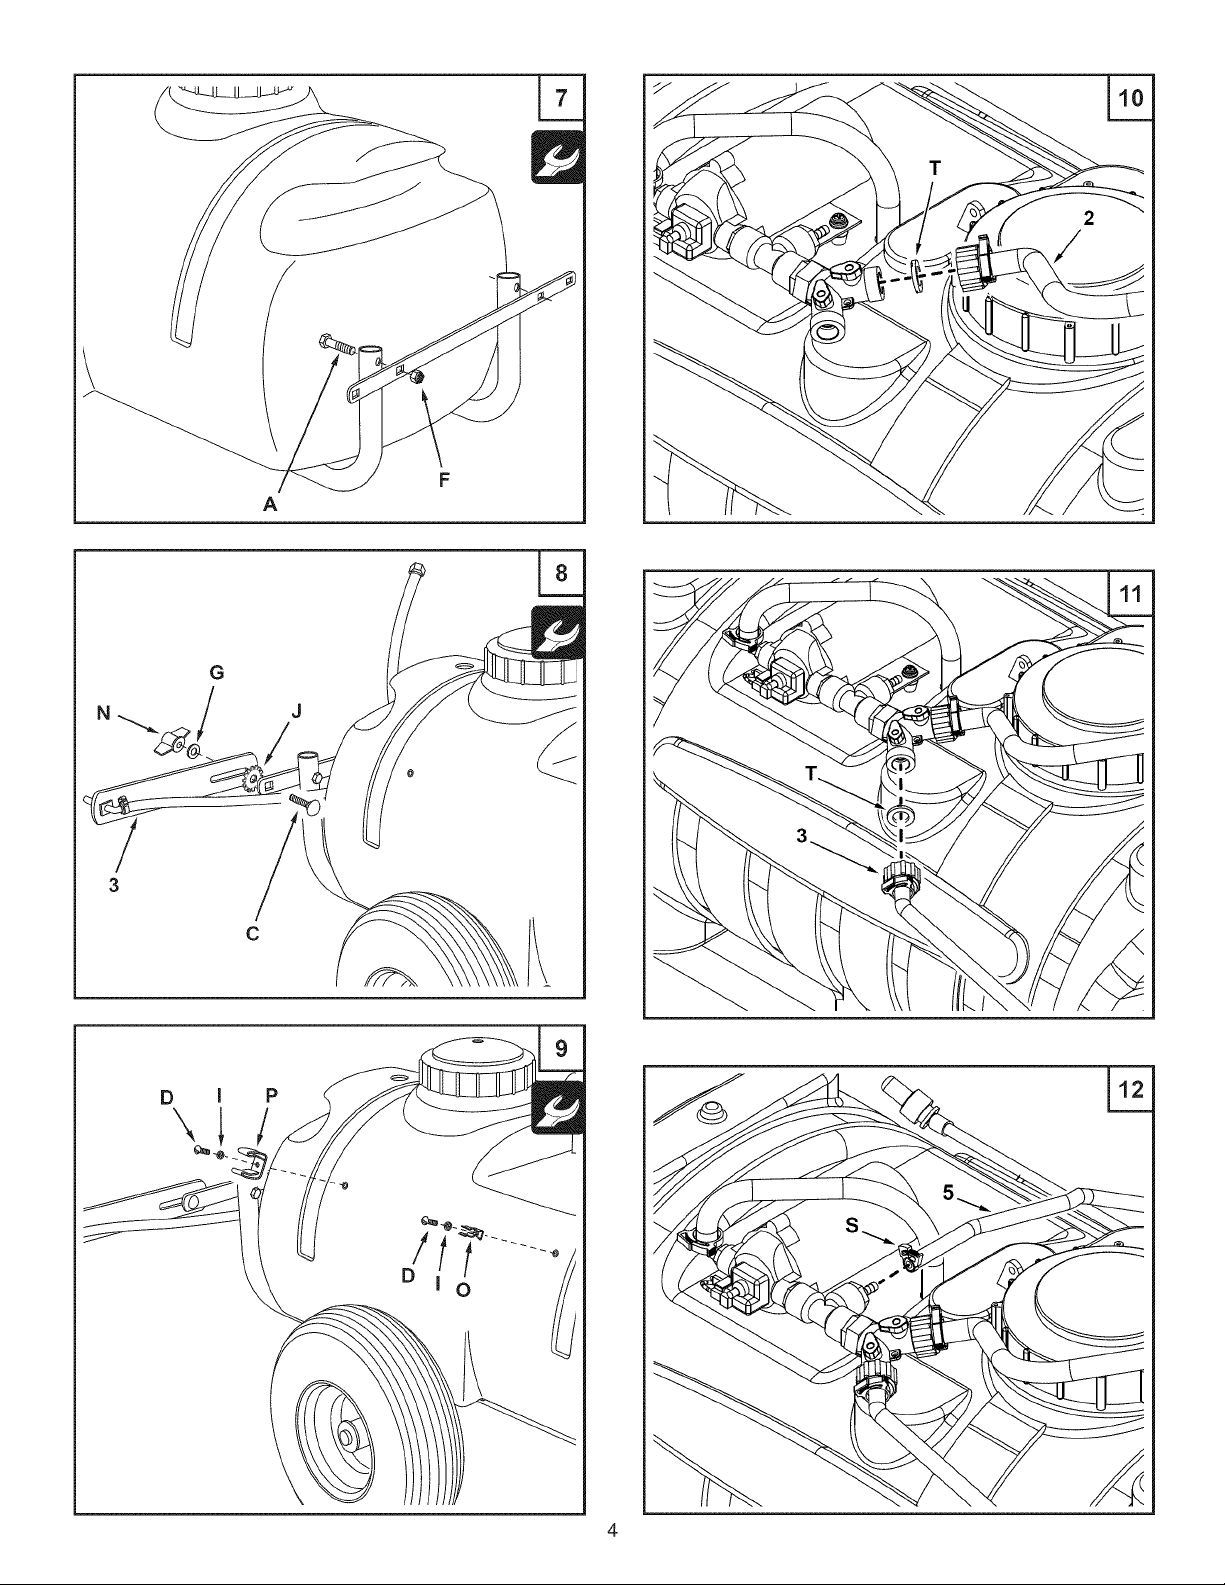
ASSEMBLY
The meanings of symbols used in the illustrations are as follows:
Do not tighten yet.
3,
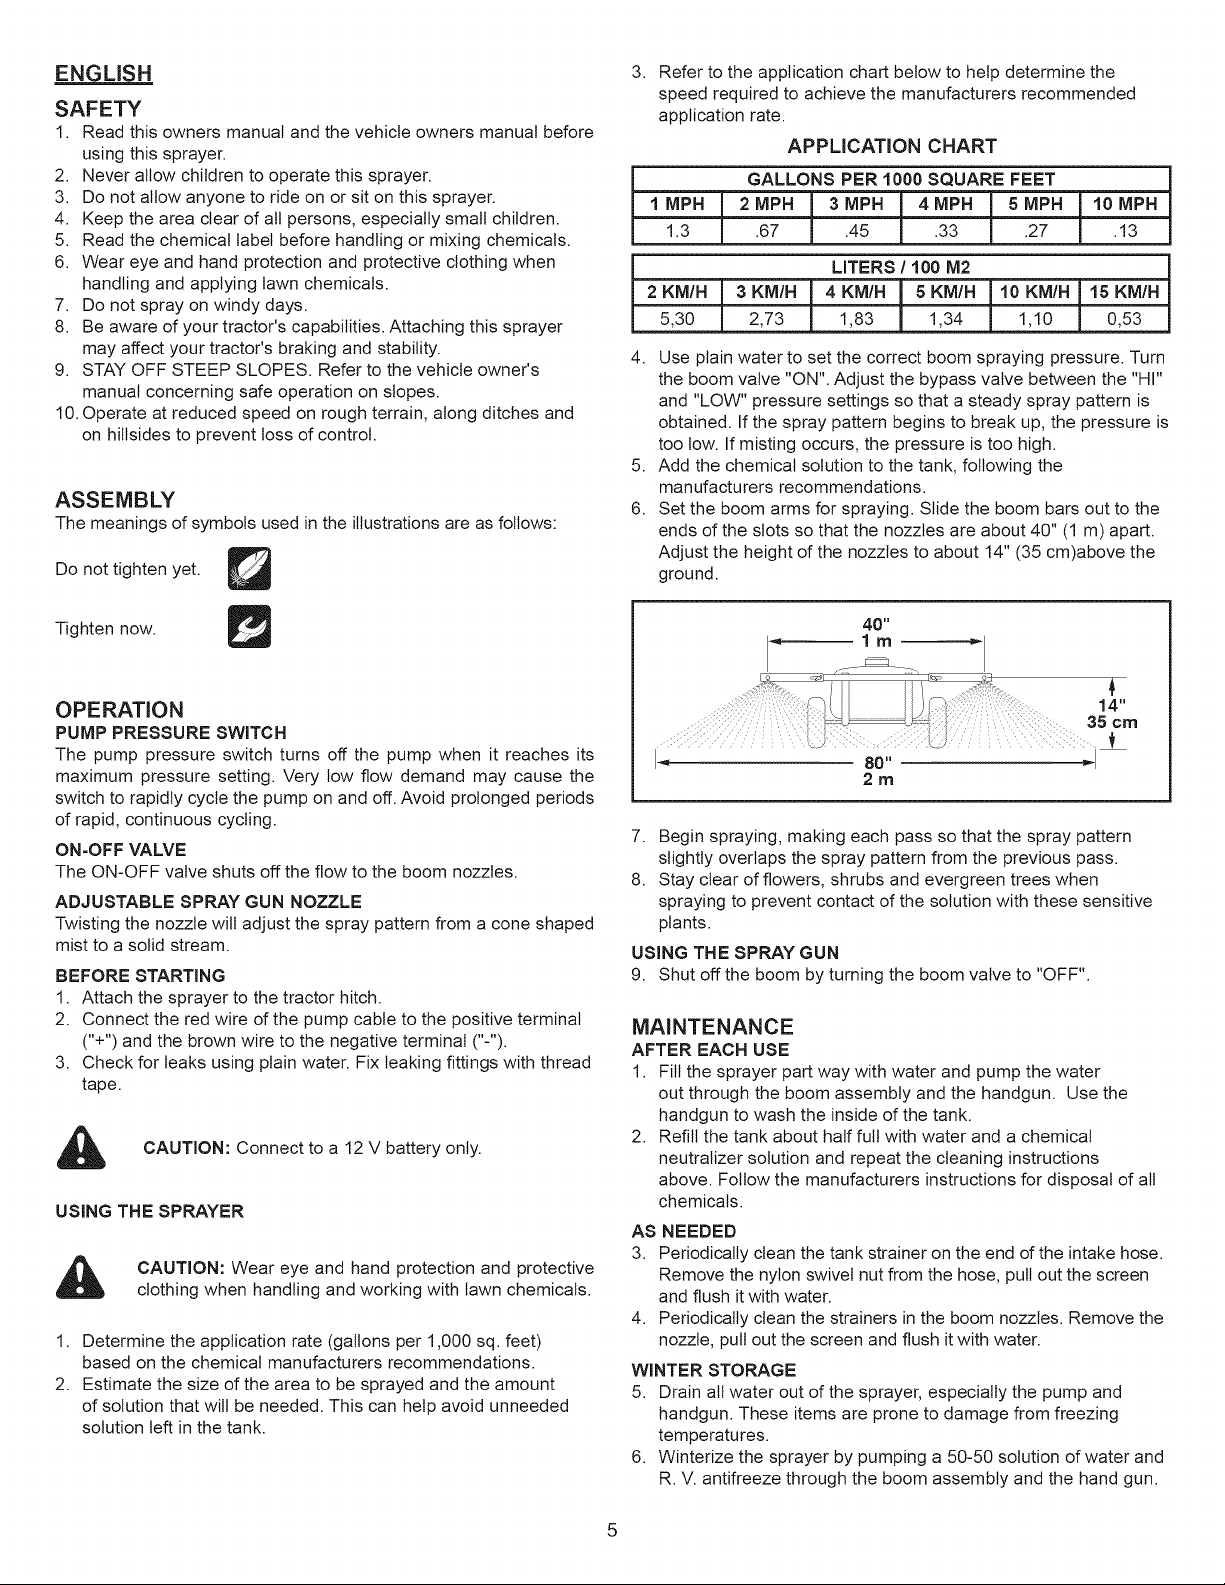
Refer to the application chart below to help determine the
speed required to achieve the manufacturers recommended
application rate.
APPLICATION CHART
GALLONS PER 1000 SQUARE FEET
1.3 .67 .45 .33 .27 .13
LITERS / 100 M2
5,30 2,73 1,83 1,34 1,10 0,53
4. Use plain water to set the correct boom spraying pressure. Turn
the boom valve "ON". Adjust the bypass valve between the "HI"
and "LOW" pressure settings so that a steady spray pattern is
obtained. If the spray pattern begins to break up, the pressure is
too tow. If misting occurs, the pressure is too high.
5. Add the chemical solution to the tank, following the
manufacturers recommendations.
6. Set the boom arms for spraying. Slide the boom bars out to the
ends of the slots so that the nozzles are about 40" (1 m) apart.
Adjust the height of the nozzles to about 14" (35 cm)above the
ground.
Tighten now.
OPERATION
PUMP PRESSURE SWITCH
The pump pressure switch turns off the pump when it reaches its
maximum pressure setting. Very low flow demand may cause the
switch to rapidly cycle the pump on and off. Avoid prolonged periods
of rapid, continuous cycling.
ON=OFF VALVE
The ON-OFF valve shuts off the flow to the boom nozzles.
ADJUSTABLE SPRAY GUN NOZZLE
Twisting the nozzle wilt adjust the spray pattern from a cone shaped
mist to a solid stream.
BEFORE STARTING
1. Attach the sprayer to the tractor hitch.
2. Connect the red wire of the pump cable to the positive terminal
("+") and the brown wire to the negative terminal ("-").
3. Check for leaks using plain water. Fix leaking fittings with thread
tape.
CAUTION: Connect to a 12 V battery only.
USING THE SPRAYER
CAUTION: Wear eye and hand protection and protective
clothing when handling and working with lawn chemicals.
1. Determine the application rate (gallons per 1,000 sq. feet)
based on the chemical manufacturers recommendations.
2. Estimate the size of the area to be sprayed and the amount
of solution that will be needed. This can help avoid unneeded
solution left in the tank.
40"
80"
2rn
7. Begin spraying, making each pass so that the spray pattern
slightly overlaps the spray pattern from the previous pass.
8. Stay clear of flowers, shrubs and evergreen trees when
spraying to prevent contact of the solution with these sensitive
plants.
USING THE SPRAY GUN
9. Shut off the boom by turning the boom valve to "OFF".
MAINTENANCE
AFTER EACH USE
1. Fill the sprayer part way with water and pump the water
out through the boom assembly and the handgun. Use the
handgun to wash the inside of the tank.
2. Refill the tank about half full with water and a chemical
neutralizer solution and repeat the cleaning instructions
above. Follow the manufacturers instructions for disposal of all
chemicals.
AS NEEDED
3. Periodically clean the tank strainer on the end d the intake hose.
Remove the nylon swivel nut from the hose, pull out the screen
and flush it with water.
4. Periodically clean the strainers in the boom nozzles. Remove the
nozzle, pull out the screen and flush it with water.
WINTER STORAGE
5. Drain all water out of the sprayer, especially the pump and
handgun. These items are prone to damage from freezing
temperatures.
6. Winterize the sprayer by pumping a 50-50 solution of water and
R. V. antifreeze through the boom assembly and the hand gun.
DEUTSCH
SICHERHEIT
1. Lesen Sie, bevor Sie dieses SprQhger_t verwenden, bitte diese
Bedienungsleitung und die des Fahrzeugs durch.
2. Die Bedienung dieses Sprehger_ts durch Kinder ist untersagt.
3. Jemand auf diesem Sprehger_t reiten bzw. sitzen zu lassen ist
strengstens verboten.
4. Halten Sie das Umfeld frei von allen Personen, insbesondere
kleinen Kindern.
5. Lesen Sie sich vor dem Handhaben und Anmengen der
Chemikalien bitte deren Etiketten durch.
6. Bei der Handhabung und Ausbringung von Rasenchemikalien sind
sowohl Augen- als auch Handschutz sowie Schutzkleidung zu
tragen.
7. Nicht an windigen Tagen sprQhen.
8. Seien Sie sich der F_higkeiten Ihres Traktors bewusst. Das
Anh_ngen des Sprehger_ts kann sich u. U. auf das Bremsverhalten
und die Stabilit_t des Traktors auswirken.
9. BITTE BLEIBEN SIE STARKEN GEF,_,LLEN FERN! Bitte schlagen
Sie in der Bedienungsanleitung des Fahrzeugs die Anweisungen
zum sicheren Betrieb an Gef_llen nach.
10.Auf unebenem Terrain und an H_ingen sowie in der N_he von
Gr_ben muss ein Betrieb mit reduzierter Geschwindigkeit erfolgen,
um einen Verlust der Kontrolle zu vermeiden.
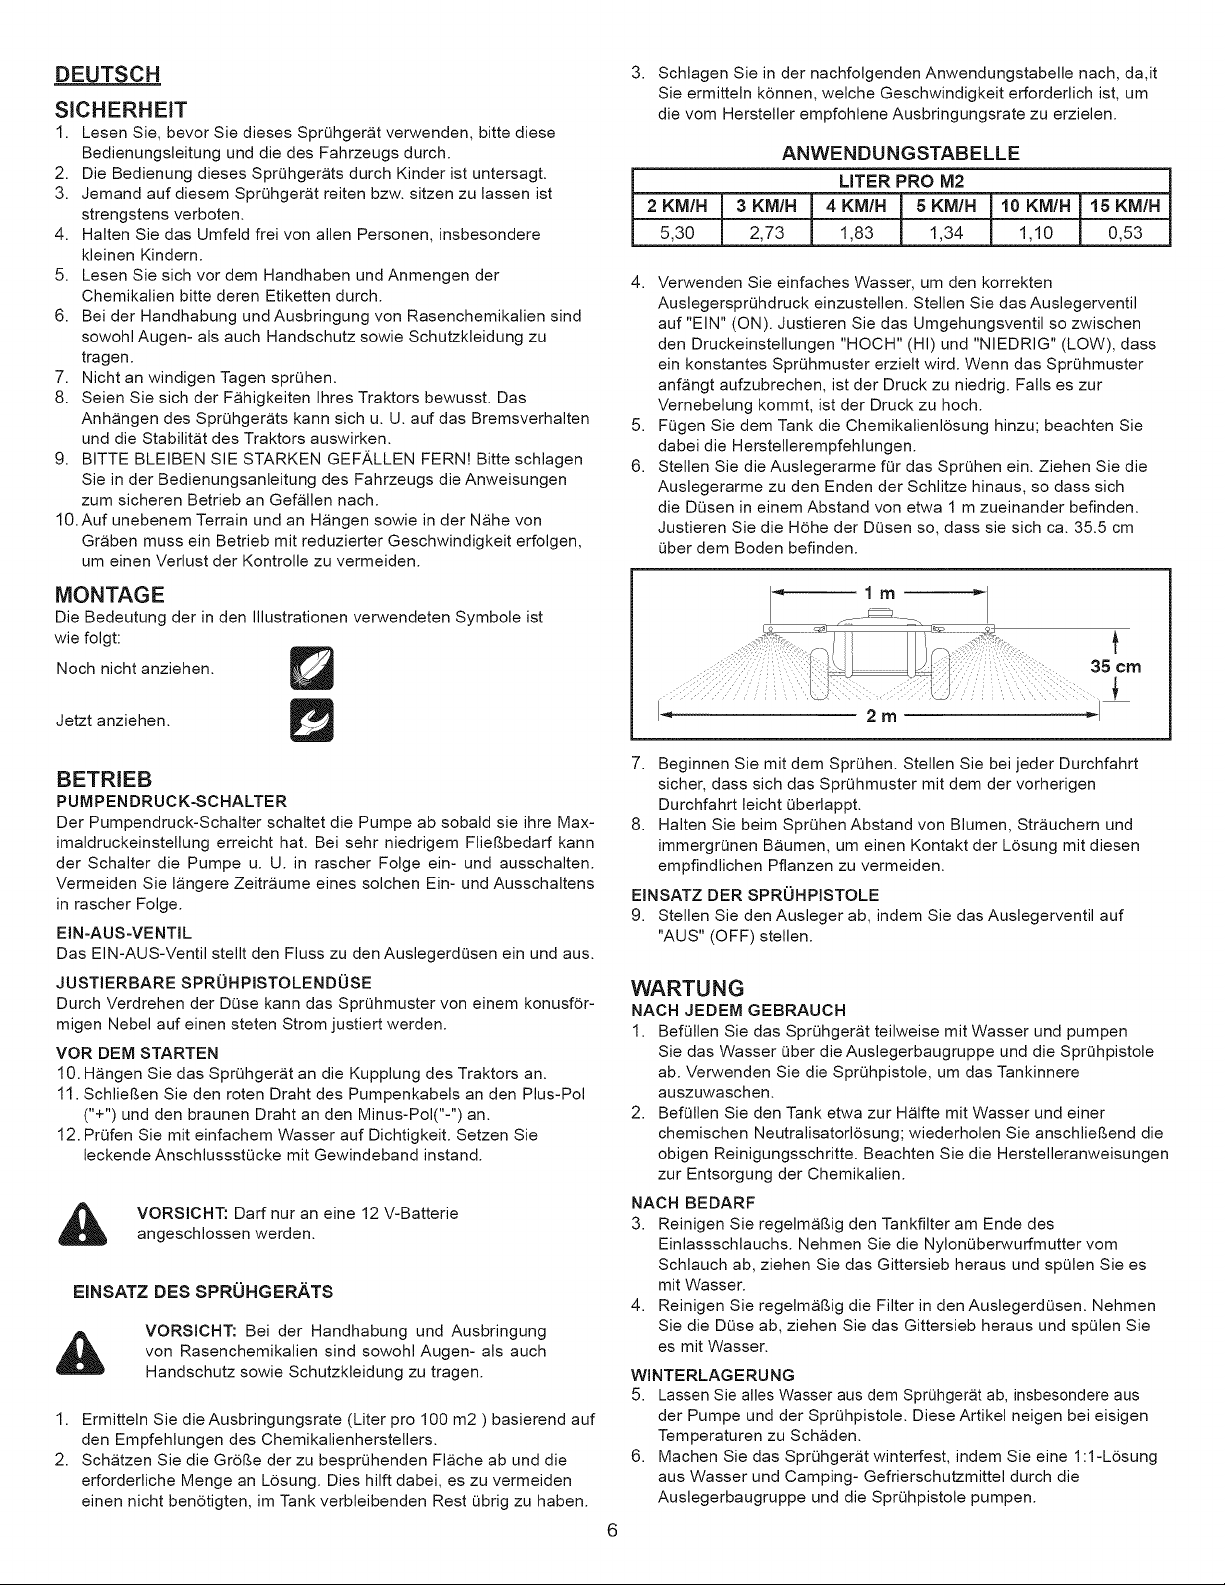
3. Schlagen Sie in der nachfolgenden Anwendungstabelle nach, da,it
Sie ermitteln k6nnen, welche Geschwindigkeit erforderlich ist, um
die vom Hersteller empfohlene Ausbringungsrate zu erzielen.
ANWENDUNGSTABELLE
LITER PRO M2
2KM/H [ 3KM/H j 4KM/H I 5KM/H 110KM/HI15KM/H
4. Verwenden Sie einfaches Wasser, um den korrekten
Auslegerspr0hdruck einzustellen. Stellen Sie das Auslegerventil
auf "EIN" (ON). Justieren Sie das Umgehungsventil so zwischen
den Druckeinstellungen "HOCH" (HI) und "NIEDRIG" (LOW), dass
ein konstantes SprOhmuster erzielt wird. Wenn das SprOhmuster
anf_ngt aufzubrechen, ist der Druck zu niedrig. Falls es zur
Vernebelung kommt, ist der Druck zu hoch.
5. FOgen Sie dem Tank die Chemikalienl6sung hinzu; beachten Sie
dabei die Herstellerempfehlungen.
6. Stellen Sie die Auslegerarme for das SprOhen ein. Ziehen Sie die
Auslegerarme zu den Enden der Schlitze hinaus, so dass sich
die DQsen in einem Abstand von etwa 1 m zueinander befinden.
Justieren Sie die H6he der DOsen so, dass sie sich ca. 35.5 cm
Ober dem Boden befinden.
MONTAGE
Die Bedeutung der in den Illustrationen verwendeten Symbole ist
wie folgt:
Noch nicht anziehen.
Jetzt anziehen.
BETRIEB
PUMPENDRUCK-SCHALTER
Der Pumpendruck-Schalter schaltet die Pumpe ab sobald sie ihre Max-
imaldruckeinstellung erreicht hat. Bei sehr niedrigem Flief_bedarf kann
der Schalter die Pumpe u. U. in rascher Folge ein- und ausschalten.
Vermeiden Sie I_ngere Zeitr_ume eines solchen Ein- und Ausschaltens
in rascher Folge.
EIN-AUS-VENTIL
Das EIN-AUS-Ventil stellt den Fluss zu den Auslegerdesen ein und aus.
JUSTIERBARE SPROHPISTOLENDOSE
Durch Verdrehen der DQse kann das Sprehmuster yon einem konusf6r-
migen Nebel auf einen steten Strom justiert werden.
VOR DEM STARTEN
10. H_ngen Sie das SprQhger_t an die Kupplung des Traktors an.
11. Schliel_en Sie den roten Draht des Pumpenkabels an den Plus-Pol
("+") und den braunen Draht an den Minus-Pol("-") an.
12. PrOfen Sie mit einfachem Wasser auf Dichtigkeit. Setzen Sie
leckende AnschlussstQcke mit Gewindeband instand.
VORSICHT: Dart nur an eine 12 V-Batterie
angeschlossen werden.
EINSATZ DES SPROHGERATS
VORSICHT: Bei der Handhabung und Ausbringung
von Rasenchemikalien sind sowohl Augen- als auch
Handschutz sowie Schutzkleidung zu tragen.
1. Ermitteln Sie die Ausbringungsrate (Liter pro 100 m2 ) basierend auf
den Empfehlungen des Chemikalienherstellers.
2. Sch_itzen Sie die Gr6r_e der zu besprQhenden Fl_che ab und die
erforderliche Menge an LSsung. Dies hilft dabei, es zu vermeiden
einen nicht ben6tigten, im Tank verbleibenden Rest ebrig zu haben.
1 m
21TI
7. Beginnen Sie mit dem Sprehen. Stellen Sie bei jeder Durchfahrt
sicher, dass sich das SprQhmuster mit dem der vorherigen
Durchfahrt leicht Qberlappt.
8. Halten Sie beim SprOhen Abstand von Blumen, Str_uchem und
immergrOnen B_umen, um einen Kontakt der L6sung mit diesen
empfindlichen Pfianzen zu vermeiden.
EINSATZ DER SPRUHPISTOLE
9. Stellen Sie den Ausleger ab, indem Sie das Auslegerventil auf
"AUS" (OFF) stellen.
WARTUNG
NACH JEDEM GEBRAUCH
1. BefQIlen Sie das SprQhger_t teilweise mit Wasser und pumpen
Sie das Wasser Qber die Auslegerbaugruppe und die SprQhpistole
ab. Verwenden Sie die Sprehpistole, um das Tankinnere
auszuwaschen.
2. Befellen Sie den Tank etwa zur H_ilfte mit Wasser und einer
chemischen Neutralisatorl6sung; wiederholen Sie anschlier_end die
obigen Reinigungsschritte. Beachten Sie die Herstelleranweisungen
zur Entsorgung der Chemikalien.
NACH BEDARF
3. Reinigen Sie regelm_l_ig den Tankfilter am Ende des
Einlassschlauchs. Nehmen Sie die Nyloneberwurfmutter vom
Schlauch ab, ziehen Sie das Gittersieb heraus und spQlen Sie es
mit Wasser.
4. Reinigen Sie regelm_l_ig die Filter in den Auslegerdesen. Nehmen
Sie die DQse ab, ziehen Sie das Gittersieb heraus und spQlen Sie
es mit Wasser.
WINTERLAGERUNG
5. Lassen Sie alles Wasser aus dem SprOhger_t ab, insbesondere aus
der Pumpe und der SprOhpistole. Diese Artikel neigen bei eisigen
Temperaturen zu Sch_den.
6. Machen Sie das SprQhger_it winterfest, indem Sie eine 1:l-L6sung
aus Wasser und Camping- Gefrierschutzmittel durch die
Auslegerbaugruppe und die Sprehpistole pumpen.
FRANGAIS
S#CURIT#
1. LiFe entierement le present manuel et le manuel du vehicule
avant d'utitiser ce pulverisateur.
2. Ne jamais laisser d'enfants faire fonctionner ce putverisateur.
3. Ne taisser personne monter sur ce pulverisateur pendant son
fonctionnement, ni s'asseoir dessus.
4. S'assurer qu'it n'y a personne dans la zone, en particulier de
jeunes enfants.
5. Lire tes etiquettes des produits chimiques avant toute
manipulation ou melange de ceux-ci.
6. Porter des tunettes protectrices et des gants pendant la
manipulation et l'epandage de produits chimiques pour petouse.
7. Ne pas pulveriser quand it y a du vent.
8. Faire attention aux capacites de votre tracteur. Le remorquage
de ce pulverisateur risque de reduire les capacites de freinage
et ta stabitite de votre tracteur.
9. F_VITER LES FORTES PENTES. Consulter tes instructions
relatives a ta securit6 de fonctionnement sur tes pentes qui
figurent dans le manuel d'utitisation du tracteur.
10. Rouler a vitesse reduite en terrain difficile, le long de fosses et
sur les pentes, pour eviter toute perte de contr6te.
ASSEMBLAGE
On trouvera ci-dessous l'explication des symboles figurant dans les
illustrations :
Ne pas serrer a ce stade.
Serrer maintenant.
3,
Consulter le tableau d'application ci-dessous pour determiner
la vitesse correspondant au taux d'application preconis6 par le
fabricant du produit.
TABLEAU D'APPLICATION
LITRES / 100 M2 ]
2 KM/H
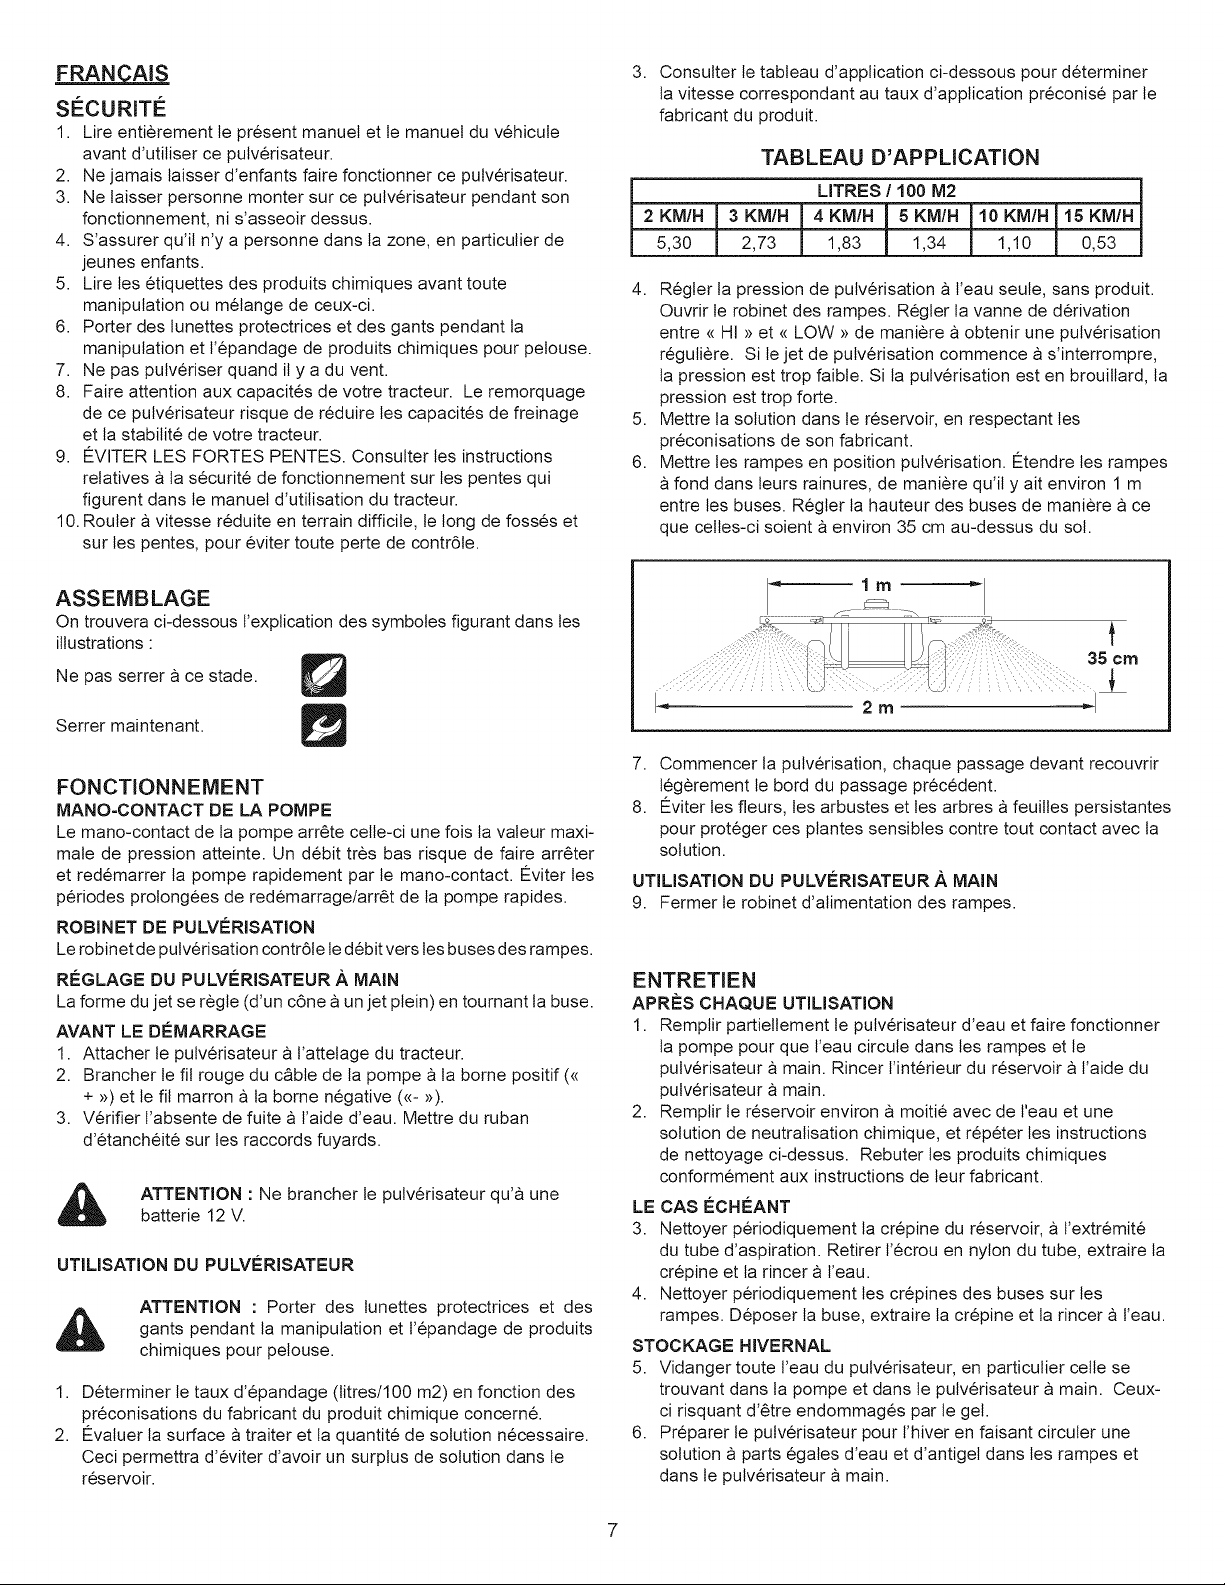
4. Regter la pression de pulverisation a t'eau seule, sans produit.
5. Mettre la solution dans te reservoir, en respectant les
6. Mettre les rampes en position pulverisation. Fi:tendre les rampes
j 3KM/. j 4 KM/. J SKM/H110KM/. JlSKM
5,30
! ,73 !1, 3 ! 1,3 !1,10 I0,531
Ouvrir te robinet des rampes. Regler la vanne de derivation
entre <<HI >>et <<LOW >>de maniere a obtenir une pulverisation
reguliere. Site jet de putverisation commence a s'interrompre,
la pression est trop faibte. Si ta pulverisation est en brouitlard, la
pression est trop forte.
preconisations de son fabricant.
fond dans teurs rainures, de maniere qu'it y ait environ 1 m
entre les buses. Regter la hauteur des buses de maniere ace
que celtes-ci soient a environ 35 cm au-dessus du sol.
cm
I-= 2 ITI _l
FONCTIONNEMENT
MANO-CONTACT DE LA POMPE
Le mano-contact de ta pompe arrete cetle-ci une fois ta valeur maxi-
male de pression atteinte. Un debit tres bas risque de faire arreter
et redemarrer la pompe rapidement par le mano-contact. €:viter tes
periodes prolongees de redemarrage/arret de ta pompe rapides.
ROBINET DE PULVERISATION
Le robinet de pulverisation contr61e le debit vers les buses des rampes.
R#GLAGE DU PULVI_RISATEUR .& MAIN
La forme du jet se regte (d'un c6ne a un jet plein) en toumant la buse.
AVANT LE DI_MARRAGE
1. Attacher le pulverisateur a t'attelage du tracteur.
2. Brancher te fJlrouge du c_bte de la pompe a ta borne positif (<<
+ >>)et le fJlmarron a la borne negative (<<->>).
3. Verifier t'absente de fuite a l'aide d'eau. Mettre du ruban
d'etancheite sur les raccords fuyards.
ATTENTION : Ne brancher le pulverisateur qu'a une
batterie 12 V.
UTILISATION DU PULVC:RISATEUR
ATTENTION : Porter des tunettes protectrices et des
gants pendant la manipulation et l'epandage de produits
chimiques pour petouse.
1. Determiner le taux d'epandage (titres/100 m2) en fonction des
preconisations du fabricant du produit chimique concern&
2. Fi:vatuer la surface a traiter et ta quantite de solution necessaire.
Ceci permettra d'eviter d'avoir un surplus de solution dans le
reservoir.
7. Commencer la pulverisation, chaque passage devant recouvrir
leg@ement le bord du passage precedent.
8. Fi:viterles fleurs, tes arbustes et les arbres a feuitles persistantes
pour proteger ces plantes sensibles contre tout contact avec la
solution.
UTILISATION DU PULVg:RISATEUR A MAIN
9. Fermer le robinet d'alimentation des rampes.
ENTRETIEN
APRES CHAQUE UTILISATION
1. Remplir partietlement le pulverisateur d'eau et faire fonctionner
la pompe pour que t'eau circule dans tes rampes et te
pulverisateur a main. Rincer l'interieur du reservoir a l'aide du
putverisateur a main.
2. Remplir le reservoir environ a moitie avec de t'eau et une
solution de neutralisation chimique, et repeter tes instructions
de nettoyage ci-dessus. Rebuter les produits chimiques
conformement aux instructions de leur fabricant.
LE CAS ECHg:ANT
3. Nettoyer periodiquement la crepine du reservoir, a t'extremite
du tube d'aspiration. Retirer t'ecrou en nylon du tube, extraire la
crepine et la rincer a l'eau.
4. Nettoyer periodiquement les crepines des buses sur les
rampes. Deposer ta buse, extraire la crepine et la rincer a l'eau.
STOCKAGE NIVERNAL
5. Vidanger toute l'eau du pulverisateur, en particulier cette se
trouvant dans ta pompe et dans le pulverisateur a main. Ceux-
ci risquant d'etre endommages par le get.
6. Preparer le putverisateur pour l'hiver en faisant circuler une
solution a parts egales d'eau et d'antiget dans les rampes et
dans le pulverisateur a main.
ITAMANO
SICUREZZA
1. Leggere questo manuale operativo e quetto det veicolo prima di
usare l'irroratore.
2. Non permettere mai ai bambini di usare questo irroratore.
3. Vietare a chiunque di farsi un giro o di sedersi su questo
irroratore.
4. Allontanare dall'area di lavoro tutti gti astanti, specie i bambini
piccoli.
5. Leggere retichetta det prodotto chimico prima di maneggiare o
miscelare sostanze chimiche.
6. Indossare guanti, occhiali ed abbigtiamento di protezione
durante la movimentazione e t'applicazione di sostanze
chimiche per it prato.
7. Non irrorare netle giomate ventose.
8. Bisogna essere consapevoli dette capacita det trattore. I1
rimorchio dett'irroratore puo influire sulla stabitita e sulla frenata
det mezzo.
9. EVITARE I PENDII TROPPO SCOSCESI! Per indicazioni sul
funzionamento sicuro sui pendii, fare riferimento al manuale det
veicolo.
10.Azionare t'irroratore a vetocita ridotta su terreni sconnessi,
in collina o in vicinanza di fossi, in modo da non perdere it
controllo.
MONTAGGIO
Legenda dei simboli dette iltustrazioni:
3,
Vedere la successiva tabetla applicativa per determinare la
velocita richiesta per mantenere la portata applicativa consigtiata
dal produttore.
TABELLA APPLICATIVA
LITRI / 100 M2
2KM/H [ 3KM/H j 4KM/H 5KM/H 10KM/H__lSKM/H
5,30 [ 2,73 [ 1,83 1,34 1,10 1 0,53
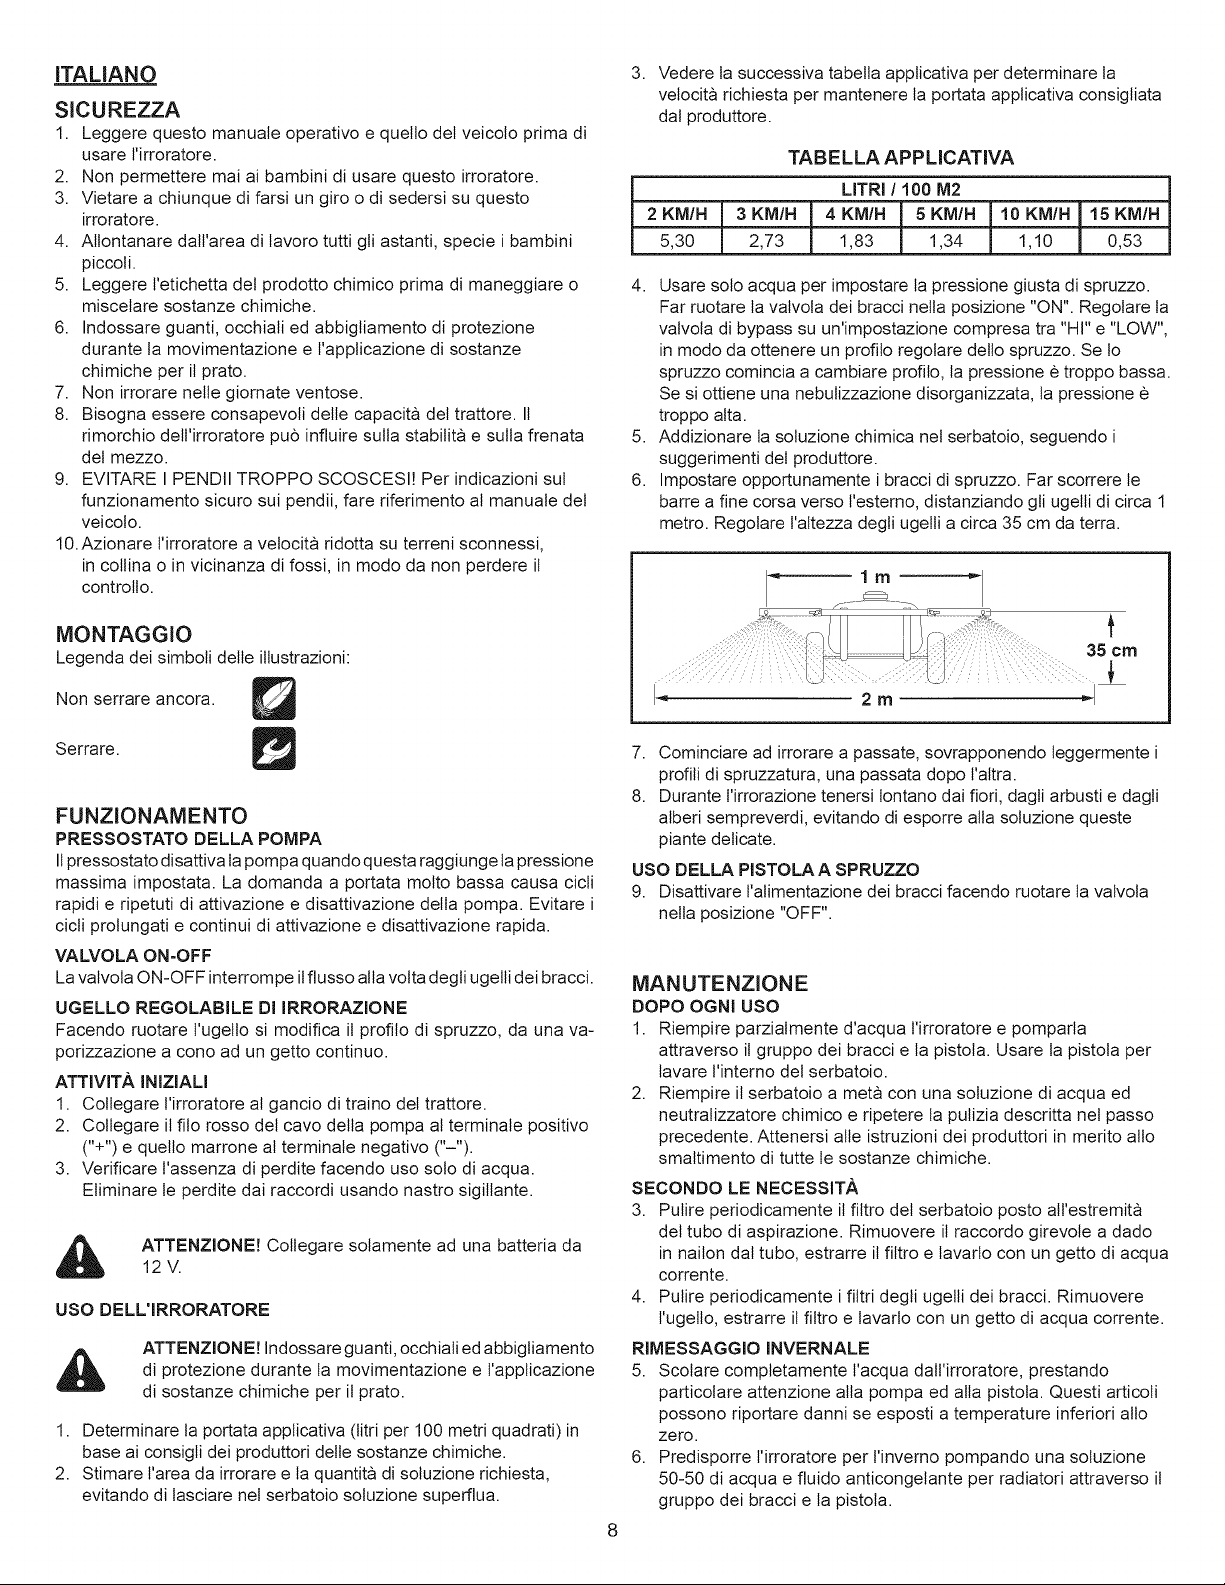
4. Usare solo acqua per impostare la pressione giusta di spruzzo.
Far ruotare la valvoia dei bracci netla posizione "ON". Regolare ta
valvoia di bypass su un'impostazione compresa tra "HI" e "LOW",
in modo da ottenere un profilo regolare detlo spruzzo. Se lo
spruzzo comincia a cambiare profilo, la pressione 6 troppo bassa.
Se si ottiene una nebulizzazione disorganizzata, la pressione 6
troppo alta.
5. Addizionare la soluzione chimica net serbatoio, seguendo i
suggerimenti del produttore.
6. Impostare opportunamente i bracci di spruzzo. Far scorrere le
barre a fine corsa verso l'esterno, distanziando gli ugelti di circa 1
metro. Regolare l'altezza degti ugetti a circa 35 cm da terra.
Non serrate ancora.
Serrate.
FUNZIONAMENTO
PRESSOSTATO DELLA POMPA
I1pressostato disattiva la pompa quando questa raggiunge ta pressione
massima impostata. La domanda a portata molto bassa causa cicti
rapidi e ripetuti di attivazione e disattivazione della pompa. Evitare
cicti prolungati e continui di attivazione e disattivazione rapida.
VALVOLA ON-OFF
La valvola ON-OFF interrompe itflusso alta volta degti ugelti dei bracci.
UGELLO REGOLABILE DI IRRORAZIONE
Facendo ruotare t'ugelto si modifica il profilo di spruzzo, da una va-
porizzazione a cono ad un getto continuo.
ATTIVITA INIZIALI
1. Collegare l'irroratore al gancio di traino det trattore.
2. Collegare it filo rosso del cavo della pompa al terminale positivo
("+") e quetlo marrone al terminale negativo ("-").
3. Verificare t'assenza di perdite facendo uso solo di acqua.
Eliminate le perdite dai raccordi usando nastro sigittante.
ATTENZIONE! Collegare solamente ad una batteria da
12V.
USO DELL'IRRORATORE
ATTENZJONE! Indossare guanti, occhiali ed abbigtiamento
di protezione durante ta movimentazione e l'applicazione
di sostanze chimiche per it prato.
1. Determinate la portata applicativa (titri per 100 metri quadrati)in
base ai consigti dei produttori dette sostanze chimiche.
2. Stimare rarea da irrorare eta quantita di soluzione richiesta,
evitando di lasciare nel serbatoio soluzione superflua.
2m
7. Cominciare ad irrorare a passate, sovrapponendo leggermente i
profiti di spruzzatura, una passata dopo l'altra.
8. Durante t'irrorazione tenersi tontano dai fiori, dagti arbusti e dagti
alberi sempreverdi, evitando di esporre alia soluzione queste
piante delicate.
USO DELLA PISTOLA A SPRUZZO
9. Disattivare l'atimentazione dei bracci facendo ruotare la valvola
netta posizione "OFF".
MANUTENZIONE
DOPO OGNI USO
1. Riempire parzialmente d'acqua rirroratore e pomparta
attraverso it gruppo dei bracci e la pistola. Usare la pistola per
lavare l'intemo det serbatoio.
2. Riempire it serbatoio a meta con una soluzione di acqua ed
neutralizzatore chimico e ripetere la pulizia descritta net passo
precedente. Attenersi alle istruzioni dei produttori in merito alto
smaltimento di tutte te sostanze chimiche.
SECONDO LE NECESSITA
3. Pulire periodicamente it filtro det serbatoio posto alrestremita
det tubo di aspirazione. Rimuovere it raccordo girevole a dado
in naiton dal tubo, estrarre it filtro e lavarlo con un getto di acqua
corrente.
4. Pulire periodicamente i filtri degli ugetli dei bracci. Rimuovere
l'ugelto, estrarre it filtro e lavarlo con un getto di acqua corrente.
RIMESSAGGIO INVERNALE
5. Scotare completamente t'acqua dall'irroratore, prestando
particolare attenzione alia pompa ed alia pistota. Questi articoli
possono riportare danni se esposti a temperature inferiori allo
zero.
6. Predisporre l'irroratore per l'invemo pompando una sotuzione
50-50 di acqua e fluido anticongetante per radiatori attraverso it
gruppo dei bracci e la pistola.
 Loading...