

Page 1

@agptek.fans
@AGPTEK_fans
agptek.fans
AGPTEK
AGPTEK Official AGPTEK Forum
Follow us at:
Visit agptek.com to know more about us.
Contact us: support@agptek.com.
English 01/13
Deutsch 14/29
Françai 30/45
日本語 46/58
W2 User Manual
Page 2

To find out how to use W2 or if you have a problem, please refer to Quick
Guide. The color of W2 sold in other countries/areas may differ from the color
shown in this manual.
Before Use
1. Thank you for purchasing the W2 Digital Audio Player produced by
AGPTEK. Before using the player, please read the manual carefully. If you have
any question or any idea about this product, please email
support@agptek.com. We look forward to hearing from you!
2. We strongly suggest you to back up the data in case there is accident
happening on the Digital Audio Player. We are afraid that we could not bear
responsibilities for data loss due to mistaken operation or hardware damage.
3. Generally wear at 1-2 finger width from wrist join. It is not recommended to
wear tightly and does not shake. Otherwise, it will affect the blood circulation
and Bluetooth connection. Once the Bluetooth connection is affected, the
effect of music playback via Bluetooth will be affected accordingly.
4. With the functions of sweat proof, it can be used in daily exercise. Do not
use in bath, sauna, hot spring or other hot environments with hot water and
steam, which will lead to product failure. Owing to the action of water pressure,
do not wear it while swimming or diving.
Note
It is recommended to clean the player regularly with a soft, lint-free cloth.
Always place the player out of reach of children and it is not allowed to use
alone by kids.
Do not use the player in a humid environment. This player may not work
properly or shorten its service life because of moisture.
Charge the Player
THIS PLAYER DOES NOT SUPPORT QUICK CHARGE.
Please charge this player before use. It takes two hours to fully charge.
1
2
Page 3

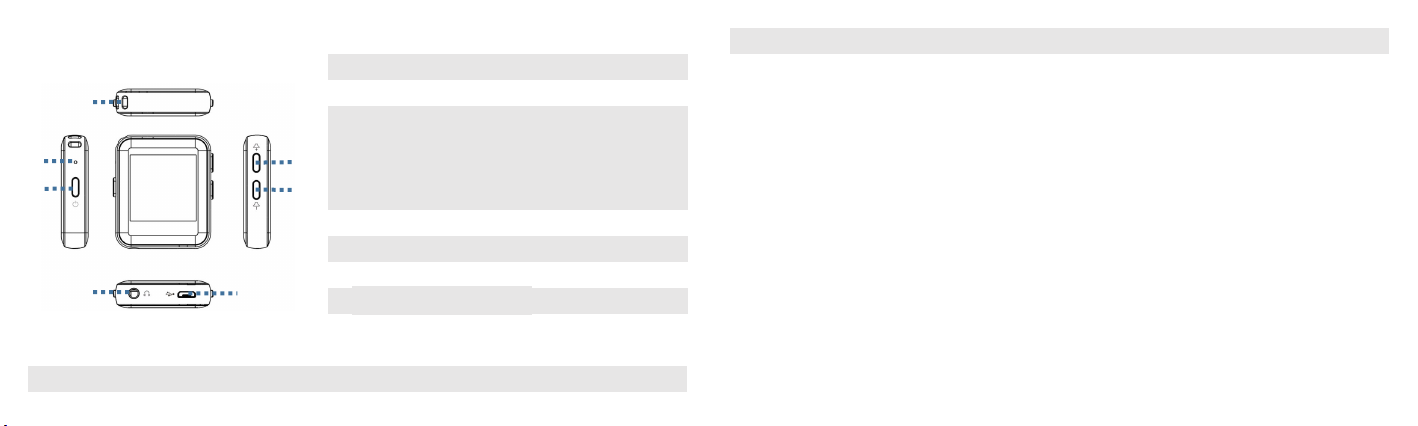
Buttons and Control
1. Lanyard hole.
2. Mic.
3. Power button: Hold for 3s to turn
on/off the player; When it is on, press to
turn on/off the screen.
4. Volume+.
5. Volume-.
6. Earphone jack.
7. Micro USB port.
8. Home: Activating the screen, tap it to
enter into the Home menu.
9. Return: Swipe right on this screen.
Music
Playing music via Bluetooth
Make sure your device's Bluetooth is in pairing before turning on player's
Bluetooth. Find Bluetooth in Home menu and tap its icon to access to Bluetooth
of player, and then this player will automatically search for devices for about 10s
that can be connected. After a successful search, select the device that you
would like to connect.
Note: If you want to make the Bluetooth of this player being on, please make
sure that Bluetooth on/off memory is on. Every time you boot up this player, its
Bluetooth will turn on automatically and connect your device automatically that
had been connected before.(Ensure your device's Bluetooth is on.)
Features:
The related list will show, including: All Songs, Artists, Albums, Playlists, Update
playlist. Tap any one of these choices you wan to access to its function.
3
①
③
④
⑤
②
⑦
⑥
4
Page 4

1. "Now playing/Last played". Take you back to the song or audio file you are
playing now or played last time.
2. "Update Playlist". Updatemusic file.
3. "Rewind/Forward". While it's on music playing interface, hold the button
to fast forward, click to next music file; hold the button to fast rewind,
click to the previous song files. Click button to play/pause.
Submenu
While it's on music playing interface, click button to access to the submenu.
The related list will show:
1. "Home". Go back to home menu.
2. "Play mode". Choose play mode: Shuffle, Repeat playlist, Repeat
one, Play by playlist, Viewplaying, Playlists auto switch.
Note: "View playing". The player would only play the first 10 seconds of a
track and then skip next one if you select this option.
"Playlists auto switch". After playing a song of a folder, the song of the next
folder is automatically played.
3. "Equalizer". Set Equalizer.(Off,Rock, Funk, Hip hop, Jazz, Classical,Techno)
4. "Lyrics display". Choose turn on or off the lyrics, off by default.
5. Resume. Take you back to the song or audio file you are played last time or
playing now.
6. "Bookmarks". Choose to add, delete or go to bookmark.
7. "Repeat settings". Choose A-B repeat settings and set replay times and
interval.
8. "Delete". Choose to delete the song that is playing now.
9. "Add to playlist"/"Remove from playlist". Choose to add to or remove from
the 3 playlists.
FM Radio
Two ways to play radio
5
6
Page 5

1. Playing radio via Bluetooth
Make sure your device's Bluetooth is in pairing before turning on player's
Bluetooth. Find Bluetooth in Home menu, and tap its icon to access to
Bluetooth of player, and then this player will automatically search for devices for
about 10s that can be connected. After a successful search, select the device
that you would like to connect.
Note: If you want to make the Bluetooth of this player being on, please make
sure that Bluetooth on/off memory is on. Every time you boot up this player, its
Bluetooth will turn on automatically and connect your device automatically that
had been connected before. (Ensure your device's Bluetooth is on.)
2. Playing radio via wired earphones.
Find "FM Radio" in Home menu and tap the icon of FM radio to access to its
function. You can listen to radio via wired earphones.
Features:
Find "FM radio" on main menu and tap the icon of FM radio to enter to its
function.
While it's on radio playing interface, click to access to its submenu which
includes: Home, Start FM radio recording, Presets, Save to preset, Clear preset,
Auto tune, Tuner Region and FM Recording.
1. Auto tune/save to/Clear preset
(1) "Auto tune". Search stations automatically. You can see the searched
stations in "Presets". While is on radio playing interface, click / to
switch among preset stations.
(2) "Save to preset". Save the station that you are listening to to "Presets" list.
(3) "Clear preset". Click "Clear preset" to enter the Presets, choose the station
you want to clear,and choose "yes" to clear the preset station.
2. FM recording. Choose "Start FM radio recording". Click the interface of
recording to pause/continue. Swipe right on the screen and select "yes" to save
7
8
Page 6

the recording file.
Note:
1. When using the radio function for the first time or when there is no station,
the station can be added by [Presets], [Auto Tune].
2. The FM radio does not support playback by Built-in speaker. There is no
built-in antenna. So it is necessary that the wired earphones or antenna
connect to the 3.5mm port for receiving signals.
3. FM radio supports listening with the wired earphones connection.Wired
earphones listening: Before turning on the FM radio, you should connect to
the wired earphones without wire control for listening.
Clock Screen saver
Find “Settings” in the Home menu via clicking / . Tapthe icon of Settings,
Select and enter into “Display settings”. Click “Screen saver” where a related
list will be displayed: None/Digital clock/Turntable clock. Select any one of two
choices(Digital clock/Turntable clock), the screen will display the corresponding
interface(as the following pictures shown). Note: “Backlight timer”can help you
select the interval (10S/30S/60S/Always on) of Screen saver.
Turntableclock Digital clock
Settings
Find "Settings" on main menu with tapping its icon to enter to its function. A
related list will show, including: Language, Date and time, Display settings,
Volume limit, Information,Format device, Factory settings Shutdownsettings.
9
10
Page 7

1. Date and time. Choose "Date settings" to set date format and date. When
you want to set date, you can tap YY|MM|DD to switch among year|month|day,
and click button / to adjust the value of year|month|day. Set time under
"Time setting" and adjust the time in the same way.
2. Display settings. Set Brightness, Backlight timer and Screen saver.
3. Shutdown settings.
(1) Power off mode: When there is no operation on the device, the device will
shut off automatically when reaches the set time(1-5min);
(2) Sleep timer: The device will shut down automatically when reaches the set
time(5-90min).
4. Information. Check player informationand disk space about your player;
5. Format device/Factory settings. Format the device or restore to factory
settings.
Note:
Before formatting the device, please backup the file so as not to lose any
files.
Specifications:
Size&Weight
42*38*11mm (3.62*1.57*0.35in)/38g
Wristband
TPU; Suitable for wrist: 15-20cm
Screen
1.54inch TFT screen(zinc alloy)
Internal memory
16GB
Bluetooth
YES
Play mode
Repeat one/Repeat all/Shuffle/
Normal/Last played/A-B Repeat
EQ
Rock, Funk, Hiphop, Jazz, Classical, Techno, etc
Languages
English/German/Russian/French/Polish/
Japanese/Chinese/Italian/Spanish etc.
Supporte
Music
MP3/WMA/OGG/APE/FLAC/WAV/
12
11
Page 8

d formats
AAC-LC/ACELP
Recording
MP3: 32/64/128kbps
PCM:512/768/1024/1536kbps
Photo
JPG/BMP/GIF
Ebook
TXT
Music via
Bluetooth
MP3/WMA/APE/FLAC/WAV
Battery
260mAh Li-ion Polymer battery
OS
Windows98/ME/2000/XP/Vista/10/Linux6.2/Mac OS 10.3
Um herauszufinden, wie Sie W2 benutzen oder wenn Sie ein Problem haben,
lesen Sie bitte das Benutzerhandbuch. Die Farbe von W2, die in anderen
Ländern/Gebieten verkauft wird, kann vielleicht von der Farbe in diesem
Benutzerhandbuch abweichen.
Vor dem Gebrauch
1. Vielen Dank für den Kauf des W2 Digital Audio Players von AGPTEK. Bevor
Sie den Player benutzen, lesen Sie bitte zuerst sorgfältig das Handbuch. Wenn
Sie Fragen oder Anregungen zu diesem Produkt haben, senden Sie eine
E-Mail an support@agptek.com. Wir freuen uns von Ihnen zu hören!
2. Wir empfehlen Ihnen dringend, die Daten zu sichern, falls auf dem Digital
Audio Player ein Unfall passiert. Wir befürchten, dass wir die Verantwortung
für Datenverluste aufgrund von Fehlbedienung oder Hardwareschäden nicht
übernehmen können.
3. Tragen Sie im Allgemeinen 1-2 Fingerbreite vom Handgelenk. Es wird nicht
14
13
Page 9

empfohlen, sehr fest zu tragen und nicht zu rütteln. Andernfalls wird der
Blutkreislauf und die Bluetooth-Verbindung beeinträchtigt. Wenn die
Bluetooth-Verbindung betroffen ist, wird der Effekt der Musikwiedergabe über
Bluetooth entsprechend beeinflusst.
4. Mit Anti-Schweiß-Funktion kann es im täglichen Training verwendet
werden. Nicht in Bädern, Saunen, heißen Quellen oder anderen heißen
Umgebungen mit heißem Wasser und Dampf verwenden, da dies zu
Produktfehlern führen kann. Tragen Sie es aufgrund des Wasserdrucks nicht
beim Schwimmen oder Tauchen.
Hinweis
Es wird empfohlen, den Player regelmäßig mit einem weichen, fusselfreien
Tuch zu reinigen.
Stellen Sie den Player immer außerhalb Reichweite von Kindern und es ist
nicht erlaubt, ihn alleine zu benutzen.
Verwenden Sie den Player nicht in einer feuchten Umgebung. Dieser Player
funktioniert möglicherweise nicht richtig oder verkürzt seine
Lebensdauer aufgrund von Feuchtigkeit.
Laden Sie den Player auf
DIESER MP3 PLAYER UNTERSTÜTZT KEINE SCHNELLE AUFLADUNG.
Laden Sie den Player vor dem Gebrauch auf. Das vollständige Aufladen
dauert 2 Stunden.
Auflademethode: Laden Sie ihn bitte mit 5V 500mA Ladegerät/durch
Computer USB 2.0 oder 3.0 Port auf.
Ladezeit: 2-2,5 Stunden.
16
15
Page 10
Tasten und Kontrolle
1. Lanyard Loch.
2. Mikrofon.
3. Ein-/Ausschalter: Halten Sie 3s
gedrückt, um Player ein-/auszuschalten;
Wenn es eingeschaltet ist, drücken Sie, um
Bildschirm ein-/auszuschalten.
4. Lautstärke+.
5. Lautstärke-.
6. Kopfhörerbuchse.
7. Micro USB Anschluss.
8. Home: Wenn der Bildschirm aktiviert ist, tippen Sie auf den Bildschirm, um
das Hauptmenü aufzurufen.
9. Zurück: Streichen Sie rechts auf dem Bildschirm.
Musik
Musikwiedergabe über Bluetooth
Stellen Sie sicher, dass sich das Bluetooth Ihres Geräts
im Paarung-Modus befindet, bevor Sie die Bluetooth-Funktion des Players
einschalten. Suchen Sie Bluetooth im Hauptmenü und tippen Sie auf das
Symbol, um auf Bluetooth des Players zuzugreifen. Der Player sucht dann
automatisch nach Geräten für ca. 10 Sekunden, die angeschlossen werden
können. Wählen Sie nach einer erfolgreichen Suche das Gerät aus, zu dem Sie
eine Verbindung herstellen möchten.
Hinweis: Wenn Sie Bluetooth für diesen Player aktivieren möchten, stellen Sie
sicher, dass Bluetooth Ein/Aus Speichern aktiviert ist. Bei jedem Start dieses
Players wird Bluetooth automatisch eingeschaltet und verbinden Sie Ihr Gerät
automatisch mit dem zuvor verbundenen Gerät. (Stellen Sie sicher, dass das
Bluetooth Ihres Geräts eingeschaltet ist.)
①
③
④
⑤
②
⑦
⑥
17
18
Page 11

Eigenschaften:
Die Themenliste wird angezeigt: Alle Titel, Interpreten, Alben, Playlists, Playlist
aktualisieren. Tippen Sie auf eine dieser Optionen, um auf ihre Funktion
zuzugreifen.
1. "Aktueller Titel/Letzter Titel". Führt Sie zu dem Titel oder der Audiodatei
zurück, die Sie gerade oder zuletzt abgespielthaben.
2. "Playlist aktualisieren". Musikdatei aktualisieren.
3. "Rücklauf/Vorlauf". Während es auf der Musikschnittstelle läuft, halten Sie
die Taste gedrückt, um schnell vorzuspulen, klicken, auf die nächste
Datei; halten Sie die Taste , um schnell zurückzuspulen, klicken, auf die
vorherige Datei. Klicken Sie die Taste , um abzuspielen oder zu
pausieren.
Untermenü
Während es auf der Musikschnittstelle läuft, klicken Sie die Taste , um das
Untermenü aufzurufen.
Die Themenliste wird angezeigt:
1. "Hauptmenü". Gehen Sie zurück zum Hauptmenü.
2. "Wiedergabemodus". Wählen Sie den Wiedergabemodus: Shuffle,
Wiederholen die Playlist, Titel Wiederholen, Abspielen nach Playlist,
Durchblättern und Starten, Ordnern auto umschalten.
Hinweis: "Durchblättern und Starten". Der Spieler würde nur die ersten 10
Sekunden eines Titels spielen und dann die nächste überspringen, wenn Sie
diese Option auswählen.
"Ordnern auto umschalten". Nach dem Abspielen eines Liedes eines
Ordners wird automatisch das Lied des nächsten Ordners abgespielt.
3. "Equalizer". Equalizer einstellen (Aus, Rock, Funk, Hip Hop, Jazz, Klassik,
Techno).
4. "Liedtext zeigen". Wählen Sie den Text ein- oder ausschalten, standardmäßig
20
19
Page 12

deaktiviert.
5. "Letzter Titel". Führt Sie zu dem Titel oder der Audiodatei zurück, die Sie
gerade oder zuletzt abgespielt haben.
6. "Lesezeichen". Wählen Sie Lesezeichen hinzufügen, löschen oder wechseln.
7. "Wiederholundseinstellung". Wählen Sie die Wiederholungseinstellung und
legen Sie die Wiederholungszeit und Wiederholungsintervall fest.
8. "Löschen". Löschen Sie das gerade abgespielte Lied.
9. "Zur Wiedergabeliste hinzufügen"/"Aus Wiedergabeliste". Wählen Sie das
Hinzufügen oder Entfernen aus den 3 Wiedergabelisten.
UKW-Radio
Zwei Möglichkeiten, um Radio zu spielen
1. Radio über Bluetooth spielen
Stellen Sie sicher, dass sich das Bluetooth Ihres Geräts
im Paarung-Modus befindet, bevor Sie die Bluetooth-Funktion des Players
einschalten. Suchen Sie Bluetooth im Hauptmenü und tippen Sie auf das
Symbol, um auf Bluetooth des Players zuzugreifen. Der Player sucht dann
automatisch nach Geräten für ca. 10 Sekunden, die angeschlossen werden
können. Wählen Sie nach einer erfolgreichen Suche das Gerät aus, zu dem Sie
eine Verbindung herstellen möchten.
Hinweis: Wenn Sie Bluetooth für diesen Player aktivieren möchten, stellen Sie
sicher, dass Bluetooth Ein/Aus Speichern aktiviert ist. Bei jedem Start dieses
Players wird Bluetooth automatisch eingeschaltet und verbinden Sie Ihr Gerät
automatisch mit dem zuvor verbundenen Gerät. (Stellen Sie sicher, dass das
Bluetooth Ihres Geräts eingeschaltet ist.)
2. Radio über kabelgebundene Kopfhörerspielen.
Suchen Sie im Hauptmenü nach "UKW-Radio" und tippen Sie auf das Symbol
des UKW-Radios, um auf seine Funktion zuzugreifen. Sie können Radio über
kabelgebundene Ohrhörer hören.
22
21
Page 13

Eigenschaften:
Suchen Sie im Hauptmenü nach "UKW-Radio" und tippen Sie auf das Symbol
für UKW-Radio, um seine Funktionaufzurufen.
Während es auf der Radio-Schnittstelle läuft, klicken Sie auf , um auf das
entsprechende Untermenü zuzugreifen: Hauptmenü, UKW-Radio starten,
Voreinst., Als Voreinst. Speichern, Voreinstellung löschen, Autom. Einst.,
Bandabstimmung und UKW-Aufnahme.
1. Autom. Einst./Als Voreinst. Speichern/Voreinstellung löschen
(1) "Autom. Einst.". Sie können die gesuchten Sender in "Voreinst." sehen.
Während es auf der Radio-Schnittstelle läuft, klicken Sie auf / , um
zwischenvoreingestellten Sendern zu wechseln.
(2) "Als Voreinst. Speichern". Speichern Sie den Sender,den Sie gerade hören,
in der Liste "Voreinst.".
(3) "Voreinstellung löschen". Klicken Sie auf "Voreinstellung löschen", um die
Voreinstellungen aufzurufen, wählen Sie den Sender aus, den Sie löschen
möchten, und wählen Sie "Ja", um den voreingestellten Sender zu löschen.
2. UKW-Aufnahme. Wählen Sie "Aufnahme vom UKW-Radio starten". Klicken
Sie auf die Aufzeichnungsoberfläche, um die Wiedergabe
anzuhalten/fortzusetzen. Streichen Sie rechts auf dem Bildschirm und
wählen Sie "Ja", um die Aufnahmedatei zu speichern.
Hinweis:
1. Wenn Sie die Radiofunktion zum ersten Mal verwenden oder kein Sender
vorhanden ist, können Sie den Sender mit [Voreinst.], [Autom. Einst.]
hinzufügen.
2. Das UKW-Radio unterstützt die Wiedergabe über den eingebauten
Lautsprecher nicht. Es gibt keine eingebaute Antenne. Daher ist es erforderlich,
dass die kabelgebundene Kopfhörer oder die Antenne an den 3,5mm
Anschluss angeschlossen werden, um Signale zu empfangen.
24
23
Page 14

3. Das UKW-Radio unterstützt das Hören mit dem Kopfhöreranschluss.
Kabelgebundene Kopfhörer: Bevor Sie das UKW-Radio einschalten, sollten Sie
die Kopfhörer ohne Kabelsteuerung anschließen, um zu hören.
Bildschirmschoner
Disc Uhr Digitaluhr
Suchen Sie im Hauptmenü nach "Einstellungen", indem Sie auf / klicken.
Tippen Sie auf das Symbol "Einstellungen", wählen Sie und geben Sie
"Bildschirmeinstellungen" ein. Klicken Sie auf "Bildschirmschoner", wo eine
Themenliste angezeigt wird: Keine/Digitaluhr/Disc Uhr. Wählen Sie eine von
zwei Optionen (Digitaluhr/Disc Uhr), der Bildschirm wird die entsprechende
Schnittstelle anzeigen (wie die folgende Bilder gezeigt). Hinweis: Mit dem
"Hintergrundbeleuchtung" können Sie das Intervall (10S/30S/60S/Immer an)
des Bildschirmschoners auswählen.
Einstellungen
Suchen Sie im Hauptmenü nach "Einstellungen", indem Sie auf das
entsprechende Symbol tippen, um dessen Funktion aufzurufen. Eine
Themenliste wird angezeigt: Language/Sprache, Datum und Uhrzeit,
Displayeinstellungen, Lautstärkebegrenzung, Informationen, Gerät formatieren,
Werkseinstellungen, Ausschalten Einstellungen.
1. Datum und Uhrzeit. Wählen Sie "Datum einstellen", um das Datumsformat
und das Datum einzustellen. Wenn Sie das Datum einstellen möchten, tippen
Sie auf JJ|MM|TT, um zwischen Jahr|Monat|Tag zu wechseln, und klicken Sie auf
25
26
Page 15

die Tasten / , um den Wert von Jahr|Monat|Tag anzupassen. Stellen Sie
unter "Zeit einstellen" die Zeit ein und stellen Sie die Zeit auf dieselbe Weise ein.
2. Displayeinstellungen. Stellen Sie Helligkeit, Hintergrundbeleuchtung (Timer)
und Bildschirmschoner ein.
3. AusschaltenEinstellungen.
(1) Sleep Timer: Das Gerät wird automatisch ausschalten, wenn die
eingestellte Zeit (5-90min) erreicht ist.
(2) Ausschalten: Wenn das Gerät nicht bedient wird, schaltet sich das Gerät
automatisch aus, wenn die eingestellte Zeit (1-5min) erreicht ist.
4. Informationen. Überprüfen Sie die Informationen und den Speicherplatz
Ihres Players;
5. Gerät formatieren/Werkseinstellungen. Formatieren Sie das Gerät oder
stellen Sie die Werkseinstellungen wieder her.
Hinweis:
Bevor Sie das Gerät formatieren, sichern Sie bitte die Datei, um keine
Dateien zu verlieren.
Spezifikation:
Größe&Gewicht
42*38*11mm (3.62*1.57*0.35 Zoll)/38g
Armband
TPU; Geeignet für das Handgelenk: 15-20cm
Bildschirm
1,54 Zoll TFT-Bildschirm (Zinklegierung)
Interner Speicher
16GB
Bluetooth
JA
Wiedergabe-
modus
Shuffle/Wiederholen die Playlist/Titel
Wiederholen/Abspielen nach Playlist/Durchblättern
und Starten/Ordnern auto umschalten
EQ
Rock, Funk, Hiphop, Jazz, Klassik, Techno usw.
Sprache
Englisch/Deutsch/Russisch/Französisch/Polnisch/
Japanisch/Chinesisch/Italienisch/Spanisch usw.
27
28
Page 16

Unterstütz
te
Formate
Musik
MP3/WMA/OGG/APE/FLAC/
WAV/AAC-LC/ACELP
Aufnahme
MP3: 32/64/128kbps
PCM: 512/768/1024/1536kbps
Foto
JPG/BMP/GIF
E-buch
TXT
Musikformate im
Bluetooth-Modus
MP3/WMA/APE/FLAC/WAV
Batterie
260mAh Li-Ion Polymer Batterie
Betriebssystem
Windows98/ME/2000/XP/Vista/10/Linux6.2/Mac OS
10.3
Pour savoir comment utiliser W2 ou si vous rencontrez un problème, veuillez
vous reporter au Guide rapide. La couleur du W2 vendu dans d'autres
pays/régions peut différer de la couleur indiquée dans ce manuel.
Avant de l'Utilisation
1. Merci d'avoir acheté le lecteur audio numérique W2 fabriqué par AGPTEK.
Avant d'utiliser ce lecteur, veuillez lire attentivement le manuel. Si vous avez
des questions ou des idées sur ce produit, veuillez envoyer un e-mail à
support@agptek.com. Nous sommes toujours dans l'attente de vos lettres!
2. Nous vous suggérons fortement de sauvegarder vos données en cas
d'accident arrivé sur ce lecteur audio numérique. Nous craignons de ne
pouvoir assumer aucune responsabilité en cas de perte de données due à un
fonctionnement erroné ou à des dommages matériels.
3. Portez généralement à une largeur de 1 à 2 doigts à partir de l'articulation
du poignet. Il n'est pas recommandé de le porter trop serré et de l'agiter.
29
30
Page 17

Sinon, cela affectera la circulation sanguine et la connexion Bluetooth. Une
fois que la connexion Bluetooth est affectée, l'effet de la lecture de musique
via Bluetooth sera affecté en conséquence.
4. Avec ses fonctions de protection contre la transpiration, il peut être utilisé
dans l'exercice quotidien. Ne pas utiliser dans un bain, un sauna, une source
d'eau chaude ou tout autre environnement chaud avec de l'eau chaude et de
la vapeur, ce qui pourrait entraîner une défaillance du produit. En raison de
l'action de la pression de l'eau, ne la portez pas lorsque vous nagez ou
plongez.
Remarque
Il est recommandé de nettoyer régulièrement le lecteur avec un chiffon
doux et non pelucheux.
Placez toujours le lecteur hors de portée des enfants et il n'est pas permis
de l'utiliser seul par les enfants.
N'utilisez pas le lecteur dans un environnement humide. Ce lecteur risque
de ne pas fonctionner correctement ou de réduire sa durée de vie en
raison de l'humidité.
Charger ce Lecteur
CE LECTEUR NE SUPPORTE PAS LA CHARGE RAPIDE.
Veuillez charger ce lecteur avant de l'utiliser. Il faut deux heures pour le
charger complètement.
Méthode de charge: Chargé par un chargeur 5V 500mA ; Chargé par le port
USB 2.0 ou 3.0 de l'ordinateur.
Temps de charge: 2-2,5 heures
32
31
Page 18

Boutons et Contrôle
1. Trou du cordon.
2. Mic.
3. Bouton d'alimentation: Maintenez sur
ce bouton pendant 3 secondes pour
allumer/éteindre le lecteur; Lorsqu'il est
allumé, maintenez sur ce bouton pour
allumer/éteindre l'écran.
4. Volume+.
5. Volume-.
6. Prise d'écouteurs.
7. Port micro USB.
Accueil: lorsque vous activez l'écran, appuyez sur l'écran pour accéder au
menu Accueil.
Retour: Balayez vers droite sur l'écra.
Musique
Jouer de la musique via Bluetooth
Assurez-vous que le Bluetooth de votre appareil est en l'état de jumelage avant
d'activer le Bluetooth du lecteur. Recherchez Bluetooth dans le menu d'accueil
et appuyez sur l'icône de Bluetooth pour accéder au Bluetooth du lecteur. Ce
lecteur recherchera automatiquement les appareils pouvant être connectés
pendant environ 10 secondes. Après une recherche réussie, sélectionnez le
périphérique que vous souhaitez connecter.
Remarque: Si vous souhaitez activer le Bluetooth de ce lecteur, assurez-vous
que Switch Bluetooth en mémoire est activée. Chaque fois que vous démarrez
ce lecteur, son Bluetooth s'allume automatiquement et connecte
automatiquement votre appareil déjà connecté (assurez-vous que le Bluetooth
de votre appareil est activé).
①
③
④
⑤
②
⑦
⑥
34
33
Page 19

Caractéristiques:
La liste correspondante s'affichera, y compris:Tous les titres, Artistes, Albums,
Playlists, Renouveler la Playlist. Appuyez sur l'un de ces choix pour accéder à sa
fonction.
1. «En cours de lecture/Dernière lecture». Vous ramène à la chanson ou au
fichier audio que vous êtes en train de lire ou que vous avez lu la dernière fois.
2. «Renouveler la Playlist». Renouveler les fichiers musicaux.
3. «Rembobiner/Avance rapide». Pendant que vous êtes sur l'interface de
lecture de musique, maintenez sur le bouton pour avancer rapidement, le
cliquez pour le fichier musical suivant; Maintenez le bouton pour
rembobiner rapidement, le cliquez pour le fichier musical précédent. Cliquez sur
le bouton pour lire/mettreen pause.
Sous-menu
Pendant qu'il est sur l'interface de lecture de musique, cliquez sur le bouton
pour accéder au sous-menu.
La liste correspondante s'affiche:
1. «Accueil». Retourau menu d'accueil.
2. «Mode de lecture». Choisir le mode de lecture: Aléatoire, Répéter la
playlist, Répéter 1, Lire par playlist, Marche de visualisation,
Lecturedans les lists.
Remarque: «Marche de visualisation». Le lecteur ne jouera que les 10
premières secondes d'un morceau et sautera la suivante si vous sélectionnez
cette option.
«lecture dans les lists». Après la lecture des morceaux d'un dossier, les
morceaux du dossier suivant seront automatiquement lus.
3. «Égaliseur». Réglez l'égaliseur.(Désactivé, Rock, Funk, Hip hop, Jazz, Classique,
Techno)
4. «Affichage des paroles». Choisissez d'activer ou de désactiver les paroles,
36
35
Page 20

désactivé par défaut.
5. Reprendre . Il vous ramène à la chanson ou au fichier audio que vous avez lu
la dernière fois ou que vous jouez maintenant.
6. «Signets». Choisissez d'ajouter, de supprimer ou d'aller au signet.
7. «Paramètres de répétition». Choisissez les paramètres de répétition A-B et
définissez les durées et les intervalles de relecture.
8. «Supprimer». Choisissez de supprimer la chanson en cours de lecture.
9. «Ajouter à playlist»/«Supprimer de la playlist». Choisissez d'ajouter ou de
supprimer des 3 listes de lecture.
Radio FM
Deux façons pour jouer de la radio
1. Jouer de la radio via Bluetooth
Assurez-vous que le Bluetooth de votre appareil est en l'état de jumelage avant
d'activer le Bluetooth du lecteur. Recherchez Bluetooth dans le menu d'accueil
et appuyez sur l'icône de Bluetooth pour accéder au Bluetooth du lecteur. Ce
lecteur recherchera automatiquement les appareils pouvant être connectés
pendant environ 10 secondes. Après une recherche réussie, sélectionnez le
périphérique que vous souhaitez connecter.
Remarque: Si vous souhaitez activer le Bluetooth de ce lecteur, assurez-vous
que Switch Bluetooth en mémoire est activée. Chaque fois que vous démarrez
ce lecteur, son Bluetooth s'allume automatiquement et connecte
automatiquement votre appareil déjà connecté (assurez-vous que le Bluetooth
de votre appareil est activé).
2. Jouer de la radio via les écouteurs filaires.
Recherchez «Radio FM» dans le menu d'accueil et appuyez sur l'icône de la
radio FM pour accéder à cette fonction. Vous pouvez écouter la radio via des
écouteurs filaires.
Caractéristiques:
37
38
Page 21

Recherchez «Radio FM» dans le menu d'accueil et appuyez sur l'icône de la
radio FM pour accéder à cette fonction.
Lorsque vous êtes sur l'interface de lecture radio, cliquez sur pour accéder
à son sous-menu, y compris: Accueil, démarrer l'enreg. Radi., Présél., Enreg.
dans présélection, Effacer présélection, Réglage auto, Plage Fréquences et
Enregistrez FM.
1. Réglage auto/Enreg. dans présélection/Effacer présélection
(1) «Réglage auto». Rechercher les stations automatiquement. Vous pouvez
voir les stations recherchées dans «Présél.». Lorsque vous êtes sur
l'interface de lecture radio, cliquez sur / pour basculer entre les
stationspréréglées.
(2) «Enreg. dans présélection». Save the station that you are listening to to
the «Presets» list.
(3) «Effacer présélection». Cliquez sur «Effacer présélection» pour accéder au
Présél., choisissez la station que vous souhaitez supprimer et choisissez
"oui" pour supprimer la station préréglée.
2. Enregistrement FM. Choisissez «démarrer l'enreg. radi.». Cliquez sur
l'interface d'enregistrement pour mettre en pause/continuer. Balayez vers la
droite sur l'écran et sélectionnez «Oui» pour enregistrer le fichier
d'enregistrement.
Remarque:
1. Lorsque vous utilisez la fonction radio pour la première fois ou il n'y a pas la
station, vous pouvez ajouter la station au [Présél.], [Réglage auto].
2. La radio FM ne supporte pas la lecture par le haut-parleur intégré. Il n'y a
pas d'antenne intégrée. Il est donc nécessaire que les écouteurs ou l'antenne
câblés se connectent au port 3,5 mm pour recevoir les signaux.
3. La radio FM supporte l'écoute avec une connexion des écouteurs filaires.
Écouteurs filaires à l'écoute: Avant d'allumer la radio FM, vous devez le
39
40
Page 22

connecter aux écouteurs filaires sans contrôle de fil pour l'écoute.
Définir
Trouvez «Définir» dans le menu principal en cliquant sur son icône pour accéder
à cette fonction. Une liste correspondante s'affichera, y compris: Langue, Date et
heure, Paramètres d'affichage, Limite de volume, Informations, Formater le
périphérique, Paramètres d'usine, Paramètres d'arrêt.
1. Date et heure. Choisissez «Régl. date» pour définir le format de la date de la
date. Lorsque vous souhaitez définir une date, vous pouvez appuyer sur AA |
MM | JJ pour basculer entre année | mois | jour et cliquer sur le bouton /
pour régler la valeur de année | mois | jour. Définir l'heure sous "Régler heure" et
ajustezl'heure de la même manière.
2. Réglages de l'affichage. Réglez la luminosité, Prog. de rétroéclairage et
l'écran de veille.
3. Paramètres d'arrêt.
(1) Arrêt d'économie d'énergie: En l'absence d'opération sur l'appareil,
l'appareil s'éteint automatiquement lorsqu'il atteint l'heure définie (1-5
minutes).
(2) Arrêt programmé: L'appareil s'éteindra automatiquement lorsqu'il aura
atteint l'heuredéfinie (5-90min).
4. Information. Vérifiez les informations du lecteur et l'espace disque de votre
lecteur;
5. Formater périphérique/Réglages d'usine. Formatez le périphérique ou
restaurez les paramètres d'usine.
Remarque:
Avant de formater le périphérique, sauvegardez le fichier afin de ne
perdreaucun fichier.
Horloge l'écran de veille
Recherchez «Définir» dans le menu Accueil en cliquant sur / . Appuyez sur
l'icône Définir, sélectionnez et entrez dans «Paramètres d'affichage». Cliquez sur
42
41
Page 23

«Écran de veille» pour afficher une liste correspondante: Néant/Horloge
numérique/Horloge tournante. Sélectionnez l'un des deux choix possibles
(Horloge numérique/Horloge tournante), l'écran affiche l'interface
correspondante (voir les images suivantes). Remarque: «Prog. de
rétroéclairage» peut vous aider à sélectionner l'intervalle (10S/30S/60S/Toujours
actif) de l'Écran de veille.
Horloge numérique Horloge tournante
Spécifications
Taille&Poids
42*38*11mm (3.62*1.57*0.35in)/38g
Bracelet
TPU; Convient au poignet: 15-20cm
Écran
Écran TFT de 1,54 pouce (en alliage de zinc)
Mémoire interne
16GB
Bluetooth
OUI
Mode de lecture
Répéter 1/Répéter tout/Aléatoire/Normal/Dernière
lecture/Répéter A-B
EQ
Rock, Funk, Hiphop, Jazz, Classique, Techno, etc
Langues
English/German/Russian/French/Polish/Japanese/
Chinese/Italian/Spanish etc.
Formats supportés
Musique
MP3/WMA/OGG/APE/FLAC/
WAV/AAC-LC/ACELP
44
43
Page 24

Enregistrement
MP3: 32/64/128kbps
PCM: 512/768/1024/1536kbps
Photo
JPG/BMP/GIF
Livre électronique
TXT
Formats de
musique sous le
mode Bluetooth
MP3/WMA/APE/FLAC/WAV
Batterie
260mAh Batterie au Li-ion Polymer
Système
Windows98/ME/2000/XP/Vista/10/Linux6.2/Mac OS
10.3
W2 の使用について、何か問題がございましたら、本書に参照してください。国ま
たは地域によって、販売された W2 の色と本書に示されている色と異なる場合が
あります。
ご使用前に
1. AGPTEK W2 デジタルオーディオプレーヤーをお買い上げ頂きまして、ありがと
うございます。正しく安全にお使いいただくため、ご使用の前に必ず取扱説明書を
よ く お 読 み く だ さ い 。 若 し 何 か ご 質 問 が ご ざ い ま し た ら 、 遠 慮 な く
support@agptek.com までご連絡してください。
2. プレーヤーでデータ紛失などの事故を防ぐために、データをバックアップすることを
強くお勧めします。誤操作やハードウェアの損傷によるデータ損失の責任を負いか
ねます。
3. つけた時にベルト内側に指 1-2 本分の余裕があるサイズをお勧めです。血
液循環と Bluetooth 接続に影響する可能性があるため、きつく着用することと揺
れることはお勧めしません。Bluetooth 接続が不安定になると、Bluetooth モー
46
45
Page 25

ドでの音楽再生効果も影響を受けます。
4. 防汗機能により、毎日の運動で使用できます。製品の故障等の原因となりま
すので、お風呂、サウナ、温泉等温水と蒸気のある環境では使用しないでくださ
い。そして、水泳やダイビング中は着用しないでください。
注意
柔らかい、糸くずがない布で定期的にプレーヤーを清掃して下さい。
各部名前
お子様が届けないところに保管してください。お子様が単独で使用することはで
きません。
プレーヤーが正常に動作できません、または寿命を短くなる可能性があるため、
湿度の高い環境でプレーヤーを使用しないでください。
充電について
本機は快速充電をサポートしません。
ご使用前にプレーヤーをフル充電(2 時間)してください。
1. ランヤードホール
2. Mic
3. 電源ボタン:プレーヤーをオン/オフになるのは、
3 秒間押し続けます。オンになっている時押すと、画
面のオン/オフが切り替わります。
4. 音量+
5. 音量-
6. イヤホンジャック
7. マイクロ USB ポート
8. ホーム:画面を明るくにし、それをクリックしてホ
ームメニューに入ります。
9. 戻る: この画面を右にスワイプします。
48
①
③
④
⑤
②
⑦
⑥
47
Page 26

音楽
Bluetooth モードで音楽を再生
プレーヤーの Bluetooth をオンにする前に、デバイスの Bluetooth がペアリングさ
れていることを確認してください。ホームメニューで Bluetooth を見つけ、そのアイコ
ンをタップしてプレーヤーの Bluetooth にアクセスします。約 10 秒間がかかり接続
可能なデバイスを自動的に検索します。検索が成功したら、接続するデバイスを選
択します。
注意:このプレーヤーの Bluetooth をオンにする場合は、「Bluetooth スイッチの
記憶機能」がオンになっていることを確認してください。起動するたびに、Bluetooth
が自動的にオンになり、以前に接続されていたデバイスが自動的に接続されます
(デバイスの Bluetooth がオンになっていることを確認してください)。
機能:
関連リストはすべての曲、アーティスト、アルバム、プレイリスト、再生リストを作ります
等のを表示されます。
1.「再生中」/「直前に再生した曲」:現在再生中または前回再生した曲または
オーディオファイルに戻ります。
2.「再生リストを作ります」:音楽ファイルを更新します。
3.「巻き戻し」/「早送り」:音楽を再生中界面で ボタンを押したまま早送りし
ます。 ボタンを押したまま巻き戻しします。 ボタンを押すより再生/一
時停止します。
サブメニュー
音楽を再生中界面で、 ボタンを押せばそのサブメニューに入ります。
関連リストが表示される:
1. 「ホームに戻る」:ホームメニューに戻ります。
2. 「再生モード」: シャッフル、 プレイリストをリピート、 1 曲リピート、
プレイリストで再生、 閲覧再生、 フォルダ自動的切り替え。
注意:「閲覧再生」 機能は曲の最初の10秒間しか再生せず
。
「
プレイリストが自動に切り替え」:当該フォルダ内の曲を全部再生完了した後
50
49
Page 27

次のフォルダ内の曲は自動的に再生されます。
3. 「イコライザー」: イコライザーを設定します。(オフ、ロック、ファンク、 ヒップホッ
プ、ジャズ、 クラシカル、テクノ)
4. 「歌詞の表示」:歌詞をオンまたはオフにします。デフォルトではオフです。
5. 「直前に再生した曲」:現在再生中または前回再生した曲/オーディオファイル
に戻ります。
6. 「ブックマーク」:追加、削除、またはブックマークに移動を選択します。
7. 「リピート設定」:A-B リピート、再読回数または再生間隔の設定を選択しま
す。
8. 「削除」:現在再生中の曲を削除することを削除します。
9. 「プレイリストに追加」/「プレイリストから削除」:3 つのプレイリストに追加ま
たは削除することを選択します。
FM ラジオ
2つの再生方法
1. Bluetooth でラジオを再生する
プレーヤーの Bluetooth をオンにする前に、デバイスの Bluetooth がペアリングさ
れていることを確認してください。ホームメニューで Bluetooth を見つけ、そのアイコ
ンをタップしてプレーヤーの Bluetooth にアクセスします。約 10 秒間がかかり接続
可能なデバイスを自動的に検索します。検索が成功したら、接続するデバイスを選
択します。
注意:このプレーヤーの Bluetooth をオンにする場合は、「Bluetooth スイッチの
記憶機能」がオンになっていることを確認してください。起動するたびに、Bluetooth
が自動的にオンになり、以前に接続されていたデバイスが自動的に接続されます
(デバイスの Bluetooth がオンになっていることを確認してください)。
2. 有線イヤホンでラジオを再生する
ホームメニューで「FM ラジオ」を見つけ、FM ラジオというアイコンをタップしてその機能
にアクセスします。有線イヤホンでラジオを再生できます。
機能:
51
52
Page 28

ホームメニューで「FM ラジオ」を見つけ、FM ラジオというアイコンをタップしてその機能
にアクセスします。
ラジオを再生中界面で ボタンを押すよりそのサブメニューに入ります。ホームに
戻る、FM ラジオ録音を開始、プリセット、プリセットに保存、プリセットをクリア、自
動チューニング、周波数範囲、FM 録音等の機能を表示されます。
1.自動チューニング/プリセットに保存/プリセット消去
(1) 「自動チューニング」: 自動的に放送局を検索します。検索した放送局は
「プリセット」で見ることができます。ラジオを再生中界面で / ボタンをクリ
ックしてプリセット局を切り替えます。
(2) 「プリセットに保存」:聞いている放送局を「プリセット」に保存します。
(3) 「プリセットをクリア」:「プリセット消去」をクリックして、ブリセットリストを入力
します。消去したい放送局を選択して、「はい」を選択し、プリセット放送局を
消去します。
2.FM 録音:「FM ラジオ録音を開始」を選択して、録音界面をクリックすると一
時停止/続行する 。画面を右にスワイプし、[はい]を選択して録音ファイルを保
存します。
注意:
1. 初めてラジオ機能を使用するまたは放送局がないときは、「プリセット」、[自動
チューニング]で放送局を追加できます。
2. FM ラジオは、内蔵スピーカーによる再生をサポートしていません。内蔵アンテナ
はありません。 そのため、信号を受信するには、有線イヤホンまたはアンテナを
3.5mm ポートに接続する必要があります。
3. FM ラジオは、有線イヤホン接続での再生をサポートしています。有線イヤホン
で聴く:FM ラジオをオンにする前に、有線イヤホンに接続する必要があります。
時計スクリーンセーバー
/ ボタンをクリックするより、ホームメニューで「設定」を見つけます。設定というア
イコンタップして「表示設定」に入ります。「スクリーンセーバー」をクリックすると、関連
リストは表示される:なし/デジタル時計/ターンテーブルクロック。2つの選択肢(デ
54
53
Page 29

ジタル時計/ターンテーブルクロック)のいずれかを選択すると、対応するインターフェ
イスが表示されます(下図をご参照ください)。注意: 「バックライトタイマー」
は、スクリーンセーバーの間隔(10 秒/30 秒/60 秒/常にオン)を選択できます。
ターンテーブルクロック デジタル時計
設定
ホームメニューで「設定」を見つけ、そのアイコンをタップしてその機能にアクセスします。
関連リストには、言語、日時、表示設定、音量制限、情報、デバイスをフォーマット、
工場出荷時設定、シャットダウン設定などが表示されます。
1. 日時:「日付の設定」を選択して、日付の形式と日付を設定します。 日付を
設定する場合は、YY | MM | DD をタップして年|月|日を切り替え、 / ボタ
ン/をクリックして年|月|日の値を調整します。 「時刻の設定」で時刻を設定します。
同じ方法で時刻を調整します。
2. 表示設定:ブライトネス、バックライトタイマー、スクリーンセーバーを設定します。
3. シャットダウン設定
(1) 電源オフモード:デバイスで操作がない場合、デバイスは設定時間(1〜5
分)に達すると自動的にオフになります。
(2) スリープタイマー:デバイスは設定時間(5〜90 分)に達すると自動的にシ
ャットダウンします。
4. 情報:プレーヤー情報とディスク容量をチェックします。
5. デバイスをフォーマット/工場出荷時設定:デバイスをフォーマットするまたは出
荷時設定に戻す。
注意:フォーマットする前に、ファイルを紛失しないようにファイルをバックアップしてく
56
55
Page 30

ださい。
仕様:
サイズ&重さ
42*38*11mm/38g
リストバンド
TPU。手首に適し:15-20cm
スクリーン
1.54 インチ TFT スクリーン(亜鉛合金)
内蔵メモリー
16GB
Bluetooth
内蔵
再生モード
1曲リピート/すべてリピート/シャッフル/
普通/前回再生/A-B リピート
イコライザー
ロック、ファンク、 ヒップホップ、ジャズ、 クラシカル、テクノ等
言語
英語/ドイツ語/ロシア語/フランス語/ポーランド語/
日本語/中国語/イタリア語/スペイン語等
サポートした
音楽
MP3/WMA/OGG/APE/FLAC/WAV/
フォーマット
AAC-LC/ACELP
録音
MP3: 32/64/128kbps
PCM:512/768/1024/1536kbps
画像
JPG/BMP/GIF
電子ブック
TXT
Bluetooth モードで
の音楽
MP3/WMA/APE/FLAC/WAV
バッテリー
260mAh リチウムイオンポリマー電池
OS
Windows98/ME/2000/XP/Vista/10/Linux6.2/Mac OS 10.3
57
58
 Loading...