

Page 1
Page 2

CONTENT
1 Remote Control
..................................................................................................................
1
2 Front and Rear Panel
2.1 Front Panel
2.1 Rear Panel
3 Installation
4 DTV Mode
4.1 Initialization
4.2 Channel & Left and Right Channel Switching
4.3 EPG (Electric Program Guide)
4.4 Teletext
5 Main menu
5.1 Installation
5.1.1 Auto Search
...................................................................................................................
.....................................................................................................................
..........................................................................................................................
...........................................................................................................................
.........................................................................................................................
.......................................................................................................................
..................................................................................................................
.........................................................................................................
................................................................................................................
.......................................................................................
..........................................................................................................
..............................................................
2
2
2
3
4
4
5
6
9
10
10
11
5.1.2 Manual Search
5.2 Channel
5.3 Preference
5.4 Setting
5.4.1 Timers
5.4.2 Child Lock
5.4.3 Factory Reset
5.4.4 Upgrade
5.5 AV Setting
5.6 Multimedia Mode
6 Record & Timeshift
6.1 Record
.......................................................................................................................
..................................................................................................................
.........................................................................................................................
...................................................................................................................
.............................................................................................................
................................................................................................................
...................................................................................................................
.........................................................................................................................
.....................................................................................................
........................................................................................................
.......................................................................................................
..........................................................................................................
12
13
14
15
16
19
20
21
23
25
28
28
6.2 Timeshift
.....................................................................................................................
31
Page 3
1
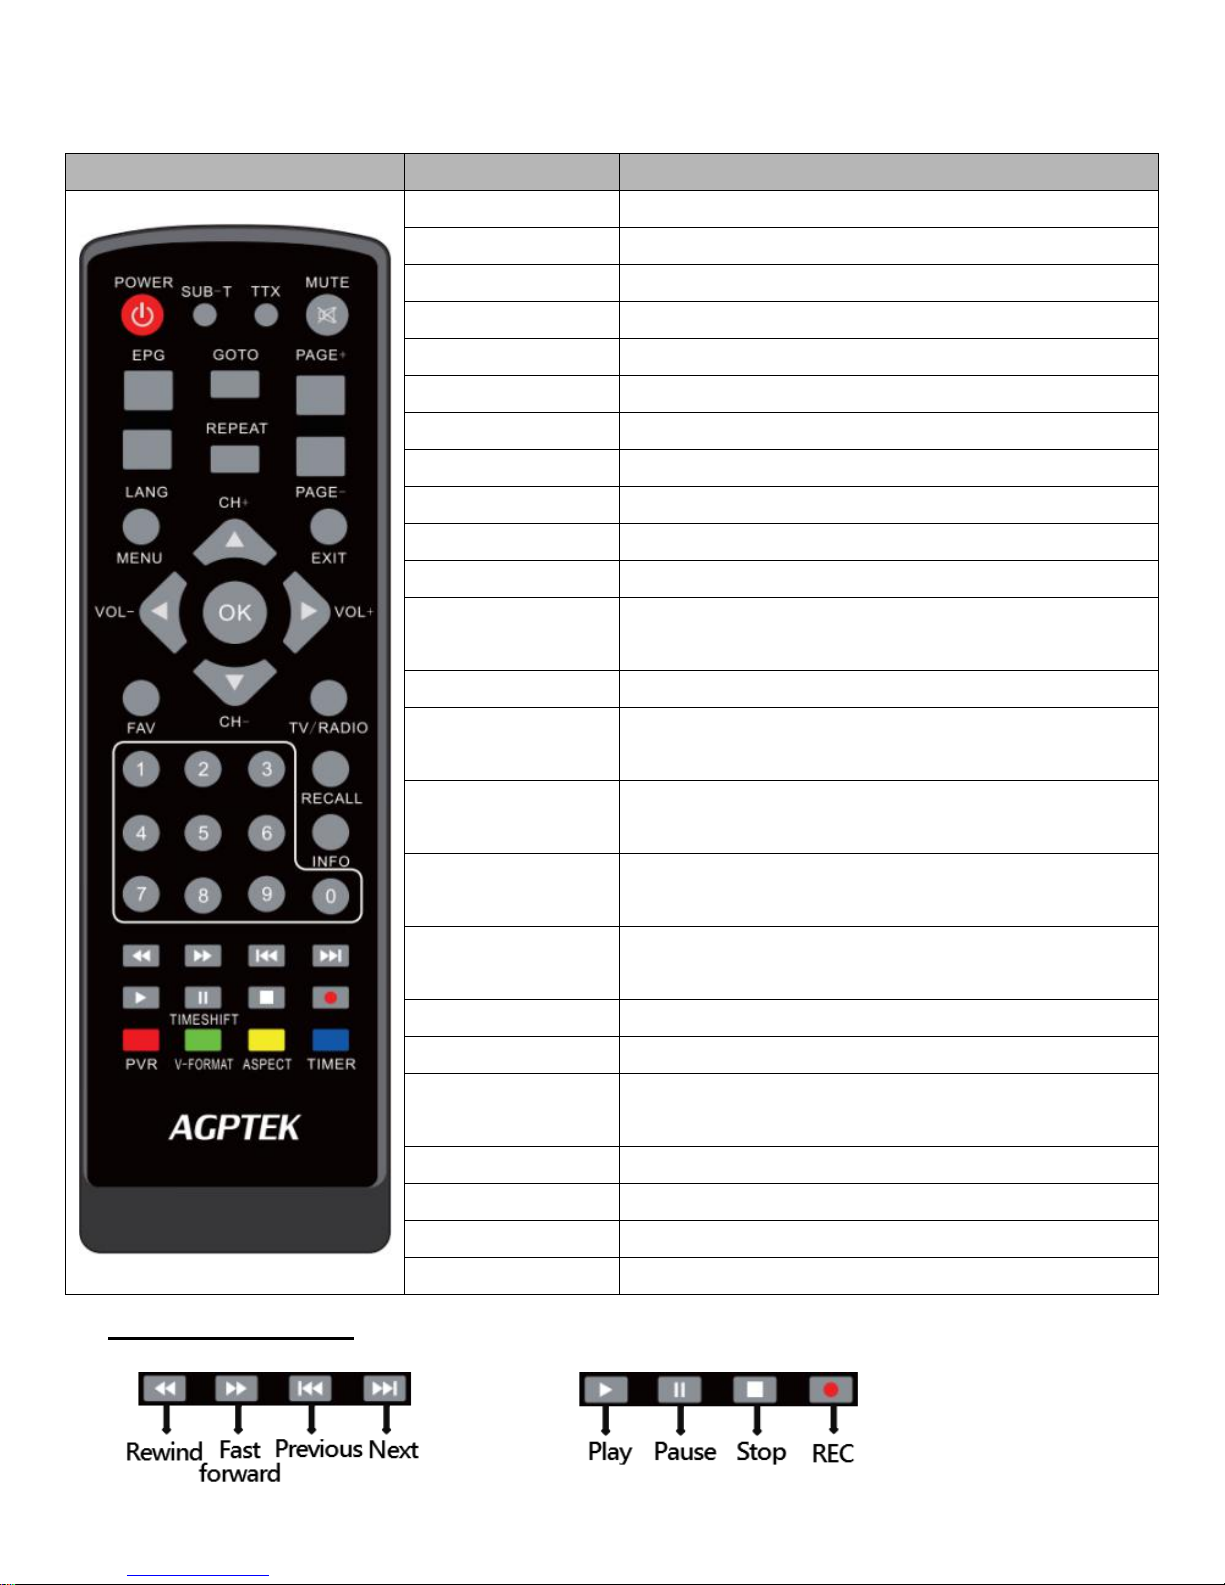
1. Remote Control
Photograph
Key
Function
POWER
Standby /On
SUB-T
Subtitle display option
TTX
Switch on teletext (press EXIT to switch off)
MUTE
Switch on/off volume
EPG
Shows the Electronic Program Guide
GOTO
Go to desired time in multimedia file
PAGE+/PAGE-
To navigate inside the menu
REPEAT
Repeat multimedia file playback
LANG
Audio language; Left/Right channel option
MENU
Display/Exit main menu on TV screen
EXIT
Quit current menu
VOL-/ VOL+
Decrease/increase volume;
Hold down to move the cursor
CH-/CH+
Go to previous/next channel
OK
Confirm the current settings in a menu;
Call up a program list while watching TV
FAV
Display favorite channel lists;
Press again to display other favorite lists
TV/RADIO
Switch between TV program and Radio
program
<0>-<9>
Numeric buttons, for input of numbers or for
selecting a TV channel
RECALL
Go back to the previous viewed channel
INFO
Display information about the current channel
RED/GREEN/
YELLOE/BLUE
Navigate between pages in teletext mode;
Specific function keys in Menu or EPG
V-FORMAT
Switch the HDMI between 720P and 1080i
ASPECT
Switch aspect ratio between 4:3 and 16:9
TIMESHIFT
Access to ON/OFF timer directly
PVR
Access to recorded content in USB drive
Multimedia Keys:
Page 4
2
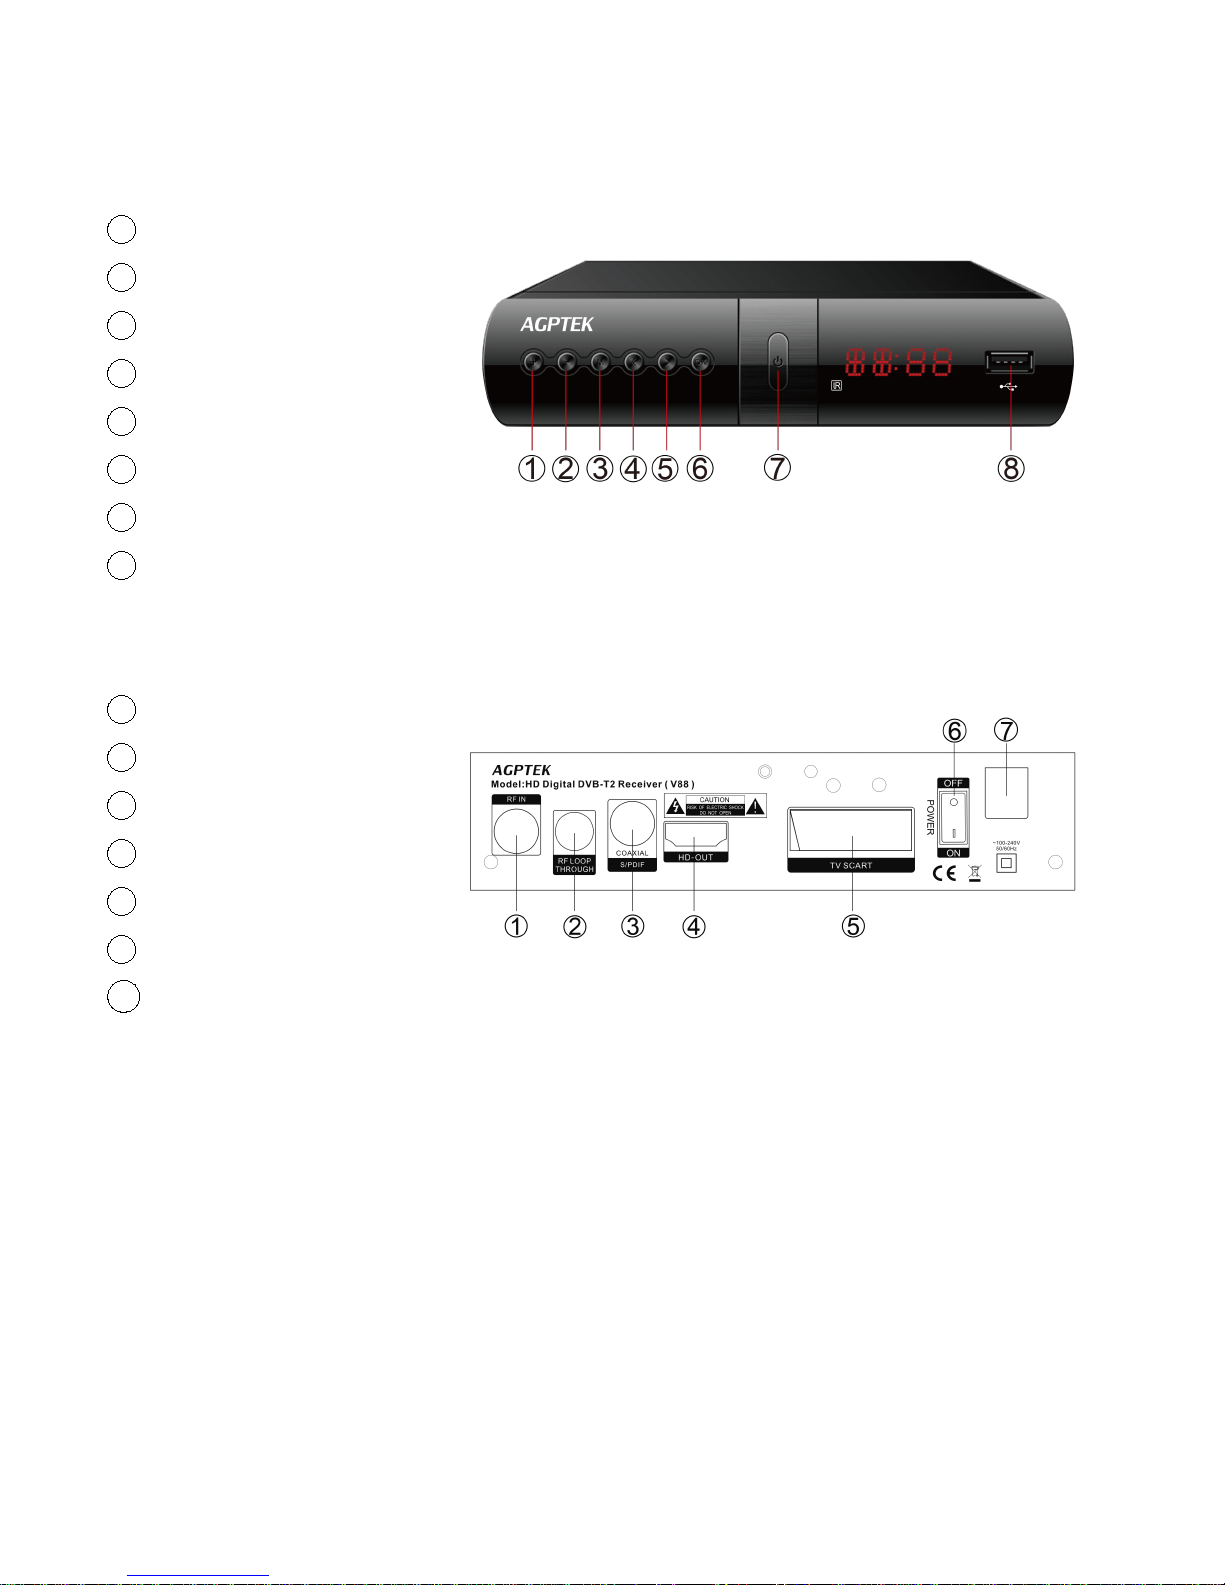
2. Front and Rear Panel
2.1 Front Panel
1 VOL+
2 VOL-
3 MENU
4 CH-
5 CH+
6 OK
7 STANDBY ON/OFF
8 USB 2.0 PORT
2.2 Rear Panel
1 RF IN
2 RF LOOP THROUGH
3 S/PDIF (COAXIAL)
4 HD-OUT
5 TV SCART
6 POWER ON/OFF
7
POWER INPUT(AC 100-240V)
Page 5
3
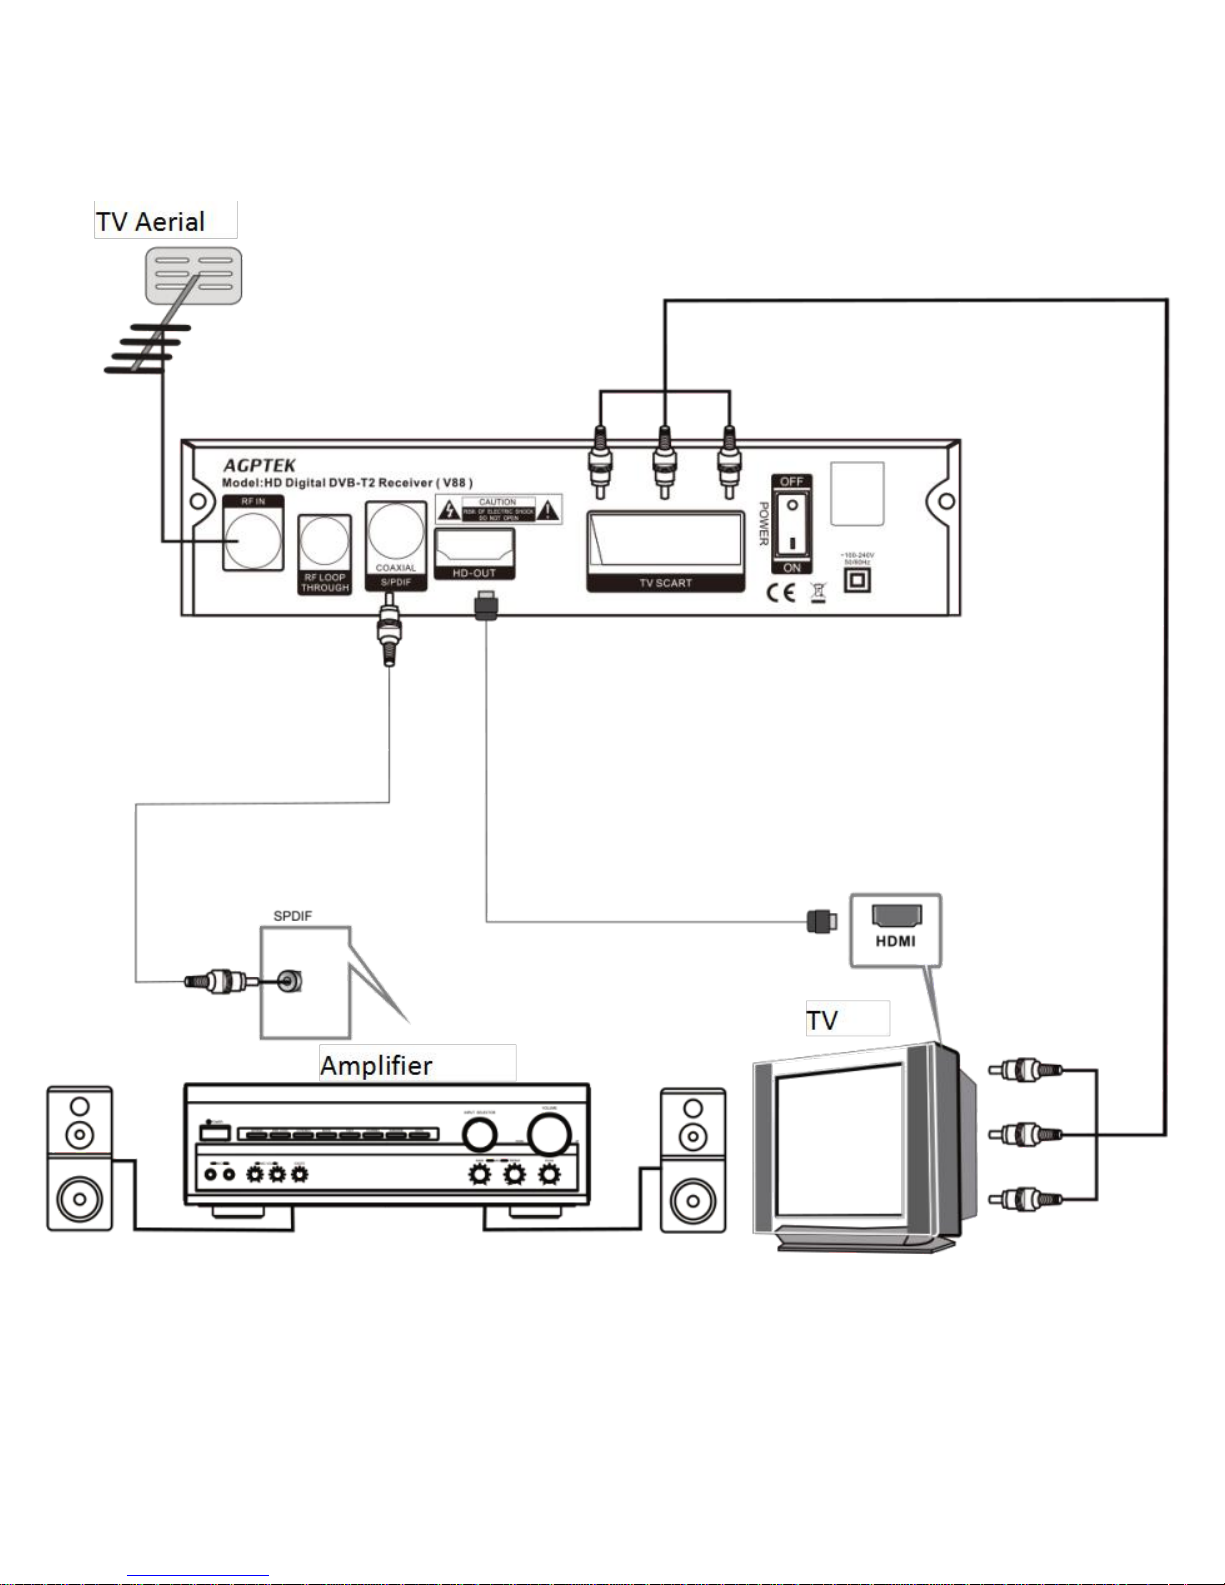
3. Installation
Page 6
4
4. DTV Mode
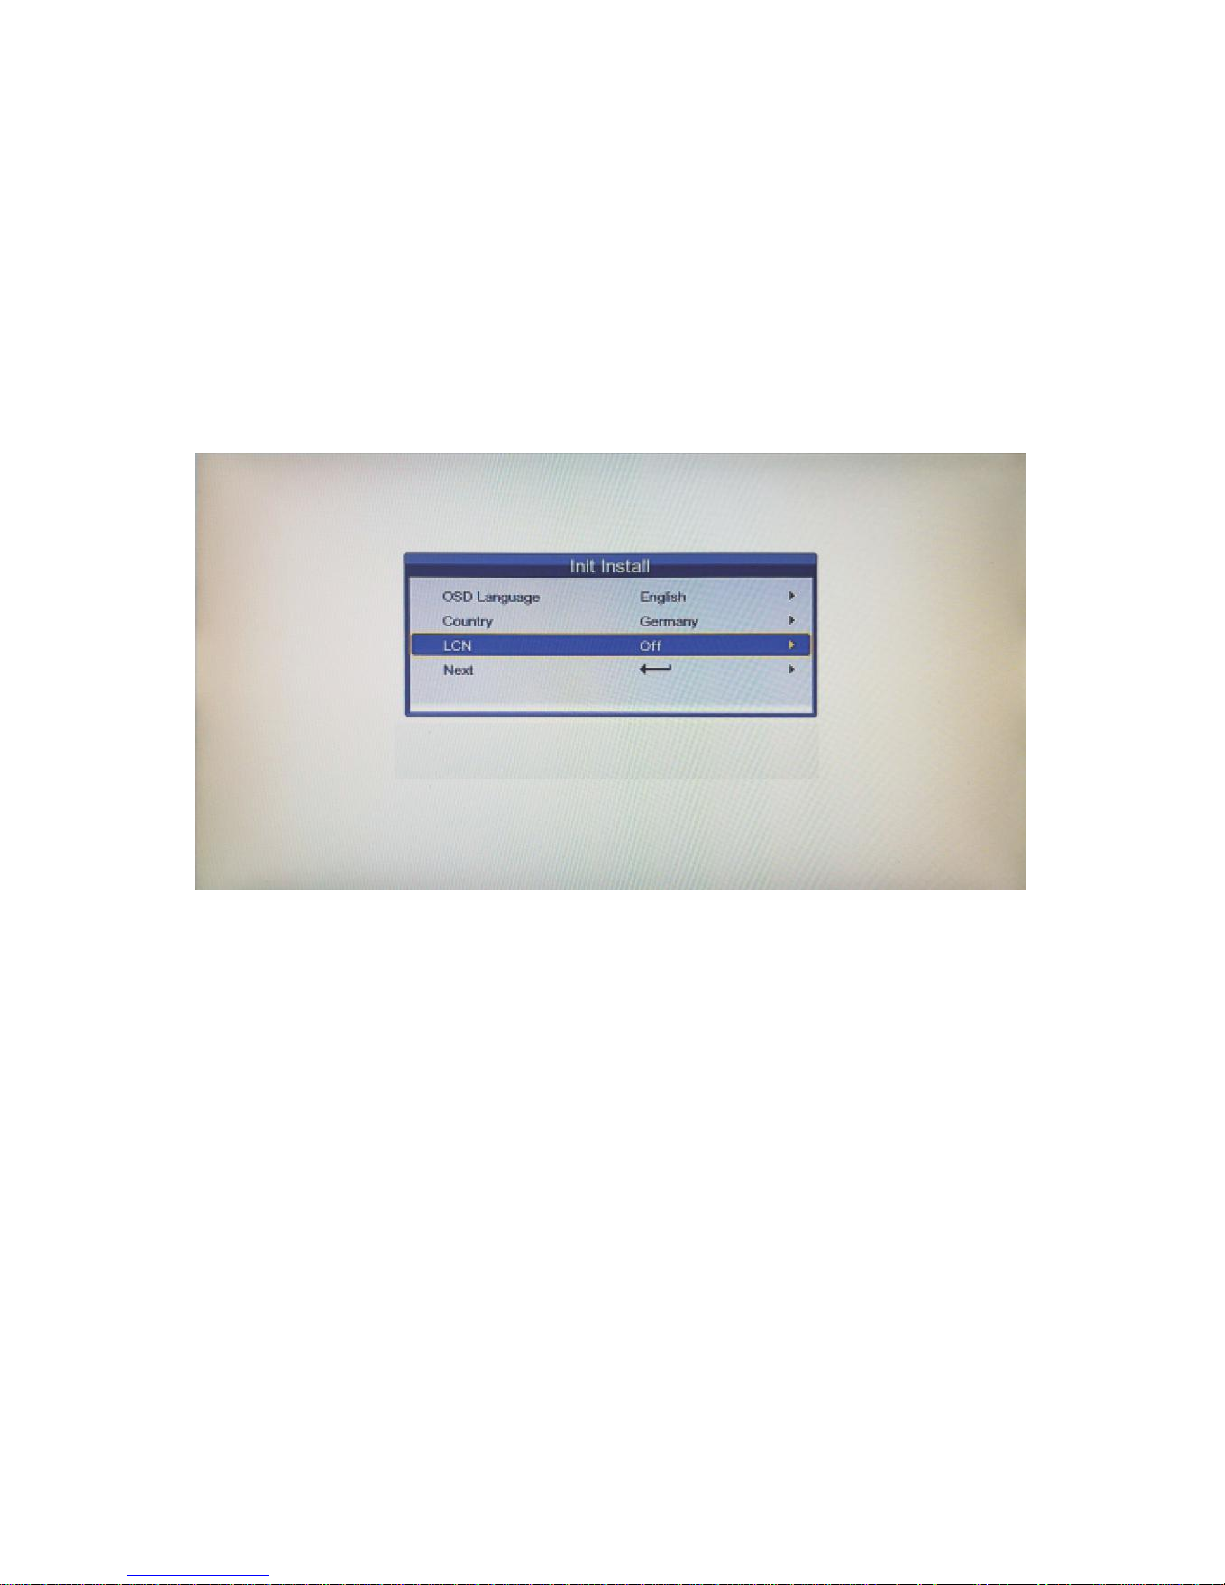
4.1 Initialization
Initialization is needed for the first-time entry into the system by setting
language, country time zone, active antenna and channel number, etc. After
finishing setting, choose [Start Search] and press [ENTER] to scan channels,
and all available channels will be reserved automatically. Menu display as
follows:
Pic 4.1 Initialization
Page 7
5
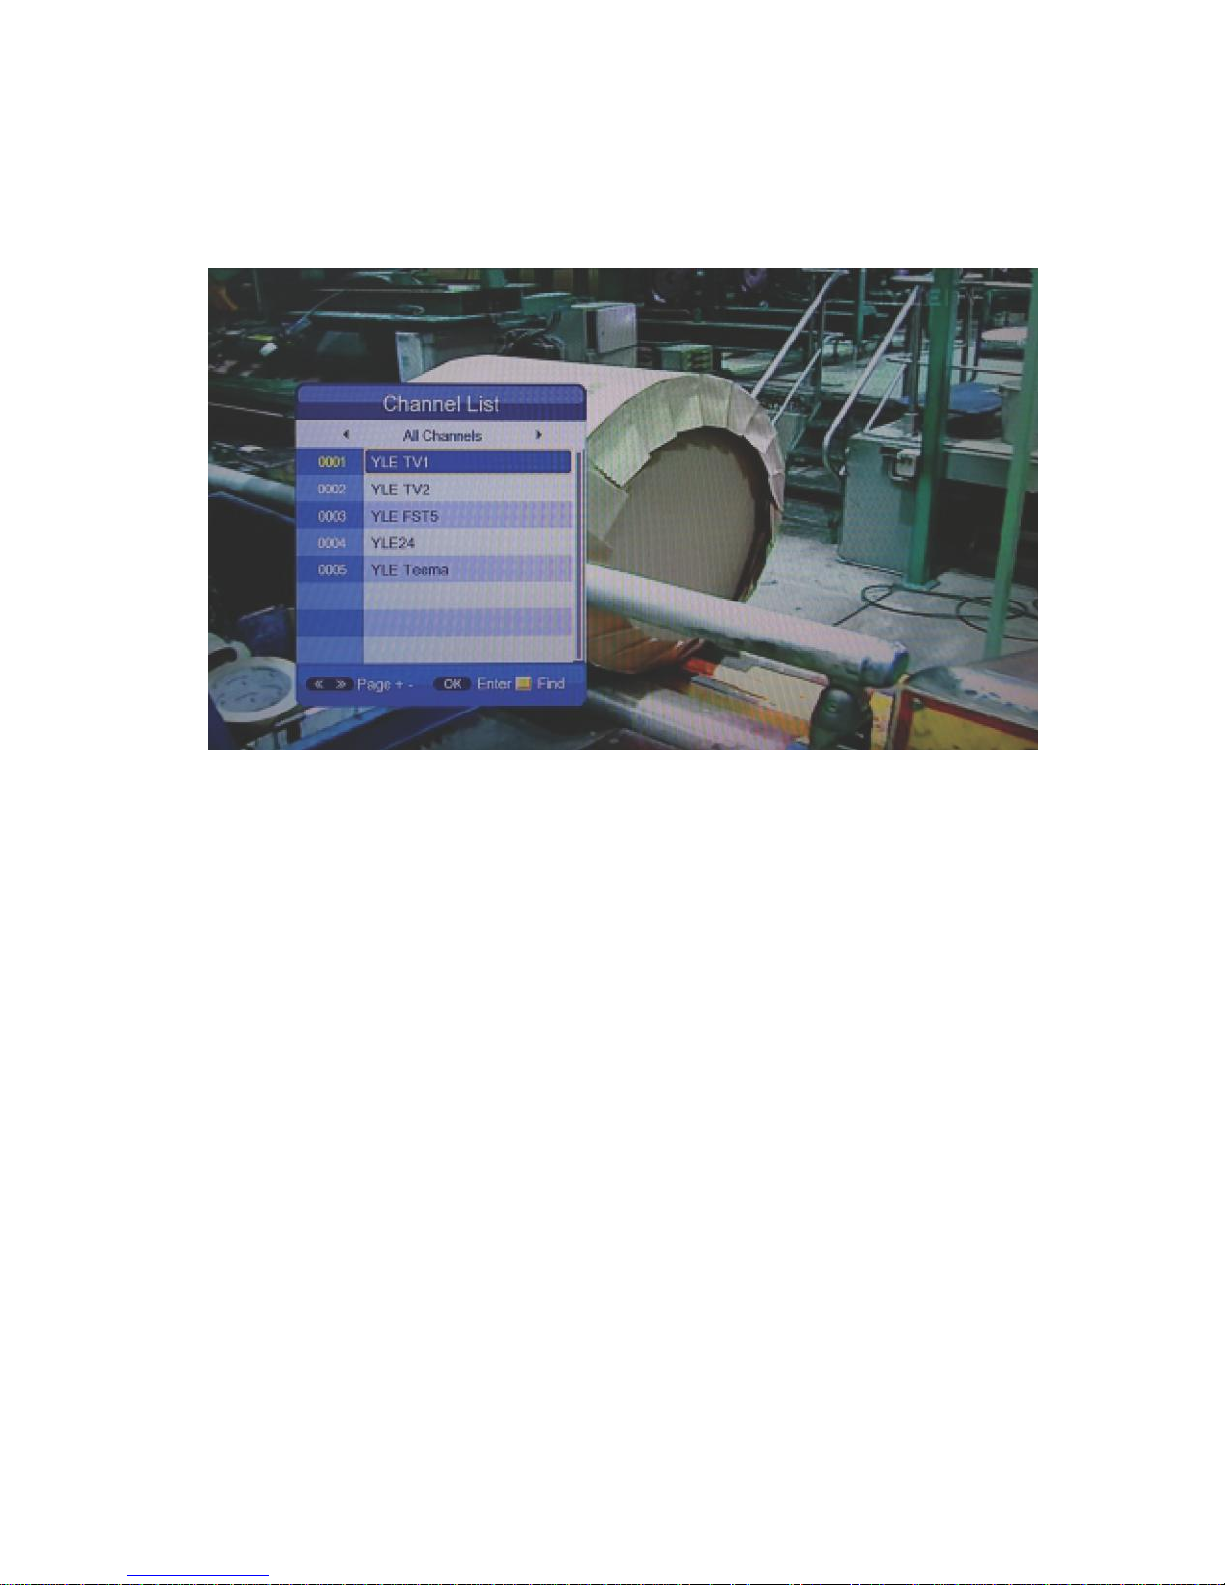
4.2 Channel & Left and Right Channel Switching
4.2.1. Under full-screen state, press [AUDIO] to match the language of the
current program and show left& right Channel list:
Pic 4.2 Channel and left & right Channel list
4.2.2. Press [LEFT/RIGHT] to choose left & right channel or stereo;
press[UP/DOWN] to choose language;
4.2.3. Press [ENTER] to Exit setup.
Page 8
6
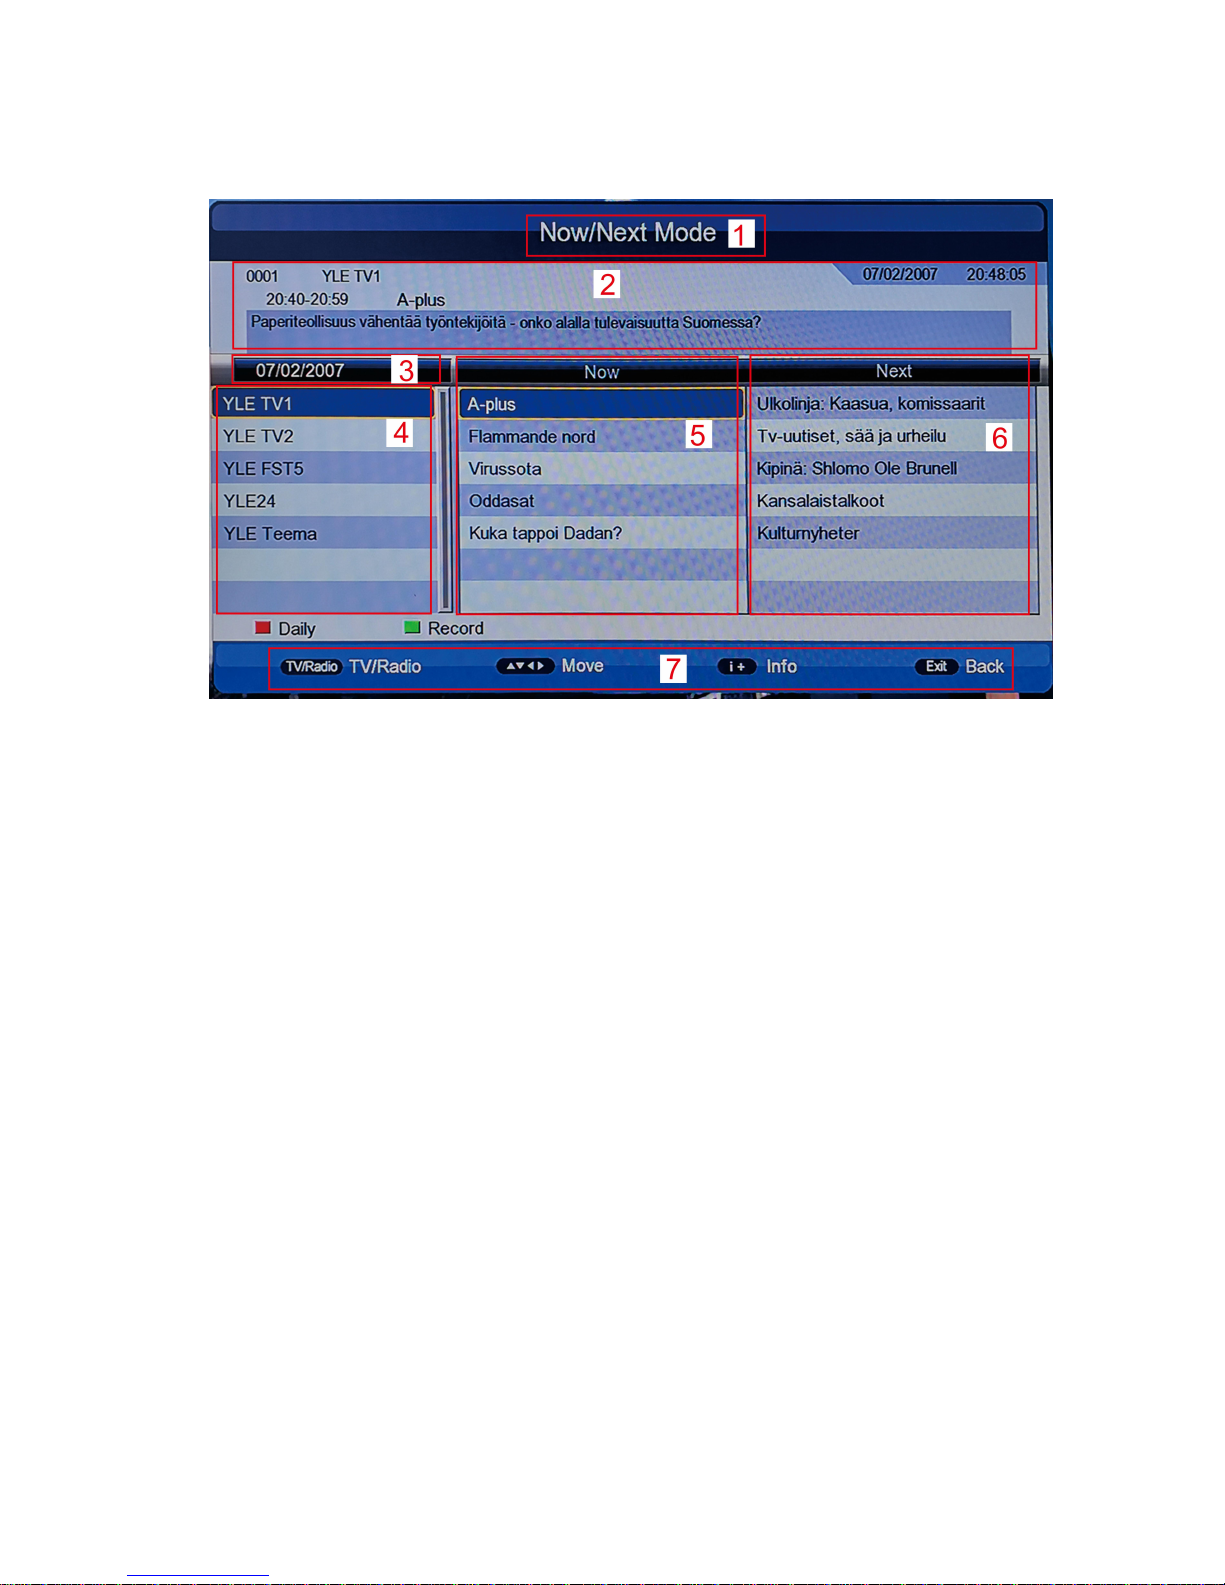
4.3 EPG (Electric Program Guide)
4.3.1 Press [EPG] to check Program information:
Pic 4.3.1 EPG Menu
Default EPG menu shows NOW/NEXT Mode, including 7 parts:
1) Mark 1 shows current EPG state;
2) Mark 2 shows current time and program information;
3) Mark 3 shows detailed date;
4) Mark 4 shows program, press [UP/DOWN] to switch program, or press
[PAGE-/+] to switch pages;
5) Mark 5 shows Now Event, press [UP/DOWN] to check program, or press
[LEFT/RIGHT] to change to NOW or NEXT;
6) Mark 6 shows NEXT Event;
7) Mark 7 shows key function
Red Key: Switch EPG Mode
Green Key: Recording TV program of Mark 5 (Now Event) or make a record
reservation of Mark 6 (Next Event)
Page 9
7
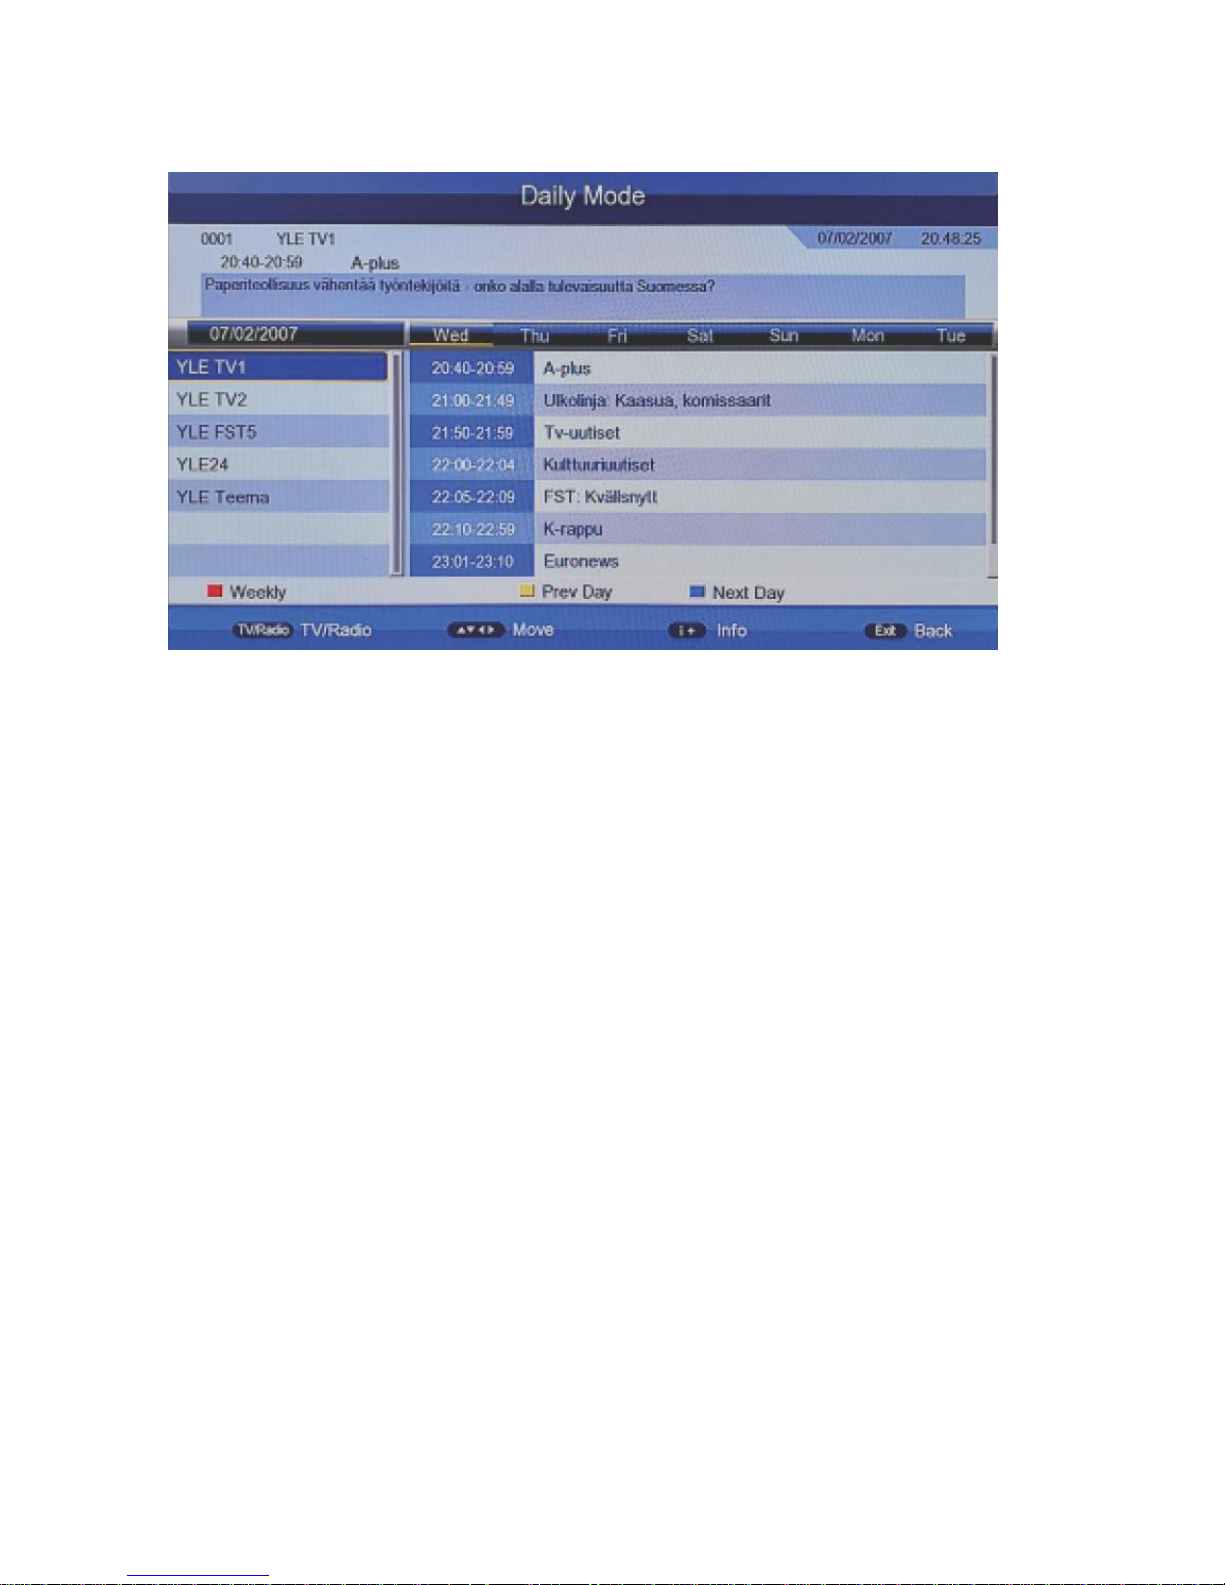
4.3.2 Press Red Key to entry Daily Mode:
Pic 4.3.2 Daily Mode
1) Press Yellow Key or Blue Key can change from Monday to Sunday.
2) Select playing TV shows, press Green Key to record
Page 10
8
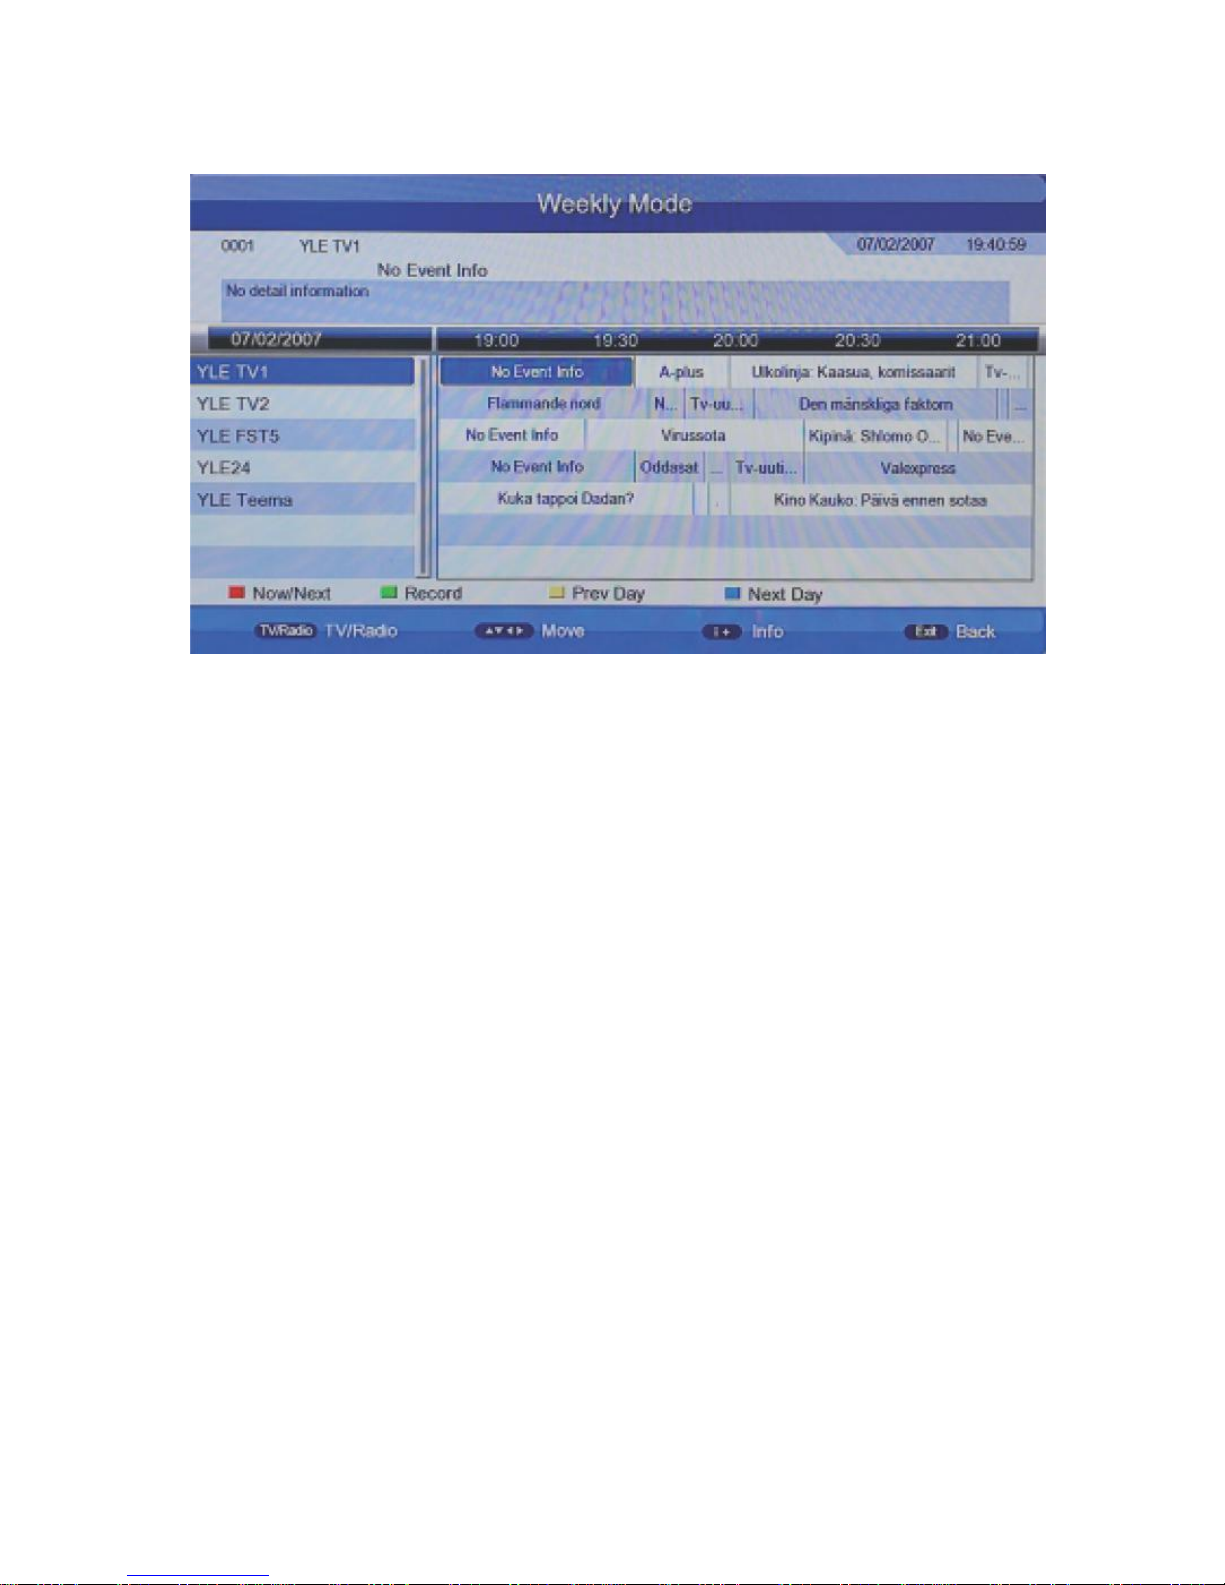
4.3.3 Press Red Key to entry Weekly Mode:
Pic 4.3.3 Weekly Mode
1) Press [LEFT/RIGHT] to switch windows.
2) Press Yellow Key or Blue Key to switch TV programs of yesterday or
tomorrow.
Page 11

9
4.4 Teletext
Press [TTX] to entry program menu
4.4.1 Input page number(100 - 899) in Teletext to turn over;
4.4.2 Press [UP/DOWN] and [PAGE+/-] to switch pages;
4.4.3 Long press [UP/DOWN] for fast switch pages;
4.4.4 Press [ENTER] to change the transparency of TTX;
4.4.5 Pres [LEFT/RIGHT] to switch to Subpage of current page, if
choose[AUTO],it will switch to Subpages automatically;
4.4.6 Four color key is used as Guidance, its specific functions are decided
by code stream;
4.4.7 Press [TTX] or [exit] to exit
Page 12

10
5. Main menu
Main menu includes Installation, Channel, Preference, Setting, AV, Multimedia
Pic 5
5.1 Installation
[Installation] includes Auto Search, Manual Search, Channel Filter,
Country, .LCN, Active Antenna.
Notice: This menu cannot be chose in Multi-media Mode.
Pic 5.1 Installation
Page 13

11
5.1.1 Auto Search
Press [UP/DOWN] to choose [Auto Search] and then press [ENTER] or
[right], it will show a message to ask you: whether delete previous TV
programs. Choose [YES] to enter [Auto search]:
Pic 5.1.1 Confirm Auto Search
Pic 5.1.1.1 Auto Search
System will scan programs and reserve them automatically:
Page 14

12
5.1.2 Manual Search
Pic 5.1.2 Manual Search
5.1.2.1 Press [UP/DOWN] to choose [Manual Search] and then press
[ENTER] or [RIGHT]:
5.1.2.2 Deploy the parameters before manual scan, including following
three parameters:
1) Channel NO.: scanning station ID, every country has some default station
ID, you can modify it by using number key (0 - 9), if the station ID was set
up, other two parameters are no need to set;
2) Frequency (KHz): scanning frequency, the default frequency is
177500KHz, you can modify it by using number key (0 - 9);
3) Bandwidth: Press [UP/DOWN] to choose [Bandwidth]. Press[ENTER] for
setting the current scanning frequency bandwidth, 6MHz,7MHz,8MHz are
available, the default bandwidth is 7MHz.
5.1.2.3 After setting up the scanning parameters, press [UP/DPWN] to
choose [Manual Search] and then press [enter].
5.1.2.4 After finishing the searching, the system will exit the interface of
searching program automatically, reserve the TV program information and
then return to [Installation] menu.
Page 15

13
5.2 Channel
[Channel] has two options, including [Channel Manager] and [Favorite List].
In the [Main Menu], press [UP/DOWN] to choose [Channel] and press
[ENTER] or [RIGHT]. As picture 5.2 shows:
Pic 5.2 Channel
Page 16

14
5.3 Preference
[Installation] includes OSD Language, OSD Timeout, 1st Preferred Subtitle,
2nd Preferred Subtitle, Hard Hearing, 1st Preferred Audio, 2st Preferred
Audio.
Pic 5.3 OSD Language Setting
[OSD Language] is mainly used to change the language of menu and tips.
Press [UP/DOWN] to choose language and then press [ENTER] to confirm.
Page 17

15
5.4 Setting
[Setting] is used to set up or upgrade system, including Timers, Child Lock,
Date Time, Factory Reset, Upgrade, Version, Auto Standby.
Pic 5.4 Setting
Page 18

16
5.4.1 Timers
Timers is used to manage and edit the reserved program. In timers menu, you
can edit program name, starting time and type of reserved program. From left
to right are: number, program name, date, time, mode, reserved type.
Pic 5.4.1 Timer List
Press [OK] to enter timer edit interface:
Pic 5.4.1.1 Timer Edit
Page 19

17
1) [Date] is used to set up appoint date, if you want to change date, after
choosing [DATE], press [RIGHT] to edit;
2) [Program Name] is the name of appointed program, if you want to
change name, after choosing [Program Name], press [RIGHT] to edit;
3) [Start Time] is used to set up the appointed time, if you want to change
time, after choosing [Start Time],press[RIGHT] to edit;
4) [End Time] is the program recording ending time which cannot be set up
by users. When [Type] is VCR or Recorder Mode(refer to 7[Type]), it
will change automatically according to Start time and Duration(refer to
5[Duration]) which are set by user; When [Type] is other option, [End
Time] will be consistent with [Start Time];
5) [Duration] is recording lasting time of the reserved program which only
can be set up when [Type] is VCR or Recorder Mode. After choosing
[Duration], press [RIGHT] to enter the editing;
6) [Mode] is for setting up the appointed mode, including Once, Daily,
Weekly and monthly. In Once mode, reservation was only set up once, it
will be deleted after response; In daily mode, it will be existed in
appointed time every day; In Weekly mode, it will be existed in
appointed time every week; In Monthly mode, it will be existed in
appointed time every month;
7) [Type] is for setting up the program reserved type, including five types:
Recorder, VCR, On, Channel and Standby.Recorder is for burning the
appointed program, you can select whether burn AD,TTX and Subtitle
or not;
VCR is also burning program, but is for burn program, not
AD,TTX or Subtitle;
when[Type]is On, if the set top box in standby
mode, it will wake-up set top box automatically and play the reserved
program;
when [Type] is Channel, it will go to the reserved program
automatically in the setting time;
when [Type] is standby, set top box
will go to standby mode in the setting time.
Page 20

18
8) [AD Record], [Subtitle Record], [Teletext Record] can be set up only
when the [Type] is Recorder, for selecting whether burn AD,TTX and
Subtitle or not.
Page 21

19
5.4.2 Child Lock
[Child Lock] is for setting up Child Lock and limit program to avoid that
children contact with some unsuitable information. Choose [Child Lock] and
then press [ENTER], password input box will be popped up, and then input
the correct password (The default password is 0000) to enter the menu, as
picture 5.4.2 shows:
Pic 5.4.2 Child Lock
[Child Lock] include the following three options:
1) [System Lock]: whether to enable child lock or not;
2) [Parental Rating]: for setting up age rating limitations, if it is 0, it
suggests no limitation;
3) [Change Pin Code]: for changing password, after choosing [Change Pin
Code], press [ENTER], it will pop up the message box of [Change Pin
Code]. As picture 5.4.2.1 shows:
Page 22

20
Pic 5.4.2.1 Change Pin Code
Enter the old correct password, and then enter the new password twice to
confirm.
5.4.3 Factory Reset
[Factory Reset] is for restoring the system to factory settings, press
[UP/DOWN] and choose the [Factory Reset], and then press [ENTER], after
popping up password input box, input the correct password (the default is
0000), the system will restore to factory settings, after that, it will pop up
systematic initial menu and guide the system to reinitialize.
Page 23

21
5.4.4 Upgrade
[Upgrade] can be choosed in [Main Menu]->[Setting]->[Upgrade] like the
picture 5.4.4.1:
Pic 5.4.4.1 Upgrade
Page 24

22
There are three ways to support upgrade. They are USB/Card Upgrade, OTA
Upgrade, IRD Upgrade. Select [USB/Card Upgrade], press [ENTER], if you
didn't connect to USB equipment, it will give message; otherwise, it will show
as below:
Pic 5.4.4.2 USB/Card Upgrade
Page 25

23
Select rom.bin as storage area. Press [ENTER] and then choose rom.bin, pres
s [ENTER] again and start using USB to upgrade, as picture shown below:
Pic 5.4.4.3 USB Upgrade Flow
After finishing USB Upgrade, the system will restart automatically.
Page 26

24
5.5 AV Setting
[AV] is for setting up the related options about video output, brightness,
resolution, output format, etc. In [Main Menu], press [UP/DOWN] to choose
[AV], press [ENTER] to enter [AV], as picture 5.5 shows:
Pic 5.5 AV Setting
Page 27

25
5.5.1 Video Resolution
[Video Resolution] is for setting up output video resolution and refresh rate, it
supports up to 1080p_60 (Full HD). After choosing [Video Resolution], press
[ENTER], it will pop up the select list, as picture5.5.1 shows:
Pic 5.5.1 Video Resolution
List includes the following options (P represents line-to-line scan, i represents
interlaced scan):
1) 480: P_60,i_30
2) 576: P_50,i_25
3) 720: P_60,P_50
4) 1080: P_60,P_50,i_30,i_25 ([Aspect Ratio] only can choose 16:9, 16:9PB)
Page 28

26
5. 6 Multimedia Mode
5.6.1 [Multimedia Mode] is for viewing and editing media in the USB flash
disk inserted. You can switch to [Multimedia Mode] by choosing [Main
Menu]->[Media Center]->[Multimedia]. After choosing [Multimedia Mode],
press [ENTER], it will check whether there is USB (CARD) equipment
automatically. If there is no USB (CARD) equipment or USB (CARD)
equipment is pulled out, it will show like pic5.1:
Pic 5.6.1 NO USB (CARD)
Page 29

27
5.6.2 Insert a USB flash disk and the initialization will be processed
automatically
Pic 5.6.2 USB (CARD) Equipment
5.6.3 And then you can enter the Multimedia List, including Movie/ Music/
Photo/ Record Manager/ Disk Manager/ EBook. The partitions supported
includes: FAT FAT32 and NTFS.
Pic 5.6.3 Multi-media List
Page 30

28
5.6.4 Press [Menu] to set up the multimedia playback, including:
1) [Movie Repeat]: Select loop mode when playing a video file: Dir (play by
list), One, OFF.
2) [Music Repeat]: Select loop mode when playing an audio file: Dir (play by
list), One, OFF.
3) [Photo Repeat]: Select loop mode when playing a graphic file:Dir (play by
list), OFF.
4) [BG music]: Select [YES] or [NO] to decide whether supporting BG music
when playing pictures or reading e-books.
5) [Slide Time]: Set slide time of picture slideshow.
6) [Effect]:Select slideshow effect of playing pictures
Page 31

29
6. Record & Timeshift
6.1 Record
Under full-screen state, if you want to record the television program, please
press [REC]. If you haven’t inserted any USB Flash disk (CARD), it will
show as pic 7.1:
Pic 6.1 Without USB (CARD) DISK
Page 32

30
When USB Flash disk (CARD) inserted, it will initialize and start to record,
like the pic 6.1.1. If you want to stop recording, please press [STOP]; if you
want to suspend record, please press [PAUSE], like pic 6.1.2:
Pic 6.1.1 USB (CARD) Initialization
Pic 6.1.2 Record Suspension
Page 33

31
While recording, press [INFO] and it can show detailed information, when
press [INFO] again, it will show the list of what you are recording, like pic
6.1.3:
Pic 6.1.3 Record List
Page 34

32
6.2 Timeshift
Timeshift is for previous TV program playback. You can make the setting in
[Main Menu]->[Media Center]->[PVR Config],like the picture 6.2:
Pic 6.2 PVR Config
[Timeshift] has three options:
1) Auto: when you are in optional channels, it will open Timeshift
automatically;
2) Pause: Under full-screen state, press [PAUSE] to open Timeshift;
3) Off: While recording, press [PAUSE] or [PR] to open Timeshift.
 Loading...