

Page 1
Page 2

CONTENTS
01/12
13/24
25/36
37/48
49/60
English
Deutsch
Italiano
Español
Français
Page 3
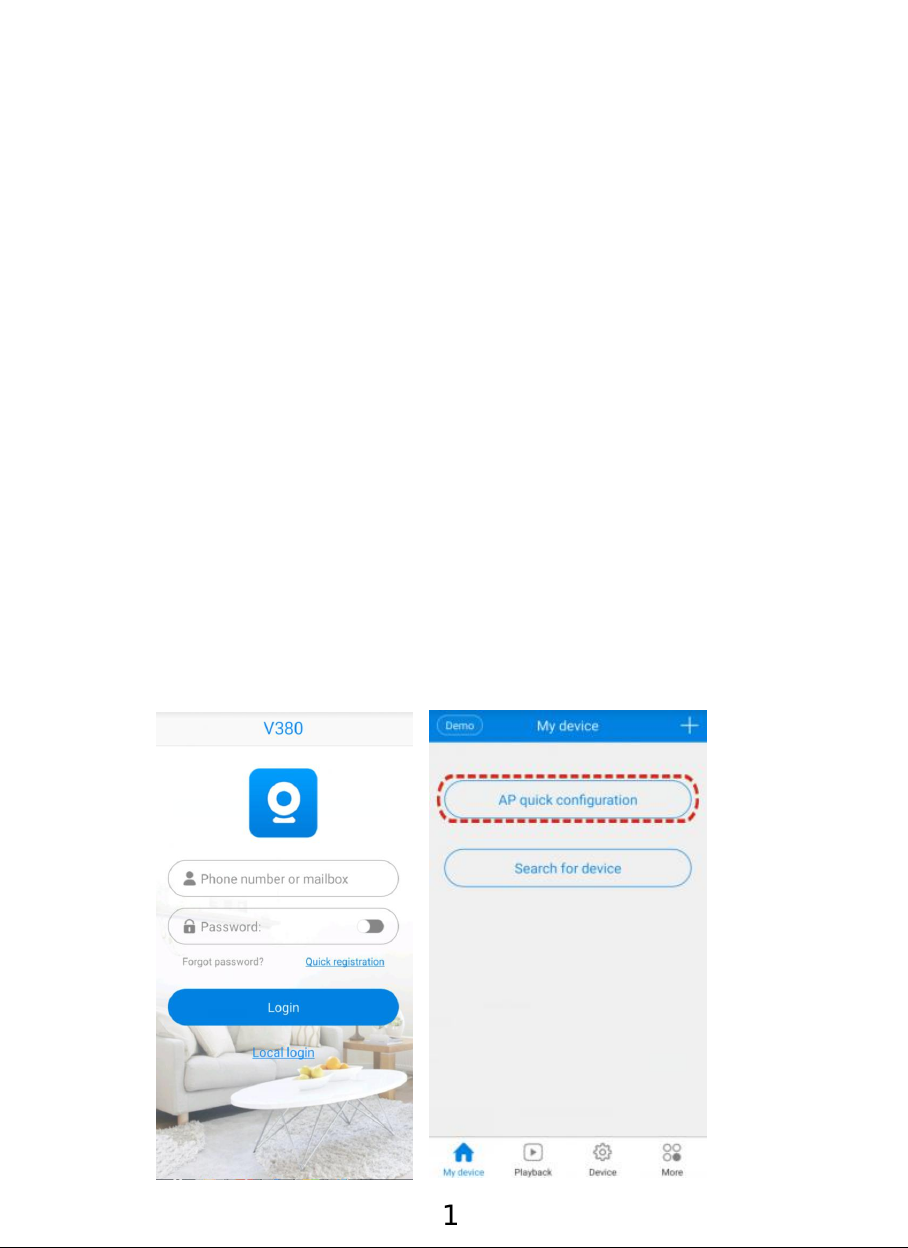
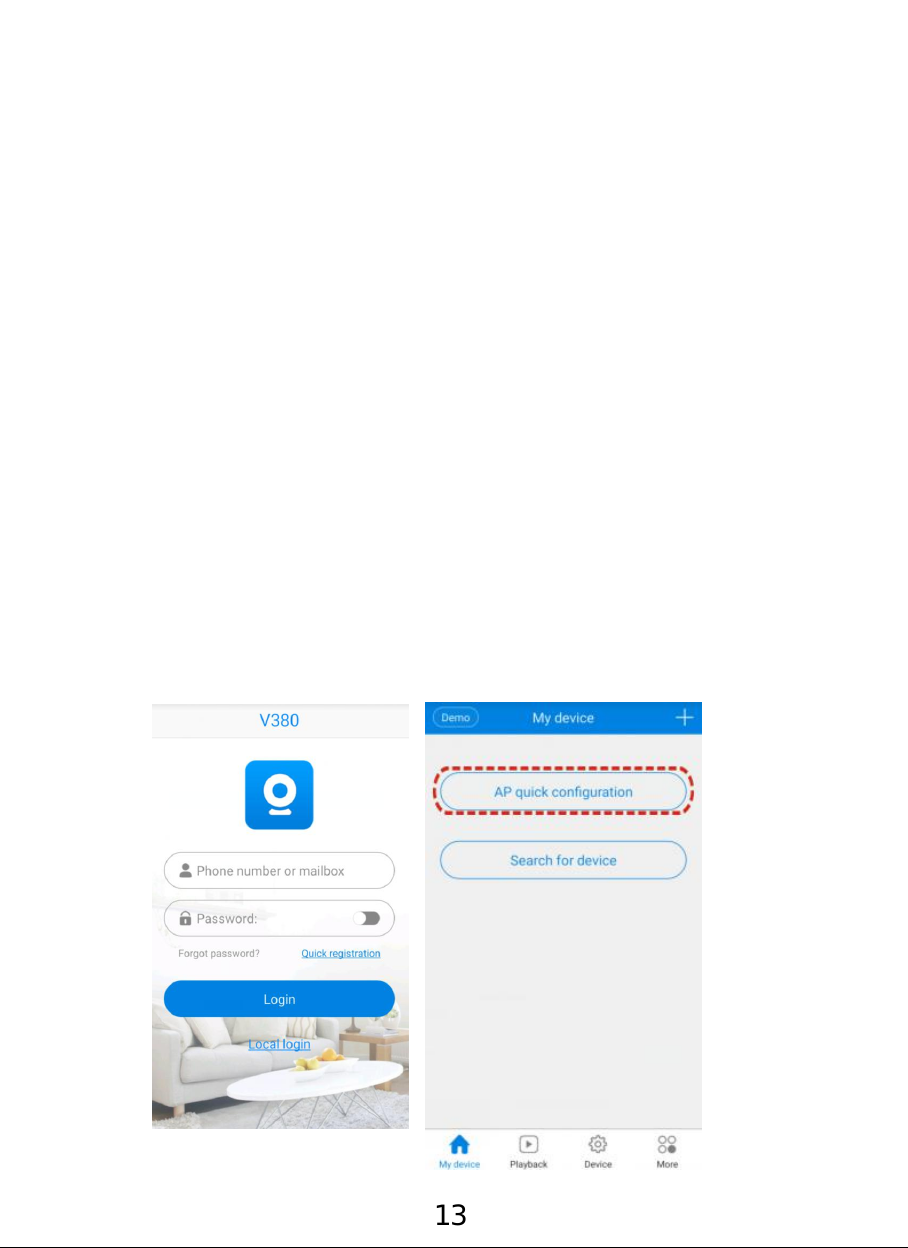
Search for "V380" on Google Play or App store and
download it.
Log in&Register
You will need to register for the first use. Enter your
name and password after registered, or you can also
choose “ Local login ” to experience parts of its
functions without registration.
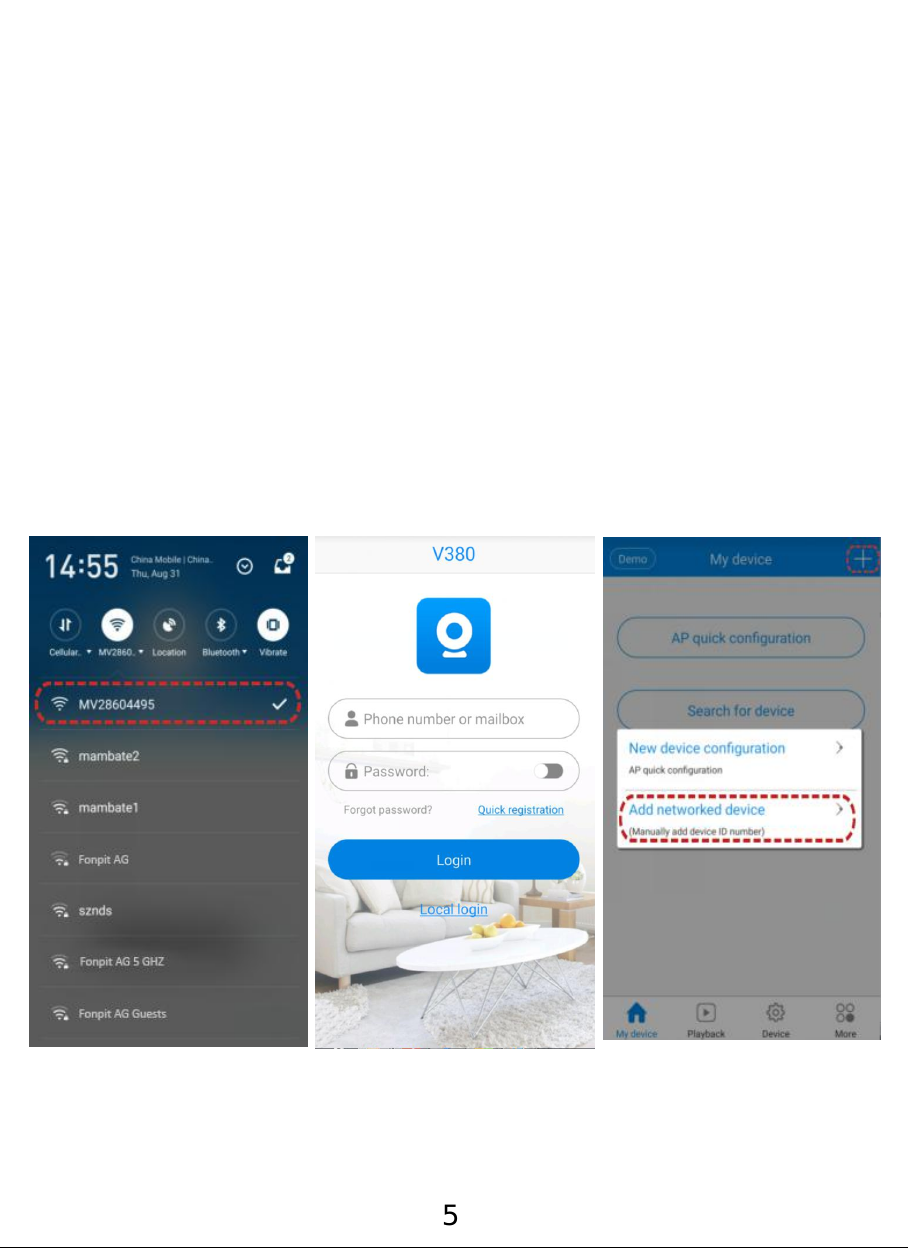
Enable the Wifi connection with the device name
begins with “MV.”(eg. MV28604495).
Pair with your phone by Wifi
1. Open the APP“V380 ”and choose login or“Local
login”.
2. Choose AP quick configuration
1
Page 4
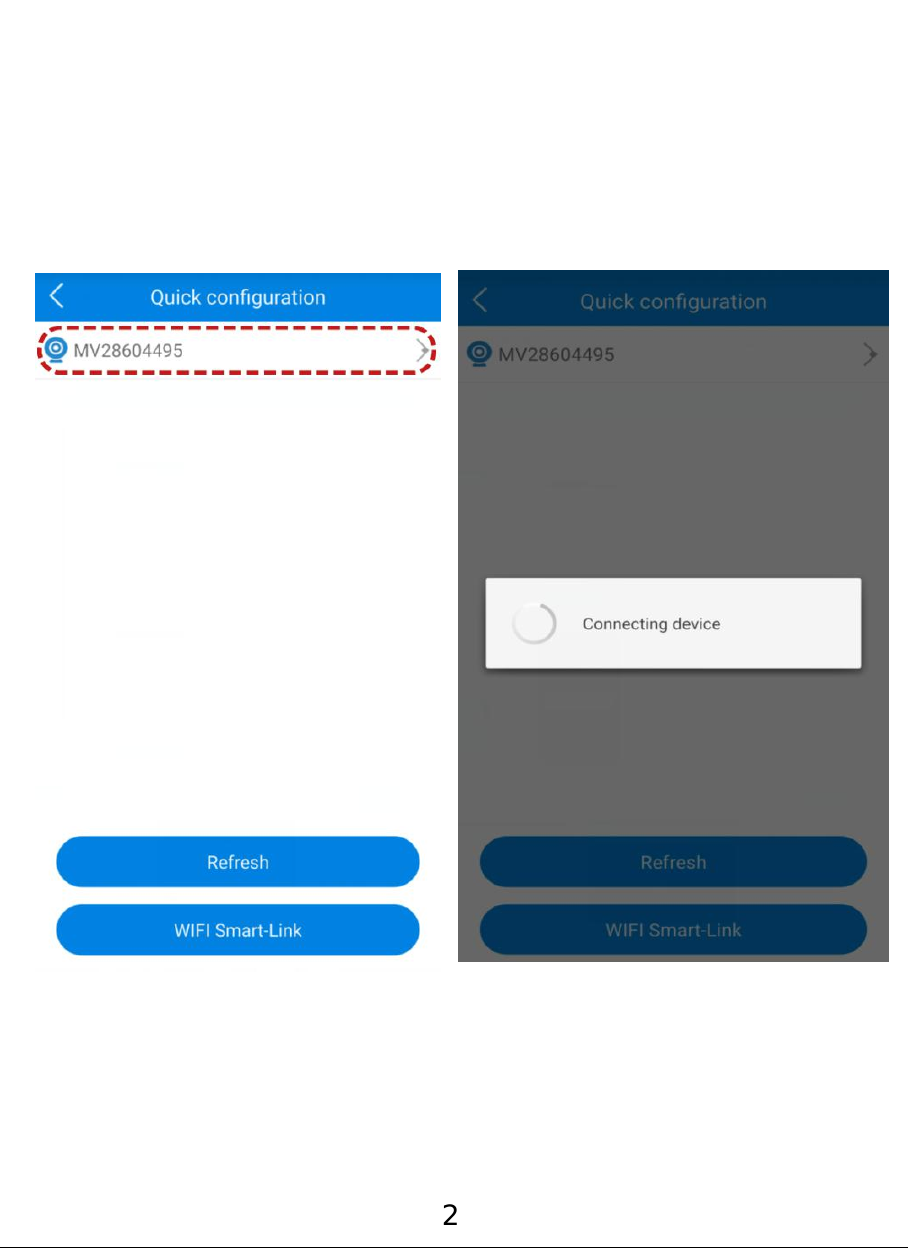
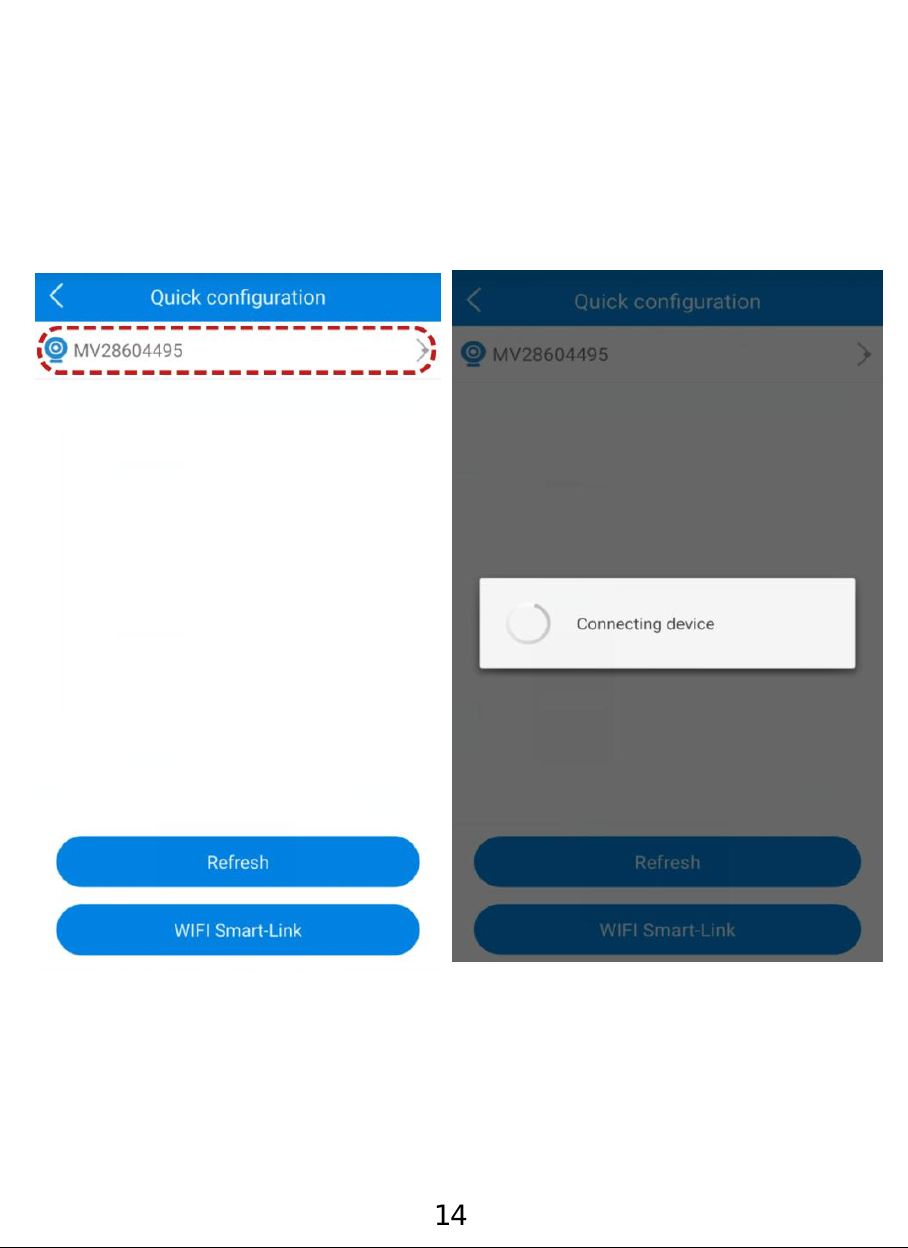
3. Choose the device name begins with “MV.”(eg.
MV28604495), which you can also find on the
camera. Tap to connect with the camera.
4. Waiting for connection.
2
Page 5

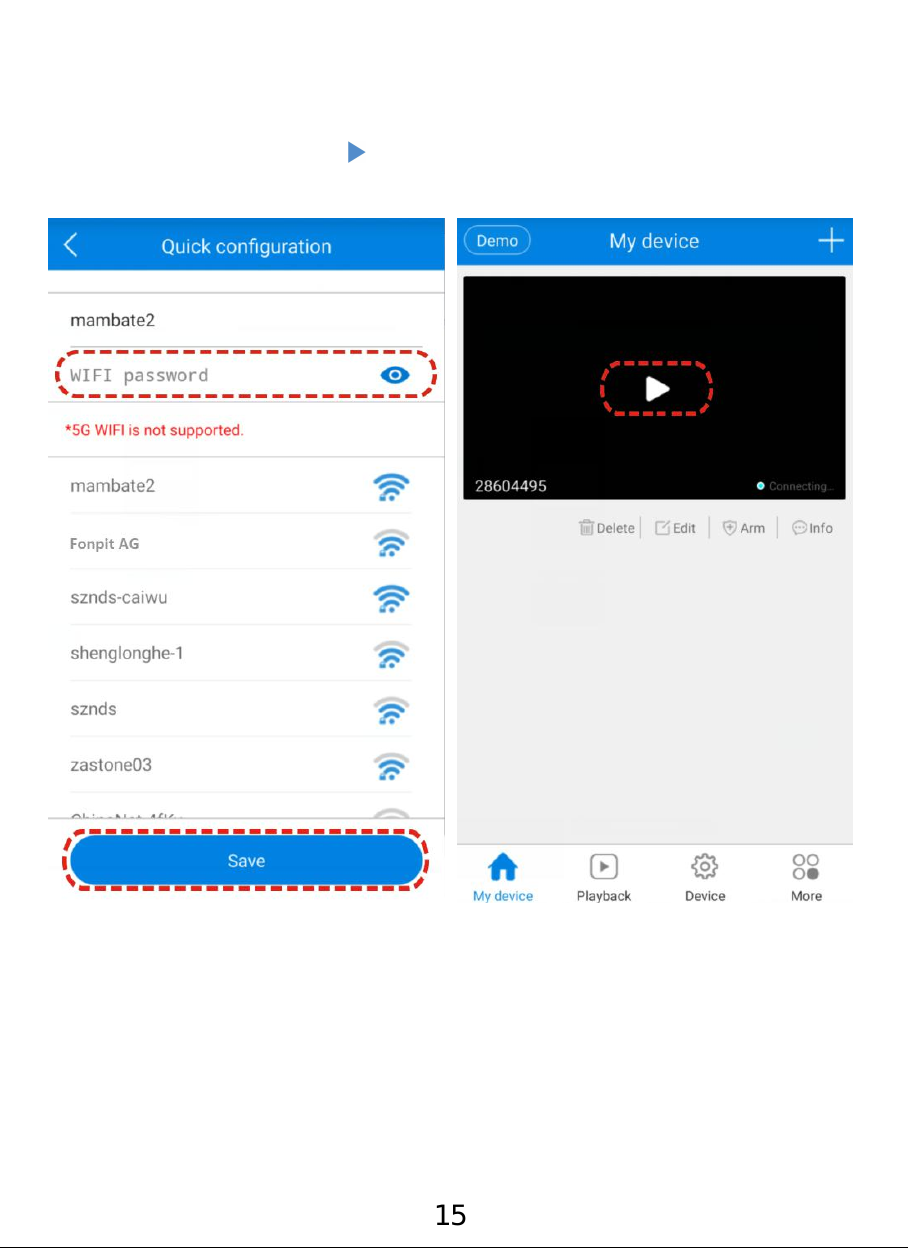
5. Enter your Wifi password and choose “Save”.
6. Tap to play the video recording.
3
Page 6
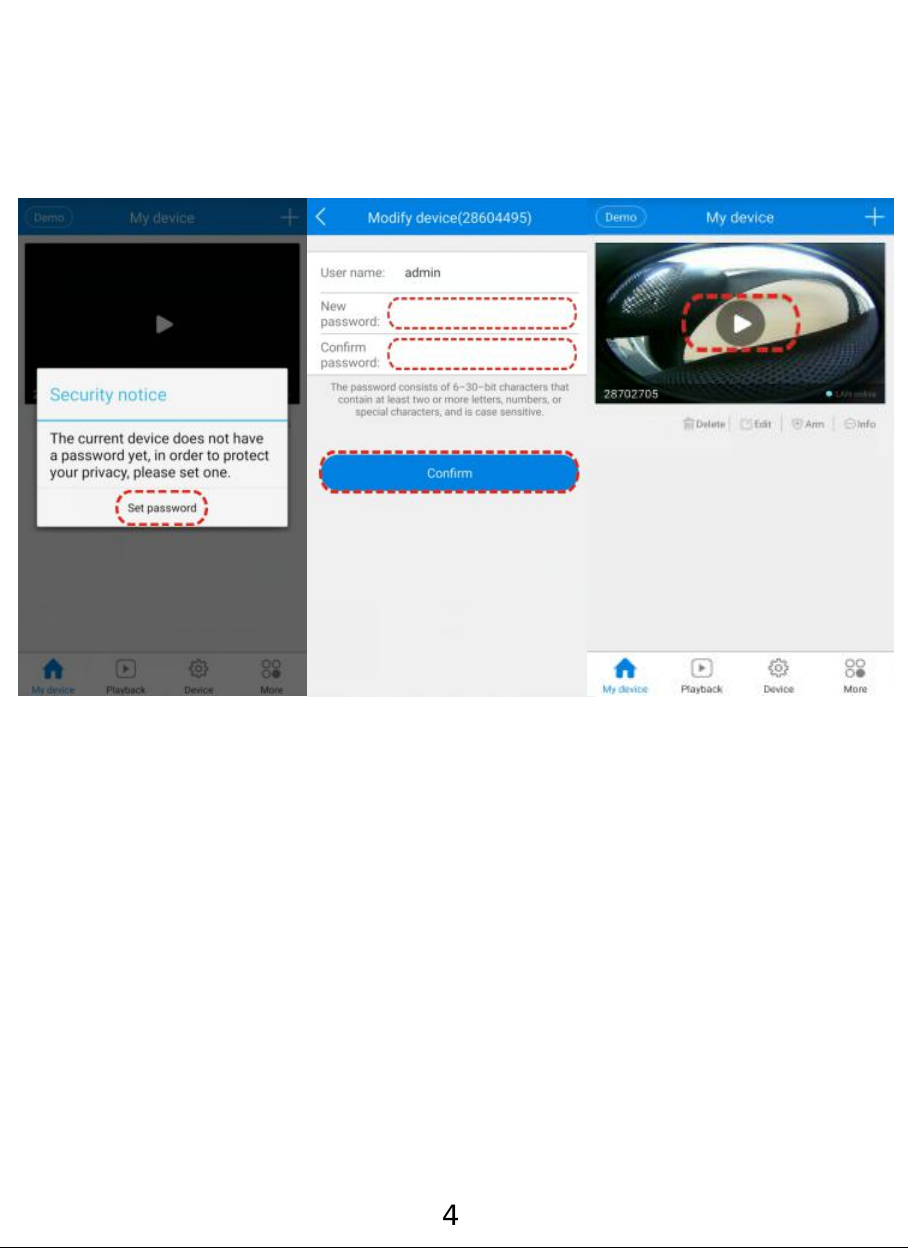
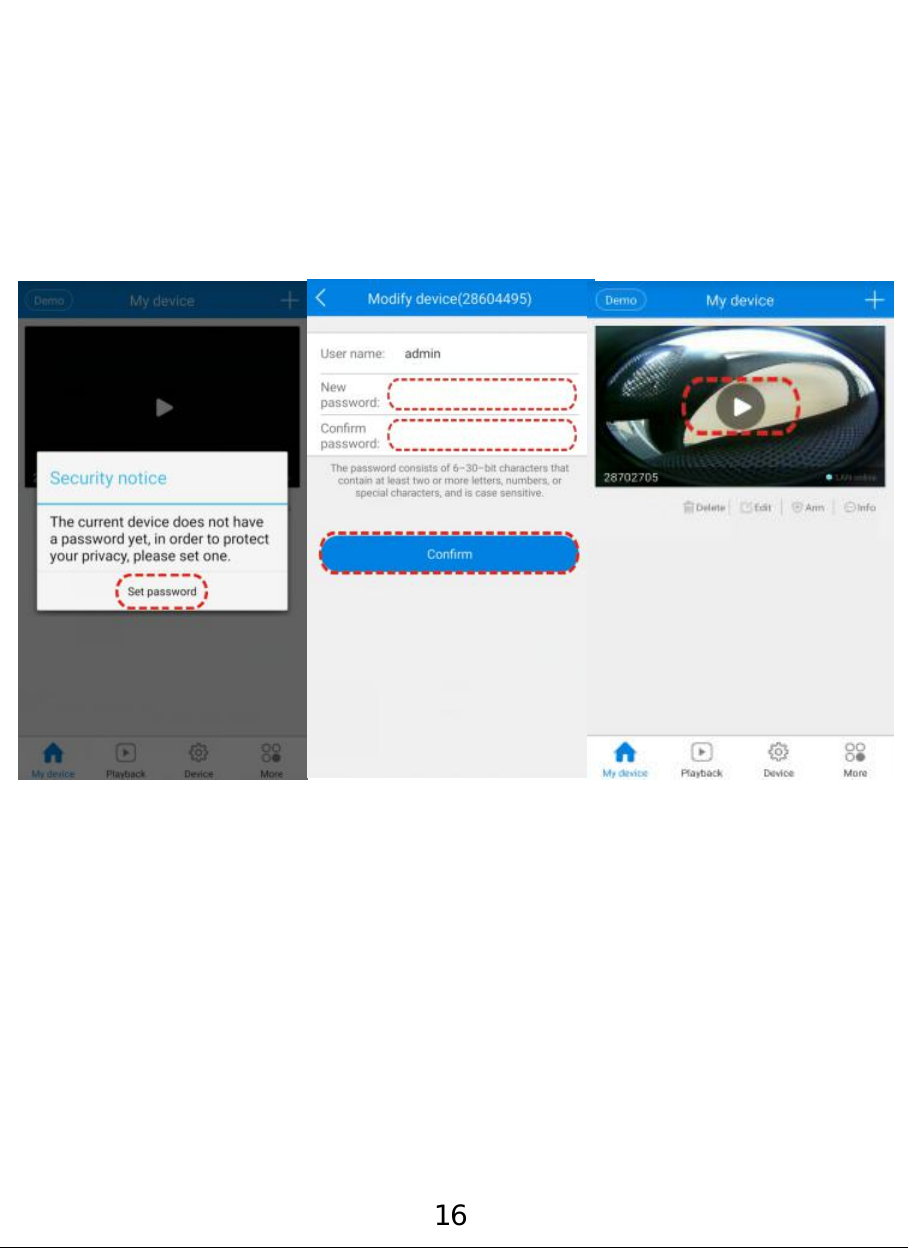
7. Choose “Set password”to protect your privacy.
8. Set the camera Password(required) and
Tap”Confirm” to view the video recording.
4
Page 7
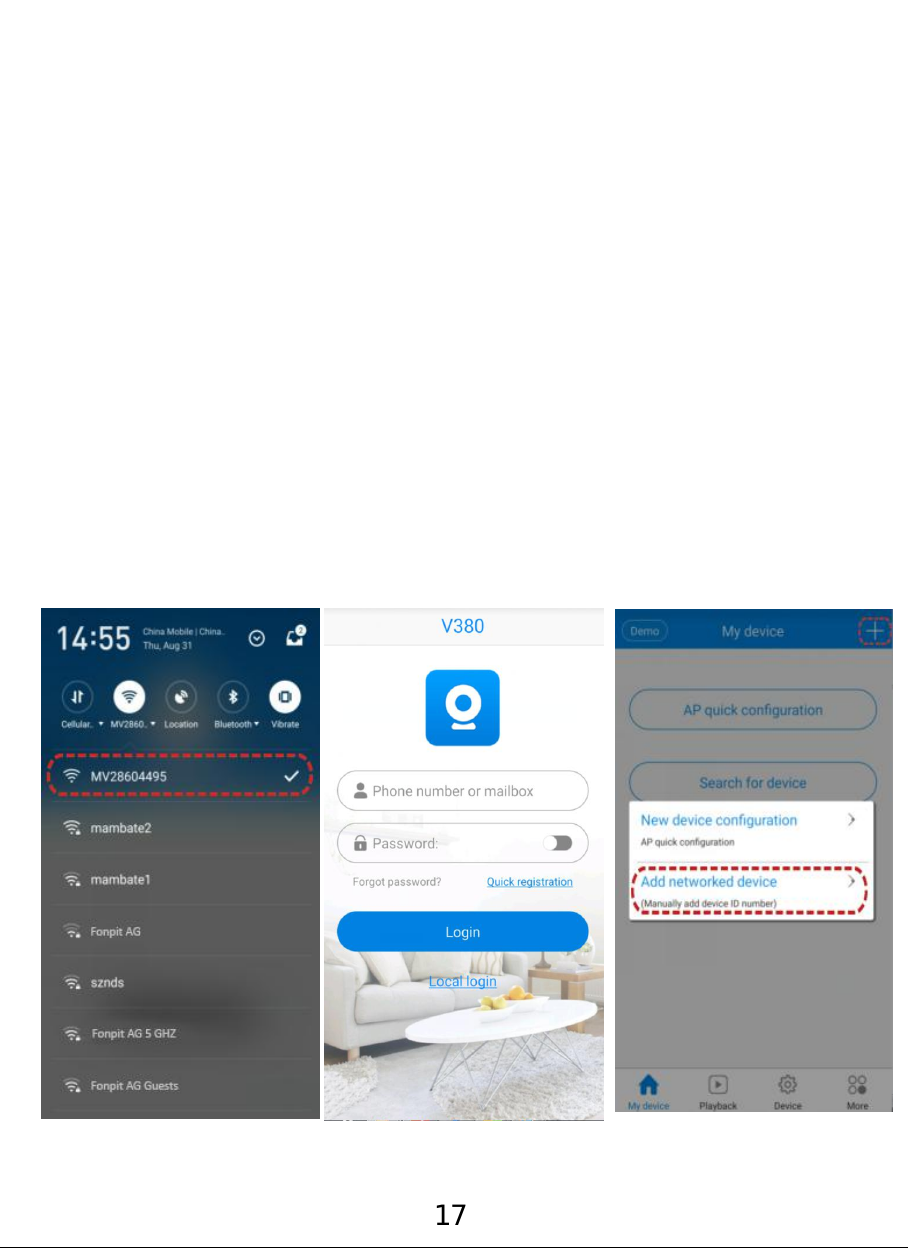
Watch the video recording after connecting
to LAN
Insert the included small screwdriver to the reset
hole for a few seconds to reset the camera.
1. Turn on the Wifi of your phone, and search the
device name begins with “MV.”(eg. MV28604495),
which you can also find on the camera. Pair with the
camera.
2. Open the “V380”, choose login or “Local
login”, then tap the”+”on the top right corner
and choose”Add networked device”to enter.
5
Page 8
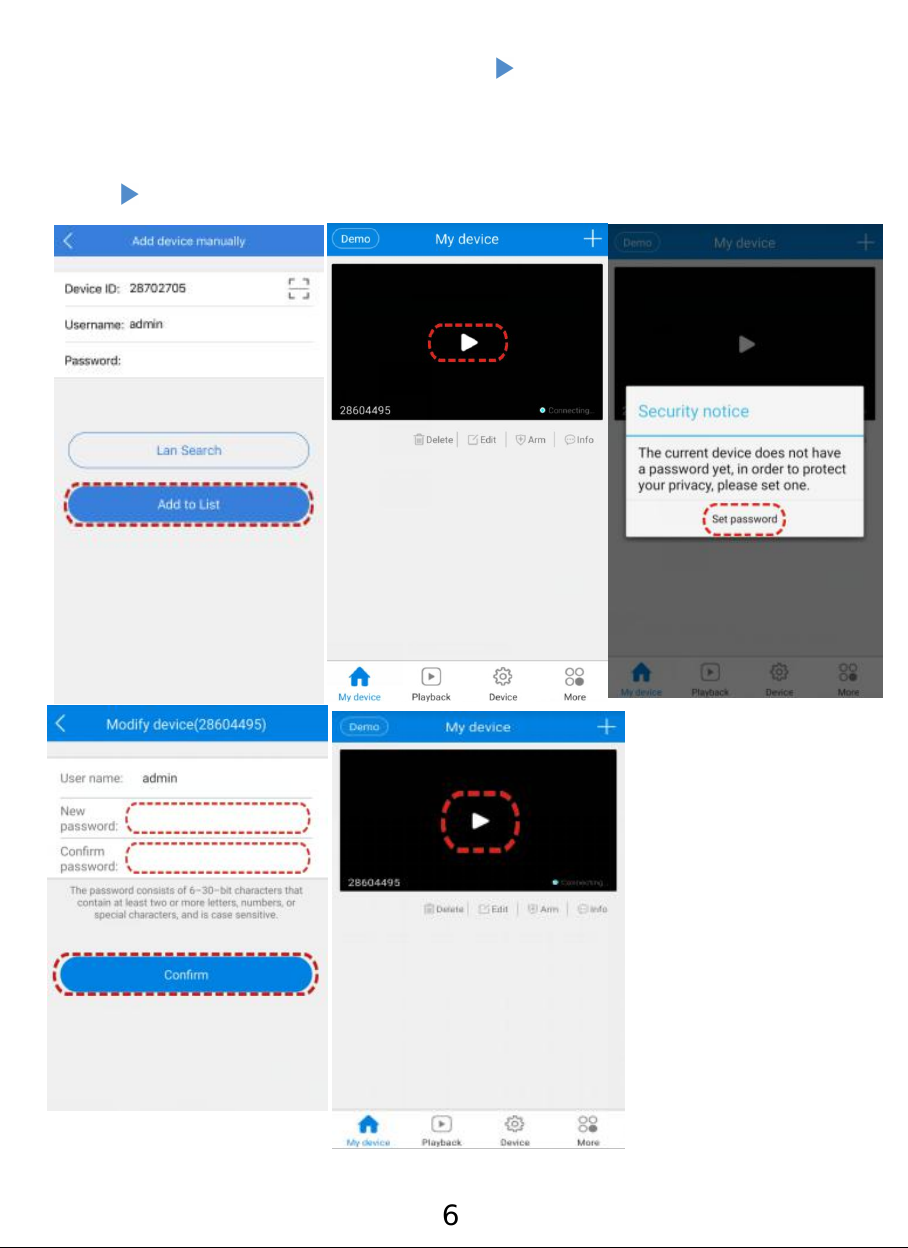
3. Choose“Add to list”, tap to set the password.
4. Choose“Set password”, then enter the
password(required) and choose“Confirm”, then
tap to watch the video recording.
6
Page 9
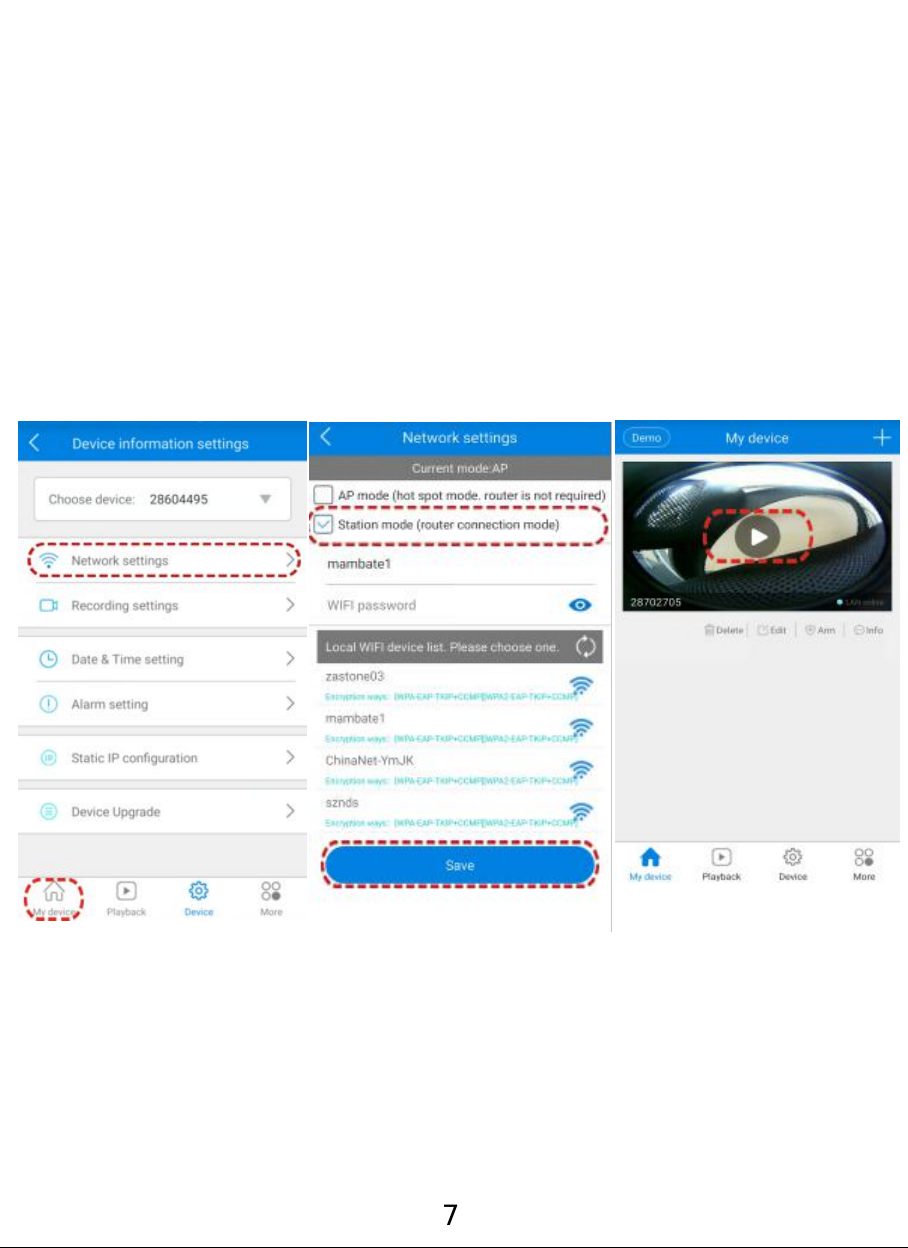
How to switch the connection from LAN to
1. Choose”Device”in the bottom menu.
2. Choose “Network settings”, and check
the“Station mode”, choose from the searched
router and enter the password, then choose
“Save”.
7
WAN?
Page 10
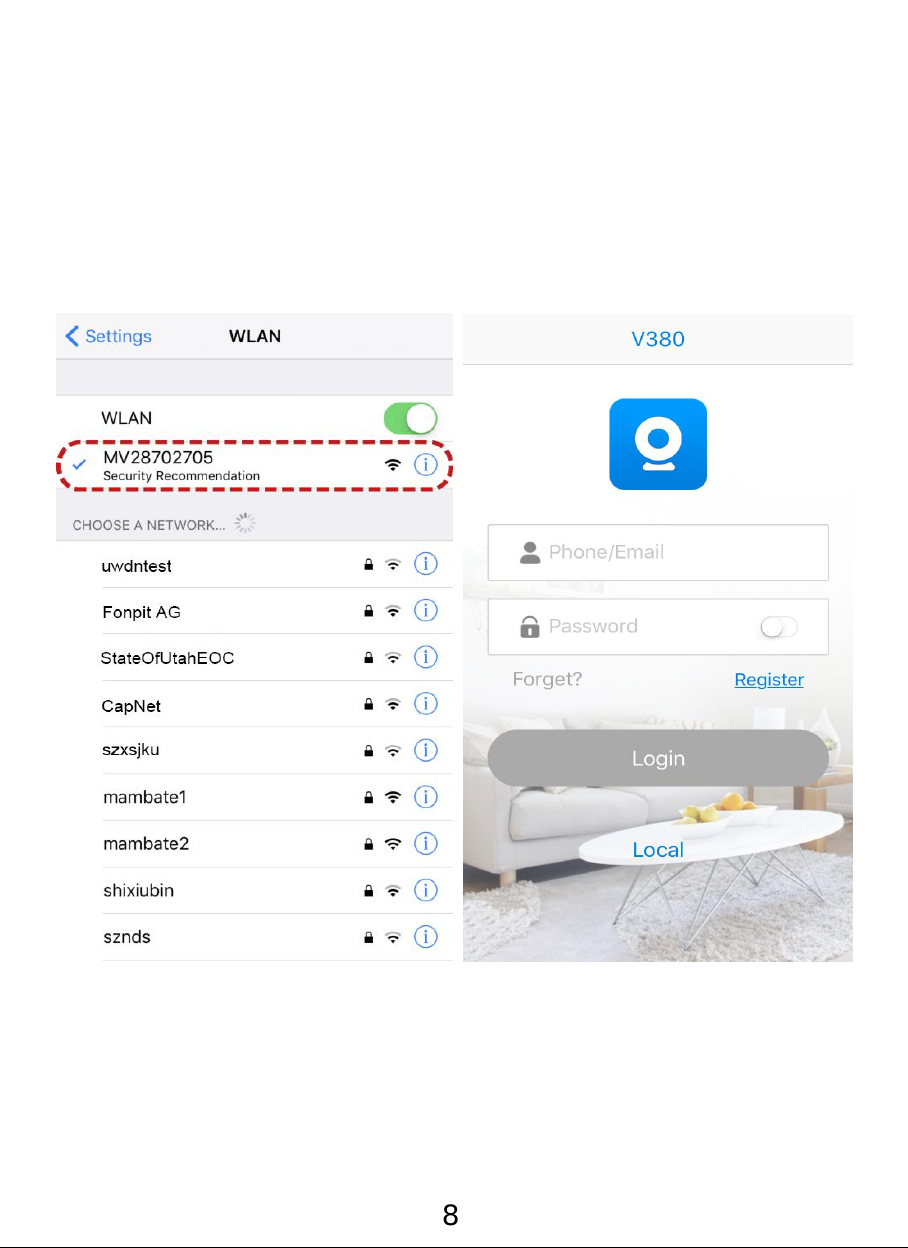
Instructions for iOS system
Instructions for iOS system after connected to LAN
1. Tap to connect the device with its name begins
with “MV.”(eg. MV28702706).
2. Open the APP”V380”and select “Local login”.
8
Page 11
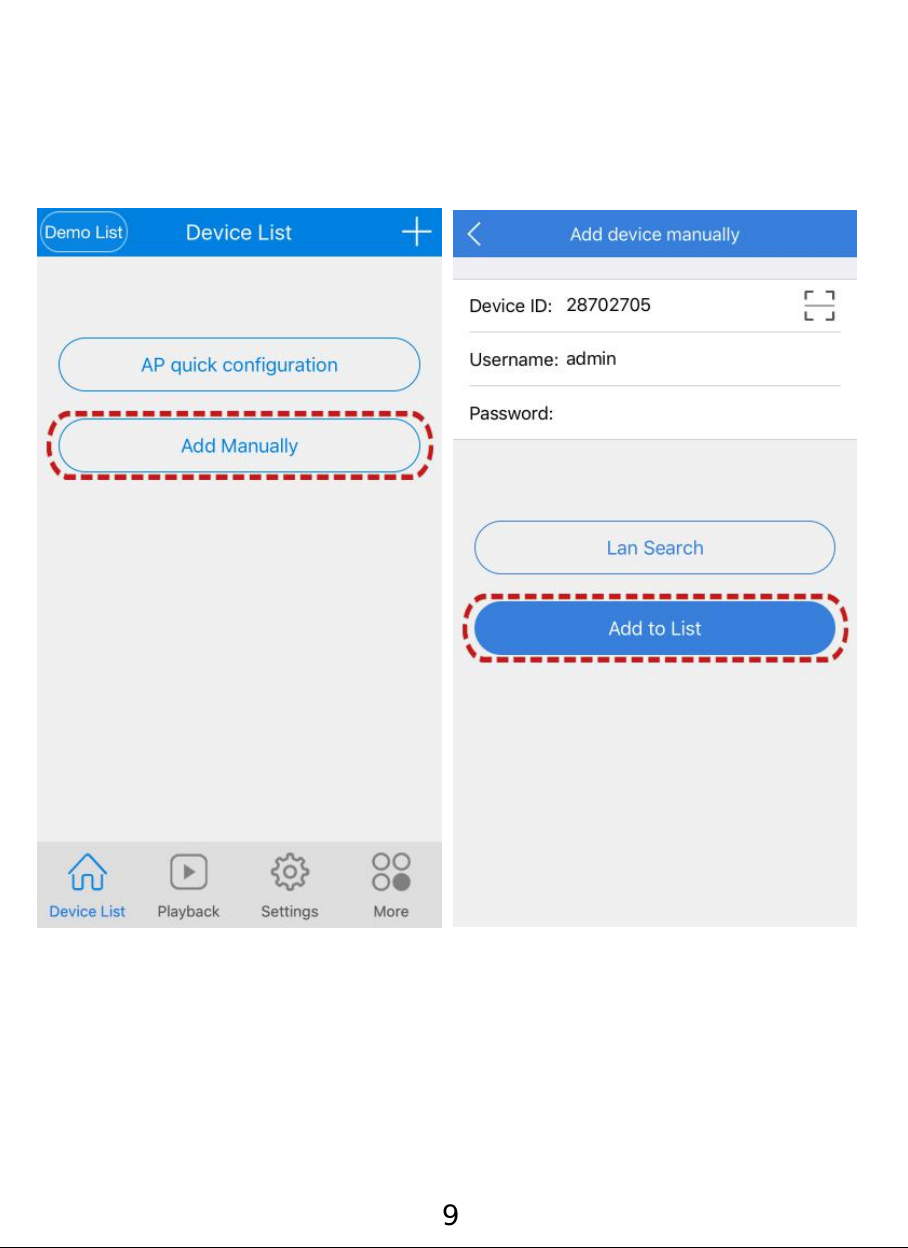
3. Choose “Add manually”.
4. Enter the device name and password, then choose
“Add to list”.
9
Page 12
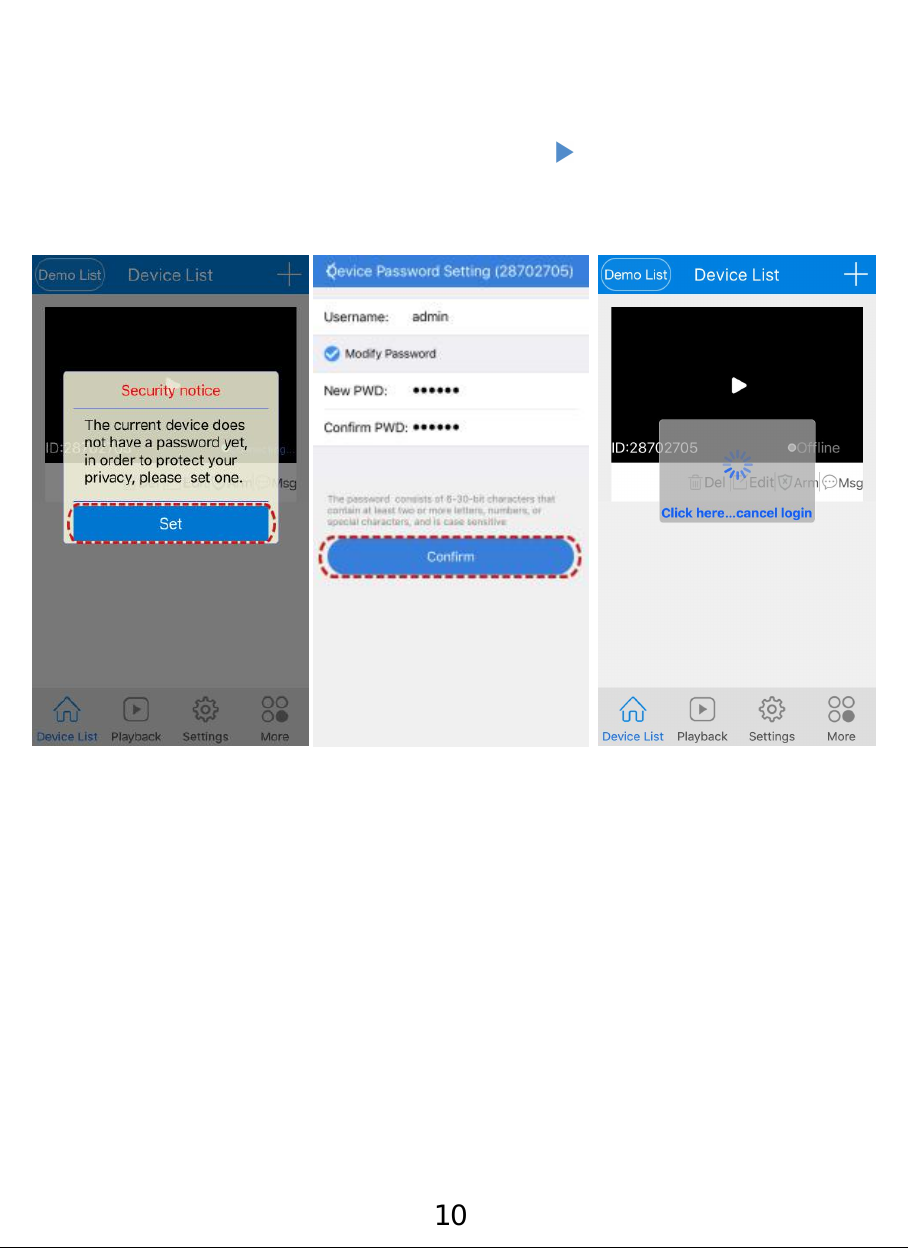
5. Set the password and Confirm. Then you can start
watching the video recording.
6. Choose”Confirm”, then tap to play the video
recordings.
10
Page 13
Instructions for iOS system
Instructions for iOS system after connected to WAN
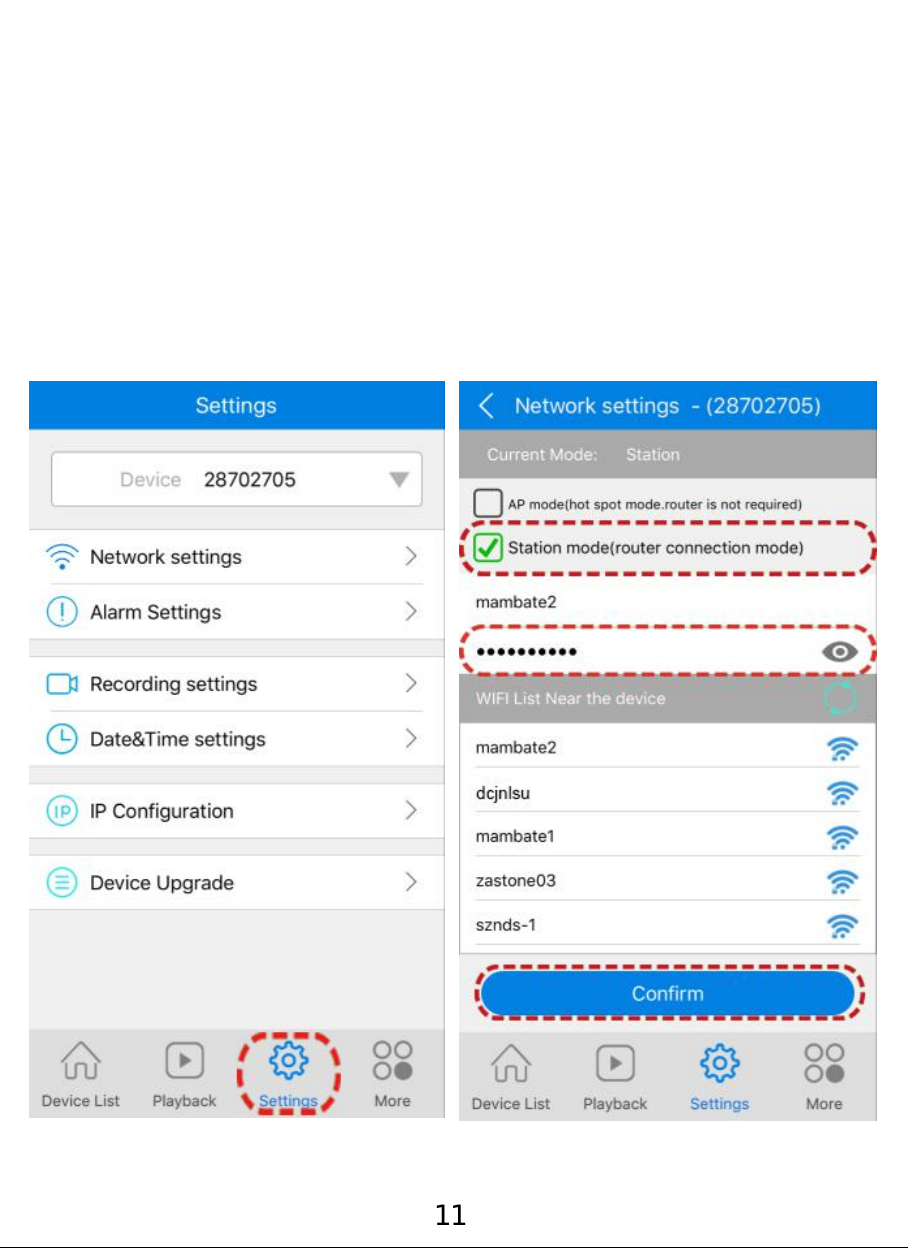
1. Select “Settings”after connected with LAN.
2.Choose “Network settings”, and check
the“Station mode”, choose from the searched
network and enter the password, then choose
“Confirm”.
11
Page 14
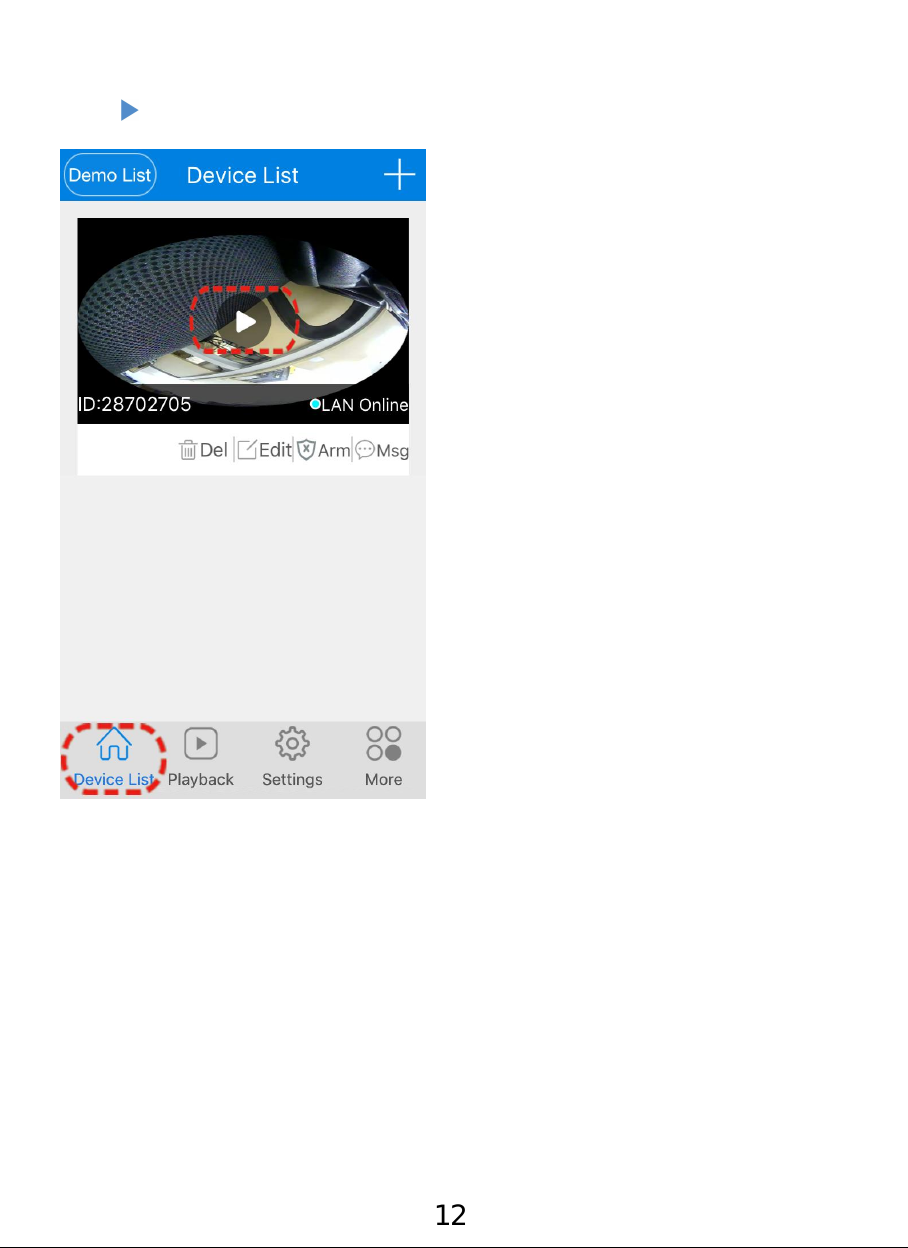
3.Choose”Device list” in the bottom menu, then
tap to play the video recordings.
12
Page 15
Suchen Sie bitte ein "V380" App auf dem Google
Play oder App Store und dann laden Sie bitte es
herunter.
Anmelden & Registrieren
Registrieren Sie bitte, vor dem Ersten benutzen.
Geben Sie Ihren Namen und Ihres Passwort nach der
Registrierung ein. Sie können auch "Local Login"
wählen, um Teile seiner Funktionen ohne
Registrierung zu erleben.
Sie können auch das Gerät mit Wifi verbinden durch
den Name“MV.”(eg. MV28604495).
Paaren mit Ihrem Telefon von Wifi
1.Öffnen Sie bitte die APP "V380" und wählen Sie
Login oder "Local Login".
2. Wählen Sie bitte "AP schnelle Konfiguration".
13
Page 16
3. Wählen Sie den Gerätenamen mit "MV" (zB
MV28604495), den Sie können auch auf der Kamera
finden. Klicken Sie die Wahl, um eine Verbindung zur
Kamera herzustellen.
4. Warten Sie auf der Verbindung.
14
Page 17
5. Geben Sie Ihr Wifi-Passwort ein und wählen Sie
“Save”("Speichern").
6. Klicken Sie die Taste um die Videoaufnahme
abzuspielen.
15
Page 18
7. Wählen Sie “Set password”("Passwort setzen"),
um Ihre Privatsphäre zu schützen.
8. Stellen Sie das Kamera-Passwort (erforderlich) ein
und klicken Sie auf ”Confirm”("Bestätigen" ), um
die Videoaufnahme abzuspielen.
16
Page 19
Sehen Sie sich die Videoaufnahme beim LAN
Anschluss
Um die Kamera zurückzusetzen, legen Sie den
mitgelieferten kleinen Schraubenzieher für einige
Sekunden in das Rücksetzloch ein.
1. Schalten Sie den Wifi ihres Telefons ein und
suchen Sie den Gerätenamen mit "MV". (eg.
MV28604495). Der Name wird also auf Ihrem
Kamera zeigen. Paaren Sie bitte es mit ihrem Kamera.
2. Öffnen Sie bitte die "V380", wählen Login oder
"Local Login". Dann klicken bitte Sie auf die "+" in
der rechten oberen Ecke und wählen Sie "Add
Networked Device" um die Funktion zu geben.
17
Page 20

3. Wählen Sie bitte "Add to list". Klicken Sie bitte die
Taste, um das Passwort einzustellen.
4. Wählen Sie“Set password” (Passwort setzen),
geben Sie dann das Passwort(erforderlich) ein. Dann
wählen Sie “Confirm”(Bestätigen) und klicken Sie
bitte die Taste um die Videoaufnahme zu sehen.
18
Page 21

Wie die Verbindung von LAN auf WAN zu
1. Wählen Sie im unteren Menü "Device"(Gerät).
Wählen Sie aus dem gesuchten Router und geben
Sie das Passwort ein. Und danach wählen Sie "Save"
(Speichern).
2.Wählen Sie "Network settings"
(Netzwerkeinstellungen), dann überprüfen Sie bitte
den “Station mode”(Stationsmodus). Wählen Sie
aus dem gesuchten Router. Geben Sie das Passwort
ein und dann wählen Sie“Save”(Speichern).
19
ändern?
Page 22

Anleitung für das iOS-System
Anleitung für das iOS-System nach dem Anschluss
an LAN.
1. Klicken Sie bitte das Menü, um das Gerät mit
seinem Namen zu verbinden, beginnt mit "MV" (zB
MV28702706).
2. Öffnen Sie bitte die APP mit dem Name "V380"
und wählen Sie Login oder "Local Login".
20
Page 23

3. Wählen Sie bitte“Add manually”(Manuell
hinzufügen).
4. Geben Sie den Gerätenamen und das Passwort ein.
Dann wählen Sie bitte "Add to list".
21
Page 24

5. Stellen Sie bitte Password ein und bestätigen Sie
Password. Dann können Sie die Videoaufnahme
ansehen.
6. Wählen Sie bitte ”Confirm”(Bestätigen) und
dann klicken Sie die Taste, um die Videoaufnahmen
abzuspielen.
22
Page 25

Anleitung für das iOS-System
Anleitung für das iOS-System nach dem Anschluss
an WAN
1. Wählen Sie "Settings(Einstellungen)" nach der
Verbindung mit LAN.
2. Wählen Sie bitte "Network settings"
(Netzwerkeinstellungen), dann überprüfen Sie bitte
den “Station mode”(Stationsmodus). Wählen Sie
aus dem gesuchten Router. Geben Sie das Passwort
ein und dann wählen Sie“Save”(Speichern).
23
Page 26

3. Wählen Sie ”Device list” (Geräteliste) und dann
klicken Sie die Taste um die Videoaufnahmen
abzuspielen.
24
Page 27

Cerca "V380" su Google Play o App Store e scaricalo.
Accedi e registrati
Sarà necessario registrarsi per il primo utilizzo.
Inserisci il tuo nome e la password dopo la
registrazione, oppure puoi anche scegliere "Local
login" per sperimentare parti delle sue funzioni
senza registrarti.
Attivare la connessione WiFi con il nome del
dispositivo inizia con "MV". (Per esempio.
MV28604495).
Coppia con il telefono da WiFi
1. Aprire l'app "V380" e scegliere Login o "Local
login".
2. Scegliere “AP quick configuration”
25
Page 28

3. Scegliere il nome del dispositivo inizia con "MV".
(Per esempio MV28604495), che potete trovare
anche sulla fotocamera. Toccare per collegarsi con la
fotocamera.
4. In attesa di connessione.
26
Page 29

5. Inserisci la tua password wifi e scegli "Save".
6. Toccare per riprodurre la registrazione video.
27
Page 30

7. Scegli "Set password" per proteggere la tua
privacy.
8. Impostare la password della fotocamera (richiesta)
e toccare "Confirm" per visualizzare la registrazione
video.
28
Page 31

Guarda la registrazione video dopo la
connessione a LAN
Inserire il piccolo cacciavite incluso nel foro di reset
per alcuni secondi per azzerare la videocamera.
1. Accendere il WiFi del telefono, e cercare il nome
del dispositivo inizia con "MV". (Per esempio:
MV28604495), che potete trovare anche sulla
fotocamera. Coppia con la fotocamera.
2. Aprire il "V380", scegliere Login o "Local login",
quindi toccare il "+" nell'angolo in alto a destra e
scegliere "Add networked device" per entrare.
3.Scegliere "Add to list", toccare per impostare la
password.
29
Page 32

4. Scegliere "Set password", quindi inserire la
password (richiesta) e scegliere "conferma", quindi
toccare per guardare la registrazione video.
30
Page 33

Come passare la connessione da LAN a WAN?
1. Scegliere "Device" nel menu in basso.
2. Scegliere "Network settings", e selezionare la
"Station mode", scegliere dal router cercato e inserire
la password, quindi scegliere "Save".
31
Page 34

Istruzioni per il sistema iOS
Istruzioni per il sistema iOS dopo la connessione a
LAN
1. Toccare per collegare il dispositivo con il suo nome
inizia con "MV". (por esempio. MV28702706).
2. Aprire l'app "V380" e selezionare "Local login”.
32
Page 35

3. Scegliere "Add manually".
4. Inserire il nome del dispositivo e la password,
quindi scegliere "Add to list”.
33
Page 36

5. Impostare la password e confermare. Poi si può
iniziare a guardare la registrazione video.
6. scegliere "Confirm", quindi toccare per
riprodurre le registrazioni video.
34
Page 37

Istruzioni per il sistema iOS
Istruzioni per il sistema iOS dopo la connessione a
WAN
1. Selezionare "Settings" dopo la connessione con
LAN.
2. Scegliere "Network settings", e selezionare la
"Station mode", scegliere dalla rete ricercata e
inserire la password, quindi scegliere "Confirm".
35
Page 38

3. Scegliere "Device list" nel menu in basso, quindi
toccare per riprodurre le registrazioni video.
36
Page 39

Busca "V380" en Google Play o App tienda y
descargarlo.
Iniciar sesión y registrarse
Necesita registrarse para el primer uso. Ingrese su
nombre y contraseña después de registrarse, o
también puede elegir "login local" para
experimentar partes de sus funciones sin registrarse.
Activar la conexión WiFi con el nombre del
dispositivo comienza con "MV." ( Por ejemplo:
MV28604495).
Emparejar con su teléfono por WiFi
1. Abra la aplicación "V380" y elija login o "login
local".
2. Elija "AP quick configuration"
37
Page 40

3. Elija el nombre del dispositivo comienza con "MV".
(por ejemplo: MV28604495), que también se puede
encontrar en la cámara. Pulse para conectar con la
cámara.
4. Esperando la conexión.
38
Page 41

5. Ingrese su contraseña WIFI y elija "Save".
6. Pulse para reproducir la grabación de vídeo.
39
Page 42

7. Elija " Set password " para proteger su privacidad.
8. Establece la contraseña de la cámara (requerida) y
pulse " Confirm " para ver la grabación de vídeo.
40
Page 43

Ver la grabación de vídeo después de
conectar a LAN
Inserte el destornillador pequeño incluido en el
aguja de restablecimiento durante unos segundos
para restablecer la cámara.
1. Encienda el wifi de su teléfono, y busque el
nombre del dispositivo comienza con "MV." (por
ejemplo: MV28604495), que también se puede
encontrar en la cámara. Emparejar con la cámara.
2. Abra el "V380", elija login o "login local", luego
pulse "+" en la esquina superior derecha y elija " Add
networked device " para entrar.
41
Page 44

3. Seleccione " Add to list ", pulse para establecer la
contraseña.
4. Elija " Set password ",luego entra la contraseña
(necesario) y elija "confirmar",luego pulse para ver
la grabación de vídeo.
42
Page 45

¿Cómo cambiar la conexión de LAN a WAN?
1. Seleccione " Device " en el menú inferior.
2. Elija " Network settings ", y compruebe el " Station
mode ", elija del enrutador buscado e entra la
contraseña, después elija " Save".
43
Page 46

Instrucciones para el sistema iOS
Instrucciones para el sistema iOS después de
conectado a LAN
1. Pulse para conectar el dispositivo con su nombre
comienza con "MV." (por ejemplo: MV28702706).
2. Abre la app "V380" y selecciona " Local login ".
44
Page 47

3. Elija "Add manually ".
4. Ingrese el nombre del dispositivo y la contraseña,
luego elija " Add to list ".
45
Page 48

5. Configure la contraseña y confirme. Entonces
usted puede comenzar a ver la grabación de vídeo.
6. Elija "Confirm", luego pulse para reproducir los
vídeo grabado.
46
Page 49

Instrucciones para el sistema iOS
Instrucciones para el sistema iOS después de
conectar a WAN
1. Seleccione "Settings" después de conectar con
LAN.
2. Elija " Network settings ", y compruebe el " Station
mode ", elija de la red buscada y entra la contraseña,
después elija "Confirm".
47
Page 50

3.Seleccione ”Device list” en el menú inferior,
luego pulse para reproducir los vídeo grabado.
48
Page 51

Recherchez "V380" sur Google Play ou App store et
le télécharger.
Inscrire &login
Vous devez inscrire dès la première utilisation.
Remplissez le nom et le code secret après la
inscription, ou vous pouvez aussi choisir “Local
login”pour essayer les fonctions d’expérience sans
l’inscription.
Le nom de la connexion Wifi possible avec cet
appareil est commencer par“MV.”(eg. MV28604495).
Jumeler avec votre téléphone par Wifi
1. Ouvrir le APP“V380 ”et choisir login ou“Local
login”.
2. Choisissez AP quick configuration(voyez la photo,
svp)
49
Page 52

3. Choisissez l’appareil au nom de “MV.”(eg.
MV28604495) ce que vous trouvez aussi sur la
caméra. Touchez pour la connexion.
4. Veuillez patienter pour la connexion.
50
Page 53

5. Remplissez le code secret de votre Wifi et puis
choisir “Save”(sauvegarder).
6. Touchez le bouton pour lire la vidéo
enregistrée.
51
Page 54

7. Choisissez“Set password”(définir le code secret)
pour protéger votre confidentialité.
8. Définissez le code secret de camera (required) et
touchez”Confirm” pour lire la vidéo enregistrée.
52
Page 55

Lire la vidéo enregistrée après connecté avec
LAN
Insérez le petit tournevis inclus dans le trou de
réinitialisation pendant quelques secondes pour
réinitialiser la caméra.
1. Ouvrez le wifi de votre téléphone et recherchez
l’appareil au nom de“MV.”(eg. MV28604495), ce
que vous pouvez trouver aussi sur la caméra.
Jumelez votre téléphone avec la caméra.
2. Ouvrez “V380”, choisissez login ou “Local
login”, et puis toucher ”+”sur le coin droite en
haut et choisissez ”Add networked device”pour
entrer.
53
Page 56

3. Choisissez“Add to list”(ajouter à liste), touchez
pour définir le code secret
4. Choisissez“Set password”, et puis remplir le
code secret (required) ,Choisissez“Confirm”, et
puis touchez pour lire la vidéo enregistrée.
54
Page 57

Comment switch la connexion de LAN à
1. Choisissez”Device”dans le fond de menu.
2. Choisissez “Network settings”, et cochez
le“Station mode”, Choisissez de liste recherchée et
remplissez le code secret, Choisissez
“Save”(sauvegarder).
55
WAN?
Page 58

Instructions pour système iOS
Instructions pour système iOS après connecté à LAN
1. touchez pour connecter l’appareil au nom de
“MV.”(eg. MV28702706).
2. Ouvrez APP”V380”et selectionner“Local
login”.
56
Page 59

3.Choisissez “Add manually”.(ajouter
4. Remplissez le nom de l’appareil et le code secret.
Choisissez “Add to list”.(ajouter à liste)
57
manuellement)
Page 60

5. Definissez le code secret et Confirmer.
6. Choisissez”Confirm”, touchez pour lire la
vidéo enregistrée.
58
Page 61

Instructions pour système iOS
Instructions pour système iOS après connecté à
WAN
1. Selectionnez“Settings”(définir) après avoir
connecté à LAN.
2.Choisissez “Network settings”, et cochez
le“Station mode”, Choisissez de liste recherchée et
remplissez le code secret. Choisissez “Confirm”.
59
Page 62

3.Choisissez”Device list” dans le fond de menu,
touchez lire la vidéo enregistrée.
60
 Loading...