

Page 1
Page 2

Power ON/OFF
Slide the on/off button on the left side to switch on/off the device.
When the slider is in “ON” position, hold the “PLAY” button for about
3 seconds to turn on or turn off the player.
If you can’t turn on the player, please kindly note if the slider
switch(power button) is in “ON” position.
To totally turn off your player, please slide the power button to “OFF”.
Screen-lock
Unlock or lock the screen by scrolling up/down the LOCK slider.
Charge the Player
Plug one end of the micro USB cable into the USB port of a computer, and
connect the other end to the port of your device. While it is fully charged,
disconnect the micro USB cable from your device and the computer.
Recording
1.
At any interface, click the “REC” button to start recording. when it is in
recording status, the indication light flashes red.
1
Page 3

-
Click the “PLAY” button to start recording, click it again to pause.
-
Click the “STOP” button to finish and save the recording.
-
Then click the “PLAY” button to play the recording files you just saved.
Click the / button to select from all the recording files you have
saved.
Note: When recording in the voice control mode, the player will stop
recording automatically if no sound is detected. For important recordings,
please don't record under the voice control mode.
2.
Use the external MIC to record
After connected to external mic, select “LINE-IN” under the “Record from”
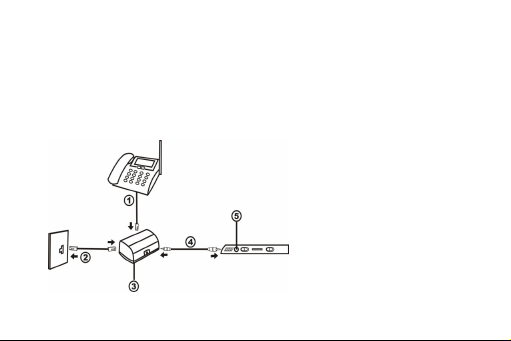
menu.3.Use the LINE-IN to record
Connect the telephone line, the LINE-IN cable and audio cable
together as shown by the following picture, and then connect to the MIC of
the voice recorder.
2
Page 4
In the recording setting menu, select “LINE-IN” under the “Record
from” menu and click the “PLAY” button to confirm. Then click the “REC”
button to start recording when calling by the telephone.
Recording Settings
Select “Recording Settings” on main screen with “PLAY” button to access
to its function. Select from these settings according to your need and click
the “PLAY” button to save.
1. Telephone Line
2. Phone Jack
3. Telephone Adapter
4. Audio Cable
5. MIC-in of the Voice
Recorder
3
Page 5

-
Record format: choose from the two format options (MP3/PCM).
-
Record from: choose “Microphone”/”Line In”, then click the “PLAY”
button to save.
Note: Select “Microphone” to record by the internal Mic of the voice
recorder. Select “Line In” to record by the telephone.
-
Record quality: Set “low”/”middle”/”high” level for your recording.
-
AVR set: choose ON/OFF for the AVR set.
-
Set recording scene: Choose from “Normal scene”/“train scene”/“meeting
scene”/“long range scene” for the recording.
-
Recording lamp set: Choose ON/OFF for the recording indication
light(flashing red).
-
Monitor: Choose ON/OFF for the monitor.
-
Auto record: “Record on/off” to start/stop record automatically; “start
time” to set the beginning time to record, “end time” to set the ending time
to record and “Auto REC cycle” to set the record frequency for
Once/Daily/Work day.
4
Page 6
Note: This function is available only when the slider is in “ON” position.
-
Subsection record: Select 0 Minute/30 Minute/60 Minute/90 Minute/120
Minute for your recording. Click the “PLAY” button to confirm.
Play Your Music & Audios
While there is a “Music” / “Voice” icon on the main menu, click the
“PLAY” button to access to its function. Click the / button to choose,
then click the “PLAY” button to start playing.
Volume adjust
Click the +/- button on the right side of the player to increase/decrease the
volume.Return
Return to the main menu: click the M button on the right side of the player
continually to go back to the main music playing screen.
Rewind/Forward
While it’s on music playing interface, hold the button to fast forward,
single click to next audio file; hold the button to rewind, single click to
5
Page 7

the previous audio file. Click the “PLAY” button for playing. Click the
“PLAY” button again or the “STOP” button for pause.
Repeat Settings
Click the “A-B” button on the right side, and the icon for A-B
indication will appear on playing screen. Starting time for replay is
confirmed while clicking the “A-B” button(B is flashing).
Click the “A-B” button again to set the ending time(B is no longer
flashing). And the audio from time A to B will be repeated. Click the
“PLAY” or the “A-B” button to back to normal playing.
Resume playing
While the music is still playing in the backstage, and you switch off the
player, then next time you turn it on, it will start playing from where you
left.Submenu
While it’s on music playing interface, hold the button “M” to access to the
submenu. The related list will show, including “Play mode”, “Bookmarks”,
6
Page 8

“Variable Speed Playback”, “Delete”, “Sound Setting”, “Add to
Playlist”and “Remove from Playlist”.
1. Play mode
Hold the button M“Play mode”“Repeat”/”Shuffle”.
2. Bookmarks
Hold the button M“Bookmarks”“Add bookmark”/” Go to
bookmark”/” Delete bookmark”. Select according to your need.
It is marked by the stopping time as “hh:mm:ss”. So you can set the
stopping time before you add it for continues playing next time
conveniently.
Maximum number of bookmarks supported by each audio file is 10.
You can also cover the previous bookmark with new bookmark, and then
the old one will be replaced by the new.
You can find the bookmarks you saved with the
option “Go to bookmark” under item “Bookmarks”, and you can delete
them with the option “Delete bookmark”.
7
Page 9

3. Variable Speed Playback
Hold the button M” Variable Speed Playback” to adjust speed from
-8(Slowest) to +8(Fastest ).
4. Delete
Delete the audio files you want.
Note: In the now playing interface, hold the A-B button on the right side to
get access to quick deletion, choose “yes” and click ‘’PLAY” button to
delete.
5. Sound Settings
Hold the button M“Sound Settings”” Normal”, “Rock”, “Funk” and
etc.
For equalizer, you can choose different music style, such as “Rock”,
“Funk” and etc.
For variable speed playing, you can set the playing speed as you need.
6. Add to Playlist
There are 3 options prepared for you, including “Playlist on the go [1]”,
8
Page 10

“Playlist on the go [2]” and “Playlist on the go [3]”, you can add the song
which is playing to any one of these three as you like.
7. Remove from Playlist
You can remove the song which is playing to any one of these three
Playlists as you like.
To create playlists by yourself
There is a free program called Media Go. It's the easiest program to use for
transferring playlists to the AGPTek. Just create your playlists in Media Go
and then right-click its name and select ‘Add playlist to X :( Which is your
MP3 player's disk. (For more details, please kindly check the link:
http://mediago.sony.com/chs/download).
Note: whenever at any interface, short click M to exit and back to superior
menu.Transfer Files to Your Player
Connect your device to the computer with the enclosed Micro USB cable.
The mp3 player will show up as a removable disk(RP11) as soon as the
9
Page 11

computer recognize it and then just drag the files into the mp3 player. If
your computer cannot recognize the player, the enclosed Micro USB lead
may has problem, please use another Micro USB lead to connect it to your
PC.
Note: for lyrics to be synchronous displayed with the playing music, please
download the lyric files first. (Lyric format:LRC), and please put the lyric
file and the music file in the same folder.
Music
While there is a “Music” icon on the main menu, click the “PLAY” button
to access to its function. Choose to play your music by “All songs”,
“Artists”, “Albums”, ”Genres” and “Playlists”.
Shortcut music playing button: On the main menu, click M button can
directly return back to the now playing interface if there are musics playing
at the backstage.
Voice
The “Voice” contains all of the recording files saved in the player. Click the
10
Page 12
“PLAY” button to go to the now playing interface and the audios start
playing. Hold the button “M” to access to its submenu.
Alarm
While there is “Alarm” icon on main menu, click the ”PLAY” button to
access to the alarm function. You can adjust its 5 different items, including
“Alarm ON/OFF”, “Alarm time”, “Alarm cycle”, “Alarm music” and
“Alarm volume”. Click the and button to select and click the
“PLAY” button to save. (you can use the music in flash for your alarm
music)
System Settings
Select “System Settings” on main screen with “PLAY” button to access to
its functions. Select from these settings according to your need and click the
“PLAY” button to save.
Sleep timer: When playing time is reach sleep timer you set, the player
will power off automatically;
Display settings: Set the “Brightness”, “Backlight timer”, “Screensaver”
of your player;
11
Page 13

Set the Sleep time/Display settings/Date and time according to your
need;
Language: Choose your language;
Filmware Version/Disk Space: See information about your player;
Format device/ Factory settings: Format the device or do factory setting
according to your need.
Help and Troubleshooting
Can’t turn the player on
Please check whether the battery has been run out, maybe you can connect
the player with computer and try again after charging.
Can’t download the file from the computer
- Please confirm whether it’s connected properly.
- Please check whether the storage space of the internal memory is full.
- Please check whether the USB cable is damaged.
If you have any problems about this product, please feel free to contact
support@agptek.com.
12
Page 14
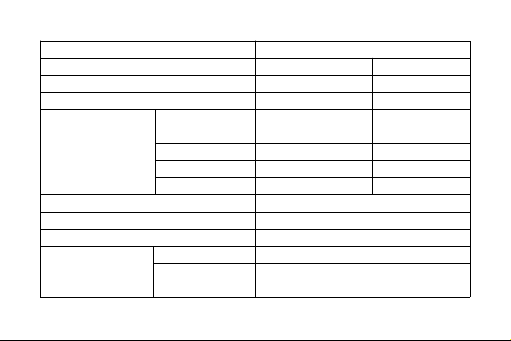
Specifications
Memory capacity
8GB
Low
34560 min
540 min
Middle
4325 min
360 min
High
2163 min
180 min
Recording bit
rate
Recording
format
MP3
PCM
Low
32kbps
512kbps
Middle
64kbps
768kbps
High
128kbps
1536kbps
Frequency
20Hz ~ 20KHz
Dimension
95 mm*33mm*12mm
Weight
60g (Battery included)
Power supply
(after being
fully charged)
Recording
About 70-90 hours
Play
About 100 hours (by earphone)
13
Page 15

Encender-Apagar
Deslice el botón ON/OFF a la izquierda para encender or apagar el
dispositivo.
Cuando el deslizador está en "ON" posición, mantenga presionado el
botón "PLAY" durante unos 3 segundos para encender o apagar el
reproductor.
Si no se puede activar en el reproductor, por favor amablemente nota si
el deslizante de interruptor (botón Power) está en "ON" posición.
Para totalmente apagar el reproductor, por favor deslice el botón Power
en "OFF" posición.
Bloqueo de pantalla
Para desbloquear o bloquear la pantalla, desplace arriba/abajo el deslizador
de bloqueo.
Cargar el reproductor
Enchufe un extremo del cable micro USB al puerto USB de un ordenador y
conecte el otro extremo al puerto del dispositivo. Mientras que está
14
Page 16

completamente cargado, desconecte el cable micro del USB de su
dispositivo y del ordenador.
Grabación
1.
En cualquier interfaz, haga clic en el botón "REC" para iniciar la
grabación. Cuando está en grabación, la luz indicadora parpadea en rojo.
- Haga clic en el botón "PLAY" para iniciar la grabación, haga clic otra
vez para hacer una pausa.
- Haga clic en el botón "STOP" para finalizar y guardar la grabación.
- Luego haga clic en el botón "PLAY" para reproducir los archivos de
grabación que acaba de guardar. Haga clic en el botón / para
seleccionar todos los archivos de grabación que ha guardado.
Nota: Al grabar en el modo de control de voz, el reproductor detendrá
automáticamente la grabación si no se detecta ningún sonido. Para
grabaciones importantes, por favor no grabe bajo el modo de control de
voz.2.Utilice el micrófono externo para grabar
15
Page 17
Después de conectar al micrófono externo, seleccione "LINE-IN" bajo el
menú "Record from".
3. Utilice LINE-IN para grabar
Conecte la línea telefónica, cable LINE-IN y cable de audio se
muestran juntos como el cuadro siguiente y luego conecte el micrófono de
la grabadora de voz.
En el menú de configuración de grabación, seleccione "LINE-IN" bajo
1.Línea telefónica
2. Jack de telefóno
3. Adaptador de telefóno
4. Cable de Audio
5. MIC-en de la grabadora
de voz
16
Page 18

el menú " Record from " y haga clic en el botón "PLAY" para confirmar.
Haga clic en el botón "REC" para iniciar la grabación cuando se llama por
el teléfono.
Configuración de grabación
Seleccione " Recording Settings" en la pantalla principal con el botón
"PLAY" para acceder a su función. Seleccione estas opciones según su
necesidad y haga clic en el botón "PLAY" para guardar.
- Formato de grabación: elegir entre las dos opciones de formato
(MP3/PCM).
- Record from: seleccione “Microphone”/”Line In”,y haga clic en "PLAY"
para guardar.
Nota: Seleccionar "Microphone" para grabar por el micrófono interno de
la grabadora de voz. Seleccionar "Line In" para grabar por el teléfono.
- Calidad de grabación: "bajo" / "medio" / "alto" nivel para su grabación.
- AVR set: seleccione ON/OFF para el AVR set.
- Set de escena de grabación: Seleccionar entre “Normal scene”/“train
17
Page 19

scene”/“meeting scene”/“long range scene” para la grabación.
- Set de lámpara de grabación: seleccione ON/OFF para la indicación de
grabación ligera (parpadea en rojo).
- Monitor: Seleccione ON/OFF para el monitor.
- Auto grabación: “Record on/off” para iniciar/parar grabación
automáticamente; “start time” para ajustar el comienzo de tiempo para
grabar, “end time” para ajustar el tiempo final para grabar y “Auto REC
cycle” para ajustar la frecuencia de grabación por Una vez/Diario/Jornada.
Nota: Esta función está disponible sólo cuando el deslizador está en
"ON"posición.
- Subsección de grabación: Seleccione 0 Minuto/30 Minutos/60
Minutos/90 Minutos/120 Minutos para su grabación. Haga clic en el botón
"PLAY" para confirmar.
Reproducirr su música & Audios
Mientras que hay un icono " Music” / “Voice " en el menú principal, haga
clic en el botón "PLAY" para acceder a su función. Haga clic en e botón
18
Page 20

l / para elegir, luego haga clic en el botón "PLAY" para comenzar a
reproducir.
Adjuste de volumen
Haga clic en el botón +/-en la derecha del reproductor para aumentar o
disminuir el volumen.
Volver
Volver al menú principal:Haga clic en el botón M en el lado derecho del
reproductor continuamente para volver a la pantalla principal de
reproducción.
Rebobinar/Avanzar
Mientras está en la interfaz de reproducción de música, mantenga
presionado el botón para avanzar rápido, solo haga clic al siguiente
archivo de audio; Mantenga presionado el botón para rebobinar, solo
haga clic al archivo de audio anterior. Haga clic en el botón "PLAY" para
reproducir. Haga clic en el botón "PLAY" otra vez o el botón "STOP" para
pausa.
19
Page 21

Configuración de Repetición
Pulse el botón de "A-B" en el lado derecho, y el icono de indicación de
A-B aparecerá en la pantalla de reproducción. El comienzo de tiempo para
repetición se confirma mientras hace clic en el botón de "A-B" (B- está
parpadeando).
Pulse el botón de "A-B" otra vez para ajustar el tiempo final (B no está
parpadeando). Y el audio entre tiempo A y tiempo B se repetirá. Haga clic
"PLAY" o el "A-B" para volver a reproducción normal.
Reanudar reproducción
Mientras la música sigue reproduciendo en el backstage, y apaga el
reproductor, entonces la próxima vez que se enciende, comienza a
reproducir desde donde lo dejó.
Submenú
Mientras está en la interfaz de reproducción de música, mantenga
presionado el botón "M" para acceder al submenú. Se mostrará una lista
relacionada, incluyendo“Play mode”, “Bookmarks”, “Variable Speed
20
Page 22

Playback”, “Delete”, “Sound Setting”, “Add to Playlist”y “Remove from
Playlist”.
1. Modo de Play
Mantenga presionado el botón M“Play mode”“Repeat”/”Shuffle”.
2. Marcadores
Mantenga presionado el botón M“Bookmarks”“Add bookmark”/”
Go to bookmark”/” Delete bookmark”. Seleccione según su necesidad.
Está marcado por el tiempo de parada como " hh:mm:ss ". Así que
usted puede configurar el tiempo de parada antes de agregarlo para
continuar reproduciendo la próxima vez convenientemente.
El número máximo de marcadores soportado por cada archivo de audio
es 10. También puede cubrir el marcador anterior con el nuevo marcador y
luego el anterior se sustituirá por el nuevo.
Usted puede encontrar los marcadores que guardó con la opción " Go
to bookmark" bajo el tema " Bookmarks", y usted puede eliminarlos con
21
Page 23

la opción " Delete bookmark".
3. Variables velocidades de reproducción
Mantenga presionado el botón M” Variable Speed Playback” para ajustar
velocidad desde -8(Más lento) hasta +8(Más rápido).
4. Eliminar
Eliminar los archivos de audio que desee.
Nota: En la interfaz de reproducción, mantenga pulsado el botón A-B a la
derecha para acceder a eliminación rápida, elija "YES" y haga clic en el
botón "PLAY" para eliminar.
5. Ajustes de sonido
Mantenga presionado el botón M“Sound Settings”” Normal”,
“Rock”, “Funk” y etc.
Para ecualizador, puede elegir los estilos de música diferentes, tales como
“Rock”, “Funk” y etc.
Para variables velocidades de reproducción, puede establecer la velocidad
22
Page 24

de reproducción según su necesidad.
6. Añadir a lista de reproducción
Hay 3 opciones preparadas para usted, incluyendo “Playlist on the go [1]”,
“Playlist on the go [2]” and “Playlist on the go [3]”, puede agregar la
canción que está reproduciendo a cualquiera de estas tres como quiera.
7. Mover de la lista de reproducción
Puede mover la canción que está reproduciendo en cualquiera de estas tres
listas de reproducción como quiera.
Crear propias listas de reproducción
Hay un programa gratuito llamado Media Go. Es el programa más fácil de
usar para transferir listas de reproducción a la AGPTek. Sólo crear sus listas
de reproducción en el Media Go y luego haga clic derecho en su nombre y
seleccione ' Add playlist to X :( Que es el disco de su reproductor de MP3.
(Para más detalles,por favor amablemente compruebe el
enlace:http://mediago.sony.com/chs/download).
23
Page 25

Nota:Cuando en cualquier interfaz, simplemente haga clic en M para salir y
volver al menú superior.
Transferir archivos al reproductor
Conecte el dispositivo al ordenador con el cable Micro USB. El reproductor
de mp3 se mostrará como un disk(RP11) removible tan pronto como el
ordenador lo reconoce y luego sólo tiene que arrastrar los archivos en el
reproductor de mp3. Si su ordenador no puede reconocer el reproductor, el
cable Micro USB posiblemente tiene problema, utilice otro cable Micro
USB para conectarlo a su PC.
Nota: Como letras aparecen sincrónicos con la reproduccion de música,
por favor primero descargue los archivos de letras(Formato de letra:LRC),
y por favor ponga el archivo de letra y el archivo de música en la misma
carpeta.
Música
Mientras hay un icono "Music" en el menú principal, haga clic en el botón
24
Page 26

"PLAY" para acceder a su función. Elegir reproducir su música por “All
songs”, “Artists”, “Albums”, ”Genres” y “Playlists”.
Botón de acceso directo a reproducción de música:En el menú principal,
haga clic en botón M y puede regresar directamente a la interfaz que está
reproduciendo si hay músicas en el backstage.
Voz
La «Voice» contiene todos los archivos de grabaciones guardados en el
reproductor. Haga clic en el botón "PLAY" para ir a la interfaz que está
reproduciendo y los audios comienzan a reproducir. Mantenga presionado
el botón "M" para acceder a su submenú.
Alarma
Mientras hay un icono "Alarm" en el menú principal, haga clic en el botón
"PLAY" para acceder a la función de alarma. Usted puede ajustar sus 5
diversos artículos, incluyendo “Alarm ON/OFF”, “Alarm time”, “Alarm
cycle”, “Alarm music” y “Alarm volume”. haga clic en y para
25
Page 27

seleccionar y haga clic en el botón "PLAY" para guardar. (puede utilizar la
música en flash para su música de alarma)
Configuración del sistema
Seleccione "System Settings" en la pantalla principal con el botón "PLAY"
para acceder a sus funciones. Seleccione estas opciones según su necesidad
y haga clic en el botón "PLAY" para guardar.
Temporizador para dormir: Cuando el tiempo de reproducción llega al
de temporizador que está configurado, el reproductor se apagará
automáticamente
Configuración de la pantalla: Configurar “Brightness”, “Backlight
timer”, “Screensaver” de su reproductor;
Configuración del tiempo para dormir / Configuración de la pantalla
/fecha y hora según su necesidad
Lengua: elegir su lengua;
Filmware Versión/Espacio de Disco:Ver información sobre el
26
Page 28

reproductor
Formato de dispositivo/Configuración de fábrica: Formatear el
dispositivo o configurar fábrica según su necesidad.
Ayuda y solución de problemas
No se puede encender el reproductor
Por favor, compruebe si la batería ha sido agotada, tal vez puede conectar el
reproductor con ordenador y pruebe otra vez después de cargarlo.
No se puede descargar el archivo desde el ordenador
- Por favor confirmar si está correctamente conectado.
- Por favor compruebe si el espacio de almacenamiento de la memoria
interna está lleno.
- Por favor, compruebe si está dañado el cable USB.
Si tiene cualquier problema sobre este producto, no dude en contactar con
support@agptek.com.
27
Page 29

Especificaciones
Capacidad de memoria
8GB
Bajo
34560 min
540 min
Medio
4325 min
360 min
Alto
2163 min
180 min
Tasa de bits de
grabación
Formato de
grabación
MP3
PCM
Bajo
32kbps
512kbps
Medio
64kbps
768kbps
Alto
128kbps
1536kbps
Frecuencia
20Hz ~ 20KHz
Dimensión
95 mm*33mm*12mm
Peso
60g (Batería incluida)
Fuente de
energía(despu
és de cargar
totalmente)
Grabación
Cerca de 70-90 horas
Play
Cerca de 100 horas (por auriculares)
28
Page 30

Pulsanti e Controlli:
1. Riprodurre/Pausa/Accendere-
Spegni /Immettere
2. REC
3. FERMATA
4. Altoparlante
5. MIC-in
6. Blocco/Sblocco
7. Presa di micro-SD
8. ON/OFF
9. Jack per cuffie
10. Precedente
11. Pulsante M/Retro
12. Avanti
13. A-B/Elimina
14. Volume +
15. Volume -
29
Page 31

Accendere/Spegni
Far scorrere il pulsante on/off sul lato sinistro per accendere/spegnere il
dispositivo.
Quando il cursore è in posizione "ON", premere e tenere premuto il
tasto "PLAY" per circa 3 secondi per accendere / spegnere il lettore.
Se non può essere attivato sul lettore, si prega di notare se l'interruttore
scorrevole (pulsante di accensione) è impostata "posizione ON".
Per spegnere completamente il lettore, si prega far scorrere il pulsante di
accensione in "posizione OFF".
Blocco dello schermo
Per sbloccare o bloccare lo schermo, spostare su/giù il cursore di blocco.
Caricare il lettore
Collegare un'estremità del cavo micro USB alla porta USB di un computer
e collegare l'altra estremità alla porta sul dispositivo. Mentre è
completamente carica, scollegare il cavo micro USB del dispositivo e il
computer.
30
Page 32

Registrazione
1.
Su qualsiasi interfaccia, fare clic sul pulsante "REC" per avviare la
registrazione. Durante la registrazione, l'indicatore luminoso lampeggia
in rosso.
-
Fare clic sul pulsante "PLAY" per avviare la registrazione, clicca di
nuovo per mettere in pausa.
-
Fare clic sul pulsante "STOP" per terminare e salvare la registrazione.
-
Poi clicca sul pulsante "PLAY" per riprodurre i file di registrazione che
appena salvato. Fare clic sul pulsante / per selezionare i file di
registrazione salvato.
Nota: quando si registra in modalità di controllo vocale, il lettore si arresta
automaticamente la registrazione se non viene rilevato alcun suono. Per
registrazioni importanti, si prega di non registrare sotto modalità di
controllo vocale.
2.
Utilizzare il microfono esterno per registrare
Dopo aver collegato il microfono esterno, selezionare "LINE-IN" sotto il
31
Page 33

menu " Record from".
3.
Utilizzare il LINE-IN per la registrazione
Collegare la linea telefonica, il cavo LINE-IN e il cavo audio insieme
come mostrato dall'immagine seguente e quindi connettersi al microfono
del registratore vocale.
Nel menu di impostazione registrazione, selezionare "LINE-IN" sotto
1. Linea telefonica
2. Presa telefonica
3. Adattatore telefonico
4. Cavo audio
5.MIC-in del registratore vocale
32
Page 34

il menu "Record from" e fare clic sul pulsante "PLAY" per confermare.
Fare clic sul pulsante "REC" per avviare la registrazione quando si chiama
il telefono.
Impostazioni di registrazione
Selezionare "Impostazioni di registrazione" sulla schermata principale con
il tasto "PLAY" per accedere alla vostra funzione. Selezionare queste
opzioni secondo il vostro bisogno e fare clic sul pulsante "PLAY" per
salvare.
- Registrazione formato: scegliere il formato di due opzioni (MP3/PCM).
- Record from: Selezionare "Microfono" / "Line In" e fare clic su "PLAY"
per salvare.
Nota: Selezionare " Microphone " per registrare per il microfono interno
del registratore vocale. Selezionare "Line In" per registrare per telefono.
- -Qualità di registrazione: livello "basso" / "medio" / "alta" per la
registrazione
- AVR set: selezionare ON/OFF per AVR set.
33
Page 35

- Registrazione scena Set: selezionare tra “Normal scene”/“train
scene”/“meeting scene”/“long range scene” per la registrazione.
- Registrazione Lampada Set: selezionare ON/OFF per l'indicazione di
registrazione luce (rosso lampeggiante).
- Monitor: Scegli ON/OFF per il monitor.
- Auto registrazione: "Record on/off" per avviare / interrompere la
registrazione automaticamente; " start time" per regolare l'inizio di tempo
per bruciare, " end time" per impostare l'ora di fine per registrare e "C Auto
REC cycle" per regolare la frequenza di registrazione una volta/ogni
giorno/lavoro giorno.
Nota: Questa funzione è disponibile solo quando il cursore è in posizione
"ON".
- -Sottosezione di registrazione: selezionare 0 minuti/30 minuti/60 minuti,
90 minuti/120 minuti per la registrazione. Fare clic sul pulsante "PLAY"
per confermare.
34
Page 36

Reproducirr tua musica & audio
Mentre c'è un'icona "Music" / "Voice" nel menu principale, fare clic sul
pulsante "PLAY" per accedere alla vostra funzione. Fare clic su e tasto l
/ per scegliere, quindi fare clic sul pulsante "PLAY" per iniziare a
riprodurre.
Regolazione del volume
Fare clic sul pulsante + /-a destra per aumentare o diminuire il volume.
Ritorno
Ritorno al menu principale: fare clic sul pulsante M sul lato destro del
lettore continuamente per ritornare al display principale.
Riavvolgi / Avanti
Mentre nell'interfaccia di riproduzione di musica, premere e tenere premuto
il pulsante per avanzamento rapido, basta un clic per il successivo file
audio; Premere e tenere premuto il pulsante per tornare indietro, basta
cliccare al file audio precedente. Fare clic sul pulsante "PLAY" per
riprodurre. Scegliere nuovamente il pulsante "PLAY" o il tasto "STOP" per
35
Page 37

mettere in pausa.
Impostazioni di ripetizione
Fare clic sul pulsante "A-B" sul lato destro, e l'icona per l'indicazione
di A-B appariranno sulla schermata di riproduzione. Ora d'inizio per replay
è confermata premendo il pulsante "A-B" (B è lampeggiante).
Premere tasto "A-b" per impostare l'ora di fine (B non è lampeggiante).
E audio tra periodo A e B viene ripetuto. Fare clic su "PLAY" o "A-b" per
tornare alla riproduzione normale.
Ripresa della riproduzione
Mentre è ancora la musica nel backstage, e spegnete il lettore, quindi la
prossima volta si accende, esso inizierà a riprodurre da dove avete lasciato.
Sottomenu
Mentre è sulla musica interfaccia di riproduzione, tenere premuto il
pulsante "M" per accedere al sottomenu. Mostrerà l'elenco correlato, tra
cui“Play mode”, “Bookmarks”, “Variable Speed Playback”, “Delete”,
“Sound Setting”, “Add to Playlist”e “Remove from Playlist”.
36
Page 38

1. Modalità di riproduzione
Premere e tenere premuto il tasto M“Play mode”“Repeat”/”Shuffle”.
2. Segnalibro
Premere e tenere premuto il tasto M“Bookmarks”“Add bookmark”/”
Go to bookmark”/” Delete bookmark”. Selezionare secondo il vostro
bisogno.
È segnata dal tempo di arresto " hh:mm:ss ". Quindi è possibile
impostare il tempo di arresto prima di aggiungerlo per continua a ripeodurre
la prossima volta convenientemente.
Massimo numero di segnalibri supportati da ogni file audio è 10. Si
può anche coprire il segnalibro precedente con nuovo segnalibro e quindi
quello vecchio verrà sostituito dal nuovo.
È possibile trovare i segnalibri è stato salvato con l'opzione “Go to
bookmark” nell'ambito del tema “Bookmarks”,ed è possibile eliminarli con
l'opzione“Delete bookmark”.
3. Variabile velocità di riproduzione
Premere e tenere premuto il tasto M” Variable Speed Playback” per
37
Page 39

regolare la velocità da - 8 (più lento) fino al + 8 (più veloce).
4. Elimina
Eliminare i file audio che si desidera.
Nota: Nell'interfaccia di riproduzione, premere e tenere premuto il pulsante
a-b sulla destra di accesso rapida eliminazione, scegliere "YES" e fare clic
sul pulsante "PLAY" per eliminare.
5. Impostazioni audio
Premere e tenere premuto il tasto M“Sound Settings”” Normal”,
“Rock”, “Funk” e ecc.
Per equalizzatore, è possibile scegliere diversi stili di musica, come“Rock”,
“Funk” e ecc.
Per la riproduzione a velocità variabile, è possibile impostare la velocità di
riproduzione secondo il vostro bisogno.
6. Aggiungere alla Playlist
Ci sono 3 opzioni preparati per voi, tra cui“Playlist on the go [1]”, “Playlist
on the go [2]” e “Playlist on the go [3]”, È possibile aggiungere la canzone
che sta suonando in qualsiasi di questi tre, come si desidera.
38
Page 40

7. Rimuovere dalla Playlist
È possibile rimuovere la canzone che sta giocando in uno di questi tre
playlist come ti piace.
Per creare playlist da soli
C'è un programma gratuito chiamato Media Go. È il programma più
semplice da utilizzare per il trasferimento di playlist per il AGPTek. Basta
creare le tue playlist in Media Go e quindi clic destro sul suo nome e
selezionare ' Add playlist to X :( Che è il disco del tuo lettore MP3. (Per
maggiori dettagli, la prego gentilmente controllare il link:
http://mediago.sony.com/chs/download).
Nota: Quando su qualsiasi interfaccia, semplicemente scegliere M per
uscire e tornare al menu principale.
Trasferimento file al lettore
Collegare il dispositivo al computer con il cavo Micro USB. Il lettore mp3
verrà visualizzato come un disk(RP11) rimovibili, non appena il computer
lo riconosce e poi basta trascinare i file nel lettore mp3. Se il computer non
39
Page 41

riconosce il lettore, il cavo Micro USB incluso può ha problema, si prega di
utilizzare un altro cavo Micro USB per collegarlo al tuo PC.
Nota: per testi di essere visualizzata sincrona con la riproduzione di musica,
si prega di scaricare prima i file lirici. (Lyric formato: LRC) e si prega di
mettere il file lyric e il file musicale nella stessa cartella.
Musica
Mentre c'è una "Music" icona nel menu principale, fare clic sul pulsante
"PLAY" per accedere alla sua funzione. Scegliere di riprodurre la musica
di“All songs”, “Artists”, “Albums”, ”Genres” e “Playlists”.
Pulsante riproduzione di musica di scelta rapida: Nel menu principale, fare
clic sul pulsante M e possono restituire direttamente all'interfaccia che si sta
giocando, se c'è musica nel backstage.
Voce
La "Voice" contiene tutti i file di registrazione salvati nel lettore. Fare clic
sul pulsante "PLAY" per andare all'interfaccia di riproduzione e l'audio
comincia a riprodurre. Tenere premuto il pulsante "M" per accedere al
relativo sottomenu.
40
Page 42

Allarme
Mentre c'è "Alarm" icona nel menu principale, fare clic sul pulsante
"PLAY" per accedere alla funzione di allarme. È possibile regolare la sua 5
elementi diversi, tra cui “Alarm ON/OFF”, “Alarm time”, “Alarm cycle”,
“Alarm music” and “Alarm volume”. Clicca il pulsante e per
selezionare e fare clic sul pulsante "PLAY" per salvare. (è possibile
utilizzare la musica in flash per la tua musica di allarme)
Impostazioni di sistema
Selezionare "System Settings" sulla schermata principale con il tasto
"PLAY" per accedere alle sue funzioni. Selezionare da queste impostazioni
in base alle vostre necessità e fare clic sul pulsante "PLAY" per salvare.
Timer di spegnimento: Quando tempo di gioco è raggiungere il timer di
spegnimento si partì,, il lettore si spegne automaticamente;
Impostazioni di visualizzazione: Impostare la “Brightness”, “Backlight
timer”, “Screensaver” del lettore;
Impostazione tempo di sonno/ Visualizza impostazioni/data e ora
41
Page 43

secondo il vostro bisogno;
Lingua: Scegli la tua lingua;;
Versione Filmware/spazio del disco: Visualizza informazioni sul lettore;
Dispositivo formato / impostazioni di fabbrica: formattare il dispositivo
o l'impostazione di fabbrica secondo il vostro bisogno di fare.
Aiuto e risoluzione dei problemi
Non può accendere il lettore
Si prega di controllare se la batteria è stata esaurita, forse si può collegare il
lettore con il computer e provare nuovamente dopo la ricarica.
Non può scaricare il file dal computer
-
Si prega di confermare se sia collegato correttamente.
-
Si prega di verificare se lo spazio di archiviazione della memoria interna
è pieno.-Si prega di controllare se il cavo USB è danneggiato.
Se avete qualche problema su questo prodotto, non esitate a contattare
support@agptek.com.
42
Page 44

Specifiche
Capacità di memoria
8GB
Basso
34560 min
540 min
Medio
4325 min
360 min
Alta
2163 min
180 min
Tasso di punta
di
registrazione
Formato di
registrazione
MP3
PCM
Basso
32kbps
512kbps
Medio
64kbps
768kbps
Alta
128kbps
1536kbps
Frequenza
20Hz ~ 20KHz
Dimensione
95 mm*33mm*12mm
Peso
60g (Batteria inclusa)
Fonte di
energia (dopo
completament
e carica)
Registrazione
Circa 70-90 ore
Play
Circa 100 ore (di cuffie)
43
Page 45

AGPtEK RP11 ボイスレコーダー取扱説明書
初めは中国語なので、メーン界面に「系统设置」-「Language/语言」-「日本語」の手順で設
定にしてください。
ご使用の前に
1. ◎AGPtEK RP11 ボイスレコーダーをお買い上げ頂きまして、ありがとうございました。
◎正しく安全にお使いいただくため、ご使用の前に必ず取扱説明書をよくお読みくださ
い。
◎お読みになったあとはいつでも見られる所に大切に保管してください。
◎商品について何か問題やご意見があれば、遠慮なく、linkingportjp@163.com に連絡し
てください。お客様のご意見をお待ちしています。
2.より安心して楽しむため、データをバックアップすることをお勧めいたします。万が一、
突発的な状況が発生するかもしれません。お客様の誤操作やハードウェア損傷による、メモ
リ内容消失については、当社は責任を負いかねますので、予めご了承ください。
3.不当な修理や改造による故障及び損傷が生じた場合、無料での修理、交換や返品はいたし
かねます。予めご了承ください。
44
Page 46

各部名称
:
1. 再生/中止/電源オン/オフ/確認
2. 録音
3. 一時停止
4. スピーカー
5. マイクジャック
6. ロック掛け/ロック解除
7. マイクロ sd カードジャック
8. 電源オン/オフ
9. イヤホンジャック
10. 前の曲
11. メニューボタン/戻し
12. 次の曲
13. A-B モード/削除
14. 音量上げ
15.音量下げ
45
Page 47

電源オン/オフ
電源スイッチ:ON の方向にずらすと、レコーダーは起動になります。OFF の方向にずらす
と、ボイスレコーダーはオフになります。
本体はしばらく使用しないと、スイッチが on の方向にあっても自動的に電源オフになり
ます。PLAY ボタンを長押しすると、再起動します。PLAY ボタンを再度長押しすると、オ
フになります。
本体が起動できない場合は、電源スイッチを on の方向であるかどうかをご確認してくだ
さい。
長い時間で本体を使用しない場合は、電源スイッチを off の方向へずらすにして電源オフ
にしてください。
スクリーンをロック
ホールドスイッチを上/下にスクロールして、本体をロック掛け/ロック解除する。
充電
レコーダーは電源不足 の時、充電してくださ い。USB ケーブルでパソコンと接続、あるい
は充電器と接続充電可能です。充電完了後、バッテリーアイコンがフル状態になります。
46
Page 48

録音
1
.レコーダーは起動後、録音スイッチ
REC
を押して、「しばらくお待ちください」という
表示の後、自動的に録音が始まります。録音中に、LED 指示灯が赤色で点滅します。
- PLAY ボタンを押すより録音を開始/一時停止にします。
- STOP
ボタンを押すより録音を終了し保存します。
- PLAY ボタンを押すより、先保存された録音ファイルが再生できます。 / ボタンを
操作するより、録音ファイルが選んでます。
2
.外部マイクの使用
外部マイクを接続して、録音設定に入って、録音源を選択し、ライン入力を選択してくださ
い。
3
.ライン入力を通して録音
以下の画像で示すように:電話回線、LINE-IN ケーブルとオーディオケーブルを接続して、
本体のマイクへ挿入してください。
47
Page 49

録音設定に入って、録音源からライン入力 を選択し、「PLAY」ボタンをクリックし確認
します。後、電話する時 REC ボタンを押すより、録音を開始します。
録音設定
録音設定を「PLAY」ボタンで押すより、録音設定機能に入ります。設定完了後、「PLAY」
ボタンで確認します。
-
録音フォーマット:
MP3
フォーマット
/PCM
フォーマット
- 録音源:マイク/ライン入力
1.
電話回線
2. 電話ジャック
3. 電話アダプタ
4.
オーディオケーブル
5. レコ ー ダー の マイ ク ジャ ッ
ク
48
Page 50

- 録音音質:低/中/高
- AVR モード : オン/オフ
- 録音環境:普通場所/電車中/会議中/長距離
- 録音指示灯: オン/オフ
-
モニター:オン/オフ
- 定時録音
1
.録音(オン/オフ):定時録音機能をオン/オフにする。
2
.開始時間:録音の開始時間を設定する。
HH:時MM:分/
を操作するより、時間を
調節する。音量調節ボタンで各時間単位間に変更する。
3
.終了時間:録音の終了時間を設定する。上記を参照してください。
4
.定時
REC
サイクル:1回/毎日/労働日の録音モードを設定する。
ご注意:本機能は電源onの状態で有効です。
-
区間録音設定:0分
/30分/60分/90分/120
分の区間切りが設定する。「
PLAY
」ボタンで確認
する。再生メインメニュ-界面で「音楽/録音」機能を「
PLAY
」ボタンを押すより各機能に入ります。
49
Page 51

/
ボタンを押すより、各選択肢を選んでます。「
PLAY
」ボタンを押すより再生始まり
ます。音量調節
本体側面の「+」ボタンまたは「-」ボタンを押すと音量調節できます。
戻し
Mボタンを押すよりメインメニューに戻ります。
早く戻し/早送り
:
再生中に長押しすると曲の早戻し、短く押すと前の曲に戻ります。
:
再生中に長押しすると曲の早送り、短く押すと次の曲に移ります。
再生中に「
PLAY
」ボタンを操作するより、再生一時停止/再度開始にします。
リピート設定
本体右側の
“A-B”
ボタンを押すより、
A-B
モードに入ります。1回で押すより、始まりにし
ます。それから、Bが打つと、
“A-B”
ボタンを再び押し、終わりにします。では、ご設定す
るピースが聞かれます。再度
A-B”
ボタンを押し、通常再生モードに戻ります。
記憶再生
再生中に直接電源スイッチをオフにすれば、次回電源をonにすると、記憶位置で再生続け
50
Page 52

ます。サブメニュー
再生中に「M」ボタンを長押すよりサブメニューに入ります。
再生モード、ブックマーク、シフト配信、削除、サウンド設定、プレイリストに追加とプレ
イリストから削除の選択肢があります。
1.
再生モード
リピート/シャッフル
2.
ブックマーク
ブックマークを追加/ブックマークに移動/ブックマークを削除
3.
シフト配信
シフト配信:再生速度が変更します。
4.
削除
ご注意:再生中に「
A-B
」ボタンを長押すより、直接に音楽ファイルが削除できます。
5.
サウンド設定
サウンド設定:ノーマル/ロック/ファンク/ヒップポプ/ジャズ/クラッシク/テクノ
6.
プレイリストに追加/プレイリストから削除
51
Page 53

プレイリストが 1、2 と 3 三つが有ります。
プレイリストの使い方
プレイリストを編集するこ とは煩わしいと思われてい ます。Media Go と呼ばれる無料のプ
ログラムがある。そ れは AGPTek MP3 プレーヤーに プレイリストを作るするために最も 簡
単なプログラムです。
Media Go
でのプレイリストを作成し、曲名を右クリックし、
AGPTek
MP3 プレーヤーの同期を行う。
リンク: http://mediago.sony.com/chs/download
ファイル転送
USB ケーブルを使って、パソコンに接続します。プレーヤーがリムーバブルディスク(RP11)
と表示されます。お使 いのコンピュータがプ レイヤーを認識できない場合は、USB ケーブ
ルが不具合の可能性あります、別の
USB
ケーブルを使用してください。
音楽
メインメニュ-界面で「音楽」機能を「PLAY」ボタンを押すより入ります。すべての曲、
アーティスト、アルバム、ジャンルとプレイリストの選択肢があります。
再生中曲に戻る方法 :メインメニューで、Mボタンを押すより、簡 単的に再生界面に戻りま
52
Page 54

す。(前提は音楽が流れる中です。)
録音
録音中にすべての録音ファイルが見つけます。
アラーム
アラーム(オン/ オフ)、時間を調節します、周期、アラームメロディ、ボリュームの選択肢
があります。 と ボタンで選択し、「PLAY」ボタンで確認します。
設定
スリープタイマー:オフ/スリ ープタイマーを設定の選択肢があります。スリープタイマ
ーを設定:1-99 分間で設定する。設定時間通り、プレーヤーは自動的に電源オフになり
あす。
表示設定:ブライトネス/バックライトタイマー/スクリーンセーバー
日時:時刻形式の設定/時刻の設定/日付の設定。 / を操作するより、時間を調節する。
音量調節ボタンで各時間単位間に変更する。
Language/言語
ソフトバージョン/ディスク容量/ディスクをフォーマット/工場出荷時設定
53
Page 55

故障かな?と思ったら
起動できない
電源があるかどうかチェックする
音が鳴らない
1.音量UP
ボタン+を押して音量を上げる。
2.
イヤフォンプラグをしっかり差し込む。
3.
音楽ファイルが対応できる形式か確認してください。
4.
パソコンでファイルが 破損していないか確認し てくださ
い。
ファ イ ル を 転 送
できない
1.
本体とパソコンが接続しているか確認してください。
2.
内蔵メモリ容量が不足していないか確認してください。
3
、別の
USB
ケーブルに替えて試してください。
雑音
1.
イヤフォンの端子に汚 れがないか確認してく ださい。汚
れが
あるとノイズが発生することがあります。
2.
破損した音楽ファイル は、ノイズが発生する ことがあり
ます。
54
Page 56

商品仕様
内蔵メモリ容量
8GB
録 音 ビ ッ ト レ ー
ト
録音 フ ォー マ
ット
MP3
PCM
低
32kbps
512kbps
中
64kbps
768kbps
高
128kbps
1536kbps
周波数
20Hz ~ 20KHz
寸法
95 mm*33mm*12mm
重量
60g (電池も含めて)
使用時間
録音
70-90 時間
音楽再生
約 100 時間(イヤホン)
55
 Loading...