

Page 1
To find out how to use K1 or if you have a problem, please refer to User Manual.
The color of K1 sold in other countries/areas may differ from the color shown in this manual.
Register AGPTEK Forum
Please visit www.agptek.com/forum and register AGPTEK official forum to get better customer
support.
AGPTEK Official AGPTEK Forum
Page 2

Thank you for purchasing the AGPTEK product. Please read this [User Manual] carefully
1) It is recommended to clean the player regularly with a soft, lint-free cloth.
2) Always place the player out of reach of children and it is not allowed to use alone by kids.
3) Do not use the player in a humid environment. This player may not work properly or
4) The AGPTEK-K1 uses Micro USB port for charging and data transfer. Connect this player
5) Disassemble, squeeze, bend, incinerate, or soak the player may cause a fire or other
6) For disposition of this player, please refer to the local rules for waste disposal first. Please
1) Use a sound level that prevent yourself from hearing loss while enjoying the music.
2) Do not listen to music by headphones while driving, cycling or operating any large
3) Please do not play music loudly in public. This may affect your hearing and people
4) Long-term exposure, repeated exposure to music or other noisy environments may result
5) The symptoms of hearing loss gradually increase with the exposure time. At the beginning,
6) To protect your hearing, please adjust the volume so that the sound coming out of the
Refrigerator humming
40dB
Normal conversation
60dB
City traffic
80dB
Motorcycles and lawnmowers
90dB #
Rock concerts
110-120dB #
Firearms
120-140dB #
before using the product, retain it in for future use.
Note: This [User Manual] can help you understand how to use and troubleshoot the problem
safely.
shorten its service life because of moisture.
to cables with different port forcefully may lead to serious damage.
danger.
do not discard the player at will, or it will do harm to others and the environment.
Tips:
machinery. This may distract you and cause accidents. In potentially dangerous situations,
use headphones with care while listening to music.
around you.
in temporary or permanent noise-induced hearing loss.
you may not even be aware of the loss unless it is detected through a hearing test.
earphones is appropriate. When you can listen to the music clearly, it is recommended to
set a lower volume as much as possible. Studies have shown that when people's ears are
in an environment with a sound level of less than 80 dB for a long time, it will do no harm
to the hearing. Therefore, it is safe to listen to music by earphones at this volume.
Examples of Typical Approximate Sound Level:
Page 3

K1 Features:
Designed for kids: This MP3 player is designed with volume limited function to avoid
hearing loss of children. It allows to adjust volume from 0-30 and brightness to help
Great for learning: with built-in speaker, ±8 variable speed playback and A-B repeat
Game feature: 3 kinds of puzzle games (bricks, minesweeping and snake) help your kids
All-in-one: an MP3 player that can also work as music player, voice recorder (one-click to
Large storage capacity: Built-in 8G internal memory and a microSD card slot compatible
CE, FCC, RoHS Certified. Lifelong free firmware update at any time.
Clock screensaver, Calendar, Stopwatch, Alarm clock, 24 languages Available. Support
protect the eyesight and hearing of children.
function which are helpful for children's learning.
to achieve the potential in an all-round way.
save recording), e-book reader(TXT file only), video player, FM radio and picture browser
(JPG, BMP, GIF), alarm clock etc.
with up to 128GB of external memory.
sleep timer(1-99mins) and Power-off timer(1-3mins) for daily needs.
Page 4

For First Use
Before you start using AGPTEK-K1, please check the following information.
Computer System Requirements
When you connect AGPTEK-K1 to your computer, check the system requirements of your
computer. Supporting (Windows® 98 / 2000 / ME / XP / Vista /10/MacOS.)For other systems,
K1 may not be recognized properly. Some systems may need to install drivers manually.
Charge the player
When using AGPTEK-K1 for the first time, the battery power might be low. Please use
5V/500mA Charger or USB 2.0 interface charge the battery about 3 hours Before.
Image and illustration
The screen image shown in [User Manual] is for reference only. They may be sightly different
with the real product or screen display.
Package contents
AGPTEK-K1(1)
USB cable (1)
Quick Guide (1)
Earphone(1)
Box(1)
Design or specifications are subject to change without prior notice.
Page 5

Start initial setup
To reset or format the device: Find Settings > Factory settings/Format device, choose Yes or
No to make or cancel the changes.
Turn On
Slide to the left
Turn Off
Slide to the right
1.Push the slider to the left or right to power on or off the player. AGPTEK-K1 is turned on
when boot animation appeared.
2.When you turn on AGPTEK-K1 for the first time, the initial setup wizard starts. During
the initial setup, you can set the language.
Connect the player to an adapter or computer USB port via an USB 2.0
standard cable or the included data cable to charge it.
During the initial setup, you can set the following options.
Basic Usage
Turning on and off AGPTEK-K1:
Note: Do Not power on/off the player frequently.
Note: Reset or format the device will delete all of the data in this player. Before formatting the
device, please backup the files so as not to lose any files.
Charge the player:
1. Use 5V/500mA charger only. Usually, it will need about 3 hours to charge the player.
2. Charge by computer: Connect the device to a running computer via included USB cable.
USB 2.0 port only. Usually, it will need about 3 hours to charge the player.
Note: If the charging condition doesn't meet the standard, it may cause device malfunction,
which would be regarded as man-made damage.
Page 6

How to transfer data by computer?
Note:
Directly move the files from your computer to
the folder of AGPTEK-K1.
1. Connect your player to your computer via USB cable properly.
2. Double click "Computer” on the desktop and find the AGPTEK-K1 disk, and then double
click to open it.
3. Find the file or file folder you need in the computer, right click it and choose "Copy”, then in
the AGPTEK-K1 disk window, right click and choose "Paste” and the files will be transferred to
the AGPTEK-K1 disk. Or you can simply drag the files you need and drop them in the
AGPTEK-K1 disk window.
1. During the file transferring process, do not disconnect the player from computer, or it may
cause malfunction and the file being transfer may be damaged.
2. The music files transferred to the player may be arranged in a different order which is
different in your computer.
Page 7
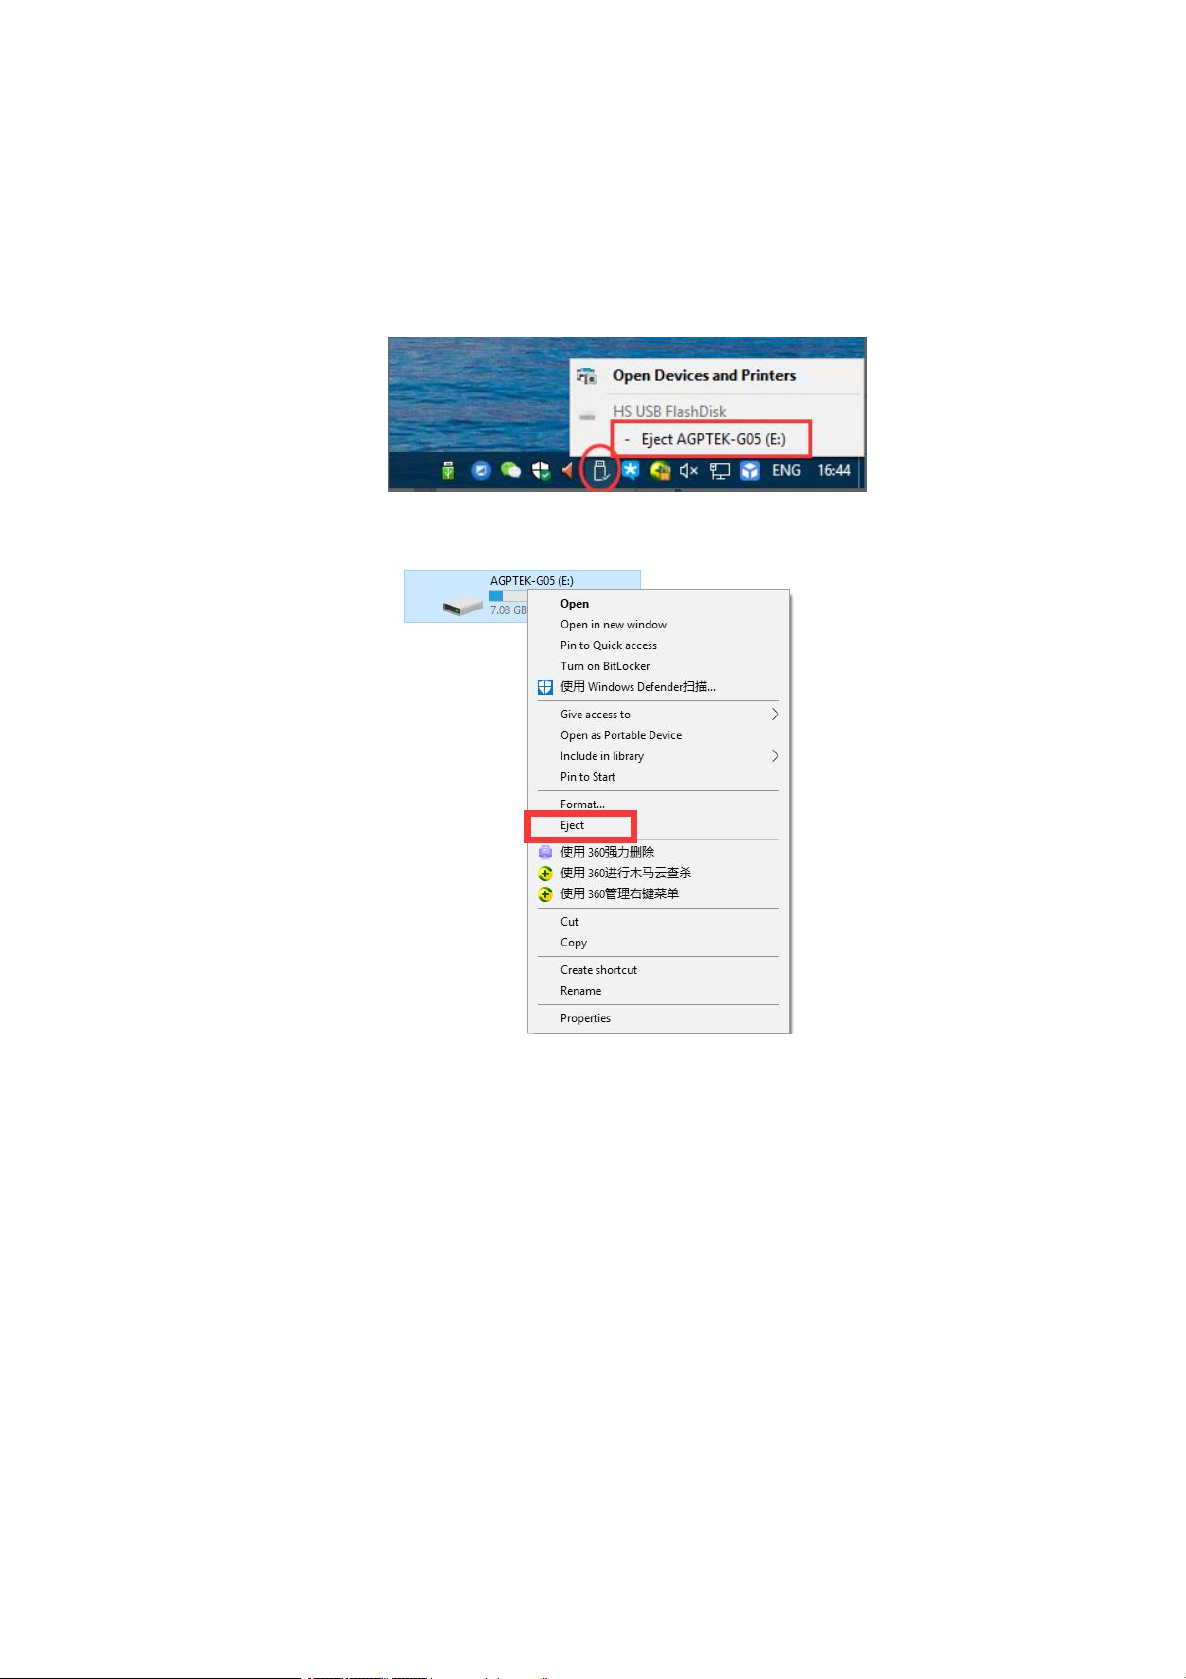
Disconnect from the computer
While you disconnecting it from the computer, please follow the steps below to avoid files and
player being damaged.
Left click on the flash disk icon in the task-bar at the bottom right of your desktop and click
"Eject-AGPTEK-K1 PLAYER”.
Or you can double click the "Computer” on the desktop and right click AGPTEK-K1 disk, then
click "Eject” to disconnect your player from the computer.
Note: DO NOT disconnect the player in the following case or it may cause malfunction and
the file being transfer may be damaged.
1. Do not disconnect the player during file transferring process.
2. Do not disconnect the player when there are files in the "AGPTEK-K1” disk opened in the
computer.
Firmware Update
AGPTEK updates the firmware irregularly, such as adding new features, optimizing functions,
fixing bugs and so on. For better firmware support, it is recommended to download and
install the latest firmware on the AGPTEK website for a better user experience.
Download the latest firmware:
1. Go to AGPTEK website(https://www.agptek.com/blog) and search the firmware you want
to update with keyword like "agptek a02”.
Page 8

2. Click , you will download a zip/rar file. Find a PDF file inside it(this is a
step-by-step guide for firmware update).
Reset AGPTEK-K1 player
If your AGPTEK-K1 player has stopped responding and does not work, you can reset the
player to fix it.
Please note:
1. Turn off the player, then power it on.
2. Resetting the player will put the system back to default settings.
3. Resetting the player will not delete the files or data you saved in the player.
4. Do not reset the player during normal operation or it could cause memory damage.
Page 9

Buttons and Controls
1
Up
Move up/Submenu
2
Left
Move to the left side/Screen-lock(hold to
lock/unlock screen)
3
Down
Move down
4
Right
Next/Fast forward/Move to right side
5
Volume+
Increase volume
6
Volume -
Decrease volume
7
Return
Click to back to previous menu, hold to back to Home menu
8
Enter/Play/Pause/Power
On/Off
Click to Confirm/Enter/Play/Pause
Hold for 3 seconds to power on/off the player
9
Power slider
Slide to power on/off
10
Earphone jack
For Headphones or Aux Cord
11
Micro USB jack
For charging or data transfer
12
Card slot
Insert MicroSD card
13
Built-in Speaker
Enable built-in speaker
Page 10

You can find out how to use music features here.
All songs
Lists all recognizable songs in the player
Nowplaying/Last played
Displays the now playing song or Last played song
Artists
Sorts songs by artist
Albums
Sorts songs by album category
Genres
Sorts songs by genre
Playlists(1/2/3)
You can add songs to the list (1/2/3) according to your own
preferences.
Update playlist
Update song files
In the song list, "click down" to go to next song list; "click up" to go to previous song list;
"click right " to go to "Last played", "Play", "Add to Playlist".
Music
You will see the following list of features:
Page 11

When there is music playing, we can access the music-playing interface.
Music-playing interface
1.Choose play mode, click button to enter the following submenu: Repeat song list,
Repeat one, Shuffle, A-B repeat
2.Click button : pause/play.
3.Click button / : go to next/replay or previous song.
4.Hold button / : fast forward/rewind.
5.Click button to return to the previous menu. Press and hold the button to back to
Home.
Adjust the volume:
Album cover/
Lyric display
Progress bar
Play mode
Next song
Previous song
The longer the ring is, the higher the volume will be.
Tips: When the screen is off, click any button to turn on the screen, then you are able to click
button +/- to increase or decrease the volume, or click button / to next/previous song.
While on the volume adjustment interface, you can click+/- to increase or decrease the
volume.
Note: When the screen is off, click button +/- to operate.
Page 12

In the music-playing interface, click button to enter Play settings.
Tip:Long press button to back to Home.
Play mode
Shuffle, Repeat all, Repeat one, Repeat A-B, View-playing
Sound settings
Choose "off" to turn off equalizer or 6 sound effects(Rock, Funk,
Hiphop, Jazz, Classical, Techno); "Variable speed playback",
adjust playback speed from -8(Slowest) to +8(Fastest).
Lyric on/off
Choose OFF/ON
Repeat
settings
Choose "Repeat A-B", set the repeat mode of the song by setting
the repeat time and intervals
Add to playlist
Add to the 3 playlists
Remove from
Playlist
Remove from the 3 playlists
Music
Bookmarks
Choose to "add to bookmark", "go to bookmark", "delete
bookmark”
Delete
Choose to delete the song that is playing now
Page 13

You can find out how to use FM Radio features here.
FM Radio
FM-playing interface
Find "FM radio” on Home and click it to enter to its function.
Note: When using the radio function for the first time or when there is no station, the station can be
added by [Presets], [Auto tune].
1.Click : go to next station
2.Click / : tune frequency forward/backward manually
3.Adjust volume: please refer to section "Music playing interface”.
4.Click button to back to the previous menu, press and hold the button to back to Home.
Page 14

Click to access submenu, including:
Auto tune
Search stations automatically. You can see the searched stations in
"Presets”. While is on radio playing interface, click to switch
among preset stations.
Presets
Add up to 30 preset radio stations
Save to preset
Save radio stations to preset
Clear preset
Choose "Clear preset” to enter the preset list, select the station you
want to clear, choose yes to clear the preset station.
Tuner Region
You can choose Normal band and Japan band.
Start FM Radio
Recording
Click to pause/continue, click button to exit FM recording:
select "Yes" to save the recording, select "No" to discard the
recording.
FM REC library
Find the radio recordings in [FM radio] > [FM recording]. The radio
recordings will also be saved in [FM REC library]
Page 15

You can find out how to use Game features here.
Turn right
Turn left
Transform square shape or move up
Click to move down; hold to move down quickly
Confirm
Game
Find "Game" on the Home menu, click it to access to its function.
A related list will show, including: Bricks, Minesweeping, Snake
-[Bricks], Start game, Speed(level 0-5), Highest score(Top1-4).
Start game, click / to move to left or right, click to transform square shape, hold
button to go to the bottom directly, click to stop/continue.
-[Minesweeping], click button / / / to go to the place you want, click to
stop/continue.
-[Snake], click button / / / to go to the place you want, click to stop/continue.
Page 16

You can find out how to use Folder feature here.
Folder: View all file include music, videos, Ebooks, pictures, recordings and folders. It also
Video
AMV/AVI format
FM recording
WAV/MP3 format
Ebook
TXT format
Picture
JPEG, BMP, GIF formats
Audio
WAV / APE / FLAC / MP3 / OOG / AAC / M4A / WMA
Folder view
Find Folder view on main menu, click to access to its function.
enable to play or repeat playback by folders.
Support format:
Note: This player can not playing files other than the above formats.
Page 17

You can find out how to use Tools feature here.
Select and Click "Alarm" to enter, set the alarm on/off/time/cycle/music/volume you want.
Select and Click "Record" to enter, the related list will show:
Select calendar function, click to start timing:
Select calendar function:
Choose Photos to enter photo list.
1. Although you can browse albums while the music is playing, in order to provide you with a
Start Recording
①Choose "Start Voice Recording" to start voice recording.
②Click button to pause/resume recording.
③Click button to choose saving the recording file or not.
Recordings Library
Find the saved recordings in Recordings library
Set REC bitrate
MP3: 32kbps / 64kbps / 128kbps / 192kbps
WAV: 512kbps / 768kbps / 1024kbps / 1536kbps
VOR Set
2 modes to choose from: Normal/VOR mode
Click button
Select any one of T1-T3
Click button
Select any one of T1-T3
Click button
Return to the previous menu
Click button
Clear all the data of T1-T3
Click button
Pause/resume timer
Click button
Return to previous
Click button
Go to next
Click button
Select year/month/day
Tools
Find "Tools" on main interface, click it to access to its function. A related list will show
"Calendar", "Stopwatch", "Alarm", "Record", "Photo", "Ebook", "Video".
Click , choose year/month/date, then use button / to change the value.
better experience, it is recommended to turn off background music playback before browsing
albums.
2.You can browse albums while listening to FM radio.
Page 18

After entering the album, In the picture list, the following operations are supported:
Choose Video to enter video playlist
Choose eBook, Local folder/Card folder to enter eBook list:
1.Click to choose e-book file to start reading.
2.Click button / to go to previous/next page.
3.The e-book will not automatically turn the page in default. You can click button to
turn the page automatically.
4.When reading the eBook, you can click button to enter submenu, including:
Click button
Previous picture
Click button
Next picture
Click button
Return to the previous menu
Click button to access
submenu
Enter the album settings: Nowplaying/Last played,
Slideshow settings, Delete pictures, Update playlist
Click button
Back to the previous menu
Click button
You will see the video settings, including: Nowplaying,
Brightness, Repeat, Delete, Update video
Click button /
Click Up/Down to select video file
Adjust volume
Click button +/- to increase or decrease the volume
Switch video
Click / to go to previous/next video
Play/Pause
Click to pause/resume
Click button
Return to the previous menu
Click button
You will see the video submenu, including:
[Brightness], [Repeat], [Delete Video], [Update Playlist].
Add bookmark
Bookmark select
Delete bookmark
Delete e-book
Auto playtime setting
If you are viewing an image, you can also perform the above operations.
Note: The device only supports pictures in JPG, BMP and GIF format.
In the video list:
When playing video, you can:
Note: You can not turn off the screen when playing video.
Page 19

Note: The device can only recognize file in "txt" format.
Select Page
Page 20

You can find out how to use Settings feature here.
Find "Settings” on main menu click to enter to its function.
A related list will show, including:
Date and time:
1.[Time Settings]: You can set the time format (12/24 hours) and set the system time of the
player.
2.[Date Setting]: You can set the date format [DD/MM/YYYY]/[MM/DD/YYYY]/[YYYY/MM/
DD] and set the system date.
Note: Changes of date and time will influence the display time of the player, alarm clock time
as well as name of recording file since they are all based on the system date and time.
Time Settings: You can set the time format (12/24 hours) and set the system time of the
player.
Date Setting: You can set the date format [DD/MM/YYYY]/[MM/DD/YYYY]/[YYYY/MM/DD]
and set the system date.
Note: Changes of date and time will influence the display time of the player, alarm clock
time as well as name of recording file since they are all based on the system date and time.
Display settings: Set Brightness, Backlight timer and Screen saver.
Power off:
1.Power off mode: When there is no operation on the device, the palyer will shut off
automatically when reaches the preset time(1-3min);
Language
Date and time
Display settings
Power off
Volume limit
Amplifier
Background radio
Information
Format Device
Factory Settings
Settings
Page 21

2.Sleep timer: The device will shut down automatically when reaches the set
time(1-99min).
Volume limit: 0~30(Max.)
Amplifier: you can choose to turn it on or off.
Background radio: You can choose to play radio at background or not.
Information: check player information and disk space about your player;
Format device/Factory settings: Format the device or restore to factory settings.
Note: Before formatting the device, please backup the file so as not to lose any files.
Page 22

How to extend battery life:
1. Find Settings >Power off. Choose from the following two ways to save the battery.
- Power off (When there is no operation or music playing for 3 minutes, the player will shut
off automatically).
- Sleep timer(The player will shut down automatically)
2.Set a shorter backlight time to save the battery
[Settings] - [Display Settings] - [Backlight Timer]
3.Set a lower screen brightness to save the battery
[Settings] - [Display Settings] - [Brightness]
Page 23

Charging Precautions
1. Make sure the USB plug is plugged into the player and the power source properly, and use
2. If charge by computer, make sure your computer does not enter hibernation or sleep
3. Make sure the USB interface on the charger or computer is version 2.0 .(version1.1/3.0
4. When fail to charge by computer, try different USB interfaces even the back USB interface
5. While charge, the player may heat up, and it is not malfunction in this case.
6. If you use a laptop to charge the player, please note that the laptop requires an external
7. While transferring file and charging, do not disconnect until the transfer is done, or it may
8. Charge the battery under an proper temperature within the range of 5℃(41℉) to 35℃
9. To prevent battery deterioration, you are supposed to charge the battery at least once
10. Do not use car charger, fast charge or power bank, or it may burn the battery. Car
11. The rechargeable battery is consumable, its battery capacity will be gradually reduced.
Pay attention to the following when charging your AGPTEK-K1 player:
the original included USB cable.
mode when the player is connected. The computer must be in running state to charge the
player.
may sometimes cause to charging problem)
of the computer host. Because sometimes the output power of the front USB port is limited so
the player can not be charged.
power supply.
cause data loss and damage.
(95 ℉).
every half a year or every year. If you place the player in low temperature environment for a
long time, you may need to charge the battery once a month.
charger power may be too high and it doesn't meet the AGPTEK-K1 player charging
standards.
* Please use the standard USB2.0 port to charge AGPTEK-K1
* Do not charge the AGPTEK-K1 through the power supply on the car
Page 24

* Do not charge AGPTEK-K1 by power bank
1. Backlight Timer: The longer time you set, the shorter the battery life it will be.
2. Display Brightness: The higher brightness level you set, the shorter the battery life it will be.
3. File Format and Size: The lossless format like OGG, APE and FLAC will significantly shorten
4. Volume: Playing in high volume will to some extent shorten the playtime.
5. Operating Frequency: The system will be in high-load operation continuously when you
6. Temperature: High or low temperature will directly influence the battery life, serious may
1. Turn on and shut down AGPTEK-K1 player frequently.
2. Change AGPTEK-K1 player settings frequently.
3. Repeatedly charge and discharge the battery.
Factors that influence the battery life
the battery life because it takes more time and battery power to deal with the files of these
format.
operate it frequently, which will lead to more power consumption.
lead to the player unable to boot. Do not use the player immediate when brought from high
temperature environment to low temperature environment, or it can easily cause damage to
it.
Troubleshooting for short battery life:
Battery life depends on on usage, setting and ambient temperature. Try to avoid the operation
described below which will significantly reduce the battery life:
Those operation will gradually reduce the battery capacity and thus shorten the battery life. As
a result, the battery may run out of power soon after the battery is fully charged.
Page 25

Troubleshooting:
The player turned off automatically after boot
1. Check if the player is in low-power state, if so, connect to power source to charge first.
2. Check if you set a power-off timer or sleep timer in your player, if so, reset to extend the
3. Reset the player.
4. Flash the firmware.
Can’t play the music file
1. Check if the format of the file is supported by the player.
2. Check if the file is damaged. Play the file on another working device to test.
3. Check if the music file is converted.
4. Some player models may not support music file downloaded from iTunes. It need to
5. Reboot the player.
Sound only comes through one side of the headphones or not at all
1. Check if there are music files in your player. Check if the headphones’ plug is firmly seated
2. Check the setting volume, increase the volume up on the player to see if there is an
3. Test the headphones with another device, if problem still exist, replace it with a new pair of
4. Check if the music file is damaged. Play the music file on another audio device, if it failed,
Button response failure
1. Check if the way you operate is proper. Check if there are music files in your player.
2. Reboot the player
3. Flash the firmware.
power off time or turn off the timer.
Note: When solution 1 & 2 don’t work, please contact our customer service for details of
solution 3 & 4.
convert to the format that the AGPTEK-K1 player supports.
in the headphone jack of the device and if it is plugged in to the end.
improvement. If there is volume control button on the headphones, try to increase the volume
by it too.
headphones.
please replace the music file.
For physical buttons: Press the middle part of the corresponding button (button icon)
For touch buttons: Click the button. If the contact time is too short, the device may not be able
to recognize your operation.
Page 26

Note: When solution 1 & 2 don’t work, please contact our customer service for details of
Player can’t be recognized when connected to computer
1. Check if the computer USB interface meets the standard - USB 2.0 version.
2. Check if the USB cable can work on other device, because some USB cable is only for
3. Check the computer driver is working.
4. Check if the AGPTEK-K1 is low-battery, if so, charge for a while first.
5. Check if the computer is reading other USB device. (In addition to the mouse, keyboard,
6. Make sure the computer is not in low-battery state
7. Reboot the computer.
8. Some model of the player need to be connected in power-on state, such as S22.
9. Forced firmware flashing. DO NOT operate by yourself, please contact our customer
solution 3.
charging.
USB connection device)
service for firmware download instruction.
 Loading...