

Page 1
User Manual
English.....................01/09
Français...................21/31
Deutsch....................10/20
日本語.....................32/40
C8 Music Player
Page 2

EN:
Manufacturer: Shenzhen BenjieTechnology Co., Ltd.
Address: 8F, B unit, 10 bldg, Huafeng Techonology Park, Fengtang Road, Tangwei,
Fuyong, Bao'an, Shenzhen, China.
E-mail: support@agptek.com.
DE:
Hersteller: Shenzhen BenjieTechnology Co., Ltd.
Addresse: im achten Stock, Einheit B, Gebäude 10, Huafeng Techonology Park,
Fengtang Straße, Tangwei, Fuyong, Bao'an, Shenzhen, China.
E-mail: support@agptek.com.
FR:
Fabricant: Shenzhen BenjieTechnology Co., Ltd.
Adresse: 8 étage, unité B, 10 bldg, Parc technologique de Huafeng, Route Fengtang,
Tangwei, Fuyong, Bao'an, Shenzhen, Chine.
E-mail: support@agptek.com.
IT :
Manufacturer: Shenzhen BenjieTechnology Co., Ltd.
Address: Via Fengtang, Zona di Huafeng Techonology, 8 Piano, Unità B, Edificio
10 ,Distretto di Bao'an, Città di Shenzhen, Cina.
E-mail: support@agptek.com.
ES:
Fabricante: Shenzhen BenjieTechnology Co., Ltd.
Dirección: 8F, unidad B, 10 edif, Parque Tecnológico de Huafeng, Fengtang Road,
Tangwei, Fuyong, Bao'an, Shenzhen, China.
Correo electrónico: support@agptek.com.
JP:
: 8F, B unit, 10 bldg, Huafeng Techonology Park, Fengtang Road, Tangwei,
Fuyong, Bao'an, Shenzhen, China.
: Shenzhen BenjieTechnology Co., Ltd.
: support@agptek.com.
Page 3
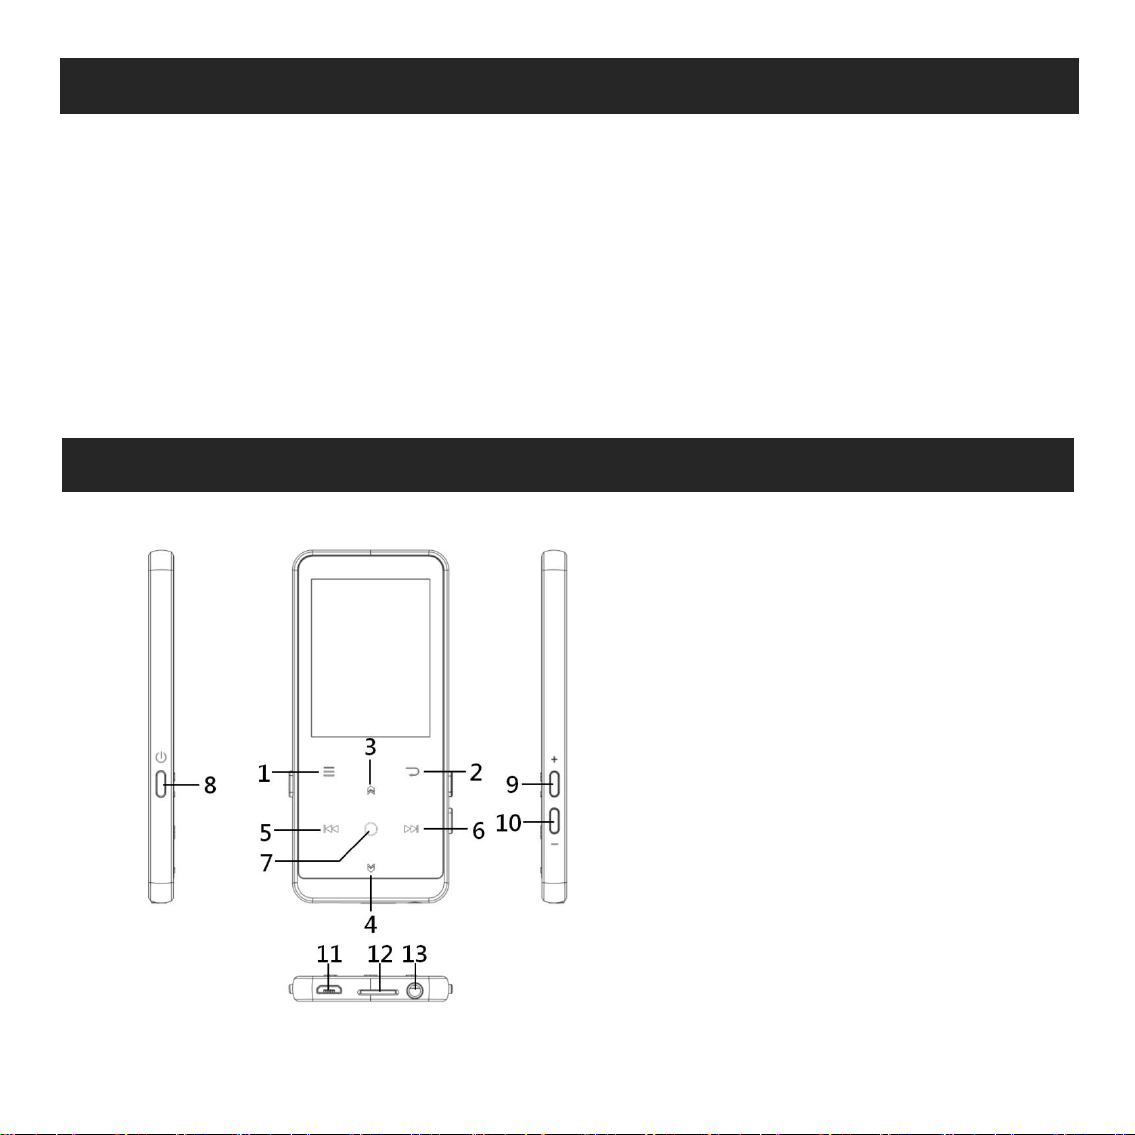
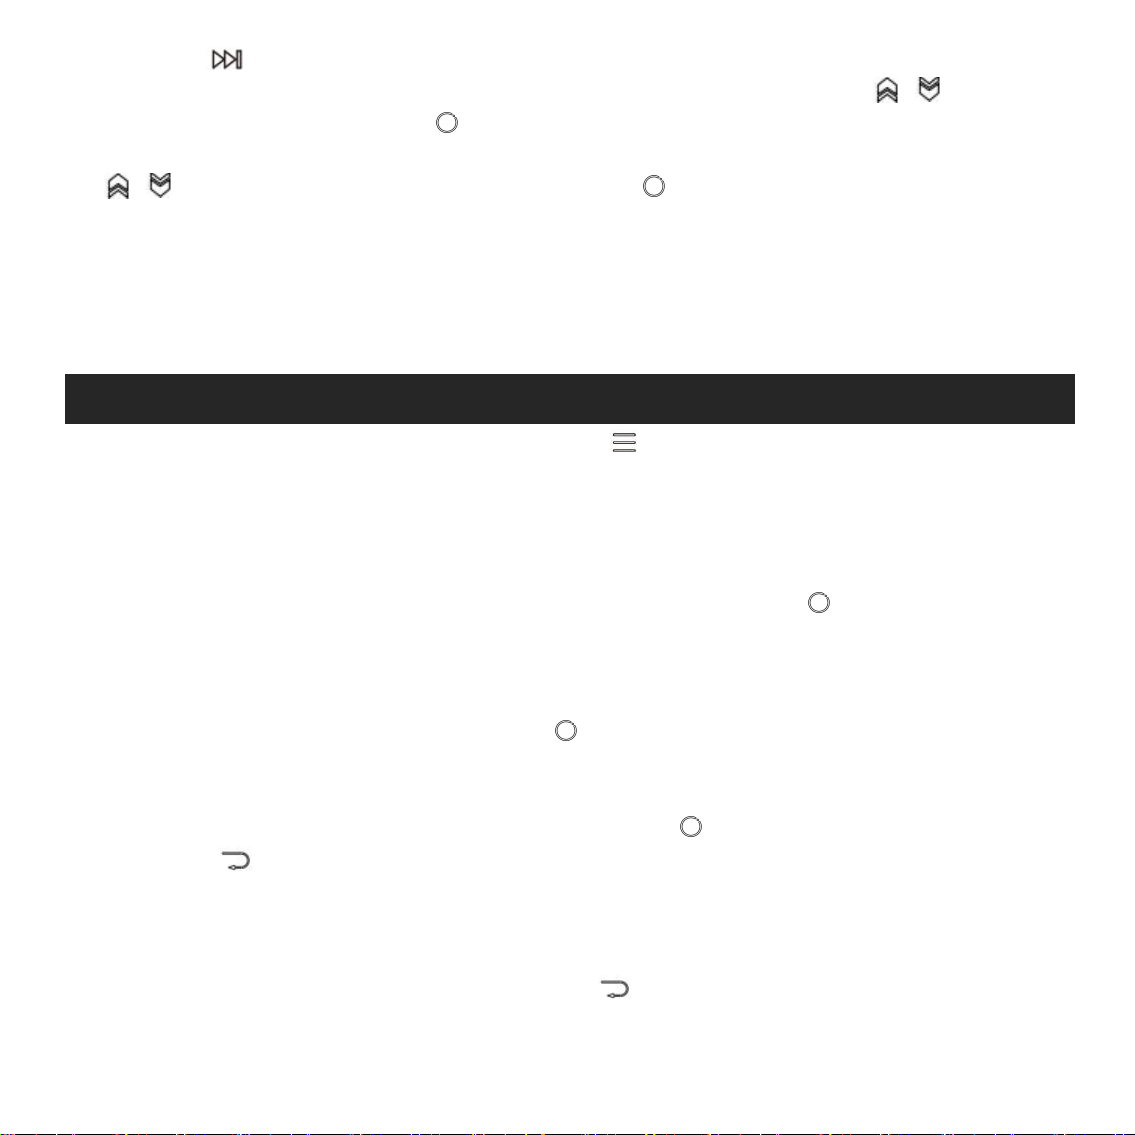
1
Charge the Player
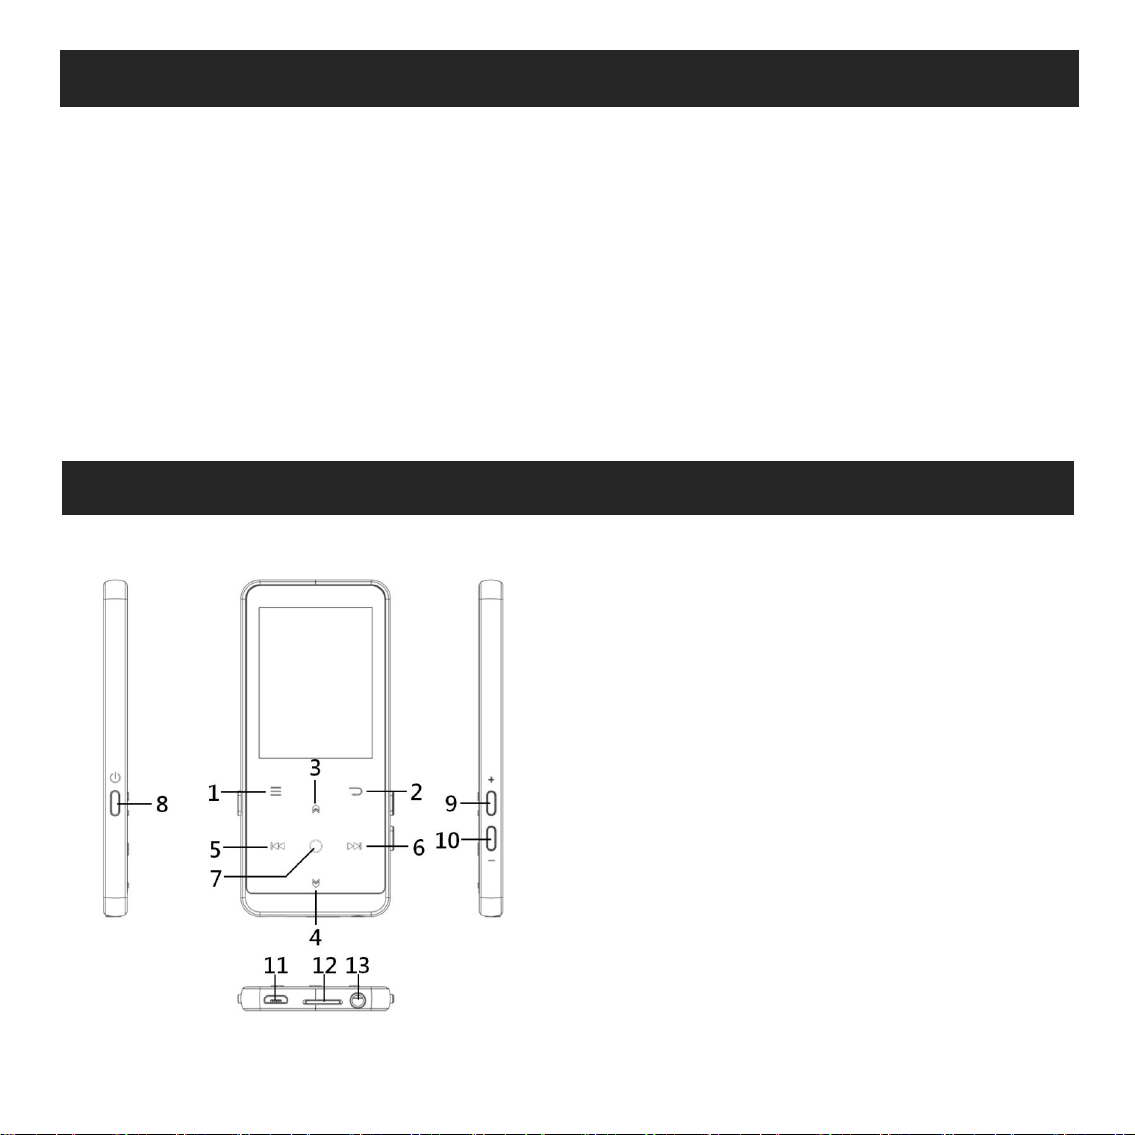
Buttons and Controls
1. Use 5V/500mA Charger
1. Menu
2. Back
3. Move up
4. Move down
5. Previous/Fast backward
6. Next/Fast forward
7. Enter/Play/Pause
8. Power button; Screen on/off
9. Volume up
10. Volume down
11. USB interface
12. Micro SD card slot
13. Headphone jack
Plug one end of the micro USB cable into the USB port of a charger, the other
end to the port on your device. After fully charged, disconnect the cable from
your device by pulling it straight outward.
2. Charge by Computer
Connect the device to a running computer via included USB cable.
Note:
To prevent battery deterioration, you are supposed to charge the battery at
least once every half a year or every year.
Page 4
2
Quick Guide
Music
1. Power On/Off
Long press the power button for 3 seconds to turn on/off the player.
Short press the power button to turn on/off the screen display.
2. Home Menu:
The Home menu is the starting point of each application. There are 9 main
functions on the home menu: Music/Bluetooth/Folder/Recordings/FM
radio/Tools/Video/EBook/Settings.
3. Basic Operation:
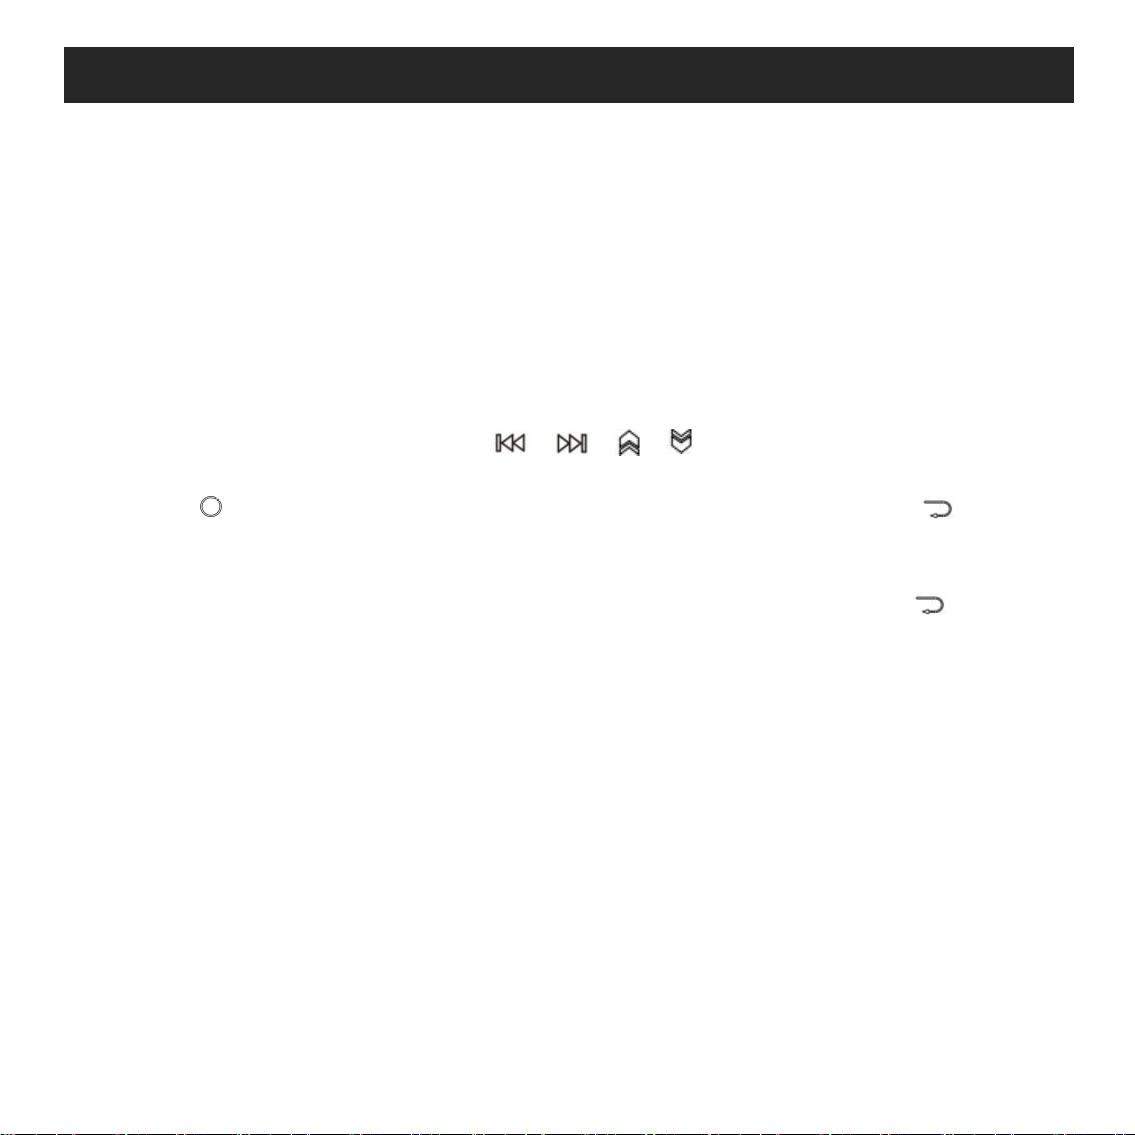
Tap the button / / / to choose its 9 different functions on main
interface, and tap the middle button to enter it; tap to go back; hold to
go back to the main interface directly.
Note: When is on main menu and there is music/radio playing/paused in the
background, tap to go back to music/radio playing interface.
4. Import and Transfer Music
Connect the computer via the USB cable. Copy the music and other files you
need to transfer in the computer, and then paste in the player, or just drag and
drop the music files or folders directly when connected to computer.
Note: Do not disconnect your player during the transferring process. If you do,
the file being transferred will be damaged.
5. Reset
When the player is crashing, press the power button for 10 seconds to reset
the player.
Find “Music” on Home menu and press the button to access to its function.
The related list will show, including: All Songs, Last played, Artists, Albums,
Genres, Playlists, Update playlists, Local folder and Card folder. Choose from
the menu, and tap the button to play the music.
- “Last played”, take you back to the song or audio file you are playing now or
Page 5
3
played last time.
- “Update Playlists”, update music file.
Note: Local folder and card folder function is only available when memory card
inserted.
Operations on music playing interface
- While it’s on music playing interface, hold the button to fast forward,
tap to switch to next song; hold the button to fast rewind, tap to
switch to the previous song.
- Tap button to play/pause.
Submenu
While it’s on music playing interface, tap button to access to the
submenu.
The related list will show:
- "Home", go back to main interface.
- Play mode. Choose play mode: Shuffle, Repeat all, Repeat 1, Play
off, Preview, Playlists auto switch, Play music from.
Note: "Preview". The player would only play the first 10 seconds of a track and
then skip other tracks if you select this option. "Play music from", choose to
play songs from all songs/artist/album.
- Lyrics display. Choose turn on or off the lyrics, off by default.
- Resume. Help you to return to the position before the manual switch song.
- "Equalizer", choose from the 6 sound effects, or choose "off" to turn off
equalizer
Note: You can also find "Equalizer" in "Set">"Sound settings".
- "Bookmarks", choose to add, delete or go to bookmark.
- "Variable Speed Playback", tap button / to adjust playback speed from
-8(Slowest) to +8(Fastest) and tap button to confirm.
- “Repeat settings”, A-B repeat settings:
1) Choose the option “Replay Mode”, tap button to confirm the starting
time A when A is flashing. Then tap the button to set the ending time
B when B is flashing. The passage from time A to B will be repeated
automatically. The icon for A-B indication will appear on the screen. Tap
Page 6
4
FM Radio
button again to back to normal playback.
2) Replay times: Set the replay times from 1 to 10. Tap button / to adjust
the value and tap button to confirm.
3) Replay intervals: Set the replay interval from 1 to 10 (seconds). Tap button
/ to adjust the value and tap button to confirm.
- "Delete", choose to delete the song that is playing now.
- "Add to playlist"/"Remove from Playlist", choose to add to or remove from
the 3 playlists.
Note: In Bluetooth mode, Equalizer and Variable speed playback are
unavailable.
While it’s on radio playing interface, tap to access to its submenu which
includes: Home, Start FM radio recording, Station list, Save to preset, Clear
preset, Auto tune, Turner Region and FM Recording.
Auto tune/save to/Clear preset
- “Auto tune”, search stations automatically. You can see the searched stations
in “Stationlist”. While is on radio playing interface, tap to switch among
preset stations.
- “Save to preset”, save the station you are listening to “Stationlist” .
- “Clear preset”, click “Clear preset” to enter the preset list, choose the
station you want to clear, then tap and choose yes to clear the preset
station.
Start FM radio recording
Choose "Start FM Radio Recording", tap button to pause/continue, tap
The button and select “yes” to save the recording file.
Find the radio recordings in FM radio > FM recording. The radio recordings will
also be saved in Recordings > Recordings library.
Turn off radio background
While it’s on radio playing interface, tap and choose “Yes” to turn off the
radio playing background.
Note:
Page 7

5
Bluetooth
1.When using the radio function for the first time or when there is no station,
the station can be added by [Station list], [Manual Tune], [Auto Tune].
2.If you can't search for an FM radio station, or if the FM sound quality is not
good, please try adjusting the position of the wired headset or antenna. In
some remote places, the FM signal may be poor. Please contact the local staff
working in FM broadcasting to confirm whether the FM signal is covered or
not.
3.FM radio supports listening with the wired earphones connection/Bluetoot
h connection
1) Wired earphones listening: Before turning on the FM radio, you should con
nect to the wired earphones for listening;
2) Bluetooth connection listening: You can use the wired earphones
or antenna to receive the signal, and then connect Bluetooth devices.
Find “Bluetooth” on Home menu and tap to access to its function.
Bluetooth On/Off:
Choose to enable or disable Bluetooth.
Bluetooth On/Off memory.
Choose On-the player will connect with devices that have been connected by
its Bluetooth automatically, when you turn on the player next time.(The
Bluetooth devices must be powered on and unoccupied)
Search for device:
When the Bluetooth is enabled, choose “Search for device” to search the
nearby devices, then all of the devices which has opened its Bluetooth will be
listed.
Device List:
Choose from the available devices and select to connect/disconnect. Select the
device you want to connect, and then click to connect. After successfully
connected, this player is ready to play music or FM radio by Bluetooth
earphones, Bluetooth speaker, etc.
Note:
Page 8
6
Recordings
Videos
- Please open the Bluetooth of the device at first if you want to connect with
the player.
- Record/Video/Picture function is not available while using Bluetooth
function.
Find “Recordings” on the Home menu, tap button to access to its function.
The related list will show, including: Start Voice Recording, Recordings Library,
Storage(only available when memory card inserted), Record Format, VOR set.
Choose “Start Voice Recording” and tap button to start voice recording,
press again to pause. Tap the button and choose “yes” to save the
recording file.
Find the saved recordings in Recordings >Recordings library.
“Storage” , choose to store your recordings in internal or external memory.
Confirm your selection with button .
Record Format: Choose the record format between MP3/PCM.
VOR set: When you start recording under VOR mode, the recorder will start
recording automatically if sound is detected and stop recording when no
sound detected.
Find "Videos" on Home menu, tap button to access to its function. You will
need to choose from local folder or card folder if the memory card is inserted.
Tap button to watch videos, tap / to go to previous/next video or
hold down to fast backward/forward.
When it’s on video playing interface,tap button to access to its
submenu, including: Brightness, Repeat, Delete Video. Set according to
your preference.
Note: If the format of your video is not supported, you can visit
https://www.agptek.com/support/download.html#drivers-and-tool to
download video conversion tool(Video_Format_Converter). Then convert the
Page 9
7
EBook
Settings
Tools
format of your video and enjoy video.
Find "EBook " on main interface, tap button to access to its function.
While it’s on text playing interface, Tap button / to turn the pages.
Tap to play automatically, click again to stop.
While it’s on book reading interface, tap to enter its submenu and set
your preference, including Playsetting(set the automatic playing interval),
Page select, Bookmark select, Background color, Delete ebook, etc. Set
according to your preference.
Note: The device can only recognize the article in “txt” format.
Find "Tools" on main interface, tap button to access to its function. A
related list will show “Calendar”, “Alarm”, "Pictures".
Pictures.
- Tap to view pictures, tap / to go to previous/next picture.
- When it’s on picture viewing interface, tap to access to its
submenu,including: Brightness, Backlight timer, Slideshow settings, Delete
picture and. Set according to your preference.
Alarm
- Select Alarm and click button to enter, set the alarm
switch/time/cycle/music/volume you want.
Note:
The device only supports pictures in JPG, BMP and GIF format.
Language: Select the language of MP3 Player, and confirm it via pressing
Find “Settings” on main menu with the button to enter to its function. A
related list will show, including: Language, Date and time, Display settings,
Sound settings, Button lights, Shutdown settings, Information, Format
Device, Factory Settings.
Page 10
8
Help and Troubleshooting
the button .
Date and time: Choose “Date settings” to set date format and date. Tap
button / to switch among year|month|day, tap button / to
adjust the value of year|month|day and confirm with button . Set time
under “Time setting” and adjust the time in the same way.
Display settings: Set Brightness, Backlight timer and Screensaver.
Sound settings: Set equalizer and volume limit for music playback.
Button lights: Choose to turn/off the button lights.
Shutdown settings:
- Power Off: When there is no operation on the device, the device will shut off
automatically when reaches the set time(0-5 Mins);
- Sleep timer: The device will shut down automatically when reaches the set
time(0-100 Mins).
Information: check player information and disk space about your player;
Format device/Factory settings: Format the device or restore to factory
settings.
Note: Before formatting the device, please backup the file so as not to lose any
files.
Can’t turn on the player
- Please check whether the player is run out of power, connect the player to an
adapter and try again after charging.
Can’t charge the battery
- Disconnect the player, and then reconnect it.
- Charge the battery under an proper temperature within the range of 5℃(41
℉) to 35℃ (95 ℉).
- Turn on the computer.
Can’t download files from computer
- Please confirm whether it’s connected properly;
- Please check whether the storage space of the internal memory is full;
- Please check whether the USB cable is damaged.
Can’t recognize the player when connected to the computer via USB
Page 11
9
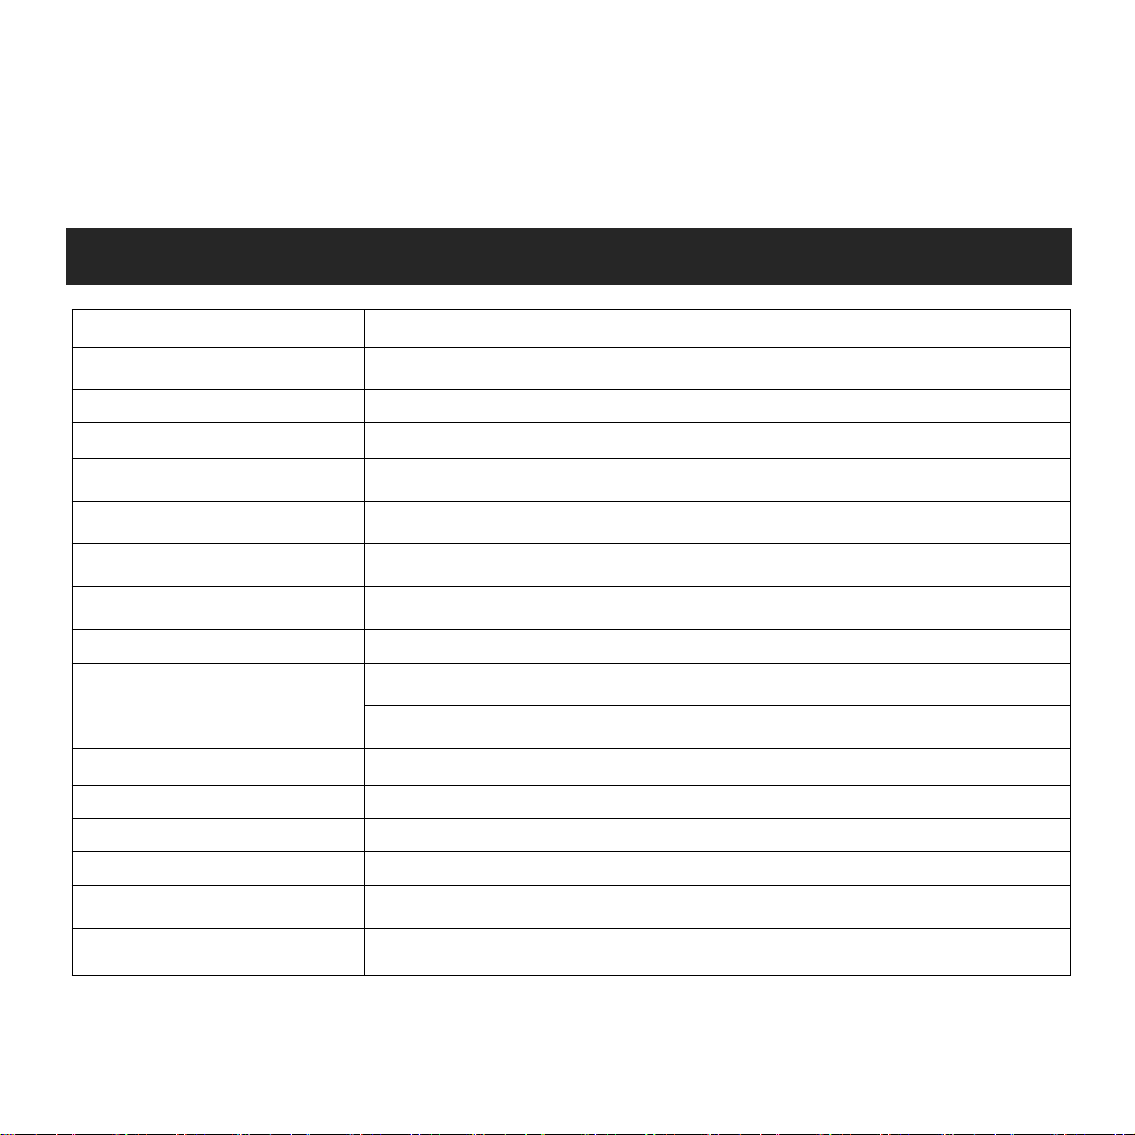
Specifications
cable.
Screen
2.4inch TFT LCD Display
Housing Material
Aluminum alloy
Unit Size
108.5*48.0*9.1mm
Net Weight
75g
Bluetooth Format
MP3/WMA/APE/FLAC/WAV
Audio Format
MP3/WMA/OGG/APE/FLAC/WAV/AAC-LC/ACELP
Video Format
240*320AVI/AMV
Photo Format
JPG/BMP/GIF
E-book Format
TXT
Recording Format
MP3: 32 kbps/64 kbps/128 kbps
PCM: 512kbps/768kbps/1024kbps/1536kbps
Interface Type
USB 2.0
Internal Memory
16GB/32GB
SD Card Expansion
Up to 128GB
Battery
580mAh lithium cobalt oxide battery
Charging Time
3 hours (5V/500mA)
OS
WindowsXP/Vista/7/8/10/Linux6.2/Mac os 10.3
- Disconnect the player, wait for a few minutes, and then reconnect it.
- Disconnect the player, restart the computer, and then reconnect the player.
- Connect your player to another USB port on your computer.
- If the player has not been used for a long period of time, charge the player
for about 10 minutes, after which it should start operating normally again.
If you have any problems about this product, please feel free to contact
support@agptek.com and get help from our customer service first.
Page 12
10
Aufladfen
Tasten und Bedienelemente
1. Mit 5V/500mA Ladegerät aufladen
1. Menü
2. Zurück
3. Nach oben
4. Nach unten
5. Vorherig/zurückspulen
6. Nächste/Vorspulen
7. Eingeben/Wiedergabe/Anhalten
8. Power-Taste; Bildschirm ein/aus
9. Lautstärke erhöhen
10. Lautstärke verringern
11. USB-Anschuluss
12. Micro SD-Kartensteckplatz
13. Kopfhörerbuchse
Verwenden Sie ein Ladegerät per 5V/500mA(Nicht mitgeliefert) zum Laden.
Während es vollständig aufgeladen ist, trennen Sie das Kabel von Ihrem Gerät,
indem Sie es gerade nach außen ziehen.
2. Mit Computer aufladen
Sie können auch das Gerät aufladen.( Durch das USB-Kabel an einen laufenden
Computer angeschlossen).
Hinweis:
Um eine Verschlechterung der Batterie zu vermeiden, laden Sie den Akku
mindestens einmal alle halben Jahr oder jedes Jahr auf.
Page 13
11
Kurzanleitung
1. Ein/Ausschalten:
Halten Sie die Ein/Ausschalten Taste 3 Seunden gedrückt um den Player
ein/auszuschalten.
Drücken Sie die Taste, um den Bildschirm ein- oder auszuschalten.
2. Hauptmenü:
Der Hauptmenü ist der Ausgangspunkt jeder Funktionen. Es gibt 9
Hauptfunktionen im Hauptmenü:
Musik/Bluetooth/Ordner/Aufzeichnungen/UKW-Radio/Werkzeuge/Video/E-Bu
ch/Einstellungen.
3. Funktion auswählen:
Klicken Sie auf die Schaltfläche / / / , um ihre 9 verschiedenen
Funktionen auf der Hauptschnittstelle auszuwählen. Und dann klicken Sie auf
die Taste , um sie einzugeben, und drücken Sie die Taste , um zur
Hauptschnittstelle zurückzukehren.
Hinweis: Wenn Sie sich im Hauptmenü befinden und Musik/Radio im
Hintergrund abgespielt/angehalten wird, klicken Sie die Taste , um zur
Musik-/Radio-Wiedergabeschnittstelle zurückzukehren.
4. Musik importieren und übertragen:
Verbinden Sie der Player mit dem Computer über das USB-Kabel. Kopieren Sie
die Musik und andere Dateien, die Sie auf dem Computer übertragen möchten,
und fügen Sie sie in den Player ein. Sie können auch die Musikdateien oder
Ordner auch direkt per Drag & Drop verschieben, wenn Sie den Player mit dem
Computer verbunden sind.
Hinweis: Trennen Sie Ihren Player aus dem Computer nicht, während die
Datien übertragen. Sonst wird die übertragene Datei beschädigt.
5. Zurücksetzen:
Wenn der Player abstürzt, halten Sie den Ein-/Ausschalter 10 Sekunden lang
gedrückt, um den Player zurückzusetzen.
Page 14

12
Musik
Finden Sie “Musik” auf dem Hauptmenü und dann drücken Sie die Taste um
diese Funktion einzugeben.
Das Untermenü wird zeigt: Alle Titel, Letzte Titel, Interpreten, Alben, Genres,
Wiedergabelisten, Die Playlist aktualisieren, Haptkatalog und Kartenkatalog.
Wählen Sie aus dem Menü und drücken Sie die Taste , um die Musik
abzuspielen.
- “Letzte Titel”, lässen Sie zurück zu dem Lied oder der Musikdatei, die gerade
spielt wrid oder letztes Mal gespielt hat.
- “Die Playlist aktualisieren”, um die Musikdatei zu aktualisieren.
Hinweis: Die Funktion für den lokalen Ordner und die Karten Ordner ist nur
verfügbar, wenn die SD-Karte eingelegt ist.
Bedienung an der Musikwiedergabe-Schnittstelle
- Wenn Sie auf der Musikwiedergabe-Schnittstelle ist, Halten Sie den Taste
gedrückt, um vorzuspulen, oder klicken Sie kurz, um nächsten Musikdatei zu
gelangen; Halten Sie die Taste gedrückt, um schnell zurückzuspulen,
Klicken Sie, oder um zu den vorherigen Song-Dateien zu gelangen.
- Klicken Sie die Taste zum Abspielen/Anhalten.
Untermenü
Wenn es sich um Musikwiedergabe handelt, klicken Sie die Taste um das
Umtermenü einzugeben. Das Untermenü wird zeigt:
- "Hauptmenü", gehe zurück zur Hauptschnittstelle.
- Wiedergabemodus. Wählen Sie den Wiedergabemodus: Shuffle, Alles
wiederholen, Titel Wiederholen, Aus, Durchblättern und Starten, Ordnern auto
Umschalten, Musikwiedergabe von...
Hinweis: "Durchblättern und Starten": Der Player spielt nur die ersten 10
Sekunden jedes Titels und springt dann automatisch zur nächsten, wenn Sie
diese Option wählen. "Musik abspielen von", wählen Sie die Wiedergabe von
Titeln aller Lieder / Interpreten / Alben.
- Anzeige der Liedtexte. Wählen Sie den Text ein- oder ausschalten,
Page 15

13
standardmäßig deaktiviert.
- Fortsetzen. Helfen Sie Ihnen, in die Position vor dem Manual-Switch-Song
zurückzukehren
- "Equalizer", wählen Sie aus den 6 Soundeffekten, oder wählen Sie "aus", um
den Equalizer auszuschalten
Hinweis: Sie können "Equalizer" auch unter "Einstellungen" >
"Sound-Einstellungen" finden.
- "Lesezeichen", wählen Sie Hinzufügen, Löschen oder zum Lesezeichen gehen.
- "Variable Schnelligkeit", klicken Sie auf die Taste / , um die
Wiedergabegeschwindigkeit von -8 (langsamste) bis +8 (schnellste)
einzustellen und klicken Sie zur Bestätigung.
- "Wiederholungseinstellung", A-B Wiederholungs einstellen:
1) Wählen Sie die Option "Wiederholungsmodus". Drücken Sie die Taste ,
um die Startzeit A zu bestätigen, wenn A blinkt. Drücken Sie dann die Taste
, um die Endzeit B bestätigen, wenn B blinkt. Der Übergang von A nach B
wird automatisch wiederholt. Das Symbol für die A-B-Anzeige erscheint auf
dem Bildschirm. Klicken Sie erneut , um zur normalen Wiedergabe
zurückzukehren.
2) Wiederholungszeit: Stellen Sie die Wiederholungs-Anzahl von 1 bis 10 ein.
Drücken Sie die Taste / , um den Wert einzustellen, und drücken Sie die
Taste zur Bestätigung.
3) Wiederholungsintervalle: Stellen Sie das Wiederholungsintervall von 1 bis
10 (Sekunden) ein. Drücken Sie die Taste / , um den Wert einzustellen,
und drücken Sie die Taste zur Bestätigung.
- "Löschen", wählen Sie, um den Song zu löschen, der gerade abgespielt.
- "Zu Wiedergabeliste hinzufügen"/"Aus Wiedergabeliste entfernen",Wählen
Sie, um hinzuzufügen zu den 3 Wiedergabelisten hinzufügen oder aus diesen
entfernen möchten.
Hinweis: Im Bluetooth-Modus sind die Wiedergabe mit Equalizer und variabler
Geschwindigkeit nicht verfügbar.
Page 16

14
UKW- Radio
Finden Sie “UKW-Radio” auf dem Hauptmenü und dann drücken Sie die
Taste um diese Funktion einzugeben.
Wenn es sich um Radiowiedergabe handelt, klicken Sie die Taste um das
Umtermenü einzugeben. Das Untermenü zeigt: Hauptmenü, Aufnahme vom
UKW-Radio starten; Voreinstellung; In Voreinstellung speichern;
Voreinstellung löschen; Autom. Einstellung; Bandabstimmung;
UKW-Aufnahme.
Automatische Abstimmung/Speichern/Voreinstellung löschen
- “Automatische Abstimmung”, wird Radio-Senders automatisch suchen. Sie
können die gesuchten Sendern in "Voreinstellung" sehen. Wenn es sich um
Radiowiedergabe handelt, klicken Sie , um zwischen den voreingestellten
Sendern zu wechseln.
- “Als Voreinstellung-Abstimmung speichern”, speichern Sie den Sender, dem
auf der "Voreinstellung" Liste stellt.
-“Voreinstellungabstimmung löschen”, klicken Sie “Voreinstellungabstimmung
löschen” um die voreingestellte Liste einzugeben. Dann wählen Sie den
Sender aus, den Sie löschen möchten. Klicken Sie dann auf und wählen Sie
"Ja", um den voreingestellten Sender zu löschen.
UKW-Radio Aufnehmen
Wählen Sie "Aufnahme vom UKW-Radio starten", klicken Sie die Taste zum
die Musik pausen/spielen, klicken Sie die Taste und wählen Sie "Ja", um
die Aufnahmedatei zu speichern.
Finden Sie die Radioaufnahmen in UKW Radio > UKW- Aufnahmen.
Die Radioaufnahmen werden auch in Aufnahmen > Aufnahmebibliothek
gespeichert.
Radiohintergrund ausschalten
Wenn es sich um Radiowiedergabe handelt, klicken Sie die Taste . Dann
wählen Sie "Ja", um den Hintergrund (Radio) auszuschalten.
Hinweis:
1. Bei der ersten Verwendung der Radiofunktion oder wenn kein Sender
Page 17

15
Bluetooth
vorhanden ist, kann der Sender mit [Senderliste], [Manuelle Einstellung],
[Automatische Einstellung] hinzugefügt werden.
2. Wenn Sie keinen UKW-Radiosender suchen können oder die Klangqualität
nicht gut ist, versuchen Sie die Kopfhörer oder Antenne zu drehen. In einigen
Orten ist das UKW-Signal möglicherweise schwach. Wenden Sie sich bitte an
das örtliche FM-Rundfunkpersonal, um überzuprüfen, ob das UKW-Signal
abgedeckt ist oder nicht.
3. UKW-Radio unterstützt das Hören mit der
Kabelkopfhörer/Bluetooth-Verbindung
1) Hören über Kabelkopfhörer: Bevor Sie das UKW-Radio einschalten, sollten
Sie an Kabelkopfhörer anschließen.
2) Hören über Bluetooth-Verbindung: Sie können die Kabelkopfhörer oder
Antenne verwenden, um das Signal zu empfangen, und dann
Bluetooth-Geräte anschließen.
Finden Sie “Bluetooth” auf dem Hauptmenü und dann drücken Sie die Taste
um diese Funktion einzugeben.
Bluetooth Schalter:
Wählen Sie aus, ob die Bluetooth ein/ausschalten.
Bluetooth Ein/Aus Erinnerung
Wählen Sie Ein - Der Player verbindet sich automatisch mit Geräten, die über
Bluetooth verbunden wurden, wenn Sie den Player das nächste Mal
einschalten. (Die Bluetooth-Geräte müssen eingeschaltet und frei sein.)
Gerät suchen:
Wenn Bluetooth eingeschaltet wird, wählen Sie "Gerät suchen", um die Geräte
in der Nähe zu suchen. Dann werden alle Geräte aufgelistet, die Bluetooth
geöffnet haben.
Gerätliste:
Wählen Sie aus den verfügbaren Geräten und drücken Sie die Taste zum
Verbinden/Trennen. Wählen Sie das Gerät aus, zu dem Sie eine Verbindung
herstellen möchten, und klicken Sie dann auf, um eine Verbindung herzustellen.
Page 18

16
Aufzeichnungen
Videos
Nach erfolgreicher Verbindung wird den Mp3 Player die Musik oder
UKW-Radio über Bluetooth-Kopfhörer, Bluetooth-Lautsprecher usw.
abzuspielen.
Hinweis:
- Bitte öffnen Sie zunächst das Bluetooth des Geräts, wenn Sie sich mit dem
Player verbinden möchten.
Die Funktion Aufnahme/Video/Bilder ist bei der Bluetooth-Funktion nicht
verfügbar.
Finden Sie "Aufzeichnungen" im Hauptmenü, klicken Sie die Taste , um zu
die Funktion zu gelangen.
Dann gibt es ein Untermenü: Aufnahme starten, Aufnahmebibliothek,
Speicher(nur verfügbar, wenn SD-Karte eingelegt ist), Aufnahme Format,
VOR-Einstellung.
Wählen Sie "Aufnahme starten" und drücken Sie die Taste , um die
Sprachaufnahme zu starten. Drücken Sie diese Taste erneut, um die
Wiedergabe zu pausen. Drücken Sie die Taste und wählen Sie "ja", um
die Aufnahmen zu speichern.
Finden Sie die gespeicherten Aufnahmen in der Aufnahmen >
Aufnahmebibliothek.
“Speicher”, wählen Sie aus, um Ihre Aufnahmen im internen oder externen
Speicher zu speichern. Bestätigen Sie Ihre Auswahl mit der Taste .
Aufnahme Format: Wählen Sie das Aufnahmeformat zwischen MP3/PCM.
VOR-Einstellungen: Wenn Sie die Aufnahme im VOR-Modus starten,
beginnt den Player automatisch mit der Aufnahme, wenn es ein Ton
erkannt wird. Und wenn es kein Ton erkannt, wird die Aufnahme stoppt.
Finden Sie “Videos” auf dem Hauptmenü und dann drücken Sie die Taste
um diese Funktion einzugeben.
Klicken Sie die Taste um das Video aktualisieren und ansehen. Drücken
Page 19

17
E-Buch
Werkzeuge
Sie die Taste / , um den nächsten oder vorherigen zu zeigen.
Wenn es sich um eine Videobetrachtungsschnittstelle steht, drücken Sie die
Taste , um auf das Untermenü zuzugreifen. Das Untermenü zeigt:
Helligkeit, Wiederholen, Video löschen. Stellen Sie Ihren Wünschen
entsprechend ein.
Hinweis: Wenn das Format Ihres Videos nicht unterstützt wird, können Sie das
Videokonvertierungstool (Video_Format_Converter) von
https://www.agptek.com/support/download.html#drivers-and-tool
herunterladen. Dann konvertieren Sie das Format Ihres Videos und genießen
Sie Videos.
Finden Sie “E-Buch” auf dem Hauptmenü und dann drücken Sie die Taste
um diese Funktion einzugeben.
-Wenn es sich um ein E-Buchwiedergabesschnittstelle befinden, drücken Sie
die Taste / , um die Seiten zu drehen. Klicken Sie die Taste , um
automatisch zu spielen, klicken Sie erneut, um zu stoppen.
-Wenn es sich um ein E-Buch-Schnittstelle steht, drücken Sie die Taste , um
das Untermenü aufzurufen. Stellen Sie die Funktion sowie: Automatisch
Wiedergabe Einstellung, Hintergrundfarbe, E-Buch löschen, Lesezeichen
hinzufügen, Seite auswählen usw.
Hinweis: Das Gerät unterstützt nur E-Buch im “txt” Format.
Finden Sie “Werkzeuge” auf dem Hauptmenü und dann drücken Sie die Taste,
um diese Funktion einzugeben. Dann gibt es ein Untermenü: "Kalender",
"Bilder", "Wecker".
Bilder.
- Klicken Sie die Taste um die Bilder ansehen. Drücken Sie die Taste / ,
um den nächsten oder vorherigen zu zeigen.
- Wenn es sich um eine Bildbetrachtungsschnittstelle steht, drücken Sie die
Taste , um auf das Untermenü zuzugreifen. Das Untermenü zeigt: Helligkeit,
Page 20

18
Einstellungen
Hintergrundbeleuchtung(Timer), Diashow-Einstellungen, Bild löschen. Stellen
Sie Ihren Wünschen entsprechend ein.
Hinweis:
Das Gerät unterstützt nur Bilder im JPG-, BMP- und GIF-Format.
Wecker
- Wählen Sie Wecker und dann klicken Sie die Taste um die Funktion
einzugeben. Stellen Sie den Wecker EIN/AUS; Uhrzeit-Einstellung; Zyklus;
Wecker-Musik; Lautstärke ein.
Finden Sie “Einstellungen” auf dem Hauptmenü und dann drücken Sie die
Taste um diese Funktion einzugeben. Das Untermenü zeigt: Sprache,
Datum und Uhrzeit, Bildschirmeinstellungen, Klangeinstellungen,
Tastenbeleuchtung, AUSSCHALTEN-Einstellung, Informationen, Gerät
formatieren, Werkseinstellungen.
Sprache: Wählen Sie die Sprache des MP3-Players und bestätigen Sie diese
durch Drücken der Taste.
Datum und Uhrzeit: Wählen Sie das Datumsformat, drücken Sie die Taste
/ , um zwischen Jahr/Monat/Tag umzuschalten. Drücken Sie die
Taste / , um den Wert von Jahr/Monat/Tag einzustellen, bestätigen Sie
mit der Taste . Unter "Zeiteinstellung" stellen Sie die Zeit auf die gleiche
Weise ein.
Bildschirmeinstellungen: Stellen Sie Helligkeit, Hintergrundbeleuchtung und
Bildschirmschoner ein.
Klangeinstellungen: Stellen Sie den Equalizer und Volumenlimit für die
Musikwiedergabe ein.
Tastenbeleuchtung: Wählen Sie aus, um die Tastenbeleuchtung ein- oder
auszuschalten.
AUSSCHALTEN-Einstellung
- Energiesparmodus (Power Off): Schalten Sie das Gerät automatisch aus,
wenn es nicht in Betrieb ist(0-5 Mins).
- Sleep Timer: Schalten Sie das Gerät automatisch aus, wenn die eingestellte
Page 21

19
Fehler Behebung
Zeit erreicht ist(0-100 Mins).
Informationen: Zeigen Sie Player-Informationen an und überprüfen Sie
Speicherplatz auf Ihrem Player;
Gerät formatieren/Werkseinstellungen: Formatieren Sie das Gerät oder
stellen Sie es auf die Werkseinstellungen zurück.
Hinweis: Stellen Sie bitte sicher, haben die Datensicherung schon gemacht,
bevor dem Formatieren des Geräts.
Der Player lässt sich nicht einschalten
- Überprüfen Sie, ob Batterie leer ist, schließen Sie den Player an einen
Computer an und versuchen Sie es nach dem Laden erneut.
Der Player kann NICHT Aufladen.
- Trennen Sie den Player mit dem Ladegerät/Computer und dann schließen Sie
ihn mit diesen wieder an.
- Der Akku liegt bei einer Umgebungstemperatur im Bereich von 5℃(41℉)
bis 35℃ (95 ℉).
- Schalten Sie den Computer ein.
- Lassen Sie den Computer nicht in Ruhe- oder Ruhezustand.
Kann NICHT mit Computer Daten übertragen.
- Stellen Sie sicher, dass es mit PC richtig angeschlossen ist;
- Bitte prüfen Sie, ob der Speicherplatz des internen Speichers voll ist;
- Bitte prüfen Sie, ob das USB-Kabel kaputt ist.
[USB anschließen] Erscheint nicht, wenn Ihr Player an den Computer
angeschlossen ist.
- Trennen ihren Player von dem PC, bitte warten Sie eine Moment. Und dann
verbinden Sie die beide noch einmal.
- Wenn es noch nicht funktioniert, trennen Sie bitte den Player vom PC, starten
Sie den Computer neu und verbinden Sie wieder noch einmal den Player und
Computer.
- Probieren Sie noch einmal Ihren Player mit einem anderen USB-Anschluss
Ihres Computers.
Page 22

20
Technische Daten
- Laden Sie Ihren Player auf, wenn er längere Zeit nicht benutzt wurde. Wenn
Bildschirm
2.4inch TFT LCD Display
Gehäusematerial
Aluminiumlegierung
Größe
107.5*47*8mm
Rein Gewicht
75g
Bluetooth Format
MP3/WMA/APE/FLAC/WAV
Musik Formate
MP3/WMA/OGG/APE/FLAC/WAV/AAC-LC/ACELP
Video Formate
240*320AVI/AMV
Foto Formate
JPG/BMP/GIF
E-Buch Format
TXT
Aufnahmen Format
MP3: 32 kbps/64 kbps/128 kbps
PCM: 512kbps/768kbps/1024kbps/1536kbps
Interface Type
USB 2.0
Interner Speicher
16GB/32GB
SD Karte Kapazität
Bis zum 128GB
Batterie
580mAh Lithium-Kobaltoxid-Batterie
Ladezeit
3 Stunden (5V/500mA)
Kompatible System
WindowsXP/Vista/7/8/10/Linux6.2/Mac os 10.3
es beim Ihr Computer nicht erkennt werden, oder erscheinen das Display nicht
mehr. Laden Sie bitte den Mp3 Player für ca. 10 Minuten, danach sollte er
wieder normal funktionieren.
Für weitere Fragen stehen wir Ihnen sehr gerne per Email zur Verfügung:
support@agptek.com.
Page 23

21
Boutons et Contrôles
1. Menu
2. Retour
3. Sélection Haut
4. Sélection Bas
5. Précédent/Retour rapide
6. Suivant/Avance rapide
7. Entrer/Lire/Pause
8. Bouton d'alimentation; Affichage
écran activé/désactivé
9. Volume +
10. Volume -
11. Port micro USB
12. Slot carte Micro SD
13. Prise de casque
Charger le lecteur mp3
1. Utilisez le chargeur 5V/500mA
Branchez le mp3 sur votre chargeur avec le câble USB fourni. Quand il est
complètement chargé, débranchez le câble de votre appareil .
2. Charger par ordinateur
Connectez l'appareil à un ordinateur en cours d'exécution via le câble USB
fourni.
Remarque:
Pour éviter la détérioration de la batterie, vous devez charger la batterie au
moins une fois tous les six mois ou tous les ans.
Page 24

22
Guide rapide
Musique
1. Allumer/Eteindre:
Appuyez longuement sur le bouton d'alimentation pendant 3 secondes pour
allumer/éteindre le lecteur.
Appuyez brièvement sur le bouton d'alimentation pour allumer/éteindre
l'affichage à l'écran.
2. Menu d’accueil:
Le menu d’accueil est le point de départ de chaque application. Il y a 9
fonctions principales sur le menu d’accueil: Musique/Bluetooth/Affich.
dossiers/Enregistrements/Radio FM/Outils/Vidéo/Livre Electronique/Définir.
3. Opération de base:
Appuyez sur le bouton / / / pour choisir ses 9 fonctions différentes
sur l'interface principale, appuyez sur le bouton central pour l'entrer, puis
appuyez sur pour revenir à l'interface principale.
Remarque: Lorsqu’il est sur le menu principal et la musique/la radio est en
cours de lecture/en pause en arrière-plan, appuyez sur pour revenir à
l'interface de lecture de musique/radio.
4. Télécharger et transférer la musique
Connectez l'ordinateur via le câble USB. Copiez la musique et les autres fichiers
que vous voulez transférer dans l'ordinateur, puis les collez ou faites
simplement traîner et déposer les fichiers musicaux ou les dossiers
directement dans le lecteur.
Remarque: Ne déconnectez pas votre lecteur pendant le processus de
transfert. Sinon, le fichier en cours de transfert sera endommagé.
5. Reset
Lorsque le lecteur est en panne, appuyez sur le bouton d'alimentation pendant
10 secondes pour réinitialiser le lecteur.
Trouvez “Musique” sur le menu principal et appuyez sur le bouton pour
Page 25

23
accéder à sa fonction.
La liste associée affichera, y compris: Tous les titres, Dernière lecture, Artistes,
Albums, Genres, Playlists, Renouveler la playlist, Dossier local et Dossier de la
carte. Choisissez sur le menu et appuyez sur le bouton pour lire la musique.
- “Dernière lecture”, vous ramène à la chanson ou au fichier audio en cours de
lecture ou joué la dernière fois.
- “Renouveler la playlist”, mettre à jour le fichier musical.
Remarque: La fonction de dossier local et de dossier de la carte n'est disponible
que lorsque la carte SD est insérée.
Opérations sur l'interface de lecture musicale
-Pendant qu'il est sur l'interface de lecture musicale, maintenez le bouton
pour avancer rapidement, appuyez brièvement sur pour la chanson
suivante; Maintenez le bouton pour rembobiner, appuyez brièvement sur
pour la chanson précédente.
- Appuyez sur le bouton pour lire/pauser.
Sous-menu
Pendant qu'il est sur l'interface de lecture musicale, appuyez sur le bouton
pour accéder au sous-menu.
La liste associée affichera:
- "Accueil", retournez au menu d’accueil.
- "Mode de lecture", choisissez le mode de lecture: Aléatoire, Répéter
tout, Répéter 1, Répéter désactivé, Marche de visualisation, Lecture
dans les listes, Lire la musique de ...
Note: "Marche de visualisation", Le lecteur ne joue que les 10 premières
secondes d'une piste et saute ensuite si vous sélectionnez l'option. "Lire la
musique de", choisissez de lire les chansons de toutes les
chansons/artiste/album.
- Affichage des paroles, choisissez d'activer ou de désactiver les paroles,
désactivé par défaut.
- Reprenedre, aide-vous à revenir à la position avant la chanson de
l'interrupteur manuel.
Page 26

24
Radio FM
- "Egaliseur", choisissez parmi les 6 effets sonores, ou choisissez "désactivé"
pour éteindre l'égaliseur.
Remarque: vous pouvez également trouver " Egaliseur" dans
"Définir">"Réglages du son".
- " Signets", choisissez d'ajouter, de supprimer ou d'accéder au signet.
- " Vitesse variable ",appuyez sur le bouton / pour régler la vitesse de
lecture de -8 (le plus lent) à +8 (le plus rapide) et appuyez sur le bouton
pour confirmer.
- “Paramètres de répétition ”, paramètres de répétition A-B:
1) Choisissez l'option “Mode de répétition”, appuyez sur le bouton pour
confirmer l'heure de départ A lorsque A clignote. Appuyez ensuite sur le
bouton pour régler l'heure de fin B lorsque B clignote. Le passage du
temps A au B sera répété automatiquement. L'icône pour l'indication A-B
apparaîtra sur l'écran. Cliquez à nouveau sur le bouton pour revenir à la
lecture normale.
2) Nombre de fois de répétitions: Réglez les temps de répétition de 1 à 10.
Appuyez sur le bouton / pour ajuster la valeur et appuyez sur le bouton
pour confirmer.
3) Intervalle Re-lecture: Réglez l'intervalle de relecture de 1 à 10 (secondes).
Appuyez sur le bouton / pour ajuster la valeur et appuyez sur le bouton
pour confirmer.
- " Supprimer", choisissez de supprimer la chanson en cours de lecture.
- "Ajouter à la playlist"/"Supprimer de la playlist", choisissez d'ajouter ou de
supprimer des 3 playlists mobiles.
Note: En mode Bluetooth, l'égaliseur et la lecture à vitesse variable ne sont pas
disponibles.
Trouvez “Radio FM” sur le menu principal et appuyez sur le bouton pour
accéder à sa fonction.
Pendant qu'il est sur l'interface de lecture radio, appuyez sur pour
accéder à son sous-menu qui comprend: Accueil, Démarrer l'enreg. radio FM,
Page 27

25
Présél., Enreg. dans présélection, Effacer la présélection, Réglage auto, Plage
Fréquences et Enregistrement FM.
Réglage auto/Enreg. dans présélection/Effacer présélection
- “Réglage auto”, recherche automatique des stations. Vous pouvez voir les
stations recherchées dans "Présél.". Pendant qu'il est sur l'interface de
lecture radio, appuyez sur pour basculer entre les stations préréglées.
- “Enreg. dans présélection”, sauvegardez la station que vous écoutez dans la
liste " Présél.".
- “Effacer la présélection”, cliquez sur “Effacer la présélection” pour entrer
dans la liste des préréglages, choisissez la station que vous souhaitez effacer,
puis appuyez sur et choisissez Oui pour effacer la station préréglée.
Enregistrement FM
Choisissez "Démarrer l'enregistrement radio FM", appuyez sur le bouton
pour faire une pause/continuer, appuyez sur et sélectionnez "Oui" pour
enregistrer le fichier d'enregistrement.
Trouvez les enregistrements radio dans la radio FM> Enregistrement FM. Les
enregistrements radio seront également être enregistrés dans
Enregistrement > Bibliothèque d'enreg.
Éteindre Radio en tâche de fond
Pendant qu'il est sur l'interface de lecture radio, appuyez sur et
choisissez "Oui" pour éteindre la radio jouant en l'arrière-plan.
Notes :
1. Lorsque vous utilisez la fonction radio pour la première fois ou lorsqu'il n'y a
pas de station, la station peut être ajoutée par[Présél.],[Réglage
manuel],[Réglage auto].
2. Si vous ne pouvez pas rechercher une station radio FM, ou si la qualité
sonore FM n'est pas bonne, essayez de régler la position du casque filaire ou
de l'antenne. Dans certains endroits éloignés, le signal FM peut être faible.
Veuillez contacter les employés locals travaillant dans la radiodiffusion FM
pour confirmer si le signal FM est couvert ou non.
3. La radio FM supporte l'écoute avec la connexion d'écouteurs filaires/la
connexion Bluetooth
Page 28

26
Bluetooth
1) Écoute avec des écouteurs filaires : Avant d'allumer la radio FM, vous devez
vous connecter aux écouteurs filaires sans contrôle filaire pour l'écoute ;
2) Ecoute de la connexion Bluetooth : Vous pouvez utiliser les écouteurs
filaires (sans contrôle filaire ou antenne pour recevoir le signal, puis connecter
les appareils Bluetooth).
Trouvez “Bluetooth” sur le menu principal et appuyez sur le bouton pour
accéder à sa fonction.
Bluetooth On/Off:
Choisissez d'activer(on) ou de désactiver(off) le Bluetooth.
Mémoire Bluetooth On/Off.
Choisissez On (Activé), le lecteur se connectera automatiquement aux
appareils qui ont été connectés via Bluetooth lorsque vous allumez le lecteur la
prochaine fois (les appareils Bluetooth doivent être allumés et inoccupés).
Rechercher un appareil:
Lorsque le Bluetooth est activé, choisissez “Rechercher un appareil” pour
rechercher les appareils à proximité, puis tous les appareils qui ont ouvert leur
Bluetooth seront listés.
Liste d’appareils:
Choisissez parmi les périphériques disponibles et sélectionnez pour
connecter/déconnecter. Sélectionnez l'appareil que vous souhaitez connecter,
puis cliquez pour connecter. Une fois connecté avec succès, ce lecteur est prêt
à écouter de la musique ou de la radio FM via des écouteurs Bluetooth, une
enceinte Bluetooth, etc.
Remarque:
Veuillez d'abord ouvrir le Bluetooth de l'appareil si vous voulez le connecter
avec le lecteur.
La fonction Enregistrement/Vidéo/Photos n'est pas disponible lors de
l'utilisation de la fonction Bluetooth.
Page 29

27
Enregistrements
Vidéo
Trouvez “Enregistrements” sur le menu principal et appuyez sur le bouton
pour accéder à sa fonction. La liste associée affichera, y compris: Démarrer
l'enregistrement vocal, Bibliothèque d'enreg., Stockage (uniquement
disponible lorsque la carte SD est insérée), Format d’Enreg. et Définir VOR.
Choisissez " Démarrer l'enregistrement vocal " et appuyez sur le bouton
pour démarrer l'enregistrement vocal, appuyez sur à nouveau pour
faire une pause. Appuyez sur le bouton et choisissez "oui" pour
enregistrer le fichier d'enregistrement.
Trouvez les enregistrements sauvegardés dans Enregistrements>
Bibliothèque Enregistrements.
“ Stockage", choisissez de stocker vos enregistrements dans la mémoire
interne ou externe. Confirmez votre sélection avec le bouton .
Format d'Enreg: Choisissez le format d'enregistrement entre MP3/PCM.
Définir VOR: Lorsque vous démarrez l'enregistrement en mode VOR,
l'enregistreur commencera à enregistrer automatiquement si un son est
détecté et arrêtera l'enregistrement si aucun son n'est détecté.
Remarque:
Vous ne pouvez pas enregistrer pendant l'utilisation de la fonction Bluetooth.
Trouver "Vidéo" sur le menu principal, appuyez sur le bouton pour accéder
à sa fonction. Vous devrez choisir parmi le dossier local ou le dossier de la
carte si la carte mémoire est insérée.
Appuyez sur le bouton pour regarder des vidéos, appuyez sur /
pour aller à la vidéo précédente/suivante ou maintenez enfoncé pour
avancer rapidement/rembobiner.
Quand il est sur l'interface de lecture vidéo, appuyez sur le bouton pour
accéder à son sous-menu, y compris: Luminosité, Répéter, Effacer la vidéo.
Réglez selon vos préférences.
Page 30

28
Livre Electronique
Outils
Note: Si le format de votre vidéo n'est pas pris en charge, vous pouvez visiter
https://www.agptek.com/support/download.html#drivers-and-tool pour
télécharger l'outil de conversion vidéo (Video_Format_Converter). Ensuite,
convertissez le format de votre vidéo et profitez de la vidéo.
Trouvez " Livre Electronique " sur le menu principal et appuyez sur le bouton
pour accéder à sa fonction.
Pendant qu'il est sur l'interface de lecture de livre, appuyez sur le bouton
/ pour tourner les pages. Cliquez sur pour jouer automatiquement,
cliquez à nouveau pour arrêter.
Pendant qu'il est sur l'interface de lecture de livre, cliquez sur pour
entrer dans son sous-menu et définir vos préférences, y compris Playsetting
(définir l'intervalle de lecture automatique), Supprimer un signet, Ajouter
un signet, Sélectionner un signet, etc.
Remarque: L'appareil ne peut reconnaître que l'article au format "txt".
Trouvez "Outils" sur le menu principal et appuyez sur le bouton pour
accéder à sa fonction. La liste associée affichera "Calendrier", "Photos " et
"Réveil ".
Photos.
- Appuyez sur pour voir les photos, appuyez sur / pour passer à
l'image précédente/suivante.
- Lorsqu'il est sur l'interface de visualisation d'image, appuyez sur
pour accéder à son sous-menu, y compris: Luminosité, Prog. de rétroéclairage,
Réglages du diaporama, Supprimer l'image. Réglez selon vos préférences.
Note:
L'appareil prend uniquement en charge les images au format JPG, BMP et GIF.
Réveil
- Sélectionnez Réveil et cliquez sur le bouton pour entrer, réglez Réveil
on/off(activé/désactivé)/Heure Réveil(Ajuster le temps)/Cycle Réveil/Sonnerie
Page 31

29
Définir
Réveil/Volume Réveil.
Trouvez “Définir” sur le menu principal et appuyez sur le bouton pour
accéder à sa fonction. La liste associée affichera, y compris: Langue/Language,
Date et heure, Réglages de l’affichage, Réglages du son, L’éclairage des touches,
Paramètres d'arrêt, Informations, Format périphérique , Réglages d’usine.
Langue : Sélectionnez la langue du lecteur MP3 et confirmez-la en
appuyant sur le bouton .
Date et heure: Choisissez " Réglages date" pour régler le format date et
régler la date.Cliquez sur le bouton / pour basculer entre année |
mois | jour, cliquez sur le bouton / pour ajuster la valeur de l'année |
mois | jour, puis appuyez sur le bouton pour confirmer. Réglez l'heure
sous "Réglages heure" et ajustez l'heure de la même manière.
Réglages de l’affichages: Réglez la luminosité, Prog. de rétroéclairage et
Ecran de veille.
Réglages du son: Réglez l'égaliseur et la limite de volume pour la lecture de
musique.
L’éclairage des touches: choisissez d'activer/de désactiver l’éclairage des
touches.
Paramètres d'arrêt
- Power Off (Mode d'économie d'énergie): Lorsqu'il n'y a aucune opération sur
l'appareil, l'appareil s'éteint automatiquement lorsqu'il atteint l'heure définie
(0-5 Mins);
- Arrêt programmé(Minuterie de mise en veille): L'appareil s'éteint
automatiquement lorsqu'il atteint l'heure programmée (0-100 Mins).
Informations: vérifiez les informations sur le lecteur et l'espace disque sur
votre lecteur;
Format périphérique/Réglages d’usine: Formatez l'appareil ou restaurez les
paramètres d'usine.
Remarque: Avant de formater l'appareil, veuillez sauvegarder le fichier afin de
ne perdre aucun fichier.
Page 32

30
Aide et dépannage
Impossible d'allumer le lecteur
- Veuillez vérifier si la batterie est faible, connectez le lecteur à un chargeur et
réessayez après la charge.
Impossible de charger la batterie
- Débranchez le lecteur, puis reconnectez-le.
- Chargez la batterie à une température appropriée comprise entre 5 ℃ (41
℉) et 35 ℃ (95 ℉).
- Allumer l'ordinateur.
Impossible de télécharger des fichiers de l'ordinateur
- Veuillez vérifier si la connexion est correcte;
- Veuillez vérifier si l'espace de stockage de la mémoire interne est plein;
- Veuillez vérifier si le câble USB est endommagé.
Impossible de reconnaître le lecteur lorsqu'il est connecté à l'ordinateur
via un câble USB
- Débranchez le lecteur, attendez quelques minutes, puis reconnectez-le.
- Déconnectez le lecteur, redémarrez l'ordinateur, puis reconnectez le lecteur.
- Connectez votre lecteur à un autre port USB de votre ordinateur.
- Si le lecteur n'a pas été utilisé pendant une longue période, chargez le lecteur
pendant environ 10 minutes, après il devrait recommencer à fonctionner
normalement.
Page 33

31
Spécifications
Si vous avez des problèmes avec ce produit, n'hésitez pas à contacter
Écran
Écran LCD TFT 2,4 pouces
Matériau du boîtier
Alliage d'aluminium
Taille de l'unité
108.5*48.0*9.1mm
Poids net
75g
Format Bluetooth
MP3/WMA/APE/FLAC/WAV
Format d’audio
MP3/WMA/OGG/APE/FLAC/WAV/AAC-LC/ACELP
Format de vidéo
240*320AVI/AMV
Format de photo
JPG/BMP/GIF
Format de Livre
Electronique
TXT
Format
d'enregistrement
MP3: 32 kbps/64 kbps/128 kbps
PCM: 512kbps/768kbps/1024kbps/1536kbps
Type d'interface
USB 2.0
Mémoire interne
16GB/32GB
Carte SD
Jusqu'à 128 GB
Batterie
Batterie 580mAh au lithium-oxyde de cobalt
Temps de charge
3 heures (5V/500mA)
OS
WindowsXP/Vista/7/8/10/Linux6.2/Mac os 10.3
support@agptek.com et demandez d'abord l'aide de notre service
clientèle.
Page 34

32
1.メニューボタン
2.戻るボタン
3.上の選択肢。
4.下の選択肢
5.前の曲/早戻り
6.次の曲/早送り
7.確認/再生/一時停止ボタン
8.電源オン/オフボタン。画面のオン/オフ
9.音量+
10.音量ー
11. USB 端子
12.マイクロ SD カード端子
13.イヤホンジャック
①付属 USB ケーブルでパソコンに接続して充電できます。
②5V 500mA USB 充電器を使用して充電できます。(別売)
バッテリーの劣化を防ぐため、本機を半年ごとに 1 回充電してください。
Page 35

33
電源ボタンを 3 秒間長押すると、本器の電源がオン/オフにします。
電源ボタンを短く押すと、画面表示をオン/オフにします。
ホームメニューには9 つ機能間に選択できます。音楽/Bluetooth/フォルダ/録音/FM ラ
ジオ/ツール/動画/電子ブック/設定等の選択肢があります。
/ / /
能に入ります。 ボタンを押してホームメーニューに戻ります。
メインメーニューで、若しバックグラウンドで音楽・ラジオの再生/一時停止の場
合は、 ボタンを押すより、音楽・ラジオの再生画面に戻ります。
ボタンを押すより、9 つ機能間に選択できます。 ボタンを押してその機
USB ケーブルでパソコンと接続します。 コピー&ペーストの方法で本器へ音楽ファイルを
直接転送可能です。
ファイルを破損しないように、転送中に本器を取り外さないでください。
MP3 プレーヤーがフリーズされたら、電源ボタンを 10 秒間押してリセットしてください。
ホームメニューで「音楽」を見つけて、 ボタンを押してその機能に入ります。すべての曲、
直前に再生した曲、アーティスト、アルバム、ジャンル、プレイリスト、プレイリストを更新し
ます、ホームディレクトリまたはカードディレクトリ等の選択肢があります。
- 「直前に再生した曲」:今再生している、または前回再生した曲またはオーディオファイ
ルに戻ります。
- 「プレイリストを更新します」:音楽ファイルを更新します。
ホームディレクトリまたはカードディレクトリ機能は、SD カードが挿入されている
場合のみ使用できます。
Page 36

34
- 音楽再生画面で、 ボタンを短く押すより次の曲に移し、 ボタンを長押すより早
送りとなります。 ボタンを短く押すより前の曲に移し、 ボタンを長押すより巻き戻しと
なります。 ボタンを押して再生/一時停止します。
音楽再生画面で、 ボタンを押してサブメーニューに入ります。
- 「ホーム」:メインメーニューに戻ります.
- 「再生モード」:再生モードを選択します。 シャッフル、 すべての曲をリピート、 1
曲リピート、 プレイリストで再生、 閲覧再生、 フォルダ--自動的切り替え.....から音
楽を再生
注意:若し「閲覧再生」を選択し、曲の最初の 10 秒間だけ再生してから、次の曲に入ります。
「.....から音楽を再生」:すべての曲/アーティスト/アルバムから曲を選択し再生します。
- 「歌詞表示」: 歌詞のオン/オフを選択する、デフォルトではオフにする。
- 「再開」: 最後に再生した、または今再生している曲またはオーディオファイルに戻りま
す。
- 「イコライザー」:6つ音楽スタイル間に選択できます、または 「オフ」を選択してイコライ
ザーをオフにする可能です。
ご注意:「設定」>「サウンド設定」で「イコライザー」を見つけることもできます。
- 「ブックマーク」:追加、削除、またはブックマークに移動を選択します。
- 「シフト配信」(可変速再生): / ボタンを押すより再生速度を-8 から+8 に調
整可能です。 ボタンで確定します。
- リピート設定ーリピートモード(A-B): "リピートモード"を選択し、 ボタンを押し
て開始時間 A を確定します(A が点滅している)。 ボタンをもう一度押して終了時
間 B を確定します。(B が点滅している) 時間 A から時間 B は自動的に繰り返され
ます。 A-B 表示のアイコンが画面に表示されます。 ボタンをもう一度押して通常の再
生に戻ります。
- 再生時間:1〜10 の再生時間を設定します。 / ボタンを押して値を調整し、
ボタンを押して確認します。
Page 37

35
- 再生間隔:再生間隔を 1〜10(秒)に設定します。 / ボタンを押して値を調
整し、 ボタンを押して確定します。
- 「削除」:現在再生中の曲を削除することを選択できます。
- 「プレイリストに追加」/「プレイリストから削除」を選択し、3 つのプレイリストを追加また
は削除できます。
注意:Bluetooth モードでは、イコライザーと可変速再生は使用できません。
ホームメニューで「音楽」を見つけて、 ボタンを押してその機能に入ります。
ラジオ再生画面で、 ボタンを押すより、サブメーニューに入ります。ホームに戻る、FM ラ
ジオ録音を開始、プリセット、プリセットに保存、プリセットをクリア、自動チューニング、周
波数範囲と FM 録音等の選択肢があります。
- 「自動チューンニング」:放送局を自動的に検索します。検索された放送局は「プリセ
ット」で保存できます。 ラジオを再生している場合は、 ボタンをクリックすると、プリセット
された放送局が切り替わります。
- 「プリセットに保存」:聞いている放送局を「プリセット」に保存します。
- 「プリセットをクリア」:「プリセットをクリア」をクリックして、プリセットリストに入り、クリアす
る放送局を選択してから、 ボタンを押すより「はい」を選択し、プリセット放送局をクリア
します。
「FM ラジオ録音を開始」を選択し、 ボタンをクリックするより、一時停止/続行
を選択します、 ボタンを押すと「はい」を選択して録音ファイルを保存します。
FM ラジオ> FM 録音でラジオ録音ファイルを検索できます。 ラジオ録音ファイルは
録音>録音ライブラリに保存することもできます。
ラジオを再生している場合は、 ボタンをクリックして「はい」を選択して、ラジオの再生
のバックグラウンドをオフにします。
Page 38

36
Bluetooth
ご注意:
1. FMラジオ機能を初めて使用する時、又はFM放送局がない時は、[ステーション
リスト]、[マニュアルチューン]、[自動チューンニング]で放送局を追加できます。
2. 若し FM 放送局を検索できない場合、又は FM 音質が悪い場合は、有線イヤ
ホン或いはアンテナの位置を調整してみてください。ある遠隔地では、FM の受信感度
が非常に不安定だ可能性があります。FM 放送の担当者にお問い合わせて、ここで
FM 信号がカバーされているかどうかを確認してください。
3. FM ラジオは、有線イヤホン接続/Bluetooth 接続で再生をサポートしています
1) 有線イヤホンモード:FM ラジオをオンにする前に、有線イヤホンを挿す必要があり
ます。(ラインコントロールが不要、聞けます。)
2) Bluetooth モード:受信のため、アンテナとして有線イヤホン(ラインコントロールが
ない)又はアンテナを挿す必要があります。その後、Bluetooth 設備に接続してくださ
い。
ホームメニューで「Bluetooth」を見つけて、 ボタンを押してその機能に入ります。
1.
Bluetooth のオン/オフを選択できます.
2.
Bluetooth を有効にすると、MP3 プレーヤーは Bluetooth で自動的に前回接続され
た設備と再接続できます。(Bluetooth 設備は電源が入っていて、使用されていない
必要があります)。
3.
Bluetooth を開いた後、Bluetooth が有効の場合は、「デバイスを検索」を選択してか
ら、近くの利用可能なデバイスがリストされます。
4.
使用可能なデ バイスか ら接続/切断を選択しま す。接続が成功す ると、本器は
Bluetooth イヤホンや Bluetooth スピーカーなどで音楽や FM ラジオを再生できていま
Page 39

37
す。
- プレーヤーと接続したい場合は、最初にデバイスの Bluetooth を開いてください。
- Bluetooth 機能を使用している時は、録音/動画/画像機能は使用できません。
ホームメニューで「録音」を見つけて、 ボタンを押して、その機能に入ります。「音声録音
を開始」、「録音ライブラリ」、「ストレージ」(カードが挿入されている場合のみ)、「録音
フォーマット」、 「VOR 設定」から選択できます。
「音声録音を開始」を選択して、 ボタンを押すと音声録音が開始し、もう一度押
すと一時停止します。 ボタンを押して「はい」を選択すると、録音ファイルが保存さ
れます。
[録音]> [録音ライブラリ]で保存された録音を探します。
「ストレージ」 録音ファイルを内蔵メモリまたは外部メモリに保存することを選択しま
す。 ボタンで選択を確認します。
「録音フォーマット」: MP3/PCM 間に録音形式を選択します。
「VOR 設定」:VOR 設定のオン/オフを選択できます。VOR モードで録音を開始す
ると、音声が検出された場合は自動的に録音を開始し、音声が検出されない場合
は録音を停止します。
Bluetooth 機能が有効の場合は録音できません。
ホームメニューで「動画」を見つけて、 ボタンを押して、その機能に入ります。
ボタンをクリックすると動画が表示されます。 / ボタンを押すより次の動画/前の
動画に選択できます。
動画表示画面で、 ボタンを押してサブメーニューに入ります、ブライドネス、リピート、
動画を削除等の選択肢があります。
ビデオの形式がサポートされていない場合は、
Page 40

38
https : //www.agptek.com/support/download.html#drivers-and-tool
にアクセスしてビデオ変換ツール(Video_Format_Converter)をダウンロードできま
す。 それからビデオのフォーマットを変換できます。
ホームメニューで「電子ブック」を見つけて、 ボタンを押して、その機能に入ります。
電子ブックを再生中に、 / ボタンを押してページを切り替えます。 ボタンをクリ
ックすると自動的に再生され、もう一度クリックすると停止します。
電子ブックを再生中、 ボタンを押すより、サブメニューに入ります。再生設定(自動
再生間隔を設定する)、ページを選択、ブックマークを選択、ブックマークに追加、ブ
ックマークを削除、バックグラウンド色、電子ブックを削除などの選択肢があります。
ご注意:本器は「txt」形式のみをサポートしています。
ホームメニューで「ツール」を見つけて、 ボタンを押してその機能に入ります。「カレンダー」、
「アラーム」、「画像」等の選択肢があります。
- ボタンをクリックすると画像が表示され、
移動します。画像表示画面で ボタンを押してサブメニューにアクセスします:明るさ、バ
ックライトタイマー、スライドショー設定、画像の削除等の選択肢があります。
- ボタンをクリックしてアラームを選択します、アラーム(オン/オフ)/時間を調整します/
周期/アラーム音楽/アラーム音量を設定できます。
ボタンをクリックすると前/次の画像に
/
ホー ムメニュー で「 設定」 を見 つけ て、 ボタ ンを 押して 、そ の機 能に入 りま す。
Language/言語、日時、表示設定、サウンド設定、ボタンライト、電源オフ設定、情
報、デバイスをフォーマット、工場出荷時設定などの選択肢があります。
Language/言語: MP3 プレーヤーの言語を選択し、 ボタンを押して確認します。
日時:「日付設定」:
ボタンを押すより年/月/日の値を調整可能です。 ボタンを押して設定を保存しま
す。 「時刻設定」は同じ方法を採用します。
表示設定:ブライトネス、バックライトタイマー、スクリーンセーバーを設定できます。
ボタンを押すより、年/月/日間に選択します、
/
/
Page 41

39
サウンド設定:イコライザーを設定します。
ボタンライト:ボタンの点灯/消灯を選択します。
電源オフ設定
- 節電モード:本器に何も操作がない場合、設定された時間(0〜5 分)に達する
と本器は自動的電源オフにします。
- スリープタイマー:設定された時間(0〜100 分)に達すると本器は自動的電源オ
フにします。
情報:本器の情報と本器のディスク容量を確認します。
デバイスのフォーマット/工場出荷時設定:デバイスをフォーマット、または工場出荷
時設定に復元します。
:本器をフォーマットする前に、ファイルを紛失しないようにファイルをバックアップし
てください。
- 電量は充足状態かどうかをご確認ください。本器をアダプタに接続し、充電後にもう一
度お試しください。
- ケーブルを取り外して、再度接続してください。
- 5℃〜35℃の温度範囲でバッテリーを充電してください。
- パソコンの電源を入れてください。
- 正しく接続されているかどうか確認してください。
- 内蔵容量がいっぱいかどうか確認してください。
- USB ケーブルが破損していないか確認してください。
- 本機を取り外して、数分間待ってから、再度接続してください。
- 本機を取り外し、パソコンを再起動して、本機を再接続します。
- 本機を他の USB ケーブルでパソコンと接続します。
- 長時間使用していない場合は、約 10 分間充電してください。その後、正常に動作す
る可能性があります。
Page 42

40
本製品についてのご質問は、support@agptek.com までお気軽にお問い合わせく
スクリーン
2.4 インチ TFT LCD スクリーン
材質
アルミニウム合金
サイズ
108.5*48.0*9.1mm
重さ
75g
Bluetooth Ver
4.0
Bluetooth でサポート
されたフォーマット
MP3/WMA/APE/FLAC/WAV
オーディオフォーマット
MP3/WMA/OGG/APE/FLAC/WAV/AAC-LC/ACE
LP
ビデオフォーマット
240*320AVI/AMV
写真フォーマット
JPG/BMP/GIF
電子ブックフォーマット
TXT
録音フォーマット
MP3: 32 kbps/64 kbps/128 kbps
PCM: 512kbps/768kbps/1024kbps/1536kbps
USB 端子
USB 2.0
内部メモリ
16GB/32GB
SD カード
最大 128GB は拡張可能
電池
580mAh リチウムコバルト酸化物電池
充電時間
3 時間 (5V/500mA)
OS
WindowsXP/Vista/7/8/10/Linux6.2/Mac os
10.3
ださい。
Page 43

@agptek.fans
@AGPTEK_fans
agptek.fans
AGPTEK Official AGPTEK Forum
Follow us at:
Visit agptek.com to know more about us.
Contact us: support@agptek.com
 Loading...