

Page 1

AGPTEK
User Manual
C05
Page 2
Contents
Page 3
Quick Guide
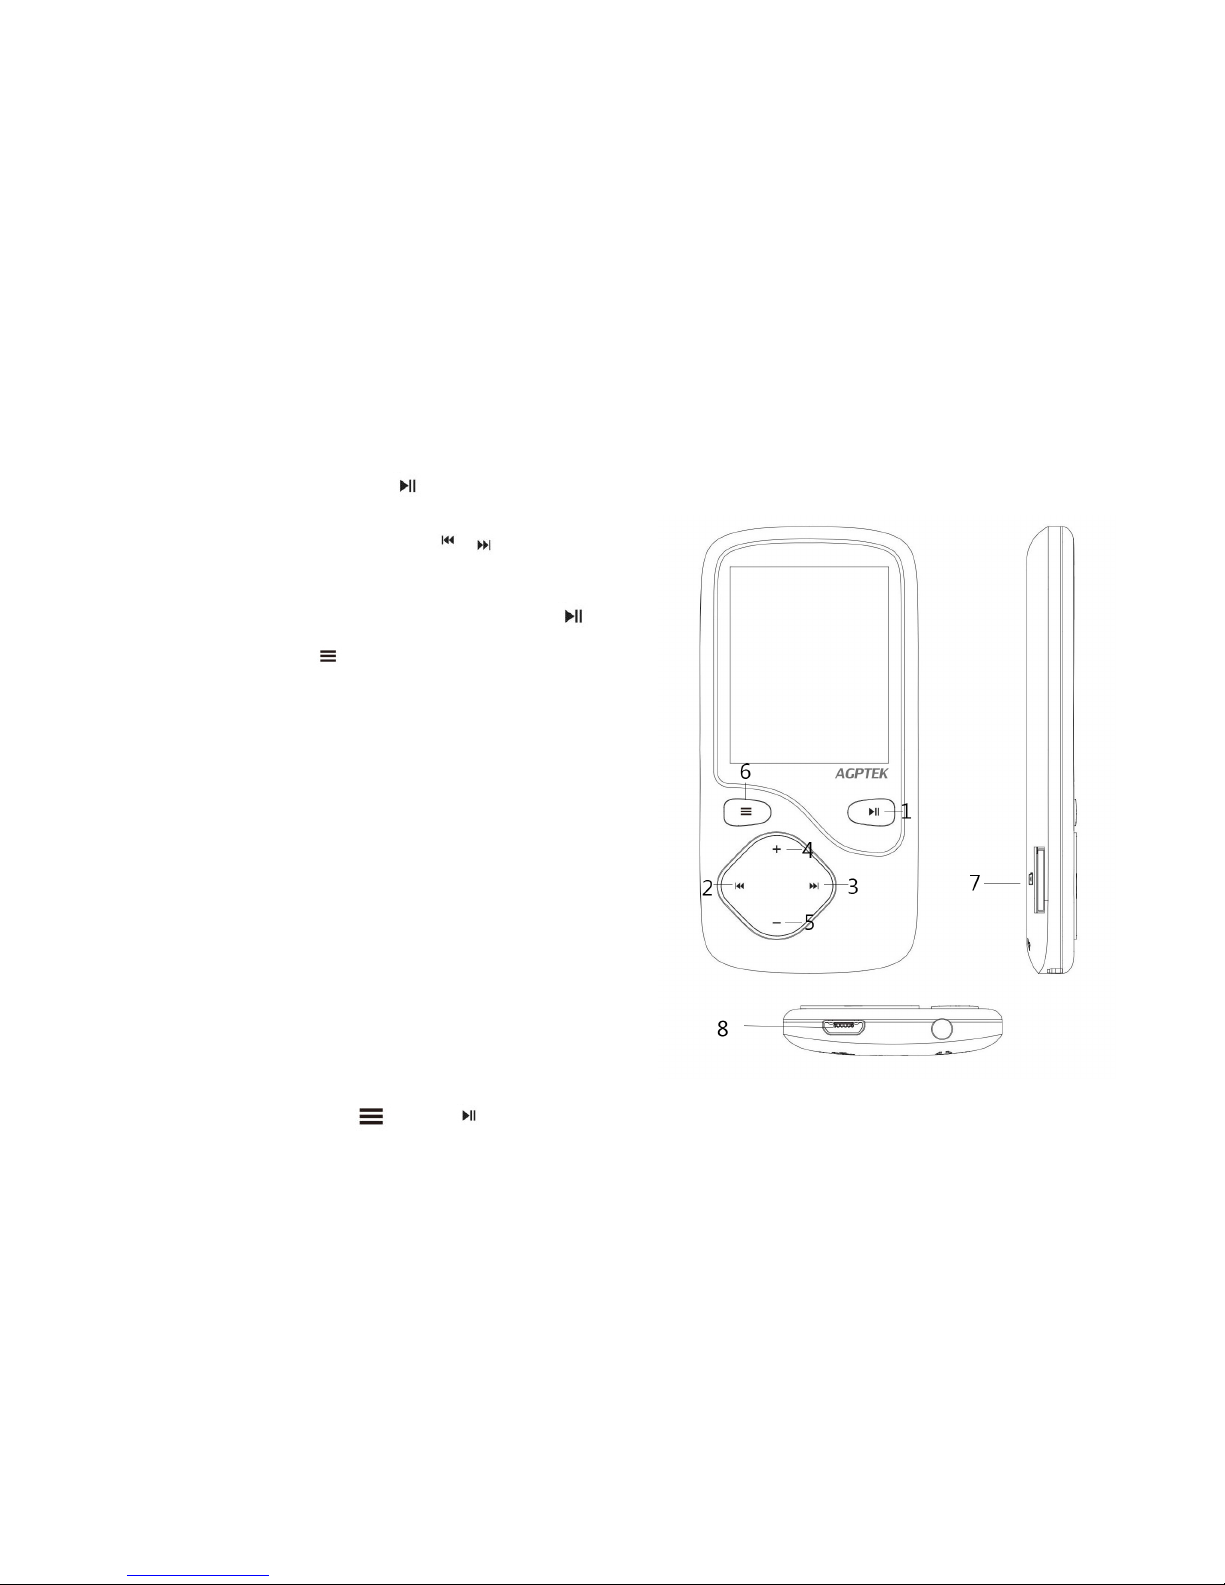
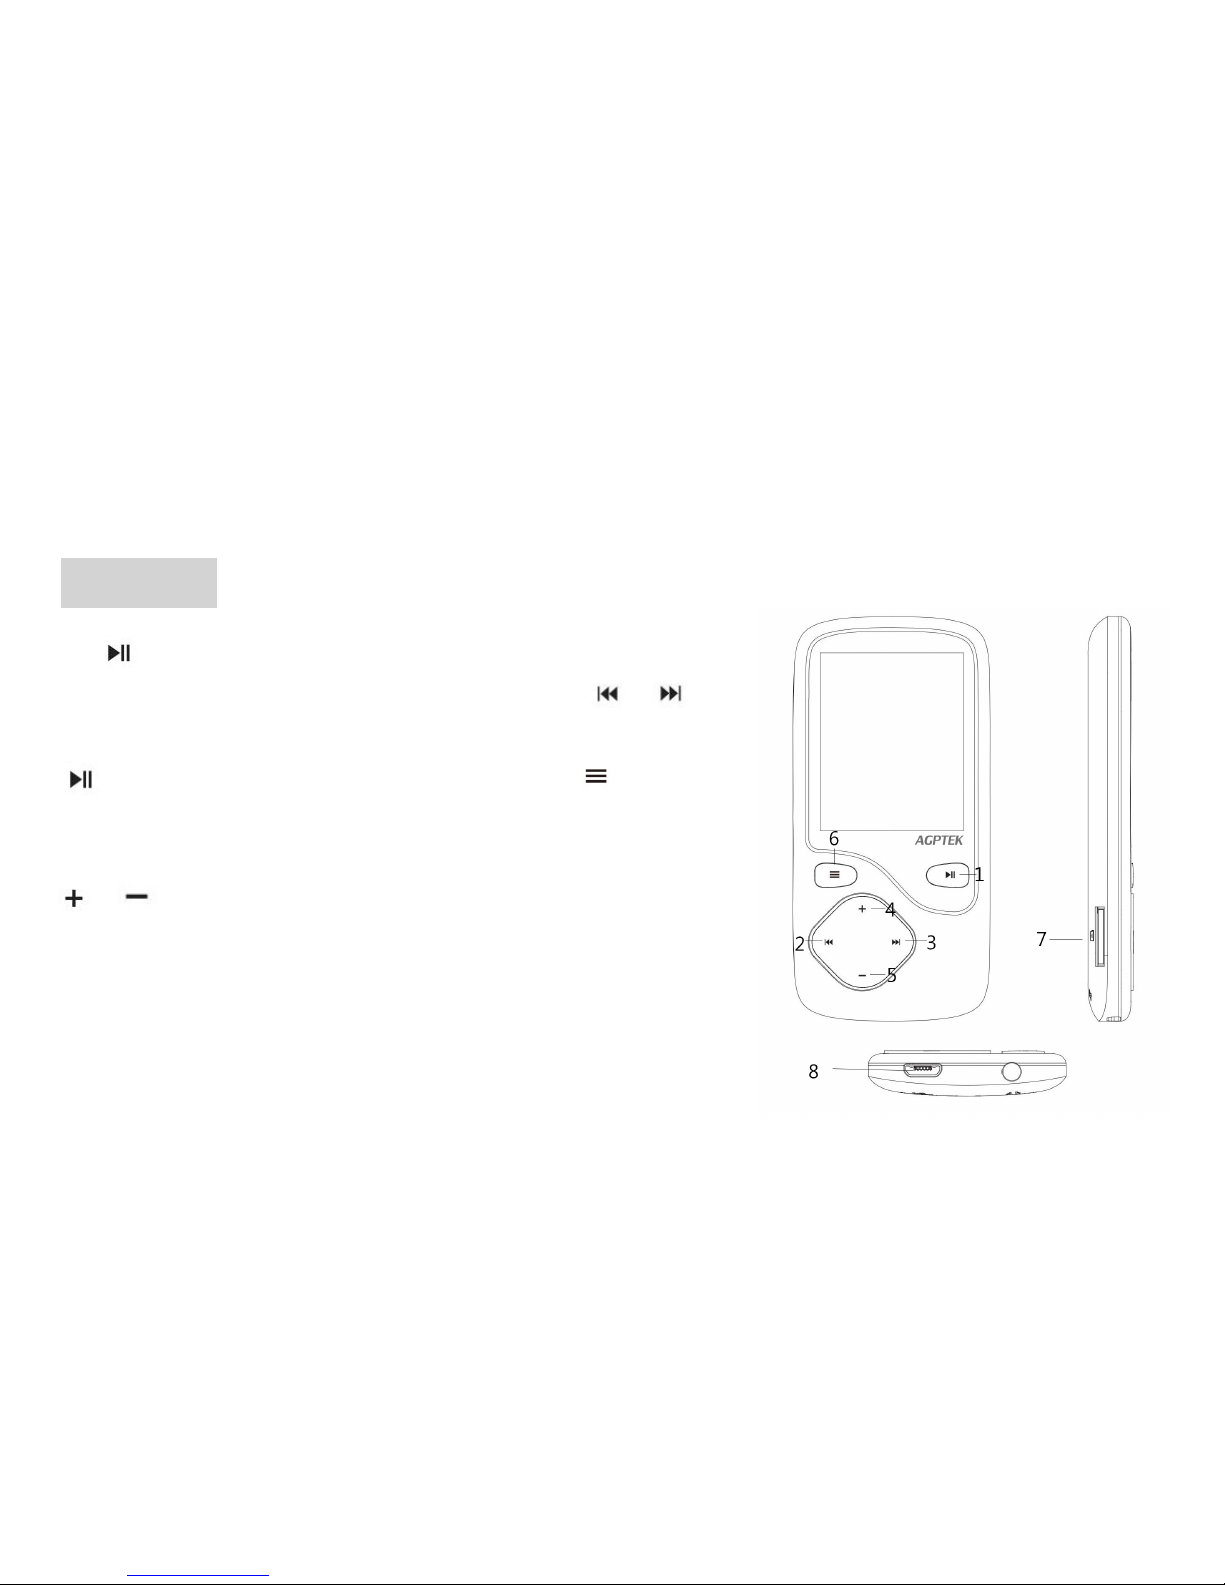
1.
Press the button for about 3 seconds to turn on/off the device,
tap the button +/-/ / to choose
its 9 different functions on
main interface, and tap to
enter it, tap for back.
2.
Plug Earphone into the jack on
bottom left of your device, tap the
icon “Music” to access to its
function. Tap the + / - button to
adjust the volume.
3.
Charge the Device: Plug one
end of the micro USB cable
into the device, plug the other
end into the charger (or into
the USB port of a computer).
4. Tap the button and at the same time to lock the player; tap them
again to unlock it.
1
Page 4
Note: tap the button +/- to increase/decrease the volume while on
music/radio/video playing interface.
Play Your Music
Select
music application on main menu to enter it, and then play your songs
1
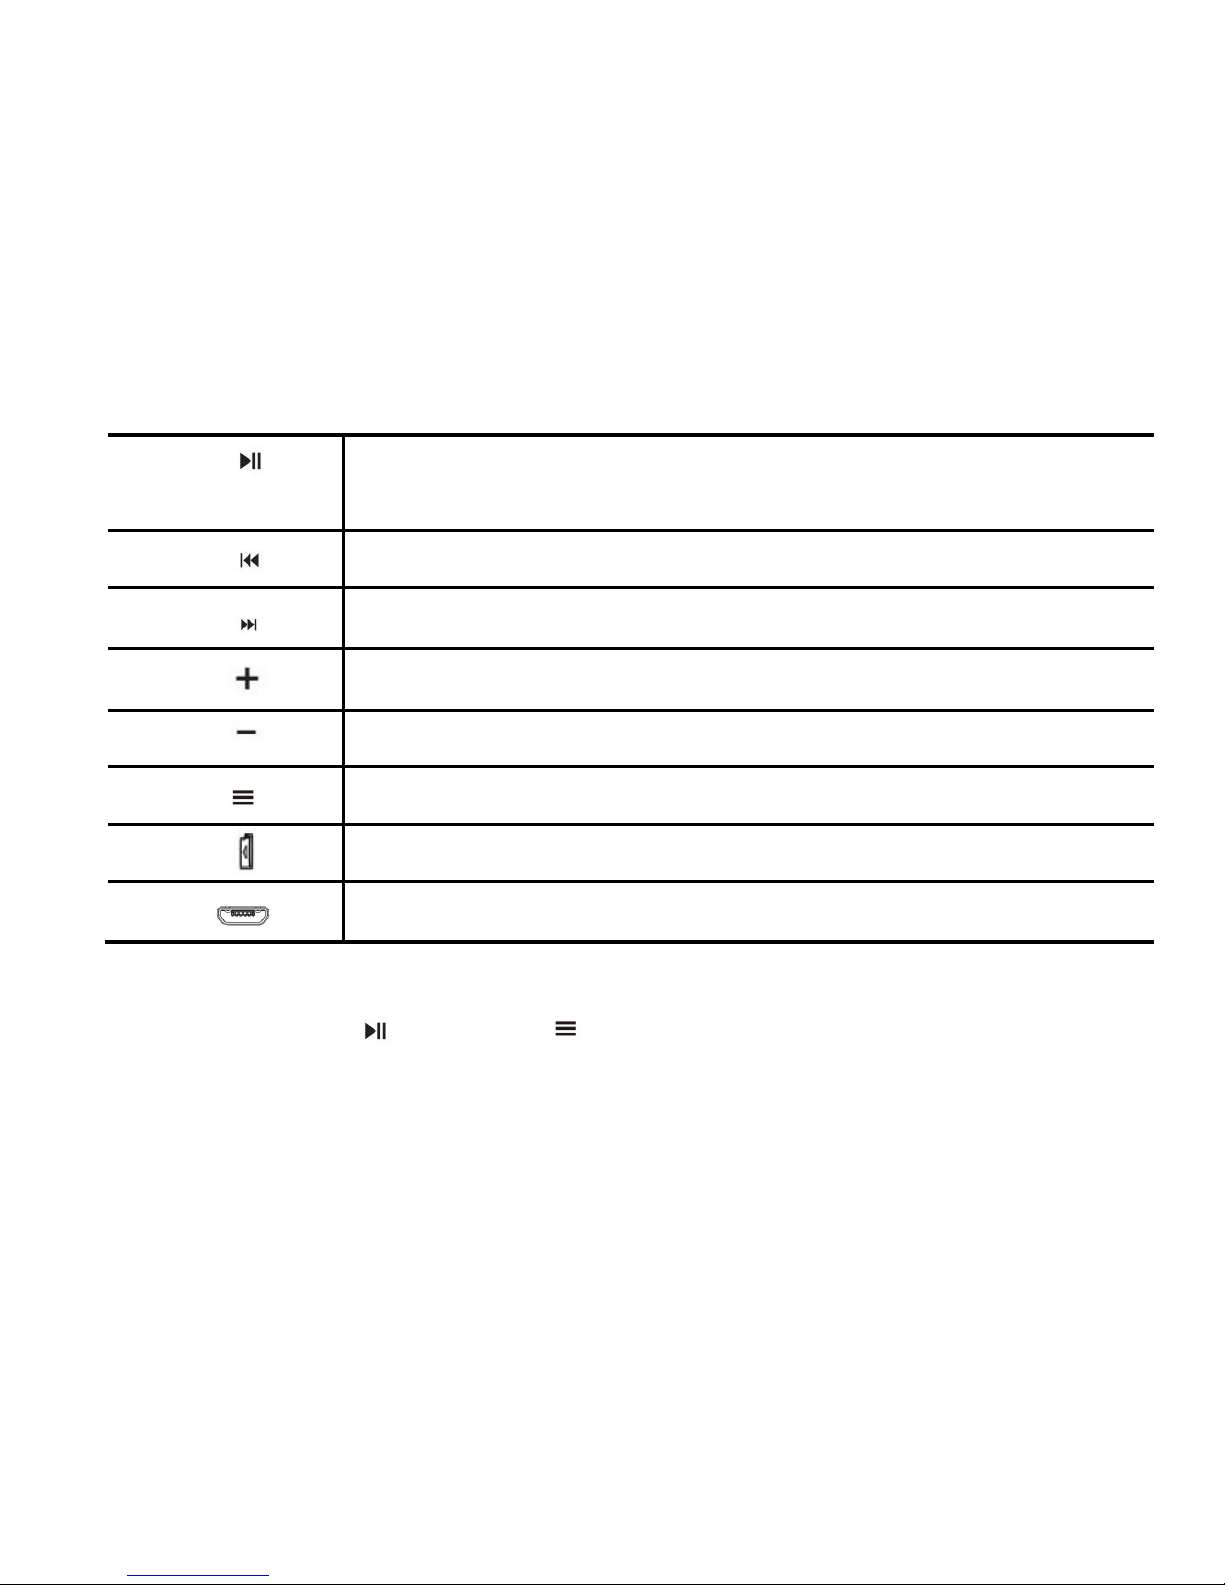
Play/Pause/Power On-Off /Enter
2
Previous, moving up and fast forward playing
3
Next, moving down and fast backward playing
4
Scroll up
5
Scroll down
6
Menu button, exit to superior menu/back
7
Micro-SD socket
8
Micro-USB jack
5.
Keys definition
2
Page 5

Rewind/forward
When it’s on main playing interface, long
pr
ess
the / for
rewind/forward, and tap it
to the previous/next song.
Note: the rewind/forward function is not supported under Bluetooth
mode.
Shuffle/repeat
Shuffle your music through the button submenu
When it’s on main playing interface, long press the button and then
a related list will show, select the item “Shuffle” and “Repeat” under
the choice “Play mode”. Then choose the shuffle and repeat mode you
want.
Shuffle your music through “Setting”
You can also shuffle your songs under play mode by tap the icon
“Setting” on main interface, then select the item “Shuffle” and “Repeat”
under the choice “Play mode”.
according to a related list including “All songs”, “Artists”, “Albums”,
“Genres”, “Playlists”, “Album art”, “Audiobooks” and “Update card data”.
3
Page 6

“Folder”, it will shuffle songs by folder;
If you play songs through “Music”, it will only repeat in the folder
which your songs is included. If you play songs through “Folder”, it will
repeat by folder with the option “Repeat all”.
Playlist
To use the preset playlist
Long Press the button and then choose the option “Add to playlist”
for the song you want to operate. There are 3 items prepared for you,
including “Playlist on the go [1]”, “Playlist on the go [2]” and “Playlist
on the go [3]”, you can add the song to any one of these three as you
like.
To create the playlist by yourself
There is a free program called Media Go. It's the easiest program to use
for transferring playlists to the AGPTek. . Just create your playlists in
Media Go and then right-click its nam
e and select 'Add playlist to
X :( Which is your MP3 player's disk) '. (You can download it at
Note: if you play the song through “Music”, it will only shuffle the songs
in the folder which your music is included. If you play the song through
4
Page 7

Add bookmark for
your audio book
Long Press
the button and then choose the option “Add
bookmark” under “Bookmarks”.
It is marked by the stopping time as “hh:mm:ss”. So you can set
the stopping time before you add it for continues playing next
time conveniently.
Maximum number of bookmarks supported by each audio file is
10. You can also cover the previous bookmark with new bookmark,
and then the old one will be replaced by the new.
You can find the bookmarks you saved with the option “Go
to bookmark” under item “Bookmarks”, and you can delete them
with the option “Delete bookmark”.
Bluetooth Function
Select Bluetooth application on main menu with tapping the button
to access to its function.
http://mediago.sony.com/chs/download).
Note: Playlist is not supported under Bluetooth mode.
5
Page 8

2. Your device will be connected with the player automatically be with
“Bluetooth connected” for the first time.
3. If it’s not connected automatically, you can take the following steps
Please make sure you BT device is on pairing mode
Choose the item “Bluetooth Search”, when your BT device is
showed on player, choose it with the option “Connect Bluetooth”,
it will be connected successfully.
4. In Bluetooth mode, the shuffle option only works in an individual
folder, it will shuffle each folder one by one. And you can put all of your
songs into one folder (Music) to get them to shuffle if you need.
Note:
Make sure the previous paired device is under pairing mode.
Playlist is not supported under Bluetooth mode;
The rewind/forward function is not supported under Bluetooth
mode.
1. Please make sure your BT device is on pairing mode before you
search it, which means the green and red light flash at the same time
for most BT devices.
6
Page 9

Folder/Recordings/Tools
Folder
Select folder view application on main menu to enter it, then you can
browse all the files saved in the player, including files of recording,
music, video, pictures etc.
Note: the player supports AMV and AVI video file, and you can use the
Video Tool to transfer the formats to the correct.
Recordings
There are 4 items under “Recordings” including Start voice recording,
Recording library, Record format and Record setting. Tap the button
for entering. In the meantime please note:
1.
During recording, only and can be effective. You can adjust the
volume by tapping /
2.
Tap to save present recording file, or choose “yes” when you back
to the main menu.
Tools
There are Calendar, Stopwatch, Alarm
and Video included in this item.
Choose according to your
n
eed.
7
Page 10

Pictures/E book/ FM radio
Pictures
Tap the button for enter/play, tap the button / to choose up
and down.
When it’s on main playing interface, long press to access to submenu, including “Brightness”, “Backlight timer”, “Slideshow settings”,
“Delete picture” and “Update card data”. Choose according to your
need.
E book
You can read and edit the article in the device. The device only can
recognize the article in “txt.” format.
FM radio
Select FM radio on main menu to enter it, and then a related list
will show including “Stations”, “Manual tune”, “Auto tune” and “FM
recording”.
Stations
The frequency points of radio station are displayed with 30 frequency
points reserved at most.
8
Page 11

Manual tune
Press to enter manual search mode, you can search programs
manually through pressing / button.
Auto tune
Press to enter Auto tune mode, it will show “Do you want to
update the stations”, press to confirm Yes or No. If choose Yes, it
will search stations automatically and keep the searched station in
"Stations" automatically.
Submenu
When listening to the broadcast station program, long press to
access to its sub-menu, including "Bluetooth link", "Start FM radio
recording", "Save to station", "Clear station", "Auto tune" , "Tuner
Region" and "FM recording".
- FM recording
Choose "Start FM radio recording", tap the button to save the now
recording file.
- Bluetooth link
Choose "Bluetooth link" and then a related list will show as "Search"
9
Page 12

and "Device list".
Choose the name of your BT device with the option "Bluetooth Device
Connected" and then you can enjoy FM via it.
Note: Please make sure your BT device is on pairing mode which means
the green and red light flash at the same time for most BT devices.
- Tuner Region
Adjust the region according to your need.
Note: the player is defaulted with command band, if you are in Japan,
you need to change to Japan Band.
Set
Select "Set" on main menu with tapping the button to access to its
function.
A related list will show as "Language", "Display settings", "Sleep timer",
"Format the device", "Factory settings" etc. Adjust according to your
need. For example:
Choose the format of date and time as you want. Tap the button /
to adjust different items, tap the +/- button to adjust its value. Tap the
button for ensure.
Date and time
10
Page 13

Trouble Shooting
Media player doesn’t work or screen doesn’t display the content:
-Check battery power Unable to download files
-Check the connection between USB port of the computer and USB
cable.
-Format the media player.
it be connected with my BT device
-Please make sure your BT device is under paring mode before you
search it, which means the green light and red light �lash at the same
time for most BT devices.
If you have any question about this product, please you can contact
with
support@agptek.com
Page 14

Specifications
Screen 1.8 inch 128*160 TFT screen
Flash memory 8GB
Audio format
MP3/WMA/ OGG,APE,FLAC,WAV,AAC
-LC,ACELP
Video format
AMV /AVI
Recording format
FM/MIC record and WAV
Photo format
JPG,BMP and GIF
Charging time
2.5 hours
BT playing time
4 hours
12
Page 15

ご使用前に
一、◎AGPtEK C05 MP3 プレーヤーをお買い上げ頂きまして、ありが
とうございました。
◎正しく安全にお使いいただくため、ご使用の前に必ず取扱説
明書をよくお読みください。
◎お読みになったあとはいつでも見られる所に大切に保管して
ください。
◎若し商品についてどの様な問題と意見があれば、ご遠慮なく、
linkingportjp@163.com と連絡してください。お客様のご意見を待ち
して望んでいます。
二、最大ご存分に楽しむために、データをバックアップすることが
推薦されます。万が一突発状況が発生した場合も存在あるかもしれ
ません。お客様のミース操作とハードウェア損傷による、メモリ内
容消失については、当社は責任を負いかねますので、予めご了承く
ださい。
三、ご不当な修理や改造による故障及び損傷場合、無料修理、交換、返
品させて頂きかねます。予めご了承ください。
13
Page 16
(ご注意:初めは中国語なので、「設置」-「Language/语言」-「日本語」
の手順で設定してください。)
操作一覧
1. ボタンを 3 秒ぐらい押しで電源をオ
ン・オフにします。メイン界面で
/ を
操作するより、九つの機能間に変更します。
ボタンを押し、OK にします。 ボタン
を押し、前の界面に戻ります。
2. イヤホンをプラグし 音楽機能に入り、
/ ボタンを操作するより、音量調節で
きます。
3. USB ケーブルでパソコン或いは充電器と
接続し、充電できます。
4. ボタン説明
14
Page 17
1
再生
/一時停止/電源オン/オフ/OK にします/リセ
ットボタン
2
前の曲
/ 早く戻し
3
次の曲
/早く送り
4
音量上げ
/上の選択肢
5
音量下げ
/下の選択肢
6
メニューボタン
/前の界面に戻り/戻り
7
マイクロ
SD カード端子
8
マイクロ
USB 端子
ロック機能:同時に ボタンと ボタンを押すと、本機器をロック
にします。再度同時に押すと、ロックを解除にする。
15
Page 18
Page 19

リピート、すべてリピート、リピートモード、再生間隔、再読回
数。シャッフル
:オン/オフ。サウンド設定下でイコライザー:オ
フ、ロック、ファンク、ヒップポプ、ジャズ、クラッシク、テク
ノ、カスタム(ご自由に水準が設定できます。)
Page 20

ご注意:Bluetooth モードで、プレイリスト機能は対応しません。
オーディオブックにブックマークを作る方法
再生中に
ボタンを長押すより、「ブックマーク」下の「ブックマ
ークを追加」を選択します。次回再生始め箇所でブックマークを追加
できます。各オーディオファイルは最大 10 個のブックマークは追加
できます。要らないブックマークも削除できます。あらためて利用し
ます。「ブックマークに移動」中で作ったブックマークが見つけられ
ます。
Bluetooth
ご注意:Bluetooth 機能搭載:Bluetooth Ver.2.1 以上対応機器との接
続も可能です。(Bluetooth ワイヤレスイヤホン/Bluetooth スピーカ
ーなど対応)
AGPTek MP3 プレーヤーの同期を行う。
リンク: http://mediago.sony.com/chs/download
Media Go でのプレイリストを作成し、曲名を右クリックし、
18
Page 21

AGPtEK MP3 プレーヤー本体の Bluetooth モードを入り
「Bluetooth Search」→Searching→ Bluetooth デバイスの名前→
Bluetooth の接続、「しばらくをお待ちください」と言うヒントが
出来ます。その後、「Bluetooth connected」(Bluetooth 接続で
きた)のヒントが出来ます。
ご注意:
プレイリストは Bluetooth モードで対応しません
早く戻し/早く送り機能は Bluetooth モードで対応しません
Bluetooth モードでシャッフル/リピート機能は内蔵ディスク中
で
対応します。またはマイクロ
SDカード中で対応します。内蔵デ
ィスクとマイクロ
SDカード間で移動し再生することは対応しませ
ん。1つフォルダが再生完了後、自動的に次のフォルダへ移動しま
す。
Bluetooth
モードで再生中曲に戻る方法:
イヤホン/スピーカー等 Bluetooth 機能搭載デバイスを電源スイ
ッチ/ボタンをオンにして、青い指示ライトとレッド指示ライトが
同時に打つまでです。
19
Page 22

フォルダ/録音/アラームモード
フォルダ
フォルダ:音楽、録音、ビデオ、画像などのファイルがあります。
ご注意:本製品は AMV/AVI 形式のビデオだけに対応します。
録音
音声録音を開始/録音ライブラリ/録音フォーマット/録音設置四つ
の選択肢があります。
1.録音したい場合は、「録音を開始」を押し、「しばらくお待ち
ください」のヒントが出ますと、録音開始になります。録音を一
時停止したい場合は、
ボタンを押します。録音を終了したい場合
は、 ボタンを押し、「録音を保存しますか」というヒントが
Bluetooth のサブ界面に戻り、「Bluetooth Search」「Bluetooth
Device List」「All songs」「Music」4 番目の「Music」を押しで再
生中曲に戻ります。
20
Page 23

画像/電子ブック/ FM ラジオ
画像
画像が表示している時は、
ボタンを長押すより、ブライトネス/
バックライトタイマー/スライドションー設定/画像を削除/再生リ
ストを作りますなど設定ができます。
電子ブック
電子ブックを読み中界面に、
ボタンを長押しで Playsetting/削
除電子ブック/ブックマーク選択/ブックマークを削除/ブックマー
クを追加/ページ選択など選択肢があります。
FM ラジオ
プリセット
手動チューニング
表示されます。「はい/いいえ」が選択できます。
2.録音ライブラリ中にご保存された録音ファイルが見つけます。
アラームモード
カレンダー/ストップウォッチ/アラーム/動画の選択肢がありま
す。
21
Page 24

ますか?」のヒントが出ます。「はい」と「いいえ」が選びます。
「はい」を選択する場合は、放送局が自動的にサーチし、完了後自動
的にプリセットで保存されます。
FM 録音
FM ラジオを聴く中に、
ボタンを長押しでサブメニュー入ります。
Bluetooth link、FM ラジオ録音を開始、プリセットに保存、プリセ
ットをクリア、周波数範囲の選択肢があります。
ご
注意:日本の FM 周波数に合わせられます。周波数範囲→日本周波
段にしてください。
よくある質問
1、PC を使わず、本体の操作だけで、音楽ファイルを削除すること
ができますか。
再生中に
ボタンを押し、サブメニューに入ります。一番下の選択
手動チューニングモードに入り、 / ボタンを操作するより、放送
局が選択できます。
自動チューニング
自動チューニングモードに入り、「プリセットを自動チューニングし
22
Page 25

定します。
イコライザは使ってるイヤホンの周波数特性や環境によって大き
く異なるので自分の耳を頼ることをお勧めします。
3、どうやって曲を入れるのですか?
PC に mp3 等の曲が入っていれば、付属の USB ケーブルでつない
で USB フラッシュメモリと同じ感覚で曲を MUSIC のフォルダーに
入れて OK です。 もっとも簡単な方法はマイクロ SD をパソコンに
接続したリーダに入れて MP3 データ(MP3以外にもありますが)を
入れればよいです。AGPtEK 自体をパソコンに接続しておけば機器
本体のメモリにも入れられます。ついでに言えば初期画面のフォ
ルダーを選択して機器本体か SD カードかを選択すればその中の音
楽等を使用できます。
4、Bluetooth モードで FM ラジオを聞き方法
肢は「削除」です。操作するより音楽ファイルを削除ができます。
2、イコライザー下のカスタムが指示する意味は何ですか。
カスタムに指定すれば、B:Very low、L:Low、M:Medium、H:High、
T:Very high。重低音を増強したい場合は、B 或いは L を選択し設
23
Page 26

スと接続します。
5、スマホと接続できない原因
多いのスマホとタブレットは受信方ではなりませんが、送信方
の役にしています。
MP3 プレーヤーは Bluetooth イヤホン或いは Bluetooth スピーカー
と接続することはお勧めです。予めご了承ください。
6、本製品を起動できない場合は
リセットボタン:
ボタンを 10 秒ぐらい長押します。
先ずはイヤホンを MP3 にプラグしてください。(アンテナ用と
して)それから、FM ラジオに入り、自動チューニングを選択し、
任意に周波数にして、それから
ボタンを押します。
一番目の Bluetooth link を押し、Bluetooth スピーカーデバイ
24
Page 27

故障かな?と思ったら
起動できない 電源が切り場合は、充電してください
音が鳴らない
1. 音量 UP ボタン+を押して音量を上げる。
2. イヤフォンプラグをしっかり差し込む。
3. 音楽ファイル対応できるか確認してくださ
い。
4. パソコンでファイルが破損していないか確認
してください。
ファイルを転
送できない
1.SD カードを変換し試してください。
2.本体とパソコンはちゃんと接続しないか確認
してください。
3. 内蔵メモリ容量がなくなります。
4.別の USB ケーブルを変換し試してください。
25
Page 28

雑音
1. イヤフォンがきれいであるか否かを確認して
ください。汚い、ノイズの原因となる可能で
す。
2. 破損した音楽ファイルは、ノイズが発生する
ことが可能です。
商品仕様
スクリーン
1.8 inch 128*160 TFT スクリーン
内蔵容量 8GB
音楽フォーマット
MP3/WMA/OGG/APE/ALAC/WAV/AACLLCLCLC/ACELP
ビデオフォーマット AMV/AVI
録音フォーマット MP3/WAV/ACT
画像フォーマット JPG/BMP/GIF
26
Page 29

Notice d’utilisation
1. Appuyez sur le bouton pendant trois secondes pour allumer/éteindre
votre appareil, appuyez sur le bouton / pour choisir ces 9 fonctions
différentes sur l’écran d'accueil, appuyez sur le bouton pour entrer, pour
retourner .
2. Insérez l’écouteur dans le jack à la base de l’appareil, vous pouvez jouer
la musique en appuyant l’icône “Musique” et ajuster le volume par le
bouton +/-.
3. Charger la batterie: connectez votre appareil avec l’ordinateur à l’aide
d’un câble USB pour le charger .
Définition de bouton principal
1. démarrer /pauser /allumer /éteindre /entrer
2. retourner au choix precedent/rembobiner
3.
passer au choix suivant /avance rapide
4.
+ rouler vers le haut
5.
- rouler vers le bas
6. menu /retourner au menu précédent /retourner
7. cran de carte SD
27
Page 30

8. port USB
Remarque:sur l'interface de la lecture de musique /radio /vidéo, vous
pouvez appuyer sur +/- pour augmenter ou réduire le volume .
9. Appuyez et simultanément pour fermer l’écran.
Lecture de Musique
Appuyez sur l’écran d'accueil pour choisir “Musique” et entrer dans la
lecture de musique, vous pouvez jouer vos musiques selon les playlists
relatives,y compris “Toutes les musiques”, “Artistes”, “Albums”, “Genres”,
“Livres audio” et “Update data de carte SD” .
REW(rembobiner)/FF(avance rapide)
Sur l'interface de la lecture de musique :
-appuyez longuement sur le bouton / pour rembob
iner /avance
rapide ,appuyez sur le bouton / pour choisir la chanson précédente/
la chanson suivante
-appuyez sur pour jouer/ pauser
Remarque: la fonction de rembobiner /avance rapide ne peut pas
être utilisée quand le Bluetooth est activé
1. lecture aléatoire /lecture répétée
Page 31

2. Choisir la lecture aléatoire selon les boutons
Sur l'interface de la lecture de musique ,appuyez longuement sur le bouton
pour faire révéler les listes relatives et choisissez aléatoire/ répéter dans
le mode lecture
3. Jouez aléatoirement votre musique via “Réglages ”
Accédez à “Réglages”> “Mode de lecture” > “Lecture aléatoire” / “Répéter”
Remarque : Si vous jouez vos musiques par “Musique” ,on va seulement
répéter les musiques dans le dossier comportant la chanson choisie, Si
vous jouez par “Documents ” , on va répéter les musiques de tous dossiers
avec l’option “ Répéter tout”.
Playlist
1.Utilisez la playlis t
Appuyez longuement sur le bout on et cho i sis sez “Ajo u ter à playlist”, il y a 3
options ,comportant “Playlist mobile 1”, “Playlist mobile 2”, “Playlist mobile
3”
2.Créer une nouvelle playlist
Le programme gratuit , “Media Go” ,peut transférer le plus facilement votre
playlist dans AGPTek ,vous devez seulement créer votre playlist dans “Media
Go” ,cliquez son nom sur le bouton droit et choisissez “Ajouter la playlist dans
29
Page 32

X”(X signfie votre disque de MP3 (Pour plus d’informations ,consultez la page
http://mediago.sony.com/chs/download)
Remarque:l’appareil ne support e pas cette fonction quand Bluetooth est activé
Ajouter un signet dans les livres audio
appuyez longuement sur le bouton et choisissez “Ajouter signet” dans
l’opti on “Signet ”
1.Le signet sera marq ué par le t emp s term in é comm e “hh:m m:ss ” ,vo us p ouvez
régler le temps terminé avant de ajouter le signet pour continuer facilement
votre lect ure à la proc haine fois
2.Le maximum de signet pour chaque document audio est 10 ,vous pouvez
aus si couvri r le si gnet précéd ent avec le nou veau si gnet ,a insi le p récéden t sera
remplacé par le nouveau
3.Vous pouvez trouver vos signets gardés dans “Signet”> “Aller au signet” ou
vous pouvez supprim er vos signets en sélectionnant “S u ppri mer le signet”
Bluetooth
1. Assurez que votre appareil BT est sous ce mode d’appariement avant le
recherchez, c’est à dire que la lumière bleue et la rouge scintillent en même
temps pour la plupart d’appareil BT
30
Page 33

2. Votre lecteur va connecter avec l’appareil BT pour la première fois
3. Vous pouvez suivre les démarches suivantes si la connection est
impossible .
Assurez que votre appareil BT est sous le mode d’appariement
Choisissez “Rechercher Bluetooth” et adaptez “Connecter Bluetooth”
quand votre appareil se relève sur l’interface , puis vous pouvez accomplir
la connection.
1.Sous le mode Bluetooth,la lecture aléatoire sera seulement effectué dans
un dossier, le l ecteur jouera chaque dossier l’un après l’autre ,vous pouvez
mettre toutes les musiques dans un seul dossier pour les jouer
aléatoirement
Assurez votre appareil d’appariement précédent est sous le mode
d’appariement
l’appareil ne supporte pas de fonction de playlist quand votre Bluetooth
est activé
l’appareil ne supporte pas de fonction de REW(rembobiner)/FF(avance
rapide) quand votre Bluetooth est activé
31
Page 34

Dossiers /Enregistrements /Outils
Documents
Documents comportent tous les documents de l’appareil ,y compris les
enregistrements ,les musiques ,les vidéos, les images , etc
Enregistrements
Appuyez sur pour accéder à Enregistrements, une liste relative sera
révélée ,y compris “Enregistrer”, “Fichiers d’enregistrement” “Stockage”
“Formats d’enregistrement ” et “Réglages d’enregistrement” ( sur
l'interface ,appuyez su
r+/-pour déplacer vers le haut ou vers le
bas ,appuyez sur / pour retourner , appuyez sur / pour entrer)
-choisissez le format d’enregistrement ,y compris MP3/WAV et ACT
-roulez jusqu’au bouton “Enregistrer” pour commencer l’enregistrement sur l'interface d’enregistrements ,appuyez sur le bouton pour pauser
ou commencer
-appuyez sur +/- pour ajuster le volume
-appuyez sur pour garder l’enregistrement dans “Documents
d’enregistrement” (choisissez “Oui”) et retourner au menu précédent
-vous pouvez trouver vos enregistrements dans “Documents
32
Page 35

d’enregistrement”
-choisissez le débit binaire de l’enregistrement comme vous voulez
-si vous adaptez le mode “Tarck AVR”, l’appareil enregistrera dès qu’il
est activé par la voix mais vous devez appuyer sur “Enregistrer ” à l’avance
Outils
La date
Chronomètres
Alarmes
Vidéos
Photos /livres électroniques /Radio FM
Photos
-appuyez sur pour entrer/jouer
-appuyez sur / pour choisir les photos précédentes ou suivantes
-sur l'interface de lecture ,appuyez longuement sur le bouton
pour accéder au sub-menu, le menu comporte “Luminosité”,
“Prog. de retroéclairage”, “réglages du diaporama”, “Supprimer l’image”
et “Creer liste de lecture”, choisissez selon votre besoin
Livres électroniques
Remarque :l’appareil ne supporte que les documents de format txt
33
Page 36

-appuyez sur pour entrer l’interface
-appuyez la flèche gauche ou droite pour tourner la page
-sur l'interface de la lecture du texte ,vous pouvez appuyer sur et
commencer la lecture automatique, l’appuyez de nouveau pour retourner
au mode normal de la lecture(ajuster l’intervalle dans Réglages de lecture )
-appuyez longuement sur le bouton pour accéder au menu déroulant et
ajuster selon votre besoin
Radio FM
La liste relative comporte “Préréglages” , “Réglage manuel” , “Réglage auto”
et “Enregistrements ”
Préréglages
Les points de fréquence de la station de radio montrent 30 points de
fréquence les plus résérvés
Appuyez sur pour accéder au Réglage manuel , vous pouvez appuyer sur
/ pour rechercher manuellement des programmes Réglage auto,
Appuyez sur / pour accéder au Réglage auto, l’appareil vous
demandera “est-ce que vous voulez ajuster automatiquement les
préréglages ?” appuyez sur / pour confirmer, si vous
choisissez “Oui”, l’appraeil
34
Page 37

recherchera automatiquement des radios et les gardera dans préréglages
Enregistrements de Radio FM
Quand vous écoutez les programmes de radio ,appuyez longuement sur
pour accéder au menu déroulant, y compris “Connecter
bluetooth”, “démarrer l’enreg radio FM”, “Enreg dans présélection”, “Effacer
présélection ” et “réglage auto”, etc.
Remarque: le lecteur est limité par les frequences de radio ,si vous êtes au
Japon, vous devez changer à la bande Japonaise
Dépannages
L’appareil ne s’allume pas / l’écran ne révèle pas de l’interface
-vérifiez votre batterie.
impossible de télécharge un document
-vérifiez la connection entre l’appareil et l’ordinateur à l’aide d’un câble
USB
-réinitialisez votre appareil
Pourquoi je ne peux pas connecter le lecteur avec mon appareil BT?
-Assurez que votre appareil BT est sous le mode d’appariement avant le
recherchez, c’est à dire que la lumière verte et la rouge scintillent en même
temps pour la plupart d’appareil BT
35
Page 38

Si vous avez d’autres problèmes sur cet produit , contactez avec
support@agptek.com.
Spécialisations
Ecran
1.8pouce (128*160)TFT ecran
Capacité de mémoire �lash
8Go
Formats audio
MP3/WMA/OGG,APE,FLAC,WAV,AAC-LC
,ACELP
Formats de vidéos
AMV/AVI
Formats de �ichiers
FM/MIC et WAV
Formats d’images
JPG ,BMP ,GIF
Temps de charge
2.5 heures
Temps de lecture Bt
4 heures
Page 39

Guía Rápida
1.
Pulse el botón durante 3 segundos para encender/apagar el
dispositivo, pulse el botón
/
elegir
s
us 9 funciones diferentes eninterfaz
p
rinc ipal y toque para entrar en ella,
toque el botón≡para atrás.
I
ntercale el auricular en el jack de la
p
arte inferior izquier da del dispositivo,
p
ulse el icono "Música" para acceder a
s
u función. Pulse el botón +/-para
a
justar el volumen.
C
argar el dispositivo: Conecte un
extremo del cable micro USB en el
dispositivo, conecte el otro ex treme
en el cargador (o en el puerto USB de
u
n ordenador).
D
efinición de teclas
37
2.
3.
4.
Page 40

Nota: Pulse el botó n +/-p ara aumentar o disminuir el volumen cuando en
el interfaz de reprodución de la música / radio/video.
Reproducir Su Música
S
eleccione aplicación de música en el menú principal al entrar en él y lueg
o
r
eproduzca sus canciones según una lista relac ionada incluyendo "Todas
l
as canciones", "Artistas", "Álbumes", "Géneros", "Listas de reproducción",
"Arte de álbumes ", "Audiolibros" y "Actualización de datos de la tarjeta".
38
1
Play/Pausa/Power On-Off / Entrar
2
Anterior, al mover hacia arribay reproduciendo rápido adelante
3
Siguiente, al mover hacia abajo y reproduciendo rápido
4
Desplazar hacia arriba
5
Desplazar hacia abajo
6
Botón de men ú, salida al menú superior y atrás
7
Socket de Micro-SD socket
8
Jack de Micro-USB
Page 41

Rebobinar/avanzar
Cuando está en la interfaz principal de reproducción, pulse y mantenga el
botón / para rebobinar/avanzar y pulse una vez a la canción
anterior/siguiente.
Nota: la función de rebobinado/avance no es compatible en modo Bluetooth
Reproducir aleatorio /repetir
Reproducir aleatorio su música con el botón de submenú
Cuando está en la interfaz principal de reproducción, pulse y mantenga el
botón y luego se mostrará una lista relacionada, seleccione la opción "
Reproducir aleatoriamente " y "Repetir" bajo el opción "modo de
reproducción". Después, elija el modo que desee.
Reproducir aleatorio su música a través de "Configuración"
Puede también reproducir aleatorio sus canciones en el modo de
reproducción con pulsar el icono "Configuración" en la interfaz principal,
a continuación, seleccione el elemento " Reproducir aleatorio " y "Repetir"
bajo la opción "modo de reproducción".
Nota: Si reproduce la canción a través de "Música", sólo se reproducen las
39
Page 42

canciones en la carpeta que están incluidas en su música. Si reproduce
la canción a través de "Carpeta",se reproducen canciones por carpeta;
Si reproduce canciones a través de "Música", sólo se repetirá las canciones
en la carpeta que están incluidas en su música. Si reproduce canciones a
través de la "Carpeta", se repetirá por la carpeta con la opción "repetir
todo".
Listas de reproducción
Para utilizar la lista de reproducción predefinida
Mantenga pulsado el botón y elija la opción "Añadir a playlist" para la
canción que desea operar. Hay 3 artículos prepados para usted, incluyendo
la "Lista de reproducción sobre la marcha [1]", "Lista de reproducción
sobre la marcha [2]" y "Lista de reproducción sobre la marcha [3]", puede
agregar la canción en cualquiera de estas tres como quiera.
Para crear la propia lista de reproducción
Hay un programa gratuito llamado Media Go. Es el programa más fácil de
usar para transferir listas de reproducción a la AGPTek. Ahora cree sus
listas de reproducción en el Media Go y luego haga clic derecho en su
nombre y seleccione ' Añadir lista de reproducción a X :( Que es el disco
del reproductor de MP3) '. (Se puede descargar en
http://mediago.sony.com/chs/download).
40
Page 43

Está marcada por el tiempo de parada como "hh,mm,ss". Así que usted
puede cambiar el tiempo de parada antes de agregarlo que continúa
reproduciendo la próxima vez convenientemente.
Número máximo de marcadores soportado por cada archivo de audio es
10. Usted también puede cubrir el marcador anterior con el nuevo
marcador y,luego, el viejo uno se sustituirá por el nuevo.
Usted puede encontrar los marcadores que guardaron con la opción "ir
al marcador"bajo tema "Marcadores", y usted puede eliminarlos con la
opción "Borrar marcadores ".
Función de Bluetooth
Seleccione aplicación Bluetooth en el menú principal para entrar en él.
1.Asegure que su dispositivo de BT está en modo de emparejamiento
antes de buscar, que significa la luz verde y rojo brillan al mismo
tiempo para la mayoría de los dispositivos BT.
41
Nota: La lista de reproducción no es compatible en modo Bluetooth.
Pulse y mantenga el botón and then choose the option “Add
marcador" bajo"Marcadores".
Agregar marcador para sus libros de audio
Page 44

2.El dispositivo se conectará automáticamente con el reproductor con
"Bluetooth conectado" por primera vez.
3.Si no está conectado automáticamente, puede seguir los siguientes pasos.
Asegure de BT dispositivo está en modo de emparejamiento.
Seleccione la opción "Búsqueda de Bluetooth", cuando su
dispositivo BT se muestra en el reproductor, seleccione la opción
"Conexión de Bluetooth", se conectará exitosamente.
4 En el modo Bluetooth, la opción de reproducción aleatoria funciona
sólo en una carpeta individual, reproduce aleatorio cada carpeta una a
otra. Y usted puede poner todas sus canciones en una carpeta (música)
para reproduce es necesario.
Asegure que el anterior dispositivo está en modo de emparejamiento.
Lista de reproducción no es compatible en modo Bluetooth
La función de rebobinado/avance no es compatible en modo
Bluetooth.
Carpeta / Grabaciones/
Carpeta
42
Page 45

Seleccione aplicación de vista de la carpeta en el menú principal para
entrar en ella, entonces puede leer todos los archivos guardados en el
reproductor, incluyendo archivos de grabación, música, video,foto, etc..
Nota: El reproductor soporta archivos de video AMV y AVI, y puede utilizar
la herramienta de vídeo para transferir los formatos a los correctos.
Grabaciones
Hay 4 artículos en "Grabaciones" incluyendo iniciar grabación de voz,
Biblioteca de grabación, formato de grabación y configuración de grabación.
Pulse el botón para entrar.Tenga en cuenta:
1. Durante la grabación, solamente y pueden ser eficaces.Puede ajusta
r el volumen pulsando +/-
2. Pulse para guardar archivo de grabación actual, o seleccione "sí" cuando
vuelve al menú principal.
Herramientas
Hay calendario, cronómetro, alarma y vídeo incluido en este artículo.
Elija según su necesidad.
Fotos/E book / Radio FM
Fotos
43
Page 46

Pulse el botón de entrar/reproducir, pulse brevemente el botón
/
para elegir hacia arriba y hacia abajo.
Cuando está en la interfaz principal de reproducción, pulse y mantenga
para acceder al submenú, incluyendo "Brillo", "Tiempo de
iluminación", "Ajustes de diapositivas", "Eliminar fotos" y "Actualización
de la tarjeta de datos". Elija según su necesidad.
E book
Puede leer y editar el artículo en el dispositivo. El dispositivo sólo puede
reconocer el artículo en formato "txt".
Radio FM
Seleccione aplicación Bluetooth en el menú principal para entrar en él, y
luego mostrará una lista relacionada incluyendo "Presets", "Manual
ajuste","Auto ajuste" y "Grabación FM".
Presets
Los puntos de frecuencia de radio que se muestran son no más de 30
puntos de frecuencia reservados.
Manual ajuste
Pulse para entrar en modo de búsqueda manual, puede buscar
44
Page 47

manual programas pulsando /
Autotune
Pulse para entrar en modo de Auto ajuste, se mostrará "quieres
adjustar automático Presets ", pulse para confirmar sí o no. Si elige
sí, se busca automáticamente y automáticamente guarda búsquedas
de estación en Presets.
Grabación FM
Cuando escuche el programa de la emisora, pulse y mantenga y luego se
aparecerá el menú, incluyendo El enlace Bluetooth, Iniciargrabación de
radio FM, Guardar Presets, Claro Presets y Sintonizador de región.
Nota:The reproductor está predeterminado con banda commando.
Si está en Japón, necesita cambiar en banda japonesa.
Solución de problemas
No funciona el reproductor multimedia o pantalla no muestra el contenido:
-Comprobar si la energía de la batería no es suficiente para descargar
archivos
-Comprobar la conexión entre el puerto USB del ordenador y cable USB.
-Formato del reproductor multimedia.
45
Page 48

Por qué no se puede conectar con mi dispositivo BT
Asegure que su dispositivo de BT está en modo de emparejamiento
antes de buscar, que significa la luz verde y rojo brillan al mismo
tiempo para la mayoría de los dispositivos BT.
Si usted tiene cualquier pregunta sobre este producto, usted puede
contactar con support@agptek.com.
Especificaciones
46
Pantalla
1.8 pulgadas 128*160 TFT Pantalla
Memoria Flash
8GB
Formato de audio
MP3/WMA/OGG, APE, FLAC, WAV, AAC-LC, ACELP
Formato de vídeo
AMV/AVI
Formato de grabación
FM/MIC record y WAV
Formato de foto
JPG, BMPy GIF
Tiempo de carga
2.5horas
Tiempo de reproducción de BT
4 horas
Page 49

Guida rapida
1.
Premere pulsante 3 secondi per accendere / spegnere il dispositivo,
premere pulsante / per elegir 9 differenti funzioni in
interfaccia principale e toccare per
inserire in esso, toccare per indietro.
Collegare l'auricolare nella presa della
inferiore sinistro del dispositivo,
premere l'icona "musica" per l'accesso
a la sua funzione. Premere + /per regolare il volume.
Caricare il dispositivo: collegare un
cavo estrema micro USB il
dispositivo, collegare l'altro estremo
sul caricabatterie (o porta USB del
un computer).
Definizione di chiavi
2.
3.
4.
47
Page 50

Page 51

Rewind/forward
Quando è nell'interfaccia principale di riproduzione, premere e tenere
premuto il pulsante
/ per il riavvolgimento / avanzamento e premere una
volta il brano precedente / seguente.
Nota: la funzione di riavvolgimento/avanzamento non è supportata in
modalità Bluetooth.
Riproduzionecasuale/Ripetizione
Random riprodurre la vostra musica c on il tasto sottomenu
Quando siete sull'interfaccia principale di riproduzione, premere e
tenere
premuto il pulsante e poi una lista concatenata è v isualizzato,
s
elezionare l'opzione " Riproduzionecasuale" e " Ripetizione " sotto
l'opzione "modalità di riproduzione". Quindi, scegliere la modalità
desiderata.
Random riprodurre la vostra musica tramite "Impostazioni"
Si può anche giocare random canzoni in modalità riproduzione l'icona
"Impostazioni" nell'interfaccia principale, quindi selezionare la voce
"riproduzione casuale" e " Ripetizione " sotto l'opzione "modalità d
i
riproduzione".
N
ota: Se si riproduce a la canzone attraverso la "Musica", solo riproduce le
canzoni nella cartella che sono inclusi nella loro musica. Se si riproduce il
brano attraverso la "Cartella", i brani vengono
Page 52

riprodotti dalla cartella;
Se si riproduce canzoni attraverso la "musica", sarà solo ripetere le canzoni
nella cartella che sono inclusi nella loro musica. Se si riproduce canzoni
attraverso la "cartella", viene ripetuto dalla cartella " Ripeti tutto”.
Playlist
Utilizzare la playlist predefinita
Premere e tenere premuto il pulsante e scegliere l'opzione "Aggiungi
alla playlist" per il brano che si desidera operare. Ci sono 3 articoli
preparati per voi, tra cui "Playlist on the go [1]", "Playlist on the go [2]"
e "Playlist on the go [3]", è possibile aggiungere la canzone in uno di
questi tre, come vi piace.
Per creare la propria playlist
C'è un programma gratuito chiamato Media Go. È il programma più
facile da usare per trasferire playlist per il AGPTek. Ora creare le tue
playlist in Media Go e quindi fare clic destro sul suo nome e selezionare '
Aggiungi playlist a X :( (Che è il disco dal lettore di MP3) '. (È possibile
scaricare presso http://mediago.sony.com/chs/download).
Nota: La Playlist non è supportato in modalità Bluetooth.
50
Page 53

Aggiungi segnalibro per i tuoi libri
Premere e tenere premuto il pulsante and then choose the option
“
Add
e segliere l'opzione arcatore "sotto" segnalibri".
È contrassegnato dall'arresto come tempo "hh, mm, ss". Così è possibile
modificare il tempo di arresto prima di aggiungere che continua a
giocare la prossima volta convenientemente.
Numero massimo di marcatori che sono supportate da ogni file audio è
10. Si può anche coprire il marcatore precedente con il nuovo marcatore
e, quindi, quello vecchio viene sostituito dal nuovo.
Li potete trovare marcatori che teneva con l'opzione "Vai al marcatore"
tema basso "marcatori" e si può rimuovere con l'opzione "eliminare i
marcatori".
Funzione di Bluetooth
Selezionare applicazione Bluetooth nel menu principale per entrare.
1. Si prega di assicurarsi che il dispositivo BT è sulla modalità di
accoppiamento prima di ricerca, che significa il lampo di luce verde e
rosso allo stesso tempo per la maggior parte dei dispositivi BT.
51
Page 54

2.
Il dispositivo si collegherà automaticamente con il giocatore con
"Bluetooth connesso" per la prima volta.
3.
Se non è c ollegato automaticamente, è possibile seguire la procedura
Si prega di assicurarsi di dispositivo BT si è in modalità di
accoppiamento.
Selezionare l'opzione "Ricerca per Bluetooth", quando il dispositivo B
T
mostrato nel lettore, selezionare l'opzione "Connessione Bluetooth", si
connette con successo.
4. In modalità Bluetooth, l'opzione shuffle funziona solo in una singola
cartella, esso pr ovvederà a mischiare ogni cartella uno per uno. E si può
mettere tutte le vostre canzoni in una cartella (musica) per arrivare
a
shuffle Se avete bisogno.
Note:
Assicurarsi che il dispositivo di cui so pra è in modalità di abbinamento
Playlist non è supportato in modalità Bluetooth
Riavvolgimento/avanzamento non è compatibile in modalità Bluetooth.
Cartella / Registrazioni / Strumenti
Cartella
Page 55

Selezionare applicazione dalla vista cartelle nel menu principale per
entrare, quindi è possibile leggere i file memorizzati nel lettore,
c
ompresa la registrazione, i file musicali, video, foto.
Nota: Il lettore supporta file video AMV e AVI, ed è possibile utilizzare lo
strumentovideo per trasferire formati per correggere.
Registrazioni
Ci sono 4 articoli nel "Registrazioni" tra cui inizio registrazione vocale,
Biblioteca di registrazione, formato di registrazione e le impostazioni di
registrazione. Premere il pulsante per entrare. Tenere a mente:
Durante la registrazione, solo e può essere efficace. È possibile
regolare il volume premendo il tasto + /-
Premere per salvare il file di registrazione corrente, oppure
selezionare 'Sì' quando ritorna al menu principale.
Strumenti
Ci sono calendario, cronometro, allarme e video incluso in questo
articolo. Scegliere secondo il vostro bisogno.
F
otos/E book / Radio FM
Fotos
Page 56

Premere immettere / giocare, premere brevemente il / per
selezionare su e giù.
Quando si utilizza l'interfaccia principale di riproduzione, premere e
tenere premuto per accedere al sottomenu, tra cui "Shine", "Tempo di
illuminazione", "Impostazioni presentazione", "Elimina foto" e
"Aggiornamento di dati di carta". Scegliere secondo il vostro bisogno.
E book
È possibile leggere e modificare l'articolo sul dispositivo. Il dispositivo
è in grado di riconoscere solo l'articolo in formato "txt".
Radio FM
Selezionare applicazione Bluetooth nel menu principale per entrare e
poi mostrerà un elenco correlato tra cui "Preset", "Impostazione
manuale","Regolazione automatica" e " Registrazione di FM".
Presets
Radio frecuencia registrado incluyen no más de 30 puntos de frecuencia
reservada.
Impostazione manuale
Premere per accedere alla modalità di ricerca manuale, è possibile
54
Page 57

Page 58

Perché non può essere collegato con il mio dispositivo BT
- Si prega di assicurarsi che il dispositivo BT è sotto modalità per
sbucciare prima di ricerca, che significa la luce verde e rosso luce flas
h
allo stesso tempo per la maggior parte dei dispositivi BT.
S
e avete qualsiasi domanda circa questo prodotto, può contattare con
support@agptek.com.
S
pecifiche
Schermo
1.
8 pollici128*160 TFTSchermo
Memoria Flash
8GB
Formatoaudio
MP3/WMA/OGG, APE, FLAC, WAV, AAC-LC, ACELP
Formatovideo
AMV/AVI
Formatodi registrazione
FM/MIC record eWAV
Formatofoto
JPG, BMPeGIF
Tempo di ricarica
2.5oras
Tempo di riproduzione di BT
4 oras
 Loading...