

Page 1

User Manual
A50 Music Player
Page 2

Quick Guide
While the player is powered on, click button / to access to its 8
different functions, including “Music”, “Recordings”, “FM radio”, “Tools”,
“Setting”, “Folder view”, “Bluetooth” and “Pedometer”, click the central
button to enter.
Plug your earphone into the jack to enjoy the music and radio you like.
Page 3
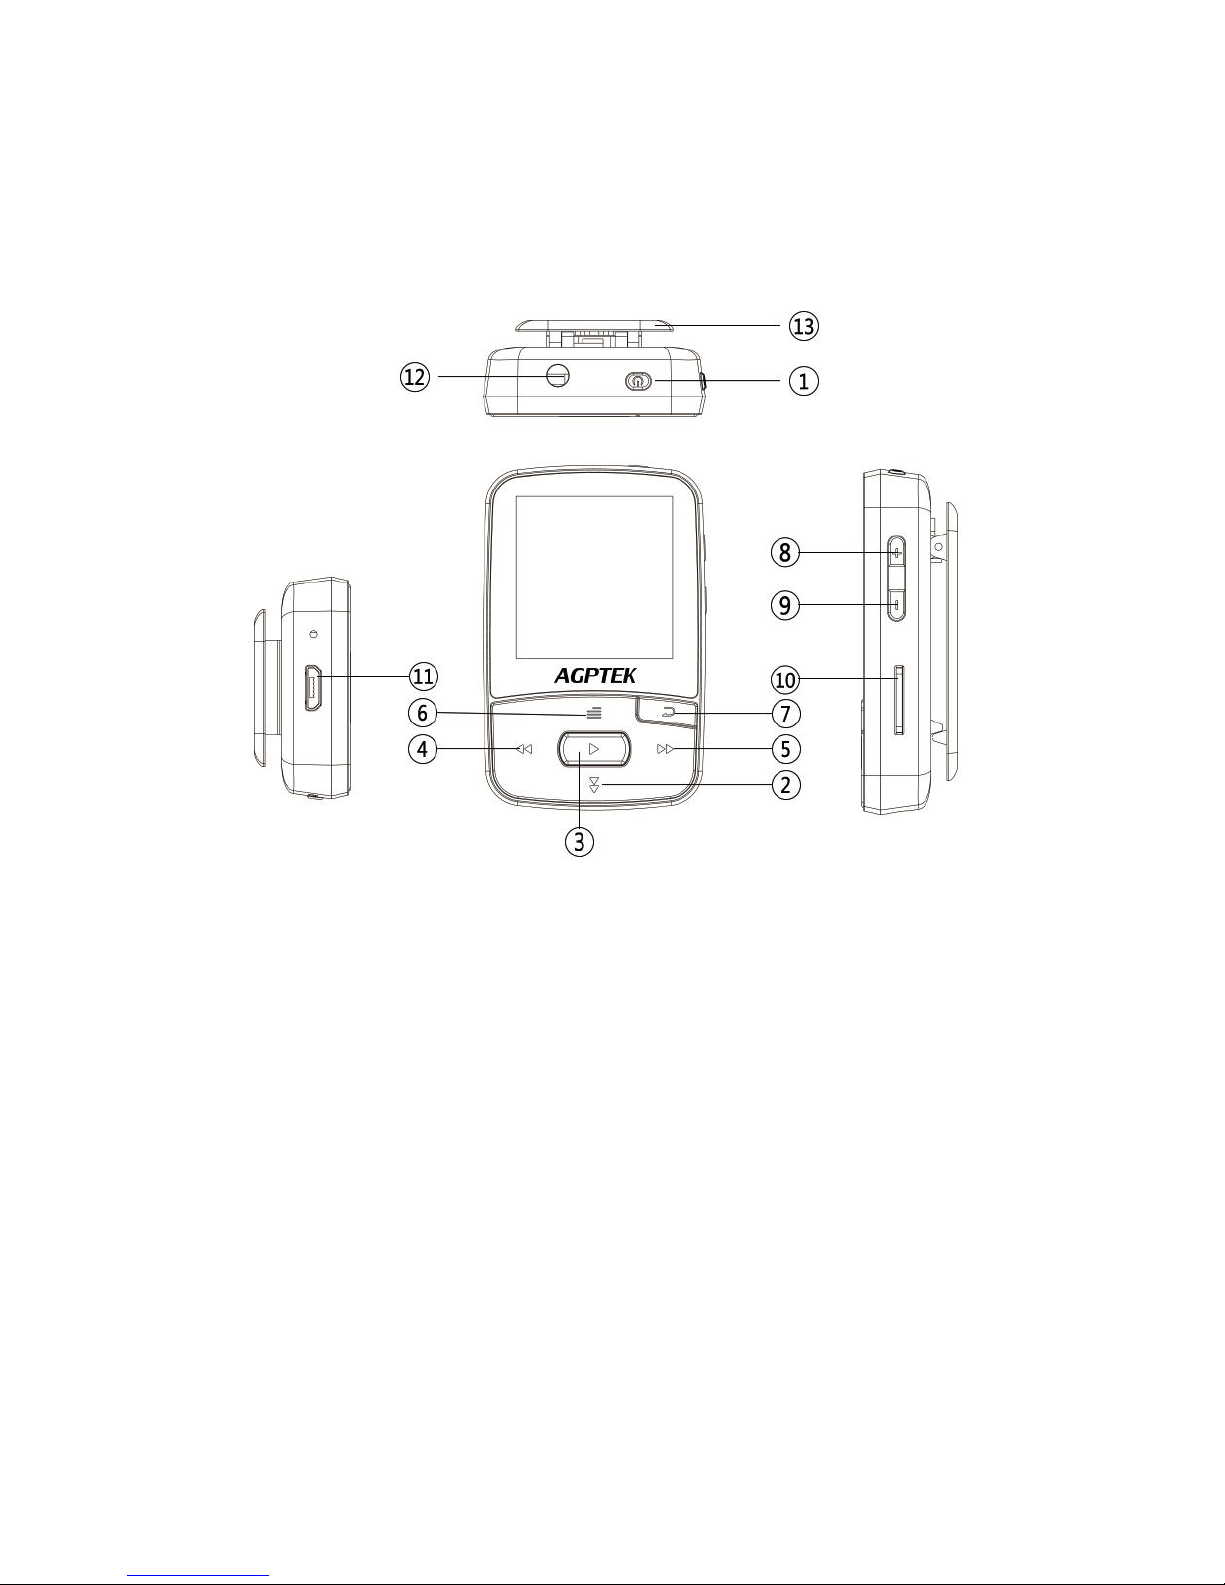
1. Power On/Off
3. Play/Pause/Enter
5. Next/Fast forward
7. Return
8. Volume up
10. Card slot
12. Earphone jack
Basic Operations
2. Scroll down
4. Previous/Rewind
6. Menu button/
Scroll up
9. Volume down
11. Micro USB jack
13. Clip
Page 4

Charge the Player
1. Plug the attached USB cable into the USB port of a computer to charge
the player.
When you start charging, it will show two options: “Charge & Transfer” and
“Charge & Play”. An icon in the top right corner will show the charging
status.
2. Use only the 5V/800mAh charger for charging or it may lead to product
failure.
Power On/Off
Hold the power button for 3 seconds to switch on/off the player.
Date Transfer
Plug it into your computer and copy over media files with the attached USB
cable as if it were a hard drive or use music management software such as
Windows Media Player to transfer the files.
Lock Screen
Hold button for 3 seconds to lock the screen. Repeat to unlock.
Page 5

Music
Select "Music" on main interface, then click the central button on main
interface to access to its function. And then a related list will show as
follows: “All songs”, “Resume”, “Artists”, “Albums”, “Genres”, “Playlists”,
“Album art” and “Create playlist”. Scroll up/down with button / .
Return
In any interfaces, click button to back to the previous menu; hold to
back to main interface.
Note:
1) You can not hold the button to back to the main interface when you
are playing music by Bluetooth.
2) When you turn off the player while the music is still playing on
backstage, the next time you turn on it, it will start from where you left
off.
Rewind/Forward
While it’s on music playing interface:
Hold the button / to rewind/fast forward.
Click button / to go to the previous/next song.
Volume Adjustment
Click the button +/- on the left side to increase/decrease the volume in any
interface.
Page 6

Submenu
While it’s on music playing interface, click button to access to its
submenu. The related list will show, including “Play mode”, “Shuffle”,
“Sound settings”, “Add to playlist”, “Remove from playlist”, “Sleep timer”,
“Delete” and “Bookmarks”. Scroll up/down with button / .
1.Play Mode
"Play music from", choose to play music from all songs/this
aritist/album/genre.
"Repeat", choose to repeat 1, repeat all, view playing or turn off repeat
function.
"Repeat settings", choose to set Repeat Mode, Replay Times, Replay
Interval.
A-B Repeat Function:
"Repeat Mode"(only available when the music is playing)
1)Choose the option "Repeat Mode" with button to confirm the starting
time A(A is flashing).
2)Then click button again to set the ending time B(B is flashing). Click
button again and the passage from time A to B will be repeated
automatically. The icon for A-B indication will appear on the screen.
3)Click button again to back to normal playback.
Replay Times, choose to replay passage A-B for 1-10 times.
Replay Interval, choose to set the playing intervals for 1-10 seconds.
Page 7

2.Shuffle
Choose to turn on/off shuffle mode.
Please note: you can also find "Play music from"/"Repeat"/"Shuffle mode”
in "Setting">"Play Mode", whether you make changes in "submenu" or
"settings", the setting will work in Music, but not in video.
3.Sound Settings
"Equalizer", choose from the 7 sound effects, or choose "off" to turn off
equalizer.
Please note: you can also find "Equalizer" in "Setting">"Sound Settings",
whether you make changes in "submenu" under Music or "settings", the
setting will both work.
"Variable Speed Playback", adjust speed from -8(Slowest) to +8(Fastest).
"Volume limit", adjust the volume from 0(Min.)~30(Max.) with button +/-.
4.Add to playlist
Choose to add to the 3 playlists.
5.Remove from playlist
Choose to remove from the 3 playlists.
6.Sleep timer
Choose "Off" to turn off timer, or choose to set the sleep timer in 1-99
minutes.
Page 8

7.Delete
Choose to delete the song that is playing now.
8.Bookmarks
Choose to add, delete or go to bookmark.
Page 9

Recordings
Select "Recordings" on main interface, click button to access to its
function, then a related list will show as "Start Voice Recording",
"Recordings library", "Storage"(only available with card inserted), "Record
Format" and "Record Settings". Scroll up/down with button / .
1.Start Voice Recording
- Select "Start Voice Recording" and click to start your recording.
Click and then click to save your recording;
- When it’s on recording interface, click the button to pause or start.
2.Recordings library
See your recording files in "Recordings library". Click button to play the
recordings. Click / to go to the previous/next recording.
3.Storage (only available when an expandable card is inserted), choose to
store your recordings in internal or external memory. Confirm your
selection with button .
4.Record Format
Select a format among MP3, WAV and ACT;
5.Record Settings
"Set rec bitrate", Select from 512/768/1024/1536kbps for WAV format;
32/64/128/192 kbps for MP3 format; 8 kbps for ACT format;
"Track AVR mode", Choose Normal/AVR mode;
Note: When it is in AVR mode and you choose to start recording, the player
Page 10

will not record until sound is detected and stop recording when no sound
detected.
"Set recording scene", choose from different scenes.
When it’s on recording playing interface, click the button to access to
its submenu; click the button continually to back to the main screen.
Page 11

FM radio
To enjoy the radio, plug your earphone into the player first.
Select "FM Radio" on main menu, click button to access to its function.
A related list will show including "Presets", "Manual tune", "Auto tune" and
"FM recordings". Click / to select. Press continually or hold
button to back to the main interface.
• Manual tune and Auto tune
You can tune the radio by "Manual tune" or "Auto tune", Choose "Manual
tune", click button / to rewind or forward search one by one, or hold
button / to search automatically, press the button to stop.
Set the FM radio with button
While on radio playing screen, press button to go to its submenu. A
related list will show including "Bluetooth link", "Start FM radio recording",
"Save to preset", "Clear preset", "Auto Tune", "Tuner Region", "FM
Recording".
1.Choose "Bluetooth link" to listen to the radio by Bluetooth
Find Bluetooth link, and click button to access to its submenu:
Bluetooth Status: choose to turn on/off the Bluetooth, turn on Bluetooth
before searching the Bluetooth around.
Bluetooth Search: all of the Bluetooth searched will be listed, choose the
device and click the button to connect/disconnect.
Bluetooth Device List: all of the Bluetooth connected before will be listed.
2.Choose "Start FM radio recording" to save the radio you want to
record, click the button to select whether to save it or not, find the
Page 12

saved recordings in the "FM recording".
3. "Save to preset", choose the save the station to preset.
4. "Clear preset", choose the clear the station from preset.
Please note: You can save the now playing FM station to preset or clear the
preset station. The maxim presets is 30.
5 "Auto Tune", If you choose "Auto tune" to search, it will save all
searched radio stations automatically.
6."Tuner Region", choose from Common /Japan / European Band.
7. "FM Recording", all saved recordings will be listed here.
Please note:
1) You can only listen to mono radio station on this player.
2) The recordings will be saved in WAV (in default) /MP3/ACT format,
choose to set the format in "Recordings" > "Record Format".
3) You can choose to store your radio in local folder or card folder under
"Recordings" when the card is inserted.
Page 13

Tools
Select "Tools" on main interface, click button to access to its function.
A related list will show "Video", "EBook", "Calendar", "Stopwatch" and
"Alarm".
1.Video
Choose "Video", click button to access to its function. You will need to
choose from local folder or card folder if the card is inserted. In the video
list, click button to go to its submenu:
"Brightness", choose to decease/increase the brightness with button -/+.
"Repeat", choose to repeat 1, repeat all or turn off repeat function.
"Delete video", choose to delete the video.
"Update playlist", update the video playlist in the local folder or card folder.
Fast Rewind/Forward
When it’s on video playing interface:
- Press volume button and then click -/+ to decrease/ increase the volume.
- Hold the button / for fast backward/forward. Click to the
previous/next video;
- Click button to play or pause.
- Click button to back to the previous menu; hold to back to main
interface.
Please note: This player can only support the .amv format in 160*128, you
should convert video files by format conversion software first.
2.EBook
Choose "EBook", click button to access to its function.
Please kindly note this player only can recognize the article in “txt.” format.
Page 14

Click the central button to enter;
Click button / to turn the page up and down;
While on text playing interface, click button to play automatically, click
again to back to normal playing;
Click button and choose Playsetting to set the interval, add or delete
ebook/bookmark, click button to return.
3.Calendar
Choose "Calendar", click button to access to its function and view the
date and time. Click button to go back.
4.Stopwatch
Choose "Stopwatch", click button to access to its function. Click
again to start the timer, then click again to stop/resume. Press to
start a new one. Click to go back.
Please note: the maximum Stopwatch list is 5.
5.Alarm
Choose "Alarm", click button to access to its function and set the alarm
switch/time/cycle/music/volume you want.
Page 15

Settings
Choose "Settings", click button to access to its function.
Click to back to the previous menu; hold to back to main interface.
The related list will show as below:
Sleep timer: Choose "Off" to turn off this function or set the sleep timer
between 1-99(minutes), when it reaches the sleep time you set, the player
will power off automatically;
Display: Set the Brightness, Backlight time and Screensaver of your
player;
1) Brightness: decease/increase the brightness with button -/+.
2) Backlight time: set the time at 10(seconds)/20(seconds)/ 30
(seconds)/Always on.
3) Screensaver: choose to set Digital/Pointer clock or no screensaver.
Language: Choose your language;
Date and Time: Set the Date and time according to your need; Click
button to switch between year/month/day/hour/minute. Click / to
set the year/month/day/hour/minute. Click button to save your settings.
Information: See system information about your player;
Format device: choose to format the device and all data on your player is
deleted.
Default settings:choose to restore to factory setting.
Note: if you do the “Default settings”, language selection will appear on the
screen for you to choose when you turn it on next time.
Page 16

Folder View
Select "Folder View" on main menu, click button to access to its function.
All of the files in the player will be listed. If the Micro SD card is inserted,
you can choose to go to Local folder or Card folder. Use button / to
select and choose to play.
Page 17

Bluetooth
Choose "Bluetooth", click button to access to its function. It will search
the nearby Bluetooth devices(Check the Bluetooth status of the device you
want to connect at first) automatically.
A related list will appear as “Device List”, “Search Device”, “All Music” and
“BT Now Playing”.
Play music by Bluetooth
1. The device will search and pair the nearby searched device automatically.
If your device cannot be searched, choose“Search Device”to try again.
2. Choose “Search Device” to search the Bluetooth around(Check the
Bluetooth status of the device you want to connect at first) .
3. All of the devices(Bluetooth Receiver) connected before and being
searched now will be listed here. Choose from the devices and click
button to connect.
4. After successfully connected, you can choose to play the musics in the
connected device or the player in “All Music”.
5. Click button and choose “Yes”/”No” to exit or not.
“BT Now Playing”, go to the music playing interface via Bluetooth.
Note: A50 music player can only pair with Bluetooth Receiver like Bluetooth
earphone or Bluetooth Speaker, etc.
Page 18

Pedometer
Select "Pedometer" on main interface, click button to access to its
function, then a related list will show as "Start step", "Personal info",
"History" and "Clear history".
Choose "Start step", it will display your realtime workout information as
below:
S: step counts
D: distance traveled
C: calories burned
S: walking speed
T: elapsed time
Click button and choose “Yes”/”No” to save the step record or not.
"Personal info", set your step length between 0~200cm with button / .
"History", all your saved step record will be listed here, you can save up to 7
records.
"Clear history", you can choose to delete the record you want or delete all
of the record.
Page 19

Support and Troubleshooting
Can’t turn on your player
- Check if the battery has run out
- Check if the charge adaptor meets the standards
No sound from your earphone
- Check if the volume is set for 0
- Check it’s connected correctly
Page 20

Specifications
Screen
1.5" TFT screen
Weight
25g
Dimension
60*40*11mm
Flash memory
8G
Audio format
MP3/WAV/APE/WMA/FLAC etc.
Video format
128*128 AMV(converted video)
Recording format
MP3/WAV/ACT
Recording range
5-8 meters
Bluetooth range
5-10 meters
Playing time
20-25 hours for music playback
Battery
3.7V/240 mAh
Charging time
1-1.5 hours
SD card expansion
Up to 64G
Lyric Format
LRC
Any more problems, please feel free to contact with our customer service at
support@agptek.com.
 Loading...