

Electric bike user guide

AGOGS electric bikes
Producer:
ekolo.cz s.r.o.
Pod Višňovkou 1 664/29, 1 40 00 Praha 4 - Krč
Czech Republic
Service: +420 226 21 0 226
Email: servis@agogs.com
WWW: www.agogs.com

Congratulations on your electric bike purchase!
AGOGS electric bikes come with high quality components all of which are carefully
adjusted and tested before distribution. To keep your bike in perfect condition please
read this brief guide.
Happy e-biking!
Declaration of conformity
This electric bicycle is compliant with the legislation and standards applicable to
electric bicycles within the EU :
1 . ISO 421 0-2 (Safety requirements for bicycles)
2. EN 1 51 94 (EPAC - Electrically Power Assisted Cycles)
Components a nd d esi gn m ay d i ffer.
Version: GU1 803.
All rights reserved.

Content
Important information and safety ................................................................................. 6
General disclaimers ................................................................................................... 8
Electric bike components ........................................................................................... 1 0
Technical specifications .............................................................................................. 1 2
Assembling after delivery ............................................................................................ 1 4
Before your first ride ................................................................................................... 1 6
Bike control .................................................................................................................. 1 8
User setting ................................................................................................................. 21
Riding ebike ................................................................................................................. 22
Ebike running-up ......................................................................................................... 23
Battery care ................................................................................................................ 24
Battery charging .......................................................................................................... 25
Safety recommendations ............................................................................................ 27
Tires ............................................................................................................................ 28
Rear derailleur ........................................................................................................... 29
Adjustable stem .......................................................................................................... 30
Front suspension fork ................................................................................................ 31
Cleaning and lubrication ............................................................................................ 32
Long-term storage ..................................................................................................... 32
4

Operating range .......................................................................................................... 33
Lighting and safety ...................................................................................................... 33
Riding in wet conditions ............................................................................................. 34
Parking the bike ......................................................................................................... 34
Returning the battery / Recycling .............................................................................. 35
Warranty ..................................................................................................................... 36
Service records ........................................................................................................... 37
Certificate of warranty ................................................................................................ 39
5

Important information and safety
Read this guide carefully. If there is anything you do not understand completely
please contact your dealer.
Do not lend your bicycle to anyone who is unfamiliar with it. Defects caused by
inappropriate use are not be covered by warranty.
The bicycle can only legally be used on the road by a person aged 1 5 years or
older.
We strongly advise you to always wear a cycle helmet when using your bicycle
and if you are unfamiliar with cycling to attend a cycle proficiency course prior to
using it . Your electric bicycle is not a toy and should be considered a serious
mode of transport.
As with all bicycles it is important that you stay within safe limits, if you feel as if
you are travelling too quickly for the road conditions you probably are so slow
down.
Test your brakes prior to using the bike every time you use it and remember the
bike will not stop as quickly in wet or icy conditions as it would on a dry road.
6

NEVER drink alcohol and ride your electric bike. The use of alcohol greatly
reduces reflexes and limits your ability to ride safely. Even a very small amount of
alcohol will limit your ability to be safe on the road.
Frequent braking and accelerating, riding into the wind and long uphill rides
consume more energy from the battery, thus reducing the d istance you can
travel.
Rain free days when the outdoor temperature is over 1 0°C are good conditions to
ride in. It is not recommended to ride the bike when the outdoor temperature is
below 0°C.
During long periods of storage and non-use keep your battery at least 70% full
and top up with charge every 5 to 8 weeks. When in storage keep your battery in a
dry room where the temperature is about 1 5°C.
IMPORTANT! Do not attempt to open the casings of the battery, motor or
controller! It could be dangerous and all warranties will become void. If
you experience a problem contact our service department or your retailer.
ONLY use the charger supplied with your battery or a correct model
replacement from AGOGS. AGOGS is not responsible for damage caused by
using a non-compatible charger.
7

General disclaimers
ekolo.cz s.r.o. shall not be responsible for any damage of any kind, including time
lost, money lost, difficulties and complications that can arise from:
electric bike misuse
infringement of the instructions listed in user guid e
infringement of the traffic regulations and laws valid in country of use
rider's failure
using the bike in way other than it has been produced for
cause of external origin
8

ekolo.cz states to the owner of this electric bike that its use involves risks and
hazards and the owner agrees to assume these risks in full, regardless of their
nature. The owner agrees to take full responsibility for any damage of any kind
related to the electric bike use.
The owner waives all claims against ekolo.cz for compensation in the event of
possible loss, theft, damage or injury of any kind that may incur in the context of
using this electric bike. Defects of the product are covered by the full guarantee
period of 24 months.
We recommend you to insure your electric bike.
9
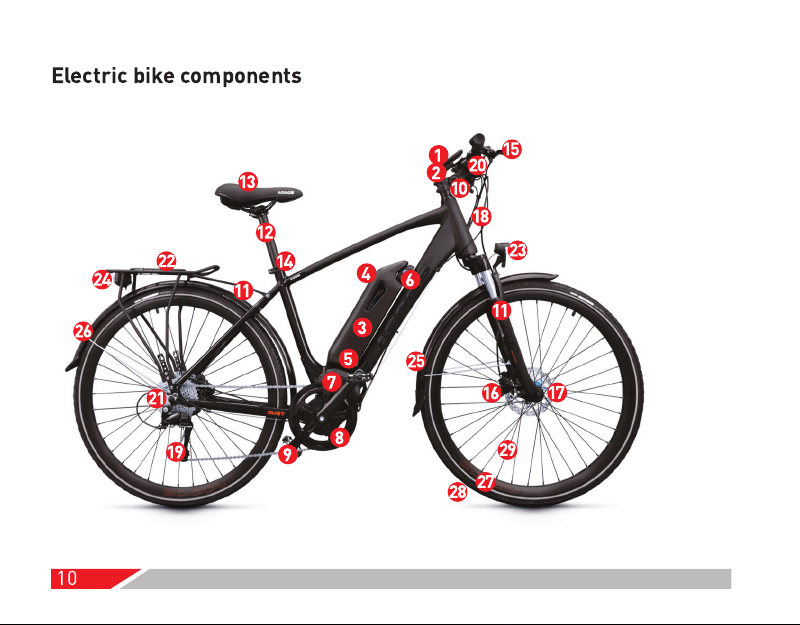
Electric bike components
1 0

1 display
2 boost button
3 battery
4 voltmeter
5 charge connector and USB output
6 battery lock
7 motor
8 chainwheel
9 pedal
1 0 adjustable stem
1 1 suspension fork
1 2 seatpost
1 3 sadd le
1 4 seatpost clamp
1 5 brake lever
1 6 brake caliper
1 7 disc brake rotor
1 8 brake hose
1 9 rear derailleur
20 shifter lever
21 cassette
22 carrier
23 front light
24 rear light
25 front fender
26 rear fender
27 rim
28 tire
29 spokes
1 1

Technical specifications
Dimensions and weight
Weight: 21 .6 kg (without battery)
Maximum load: 1 50 kg including carrier load
Max. carrier load: 1 8 kg
Length x height x width: 1 85 x 1 1 0 x 65 cm
Motor
Output power: 250 W
Torque: 50 Nm
Max. assisted speed: 25 kph
Battery
Nominal voltage: 36 V
Maximum voltage: 42 V
Minimum voltage: 32 V
Capacity: 1 6 Ah
Weight: 3.6 kg
1 2
Charger
Input: 1 00-240 VAC
50/60 Hz
DC output: 42 V / 3A

Frame:
Rims:
Derailleur:
Shifter:
Cassette:
Brakes:
Front fork:
Handlebar:
Stem:
Seatpost:
Chainwheel:
Drivetrain:
Motor:
Battery
Battery charger:
Do not overload bicycle or carrier! Carrier can not be used to transport
persons!
Alloy 6061 .T6
Double-wall aluminium, 28"
Shimano RD-T3000 Acera
Shimano SL-M370 Altus, 9 speed
Shimano CS-H G300, 1 2-36T
Shimano hydraulic disc brakes, 1 60 mm rotor
RST Neon, suspension, preload adjust, lock-out, 60 mm travel
Promax 22.2*31 .8*660 (620) mm
Promax 31 .8*28.6*1 08 mm, angle adjust
Promax 30.9*350 mm
Bafang, 46T, 1 70 mm
Pedal asistance system with accelerator
Bafang BBS01 , 36V/250W.
Li-ion 36V/1 6Ah
ST Electronics, 36V/3A, charging time up to 6 hrs.
1 3

Assembling after delivery
If you bought your ebike by e-shop, it has been very probably delivered partly
disassembled in a box. You need to make the bike complete first.
If you need any help contact your dealer immediately.
Tools:
Allen key 4 mm, open-end wrench 1 5 mm
Unpack the carton and remove everything that is not fixed to the bike frame.
Take the electric bike out of the box.
Remove the packing material.
Remove the plastic protective lids from front fork, stem and front wheel hub if
installed.
You will find a skewer in fabric bag. Install it into the front wheel hub.
Put front wheel into the front fork, center it and fix it with skewer.
Test front brake function.
1 4

Mount front fender holder and front light to fork arch. Then mount fender wire
holder to outer legs of fork.
Put seat post with saddle into the seat tube, adjust height and fix with clamp.
Never raise the seat post above the mark of MINIM UM INSERTION!
Install pedals on cranks using 1 5 mm wrench. Right pedal is marked with R, left
pedal is market with L. Keep in mind that left pedal has left-hand thread.
1 5

Before your first ride
There are several keys attached which are related only to your battery. Choose
one of them which you will use and store the other one in case of damage or loss.
Learn how to release/insert the battery. Unlock the battery lock anticlockwise
and push the battery carefully. When you insert the battery back to frame, start
with bottom end socket and the push upper part against the lock. You dont need
to hold the lock open. Battery will snap to the lock itself.
1 6

Activate the battery by button on battery upper
part. Check the state of charge which is indicated
by LEDs. The more LEDs on, the higher state of
charge. If it is less then a half, recharge the
battery. See chapter Charging. The same button is
used to turn the battery off.
Adjust height of saddle. Your knee should be slightly bent when the pedal is in the
lowest position. When you stop you should be able to touch the ground with both
feet. It is important that the nut of the seat clamp is tightened so the post will not
move in the frame tube. Make this adjustment with the quick release lever in the
open position. Never raise the seat post above the mark of MI NIMUM INSERTI ON!
Adjust height of hand le bar. See chapter Adjustable stem.
Check tire pressures. Acceptable pressure is printed on tires side walls.
Check front and rear brake operation.
1 7

Bike control
This bike uses the large display which provides
the rider with all the relevant information
during each ride. Pedal assistance system is
controlled by display too.
A - up
B - d own
C - light
D - on/off
E - i (mode)
1 8

A - Battery status. 1 0 degree battery indicator.
B - U SB output for charging external devices
C - Lights indicator. Indicates whether lights
are on or not.
D - Error indicator.
E - Menu
F - Units of speed. Km/h or mile/h.
G - M AXS - maximal speed
H - AVG - average speed
I - Units in digit filed (L)
J - Level of assistance
K - WALK mode indicator
L - Digit field
M - TRI P distance
N - TOTAL distance
O - Real time speed
P - SERVICE. It is indicates when
maintenace was planned.
1 9

Turning the bike on/off
Turn the battery on by button on its top first. Activate the electrical system by a long
press on/off button. When you want to turn of the bike, press and hold on/off button
again. Then turn off the battery. In case the bike remains without any move for 5
minutes, the display turns of itself. Battery keeps on.
After starting up the display the default shown is Real time speed and TRIP. Lowest
assistance level is set. To change level of assistance use buttons up and down. By
button up you increase the power of motor. By button down you downcrease it. You
can also turn it off completely.
Bicycle computer functions
To change indicated information use button mode. I nformations are changed in
following order:
TRIP -> TOTAL -> MAXS -> AVG.
USB output
Display is equipped with U SB plug to charge external devices. Output is 5V/0.5A. You
can find it in left down corner of display. It is protected by rubber cover.
20

BOOST button
There is a red boost button on the left handlebar. Use this button when you need to
accelerate rapidly. You can also use this button independently of PAS up to 6 kmh
(walking mode).
Lights control
Press and hold button "light" for 2 seconds. Display backlight and front and rear
lights will be activated. When you press and hold it for 2 seconds again, all lights will
go off. There is light sensor in display so you can enjoy automatic lights function
when day light conditions are bad.
User setting
You can adjust some of ebike parametres. Dou ble click "i" (mode) to get into setting.
Each parameter you can adjust by "up" and "down" button. U se "i" to switch between
paramatres. To save and exit setting double click "i" again.
You can set following parametres:
tC - trip clearance. To reset trip set parameter to y.
S7 - choice between metric or royal units.
21

bL0 - light sensor sensitivity (0 - light sensor is off)
bL1 - backlight intensity
OFF - time of idle before turning display off itself
nnA - maintenance warning. 0 - warning off. 1 - warning after 5000 covered
kilometres
LUd - wheel size setting
SPl - maximal speed setting (blocked)
b01 - battery comunication (NA)
E00-E09 - errors memory
Riding ebike
Learn how to ride your bike before your first trip. It is better find a place with low
traffic for these purposes. Set assistance level to 1 . Start to pedal. You will feel motor
assistance in a moment. Test brake function and effectivity. Repeat it untill you get
used to bike behavior. Increase assistance level step by step. Focus to feel bike mass
compared to normal bike. Try out BOOST button.
When you want to go for a long trip, compare the trip distance with the bike operation
22

range first.
Ebike running-up
It is essential to have your bike servised after 200-300 kilometres from purchase.
This is a free service provided by your supplier. I f this service has not been
undertaken at the correct time this may cause damage to some components that will
not be covered under our warranty. This first service will be written down on your
warranty certificate.
Do not overload your bike when you first ride it (for example by going up long steep
hills). Try to cover the first tens of kilometres in normal landscape. When the motor
heats up so you can not hold your hand on it, take a brake from riding until it gets
cold again. This is not only for ebike running-up but during the whole lifetime.
Never use only BOOST button without pedalling when going up the hill. You
could damage the drive train of the bike!
Do not start riding using only BOOST button. You must also pedal! This will
increase the opareting range of your bike and the lifetime of your battery.
Make sure that the battery is OFF when handling the bike. Otherwise you could
initiate uncontrolled self-motion of the bike.
23

Battery care
The battery is the most expensive and important part of your bike. This bike uses a
lithium-ion battery (Li-I on) with nominal voltage of 36V. It is a commonly used type of
battery with a great balance of weight, capacity and life.
The battery has been delivered as a part of your electric bicycle. Its serial number is
marked on the battery box (you can see when you remove the battery out of the bike)
and written down in your warranty certificate.
Battery storage
Protect the battery from freezing and radiating heat during storage. Ideal
temparature to store battery is 1 0-1 5°C and 70% hu midity at most. Never store it
discharged. Charge state 50-70% would be the best for battery life time.
24
Battery charging
Lithium-ion bateries are very vulnerable to incorrect charging. U se regular Li-Ion or
Li-Pol battery chargers only. I t is essential to use charger with 42V output. Some
models can be labeled as 36V. 36V is nominal voltage of battery and you can use this
kind of charger with no problems. Original delivered charger is 3A. Maximal allowed
charging current for this battery is 5 A.
It takes up to 6 hours to fully charge an empty battery. By 5 A charger it takes up to 4
hours. You can buy this charger from your AGOGS dealer.
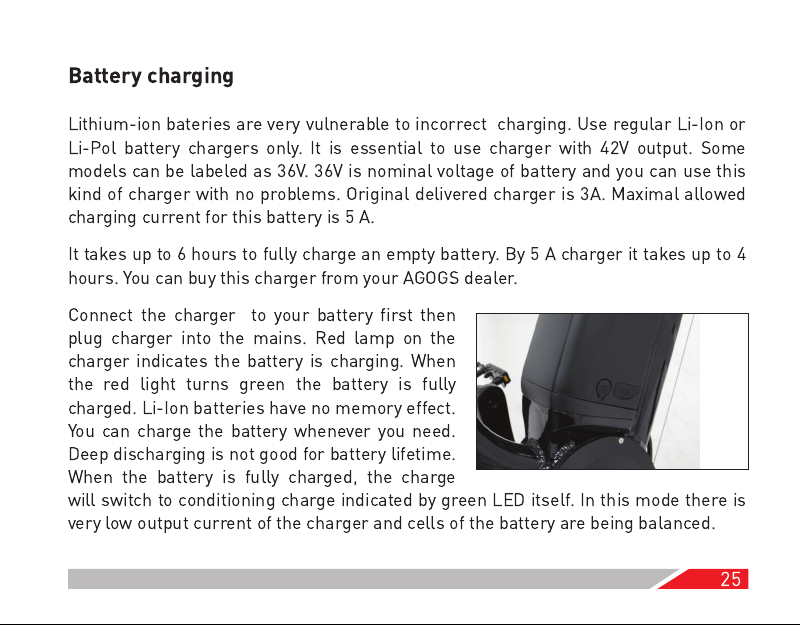
Connect the charger to your battery first then
plug charger into the mains. Red lamp on the
charger indicates the battery is charging. When
the red light turns green the battery is fully
charged. Li-Ion batteries have no memory effect.
You can charge the battery whenever you need.
Deep discharging is not good for battery lifetime.
When the battery is fully charged, the charge
will switch to conditioning charge indicated by green LED itself. In this mode there is
very low output current of the charger and cells of the battery are being balanced.
25

You can charge your battery either on the bike or released from the bike. In both
cases turn the battery off before charging.
When charging the battery always do so in a dry and well ventilated area in
temperature 5 - 40°C.
Do not leave the charger connected to the mains when not in use.
Use only original battery delivered with your bike or replacement battery approved by
AGOGS. Damages caused by using uncertified battery won't be covered by warranty!
Recommendations for maximum battery lifetime
Use the battery between 30% and 80% state of charge. Charge it more than 80% only
when you need maximal distance to ride.
Do not discharge battery below 20%. Deep discharge speed up wear-out of lithium-
iont cells.
Use 3 A charger regularly. 5 A charger use only when it is really needed.
When storage keep the capacity at 70%. Best storage temperature would be about
1 0°C.
26

Safety recommendations
Battery
- do not short circuit positive and negative ports of the battery
- do not dismantle the battery
- do not store the battery in high temperature (heat, sunshine or close to a fire)
- do not power supply another device with the battery
- always charge the battery with licensed charger for lithium-ion batteries
- do not place the battery in fluids such as water, acid, alkaline or salt water.
Charger
- do not dismantle or modify the charger
- do not charge incompatible batteries with this charger
- protect from water and impacts
- do not touch with wet hands
- keep it away from children and pets
- do not cover when in use
- keep the fan free to allow air flow
- pull the plug when disconnecting from mains, not the wire
- do not use defective charger
27

Tires
This electric bicycle uses 28" tires of 1 .50" width.
These tires offer good comfort and low rolling
resistance. The tires have reflective strips on both
sides for your safety.
To inflate the tires use only a normal hand pump.
Do not use air compressors which are available at
gas stations.
Maximum acceptable tire pressure is 5.1 5 bar (75 psi). Recommended tire pressure is
4.5 bar.
Do not exceed the limits of acceptable pressure. It will cause quick yoiur
tires to wear out quickly and low travel comfort. Smaller contact area can
cause loss of grip and thus an accident.
28

Rear derailleur
You can use 9 different gears when riding on this bike. Change the gear only when
pedalling forward but never under a big load.
When there is free movement of derailleur cable or the cable is too short (it is not
possible to shift gear 9) adjust it by the barrel. See picture. By turning the barrel
anticlockwise you downcrease the free move of cable, by turning it clockwise you
increase the free move. M ake sure that the cable does not interfere with the chain or
freewheel.
When you are experiencing problems with the derailleur, contact authorized service
centre.
29

Adjustable stem
Adjust the handlebar height according to your needs. Rider position should be more
sporty on this bike. To adjust height and angle of handlebar loosen Allen bols
highlighted on picture. Adjust the handlebar to possition which is most comfortable
for you and tighten the bolt again.
30

Front suspension fork
You can adjust the preload of the suspension. The adjuster is
located on the left hand side of the fork crown. Turn the adjuster
clockwise to increase the suspension preload and anticlockwise
to reduce it.
There is a black lock-out lever on the right hand side of the fork
crown. Turn the lever in arrow direction to lock the suspension.
This feature is useful when going on high quality tarmac road.
Keep the fork stanchions (inner legs) clean! .
Lube a dust cap with silicon oil at least 1 x per season to
prevent rottennes.
Do not ride with locked suspension off the road. You
could damage lock-out mechanism.
31
Cleaning and lubrication
It is essential to keep the bike clean. For cleaning use a wet house-flannel with
detergent or special bike cleaner. Then dry it. Do not use a high-pressure water
cleaner. Regulary lubricate chain, derailleur, brake cable and derailleur cable with
light oil. Lubricate brake pivot bushes (not the brake pads!) with a little grease.
Do not lubricate the parts too often. Too much oil causes dirt to stick on
parts.
Long-term storage
If you are going to leave your bike unused for more than four weeks, it is best to
release the battery and store as descibed above. Shift to highest gear and hang the
bike to prevent tire deformation.
32

Operating range
The operating range of you r electric bike depends on rider weight and carrier load,
road profile, weather conditions, condition of the bike, riding style and the rider's
physical condition. Regular braking and accelarating, climbing steep hills, low
pressure tires, dragging brakes or a heavy carrier load, all limits the operating range
of the bike. Ride the bike fluidly with continuous pedalling to give maximum
operating rang e.
Lighting and safety
Always turn on lights when visibility is reduced. Keep reflectors clean and visible.
Check your state law for light use regulations.
33

Riding in wet conditions
Your electric bike is rain and splash proof and can be used in all weathers. Do not
ride the bike through floods, deep pools and mud. Do not park your bike where it is
not protected against heavy rain, snow and direct sunlight (UV radiation can harm
paint and colors). I n case of water condensation in controller box, the bike will not
operate. Wait until it dries.
The electrical components of the bike, such as motor, battery and controller must not
be submerged in water.
IMPORTANT! Braking distances increase on wet or icy roads.
Parking the bike
When you leave your bike in a public place, always check the battery is locked in the
frame and is turned off. Lock the bike to a fixed base using a good quality lock.
We suggest you to register your bike with the police database if possible.
34

Returning the battery / Recycling
Please do not put the battery pack into household waste. Containers for collecting
batteries can be found wherever batteries are sold or at local collection points. This
ensures batteries are disposed of correctly. You can also return the battery to your
retailer.
Treat the same way with all the other electrical components of the bike.
35

Warranty
The warranty period shall commence from the day delivery was made to the retail
customer, or from the day the retail customer collected the bike from the retailer
Warranty period for the electric bicycle and specified parts of battery (case, lock,
BMS, charger) is 2 years.
Minimum working lifetime of battery cells is 1 2 months. Capacity step down more
than 30% within this period is covered by warranty only. Battery cells problems
claimed after 1 2 months from bike purchase can not be dealt under warranty.
Exeptions to warranties:
1 . Damage resulting from misuse, not maintaining the bicycle or not following the
gu idelines within this user guide.
2. Accidental or deliberate damage.
3. Damage due to private repair or alteration by user or unauthorised service centre.
4. Spare parts and components worn in normal use (tires, brake pads, chain, etc.).
5. Failure to produce invoice or proof of purchase.
Warranty problem must be claimed at the your retailer or AGOGS service centres
immediately. If failure is covered by our guarantee the part will be repaired or
36

replaced within 30 days from date of claim. In exceptional circumstances we may
replace the whole bike.
It is essential to have your bike serviced after 200 - 300 kilometres. This is a free
service provided by your retailer. If this service has not been undertaken at the
correct time this may cause damage to some components that will not be covered
under our guarantee.
We offer 2 years limited warranty on following items:
Main frame and fork.
Handle bar controls, brakes (excluding brake pads).
Controller, display and charger.
Battery casing, power lock, battery leak.
Paintwork (excluding deliberate or accidental damage).
Bottom bracket, front hub, hub motor, motor shell.
Rims (excluding rim worn by braking).
Shifter, derailleur, freewheel, chainwheel
Saddle, seat post (excluding cases when seat post was raised above the minimum
insertion mark)
37

Service records
..........................................................................................................................................
..........................................................................................................................................
..........................................................................................................................................
..........................................................................................................................................
38

CERTIFICATE OF WARRANTY
Date sold: .........................................................................................................................
E-bike type/color: ............................................................................................................
Frame number: ............................................... Battery number: ....................................
Purchaser
Comments: ......................................................................................................................
............................................... .............................................................
Retailer stamp and signature 200km service confirmation
Full name/company: ...........................................................................
Address: ................................................................... ZIP: ...................
Phone number: ...................................................................................
39

40
 Loading...