

Page 1
CMP-01
60 kg (132 lbs)
/per side
60 kg (132 lbs)
/per side
Ceiling Mounting Kit
Page 2

TABLE OF CONTENTS
中文
English
Deutsch.............................................................1~14
Français
Español
Italiano.............................................................15~28
Page 3
安 全 警 告
Caution安全警告
中文
1. 為確保安全,在安裝前,請先詳細閱讀本安裝說明書並遵守內容,妥善保存本安裝說
明書於安全的地方,以便日後參考。
2. 因錯誤的安裝及操作方法所造成的設備毀損及人員傷害,本製造商將完全不承擔所衍
生的相關法律責任。
3. 本吊架之設計為容易安裝及拆卸,若因人為或天然災害:如地震、颱風…等,所造成
之設備損毀及人員傷害,本製造商將完全不承擔所衍生的相關法律問題。
4. 安裝面板顯示器吊架需由專業人員執行安裝。
5. 無論安裝或移除本產品,至少需由2人執行,以避免沈重的物品掉落造成人員傷害或
物品損毀。
6. 安裝前請先確認吊掛處周圍的環境:
避免安裝在溫度或濕度過高及任何會碰觸到水的地方。
請勿安裝於空調設備的出入口附近及避免大量灰塵及油煙處。
只能安裝於水平的天花板,避免傾斜的牆面。
請勿安裝於振動及撞擊處。
請勿安裝於強光直射,強光會對使用者於觀看面板顯示器時造成眼睛疲勞。
7. 安裝時請於面板顯示器周圍預留足夠的空間,以確保空氣的流通。
8. 為了安全及防止意外發生,安裝前,需檢查天花板的結構及選擇耐久性高的適當位置
。
9. 天花板需能支撐面板顯示器及吊架總重量4倍以上,且需確保有足夠的強度能承受地
震及其它外力的振動。
10.請勿自行變更任何零件,勿使用已破損的零件,若有任何問題請與你的經銷商聯絡。
11.鎖緊螺絲(切勿以過大的扭力鎖付螺絲,以免造成螺絲斷裂或螺牙的損害)。
12.本吊架所能支撐面板顯示器的重量60kg.(132 lbs.)以下。
13.本吊架除了懸掛面板顯示器不可加掛其它物件並嚴禁人員懸掛在本吊架上。
14.日後移除面板顯示器吊架時,會在天花板留下螺絲孔及螺栓,且因長期使用會在天花
板上留下污漬。
15.因天花板種類及吊架安裝施工品質非本製造商所能控制,本產品所保固範圍只限吊架
本體,本產品保固期限3年。
16.若有任何條文爭議,請以英文說明書為主。
1. To ensure safety, please read this manual carefully before installation and follow the
instructions herein. Store this manual in a secure place for future reference.
2. The manufacturer shall not be legally responsible for any equipment damage or
personal injury caused by incorrect installation or operation other than that covered
in this manual.
3. The Mounting Bracket is designed for easy installation and removal. The
manufacturer shall not be liable for damage to equipment or personal injuries arising
out of human factors or acts of God, such as earthquake or typhoon.
4. It is recommended that the projector Mounting Bracket installed by specialists.
5. At least two persons are needed to install or remove the product to avoid hazards to
person or property caused by falling objects.
6. Please carefully inspect the area where the Mounting Bracket is to be installed:
Avoid places that are subject to high temperatures, humidity, or contact with water.
Do not install the product near air conditioning vents or areas with excess dust or fumes.
Only install on flat ceilings and avoid slanted surfaces.
Do not install in places subject to shocks or vibration.
Do not install in places subject to direct exposure to bright light, at it may cause eye
fatigue when viewing the display panel
7. Maintain sufficient space around the display to ensure adequate ventilation.
8. To ensure a safe installation, first check the structure of the ceiling and select a
secure mounting location.
9. The ceiling should be strong enough to sustain a weight of at least four times the
combined weight of the projector and mounting bracket. The mounting location must
be able to withstand vibrations such as from an earthquake.
10.Do not modify any accessories or use broken parts. Contact your dealer with
any questions.
11. Tighten all screws (do not exert excessive force to avoid breaking screws or
damaging their threads).
12.The maximum loading capacity of the Mounting Bracket is 60Kg. (132 lbs.).
13. This Mounting Bracket is meant to support the display only, do not hang anything
else on it; especially, do not use it to support any person.
14. Drill holes and screws will remain in the ceiling once the projector and Mounting
Bracket are removed. Stains may occur on the ceiling after extended use.
15. Since the ceiling type and the installation of the Mounting Bracket is beyond the control
of the supplier, the warranty of this product is limited to the physical body of the
Mounting Bracket for a period of 3 years.
16.Please consult the English language manual for any dispute on conditions.
ENG
1 2
Page 4
Vorsicht
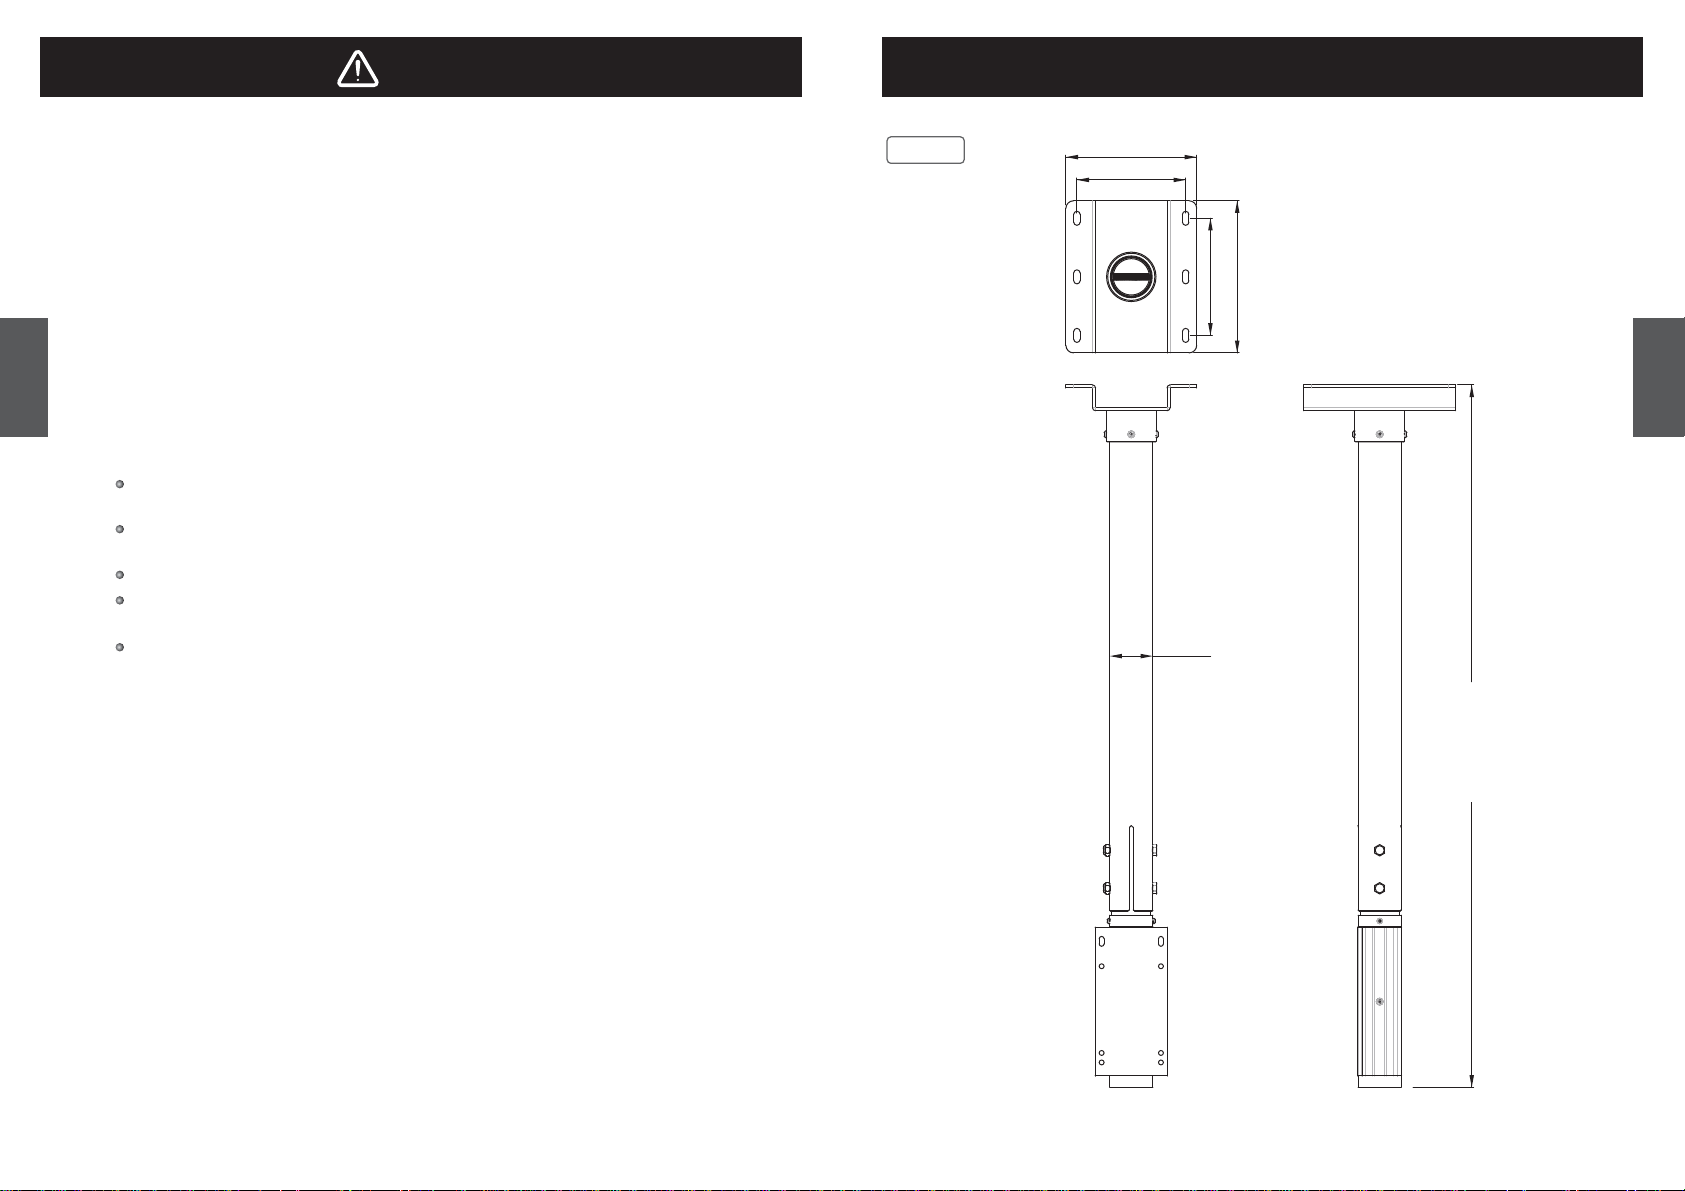
外觀尺寸圖
單位:公厘
外觀尺寸圖
(單位:公厘
) / Outside Dimensions (mm) / Außenabmessungen (mm)
DE
1. Lesen Sie bitte vor der Installation das Handbuch sorgfältig durch und befolgen alle Anweisungen,
um die Sicherheit zu gewähren. Heben Sie das Handbuch auf, damit Sie später darin nachlesen
können.
2. Der Hersteller haftet für keine Geräte- oder Personenschäden, die durch unsachgemäße Installation
oder Bedienung, die nicht in diesem Handbuch beschrieben ist, entstanden sind.
3. Das Montageset ist für eine einfache Installation und Demontage ausgelegt. Der Hersteller haftet
nicht für Geräte- oder Personenschäden, die durch menschliche Faktoren oder höhere Gewalt wie
z.B. Erdbeben oder Orkan entstanden sind.
4. Wir empfehlen Ihnen das Projektor-Montageset von einem qualifizierten Techniker installieren zu
lassen.
5. Die Installation oder Demontage des Produkts muss von mindestens zwei Personen ausgeführt
werden, um Sach- oder Personenschäden durch Herunterfallen von Gegenständen zu vermeiden.
6. Bitte überprüfen Sie sorgfältig die Stelle, wo das Montageset installiert wird:
Vermeiden Sie Stellen mit hohen Temperaturen oder Feuchtigkeit bzw. Stellen, die mit Wasser in
Kontakt kommen können.
Installieren Sie das Produkt nicht in der Nähe von Klimaanlagenöffnungen oder an einer Stelle,
wo es übermäßig Staub oder Rauch gibt.
Montieren Sie das Produkt nur an eine ebene Decke. Vermeiden Sie schräge Oberflächen.
Installieren Sie das Produkt nicht an einer Stelle, an denen es Erschütterungen oder
Schwingungen ausgesetzt ist.
Installieren Sie das Produkt nicht an einer Stelle mit direkter Sonneneinstrahlung bzw. starkem
Licht. Dies fördert beim Anschauen der Bildschirmanzeige das Ermüden der Augen.
7. Halten Sie um das Anzeigegerät ausreichend Freiraum, um eine gute Belüftung zu gewähren.
8. Um eine sichere Installation zu gewähren, prüfen Sie bitte zuerst die Deckenstruktur und wählen
einen sicheren Montageort aus.
9. Die Decke muss stark genug sein, um ein Gewicht von mindestens dem Vierfachen des
Gesamtgewichts des Projektors und des Montagesets zu tragen. Der Montageort muss in der Lage
sein, starke Erschütterungen wie z.B. Erdbeben standzuhalten.
10. Modifizieren Sie keine Zubehörteile. Verwenden Sie keine beschädigten Teile. Wenden Sie sich an
Ihren Händler, wenn Sie Fragen haben.
11. Ziehen Sie alle Schrauben fest. (Wenden Sie nicht zu viel Kraft an, um ein Brechen der Schrauben
oder Beschädigen der Gewinde zu vermeiden.).
12. Die maximale Nutzlast des Montagesets beträgt 60kg.(132 lbs.).
13. Das Montageset dient nur zum Halten eines Anzeigegerätes. Hängen Sie keine anderen Gegenstände
an dieses Produkt. Verwenden Sie es vor allem nicht zu dem Zweck, eine Person zu halten.
14. Die Bohrungen und die Schrauben bleiben an der Decke sichtbar, wenn der Projektor und das
Montageset entfernt wird. Nach längerem Gebrauch kann ein Fleck an der Decke bleiben.
15. Der Hersteller hat keinen Einfluss auf den Deckentyp und die Installation des Montagesets. Deshalb
deckt die Garantie des Produkts nur das Montageset selbst ab. Die Garantie gilt für 3 Jahre.
16. Bitte ziehen Sie die englische Version des Handbuchs zu Rate, falls es Unstimmigkeiten hinsichtlich
der Bedingungen gibt.
CMP-01
172
143
Ø56.5
154
200
Max.1424mm
Min :924mm
中文
ENG
DE
3 4
Page 5
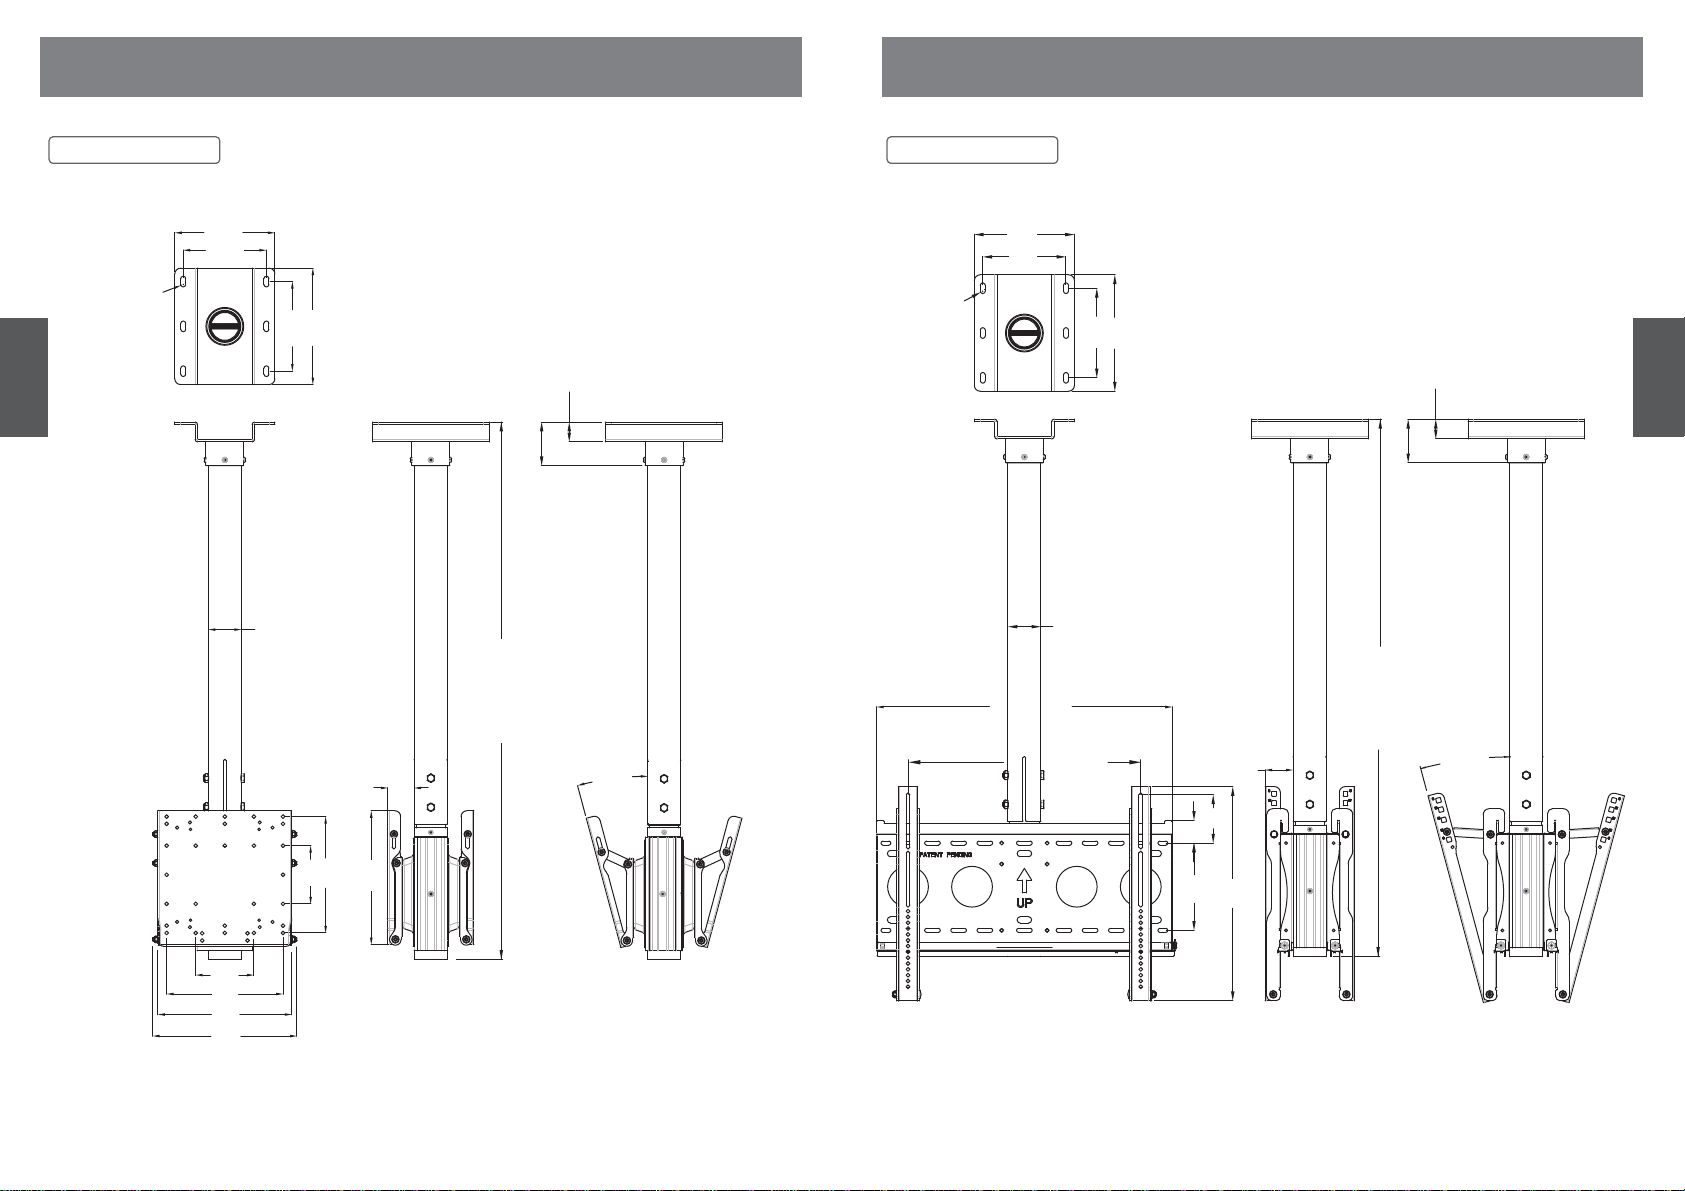
外觀尺寸圖
外觀尺寸圖
單位:公厘
外觀尺寸圖
單位:公厘
CMP-01 + WMK-03 CMP-01 + LMK-02
(單位:公厘
) / Outside Dimensions (mm) / Außenabmessungen (mm)
(單位:公厘
) / Outside Dimensions (mm) / Außenabmessungen (mm) 外觀尺寸圖
中文
ENG
DE
Ø8.5
172
143
Ø56.5
154
200
45
34
75
Max.1424mm
Min :924mm
Max.15°
Ø8.5
172
143
Ø56.5
508
Max.440
Min.50
200
154
39
83
48
34
75
Max.1424mm
Min :924mm
Max.15°
中文
ENG
DE
100
200
230
248
200
100
230
5 6
150
368
Page 6

包裝零件
安裝時具備工具
外觀尺寸圖
外觀尺寸圖
單位:公厘
(單位:公厘
) / Outside Dimensions (mm) / Außenabmessungen (mm)
包裝零件
/ Enclosed Parts / Mitgelieferte Teile
CMP-01 + LMK-01
中文
ENG
DE
Ø8.5
172
143
Ø56.5
Max.725mm
Min.50mm
154
788
200
48
75
Max.1424mm
Min :924mm
Max.15°
34
A
Ceiling mount bracket --- 1 pcs
B
Inflate screw M8 L=60mm --- 6 pcs
C
Height adjust outside pipe --- 1 pcs
D
Screw (M5 type) --- 6 pcs
E
Height adjust Inside pipe --- 1 pcs
F
Hexagon Head Bolt (M8 type) --- 2 pcs
G
Nut (M8 type) --- 2 pcs
H
Hexagon Head Bolt (M6 type) --- 12 pcs
I
Nut (M6 type) --- 12 pcs
中文
ENG
DE
安裝時具備工具
203
490
450
150
7 8
10 mm / 13 mm
/ Tools Required for Installation / Werkzeuge für die Installation
10 mm (25/64")
Page 7

安裝步驟及方式
安裝步驟及方式
安裝步驟及方式
/ Installation Process / Installationsvorgang
安裝步驟及方式
/ Installation Process / Installationsvorgang
中文
ENG
DE
1
安裝前請先了解您要安裝位置的天花板種類: 水泥或木頭。
1-1
注意:如果安裝在木頭時,不可將吊架本體固定於裝飾的柱子或石膏板上。
決定您要在天花板上的安裝位置,將吊架本體(A)靠著天花板,使用鉛筆
1-2
在吊架上的橢圓孔作記號。
如果是水泥的天花板使用電鑽及鑽頭在作記號的天花板上鑽出孔徑為10mm
1-3
深55mm的孔。
注意:安裝時應先確認天花板的種類,選擇適當的螺絲,本配件包所附的螺絲
(B),只適用於水泥牆。
安裝在木質的天花板須有足夠的強度,並且由專業人員選擇適當的螺絲。
Before the installation, you need to find out the type of ceiling at the
1-1
installing position, whether it is a cement ceiling or a wooden ceiling.
Note: For installation on a wooden ceiling, do not fix the bracket onto a
decorative beam or a gypsum board.
Decide the position on the ceiling for the installation, press the Ceiling
1-2
Mount Bracket (A) against the ceiling and mark the oval holes of the
bracket (onto the ceiling) with a pencil.
For a cement ceiling, use an electrical drill (and a drill bit) to drill φ10mm
1-3
holes with a 55mm depth.
Note: Before the installation, you need to find out the type of the ceiling and
choose appropriate screws. Screws (B) attached in the accessory pack
are for cement ceiling only.
For wooden ceiling installation, the ceiling must have sufficient strength
and the installation must be carried out by specialists with the right choice
of screws.
Sie müssen vor der Installation feststellen, ob es sich bei der Decke am
1-1
Installationspunkt um eine Betondecke oder Holzdecke handelt.
Hinweis: Im Fall einer Holzdecke achten Sie bitte darauf, die Halterung nicht in
einen Zierbalken oder eine Gipskartonplatte einzudrehen.
Stellen Sie die Installationsposition an der Decke fest, halten die
1-2
Deckenhalterung (A) an die Decke und markieren mit einem Bleistift die
ovalförmigen Löcher der Halterung (an der Decke).
Wenn es sich um eine Betondecke handelt, verwenden Sie bitte eine
1-3
Bohrmaschine (mit einem passenden Bohrer), um Löcher mit einem
Durchmesser von 10mm und einer Tiefe von 55mm zu bohren.
Hinweis: Sie müssen vor der Installation den Deckentyp feststellen und die
passenden Schrauben auswählen. Die mitgelieferten Schrauben (B)
sind nur für eine Betondecke geeignet.
Im Fall einer Holzdecke achten Sie bitte darauf, dass die Decke die
Last aushalten kann. Ferner sollte die Installation von einem Fachmann
mit richtigen Schrauben ausgeführt werden.
1-3
55
Ø10
Cement walls
1-4
B
鬆開並卸下膨脹螺絲上的彈簧墊片和螺帽。將吊架本體(A)鎖固於天花板上。
1-5
Loosen and remove the nut and spring washer from the Inflate Screw. Fix the
Ceiling Mount Bracket (A) to the ceiling.
Entfernen Sie die Mutter und den Federring von der Spreizschraube. Befestigen
Sie die Deckenhalterung (A) an der Decke
A
FLAT WASHER
SPRING WASHER
NUT
中文
ENG
DE
9 10
Page 8

安裝步驟及方式
安裝步驟及方式
安裝步驟及方式
2 4
中文
ENG
DE
/ Installation Process / Installationsvorgang 安裝步驟及方式
將外套管(C)旋轉鎖緊於吊架本體(A) ,使
2-1
用螺絲(D)將外套管鎖固於吊架本體。
將電源線、訊號線及其它線材,由天花板
2-2
吊架本體缺口處(箭頭處)穿入鐵管內。
Fix the Outer Sleeve (C) [Height adjust
2-1
outside tube] to the Ceiling Mount Bracket
(A): Use Screws (D) to tighten the Outer
Sleeve to the Bracket.
Insert the power cable, signal cable and
2-2
other wires through the iron pipe via the
recess of the Ceiling Mount Bracket
(indicated by the arrow).
Bringen Sie die Abstandhülse (C)
2-1
[Höhenanpassungsaußenrohr] an der
Deckenhalterung (A) an: Verwenden Sie
die Schrauben (D), um die Abstandhülse
an der Halterung zu befestigen.
Stecken Sie das Netzkabel, das
2-2
Signalkabel und sonstige benötigte Kabel
durch die Vertiefung der Deckenhalterung
(mit dem Pfeil angezeigt) in das Eisenrohr
ein.
3
C
F
G
/ Installation Process / Installationsvorgang
or
E
H
E
H
中文
ENG
DE
E
A
D
I
I
D
C
A
90°
C
360°
Rotate
11 12
Fix
Page 9

安裝步驟及方式
安裝步驟及方式
安裝步驟及方式
/ Installation Process / Installationsvorgang 安裝步驟及方式
/ Installation Process / Installationsvorgang
中文
ENG
DE
5
因不同型號的壁掛架所配備壁掛架本體及支架不同,所以安裝面板顯示器支架時
請參照你所購買的壁掛架內所附的安裝說明書。
將面板顯示器安裝至吊架完成後,需將面板顯示器中心對準吊架中心,確定左右
重量平均。
Since different models of Wall Mounting Bracket are equipped with different
Wall Mounting Brackets and Display Housing Brackets, refer to the instructions
that came with the Wall Mounting Bracket that you have purchased.
On completion of installation of the display panel to the hanger, you need to
adjust the display panel so its center aligns to the center of the hanger bracket,
so that the weight is balanced on both the left and right sides.
Unterschiedliche Wandhalterungsmodelle sind mit unterschiedlichen
Wandhalterungen und Anzeigegerätehalterungen ausgestattet. Beziehen Sie
sich bitte auf die Anleitung, die mit Ihrer Wandhalterung mitgeliefert ist.
Bei Fertigstellung der Montage des Anzeigegerätes an die Hängevorrichtung
müssen Sie das Anzeigegerät auf die Mitte des Winkels der Hängevorrichtung
richten, damit das Gewicht an der linken und rechten Seite ausgeglichen wird.
6
請確實執行此步驟以防面板顯示器因人為或天然災害等因素而跳脫落掉。
Please make sure this step is carried out correctly, to prevent the display
panel from falling off due to human error or natural calamity.
Bitte stellen Sie sicher, dass dieser Schritt richtig ausgeführt wird, um das
Herunterfallen des Anzeigegerätes durch Unachtsamkeit oder
Naturkatastrophe zu vermeiden.
中文
ENG
DE
or
LOCK
CENTER
13 14
SCREW
LOCK
SCREW
Page 10

PrecauciónAttention
FR
1. Afin d'assurer votre sécurité, nous vous prions de bien lire le manuel avant l'installation et de
suivre attentivement les instructions qui y sont incluses. Conservez ce manuel dans un endroit
sûr comme référence.
2. Le fabricant ne sera tenu légalement responsable d’aucun dommage à l’équipement ou de
blessure corporelle causés par une mauvaise installation ou utilisation de l’équipement autre que
celle décrite au sein du présent manuel.
3. Le support de fixation est conçu de façon à faciliter l'installation et le déplacement. Le fabricant
ne sera tenu responsable d'aucun dommage à l'équipement ou de blessure corporelle découlant
d’erreur humaine ou de cas de force majeure, tels un tremblement de terre ou un typhon.
4. Il est recommandé de ne permettre qu’au personnel qualifié d’installer le support de fixation du
projecteur.
5. L’installation ou le déplacement du produit doit être accompli par un minimum de deux personnes
afin d’éviter des dommages ou des blessures causés par une chute.
6. Nous vous prions d’inspecter soigneusement l'emplacement où le support de fixation sera
installé:
Évitez les endroits avec des températures ambiantes élevées, de l’humidité ou tout contact
avec de l’eau.
N’installez pas le produit près de bouches d’air climatisé ou dans des endroits avec beaucoup
de poussière ou de vapeurs toxiques.
N’installez que sur des plafonds plats et évitez les surfaces inclinée.
N’installez pas dans des endroits avec des chocs ou des vibrations.
N’installez pas dans endroits exposés à des lumières fortes, cela pourrait causer la fatigue
visuelle lors de l’observation du panneau d’affichage.
7. Laissez un espace suffisant autour de l’écran pour une ventilation adéquate.
8. Pour garantir une bonne installation, il est impératif de vérifier la structure du plafond et de choisir
un bon endroit pour l’installation.
9. Le plafond devrait être assez suffisamment fort pour soutenir un poids quatre fois supérieur à
celui du poids combiné du projecteur et du support de fixation ensemble. L’emplacement du
montage doit pouvoir survivre à des vibrations et même un tremblement de terre.
10. Ne modifiez aucun des accessoires et n’utilisez aucune pièce endommagée. Contactez votre
revendeur si vous avez des questions.
11. Resserrez toutes les vis (n’utilisez pas de force excessive pour éviter d’abîmer les vis ou le filetage).
12. Le poids maximal pouvant être soutenu par le support de fixation est 60Kg (132 livres).
13. Ce support de fixation est conçu pour cet écran uniquement ; n'attachez rien d'autre dessus ; ne
l'utilisez jamais pour supporter des personnes.
14. Les trous de perçage et les vis resteront dans le plafond lorsque vous enlevez le projecteur et le
support de fixation. Des taches peuvent apparaître sur le plafond après une longue utilisation.
15. Puisque le fabricant ne peut en aucun cas contrôler le type de plafond et la qualité de l’installation
du support de fixation, la garantie du produit ne couvre que le corps du support de fixation
pendant une période de 3 ans.
16. Veuillez consulter le manuel Anglais pour tout désaccord quant aux termes.
1. Para garantizar su seguridad, lea este manual detenidamente antes de la instalación y siga sus
instrucciones. Conserve este manual en un lugar seguro para futuras consultas.
2. El fabricante no será legalmente responsable de ningún daño producido sobre el equipo o lesión
personal causada por una instalación o uso no mencionado explícitamente en este manual.
3. El soporte de pared ha sido diseñado para instalar y retirar fácilmente el dispositivo. El fabricante no
se hace responsable de los daños provocados sobre el equipo o las lesiones personales que se
deriven de factores humanos o actos de fuerza mayor, como un terremoto o un tifón.
4. Se recomienda que el soporte de pared para proyector sea instalado por un especialista.
5. Para evitar lesiones a personas y daños a la propiedad, la instalación o retirada deberá ser realizada
por al menos dos personas.
6. Inspeccione detenidamente el área en el que desee instalar el soporte de pared:
Evite los lugares sometidos a altas temperaturas, alto nivel de humedad, o que se encuentren en
contacto con el agua.
No instale el producto cerca de un orificio de aire acondicionado, o en zonas con gran cantidad
de polvo o humos.
Instale el producto en un techo plano. Evite las superficies sesgadas.
No instale el producto en lugares sujetos a golpes o vibraciones.
No instale el producto en lugares en los que se encuentre expuesto a luces muy brillantes. Ello
podría provocar fatiga ocular al mirar el panel de pantalla.
7. Mantenga espacio libre suficiente alrededor de la pantalla para asegurar su adecuada ventilación.
8. Para garantizar la seguridad de la instalación, compruebe primero la estructura del techo y
seleccione una ubicación de montaje segura.
9. La pared debe tener fuerza suficiente para soportar un peso de al menos cuatro veces el proyector y
el soporte en conjunto. El lugar de montaje debe se capaz de aguantar terremotos u otros golpes
fuertes.
10. No modifique ningún accesorio ni utilice componentes deteriorados. Póngase en contacto con su
distribuidor si tiene alguna duda.
11. Apriete todos los tornillos (no ejerza demasiada fuerza para evitar que se roma el tornillo o se dañe
la rosca).
12. La capacidad de carga máxima del soporte de montaje es de
13. Este soporte de montaje ha sido fabricado para sostener únicamente la pantalla. No cuelgue objetos
del mismo. En especial, no lo utilice como apoyo para personas.
14. Si retira el soporte, conserve los tornillos y los orificios en el techo. Podrían quedar manchas
después de un uso prolongado.
15. Dado que escapa al control del proveedor el conocimiento del tipo de techo y la instalación del
soporte, la garantía de este producto se limita al propio soporte, durante un periodo de 3 años.
16. Consulte el manual en inglés si tiene alguna duda acerca de las condiciones.
60kg.(132 lbs.).
ES
15 16
Page 11

Attenzione
Dimensions externes (mm) / Dimensiones exteriores (mm) / Dimensioni esterne (mm)
IT
1. Per garantire la sicurezza, leggere attentamente questo manuale prima di effettuare
l’installazione e seguire le istruzioni qui contenute. Conservare questo manuale in un luogo
sicuro per riferimenti futuri.
2. Il produttore non deve essere ritenuto responsabile legalmente per qualsiasi danno
all'apparecchio o lesione alla persona provocati da installazione non corretta o funzionamento
diverso da quello riportato nel seguente manuale.
3. La staffa per il montaggio è stata ideata per una facile installazione e rimozione. Il produttore
non sarà responsabile per danni all’apparecchio o per lesioni alla persona derivanti da fattori
umani o eventi naturali, come tifoni o terremoti.
4. Si consiglia l’installazione della staffa per il montaggio del proiettore da parte di uno specialista.
5. Per installare o rimuovere il prodotto sono necessarie almeno due persone, per evitare rischi
alle persone o alle proprietà derivanti dalla caduta di oggetti.
6. Controllare attentamente l’area dove deve essere collocata la staffa per il montaggio:
Evitare luoghi soggetti a temperature alte, umidità o contatto con l'acqua.
Non installare il prodotto accanto a uscite di ventilazione di aria condizionata o aree con
polvere o fumi eccessivi.
Installare solo su soffitti piani ed evitare superfici inclinate.
Non installare in luoghi soggetti a urti o vibrazioni.
Non installare in luoghi soggetti a esposizione diretta alla luce, in quanto si potrebbe
provocare affaticamento agli occhi durante la visualizzazione del pannello.
7. Mantenere spazio suf ficiente intorno al monitor per garantire una adeguata ventilazione.
8. Per garantire un’installazione sicura, controllare la struttura del sof fitto e scegliere un punto
adatto per il montaggio.
9. Il sof fitto deve essere abbastanza resistente da sostenere almeno quattro volte il peso del
proiettore e della staffa per il montaggio insieme. La posizione di montaggio deve poter
sopportare le vibrazioni, come in caso di terremoto.
10. Non modificare gli accessori o utilizzare parti rotte. Contattare il rivenditore per qualsiasi
domanda.
11. Stringere tutte le viti (non applicare forza eccessiva per evitare la rottura delle viti o il
danneggiamento della filettatura).
12. La capacità massima di carico della staffa per il montaggio è 60 kg. (132 lb.).
13. Questa staffa per il montaggio è studiata solo per supportare il monitor, non per appendere
altre cose. In particolare, non utilizzarla per sostenere le persone.
14. I fori e le viti rimarranno sul soffitto, una volta rimossi il proiettore e la staffa per il montaggio.
Dopo un periodo prolungato di utilizzo, sul soffitto possono formarsi delle macchie.
15. Dato che il tipo di soffitto e l'installazione della staffa per il montaggio esulano dal controllo del
fornitore, la garanzia di questo prodotto è limitata alla struttura fisica della staffa per un periodo
di 3 anni.
16. Consultare il manuale in lingua inglese per eventuali controversie sulle condizioni.
CMP-01
172
143
Ø56.5
154
200
Max.1424mm
Min :924mm
FR
ES
IT
17 18
Page 12

Dimensions externes (mm) / Dimensiones exteriores (mm) / Dimensioni esterne (mm)Dimensions externes (mm) / Dimensiones exteriores (mm) / Dimensioni esterne (mm)
CMP-01 + WMK-03 CMP-01 + LMK-02
FR
ES
IT
Ø8.5
172
143
Ø56.5
154
200
45
34
75
Max.1424mm
Min :924mm
Max.15°
Ø8.5
172
143
Ø56.5
508
Max.440
Min.50
200
154
39
83
48
34
75
Max.1424mm
Min :924mm
Max.15°
FR
ES
IT
100
200
230
248
200
100
230
19 20
150
368
Page 13

Dimensions externes (mm) / Dimensiones exteriores (mm) / Dimensioni esterne (mm)
Parties cloisonnées / Componentes suministrados / Parti incluse
CMP-01 + LMK-01
FR
ES
IT
Ø8.5
172
143
Ø56.5
Max.725mm
Min.50mm
154
788
200
48
75
Max.1424mm
Min :924mm
Max.15°
34
A
Ceiling mount bracket --- 1 pcs
B
Inflate screw M8 L=60mm --- 6 pcs
C
Height adjust outside pipe --- 1 pcs
D
Screw (M5 type) --- 6 pcs
E
Height adjust Inside pipe --- 1 pcs
F
Hexagon Head Bolt (M8 type) --- 2 pcs
G
Nut (M8 type) --- 2 pcs
H
Hexagon Head Bolt (M6 type) --- 12 pcs
I
Nut (M6 type) --- 12 pcs
FR
ES
IT
Outils requis pour l’installation / Herramientas necesarias para la instalación /
203
490
450
150
21 22
Utensili necessari per l’installazione
10 mm (25/64")
10 mm / 13 mm
Page 14

Méthode d’installation / Proceso de Instalación / Processo di installazione
Méthode d’installation / Proceso de Instalación / Processo di installazione
FR
ES
IT
1
Identifiez le type de plafond avant l’installation et l’endroit où vous désirez
1-1
l’installer, que ce soit un plafond en ciment ou un plafond en bois.
Remarque: Pour l’installation sur un plafond en bois, n’installez pas le support sur
Choisissez la position d’installation au plafond, pressez le dispositif de
1-2
une colonne décorative ou une plaque de plâtre.
fixation de plafond (A) sur le plafond et marquez avec le crayon
l’emplacement des trous (sur le plafond).
Pour les plafond en ciment, utilisez une perceuse électrique (et un foret)
1-3
pour faire des trous deφ10mm et d’une profondeur de 55mm.
Remarque: Avant de commencer l’installation, vérifiez le type de plafond et
choisissez le bon type de vis. Les vis (B) fournies dans le sachet
d’accessoires sont pour les plafonds en ciment seulement.
Pour les plafonds en bois, le plafond doit être suffisamment fort et
l'installation ne doit être faite que par des techniciens qualifiés avec le
bon type de vis.
Antes de la instalación necesitará averiguar qué tipo de techo existe en la
1-1
ubicación de instalación (de cemento o de madera).
Nota: Para realizar la instalación en un techo de entramado de madera, no
coloque el perno sobre una placa de yeso.
Seleccione la posición en la que desee instalar el soporte en el techo,
1-2
presione la abrazadera de montaje en techo (A) contra el techo y marque
los orificios ovalados de la abrazadera (en el techo) con un lápiz.
En el caso de un techo de cemento, utilice un taladro eléctrico (y una
1-3
broca) para taladrar orificios deφ10 mm con una profundidad de 55 mm.
Nota: Antes de realizar la instalación necesitará averiguar el tipo de techo y
seleccionar los tornillos adecuados. Los tornillos (B) adjuntos al paquete de
accesorios son adecuados sólo para techos de cemento.
En caso de realizar la instalación en un techo de entramado de madera, el
techo deberá tener la fortaleza suficiente, y la instalación deberá ser
realizada por especialistas con el conjunto de tornillos adecuado.
1-3
55
Ø10
Cement walls
1-4
B
1-5
Desserrez et enlevez les écrous et les rondelles des vis gonflantes. Attachez le
support de fixation de plafond (A) au plafond.
Afloje y extraiga la tuerca y la arandela del tornillo de inflado. Coloque el soporte
de montaje para techo (A) en el techo.
Allentare e togliere i dadi e le rondelle elastiche dalla viti ad espansione. Fissare
la staffa per il montaggio al soffitto (A).
FR
ES
IT
Prima dell’installazione, è necessario verificare se il soffitto è in legno o
1-1
cemento, nel punto prescelto.
Nota: In caso di montaggio su un soffitto in legno, non fissare la staffa su travi
decorative o su bordi in gesso.
Scegliere la posizione sul soffitto, appoggiare la staffa per il montaggio (A)
1-2
contro di esso e fare un segno con la matita in corrispondenza dei fori
ovali della staffa stessa.
In caso di soffitto in cemento, utilizzare un trapano elettrico facendo dei
1-3
fori con un diametro di 10 mm e una profondità di 55 mm.
Nota: Prima dell’installazione è necessario verificare il tipo di soffitto e scegliere le
viti appropriate. Le viti (B) in dotazione nella confezione dell’accessorio sono
solo per soffitti in cemento.
Per il montaggio su soffitti in legno, è necessario che questi siano
sufficientemente resistenti e che l’installazione sia eseguita da uno
specialista e con le viti adatte.
23 24
A
FLAT WASHER
SPRING WASHER
NUT
Page 15

Méthode d’installation / Proceso de Instalación / Processo di installazione Méthode d’installation / Proceso de Instalación / Processo di installazione
Attachez l’enveloppe extérieure (C)
2-1
[hauteur réglable avec tube extérieur] sur
2 4
FR
ES
IT
le support de fixation de plafond (A) :
Utilisez les vis (D) pour serrer l’enveloppe
extérieure au support.
Insérez le cordon d’alimentation, le câble
2-2
de signal et les autres câbles dans le
tube en fer via l'orifice du support de
fixation de plafond (indiqué par la flèche).
Coloque la funda exterior (C) [ajuste la
2-1
altura con el tubo exterior] en la
abrazadera de montaje para techo (A):
Utilice los tornillos (D) para apretar la
funda exterior a la abrazadera.
Inserte el cable de alimentación, el cable
2-2
de señal y los demás cables a través del
tubo de hierro por medio del orificio de la
abrazadera de montaje para techo
(indicado con la flecha).
2-1
Fissare il manicotto esterno (C) [tubo
esterno per la regolazione dell’altezza]
alla staffa per il montaggio a soffitto (A):
utilizzare le viti (D) per stringerlo.
Inserire il cavo di alimentazione, il cavo
2-2
del segnale e gli altri fili nel tubo di ferro,
facendoli passare dalla rientranza della
staffa di montaggio a soffitto (indicata
dalla freccia).
A
3
G
C
or
F
E
I
E
H
E
H
I
FR
ES
IT
D
D
Fix
C
A
90°
C
360°
Rotate
25 26
Page 16

Méthode d’installation / Proceso de Instalación / Processo di installazione Méthode d’installation / Proceso de Instalación / Processo di installazione
FR
ES
IT
5
Puisque chaque modèle de support de fixation murale est équipé de différents
supports de fixation murale et de boîtiers de support de l’écran, consultez les
instructions fournies avec le support de fixation murale que vous avez acheté.
Lorsque vous avez fini d’installer l’écran sur le dispositif de fixation, réglez
l’écran de façon à ce que son centre soit aligné avec le centre du dispositif de
fixation, pour que le poids de l’écran soit égal à gauche et à droite.
Dado que los distintos modelos de abrazaderas de montaje en pared van
equipados con diferentes abrazaderas de montaje y abrazaderas de soporte
de pantalla, consulte las instrucciones que se incluyen con la abrazadera de
montaje en pared que ha adquirido.
Una vez finalizada la isntalación del panel de pantalla en el soporte, necesitará
ajustar el panel de pantalla de forma que su centro quede alineado con el
centro del soporte, para que el peso quede balanceado a ambos lados.
Dato che i modelli di staffe per il montaggio a parete sono diversi, fare
riferimento alle istruzioni allegate al tipo acquistato.
Una volta completata l’installazione del pannello del monitor sul supporto, è
necessario regolarlo in modo che il centro del monitor stesso sia allineato al
centro della staffa di supporto, così da bilanciare il peso sia a destra che a
sinistra.
6
Assurez-vous que cette étape est faite correctement, pour éviter que
l’écran ne tombe par accident ou suite à une catastrophe naturelle.
Asegúrese de llevar a cabo este paso correctamente para evitar que el
panel de pantalla se caiga debido a un error humano o algún accidente
natural.
Accertarsi di eseguire questa operazione correttamente, per prevenire la
caduta del pannello del monitor in caso di errore umano o calamità
naturale.
FR
ES
IT
or
LOCK
CENTER
27 28
SCREW
LOCK
SCREW
 Loading...