

AGL A710, A710HR User Manual
A710
Multipurpose Laser
Owner’s Manual

GENERAL INFORMATION
Thank you for buying the Agatec A710 laser! Although the A710 is
simple to use, we recommend that you read this manual before
operating the laser.
Description
The A710 is a visible universal laser that can be used for leveling,
vertical alignment, squaring, and single and dual slope grade control.
It has a digital grade display and is ideal for machine control and
other dual grade applications. It’s totally waterproof and has a beam
designed for pipelaying. It also has scanning and constant squaring
for interior jobs.
Other advanced features include: totally automatic self-leveling in
both horizontal and vertical modes; electronic calibration by the
user; and a detachable keypad that can be used as a remote control.
Specifications
Recommended use 1,000 ft. (300 m) diameter
Accuracy ± 3/16” at 100 ft.
Leveling range ± 10% in X and Y axes
Grade range -10% to +10% in X,Y & Z axes
Rotation speeds 60, 150, 300, 450, 600, 720 rpm
Scanning lengths Choice of 3
Laser battery NiMh rechargeable
Charging time 15 hours
Battery life 40 hours
Remote control batteries 2 AAA alkaline
Dimensions 5” x 4 ½” x 8 1/2”
Weight 7 ¾ lbs. (3.5 kg)
Environmental Laser is waterproof: IP67
Laser Diode Visible 635 nm, <5mW
CDRH/IEC Classification Class 3R
12.5 x 11.5 x 21.9 cm
Remote control is weatherresistant
2

Radio Frequency Interference
WARNING: This equipment complies with Part 15 of the FCC
rules. Any changes or modifications not expressly approved by the
manufacturer could void the user’s authority to operate the
equipment.
Operation is subject to the following two conditions: (1) this device
may not cause harmful interference, and (2) this device must accept
any interference received, including interference that may cause
undesired operation.
This equipment has been tested and found to comply with the limits
for a Class B digital device, pursuant to Part 15 of the FCC rules.
These limits are designed to provide reasonable protection against
harmful interference in a residential installation. This equipment
generates, uses, and can radiate radio frequency energy and, if not
installed and used in accordance with the instructions, may cause
harmful interference to radio communications. However, there is no
guarantee that interference will not occur in a particular installation.
If this equipment does cause harmful interference to radio or
television reception, which can be determined by turning the
equipment off and on, the user is encouraged to try to correct the
interference by one or more of the following measures:
Reorient or relocate the receiving antenna
Increase the separation between the equipment and receiver
Connect the equipment into an outlet on a circuit different from
that to which the receiver is connected
Consult the dealer or an experienced radio/TV technician for help
Notice for Canada
This Class B digital device meets all requirements of Canadian
Radio Standards Specification RSS-210.
Cet appareil numérique de la Class B respecte toutes les exigences
du Règlement sur le matériel brouilleur du Canada.
Location of FCC labels
FCC
label
(back of
laser)
FCC label
(back of
detachable remote
control/keypad)
3
Safety Labels
Back of laser:
A CDRH label
B Serial no. tag
C Explanatory label
COMPLIES WITH 21CFR 1040.10 AND 1040.11
EXCEPT FOR DEVIATIONS PURSUANT TO
LASER NOTICE No. 50, DATED JULY 26, 2001
AGL
Model
P/N
2202 Redmond Rd. P.O. Box 189, Jacksonville, AR 72076
LASER LIGHT; AVOID DIRECT EYE EXPOSURE
Front of laser
with keypad:
D Warning label
E Aperture label
AVOID EXPOSURE. LASER LIGHT
IS EMITTED FROM THIS APERTURE
CLASS 3R LASER PRODUCT
WAVE LENGTH 630-680 nm
MAX. OUTPUT POWER: 5mW
CONFORMS TO IEC 60825-1; 2001
A
B
C
D
E
4
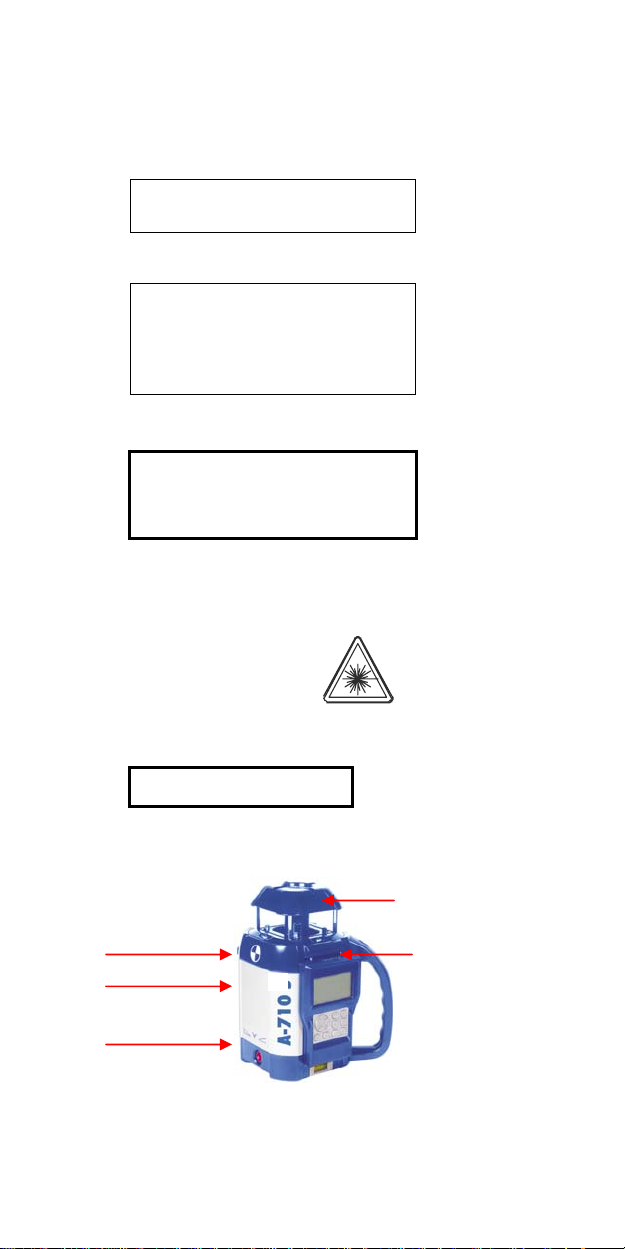
Laser overview
2
3
1
4
9
7
6655
1 Rotating laser beam (head enclosed in glass lighthouse)
2 Non-rotating laser beam for plumb, squaring, or pipeline
3 Sighting notches for X & Y axes
4 Remote control with digital display
5 Detachable handle
6 Charger jack
7 Bubble vial for vertical setup
8 On/Off
9 Adjustable feet for vertical setup
5
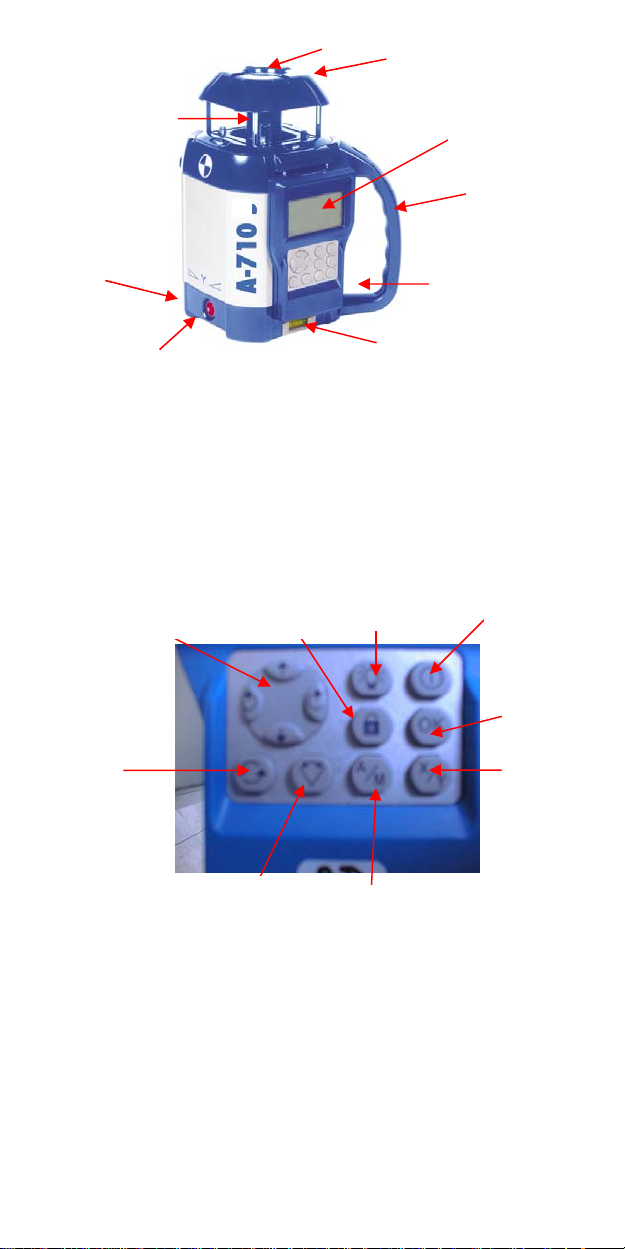
10 Multifunction (multi) key Remote control
11 H.I. Alert
12 Backlight for display
13 On / Off
14 Enter settings for grade
15 X or Y axis (or Z axis)
16 Automatic / manual mode (or left / right adjustment)
17 Scanning
18 Rotation
17
16
keypad
5
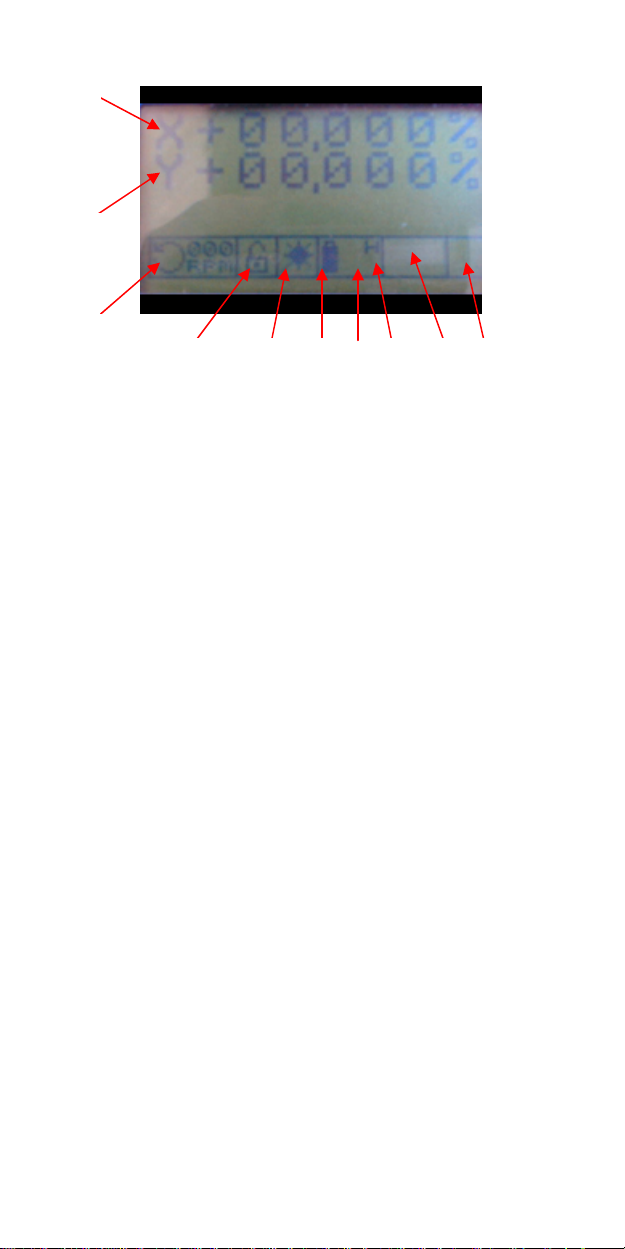
Remote control display
19 Grade display for X axis
20 Grade display for Y axis (Z axis when in vertical mode)
21 Rotation direction & speed / Scanning
22 H.I. Alert safeguard
22/23 Manual mode (hand symbol)
23 Indicates when level or grade is reached
24 Battery / Charging
25 Out-of-leveling-range indicator
26 Horizontal / Vertical
27 Calibration mode (or Z axis
' left / right adjustment)
28 Communication status between laser & remote control
(or backlight indicator)
ψ : radio mode
↑ : infrared mode
6

HOW TO USE THE A710
Setup
Horizontal
The laser can be used on a 5/8-11 tripod, on a wall mount, or
directly on a solid, stable surface.
Vertical
The laser can be placed directly on a solid, stable surface. If you
are using it in a pipe or other confined space, you can detach the
handle with a 3mm Allen wrench so it has a narrower profile.
Place the laser on the side with the two adjustable feet (9).
Rough level the laser by using the feet to center the bubble in
the vertical vial (7).
Setup range
When the keypad is turned on, an “H” for horizontal mode or a
“V” for vertical mode will appear on the display (26). The A710
has a wide self-leveling range; however, if the laser is set up out
of the leveling range, a triangle with an exclamation point will
appear on the display (25).
Turning on the laser
Turn on the laser with the On / Off key (8). It does a self-test
and the beam blinks while the laser is self-leveling. After it’s
leveled, the head rotates and keypad symbol (23) stops blinking.
Remote control / keypad
The keypad can remain attached to the laser, or it can be
detached and used as a remote control. Push up on the remote to
remove it from the laser.
The remote will automatically turn off if it is idle for a length of
time. Reactivate by pressing the On / Off key (13).
The display can be backlit; press key (12) to activate. A light
bulb symbol will appear on the display (28).
The remote is not waterproof. Detach it from the laser before
submersing laser in water.
7
 Loading...