

Page 1

User’s Manual
Series 60 Version3
(Symbian OS)
Version 1.1.8088
1
Page 2

About NAVFone
NAVFone is a digitized street directory that allows you to view maps on
Symbian phones and much more.
The main user interface for NAVFone is the map view window. All the features can
be access via the menu. The application provides zooming and panning capabilities
to facilitate map navigation.
For easy and fast access to specific positions of interest, waypoints, with friendly
names and textual descriptions, can be created and mark in the map. The icon type
and priority of each waypoint can also be customized to enable easy identification on
the map.
The software also allows users to perform various types of search in the database to
suit different needs. Matching results can then be selected and viewed in detail.
Asia GIS’ GPRX
location in an instance. This feature also allows you to find the location of your
friends. Connect it to a Bluetooth GPS device and turn your mobile phone into a
Navigation device!
tm
technology with GPS-like feature, allows you to determine your
NAVFone is copyright © of ASIA GIS Private Limited.
is a registered trademark of Asia GIS Private Limited.
Adobe, Acrobat and Acrobat Reader are trademarks or registered trademarks of
Adobe Systems Incorporated.
All other product names mentioned herein may be trademarks of their respective
companies.
ASIA GIS Private Limited shall not be liable for technical or editorial errors or
omissions contained herein. The information in this document is provided “as is”
without warranty and is subject to change without notice. The warranties for products
are set forth in the express limited warranty statements accompanying such
products.
This document contains proprietary information that is protected by copyright. No part
if this document may be photocopied, reproduced, or translated to another language
without the prior written consent of ASIA GIS Private Limited.
2
Page 3

!
Caution set out in this manner indicates that failure to
follow instructions might result in loss of lives.
Caution set out in this manner indicates that failure to
follow instructions might result in damage to equipment,
loss of data or malfunction of the system.
Abbreviations:
SMS – Short Message Service
WP – Way Point
NAVFone is created and owned by:
ASIA GIS Private Limited
49 Jalan Pemimpin
#05-11
APS Industrial Building
Singapore 577203
Tel: +65 6391 4500
Fax: +65 6298 2735
Email: [email protected]
Website: www.asiagis.com.sg
Support: support-s
g@asiagis.com.sg
3
Page 4

LICENSE AGREEMENT
BY INSTALLING THIS SOFTWARE YOU AGREE TO THE TERMS AND CONDITIONS OF
THIS SOFTWARE LICENCE AGREEMENT.
1. DEFINITIONS
1.1 The terms used in this agreement shall have the following meanings:
"agis" shall mean Asia GIS Pte Ltd., whose address is 49, Jalan Pemimpin, #05-11
APS Industrial Building, Singapore 577203. agis is the licensed owner of the
copyrighted SERVICES enclosed with the right to License, sell and distribute the
SERVICES.
"LICENSEE" shall mean a person, an organization, a corporation, a government
entity, or other legal entity subscribing the SERVICES and hence obtaining the
independent right to use the SERVICES.
"SERVICES" shall mean agis’ proprietary maps, mapping software and locationbased technology provided herein.
“DEVICE” shall mean any computer or CPU on which the SERVICES are installed.
LICENSEE must be the owner of the DEVICE or must be authorised to use the
DEVICE.
2. LICENSE GRANT
3. agis is the licensed owner of the copyrighted SERVICES enclosed with the right to
sell and distribute the SERVICES and retain all rights, title, interest and copyright in the
SERVICES.
4. agis hereby grants to LICENSEE and LICENSEE hereby accepts from agis, a non-
exclusive, non-transferable License to use the SERVICES contained herein only in the normal
course and scope of its own business activity and for no other purpose whatsoever. The
SERVICES are provided solely and exclusively for the private use of the LICENSEE and/or
such other person(s) declared in the terms of this License.
5. LICENSEE must not re-market, re-license, give away, trade, barter, disclose, transfer,
lease, assign, distribute or otherwise provide unauthorized third party access to the
SERVICES in whole or in part, without prior written consent from agis.
6. LICENSEE must not copy the SERVICES for any purpose whatsoever. LICENSEE
must not translate the SERVICES into other formats and/or media.
7. LICENSEE must install and use the SERVICES only on a single DEVICE. LICENSEE
must not modify the SERVICES in any manner whatsoever.
8. LICENSEE acknowledges the usage of the SERVICES and accepts full responsibility
for using the SERVICES within rules, regulations and laws imposed by the country in which
the SERVICES are used.
4
Page 5

9. TERM
9.1 These terms and conditions shall commence on the date the SERVICES are
subscribed and shall continue until:
LICENSEE elects to discontinue use of the SERVICES and thereby terminates this
Agreement, or
upon agis' termination of this Agreement due to breach by LICENSEE.
9.2 If the LICENSEE fails to comply with any of the terms and conditions provided herein,
agis may at its option, and in addition to any other remedies that it may be entitled to,
terminate LICENSEE's use of the SERVICES without further notice.
10. ASSIGNMENT AND SUCCESSORS
10.1 No interest herein shall be assigned or transferred, in whole or in part, without the
prior written consent of agis and any attempt to do so shall be a material breach of
this Agreement and shall render such assignment null and void. The terms and
provisions of this Agreement shall be binding upon and inure to the benefit of the
parties thereto and their successors, assigns and legal representatives.
11. LIMIT ATION OF LIABILITY
11.1 agis shall not be liable for any activity involving the installation of the SERVICES, its
use, or the results obtained from such use. IN NO EVENT SHALL agis BE LIABLE
TO LICENSEE OR ITS CUSTOMERS OR END USERS, FOR ANY DAMAGE
WHATSOEVER (INCLUDING, BUT NOT LIMITED TO, ANY DAMAGES FOR LOST
PROFITS OR LOST REVENUE, BUSINESS INTERRUPTION, LOSS OF DATA,
LOSS OF USE OF SOFTWARE, OR CLAIMS BY THIRD PARTIES, SPECIAL,
INCIDENTAL OR CONSEQUENTIAL DAMAGES ARISING OUT OF THE USE OF
OR INABILITY TO USE THE SERVICES, EVEN IF agis HAS BEEN ADVISED OF
THE POSSIBILITY OR LIKELIHOOD OF SUCH DAMAGES.
IN NO CASE SHALL agis’ LIABILITY EXCEED THE PRICE PAID FOR THE
SERVICES BY THE LICENSEE.
12. INDEMNITY
12.1 LICENSEE, at its own expense, will defend, indemnify, and hold harmless agis, its
officers, directors, employees and agents, from any and all claims, losses, liabilities,
damages and expenses (including reasonable attorneys' fees) of any kind
whatsoever for injuries to or death of any person (including, but not limited to,
employees of agis) arising out of or related to the use of the SERVICES, and any
subsequent modifications, updates or enhancements to the SERVICES including its
maps, regardless of whether the negligence of agis caused or contributed to the said
injuries or death. This clause shall survive the termination or expiration of this
Agreement.
13. NO INDEMNITY FROM agis
13.1 LICENSEE assumes all risk of use relating to the SERVICES.
14. LIMITED WARRANTY
14.1 agis shall use its best efforts to ensure that the SERVICES are delivered free of
physical defect. EXCEPT AS PROVIDED HEREIN, agis MAKES NO WARRANTIES,
EXPRESS OR IMPLIED, INCLUDING WARRANTIES OF MERCHANTABILITY OR
FITNESS FOR A PARTICULAR PURPOSE. No oral or written information or advice
given by agis shall create a warranty or in any way increase the scope of this
warranty.
5
Page 6

15. MISCELLANEOUS
15.1 Entire Agreement. This Agreement constitutes the sole and entire agreement
between the parties as to the matter set forth herein and supercedes any previous
agreements, understandings, or arrangements, oral or written, between the
parties related to the subject matter of this Agreement. Except as otherwise expressly
provided herein, any amendments to this Agreement must be in writing and signed by
an authorized representative of each party.
15.2 Governing Law. This Agreement shall be construed in accordance with, and its
performance governed by, the laws of the Republic of Singapore. The parties agree
to submit to the exclusive jurisdiction of Singapore Courts. If any provision of this
Agreement is finally held to be unenforceable, that provision will be deleted from this
Agreement but will not affect the validity of the remainder of this Agreement.
LICENSEE expressly agrees that every limitation of liability, disclaimer of warranty,
and exclusion of damages in this Agreement is severable and independent of any
other such provision, may be enforced as such, and will remain in effect even if a
remedy of LICENSEE is held to have failed of its essential purpose. All rights not
specifically granted in this Agreement are reserved by agis.
15.3 Headings. The heading in this Agreement are only for the convenience of the parties.
6
Page 7

CONTENT
User’s Manual 1
About NAVFone 2
LICENSE AGREEMENT 4
1.0 Getting Started 11
1.1 System requirements 11
1.2 Installation preparations 12
2.0 Using NAVFone 13
2.1 Launching NAVFone 13
2.2 The Map View 15
2.3 Accessing the Menus 15
3.0 Basic Map Function
3.1 Zoom In
3.2 Zoom Out 16
3.3 Pan Up 17
3.4 Pan Down 17
3.5 Pan Left 18
3.6 Pan Right 18
3.7 Home View 19
3.8 Cursor Movement 19
4.0 Search 20
4.1 Search Keyword 21
4.2 What's Nearby? 22
4.3 Search Result 23
5.0 Yellow Pages 24
5.1 Search Keyword (Yellow Pages) 24
5.1.1 Clear Search (Yellow Pages) 25
5.1.2 Next/Previous Page(Yellow Pages) 25
5.1.3 Item Details
5.1.4 Branch Details
5.1.5 Favourites (Yellow Pages)
5.1.6 Navigation (Yellow Pages) 28
6.0 Favourites Management
6.1 WP Viewer 29
6.1.1 Jump to WP 30
6.1.2 Create a New WP
6.1.3 View/Edit WP
6.1.4 Delete WP 32
6.2 WP settings 32
6.2.1 Save 33
6.2.2 Cancel 33
6.3 List of WP properties 34
6.3.1 Name 34
6.3.2 Note 34
6.3.3 Status 35
6.3.4 Icon
6.3.5 Visibility
7.0 Map Options 38
16
16
26
27
27
29
30
31
36
36
7
Page 8

7.1 Load Map 38
7.2 Set as Default 38
7.3 License 39
8.0 Where is 40
8.1 Where Am I? 40
8.2 Where Are U? 41
8.3 Set Visible/Invisible 42
8.4 SMS Polling Log 42
8.5 SMS Position 43
9.0 Navigation 44
9.1 Planning your route (start point) 44
9.2 Planning your route (destination point) 45
9.3 Routing 45
9.4 ERP Cost
9.3 Navigation Map View
46
46
9.5 Simulating a planned route 46
9.6 Toggle view 46
10.0 About 48
11.0 Settings 49
12.0 Exit NAVFone 52
8
Page 9

Safety Information
!
Warning!
For safety, user should not operate this system
while driving or in motion. User shall be responsible
for his/her own safety and adhere to all traffic rules
and regulations at all times. Map data are updated
periodically and user shall exercise good judgment
when using the system for map guidance.
agis Private Limited shall not be liable for any loss
or damage caused by the usage of the system.
9
Page 10

Important Information
NAVFone license is specific to your mobile phone
and it is not transferable.
In the event of an upgrade of mobile phone (within 3
months), user can bring in their old and new mobile
phones. We will enable the transfer of NAVFone to the
new mobile phone. Administrative charges will apply.
The serial number provided with the NAVFone is for
installation on a single mobile phone only. Please
keep it at a safe location. agis will not be liable for
misplace or misuse of the serial number.
When NAVFone program is lost due to loss, damage or
repair of mobile phone, agis will not be liable for a
replacement. However, with supporting documents such
as a police report or a repair invoice, replacement can
be obtained on a case to case basis. Administrative
charges may apply.
As map data is always changing, updates can be
purchased from our website www.asiagis.com.sg.
NAVFone has been fully tested on a limited range of
mobile phones in a given time frame. As mobile phone
specification varies among models and/or batches, agis
will not be liable for any incompatibility issue.
10
Page 11

1.0 Getting Started
The NAVFone is an advanced and intelligent information system that harnesses the cutting
edge technology of GPRX (cell-based location engine) and Geographical Information System
(GIS) to provide detailed street level map information and LBS (Location Based Services).
When connected to a GPS receiver via Bluetooth, NAVFone is able to provide street level
turn-by-turn voice-guided navigation.
NAVFone is developed for Symbian Platform.
The map data can be purchased at www.asiagis.com.sg
In this section, you will learn about:
What are the system requirements?
Installing the NAVFone
1.1 System requirements
Before you begin with the installation, make sure that the following requirements are
met:
A mobile phone:
• Using Symbian OS Nokia Series 60 Version 2, Version 3.
• Free memory space of 50 MB
• Connector cable, IrDA, Bluetooth or other forms of communication with the PC
Please contact us to have an updated list of compatible mobile phones.
Desktop or laptop:
• PC running Microsoft Windows
• Connector cable port, IrDA, Bluetooth or other forms of communication port with
your mobile phone
• Your mobile phone PC suite (See your mobile phone’s user manual for
installation procedures.)(Optional)
11
Page 12

1.2 Installation preparations:
Note: If any of the above requirements is not met, you will not be able to
complete the installation.
If a NAVFone Activation Guide is included as part of your device packaging, kindly
refer to it for installation instructions.
Please visit www.agis.com.sg
for the latest installation instruction.
12
Page 13
2.0 Using NAVFone
2.1 Launching NAVFone
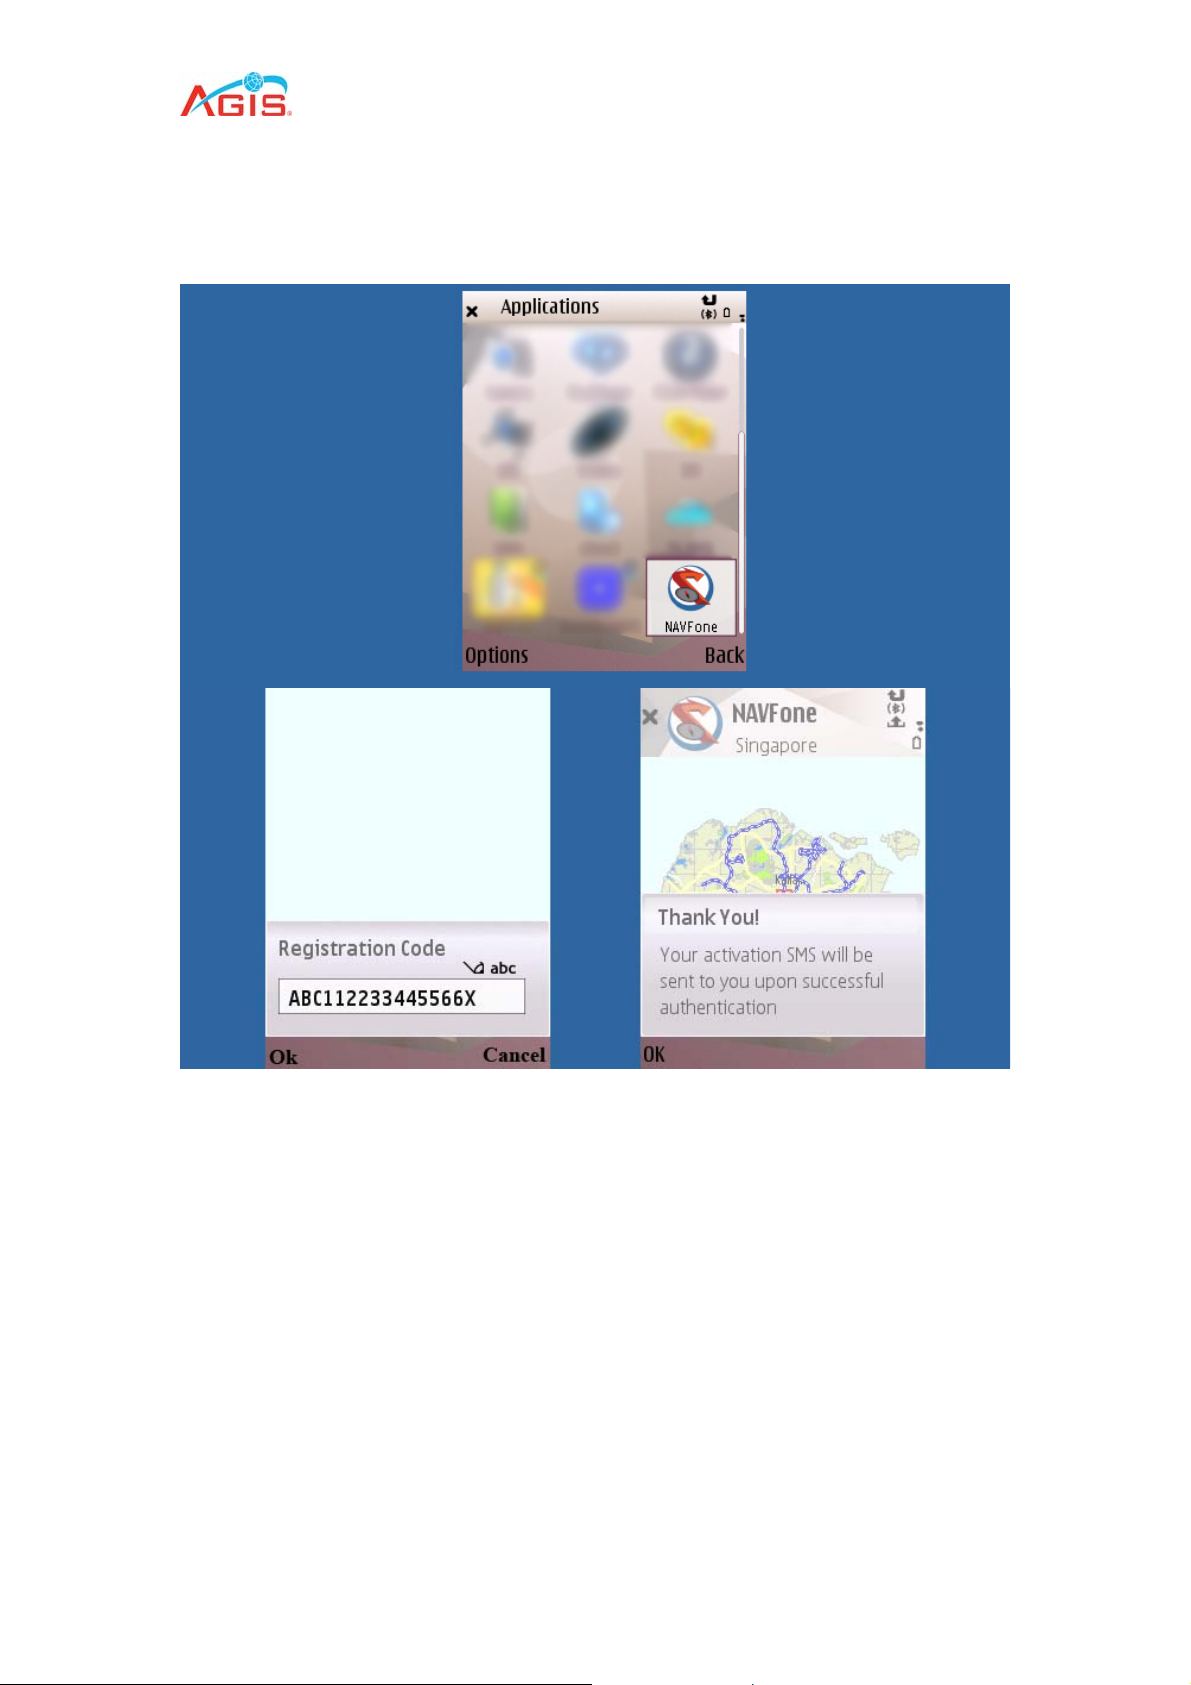
After you have successfully completed the installation, you will see the NAVFone
icon in the application launcher screen.
To launch the application
1. Go into Menu
2. Move the cursor to the Installations folder and Open.
3. Move the cursor to the NAVFone Icon
4. Press Options and select Open. (Skip procedure 5-12 after you activated the
software)
5. Enter License number and then press Ok. This can be obtained from the
NAVFone scratch card provided. (Take note it is case sensitive)
6.
Once activation SMS is received, start NAVFone again.
13
Page 14

7. Scroll down and read the Disclaimer
8. After reading the Disclaimer, click OK
9. Scroll down and read the Agreement
10. After reading the Agreement, click OK
11.
Select default map.
12. NAVFone is ready to be used once the map is loaded.
14
Page 15
2.2 The Map View
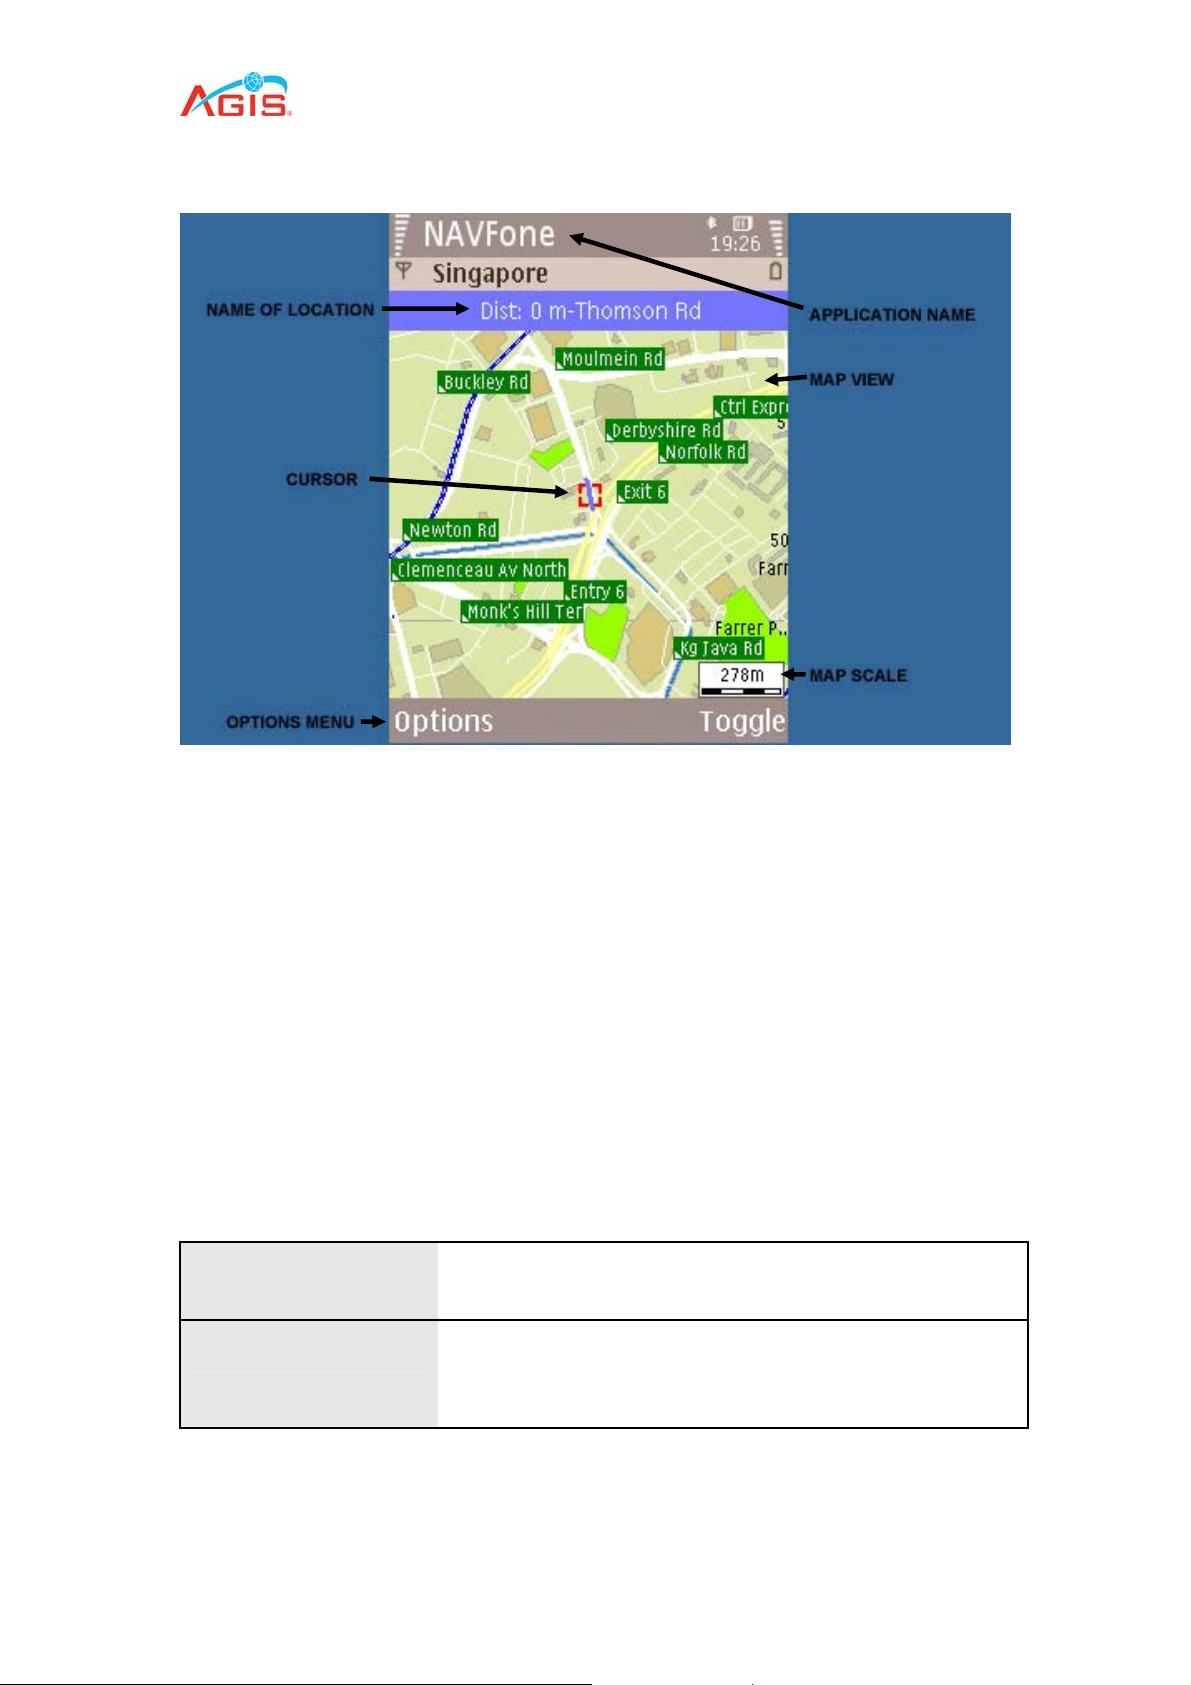
The Map View window shows the main screen.
All maps shown are always orientated to the North. The cursor can be used to call up
the Map menu or select an object by moving the cursor button over the object and
clicking on it. The name of the item selected is shown at the top of the map. The
scale on the bottom left changes according to the zoom level and provides a rough
estimate of distances between places and objects.
Just as the phone cursor is used to move the red map cursor, the numeric * and # of
the keypad is used to zoom in and out of the map.
2.3 Accessing the Menus
There are two menus in the Map view window.
Main menu
Toggle
Note: The two menus stated above are available only in the Map view window.
The list of commands available varies with different windows.
Press Options.
Allow
toggling between various navigational map
view and favourites.
15
Page 16

3.0 Basic Map Function
3.1 Zoom In
Method 1: Pressing key
cursor position.
Method 2: Press Options > Zoom > Zoom In
* on the keypad of the mobile device to zooms in onto the
3.2 Zoom Out
Method 1: Pressing key
Method 2: Press Options > Zoom > Zoom Out
# on the keypad of the mobile device to zooms out of map.
16
Page 17
3.3 Pan Up
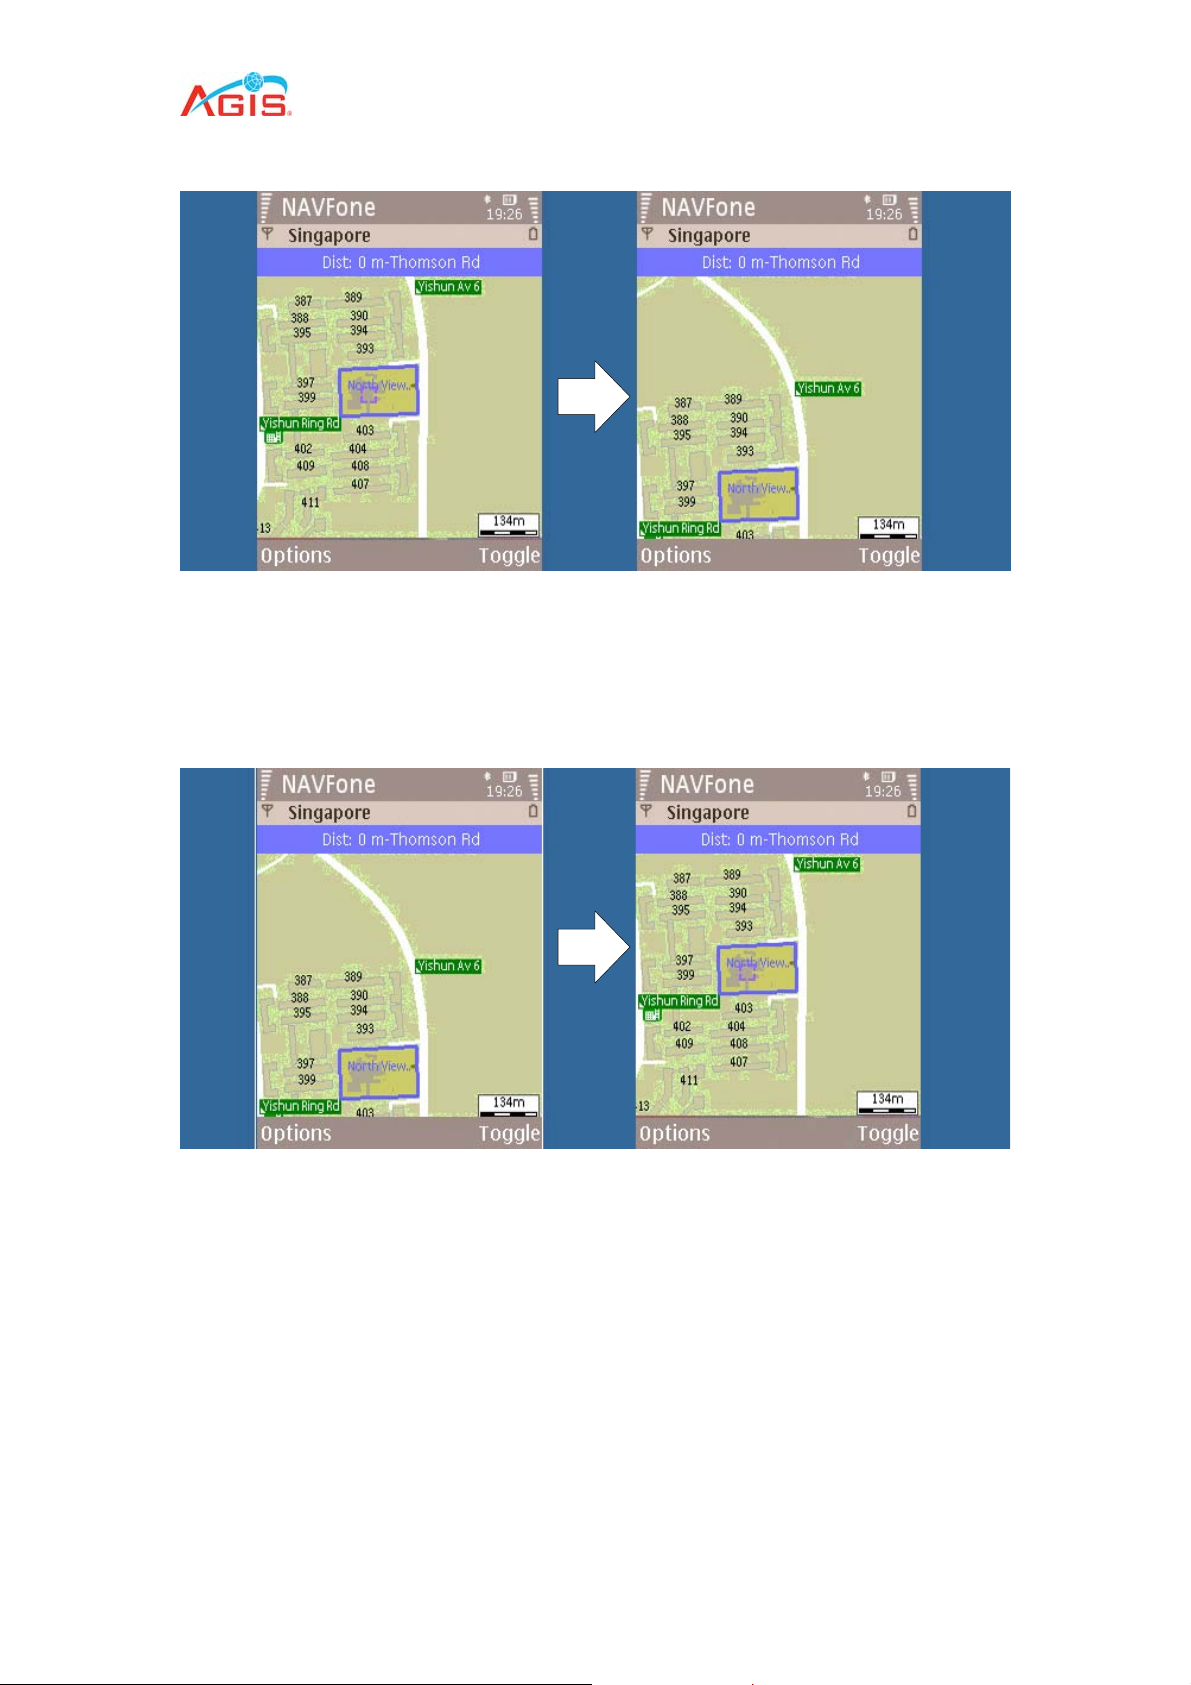
Moving the cursor upwards will display more map details to the top of the current
view.
3.4 Pan Down
Moving the cursor downwards will display more map details to the bottom of the
current view.
17
Page 18
3.5 Pan Left
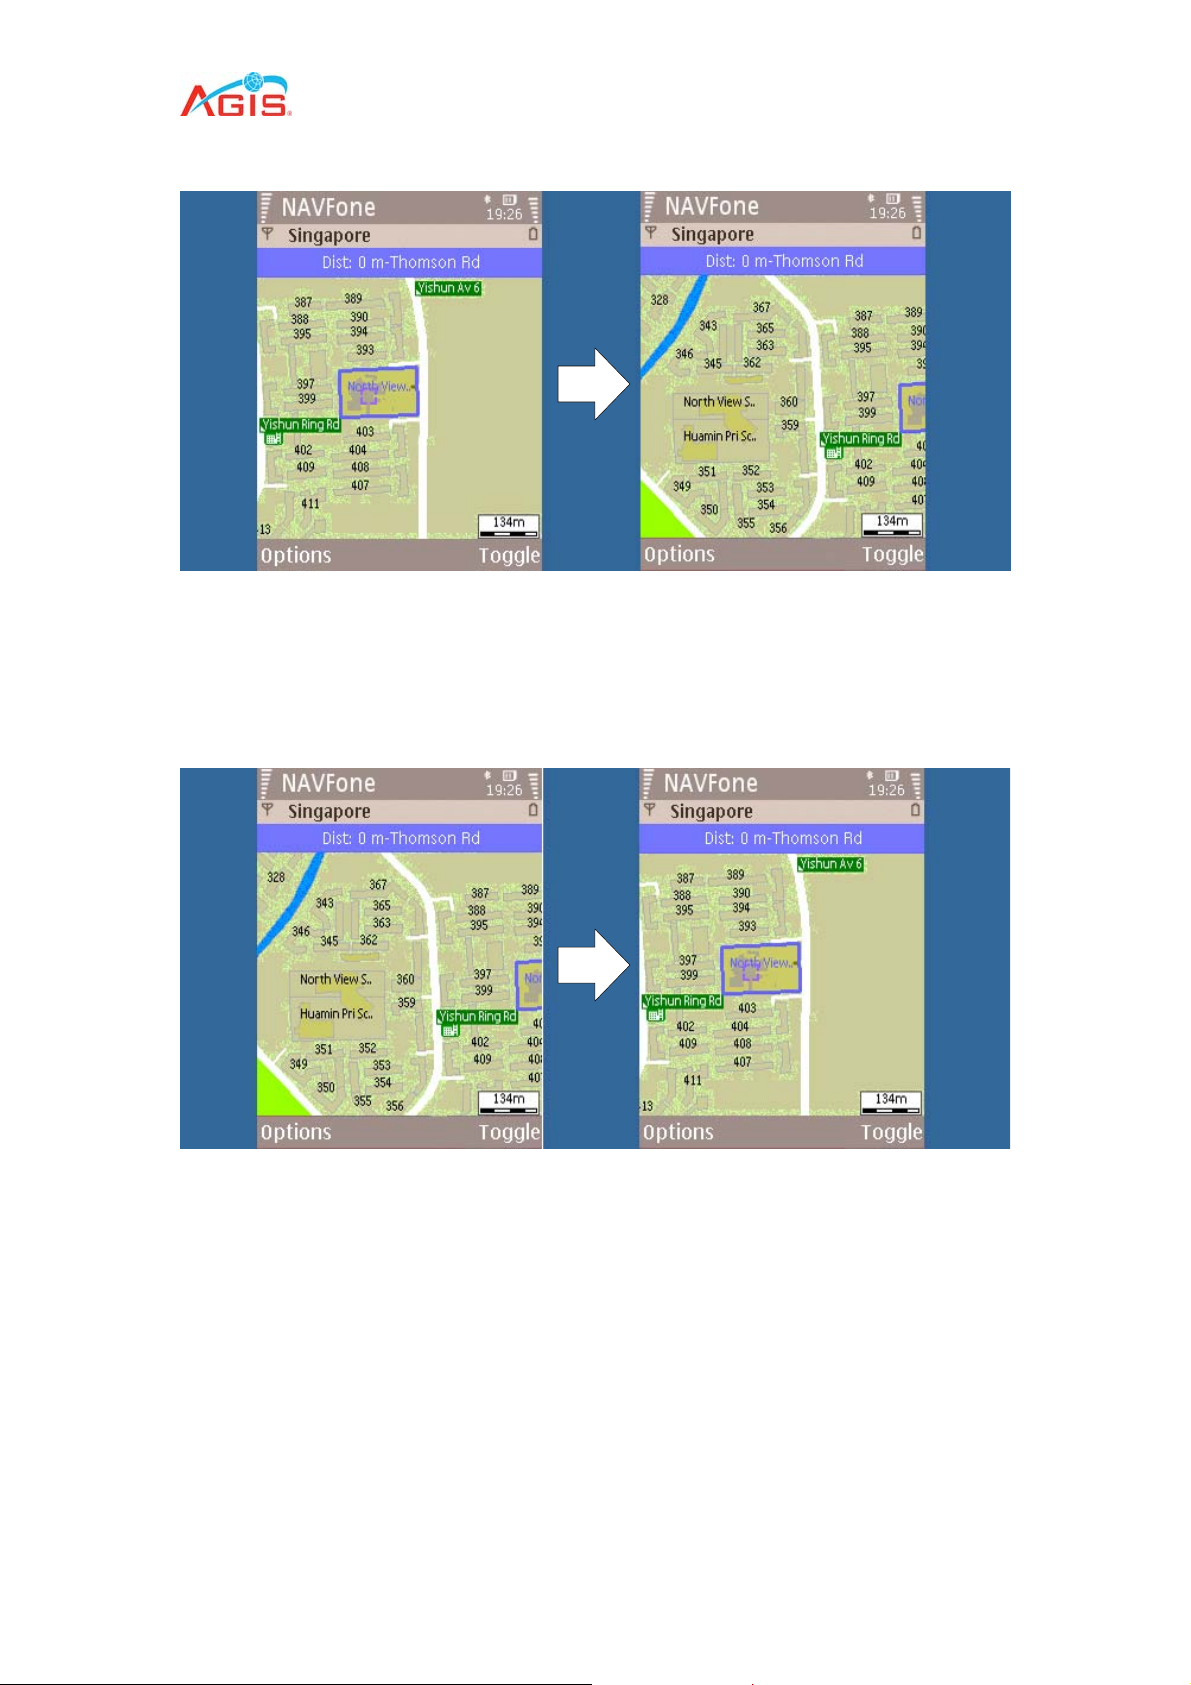
Moving the cursor to the left will display more map details to the left of the current
view.
3.6 Pan Right
Moving the cursor to the right will display more map details to the right of the current
view.
18
Page 19
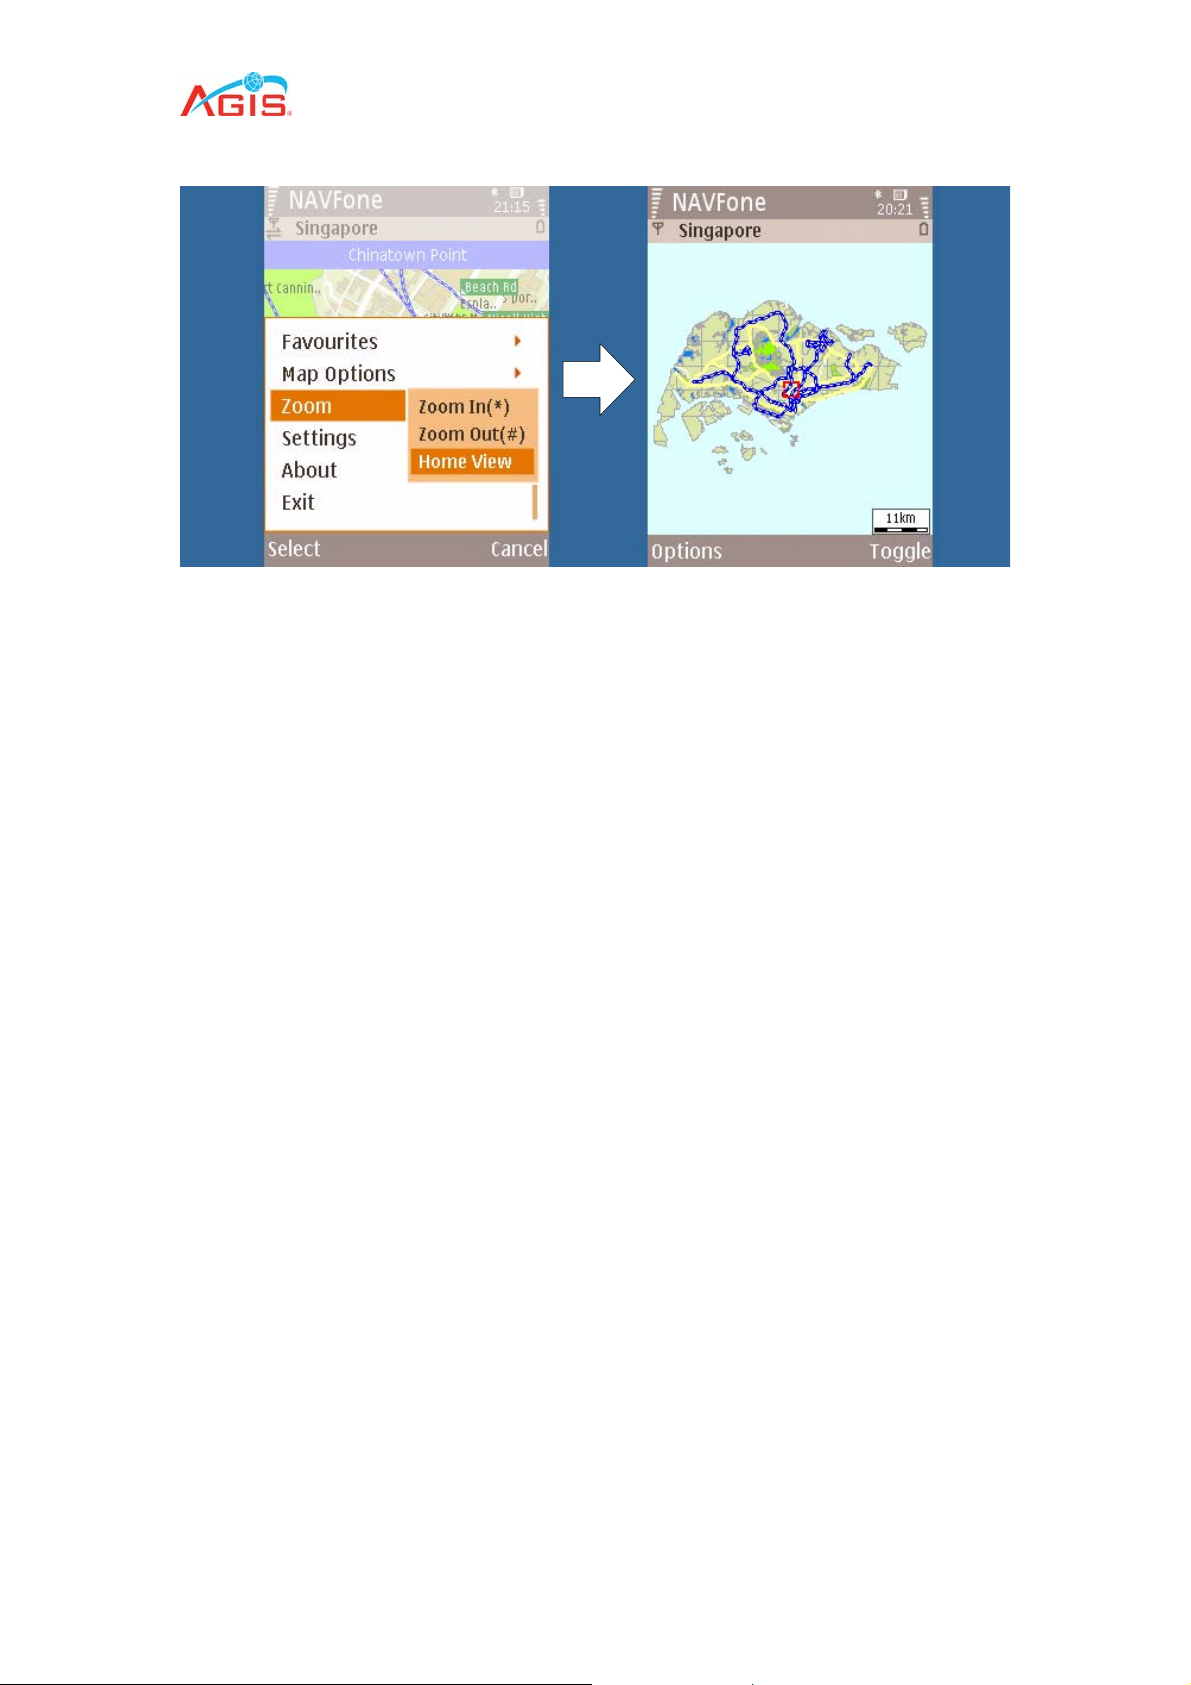
3.7 Home View
The Home View returns the user to the overview of the selected country.
To Set the current map as your default
1. Click on Options and Scroll to the Map Option.
1. Navigate one step to the right
2. Select the option Home View
3.8 Cursor Movement
Use the directional button to move the cursor in the Map view window.
Push down the directional button to highlight and show the name of the location the
cursor is at.
19
Page 20
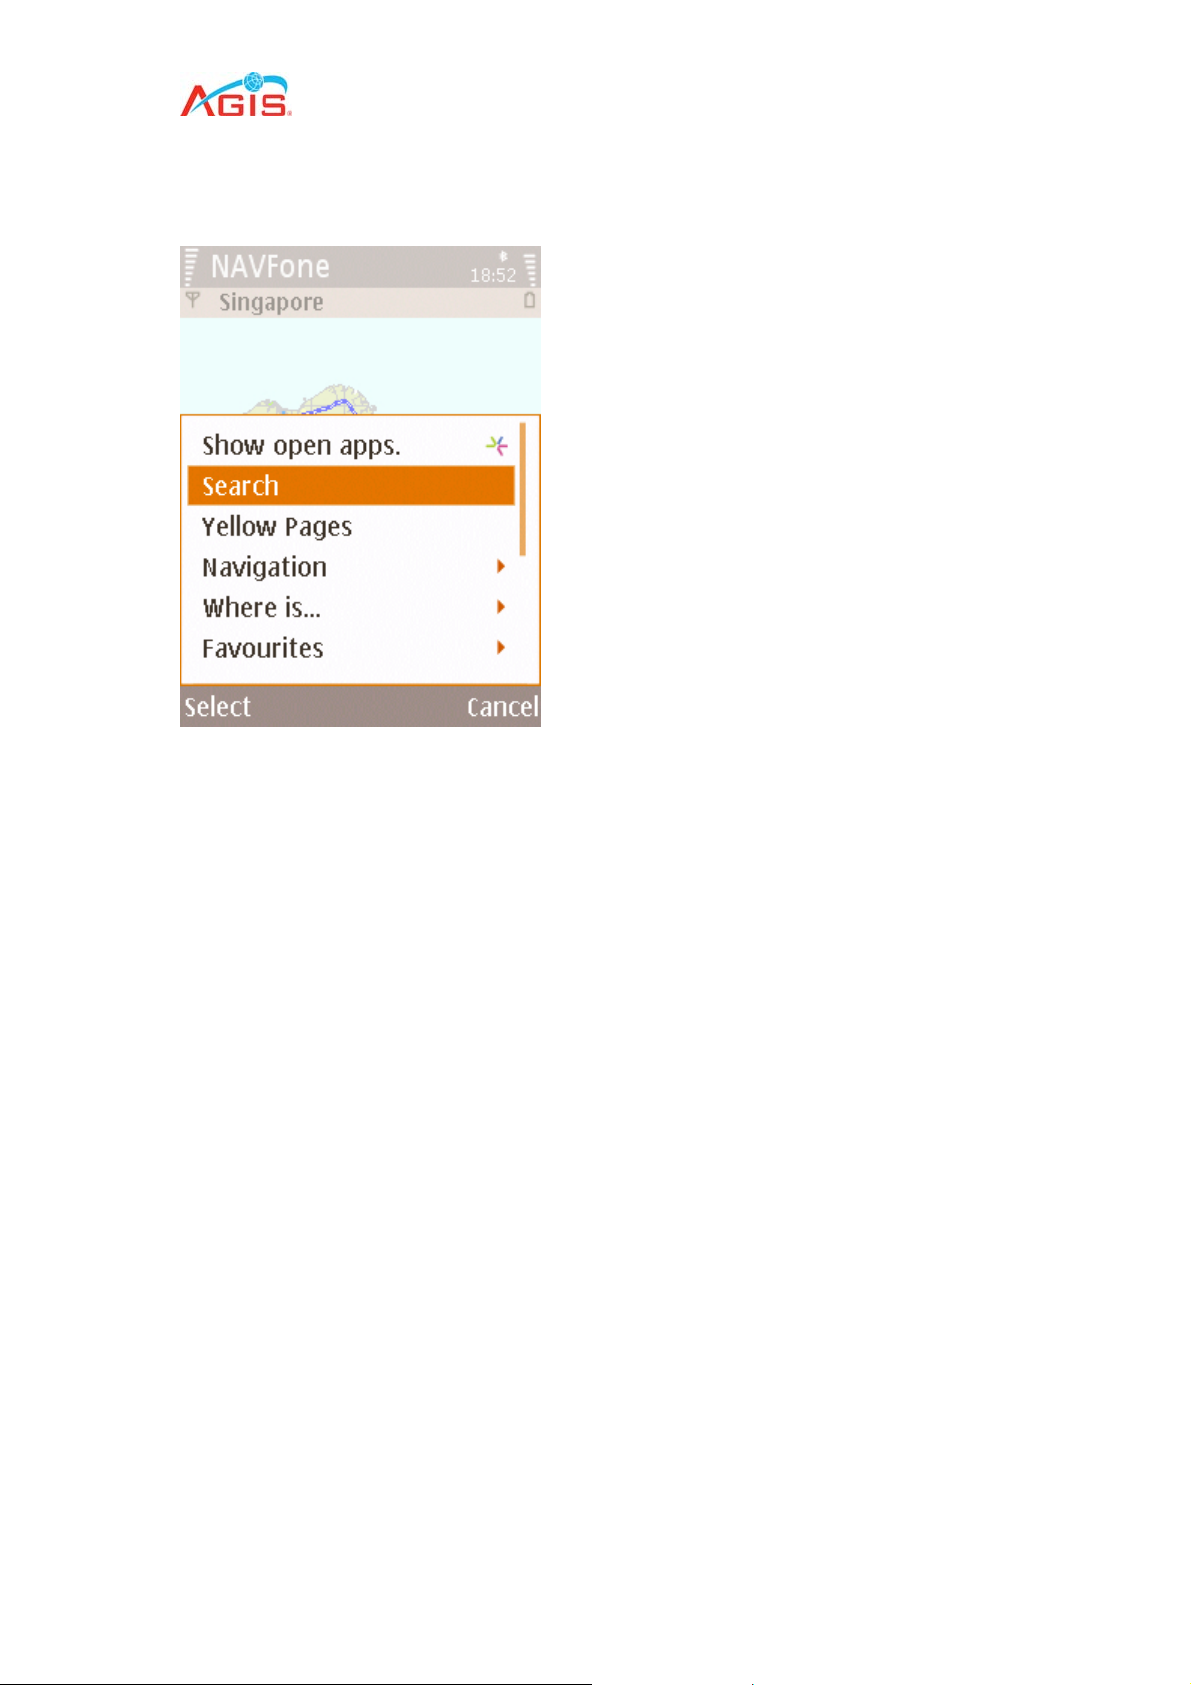
4.0 Search
There are 2 types of search available in this application.
The first type search command performs a search for locations or map features in the
map, based on a keyword or phrase and list them in alphabetical order. Search can
be conducted for all layers or a single layer.
The other search command conducts a search for locations or map features in the
vicinity of the current cursor position on the map. No keyword is required for this
search, and results are listed with respect to the distance from the cursor. Search
can be conducted for all layers or a single layer.
20
Page 21
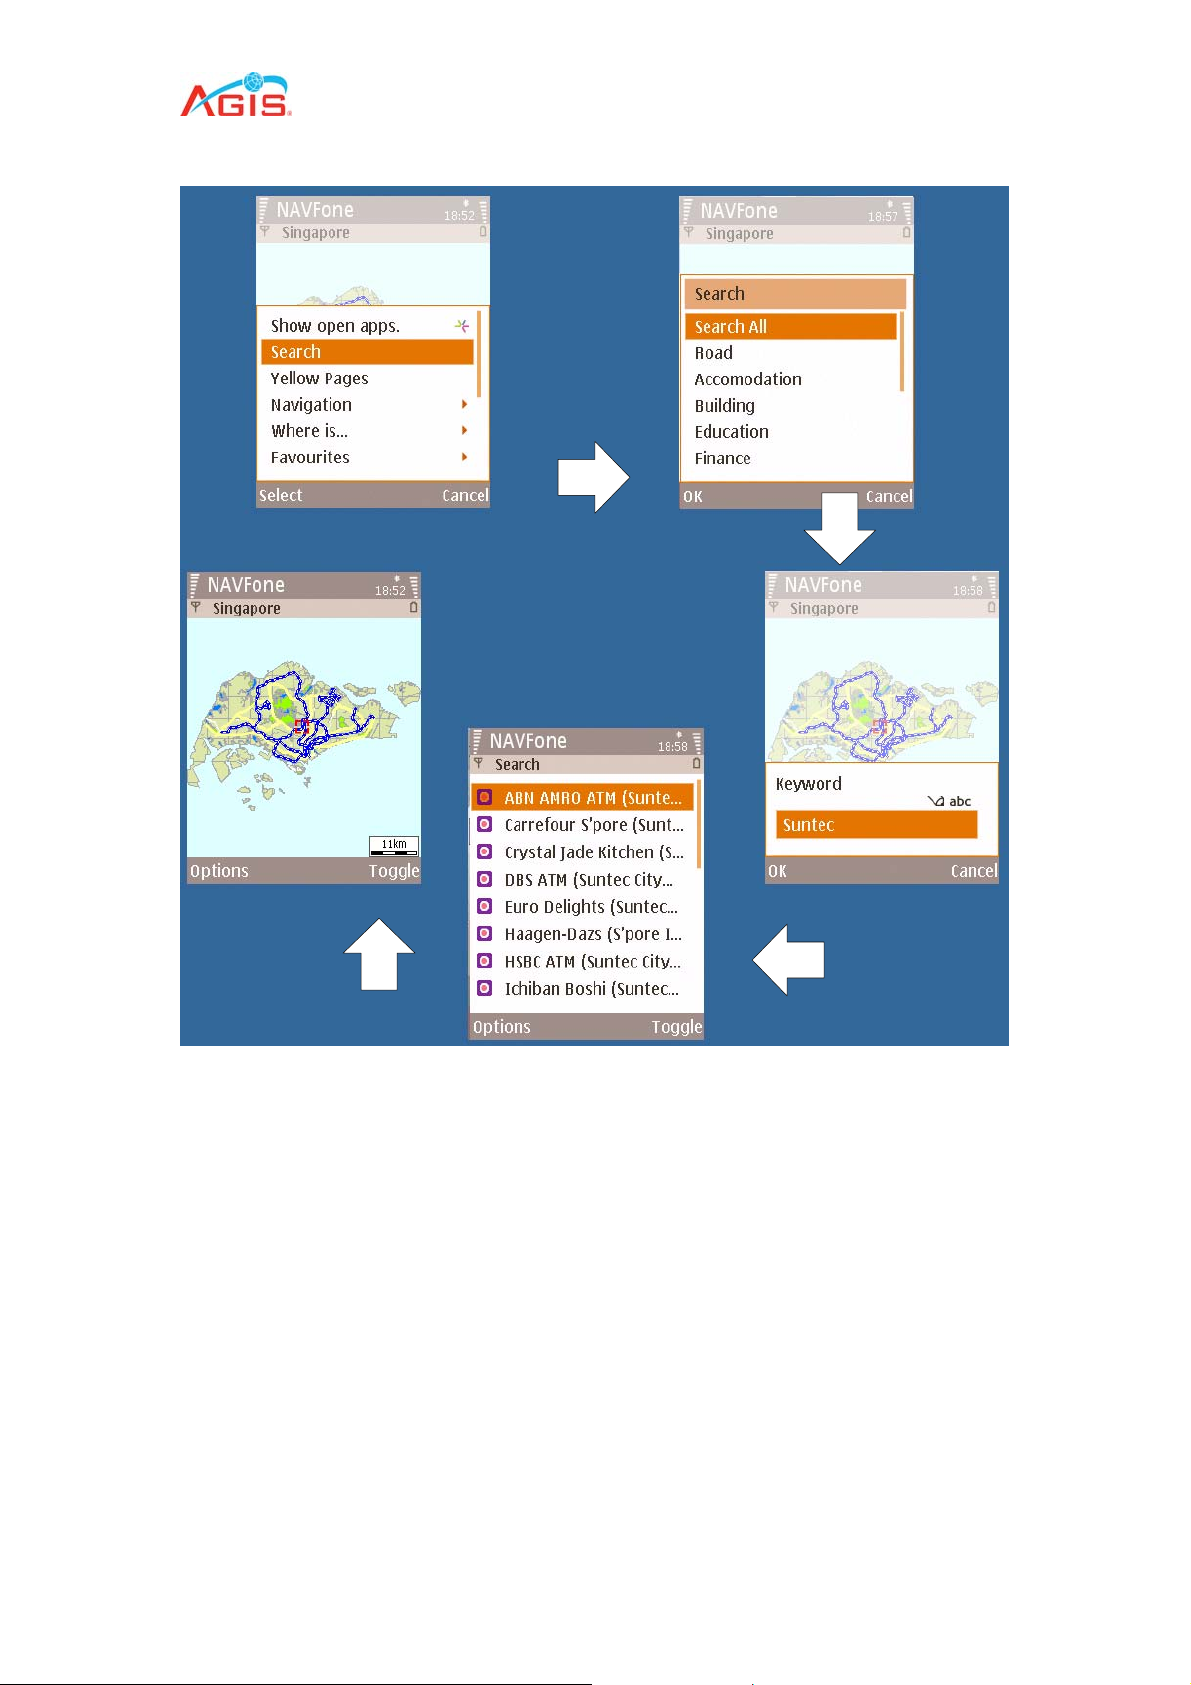
4.1 Search Keyword
This command allows the user to perform a search in the map by layers and using a
keyword or phrase.
To perform a ‘Search’ search
1. Press Option and select Search.
2. Using the up or down navigation key, move the cursor to select a layer* (e.g
BUILDING, FOOD, etc) or Search all to search all layers.
3. Press Ok to confirm selection. Alternatively, press the center of navigation
key.
4. Input keyword(s) using the keypad.
5. Press Ok to confirm selection. Alternatively, press the center of navigation
key.
6. Maximum number of results is limited to 200.
* All map features in the map are classified into many groups called layers. Select all
map features (Search all) or one that you are interested to continue your search.
21
Page 22
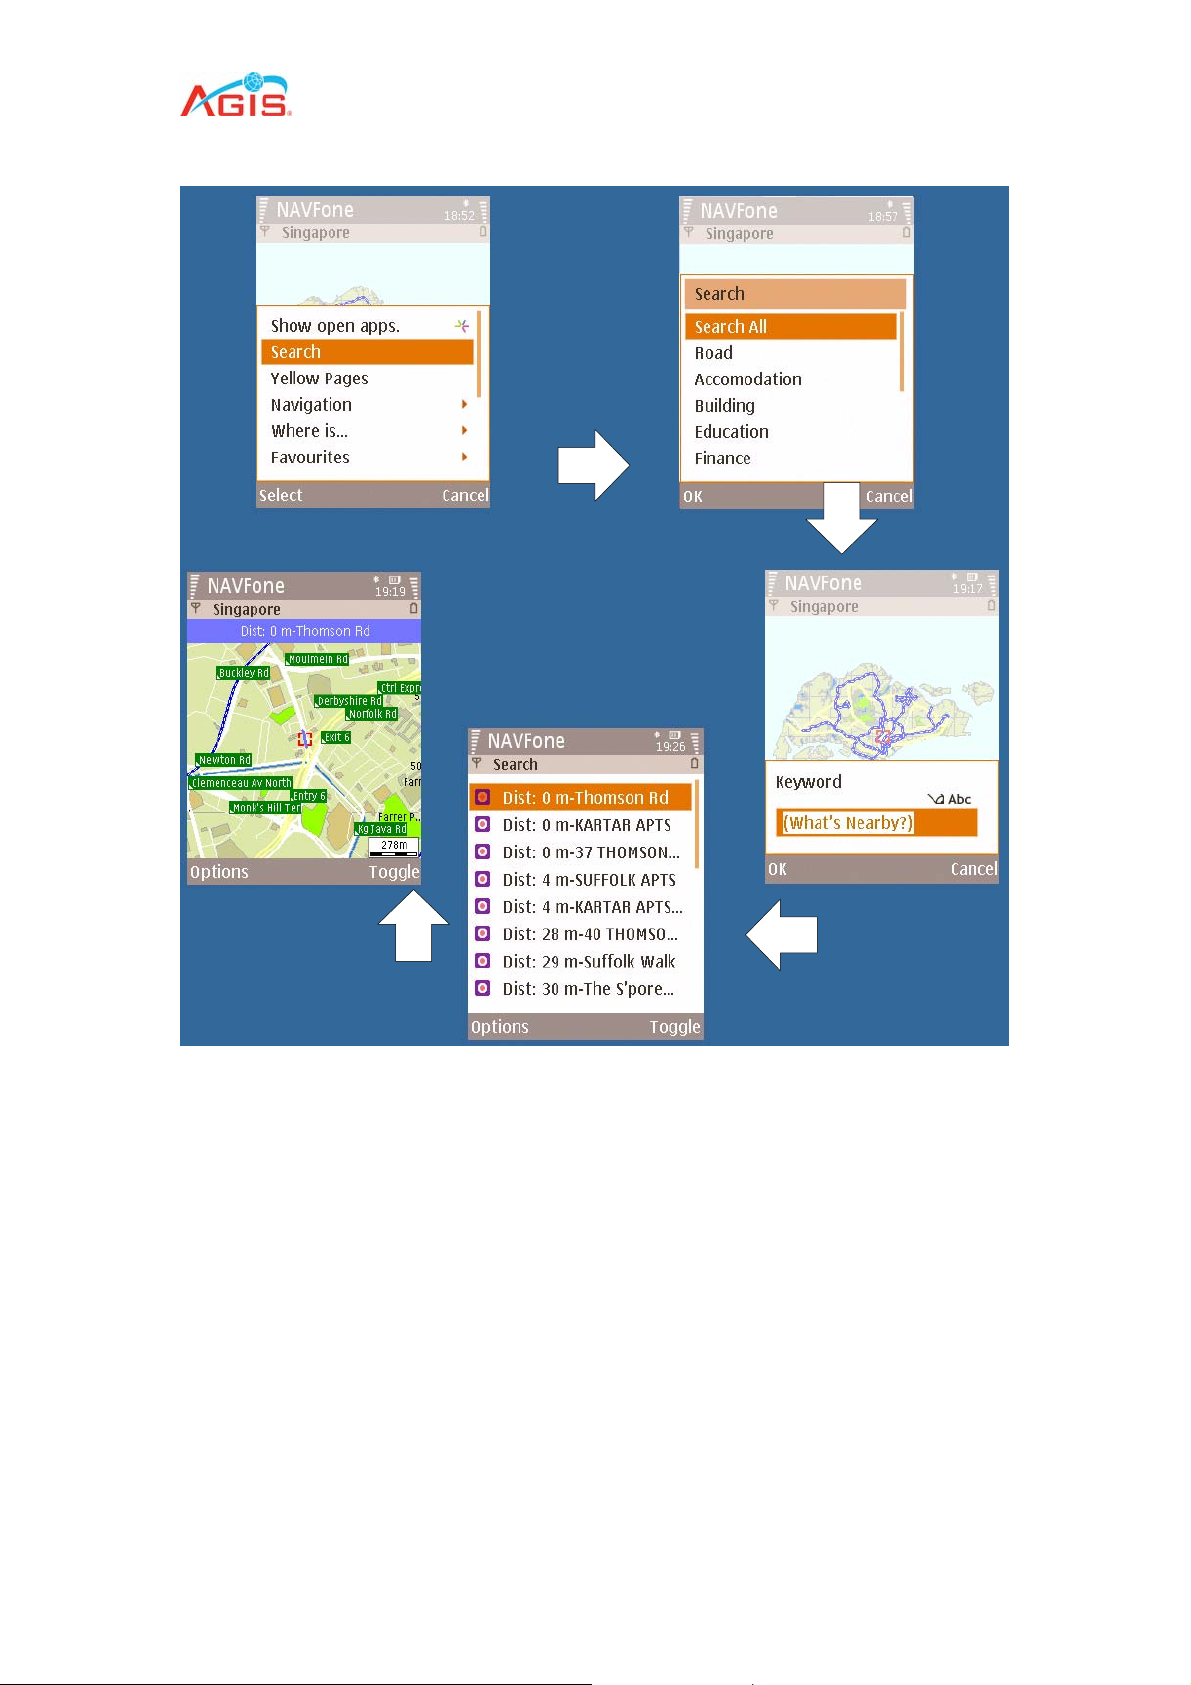
4.2 What's Nearby?
This command conducts a search for locations or map features in the map with
respect to a reference point. This reference point is the cursor position on the map in
the Map view window. The result is listed out according to their distance away from
the reference point. No keyword is required for this search command.
To perform a ‘What’s Nearby’ search
1. Press Option and select Search.
2. Using the up or down navigation key, move the cursor to select a layer * (e.g.
BUILDING, FOOD, etc) or do Search all to search all layers.
3. Keyword dialog box will appear with the default “(What’s Nearby?)” wording.
4. Press Ok. Alternatively, press the center of navigation key.
5. The search result window will open.
* All map features in the map are classified into many groups called layers. Select all
map features (Search all) or one that you are interested to continue your search.
22
Page 23
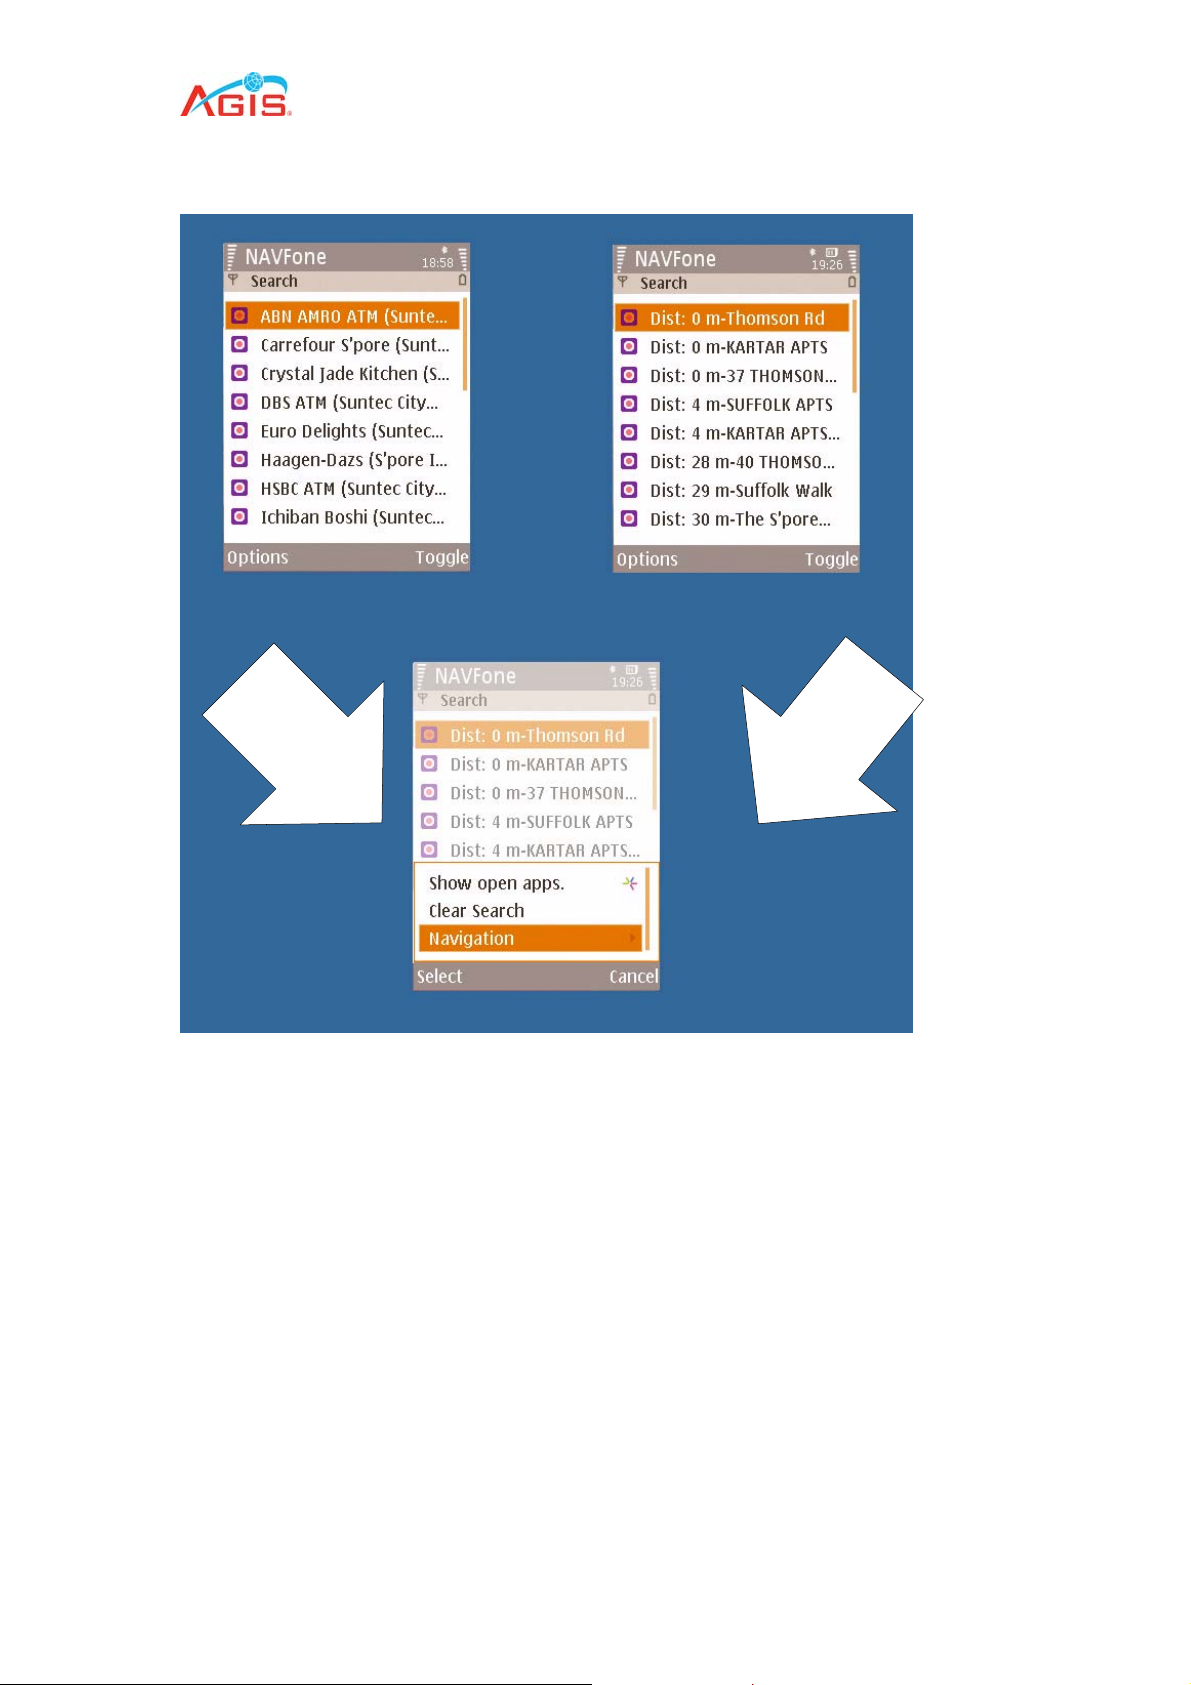
4.3 Search Result
Both search result window are similar. A list of search results is formed. If ‘What’s
Nearby?’ search is used, the result will be listed according to their distance away
from the cursor. If no result is found, it will automatically return the Map view window.
To view location on the map
1. Using the phone cursor buttons, scroll to the wanted object then press the
center of navigation key.
To do a new search
1. Press Option and select Clear Search. Then repeat the search function
shown on section 4.1 and 4.2.
To create a new WP at the object
1. Press Menu and select Clear Search then press Menu, Favourites, New.
After which, type in a name you will want to call theplace and click OK. A
waypoint will subsequently be created at the object’s location.
You can also create your WP using the main menu and in WP viewer window.
23
Page 24
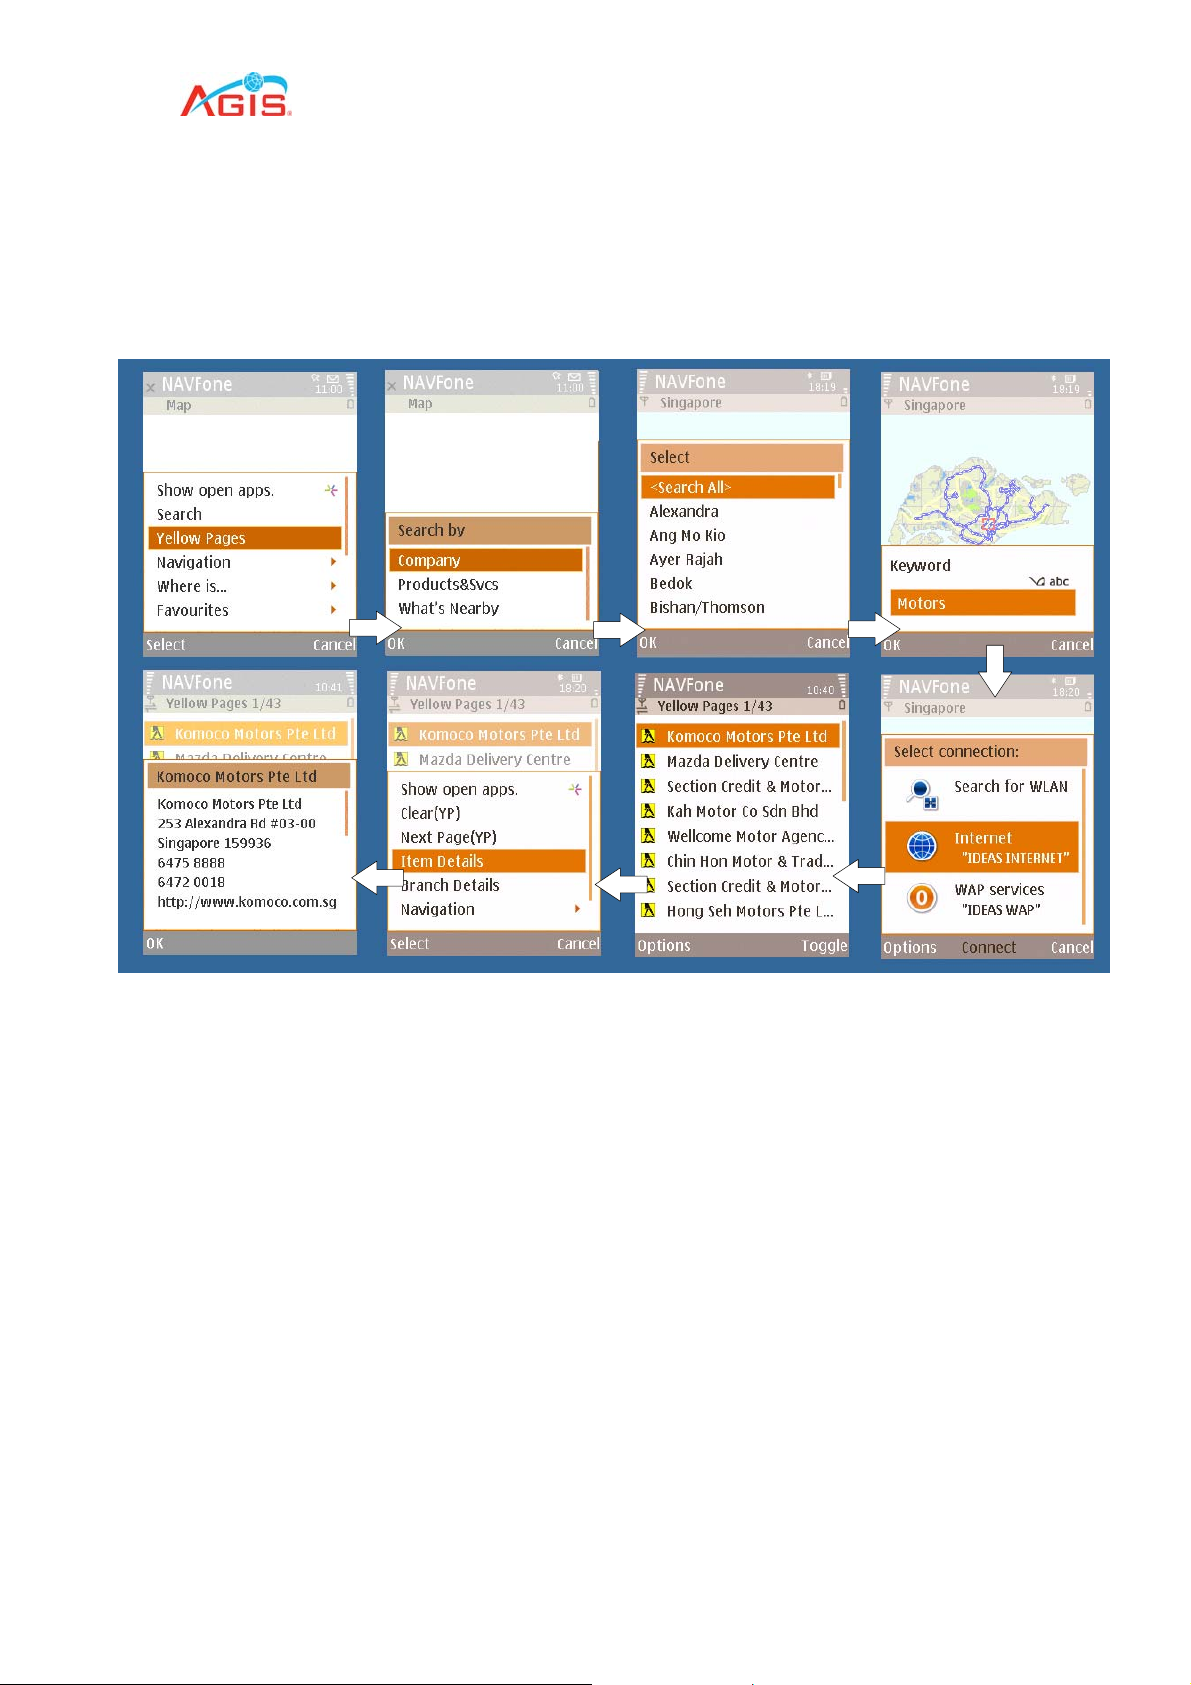
5.0 Yellow Pages
Yellow Pages is now available in NAVFone. This feature allows you to search within
Yellow Pages extensive database.
5.1 Search Keyword (Yellow Pages)
This command allows the user to perform a Yellow Pages search by categories and
using a keyword or phrase.
To perform a ‘Search’ search
1. Press Option and select Yellow Pages.
2. Using the up or down navigation key, move the cursor to select a search
category* (Company, Product & Services, What’s Nearby).
3. Select a location or use Search All for full coverage.
4. Input keyword(s) using the keypad.
5. Select the internet access point. The search query is done online. Note that if
GPRS is used, normal data charges will apply.
6. Select a search result.
7. Press Option and select Item Details.
24
Page 25
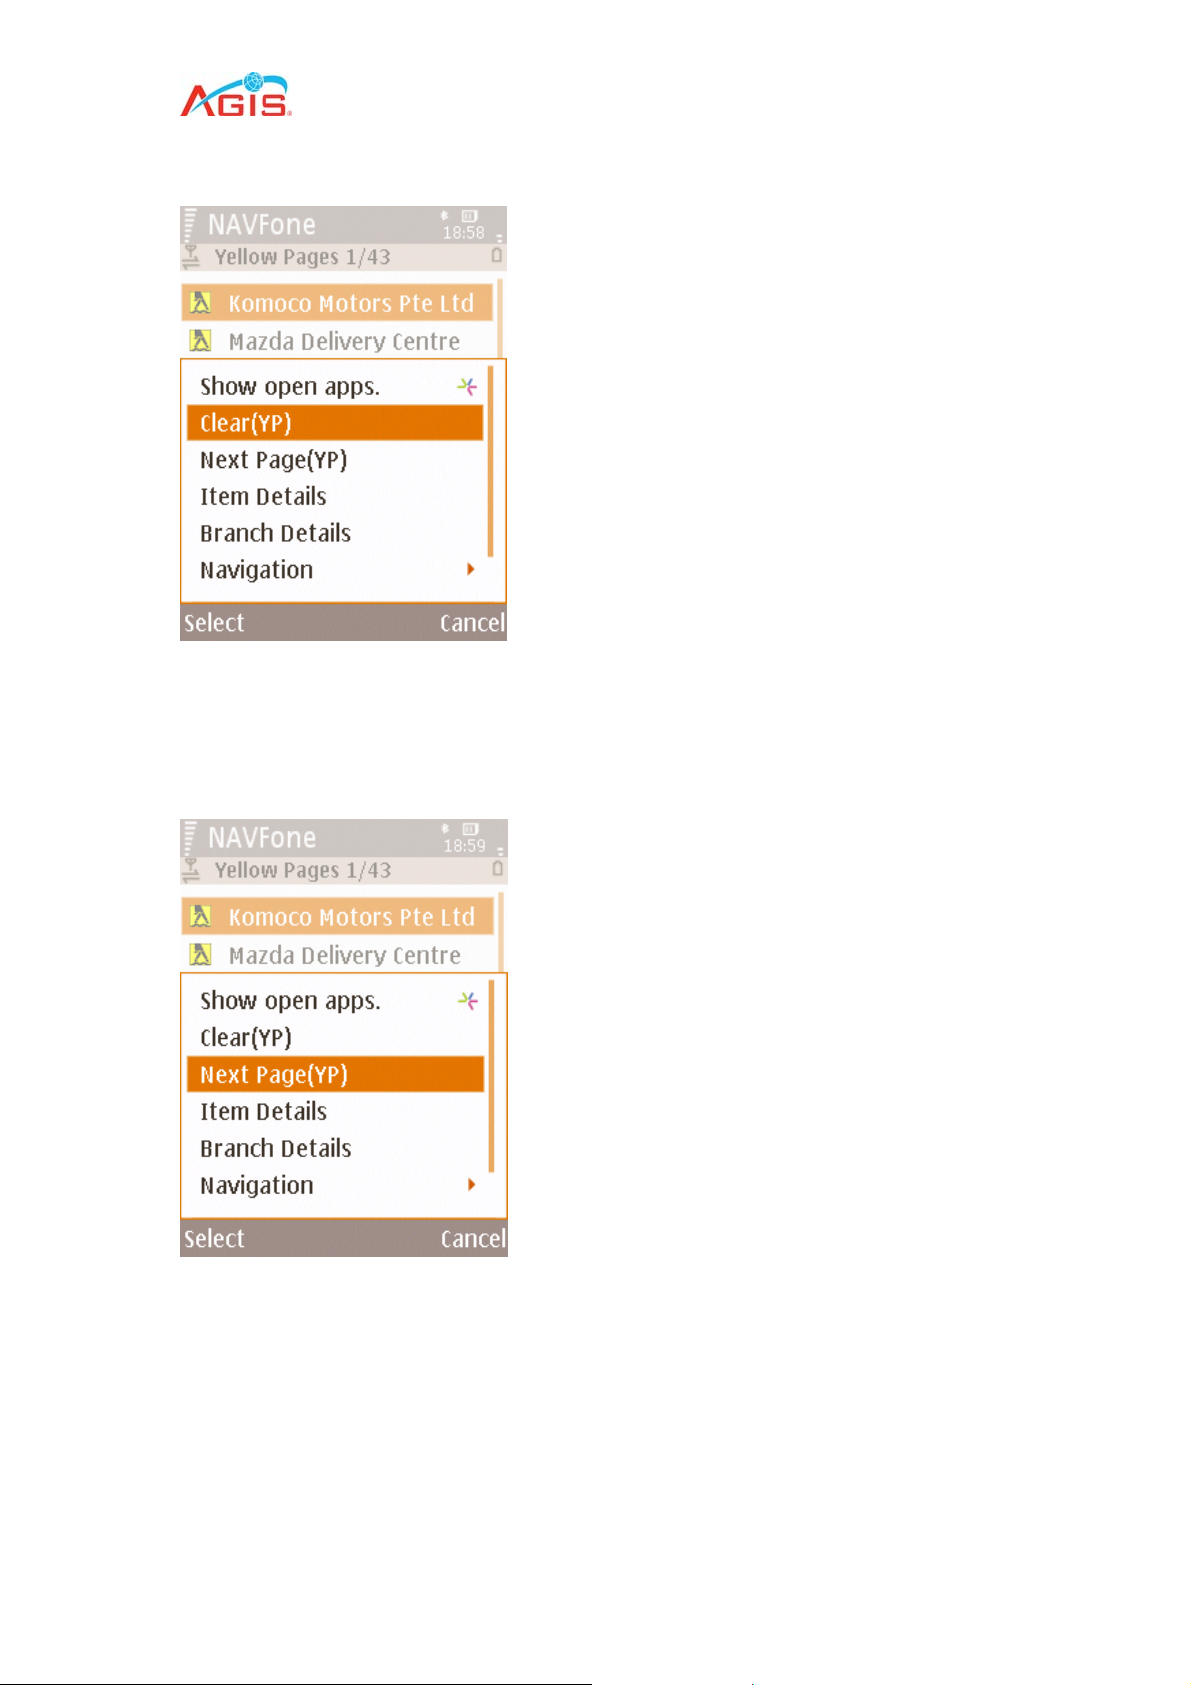
5.1.1 Clear Search (Yellow Pages)
To clear the current results
Press Options and select Clear (YP).
5.1.2 Next/Previous Page (Yellow Pages)
To view next set of results
Press Options and select Next Page (YP).
25
Page 26

To view previous set of results
Press Options and select Prev Page (YP).
5.1.3 Item Details
To view result detail
Press Options and select Item Detail.
26
Page 27
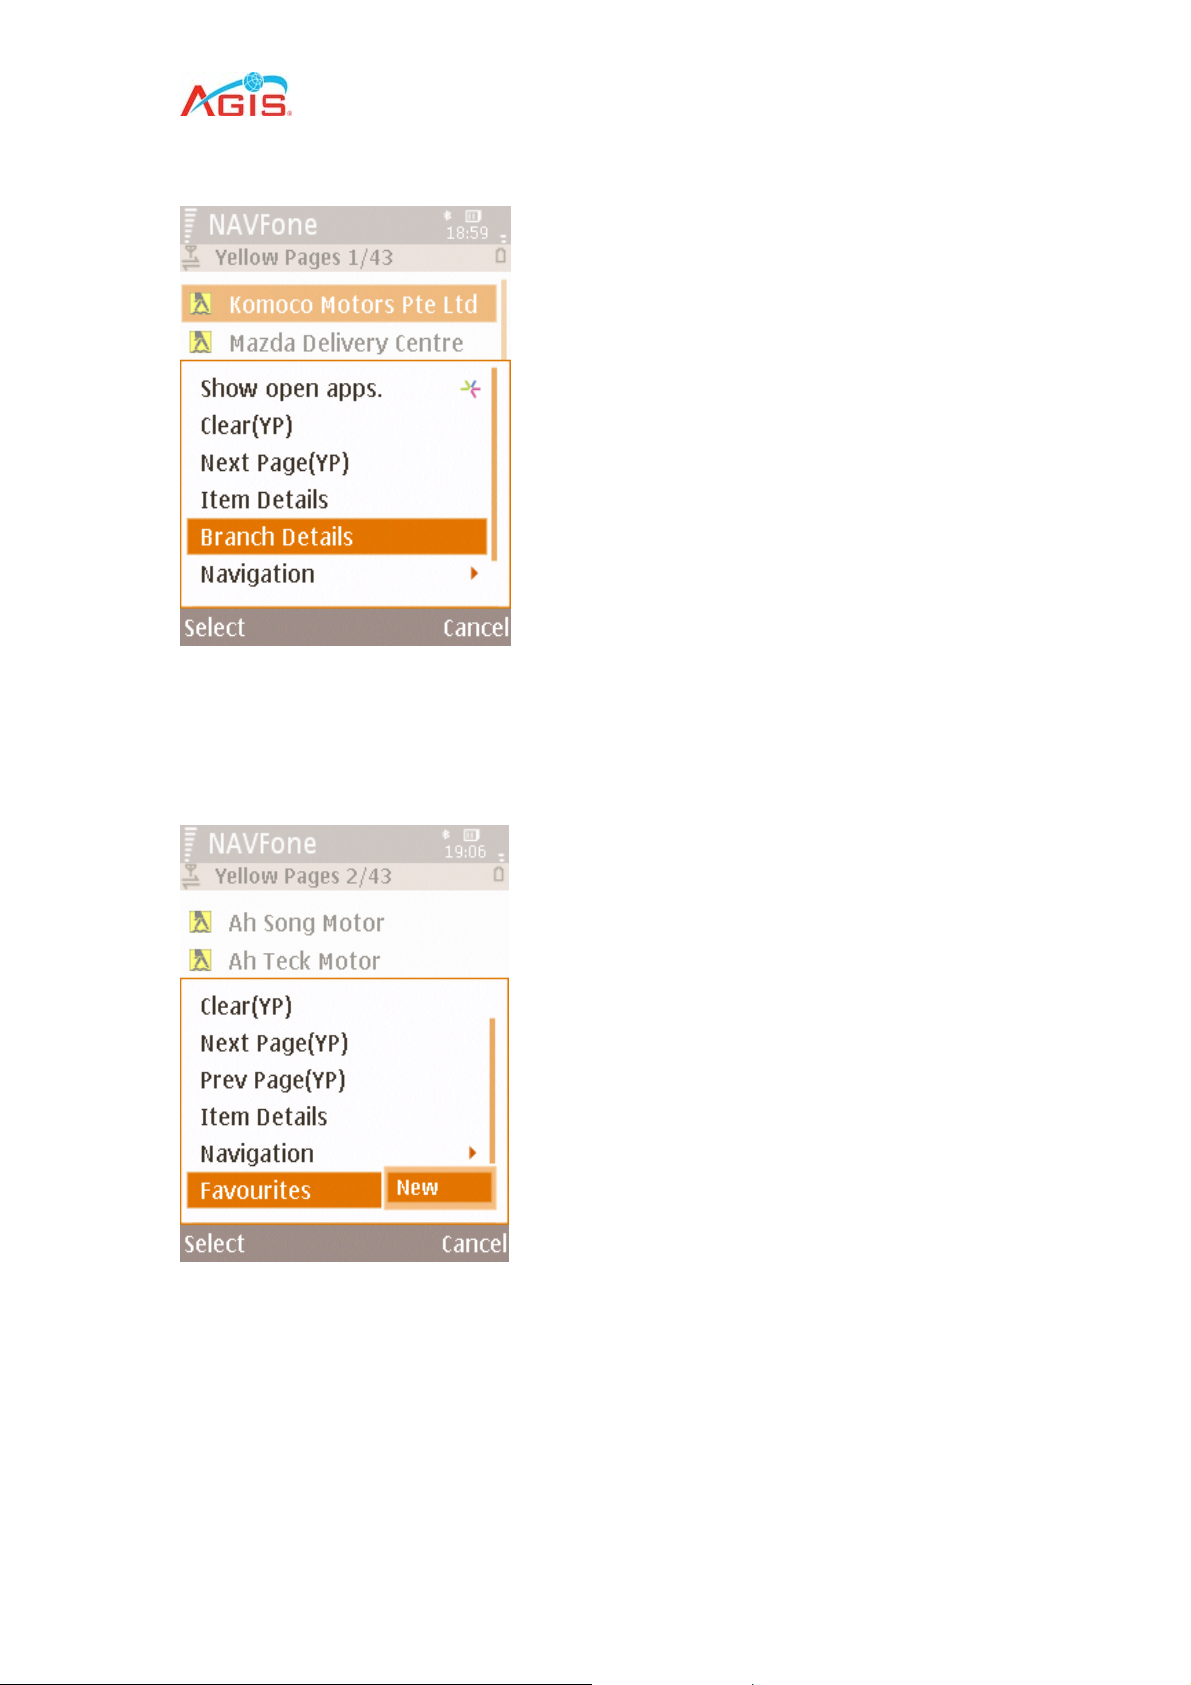
5.1.4 Branch Details (Yellow Pages)
To view result branch detail
Press Options and select Branch Detail.
5.1.5 Favourites (Yellow Pages)
To add select search results to favourites
Press Options and select Favourites and then New.
27
Page 28
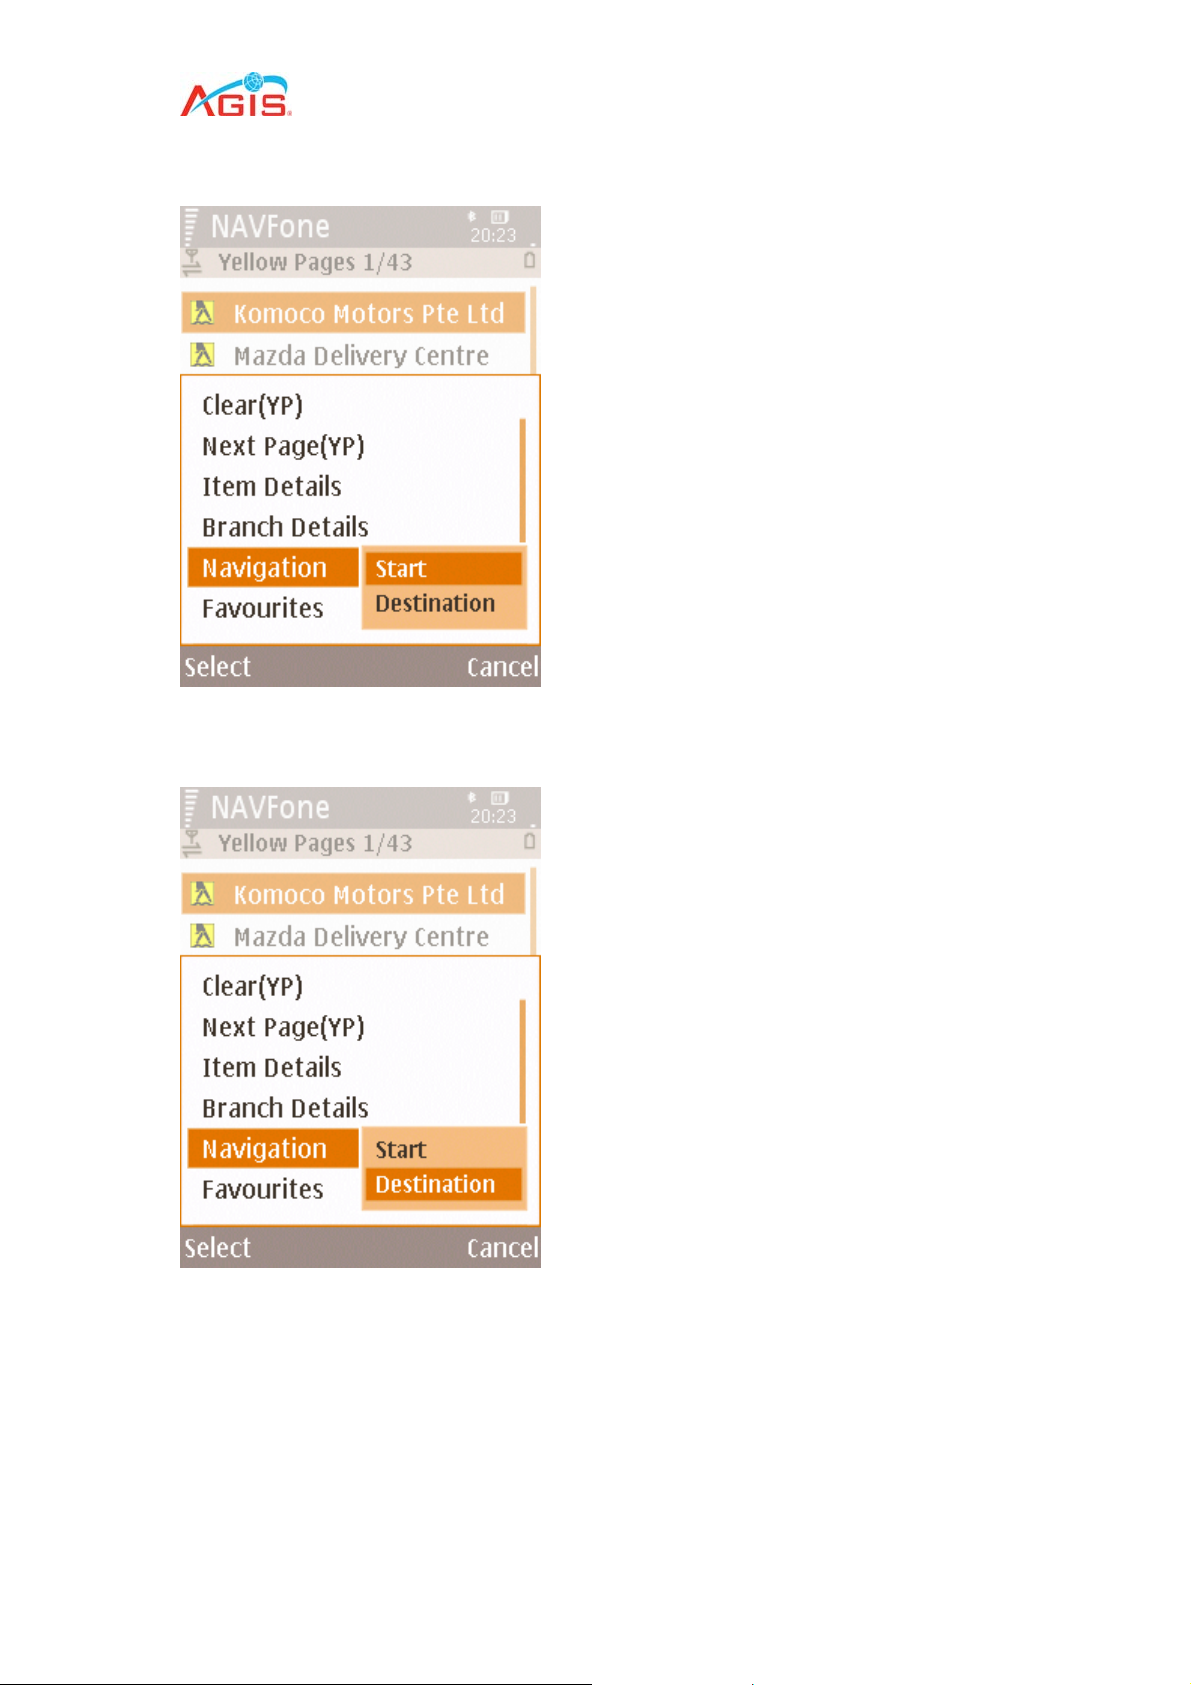
5.1.6 Navigation (Yellow Pages)
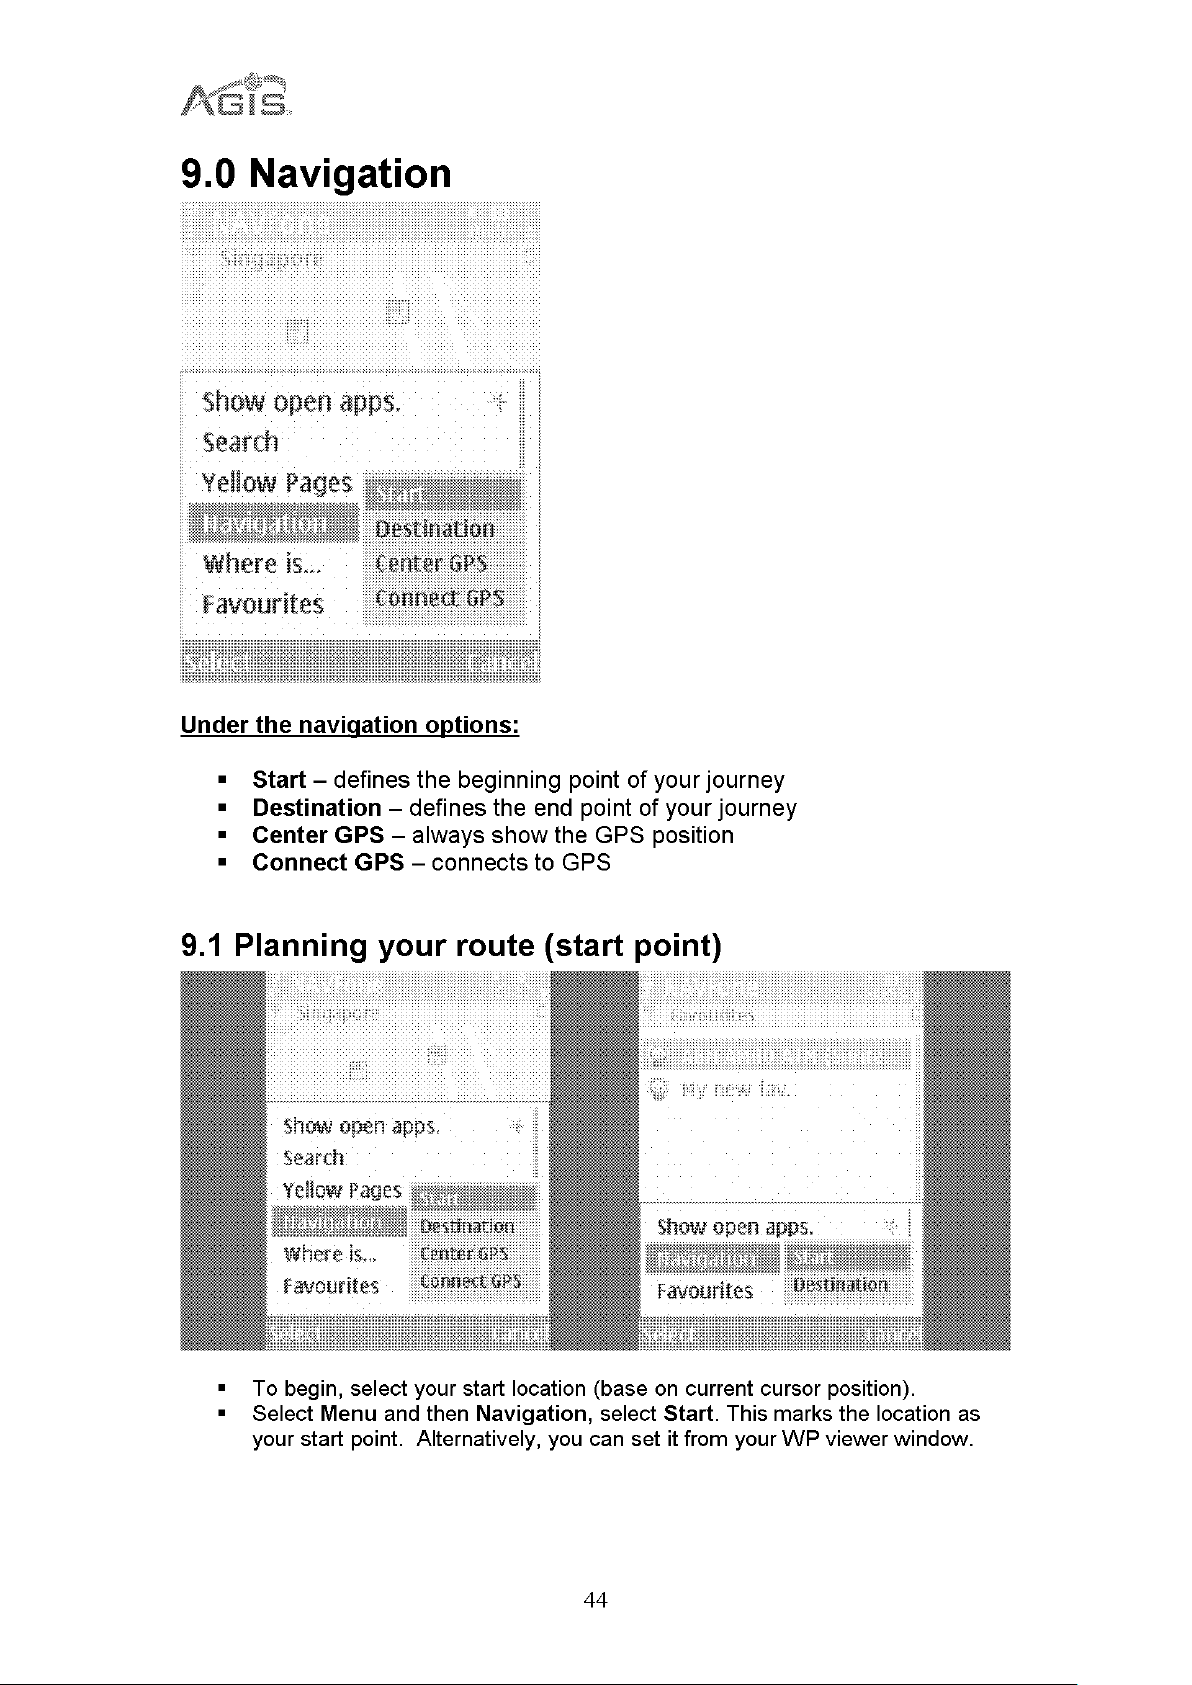
To set selected result as navigation start point
Press Options and select Navigation and then Start.
To set selected result as navigation destination
Press Options and select Navigation and then Destination.
28
Page 29
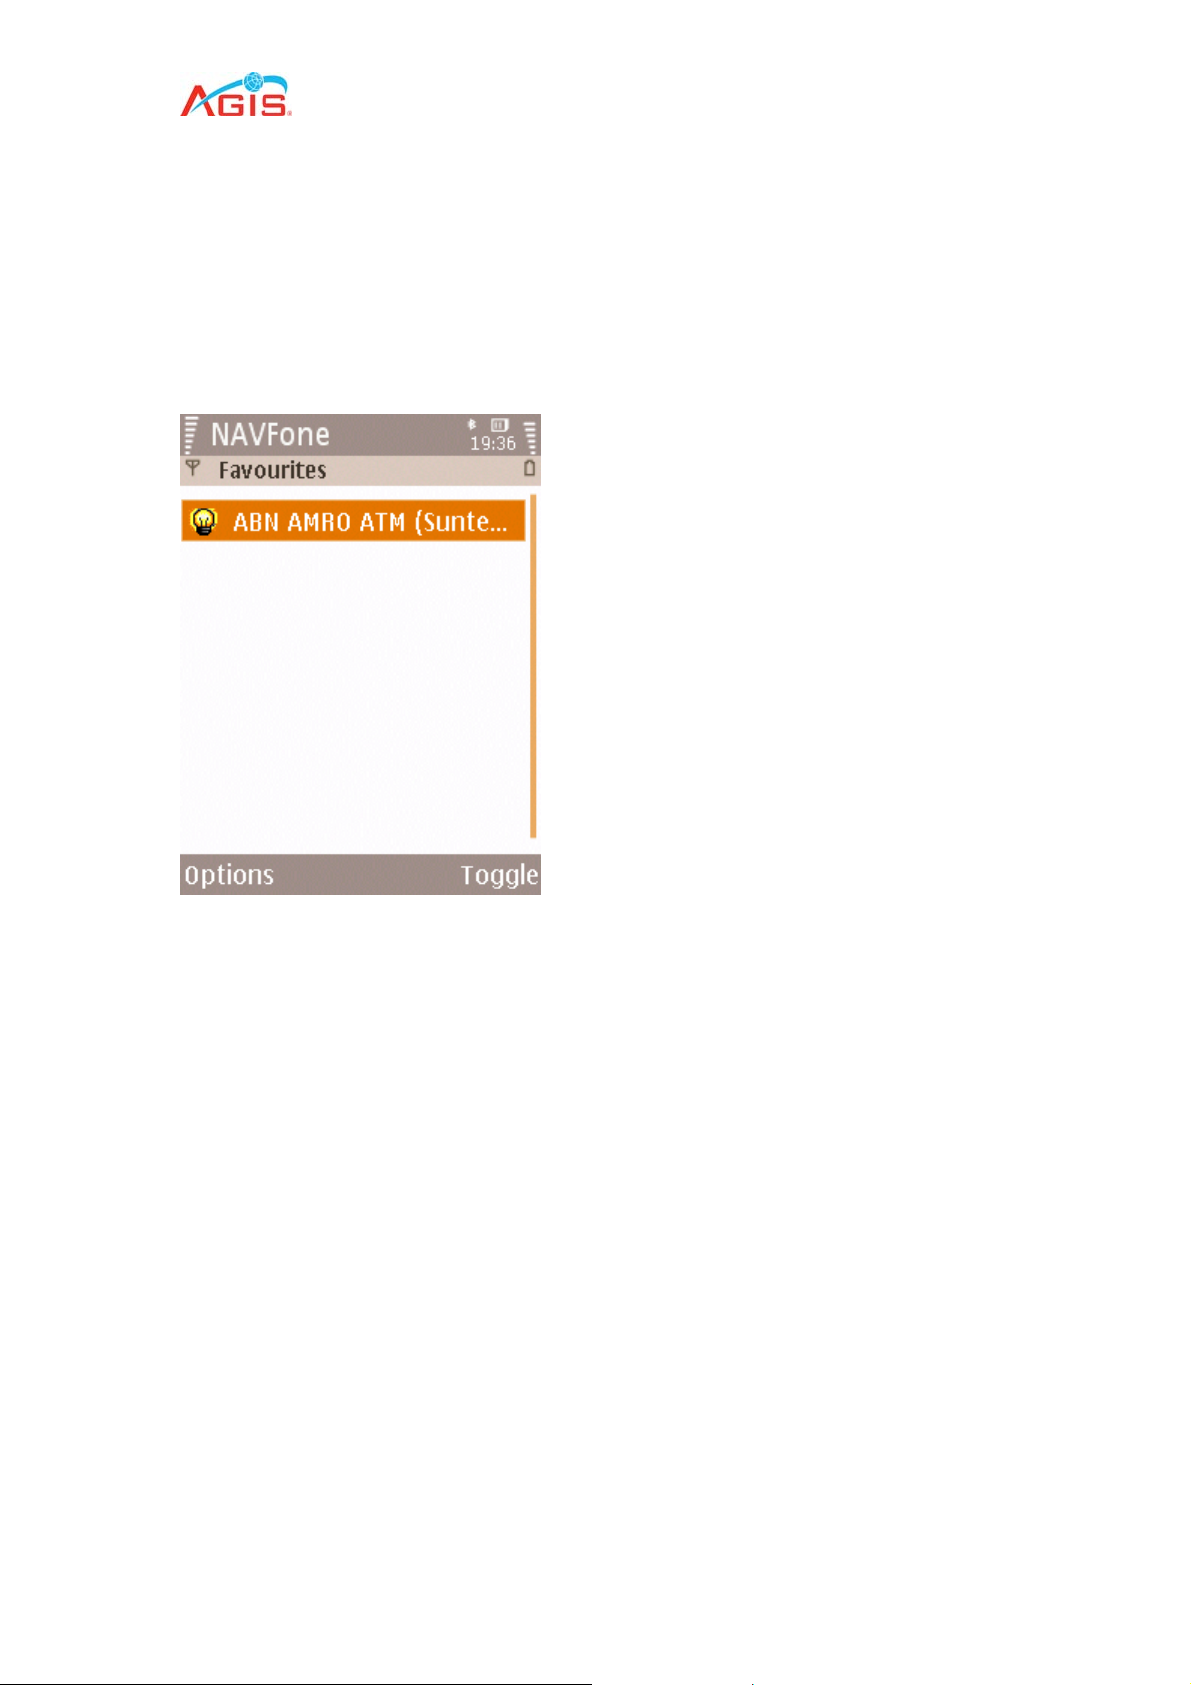
6.0 Favourites Management
Favourites (also known as waypoints) are points that can be created and displayed in
the map as an icon with a label attached to it. All waypoint can be saved for later use
and easy reference. Each waypoint’s label, icon type and size can be set to
differentiate one from another. A short note can also add to it.
6.1 WP Viewer
This command allows the user to create new waypoints. Pressing the Toggle button
allows you to enter the WP viewer window quickly.
The WP viewer lets you create, edit and view your waypoints.
Press Options to display and select actions available.
Press Toggle to return to Map view window.
29
Page 30
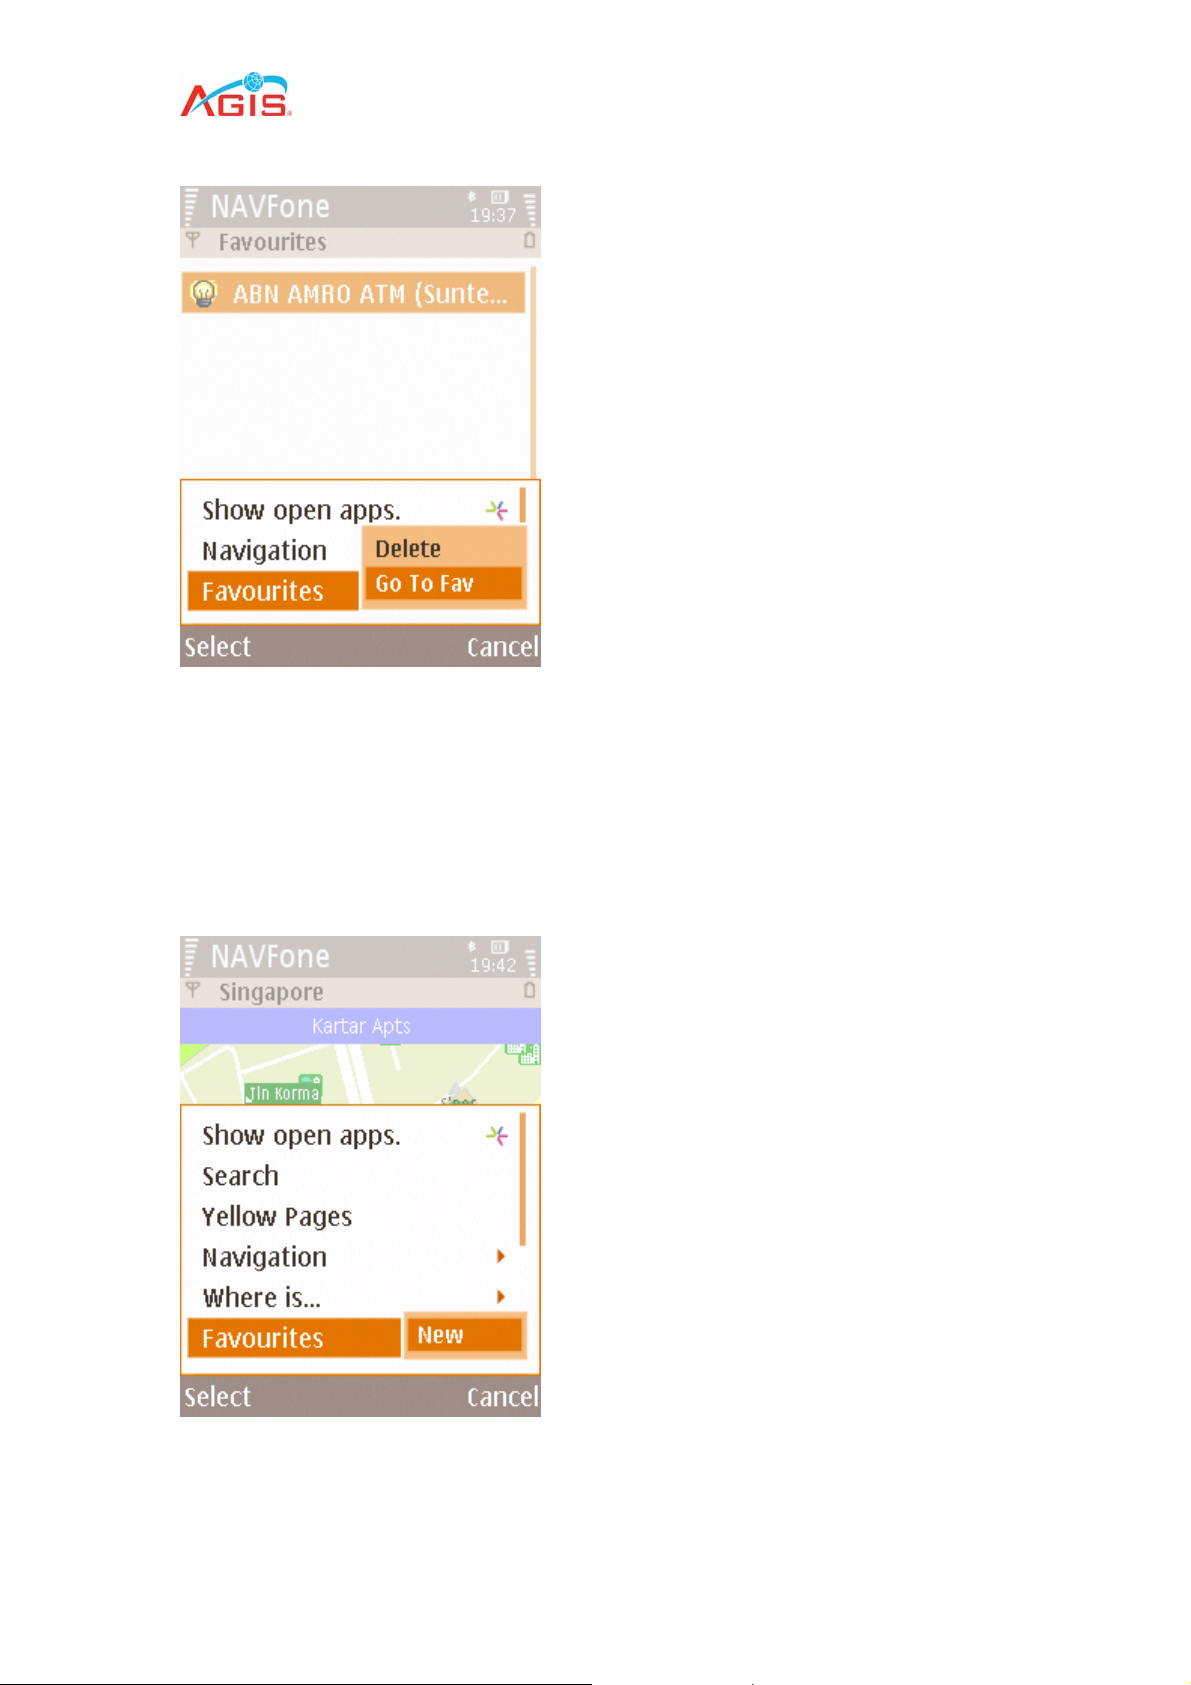
6.1.1 Jump to WP
This option shows the user the location of the WP.
To show a WP in the map
1. Using the up or down navigation key, move the cursor to the WP you want to
show in the map.
2. Press Select, Favourites and select Go To Fav.
6.1.2 Create a New WP
This option creates a WP at where the cursor is in the map and opens the WP
settings window.
30
Page 31
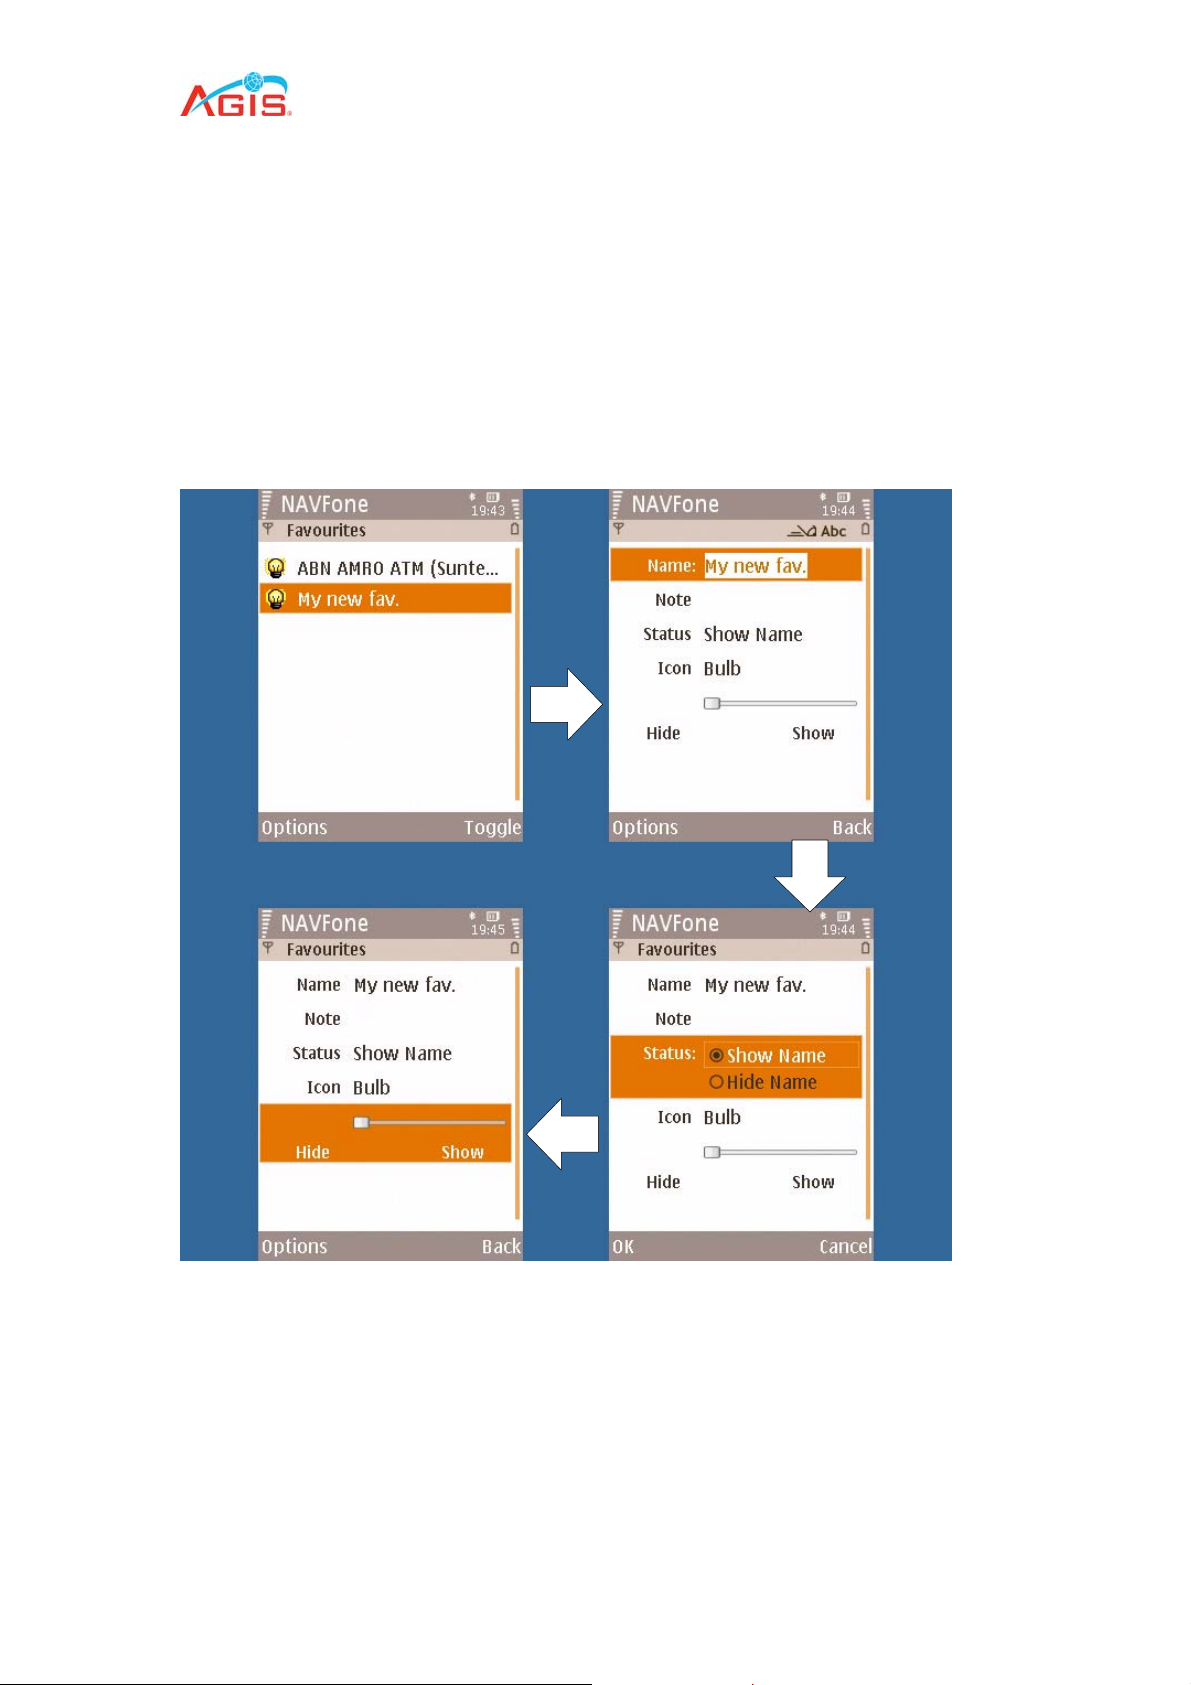
To create a new WP from Map view window
1. Press Options, Favorites and select New.
2. The WP settings window will open up.
To create a
3. Press Options, Favourites and select New.
4. The WP settings window will open up
You can also create your WP in the Map view
new WP from WP viewer window
6.1.3 View/Edit WP
.
window and search result window.
This option opens the WP settings window for user to view or edit existing WP.
To view or edit existing WP
1. Using the up or down navigation key, move the cursor to select the WP you
want to view or edit.
2. Press the center of navigation key to enter the WP settings window.
3. The WP settings window will open up.
31
Page 32
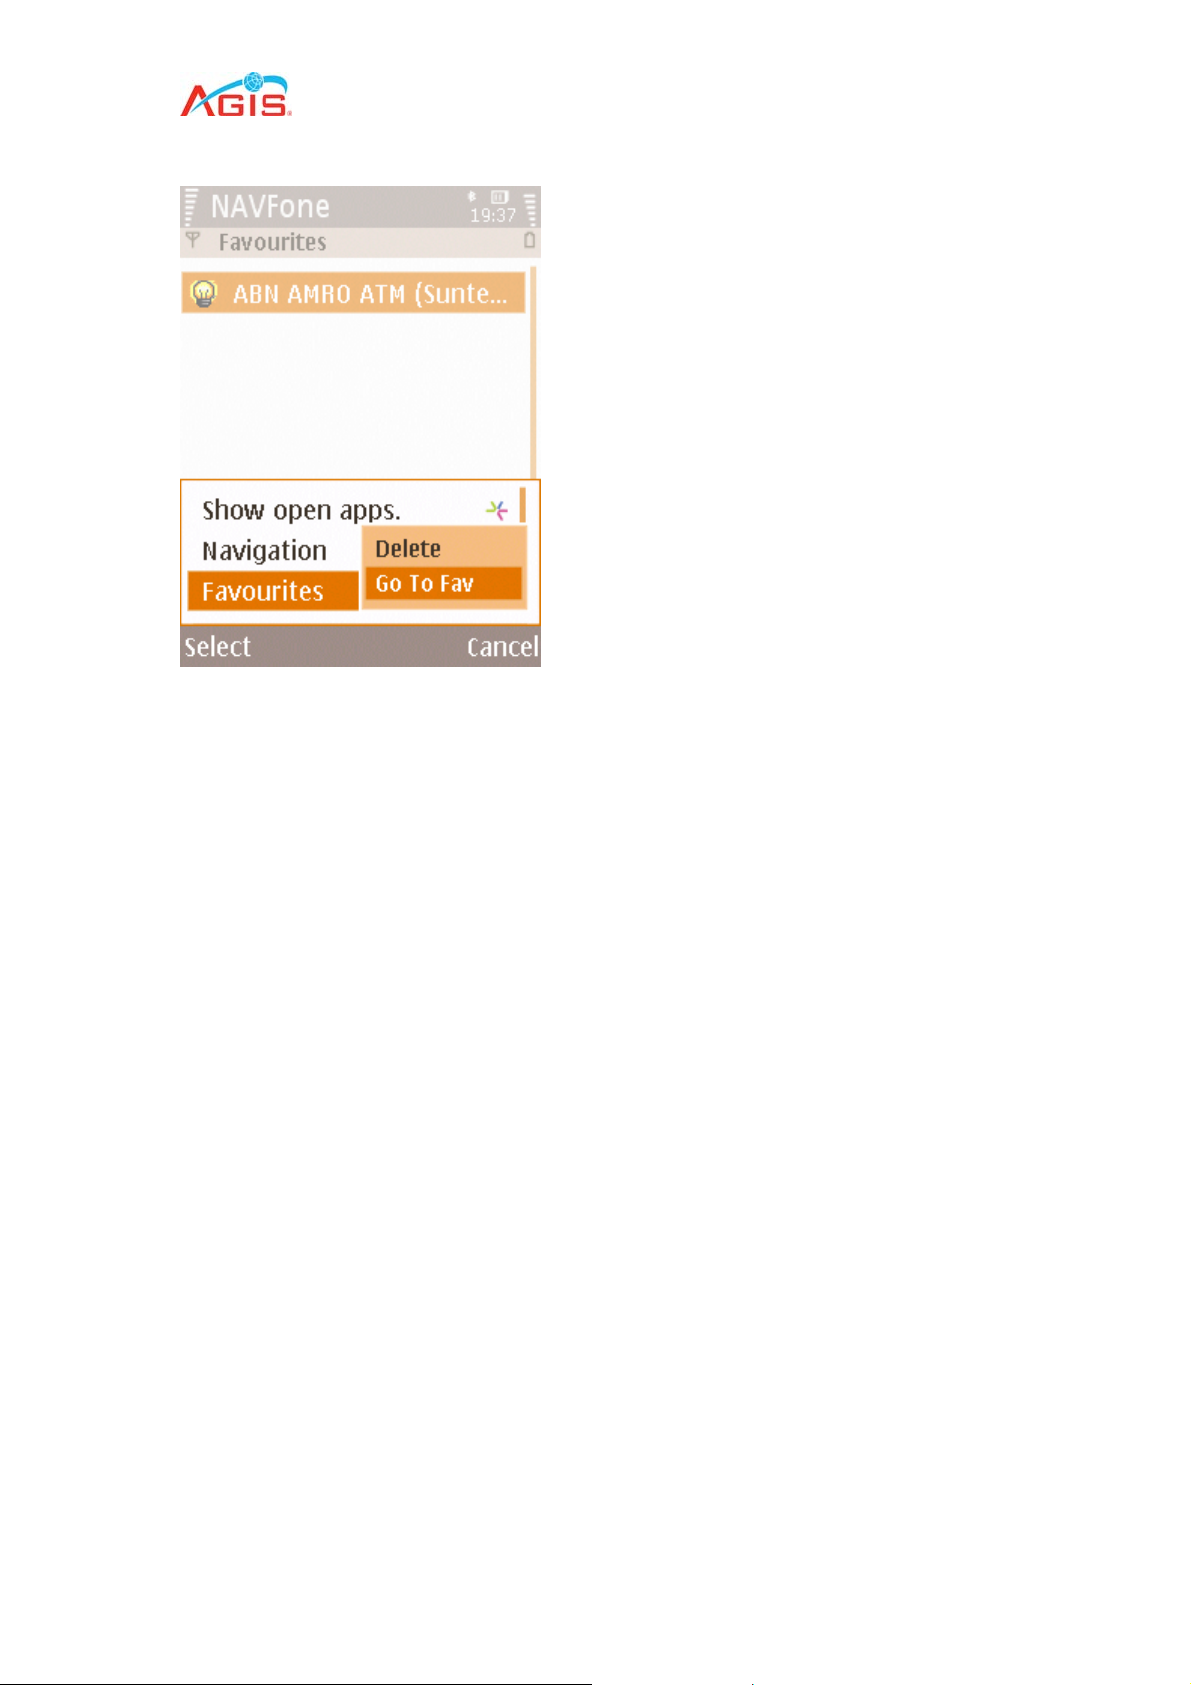
6.1.4 Delete WP
This option deletes an existing WP in the WP viewer.
To delete an existing WP
1. Move the cursor to select the WP you want to view or edit using the up or
down navigation key.
2. Press Options, Favourites and select Delete.
3. The software will not double prompt if you wish to delete the selected WP so
please delete with caution.
6.2 WP Settings
The WP settings window allows you to set your waypoint properties.
Press Options to display and select actions available.
Press Cancel to return to WP viewer window.
32
Page 33
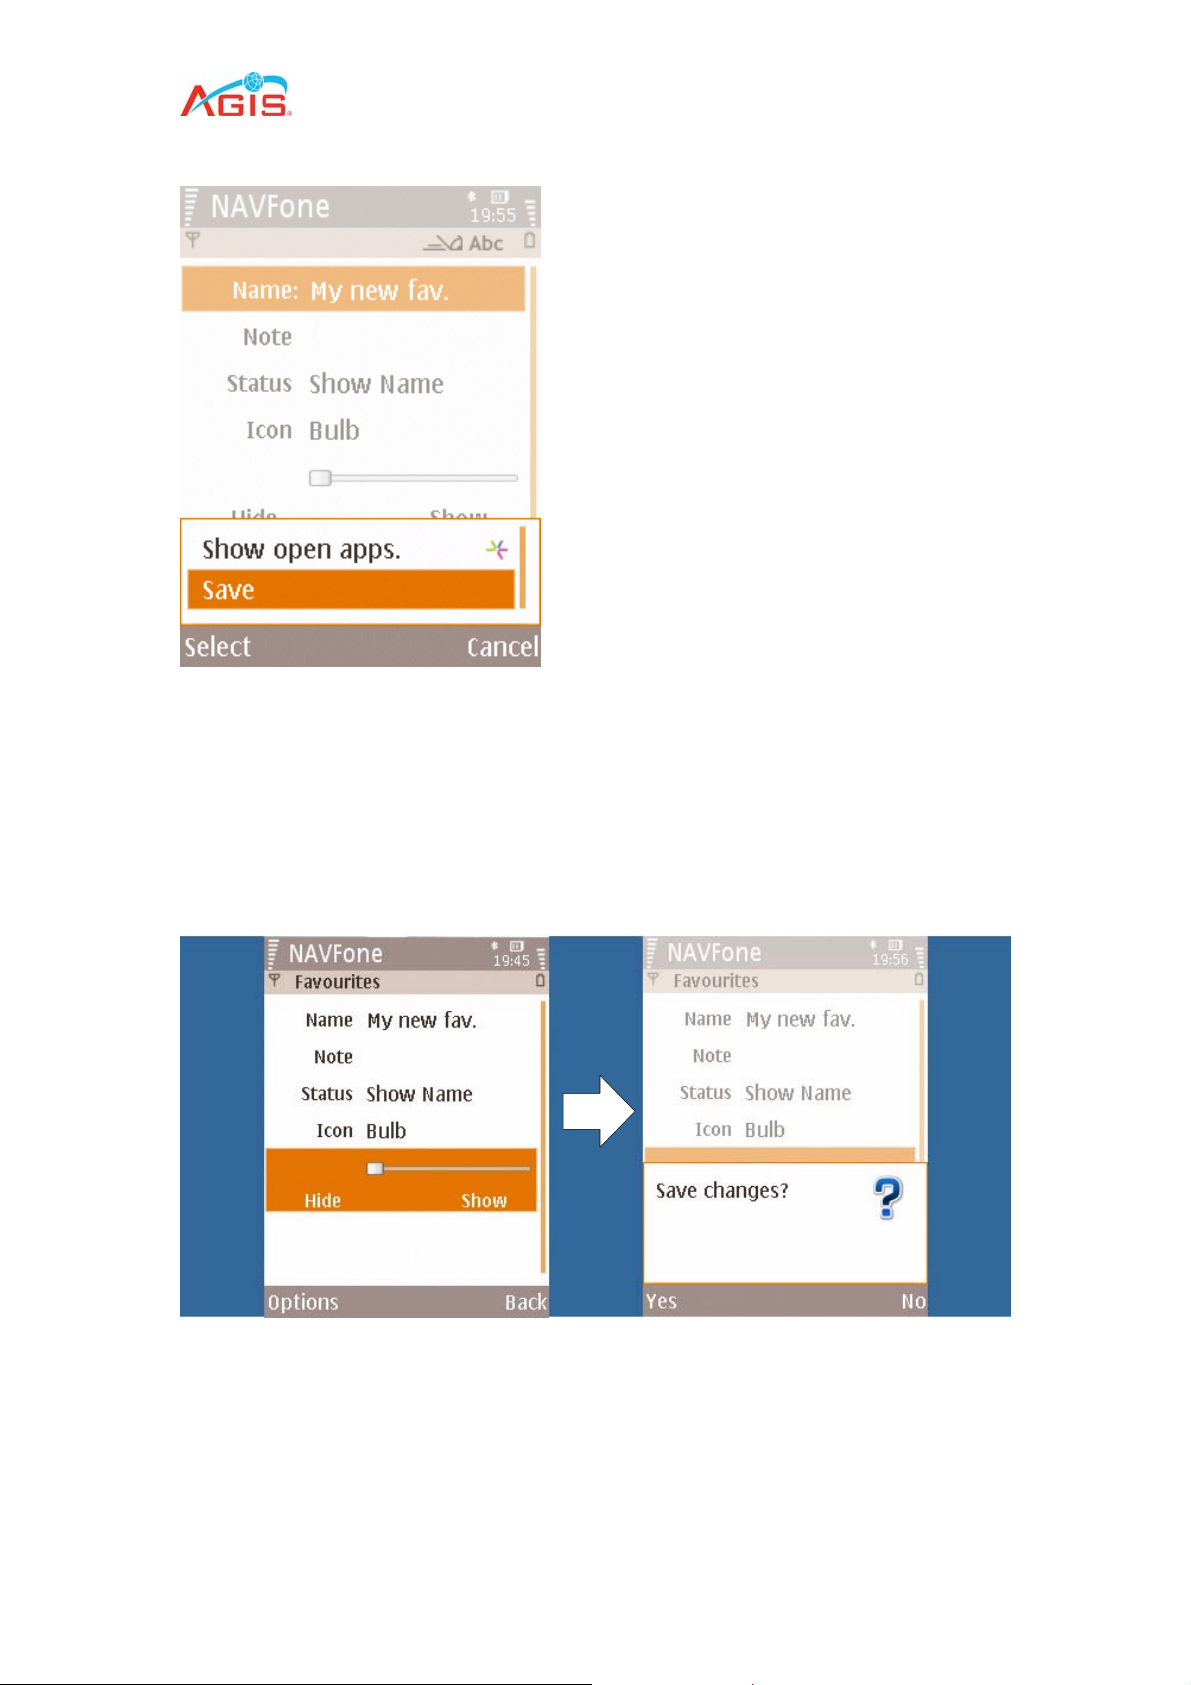
6.2.1 Save
This option saves the settings of the current WP and returns to the WP viewer
window. Newly created/edited WP must be saved for the changes to take effect.
To save the settings of the current WP
1. Press Options and select Save.
6.2.2 Cancel
This option returns to the WP viewer window without saving the settings of the
current WP.
To return to the WP viewer window
1. Press Back and select No when prompt if you wish to “Save changes?”.
33
Page 34
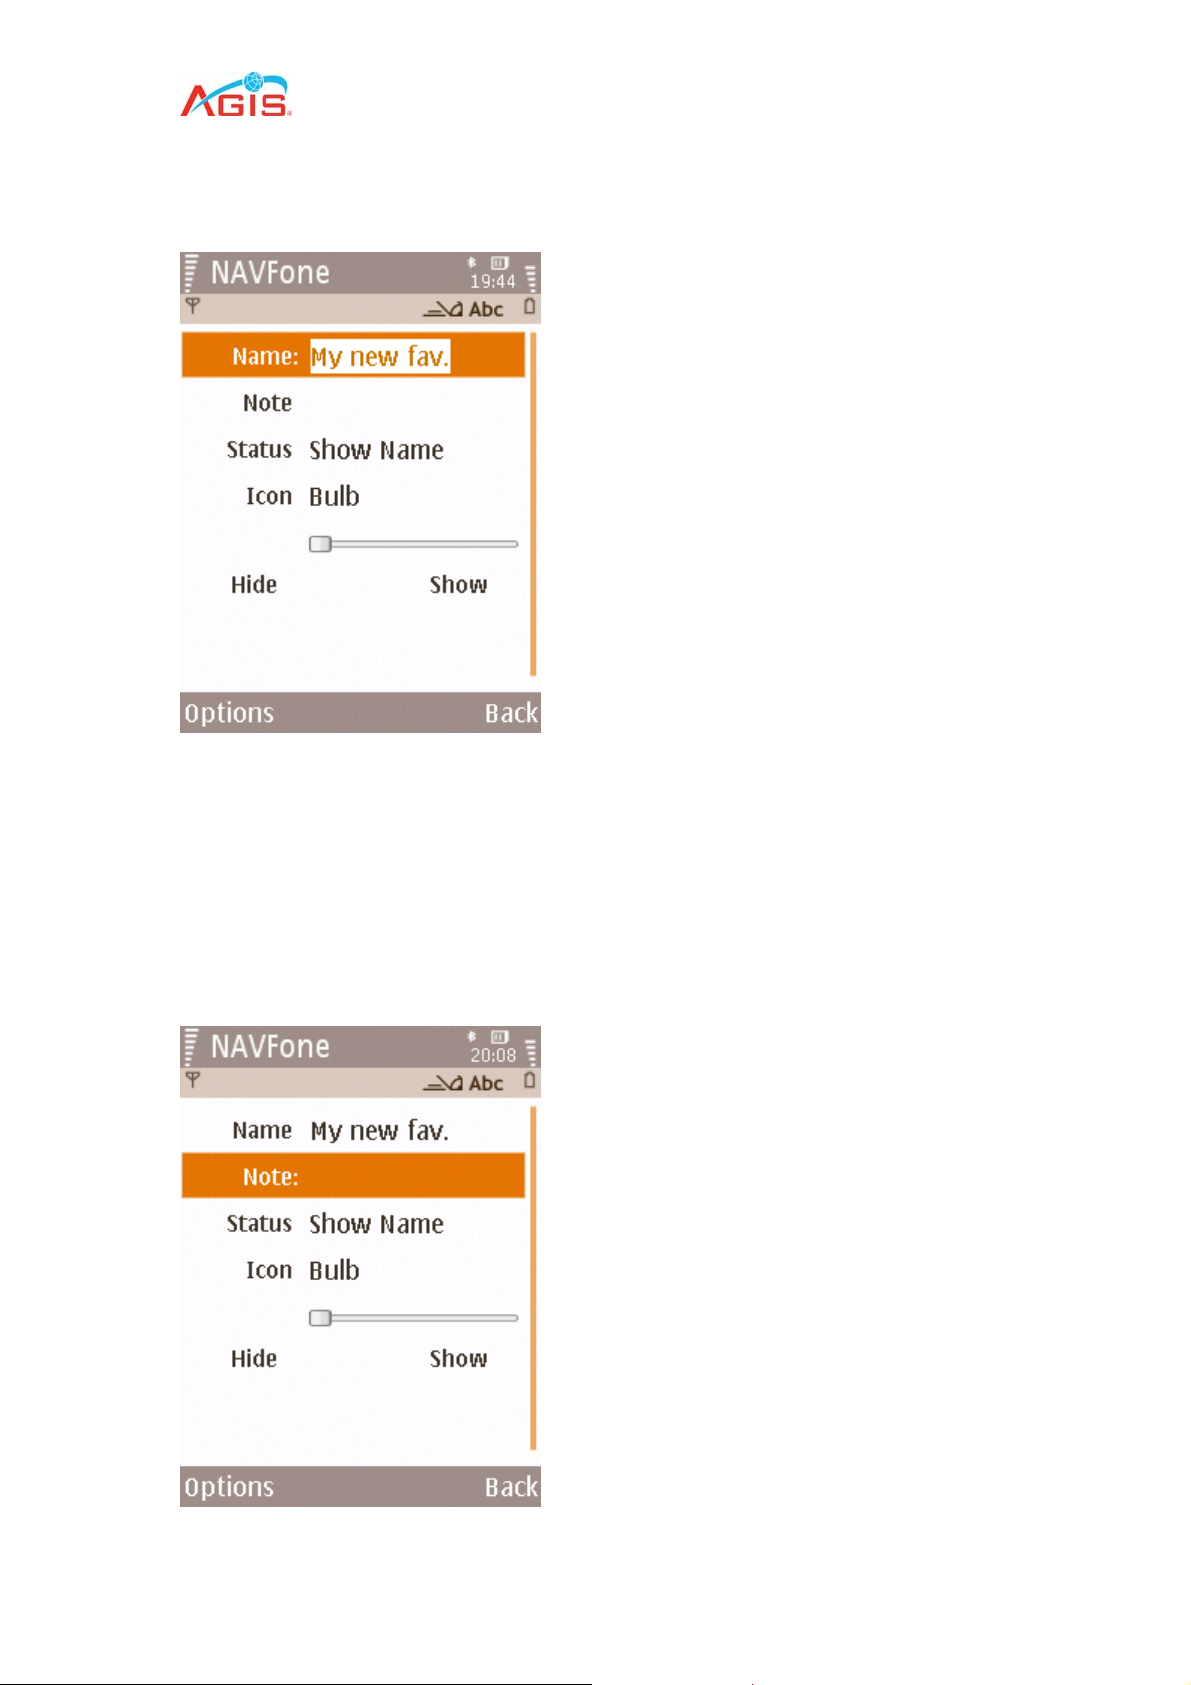
6.3 List of WP properties
6.3.1 Name
User can label the WP for easy reference. The software will try to capture the street
name, building etc if it is available, otherwise a default name, eg. WP#1, is given to a
WP upon creation.
To change your WP name
1. Move the cursor to Name using the up or down navigation key.
2. Press the center of navigation key to select.
3. Start writing the WP name using the keypad.
4. Press the up / down of the navigation key to exit the field.
6.3.2 Note
34
Page 35
User can add additional notes about the WP.
To add or edit WP note
1. Move the cursor to Note using the up or down navigation key.
2. Press the center of navigation key to select.
3. Start writing or editing the WP note using the keypad.
4. Press the up / down of the navigation key to exit the field.
You can also view your WP note in the Map window.
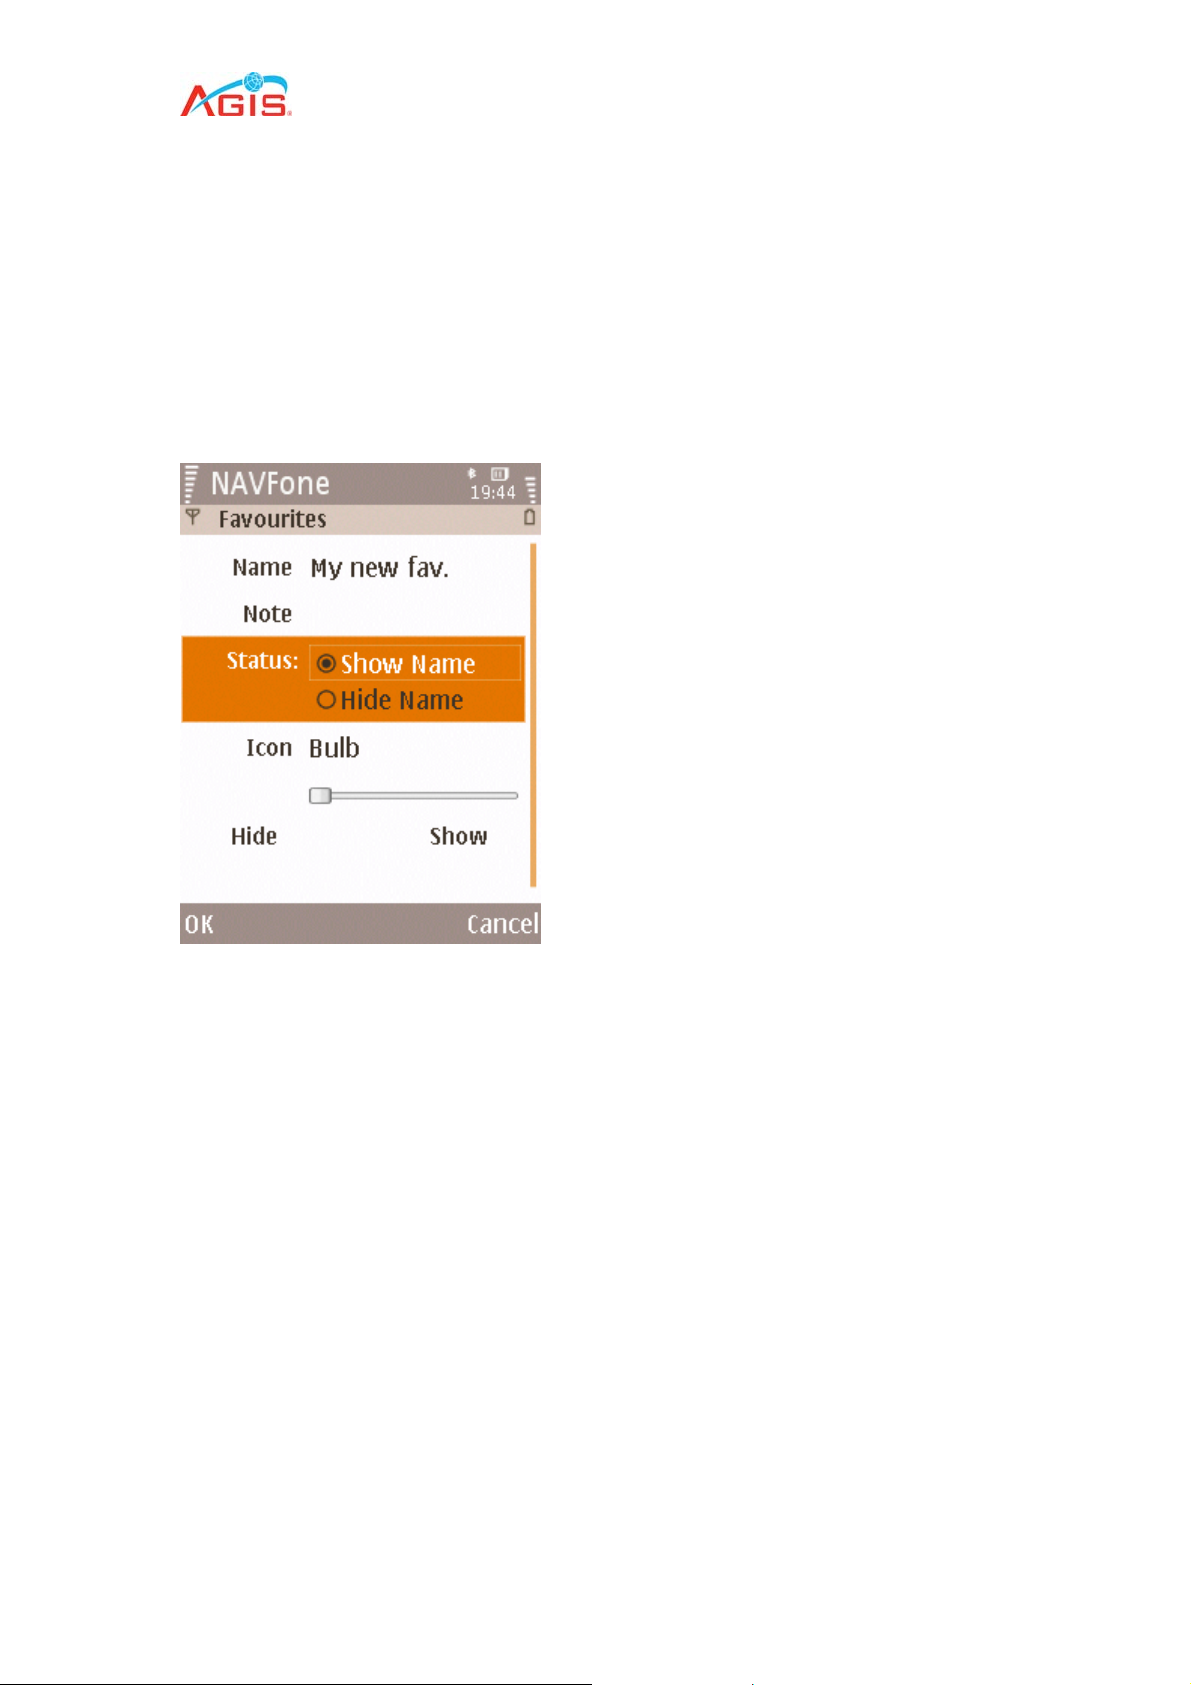
6.3.3 Status
To allow the Name to show / stay hidden on the map
1. Move the cursor to Status using the up or down navigation key.
2. Press the center of navigation key to select.
3. Mover the cursor to show or hide the name field on the map.
4. Press the up / down of the navigation key to exit the field.
35
Page 36
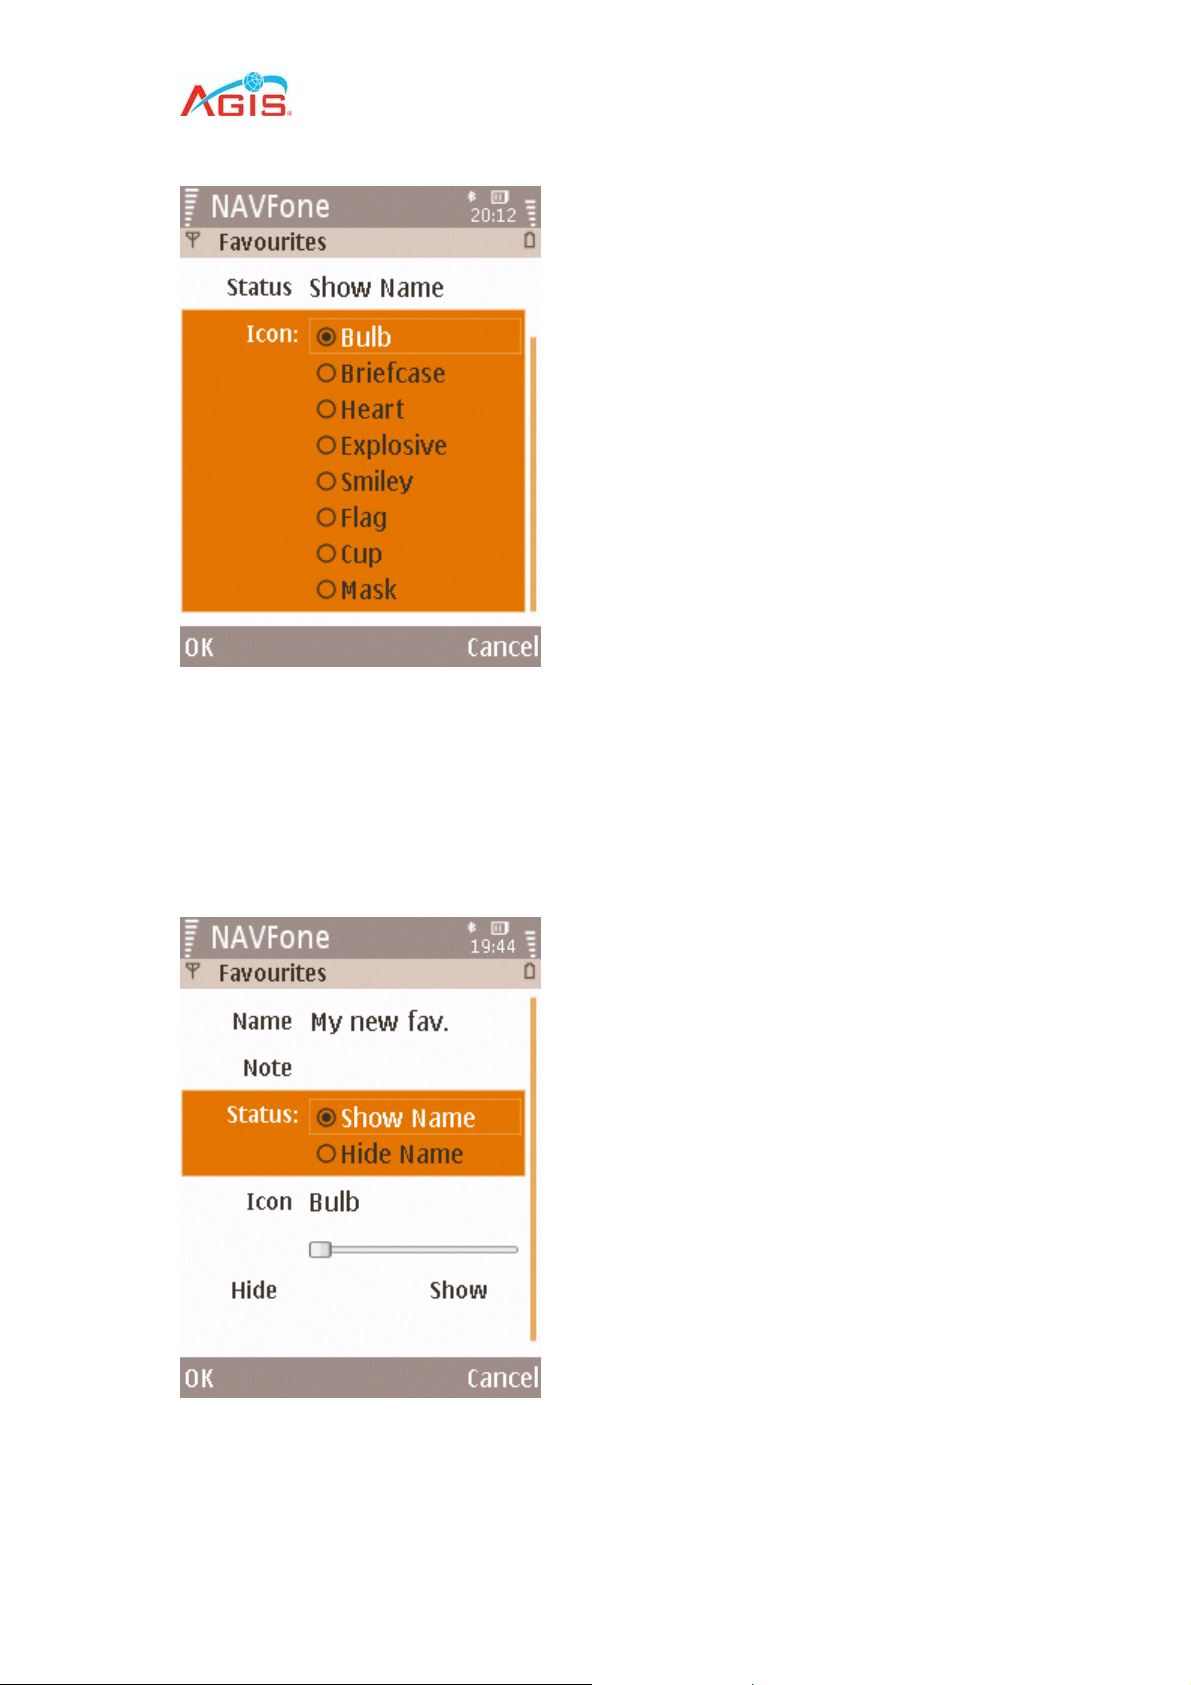
6.3.4 Icon
To change the WP icon type
1. Move the cursor to Icon using the up or down navigation key.
2. Press the center of navigation key to select.
3. Select the icon type using the left or right navigation key.
4. Press the up / down of the navigation key to exit the field.
6.3.5 Visibility
The Visibility denotes the visibility of the waypoints at different zoom scales. A newly
created waypoint has its Icon Priority automatically pegged to the current zoom scale
that it is created. It only becomes visible from that zoom onwards, and invisible when
36
Page 37

zoomed out. User can override the Icon Priority defaults by adjusting the priority
levels.
To change your icon priority
1. Move the cursor to Visibility using the up or down navigation key.
2. Press the center of navigation key to select.
3. Select the icon priority using the left or right navigation key.
4. Press the up / down of the navigation key to exit the field.
Note: Your settings MUST be saved them to take effect. To save settings, Press
Options and select Save.
37
Page 38
7.0 Map Options
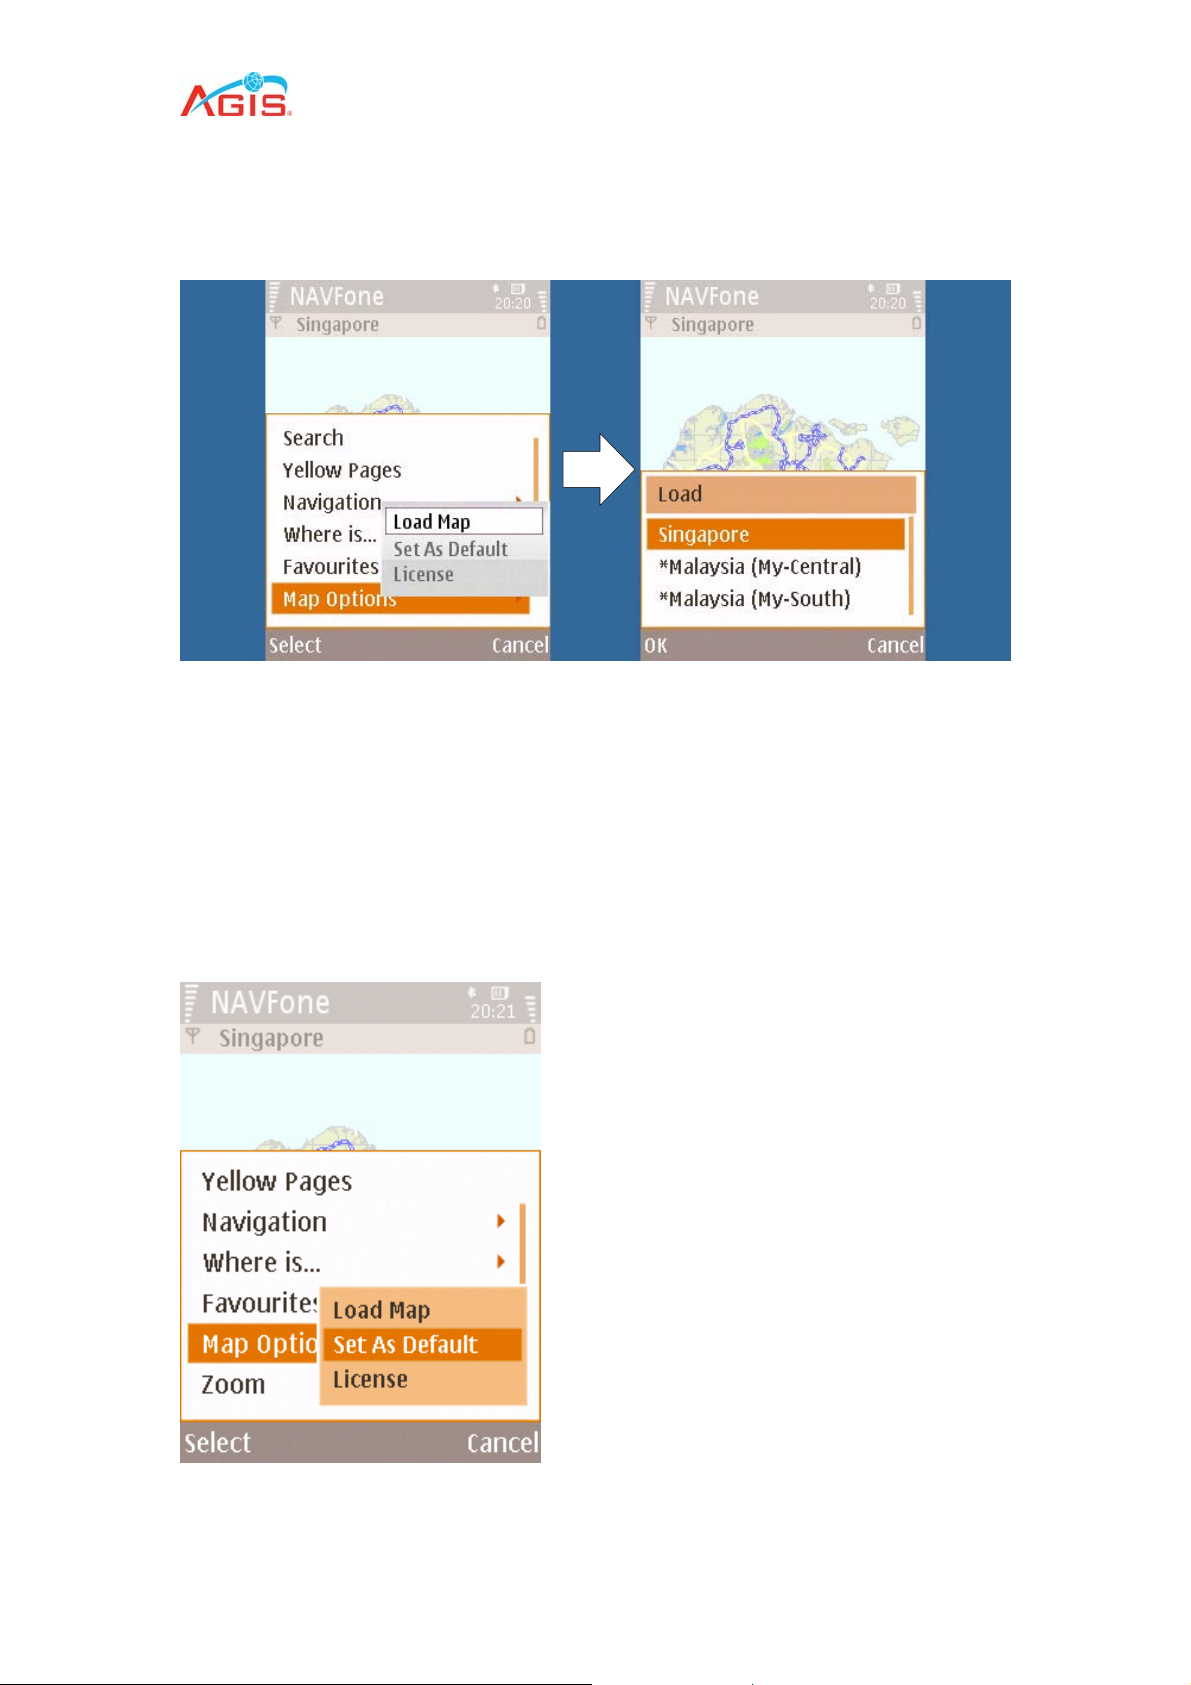
7.1 Load Map
This function allows the user to load the various maps layers of different country that
you may have purchased.
To Load Map
1. Click on Options and Scroll to the Map Option.
2. Navigate one step to the right
3. Select the option Load Map
4. Select the chosen map and click OK
7.2 Set as Default
38
Page 39
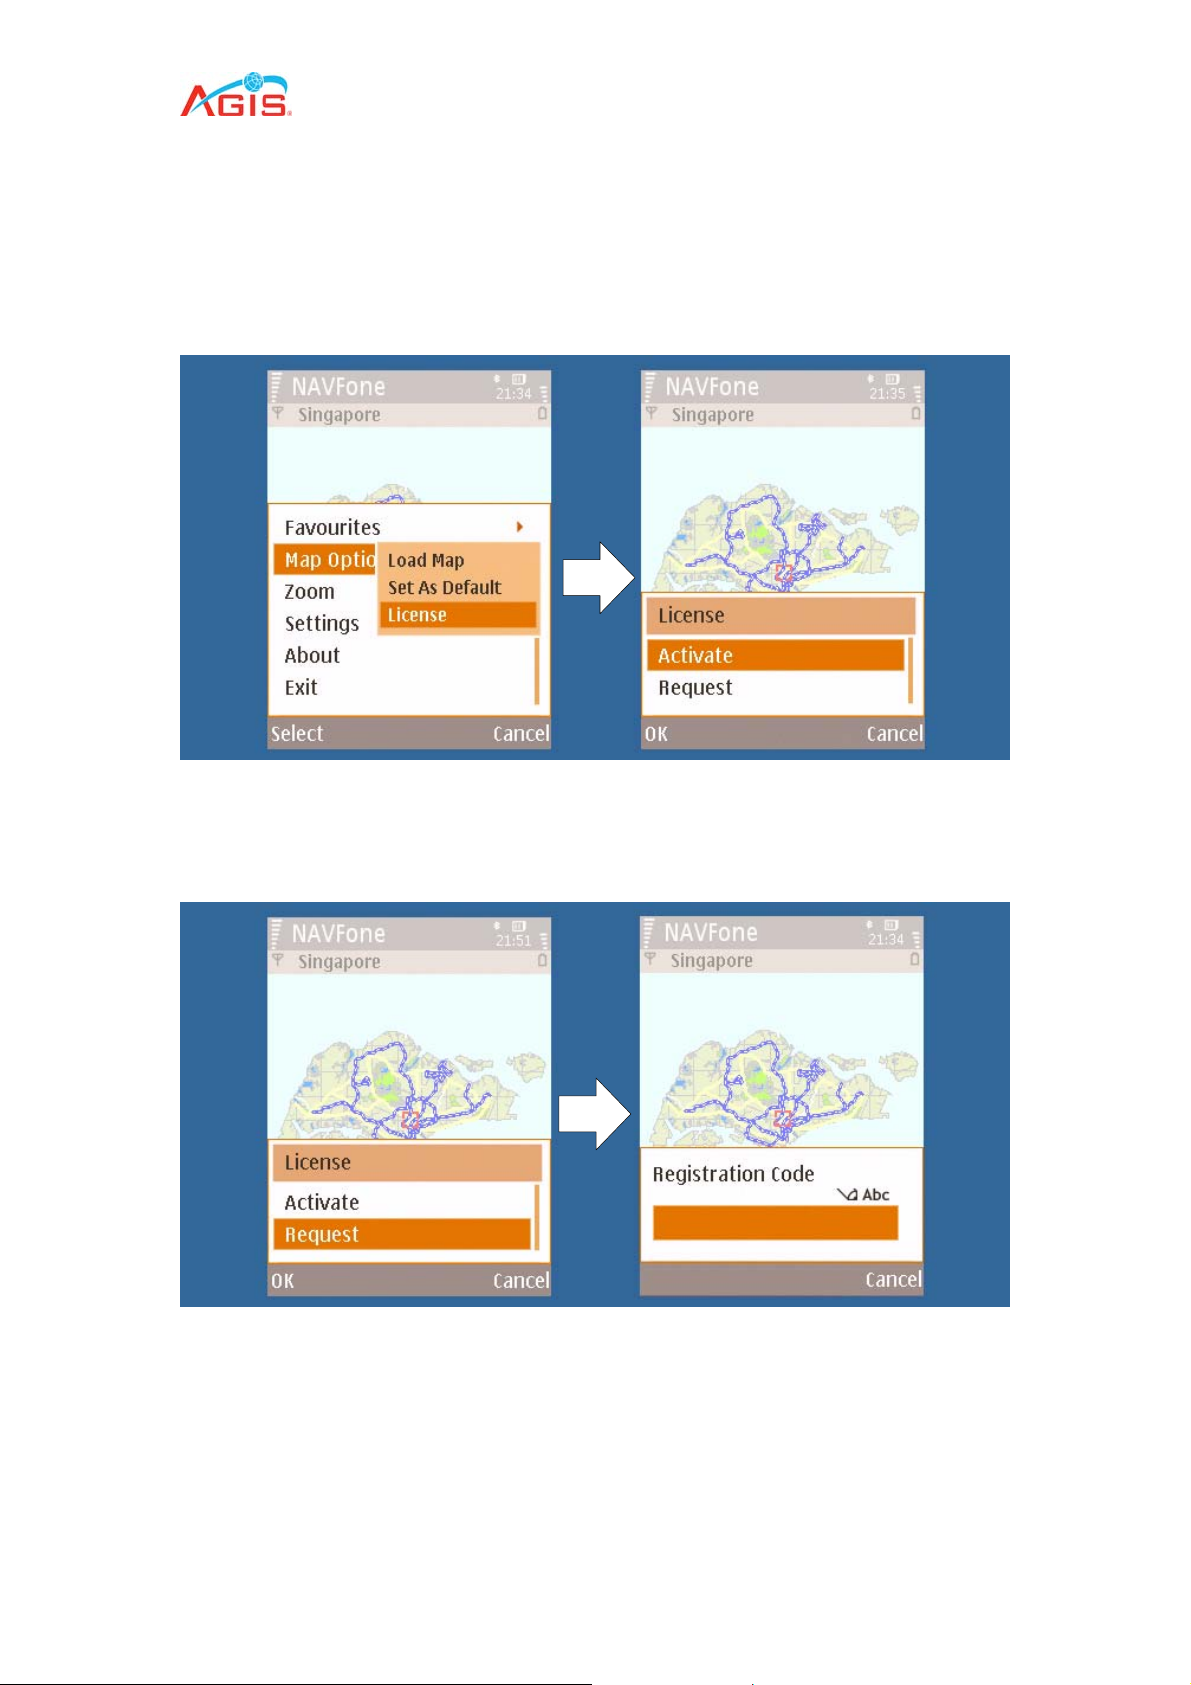
To Set the current map as your default
1. Click on Options and Scroll to the Map Option.
2. Navigate one step to the right
3. Select the option Set as Default
7.3 License
This option is for the activation of newly installed maps. Additional maps can be
purchased from the Agis Online Store. A license number will be given when a map is
purchased.
To activate purchased maps;
Go to Options -> Map Options -> Request. Key in the License number. This process
is similar to initial NAVFone activation.
Once the activation SMS is received, select Activate. The new map is now functional.
39
Page 40
8.0 Where is
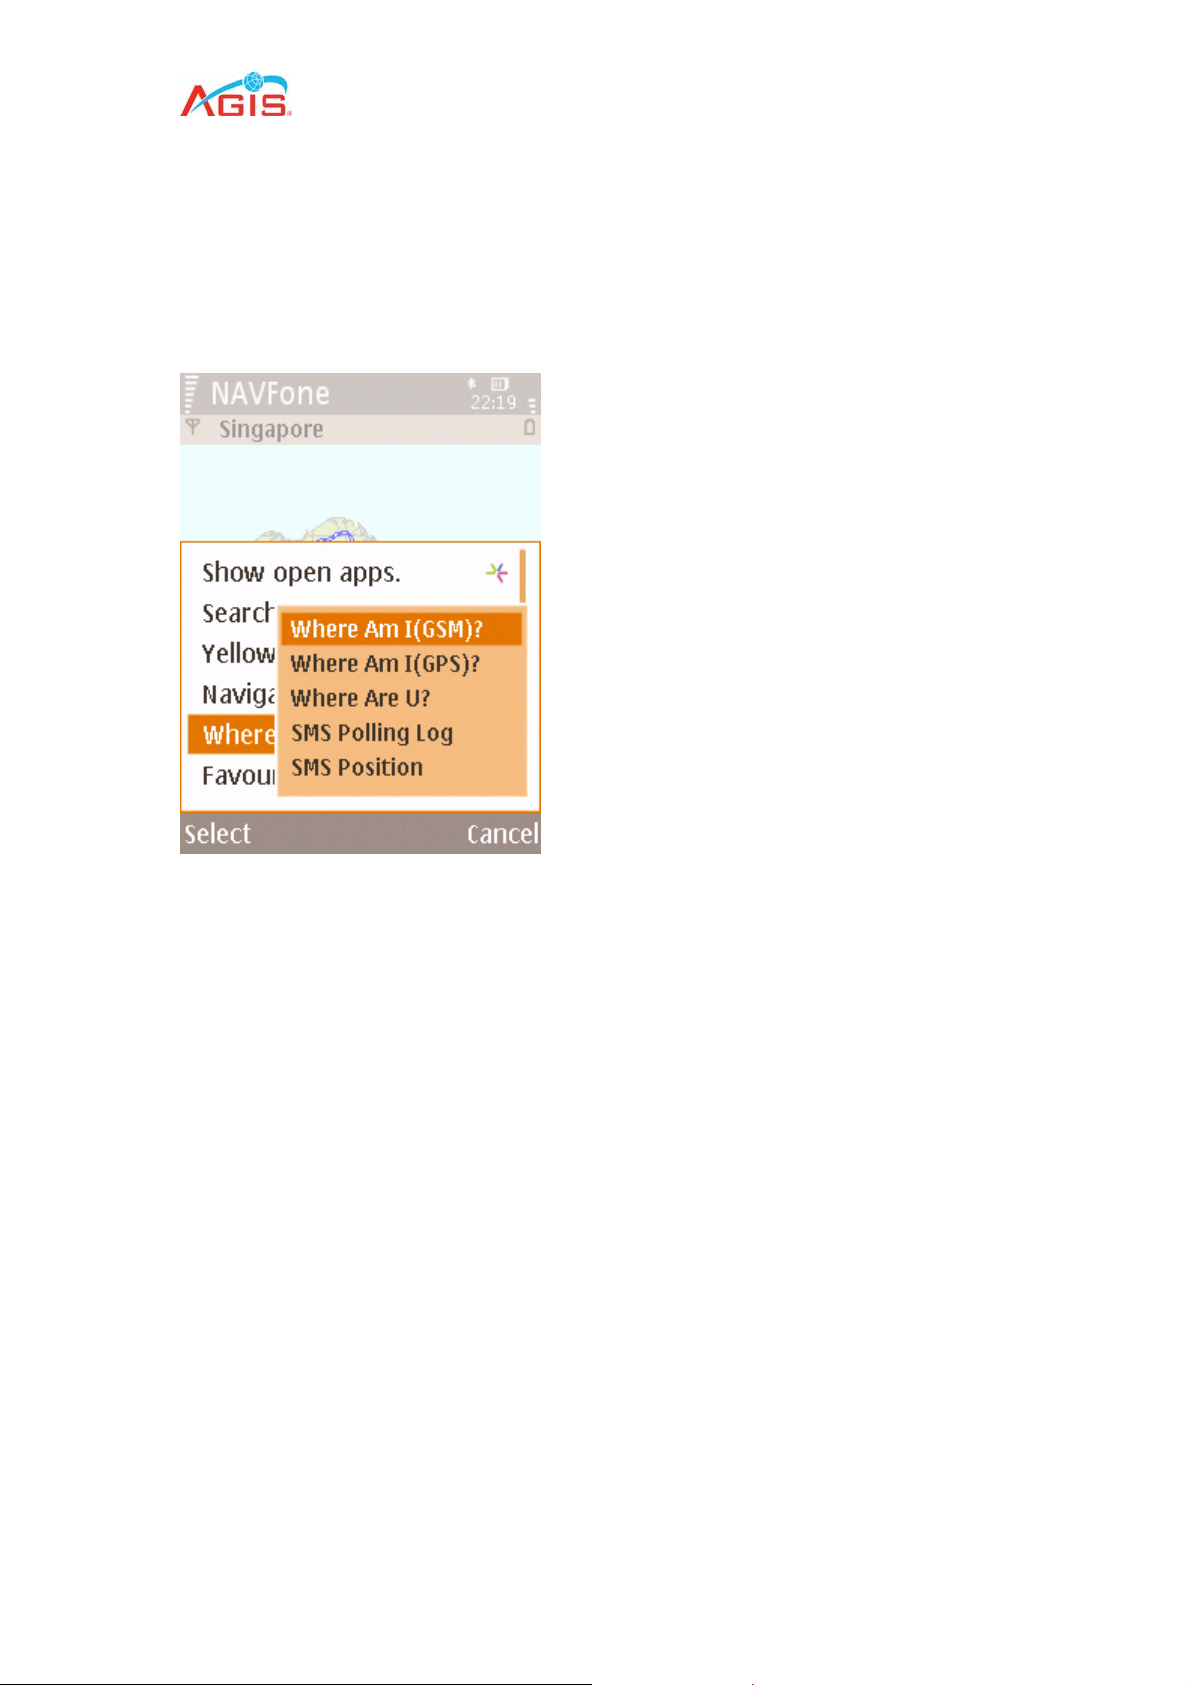
The Where is function uses agis’ Gprxtm GPS-like technology to find your
location and also your friend’s location.
8.1 Where Am I?
This command shows you the current location you are in.
To show your current location
1. Press Option->Where is...->Where am I (GSM)?
Your current location will be indicated with a green circle.
2. To show current GPS position, Press Option->Where is...->Where am I
(GPS)?
40
Page 41
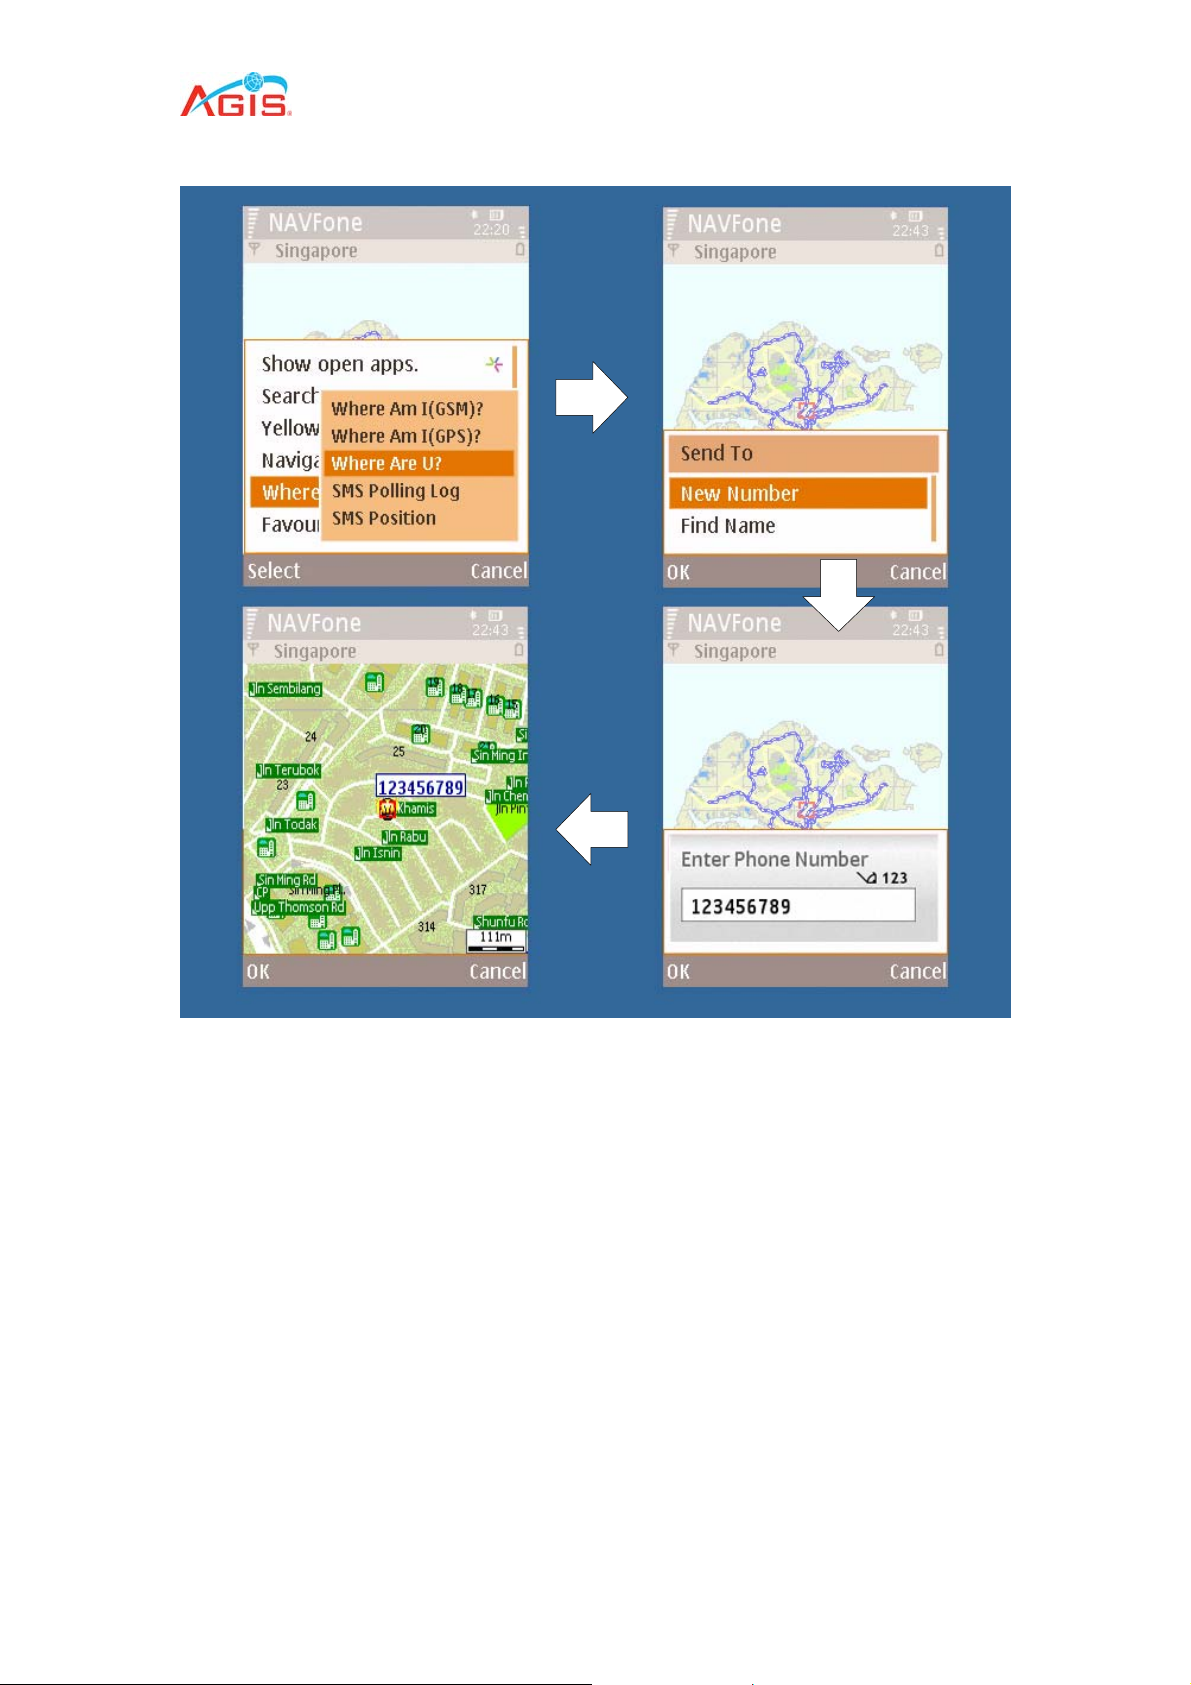
8.2 Where Are U?
This command allows you to request the location of another user of NAVFone.
1. Press Option->Where is...-> Where are U?
2. Select either New Number or Find Name
3. Enter the recipient mobile number or name and press OK
4. Recipient’s position will be shown on map.
41
Page 42

8.3 Set Visible/Invisible
This command allows you to be or not to be located when a user of NAVFone try to
request for your location.
8.4 SMS Polling Log
When the being-polled user is set to invisible mode, this command shows the sms
log of who has been requesting for the location of the polled user. The message
indicates the poller’s handset number and the date and time of this message.
42
Page 43
To check the sms polling log
Press Options and select Settings, then SMS Polling Log
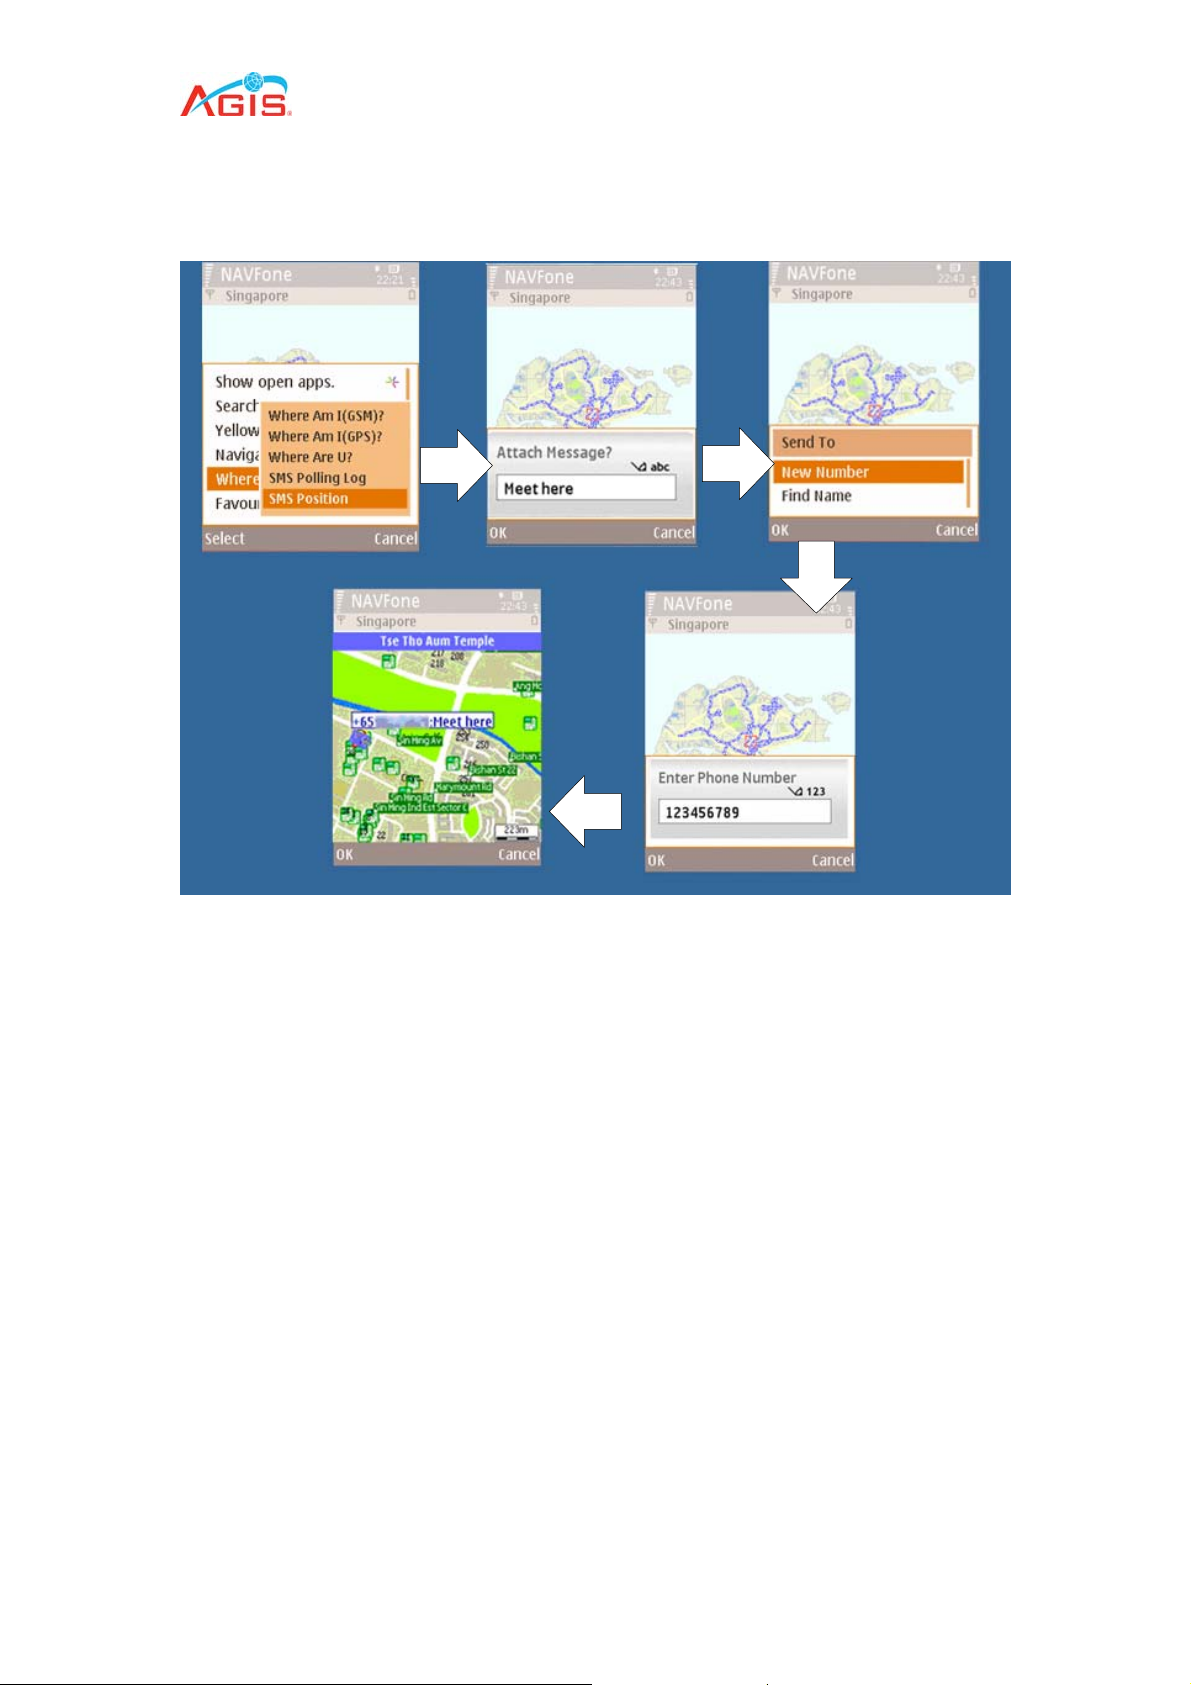
8.5 SMS Position
This command sends the position of location, where the cursor is in map, to another
phone via SMS. The message indicates the position of location and the date and
time of this message sent.
To send position
1. Press Menu and select SMS Position from Where is….
2. You may type in a short message at the Attach Message dialog box.
3. Enter the recipient’s mobile number or find an existing number from phone
number list.
4. Press Ok and to SMS your position to another NAVFone user.
If the recipient has NAVFone, a WP is created automatically with your mobile number
and can be viewed on the map.
If the receiving party is also running the NAVFone, the message would be
intercepted and appear as a waypoint zoomed in on the location. Normal sms would
not be intercepted by the program.
43
Page 44
Page 45
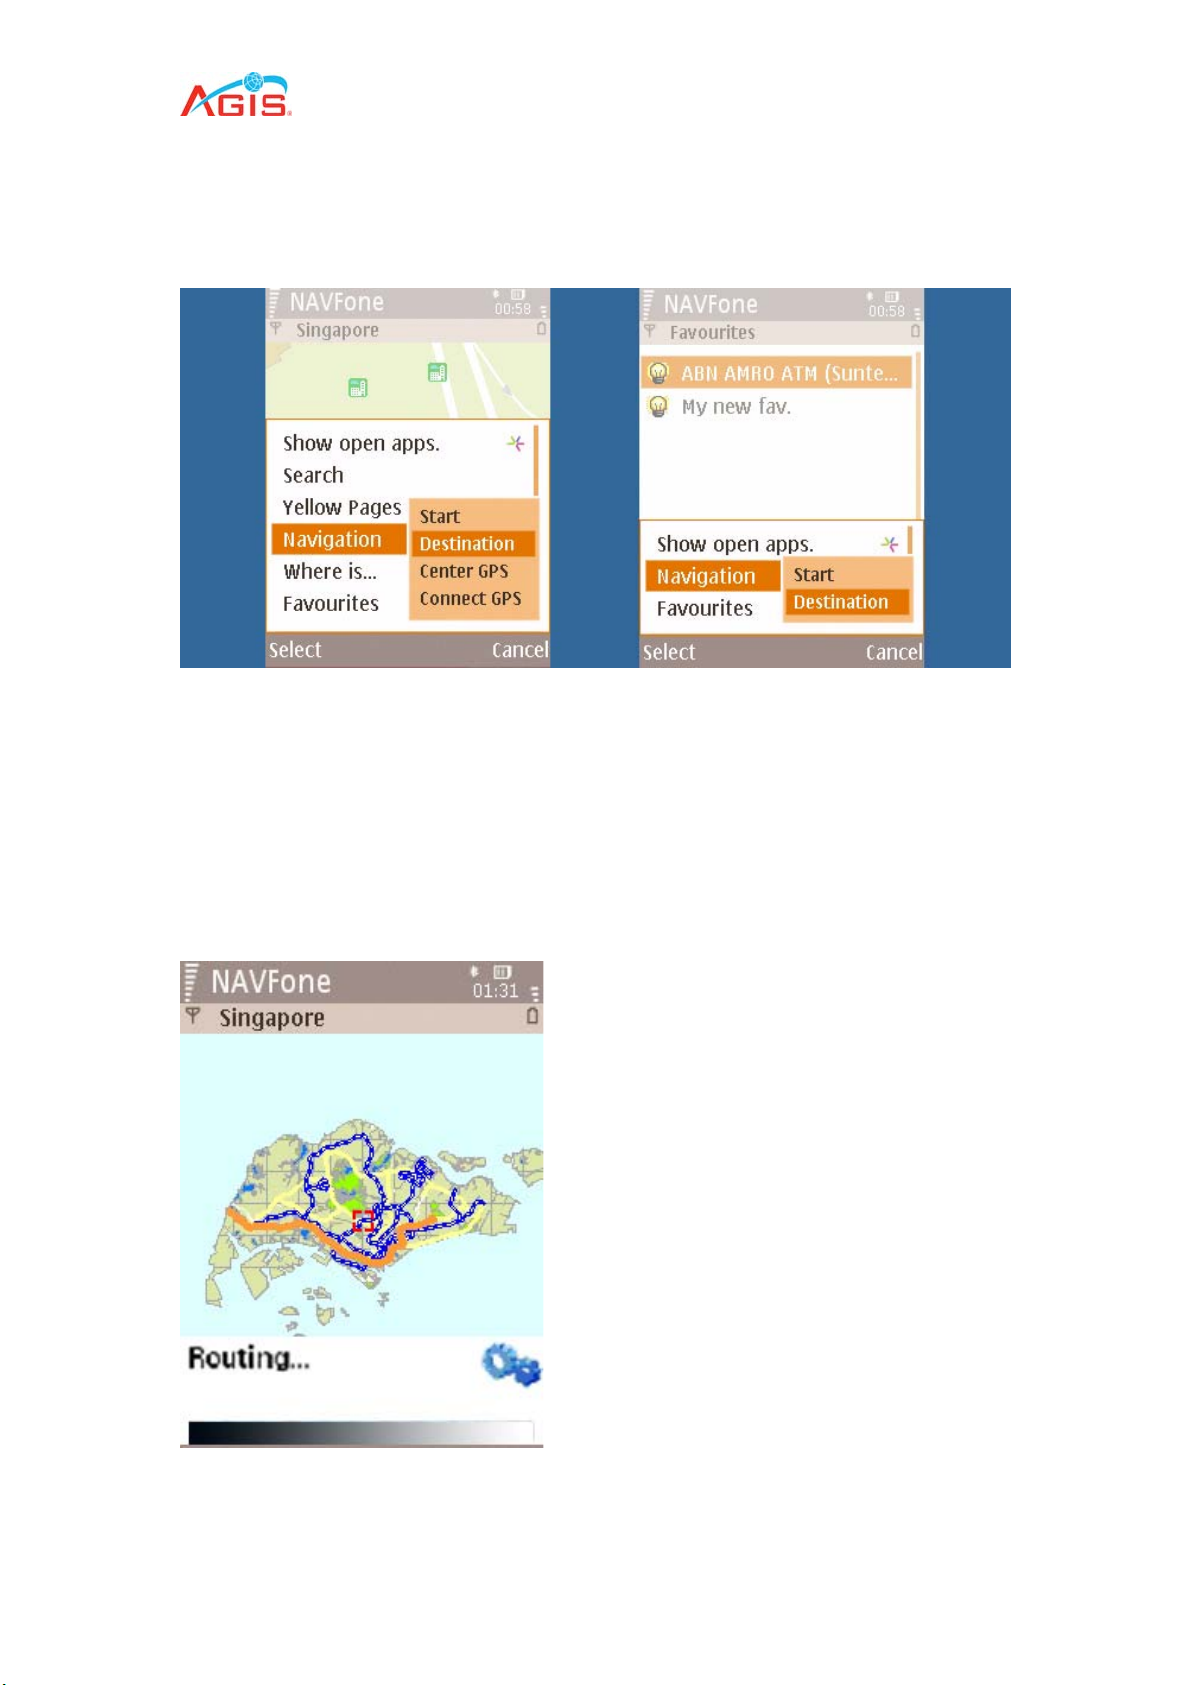
9.2 Planning your route (destination point)
Do a search for your destination by going SEARCH. Enter the keyword of the place
you would like to travel to. When the result appears, click on the link to zoom to your
destination which is highlighted on your map.
Select Menu and then Navigation, select Destination. This marks the
location as your end point. Alternatively, you can set it from your WP viewer
window.
9.3 Routing
Upon selecting your destination, the software will request to connect to a GPS.
The software will then begin to plan a route
45
Page 46
9.4 ERP Cost
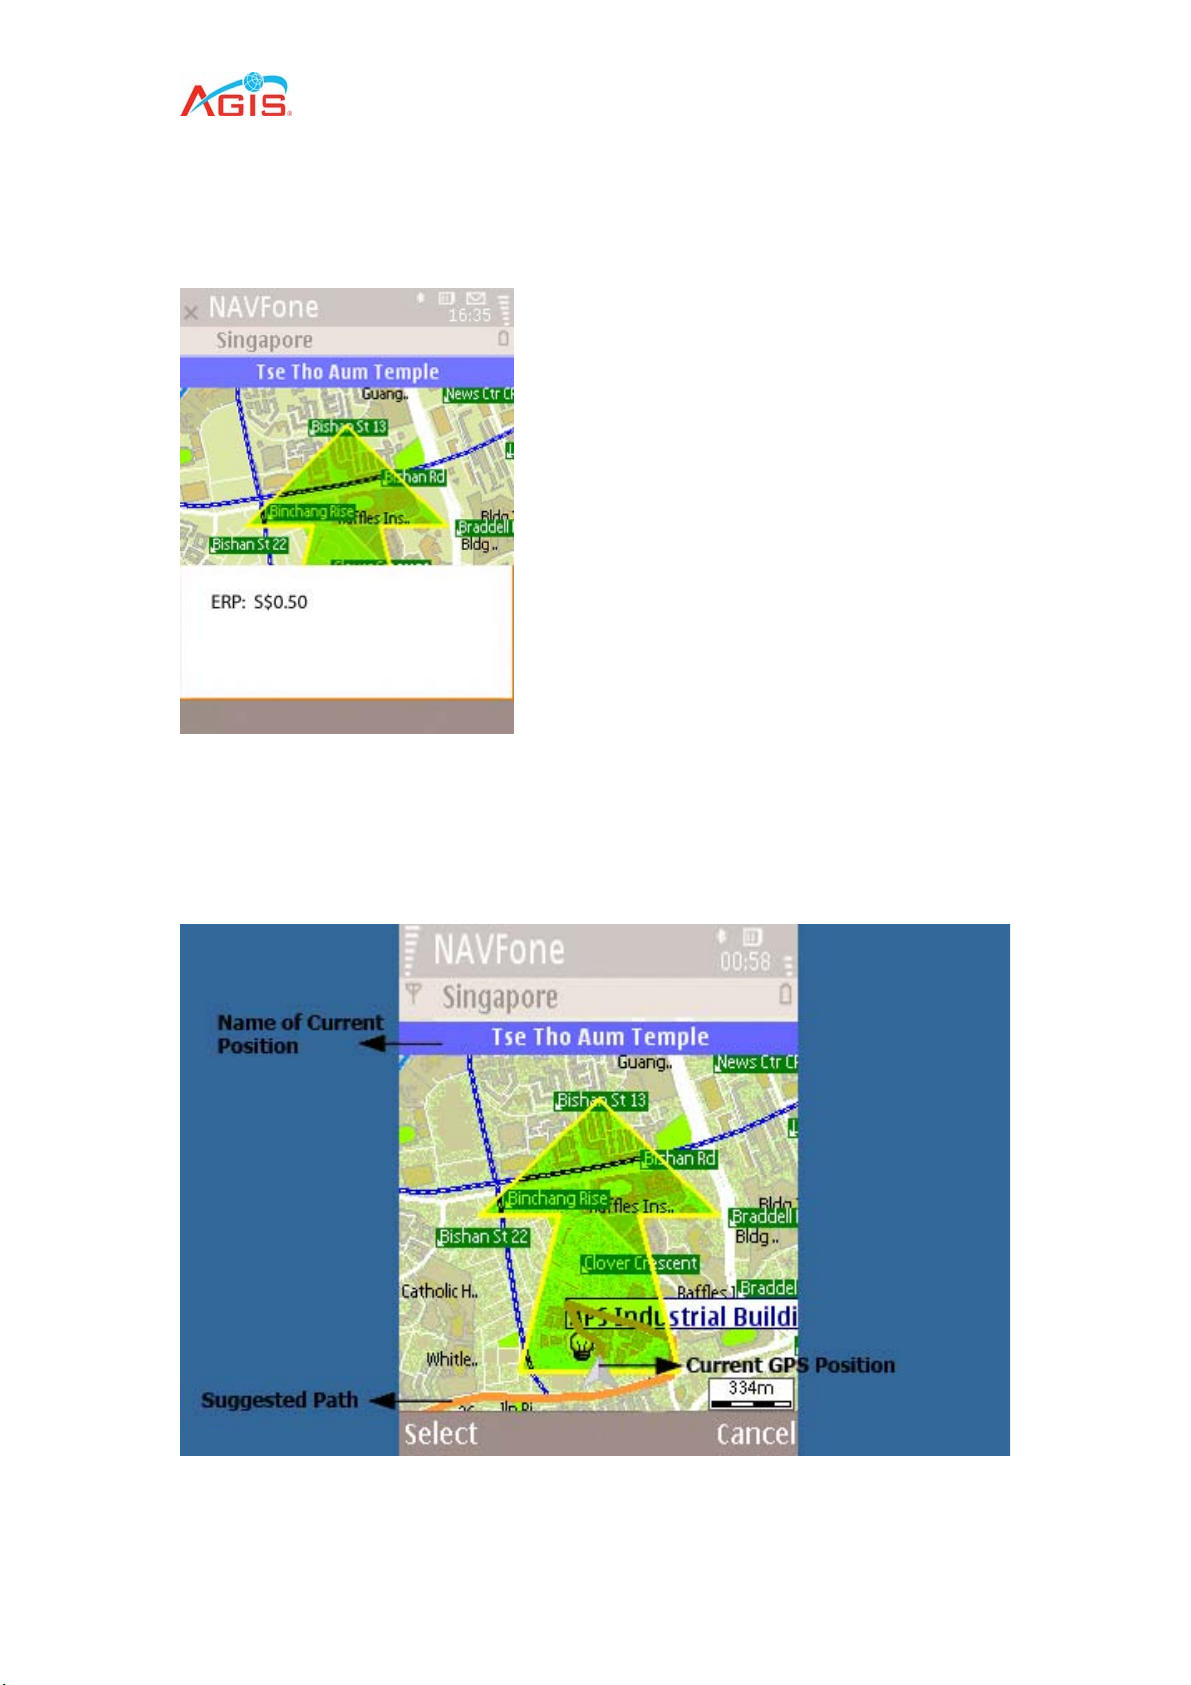
Once routing is completed, the ERP cost for the planned route will be shown
momentarily.
9.5 Navigation Map View
The route will then be shown on the map (highlighted in orange). If you have GPS
connection and outdoor with GPS locked, the map will also indicate your current
position with a red arrow.
46
Page 47

9.6 Simulating a planned route
You can choose to simulate a route that NAVFone have generated.
During playback, there will be a green arrow showing next turn. It will also include
voice prompts during the routing.
You can also choose to toggle to a different view by clicking on Toggle.
9.7 Toggle view
There are 3 type of display mode for routing.
1. Full maps feature.
2. Arrow indicator (no maps in the background)
3. Text based (clear road name and small arrow indication only).
All 3 modes will still include voice navigation capabilities.
47
Page 48
10.0 About
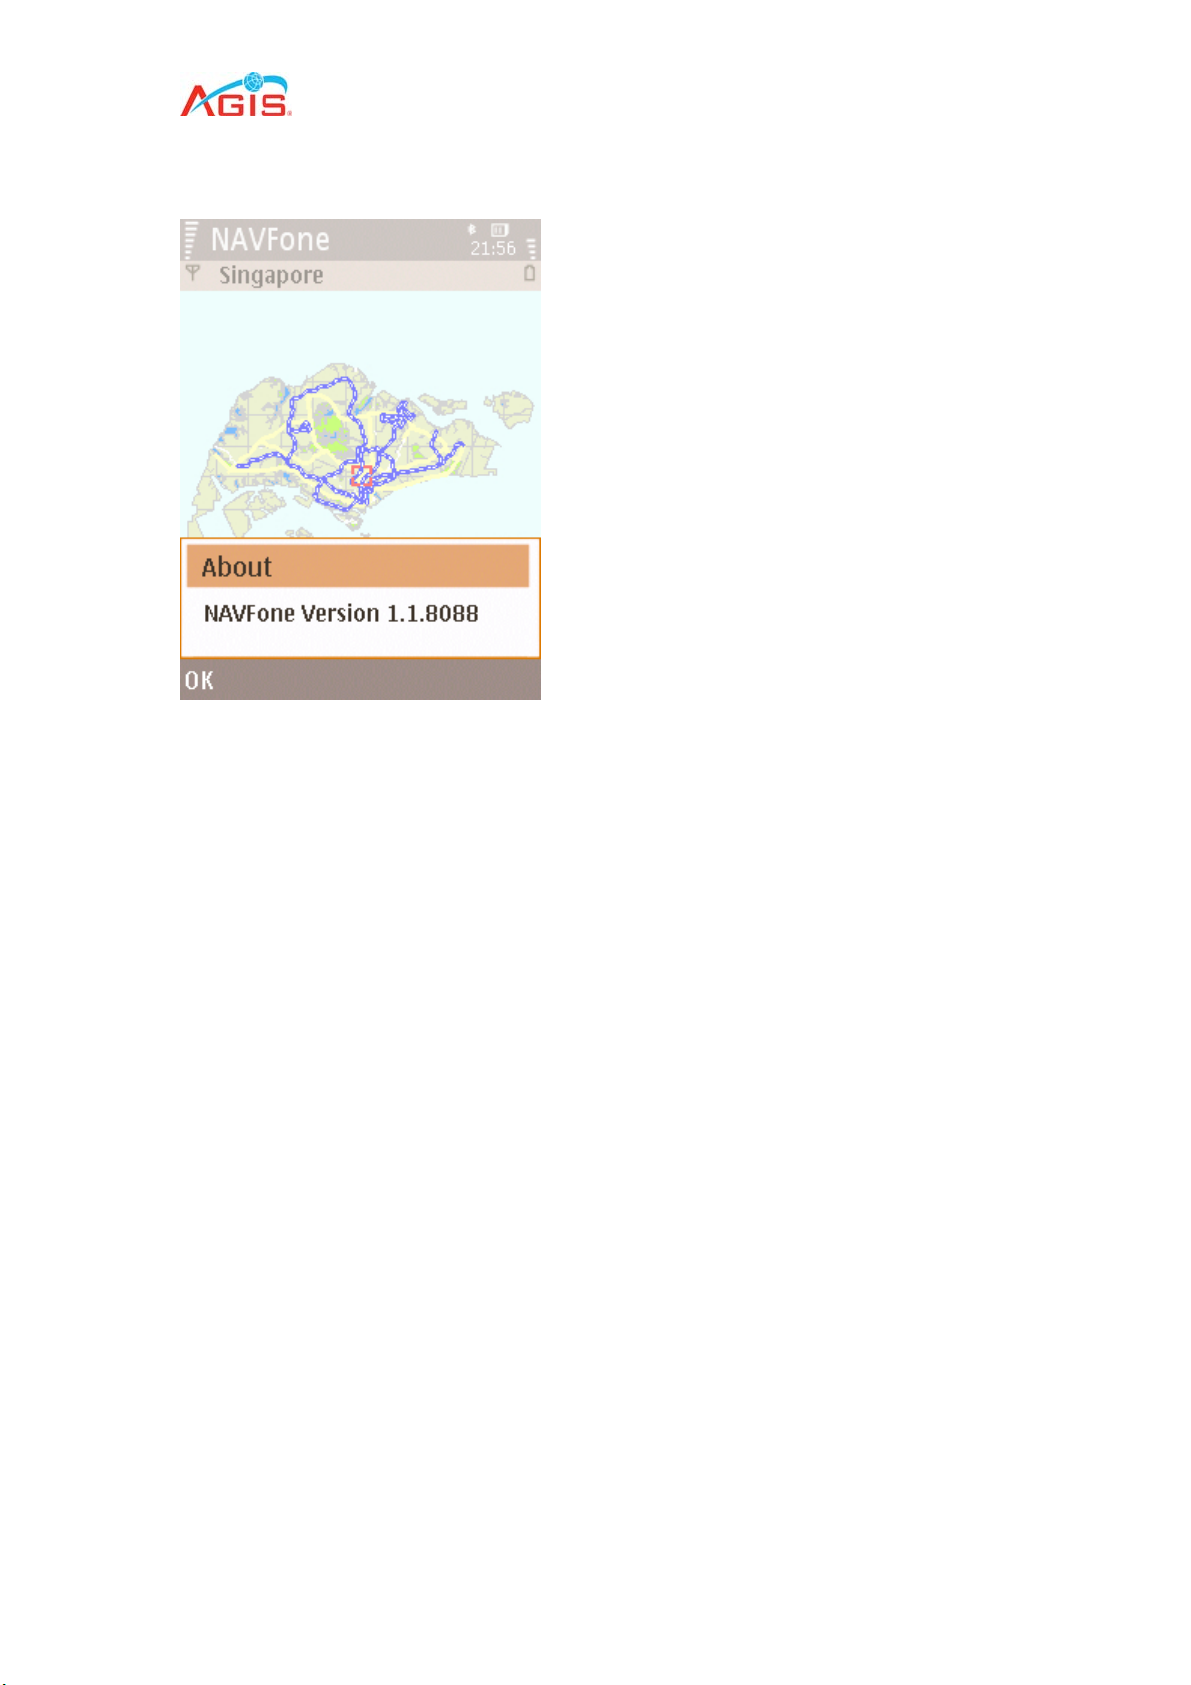
Options -> About, shows the version of the software.
48
Page 49
11.0 Settings
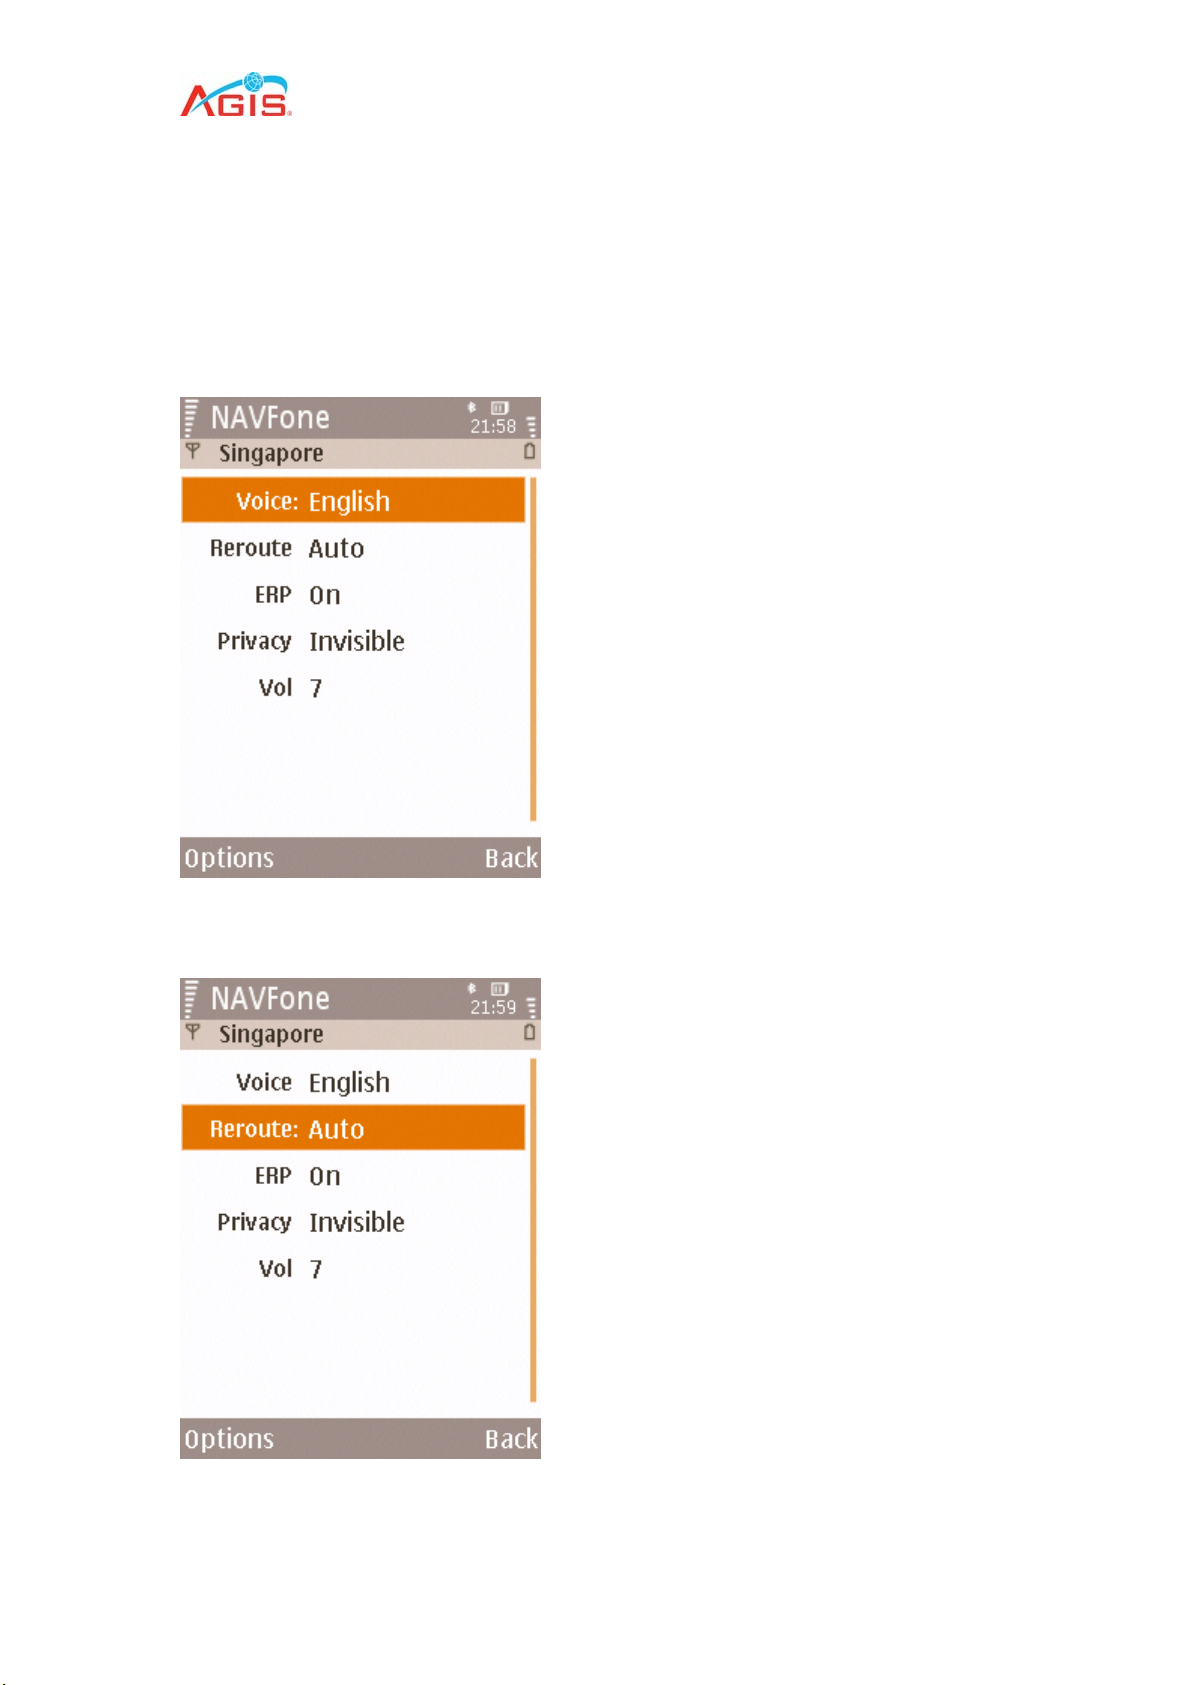
This feature allows you to change certain NAVFone options and settings.
Goto Options and select Settings.
There are 5 available settings.
Voice:
Toggles English, Chinese & Indonesian languages
Reroute:
Toggles Auto and Off
49
Page 50

ERP
On: Routing includes ERP
Off: Routing avoids ERP
Privacy:
Refer to Section 7.3
50
Page 51
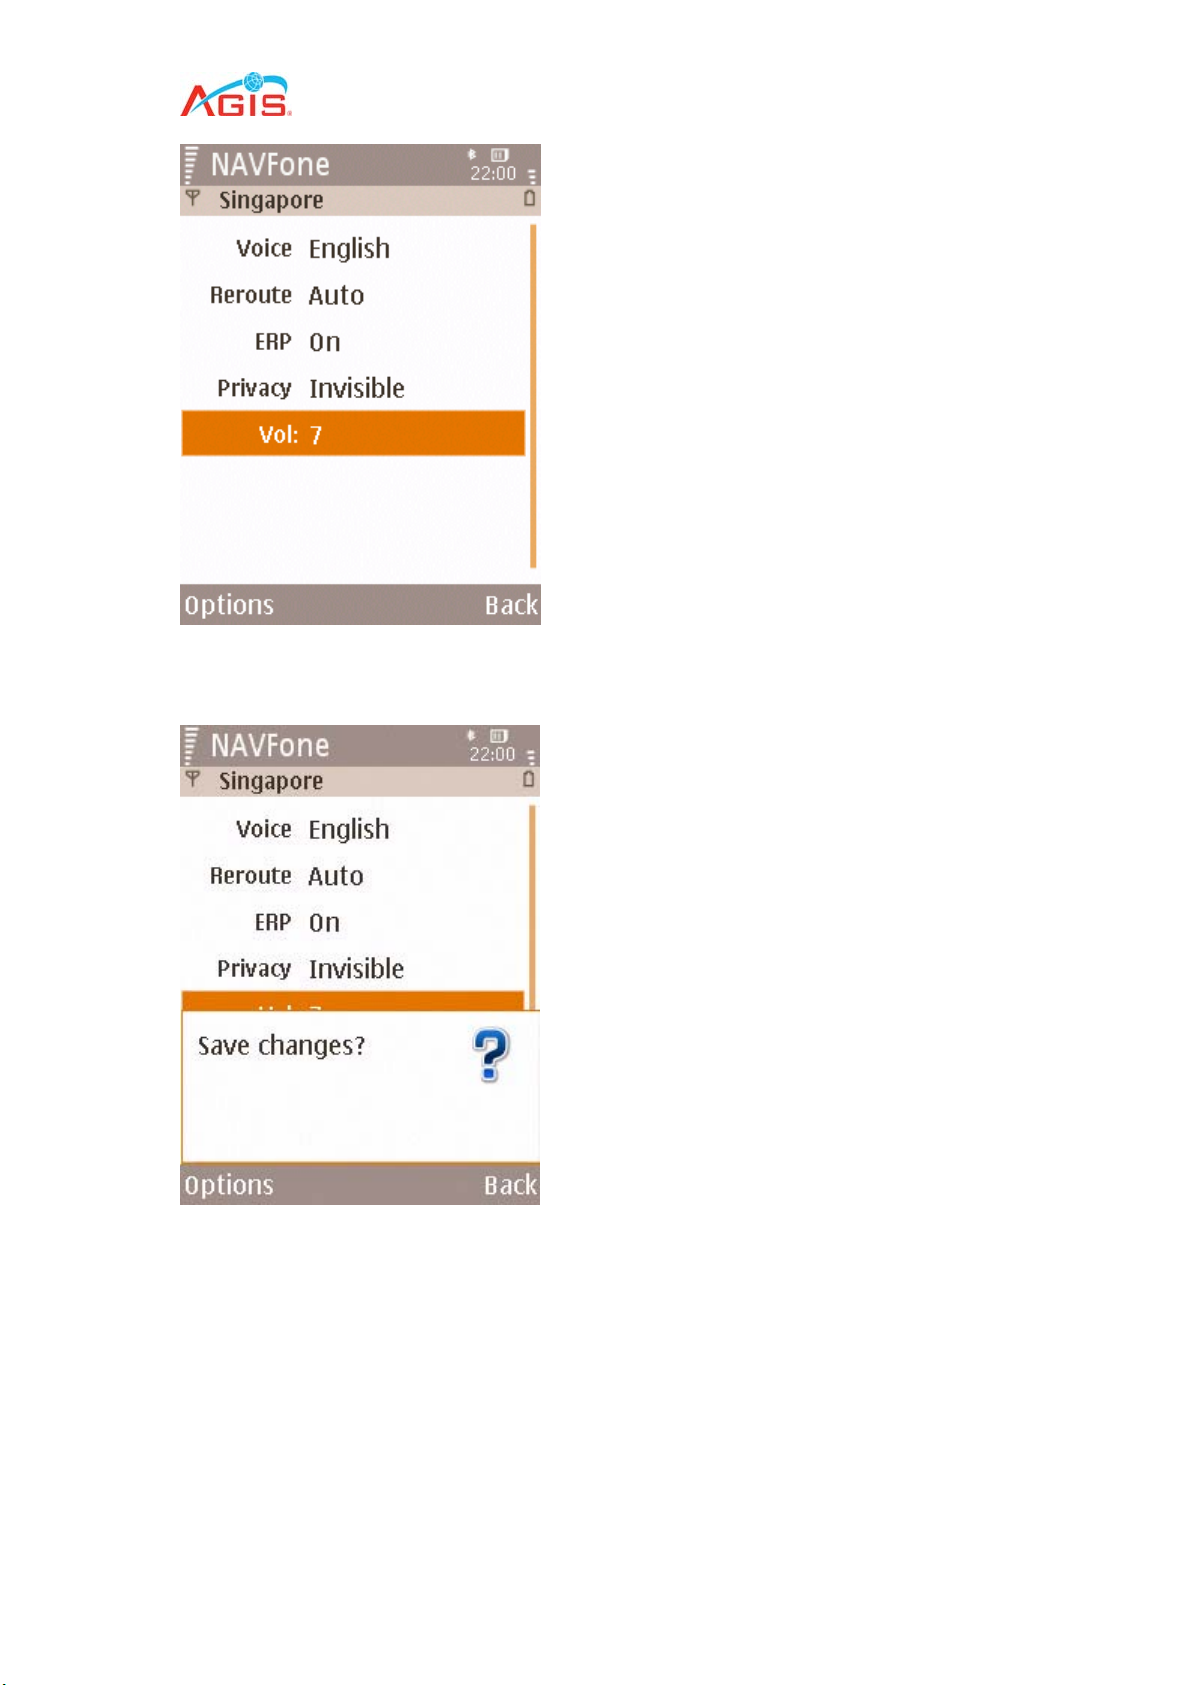
Vol:
Changes the volume level of the voice prompts, ranges from 0 to 10.
To save changes
Goto Options and select Save
51
Page 52

12.0 Exit NAVFone
This command quits the application.
To quit NAVFone
1. Click on Options
2. Scroll down to the Exit option
3. Press Yes to quit or No to continue using the application.
52
 Loading...