

Page 1
IMPORTANT!! PLEASE READ ENTIRE INSTRUCTION SHEET BEFORE ASSEMBLY!!
PARTS LIST DESCRIPTION
QTY./PCS
Step 1:CAREFULLY remove glass and set aside until
Step 7. Lay glass flat--do not stand on edge.
Set parts on a flat, non-abrasive surface. Remove
all protective materials. Identify all parts packed
in carton against the parts list. If you are missing
any parts, or are unsure how to proceed with
assembly, call our Customer Service Center at
1-800-416-3511. Do not attempt to assemble the
table if any parts are missing or damaged.
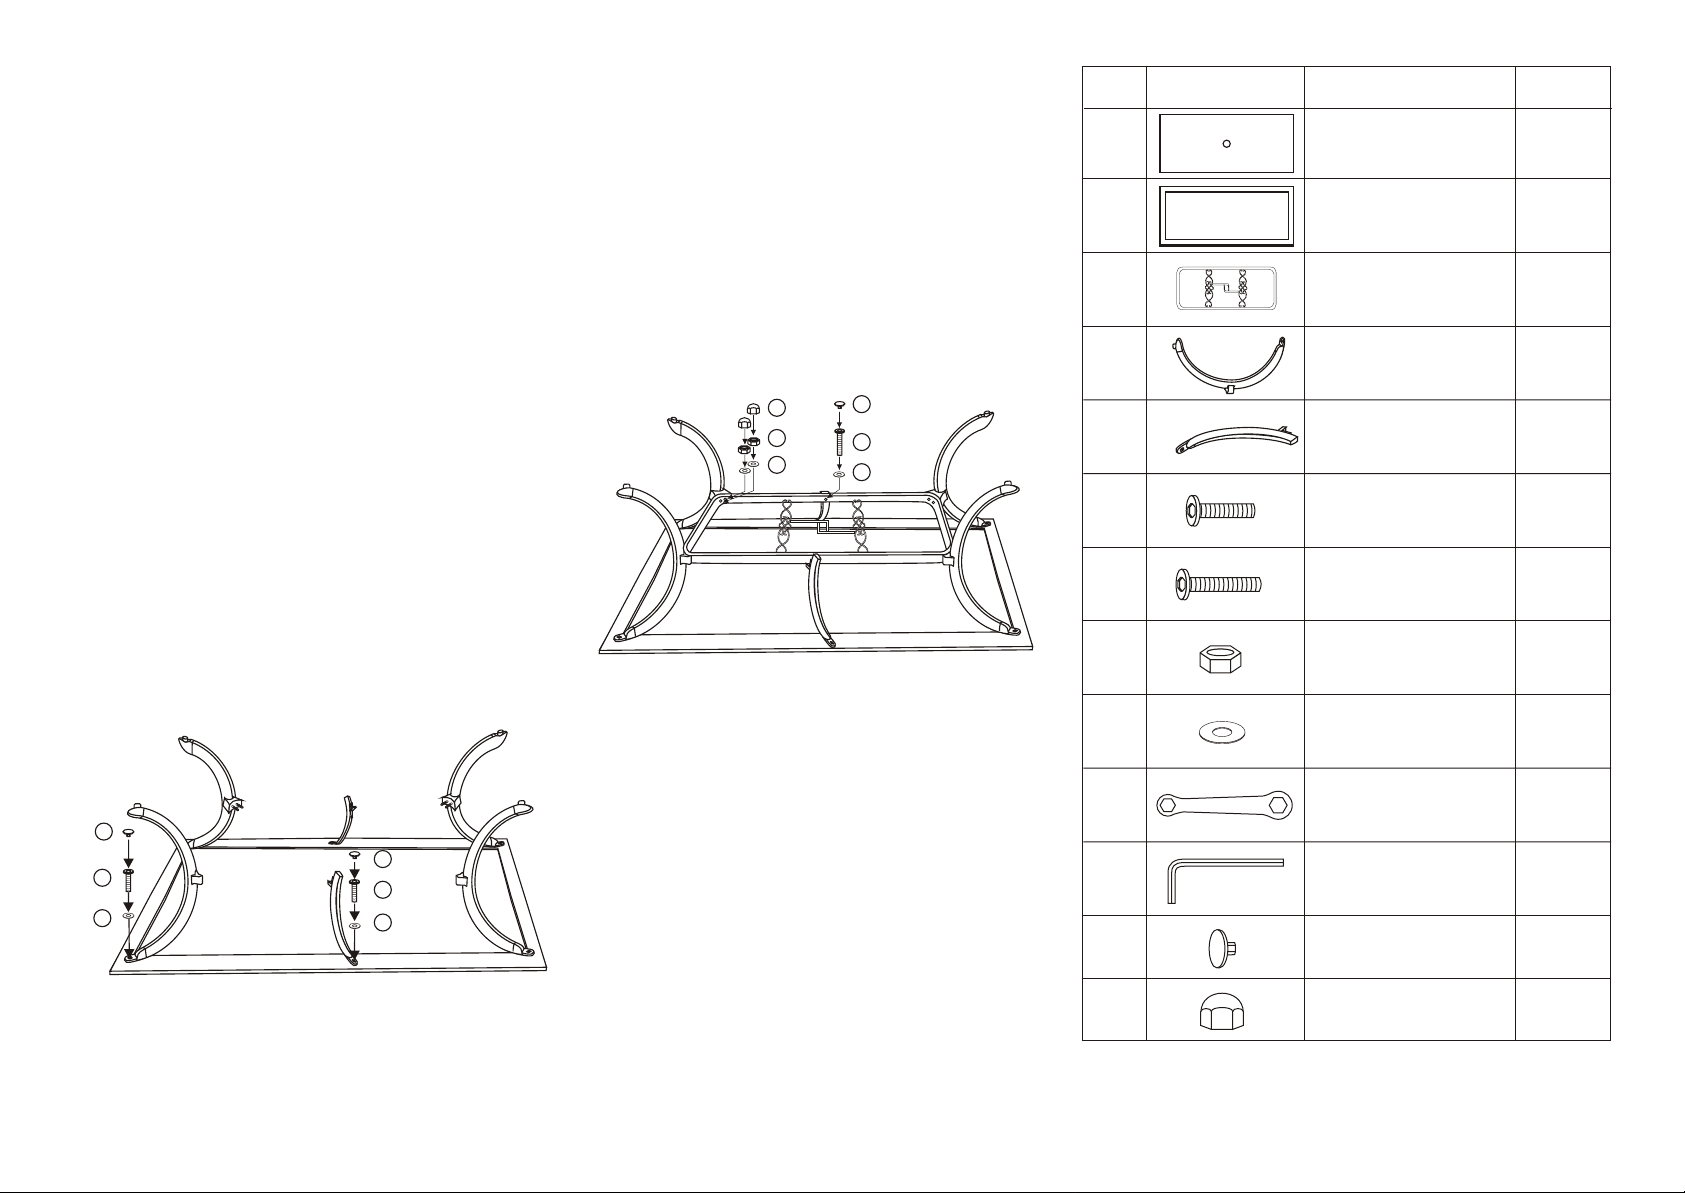
Step2: Place the table rim (without glass) upside down
on a flat, non-abrasive surface to avoid scratching
the rim.
bolt. Add a washer to bolt, then guide this into the
pre-drilled hole already in place in the table rim.
Hand tighten bolts. Repeat on the other three legs.
Important note: Hand tighten bolts only for this step.
Do not over tighten. Some adjustments may be
necessary to ensure table legs are aligned properly.
Step3:Attach a topside support to the rim using the
(1/4"x20mm) bolt. Add a washer to each bolt, then
guide into the pre-drilled hole in the table rim. Hand
tighten bolts. Repeat on the other side. Important note:
Hand tighten bolts only for this step. Do not over
tighten. Some adjustments may be necessary to
ensure table legs are aligned properly.
Attach a leg to the rim using a (1/4"x20mm)
Step4:Attach a leg to the leg connector bracket by carefully
guiding the bolts already in place on the table legs (each
leg has two bolts)
bracket. Add a washer and a nut to the end of each bolt.
Hand tighten only. Repeat on other three legs.
Step5:Using a (1/4"x25mm) bolt, attach a topside support
to the leg connector bracket. Add a washer to each bolt,
and guide this through the inside of the leg connector
bracket, and into the fixed nut already in place in the
topside support. Hand tighten only. Repeat for other side.
through the holes in the leg connector
13
8
9
12
7
9
1
2
GLASS TOP
TABLE RIM
LEG CONNECTOR
3
4
5
6
7
8
BRACKET
TABLE LEG
TOPSIDE SUPPORT
1/4"x20MM BOLT
1/4"x25MM BOLT
NUT
1
1
1
4
2
6
2
8
Step6:At this time, make any minor adjustments in the alignment
of the table legs or topside supports. Once you have
legs and topside supports in the correct position, use the
Hex Bolt Drive and Hex Wrench provided to tighten all
12
6
9
12
6
9
nuts and bolts. Note:
revolutions at a time. In order to apply even pressure, we
recommend you alternate between nuts and bolts, working
in a cross corner (”X”) fashion. DO NOT OVER
TIGHTEN. Cover all nuts and bolts with PVC covers.
Step7:With the help of another person , turn the table in
the upright position. Note the clear bumpers spaced
evenly throughout the inside of the table rim.
CAREFULLY place the glass inside the rim, resting on
the clear bumpers.
If you have any questions, please call our customer
service department (800) 416-3511.
Each bolt must be tightened a few
Your table is ready for use.
9
10
11
12
13
WASHER
HEX WRENCH
HEX BOLT DRIVER
PVC BOLT COVER
PVC NUT COVER
16
1
1
8
8
MODEL # 553860-22-487
Page 2
 Loading...