

Aginova SENTINEL Users Manual

1
Sentinel
Desktop Version
User Guide
Software version 1.0.3
Document revision 6

Contents
2
What You Need ..................................................................................................................................................... 3
Sentinel Setup .......................................................................................................................................................... 3
Introduction .......................................................................................................................................................... 4
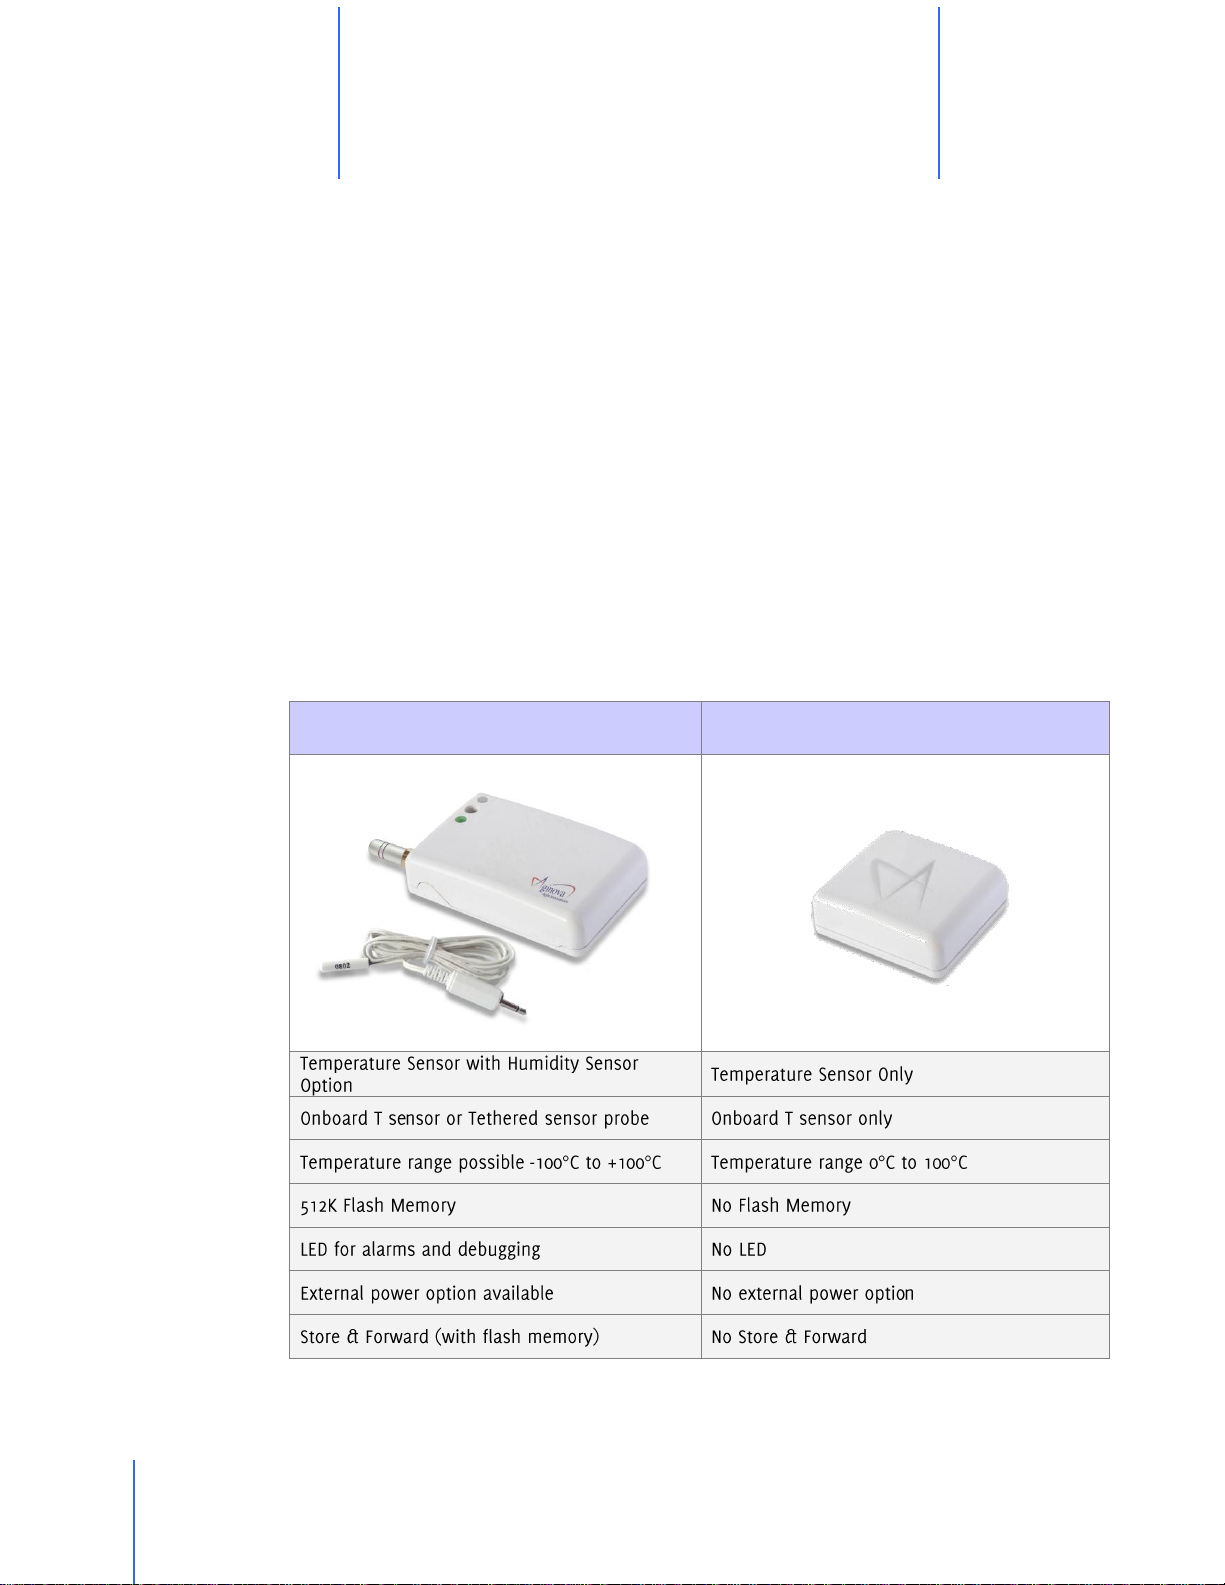
The Sentinel Pro and Micro compared ................................................................................................................. 4
Introduction to the Sentinel .................................................................................................................................... 4
Low-power WiFi Sensors ...................................................................................................................................... 5
Overview ............................................................................................................................................................... 6
Configure your Wi-Fi router ................................................................................................................................. 6
Desktop Software Setup .......................................................................................................................................... 6
Changing the PC’s network IP address ................................................................................................................ 7
Installing the Desktop Software ............................................................................................................................ 8
Setup of the Sentinel Sensor .................................................................................................................................. 9
Introduction ........................................................................................................................................................ 10
Running the Desktop Software ............................................................................................................................ 10
Desktop Software Guide ....................................................................................................................................... 10
The Overview section .......................................................................................................................................... 11
The List of Sensors section.................................................................................................................................. 12
Reconfiguring your sensors ................................................................................................................................ 13
Reprogramming your sensors ............................................................................................................................. 14
The Graphs & Data section ................................................................................................................................ 15
The Configuration section .................................................................................................................................. 15
The Communications section .............................................................................................................................. 16
Overview of the data flow ................................................................................................................................... 17
Troubleshooting ..................................................................................................................................................... 17
Common problems .............................................................................................................................................. 18
Understanding LEDs’ meaning .......................................................................................................................... 18
Using Wireshark to sense Ethernet packets ........................................................................................................ 19
Using Wireshark to sense Wi-Fi packets ............................................................................................................ 19

Chapter 1 Sentinel Setup
3
Sentinel Setup
1
What You Need
To use the Sentinel and the Desktop Software, you will need:
At least one Sentinel Pro or Sentinel Micro.
Windows 2000 operating system or better
At least 1 GB of Physical RAM
At least 1 GB of Hard Disk space
Screen resolution of 800x600 or better, 16-bit color depth
Aginova Desktop Software (CD-ROM)
A WiFi Access Point with the following capabilities:
o 802.11 b/g
o Open security or WPA2 PSK
o DHCP (or provided by your network)
o 1,2 Mbps basic rate set
4
Chapter 2 Introduction to the Sentinel
Sentinel PRO
Sentinel MICRO
Introduction to the Sentinel
2
Introduction
The Sentinel Wi-Fi Sensors are devices with various sensors (depending on
configuration temperature, humidity, moisture, light) that use your existing
802.11b/g Wi-Fi network infrastructure.
The sensors will take a measurement at a regular time interval (for the remaining of
this guide, we will use temperature as an example) and report them to a local PC.
When not taking a measurement, the sensor will enter a low power sleep mode to
preserve the internal lithium battery.
The Sentinel Pro and Micro compared

Chapter 2 Introduction to the Sentinel
5
Measure
SendSleep
Wake up CPU
Wake up WLAN TX
Shutdown
Sleep
Send
ConfigUpdate
Trap
Waitfor
ConfigUpdate
SET/GET
Wake up WLAN TX
Wake up WLAN
RX for 1 sec
Shutdown
Low-power WiFi Sensors
The Sentinel uses a low-power duty cycling algorithm to preserve battery power
and perform scheduled temperature measurements.
6
Chapter 3 Desktop Software Setup
You only need to go through these steps if the sensor was
configured for DESKTOP application. This will not work for
WEB application.
Desktop Software Setup
3
Overview
In the desktop software application, the sensor is pre-configured to send its data to
a Personal Computer (PC) whose IP address is set by default to 172.19.0.10.
In order to connect to the sensors, you will first need to configure your WiFi router,
reconfigure your PC with the appropriate settings, and install the Desktop
Software. Once you are able to connect to the sensors, you can reconfigure them
to send the data packets to a different IP address.
In summary:
- Configure the Wi-Fi router
- Change your PC IP address (and network addressing)
- Install the Software on the PC
- Turn on the sensor(s) and wait until they appear on the Desktop Software
- Reconfigure the sensors to point to a different IP address
- Reconfigure your PC IP address back to its original settings
Configure your Wi-Fi router
For desktop software configure the Access Point with the following settings:
SSID: demokit (case sensitive)
Channel: 1
Mode: 802.11 b/g
DHCP: enabled
Security: Either Open or WPA2 Personal, with PSK “demokit1234”
Basic rate set: 1, 2 Mbps
IP Address: 172.19.0.1
Netmask: 255.255.0.0
Chapter 3 Desktop Software Setup
7
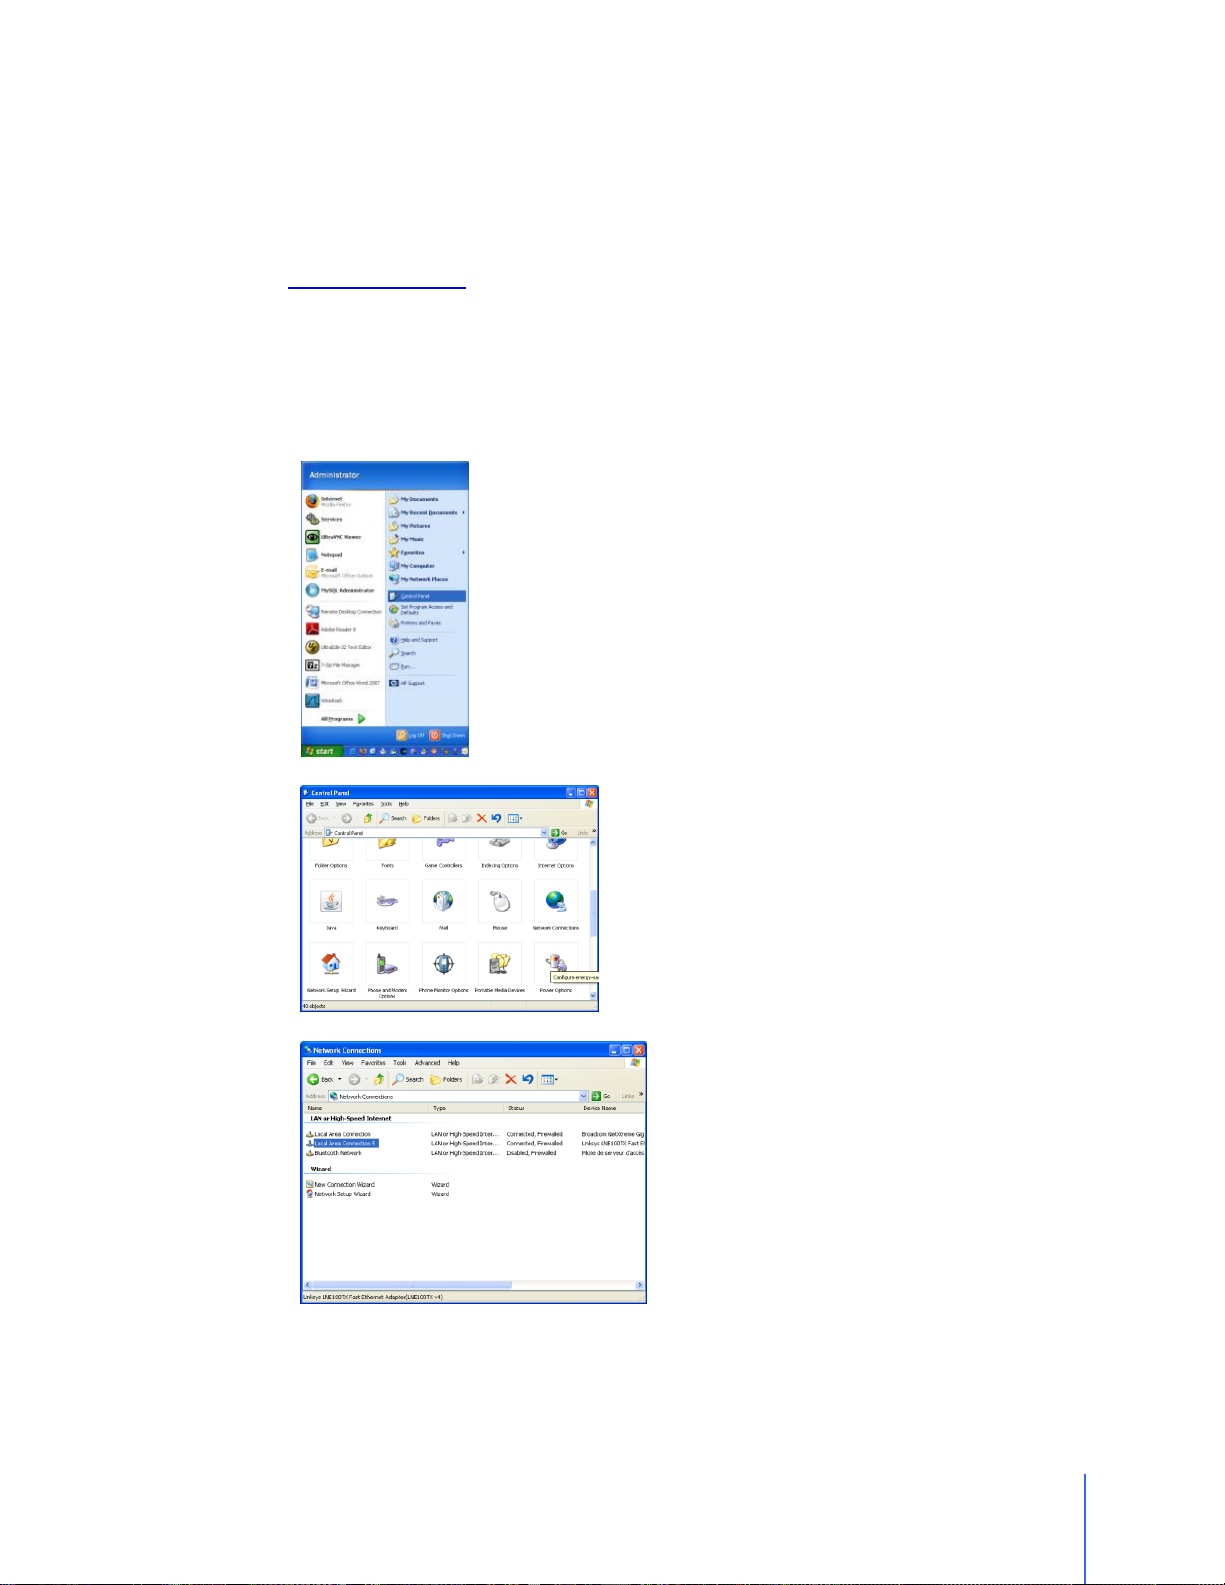
A. Open the Control Panel, Network
Connections
Go to START
Select Control Panel
Double-click on the network connections
icon.
B. Disable the Ethernet network interface
Right-click on the Ethernet network
interface and select disable.
NOTE
- WEP, or WPA1+2 is not supported at this moment
- You must connect your PC to the one of the LAN ports of your router
An illustrated reconfiguration of a Linksys WRT54GC router is available at
www.aginova.com
Changing the PC’s network IP address
Computer has to be set up as follows when using the desktop software OR the
RTMS (No set up necessary when using Aginova’s hosted solution):
8
Chapter 3 Desktop Software Setup
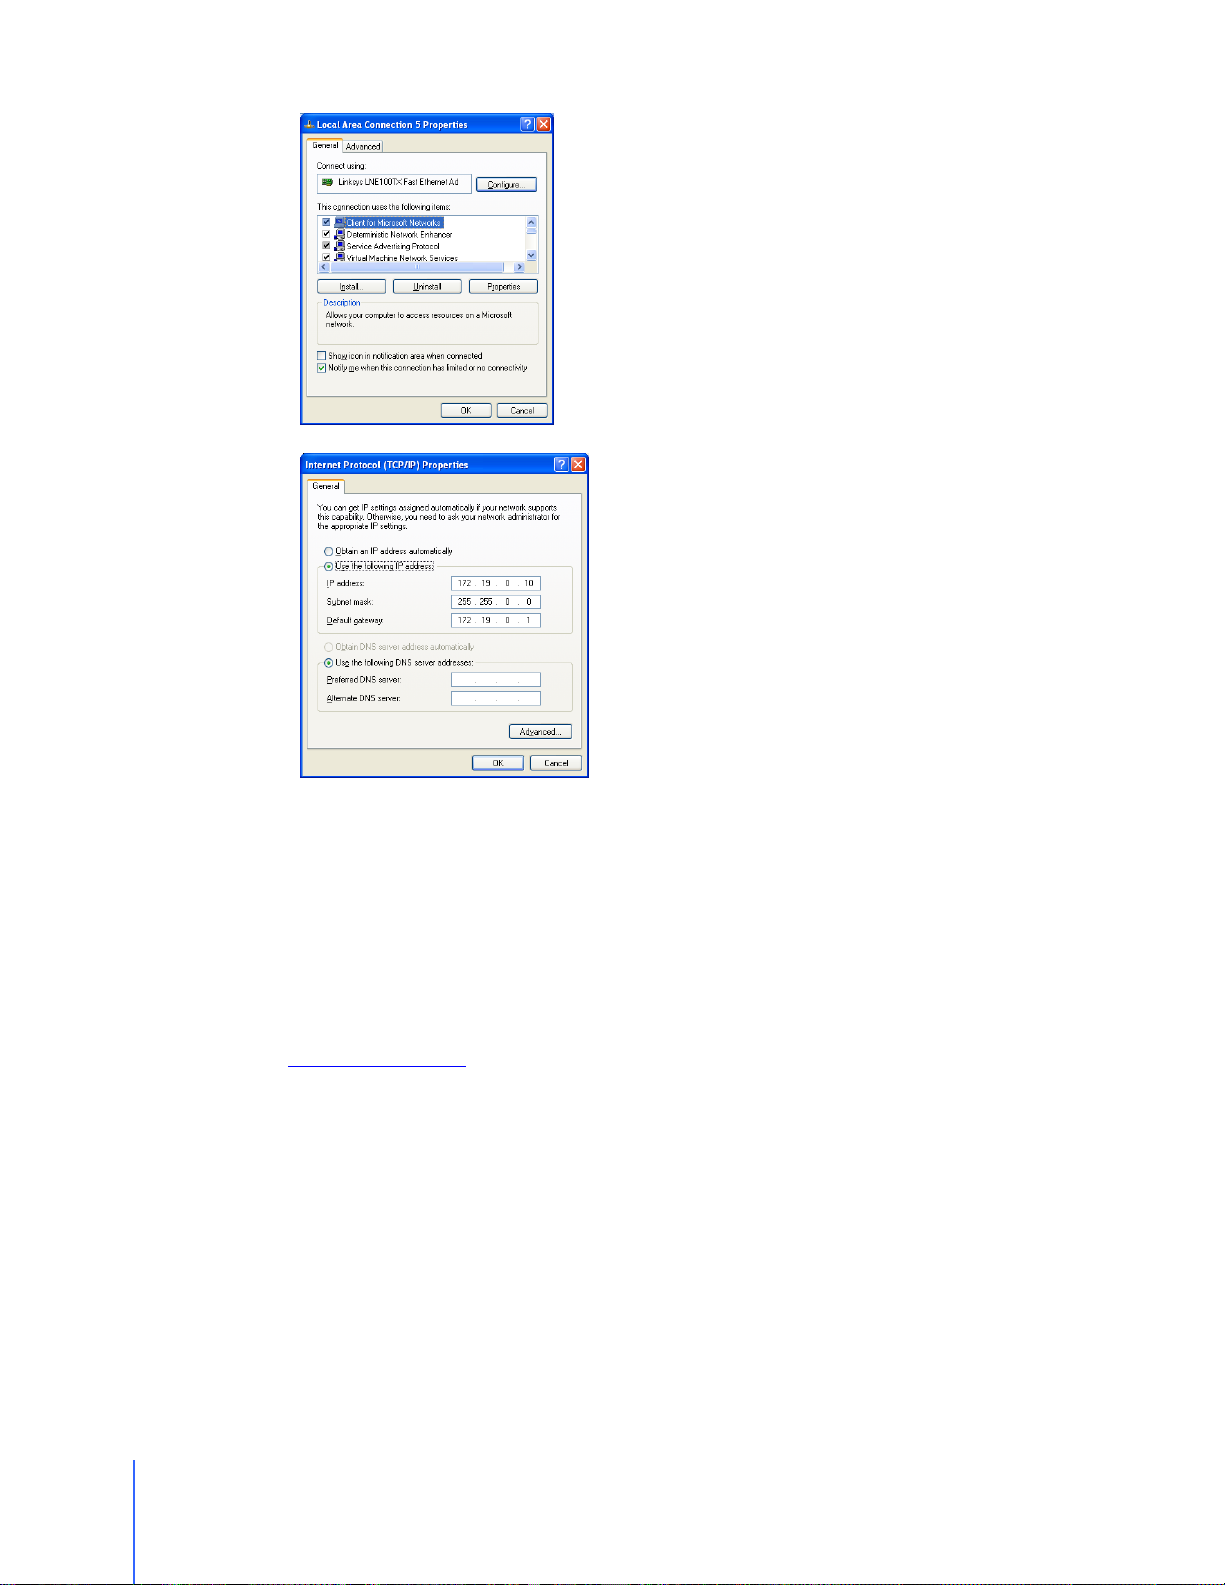
C. Open the TCP/IP configuration
Right-click on the Ethernet network
interface and select Properties.
Double-click on Internet Protocol (TCP/IP).
D. Change the configuration to use static
IP
Write down your previous settings.
Select Use the following address:
IP address: 172.19.0.10
Subnet mask: 255.255.0.0
Default gateway: 172.19.0.1
E. Enable the Ethernet network interface
Right-click on the Ethernet network
interface and select enable.
Installing the Desktop Software
Insert the provided CD-ROM or download the latest release from
www.aginova.com .
The installer should start automatically. If not, locate and run the installer file.
Once the installation starts, you can leave all options with default values.
 Loading...