

Page 1
User’s Guide
Part Number: E3640-90001
February 2008.
For Safety information, Warranties, and Regulatory information,
see the pages behind the Index.
© Copyright Agilent Technologies 1999 - 2008
All Rights Reserved.
Agilent Technologies E364xA
Single Output DC Power Supplies
Page 2

The Agilent Technologies E3640A/E3641A (30 watt), E3642A/E3643A (50 watt),
and E3644A/E3645A (80 watt) are high performance single-output dual range
programmable DC power sup pli es wi th GPIB and RS- 232 interfaces. The
combination of bench-top and system features in these power supplies
provides versatile solutions for your design and test requirements.
Convenient bench-top features
• Single-output dual range
• Output on/off
• High accuracy and high resolution
• Excellent load and line regulation
• Low ripple and noise
• Overvoltage protection
• Five Operating states storage
• Easy-to-use controls
• Remote voltage sensing
• Front and Rear output terminals
• Portable, ruggedized case with non-sk id feet
• Highly visible vacuum-fluorescent displays
• Error messages availabl e on the display
Flexible system features
• GPIB (IEEE-488) and RS-232 interfaces are standard
• SCPI (Standard Commands for Programmable Instruments) compatibility
• I/O setup easily done from front-panel
• Software calibration, no internal physical adjustments
Agilent Technologies E364xA
Single Output DC Power Supplies
Page 3
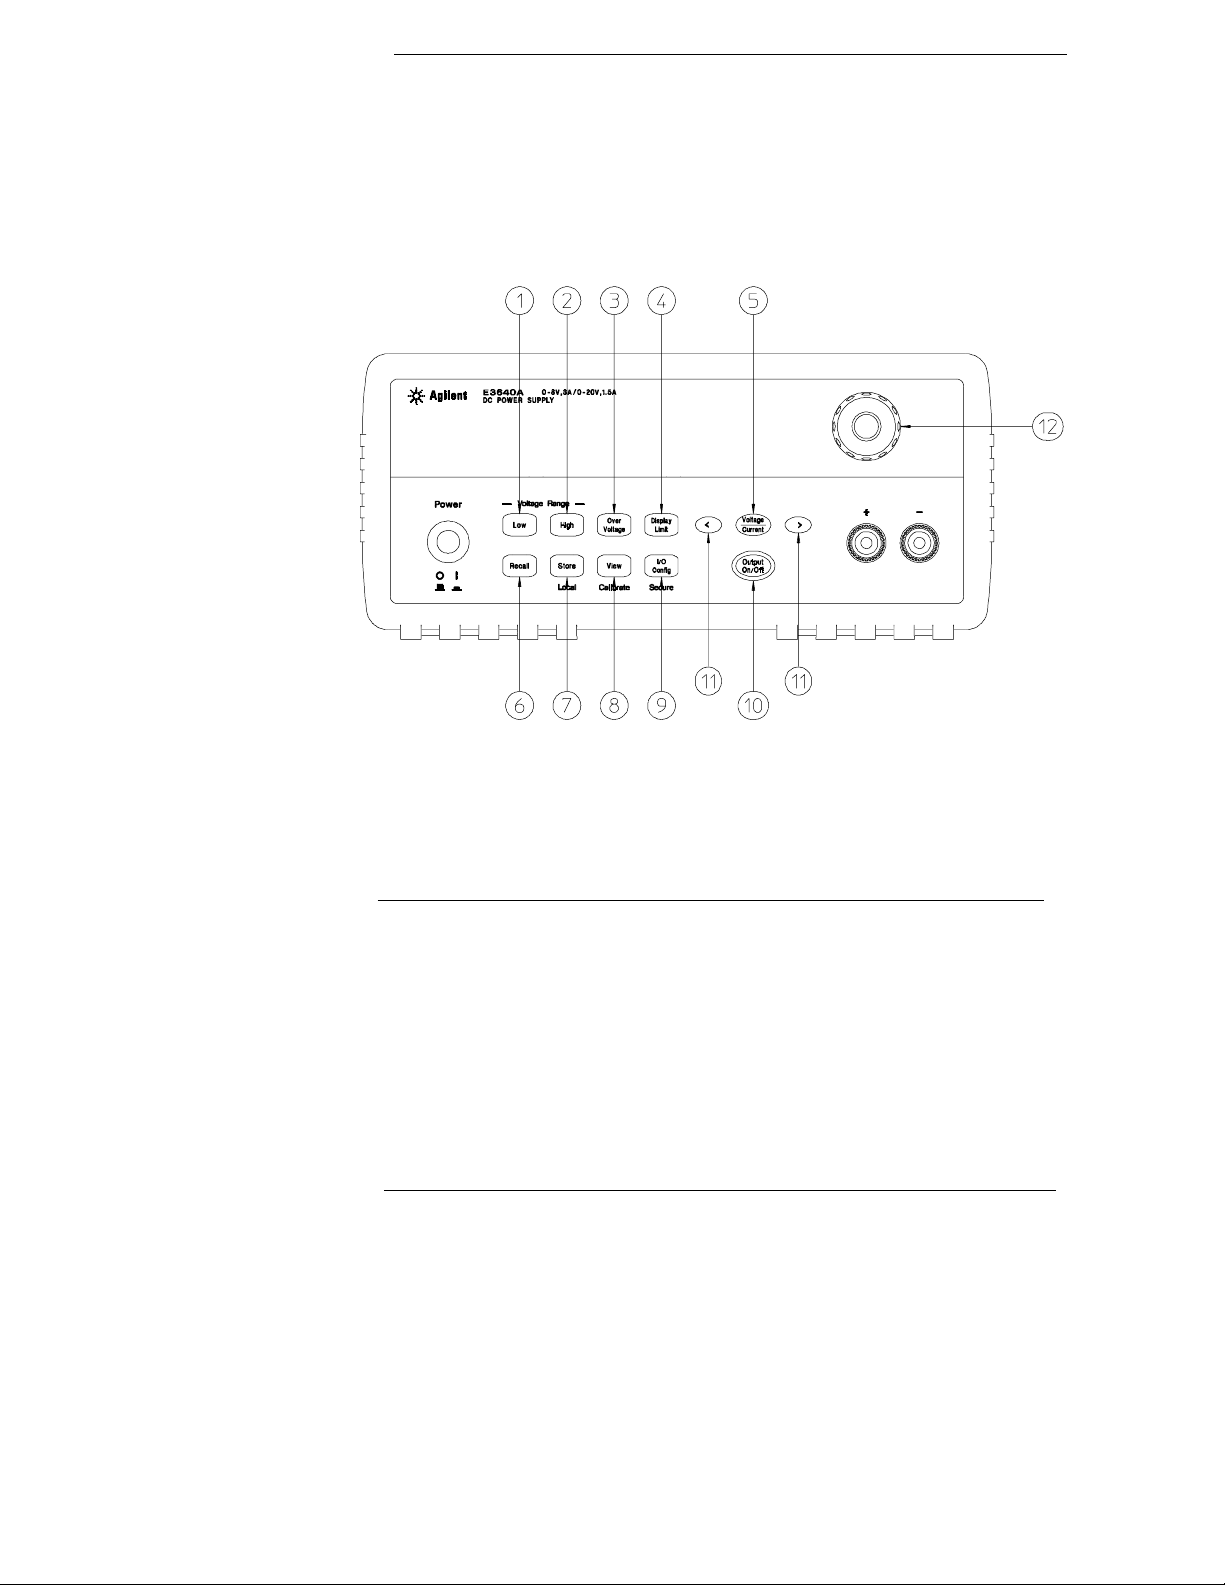
The Front Panel at a Glance
1 Low voltage range selection Key
2 High voltage range selection Key
3 Overvoltage protection Key
4 Display limit Key
5 Voltage/Current adjust selection Key
6 Stored state Recall/Reset Menu
7 State storage menu/Local Key
8 View menu/Calibrate Key
9 I/O Configuration menu/Secure Key
10 Output On/Off Key
11 Resolution selection Keys
12 Knob
2
Page 4
Front-Panel Menu/Key Reference
This section gives an overview of the front-panel keys/menus. The menus are
designed to automatically guide you through all parameters required to
configure a particular function or operation.
1 Low voltage range selection key Selects the low voltage range and allows
its full rated output to the output terminals.
2 High voltage range selection key Selects the high voltage range and allows
its full rated output to the output terminals.
3 Overvoltage protection key Enables or disables the overvoltage protection
function, sets trip voltage level, and clears the overvoltage condition.
4 Display limit key Shows voltage and current limit values on the display and
allows the knob adjustment for setting limit values.
5 Voltage/Current adjust selection key Selects the knob control function for
voltage or current adjustment.
6 Stored state recall menu Recalls a stored operating state from location ‘‘1’’
through ‘‘5’’ and resets the power supply to the power-on state (*RST
command) from the front panel by selecting the ‘‘RESET’’ from this menu.
7 State storage menu / Local key1 Stores up to five power supply’s states in
non-volatile memory and assigns a name to each of the storage locations / or
returns the power supply to local mode from remote interface mode.
8 View menu / Calibrate key2 Views the error codes and the text of the error
message, calibration string, and system firmware revision / or enables
calibration mode.
9 I/O Configuration / Secure key3 Configures the power supply for remote
interfaces / or secures or unsecures the power supply for calibration.
10 Output On/Off key Enables or disables the power supply output. This key
toggles between on and off.
11 Resolution selection keys Move the flashing digit to the right or left and
adjust the scrolling speed of the text being displayed in the View menu.
12 Knob Increases or decreases the value of the flashing digit by turning
clockwise or counter clockwise.
1
The key can be used as the ‘‘
Local
’’ key when the power supply is in the remote
interface mode.
2
You can enable the ‘‘calibration mode’’ by holding down this key when you
turn on the power supply.
3
You can use it as the ‘‘Secure’’ or ‘‘Unsecure’’ key when the power supply is
in the calibration mode.
3
Page 5
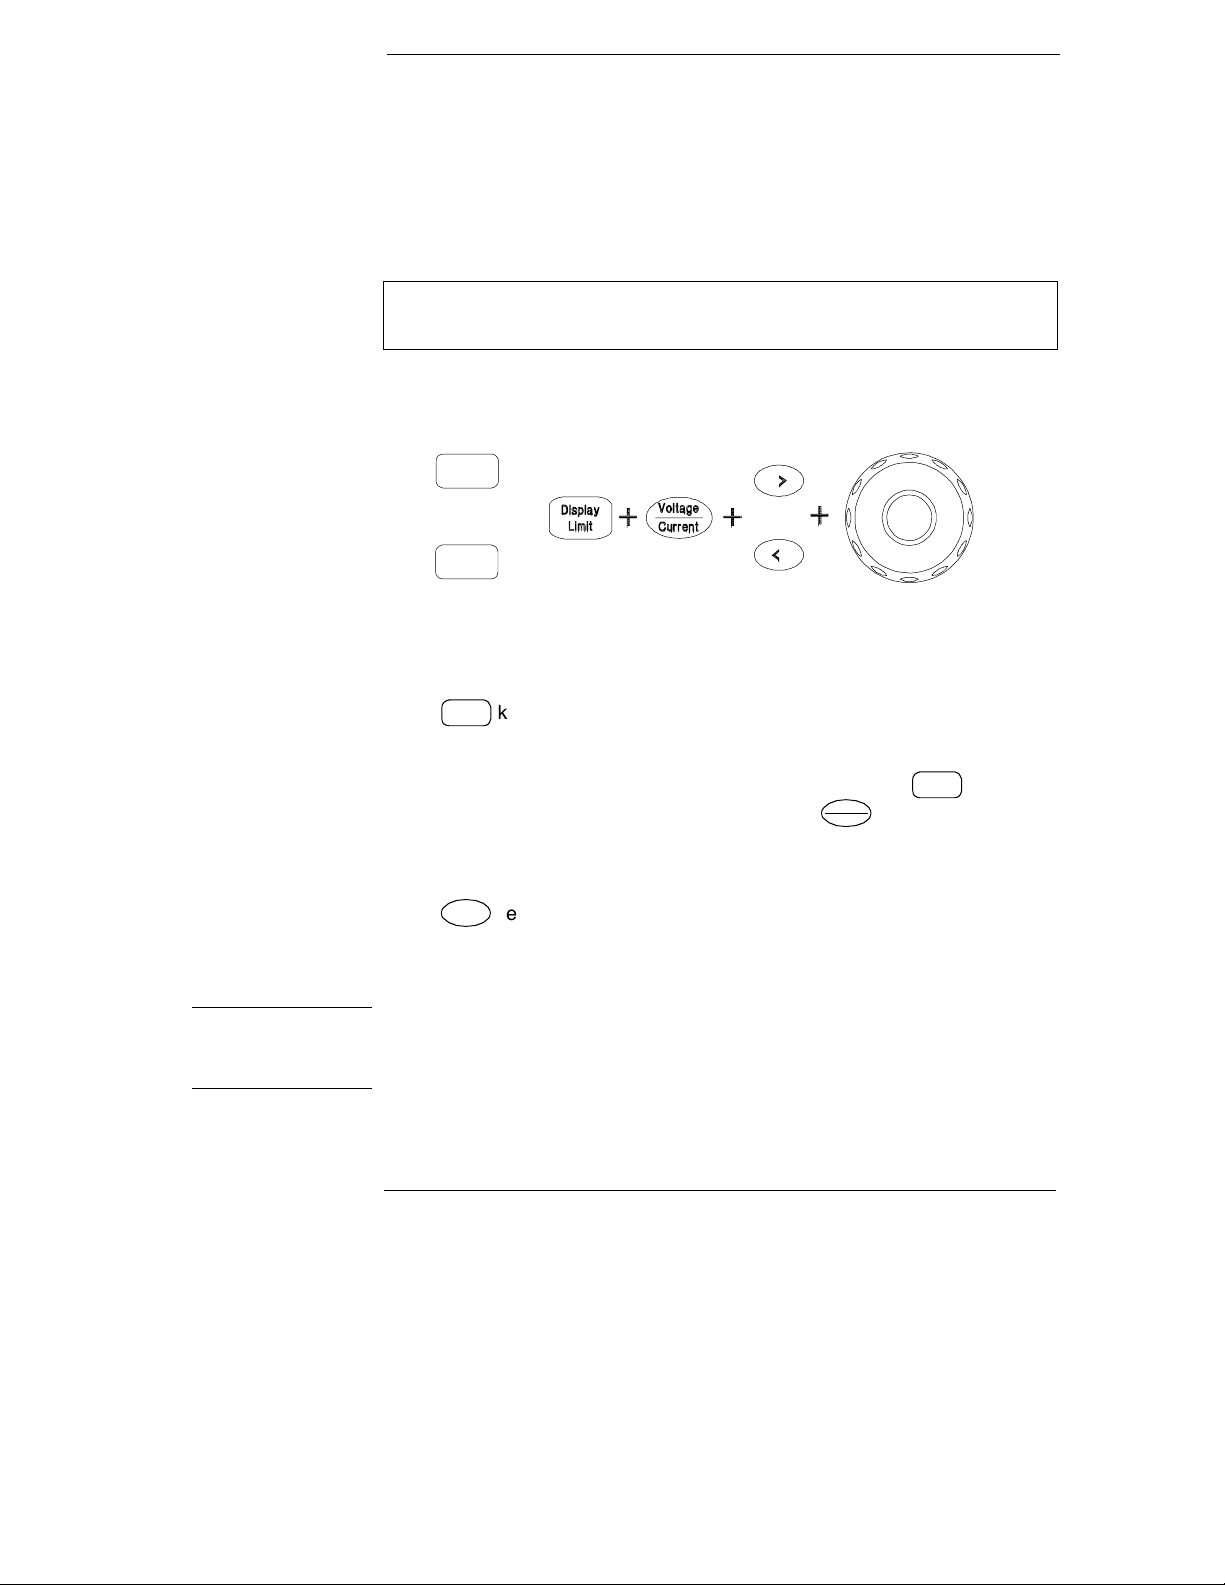
Front-Panel Voltage and Current Limit Settings
You can set the voltage and current limit values from the front panel using the
following method.
Use the voltage/current adjust selection key, the resolution selection keys,
and the control knob to change the voltage and current limit values.
Low
Or
+
High
1 Select the desired voltage range using the voltage range selection keys after
turning on the power supply.
2 Press
3 Move the blinking digit to the appropriate position using the resolution
selection keys and change the blinking digit value to the desired voltage limit
by turning the control knob. If the display limit times out, press
4 Set the knob to current control mode by pressing key.
5 Move the blinking digit to the appropriate position using the resolution
selection keys and change the blinking digit value to the desired current limit
by turning the control knob.
6 Press
go to output monitoring mode automatically to display the voltage and current
at the output.
Display
key to show the limit values on the display.
Limit
Display
Voltag e
Current
Output
key to enable the output. After about 5 seconds, the display will
On/Off
Limit
key again.
Note All front panel keys and controls can be disabled with remote interface commands.
The power supply must be in "
Local" mode for the front panel keys and controls to
function.
4
Page 6
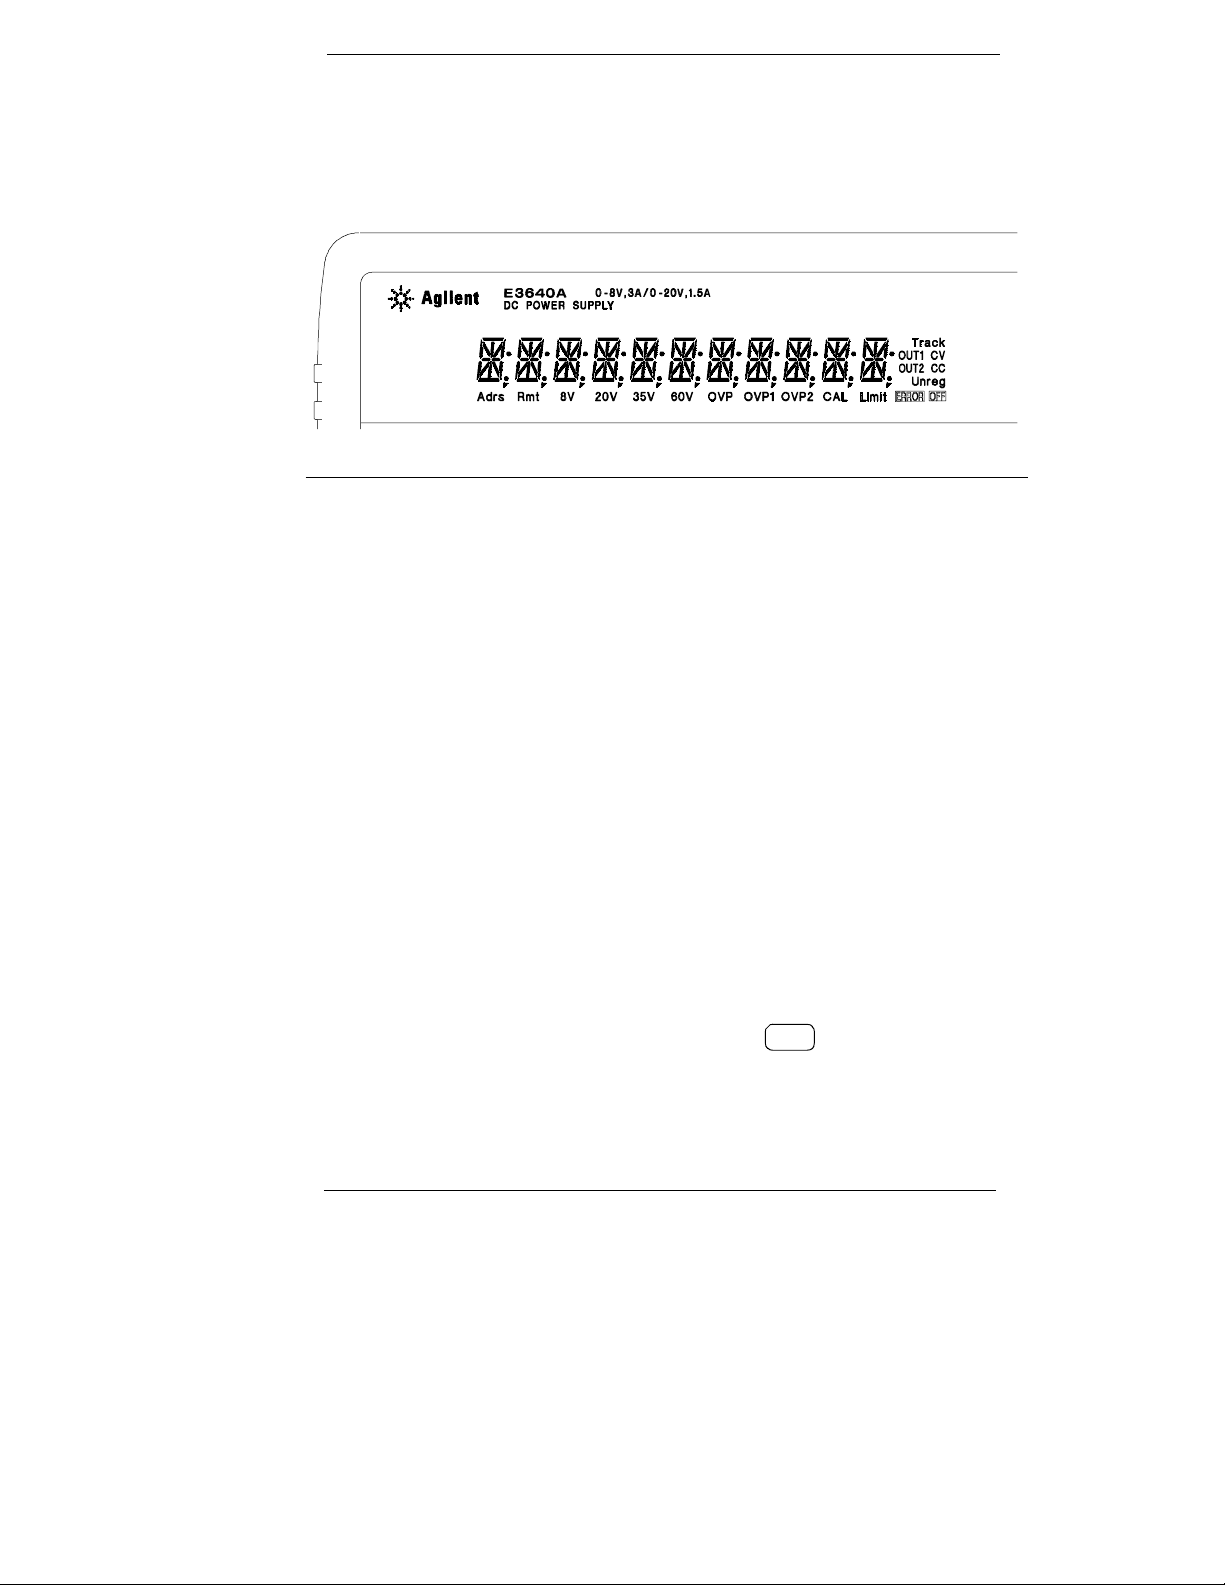
Display Annunciators
Adrs Power supply is addressed to listen or talk over a remote interface.
Rmt Power supply is in remote interface mode.
8V* Shows the low voltage range is selected.
20V* Shows the high voltage range is selected.
35V** Shows the low voltage range is selected.
60V** Shows the high voltage range is selected.
OVP The overvoltage protection function is enabled when the
annunciator turns on or the overvoltage protection circuit has
caused the power supply to shutdown when the annunciator blinks.
CAL The power supply is in calibration mode.
Limit The display shows the limit values of voltage and current.
ERROR Hardware or remote interface command errors are detected and
the error bit has not been cleared.
OFF The output of the power supply is disabled (See page 54 for more
information).
Unreg The output of the power supply is unregulated (output is neither CV
nor CC).
CV The power supply is in constant voltage mode.
CC The power supply is in constant current mode.
To review the display annunciators, hold down key as you turn on
Display
Limit
the power supply.
*For E3640A/42A/44A model. **For E3641A/43A/45A model.
5
Page 7

The Rear Panel at a Glance
Note: The supplier code of the C-Tick for the E3643A/45A is N10149.
1 AC inlet
2 Power-line fuse-holder assembly
3 Power-line module
Use the front-panel key to:
I/O
Config
4 RS-232 interface connector
5 GPIB (IEEE-488) interface connector
6 Rear output terminals
• Select the GPIB or RS-232 interface (see chapter 3).
• Set the GPIB address (see chapter 3).
• Set the RS-232 baud rate and parity (see chapter 3).
6
Page 8
In This Book
Quick Start
the front panel feature.
General Information
power supply. This chapter also provides instructions for installation of your
power supply and the output connections.
Front- Pa ne l O per ati on
keys and how they are used to operate the power supply from the front panel.
This chapter also shows how to configure the power supply for the remote
interface and gives a brief introduction to the calibration features.
Remo te Int e rf a c e R ef e r e nc e
help you program the power supply over the remote interface. This chapter
also explains how to program for status reporting.
Error Messages
are working with the power supply. Each listing contains information to help
you diagnose and solve the problem.
Application Programs
applications to help you develop programs for your application.
Tutorial
gives specific details on the operation and use of your power supply.
Specifications
Chapter 1 helps you get familiar with a few of the power supply’s
Chapter 2 contains a general description of your
Chapter 3 describes in detail the use of front-panel
Chapter 4 contains reference information to
Chapter 5 lists the error messages that may appear as you
Chapter 6 contains some remote interface
Chapter 7 describes basic operation of linear power supplies and
Chapter 8 lists the power supply’s specifications .
Service Information
Agilent Technologies for servicing, procedures for verification & calibration,
and schematics.
If you have questions relating to the operation of the power supply, call
1-800-829-4444 in the United States, or contact your nearest Agilent
Technologies Sales Office.
If your power supply fails within one year of purchase, Agilent will repair
or replace it free of charge. Call 1-800-258-5165 ("Express Exchange") in
the United States, or contact your nearest Agilent Technologies Sales Office.
Contains guid eli nes to return your power supply to
7
Page 9

8
Page 10
Contents
Chapter 1 Quick Start
Preliminary Checkout- - - - - - - - - - - - - - - - - - - - - - - - - - - - - - - - - - 17
Output Checkout- - - - - - - - - - - - - - - - - - - - - - - - - - - - - - - - - - - - - - 18
Voltage Output Checkout - - - - - - - - - - - - - - - - - - - - - - - - - - - - 18
Current Output Checkout - - - - - - - - - - - - - - - - - - - - - - - - - - - - 19
If the Power Supply Does Not Turn On - - - - - - - - - - - - - - - - - - - - 20
Line Voltage Conversion- - - - - - - - - - - - - - - - - - - - - - - - - - - - - - - - 21
To Adjust the Carrying Handle- - - - - - - - - - - - - - - - - - - - - - - - - - - 23
To Rack Mount the Instrument - - - - - - - - - - - - - - - - - - - - - - - - - - 24
Chapter 2 General Information
Safety Considerations- - - - - - - - - - - - - - - - - - - - - - - - - - - - - - - - - - 29
Safety and EMC Requirements - - - - - - - - - - - - - - - - - - - - - - - - 29
Options and Accessories - - - - - - - - - - - - - - - - - - - - - - - - - - - - - - - 30
Options- - - - - - - - - - - - - - - - - - - - - - - - - - - - - - - - - - - - - - - - - - - 30
Accessories - - - - - - - - - - - - - - - - - - - - - - - - - - - - - - - - - - - - - - - 30
Description - - - - - - - - - - - - - - - - - - - - - - - - - - - - - - - - - - - - - - - - - - 31
Installation - - - - - - - - - - - - - - - - - - - - - - - - - - - - - - - - - - - - - - - - - - 33
Initial Inspection - - - - - - - - - - - - - - - - - - - - - - - - - - - - - - - - - - - 33
Cooling and Location - - - - - - - - - - - - - - - - - - - - - - - - - - - - - - - 33
Output Connections - - - - - - - - - - - - - - - - - - - - - - - - - - - - - - - - - - - 34
Current Ratings - - - - - - - - - - - - - - - - - - - - - - - - - - - - - - - - - - - - 34
Voltage Drops - - - - - - - - - - - - - - - - - - - - - - - - - - - - - - - - - - - - - 35
Load Consideration- - - - - - - - - - - - - - - - - - - - - - - - - - - - - - - - - 35
Remote Voltage Sensing Connections - - - - - - - - - - - - - - - - - - 36
Multiple Loads- - - - - - - - - - - - - - - - - - - - - - - - - - - - - - - - - - - - - 38
Contents
Chapter 3 Front-Panel Operation and Features
Front-Panel Operation Overview- - - - - - - - - - - - - - - - - - - - - - - - - 41
Constant Voltage Operation - - - - - - - - - - - - - - - - - - - - - - - - - - - - - 42
Constant Current Operation- - - - - - - - - - - - - - - - - - - - - - - - - - - - - 44
Configuring the Remote Interface - - - - - - - - - - - - - - - - - - - - - - - - 46
GPIB Configuration- - - - - - - - - - - - - - - - - - - - - - - - - - - - - - - - - 46
RS-232 Configuration - - - - - - - - - - - - - - - - - - - - - - - - - - - - - - - 47
Storing and Recalling Operating States - - - - - - - - - - - - - - - - - - - - 48
Programming Overvoltage Protection- - - - - - - - - - - - - - - - - - - - - 50
Setting the OVP Level and Enable the OVP Circuit - - - - - - - - 50
Checking OVP Operation - - - - - - - - - - - - - - - - - - - - - - - - - - - - 51
Clearing the Overvoltage Condition - - - - - - - - - - - - - - - - - - - - 51
Disabling the Output- - - - - - - - - - - - - - - - - - - - - - - - - - - - - - - - - - - 54
Disconnecting the Output Using an External Relay - - - - - - - 54
9
Page 11

Contents
System-Related Operations- - - - - - - - - - - - - - - - - - - - - - - - - - - - - - 55
State Storage - - - - - - - - - - - - - - - - - - - - - - - - - - - - - - - - - - - - - - 55
Self-Test - - - - - - - - - - - - - - - - - - - - - - - - - - - - - - - - - - - - - - - - - - 56
Error Conditions - - - - - - - - - - - - - - - - - - - - - - - - - - - - - - - - - - - 56
Firmw are Revisi on Query - - - - - - - - - - - - - - - - - - - - - - - - - - - - 57
SCPI Language Version - - - - - - - - - - - - - - - - - - - - - - - - - - - - - - 57
GPIB Interface Reference- - - - - - - - - - - - - - - - - - - - - - - - - - - - - - - 58
RS-232 Interface Reference- - - - - - - - - - - - - - - - - - - - - - - - - - - - - - 59
RS-232 Configurati on Overview - - - - - - - - - - - - - - - - - - - - - - - 59
RS-232 Data Frame Format - - - - - - - - - - - - - - - - - - - - - - - - - - - 59
Connection to a Computer or Termi nal - - - - - - - - - - - - - - - - - 60
RS-232 Troubles hooti ng- - - - - - - - - - - - - - - - - - - - - - - - - - - - - - 61
Calibration Overview - - - - - - - - - - - - - - - - - - - - - - - - - - - - - - - - - - 62
Calibration Security- - - - - - - - - - - - - - - - - - - - - - - - - - - - - - - - - 62
To Unsecure for Calibration - - - - - - - - - - - - - - - - - - - - - - - - - - 63
To Secure Against Calib ration - - - - - - - - - - - - - - - - - - - - - - - - - 64
Calibration Count- - - - - - - - - - - - - - - - - - - - - - - - - - - - - - - - - - - 65
Calibration Message- - - - - - - - - - - - - - - - - - - - - - - - - - - - - - - - - 66
Chapter 4 Remote Interface Reference
SCPI Command Summary- - - - - - - - - - - - - - - - - - - - - - - - - - - - - - - 69
Contents
Simpli fied Pro gramm in g Overview - - - - - - - - - - - - - - - - - - - - - - - - 74
Using the
Using the Low-Level Com mands - - - - - - - - - - - - - - - - - - - - - - - 74
Reading a Query Response - - - - - - - - - - - - - - - - - - - - - - - - - - - 75
Selecting a Trigger Source - - - - - - - - - - - - - - - - - - - - - - - - - - - - 75
Power Supply Programm i ng Ranges- - - - - - - - - - - - - - - - - - - - 76
Using the
Output Setting and Operation Commands - - - - - - - - - - - - - - - - - - 78
Triggering- - - - - - - - - - - - - - - - - - - - - - - - - - - - - - - - - - - - - - - - - - - - 82
Trigger Source Choices - - - - - - - - - - - - - - - - - - - - - - - - - - - - - - 82
Triggering Commands - - - - - - - - - - - - - - - - - - - - - - - - - - - - - - - 84
System-Related Commands - - - - - - - - - - - - - - - - - - - - - - - - - - - - - 85
State Storage Commands - - - - - - - - - - - - - - - - - - - - - - - - - - - - - - - 88
Calibration Commands - - - - - - - - - - - - - - - - - - - - - - - - - - - - - - - - - 89
Interface Configuration Comm ands - - - - - - - - - - - - - - - - - - - - - - - 92
The SCPI Status Registers- - - - - - - - - - - - - - - - - - - - - - - - - - - - - - - 93
What is an
What is an
SCPI Status System - - - - - - - - - - - - - - - - - - - - - - - - - - - - - - - - - 94
The Questionable Status Register - - - - - - - - - - - - - - - - - - - - - - 95
The Standard Event Register- - - - - - - - - - - - - - - - - - - - - - - - - - 96
APPLy
APPLy
Event
Enable
Command - - - - - - - - - - - - - - - - - - - - - - - - - - 74
Command - - - - - - - - - - - - - - - - - - - - - - - - - - - - - 77
Register? - - - - - - - - - - - - - - - - - - - - - - - - - - - 93
Register? - - - - - - - - - - - - - - - - - - - - - - - - - - 93
10
Page 12
Contents
The Status Byte Register- - - - - - - - - - - - - - - - - - - - - - - - - - - - - 97
Using Service Request (SRQ) and Serial POLL - - - - - - - - - - - 98
Using *STB? to Read the Status Byte- - - - - - - - - - - - - - - - - - - 99
Using the Message Available Bit (MAV)- - - - - - - - - - - - - - - - - 99
To Interrupt Your Bus Controll er Usi ng SRQ - - - - - - - - - - - - 99
To Determine When a Command Sequence is Com pl eted - 100
Using *OPC to Signal When Data is in th e Output Buffer - - 100
Status Reporting Commands - - - - - - - - - - - - - - - - - - - - - - - - - - - 101
An Introduction to the SCPI Language - - - - - - - - - - - - - - - - - - - 103
Command Format Used in This Manual- - - - - - - - - - - - - - - - 104
Command Separators - - - - - - - - - - - - - - - - - - - - - - - - - - - - - - 105
Using the
Querying Parameter Settings - - - - - - - - - - - - - - - - - - - - - - - - 106
SCPI Command Terminators - - - - - - - - - - - - - - - - - - - - - - - - 106
IEEE-488.2 Common Commands - - - - - - - - - - - - - - - - - - - - - 106
SCPI Parameter Types - - - - - - - - - - - - - - - - - - - - - - - - - - - - - 107
Halting an Output in Progress - - - - - - - - - - - - - - - - - - - - - - - - - - 108
SCPI Conformance Information- - - - - - - - - - - - - - - - - - - - - - - - - 109
IEEE-488 Conformance Information - - - - - - - - - - - - - - - - - - - - - 112
Chapter 5 Error Messages
MIN
and
MAX
Parameters - - - - - - - - - - - - - - - - - - 105
Contents
Execution Errors - - - - - - - - - - - - - - - - - - - - - - - - - - - - - - - - - - - - 115
Self-Test Errors- - - - - - - - - - - - - - - - - - - - - - - - - - - - - - - - - - - - - - 120
Calibration Errors- - - - - - - - - - - - - - - - - - - - - - - - - - - - - - - - - - - - 121
Chapter 6 Application Programs
Example Program for C and C++- - - - - - - - - - - - - - - - - - - - - - - - 125
Example Program for Excel 97 - - - - - - - - - - - - - - - - - - - - - - - - - 129
Chapter 7 Tutorial
Overview of this Power Supply Operation - - - - - - - - - - - - - - - - 137
Output Characteristics - - - - - - - - - - - - - - - - - - - - - - - - - - - - - - - - 139
Unregulated State - - - - - - - - - - - - - - - - - - - - - - - - - - - - - - - - - 141
Unwanted Signals - - - - - - - - - - - - - - - - - - - - - - - - - - - - - - - - - 141
Extending the Voltage and Current Range - - - - - - - - - - - - - - - - 143
Series Connections - - - - - - - - - - - - - - - - - - - - - - - - - - - - - - - - 143
Parallel Connections- - - - - - - - - - - - - - - - - - - - - - - - - - - - - - - 143
Remote Programming- - - - - - - - - - - - - - - - - - - - - - - - - - - - - - - - - 144
Chapter 8 Specifications
Performance Specifications - - - - - - - - - - - - - - - - - - - - - - - - - - - - 149
Supplemental Characteristics - - - - - - - - - - - - - - - - - - - - - - - - - - 151
11
Page 13

Contents
Appendix Service Information
Operating Checklist- - - - - - - - - - - - - - - - - - - - - - - - - - - - - - - - - - - 157
Is the Power Supply Inoperative? - - - - - - - - - - - - - - - - - - - - - 157
Does the Power Supply Fail Self-T est? - - - - - - - - - - - - - - - - - 157
Types of Service Available - - - - - - - - - - - - - - - - - - - - - - - - - - - - - 158
Standard Repair Service (worldwi de)- - - - - - - - - - - - - - - - - - 158
Express Ex change (U.S.A . only) - - - - - - - - - - - - - - - - - - - - - - 158
Repacking for Shipment - - - - - - - - - - - - - - - - - - - - - - - - - - - - - - - 159
Electrostatic Discharge (ES D) Precautions - - - - - - - - - - - - - - - - 160
Surface Mount Repair - - - - - - - - - - - - - - - - - - - - - - - - - - - - - - - - - 160
To Replace the Power-Line Fuse - - - - - - - - - - - - - - - - - - - - - - - - 160
Troubleshooting Hints- - - - - - - - - - - - - - - - - - - - - - - - - - - - - - - - - 161
Unit Reports Error s 740 to 750 - - - - - - - - - - - - - - - - - - - - - - - 161
Unit Fails Self-Test- - - - - - - - - - - - - - - - - - - - - - - - - - - - - - - - - 161
Bias Supplies Problems- - - - - - - - - - - - - - - - - - - - - - - - - - - - - 161
Self-Test Procedures- - - - - - - - - - - - - - - - - - - - - - - - - - - - - - - - - - 162
Power-On Self-Test - - - - - - - - - - - - - - - - - - - - - - - - - - - - - - - - 162
Complete Self-Test- - - - - - - - - - - - - - - - - - - - - - - - - - - - - - - - - 162
General Disassembly- - - - - - - - - - - - - - - - - - - - - - - - - - - - - - - - - - 164
Recommended Test Equi pm ent - - - - - - - - - - - - - - - - - - - - - - - - - 165
Test Considerations- - - - - - - - - - - - - - - - - - - - - - - - - - - - - - - - - - - 166
Contents
Operation Verification and Perform ance Tests - - - - - - - - - - - - - 166
Measurement Techniques - - - - - - - - - - - - - - - - - - - - - - - - - - - - - - 167
Setup for Most Tests - - - - - - - - - - - - - - - - - - - - - - - - - - - - - - - 167
Current-M oni toring R esis tor - - - - - - - - - - - - - - - - - - - - - - - - - 167
General Measurement Techniques - - - - - - - - - - - - - - - - - - - - 168
Electronic Load - - - - - - - - - - - - - - - - - - - - - - - - - - - - - - - - - - - 168
Programming - - - - - - - - - - - - - - - - - - - - - - - - - - - - - - - - - - - - - 168
Constant Voltage (CV) Veri ficatio ns- - - - - - - - - - - - - - - - - - - - - - 169
Constant Voltage Test Setup - - - - - - - - - - - - - - - - - - - - - - - - - 169
Voltage Programmi ng and Readback Accuracy - - - - - - - - - - 169
CV Load Effect (Load Regulation) - - - - - - - - - - - - - - - - - - - - 170
CV Source effect (Line Regulation)- - - - - - - - - - - - - - - - - - - - 171
CV PAR D (Ri ppl e and Noise) - - - - - - - - - - - - - - - - - - - - - - - - 171
Load Transient Respons e Tim e - - - - - - - - - - - - - - - - - - - - - - - 173
Constant Current (CC ) Veri ficatio ns - - - - - - - - - - - - - - - - - - - - - 174
Constant Current Test Setup - - - - - - - - - - - - - - - - - - - - - - - - - 174
Current Programm in g and Readback Accuracy- - - - - - - - - - 174
CC Load Effect (Load Regulation) - - - - - - - - - - - - - - - - - - - - 175
CC Source Effect (Line Regulation) - - - - - - - - - - - - - - - - - - - 176
CC PAR D (R ipp le and Noise) - - - - - - - - - - - - - - - - - - - - - - - - 177
Common Mode Current Noise - - - - - - - - - - - - - - - - - - - - - - - - - - 178
12
Page 14
Contents
Performance Test Record for Your Power Supply - - - - - - - - - - 179
CV Performance Test Record - - - - - - - - - - - - - - - - - - - - - - - - 179
CC Performance Test Record- - - - - - - - - - - - - - - - - - - - - - - - 180
Calibration Reference- - - - - - - - - - - - - - - - - - - - - - - - - - - - - - - - - 181
Agilent Technologies Calibration Services- - - - - - - - - - - - - - 181
Calibration Interval - - - - - - - - - - - - - - - - - - - - - - - - - - - - - - - - 181
To Unsecure the Power Supply Without the Security Code 181
General Calibration/Adjustment Procedure - - - - - - - - - - - - - - - 182
Front Panel Voltage and Current Calibration- - - - - - - - - - - - 183
Calibration Record for Your Power Supply- - - - - - - - - - - - - - - - 187
Calibration Error Messages - - - - - - - - - - - - - - - - - - - - - - - - - - - - 188
Schematics - - - - - - - - - - - - - - - - - - - - - - - - - - - - - - - - - - - - - - - - - 188
Component Locator
Component Locator (
Component Locator for front panel - - - - - - - - - - - - - - - - - - - 191
Index - - - - - - - - - - - - - - - - - - - - - - - - - - - - - - - - - - - - - - - - - - - - - - 192
(top)
for main board assembly - - - - - - 189
bottom)
for main board assembly - - - 190
Contents
13
Page 15

Contents
Contents
14
Page 16

1
Quick Start
Page 17
Quick Start
One of the first things you will want to do with your power supply is to become
acquainted with the front panel. The exercises in this chapter prepare the
power supply for use and help you get familiar with some of its front-panel
operations.
This chapter is intended for both the experienced and the inexperienced user
because it calls attention to certain checks that should be made prior to
operation.
Throughout this chapter the key to be pressed is shown in the left margin.
16
Page 18
Chapter 1 Quick Start
Preliminary Checkout
Preliminary Checkout
The following steps help you verify that the power supply is ready for use.
1 Check the list of supplied items.
Verify that you have received the following item s with your power sup ply. If
anything is missing, contact your nearest Agilent Technologies Sales Office.
One power cord for your location.
This User’s
Quick Reference Guide.
Certificate of Calibration.
2 Connect the power cord and turn on the power supply.
The front-panel display will light up briefly while the power supply performs
its
power-on self-test
on display with all annunciators turned on, hold down
the power supply. If the power supply does not turn on properly, see page 20.
Guide.
. The GPIB address is also displayed. To review the power-
Display
as you turn on
Limit
1
3 Perform a
The
complete
performed at power-on. Hold down
hold down the key
complete
self-test performs a more extensive set of tests than those
self-test.
Display
as you turn on the power supply and
Limit
until you hear a lon g beep
. The
self-test
will begin when
you release the key following the beep.
If the self- tes t f ails, see t he S ervi ce I nfo rmati on f or inst ructi ons on r eturn ing
the power suppl y to Agilen t Technologies for ser vice .
Note The power supply is shipped from the factory with a power-line cord that has a plug
appropriate for your location. Your power supply is equipped with a 3-wire grounding
type power cord; the third conductor being the ground. The power supply is grounded
only when the power-line cord is plugged into an appropriate receptacle. Do not
operate your power supply without adequate cabinet ground connection.
17
Page 19

Power
Output
On/Off
Chapter 1 Quick Start
Output Checkout
Output Checkout
The following procedures check to ensure that the power supply develops its
rated outputs and properly responds to operation from the front panel. For
complete performance and verification tests, refer to the
Note:
If an error has been detected during the output checkout procedures,
the
ERROR
annunciator will turn on. See "Error Messages" starting on page
113 in chapter 5 for more information.
Voltage Output Checkout
The following steps verify basic voltage functions with no load.
1 Turn on the power supply.
The power supply will go into the
(the
OFF
annunciator turns on); its low voltage range is selected, and the
annunciator and low voltage range indication annunciator turn on (for
8V
example,
annunciator turns on for the E3640A model); and the knob is
selected for voltage control.
2 Enable the outputs.
power-on / reset
Serv ice I nfo rmati on
state; the output is disabled
OVP
.
The
OFF
annunciator turns off and the CV annunciator turns on. Notice that
the display is in the
meter
mode. ‘‘Meter mode’’ means that the display shows
the actual output voltage and current.
3 Check that the front-panel voltmeter properly responds to knob
control for both low and high voltage range.
Turn the knob clockwise or counter clockwise to check that the voltmeter
responds to knob control and the ammeter indicates nearly zero. The
flashing
digit can be adjusted by turning the knob.
1
4 Ensure that the voltage can be adjusted from zero to the full rated
value by adjusting the knob.
1
You can use the resolution selection keys to move the flashing digit to the
right or left when settin g the voltage.
18
Page 20
Power
Chapter 1 Quick Start
Output Checkout
Current Output Checkout
The following steps check basic current functions with a short across the
power supply’s output.
1 Turn on the power supply.
Make sure that the output is disabled. The
2 Conn e c t a s hor t a c r os s (+) a n d (-) o utp ut te r mi n a l s with a n i nsula ted
test lead.
OFF
annunciator is on
1
Output
On/Off
Display
Limit
Voltag e
Current
Use a wire size sufficient to handle the maximum current (See "
Rating
" on page 34 in chapter 2).
Table 2-1 Wire
3 Enable the output.
The CV or CC annunciator turns on depending on the resistance of the test
lead. Notice that the display is in the
meter
mode.
4 Adjust the voltage limit value to 1.0 volt.
Set the display to the
Adjust the voltage limit to 1.0 volt to assure CC operation. The
will turn on. To go back to normal mode, press the
limit
mode (the
Limit
annunciator will be flashi ng).
Display
Limit
CC
key again or let the
annunciator
display time out after several seconds.
5 Set the knob to the current control to check that the front-panel
ammeter properly responds to knob control.
T urn the knob clockwise or counter clockwise when the display is in the
mode (the
Limit
annunciator is off). Check that the ammeter responds to knob
meter
control and the voltmeter indicates nearly zero (the voltmeter will show the
voltage drop caused by the test lead). The
flashing
digit can be adjusted by
turning the knob.
1
6 Ensure that the current can be adjusted from zero to the full rated
value.
7 Turn off the power supply and remove the short from the output
terminals.
1
You can use the resolution selection keys to move the flashing digit to the
right or left when settin g the cur ren t.
19
Page 21
Chapter 1 Quick Start
If the Power Supply Does Not Turn On
If the Power Supply Does Not Turn On
Use the following steps to help solve problems you might encounter when
turning on the instrument. If you need more help, refer to chapter 5 for
instructions on returnin g the instrument to Agil ent Technologies for service.
1 Verify that there is ac power to the power supply.
First, verify that the power cord is firmly plugged into the power receptacle on
the rear panel of the power supply. Y ou should also make sure that the power
source you plugged the power supply into is energized. Then, verify that the
power supply is turned on.
2 Verify the power-line voltage setting.
The line voltage is set to the proper value for your country when the power
supply is shipped from the factory . Change the voltage setting if it’s not correct.
The settings are: 100, 115, or 230 Vac.
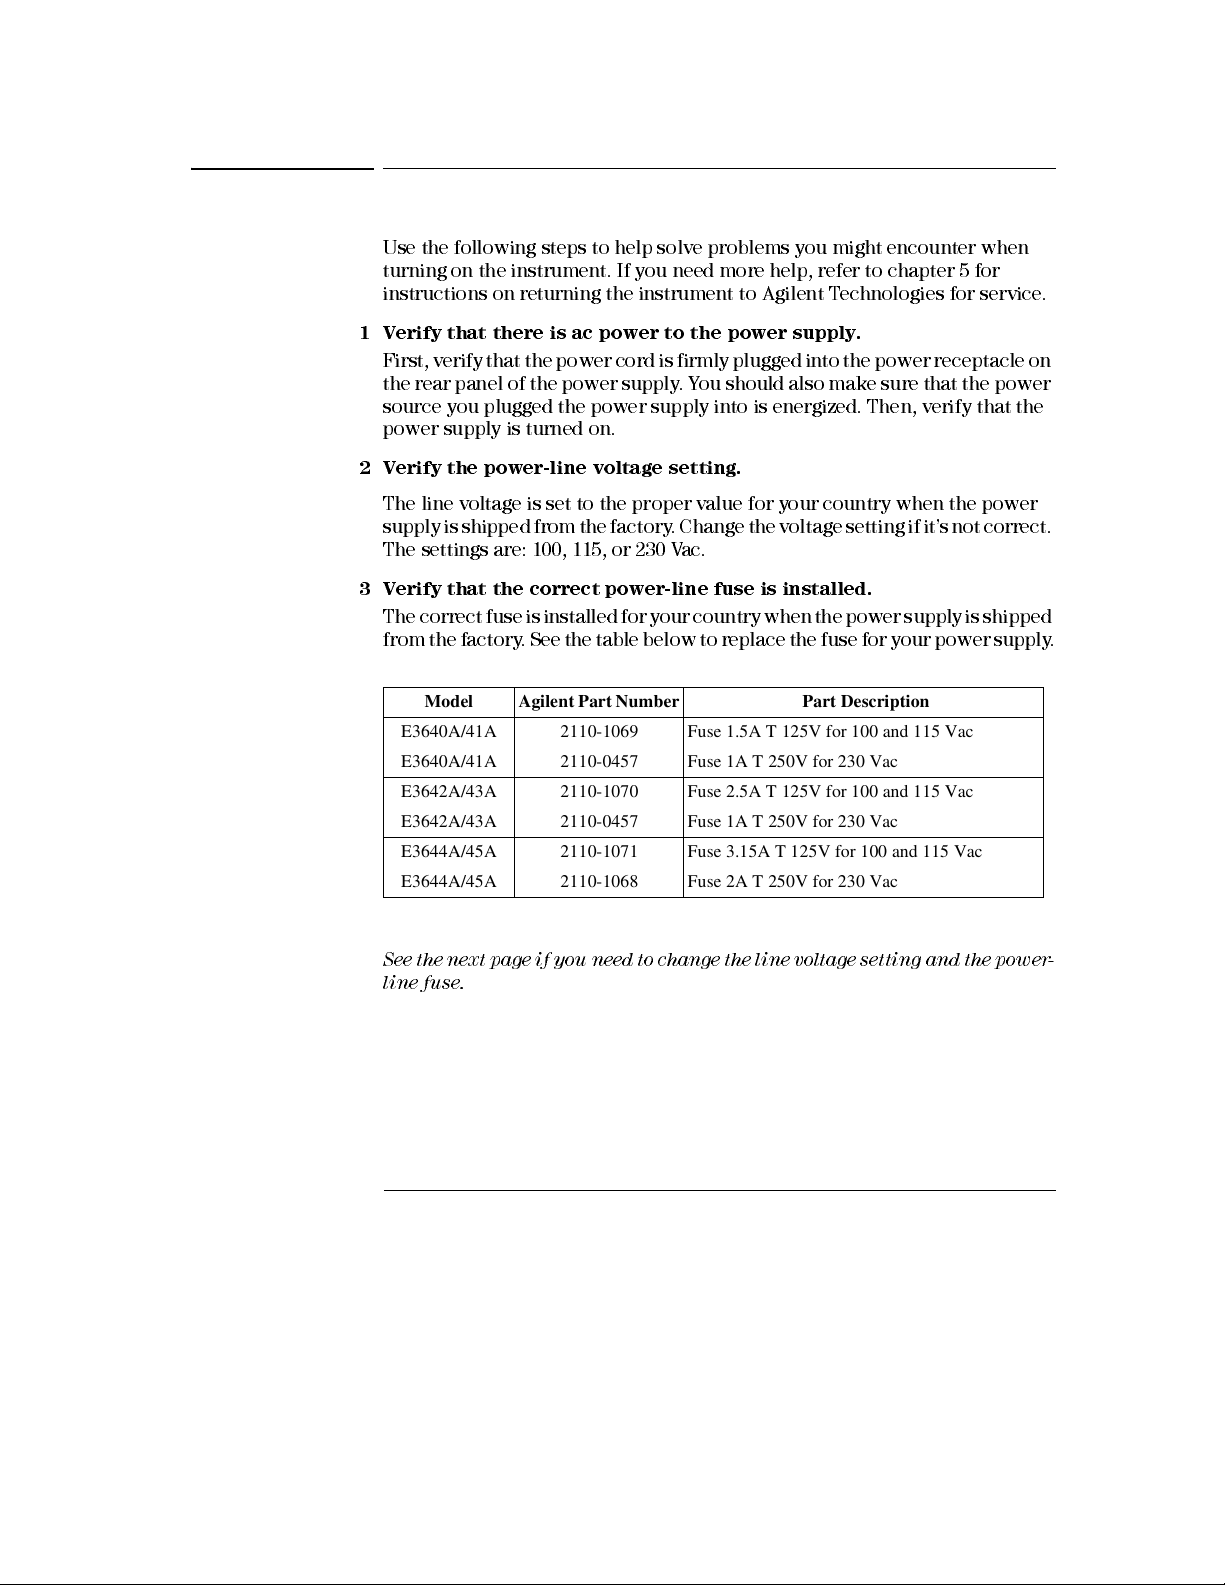
3 Verify that the correct power-line fuse is installed.
The correct fuse is installed for your country when the power supply is shipped
from the factory . See the table below to replace the fuse for your power supply .
Model Agilent Part Number Part Description
E3640A/41A 2110-1069 Fuse 1.5A T 125V for 100 and 115 Vac
E3640A/41A 2110-0457 Fuse 1A T 250V for 230 Vac
E3642A/43A 2110-1070 Fuse 2.5A T 125V for 100 and 115 Vac
E3642A/43A 2110-0457 Fuse 1A T 250V for 230 Vac
E3644A/45A 2110-1071 Fuse 3.15A T 125V for 100 and 115 Vac
E3644A/45A 2110-1068 Fuse 2A T 250V for 230 Vac
See the next page if you need to change the line voltage setting and the power-
line fuse.
20
Page 22

Chapter 1 Quick Start
Line Voltage Conversion
Line Voltage Conversion
1
Warning
Shock Hazard
Component replacement and internal adjustments must be made only by
qualified service personnel.
Line voltage conversion is accomplished by adjusting two components: the line
voltage selection switch and the power-line fuse on the rear panel.
1
Remove AC line power.
2
Remove the cover (Refer to General Disassembly on page 164).
3
Set two sections of the line voltage selector switch on the PC board for the
desired line voltage (See Figure 1-1 below).
4
See the next page to check the rating of the power-line fuse and replace with
the correct one if necessary.
5
Replace the cover and mark the power supply clearly with a tag or label
indicating the correct line voltage and fuse that is in use.
Operating personnel must not remove power supply covers.
(TOP VIEW)
Figure 1-1. Line Voltage Selector (set for 115Vac)
100V
115 V
230V
21
Page 23

Chapter 1 Quick Start
Line Voltage Conversion
1 Remove the power cord. Remove
the fuse-holder assembly with a flatblade screwdriver from the rear panel.
3 Replace with the correct fuse.
2 Remove the fuse-holder from the
assembly.
4 Replace the fuse-holder assembly in
rear panel.
Verify that the correct line voltage is selected and the power-line fuse is good.
22
Page 24
Chapter 1 Quick Start
To Adjust the Carrying Handle
To Adjust the Carrying Handle
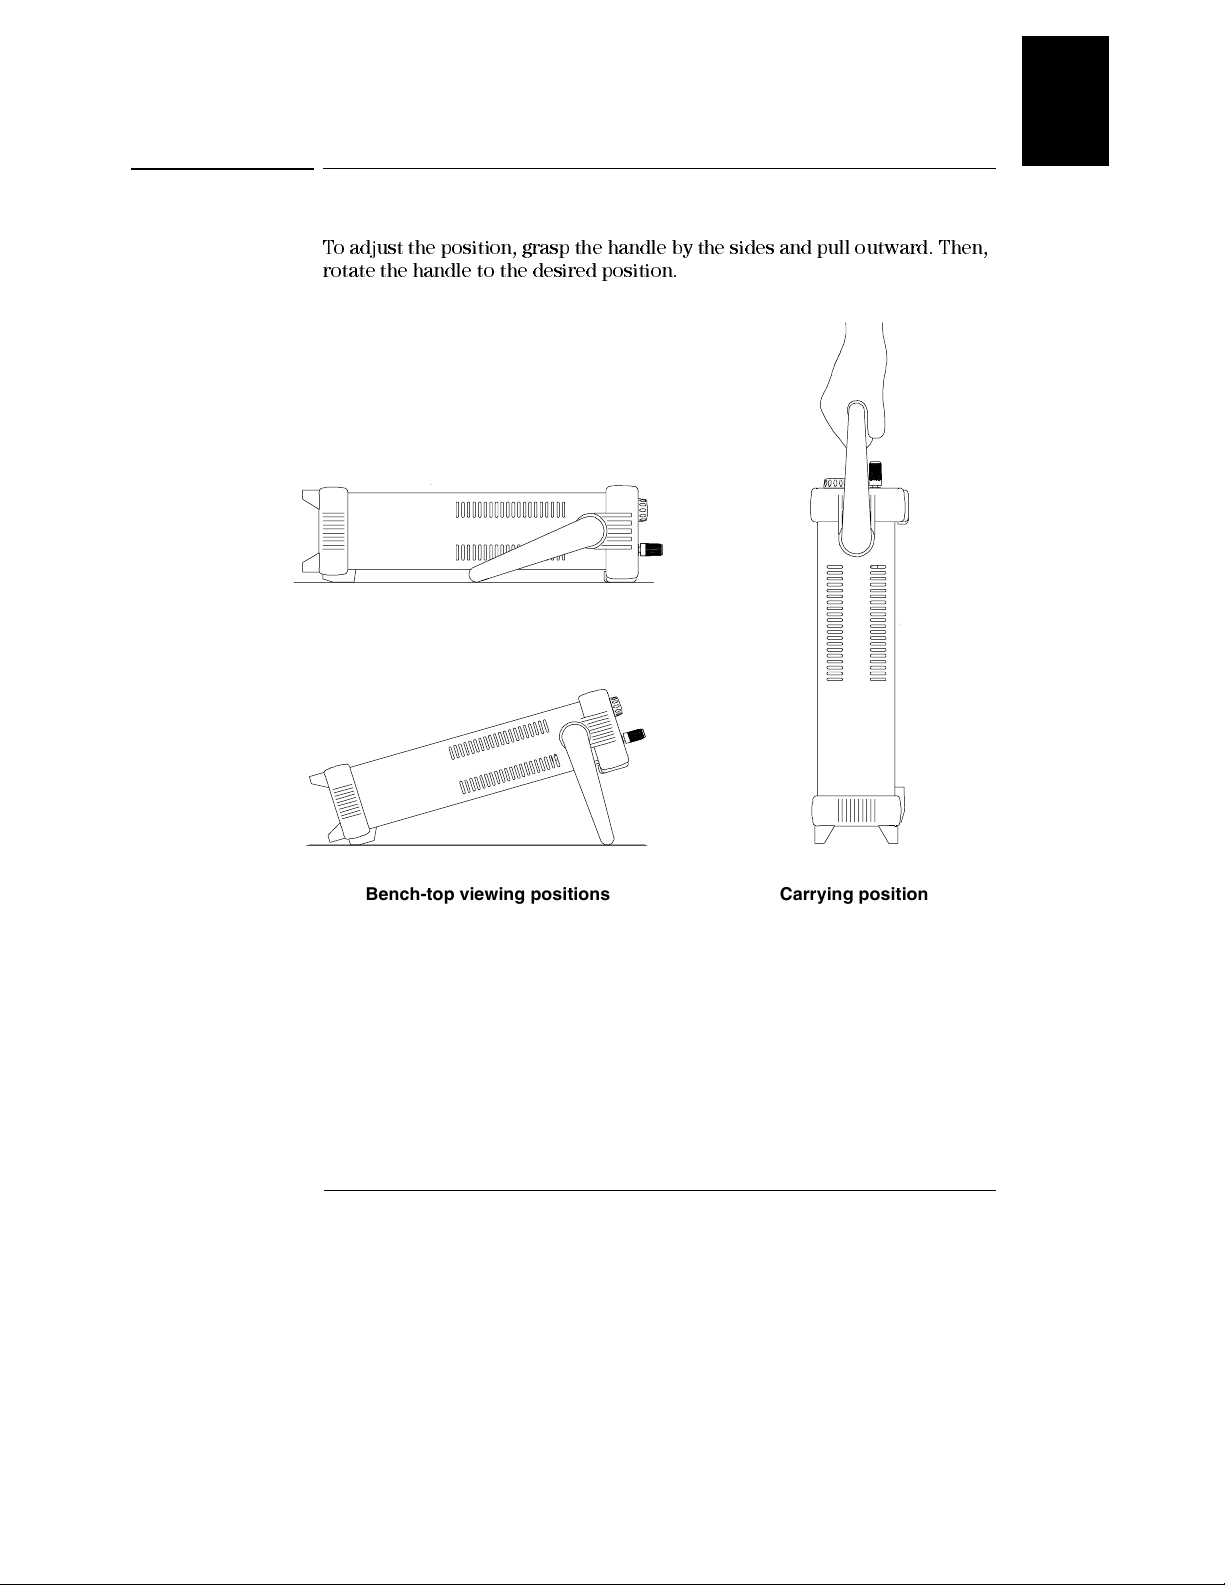
To adjust the position, grasp the handle by the sides and pull outward. Then,
rotate the handle to the desired position.
1
Bench-top viewing positions Carrying position
23
Page 25

Chapter 1 Quick Start
To Rack Mount the Instrument
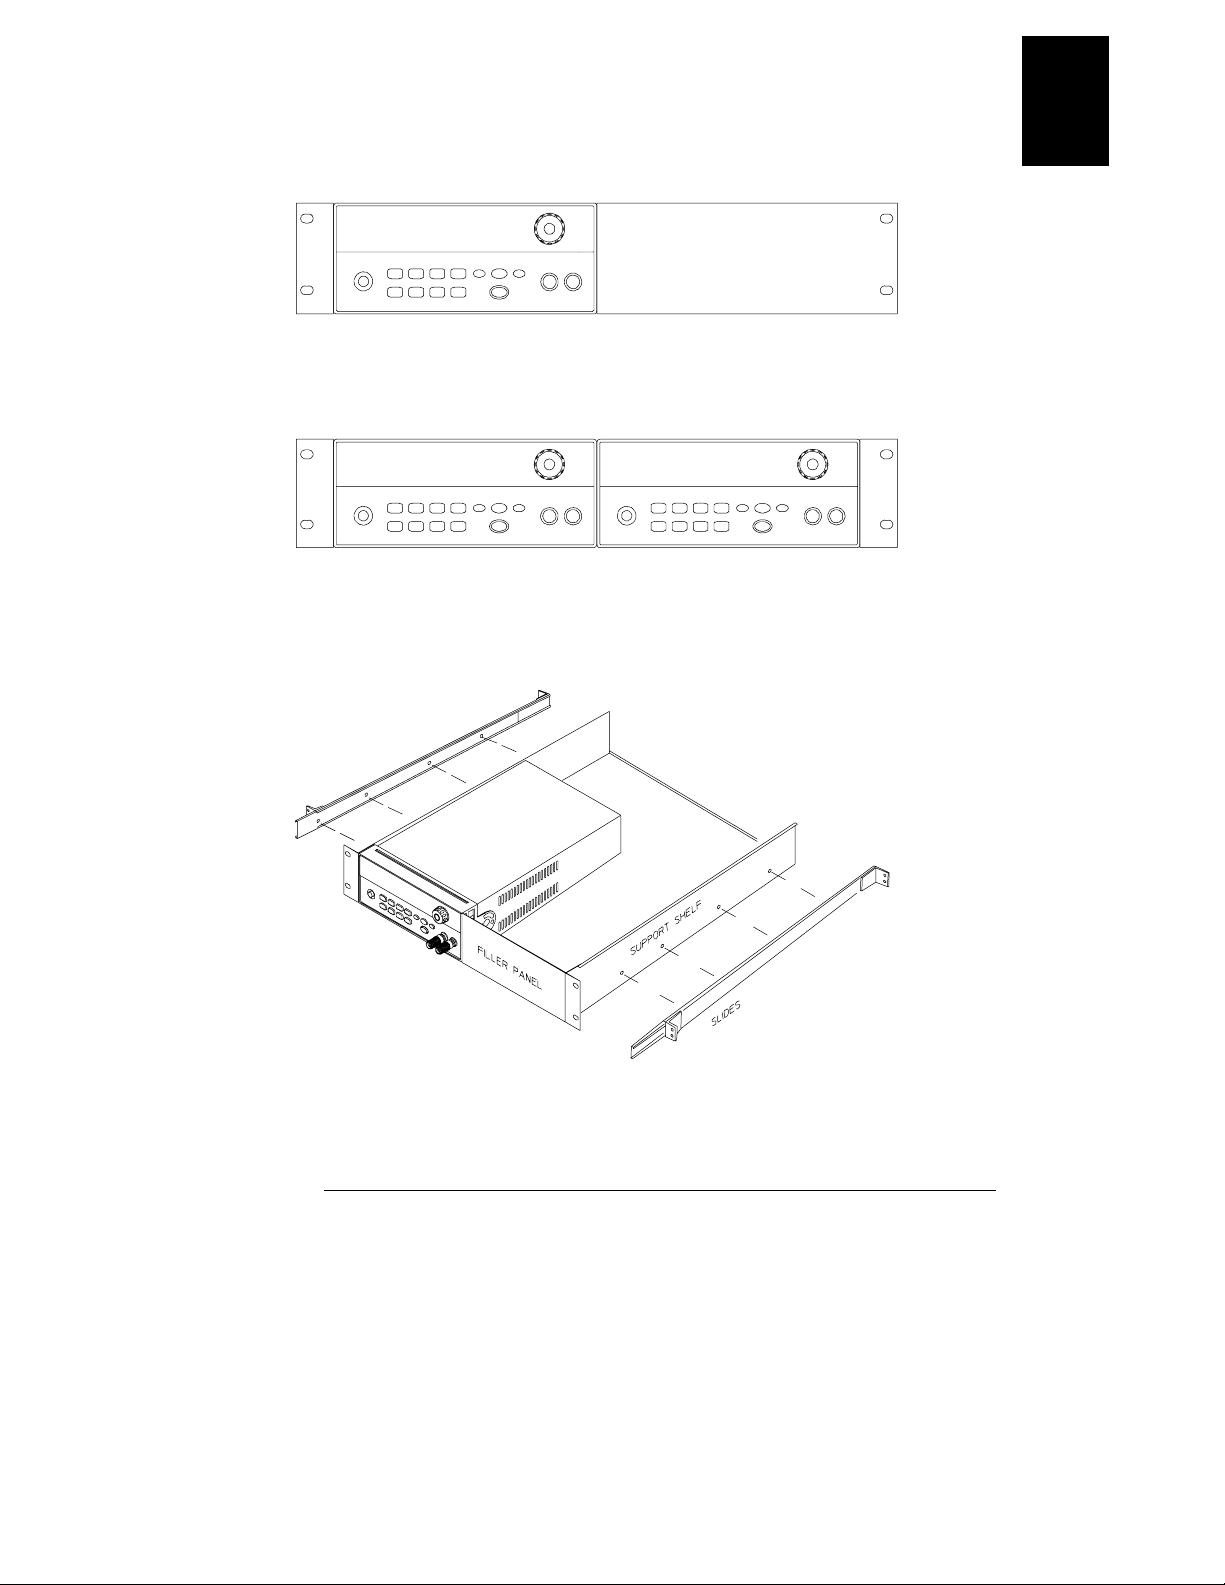
To Rack Mount the Instrument
Y ou can mount the power supply in a standard 19-inch rack cabinet using one
of three optional kits available. Instructions and mounting hardware are
included with each rack-mounting kit. Any Agilent Technologies System II
instrument of the same size can be rack-mounted beside the Agilent E3640A,
E3641A, E3642A, E3643A, E3644A, or E3645A.
Note: Remove the carrying handle, and the front and rear rubber bumpers,
before rack-moun ting the in stru m en t.
To remove the handle, rotate it to the vertical position and pull the ends outward.
Front Rear (bottom view)
To remove the rubber bumper, stretch a corner and then slide it off.
24
Page 26
Chapter 1 Quick Start
To Rack Mount the Instrument
To rack mount a single instrument, order adapter kit 5063-9240.
To rack mount two instruments side-by-side, order lock-link kit 5061-9694 and
flange kit 5063-9212. Be sure to use the support rails inside the rack cabinet.
1
To install two instruments in a sliding support shelf, order support shelf 5063-9255,
and slide kit 1494-0015.
25
Page 27

Chapter 1 Quick Start
To Rack Mount the Instrument
26
Page 28

2
General Information
Page 29

General Information
This manual descri bes the operation of the Agilent Technologies Model
E3640A, E3641A, E3642A, E3643A, E3644A and E3645A DC power supplies.
This chapter contains a general description of your power supply. This chapter
also provides instructions for installation of your power supply and the output
connections. Unless otherwi se stated, the informati on in this manual appli es
to all the six models. This chapter is divided into the following sections:
• Safety Considerations‚ on page 29
• Options and Accessories‚ on page 30
• Description‚ starting on page 31
• Installation‚ on page 33
• Output Connections‚ on page 34
28
Page 30
Chapter 2 General Information
Safety Considerations
Safety Considerations
This power supply is a Safety Class I instrument, which means that it has a
protective earth terminal. That terminal must be connected to earth ground
through a power source with a 3-wire ground receptacle.
Before installation or operation , check the power supply and review this
manual for safety markings and instructions. Safety information for specific
procedures is located at the appropriate places in this manual. See also
‘‘
Safety
’’ at the beginning of this manual for general safety information.
Safety and EMC Requirements
This power supply is designed to comply with the following safety and EMC
(Electromagnetic Compatibility) requirements:
• IEC 1010-1(1990)/EN 61010-1(1993) + A2 (1995): Safety Requirements for
Electrical Equipment for Measurement, Control, and Laboratory Use
• CSA C22.2 No.1010.1-92: Safety Requirements for Electrical Equipment for
Measurement, Control, and Laboratory Use
• EN61326-1(1997):
EN 61000-4-2(1995): Electrostatic Discharge Requirements
EN 61000-4-3(1996): Radiated Electromagnetic Fi eld Requi rements
EN 61000-4-4(1995): Electrical Fast Transient/Burst Requirements
EN61000-4-5(1995): Surge Requirements
EN61000-4-6(1996): Conducted Radio Frequency Immunity Requirements
EN61000-4-8(1993): Magnetic Field Requirements
EN61000-4-11(1994): Voltage dips, short, interruption and var Requirement
EN 55011(1991) Group 1, Class A/CISPR 11(1990): Limits and Methods of
Radio Interference Characteristics of Industrial, Scientific, and Medical
(ISM) Radio - Frequency Equipment
• Low Voltage Directive 73/23/EEC
• EMC Directive 89/336/EEC
• ICES/NMB-001
This ISM device complies with Canadian ICES-001.
Cet appareil ISM est conforme à la norme NMB-001 du Canada.
2
29
Page 31

Chapter 2 General Information
Options and Accessories
Options and Accessories
Options
Options 0EM, 0E3, and 0E9 determine which power-line voltage is selected at
the factory. The standard unit is configured for 115 Vac ± 10%, 47-63 Hz input
voltage. For more information about changing the power-line voltage setting,
see Line Voltage Conversion on page 21.
Option Description
0EM 115
0E3
0E9
1CM
0L2
Accessories
The accessories listed below may be ordered from your local Agilent
Tecnologies Sales Office either with the power supply or separately.
Agilent No. Description
10833A
10833B
34398A
34399A
9 pin (m) to 25 pin (m) for use with PC or printer
Vac ± 10%, 47-63 Hz input voltage
230 Vac ± 10%, 47-63 Hz input voltage
100 Vac ± 10%, 47-63 Hz input voltage
Rack mount kit (Agilent part number 5063-9240)
Extra English manual set (local language manual fil es are included
on the CD-ROM, Agi lent part number 5964-8251)
GPIB cable, 1 m (3.3 ft.)
GPIB cable, 2 m (6.6 ft.)
RS-232, 9 pin (f) to 9 pin (f), 2.5 m (8.2 ft.) cable; plus 9 pin (m) to
25 pin (f) adapter
RS-232 adapter kit (contains 4 adapters):
9 pin (m) to 25 pin (f) for use with PC or printer
9 pin (m) to 25 pin (m) for use with modem
9 pin (m) to 9 pin (m) for use with modem
30
Page 32

Chapter 2 General Information
Description
Description
This power supply features a combination of programming capabilities and
linear power supply performance that makes it ideal for power systems
applications. The power sup ply may be programmed lo cally from the front
panel or remotely over the GPIB and RS-232 interfaces. This power supply has
two ranges, allowing more voltage at a lower current or more current at a lower
voltage. The output range is selected from the front panel or over the remote
interfaces.
Operational features include:
• Single-output dual range
• Constant voltage (CV) or constant current (CC) operation
• Overvoltage protection (OVP)
• Five storage locations (1 to 5) for user-defined operating states
• Automatic turn-on self-test
• Remote sense at rear panel terminals
• User calibration from the front panel or over the remote interfaces
2
The front panel operation permits:
• Easy-to-us e control features
• Output range selection
• Enabling or disabling OVP
• Setting the OVP trip levels
• Clearing OVP conditions
• Setting and displaying the voltage and current limit values
• Operating state storage/recall
• Resetting the power supply to power-on state
• Returning the power supply to local mode from remote mode
• Retrieving/Scrolling error messages on the display
• Reading calibration message or system firmware revision
• Calibrating the power supply, includ ing changing the calibration secure
code
• Enabling the remote interfaces
• Enabling or disabling the output
31
Page 33

Chapter 2 General Information
Description
When operated over the remote interface, the power supply can be both a
listener and a talker. Using an external controller, you can instruct the power
supply to set the output and to send the status data back over the GPIB or
RS-232. Capabili ties inclu de the followin g features:
• Voltage and current programming
• Voltage and current readback
• Present and stored status hardback
• Programmin g syntax error detection
• Complete self-test
The front-panel VFD (Vacuum-Fluorescent Displ ay) includes :
• Displaying actual values of output voltage and current (meter mode)
• Or displaying the limit values of voltage and current (limit mode)
• Checking the operating status from the annunciators
• Checking the type of error from the error codes (messages)
Front panel binding posts
are available to connect load wires for
bench
operation. Connections to the power supply’s output and to chassis ground are
made to the
rear output
terminals.
Warning Floating the power supply output more than ±60 Vdc from the chassis presents an
electric shock hazard to the operator. Do not float the outputs more than ±60 Vdc
when uninsulated sense wires are used to connect the (+) output to the (+) sense and
the (-) output to the (-) sense terminals on the back of the unit.
1. Float voltage +/-60 Vdc Max to ( )
(shorting conductors without insulation)
2. Float voltage +/-240 Vdc Max to (
(Insulated shorting conductors)
(Rear Output Terminals)
)
32
Page 34

Chapter 2 General Information
Installation
Installation
Initial Inspection
When you receive your power supply, inspect it for any obvious damage that
may have occurred during shipment. If any damage is found, notify the carrier
and the nearest Agilent Technologies Sales Office immediately. Warranty
information is sh own in the front of this manual.
Keep the original packing materials in case the power supply has to be returned
to Agilent Tecnologies in the future. If you return the power supply for service,
attach a tag identifying the owner and model number. Also include a brief
description of the problem.
Mechanical Check
This check confirms that there are no broken terminals or knob and that the
cabinet and panel surfaces are free of dents and scratches. Verify that the
display is not scratched or cracked.
Electrical Check
Chapter 1 describes quick operation procedure that verifies to a high level of
confidence that the power supply is operating in accordance with its
specifications. More complete verification procedures are included in the
Service Information
.
2
Cooling and Location
Cooling
The power supply can operate at rated specifications within the temperature
range of 0 °C to 40 °C, Power supply loading is derated from 40 °C to 55 °C. A
fan cools the power supply by drawing air through the sides and exhausting it
out the back. Using an Agilent rack mount will not impede the flow of air.
Bench Operation
Y our power supply must be installed in a location that allows sufficient space
at the sides and rear of the power supply for adequate air circulation. The
rubber bumpers must be removed for rack mounting.
Cleaning
No cleaning is required for this product. If you wish to remove dust from the
enclosure, use a dry cloth.
33
Page 35

Chapter 2 General Information
Output Connections
Output Connections
Warning Before attempting to connect wires to the rear output terminals, make sure to turn
off the power supply first to avoid damage to the circuits being connected.
Front panel binding posts are available to connect load wires for bench
operation and are paralleled with the rear panel (+) and (-) connections. Both
front and rear panel terminals are optimized for noise, regulation, and transient
response as documented in chapte r 8 .
Available connections on the rear output terminals include the (+) and (-)
output, the (+) and (-) sense terminals, and an earth ground terminal. The rear
output terminals accept wire sizes from AWG 24 to AWG 14.
Note
: For the E3644A/45A models, when making load connections from the
rear output terminals, four load wires should be used to keep good CV load
regulation if carrying full-rated current of the power supply.
Current Ratings
The following table lists the characteristics of AWG (American Wire Gage)
copper wire.
Table 2-1 Wire Rating
AWG 10 12 14 16 18 20 22 24 26 28
Suggested maximum
Current(amps)*
mΩ/ft 1.00 1.59 2.53 4.02 6.39 10.2 16.1 25.7 40.8 64.9
mΩ/m 3.3 5.2 8.3 13.2 21.0 33.5 52.8 84.3 133.9 212.9
*Single conductor in free air at 30 °C with insulation
40 25 20 13 10 7 5 3.5 2.5 1.7
Warning To satisfy safety requirements, load wires must be heavy enough not to overheat when
carrying the maximum short-circuit output current of the power supply. If there is
more than one load, then any pair of load wires must be capable of safety carrying
the full-rated current of the power supply.
34
Page 36

Chapter 2 General Information
Output Connections
Voltage Drops
The load wires must also be large enough to avoid excessive voltage drops due
to the impedance of the wires. In general, if the wires are heavy enough to carry
the maximum short circuit current without overheating, excessive voltage
drops will not be a problem. The voltage drops across the load wires should
be limited to less than two volts. Refer to Table 2-1 to calculate the voltage drop
for some commonly used AWG copper wire.
Load Consideration
Capacitive Loading
The power supply will be stable for almost any size load capacitance. However,
large load capacitors may cause transient response ringing. Certain
combinations of load capacitance, equivalent series resistance, and load lead
inductance may result in instability (oscillation). If this occurs, the problem
may often be solved by either increasing or decreasing the size of the capacitive
load.
A large load capacitor may cause the power supply to cross into CC or
unregulated mode momentarily when the output voltage is reprogrammed. The
slew rate of the output voltage will be limited to the current setting divided by
the total load capacitance (internal and external).
2
Inductive loading
Inductive loads present no loop stability problems in constant voltage mode.
In constant current mode, inductive loads form a parallel resonance with the
power supply’s output capacitor. Generally this will not affect the stability of
the power supply, but it may cause ringing of the current in the load.
Pulse Loading
In some applications the load current varies periodicall y from a mini mu m to
a maximum value. The constant current circuit limits the output current. Some
peak loading exceeding the current limit can be obtained due to the output
capacitor. To stay within the specifications for the output, the current limit
should be set greater than the peak current e xpected or the supply may go into
CC mode or unregulated mode for brief periods.
35
Page 37

Chapter 2 General Information
Output Connections
Reverse Current Loading
An active load connected to the power supply may actually deliver a reverse
current to the supply during a portion of its operating cycle. An external source
can not be allowed to pump current into the supply without risking loss of
regulation and possible damage. These effects can be avoided by pre-loading
the output with a dummy load resistor. The dummy load resistor should draw
at least the same amount of current from the supply as the active load may
deliver to the supply. The value of the current for the dummy load plus the
value of the current the load draws from the supply must be less than the
maximum current of the supply.
Remote Voltage Sensing Connections
Remote voltage sensing is used to maintain regulation at the load and reduce
the degradation of regulation that would occur due to the voltage drop in the
leads between the power supply and the load.
When the power supply is connected for remote sensing, the OVP circuit senses
the voltage at the
Connections between the power supply sensing and output terminals should
be removed, and using shielded two-wire cable, the power supply sensing
terminals should be connected to the load as shown in Figure 2-1.
the shield as one of the sen si ng condu ctors and the other end sh ould be left
unconnected
) only. Opening a sensing lead causes the power supply output voltage to
(
decrease at the load leads. Observe polarity when connecting the sensing leads
to the load.
sensing
points (load) and not the output terminals.
Do not use
. Connect one end of the sensing lead shield to the chassis ground
Figure 2-1. Remote Voltage Sensing Connections
36
Figure 2-2. Local Sensing Connections
Page 38

Chapter 2 General Information
Output Connections
Stability
Using remote sensing under certain combinations of load lead lengths and
large load capacitances may cause your application to form a filter, which
becomes part of the voltage feedback loop. The extra phase shift created by
this filter can degrade the power supply’s stability, resulting in poor transient
response or loop instability. In severe cases, it may cause oscillations. To
minimize this possibility, keep the load leads as short as possible and twist
them together. As the sense leads are part of the power supply’s programming
feedback loop, accidental open-connections of sense or load leads during
remote sensing operation have various unwanted effects. Provide secure and
permanent connections.
Note During remote sensing setup, it is strongly recommended to power off (by presssing
power ON/OFF button) the power supply to avoid undesirable damage to the load or
the power supply.
CV Regulation
The voltage load regulation specification in chapter 8 applies at the output
terminals of the power supply. When remote sensing, add 5 mV to this
specification for each 1 V drop between the positive sensi ng point and (+)
output terminal due to the change in load current. Because the sense leads are
part of the power supply’s feedback path, keep the resistance of the sense leads
Ω
at or below 0.5
per lead to maintain the above specified performance.
2
Output Rating
The rated output voltage and current specifications in chapter 8 apply at the
output terminals of the power supply. With remote sensing, any voltage
dropped in the load leads must be added to the load voltage to calculate
maximum output voltage. The performance specifications are not guaranteed
when the maximum output voltage is exceeded. If the excessive demand on
Unreg
the power supply forces the power supply to lose regulation, the
annunciator will turn on to indicate that the output is unregulated.
Output Noise
Any noise picked up on the sense leads also appears at the output of the power
supply and may adversely affect the voltage load regulation. Twist the sense
leads to minimize external noise pickup and run them parallel and close to the
load leads. In noisy environments it may be necessary to shield the sense leads.
Ground the shield at the power supply end only.
of the sense conductors
.
Do not use the shield as one
37
Page 39

Chapter 2 General Information
Output Connections
Multiple Loads
When connecting multiple loads to the power supply, each load should be
connected to the output terminals using separate connecting wires. This
minimizes mutual coupling effects between loads and takes full advantage of
the low output impedance of the power supply. Each pair of wires should be
as short as possible and twisted or bundled to reduce lead inductance and noise
pick-up. If a shield is used, connect one end to the power supply ground
terminal and leave the other end disconnected.
If cabling considerations require the use of distribution terminals that are
located remotely from the power supply, connect output terminals to the
distribution terminals by a pair of twisted or shielded wires. Connect each load
to the distribution terminals separately.
38
Page 40

3
Front-Panel Operation and Features
Page 41

Front-Panel Operation and Features
So far you have learned how to install your power supply and do quick start.
During the quick start, you were briefly introduced to operating from the front
panel as you learned how to check basic voltage and current functions. This
chapter describes in detail the use of the front-panel keys and shows how they
are used to accomplish power supply operation.
This chapter is divided into the following sections:
• Front - Pan el Op eration O v ervi e w ‚ o n p a ge 41
• Constant Voltage Operation‚ starting on page 42
• Constant Current Operation‚ starting on page 44
• Configuring the Remote Interface‚ starting on page 46
• Storing and Recalling Operating States‚ starting on page 48
• Programmin g Overvoltage Protection‚ starting on page 50
• Disabling the Output‚ on page 54
• System-Related Operations‚ starting on page 55
• GPIB Interface Reference‚ on page 58
• RS-232 Interface Reference‚ starting on page 59
• Calibration Overview‚ starting on page 62
Throughout this chapter the key to be pressed is shown in the left margin.
Note See ‘‘Error Messages’’, starting on page 113 in chapter 5 if you encounter any errors
during front-panel operation.
40
Page 42

Chapter 3 Front-Panel Operation and Features
Front-Panel Operation Overview
Front-Panel Operation Overview
The following section describes an overview of the front-panel keys before
operating your power supply.
• The power supply is shipped from the factory configured in the front-panel
operation mode. At power-on, the power supply is autom aticall y set to
operate in the front-panel operation mode. When in this mode, the front-
panel keys can be used.
• When the power supply is in remote operation mode, you can return to front-
panel operation mode at any time by pressing the
did not previously send the front-panel lockout comm and. A change
between front-panel and remote operation modes will not result in a change
in the output parameters.
• When you press key (the
the power supply goes to the
Display
Limit
Limit
annunciator flashes), the display of
limit
mode and the present limit values will
be displayed. In this mode, you can also observe the change of the limit
values when adjusting the knob. If you press the
display time-ou t after several seconds, the power supply wil l return the
display to the
meter
mode (the
Limit
annunciator turns off). In this mode,
the actual output voltage and current will be displayed.
• The output of the power supply can be enabled or disabled from the front
panel by pressing
Output
key. When the output is off, the
On/Off
turns on and the output is disabled.
• The display provides the present operating status of the power supply with
annunciators and also informs the user of error codes. For example, the
power supply is operating in CV mode in the 8V/3A range and controlled
CV
from the front panel, then the
and 8V annunciators will turn on. If,
however, the power supply is remotely controlled, the
also turn on, and when the power supply is being addressed over GPIB
Adrs
interface, the
annunciator will turn on. See ‘‘Displ ay Annunci ators’ ’,
starting on page 5 for more information.
• The display provides the present operating status of the power supply with
annunciators and also informs the user of error codes.
Store
(Local
Local
Display
key again or let the
Limit
Rmt
) key if you
OFF
annunciator
annunciator will
3
41
Page 43

Power
Display
Limit
Chapter 3 Front-Panel Operation and Features
Constant Voltage Operation
Constant Voltage Operation
To set up the power supply for constant voltage (CV) operation, proceed as
follows.
• Front-panel operation:
1 Connect a load to the output terminals.
With power-off, connect a load to the (+) and (-) output terminals.
2 Turn on the power supply.
The power supply will go into the
(the
OFF
annunciator turns on); its low voltage range is selected (annunciator
for the range presently selected turns on, for example, the
on for the E3640A model); and the knob is selected for
Press to operate the power supply in the high voltage range before
High
proceeding to the next step. The
on which power supply you are using.
3 Set the display to the limit mode.
Not i c e that the
limit
mode. When the display is in the
Limit
annunciator flashes, indicating that the display is in the
current limit values of the power supply.
power-on / reset
20V
or
60V
annunciator turns on depending
limit
mode, you can see the voltage and
state; the output is disabled
8V
annunciator turns
voltage
control.
Voltag e
Current
In
constant voltage
mode, the voltage valu es betwee n the m ete r and
limit modes are the same, but the current values are not. Moreover, if the
display is in the meter mode, you cannot see the change of current limit
value when adjusting the knob. We recommend that you should set the
display to “lim it” m ode to see the chan ge of curr en t lim it valu e in the
constant voltage mode whenever adjusting the knob.
1
4 Adjust the knob for the desired
Check that the
Limit
annunciator still flashes. Set the knob for
current
limit.
current
control.
The flashing digit can be changed using the resolution selection keys and the
flashing digit can be adjusted by turning the knob. Adjust the knob to the
desired current limit.
1
You can use the resolution selection keys to move the flashing digit to the
right or left when settin g curr en t.
42
Page 44

Chapter 3 Front-Panel Operation and Features
Constant Voltage Operation
Voltag e
Current
1
5 Adjust the knob for the desired output voltage.
Check that the
Limit
annunciator still flashes. Set the knob for
voltage
control.
Change the flashing digit using the resolution selection keys and adjust the
knob for the desired output voltage.
Display
Limit
Output
On/Off
6 Return to the meter mode.
Press or let the display time-out after several seconds to return to the
meter mode. Notice that the
“
Display
Limit
OUTPUT OFF
” message.
Limit
annunciator turns off and the display shows
7 Enable the output.
The
OFF
annunciator turns off and the
the display is in the
meter
mode.
CV
annunciator turns on. Notice that
8 Verify that the power supply is in the constant voltage mode.
If you operate t he power supply in the constant v oltage (CV) mode, verify that
CV
annunciator is lit. If the CC annunciator is lit, choose a higher current
the
limit.
Note During actual CV operation, if a load change causes the current limit to be exceeded,
the power supply will automatically crossover to the constant current mode at the
preset current limit and the output voltage will drop proportionately.
3
• Remote interface operation:
CURRent {<current>|MIN|MAX} Set the current
VOLTage {<voltage>|MIN|MAX} Set the voltage
OUTPut ON Enable the output
1
You can use the resolution selection keys to move the flashing digit to the
right or left when settin g voltage.
43
Page 45

Power
Display
Limit
Chapter 3 Front-Panel Operation and Features
Constant Current Operation
Constant Current Operation
To set up the power supply for constant current (CC) operation, proceed as
follows.
• Front-panel operation:
1 Connect a load to the output terminals.
With power-off, connect a load to the (+) and (-) output terminals.
2 Turn on the power supply.
The power supply will go into the
(the
OFF
annunciator turns on); its low voltage range is selected (annunciator
for the range presently selected turns on, for example, the
on for the E3640A model); and the knob is selected for
Press to operate the power supply in the high voltage range before
High
proceeding to the next step. The
on which power supply you are using.
3 Set the display to the limit mode.
Not i c e that the
limit
mode. When the display is in the
Limit
annunciator flashes, indicating that the display is in the
current limit values of the selected supply.
power-on / reset
20V
or
60V
annunciator turns on depending
limit
mode, you can see the voltage and
state; the output is disabled
8V
annunciator turns
voltage
control.
In
constant current
mode, the cur re nt valu es betw ee n the m ete r m ode
and limit mode are the same, but the voltage values are not. Moreover, if
the display is in the meter mode, you cannot see the change of voltage
limit v al ue wh en ad j u s t in g t h e k n o b . We reco mme nd t h a t you sho u ld se t
the display to “limit” mode to see the change of voltage limit value in the
constant current mode whenever adjusting the knob.
1
4 Adjust the knob for the desired
Check that the
voltage
control. The flashing digit can be changed using the resolution keys
Limit
annunciator still flashes and the knob is selected for
voltage
limit.
and the flashing digit can be adjusted by turning the knob. Adjust the knob for
the desired voltage limit.
1
You can use the resolution selection keys to move the flashing digit to the
right or left when settin g the voltage.
44
Page 46

Chapter 3 Front-Panel Operation and Features
Constant Current Operation
Voltag e
Current
1
5 Adjust the knob for the desired output current.
Check that the
Limit
annunciator still flashes. Set the knob for
current
control.
Change the flashing digit using the resolution selection keys and adjust the
knob to the desired output current.
Display
Limit
Output
On/Off
6 Return to the meter mode.
Press or let the display time-out after s everal seconds to return to the
meter mode. Notice that the
“
Display
Limit
OUTPUT OFF
” message.
Limit
annunciator turns off and the display shows
7 Enable the output.
The
OFF
annunciator turns off and the CC annunciator turns on. Notice that
the display is in the
meter
mode.
8 Verify that the power supply is in the constant current mode.
If you operate the power supply in the constant current (CC) mode, verify that
CC
annunciator is lit. If the CV annunciator is lit, choose a higher voltage
the
limit.
Note During actual CC operation, if a load change causes the voltage limit to be exceeded,
the power supply will automatically crossover to constant voltage mode at the preset
voltage limit and the output current will drop proportionately.
• Remote interface operation:
3
VOLTage {<voltage>|MIN|MAX} Set the voltage
CURRent {<current>|MIN|MAX} Set the current
OUTPut ON Enable the output
1
You can use the resolution selection keys to move the flashing digit to the
right or left when settin g the cur ren t.
45
Page 47

I/O
Config
Chapter 3 Front-Panel Operation and Features
Configuring the Remote Interface
Configuring the Remote Interface
This power supply is shipped with both a GPIB (IEEE-4888) interface and an
RS-232 interface. The GPIB interface is selected when the power supply is
shipped from the factory. Only one interface can be enabled at a time. To exit
the I/O configuration mode without any changes, press
CHANGE
’’ message is displ ayed.
• You can set the GPIB address, parity, and baud rate from the front panel
only
.
• The current selection is highlighted for emphasis. All other choices are
dimmed.
• The interface selection is stored in
non-volatile
change when power has been off or after a power-on reset (
command).
GPIB Configuration
1 Turn on the remote configuration mode.
I/O
key until the ‘‘
Config
memory, and does not
*RST
NO
I/O
Config
I/O
Config
Note
GPIB / 488
If “
RS-232
” appears, select “
GPIB / 488
” by turning the knob.
2 Select the GPIB address.
ADDR 05
You can set the power supply’s address to any value between 0 and 30. The
factory setting
is address ‘‘5’’.
3 Save the change and exit the menu.
SAVED
Your computer's GPIB interface card has its own address. Be sure to avoid
using the compu ter 's addr es s for any in str um e nt on the inter face bus.
Agilent Tec hn ologies GPIB inter face cards gen er all y us e addr es s ‘‘21’ ’.
46
Page 48

I/O
Config
I/O
Config
Chapter 3 Front-Panel Operation and Features
Configuring the Remote Interface
RS-232 Configuration
1 Turn on the remote configuration mode.
GPIB / 488
Notice that if you changed the rem ote inte rfac e se le ction to RS-232 before,
“
RS-232
2 Choose the RS-232 interface.
” message is displayed.
3
RS-232
You can choose the RS-232 interface by turning the knob.
3 Select the baud rate
Select one of the following: 300, 600, 1200, 2400, 4800, or 9600 (
baud.
factory setting
)
I/O
Config
I/O
Config
9600 BAUD
4 Select the parity and number of stop bits.
Select one of the following: None (8 data bits,
factory setting
), Odd (7 data
bits), or Even (7 data bits). When you set the parity, you are also indirectly
setting the number of the data bits.
NONE 8 BITS
5 Save the change and exit the menu.
SAVED
47
Page 49

Chapter 3 Front-Panel Operation and Features
Storing and Recalling Operating States
Storing and Recalling Operating States
Store
You can store up to five different operating state in
non-volatile
storage
locations. When shipped from the factory, storage locations ‘‘1’’ through ‘‘5’’
are empty. You can name a location from the front panel or over the remote
interface but you can only recall a named state from the front panel.
The following steps show you how to store and recall an operating state.
To canc el the st ore/r ecall opera tion
, select the ‘‘
EXIT
’’ menu by turning the
knob then press the key pressed or let the display time-out.
• Front-panel operation:
Storing Operating State
1 Set up the power supply for the desired operating state.
The storage feature “remembers” output voltage range selection, the limit
value settings of voltage and current, output on/off state, OVP on/off state, and
OVP trip levels.
2 Turn on the storage mode.
STORE STATE
From the front panel, you can assign names (up to 10 characters) to each of
the five stored states. Tu rn the knob until the ‘‘
press
Store Store
to select the locations, then press to name the locations.
NAME STATE
’’ appears and
Store
Name STATE
1:p15v_test
3 Select the storage location.
Turn the knob to the right to specify the memory location 2.
2: STatE2
48
Page 50

Chapter 3 Front-Panel Operation and Features
Storing and Recalling Operating States
Store
Recall
Recall
4 Save the operating state
DONE
Recalling a Stored State
1 Turn on the recall mode.
Memory location “1” will be displ ayed in the recall mode.
1: p15v_test
2 Select the stored operating state.
2: state2
reset
Y ou can select the a bove
on state without turning power off/on or without using ‘‘
the remote interface. See
3 Recall the stored operating state.
RESET
mode to reset the power supply to the power-
page 87 for more details on ‘‘
*RST
’’ command over
*RST
’’ command.
3
done
• Remote interface operation:
Use the following commands to store and recall power supply state.
*SAV {1|2|3|4|5} Store an operating state to a specified location
*RCL {1|2|3|4|5} Recall a previously stored state from a specified
location
‘‘
MEM:STATE:NAME 1, ‘P15V_TEST
Name the storage location 1 as ‘‘P15V_TEST’’.
’’’
49
Page 51

Power
Over
Voltag e
Chapter 3 Front-Panel Operation and Features
Programming Overvoltage Protection
Programming Overvoltage Protection
Overvoltage protection guards the load against output voltages reaching values
greater than the programmed protection level. It is accomplished by shorting
the output via an internal SCR when the trip level is set to equal or greater than
3 volts, or by programming the output to 1 volt when the trip level is set to less
than 3 volts.
The following steps show how to set the OVP trip level, how to check OVP
operation, and how to clear overvoltage condition.
• Front-panel operation:
Setting the OVP Level and Enable the OVP Circuit
1 Turn on the power supply.
2 Enter the OVP menu and set the desired trip level.
Over
Voltag e
Over
Voltag e
LEVEL 22.0V (E3640A)
Use the knob and the resolution selection key or to set the desired
trip level.
Note
that you cannot set the trip levels to lower than 1.0 volt.
3 Enable the OVP circuit.
< >
OVP ON
4 Exit the OVP menu.
CHANGED
If the OVP settings are not changed, “
power supply will exit the OVP menu and the display will return to the meter
OVP
mode. Check that the
annunciator turns on.
50
NO CHANGE
” will be displayed. The
Page 52

Display
Voltag e
Limit
Over
Over
Voltag e
Chapter 3 Front-Panel Operation and Features
Programming Overvoltage Protection
Checking OVP Operation
To check OVP operation, raise the output voltage to near the trip point. Then
very gradually increase the output by turning the knob until the OVP circuit
OVP
trips. This will cause the power supply output to drop to near zero, the
annunciator to flash, and the
CC
annunciator to turn on. The “
OVP TRIPPED
”
message also appears on the display.
Clearing the Overvoltage Condition
When the OVP condition occurs, the
caused by an external voltage source such as a battery , disconnect it first. Clear
the overvoltage condition by adjusting output voltage level or by adjusting OVP
trip level.
The following steps show you how to clear the overvoltage condition and get
back to normal mode operation. In the following steps, the display will go back
to “
OVP TRIPPED
By Adjusting output voltage level
1 Lower the output voltage level below the OVP trip point.
The
OVP
and
” if you let the display time out after about several seconds.
Limit
annunciators are flashing after key is pressed.
2 Check that you lowered the voltage level below the OVP trip point.
The OVP trip point is displayed. Do not adjust the trip point at this step.
3 Select the OVP CLEAR mode by turning the knob.
OVP
annunciator flashes. When it was
Display
Limit
3
Over
Voltag e
OVP ON
OVP CLEAR
4 Clear the overvoltage condition and exit this menu.
done
The
OVP
annunciator will not flash any more. The output will return to meter
mode.
51
Page 53

Over
Voltag e
Over
Voltag e
Over
Voltag e
Chapter 3 Front-Panel Operation and Features
Programming Overvoltage Protection
By Adjusting OVP trip level
1 Raise the OVP trip level higher than the level tripped.
2 Select the OVP CLEAR mode by turning the knob.
OVP ON
OVP CLEAR
3 Clear the overvoltage condition and exit this menu.
done
The
OVP
annunciator will not flash any more. The output will return to the
meter mode.
• Remote interface operation:
VOLT:PROT {<voltage>|MIN|MAX} Set the OVP level
VOLT:PROT:STAT {OFF|ON) Disable or enable the OVP circuit
VOLT:PROT:CLE Clear the tripped OVP circuit
52
Page 54

Chapter 3 Front-Panel Operation and Features
Programming Overvoltage Protection
Note The power supply’s OVP circuit contains a crowbar SCR, which effectively shorts the
output of the power supply whenever the overvoltage condition occurs. If external
voltage source such as a battery is connected across the output, and the overvoltage
condition inadvertently occurs, the SCR will continuously sink a large current from
the source; possibly damaging the power supply. To avoid this a diode must be
connected in series with the output as shown in Figure 3-1.
3
Figure 3-1. Recommended Protection Circuit for Battery Charging
53
Page 55

Chapter 3 Front-Panel Operation and Features
Disabling the Output
Disabling the Output
The output of the power supply can be disabled or enabled from the front panel.
• When the power supply is in the “Off” state, the
and the output is disabled. The
OFF
annunciator turns off when the power
supply returns to the “On” state. When the output is disabled, the voltage
value is 0 volts and the current value is 0.02 amps. This gives a zero output
voltage without actually disconnecting the output.
• The output state is stored in
volatile
memory; the output is always disabled
when power has been off or after a remote interface reset.
• While the output is disabled, the control
knob
unwanted changes occurring. But the other front panel keys are working.
• To lock the control knob, move the flashing digit to the right or left using
< >
or resolutio n selection keys until the flashing digit disappears .
To see or check the changes while the output is disabled, press before
returning to meter mode.
• Front-panel operation:
OFF
annunciator turns on
is locked to prevent from any
Display
Limit
Output
output Off
On/Off
• Remote interface operation:
OUTP {OFF|ON}
Disconnecting the Output Using an External Relay
To disconnect the output, an external relay must be connected between the
output and the load. A TTL signal of either low true or high true is provided to
control an external relay. This signal can only be controlled with the remote
command
OUTPut:RELay {OFF|ON}
232 connection pin 1 and pin 0.
When the
OUTPut:RELay
state is “ON”, the TTL output of pin 1 is high
(4.5 V) and pin 9 is low (0.5 V). The levels are reversed when the
OUTPut:RELay
state is “OFF”. The TTL output of pin 1 or pin 9 of the RS-232
connector is available only after installing two jumpers (JP102 and JP103)
inside the power supply. See the
Note Do not use the RS-232 interface if you have configured the power supply to output
relay control signals. Internal components on the RS-232 circuitry may be damaged.
54
. The TTL output is available on the RS-
Service Infor m ation
to locate them.
Page 56

Chapter 3 Front-Panel Operation and Features
System-Related Operations
System-Related Operations
This section gives information on system-related topics such as storing power
supply states, reading errors, runni ng a self-test, dis pl aying messages on the
front panel, and reading firmware revisions.
State Storage
The power supply has five storage locations in non-volati le mem ory to store
power supply states. The locations are numbered 1 through 5. You can assign
a name to each of the locations for use from the front panel.
• You can store the power supply state in any of the five locations. However,
you can only recall a state from a location that c ontains a previously stored
state.
• The power supply stores the following: the state of output range selection,
flashing digit position on the display, the limit value settings of voltage and
current, output on/off state, OVP on/off state and trip levels.
• When shipped from the factory, storage locations ‘‘1’’ through ‘‘5’’ are empty.
• You can assign a name to the storage locations. You can name a location
from the front panel or over the remote interface but you can only recall a
named state from the front panel. From the remote interface, you can only
recall a stored state using a number (1 through 5).
• The name can contain up to 9 characters. A letter (A-Z) or numbers (0-9)
can be used for the first character to name a state. The underscore character
(‘‘_ ’’) can be used for the remaining 8 characters. Blank spaces are not
allowed. An error is generated if you specify a name with more than 10
characters.
•A
power-on
stored in memory. Once a state is stored, it remains until it is overwritten.
reset (
*RST
command) does not affect the configurations
3
• Front-Panel Operation:
Store
STORE STATE, NAME STATE, EXIT
To reset the power supply to the power-on reset state without using the
*RST
command or turning power off/on, select the ‘‘
following.
Recall
5 states, RESET, exit
RESET
’’ from the
55
Page 57

Chapter 3 Front-Panel Operation and Features
System-Related Operations
• Remote Interface Operation:
Use the following commands to store and recall power supply state.
*SAV {1|2|3|4|5}
*RCL {1|2|3|4|5}
T o assign a name to a stored state to be recalled from the front panel, send
the following command. From the remote interface, you can only recall a
stored state using a number (1 through 5).
‘‘
MEM:STATE:NAME 1, ‘P15V_TEST
’’’
Self-Test
A
power-on
This test assures you that the power supply is operational. This test does not
perform the extensive set of tests that are included as part of the complete self-
test described below. If the power-on self-test fails, the
turns on.
A
complete
seconds to execute. If all tests pass, you can have a high confidence that the
power supply is operational.
If the
If the self-test fails, ‘‘
See the
Agilent Technologies for service.
self-test occurs automatically when you turn on the power supply.
ERROR
annunciator
self-test performs a series of tests and takes approximately 2
complete
Service Information
self-test is successful, “
FAIL
’’ is displayed and the
for instructions on returning the power supply to
PASS
” is displayed on the front panel.
ERROR
annunciator turns on.
• Front-panel operation:
To perform the complete front panel
you turn on the power supply and
beep
. The self-test will begin when you release the key following the beep.
self-test
, hold down the key as
hold down the key until you hear a long
Display
Limit
• Remote interface operation:
‘‘
*TST?
’’
Returns “0” if the complete self-test passes or “1” if it fails.
Error Conditions
When the front-panel
syntax or hardware errors have been detected. A record of up to 2 0 errors can
be stored in the power supply’s
information starting on page 113 in chapter 5.
56
ERROR
annunciator turns on, one or more command
error queue
.
See ‘‘Error Messages’’ for more
Page 58

Chapter 3 Front-Panel Operation and Features
System-Related Operations
Firmware Revision Query
The power supply has three microprocessor s for control of various internal
systems. You can query the power supply to d etermine which revision of
firmware is installed for each microprocessor.
• The power supply returns three revision numbers . The firs t number is the
firmware revision number for the main processor; the second is for the
input/output processor ; and the third is for the front-panel processor.
• Front-Panel Operation:
View
Press
• Remote interface operation:
*IDN?
The above command returns a string in the form:
‘‘
Agilent Technologies,E3640A,0,X.X-Y.Y-Z.Z’’
Be sure to dimension a string variable with at least 40 characters.
REV X.X-Y.Y-Z.Z
View
twice to read the system firmware revision numbers.
(E3640A)
SCPI Language Version
This power supply complies with the rules and regulations of the present
version of SCPI (
can determine the SCPI version with which the power supply is in compliance
by sending a command from the remote interface.
You can query the SCPI version from the remote interface only.
• Remote interface operation:
‘‘
SYST:VERS?
Returns a string in the form “YYYY.V” where the “Y’s” represent the year
of the version, and the “V” represents a version number for that year
(for example , 1997.0) .
Standard Commands for Programmable Instruments
’’
Query the SCPI version
). Y ou
3
57
Page 59

Chapter 3 Front-Panel Operation and Features
GPIB Interface Reference
GPIB Interface Reference
The GPIB connector on the rear panel connects your power supply to the
computer and other GPIB devices. Chapter 2 lists the cables that are available
from Agilent Technologies. A GPIB system can be connected together in any
configuration (star, linear, or both) as long as the following rules are observed:
Each device on the GPIB (IEEE-488) interface must have a unique address.
You can set the power supply’s address to any value between 0 and 30. The
address is set to ‘‘5’’ when the power supply is shipped from the factory. The
GPIB address is displayed at power-on.
You can set the GPIB address from the front panel only.
Note
• The address is stored in
power has been off or after a power-on reset (
• Your computer's GPIB interface card has its own address. Be sure to avoid
using the computer's address for any instrument on the interface bus.
Agilent Technologies GPIB interface cards generally use address ‘‘21’’.
• The total number of devices including the computer is no more than 15.
• The total length of all the cables used is no more than 2 meter times the
number of devices connected together, up to a maximum of 20 meters.
• Do not stack more than three connector blocks together on any GPIB
connector. Make sure that all connectors are fully seated and that the lock
screws are firmly finger tightened.
See page 46 for more information on configuring the power supply for remote
interface from the front pan el .
IEEE-488 states that you should e xer cis e ca ution if your in dividu al ca ble
lengths exce ed 4 m ete rs .
non-volatile
memory, and
*RST
does not
command).
change when
58
Page 60

Chapter 3 Front-Panel Operation and Features
RS-232 Interface Reference
RS-232 Interface Reference
The power supply can be connected to the RS-232 interface using the 9-pin
(DB-9) serial connector on the rear panel. The power supply is configured as
a DTE (Data Terminal Equip ment) device. For all comm unicati ons over the
RS-232 interface, the power supply uses two handshake lines: DTR (Data
Terminal Ready, on pin 4) and DSR (Data Set Ready, on pin 6).
The following sections contain information to help you use the power supply
over the RS-232 interface. The programming commands for RS-232 are
explained on
RS-232 Configuration Overview
Configure the RS-232 interface using the parameters shown below. Use the
front-panel
(
See page 46 for more in form ation
page 92.
I/O
key to select the baud rate, parity, and number of data bits
Config
).
3
• Baud Rate: 300, 600, 1200, 2400, 4800, or
• Parity and Data Bits:
• Number of Start Bits:
• Number of Stop Bits:
None / 8 data bits (factory setting
Even / 7 data bits, or
Odd / 7 data bits
1 bit (fixed
2 bits (fixed
9600 (factory setting
)
)
)
)
RS-232 Data Frame Format
A character
character. The frame is defined as the characters from the
stop bit
data bits, and parity type. The power supply uses the following frame formats
for seven and eight data bits.
frame
consists of all the transmitted bits that make up a single
start bit
, inclusively. Within the frame, you can select the baud rate, number of
to the last
59
Page 61

Chapter 3 Front-Panel Operation and Features
RS-232 Interface Reference
Connection to a Computer or Terminal
To connect the power supply to a computer or terminal, you must have the
proper interface cable. Most computers and terminals are DTE (
Equipment
) devices. Since the power supply is also a DTE device, you must
use a DTE-to-DTE interface cable. These cables are also called null-modem,
modem-eli m inator, or crossover cables.
The interface cable must also have the proper connector on each end and the
internal wiring must be correct. Connectors typically have 9 pins (DB-9
connector) or 25 pins (DB-25 connector) with a “male” or “female” pin
configuration. A male connector has pins inside the connector shell and a
female connector has holes inside the connector shell.
If you cannot find the correct cable for your configuration, you may have to
use a
wiring adapter
adapter is a “
straight-through
. If you are using a DTE-to-DTE cable, make sure the
” type. T ypical adapters include gender changers,
null-m odem adapters, and DB- 9 to DB-25 adapters.
The cable and adapter diagrams shown below can be used to connect the
power supply to most computers or terminals. If your configuration is different
than those described, order the Agilent 34399A Adapter Kit. This kit contains
adapters for connection to other computers, terminals, and modems.
Instructions and pin diagrams are includ ed with the adapter kit.
Data Terminal
DB-9 Serial Connection
If your computer or terminal has a 9-pin serial
port with a male conn ec tor, use the null-m ode m cable incl ud ed with the
Agilent 34398A Ca ble Kit. This cable has a 9-pin fem al e c onne ctor on eac h
end. The cabl e pin diagram is s hown bel ow.
5182-4794
Instrument
DCD
RX
TX
DTR
GND
DSR
RTS
CTS
RI
DB9
Male
1
2
3
4
5
6
7
8
9
DB9
Female
Cable
1
2
3
4
5
6
7
8
9
DB9
Female
PC
DCD
RX
TX
DTR
GND
DSR
RTS
CTS
RI
DB9
Male
60
Page 62

Chapter 3 Front-Panel Operation and Features
RS-232 Interface Reference
DB-25 Serial Connection
If your computer or terminal has a 25-pin serial
port with a male conn ec tor, use the null-m ode m cable and 25-pin adapter
included with the Agilent 34398A Cable Kit. The cable and adapter pin
diagram are s hown bel ow.
5182-4794
Instrument PC
DCD
1
RX
2
TX
3
DTR
4
5
GND
6
DSR
7
RTS
8
CTS
9
RI
DB9
DB9
Female
Male
Cable
1
2
3
4
5
6
7
8
9
DB9
Female
1
2
3
4
5
6
7
8
9
DB9
Male
5181-6641
Adapter
2
3
4
5
6
7
8
20
DB25
Female
TX
RX
RTS
CTS
DSR
GND
DCD
DTR
DB25
Male
RS-232 Troubleshooting
Here are a few things to check if you are having problems communicating over
the RS-232 interface. If you need additional help, refer to the documentation
that came with your computer.
• Verify that the power supply and your computer are configured for the same
baud rate, parity, and number of data bits. Make sure that your computer is
set up for 1 start bit and 2 stop bits (these values are fixed on the power
supply).
• Make sure to execute the
supply in the remote mode.
• Verify that you have connected the correct interface cable and adapters.
Even if the cable has the proper connectors for your system, the internal
wiring may be incorrect. The
connect the power supply to most computers or terminals.
• Verify that you have connected the interface cable to the correct serial port
on your computer (COM1, COM2, etc.).
SYSTem:REMote
command to place the power
Agilent 34398A Cable Kit
can be used to
3
61
Page 63

Chapter 3 Front-Panel Operation and Features
Calibration Overview
Calibration Overview
This section gives an overview of the calibration features of the power supply.
For more detailed discussion of the calibration procedures, see the
Information
.
Calibration Security
This feature allows you to enter a security code to prevent accidental or
unauthorized calibrations of the power supply. When you first receive your
power supply, it is secured. Before you can calibrate the power supply, you
must unsecure it by entering the correct security code.
• The table 3-1 below shows the security code for each model when the power
supply is shipped from the factory. The security code is stored in
volatile
power-on reset (
• The security code may contain up to 11 alphanumeric characters or
underscore character (‘‘_’’). A letter (A-Z) or number (0-9) can be used for
the first character. You do not have to use all 11 characters.
memory, and does not change when power has been off or after a
*RST
command).
Service
non-
_ _ _ _ _ _ _ _ _ _ _ (11 characters)
• When you secure the power supply from the remote interface, use maximum
8 alphanumeric characters to unsecure the power supply from the front
panel also. For example,
e3640A
(less than 9 characters)
If you forget your securi ty code, you can disabl e the se cu rity featu re by
adding a jumper inside the power supply, and then entering a new code.
See the Service Information for more information.
Table 3-1. Factory setting security codes
Model Security
E3640A 003640 E3641A 003641 E3642A 003642
E3643A 003643 E3644A 003644 E3645A 003645
Code
Model Security
Code
Model Security
Code
62
Page 64

Power
Calibrate
Chapter 3 Front-Panel Operation and Features
Calibration Overview
To Unsecure for Calibration
You can unsecure the power supply either from the front panel or over the
remote interface. The power supply is secured when shipped from the factory.
See the table 3-1 for the factory setting secure code for your power supply.
View
1 Select the calibration mode.
SECURED
I/O
Config
Secure
I/O
Config
Secure
Power
If the power supply is secured, the above message is displayed as you turn on
the power supply by holding down
key
until you hear a lon g beep
View
(
Calibrate
Calibrate
. And a message ‘‘
) key and hold down the
CAL MODE
’’ is displayed.
2 Enter the security code.
000000
Enter the security code using the control knob and resolution selection keys.
3 Save the change and exit the menu.
UNSECURED
Y ou will see the above message if the security code is correct. And a message
‘‘
CAL MODE
and on.
Notice that if you enter the wrong se cur e c ode, “
the code entering mode is displayed for you to enter the correct code.
• Remote Interface Operation:
CAL:SEC:STAT {OFF|ON},<code> Secure or unsecure the power supply
To unsecure the power supply, send the above command with the same
code used to secure. For example,
‘‘
CAL:SEC:STAT OFF, ‘003640
’’ is displayed. To exit the calibration m ode, turn the power off
INVALID
” is displayed and
’’’ (E3640A m ode l)
3
63
Page 65

Power
Calibrate
Chapter 3 Front-Panel Operation and Features
Calibration Overview
To Secure Against Calibration
Y ou can secure the power supply against calibration either from the front panel
or over the remote interface. The power supply is secured when shipped from
the factory.
Be sure to rea d th e securi ty co de rul es on p age 6 2 bef ore a ttemp tin g to secure
the power suppl y.
• Front-Panel Operation:
View
1 Select the calibration mode.
UNSECURED
I/O
Config
Secure
I/O
Config
Secure
Power
If the power supply is unsecured, the above message is displayed as you turn
on the power supply by holding down
key
until you hear a lon g beep
. And a message ‘‘
View
Calibrate
(
Calibrate
CAL MODE
) key and hold down the
’’ is displayed.
2 Enter the security code.
000000
Enter the desired security code using the control knob and resolution selection
keys.
3 Save the change and exit the menu.
secured
The secured setting is stored in
when power has been off or after a power-on reset (
• Remote Interface Operation:
CAL:SEC:STAT {OFF|ON},<code> Secure or unsecure the power supply
T o secure the power supply, send the above command with the same code
as used to unsecure. For example,
‘‘
CAL:SEC:STAT ON, ‘003640
non-volatile
memory, and does not change
’’’ (E3640A model)
*RST
command).
64
Page 66

Chapter 3 Front-Panel Operation and Features
Calibration Overview
To Change the Security Code
To change the security code, you must first
unsecure the power supply, and then enter a new code. Be sure to read the
security code rules
on page 62 before attempting to secure the power supply.
• Front-Panel Operation:
To change the security code, first make sure that the power supply is
unsecured. Go to the security code entry, press
“
CAL MODE
” message is displayed, enter the new security code using the
control knob and resolution selection keys, then press
I/O
Config
Secure
(
Secure
I/O
Config
Secur e
) key after the
(
Secure
) key.
Changing the code from the front pan el also cha nges the code as see n from
the remote inte rfac e.
• Remote Interface Operation:
CAL:SEC:CODE <new code> Change the security code
T o change the security code, first unsecure the power supply using the old
security code. Then, enter the new code as shown below.
‘‘
CAL:SEC:STAT OFF, ‘003640
‘‘
CAL:SEC:CODE ‘ZZ001443
‘‘
CAL:SEC:STAT ON, ‘ZZ001443
’’’
’’’
Unsecure with old code
Enter new code
’’’
Secure with new code
3
Calibration Count
You can determine the number of times that your power supply has been
calibrated. Your power supply was calibrated before it left the factory. When
you receive your power supply, read the count to determine its initial value.
The calibration count feature can be performed from the remote interface
only.
• The calibration count is stored in
when power has been off or after a remote interface reset.
• The calibration count increments up to a maximum of 32,767 after which it
wraps-around to 0. Since the value increments by one for each calibration
point, a complete calibration wil l incr ease the value by 3 counts.
• Remote Interface Operation:
CAL:COUN? Query the number of times of calibration
non-volatile
memory, and does not change
65
Page 67

Chapter 3 Front-Panel Operation and Features
Calibration Overview
Calibration Message
The power supply allows you to store one message in calibration memor y in
the mainframe. For example, you can store such information as the date when
the last calibration was performed, the date when the next calibration is due,
the power supply’s serial number, or even the name and phone number of the
person to contact for a new calibration.
• You can record a calibration message
only
when the power supply is unsecured. You can read the message from
either the front-panel or over the remote interface. You can read the
calibration message whether the powers supply is secured or unsecured.
• The calibration message may contain up to 40 characters. From the front
panel, you can view 11 characters of the message at a time.
• Storing a calibration message will overwrite any message previously stored
in memory.
• The calibration message is stored in
change when power has been off or after a remote interface reset.
• Front-Panel Operation:
T o read calibration message from the front panel, press and turn the
knob until ‘‘
text of the message. Press to increase the scrolling speed.
CAL STRING
’’ is displayed. Pres s to scroll through the
>
only
from the remote interface and
non-volatile
memory, and does not
View
View
View View
CAL STRING
• Remote Interface Operation:
To store the calibration message, send
‘‘
CAL:STR ‘CAL 06-01-99
the following comm and.
’’’
66
Page 68

4
Remote Interface Reference
Page 69

Remote Interface Reference
• SCPI Command Summary‚ starting on page 69
SCPI
• Simplified Programming Overview‚ starting on page 74
• Using the
• Output Setting and Operation Commands‚ starting on page 78
• Triggering‚ starting on page 82
• System-Related Commands‚ starting on page 85
• State Storage Commands‚ on page 88
• Calibration Commands‚ starting on page 89
• Interface Configuration Commands‚ on page 92
• The SCPI Status Registers‚ startin g on page 93
• Status Reporting Commands‚ starting on page 101
SCPI
• An Introduction to the SCPI Language‚ starting on page 103
• Halting an Output in Progress‚ on page 108
• SCPI Conformance Informati on‚ startin g on page 109
• IEEE-488 Conformance Information‚ on page 112
APPLy
Command‚ on page 77
SCPI
If you are a first-time us er of the SCPI la nguage , you m ay wan t to refer to
these section s to becom e fam il iar wi th the langu age before attem pting to
program the power supply.
68
Page 70

Chapter 4 Remote Interface Reference
SCPI Command Summary
SCPI Command Summary
SCPI
This section summarizes the SCPI (
Instruments
remote interface. Refer to the later sections in this chapter for more complete
details on each command.
Throughout this manual, the following conventions are used for SCPI
command syntax.
• Square brackets ([ ]) indicate optional keywords or parameters.
• Braces ({ }) enclose parameters within a command string.
• Triangle brackets (< >) indicate that you must substitute a value or a code
for the enclosed parameter.
• A vertical bar ( | ) separates one of two or more alternative parameters.
First-time SCPI users, see page 103.
) commands available to program the power supply over the
Standard Commands for Programmable
4
69
Page 71

Chapter 4 Remote Interface Reference
SCPI Command Summary
Output Setting and Measurement Commands
(see page 78 for more information)
APPLy {<voltage>|DEF|MIN|MAX}[,{<current>|DEF|MIN|MAX}]
APPLy?
[SOURce:]
CURRent[:LEVel][:IMMediate][:AMPLitude]{<current>|MIN|MAX|UP|DOWN}
CURRent[:LEVel][:IMMediate][:AMPLitude]? [MIN|MAX]
CURRent[:LEVel][:IMMediate]:STEP[:INCRement]
{<numeric value> |DEFault}
CURRent[:LEVel][:IMMediate]:STEP[:INCRement]? [DEFault]
CURRent[:LEVel]:TRIGgered[:AMPLitude] {<current>|MIN|MAX}
CURRent[:LEVel]:TRIGgered[:AMPLitude]? [MIN|MAX]
VOLTage[:LEVel][:IMMediate][:AMPLitude]
{<voltage>|MIN|MAX|UP|DOWN}
VOLTage[:LEVel][:IMMediate][:AMPLitude]? [MIN|MAX]
VOLTage[:LEVel][:IMMediate]:STEP[:INCRement]
{<numeric value>|DEFault}
VOLTage[:LEVel][:IMMediate]:STEP[:INCRement]? [DEFault]
VOLTage[:LEVel]:TRIGgered[:AMPLitude] {<voltage>|MIN|MAX}
VOLTage[:LEVel]:TRIGgered[:AMPLitude]? [MIN|MAX]
VOLTage:PROTection[:LEVel] {<voltage>|MIN|MAX}
VOLTage:PROTection[:LEVel]? [MIN|MAX]
VOLTage:PROTection:STATe {0|1|OFF|ON}
VOLTage:PROTection:STATe?
VOLTage:PROTection:TRIPped?
VOLTage:PROTection:CLEar
VOLTage:RANGe {P8V*|P20V*|P35V**|P60V**|LOW|HIGH}
VOLTage:RANGe?
MEASure
[:SCALar]
:CURRent[:DC]?
[:VOLTage][:DC]?
*For Agilent E3640A/42/44A Models **For Agilent E3641A/43A/45A Models
70
Page 72

Chapter 4 Remote Interface Reference
SCPI Command Summary
Triggering Commands
(see page 82 for more information)
INITiate[:IMMediate]
TRIGger[:SEQuence]
:DELay {<seconds>|MIN|MAX}
:DELay?[MIN|MAX]
:SOURce {BUS|IMM}
:SOURce?
*TRG
System-Related Commands
(see page 85 for more information)
DISPlay[:WINDow]
[:STATe] {OFF|ON}
[:STATe]?
:TEXT[:DATA] <quoted string>
:TEXT[:DATA]?
:TEXT:CLEar
SYSTem
:BEEPer[:IMMediate]
:ERRor?
:VERSion?
:COMMunicate:GPIB:RDEVice:ADDRess <numeric value>
:COMMunicate:GPIB:RDEVice:ADDRess?
OUTPut
:RELay[:STATe] {OFF|ON}
:RELay[:STATe]?
[:STATe] {OFF|ON}
[:STATe]?
4
*IDN?
*RST
*TST?
71
Page 73

Chapter 4 Remote Interface Reference
SCPI Command Summary
Calibration Commands
(see page 89 for more information)
CALibration
:COUNt?
:CURRent[:DATA] <numeric value>
:CURRent:LEVel {MIN|MID|MAX}
:SECure:CODE <new code>
:SECure:STATe {OFF|ON},<quoted code>
:SECure:STATe?
:STRing <quoted string>
:STRing?
:VOLTage[:DATA] <numeric value>
:VOLTage:LEVel {MIN|MID|MAX}
:VOLTage:PROTection
Status Reporting Commands
(see page 101 for more information)
STATus:QUEStionable
:CONDition?
[:EVENt]?
:ENABle <enable value>
:ENABle?
SYSTem:ERRor?
*CLS
*ESE <enable value>
*ESE?
*ESR?
*OPC
*OPC?
*PSC {0|1}
*PSC?
*SRE <enable value>
*SRE?
*STB?
*WAI
72
Page 74

Chapter 4 Remote Interface Reference
SCPI Command Summary
Interface Configuration Commands
(see page 92 for more information)
SYSTem
:INTerface {GPIB|RS232}
:LOCal
:REMote
:RWLock
State Storage Commands
see page 88 for more information)
(
*SAV {1|2|3|4|5}
*RCL {1|2|3|4|5}
MEMory:STATe
:NAME {1|2|3|4|5} ,<quoted name>
:NAME? {1|2|3|4|5}
4
IEEE-488.2 Common Commands
(see page 112 for more information)
*CLS
*ESR?
*ESE <enable value>
*ESE?
*IDN?
*OPC
*OPC?
*PSC {0|1}
*PSC?
*RST
*SAV {1|2|3|4|5}
*RCL {1|2|3|4|5}
*STB?
*SRE <enable value>
*SRE?
*TRG
*TST?
*WAI
73
Page 75

Chapter 4 Remote Interface Reference
Simplified Programming Overview
Simplified Programming Overview
This section gives an overview of the basic techniques used to program the
power supply over the remote interface. This section is only an overview and
does not give all of the details you will need to write your own application
programs. Refer to the remainder of this chapter and also chapter 6,
‘‘Application Programs’’, for more details and examples. Also refer to the
programming reference manual that came with your computer for details on
outputting command strings and entering data.
Using the APPLy Command
The
APPLy
command provides the most straightforward method to program
the power supply over the remote interface. For example, the following
statement executed from your computer will set the power supply to an output
of 3 V rated at 1 A:
‘‘APPL 3.0, 1.0
’’
Using the Low-Level Commands
Although the
program the power supply, the low-level commands give you more flexibility
to change individual parameters. For example, the following statements
executed from your computer will set the power supply to an output of 3 V
rated at 1 A:
‘‘VOLT 3.0
‘‘CURR 1.0
APPLy
’’
’’
command provides the most straightforward method to
Set output voltage to 3.0 V
Set output current to 1.0 A
74
Page 76

Chapter 4 Remote Interface Reference
Simplified Programming Overview
Reading a Query Response
Only the query commands (commands that end with “ ? ”) will instruct the
power supply to send a response message. Queries return either output values
or internal instrument settings . For exampl e, the follow ing statements
executed from your computer will read the power supply’s error queue and
print the most recent error:
dimension statement Dimension string array (80 elements)
‘‘SYST:ERR?
bus enter statement Enter error string into computer
print statement Print error string
’’
Read error queue
Selecting a Trigger Source
The power supply will accept a ‘‘bus’’ (software) trigger or an immediate
internal trigger as a trigger source. By default, the ‘‘BUS’’ trigger source is
selected. If you want the power supply to use an immediate internal trigger,
you must select ‘‘
executed from your computer will set to an output of 3 V/1 A immediately:
‘‘VOLT:TRIG 3.0
‘‘CURR:TRIG 1.0
‘‘TRIG:SOUR IMM
‘‘INIT
IMMediate
’’
’’ . F o r ex amp l e , the fo l lowi n g st a t emen t s
’’
’’
’’
Set the triggered voltage level to 3.0 V
Set the triggered current level to 1.0 A
Select the immediate trigger as a source
Cause the trigger system to initiate
4
75
Page 77

Chapter 4 Remote Interface Reference
Simplified Programming Overview
Power Supply Programming Ranges
The
available programming value for a parameter varies according to the desired
output range of the power supply. The following table lists the programming
values available and
power supply.
Refer to this table to identify programming values when programming the power
supply.
Table 4-1. Agilent E3640A/42A/44A Programming Ranges
Voltage Programming
Current Programming
Range
MAX Value 8.24 V 20.60 V 8.24 V 20.60 V 8.24 V 20.60 V
MIN Value 0 V 0 V 0 V
DEFault Value 0 V 0 V 0 V
*RST Value 0 V 0 V 0 V
Range
MAX Value 3.09 A 1.545 A 5.15 A 2.575 A 8.24 A 4.12 A
MIN Value 0 A 0 A 0 A
DEFault Value 3 A 1.5 A 5 A 2.5 A 8 A 4 A
*RST Value 3.00 A 5.00 A 8.00 A
SOURce
subsystem requires parameters for programming values. The
MINimum, MAXimum, DEFault
E3640A E3642A E3644A
0 - 8V/3A
Range
0 V to 8.24V 0 V to 20.60 V 0 V to 8.24V 0 V to 20.60 V 0 V to 8.24V 0 V to 20.60 V
0 A to 3.09 A 0 A to 1.545 A 0 A to 5.15 A 0 A to 2.575 A 0 A to 8.24 A 0 A to 4.12 A
0 - 20V/1.5A
Range
0 - 8V/5A
Range
0 - 20V/2.5A
and reset values of your
Range
0 - 8V/8A
Range
0 - 20V/4A
Range
Table 4-2. Agilent E3641A/43A/45A Programming Ranges
Voltage Programming
Current Programming
Range
MAX Value 36.05 V 61.8 V 36.05 V 61.8 V 36.05 V 61.8 V
MIN Value 0 V 0 V 0 V
DEFault Value 0 V 0 V 0 V
*RST Value 0 V 0 V 0 V
Range
MAX Value 0.824 A 0.515 A 1.442 A 0.824 A 2.266 A 1.339 A
MIN Value 0 A 0 A 0 A
DEFault Value 0.8 A 0.5 A 1.4 A 0.8 A 2.2 A 1.3 A
*RST Value 0.8 A 1.4 A 2.2 A
76
E3641A E3643A E3645A
0 - 35V/0.8A
Range
0 V to 36.05V 0 V to 61.8 V 0 V to 36.05V 0 V to 61.8 V 0 V to 36.05V 0 V to 61.8 V
0 A to 0.824 A 0 A to 0.515 A 0 A to 1.442 A 0 A to 0.824 A 0 A to 2.266 A 0 A to 1.339 A
0 - 60V/0.5A
Range
0 - 35V/1.4A
Range
0 - 60V/0.8A
Range
0 - 35V/2.2A
Range
0 - 60V/1.3A
Range
Page 78

Chapter 4 Remote Interface Reference
Using the APPLy Command
Using the APPLy Command
The
APPLy
command provides the most straightforward method to program
the power supply over the remote interface. You can select the output voltage
and current in one command.
APPLy {<voltage>| DEF | MIN | MAX}[,{<current>| DEF | MIN | MAX}]
This command is combi nation of
The
APPLy
command changes the power supply’s output to the newly
programmed values only if the programmed values are valid within the
presently selected range. An execution error will occur if the programmed
values are not valid within the selected range.
You can substitute ‘‘
specific value for the
parameters, see Table 4-1 through Table 4-2 for each model.
If you specify only one parameter of the
regards it as voltage setting value.
MINimum
voltage
’’, ‘‘
and
VOLTage
MAXimum
current
APPLy
and
CURRent
’’, or ‘‘
DEFault
parameters. For more details of
command, the power supply
commands.
’’ in place of a
4
APPLy?
Query the power supply’s present voltage and current setting values and
returns a quoted string. The voltage and current are returned in sequence as
shown in the sample string below (the quotation marks are returned as part of
the string).
‘‘8.00000,3.00000’’
(E3640A m ode l)
77
Page 79

Chapter 4 Remote Interface Reference
Output Setting and Operation Commands
Output Setting and Operation Commands
This section describes low-level commands used to program the power supply.
’’ or ‘‘
APPLy
DOWN
Although the
program the power supply, the low-level output setting comm ands give you
more flexibility to change the individual parameters.
CURRent{<current>| MINimum | MAXimum | UP | DOWN}
Program the immediate current level of the power supply. The immediate level
is the current value of the output terminals.
The
CURRent
programmed value regardless of the output range presently selected.
You can substitute ‘‘
the current parameter.
selects the highest current values allowed for the selected range.
This command also increases or decreases the immediate current level using
the ‘‘
UP
CURRent:STEP
increment setting will cause an execution error -222 (Data out of range) when
the maximum or the minimum rated current is exceeded.
command provides the most straightforward method to
command changes the output of the power supply to the newly
MINimum
MIN
’’ parameter by a predetermined amount. The command
sets the amount of increase or decrease.
’’ or ‘‘
MAXimum
selects the lowest current values of ‘‘0’’ amps.
’’ in place of a specific value for
Notice
that a n e w
MAX
CURRent? [MINimum | MAXimum]
Return the presently programmed current level of the power supply.
CURR? MAX
current levels for the selected range.
CURRent:STEP {<numeric value>| DEFault}
Set the step size for current programming with the
DOWN
T o set the step size to the minimum resolution, set the step size to ‘‘
The minimum resolution of the step size is approximately 0.052 mA (E3640A),
0.015 mA (E3641A), 0.095 mA (E3642A), 0.026 mA (E 3643A), 0.152 mA
(E3644A), and 0.042 mA (E3645A), respectively. The
returns the minimum resolution of your instrument. The immediate current
level increases or decreases by the value of the step size. For example, the
output current will increase or decrease 10 mA if the step size is 0.01. At
the step size is the value of the minimum resolution.
78
and
CURR? MIN
commands. See the example in the
return the highest and lowest programmable
next
CURRent UP
page.
CURR:STEP? DEF
and
CURRent
DEFault
’’.
*RST
,
Page 80

Chapter 4 Remote Interface Reference
Output Setting and Operation Commands
CURRent:STEP? [DEFault]
Return the value of the step size currently specified. The returned parameter
is a numeric value. ‘‘
in unit of amps.
CURRent:TRIGgered {<current>| MINimum | MAXimum}
Program the pending triggered current level. The pending triggered current
level is a stored value that is transferred to the output terminals when a trigger
occurs. A pending triggered level is not affected by subsequent
commands.
CURRent:TRIGgered? [MINimum | MAXimum]
Query the triggered current level presently programmed. If no triggered level
is programmed, the
DEFault
CURRent
’’ gives the minimum resolution of the step size
CURRent
level is returned.
Example
The following program segments show how to use the
command to increase or decrease the output current with the
command.
‘‘
CURR:STEP 0.01
‘‘
CURR UP
‘‘
CURR:STEP 0.02
‘‘
CURR DOWN
VOLTage {<voltage>| MINimum | MAXimum | UP | DOWN}
Program the immediate voltage level of the power supply. The immediate level
is the voltage value of the output terminals.
The
VOLTage
programmed value regardless of the output range presently selected.
This command also increases or decreases the immediate voltage level using
UP
the ‘‘
VOLTage:STEP
increment setting will cause an execution error -222 (Data out of range) when
the maximum or the minimum rated voltage is exceeded.
VOLTage? [MINimum | MAXimum]
Query the presently programmed voltage level of the power supply.
’’
command changes the output of the power supply to the newly
’’ or ‘‘
DOWN
’’
’’
’’
’’ parameter by a predetermined amount. The command
sets the amount of increase or decrease. Notice that a new
Set the step size to 0.01 A
Increase the output current
Set the step size to 0.02 A
Decrease the output current
CURR UP
or
CURR DOWN
CURR:STEP
4
79
Page 81

Chapter 4 Remote Interface Reference
Output Setting and Operation Commands
VOLTage:STEP {<numeric value> | DEFault}
Set the step size for voltage programming with the
commands. See the example below.
To set the step size to the minimum resolution, set the step size to ‘‘
The minimum resolution of the step size is approximately 0.35 mV (E3640A),
1.14 mV (E3641A), 0.38 mV (E3642A), 1.14 mV (E3643A) , 0.35 mV (E3644A) ,
and 1.14mV (E3645A), respectively. The immediate voltage level increases or
decreases by the value of the step size. For example, the output voltage will
increase or decrease 10 mV if the step size is 0.01. At
value of the minimum resolution.
VOLT UP
*RST
, the step size is the
and
VOLT DOWN
DEFault
’’.
VOLTage:STEP? [DEFault]
Return the value of the step size currently specified. The returned parameter
is a numeric value. ‘‘
of volts.
DEFault
’’ gives the minimum resolution step size in unit
Example
The following program segments show how to use the
command to increase or decrease the output voltage with the
command.
‘‘
VOLT:STEP 0.01
‘‘
VOLT UP
‘‘
VOLT:STEP 0.02
‘‘
VOLT DOWN
’’
’’
Set the step size to 0.01 V
Increase the output voltage
’’
’’
Set the step size to 0.02 V
Decrease the output voltage
VOLT UP
or
VOLT DOWN
VOLT:STEP
VOLTage:TRIGgered {<voltage>| MINimum | MAXimum}
Program the pending triggered voltage level. The pending triggered voltage
level is a stored value that is transferred to the output terminals when a trigger
occurs. A pending triggered level is not affected by subsequent
commands.
VOLTage
VOLTage:TRIGgered? [MINimum | MAXimum]
Query the triggered voltage level presently programmed. If no triggered level
VOLT
is programmed, the
level is returned.
VOLTage:PROTection {<voltage>|MINimum|MAXimum}
Set the voltage level at which the overvoltage protection (OVP) circuit will trip.
If the peak output voltage exceeds the OVP level, then the power supply output
is shorted by an internal SCR. An overvoltage condition can be cleared with
VOLT:PROT:CLE
the
is removed.
command after the condition that caused the OVP trip
80
Page 82

Chapter 4 Remote Interface Reference
Output Setting and Operation Commands
VOLTage:PROTection? [MINimum | MAXimum]
Query the overvoltage protection trip level presently programmed.
VOLTage:PROTection:STATe {0 | 1 | OFF | ON}
Enable or disable the overvoltage protection function. At
set to ‘‘ON’’.
VOLTage:PROTection:STATe?
Query the state of the overvoltage protection function. The returned parameter
is ‘‘0’’ (OFF) or ‘‘1’’ (ON).
VOLTage:PROTection:TRIPped?
Return a ‘‘1’’ if the overvoltage protection circuit is tripped and not cleared or
a ‘‘0’’ if not tripped.
VOLTage:PROTection:CLEar
Cause the overvoltage protection circuit to be cleared. After this command,
the output voltage is restored to the state it was in before the protection feature
occurred and the OVP trip level remains unchanged to the value presently
programmed. Before sending this command, lower the output voltage below
the trip OVP point, or raise the OVP trip level above the output setting.
that the overvoltage condition caused by an external source must be removed
first before procee din g this com m and.
*RST
, this value is
Note
4
VOLTage:RANGe {P8V* | P20V* | P35V** | P60V** | LOW | HIGH}
Select an output range to be programmed by the identifier. For example,
‘‘P20V’’ or ‘‘HIGH’’ is the identifier for the 20V/1.5A range and ‘‘P8V’’ or ‘‘LOW’’
is for the 8V/3A range (for E3640A model). At
selected.
VOLTage:RANGe?
Query the currently selected range. The returned parameter is ‘‘P8V’’ or ‘‘P35V’’
for low voltage range, or ‘‘P20V’’ or ‘‘P60V’’ for high voltage range.
MEASure:CURRent?
Query the current measured across the current sense resistor inside the power
supply.
MEASure[:VOLTage]?
Query the voltage measured at the sense terminals of the power supply.
* For E3640A/42A/44A models **For E3641A/43A/45A models
*RST
, low voltage range is
81
Page 83

Chapter 4 Remote Interface Reference
Triggering
Triggering
The power supply’s triggering system allow s a change in voltage and current
when receiving a trigger, to select a trigger source, and to insert a trigger.
Triggering the power supply is a multi- step process .
• First, you must specify the source from which the power supply will accept
the trigger. The power supply will accept a bus (software) trigger or an
immediate trigger from the remote interface.
• Then, you can set the time delay between the detection of the trigger on the
specified trigger source and the start of any corresponding output change.
Notice that the time delay is valid for only the bus trigger source.
• Finally, you must provide an
source is selected, the selected output is set to the triggered level
immediately. But if the trigger source is the bus, the power supply is set to
the triggered level after receiving the Group Execute Trigger (GET) or
command.
INITiate
command. If the
IMMediate
*TRG
Trigger Source Choices
You must specify the source from which the power supply will accept a trigger.
The trigger is stored in volatile memory; the source is set to bus when the power
supply has been off or after a remote interface reset.
Bus (Software) Triggering
• To select the bus trigger source, send the following command.
‘‘
TRIG:SOUR BUS
• To trigger the power supply from the remote interface (GPIB or RS-232)
after selecting the bus source, send t he
*TRG
is sent, the trigger action starts after the specified time delay if any
delay is given.
• You can also trigger the power supply from the GPIB interface by sending
the IEEE-488 Group Execute Trigger (GET) mess age. The following
statement shows how to send a GET from a Hewlett-Packard controller.
‘‘
TRIGGER 705
’’
*TRG
’’ (group execute trigger)
(trigger) command. When the
82
Page 84

Chapter 4 Remote Interface Reference
Triggering
• To ensure synchronization when the bus source is selected, send the
*WAI
(wait) command. When the
waits for all pending operations to complete before executing any additional
commands. For example, the following command string guarantees that the
first trigger is accepted and is executed before the second trigger is
recognized.
‘‘
TRIG:SOUR BUS;*TRG;*WAI;*TRG;*WAI
• You can use the
(operation complete) command to signal when the operation is complete.
*OPC?
The
is co mp le te. The
Event register when the operation is complete.
Immediate Triggering
• To select the immediate trigger source, send the following comm and.
‘‘
TRIG:SOUR IMM
• When the
command imm ediately transfers the
VOLT
or
CURR
*OPC?
(operation complete query) command or the
command returns ‘‘1’’ to the output buffer when the operation
*OPC
command sets the ‘‘OPC’’ bit (bit 0) in the Standard
’’
IMMediate
value. Any delay is ignored.
is selected as a trigger source, an
command is executed, the power supply
’’
INITiate
VOLT:TRIG
or
CURR:TRIG
value to
*WAI
*OPC
4
83
Page 85

Chapter 4 Remote Interface Reference
Triggering
Triggering Commands
INITiate
Cause the trigger system to initiate. This command completes one full trigger
cycle when the trigger source is an immediate and initiates the trigger
subsystem when the trigger source is bus.
TRIGger:DELay {<seconds>| MINimum | MAXimum}
Set the time delay between the detection of an event on the specified trigger
source and the start of any corresponding trigger action on the power supply
output. Select from 0 to 3600 seconds.
*RST
At
TRIGger:DELay?[MINimum | MAXimum]
Query the trigger delay.
TRIGger:SOURce {BUS | IMMediate}
Select the source from which the power supply will accept a trigger. The power
supply will accept a bus (software) trigger or an internal immediate trigger. At
*RST
, this value is set to 0 seconds.
, the bus trigger source is selected.
MIN
= 0 seconds.
MAX
= 3600 seconds.
TRIGger:SOURce?
Query the present trigger source. Returns ‘‘BUS’’ or ‘‘IMM’ ’.
*TRG
Generate a trigger to the trigger subsystem that has selected a bus (software)
trigger as its source
as the Group Execute Trigger (GET) command. For RS -232 operation, make
sure the power supply is in the remote interface mode by sending the
SYST:REM
84
command first.
(TRIG:SOUR BUS)
. The command has the same effect
Page 86

Chapter 4 Remote Interface Reference
System-Related Commands
System-Related Commands
DISPlay {OFF | ON}
Turn the front-panel display off or on. When the display is turned off, outputs
are not sent to the display and all annunciators are disabled except the
annunciator.
The display state is automatically turned on when you return to the local mode.
Press
Store
Local
(
Local
) key to return to the local state from the remote interface.
DISPlay?
Query the front-panel display setting. Returns ‘‘0’’ (OF F) or ‘‘1’’ (ON).
DISPlay:TEXT <quoted string>
This command dis pl ays a message on the front panel. The power supply will
display up to 11 characters in a message; any additional characters are
truncated. Commas, periods, and semicolons share a display space with the
preceding character, and are not considered individual characters.
DISPlay:TEXT?
Query the message sent to the front panel and returns a quoted string.
ERROR
4
DISPlay:TEXT:CLEar
Clear the message displayed on the front panel.
OUTPut {OFF | ON}
Enable or disable the outputs of the power supply. When the output is disabled,
the voltage value is 0 V and the current value is 1 mA. At
is OFF.
*RST
, the output state
OUTPut?
Query the output state of the power supply. The returned value is ‘‘0’’ (OFF)
or ‘‘1’’ (ON).
OUTPut:RELay {OFF | ON}
Set the state of two TTL signals on the RS-232 connector pin 1 and pin 9. These
signals are intended for use with an external relay and relay driver. At
OUTPUT:RELay
the
External Relay
state is OFF. See ‘‘
’’, on page 54 for more informatio n.
Disconnecting the Output Using an
*RST
Note Do not use the RS-232 interface if you have configured the power supply to output
relay control signals. Internal components on the RS-232 circuitry may be damaged.
,
85
Page 87

Chapter 4 Remote Interface Reference
System-Related Commands
OUTPut:RELay?
Query the state of the TTL relay logic signals.
SYSTem:BEEPer
Issue a single beep immediately.
SYSTem:ERRor?
Query the power supply’s error queue. A record of up to 20 errors is stored in
the power supply’s error queue. Errors are retrieved in first-in-first-out (FIFO)
order. The first error returned is the first error that was stored. When you have
read all errors from the queue, the
are cleared.
See ‘‘
Error Messages
ERROR
’’, starting on page 113 for more details.
annunciator turns off and the errors
SYSTem:VERSion?
Query the power supply to determine the present SCPI version. The returned
value is of a string in the form YYYY.V where the ‘‘Y’s’’ represent the year of
the version, and the ‘‘V’’ represents a version number for that year (for example,
1997.0).
SYSTem:COMMunicate:GPIB:RDEVice
:ADDRess {<numeric value>}
:ADDRess?
Set or query the bus address of the peripheral device. Changing the address
with this does not affect the address of the peripheral device. It does affect the
address to which data is sent by the instrument.
*IDN?
Read the power supply’s identification string. The power supply returns four
fields separated by commas. The first field is the manufacturer’s name, the
second field is the model number, the third field is not used (always ‘‘0’’), and
the
fourth field
is a revision code which contains three numbers. The first
number is the firmware revision number for the main power supply processor;
the second is for the
input/output
processor; and the third is for the front-panel
processor.
The command returns a string with the following format (be sure to dimension
a string variable with at least
Agilent Technologies,E3640A,0,X.X-Y.Y-Z.Z
40 characters
):
(E3640A model)
*TST?
Perform a
complete
self-test of the power supply. Returns ‘‘0’’ if the self-test
passes or ‘‘1’’ or any non-zero value if it fails. If the self-test fails, an error
message is also generated with additional information on why the test failed.
86
Page 88

Chapter 4 Remote Interface Reference
System-Related Commands
*RST
Reset the power supply to its
of the power supply after a
power-on
RESET
from the
from the remote interface.
state. The table below shows the state
Recall
menu or
*RST
command
Command E3640A
CURR
CURR:STEP
CURR:TRIG
DISP
OUTP
OUTP:REL
TRIG:DEL
TRIG:SOUR
VOLT
VOLT:STEP
VOLT:TRIG
VOLT:PROT
VOLT:PROT:STAT
VOLT:RANG
Note: The voltage and current step sizes listed above are typical value.
state
3 A 0.8 A 5 A 1.4 A 8 A 2.2 A
0.052 mA 0.015 mA 0.095 mA 0.026 mA 0.152 mA 0.042 mA
3 A 0.8 A 5 A 1.4 A 8 A 2.2 A
0.35 mV 1.14 mV 0.38 mV 1.14 mV 0.35 mV 1.14 mV
22.0 V 66.0 V 22.0 V 66.0 V 22.0 V 66.0 V
P8V (Low) P35V (Low) P8V (Low) P35V (Low) P8V (Low) P35V (Low)
state
ON ON
OFF OFF
OFF OFF
0 0
BUS BUS
0 V 0 V
0 V 0 V 0 V 0 V
ON ON
E3641A
E3642A
state
E3643A
state
E3644A
state
E3645A
state
4
87
Page 89

Chapter 4 Remote Interface Reference
State Storage Commands
State Storage Commands
The power supply has five storage locations in non-volati le mem ory to store
power supply states. The locations are numbered 1 through 5. You can also
assign a name to each of the locations (1 through 5) for use from the front panel.
*SAV { 1 | 2 | 3 | 4 | 5 }
Store (Save) the present state of the power supply to the specified location.
Any state previously stored in the same location is overwritten (no error is
generated).
• A power-on reset (
stored in memory. Once a state is stored, it remains until it is overwritten
or specifically deleted.
• The state storage feature ‘‘remembers’’ the states or values of the following
commands:
CURR, CURR:STEP, CURR:TRIG, OUTP, OUTP:REL, TRIG:DEL,
TRIG:SOUR, VOLT, VOLT:STEP, VOLT:TRIG, VOLT:PROT,
VOLT:PROT:STAT,
*RST
command) does not affect the configurations
and
VOLT:RANG
*RCL { 1 | 2 | 3 | 4 | 5 }
Recall the power supply state stored in the specified storage location. When
shipped from the factory, storage locations ‘‘1’’ through ‘‘5’’ are empty.
Note:
DISP {OFF|ON
only. Going to local mode automatically sets the display state to ON.
MEMory:STATe
:NAME { 1 | 2 | 3 | 4 | 5} , <quoted name>
:NAME? { 1 | 2 | 3 | 4 | 5}
Assign a name to the specified storage location. From the remote interface,
you can only recall a stored state using a number (1 thr ough 5). The
query returns a quoted string containing the name currently assigned to the
specified storage location. If the specified location has no name assigned, an
empty string (‘‘ ’’) is returned. The name can contain up to 9 characters. The
first character can be a alphanumeric. Blank spaces are not allowed. An error
is generated if you specify a name with more than 9 characters.
Storage
If you do not specify a name (note that the name parameter is optional), no
name is assigned to that state. This provides a way to erase a name (however,
the stored state is not deleted).
88
’’, on page 55 for more information. An example is shown below.
‘‘
MEM:STATE:NAME 1,‘P15V_TEST’
} can be stored and recalled in remote interface mode
:NAME?
See ‘‘
State
’’
Page 90

Chapter 4 Remote Interface Reference
Calibration Commands
Calibration Commands
See ‘‘Calibration Overview’’, starting on page 62 f
calibration features of the power supply. An example program for calibration
is listed on
procedures, see the
Note When you calibrate the power supply, you should NOT set the OVP to ON state in
order to prevent OVP from tripping.
CALibration:COUNt?
Query the power supply to determine the number of times it has been
calibrated. Your power supply was calibrated before it left the factory. When
you receive your power supply, read the count to determine its initial value.
Since the value increments by one for each calibration point, a complete
calibration will increase the value by 3 counts.
CALibration:CURRent[:DATA] <numeric value>
This command can only be used after calibration is unsecured and the output
state is ON. It enters a current value that you obtained by reading an external
meter. You must first select the minimum calibration level (
MIN
) for the value being entered, then select the middle and maximum
calibration levels (
value being entered. Three successive values must be selected and entered.
The power supply then computes new calibration constants. These constants
are then stored in
CALibration:CURRent:LEVel {MINimum | MIDdle | MAXimum}
This command can only be used after calibration is unsecured and the output
state is ON. It sets the power supply to a calibration point that is entered with
CAL:CURR
low-end point (MIN) must be selected and entered first.
page 91. For more detailed discussi on on the calibration
Service Information
CAL:CURR:LEV MID
non-volatile
command. During calibration, three points must be entered and the
memory.
.
and
or an overview of the
CAL:CURR:LEV
CAL:CURR:LEV MAX
) for the
4
CALibration:SECure:CODE <quoted new code>
Enter a new security code. To change the security code, first unsecure the
power supply using the old security code. Then, enter the new code. The
calibration code may contain up to 11 characters over the remote interface.
See “Calibration Overview” on page 62 for more information.
89
Page 91

Chapter 4 Remote Interface Reference
Calibration Commands
CALibration:SECure:STATe {OFF | ON},<quoted code>
Unsecure or secure the power supply with a security for calibration.
CALibration:SECure:STATe?
Query the secured state for calibration of the power supply. The returned
parameter is ‘‘0’’ (OFF) or ‘‘1’’ (ON).
CALibration:STRing <quoted string>
Record calibration information about your power supply. For example, you
can store such information as the last calibration date, the next calibration due
date, or the power supply’s serial number. The calibration message may
contain up to 40 characters. The power supply shou ld be unsecured before
sending a calibration message.
CALibration:STRing?
Query the calibration message and returns a quoted string.
CALibration:VOLTage[:DATA] <numeric value>
This command can only be used after calibration is unsecured and the output
state is ON. It enters a voltage value that you obtained by reading an external
meter. You must first select the minimum calibration level (
) for the value being entered. You must then select the middle and
MIN
maximum calibration levels (
for the value being entered. Three successive values must be selected and
entered. The power supply then computes new voltage calibration constants.
These constants are then stored in
CAL:VOLT:LEV MID
non-volatile
and
memory.
CAL:VOLT:LEV
CAL:VOLT:LEV MAX
)
CALibration:VOLTage:LEVel {MINimum | MIDdle | MAXimum}
This command can only be used after calibration is unsecured and the output
state is ON. It sets the power supply to a calibration point that is entered with
CAL:VOLT
low-end point (MIN) must be selected and entered first.
command. During calibration, three points must be entered and the
CALibration:VOLTage:PROTection
Calibrate the overvoltage protection circuit of the power supply. It takes about
10 seconds to execute the command. The calibration must be unsecured and
the output be opened before calibrating the overvoltage protection circuit. The
power supply automatically performs the calibration and stores the new
overvoltage constant in
precedes before sending this command.
nonvolatile
memory.
Notice that voltage calibration
90
Page 92

Calibration
Example
Chapter 4 Remote Interface Reference
Calibration Commands
1
Enable the output of t he power supply.
‘‘
OUTP ON
2
Disable the voltage protection function.
‘‘
VOLT:PROT:STAT OFF
3
Unsecure the power supply with the secure code before calibration.
‘‘
CAL:SEC:STAT OFF, ‘<code>
4
For voltage calibr ation, connect a digital voltmeter (DVM) across the
’’
’’
’’’
power supply’s output terminals.
5
Set the po we r sup ply to low-e nd (MIN ) c alibra tion point .
‘‘
CAL:VOLT:LEV MIN
6
Enter the reading you o btained from the DVM.
‘‘
CAL:VOLT:DATA 0.549
7
Set the po we r sup ply to m iddle (MID ) c alibra tio n point .
‘‘
CAL:VOLT:LEV MID
8
Enter the reading you o btained from the DVM.
‘‘
CAL:VOLT:DATA 11.058
9
Set the po we r sup ply to high (MA X) c alibra tion point .
‘‘
CAL:VOLT:LEV MAX
10
Enter the reading you o btained from the DVM.
‘‘
CAL:VOLT:DATA 21.566
11
Set the power supply to overvoltage protection calibration point.
‘‘
CAL:VOLT:PROT
12
For current calib ration, connect an appropriate current monitoring
’’
’’
’’
’’
’’
’’
’’
resistor (shunt) across the output terminals and connect the DVM
across th e sh un t resist or.
13
Repeat the steps (5) t hrough (9) by substituting ‘‘
current calibration. For example, ‘‘
14
Record calibrati on information such as next calibration due date or
CAL:CURR:LEV MIN
CURR
’’ for ‘‘
’’
VOLT
contact per son for fu tur e r eferen ce. The c ali br ati on s tr in g may cont ain
up to 40 characters.
‘‘
CALibration:STRing ‘<string>
’’’
4
’’ for
Notice
calibration.
that you should wait for the DVM reading to stabilize for accurate
91
Page 93

Chapter 4 Remote Interface Reference
Interface Configuration Commands
Interface Configuration Commands
See also "Configuring the Remote Interface" in chapter 3 starting on page 46
SYSTem:INTerface {GPIB | RS232}
Select the remote interface. Only one interface can be enabled at a time. The
GPIB interface is selected when the power supply is shipped from the factory.
SYSTem:LOCal
Place the power supply in the
the front panel are fully functional.
SYSTem:REMote
Place the power supply in the
the front panel, except the ‘‘
It is very important that you send the
power supp ly in the rem ote m ode. Sen ding or re ce iving data over the
RS-232 interface when not configured for remote operation can cause
unpred ictabl e re su lts .
SYSTem:RWLock
Place the power supply in the remote mode for RS-232 operation. This
command is the same as the
front panel are disabled, including the ‘‘
<Ctrl-C>
Clear the operation in progress over the RS-232 interface and discard any
pending output data.
over the GPIB interface.
This is equivalent to the IEEE-488 device clear action
local
mode during RS-232 operation. All keys on
remote
mode for RS-232 operation. All keys on
Local
’’ key, are disabled while in the remote mode.
SYST:REM
SYST:REM
command except that all keys on the
Local
’’ key.
command to place the
.
92
Page 94

Chapter 4 Remote Interface Reference
The SCPI Status Registers
The SCPI Status Registers
All SCPI in strum ents im pl ement status registers in the same way. The status
system records various instr ument condi tions in three register groups: the
Status Byte register, the Standard Event register, and the Questionable Status
register groups. The status byte register records high-level sum m ary
information reported in the other register groups. The diagram on the
subsequent pages illustrates the SCPI status system used by the power supply.
What is an Event Register?
An
even t re gi ste r
the power supply. Bits in an event register are
subsequent state changes are ignored. Bits in an event register are
automatically cleared by a query of that register (such as
STAT:QUES:EVEN?
(
*RST
) or device clear will not clear bits in event registers. Querying an event
register returns a decimal value which corresponds to the binary-weighted sum
of all bits set in the register.
is a read-only register that reports defined conditions within
) or by sending the
latched
*CLS
(clear status) command. A reset
. Once an event bit is set,
*ESR?
or
4
What is an Enable Register?
An
enable register
logically ORed together to form a single summary bit. Enable registers are both
readable and writable. Querying an enable register will not clear it. The
(clear status) command does not clear enable registers but it does clear the
bits in the event registers. To enable bits in an enable register, you must write
a decimal value which corresponds to the binary-weighted sum of the bits you
wish to enable in the register.
defines which bits in the corresponding event register are
*CLS
93
Page 95

Operation Complete
Query Error
Device Depenent Error
Execution Error
Command Error
Power On
Chapter 4 Remote Interface Reference
The SCPI Status Registers
SCPI Status System
QUEStionable Status
Event Register Enable Registers
Voltag e
Current
Not Used
Not Used
Temperature
Not Used
Not Used
Not Used
Not Used
Overvol tage
Not Used
Not Used
Not Used
Not Used
Not Used
Not Used
STAT:QUES? STAT :QUES: ENA B <val ue>
STAT:QUES:ENAB?
Standard Event
Event Register Enable Registers
OPC
Not Used
QYE
DDE
EXE
CME
Not Used
PON
*ESR? *ESE <value>
*ESE?
0
1
4
"OR"
Output Buffer
+
9
0
2
3
4
5
7
"OR"
+
Status Byte
Summary Register Enable Register
Not Used
Not Used
Not Used
QUES
MAV
ESB
RQS
Not Used
Serial Po ll(SPOLL) *S RE <value>
*STB? *SRE?
3
4
5
6
Binary Weight
20 = 1
1
2
= 2
2
2
= 4
3
2
= 8
4
2
= 16
5
2
= 32
6
2
= 64
7
2
= 128
8
2
= 256
9
2
= 512
10
2
= 1024
11
2
= 2048
12
2
= 4096
13
2
= 8192
14
2
= 16384
15
2
= 32768
"OR"
+
94
Page 96

Chapter 4 Remote Interface Reference
The SCPI Status Registers
The Questionable Status Register
The Questionable Status register provides inform atio n about voltage and
current regulation. Bit 0 is set when the voltage becomes unregulated, and bit
1 is set if the current becomes unregulated. For example if the power supply
momentarily goes to constant current mode when the power supply is
operating as a voltage source (constant voltage mode), bit 0 is set to indicate
that the voltage output is not regulated.
The Questionable Status register also provides inform ation that the power
supply has an overtemperature condition and that the overvoltage protection
circuits have tripped. Bit 4 reports an overtemperature condition of the fan and
bit 9 reports that the overvoltage protection circuit has tripped. To read the
register, send
Table 4-3. Bit Definitions - Questionable Status Register
0 Voltage 1 The power supply is/was in the constant current mode.
1 Current 2 The power supply is/was in the constant voltage mode.
2-3 Not Used 0 Always set to 0.
4 Overtemperature 16 The fan has a fault condition.
5-8 Not Used 0 Always set to 0.
9 Over Voltage 512 The overvoltage protection circuit has tripped.
10 Not Used 0 Always set to 0.
11-15 Not Used 0 Always set to 0.
STATus:QUEStionable?
Bit Decimal
Value
.
Definition
4
The Questionable Status Event register is cleared when:
• You execute the
• You query the event register using
*CLS
(clear status) command.
STAT:QUES?
(Status Questionable
Event register) command.
For example, 16 is returned when you have queried the status of the
questionable event register, the temperature condition is questionable.
The Questionable Status Enable register is cleared when:
• You execute
STAT:QUES:ENAB 0
command.
95
Page 97

Chapter 4 Remote Interface Reference
The SCPI Status Registers
The Standard Event Register
The Standard Event register reports the following types of instrument events:
power-on detected, command syntax errors, command execution errors, self-
*OPC
test or calibration errors, query errors, or when an
Any or all of these conditions can be reported in the standard event summary
bit (ESB, bit 5) of Status Byte register through the enable register. To set the
enable register mask, you write a decimal value to the register using the
(Event Status Enable) command.
An error condition (Standard Event register bit 2, 3, 4, or 5) will always
record one or more errors in the power supply’s error queue. Read the
error queu e us in g the
Table 4-4. Bit Definitions – Standard Event Register
Bit Decimal
0 OPC
1 Not Used 0 Always set to 0.
2 QYE
3 DDE
4 EXE
5 CME
6 Not Used 0 Always set to 0.
7 PON
SYST:ERR?
Value
Operation Complete. All commands prior to and
1
including an
Query Error. The power supply tried to read the output
buffer but it was empty. Or, new command line was
4
received before a previous query had been read. Or, both
the input and output buffers are full.
Device Error. A self-test or calibration error occurred
8
(see error numbers 601 through 750 in chapter 5).
Execution Error. An execution error occurred (see error
16
numbers -211 through -224 in chapter 5).
Command Error. A command syntax error occurred (see
32
error numbers -101 through -178 in chapter 5).
Power On. Power has been turned off and on since the
128
last time the event register was read or cleared.
command.
*OPC command have been executed.
command is executed.
*ESE
Definition
96
Page 98

Chapter 4 Remote Interface Reference
The SCPI Status Registers
The Standard Event register is cleared when:
• You execute the
• You query the event register using the
*CLS
(clear status) command.
*ESR?
(Event Status register)
command.
For example, 28 (4 + 8 + 16) is returned when you have queried the status of
the Standard Event register, QYE, DDE, and EXE conditions have occurred.
The Standard Event Enable register is cleared when:
• You execute the
*ESE 0
command.
• You turn on the power and have previously configured the power supply
using the
*PSC 1
command.
• The enable register will not be cleared at power-on if you have previously
configured the power supply using the
*PSC 0
command.
The Status Byte Register
The Status Byte summary register reports conditions from the other status
registers. Query data that is waiting in the power supply’s output buffer is
immediately reported through the “Message Av ailable” bit (bit 4) of Status Byte
register. Bits in the summary register are not latched. Clearing an event register
will clear the corresponding bits in the Status Byte summary register. Reading
all messages in the output buffer, including any pending queries, will clear the
message available bit.
Table 4-5. Bit Definitions – Status Byte Summary Register
Bit Decimal
0-2 Not Used 0 Always set to 0.
3 QUES
4 MAV 16 Data is available in the power supply output buffer.
5 ESB
6 RQS 64 The power supply is requesting service (serial poll).
7 Not Used 0 Always set to 0.
Value
8
32
One or more bits are set in the questionable status
register (bits must be “enabled” in the enable register).
One or more bits are set in the standard event register
(bits must be “enabled” in the enable register).
Definition
4
97
Page 99

Chapter 4 Remote Interface Reference
The SCPI Status Registers
The Status Byte Summary register is cleared when:
• You execute the
• Querying the Standard Event register (
5 in the Status Byte summary register.
For example, 24 (8 + 16) is returned when you have queried the status of the
Status Byte register, QUES and MAV conditi ons have occurred.
The Status Byte Enable register (Request Service) is cleared when:
• You execute the
• You turn on the power and have previously configured the power supply
using the
• The enable register will not be cleared at power-on if you have previously
configured the power supply using
*PSC 1
*CLS
(clear status) command.
*SRE 0
command.
command.
*ESR?
*PSC 0
command) will clear only bit
.
Using Service Request (SRQ) and Serial POLL
You must configure your bus controller to respond to the IEEE-488 service
request (SRQ) interrupt to use this capability. Use the Status Byte enable
*SRE
register (
IEEE-488 service request signal. When bit 6 (request service) is set in the Status
Byte, an IEEE-488 service request interrupt message is automati call y sent to
the bus controller. The bus controller may then poll the instruments on the bus
to identify which one requested service (the instrument with bit 6 set in its
Status Byte).
The request service bit is cleared only by reading the Status Byte using an
IEEE- 4 8 8 se ri a l p o ll or b y re a d in g t h e ev e nt re g i ster whose summa ry b i t is
causing the service request.
To read the Status Byte summary register, send the IEEE-488 serial poll
message. Querying the summary register wil l return a decimal value whi ch
corresponds to the binary-weighted sum of the bits set in the register. Serial
poll will automatically clear the “request service” bit in the Status Byte
summary register. No other bits are affected. Performing a serial poll will not
affect instrument throughput.
command) to select which summary bits will set the low-level
Caution The IEEE-488 standard does not ensure synchronization between your bus controller
program and the instrument. Use the *OPC? command to guarantee that commands
previously sent to the instrument have completed. Executing a serial poll before a
*RST, *CLS, or other commands have completed can cause previous conditions
to be reported.
98
Page 100

Chapter 4 Remote Interface Reference
The SCPI Status Registers
Using *STB? to Read the Status Byte
The
*STB?
(Status Byte query) command is si milar to a serial poll but it is
*STB?
processed like any other instrument command. The
the same result as a serial poll but the “request service” bit (bit 6) is not cleared.
The
*STB?
command is not handled automatically by the IEEE-488 bus
interface hardware and will be executed only after previous commands have
completed. Polling is not possible using the
*STB?
command does not clear the Status Byte summary register.
*STB?
command. Executing the
command returns
Using the Message Available Bit (MAV)
Y ou can use the Status Byte “message available” bit (bit 4) to determine when
data is available to read into your bus controller. The power supply
subsequently clears bit 4
output buffer.
only
after all messages have been read from the
To Interrupt Your Bus Controller Using SRQ
1
Send a device clear mess age to clear the power supply’s output buffer
CLEAR 705
(e.g.,
2
Clear the event regist ers with the
3
Set up t he enabl e r egis ter masks . Execu te the
the St andar d Even t r egis ter and t he
4
Send the
*OPC?
result to ensure synchronization.
5
Enable your bus contr oller’s IEEE-488 SRQ interrupt.
).
*CLS
(clear status) command.
*ESE
command to set up
*SRE
command fo r th e Stat us B yte.
(operation complet e query) command and enter the
4
99
 Loading...