


Agilent 81570A, 71A, 76A, 77A & 78A
Variable Optical Attenuators
User’s Guide
sA

Notices
This document contains proprietary information that is protected by
copyright. All rights are reserved.
No part of this doc ument may rep roduced in ( including e lectronic s torage
and retrieval or translation into a foreign language) without prior
agreement and written consent from Agilent Technologies Deutschland
GmbH as governed by United States and international copywright laws.
”Copyright 2001 - 2004 by:
Agilent Technologies Deutschland GmbH
Herrenberger Str. 130
71034 Böblingen
Germany
Subject Matter
The material i n this document is subject to change without notice.
Agil ent Techn ologies makes no warranty of any kind with regard to this
printed materi al, including, but not limite d to, the implied warranties of
merchantability and fitness for a particular purpose.
Agilent Technologies shall not be liable for errors contained herein or for
incidental or consequential damages in connection with the furnishing,
performance, or use of this material.
Printing History
New editions are complete revisions of the guide reflecting alterations in
the functionality of the instrument. Updates are occasionally made to the
guide between editions. The date on the title page changes when an
updated guide is published. To find out the current revision of the guide,
or to purchase an updated guide, contact your Agilent Technologies
representative.
Control Serial Number: First Edition applies directly to all instruments.
Warranty
This Agilent Technologies instrument product is warranted against
defects in material and workmanship for a period of one year from date of
shipment. During the warranty period, Agilent will, at its option, either
repair or replace products that prove to be defective.
For warranty service or repair, this product must be returned to a service
facility designated by Agilent. Buyer shall prepay shipping charges to
Agilent and A gilent shall pay shipping charge s to return the product to
Buyer. However, Buyer shall pay all shipping charges, duties, and taxes
for products returned to Agilent from another country.
Agilent warrants tha t its software and firmware designated by Agilent for
use with an instrument will execute its programming instructions when
properly installed on that instrument. Agilent does not warrant that the
operation of the instrument, software, or firmware will be uninterrupted
or error free.
Certification
Agilent Technologies Inc. certifies that this product met its published
spec ifications at the ti me of ship ment from the fact ory.
Agilent Technologies further certifies that its calibration measurements
are traceable to the United States National Institute of Standards and
Technology, NIST (formerly the United States National Bureau of
Standards, NBS ) to the extent allowed by t he Institutes’s ca libration
facility, and to the calibration facilities of other International Standards
Organization members.
ISO 9001:2000 Certification
Produced to ISO 9001:2000 international quality system standard as part
of our objective of continually increasing customer satisfaction through
improved process contr ol.
Manual Part Number
81570-90A01
Eigth Edition:
81570-90A01: September 01, 2005
Seventh Edition:
81570-90A01: July 20, 2005
Sixth Edition:
81570-90A01: December, 2004
Fifth Edition:
81570-90A01: June 28, 2004
Fourth Edition:
81570-90A01: January 31, 2003
Third Edition:
81560-90A13: October 29, 2002
Seco nd Edition :
81560-90A12: August 04, 2002
First Edition:
81560-90A11: November 2001
Limitation of Warranty
The foregoing warranty shall not apply to defects resulting from improper
or inadequate m aintenance by Buyer, Buyer-suppl ied software or
interfacing, unauthorized modification or mi suse, operation outside of the
environmental specifications for the product, or improper site preparation
or maintenance.
No other warranty is expressed or implied. Agilent Technologies
specifically disclaims the implied warranties of Merchantability and
Fitness for a Particular Purpose.
Exclusive Remedies
The remedies provided herein are Buyer’s sole and exc lusive remedies.
Agilent Technologies shall not be liable for any direct, indirect, special,
incidental, or conseq uential damages whet her based on contract, tort, or
any other legal theory.
Assistance
Product maintenance agreements and other customer assistance
agreements are available for Agilent Technologies products. For any
assistance contact your nearest Agilent Technologies Sales and Service
Office.
2 Agilent 81570A, 71A, 76A, 77A & 78A Variable Optical Attenuators, Eigth Edition

Safety Summary
WAR N ING The WARNING sign denotes a hazard. It calls attention to a procedure, practice or the like,
Safety Summary
The following general safety precautions must be observed during all phases of operation,
service, and repair of this instrument. Failure to comply with these precautions or with
specific warnings elsewhere in this manual violates safety standards of design,
manufacture, and intended use of the instrument. Agilent Technologies Inc. assumes no
liability for the customer’s failure to comply with these requirements.
Before operation, review the instrument and manual, including the red safety page, for
safety markings and instructions. You must follow these to ensure safe operation and to
maintain the instrument in safe condition.
which, if not correctly performed or adhered to, could result in injury or loss of life. Do not
proceed beyond a WARNING sign until the indicated conditions are fully understood and
met.
CA U TI O N Optical power levels above 100 mW applied to single mode connectors can easily damage
the connector if it is not perfectly clean. Also, scratched or poorly cleaned connectors can
destroy optical connectors mechanically. Always make sure that your optical connectors are
properly cleaned and unscratched before connection. Refer to chapter “Cleaning
Information” on page 77 on appropriate procedures for connector cleaning and inspection.
However, Agilent Technologies Deutschland GmbH assumes no responsibility in case of an
operation that is not compliance with the safety instructions as stated above.
Safety Symbols
The apparatus will be marked with this symbol when it is necessary for the user to refer to
the instruction manual in order to protect the apparatus against damage.
Hazardous laser radiation.
Initial Inspection
Inspect the shipping container for damage. If there is damage to the container or
cushioning, keep them until you have checked the contents of the shipment for
completeness and verified the instrument both mechanically and electrically.
The Performance Tests give procedures for checking the operation of the instrument. If the
contents are incomplete, mechanical damage or defect is apparent, or if an instrument does
not pass the operator’s checks, notify the nearest Agilent Technologies Sales/Service
Office.
Agilent 81570A, 71A, 76A, 77A & 78A Variable Optical Attenuators, Eigth Edition 3

Safety Summary
WARN ING To avoid hazardous electrical shock, do not perform electrical tests when there are signs of
shipping damage to any portion of the outer enclosure (covers, panels, etc.).
WARNING You MUST return instruments with malfunctioning laser modules to an Agilent Technologies
Sales/Service Center for repair and calibration.
Line Power Requirements
The Agilent 81570A, 71A, 78A Variable Optical Attenuator modules and Agilent 81576A,
77A Variable Optical Attenuator modules with Power Control operate when installed in the
Agilent 8163A and B Lightwave Multimeters, the Agilent 8164A and B Lightwave
Measurement Systems, or the Agilent 8166A and B Lightwave Multichannel Systems.
Within this User’s Guide, these instruments are collectively referred to as ‘mainframes’.
Operating Environment
The safety information in your mainframe’s User’s Guide summarizes the operating ranges
for the Agilent 81570A, 71A, 78A Variable Optical Attenuator modules and Agilent
81576A, 77A Variable Optical Attenuator modules with Power Control. In order for these
modules to meet specifications, the operating environment must be within the limits
specified for your mainframe.
Storage and Shipment
Agilent 81570A, 71A, 78A Variable Optical Attenuator modules and Agilent 81576A, 77A
Variable Optical Attenuator modules with Power Control can be stored or shipped at
temperatures between
-40°C and +70°C.
Protect the module from temperature extremes that may cause condensation within it.
Environmental Information
This product complies with the WEEE Directive (2002/96/EC) marking requirements. The
affixed label indicates that you must not discard this electrical/ electronic product in
domestic household waste.
Product Category: With reference to the equipment types in the WEEE Directive Annex I,
this product is classed as a "Monitoring and Control instrumentation" product.
Do not dispose in domestic household waste.
To return unwanted products, contact your local Agilent office, or see
www.agilent.com/environment/product/ for more information.
4 Agilent 81570A, 71A, 76A, 77A & 78A Variable Optical Attenuators, Eigth Edition

Firmware Prerequisites
Firmware Prerequisites
For Agilent 8156x modules with a particular firmware revision to operate correctly, your
Agilent 8163A/B, 8164A/B, or 8166A/B mainframe must have a V3.5, or later, firmware
revision installed.
For Agilent 8157x modules with a particular firmware revision to operate correctly, your
Agilent 8163A/B, 8164A/B, or 8166A/B mainframe must have a V4.0, or later, firmware
revision installed.
Firmware files are provided on the OCT Support CD-ROM supplied with the instrument, and
the latest firmware revisions can also be downloaded via
www.agilent.com/comms/octfirmware
The firmware for A and B versions of our mainframes is not binary compatible. Make sure
you select the appropriate firmware for your instrument.
NOTE • Updating mainframe firmware does not require you to update the firmware in every
hosted module. New revisions of mainframe firmware are backwards compatible with
older module firmware.
• You may find it advantageous to update module firmware. To help you determine which
module firmware to update, a readme file is provided with the firmware file detailing its
revision history.
• If the serial number of your 8164A Lightwave Measurement System is DExxxxx339 or
below, problems with writing files to the floppy disk drive may occur in rare cases. If this
is the case, please contact your nearest Agilent Technologies Sales / Service Office.
Agilent 81570A, 71A, 76A, 77A & 78A Variable Optical Attenuators, Eigth Edition 5

Firmware Prerequisites
Checking your Current Firmware Revision
8163A/B Lightwave Multimeter, 8164A/B Lightwave
Measurement System, or 8166A/B Lightwave Multichannel
System
To check your 8163A/B Lightwave Multimeter, 8164A/B Lightwave Measurement System,
or 8166A/B Lightwave Multichannel System's firmware revision:
1 Press the Config hardkey.
2 Move to the <About Mainframe> menu option and press Enter.
3 The manufacturer, part number, instrument number, and firmware revision are listed. If
the firmware revision number is less than V3.5 for 8156x modules, or is less than V4.0
for 8157x modules, follow the Update Procedure described in the readme.txt in the root
directory of the OCT Support CD-ROM supplied with the instrument to install a later
firmware revision.
8157x Series Modules
To check an 8157x series, module's firmware revision:
1 Press the Config hardkey.
2 Move to the <About Modules> menu option and press Enter. You see a box displaying
the slots that have a module installed.
3 Move to the appropriate slot using the cursor key and press Enter.
4 The part number, module number, and firmware revision of the chosen module are
displayed. If the firmware revision number is less than V4.0 for 8157x modules, follow
the Update Procedure described in the readme.txt in the root directory of the OCT
Support CD-ROM supplied with the instrument to install a later firmware revision.
6 Agilent 81570A, 71A, 76A, 77A & 78A Variable Optical Attenuators, Eigth Edition

The Structure of this Manual
The Structure of this Manual
This manual is divided into two parts:
• Getting Started
This section gives an introduction to the attenuator modules and aims to make these
modules familiar to you:
– “Getting Started with Attenuator Modules” on page 15.
• Additional Information
This is supporting information of a non-operational nature, concerning accessories,
specifications, and performance tests:
– “Accessories” on page 25,
– “Specifications” on page 31, and
– “Performance Tests” on page 47.
Conventions used in this manual
• Hardkeys are indicated by italics, for example, Config, or Channel.
• Softkeys are indicated by normal text enclosed in square brackets, for example, [Zoom]
or [Cancel].
• Parameters are indicated by italics enclosed by square brackets, for example, [Range
Mode], or [MinMax Mode].
• Menu items are indicated by italics enclosed in brackets, for example, <MinMax>, or
<Continuous>.
Agilent 81570A, 71A, 76A, 77A & 78A Variable Optical Attenuators, Eigth Edition 7

The Structure of this Manual
8 Agilent 81570A, 71A, 76A, 77A & 78A Variable Optical Attenuators, Eigth Edition

Table o f Contents
Table of Contents
Safety Summary 3
Safety Symbols 3
Initial Inspection 3
Line Power Requirements 4
Operating Environment 4
Storage and Shipment 4
Firmware Prerequisites 4
Checking your Current Firmware Revision 6
8163A/B Lightwave Multimeter, 8164A/B Lightwave Measurement System, or
8166A/B Lightwave Multichannel System 6
8157x Series Modules 6
The Structure of this Manual 7
Conventions used in this manual 7
Getting Started with Attenuator Modules 15
What is an Attenuator? 17
Installation 17
Variable Optical Attenuator Front Panels 18
Front Panel Controls and Indicators 19
Typical Use Models 21
Optical Output 23
Angled and Straight Contact Connectors 23
Accessories 25
Modules and Options 27
Modules 28
User’s Guides 28
Connector Interfaces and Other Accessories 29
Specifications 31
Definition of Terms 33
Attenuation 34
Attenuation flatness 34
Attenuation range 35
Agilent 81570A, 71A, 76A, 77A & 78A Variable Optical Attenuators, Eigth Edition 9

Table of Contents
Attenuation setting mode 35
Attenuation uncertainty 35
Constant operating conditions 35
Insertion loss 36
Insertion loss flatness 36
Maximum Input Power 36
Operating temperature 37
Polarization Dependent Loss (PDL) 37
Polarization Extinction Ratio(PER) 37
Power setting mode 37
Relative power meter uncertainty 37
Repeatability (of attenuation or total loss) 38
Resolution 38
Return Loss 38
Settling Time 39
Shutter Isolation 39
Spectral ripple 39
Total loss 40
Transition speed 40
Wavelength Range 40
Specifications 41
Performance Tests 47
Required Test Equipment 48
Performance Test Procedure 50
Insertion Loss Test 51
Accuracy test 53
Repeatability Test 54
Power Setting Repeatability Test 54
Wavelength Flatness Test
(Not applicable to 81578A) 55
Return Loss Test
(Not applicable to 81578A) 56
Polarization Dependent Loss (PDL) Test -
Scanning Method
(Not applicable to 81578A) 57
Polarization Dependent Loss (PDL) Test Mueller Method
(Not applicable to 81578A) 59
10 Agilent 81570A, 71A, 76A, 77A & 78A Variable Optical Attenuators, Eigth Edition

Table of Contents
Cleaning Information 77
Safety Precautions 79
Why is it important to clean optical devices? 80
What materials do I need for proper cleaning? 80
Standard Cleaning Equipment 80
Dust and shutter caps 81
Isopropyl alcohol 81
Cotton swabs 81
Soft tissues 82
Pipe cleaner 82
Compressed air 82
Additional Cleaning Equipment 83
Microscope with a magnification range about 50X up to 300X 83
Ultrasonic bath 83
Warm water and liquid soap 84
Premoistened cleaning wipes 84
Polymer film 84
Infrared Sensor Card 84
Preserving Connectors 85
Cleaning Instrument Housings 85
General Cleaning Procedure 86
How to clean connectors 86
How to clean optical head adapters 87
How to clean connector interfaces 88
How to clean bare fiber adapters 89
How to clean lenses and instruments with an optical glass plate 89
How to clean instruments with a fixed connector interface 90
How to clean instruments with a physical contact interface 90
How to clean instruments with a recessed lens interface 92
How to clean optical devices which are sensitive to mechanical stress
and pressure 92
How to clean metal filters or attenuator gratings 93
Additional Cleaning Information 94
How to clean bare fiber ends 94
How to clean large area lenses and mirrors 94
Other Cleaning Hints 96
Agilent 81570A, 71A, 76A, 77A & 78A Variable Optical Attenuators, Eigth Edition 11

Table of Contents
12 Agilent 81570A, 71A, 76A, 77A & 78A Variable Optical Attenuators, Eigth Edition

List of Figures
List of Figures
Figure 1 Agilent 81576A/77A Optical Attenuators with Power Control . . . . . . 7
Figure 2 Agilent 81570A Attenuator with Straight Connector . . . . . . . . 8
Figure 3 Agilent 81571A Attenuator with Angled Connector . . . . . . . . 8
Figure 4 Agilent 81578A Multimode Attenuator with Straight Connector. . . . . . 9
Figure 5 Agilent 81576A High-power Attenuator with Power Control and Straight Connector . 10
Figure 6 Agilent 81577A High-power Attenuator with Power Control and Angled Connector . 10
Figure 7 Angled and Straight Contact Connector Symbols . . . . . . . . . 13
Figure 8 Mainframes, Variable Optical Attenuator Modules, and Options. . . . . . 17
Figure 9 Insertion Loss Reference . . . . . . . . . . . . . . 40
Figure 10 Insertion Loss Test . . . . . . . . . . . . . . . . 41
Figure 11 Return Loss Reference Setup for SM attenuators . . . . . . . . . 45
Figure 12 Return Loss Test Setup for SM attenuators . . . . . . . . . . 45
Figure 13 PDL Test Setup - Scanning Method for SM attenuators . . . . . . . 47
Figure 14 PDL Reference Setup for SM attenuators. . . . . . . . . . . 49
Figure 15 PDL Test Setup - Mueller method . . . . . . . . . . . . 51
Figure 16 Relative Power Meter uncertainty Setup for SM attenuators . . . . . . 53
Agilent 81570A, 71A, 76A, 77A & 78A Variable Optical Attenuators, Eigth Edition 13

List of Figures
14 Agilent 81570A, 71A, 76A, 77A & 78A Variable Optical Attenuators, Eigth Edition

Getting Started with Attenuator Modules
Agilent 81570A, 71A, 76A, 77A & 78A Variable Optical Attenuators, Eigth Edition 15

Getting Started with Attenuator Modules
CAUTION Optical power levels above 100 mW applied to single mode connectors can easily damage
This chapter describes the:
• Agilent 81570A, 81571A VOA modules,
• Agilent 81578A Multimode VOA and the
• Agilent 81576A and 81577A VOA modules with power control
the connector if it is not perfectly clean. Also, scratched or poorly cleaned connectors can
destroy optical connectors mechanically. Always make sure that your optical connectors are
properly cleaned and unscratched before connection. Refer to chapter “Cleaning
Information” on page 77 on appropriate procedures for connector cleaning and inspection.
However, Agilent Technologies Deutschland GmbH assumes no responsibility in case of an
operation that is not compliance with the safety instructions as stated above.
16 Agilent 81570A, 71A, 76A, 77A & 78A Variable Optical Attenuators, Eigth Edition

What is an Attenuator? Getting Started with Attenuator Modules
What is an Attenuator?
Agilent 8157x Variable Optical Attenuators attenuate and control the optical power of light
in single and multimode optical fibers. They allow you to set the attenuation factor and/or
power level manually, or via the host instrument’s GPIB interface.
Agilent 81576A and 81577A attenuators include power control functionality that allows
you to set the output power level of the attenuator. When power control mode is enabled,
the module automatically corrects for power changes at the input so that the output power
level set by the user is maintained. See Figure 1 on page 17.
Installation
Agilent 8157xA Variable Optical Attenuators are front-loadable modules for the Agilent
8163A/B Lightwave Multimeter, 8164A/B Lightwave Measurement System, and 8166A/B
Lightwave Multichannel System, collectively referred to as ‘mainframes’.
An Agilent 81570A, 71A or 78A module occupies one slot, while an Agilent 81576A or 77A
module occupies two slots.
For a description of how to install your module, refer to “How to Fit and Remove Modules”
in the Installation and Maintenance chapter of your mainframe’s User’s Guide.
81576A / 81577A
input
Figure 1 Agilent 81576A/77A Optical Attenuators with Power Control
attenuator
control
loop
power
meter
out put
Agilent 81570A, 71A, 76A, 77A & 78A Variable Optical Attenuators, Eigth Edition 17

Getting Started with Attenuator Modules What is an Attenuator?
Variable Optical Attenuator Front Panels
Agilent 81570A
81570A
Figure 2 Agilent 81570A Attenuator with Straight Connector
Agilent 81571A
Figure 3 Agilent 81571A Attenuator with Angled Connector
81571A
18 Agilent 81570A, 71A, 76A, 77A & 78A Variable Optical Attenuators, Eigth Edition

What is an Attenuator? Getting Started with Attenuator Modules
Agilent 81578A
81578A
MMF
50um
Figure 4 Agilent 81578A Multimode Attenuator with Straight Connector
Agilent 81570A, 71A, 76A, 77A & 78A Variable Optical Attenuators, Eigth Edition 19

Getting Started with Attenuator Modules What is an Attenuator?
Agilent 81576A
81576A
Figure 5 Agilent 81576A High-power Attenuator with Power Control and Straight Connector
Agilent 81577A
81577A
Figure 6 Agilent 81577A High-power Attenuator with Power Control and Angled Connector
20 Agilent 81570A, 71A, 76A, 77A & 78A Variable Optical Attenuators, Eigth Edition

What is an Attenuator? Getting Started with Attenuator Modules
Front Panel Controls and Indicators
The front panel contains a push button to switch the shutter open/closed, and a LED that
indicates the state of the shutter. If the shutter is “open”, the LED shows “enable”, and light
can pass through the instrument.
Typical Us e Models
Brief description Agilent's 8157xA Variable Optical Attenuators are instruments that attenuate and control
the optical power level of light in single and multimode optical fibers. As plug-in modules for
Agilent's Lightwave Multichannel platform (8163A/B, 8164A/B, 8166A/B) they allow you
to set the attenuation factor and/or power level manually, or remotely via a common
computer interface. Their high accuracy combined with their flexibility make them ideal as
test and measurement equipment for the modern telecommunication industry.
Modular Design for Multichannel Platform Agilent's 8157xA variable optical attenuators are a family of plug-in modules for Agilent's
Lightwave Multichannel Platform 8163A/B, 8164A/B and 8166A/B. The attenuator
modules 81570A, 81571A, 81578A occupy one slot, while modules 81576A and 81577A
occupy two slots. The Agilent 8166A/B Lightwave Multichannel System with its 17 slots
can host up to 17 single slot modules (such as the 81570A attenuators) or up to 8 dual slot
modules, (such as the 81577A attenuators).
Variable Optical Attenuators Agilent's 81570A, 81571A and 81578A are small and cost effective attenuator modules
with high resolution for single-wavelength applications. Once you have entered the
operating wavelength, the instrument automatically applies the appropriate corrections.
Various calibration features allow you to set a reference power so that both the attenuation
and the power level, relative to the reference power, can be set and displayed in the user
interface. An integrated shutter can be used for protection purposes or to simulate channel
drops.
Agilent's 81570A and 81571A have excellent wavelength flatness and can handle high
input power levels. These features, combined with low insertion loss, allow you to use these
modules for characterizing EDFAs and Raman amplifiers, as well for other multi-wavelength
applications such as DWDM transmission system testing. They include the reference power
functionality and an integrated shutter.
Agilent's 81578A modular attenuators are available for multimode applications with fiber
interface option for 50µm (#050) and 62.5µm (#062).
Attenuators with Power Control Agilent's 81576A and 81577A attenuators have the power control functionality combined
with the high-power handling capability and excellent wavelength flatness required for
DWDM applications.
To set the the total power level of a multi-wavelength signal, it is necessary to determine the
convolution of the signal’s spectrum against the sensitivity of the photodiode over
wavelength. An enhanced calibration feature allows you to set the integrated power of the
DWDM signal against a known spectrum.
Agilent 81570A, 71A, 76A, 77A & 78A Variable Optical Attenuators, Eigth Edition 21

Getting Started with Attenuator Modules What is an Attenuator?
Calibration Processes Comprehensive offset functionality in the firmware enhances the calibration of the optical
path in various test set-ups. There is an offset for the attenuation factor, and an
independent offset for the output power level, to calibrate for losses due to the patch cords
and connectors. Additionally, wavelength and offset value pairs can be stored in a table to
compensate for wavelength dependent effects in the optical path of the set-up. This allows
you to set the optical power level at your Device Under Test.
Calibration is even easier and more convenient if the reference powermeter and the
attenuator are hosted by the same mainframe: All power related offsets can be determined
by a firmware function that reads a value from the reference powermeter. The difference
between the power value read by the reference powermeter and the actual value of the
attenuator is automatically stored as the offset.
22 Agilent 81570A, 71A, 76A, 77A & 78A Variable Optical Attenuators, Eigth Edition

Optical Output Getting Started with Attenuator Modules
Optical Output
Angled and Straight Contact Connectors
Agilent 81570A Variable Optical Attenuator modules and 81576A Variable Optical
Attenuator modules with Power Control are designed for straight connector interfaces.
Agilent 81571A Variable Optical Attenuator modules and 81577A Variable Optical
Attenuator modules with Power Control are designed for angled connector interfaces.
The Agilent 81578A (with option 050 or 062) Variable Optical Attenuator modules are
designed for straight (FC/PC) multimode connector.
The inclusion of an angled contact connector is not optionable, and depends on the module
part number.
Angled contact connectors help you to control return loss, since reflected light tends to
reflect into the cladding, reducing the amount of light that reflects back to the source.
CAUTION If the contact connector on your instrument is angled, you can only use cables with angled
connectors with the instrument.
Angled Contact
Connector Symbol
Figure 7 Angled and Straight Contact Connector Symbols
Figure 7 shows the symbols that tell you whether the contact connector of your attenuator
module is angled or straight. The angled contact connector symbol is colored green.
You should connect straight contact fiber end connectors with neutral sleeves to straight
contact connectors, or connect angled contact fiber end connectors with green sleeves to
angled contact connectors.
NOTE You cannot connect angled non-contact fiber end connectors with orange sleeves directly
to the instrument.
See “Accessories” on page 25 for further details on connector interfaces and accessories.
Straight Contact
Connector Symbol
Agilent 81570A, 71A, 76A, 77A & 78A Variable Optical Attenuators, Eigth Edition 23

Getting Started with Attenuator Modules Optical Output
24 Agilent 81570A, 71A, 76A, 77A & 78A Variable Optical Attenuators, Eigth Edition

Accessories
Agilent 81570A, 71A, 76A, 77A & 78A Variable Optical Attenuators, Eigth Edition 25

Accessories
Agilent 8157xA Variable Optical Attenuator modules are available in various configurations
for the best possible match to the most common applications.
This chapter describes the options and accessories available for the:
• Agilent 81570A, 81571A VOA modules,
• Agilent 81578A VOA modules for multimode applications; and the
• Agilent 81576A and 81576A VOA modules with power control.
26 Agilent 81570A, 71A, 76A, 77A & 78A Variable Optical Attenuators, Eigth Edition

Modules and Options Accessories
Modules and Options
Figure 8 shows all the options that are available for Agilent 8157xA Variable Optical
Attenuator modules, and the instruments that support these modules.
Agilent 8164A or B
Lightwave Measurement System
Optical Attenuators for
Straight Contact Interface
Agilent 81570A (single slot)
Optical Attenuator
Agilent 81578A (single slot)
Optical Attenuator for multi-mode
applications.
# 050: 50 µm fiber interface
# 062: 62.5 µm fiber interface
Agilent 81576A VOA (dual slot)
Optical Attenuator with Power Control
Variable Optical Attenuator
Straight Contact Interface
Agilent 8163A or B
Lightwave Multimeter
Variable Optical Attenuator
with SMF pigtail
2m length
FC/APC
Variable Optical Attenuator
Angled Contact Interface
Agilent 8166A or B
Lightwave Multichannel System
Optical attenuators for
Angled Contact Interface
Agilent 81571A (single slot)
Optical Attenuator.
Agilent 81577A (dual slot)
Optical Attenuator with Power Control.
Connector Interfaces
81000 FI FC/PC/SPC
81000 HI E-2000
81000 KI SC/PC/SPC
81000 SI DIN 47256
81000 VI ST
8157xA - OC - ACCS
8157xA QC - STRGT
Connector Interface for
straight
connectors
8157xA QC - ANGLED
Connne ctor Interface f or
angled
connectors
Connector Interfaces
81000 HI E2000 APC
81000 KI SC/APC
81000 NI FC/APC
81000 SI DIN 4108.6
Figure 8 Mainframes, Variable Optical Attenuator Modules, and Options
Agilent 81570A, 71A, 76A, 77A & 78A Variable Optical Attenuators, Eigth Edition 27

Accessories Modules
Modules
Agilent 8157xA Modular Attenuator can be hosted by:
• Agilent 8163A and Agilent 8163B Lightwave Multimeters,
• Agilent 8164A and Agilent 8164B Lightwave Measurement Systems,
• Agilent 8166A and Agilent 8166B Lightwave Multichannel Systems.
User’s Guides
User’s Guides
Description Part No.
Agilent 8157xA Modular Attenuator User’s Guide (English). 81570-90A01
Agilent 8163A/B Lightwave Multimeter, Agilent 8164A/B Lightwave Mea-
surement System, & Agilent 8166A/B Lightwave Multichannel System User’s Guide.
Agilent 8163A/B Lightwave Multimeter, Agilent 8164A/B Lightwave Measurement System, & Agilent 8166A/B Lightwave Multichannel System Programming Guide.
08164-90B14
08164-90B63
Connector Interfaces and Other
Accessories
CAUTION Optical power levels above 100 mW applied to single mode connectors can easily damage
the connector if it is not perfectly clean. Also, scratched or poorly cleaned connectors can
destroy optical connectors mechanically. Always make sure that your optical connectors are
properly cleaned and unscratched before connection. Refer to chapter “Cleaning
Information” on page 77 on appropriate procedures for connector cleaning and inspection.
However, Agilent Technologies Deutschland GmbH assumes no responsibility in case of an
operation that is not compliace with the safety instructions as stated above.
28 Agilent 81570A, 71A, 76A, 77A & 78A Variable Optical Attenuators, Eigth Edition

Connector Interfaces and Other Accessories Accessories
81570A, 81578A and 81576A
Variable Optical Attenuator Modules
81571A and 81577A
Variable Optical Attenuator Modules
If you want to use straight connectors (such as FC/PC, DIN, SC or ST) to connect to the
instrument, you must do the following:
1 Attach your connector interface to the interface adapter.
See Figure 8 for a list of the available connector interfaces.
2 Connect your cable.
If you want to use angled connectors (such as FC/APC or SC/APC)
to connect to the instrument, you must do the following:
1 Attach your connector interface to the interface adapter.
See Figure 8 for a list of the available connector interfaces.
2 Connect your cable.
Agilent 81570A, 71A, 76A, 77A & 78A Variable Optical Attenuators, Eigth Edition 29

Accessories Connector Interfaces and Other Accessories
30 Agilent 81570A, 71A, 76A, 77A & 78A Variable Optical Attenuators, Eigth Edition

Specifications
Agilent 81570A, 71A, 76A, 77A & 78A Variable Optical Attenuators, Eigth Edition 31

Specifications
Agilent 81570A, 81571A VOA modules for high-power applications, Agilent 81578A VOA
for multimode applications and Agilent 81576A and 81577A VOA modules with power
control for high-power applications, are all produced to the ISO 9001 international quality
system standard as part of Agilent Technologies’ commitment to continually increasing
customer satisfaction through improved quality control.
Specification: describes a guaranteed product performance that is valid under the specified
conditions. Specifications are based on a coverage factor of 2 (unless otherwise stated),
corresponding to a level of confidence of >95.4%.
Typical v alu e: a characteristic describing the product performance that is usually met but
that is not guaranteed.
Generally, all specifications apply after warm-up, for the stated operating conditions and
measurement settings, with the attenuator set to the source wavelength, for transmission
from input port to output port, after settling, at uninterrupted line voltage.
Because of the modular nature of the instrument, these performance specifications apply to
these modules rather than the mainframe unit.
CAUTION Optical power levels above 100 mW applied to single mode connectors can easily damage
the connector if it is not perfectly clean. Also, scratched or poorly cleaned connectors can
destroy optical connectors mechanically. Always make sure that your optical connectors are
properly cleaned and unscratched before connection. Refer to chapter “Cleaning
Information” on page 77 on appropriate procedures for connector cleaning and inspection.
However, Agilent Technologies Deutschland GmbH assumes no responsibility in case of an
operation that is not compliace with the safety instructions as stated above.
32 Agilent 81570A, 71A, 76A, 77A & 78A Variable Optical Attenuators, Eigth Edition

Definition of Terms Specifications
Definition of Terms
This section defines terms that are used both in this chapter and “Performance Tests” on
page 47.
Measurement principles are indicated. Alternative measurement principles of equal value
are also acceptable.
Agilent 81570A, 71A, 76A, 77A & 78A Variable Optical Attenuators, Eigth Edition 33

Specifications Definition of Terms
Attenuation
Difference (in dB) between total loss (with any attenuation setting) and insertion loss (i.e.
with attenuation set to zero) of the attenuator.
Attenuation flatness
The change of the Attenuation over wavelength at any arbitrary but fixed displayed
attenuation and fixed wavelength setting of the attenuator. The attenuation flatness is ±
half the maximum span over wavelength, expressed in dB.
Attenuation flatness does not include Spectral ripple.
Conditions: Wavelength setting as specified. Temperature range, input polarization as
specified. Constant operating conditions. Other conditions as specified.
Measurement: With tunable laser source, polarization scrambler (if applicable), and optical
power meter.
NOTE Attenuation flatness does not include insertion loss flatness per definition.
Measurement: With an Erbium-Doped Fiber Amplifier to apply the necessary input power,
tunable laser source, and optical power meter to probe the wavelength dependence of the
attenuation drift.
34 Agilent 81570A, 71A, 76A, 77A & 78A Variable Optical Attenuators, Eigth Edition

Definition of Terms Specifications
Attenuation range
Attenuation range that can be set at the attenuator and for which the specifications apply (if
not differently stated).
Attenuation setting mode
Operating mode where the user sets the desired attenuation. The power control function (if
available) is deactivated in this mode (see also power setting mode).
NOTE This operating mode is applicable to attenuators with power control only.
Attenuation uncertainty
The maximum possible difference (in dB) between the displayed Attenuation and actual
Attenuation.
Conditions: Attenuator set to the wavelength of the source. Input polarization, temperature
range, maximum power and input mode (multimode attenuators only) as specified. Other
conditions as specified.
Measurement: With Fabry-Pérot laser source of applicable wavelength, polarization
scrambler (if applicable), and optical power meter.
NOTE When using a polarized source, the attenuation uncertainty increases by ± half the
specified polarization dependent loss of the attenuator
(if specified).
Constant operating conditions
This generally includes constant values of temperature, humidity, wavelength, input power
level, polarization state and mode distribution (for multimode attenuators), if the quantity is
not explicitly subject to variation.
Agilent 81570A, 71A, 76A, 77A & 78A Variable Optical Attenuators, Eigth Edition 35

Specifications Definition of Terms
Insertion loss
Specifies the Tota l lo ss at a displayed attenuation of 0 dB
Conditions: Temperature range, wavelength range, source polarization input polarization,
input mode (multimode attenuators only) as specified.
Measurement: With Fabry-Pérot Laser Source, polarization controller (if applicable) and
power meter, using high quality connectors in perfect optical condition.
NOTE Insertion loss includes the loss of one additional connector pair.
Insertion loss flatness
The change of the insertion loss over wavelength. The insertion loss flatness is ± half the
span between the maximum and minimum insertion loss, expressed in dB. Insertion Loss
flatness does not include spectral ripple.
Conditions: Constant operating conditions. Fixed wavelength setting of attenuator. Input
polarization, input mode (multimode attenuators only) as specified and constant. Excluding
wavelengths of water absorption lines.
Measurement: With tunable laser source, polarization scrambler (if applicable), power
meter, using high quality connectors in perfect optical condition. Attenuator set to 0 dB.
Maximum Input Power
The maximum input power level that can be applied to the attenuator without permanent
change to its characteristics.
NOTE For input powers > 20 dBm, clean connectors in good condition are vital to avoid thermally
induced fiber damage.
36 Agilent 81570A, 71A, 76A, 77A & 78A Variable Optical Attenuators, Eigth Edition

Definition of Terms Specifications
Operating temperature
The range of ambient temperatures of the mainframe hosting the attenuator module for
which the specifications apply.
Polarization Dependent Loss (PDL)
The dependence of the total loss on the input polarization state, expressed as the full
difference (in dB) between the highest and the lowest total loss.
Conditions: Temperature range, input mode (multimode attenuators only) as specified.
Measurement: Using high quality connectors in perfect optical condition.
NOTE PDL is a peak-to-peak value.
Polarization Extinction Ratio(PER)
The ratio of optical power in the slow axis of the polarization maintaining fiber to the optical
power in the fast axis.
Conditions: Input power level; temperature, humidity constant; other conditions as in the
Specifications; polarized light with TE mode injected in the slow axis of the polarization
maintaining fiber of the attenuator.
Measurement: with ASE source and crossed-polarizer method.
Power setting mode
Operating mode where the user sets the desired output power. The power control function
of the attenuator automatically adjusts the attenuation to get the set output power (see also
attenuation setting mode).
NOTE This operating mode is applicable to attenuators with power control only.
Relative power meter uncertainty
When changing the output power of the attenuator, the relative power meter uncertainty is
the maximum error of the displayed output power ratio to the actual output power ratio.
This uncertainty is caused by the internal power meter's nonlinearity and noise and by
errors in the sensing hardware, expressed as ± half the span of all possible errors with an
offset due to the noise level of the power meter. Symbol RU.
Conditions: Reference power level 1mW, wavelength and polarization state constant;
power limitations as in the Specifications; zeroing prior to measurement.
Agilent 81570A, 71A, 76A, 77A & 78A Variable Optical Attenuators, Eigth Edition 37

Specifications Definition of Terms
Measurement: The nonlinearity is calculated using the displayed power ratio D2 / D1 and
the corresponding actual power ratio P2 /P1:
The relative power meter uncertainty is then calculated using:
RU is then expressed in dB and the offset is expressed in pW.
NOTE This operating mode is applicable to attenuators with power control only.
NOTE Absolute power accuracy attainable with the help of an external optical power meter.
Repeatability (of attenuation or total loss)
Specifies the uncertainty in reproducing the total loss (or attenuation) after randomly
changing and re-setting the attenuation. The repeatability is defined as ±2 x StDev
where StDev
(or total loss values) A
Conditions: Constant operating conditions. Operating in power setting mode requires
zeroing prior to measurement (attenuators with power control only).
is the standard deviation over the (repeated) actual attenuations
i
act
i.
i
Resolution
The minimum addressable and displayable attenuation steps.
(
Aact
),
i
Return Loss
Ratio between incident power and reflected power, expressed in dB. Applicable to both
attenuator ports, with the respective second port terminated (zero reflectance).
Conditions: Jumper cables with high quality connectors in perfect optical condition on both
attenuator ports.
38 Agilent 81570A, 71A, 76A, 77A & 78A Variable Optical Attenuators, Eigth Edition
Definition of Terms Specifications
Measurement: With return loss meter and non-coherent source of applicable wavelength.
NOTE The measurement result includes internal reflections in the attenuator, such as reflections
from both attenuator ports and, if the shutter is closed, reflection from the shutter.
Settling Time
Maximum time needed to change the attenuation by a specified step, from the beginning
until the end of the change.
NOTE Settling time excludes the time needed for the interpretation of the command and for the
internal communication between the mainframe and the attenuator module.
Shutter Isolation
Ratio between transmitted powers with open and with closed shutter, at a displayed
attenuation of 0 dB, expressed in dB.
NOTE For another displayed attenuation, the isolation is increased by the attenuation.
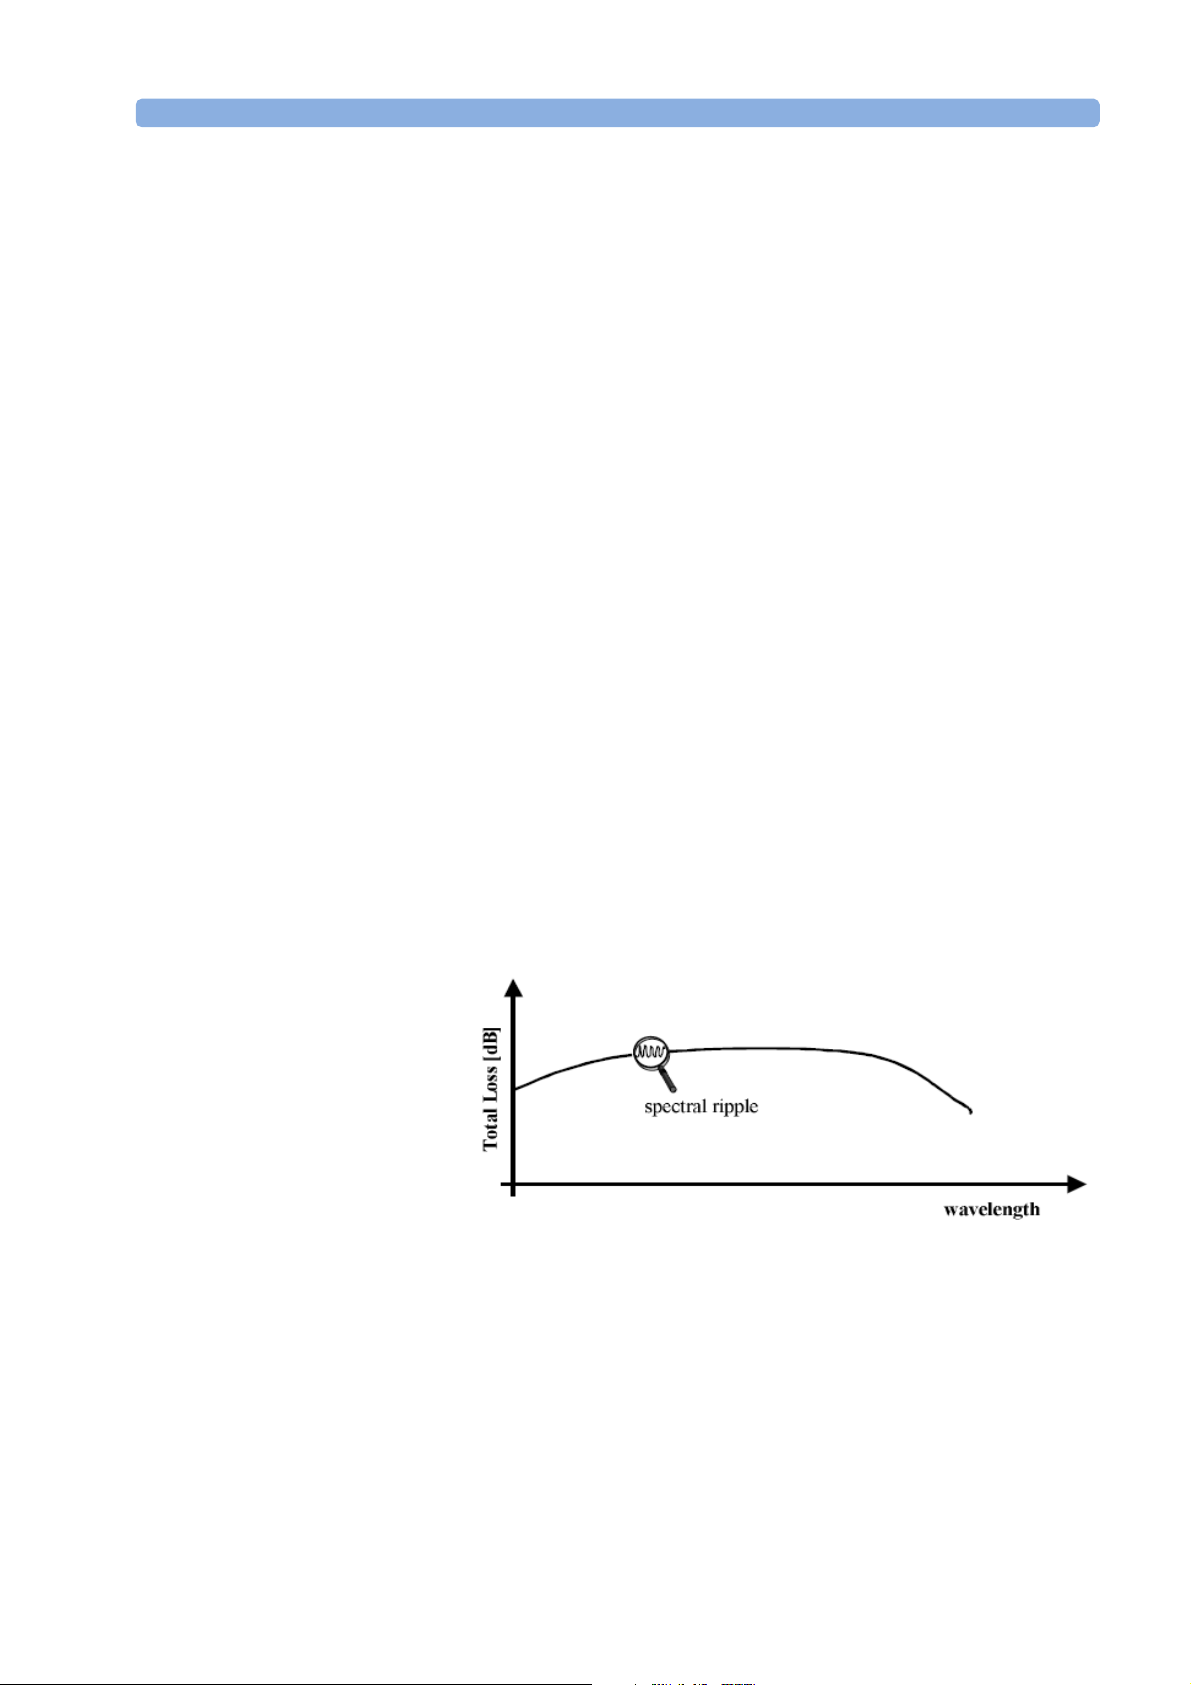
Spectral ripple
Spectral ripple is a periodic change of the total loss as a function of the input wavelength
when using a coherent light source. The spectral ripple is ± half the span between the
maximum and the minimum total loss, expressed in dB.
Spectral ripple does not include attenuation flatness or insertion loss flatness.
.
Conditions: Constant operating conditions. Linewidth as specified.
NOTE Spectral ripple results from interference between the passing wave and spurious internal
reflections.
Agilent 81570A, 71A, 76A, 77A & 78A Variable Optical Attenuators, Eigth Edition 39

Specifications Definition of Terms
Total loss
The change of power level after inserting the attenuator between two connectorized
patchcords, at an arbitrary attenuation setting, expressed in dB. Its value TL can be
calculated from:
where:
Pa = power measured at the end of the two patchcords.
Pb = power measured after the insertion of the attenuator.
Conditions: Patchcord cables with high quality connectors in perfect optical condition on
both attenuator ports.
NOTE The total loss depends on the attenuation setting.
NOTE Total loss includes the loss of one additional connector pair.
Transition speed
Specifies the settable attenuation change rate of the attenuator.
Wavelength Range
The range of wavelengths that can be set at the attenuator and for which the specifications
apply (if not differently stated).
40 Agilent 81570A, 71A, 76A, 77A & 78A Variable Optical Attenuators, Eigth Edition

Specifications Specifications
Specifications
The following Specifications tables are provided:
•“Variable optical attenuator modules for single mode applications” on page 43,
which describes the Agilent 81570A, Agilent 81571A.
•“Variable optical attenuator modules with power control for single mode
applications” on page 45, which describes the Agilent 81576A and Agilent 81577A.
•“Variable optical attenuator modules for multimode applications” on page 46,
which describes the Agilent 81578A.
Agilent 81570A, 71A, 76A, 77A & 78A Variable Optical Attenuators, Eigth Edition 41

Specifications Specifications
- this page deliberately blank -
42 Agilent 81570A, 71A, 76A, 77A & 78A Variable Optical Attenuators, Eigth Edition

Specifications Specifications
Table 1 Variable optical attenuator modules for single mode applications
81570A 81571A
Connectivity
Fiber type
Wavelength range
Attentuation range
Resolution
Repeatability
Accuracy (uncertainty)
Settling time
Transition speed
Attenuation flatness
Spectral ripple
Insertion loss
Insertion loss flatness
Polarization dependent loss
Polarization extinction ratio
Return loss
Maximum input power
Shutter isolation
Dimensions (H x W x D)
Weight
Recommended recalibration period
Operating temperature
Humidity
Warm-up time
1
1, 2, 3, 4
5
1, 4, 6, 8
7
2, 4, 9, 10
1, 4,11
2, 9, 11
9, 11
13
straight connector
versatile interface
9/125 µm SMF28 9/125 µm SMF28
angled connector
versatile interface
1200-1700 nm
0-60 dB
0.001 dB
±0.01 dB
±0.1 dB
typ. 100 ms
typ. 0.1 ... 12 dB/s
< ±0.07 dB (typ. ±0.05 dB) for 1520 nm < λ < 1620 nm
typ. ±0.10 dB for 1420 nm < λ < 1640 nm
typ. ±0.003 dB
typ. 0.7 dB excluding connectors
< 1.6 dB (typ. 1.0 dB) including connectors
11
typ. ±0.1 dB for 1420 nm < λ <1615 nm
< 0.08 dBpp (typ. 0.03 dBpp)
N/A
typ. 45 dB typ. 57 dB
+ 33 dBm
typ. 100 dB
75 mm x 32 mm x 335 mm (2.8" x 1.3" x 13.2")
0.9 kg
2 years
10 °C - 45 °C
Non-condensing
30 min.
Agilent 81570A, 71A, 76A, 77A & 78A Variable Optical Attenuators, Eigth Edition 43

Specifications Specifications
Table 1 Variable optical attenuator modules for single mode applications
1
At constant temperature
2
Tem pe ra tu re w it hin 23° ± 5 K
3
Input power < +30 dBm; λ = 1550 nm ± 15 nm;
typical for 1250 nm <
4
For unpolarized light (SMF versions), or polarized light
λ < 1650 nm
with TE mode injected in the slow axis (PMF version)
5
Stepsize < 1 dB; for full range: typ. 6 s
6
Relative to reference at 0 dB attenuation
7
Linewidth of source > 100 MHz
8
l disp set to 1550 nm;attenuation ≤ 20 dB; for attenuation >20 dB:
add typ. 0.01 dB ( a [db] - 20) for 1520 nm <
add typ. 0.02 dB ( a [db] - 20) for 1420 nm <
λ < 1620 nm
λ < 1640 nm
9
For λ= 1550 nm ± 15 nm
10
Add typ. 0.1 dB for λ= 1310
nm ± 15 nm
11
Measured with Agilent ref
erence connectors
12
Excluding connectors, mea
sured with a broadband
source.
13
Agilent Technologies Deut
schland GmbH assumes no
responsibility for damages
caused by scratched or
poorly cleanedconnectors.
44 Agilent 81570A, 71A, 76A, 77A & 78A Variable Optical Attenuators, Eigth Edition

Specifications Specifications
Table 2 Variable optical attenuator modules with power control for single mode applications
81576A 81577A
Connectivity straight connector, versatile interface angled connector, versatile interface
Fiber type 9/125
µm SMF
Wavelength range 1250-1650 nm
Attentuation range 0-60 dB
Resolution 0.001 dB
Attenuation Setting Power Setting Attenuation Setting Power Setting
Repeatability
1
Accuracy (uncertainty)
Settling time
6
1, 3, 4, 5
±0.010 dB ±0.015 dB
±0.1 dB ±0.1 dB
typ. 100 ms typ. 300 ms typ. 100 ms typ. 300 ms
2
±0.010 dB ±0.015 dB
2
Transition speed typ. 0.1 ... 12 dB/s
Relative power meter uncertainty
Attenuation flatness
Spectral ripple
Insertion loss
Insertion loss flatness
Polarization dependent loss
Return loss
12, 14
Maximum input power
1, 5, 9, 10
11
3, 5, 12, 13
1, 5, 14
3, 12, 14
15
7
± 0.03 dB ± 200 pW
< ±0.07 dB (typ. ±0.05 dB) for 1520 nm < λ < 1620 nm
typ. ±0.10 dB for 1420 nm <
typ. ±0.003 dB
typ. 0.9 dB excluding connectors
< 1.8 dB (typ. 1.2 dB) including connectors
typ. ±0.1 dB for 1420 nm < λ < 1615 nm
< 0.10 dBpp (typ. 0.05 dBpp)
typ. 45 dB typ. 57 dB
+ 33 dBm
8
λ < 1640 nm
14
Shutter isolation typ. 100 dB
Dimensions (H x W x D) 75 mm x 64 mm x 335 mm (2.8" x 2.6" x 13.2")
Weight 1.3 kg
Recommended recalibration period 2 years
Operating temperature 10 °C - 45 °C
Humidity Non-condensing
Warm-up time 30 min.
1
At constant temperature
2
Output power > - 40 dBm, input power < +27 dBm,
for input power > +27 dBm add typically ±0.01 dB
3
Temperature within 23 °C ± 5 K,
4
Input power < + 30 dBm; λ = 1550 nm ± 15 nm;
typical for 1250 nm < λ < 1650 nm
5
For unpolarized light
6
Stepsize < 1 dB; for full range: typ. 6 s
7
Wavelength and SOP constant;
temperature constant and between 23 °C ± 5 K; λ < 1630 nm
8
Input power ≤ + 27 dBm, for input power > +27 dBm add ±
9
Relative to reference at 0 dB attenuation
10
λ disp set to 1550 nm; attenuation ≤ 20 dB;
for attenuation > 20 dB:
add typ. 0.01 dB ( a [db] - 20) for 1520 nm < λ < 1620 nm
add typ. 0.02 dB ( a [db] - 20) for 1420 nm < λ < 1640 nm
11
Linewidth of source ≥ 100 MHz
12
For λ = 1550 nm ± 15 nm
13
Add typ. 0.1 dB for λ = 1310 nm ± 15 nm
14
Measured with Agilent reference connectors
15
Agilent Technologies Deutschland GmbH assumes no responsibility
for damages caused by scratched or poorly cleaned connectors.
0.02 dB
Agilent 81570A, 71A, 76A, 77A & 78A Variable Optical Attenuators, Eigth Edition 45

Specifications Specifications
Table 3 Variable optical attenuator modules for multimode applications
81578A #050 81578A #062
Connectivity straight connector, versatile interface straight connector, versatile interface
Fiber type 50/125
µm MMF 62.5/125 µm MMF
Wavelength range 700-1400 nm
Attentuation range 0-60 dB
Resolution 0.001 dB
Repeatability
Accuracy (uncertainty)
Settling time
1, 2, 5
6
±0.015 dB
5
typ. ±0.15 dB
±0.2 dB
typ. 100 ms
Transition speed typ. 0.1 ... 12 dB/s
Insertion loss
Return loss
1, 2, 4, 5
2, 5, 7
Maximum input power
typ. 1.0 dB for NA = 0.1
2.0 dB for NA = 0.2, (typ. 1.3 dB)
typ. 27 dB
8
+ 27 dBm
typ. 1.0 dB for NA = 0.1
2.0 dB for NA = 0.2, (typ. 1.3 dB)
typ. 3.0 dB for NA = 0.27
Shutter isolation typ. 100 dB
Dimensions (H x W x D) 75 mm x 64 mm x 335 mm (2.8" x 2.6" x 13.2")
Weight 0.9 kg
Recommended recalibration period 2 years
Operating temperature 10 °C - 45 °C
Humidity Non-condensing
Warm-up time 30 min.
1
Under constant conditions
2
Effective spectral bandwidth of source > 5 nm
3
For mode launch conditions with NA = 0.2; for every ∆NA = 0.01 add typ. ± 0.01 dB
4
Temperature within 20°C ± 5K and un polized light
5
At 850 nm ± 15 nm, 1310 nm ± 15 nm
6
Step size < 1 dB; for full range: typ. 6 s
7
The return loss is mainly limited by the return loss of the front panel connectors
8
Agilent Technologies Deutschland GmbH assumes no responsibility for damages caused by scratched or poorly cleaned connectors.
46 Agilent 81570A, 71A, 76A, 77A & 78A Variable Optical Attenuators, Eigth Edition

Performance Tests
Agilent 81570A, 71A, 76A, 77A & 78A Variable Optical Attenuators, Eigth Edition 47

Performance Tests Required Test Equipment
The performance tests in this section test the optical performance of the Agilent 8157xA
modular Optical Switches. The complete specifications to which the instrument is tested are
given in “Specifications” on page 31.
All tests can be performed without access to the interior of the instrument. The
performance tests refer specifically to tests using an Agilent reference connector.
Required Test Equipment
The equipment required for the performance test is listed in Ta b l e 4 . Any equipment
that satisfies the critical specifications of the equipment given in Ta b l e 4 may be
substituted for the recommended models.
Table 4 Equipment Required
Instrument/Accessory Model
Lightwave Multimeter Agilent 8163A/B x x x x x x 2 x (4 slots) 8164A/B
Laser Source Module FP Agilent 81654A x x x x - - 1550 nm
Tunable Laser Source Module Agilent 81689A x x x x - - 81640A
Power Sensor Module Agilent81634B x x x x - Interface Module Agilent 81618A x x x x x x
Optical Head Agilent 81624B x x x x x x low PDL
Depolarizing Filter Agilent 81000DF x x x x - HMS-10 Optical Head Adapter Agilent 81000AA x x x x x x
Optical Attenuator Agilent 81561A - - x x - - 8156A #201
Return Loss Module Agilent 81612A x x x x - Reference Cable Agilent 81610CC x x x x - Polarization Controller Agilent 11896A #022 x x x x - - 8169A #022
Single Mode Fiber Agilent 81101AC x - x - - - HMS-10(s) to HMS-10(s)
Single Mode Fiber Agilent 81113SC x x x x - - DIN(a) to DIN(a)
Single Mode Fiber Diamond 253-117-
003L002
Single Mode Fiber Diamond 117-183-
003L002
Single Mode Fiber Diamond 253-183-
003L002
Connector interface HMS-10 Agilent 81000AI x - x - x x
Connector interface FC/PC Agilent 81000FI - - - - x x N-key
Connector interface FC/APC Agilent 81000NI - - - - - - R-key
Required
Characteristics
81570A
81571A
81576A
81577A
81578A # 050
81578A # 062
x x x x - - DIN(a) to HMS-10(s)
x x x x - - DIN(a) to FC/PC(a)
------FC/PC(a) to HMS-10(s)
Alternative
Models
48 Agilent 81570A, 71A, 76A, 77A & 78A Variable Optical Attenuators, Eigth Edition

Required Test Equipment Performance Tests
Table 4 Equipment Required
Instrument/Accessory Model
81570A
81571A
81576A
81577A
81578A # 050
81578A # 062
Connector interface DIN Agilent 81000SI x x x x - DIN Feedthrough Adapter 1005-0255 - x - x - FC/PC Feedthrough Adapter 1005-0256 - - - - - HMS-10 Universal Adapter 81000UM x - x - x x
FP-Source, 850nm, MM 81655A_E01 - - - - x x 81551MM
FP-Source, 1310nm, SM 81655A - - - - x x 81657A
Optical Head 850nm 81623B_E01 - - - - x x 81520A
Mode Conditioner 81578-63201
(Note 1)
Mode Stripper, 50um 81578-63202
(Note 2)
NOTE:
1. Diamond AMCB - 180 - 000V050
----xx
----x-
Required
Characteristics
Alternative
Models
2. Service tool, only available for Agilent service centers. Not available for
trade sales.
Legend:
x necessary
- not applicable
ooptional
(a) angled physical contact
(s) straight physical contact
Agilent 81570A, 71A, 76A, 77A & 78A Variable Optical Attenuators, Eigth Edition 49

Performance Tests Performance Test Procedure
Test Record
Results of the performance test may be tabulated on the Test Record
provided at the end of the test procedures. It is recommended that you fill
out the Test Record and refer to it while executing the test. Since the test
limits and setup information are printed on the Test Record for easy
reference, the record can also be used as an abbreviated test procedure ( if
you are already familiar with the test procedure). The test Record can also
be used as a permanent record and may be reproduced without written
permission from Agilent Technologies. The Test Record states rejection
limits for the supplementary characteristics (typical specifications).
Test Failure
If the Agilent 8157xA High Power Optical Attenuator module fails any
performance test, return the instrument to the nearest Agilent
Technologies Sales/Service Office for repair.
Instrument Specification
Specifications are the performance characteristics of the instrument that
is certified. These specifications, listed in “Variable optical attenuator
modules for single mode applications” on page 43 are the performance
standards or limits against which the Agilent 8157xA can be tested.
Any changes in the specification due to manufacturing changes, design, or
tracebility to the National Institute of Standards and Technology (NIST),
will be covered in a manual change supplement, or revised manual. Such
specifications supercede any that were previously published.
Performance Test Procedure
The performance test given in this section includes the Attenuation
Repeatability Test. Perform each step in the order given, using the
corresponding test equipment.
Operate the Agilent 81576A and 81577A Attenuator modules as
attenuators and switch the power control loop off if not otherwise
mentioned.
50 Agilent 81570A, 71A, 76A, 77A & 78A Variable Optical Attenuators, Eigth Edition

Performance Test Procedure Performance Tests
WARNING Make sure that all optical connections of the test setup given in the
procedure are dry and clean. DO NOT USE INDEX MATCHING OIL. Make
sure that all optical connectors are undamaged.
For cleaning, use the cleaning instructions given in “Cleaning Information”
on page 77.
Make sure that all optical cables of the test setup are fixed to the table so
that they won't move during measurements.
Movement of the fibers during the test procedures and the quality of
optical connectors affect the result of power measurements.
The environmental conditions (temperature and relative humidity) must
remain constant during the test.
Insertion Loss Test
Carry out the following Insertion Loss Test at 1550 nm (81578A at 850 nm
and 1310 nm) with single mode fibers using the equipment listed in Tab l e 4
on page 48. To adapt for the straight or angled contact versions of the
optical switch use patchcords with appropriate connectors and suitable
connector interfaces.
1. Turn the instruments on and allow the devices to warm up (20...30 min).
2. Make sure that all your connectors are clean and undamaged.
3. Connect the equipment as shown in Figure 9.
Agilent 81570A, 71A, 76A, 77A & 78A Variable Optical Attenuators, Eigth Edition 51

Performance Tests Performance Test Procedure
Setup for MM attenuators
Figure 9 Insertion Loss Reference
1
Set the attenuator and the power meter to the actual wavelength of the
laser source.
2 Disable the laser source, zero the power meter and select Autorange.
Display [dB].
3 Set the power meter averaging time to 500 ms.
4 Enable the laser source and set Display to Reference on the power
meter.
5 Set attenuation [a] to 0 dB and open the shutter.
6 Record the power meter reading (in dB) as Insertion Loss in the Test
Record.
7 Connect the equipment as shown in Figure 10 on page 53.
Setup for SM attenuators
52 Agilent 81570A, 71A, 76A, 77A & 78A Variable Optical Attenuators, Eigth Edition

Performance Test Procedure Performance Tests
Setup for MM attenuators
Figure 10 Insertion Loss Test
Accuracy test
Use the same equipment and test setup as used in Figure 10 on page 53
1 Turn the instruments on and allow the devices to warm up (20 to 30
min.).
2 Make sure that all your connectors are clean and undamaged.
3 Set the attenuator and the power meter to the actual wavelength of the
laser source.
4 Disable the laser source, zero the power meter and select Autorange.
Display [dB].
5 Enable the laser source, open the shutter and set the attenuation [a] to
dB.
6 Set display to Reference on the power meter.
7 Set the attenuation [a] to the different values listed below and note the
power meter reading in the test record.
1 dB 2 dB 3 dB 4 dB 5 dB
6 dB 7 dB 8 dB 9 dB 10 dB
11 dB 12 dB 13 dB 14 dB 15 dB
25 dB 35 dB 45 dB 55 dB 60 dB
Agilent 81570A, 71A, 76A, 77A & 78A Variable Optical Attenuators, Eigth Edition 53

Performance Tests Performance Test Procedure
Repeatability Test
Use the same equipment and test set up as used in Figure 10.
1 Turn the instruments on and allow the devices to warm up (20..30 min).
2 Make sure that all your connectors are clean and undamaged.
3 Set the attenuator and the power meter to the actual wavelength of the
laser source.
4 Disable the laser source, zero the power meter and select Autorange.
Display [dB].
5 Enable the laser source and open the shutter.
6 Set the attenuation [a] to 1 dB, wait until it settles and set Display to
Reference on the power meter.
7 Set the attenuation [a] to any other value (e.g. 21 dB) and wait until it
settles at this value.
8 Change the attenuation [a] back to the previous value and note the
deviation in the Test Record.
9 Repeat step 3 to step 5 for the following attenuation settings:
7 dB 15 dB 24 dB 32 dB
40 dB 48 dB 54 dB 60 dB
Power Setting Repeatability Test
Use te same equipment and test setup as used in Figure 10 on page 53
without the Agilent 81634B Power Meter. The performance test can be
performed at other wavelengths than 1550 nm.
1 Turn the instruments on and allow the devices to warm up (20..30 min).
2 Make sure that all your connectors are clean and undamaged.
3 Set the attenuator to the actual wavelength of the laser source and set
the averaging time to 1 sec.
4 Zero the attenuator power meter, disable the power control and Display
[dBm].
5 Enable the laser source and open the shutter.
6 Set [P
[P
ACT
7 Set [P
8 Change [P
[P
ACT
9 Repeat step 6 to step 8 for [P
] to 0 dBm and wait for it to stabalize. Note the reading of
SET
] in the Test Record.
] to any other value and wait for it to settle.
SET
] back to the previous value and note the deviation of
SET
] in the Test Record.
] = -25 dBm and [P
SET
] = -50 dBm.
SET
54 Agilent 81570A, 71A, 76A, 77A & 78A Variable Optical Attenuators, Eigth Edition

Performance Test Procedure Performance Tests
Wavelength Flatness Test
(Not applicable to 81578A)
Use the same test setup as used in Figure 10 on page 53 but replace the
Agilent 81654A Fabry Perot Laser Source with the Agilent 81689A Tunable
laser Source.
10 Turn the instruments on and allow the devices to warm up (20..30 min).
11 Make sure that all your connectors are clean and undamaged.
12 Connect the equipment as shown in Figure 10 on page 53.
13 Make sure that the power meter and tunable laser source are hosted by
the same mainframe.
14 Start the PACT application by pressing the [APPL] button on the
mainframe and selecting PACT.
15 Select the modules and the sweep parameters as follows:
l Start = 1524.0 nm
l Stop = 1576.0 nm
Step = 0.1 nm
= 0.000 dBm
P
max
16 Press [Reference] and in the next screen [New Ref] and start the
reference measurement.
17 Return to the setup menu by pressing [Menu] and selecting [Setup].
18 Connect the equipment as shown in Figure 9 on page 52.
19 Set the attenuation to 15 dB.
20 Press [Measure] to start the DUT measurement.
21 After completion press [Graph] to enter the Trace Display.
22 Use the markers C and D to mark the maximum and minimum Insertion
Loss peak and note the power difference D in the Test Record.
Return Loss Test
(Not applicable to 81578A)
Carry out the following Return Loss Test at 1550 nm with single mode
fibers using the equipment listed in Ta b l e 4 , “Equipment Required,” on
page 48. To adapt for the straight or angled contact versions of the
attenuator, use patchcords with appropriate connectors and suitable
connector interfaces.
1 Turn the instruments on and allow the devices to warm up (20...30 min).
2 Make sure that all your connectors are clean and undamaged.
Agilent 81570A, 71A, 76A, 77A & 78A Variable Optical Attenuators, Eigth Edition 55

Performance Tests Performance Test Procedure
Connect the equipment as shown in Figure 11.
3
Figure 11 Return Loss Reference Setup for SM attenuators
4
Set the attenuator and the power meter to the actual wavelength of the
internal laser source of the return loss meter.
5 Disable the internal laser source, cover the end of the reference cable
and zero the return loss meter.
6 Uncover the clean end of the reference cable and enable the laser
source.
7 Select the REF CAL parameter and set the reflection reference R to 14.7
dB, the default value for the return loss of the reference reflector cable
81610CC.
8 Set Display to Reference. The value read should now be 14.7 dB, the
same as the value entered for reflection reference R.
9 Select the REF AUX parameter and terminate the reference cable by
wrapping the fiber several times around a rod with a diameter around 5
mm (such as a screwdriver shaft, or a pencil).
10 Set Display to reference to set the termination parameter.
11 Remove the reference cable and reconnect the equipment as shown in
Figure 12.
Figure 12 Return Loss Test Setup for SM attenuators
12
Terminate the patchcord on the attenuator output by wrapping the fiber
several times around a rod with a diameter around 5 mm (such as a
screwdriver shaft, or a pencil). Do the same for the monitor output if
applicable.
56 Agilent 81570A, 71A, 76A, 77A & 78A Variable Optical Attenuators, Eigth Edition

Performance Test Procedure Performance Tests
13 Set the attenuation [a] to 0 dB and note the input return loss in the Test
record.
14 Open the shutter and record the return loss in the Test Record.
15 Connect the return loss meter to the attenuator output port and
terminate the input port as described in step 12
16 You may measure the output return loss for open and closed shutter or
for other arbitrary attenuation settings as described in step 13 and
step 14 .
Polarization Dependent Loss (PDL) Test Scanning Method
(Not applicable to 81578A)
Carry out the following PDL Test at 1550 nm with single mode fibers using
the equipment listed in Ta bl e 4 on page 48. To adapt for the straight or
angled contact versions of the switch use patchcords with appropriate
connectors and suitable connector interfaces.
WARNING This test is recommended for the fiber loop-type 11869A Polarization
Controller. For plate-type Polarization Controller 8169A refer to section
“Polarization Dependent Loss (PDL) Test - Mueller Method (Not applicable to
81578A)” on page 58.
1 Turn the instruments on and allow the devices to warm up (20..30 min).
2 Make sure that all your connectors are clean and undamaged.
3 Connect the equipment as shown in Figure 13
Figure 13 PDL Test Setup - Scanning Method for SM attenuators
Agilent 81570A, 71A, 76A, 77A & 78A Variable Optical Attenuators, Eigth Edition 57

Performance Tests Performance Test Procedure
WARNING The patchcords to and from the polarization controller and the attenuator
must not move during a measurement, or between any measurements.
Use tape to fix the fibers to the table.
4 Set the attenuator to the wavelength of the laser source.
5 Enable the laser source, and open the shutter of the attenuator.
6 Display [dB] at the power meter and set Display to reference.
7 Choose the power meter Stability Application and set the parameters
as follows:
• Tot al Tim e -2 5 s ec onds
• Averaging Time -50 ms
• Wavelength -Source wavelength
• Range Mode -auto
8 Set the 11896A Polarization Controller scan rate = 4 and press
[AutoScan] to start Polarization Scrambling.
9 Press Measure at the power meter to start PDL Scanning.
10 After the mesurement press [Analysis] and [More] to get the power
readings.
11 Note the results in the Test Record.
Polarization Dependent Loss (PDL) Test Mueller Method
(Not applicable to 81578A)
Carry out the following PDL Test at 1550 nm with single mode fibers using
the equipment listed in Ta b le 4 on page 48. To adapt for the straight or
angled contact versions of the attenuator use patchcords with appropriate
connectors and suitable connector interfaces.Use the operation mode
Attenuation Set
WARNING Perform this test with the plate-type 8169A Polarization Controller.
1 Turn the instruments on, and allow the devices to warm up (20...30
min).
2 Make sure that all your connectors are clean and undamaged.
3 Connect the equipment as shown in Figure 14
58 Agilent 81570A, 71A, 76A, 77A & 78A Variable Optical Attenuators, Eigth Edition

Performance Test Procedure Performance Tests
Figure 14 PDL Reference Setup for SM attenuators
WARNING
The patchcords to and from the polarization controller and the attenuator
must not move during a measurement, or between any measurements.
Use adhesive tape to fix the fibers to the table.
4 Zero the power meter. Display [W].
5 Set the attenuator and the power meter to the actual wavelength of the
source.
6 Enable the laser source and allow 5 minutes for the laser to settle.
7 Reset the polarization controller.
8 Set the polarization filter of the 8169A to maximize the signal.
9 Note the displayed angle of the polarization filter as "Linear Horizontal
Setting".
WARNING Set plates for Horizontal polarization. For the following steps the polarizer
is kept constant.
10 Set the λ/4 Retarder Plate to the same angle as the polarization filter.
11 Note the angle as λ/4 "Linear Horizontal Polarization"
12 Set the λ/2 Retarder Plate to the same angle as the polarization filter.
13 Note the angle as λ/2 "Linear Horizontal Polarization".
Determine settings for Linear Vertical, Linear Diagonal, and Right
Hand Circular Polarization.
WARNING In order to get the required polarization, the λ/2 and λ/4 retarder plates
need to be set to the appropriate values. The corrected positions of the
polarizer plates depend on the actual wavelength and have to be taken
from Ta b l e 5 , “Retarder Settings,” on page 62.
WARNING In the case of Linear Horizontal polarized light no correction is to be made.
The table lists corrections for every 20 nm step. For wavelengths between
listed values, a linear approximation should be used.
14 Get the values (possible by approximation) for the wavelength
dependent offset positions for each type of polarization from Ta b l e 5 ,
“Retarder Settings,” on page 62.
15 Add these values to those for Linear Horizontal polarized light.
Agilent 81570A, 71A, 76A, 77A & 78A Variable Optical Attenuators, Eigth Edition 59

Performance Tests Performance Test Procedure
16
Note the calculated corrected wavelength dependent position values in
the Test Record for the λ/4 Plate setting and the λ/2 Plate setting for
Linear Vertical, Linear Diagonal, and Right Hand Circular Polarization.
Measure the Reference Power
17 Keep the settings from the polarizer and the λ/4 and λ/2 Retarder
Plates from step 5, step 6 and step 12 for Linear Horizontal polarized
light.
18 Note the power reading as Reference Power P
19 Set the λ/4 and λ/2 Retarder Plates to the corrected wavelength
in the Test Record.
1
dependent positions for Linear Vertical polarized light.
20 Read the power on the power meter and note as Reference Power P
the Test Record.
21 Set the λ/4 and λ/2 Retarder Plates to the corrected wavelength
dependent positions for Linear Diagonal polarized light.
22 Note the power reading as Reference Power P
23 Set the λ/4 and λ/2 Retarder Plates to the corrected wavelength
in the Test Record.
3
dependent positions for Right Hand Circular polarized light.
24 Note the power reading as Reference Power P
25 Connect the equipment as shown in Figure 15
in the Test Record.
4
2
in
60 Agilent 81570A, 71A, 76A, 77A & 78A Variable Optical Attenuators, Eigth Edition

Performance Test Procedure Performance Tests
.
Figure 15 PDL Test Setup - Mueller method
WARNING
The patchcords to and from the polarization controller and the attenuator
must not move during, or between measurements. Use adhesive tape to fix
the fibers to the table.
Measure the Optical Power after the Attenuator Module
26 Open the shutter of the attenuator.
27 Set the λ/4 and λ/2 Retarder Plates for Linear Horizontal polarized light.
28 Note the power reading as DUT Power P
29 Set the λ/4 and λ/2 Retarder Plates to the corrected wavelength
dependent positions for Linear Vertical polarized light.
30 Note the power displayed on the power meter as DUT Power P
Tes t R ec or d.
31 Set theλ/4 and λ/2 Retarder Plates to the corrected wavelength
dependent positions for Linear Diagonal polarized light.
32 Note the power reading as DUT Power P
33 Set theλ/4 and λ/2 Retarder Plates to the corrected wavelength
dependent positions for Right Hand Circular polarized light.
in the Test Record.
1
in the Test Record.
3
in the
2
34 Note the power reading as DUT Power P
35 Calculate the Mueller coefficients, the maximum and minimum
in the Test Record.
4
transmission and finally the Polarization Dependent Loss (PDL) as
described in the Test Record.
Agilent 81570A, 71A, 76A, 77A & 78A Variable Optical Attenuators, Eigth Edition 61

Performance Tests Performance Test Procedure
Table 5 Retarder Settings
λ/νµ
1580
1560
1540
1520
1500
Linear Vertical Linear Diagonal Right hand circular
λ/4 Plate λ/2 Plate λ/4 Plate λ/2 Plate λ/4 Plate λ/2 Plate
° 46.2° 1.7° 23.3° 42.9° -17.1°
2.5
° 45.6° 0.8° 22.9° 44.0° -16.5°
1.2
° 45.0° 0° 22.5° 45.0° -15.1°
0
° 44.3° -1.0° 22.0° 46.2° -13.8°
-1.4
-2.7
° 43.6° -2.0° 21.4° 47.4° -12.4°
62 Agilent 81570A, 71A, 76A, 77A & 78A Variable Optical Attenuators, Eigth Edition

Performance Test Procedure Performance Tests
Relative Power Meter Uncertainty Test
This test applies to the Agilent 81576A and 81577A Attenuators with
power control.
Carry out the following Power Meter Uncertainty Test at 1550 nm or
another spwcified wavelength with single mode fibers using the
equipment listed in Ta b le 4 on page 48. To adapt for the straight or angled
contact versions of the attenuator use patchcords with appropriate
connectors and suitable connector interfaces.
WARNING Do not turn the laser off during the measurement! Clean all connectors
carefully before you start with the measurement.
1 Turn the instruments on and allow the devices to warm up (20 to 30
min.).
2 Make sure that you perform this test in an environment with
temperature fluctuations less than ± 1°C.
3 Make sure that all your connectors are clean and undamaged.
4 Connect the equipment as shown below in Figure 16.
Figure 16 Relative Power Meter uncertainty Setup for SM attenuators
5
Set both attenuators to the wavelength of the source and disable them.
6 Set the attenuation [α] of 81570A reference attenuator to 55dB.
7 Set the attenuation [α] of the DUT attenuator to 0 dB.
8 Set the averaging time of the DUT attenuator power meter to 1 s.
9 Zero the reference and the attenuator power meter.
10 Enable the laser source and wait for it to stabalize (> 30 seconds).
11 Enable the attenuators.
12 Set the reference power meter to the wavelength of the source, set the
averaging time to 1 s. and display [dB]. Press [Display to Reference.
13 Set the range mode of the reference power meter to Manual.
14 On the DUT attenuator edit P Offset until the parameter P
dBm.
15 Lower P
16 Note the reference power meter reading in the Test record.
and the attenuation of the reference attenuator by 5 dB.
SET
equals 0
SET
17 Repeat step 14 and step 15 until the reference attenuator shows an
attenuation of 0 dB.
18 Perform step 14 and step 15 upward until the reference attenuator
shows 55 dB.
Agilent 81570A, 71A, 76A, 77A & 78A Variable Optical Attenuators, Eigth Edition 63

Performance Tests Performance Test Procedure
64 Agilent 81570A, 71A, 76A, 77A & 78A Variable Optical Attenuators, Eigth Edition

Performance Test Procedure Performance Tests
Test Re cord
Agilent High Power Optical Attenuator Performance Test Page 1 of 6
Test Facili ty:
Report No.:
Date:
Customer:
Tes t ed B y:
Model: Agilent High Power Optical Attenuator Product Number: #
Serial No. Ambient temperature
Firmware Rev. Relative humidity %
Line frequency Hz
Special Notes:
°C
Agilent 81570A, 71A, 76A, 77A & 78A Variable Optical Attenuators, Eigth Edition 65

Performance Tests Performance Test Procedure
Agilent High Power Optical Attenuator Performance Test
Agilent High Power Optical Attenuator Report No. Date:
Test Eq uipment
# Description Model No. Trace No. Cal. due date
1Mainframe / /
2Power Meter / /
3Laser Source / /
4 Return Loss Module / /
5 Connector Interface / /
6 Single Mode Fiber / /
7 / /
8 / /
Page 2 of 6
9 / /
10 / /
11 / /
12 / /
13 / /
14 / /
15 / /
16 / /
17 / /
18 / /
19 / /
20 / /
66 Agilent 81570A, 71A, 76A, 77A & 78A Variable Optical Attenuators, Eigth Edition

Performance Test Procedure Performance Tests
Agilent High Power Optical Attenuator Performance Test
81570A/ 71A/ 76A/ 77A
Agilent High Power Optical Attenuator Report No. Date
Insertion Loss Test
Product 81570A/71A 81576A + 81577A
Measurement
Upper test limit 1.5 dB 2.0 dB
Attenuation Accuracy Test
Setting/dB Reading/dB Deviation/dB
1
2
3
4
5
6
7
8
9
10
11
12
13
14
15
25
35
45
55
60
Most positiveDeviation
Upper test limit +0.1 dB
Most negative Deviation
Lower test limit -0.1 dB
Page 3 of 6
Agilent 81570A, 71A, 76A, 77A & 78A Variable Optical Attenuators, Eigth Edition 67

Performance Tests Performance Test Procedure
Agilent High Power Optical Attenuator Performance Test Page 4 of 6
81570A/ 71A/ 76A/ 77A
Agilent Modular Optical Attenuator Report No. Date
Attenuation Repeatability Test
Setting / dB Deviation / dB
1
7
15
24
32
40
48
54
60
Maximum peak-to-peak Deviation
Upper test limit 0.02 dBpp
Power Setting Repeatability Test
Power Setting/dB Deviation/dB
0 dBm
-25 dBm
-50 dBm
Maximum peak-to-peak Deviation
Upper test limit 0.03 dBpp
Wavelength Flatness Test
Product 8157xA
Measurement
Upper test limit 0.14 dBpp
Return Loss Test
Product 81570A + 81576A 81571A/77A
Attenuation Setting
Shutter State
Measurement Input Port
Measurement Output Port
Lower test limit 42 dB 54 dB
Open Closed
68 Agilent 81570A, 71A, 76A, 77A & 78A Variable Optical Attenuators, Eigth Edition

Performance Test Procedure Performance Tests
Agilent High Power Optical Attenuator Performance Test Page 5 of 6
81570A/ 71A/ 76A/ 77A
Agilent High Power Optical Attenuator Report No. Date
Polarization Dependent Loss Test - Scanning method (11896A)
Product 81570A/71A 81576A + 81577A
Attenuation Setting
Maximum peak-to-peak Deviation
Upper test limit 0.8 dBpp 0.10 dBpp
Polarization Dependent Loss Test - Mueller method (8169A)
Attenuation setting: dB
Polarization
Linear Horizontal Linear Vertical Linear Diagonal Right Hand Circular
Polarizer Setting deg n/a n/a n/a
λ/4 Plate Setting deg n/a n/a n/a
λ/2 Plate Setting deg n/a n/a n/a
Corrected Wavelength dependent positions
Linear Horizontal Linear Vertical Linear Diagonal Right Hand Circular
Polarizer Setting n/a deg deg deg
λ/4 Plate Setting n/a deg deg deg
λ/2 Plate Setting n/a deg deg deg
Measurement P
1
P
2
P
3
P
4
Reference Power µW µW µW µW
DUT Power
µW µW µW µW
Mueller Coefficients
m
11
m
12
m
13
m
14
=(P
DUT1/PREF1
=(P
DUT1/PREF1
=(P
DUT3/PREF3
=(P
DUT4/PREF4
+ P
DUT2/PREF2
- P
DUT2/PREF2
) - m
11
) - m
11
)/2 =
)/2 =
=
=
Minimum ans maximum Transmission
2
2
T
T
max
min
==
==
m
m
m
11
m
11
+++
12
13
2
m
m
++–
12
13
2
m
14
2
2
m
14
Product 81570A/71A 81576A + 81577A
Polarization dependent loss
PDL = 10lg(Tmax/Tmin) dBpp
Upper test limit 0.8 dBpp 0.10 dBpp
Agilent 81570A, 71A, 76A, 77A & 78A Variable Optical Attenuators, Eigth Edition 69

Performance Tests Performance Test Procedure
Agilent High Power Optical Attenuator Performance Test
81570A/ 71A/ 76A/ 77A
Agilent High Power Optical Attenuator Report No. Date
Relative Power Meter Uncertainty Test
8157xA [P
]/ dBm Reference Attenuation/dB Reference Reading 1 /dB Reference Reading 2 /dB
SET
0
-5
-10
-15
-20
-25
-30
-35
-40
-45
-50
-55
Maximum peak-to-peak deviation
Upper test limit 0.06 dBpp
Page 6 of 6
70 Agilent 81570A, 71A, 76A, 77A & 78A Variable Optical Attenuators, Eigth Edition

Performance Test Procedure Performance Tests
Agilent High Power Optical Attenuator Performance Test
81578A
Agilent High Power Optical Attenuator Report No. Date
Insertion Loss Test
Wavelength 850 nm 1310 nm
Measurement
Upper test limit 1.5 dB 1.5 dB
Attenuation Accuracy Test
Wavelength 850 nm 1310 nm
Setting/dB Reading/dB Deviation/dB Reading/dB Deviation/dB
1
2
3
4
5
6
7
8
9
10
11
12
13
14
15
25
35
45
55
60
Most Positive Deviation
Upper test limit
Most Negative Deviation
Lower test limit
+0.2dB
-0.2dB
Page 3of 4
+0.2 dB
-0.2 dB
Agilent 81570A, 71A, 76A, 77A & 78A Variable Optical Attenuators, Eigth Edition 71

Performance Tests Performance Test Procedure
Test Record
Agilent High Power Optical Attenuator Performance Test Page 1 of 4
Test Facility:
Report No.:
Date:
Customer:
Tes te d By :
Model: Agilent High Power Optical Attenuator Product Number: #
Serial No. Ambient temperature
Firmware Rev. Relative humidity %
Line frequency Hz
Special Notes:
°C
72 Agilent 81570A, 71A, 76A, 77A & 78A Variable Optical Attenuators, Eigth Edition

Performance Test Procedure Performance Tests
Agilent High Power Optical Attenuator Performance Test
Agilent High Power Optical Attenuator Report No. Date:
Test Equipment
# Description Model No. Trace No. Cal. due date
1Mainframe / /
2Power Meter / /
3Laser Source / /
4 Return Loss Module / /
5 Connector Interface / /
6 Single Mode Fiber / /
7 / /
8 / /
Page 2 of 4
9 / /
10 / /
11 / /
12 / /
13 / /
14 / /
15 / /
16 / /
17 / /
18 / /
19 / /
20 / /
Agilent 81570A, 71A, 76A, 77A & 78A Variable Optical Attenuators, Eigth Edition 73

Performance Tests Performance Test Procedure
Agilent High Power Optical Attenuator Performance Test Page 4of 4
81578A
Agilent Modular Optical Attenuator Report No. Date
Attenuation Repeatability Test
Wavelength 850 nm 1310 nm
Setting / dB Deviation / dB Deviation / dB
1
7
15
24
32
40
48
54
60
Maximum peak-to-peak Deviation
Upper test limit 0.03 dBpp
0.03 dBpp
74 Agilent 81570A, 71A, 76A, 77A & 78A Variable Optical Attenuators, Eigth Edition

Cleaning Information
Agilent 81570A, 71A, 76A, 77A & 78A Variable Optical Attenuators, Eigth Edition 77

Cleaning Information
The following Cleaning Information contains some general safety precautions, which must
be observed during all phases of cleaning. Consult your specific optical device manuals or
guides for full information on safety matters.
Please try, whenever possible, to use physically contacting connectors, and dry
connections. Clean the connectors, interfaces, and bushings carefully after use.
If you are unsure of the correct cleaning procedure for your optical device, we recommend
that you first try cleaning a dummy or test device.
Agilent Technologies assume no liability for the customer’s failure to comply with these
requirements.
78 Agilent 81570A, 71A, 76A, 77A & 78A Variable Optical Attenuators, Eigth Edition

Safety Precautions Cleaning Information
Safety Precautions
Please follow the following safety rules:
• Do not remove instrument covers when operating.
• Ensure that the instrument is switched off throughout the cleaning procedures.
• Use of controls or adjustments or performance of procedures other than those specified
may result in hazardous radiation exposure.
• Make sure that you disable all sources when you are cleaning any optical interfaces.
• Under no circumstances look into the end of an optical device attached to optical
outputs when the device is operational. The laser radiation is not visible to the human
eye, but it can seriously damage your eyesight.
• To prevent electrical shock, disconnect the instrument from the mains before cleaning.
Use a dry cloth, or one slightly dampened with water, to clean the external case parts.
Do not attempt to clean internally.
• Do not install parts or perform any unauthorized modification to optical devices.
• Refer servicing only to qualified and authorized personnel.
Agilent 81570A, 71A, 76A, 77A & 78A Variable Optical Attenuators, Eigth Edition 79

Cleaning Information Why is it important to clean optical devices?
Why is it important to clean optical
devices?
CAU T ION Optical power levels above 100 mW applied to single mode connectors can easily damage
the connector if it is not perfectly clean. Also, scratched or poorly cleaned connectors can
destroy optical connectors mechanically. Always make sure that your optical connectors are
properly cleaned and unscratched before connection. However, Agilent Technologies
Deutschland GmbH assumes no responsibility in case of an operation that is not compliace
with the safety instructions as stated above.
In transmission links optical fiber cores are about 9 mm (0.00035") in diameter. Dust and
other particles, however, can range from tenths to hundredths of microns in diameter. Their
comparative size means that they can cover a part of the end of a fiber core, and thus
degrade the transmission quality. This will reduce the performance of your system.
Furthermore, the power density may burn dust into the fiber and cause additional damage
(for example, 0 dBm optical power in a single mode fiber causes a power density of
approximately 16 million W/m
non-repeatable.
Cleaning is, therefore, an essential yet difficult task. Unfortunately, when comparing most
published cleaning recommendations, you will discover that they contain several
inconsistencies. In this chapter, we want to suggest ways to help you clean your various
optical devices, and thus significantly improve the accuracy and repeatability of your
lightwave measurements.
2
). If this happens, measurements become inaccurate and
What materials do I need for proper
cleaning?
Some Standard Cleaning Equipment is necessary for cleaning your instrument. For certain
cleaning procedures, you may also require certain Additional Cleaning Equipment.
Standard Cleaning Equipment
Before you can start your cleaning procedure you need the following standard equipment:
• Dust and shutter caps
80 Agilent 81570A, 71A, 76A, 77A & 78A Variable Optical Attenuators, Eigth Edition

What materials do I need for proper cleaning? Cleaning Information
• Isopropyl alcohol
• Cotton swabs
• Soft tissues
• Pipe cleaner
• Compressed air
Dust and shutter caps
All of Agilent Technologies’ lightwave instruments are delivered with either laser shutter
caps or dust caps on the lightwave adapter. Any cables come with covers to protect the
cable ends from damage or contamination.
We suggest these protective coverings should be kept on the equipment at all times, except
when your optical device is in use. Be careful when replacing dust caps after use. Do not
press the bottom of the cap onto the fiber too hard, as any dust in the cap can scratch or
pollute your fiber surface.
If you need further dust caps, please contact your nearest Agilent Technologies sales office.
Isopropyl alcohol
This solvent is usually available from any local pharmaceutical supplier or chemist's shop.
Results will vary depending on the purity of the alcohol.
If you use isopropyl alcohol to clean your optical device, do not immediately dry the surface
with compressed air (except when you are cleaning very sensitive optical devices). This is
because the dust and the dirt is dissolved in the alcohol and will leave behind filmy deposits
after the alcohol has evaporated. You should therefore first remove the alcohol and the dust
with a soft tissue, and then use compressed air to blow away any remaining filaments.
If possible avoid using denatured alcohol containing additives. Instead, apply alcohol used
for medical purposes.
Never drink this alcohol, as it may seriously damage to your health.
Do not use any other solvents, as some may damage plastic materials and claddings.
Acetone, for example, will dissolve the epoxy used with fiber optic connectors. To avoid
damage, only use isopropyl alcohol.
Cotton swabs
We recommend that you use swabs such as Q-tips or other cotton swabs normally available
from local distributors of medical and hygiene products (for example, a supermarket or a
chemist's shop). You may be able to obtain various sizes of swab. If this is the case, select
the smallest size for your smallest devices.
Ensure that you use natural cotton swabs. Foam swabs will often leave behind filmy
deposits after cleaning.
Agilent 81570A, 71A, 76A, 77A & 78A Variable Optical Attenuators, Eigth Edition 81

Cleaning Information What materials do I need for proper cleaning?
Use care when cleaning, and avoid pressing too hard onto your optical device with the
swab. Too much pressure may scratch the surface, and could cause your device to become
misaligned. It is advisable to rub gently over the surface using only a small circular
movement.
Swabs should be used straight out of the packet, and never used twice. This is because dust
and dirt in the atmosphere, or from a first cleaning, may collect on your swab and scratch
the surface of your optical device.
Soft tissues
These are available from most stores and distributors of medical and hygiene products such
as supermarkets or chemists' shops.
We recommend that you do not use normal cotton tissues, but multi-layered soft tissues
made from non-recycled cellulose. Cellulose tissues are very absorbent and softer.
Consequently, they will not scratch the surface of your device over time.
Use care when cleaning, and avoid pressing on your optical device with the tissue. Pressing
too hard may lead to scratches on the surface or misalignment of your device. Just rub
gently over the surface using a small circular movement.
Use only clean, fresh soft tissues and never apply them twice. Any dust and dirt from the air
which collects on your tissue, or which has gathered after initial cleaning, may scratch and
pollute your optical device.
Pipe cleaner
Pipe cleaners can be purchased from tobacconists, and come in various shapes and
sizes.The most suitable one to select for cleaning purposes has soft bristles, which will not
produces scratches.
The best way to use a pipe cleaner is to push it in and out of the device opening (for
example, when cleaning an interface). While you are cleaning, you should slowly rotate the
pipe cleaner.
Only use pipe cleaners on connector interfaces or on feed through adapters. Do not use
them on optical head adapters, as the center of a pipe cleaner is hard metal and can
damage the bottom of the adapter.
Your pipe cleaner should be new when you use it. If it has collected any dust or dirt, this can
scratch or contaminate your device.
The tip and center of the pipe cleaner are made of metal. Avoid accidentally pressing these
metal parts against the inside of the device, as this can cause scratches.
Compressed air
Compressed air can be purchased from any laboratory supplier.
82 Agilent 81570A, 71A, 76A, 77A & 78A Variable Optical Attenuators, Eigth Edition

What materials do I need for proper cleaning? Cleaning Information
It is essential that your compressed air is free of dust, water and oil. Only use clean, dry air.
If not, this can lead to filmy deposits or scratches on the surface of your connector. This will
reduce the performance of your transmission system.
When spraying compressed air, hold the can upright. If the can is held at a slant, propellant
could escape and dirty your optical device. First spray into the air, as the initial stream of
compressed air could contain some condensation or propellant. Such condensation leaves
behind a filmy deposit.
Please be friendly to your environment and use a CFC-free aerosol.
Additional Cleaning Equipment
Some Cleaning Procedures need the following equipment, which is not required to clean
each instrument:
• Microscope with a magnification range about 50X up to 300X
• Ultrasonic bath
• Warm water and liquid soap
• Premoistened cleaning wipes
• Polymer film
• Infrared Sensor Card
Microscope with a magnification range about 50X up to 300X
A microscope can be found in most photography stores, or can be obtained through or
specialist mail order companies. Special fiber-scopes are available from suppliers of splicing
equipment.
Ideally, the light source on your microscope should be very flexible. This will allow you to
examine your device closely and from different angles.
A microscope helps you to estimate the type and degree of dirt on your device. You can use
a microscope to choose an appropriate cleaning method, and then to examine the results.
You can also use your microscope to judge whether your optical device (such as a
connector) is severely scratched and is, therefore, causing inaccurate measurements.
Ultrasonic bath
Ultrasonic baths are also available from photography or laboratory suppliers or specialist
mail order companies.
An ultrasonic bath will gently remove fat and other stubborn dirt from your optical devices.
This helps increase the life span of the optical devices.
Only use isopropyl alcohol in your ultrasonic bath, as other solvents may cause damage.
Agilent 81570A, 71A, 76A, 77A & 78A Variable Optical Attenuators, Eigth Edition 83

Cleaning Information What materials do I need for proper cleaning?
Warm water and liquid soap
Only use water if you are sure that there is no other way of cleaning your optical device
without causing corrosion or damage. Do not use hot water, as this may cause mechanical
stress, which can damage your optical device.
Ensure that your liquid soap has no abrasive properties or perfume in it. You should also
avoid normal washing up liquid, as it can cover your device in an iridescent film after it has
been air dried.
Some lenses and mirrors also have a special coating, which may be sensitive to mechanical
stress, or to fat and liquids. For this reason we recommend you do not touch them.
If you are not sure how sensitive your device is to cleaning, please contact the manufacturer
or your sales distributor.
Premoistened cleaning wipes
Use pre-moistened cleaning wipes as described in each individual cleaning procedure.
Cleaning wipes may be used in every instance where a moistened soft tissue or cotton
swab is applied.
Polymer film
Polymer film is available from laboratory suppliers or specialist mail order companies.
Using polymer film is a gentle method of cleaning extremely sensitive devices, such as
reference reflectors and mirrors.
Infrared Sensor Card
Infrared sensor cards are available from laboratory suppliers or specialist mail order
companies.
With the help of this card you are able to inspect the shape of laser light emitted. The
invisible laser beam is projected onto the sensor card. The light beam’s infrared
wavelengths are refleted at visible wavelengths, so becoming visible to the normal eye as a
round spot.
Take care never to look into the end of a fiber or any other optical component, when they
are in use. This is because the laser can seriously damage your eyes.
84 Agilent 81570A, 71A, 76A, 77A & 78A Variable Optical Attenuators, Eigth Edition

Preserving Connectors Cleaning Information
Preserving Connectors
Listed below are some hints on how best to keep your connectors in the best possible
condition.
Making Connections Before you make any connection you must ensure that all cables and connectors are clean.
If they are dirty, use the appropriate cleaning procedure.
When inserting the ferrule of a patchcord into a connector or an adapter, make sure that
the fiber end does not touch the outside of the mating connector or adapter. Otherwise you
will rub the fiber end against an unsuitable surface, producing scratches and dirt deposits
on the surface of your fiber.
Dust Caps and Shutter Caps Be careful when replacing dust caps after use. Do not press the bottom of the cap onto the
fiber as any dust in the cap can scratch or dirty your fiber surface.
When you have finished cleaning, put the dust cap back on, or close the shutter cap if the
equipment is not going to be used immediately.
Immersion Oil and Other Index Matching
Compounds
Always keep the caps on the equipment when it is not in use.
All of Agilent Technologies’ lightwave instruments and accessories are shipped with either
laser shutter caps or dust caps. If you need additional or replacement dust caps, contact
your nearest Agilent Technologies Sales/Service Office.
Wherever possible, do not use immersion oil or other index matching compounds with your
device. They are liable to impair and dirty the surface of the device. In addition, the
characteristics of your device can be changed and your measurement results affected.
Cleaning Instrument Housings
Use a dry and very soft cotton tissue to clean the instrument housing and the keypad. Do
not open the instruments as there is a danger of electric shock, or electrostatic discharge.
Opening the instrument can cause damage to sensitive components, and in addition your
warranty will be invalidated.
Agilent 81570A, 71A, 76A, 77A & 78A Variable Optical Attenuators, Eigth Edition 85

Cleaning Information General Cleaning Procedure
General Cleaning Procedure
Light dirt If you just want to clean away light dirt, observe the following procedure for all devices:
• Use compressed air to blow away large particles.
• Clean the device with a dry cotton swab.
• Use compressed air to blow away any remaining filament left by the swab.
Heavy dirt If the above procedure is not enough to clean your instrument, follow one of the procedures
below.
If you are unsure of how sensitive your device is to cleaning, please contact the
manufacturer or your sales distributor
How to clean connectors
Cleaning connectors is difficult as the core diameter of a single mode fiber is only about
9 mm. This generally means you cannot see streaks or scratches on its surface. To be
certain of the condition of the surface of your connector and to check it after cleaning, you
need a microscope.
In the case of scratches, or of dust that has been burnt onto the surface of the connector,
you may have no option but to polish the connector. This depends on the degree of
dirtiness, or the depth of the scratches. This is a difficult procedure and should only be
performed by a skilled person, and as a last resort as it wears out your connector.
WARN ING Never look into the end of an optical cable that is connected to an active source.
To assess the projection of the emitted light beam you can use an infrared sensor card. Hold
the card approximately 5 cm from the output of the connector. The invisible emitted light is
projected onto the card and becomes visible as a small circular spot.
Cleaning procedure for high-power
single mode connections
Optical single mode connectors for high-power applications (optical power levels bove 100
mW) require careful cleaning to prevent the power density of burning dust or dirt into the
fiber causing permanent damage to the devices and/or connectors. If this happens,
measurements become inaccurate and unrepeatable.
The “Preferred Procedure” on page 87 or the “Procedure for Stubborn Dirt” on page 87
must be strictly followed for each part of the optical connection (connector, connector
interface, and physical connector interface).
Always make sure that the fiber end-faces are properly cleaned and unscratched before
connection. The fiber end faces must be visually inspected using a microscope with a
magnification of at leasst 400x. For recommended fiber inspection microscopes, please
refer to personnel in Agilent’s Service Team.
86 Agilent 81570A, 71A, 76A, 77A & 78A Variable Optical Attenuators, Eigth Edition

General Cleaning Procedure Cleaning Information
The connection should be made immediately after cleaning and inspection to prevent the
connection (connector, connector interface, and physical connector interface) from
becoming dusty or dirty again.(
Preferred Procedure An Optical Connector Cleaner, which ressembles a VCR cleaning tape, is a device that can
be used to clean grease from the surface of a connector.
1 Blow away any surface dust with compressed air..
2 Press the button on the sideof the Optical Connector Cleaner device to ensure that a
fresh strip of tape is ready.
3 Position the connector interface on the tape.
4 Holding the connector interface against the tape, rotate the interface about 180
degrees, then slide it across the surface of the tape.
Alternative Procedure Use the following procedure if an Optical Connector Cleaner is not available.
1 Clean the connector by rubbing a new, dry cotton swab over the surface using a small
circular movement.
2 Blow away any remaining lint with compressed air.
Procedure for Stubborn Dirt Use this procedure when there is greasy dirt on the connector:
1 Moisten a new cotton swab with isopropyl alcohol.
2 Clean the connector by rubbing the cotton swab over the surface using a small circular
movement.
3 Take a new, dry soft tissue and remove the alcohol, dissolved sediment and dust, by
rubbing gently over the surface using a small circular movement.
4 Blow away any remaining lint with compressed air.
An Alternative Procedure A better, more gentle, but more expensive cleaning procedure is to use an ultrasonic bath
with isopropyl alcohol.
1 Hold the tip of the connector in the bath for at least three minutes.
2 Take a new, dry soft tissue and remove the alcohol, dissolved sediment and dust, by
rubbing gently over the surface using a small circular movement.
3 Blow away any remaining lint with compressed air.
How to clean optical head adapters
CAU T IO N Some adapters have an anti-reflection coating on the back to reduce back reflection. This
coating is extremely sensitive to solvents and mechanical abrasion. Extra care is needed
when cleaning these adapters.
Agilent 81570A, 71A, 76A, 77A & 78A Variable Optical Attenuators, Eigth Edition 87

Cleaning Information General Cleaning Procedure
When using optical head adapters, periodically inspect the optical head’s front window.
Dust and metal particles can be propelled through the adapter’s pinhole while inserting the
connector ferrule into the receptacle. These dirt particles collect on the head’s front
window, which can lead to incorrect results if not removed.
Preferred Procedure Use the following procedure on most occasions.
1 Clean the adapter by rubbing a new, dry cotton swab over the surface using a small
circular movement.
2 Blow away any remaining lint with compressed air.
Procedure for Stubborn Dirt Use this procedure when there is greasy dirt on the adapter:
1 Moisten a new cotton swab with isopropyl alcohol.
2 Clean the adapter by rubbing the cotton swab over the surface using a small circular
movement.
3 Take a new, dry soft tissue and remove the alcohol, dissolved sediment and dust, by
rubbing gently over the surface using a small circular movement.
4 Blow away any remaining lint with compressed air.
How to clean connector interfaces
CAUTI ON Be careful when using pipe cleaners, as the core and the bristles of the pipe cleaner are
hard and can damage the interface.
Do not use pipe cleaners on optical head adapters, as the hard core of normal pipe cleaners
can damage the bottom of an adapter.
Preferred Procedure Use the following procedure on most occasions.
1 Clean the interface, when no lens is connected, by pushing and pulling a new, dry pipe
cleaner into the opening. Rotate the pipe cleaner slowly as you do this.
2 Blow away any remaining lint with compressed air.
Procedure for Stubborn Dirt Use this procedure when there is greasy dirt on the interface:
1 Moisten a new pipe cleaner with isopropyl alcohol.
2 Clean the interface by pushing and pulling the pipe cleaner into the opening. Rotate the
pipe cleaner slowly as you do this.
3 Using a new, dry pipe cleaner, and a new, dry cotton swab remove the alcohol, any
dissolved sediment and dust.
4 Blow away any remaining lint with compressed air.
88 Agilent 81570A, 71A, 76A, 77A & 78A Variable Optical Attenuators, Eigth Edition

General Cleaning Procedure Cleaning Information
How to clean bare fiber adapters
Bare fiber adapters are difficult to clean. Protect from dust unless they are in use.
CAUTI O N Never use any kind of solvent when cleaning a bare fiber adapter as solvents can:
• Damage the foam inside some adapters.
• Deposit dissolved dirt in the groove, which can then dirty the surface of an inserted fiber.
Preferred Procedure Use the following procedure on most occasions.
1 Blow away any dust or dirt with compressed air.
Procedure for Stubborn Dirt Use this procedure when there is greasy dirt on the adapter:
1 Clean the adapter by pushing and pulling a new, dry pipe cleaner into the opening.
Rotate the pipe cleaner slowly as you do this.
CAUTI O N Be careful when using pipe cleaners, as the core and the bristles of the pipe cleaner are
hard and can damage the adapter.
2 Clean the adapter by rubbing a new, dry cotton swab over the surface using a small
circular movement.
3 Blow away any remaining lint with compressed air.
How to clean lenses and instruments with an
optical glass plate
Some lenses have special coatings that are sensitive to solvents, grease, liquid and
mechanical abrasion. Take extra care when cleaning lenses with these coatings. Some
instruments, for example, Agilent’s optical heads have an optical glass plate to protect the
sensor.
CAU TI O N Do not attempt to access the internal parts of an Agilent N3988A video microscope for
cleaning or for any other purpose.
Lens assemblies consisting of several lenses are not normally sealed. Therefore, use as little
alcohol as possible, as it can get between the lenses and in doing so can change the
properties of projection.
If you are cleaning an Agilent 8162*A optical head, periodically inspect the optical head’s
front window for dust and other particles. Dust and particles can be propelled through the
optical head adapter’s pinhole while inserting a connector ferrule into the receptacle.
Particles on the optical head’s front window can significantly impair measurement results.
NOTE Do not dry the lens by rubbing with with cloth or other material, which may scratch the lens
surface.
Agilent 81570A, 71A, 76A, 77A & 78A Variable Optical Attenuators, Eigth Edition 89

Cleaning Information General Cleaning Procedure
Preferred Procedure Use the following procedure on most occasions.
1 Clean the lens by rubbing a new, dry cotton swab over the surface using a small circular
movement.
2 Blow away any remaining lint with compressed air.
Procedure for Stubborn Dirt Use this procedure when there is greasy dirt on the lens:
1 Moisten a new cotton swab with isopropyl alcohol.
2 Clean the lens by rubbing the cotton swab over the surface using a small circular
movement.
3 Using a new, dry cotton swab remove the alcohol, any dissolved sediment and dust.
4 Blow away any remaining lint with compressed air.
How to clean instruments with a fixed connector
interface
You should only clean instruments with a fixed connector interface when it is absolutely
necessary. This is because it is difficult to remove any used alcohol or filaments from the
input of the optical block.
It is important, therefore, to keep dust caps on the equipment at all times, except when your
optical device is in use.
If you do discover filaments or particles, the only way to clean a fixed connector interface
and the input of the optical block is to use compressed air.
If there are fluids or fat in the connector, please refer the instrument to the skilled personnel
of Agilent’s service team.
NOTE Both the surface and the jacket of the attached connector should be completely dry and
clean.
CAUTI ON Only use clean, dry compressed air. Make sure that the air is free of dust, water, and oil. If
the air that you use is not clean and dry, this can lead to filmy deposits or scratches on the
surface of your connector interface. This will degrade the performance of your transmission
system.
Never try to open the instrument and clean the optical block by yourself, because it is easy
to scratch optical components, and cause them to become misaligned.
How to clean instruments with a physical contact
interface
Remove any connector interfaces from the optical output of the instrument before you
begin the cleaning procedure.
90 Agilent 81570A, 71A, 76A, 77A & 78A Variable Optical Attenuators, Eigth Edition

General Cleaning Procedure Cleaning Information
Cleaning interfaces is difficult as the core diameter of a single mode fiber is only about
9 mm. This generally means you cannot see streaks or scratches on the surface. To be
certain of the degree of pollution on the surface of your interface and to check whether it
has been removed after cleaning, you need a microscope.
WARNI NG Never look into an optical output, because this can seriously damage your eyesight.
To assess the projection of the emitted light beam you can use an infrared sensor card. Hold
the card approximately 5 cm from the interface. The invisible emitted light is projected onto
the card and becomes visible as a small circular spot.
Optical single mode connections for high-power applications (optical power levels above
100mW) require careful cleaning to prevent the power density of burning dust or dirt into
the fiber causing permanent damage of the devices and/or connectors. If this happens,
measurements become inaccurate and non-repeatable.
Preferred Procedure Use the following procedure on most occasions.
1 Clean the interface by rubbing a new, dry cotton swab over the surface using a small
circular movement.
2 Blow away any remaining lint with compressed air.
Procedure for Stubborn Dirt Use this procedure when there is greasy dirt on the interface:
1 Moisten a new cotton swab with isopropyl alcohol.
2 Clean the interface by rubbing the cotton swab over the surface using a small circular
movement.
3 Take a new, dry soft tissue and remove the alcohol, dissolved sediment and dust, by
rubbing gently over the surface using a small circular movement.
4 Blow away any remaining lint with compressed air.
NOTE This procedures must be strictly followed for each part of the optical connection (connector,
connector interface and physical connector interface).
NOTE The connection should be made immediately after cleaning and inspection to prevent the
connection (connector, connector interface and physical connector interface) from getting
dusty or dirty again.
NOTE Always make sure that the fiber end faces are properly cleaned and unscratched before
connection. The fiber end faces must be visually inspected using a microscope with a
magnification of at least 400x. For recommended fiber inspection microscopes, please refer
to Agilent 's service team personnel.
Agilent 81570A, 71A, 76A, 77A & 78A Variable Optical Attenuators, Eigth Edition 91

Cleaning Information General Cleaning Procedure
How to clean instruments with a recessed lens
interface
For instruments with a deeply recessed lens interface (for example the Agilent 81633A and
81634A Power Sensors) do NOT follow this procedure. Alcohol and compressed air could
damage your lens even further.
Keep your dust and shutter caps on when your instrument is not in use. This should prevent
it from getting too dirty.
If you must clean such instruments, please refer the instrument to the skilled personnel of
Agilent’s service team.
Preferred Procedure Use the following procedure on most occasions.
1 Blow away any dust or dirt with compressed air.
If this is not sufficient, then
a Clean the interface by rubbing a new, dry cotton swab over the surface using a small
circular movement.
b Blow away any remaining lint with compressed air.
Procedure for Stubborn Dirt Use this procedure when there is greasy dirt on the interface, and using the preferred
procedure is not sufficient.
Using isopropyl alcohol should be your last choice for recessed lens interfaces because of
the difficulty of cleaning out any dirt that is washed to the edge of the interface.
1 Moisten a new cotton swab with isopropyl alcohol.
2 Clean the interface by rubbing the cotton swab over the surface using a small circular
movement.
3 Take a new, dry soft tissue and remove the alcohol, dissolved sediment and dust, by
rubbing gently over the surface using a small circular movement.
4 Blow away any remaining lint with compressed air.
How to clean optical devices which are sensitive to
mechanical stress and pressure
Some optical devices, such as the Agilent 81000BR Reference Reflector, which has a gold
plated surface, are very sensitive to mechanical stress or pressure. Do not use cotton
swabs, soft tissues or other mechanical cleaning tools, as these can scratch or destroy the
surface.
Preferred Procedure Use the following procedure on most occasions.
1 Blow away any dust or dirt with compressed air.
92 Agilent 81570A, 71A, 76A, 77A & 78A Variable Optical Attenuators, Eigth Edition

General Cleaning Procedure Cleaning Information
Procedure for Stubborn Dirt To clean devices that are extremely sensitive to mechanical stress or pressure you can also
use an optical clean polymer film. This procedure is time-consuming, but you avoid
scratching or destroying the surface.
1 Put the film on the surface and wait at least 30 minutes to make sure that the film has
had enough time to dry.
2 Remove the film and any dirt with special adhesive tapes.
Alternative Procedure For these types of optical devices you can often use an ultrasonic bath with isopropyl
alcohol. Only use the ultrasonic bath if you are sure that it won't cause any damage any part
of the device.
1 Put the device into the bath for at least three minutes.
2 Blow away any remaining liquid with compressed air.
If there are any streaks or drying stains on the surface, repeat the cleaning procedure.
How to clean metal filters or attenuator gratings
This kind of device is extremely fragile. A misalignment of the grating leads to inaccurate
measurements. Never touch the surface of the metal filter or attenuator grating.
Be very careful when using or cleaning these devices. Do not use cotton swabs or soft
tissues, as there is the danger that you cannot remove the lint and that the device will be
destroyed by becoming mechanically distorted.
Preferred Procedure Use the following procedure on most occasions.
1 Use compressed air at a distance and with low pressure to remove any dust or lint.
Procedure for Stubborn Dirt Do not use an ultrasonic bath as this can damage your device.
Use this procedure when there is greasy dirt on the device:
1 Put the optical device into a bath of isopropyl alcohol, and wait at least 10 minutes.
2 Remove the fluid using compressed air at some distance and with low pressure. If there
are any streaks or drying stains on the surface, repeat the whole cleaning procedure.
Agilent 81570A, 71A, 76A, 77A & 78A Variable Optical Attenuators, Eigth Edition 93

Cleaning Information Additional Cleaning Information
Additional Cleaning Information
The following cleaning procedures may be used with other optical equipment:
• How to clean bare fiber ends
• How to clean large area lenses and mirrors
How to clean bare fiber ends
Bare fiber ends are often used for splices or, together with other optical components, to
create a parallel beam.
The end of a fiber can often be scratched. You make a new cleave. To do this:
1 Strip off the cladding.
2 Take a new soft tissue and moisten it with isopropyl alcohol.
3 Carefully clean the bare fiber with this tissue.
4 Make your cleave and immediately insert the fiber into your bare fiber adapter in order
to protect the surface from dirt.
Preferred Procedure There is an easy method for removing dust from bare fiber ends.
1. Touch the bare fiber end with adhesive tape. Any dust will be removed.
How to clean large area lenses and mirrors
Some mirrors, as those from a monochromator, are very soft and sensitive. Therefore, never
touch them and do not use cleaning tools such as compressed air or polymer film.
Some lenses have special coatings that are sensitive to solvents, grease, liquid and
mechanical abrasion. Take extra care when cleaning lenses with these coatings.
Lens assemblies consisting of several lenses are not normally sealed. Therefore, use as little
liquid as possible, as it can get between the lenses and in doing so can change the
properties of projection.
Preferred Procedure Use the following procedure on most occasions.
1 Blow away any dust or dirt with compressed air.
Procedure for Stubborn Dirt Use this procedure when there is greasy dirt on the lens:
94 Agilent 81570A, 71A, 76A, 77A & 78A Variable Optical Attenuators, Eigth Edition

Additional Cleaning Information Cleaning Information
CAU T IO N Only use water if you are sure that there is no other way of cleaning your optical device
without causing corrosion or damage. Do not use hot water, as this may cause mechanical
stress, which can damage your optical device.
Ensure that your liquid soap has no abrasive properties or perfume in it. You should also
avoid normal washing up liquid, as it can cover your device in an iridescent film after it has
been air dried.
Some lenses and mirrors also have a special coating, which may be sensitive to mechanical
stress, or to fat and liquids. For this reason we recommend you do not touch them.
If you are not sure how sensitive your device is to cleaning, please contact the manufacturer
or your sales distributor.
1 Moisten the lens or the mirror with water.
2 Put a little liquid soap on the surface and gently spread the liquid over the whole area.
3 Wash off the emulsion with water, being careful to remove it all, as any remaining
streaks can impair measurement accuracy.
4 Take a new, dry soft tissue and remove the water, by rubbing gently over the surface
using a small circular movement.
5 Blow away remaining lint with compressed air.
Alternative Procedure A To clean lenses that are extremely sensitive to mechanical stress or pressure you can also
use an optical clean polymer film. This procedure is time-consuming, but you avoid
scratching or destroying the surface.
1 Put the film on the surface and wait at least 30 minutes to make sure that the film has
had enough time to dry.
2 Remove the film and any dirt with special adhesive tapes.
Alternative Procedure B If your lens is sensitive to water then:
1 Moisten the lens or the mirror with isopropyl alcohol.
2 Take a new, dry soft tissue and remove the alcohol, dissolved sediment and dust, by
rubbing gently over the surface using a small circular movement.
3 Blow away remaining lint with compressed air.
Agilent 81570A, 71A, 76A, 77A & 78A Variable Optical Attenuators, Eigth Edition 95

Cleaning Information Other Cleaning Hints
Other Cleaning Hints
Selecting the correct cleaning method is an important element in maintaining your
equipment and saving you time and money. This chapter highlights the main cleaning
methods, but cannot address every individual circumstance.
This section contain some additional hints which we hope will help you further. For further
information, please contact your local Agilent Technologies representative.
Making the connection Before you make any connection you must ensure that all lightwave cables and connectors
are clean. If not, then use the appropriate cleaning methods.
When you insert the ferrule of a patchcord into a connector or an adapter, ensure that the
fiber end does not touch the outside of the mating connector or adapter. Otherwise, the
fiber end will rub up against something which could scratch it and leave deposits.
Lens cleaning papers Some special lens cleaning papers are not suitable for cleaning optical devices like
connectors, interfaces, lenses, mirrors and so on. To be absolutely certain that a cleaning
paper is applicable, please ask the salesperson or the manufacturer.
Immersion oil and other index matching
compounds
Cleaning the housing and the mainframe When cleaning either the mainframe or the housing of your instrument, only use a dry and
Do not use immersion oil or other index matching compounds with optical sensors equipped
with recessed lenses. They are liable to dirty the detector and impair its performance. They
may also alter the property of depiction of your optical device, thus rendering your
measurements inaccurate.
very soft cotton tissue on the surfaces and the numeric pad.
Never open the instruments as they can be damaged. Opening the instruments puts you in
danger of receiving an electrical shock from your device, and renders your warranty void.
96 Agilent 81570A, 71A, 76A, 77A & 78A Variable Optical Attenuators, Eigth Edition

Index
A
Attenuator 7
C
Cleaning 63
Additional equipment 69
Connector Interfaces 74
General Procedure 72
High-power single mode connectors 72
How to clean connectors 72
Importance of 66
Materials required 66
Preserving Connectors 71
Safety Precautions 65
Connectors
How to clean 72
Preserving 71
Conventions 7
D
Index
Definition of Terms 23
Attenuation 24
Attenuation flatness 24
Attenuation range 25
Attenuation setting mode 25
Attenuation uncertainty 25
Constant operating conditions 25
Insertion Loss 26
Insertion loss flatness 26
Maximum Input Power 26
Operating temperature 27
Operation Temperature 27
Polarization Dependent Loss (PDL) 27
Polarization Extinction Ratio (PER) 27
Polwer setting mode 27
Power setting 27
Relative power meter uncertainty 27
Repeatability 28
Resolution 28
Return Loss 28
Settling Time 29
Shutter Isolation 29
Total Loss 30
Transition speed 30
Wavelength range 30
F
Firmware
Prerequisites 4
Revision Checking 6
Front Panel
Agilent 81570A 8
Agilent 81571A 8
Agilent 81576A 10
Agilent 81570A, 71A, 76A, 77A & 78A Variable Optical Attenuators, Eigth Edition 97

Index
Agilent 81577A 10
Agilent 81578A 9
Controls and Indicators 11
G
Getting Started 5
I
Inspection 3
L
Line Power 4
M
Mueller method 48
O
Optical Output 13
Angled & Straight Contact Connectors 13
Optional features 17
P
Performance Test
Procedure 38
Required Test Equipment 36
Performance Tests 35
S
Safety
Cleaning 65
Symbols 3
Warnings & Cautions 3, 4
Specifications 31
Variable optical attenuator modules for multimode applications 34
Variable optical attenuator modules for single mode applications 32
Variable optical attenuator modules with power control for single mode applications 33
Storage & Shipment 4
U
Use Models 11
User’s Guides 18
W
Wavelength flatness test 43
98 Agilent 81570A, 71A, 76A, 77A & 78A Variable Optical Attenuators, Eigth Edition


www.agilent.com
Agilent Technologies GmbH 2005
Printed in Germany September 2005
Eight edition, September 2005
81570-90A01
Agilent Technologies
 Loading...