

Page 1

Agilent 81133A/81134A Pulse Generator
User Guide
S1
Page 2

Important Notice
© Agilent Technologies, Inc. 2002
Manual Part Number
5988-7401EN
Revision
August 2002
Printed in Germany
Agilent Technologies
Herrenberger Straße 130
D-71034 Böblingen
Germany
Authors: t3 medien GmbH
Warranty
The material contained in this document is
provided "as is," and is subject to being changed,
without notice, in future editions. Further, to the
maximum extent permitted by applicable law,
Agilent disclaims all warranties, either express or
implied, with regard to this manual and any
information contained herein, including but not
limited to the implied warranties of
merchantability and fitness for a particular
purpose. Agilent shall not be liable for errors or
for incidental or consequential damages in
connection with the furnishing, use, or
performance of this document or of any
information contained herein. Should Agilent and
the user have a separate written agreement with
warranty terms covering the material in this
document that conflict with these terms, the
warranty terms in the separate agreement shall
control.
Technology Licenses
The hardware and/or software described in this
document are furnished under a license and may
be used or copied only in accordance with the
terms of such license.
Restricted Rights Legend
If software is for use in the performance of a U.S.
Government prime contract or subcontract,
Software is delivered and licensed as
"Commercial computer software" as defined in
DFAR 252.227-7014 (June 1995), or as a
"commercial item" as defined in FAR 2.101(a) or
as "Restricted computer software" as defined in
FAR 52.227-19 (June 1987) or any equivalent
agency regulation or contract clause. Use,
duplication or disclosure of Software is subject to
Agilent Technologies' standard commercial
license terms, and non-DOD Departments and
Agencies of the U.S. Government will receive no
greater than Restricted Rights as defined in FAR
52.227-19(c)(1-2) (June 1987). U.S. Government
users will receive no greater than Limited Rights
as defined in FAR 52.227-14 (June 1987) or DFAR
252.227-7015 (b)(2) (November 1995), as
applicable in any technical data.
Safety Notices
CAUTION
A CAUTION notice denotes a hazard. It calls
attention to an operating procedure, practice, or
the like that, if not correctly performed or adhered
to, could result in damage to the product or loss
of important data. Do not proceed beyond a
CAUTION notice until the indicated conditions
are fully understood and met.
WARNING
A WARNING notice denotes a hazard. It calls
attention to an operating procedure, practice, or
the like that, if not correctly performed or adhered
to, could result in personal injury or death. Do not
proceed beyond a WARNING notice until the
indicated conditions are fully understood and
met.
2 Agilent 81133A/81134A Pulse Generator User’s Guide, August 2002
Page 3

Contents
Safety Requirements 7
Contents
Safety Summary 7
Environmental Conditions 7
Before Applying Power 8
Ground the Instrument 8
Do not Operate in an Explosive Atmosphere 8
Do not Remove the Instrument Cover 8
Initial Inspection 9
Power Requirements 10
Performance Requirements 10
Ventilation Requirements 10
Cleaning Recommendation 11
Declaration of Conformity 12
Introduction to the Agilent 81133A/81134A Pulse Generator 13
Benefits and Key Features 14
Front Panel Overview 15
Input and Outputs 16
Rear Panel Overview 18
Operating the Agilent 81133A/81134A Pulse Generator 19
Navigation through the Pages 20
How to Navigate through the Parameters at one Page 21
How to Select a Parameter from a Selection List 21
How to Change a Number Field 23
Agilent 81133A/81134A Pulse Generator User’s Guide, August 2002 3
Page 4

Contents
Setting Up Generic and Advanced Signals 27
Setting Up a Clock Signal 28
Using the Graphical User Interface 29
Using the Remote Programming Interfaces 35
Setting Up a Pulse Signal 36
Using the Graphical User Interface 36
Using the Remote Programming Interfaces 39
Setting Up a Data Pattern 40
Using the Graphical User Interface 40
Using the Remote Programming Interfaces 45
Setting Up a Burst Signal 46
Using the Graphical User Interface 46
Using the Remote Programming Interfaces 51
Setting Up a Repetitive Burst Signal 52
Using the Graphical User Interface 52
Using the Remote Programming Interfaces 57
Setting Up Signals for a Stressed Eye Diagram
Measurement
Connecting the Instruments 59
Setting Up the 81134A by Using the Graphical User Interface 60
Setting Up the 33250A Waveform Generator 63
Viewing the Eye Diagram on the 86100 DCA 63
Play with the Settings 64
58
Using the Agilent 81133A/81134A Pulse Generator 65
Pages of the User Interface 66
Combining Parameters for Signal Generation 68
Instrument Modes 68
Pattern Modes 70
Signal Modes 71
Variable Crossover 72
Clock Sources 73
Start Mode 75
Trigger Out 75
4 Agilent 81133A/81134A Pulse Generator User’s Guide, August 2002
Page 5

Contents
Timing of Generated Signals
Clock 77
Pulses 78
Data Pattern 79
PRBS 80
Started Burst 81
Repetitive Burst 82
76
Jitter Modulation 83
Saving and Recalling Settings 83
Updating the Firmware 85
Troubleshooting 87
Agilent 81133A/81134A Pulse Generator User’s Guide, August 2002 5
Page 6

Contents
6 Agilent 81133A/81134A Pulse Generator User’s Guide, August 2002
Page 7

Safety Requirements
The following general safety precautions must be observed during all
phases of operation of this instrument. Failure to comply with these
precautions or with specific warnings elsewhere in this manual
violates safety standards of design, manufacture, and intended use of
the instrument.
Agilent Technologies Inc. assumes no liability for the customer's
failure to comply with these requirements.
Before operation, review the instrument and manual for safety
markings and instructions. You must follow these to ensure safe
operation and to maintain the instrument in safe condition.
Safety Summary
This product is a Safety Class 1 instrument (provided with a protective
earth terminal). The protective features of this product may be
impaired if it is used in a manner not specified in the operation
instructions.
All Light Emitting Diodes (LEDs) used in this product are Class 1
LEDs as per IEC 60825-1.
Environmental Conditions
This instrument is intended for indoor use in an installation category
II, pollution degree 2 environment. It is designed to operate within an
operating temperature range of 0 – 55 °C (32 – 130 °F) at a maximum
relative humidity of 95% and at altitudes of up to 2000 meters.
Refer to the specifications tables for the ac mains voltage
requirements and ambient operating temperature range.
Agilent 81133A/81134A Pulse Generator User’s Guide, August 2002 7
Page 8

Safety Requirements Safety Summary
Before Applying Power
Verify that all safety precautions are taken.
The power cable inlet of the instrument is used to disconnect the
instrument from the mains in case of hazard. The instrument must be
positioned so that the operator can easily access the power cable inlet.
When the instrument is mounted in a rack, the rack must be provided
with an easily accessible mains switch.
Ground the Instrument
To minimize shock hazard, the instrument chassis and cover must be
connected to an electrical protective earth ground. The instrument
must be connected to the ac power mains through a grounded power
cable, with the ground wire firmly connected to an electrical ground
(safety ground) at the power outlet. Any interruption of the protective
(grounding) conductor or disconnection of the protective earth
terminal will cause a potential shock hazard that could result in
personal injury.
Do not Operate in an Explosive Atmosphere
Do not operate the instrument in the presence of flammable gases or
fumes.
Do not Remove the Instrument Cover
Operating personnel must not remove instrument covers. Component
replacement and internal adjustments must be made only by qualified
personnel.
Instruments that appear damaged or defective should be made
inoperative and secured against unintended operation until they can
be repaired by qualified service personnel.
8 Agilent 81133A/81134A Pulse Generator User’s Guide, August 2002
Page 9

Initial Inspection Safety Requirements
Initial Inspection
Inspect the shipping container for damage. If the container or
cushioning material is damaged, keep it until the contents of the
shipment have been checked for completeness and the instrument has
been verified both mechanically and electrically.
WARNING To avoid hazardous electric shock, do not perform electrical tests
when there are signs of shipping damage to any part of the
instrument's outer covers or panels.
Check if the Agilent 81133A or 81134A shipping container contains
the following standard deliverables:
• The Agilent 81133A or 81134A Pulse Generator
• The Getting Started Brochure and the Product CD
•A power cable
•A USB cable
If the contents are incomplete, if there is mechanical damage, or if the
instrument does not work within its specifications, notify the nearest
Agilent office. The Agilent office will arrange for repair or replacement
without awaiting settlement.
Agilent 81133A/81134A Pulse Generator User’s Guide, August 2002 9
Page 10

Safety Requirements Power Requirements
Power Requirements
NOTE When the front panel switch is off, the instrument is in “standby”
mode. The instrument is disconnected from the AC line power only by
disconnecting the power cord.
The instrument can operate from any single-phase AC power source
supplying 100 – 240 V in the frequency range from 47 – 63 Hz. The
maximum power consumption is 200 VA with all options installed.
When the instrument is switched on the power supply adapts
automatically to the applied AC power (Auto Selection) and monitors
the AC power range during operation.
Performance Requirements
For best performance of data transfer and for EMC compliance use an
Agilent 82357-61601 Mini-USB cable only.
Ventilation Requirements
Make sure that there is adequate clearance of 50 mm (2 in) at the top
and right side to ensure adequate air flow. If the air flow is restricted,
the internal operating temperature will be higher, reducing the
instrument's reliability.
NOTE Do not cover the ventilation holes.
10 Agilent 81133A/81134A Pulse Generator User’s Guide, August 2002
Page 11

Cleaning Recommendation Safety Requirements
Cleaning Recommendation
Use a dry cloth or one slightly dampened with water to clean external
case parts. Do not attempt to clean internally.
WARNING To prevent electrical shock, disconnect the instrument from mains
before cleaning.
Agilent 81133A/81134A Pulse Generator User’s Guide, August 2002 11
Page 12

Safety Requirements Declaration of Conformity
Declaration of Conformity
DECLARATION OF CONFORMITY
According to ISO/IEC Guide 22 and CEN/CENELEC EN 45014
Manufacturer s Name:
Manufacturer s Address:
Agilent Technologies Deutschland GmbH
Boeblingen Verifications Solutions (BVS)
Herrenberger Str. 130
D-71034 Boeblingen
Declares, that the product
Product Name: 3.35 GHz Pulse Generator
Model Numbers: 81133A
81134A
Single Channel Pulse Generator
Dual Channel Pulse Generator
Product Options: This declaration covers all options of the above products.
Conforms with the following European Directives:
The product herewith complies with the requirements of the Low Voltage Directive 73/23/EEC and the EMC Directive 89/336/EEC
(including 93/68/EEC) and carries the CE Marking accordingly.
Conforms with the following product standards:
EMC
Safety
Standard
IEC 61326-1:1997+A1:1998 / EN 61326-1:1997+A1:1998
CISPR 11:1997 / EN 55011:1998 Group 1 Class A
IEC 61000-4-2:1995 / EN 61000-4-2:1995 4 kV CD, 8 kV AD
IEC 61000-4-3:1995 / EN 61000-4-3:1995+A1:1998 3 V/m, 80-1000 MHz
IEC 61000-4-4:1995 / EN 61000-4-4:1995 0.5 kV signal lines, 1 kV power lines
IEC 61000-4-5:1995 / EN 61000-4-5:1995 0.5 kV line-line, 1 kV line-ground
IEC 61000-4-6:1996 / EN 61000-4-6:1996 3 V, 0.15-80 MHz
IEC 61000-4-8:1993 / EN 61000-4-8:1993 30 A/m
IEC 61000-4-11:1994 / EN 61000-4-11:1994 1 cycle/100%
Canada: ICES-001:1998
Australia/New Zealand: AS/NZS 2064.1
IEC 61010-1:2001 /EN 61010-1:2001
Canada: CSA C22.2 No. 1010.1:1992
USA: UL 3111-1:1994
Limit
Supplemental Information:
The products were tested in a typical configuration with Agilent Technologies test systems.
2002-August-01
Date
Authorized EU-representative: Agilent Technologies Deutschland GmbH, Herrenberger Strasse 130, D-71034 Boeblingen, Germany
Revision: A Issue Date: 2002-August-01
For further information, please contact your local Agilent Technologies sales office, agent or distributor.
Hans-Martin Fischer
Name
Product Regulations Engineer
Title
12 Agilent 81133A/81134A Pulse Generator User’s Guide, August 2002
Page 13

Introduction to the Agilent 81133A/81134A Pulse Generator
The Agilent 81133A and 81134A Pulse/Pattern Generators are highend, easy-to-use tools for generating pulses, patterns and data at
speeds up to 3.35 GHz. They are ideal instruments for testing logic
devices (for example, ECL, LVDS, LVPECL) and other digital devices
with clock rates from 15 MHz to 3.35 GHz.
You can use the Pulse Generators for applications where timing and
performance are critical and full control over signal jitter is required.
The instruments are ideal data and pattern sources for eye diagram
measurements.
Agilent 81133A/81134A Pulse Generator User’s Guide, August 2002 13
Page 14

Introduction to the Agilent 81133A/81134A Pulse Generator Benefits and Key Features
Benefits and Key Features
Your ad vant ages a re:
• Fast rise times, low jitter and full parameter flexibility
When timing is critical, the 81133A/81134A’s fast rise times, the low
jitter and full parameter flexibility make it an ideal pulse, clock and
data source.
•PRBS from 2
You can evaluate the performance of a device in eye diagram
measurements with PRBS from 2
• Full signal manipulation
You can add jitter to clock or data signals with the Delay Control
Input and deform the eye with the Variable Crossover feature.
5
-1 … 231-1
5
-1 … 231-1.
• Predefined levels
You can use the predefined levels to easily set up channels for
commonly used logic families. These are: ECL, LVPECL, LVDS.
• Data can be 8 kB of pattern memory
You can create large data patterns with 8 kB of pattern memory.
Key Features Overview
The key features are:
Frequency Range 15 MHz – 3.35 GHz
Clock Jitter 1.5 ps RMS typ.
Voltage Amplitude 50 mV … 2.00 V
PRBS 2
Transition Times 20% - 80%
(10% - 90%)
Delay Modulation Range (Jitter) ± 250 ps, ± 25 ps selectable
Data 8 kBit memory, RZ, NRZ,
Delay Range -5 ns … 230 ns
Frequency Divider 1, 2, 4, ... 128
5
-1 … 231-1
< 60 ps (< 90 ps)
Burst Capability
Frequency Divider The freqency of the output signals must always be > 15 MHz. This
limits the available range for the frequency divider (for example, for a
32 MHz signal, for the frequency divider, 2 (= 16 MHz) is available, but
not 4 (= 8 MHz)).
14 Agilent 81133A/81134A Pulse Generator User’s Guide, August 2002
Page 15
Front Panel Overview Introduction to the Agilent 81133A/81134A Pulse Generator
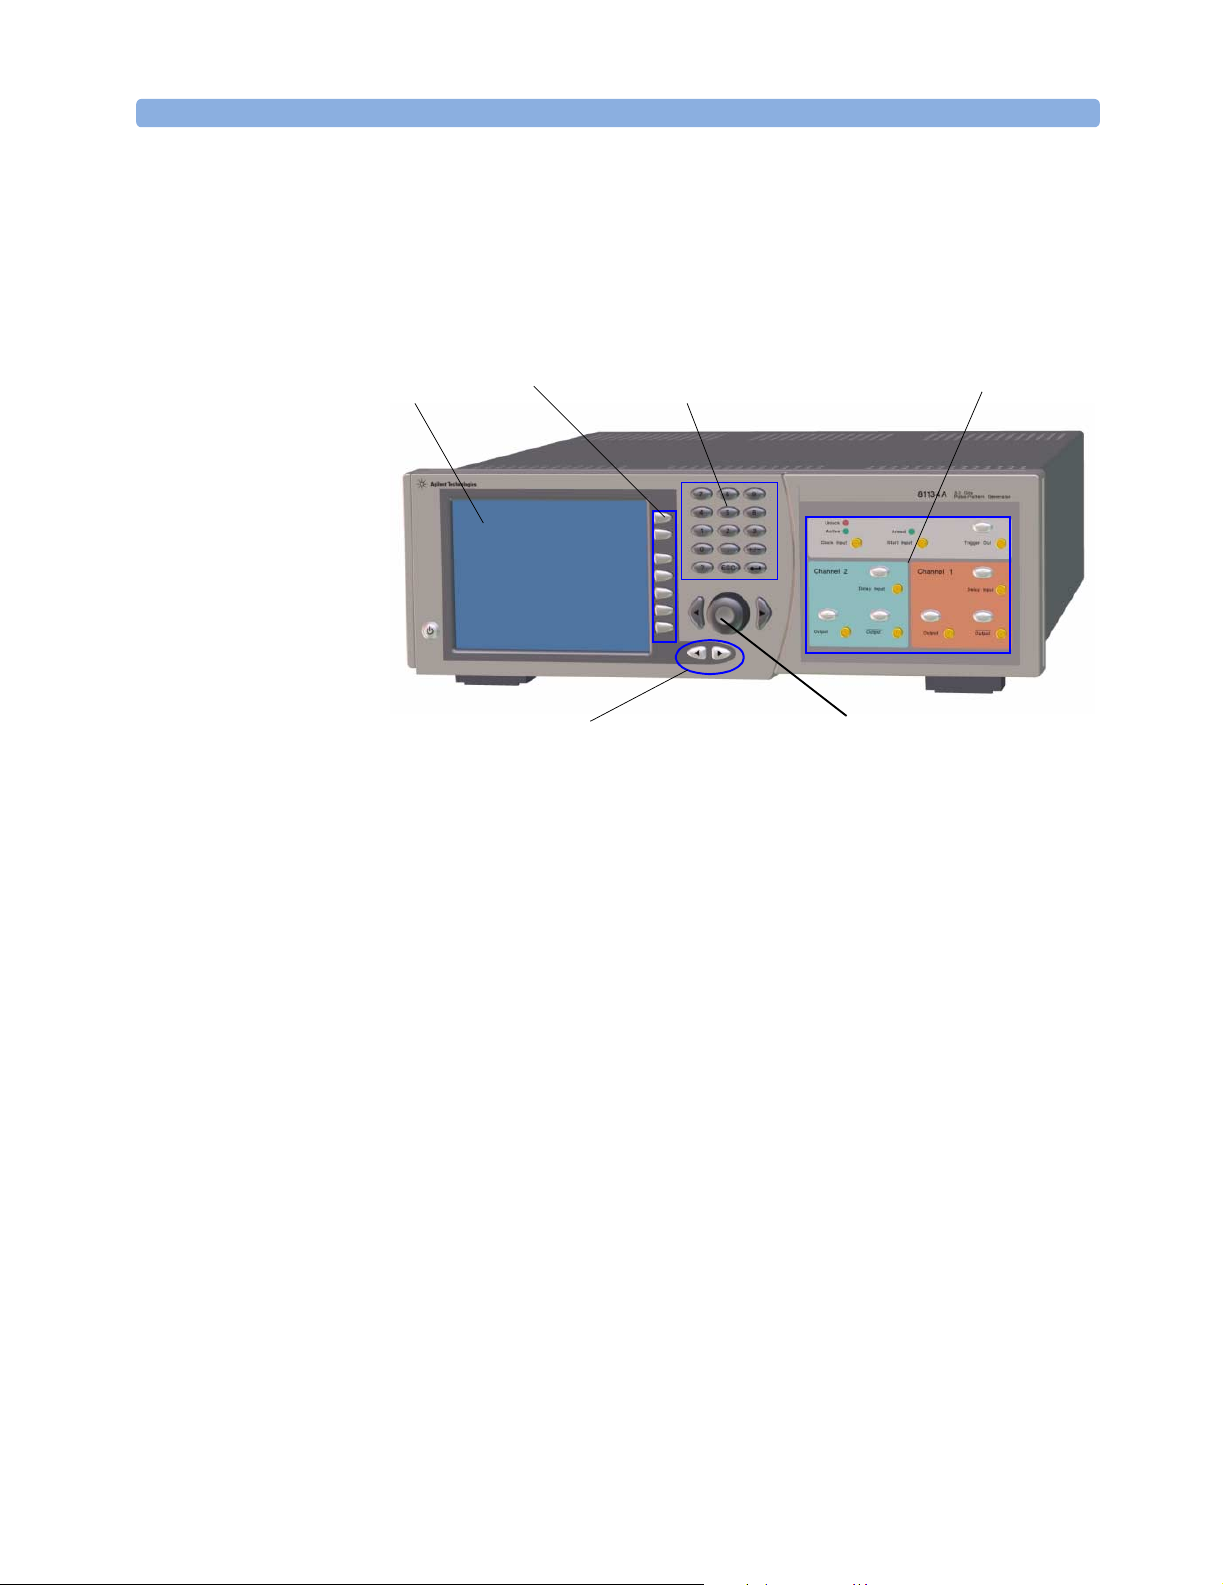
Front Panel Overview
The following figure shows the main elements of the front panel.
Interface
Softkeys Inputs and outputsGraphical User
Tab Keys to navigate
between the pages
The front panel has the following elements:
• Graphical User Interface
The graphical user interface is used for monitoring (and changing)
the instrument’s settings
Numeric
Keys
Navigation knob
•Softkeys
The softkeys provide context-sensitive functions (functionality
changes according to requirements)
•Numeric keys
Used to set parameter values.
•Tab keys
Used to scroll through the pages of the graphical user interface.
• Navigation knob
Used to navigate through and to change parameter values in an easy
way, and also for navigating through the online help.
For more information, see “Operating the Agilent 81133A/81134A
Pulse Generator” on page 19.
•Inputs and Outputs
The instrument provides global and channel-specific inputs and
outputs as described in the following section.
Agilent 81133A/81134A Pulse Generator User’s Guide, August 2002 15
Page 16
Introduction to the Agilent 81133A/81134A Pulse Generator Front Panel Overview
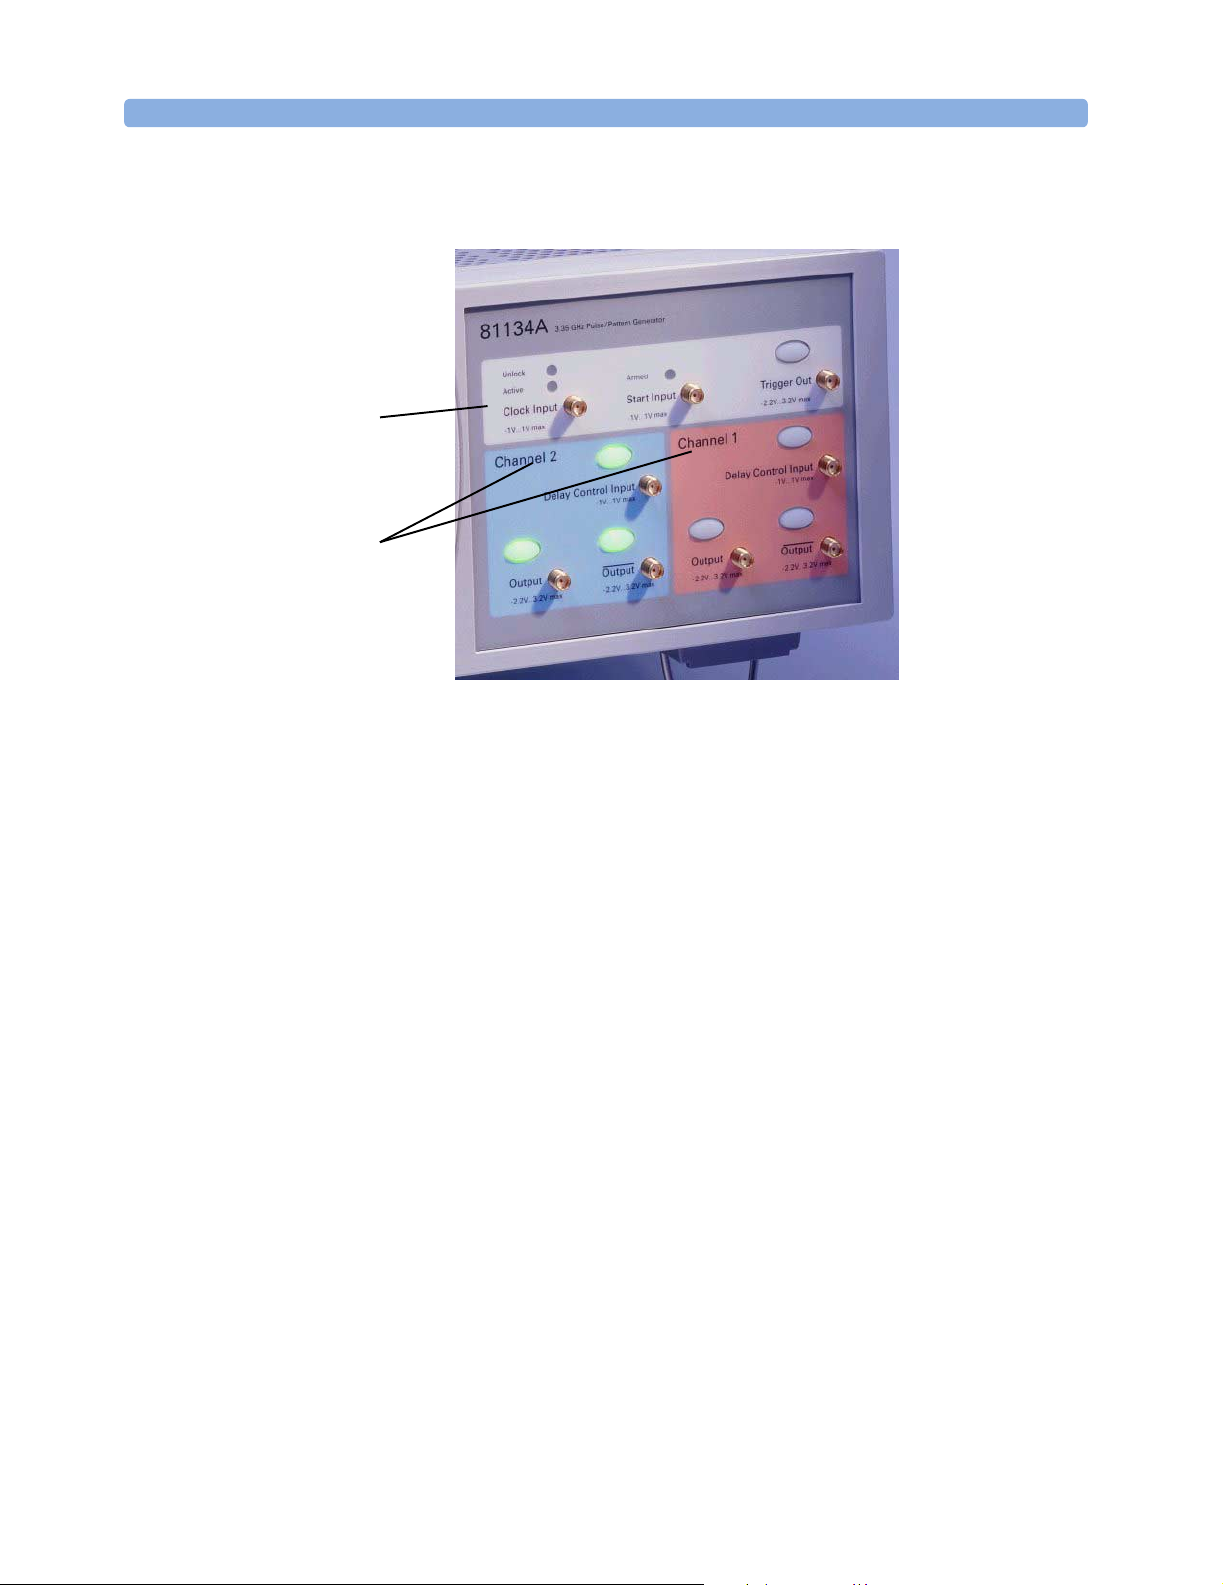
Input and Outputs
Global Inputs
and Outputs
Channel Inputs
and Outputs
The Agilent 81133A/81134A pulse generator provides the following
inputs and outputs:
Channel Specific Inputs and Outputs For each channel:
•One Delay Control Input to apply an external signal for jitter
modulation.
For more information, see “Jitter Modulation” on page 83.
• One normal and one inverted Output for the generated signal
Global Inputs and Outputs For the instrument:
•Clock Input
The clock input is used to apply an external clock signal or a
reference signal for the internal PLL if a higher frequency accuracy
than 50ppm is required.
This input can be AC or DC terminated. If it is DC is terminated, the
termination voltage can be set.
For more information, see “Clock Sources” on page 73.
•Start Input
The start input is used to start the instrument on an external signal.
For more information, see “Start Mode” on page 75.
• Trigger Output
The trigger output can be used to trigger another instrument.
For more information, see “Trigger Out” on page 75.
16 Agilent 81133A/81134A Pulse Generator User’s Guide, August 2002
Page 17

Front Panel Overview Introduction to the Agilent 81133A/81134A Pulse Generator
LEDs The front panel of the 81133A/81134A pulse generator contains the
following LEDs:
LED Description
Unlock When this LED is lit, the frequency entered for the external clock
does not match the actual input from the external clock. In this
state, the internal PLL is not locked and the instrument's outputs
may not be within specification.
You have to either reenter the frequency of the external clock, or execute the Measure function. See “Clock Sources” on page 73 for
details.
Active When lit, indicates that the instrument is either in external or direct
external clock mode. A valid external clock signal has to be applied
to the clock input.
If not lit, the internal clock source is used.
Armed Indicates that the instrument is waiting for a signal at the Start In-
put.
When the specified signal arrives, the instrument starts generating
signals.
Port LEDs Indicate the status of the port. When the LED is lit, the port is
active.
Agilent 81133A/81134A Pulse Generator User’s Guide, August 2002 17
Page 18
Introduction to the Agilent 81133A/81134A Pulse Generator Rear Panel Overview
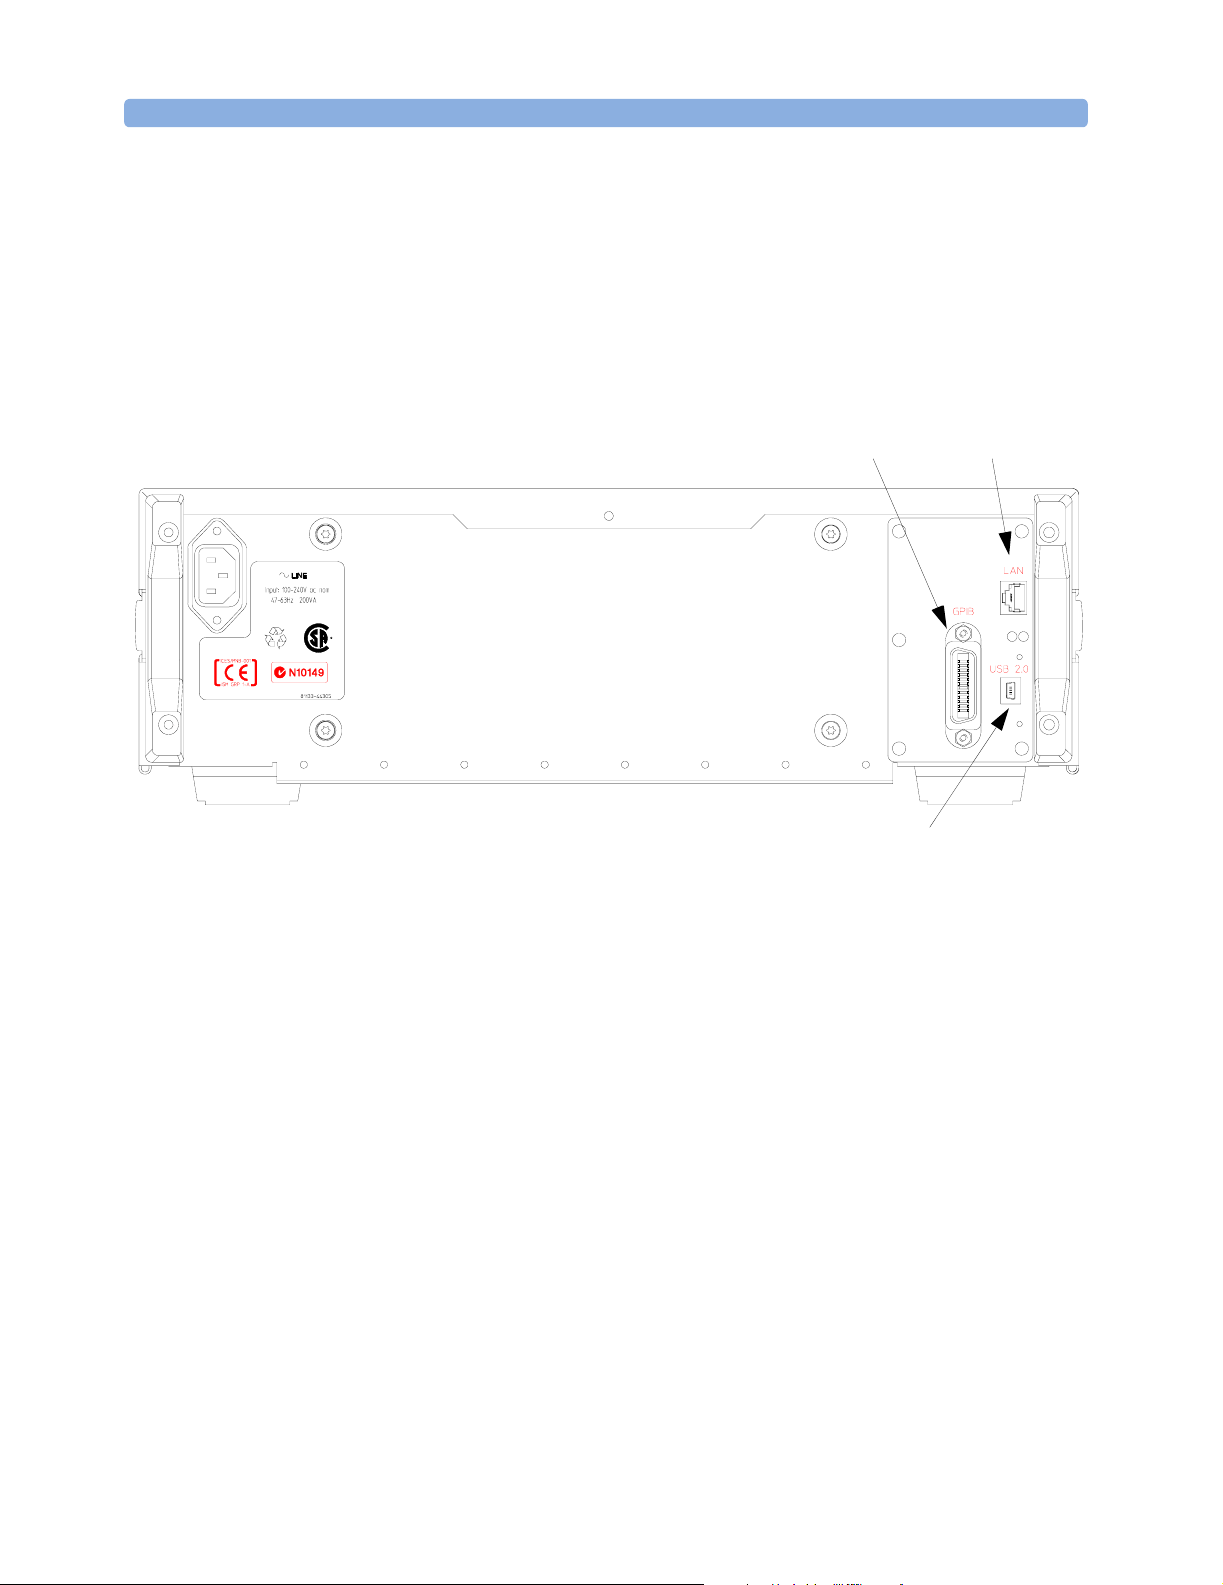
Rear Panel Overview
At the rear panel, you can find the connectors for the remote
programming interfaces GPIB, USB and LAN, and the power
connector.
GPIB LAN
USB
18 Agilent 81133A/81134A Pulse Generator User’s Guide, August 2002
Page 19

Operating the Agilent 81133A/81134A Pulse Generator
The instrument provides several navigation buttons that make it easy
to scroll through the different pages of the graphical user interface
and to change parameter values.
Scrolling through the Pages
To scroll through the different pages, use the instrument's tab keys
(located below the navigation knob).
See “Navigation through the Pages” on page 20.
Changing Parameter Values
To change parameter values, use the navigation knob.
The following sections shows:
• “How to Navigate through the Parameters at one Page” on page 21
• “How to Select a Parameter from a Selection List” on page 21
• “How to Change a Number Field” on page 23
Agilent 81133A/81134A Pulse Generator User’s Guide, August 2002 19
Page 20
Operating the Agilent 81133A/81134A Pulse Generator Navigation through the Pages
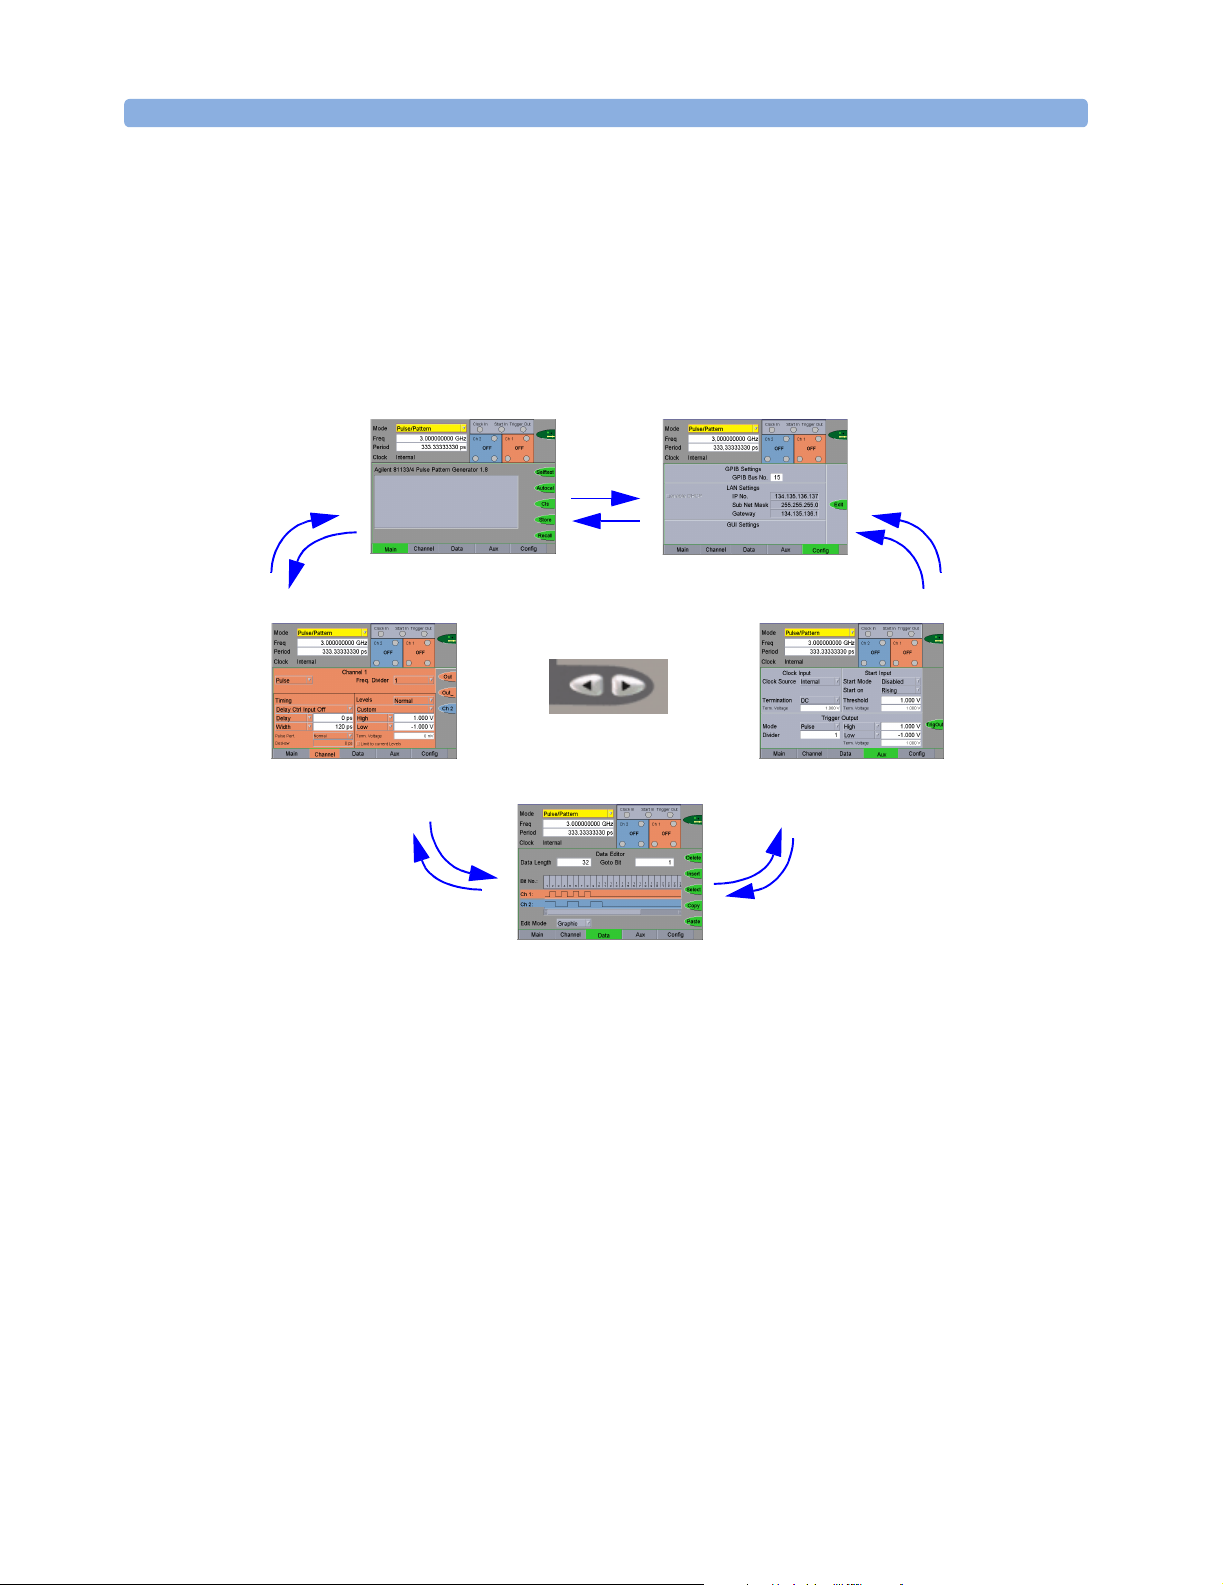
Navigation through the Pages
The key tabs at the lower left corner of the display allows you to scroll
through the different pages (Main, Channel, Data, Aux, and Config) of
the graphical user interface.
Channel Page
Main Page
Config Page
Aux Page
Data Page
20 Agilent 81133A/81134A Pulse Generator User’s Guide, August 2002
Page 21
How to Navigate through the Parameters at one Page Operating the Agilent 81133A/81134A Pulse Generator
How to Navigate through the Parameters at one Page
The navigation knob makes it easy to move through and set the
parameters:
♦ Rotate the navigation knob to move from one parameter to the next.
How to Select a Parameter from a Selection List
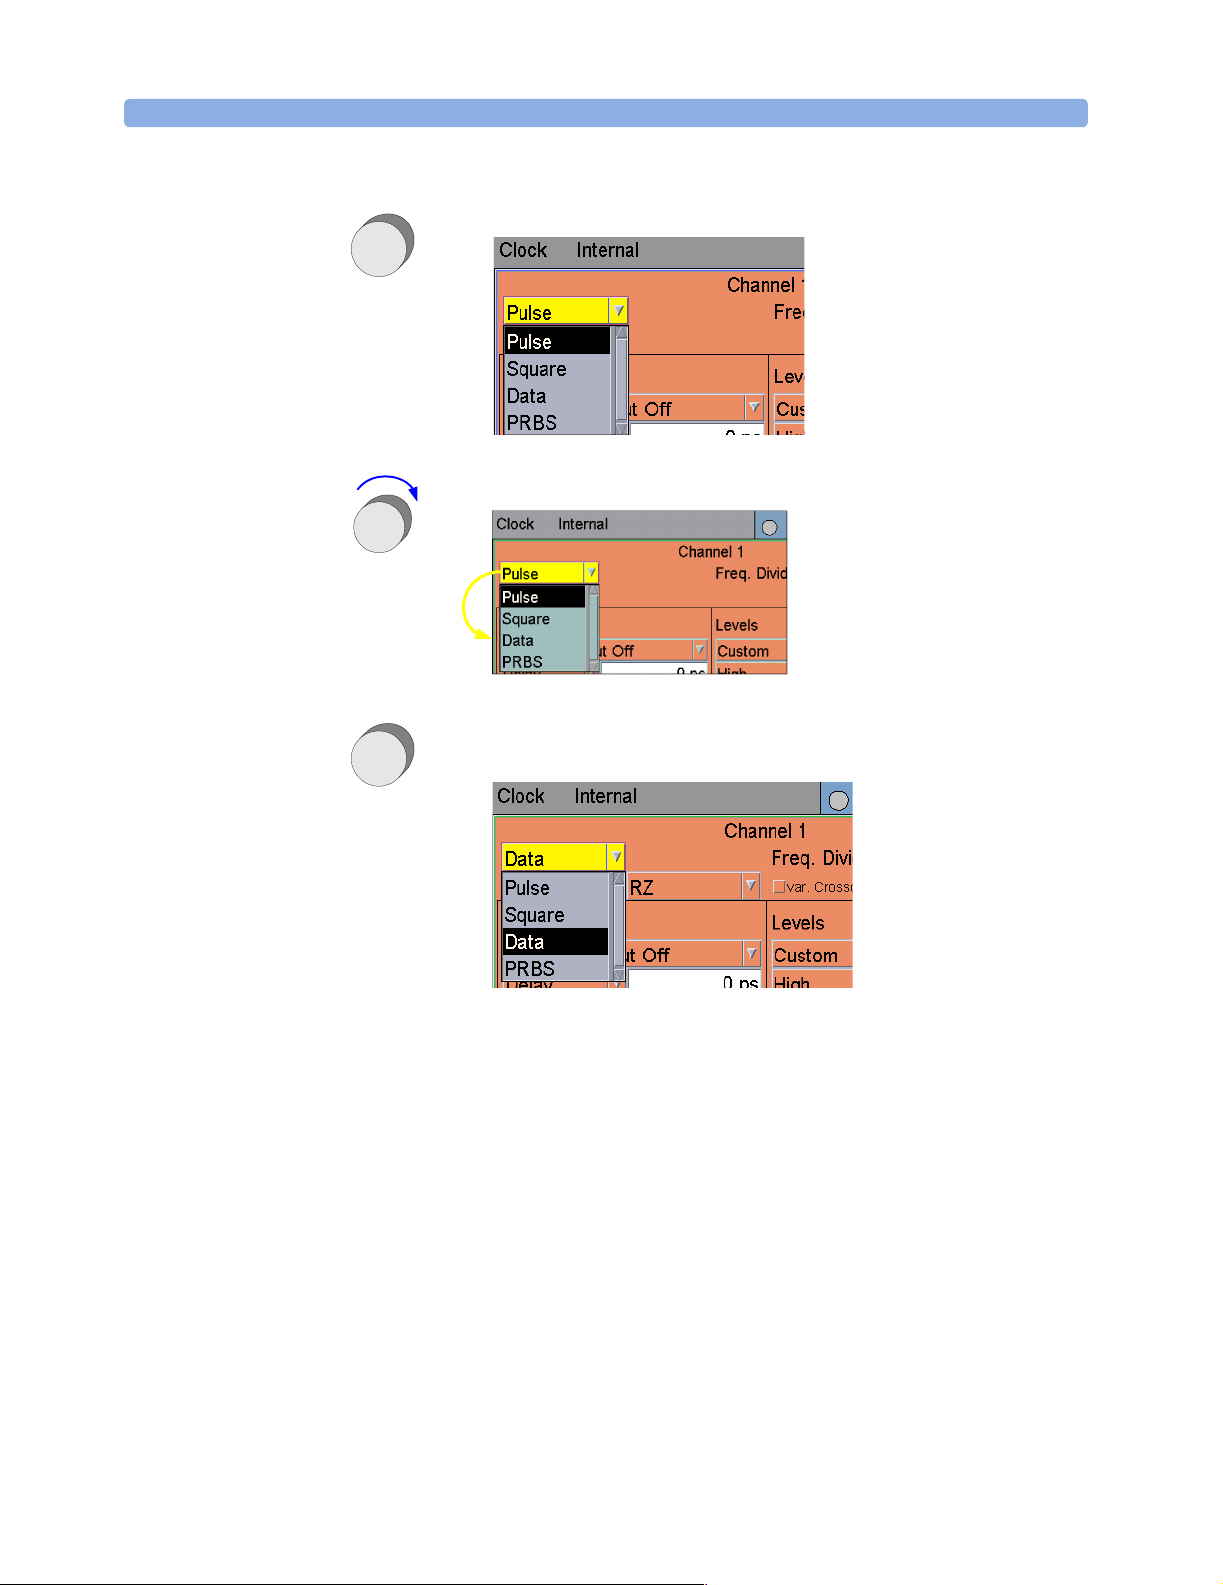
To select a parameter from a selection list:
1 Move the selection to the corresponding list by rotating the
navigation knob.
Agilent 81133A/81134A Pulse Generator User’s Guide, August 2002 21
Page 22
Operating the Agilent 81133A/81134A Pulse Generator How to Select a Parameter from a Selection List
2 Press the navigation knob to open the selection list.
Press
Press
PressPress
3 Rotate the navigation knob to scroll through the list.
Press
Press
PressPress
4 Select an item by pressing the navigation knob (like clicking with
the mouse).
22 Agilent 81133A/81134A Pulse Generator User’s Guide, August 2002
Page 23

How to Change a Number Field Operating the Agilent 81133A/81134A Pulse Generator
How to Change a Number Field
You have three possibilities for changing a number field:
• By entering new values with the keypad
• By using the navigation knob to modify the values for fine-tuning
• By changing single digits
Entering New Values
To enter a new value:
1 Focus at the number field by rotating the navigation knob to the
desired position.
2 Enter the value using the keypad.
You can tell if the value in a field is active by the color of the field:
– Yellow: Value is active (affects output).
– Orange: Value is inactive.
Agilent 81133A/81134A Pulse Generator User’s Guide, August 2002 23
Page 24
Operating the Agilent 81133A/81134A Pulse Generator How to Change a Number Field
3 Modify the unit:
– By pressing the respective softkey function (in this case, you can
immediately see the changes at the output).
Softkey functions
to select the unit
Press
Press
PressPress
Press
Press
PressPress
– OR –
By rotating the navigation knob.
In this case, you have to press Enter or the navigation knob to see
the changes at the output.
Modify Values (Fine-Tuning)
To modify the value by using the navigation knob:
1 Focus at the number field by rotating the navigation knob to the
desired position.
2 Press Enter or the navigation knob once to set the focus.
24 Agilent 81133A/81134A Pulse Generator User’s Guide, August 2002
Page 25

How to Change a Number Field Operating the Agilent 81133A/81134A Pulse Generator
3 Press and rotate the navigation knob to set the least significant digit
to change.
Press
Press
PressPress
NOTE This method is useful for fine-tuning. It also changes the values in real-
time, so that you can immediately see the changes at the output.
4 Rotate the navigation knob to change the value.
5 Press the navigation knob once when you are done.
Changing Single Digits
NOTE This procedure can also be used to change the unit of the parameter.
1 Focus at the number field by rotating the navigation knob to the
desired position.
2 Press and rotate the navigation knob to select the digit (number or
unit).
Press
Press
PressPress
NOTE You can also press the arrows next to navigation knob.
3 Release the navigation knob.
Now when you rotate it, the number (or the unit) changes.
4 Press the navigation knob to set the number (or the unit).
Press
Press
PressPress
You can now see the changes at the output.
Agilent 81133A/81134A Pulse Generator User’s Guide, August 2002 25
Page 26

Operating the Agilent 81133A/81134A Pulse Generator How to Change a Number Field
26 Agilent 81133A/81134A Pulse Generator User’s Guide, August 2002
Page 27

Setting Up Generic and Advanced Signals
The intention of this chapter is to give the necessary steps to set up
generic and advanced signals for first-time users of the Agilent
81133A/81134A Pulse Generator.
Examples are given for the following types of signals:
• “Setting Up a Clock Signal” on page 28
• “Setting Up a Pulse Signal” on page 36
• “Setting Up a Data Pattern” on page 40
• “Setting Up a Burst Signal” on page 46
• “Setting Up a Repetitive Burst Signal” on page 52
• “Setting Up Signals for a Stressed Eye Diagram Measurement” on
page 58
All these signals can be set up either by using the user interface, or by
sending SCPI commands. In the following examples, both are
described.
It is intended that you work through the example in the order in which
they appear. The first example therefore provides the most detailed
instructions, while the other examples are described in less detail.
NOTE For all examples, the Agilent 81134A Pulse Generator (with two
channels) is used.
Agilent 81133A/81134A Pulse Generator User’s Guide, August 2002 27
Page 28

Setting Up Generic and Advanced Signals Setting Up a Clock Signal
Setting Up a Clock Signal
Ta s k Set up two clock signals with 100 MHz and 200 MHz frequencies, a
duty cycle of 50%, a high level of 1.0 V and a low level of 0 V.
Duty Cycle = 50%
1.0 V
0.0 V
f = 200 MHz
1.0 V
0.0 V
f = 100 MHz
Use Cases Generating clock signals can be used for:
•Boards evaluation
•Microprocessors
•A/D Converters
• PCI/PCI-X validation
• Digital ASIC design for high-speed HDD
Duty Cycle = 50%
28 Agilent 81133A/81134A Pulse Generator User’s Guide, August 2002
Page 29

Setting Up a Clock Signal Setting Up Generic and Advanced Signals
Using the Graphical User Interface
First Steps Before you start:
1 Put the instrument into operation.
2 Protect the DUT by disconnecting the channel outputs first.
Do this by pressing the softkey next to the following function:
The open contactor shows you that your DUT is now disconnected.
Instrument Settings To set the instrument parameters:
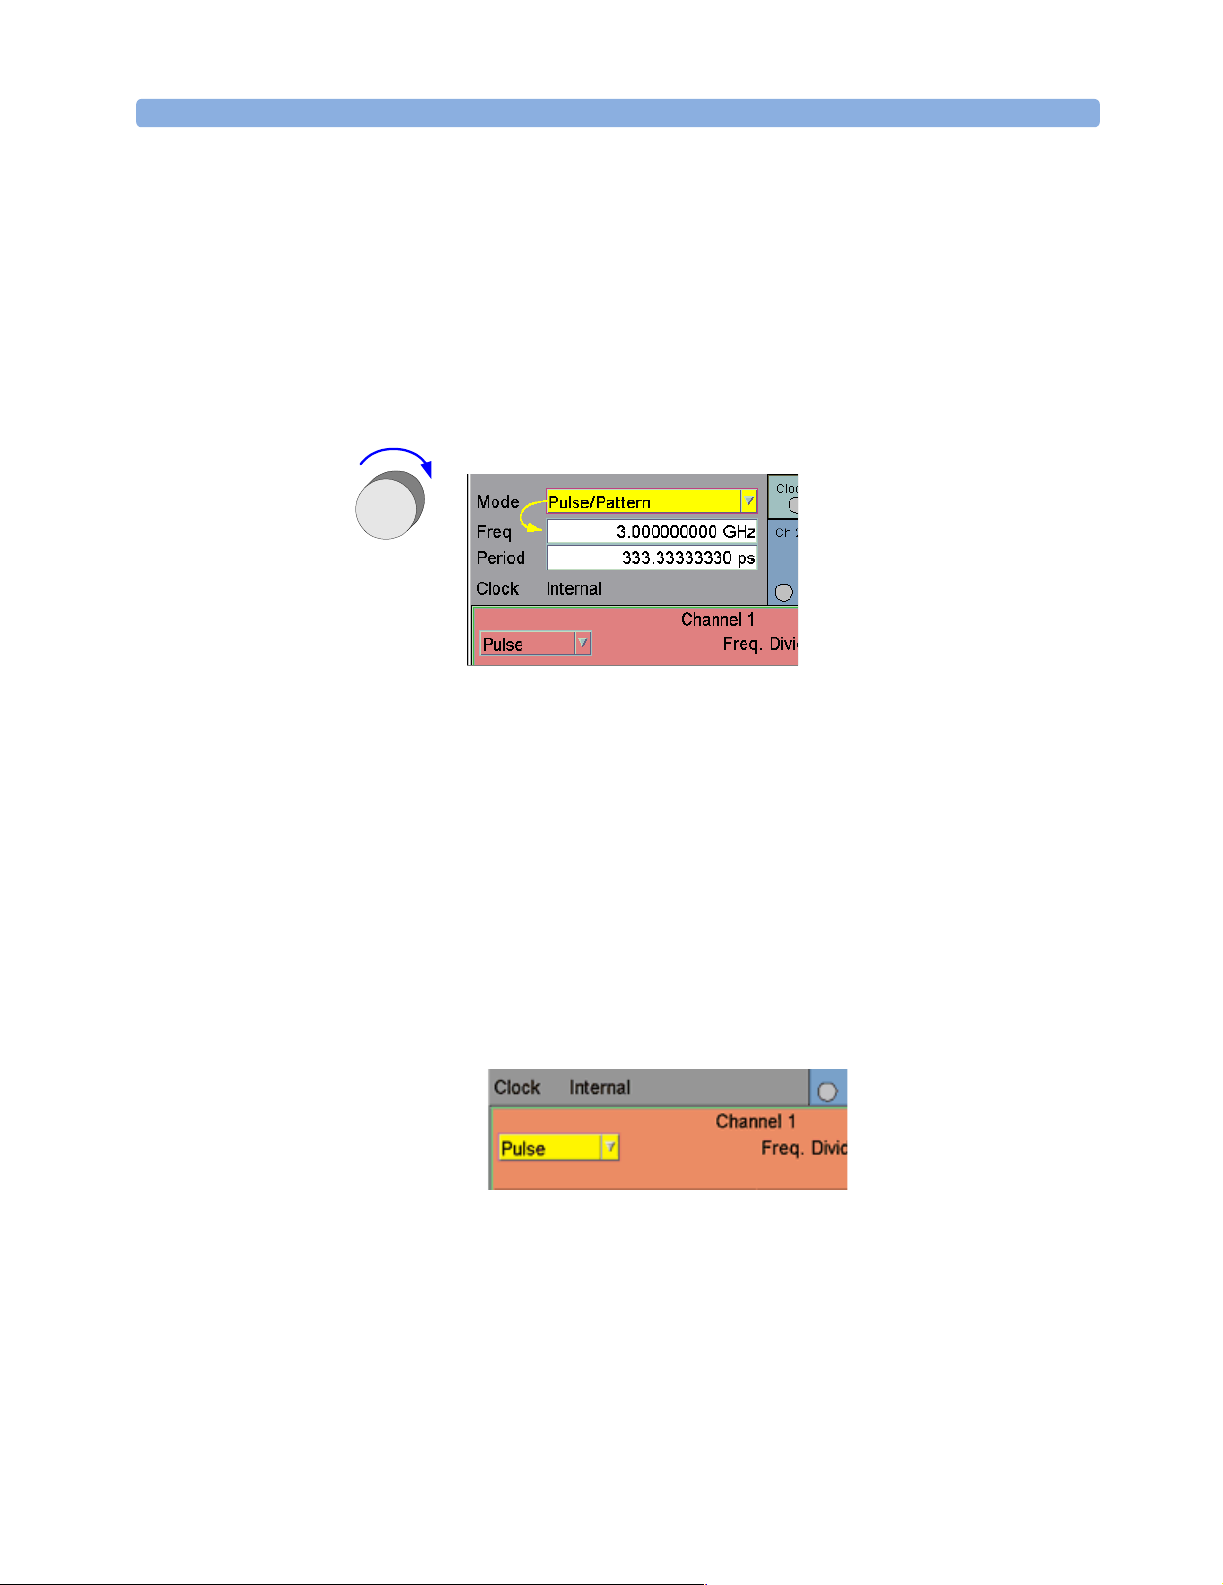
1 In the instrument panel, choose the Pulse/Pattern mode.
2 Switch to Freq and then with the numeric keypad enter 200 as the
magnitude of the frequency.
3 Select the desired unit MHz by pressing the corresponding softkey.
Channel 1 Settings To set the channel parameters for channel 1:
1 Switch to the Channel page.
Per default, channel 1 is selected.
2 Select the pattern mode Square.
In the Timing panel, the following parameter are set as default:
–The Delay is set to 0 ps.
–The DCycle is set to 50%.
–The Deskew is disabled.
3 In the Levels panel:
–Switch Ampl to High and set High to 1.0 V.
–Set Low to 0 V.
Agilent 81133A/81134A Pulse Generator User’s Guide, August 2002 29
Page 30
Setting Up Generic and Advanced Signals Setting Up a Clock Signal
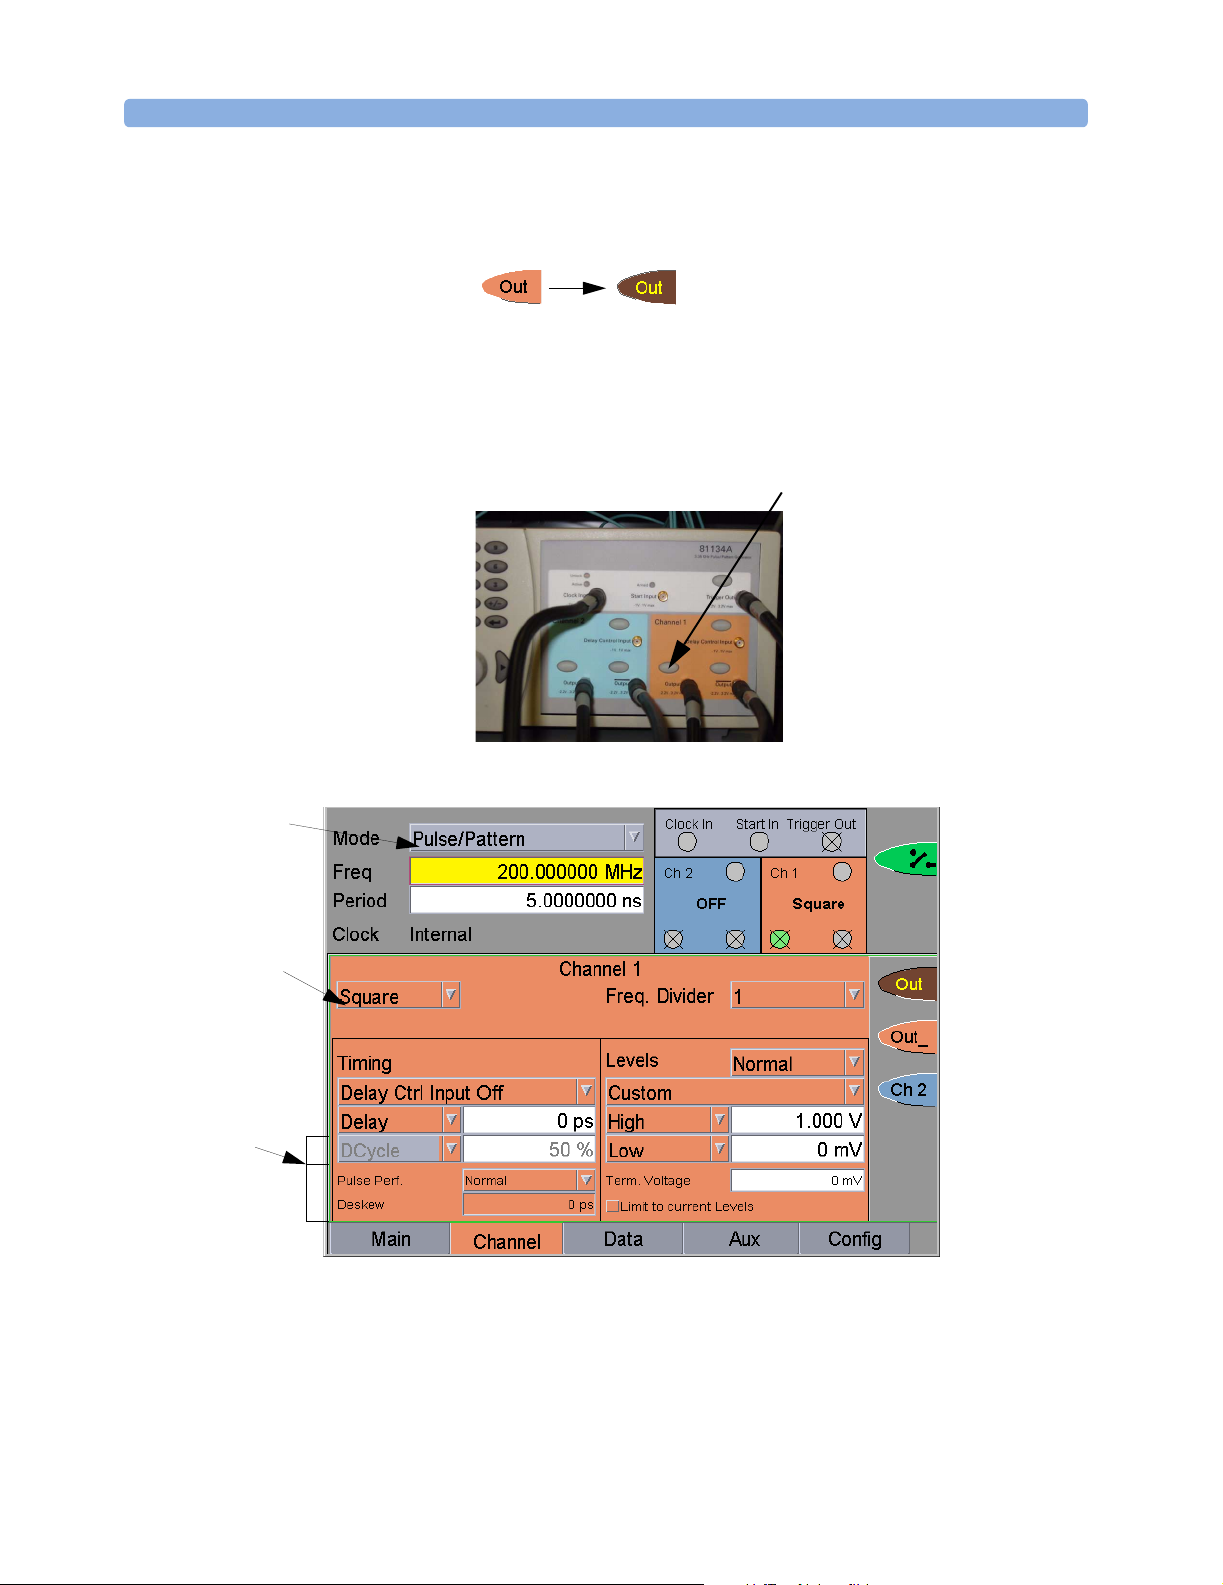
4 Enable the Channel 1 normal Output:
By pressing the respective softkey in the user interface:
– OR –
By pressing the normal Out softkey for channel 1 next to the Output
port.
Normal Out
Channel 1
Instrument Mode
Pattern Mode
Predefined Timing
Settings for the
Square Wave Signal
(Clock)
The Channel 1 page now looks as follows:
30 Agilent 81133A/81134A Pulse Generator User’s Guide, August 2002
Page 31

Setting Up a Clock Signal Setting Up Generic and Advanced Signals
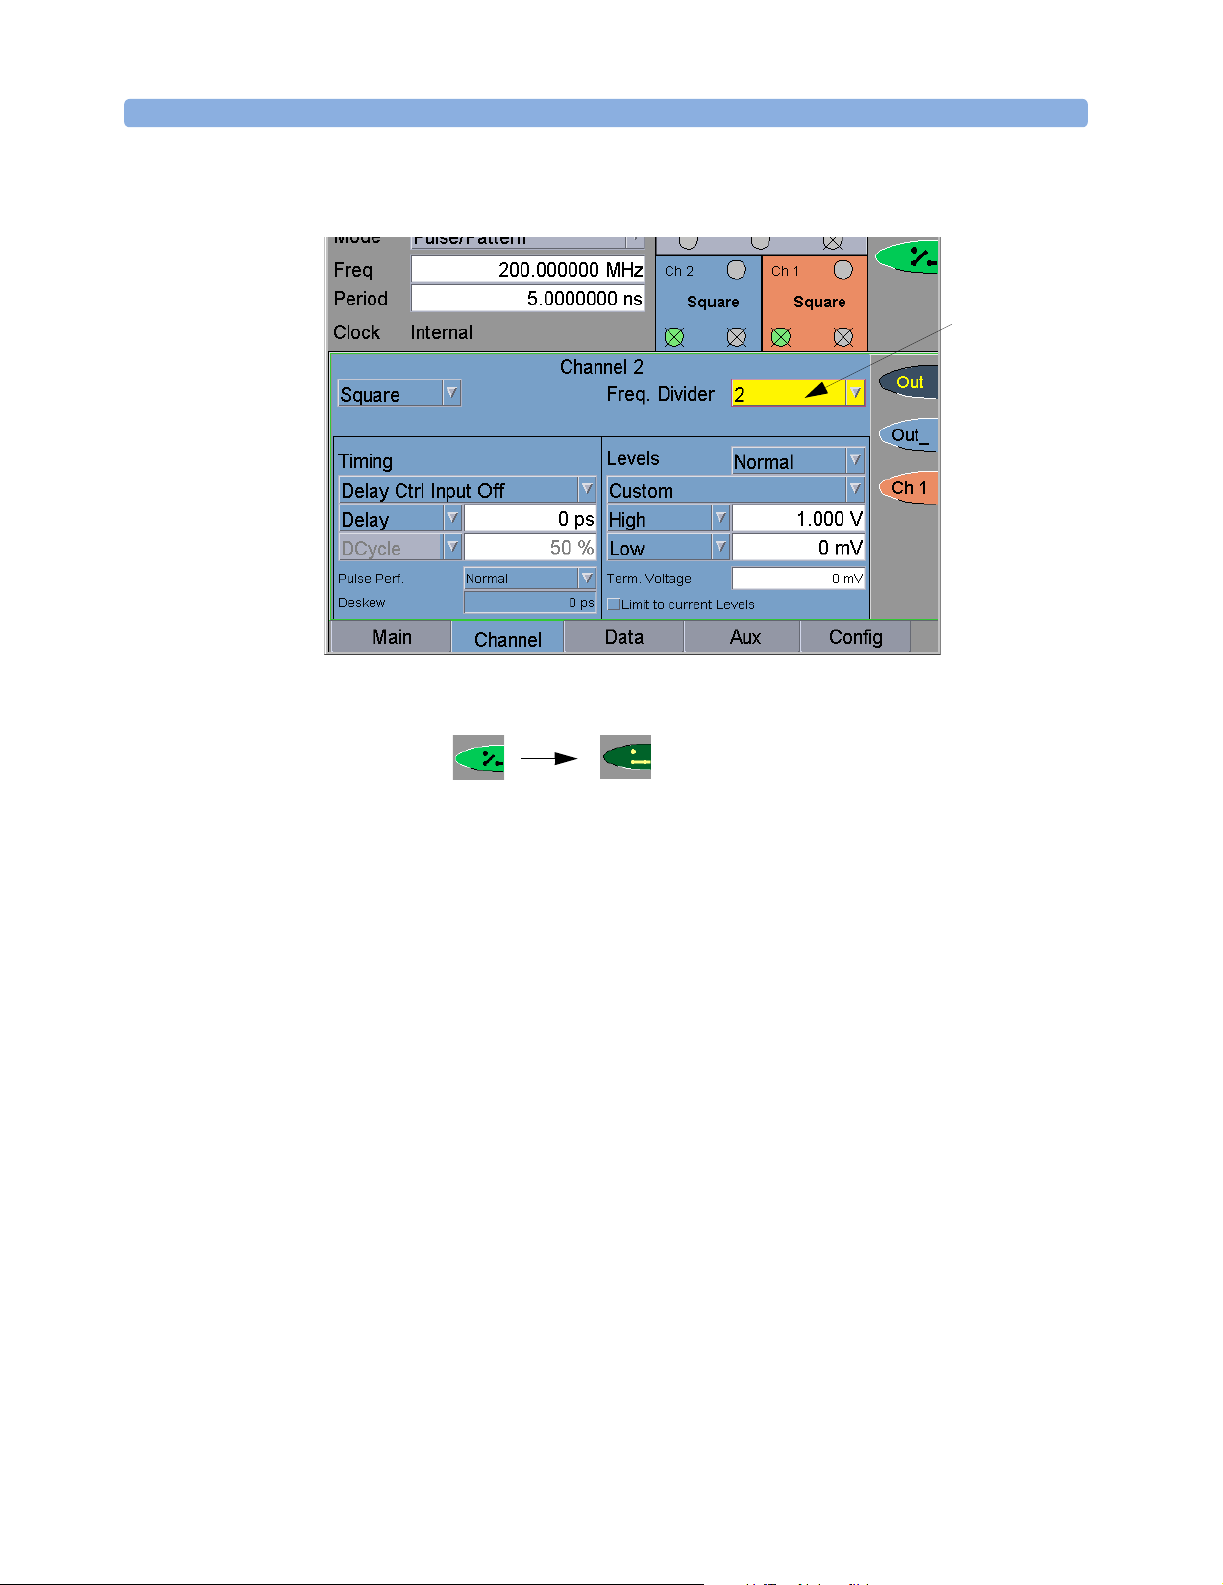
Channel 2 Settings To set the channel parameters for channel 2:
1 Switch to channel 2 by pressing the Ch2 softkey .
2 Select the pattern mode Square.
3 Set the Freq. Divider to 2.
4 In the Levels panel:
–Switch Ampl to High and set High to 1.0 V.
–Set Low to 0 V.
5 Enable the Channel 2 normal Output either:
By pressing the respective softkey in the user interface.
– OR –
By pressing the normal Out softkey for channel 2 next to the Output
port.
Normal Out
Channel 2
Agilent 81133A/81134A Pulse Generator User’s Guide, August 2002 31
Page 32
Setting Up Generic and Advanced Signals Setting Up a Clock Signal
The Channel 2 page now looks as follows:
Frequency
Divider
Reconnect the DUT Reconnect the DUT by clicking the following softkey function:
32 Agilent 81133A/81134A Pulse Generator User’s Guide, August 2002
Page 33

Setting Up a Clock Signal Setting Up Generic and Advanced Signals
Generated Signal If you attach a scope (as DUT), you can immediately see the signal.
Use the Pulse Generator’s TRIGGER OUT to trigger the scope.
To enable the trigger output:
1 At the Aux page, press the TrigOut softkey function.
Indicator
Trig O ut s of t k e y
function
The green LED indicates that Trigger Out is enabled.
– OR –
Press the Trigger Out softkey next to the Trigger Out port.
Trig ger O ut
softkey
Agilent 81133A/81134A Pulse Generator User’s Guide, August 2002 33
Page 34

Setting Up Generic and Advanced Signals Setting Up a Clock Signal
The signals as displayed on a standard oscilloscope are depicted
below.
34 Agilent 81133A/81134A Pulse Generator User’s Guide, August 2002
Page 35

Setting Up a Clock Signal Setting Up Generic and Advanced Signals
Using the Remote Programming Interfaces
The following code performs the same task.
Protect the DUT
Set up the Instrument
Set up Channel 1
Set up Channel 2
//disconnect channels
:OUTP:CENT OFF
//set mode to Pulse/Pattern
:FUNC PATT
//set freq to 200 MHz
:FREQ 200 MHz
//set pattern mode to Square
:FUNC:MODE1 SQU
//set high-Level to 1 V
:VOLT1:HIGH 1.000 V
//set low-level to 0 V
:VOLT1:LOW 0 V
//enable output channel 1
:OUTP1:POS ON
//set pattern mode to Square
:FUNC:MODE2 SQU
// set freq div to 2
:OUTP2:DIV 2
//set the high-Level to 1 V
:VOLT2:HIGH 1.000 V
//set low-level to 0 V
:VOLT2:LOW 0 V
//enable output channel 2
:OUTP2:POS ON
Generate the Signals
Agilent 81133A/81134A Pulse Generator User’s Guide, August 2002 35
//reconnect the channels
:OUTP:CENT ON
//enable trigger output
:OUTP0 ON
Page 36

Setting Up Generic and Advanced Signals Setting Up a Pulse Signal
Setting Up a Pulse Signal
Ta s k Set up a continuous pulse signal with 20 ns period, a pulse width of
5 ns, an amplitude of 2.0 V and an offset of 1.5 V (high level 2.5 V, low
level 500 mV).
Pulse Width = 5 ns
2.5 V
500 mV
Period = 20 ns
Using the Graphical User Interface
Instrument Settings To set the instrument parameters:
1 Disable the outputs.
2 In the instrument panel, choose the Pulse/Pattern mode.
3 Set the Period to 20 ns.
Channel Settings To set the channel parameters:
1 Switch to the Channel page.
2 Select the pattern mode Pulse.
3 In the Timing panel:
–Switch from DCyle to Width and set the Width to 5 ns.
4 In the Levels panel, set:
–The level format to Custom.
– Switch from High/Low to Amplitude/Offset.
– Amplitude to 2.0 V.
– Offset to 1.5 V.
36 Agilent 81133A/81134A Pulse Generator User’s Guide, August 2002
Page 37

Setting Up a Pulse Signal Setting Up Generic and Advanced Signals
5 Enable the Channel 1 normal Output:
By pressing the respective softkey in the user interface:
– OR –
By pressing the normal Out softkey for channel 1 next to the Output
port.
The Channel page now looks as follows:
Pattern Mode
Width
Levels
Reconnect the DUT Enable the outputs:
Generated Signal Use the pulse generator’s TRIGGER OUT to trigger the scope.
To set up the trigger output:
1 On the Aux page, select the trigger mode Pulse.
The frequency of the trigger output equals the system frequency.
Agilent 81133A/81134A Pulse Generator User’s Guide, August 2002 37
Page 38

Setting Up Generic and Advanced Signals Setting Up a Pulse Signal
2 Enable the trigger output.
Tr ig g e r
Mode
Trig Out sof t ke y
function
The signal as displayed on a standard oscilloscope is depicted below.
38 Agilent 81133A/81134A Pulse Generator User’s Guide, August 2002
Page 39

Setting Up a Pulse Signal Setting Up Generic and Advanced Signals
Using the Remote Programming Interfaces
The following code performs the same task.
Protect the DUT
Set up the Instrument
Set up Channel 1
Generate the Signals
//disconnect channels
:OUTP:CENT OFF
//set mode to Pulse/Pattern
:FUNC PATT
//set period to 20 ns
:PER 20 ns
//set pattern mode to Pulse
:FUNC:MODE1 PULSE
//set width to 5 ns
:WIDT1 5 ns
//set ampl to 2 V
:VOLT1:AMPL 2.000 V
//set offset to 1.5 V
:VOLT1:OFFSET 1.5 V
//enable output channel 1
:OUTP1:POS ON
//reconnect channels
:OUTP:CENT ON
//use trigger mode Pulse
:OUTP0:SOUR PER
//enable trigger output
:OUTP0 ON
Agilent 81133A/81134A Pulse Generator User’s Guide, August 2002 39
Page 40

Setting Up Generic and Advanced Signals Setting Up a Data Pattern
Setting Up a Data Pattern
Ta s k Set up two signals:
• A PRBS signal to test a digital transmitter.
• A 32-bit pattern signal with NRZ data output format at 500 MHz to
check a digital circuit with ECL logic.
The pattern is:
11110011100110010010100100000000
NOTE This example is demonstrated with the 81134A instrument.
With the 81134A instrument, you can set up both signals
simultaneously.
Using the Graphical User Interface
Instrument Settings To set the instrument parameters:
1 Disable the outputs.
2 In the instrument panel, choose the Pulse/Pattern mode.
3 Set the frequency to 500 MHz.
Channel Settings for the PRBS Signal To set the channel parameters for channel 1:
1 Switch to the Channel page.
2 Select the pattern mode PRBS.
12
3 Select the PRBS polynome 2
4 Select the signal mode NRZ.
5 In the Levels panel, select the predefined level format ECL.
This automatically sets:
–the Amplitude to 800 mV
–the Offset to –1.350 V
–the Term. Voltage to –2.0 V
-1.
40 Agilent 81133A/81134A Pulse Generator User’s Guide, August 2002
Page 41

Setting Up a Data Pattern Setting Up Generic and Advanced Signals
6 Enable the Channel 1 normal Output:
By pressing the respective softkey in the user interface:
– OR –
By pressing the normal Out softkey for channel 1 next to the Output
port.
The Channel page now looks as follows:
PRBS Polynome
Signal Mode
Pattern Mode
PRBS
Channel Settings for the Pattern
Signal
ECL Levels
To set the channel parameters for channel 2:
1 Switch to Channel 2 by pressing the Ch2 softkey .
2 Switch to the Channel page.
3 Select the pattern mode Data.
4 Select the signal mode NRZ.
5 In the Levels panel, select the predefined level format ECL.
This automatically sets:
–the Amplitude to 800 mV
–the Offset to –1.350 V
– the Term. Voltage to –2.0 V
Agilent 81133A/81134A Pulse Generator User’s Guide, August 2002 41
Page 42

Setting Up Generic and Advanced Signals Setting Up a Data Pattern
6 Enable the Channel 2 normal Output either:
By pressing the respective softkey in the user interface.
– OR –
By pressing the normal Out softkey for channel 2 next to the Output
port.
The Channel page now looks as follows:
Pulse Type NRZ
Pattern Mode
Data
Data Settings for the Pattern Signal To set the data pattern:
1 Switch to the Data page.
2 Enter a Data Length of 32 bits.
3 Switch to the Numeric Edit Mode.
4 Enter the data pattern via the keypad for channel 2.
ECL Levels
42 Agilent 81133A/81134A Pulse Generator User’s Guide, August 2002
Page 43

Setting Up a Data Pattern Setting Up Generic and Advanced Signals
The Data page now looks as follows:
Data pattern
length
Data pattern for
channel 2
Numeric
Edit Mode
Reconnect the DUT Enable the outputs:
Generated Signals Use the pulse generator’s TRIGGER OUT to trigger the scope on the
data pattern.
To set up the trigger output:
1 On the Aux page, in the Trigger Output panel:
– Select the trigger mode Data.
One trigger pulse occurs at the start of the repetitive data
pattern.
–Set the Ampl to 2 V.
–Set the Offset to 1 V.
Agilent 81133A/81134A Pulse Generator User’s Guide, August 2002 43
Page 44

Setting Up Generic and Advanced Signals Setting Up a Data Pattern
2 Enable the trigger output.
Tr ig g e r
Mode
Trig Out sof t ke y
function
The signals as displayed on a standard oscilloscope are depicted
below.
44 Agilent 81133A/81134A Pulse Generator User’s Guide, August 2002
Page 45

Setting Up a Data Pattern Setting Up Generic and Advanced Signals
Using the Remote Programming Interfaces
The following code performs the same task:
Protect the DUT
Set Up the Instrument
Set up Channel 1
Set up Channel 2
//disconnect channels
:OUTP:CENT OFF
//set mode to Pulse/Pattern
:FUNC PATT
//set freq to 500 MHz
:FREQ 500 MHz
//set pattern mode to PRBS
:FUNC:MODE1 PRBS
//set polynome to 2^12-1
:FUNC:MODE1 PRBS, 12
//set datamode to NRZ
:DIG1:SIGN:FORM NRZ
//set predefined levels to ECL values
:VOLT1:AMPL 800 mV; :VOLT1:OFFS -1.350 V; :VOLT1:TERM -2.000 V
//enable output channel 1
:OUTP1:POS ON
//set pattern mode to Data
:FUNC:MODE2 DATA
//set datamode to NRZ
:DIG2:SIGN:FORM NRZ
//set predefined levels to ECL values
:VOLT2:AMPL 800 mV; :VOLT2:OFFS -1.350 V; :VOLT2:TERM -2.000 V
//enable output channel 2
:OUTP2:POS ON
//set datalength to 32
:DIG2:PATT:LENG 32
//set pattern in channel 2
:DIG2:PATT #23211110011100110010010100100000000, DUAL
Generate the Signals
Agilent 81133A/81134A Pulse Generator User’s Guide, August 2002 45
//reconnect channels
:OUTP:CENT ON
// Set up the trigger
//set trigger mode to data
:OUTP0:SOUR BITS
//set ampl to 2 V
:VOLT0:AMPL 2 V
//set offset to 1 V
:VOLT0:OFFSET 1 V
//enable trigger output
:OUTP0 ON
Page 46

Setting Up Generic and Advanced Signals Setting Up a Burst Signal
Setting Up a Burst Signal
Ta s k Set up a burst signal consisting of a 32-bit data pattern repeated twice
at a period of 500 ps with 50 ps delay and 100 ps pulse width.
The data pattern is: 10100000000000000000000000000000
The amplitude is 2.0 V and the offset is 0 V.
Start the output at the rising edge of an external signal with 1 V
threshold applied at the start input.
Arming Source
Triggered by:
External Signal
Width = 100 ps
Generated
Signal
1 V
-1 V
Delay = 50 ps
Period = 500 ps
Using the Graphical User Interface
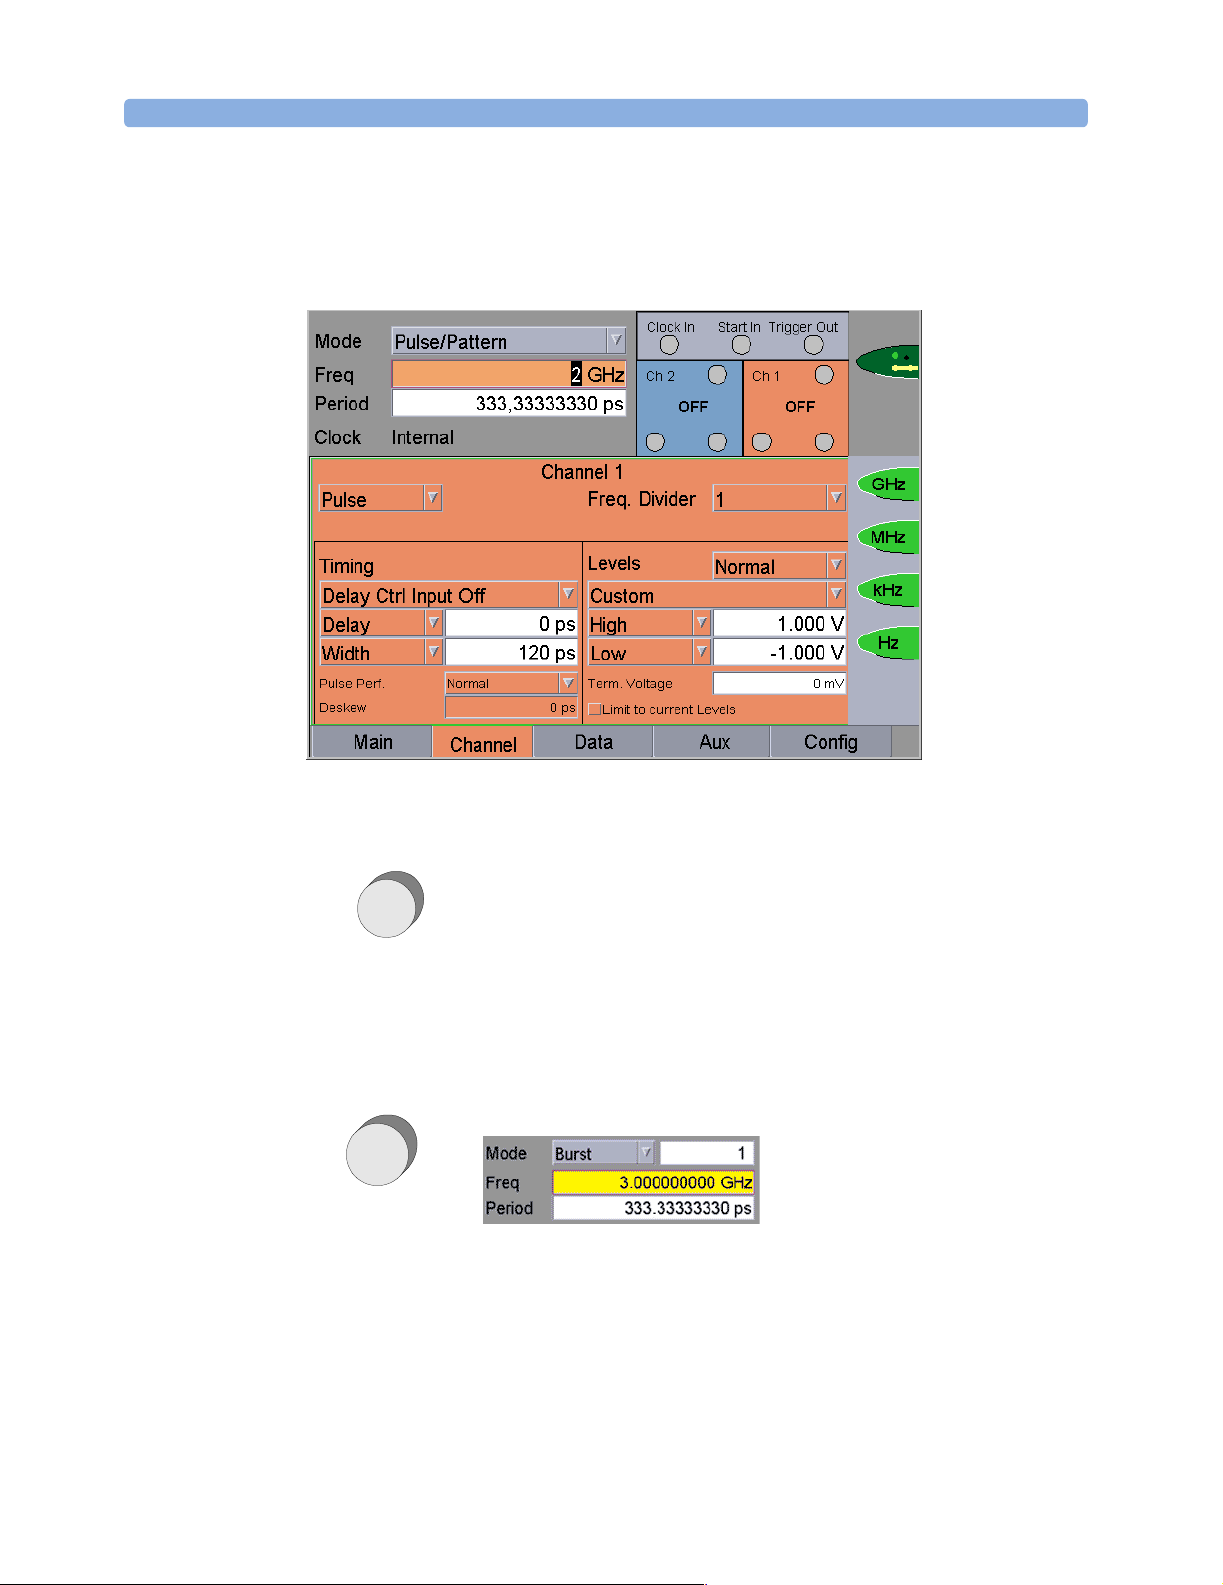
Instrument Settings To set the instrument parameters:
1 Disable the outputs.
2 In the instrument panel, choose the Burst mode.
3 Set the burst repetition to 2.
4 Set the Period to 500 ps.
46 Agilent 81133A/81134A Pulse Generator User’s Guide, August 2002
Page 47

Setting Up a Burst Signal Setting Up Generic and Advanced Signals
The instrument panel now looks as follows:
Burst RepetitionInstrument
Mode
Channel Settings for the PRBS Signal To set the channel parameters:
1 Switch to the Channel page.
2 Set the signal mode to RZ.
3 In the Timing panel:
–Switch from Dcycle to Width and set the Width to 100 ps.
–Set the Delay to 50 ps.
4 In the Levels panel, set:
– The level format to Custom.
– Amplitude to 2.0 V.
– Offset to 0.0 V.
5 Enable the Channel 1 normal Output:
By pressing the respective softkey in the user interface:
– OR –
By pressing the normal Out softkey for channel 1 next to the Output
port.
Agilent 81133A/81134A Pulse Generator User’s Guide, August 2002 47
Page 48

Setting Up Generic and Advanced Signals Setting Up a Burst Signal
The Channel page now looks as follows:
Timing
Parameter
Levels
Data Settings for the Pattern Signal To set the data pattern:
1 Switch to the Data page.
2 Enter a Data Length of 32 bits.
3 Enter the data pattern via the keypad for channel 1.
The Data page now looks as follows:
Data pattern
length
Data pattern for
channel 1
Graphic
Edit Mode
48 Agilent 81133A/81134A Pulse Generator User’s Guide, August 2002
Page 49

Setting Up a Burst Signal Setting Up Generic and Advanced Signals
Reconnect the DUT Enable the outputs:
Auxiliary Settings for Start Input and
Trigger Output
NOTE In burst mode, the “armed” mode is deactivated as soon as the
To set the start input and trigger output parameters:
1 Switch to the Aux page.
2 In the Start Input panel, set:
–The start mode to Ext. Input.
This automatically puts the instrument in “armed” mode. This is
indicated by the activated Armed softkey function.
“Armed” mode means that the signal is output as soon as the
specified external signal occurs at the start input.
specified burst has been output.
To put the instrument in “armed” mode again, press the Armed
softkey function.
– Start on the Rising edge.
– The threshold to 500 mV.
3 In the Trigger Output panel:
– Select the trigger mode Pulse.
The frequency of the trigger output equals the frequency as
specified in the instrument panel.
– Set Ampl to 2 V.
– Set Offset to 0 V.
– Enable the trigger output.
Agilent 81133A/81134A Pulse Generator User’s Guide, August 2002 49
Page 50

Setting Up Generic and Advanced Signals Setting Up a Burst Signal
The Aux page now looks as follows:
Armed is
activated
Parameters to
start the output
by an external
Tr ig g e r
Mode
signal
Tr ig O ut
softkey
function
Generated Signal Use the generator’s TRIGGER OUT to trigger a scope.
The signal as displayed on a standard oscilloscope is depicted below.
50 Agilent 81133A/81134A Pulse Generator User’s Guide, August 2002
Page 51

Setting Up a Burst Signal Setting Up Generic and Advanced Signals
Using the Remote Programming Interfaces
The following code performs the same tasks:
Protect the DUT
Set Up the Instrument
Set up Channel 1
//disconnect channels
:OUTP:CENT OFF
//set mode to Burst, 2
:FUNC BURST, 2
//set period to 500 ps
:PER 500 ps
//set signalmode to RZ
:DIG1:SIGN:FORM RZ
//set width to 100 ps
:WIDT1 100 ps
//set delay to 50 ps
:DEL1 50 ps
//set predefined levels to Custom values (Ampl=2V; Offset=0mV)
:VOLT1:AMPL 2 V; :VOLT1:OFFS 0 mV
//enable output channel 1
:OUTP1:POS ON
//set datalength to 32
:DIG:PATT:LENG 32
//set pattern in channel 1
:DIG1:PATT #23210100000000000000000000000000000, DUAL
Generate the Signals
Agilent 81133A/81134A Pulse Generator User’s Guide, August 2002 51
//reconnect channels
:OUTP:CENT ON
// Set up the trigger
//set startmode to Ext. Input
:ARM:SOUR EXT
//set starton to Rising
:ARM:SLOP POS
//set threshold to 500 mV
:ARM:LEV 500 mV
//set trigger mode to Pulse
:OUTP0:SOUR PER
//set ampl to 2 V
:VOLT0:AMPL 2 V
//set offset to 0 V
:VOLT0:OFFSET 0 V
//enable trigger output
:OUTP0 ON
Page 52

Setting Up Generic and Advanced Signals Setting Up a Repetitive Burst Signal
Setting Up a Repetitive Burst Signal
Ta s k Set up a signal with 4 repeated bursts.
Each burst consists of a 32-bit pattern signal with NRZ data output
format at 100 MHz to check a digital circuit with LVPECL logic.
The data pattern is:
11100000000000000000000000000000
Data Data Data Data Data Data Data
Data Length = 32 x 10 ns
Burst Length = 4
x Data Length
Number of Null data packets =
Burst Length
Using the Graphical User Interface
Instrument Settings To set the instrument parameters:
1 Disable the outputs.
2 In the instrument panel, choose the RBurst mode.
3 Enter 4 for the number of null data packets.
4 Define that the number of zeros that follows the repeated bursts is
as large as the burst length.
5 Set the frequency to 100 MHz.
52 Agilent 81133A/81134A Pulse Generator User’s Guide, August 2002
Page 53

Setting Up a Repetitive Burst Signal Setting Up Generic and Advanced Signals
The instrument panel now looks as follows:
Instrument
Mode
Channel Settings for the PRBS Signal To set the channel parameters:
1 Switch to the Channel page.
2 In the Timing panel:
– Set the signal mode to NRZ.
–Set the Delay to 50 ps.
3 In the Levels panel, set:
– The level format to Custom.
– Amplitude to 2.0 V.
Burst Repetition
Specifies the
number of zeros
– Offset to 0.0 V.
4 Enable the Channel 1 normal Output:
By pressing the respective softkey in the user interface:
– OR –
By pressing the normal Out softkey for channel 1 next to the Output
port.
Agilent 81133A/81134A Pulse Generator User’s Guide, August 2002 53
Page 54

Setting Up Generic and Advanced Signals Setting Up a Repetitive Burst Signal
The Channel page now looks as follows:
Levels
Data Settings for the Pattern Signal To set the data pattern:
1 Switch to the Data page.
2 Enter a Data Length of 32 bits.
3 Enter the data pattern via the keypad for channel 1.
The Data page now looks as follows:
Data pattern
length
Data pattern for
channel 1
Graphic
Edit Mode
54 Agilent 81133A/81134A Pulse Generator User’s Guide, August 2002
Page 55

Setting Up a Repetitive Burst Signal Setting Up Generic and Advanced Signals
Reconnect the DUT Enable the outputs:
Generated Signal Use the pulse generator’s TRIGGER OUT to trigger a scope.
To set up the trigger output:
1 On the Aux page, in the Trigger Output panel:
– Select the trigger mode Pulse.
One trigger pulse occurs at the start of the repetitive data
pattern.
–Set the Ampl to 1 V.
–Set the Offset to 0 V.
–Set the Divider to 256.
2 Enable the trigger output.
The Aux page looks now as follows:
Agilent 81133A/81134A Pulse Generator User’s Guide, August 2002 55
Page 56

Setting Up Generic and Advanced Signals Setting Up a Repetitive Burst Signal
The signal as displayed on a standard oscilloscope is depicted below.
56 Agilent 81133A/81134A Pulse Generator User’s Guide, August 2002
Page 57

Setting Up a Repetitive Burst Signal Setting Up Generic and Advanced Signals
Using the Remote Programming Interfaces
The following code performs the same tasks:
Protect the DUT
Set Up the Instrument
Set up Channel 1
Generate the Signals
//disconnect channels
:OUTP:CENT OFF
//set mode to rBurst, 4, 4
:FUNC RBURST, 4, 4
//set freq to 100 MHz
:FREQ 100 MHz
//set signalmode to NRZ
:DIG1:SIGN:FORM NRZ
//set delay to 50 ps
:DEL1 50 ps
//set predefined levels to Custom values (Ampl=2V; Offset=0mV)
:VOLT1:AMPL 2 V; :VOLT1:OFFS 0 mV
//enable output channel 1
:OUTP1:POS ON
//set datalength to 32
:DIG:PATT:LENG 32
//set pattern in channel 1
:DIG1:PATT #23211100000000000000000000000000000, DUAL
//reconnect channels
:OUTP:CENT ON
// Prepare the trigger
//set trigger mode to Data
:OUTP0:SOUR BITS
//set ampl to 1 V
:VOLT0:AMPL 1 V
//set offset to 0 V
:VOLT0:OFFSET 0 V
//enable trigger output
:OUTP0 ON
Agilent 81133A/81134A Pulse Generator User’s Guide, August 2002 57
Page 58

Setting Up Generic and Advanced Signals Setting Up Signals for a Stressed Eye Diagram Measurement
Setting Up Signals for a Stressed Eye Diagram Measurement
Ta s k Set up signals for a stressed eye measurement by:
• Intentionally adding jitter to your signals
• Changing the crossover of the eye pattern
One-Channel Setup For a one-channel setup, you need:
• An 81133A or 81134A instrument
• An arbitrary waveform generator to generate additional jitter, for
example, the 33250A
• A scope for displaying the signals, for example, the 86100 DCA
Two-Channel Setup For a two-channel setup, you need:
• An 81134A instrument
• An arbitrary waveform generator to generate additional jitter, for
example, the 33250A (you might need two of them for two
“independently jittering” output signals)
• A scope for displaying the signals, e.g. the 86100 DCA
NOTE This example is demonstrated with the 81134A instrument. The
two-channel instrument allows you to generate the distorted eye and a
clean “reference eye” at the same time.
Use Cases Stressed eye measurements can be used:
• In board design: For testing the RF behavior of different board
materials and transmission line geometries.
• For testing cables and connectors.
• For testing A/D converters.
58 Agilent 81133A/81134A Pulse Generator User’s Guide, August 2002
Page 59
Setting Up Signals for a Stressed Eye Diagram Measurement Setting Up Generic and Advanced Signals
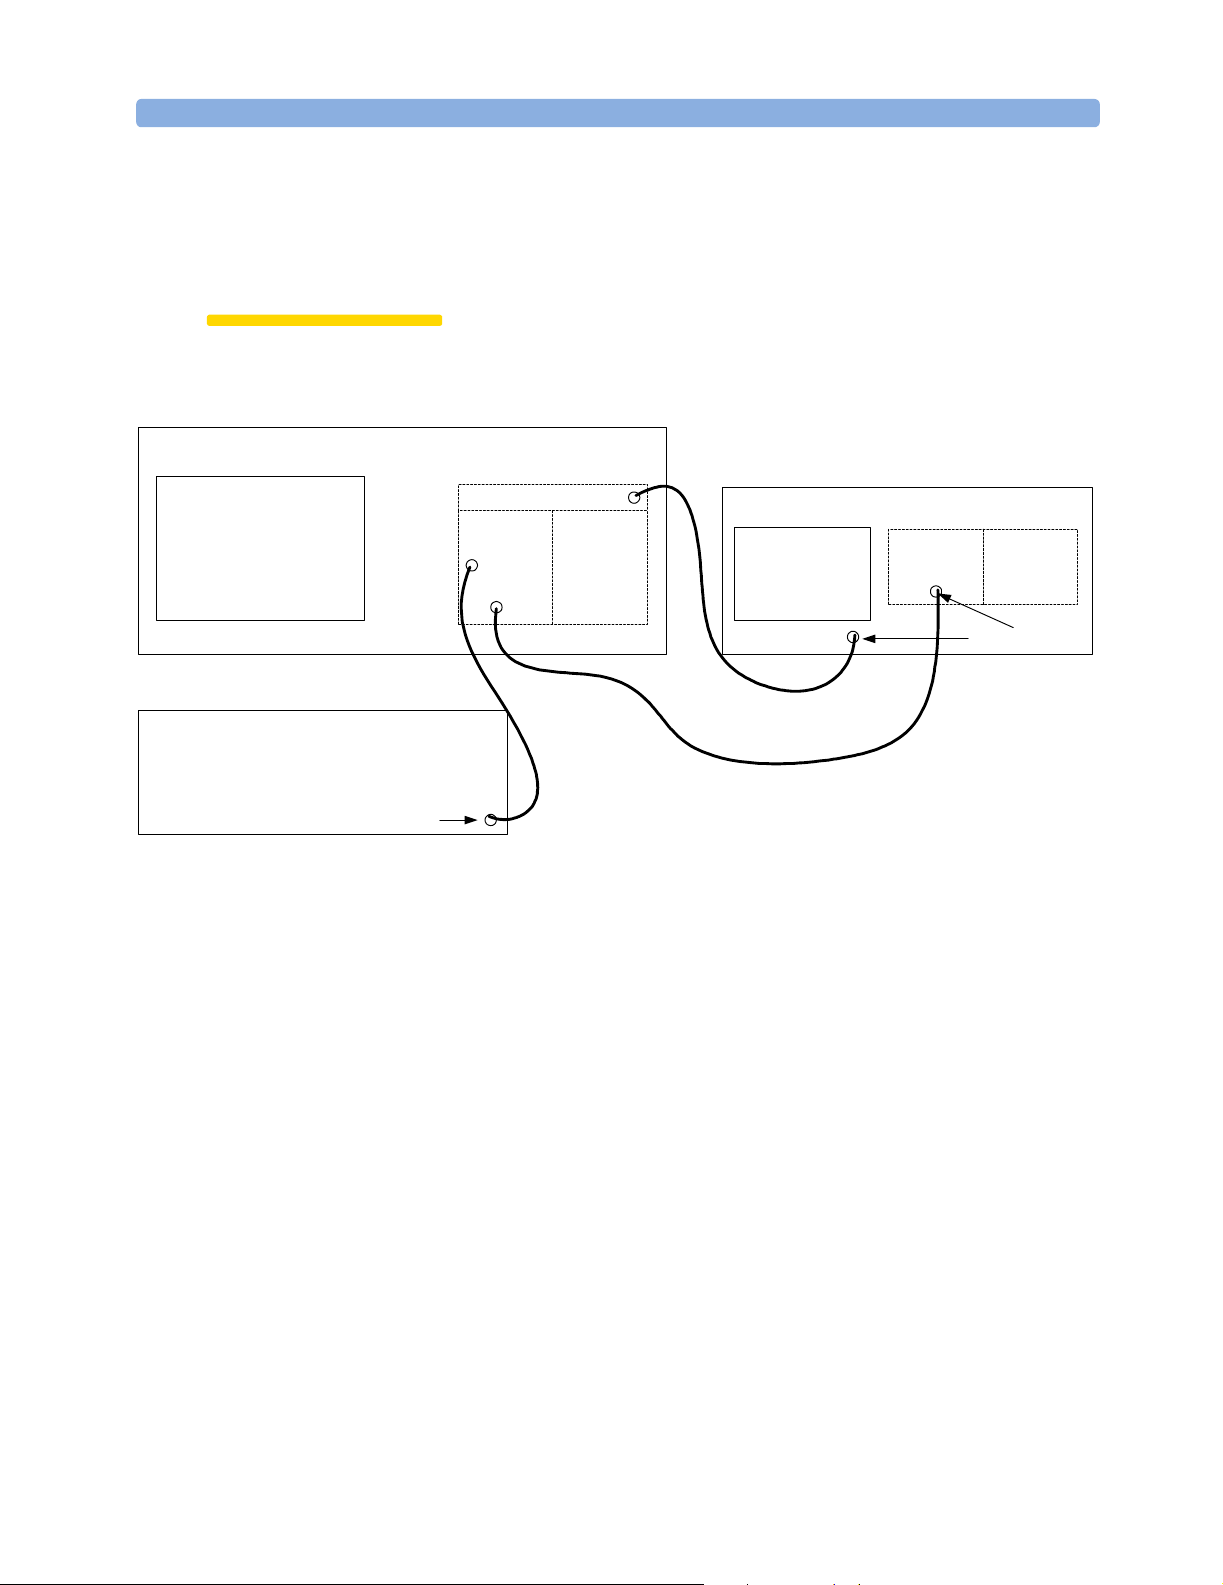
Connecting the Instruments
Connect the Pulse Generator, the Arbitrary Waveform Generator and
the DCA as follows:
CAUTION Before disconnecting/connecting any cables make sure that the
81134A output channels are turned off!
81134A Pulse Generator
33250A
Arbitrary Waveform Generator
BNC-SMA Adaptor and 20 dB Attenuator
Channel 2
Delay Control
Input
Output
TrigOut
Channel 1
Trigger In
86100 DCA
Channel 1 Channel 2
Input
20 dB Attenuator
In detail:
1 Connect the 33250A output to the channel 2 delay control input of
the 81134A (use the BNC-SMA adaptor and a 20 dB attenuator).
2 Connect a 20 dB attenuator each to the channel 1 and the trigger
input of the DCA.
3 Connect the 81134A channel 2 output to the DCA’s channel 1 input.
4 Connect the 81134A trigger output to the DCA’s trigger input.
5 Power on the three units after you have made all connections.
Agilent 81133A/81134A Pulse Generator User’s Guide, August 2002 59
Page 60

Setting Up Generic and Advanced Signals Setting Up Signals for a Stressed Eye Diagram Measurement
Setting Up the 81134A by Using the Graphical User Interface
Instrument Settings To set the instrument parameters:
1 Disable the outputs.
2 In the instrument panel, choose the Pulse/Pattern mode.
3 Set the Period to 1 GHz.
Channel Settings To set the channel parameters for channel 2:
1 Switch to the Channel page.
2 Switch to Channel 2 by pressing the Ch2 softkey .
3 Select the pattern mode PRBS.
5
4 Select the PRBS polynome 2
5 Select the signal mode NRZ.
-1.
6 Enable the variable crossover and set the crossover point at first to
50 %.
7 In the Timing panel:
– Select Delay Ctrl Input 250 ps.
–Set the Delay to 0 s.
– Set the DCycle to 50 %.
8 In the Levels panel, set:
–The level format to Custom.
– High to 1.0 V.
– Low to -1.0 V.
60 Agilent 81133A/81134A Pulse Generator User’s Guide, August 2002
Page 61

Setting Up Signals for a Stressed Eye Diagram Measurement Setting Up Generic and Advanced Signals
The Channel page now looks as follows:
Delay Control
Input for
Channel 2
(Enabled)
Variable
Crossover
Point
Delay Ctrl
Sensitivity
Reconnect the DUT Enable the outputs:
Generated Signal Use the pulse generator’s TRIGGER OUT to trigger the scope.
To set up the trigger output:
1 On the Aux page, select the trigger mode Pulse.
The frequency of the trigger output equals the system frequency.
Agilent 81133A/81134A Pulse Generator User’s Guide, August 2002 61
Page 62

Setting Up Generic and Advanced Signals Setting Up Signals for a Stressed Eye Diagram Measurement
2 Enable the trigger output.
Tr ig g er
Output
(Enabled)
Delay Control
Input
(Enabled)
Trig Out sof t ke y
function
62 Agilent 81133A/81134A Pulse Generator User’s Guide, August 2002
Page 63

Setting Up Signals for a Stressed Eye Diagram Measurement Setting Up Generic and Advanced Signals
Setting Up the 33250A Waveform Generator
Program a 50 MHz sine wave with an amplitude of 2 Vpp:
1 Press the Freq softkey.
2 With the numeric keypad enter 50 as the frequency.
3 Select the desired unit MHz by pressing the corresponding softkey.
4 Press the Ampl softkey.
5 Enter the value 2 with the numeric keypad.
6 Press the Vpp softkey to select the desired unit.
Viewing the Eye Diagram on the 86100 DCA
To view the eye diagram on the scope:
1 Ensure that the channel outputs and the trigger output at the
81134A instrument are enabled.
2 On the scope, switch to channel 1.
3 Press the Source button near the trigger input until front panel is
selected.
4 Press the Eye/Mask Mode button.
5 Press AutoScale.
6 Switch on the 33250A output with the output key.
The signal as displayed on a standard oscilloscope is depicted below.
Delay modulated with sine wave
Agilent 81133A/81134A Pulse Generator User’s Guide, August 2002 63
Page 64

Setting Up Generic and Advanced Signals Setting Up Signals for a Stressed Eye Diagram Measurement
Play with the Settings
The delay control input adds additional delay to the signal depending
on the voltage that is fed to the input.
• On the 33250A, you can change the amplitude and frequency of the
signal to show the influence of the delay control input.
• Change from sine wave to rectangular wave by pressing the
corresponding button.
You can also change the variable crossover point on the 81134A
Channel panel.
The following signals show a clear eye, a signal modulated with sine
wave and a signal modulated with rectangular wave.
Clear Eye Delay modulated with sine
wave
50 % Variable Crossover 30 % Variable Crossover 70 % Variable Crossover
Delay modulated with
rectangle wave
64 Agilent 81133A/81134A Pulse Generator User’s Guide, August 2002
Page 65

Using the Agilent 81133A/81134A Pulse Generator
CAUTION When using the Agilent 81133A/81134A Pulse Generator, make sure
you do not set parameters to values outside of the specified ranges. If
any parameters are out of range, the generated signals may not be
valid. The instrument does not check if values are within range.
For valid ranges, see the Online Help (available by pressing the "?"
button on the instrument).
This chapter:
• Describes different pages of the graphical user interface.
• Describes how to combine parameters for generating specific
signals.
• Shows typical timings. See “Timing of Generated Signals” on
page 76.
• Provided information of saving and recalling of parameter settings.
See “Saving and Recalling Settings” on page 83.
Agilent 81133A/81134A Pulse Generator User’s Guide, August 2002 65
Page 66

Using the Agilent 81133A/81134A Pulse Generator Pages of the User Interface
Pages of the User Interface
The instrument has a user interface to simplify entering and
monitoring of the signal settings. The user interface is divided into
different pages and panels.
The following figure shows the instrument panel and the Channel
page.
Instrument Panel
Channel Page
The parameters are available at the following panels and pages in the
81133A/81134A graphical user interface:
• Instrument Panel
The instrument panel is part of each page and provides controls that
define the basic setup of the instrument, such as base frequency and
instrument mode.
These controls affect all channels.
•Main Page
The Main page is used to display the results of the selftest and to
store and recall your parameter settings.
•Channel Page
At the Channel page, you can specify the signal to be generated for
each channel individually regarding pattern mode, timing, and
levels.
66 Agilent 81133A/81134A Pulse Generator User’s Guide, August 2002
Page 67

Pages of the User Interface Using the Agilent 81133A/81134A Pulse Generator
• Data Page
At the Data page, you can set up an arbitrary data pattern up to the
maximal available memory (8 kBit) per channel.
•Aux Page
The Aux page provides controls to specify:
– The Clock Source
–The Start Input
– The Trigger Output
• Config Page
If you want to program the instrument remotely, the Config page is
used to set up all necessary parameters to establish the connection
between the instrument and your control PC.
To access the individual pages, use the instrument's tab keys (located
below the navigation knob).
NOTE For a detailed description of the pages and their parameters, please
refer to the Online Help.
Agilent 81133A/81134A Pulse Generator User’s Guide, August 2002 67
Page 68

Using the Agilent 81133A/81134A Pulse Generator Combining Parameters for Signal Generation
Combining Parameters for Signal Generation
The following table shows you how the various modes and parameters
can be combined. Empty cells indicate that the combination is not
applicable:
Instrument Mode Pulse/Pattern Burst RBurst
Pattern Mode
Signal Mode
Var iabl e
Crossover
Burst Length
Factor p
(For calculating the
length of the pause
that follows the
repeated data)
Square Pulse Data/PRBS Data Data
R1 RZ NRZ R1 RZ NRZ R1 RZ NRZ
30%
…
70%
1 … 16384 4 … 16384
NOTE For the clock source, the Internal YIG Oscillator, External Clock Input
and 10 MHz Reference can be used as the clock source for all
combinations. The Internal Direct and External Direct can only be
used as the clock source for Square pattern mode and NRZ signal
mode.
30%
…
70%
(in increments of 4)
4 … 16384
(in increments of 4)
30%
…
70%
Instrument Modes
The instrument provides the following modes:
• Pulse/Pattern Mode
In this mode, each channel can be set independently to generate a
continuous stream of:
– Square waves (clocks) of fixed width
– Pulses with selectable width or duty cycle
68 Agilent 81133A/81134A Pulse Generator User’s Guide, August 2002
Page 69

Combining Parameters for Signal Generation Using the Agilent 81133A/81134A Pulse Generator
– Data in either RZ, R1 or NRZ format
– Pseudo random bit stream (PRBS) polynomials
For details on these signals, see “Pattern Modes” on page 70.
•Burst Mode
This mode enables you to generate a burst consisting of data
repeated n times followed by continuous zero data.
n
In Burst mode, exactly one burst of data is output after either:
– Applying a external signal at the start input.
– Asserting a manual trigger on one of the remote interfaces.
– Pressing the start button on the user interface.
A burst consists of data packets repeated a selectable number of
times (in data pattern mode).
• Repetitive Burst Mode
This mode enables you to generate a repetitive burst consisting of
data repeated n times. A pause of zeros is inserted between two
successive bursts.
The repetitive burst is specified by two numbers. The first number
(n) defines how often the specified data is repeated. The second
number (p) defines the length of the pause that follows the repeated
data.
p
n
The length of the pause is calculated by:
p x Length of Data Packets
Agilent 81133A/81134A Pulse Generator User’s Guide, August 2002 69
Page 70

Using the Agilent 81133A/81134A Pulse Generator Combining Parameters for Signal Generation
Pattern Modes
You can select the following pattern modes:
•Square
Generates a square wave (clock) of fixed width (50% duty cycle).
•Pulse
Generates pulses with selectable width or duty cycle.
•Data
Generates data in either RZ, R1 or NRZ format. In RZ and R1 mode,
the pulse width can be selected as either width or duty cycle.
•PRBS
Generates a PRBS polynomial of selectable type in either RZ, R1 or
NRZ format. In RZ and R1 mode, the pulse width can be selected as
either width or duty cycle.
You can also select a frequency divider for all pattern modes.
70 Agilent 81133A/81134A Pulse Generator User’s Guide, August 2002
Page 71

Combining Parameters for Signal Generation Using the Agilent 81133A/81134A Pulse Generator
Signal Modes
In Data and PRBS pattern modes, the pulse output format can be
selected from RZ, R1, and NRZ. The timing of the different format is
shown in the following diagram:
111001
RZ
R1
NRZ
•RZ
Return to 0 pulse format.
On every 0 bit of the pattern, the signal remains low. On every 1 bit
of the pattern, the signal goes to high and then back to low after the
time specified by the pulse width or duty cycle parameter.
•R1
Return to 1 pulse format.
On every 1 bit of the pattern, the signal remains high. On every 0 bit
of the pattern, the signal goes to low and then back to high after the
time specified by the pulse width or duty cycle parameter.
•NRZ
Non-return to zero pulse format.
A leading edge is generated for a 0 -> 1 data transition, a trailing
edge is generated for a 1 -> 0 data transition.
Agilent 81133A/81134A Pulse Generator User’s Guide, August 2002 71
Page 72

Using the Agilent 81133A/81134A Pulse Generator Combining Parameters for Signal Generation
Variable Crossover
You can change the crossover point in range 30% … 70% of the NRZ
signal separately for each channel. The variable crossover is used to
artificially close the eye pattern, which simulates distortion.
The crossover adjustment is not calibrated except for the 50% point.
Example The figure below shows the normal and complement output with the
crossover point set to 50% and 70% respectively.
Normal
50 %
Out
50 %
70 %
30 %
Compl.
Out
Normal
Out
Compl.
Out
72 Agilent 81133A/81134A Pulse Generator User’s Guide, August 2002
Page 73

Combining Parameters for Signal Generation Using the Agilent 81133A/81134A Pulse Generator
Clock Sources
The selected clock source defines the time base from which all other
timing parameters are derived. You can select between:
•Internal
The clock is derived from the internal YIG oscillator.
•External
Enable the external clock input (Clock In) to accept an external
clock signal that forms the time base. The frequency is measured
once by selecting the Measure function from the user interface or as
a remote SCPI command (
:MEASure:FREQuency?
Measure Function
).
Clock Source
This value is then used to calculate frequency-dependent values,
like the pulse width or the phase (available at the Channel page).
For more information about the Measure function, please refer to
the Online Help.
• External 10 MHz Reference
Enables the external clock input (Clock In) to apply a 10 MHz
reference clock. This clock is used as a reference for all timing
parameters.
• Int. Direct/Ext. Direct
The direct modes allow changes of frequency without dropouts in
the range of 1:2. They are used for applications (precise clock
source) where dropouts would make a measurement impossible, for
example, PLL frequency sweeps and microprocessor clock sweeps.
–Int. Direct
Allows you to vary the clock derived from the internal YIG
oscillator in the range of one octave.
Agilent 81133A/81134A Pulse Generator User’s Guide, August 2002 73
Page 74

Using the Agilent 81133A/81134A Pulse Generator Combining Parameters for Signal Generation
–Ext. Direct
Allows you to vary the frequency of the external clock signal in
the range of one octave.
In external direct mode, the internal PLL is bypassed. This
ensures that the instrument frequency exactly follows the
external clock.
Range switching occurs at the following frequencies:
– 1680 MHz
– 840 MHz
– 420 MHz
– 210 MHz
– 105 MHz
– 52.5 MHz
– 26.25 MHz
NOTE The range-switching frequencies are based on 1680 MHz divided by
the frequency divider.
74 Agilent 81133A/81134A Pulse Generator User’s Guide, August 2002
Page 75

Combining Parameters for Signal Generation Using the Agilent 81133A/81134A Pulse Generator
Start Mode
When the Ext. Input start mode is selected, the instrument sends the
generated signal to the outputs according to the signal applied at the
Start In connector.
You can define the following parameters that the external signal must
meet:
• Threshold (voltage)
• Termination voltage
• Edge (rising/falling)
If you select the Ext. Input mode, the instrument automatically
switches in armed mode. This means, the instrument waits for the
selected edge to appear.
The further behavior of the instrument depends on the selected
instrument mode:
• In Burst Mode:
As soon as the selected signal appears at the input, the armed mode
is deactivated (the instrument sends one burst and then stops).
• In Pulse/Pattern and Repetitive Burst Mode:
The instrument stays in armed mode (it sends the pattern/burst
every time the selected signal appears). The trigger output
frequency is calculated by dividing the instrument frequency by the
length of the data pattern.
Trigger Out
The trigger output can be set to one of the following modes:
•Trigger on pulse
The trigger output is generated according to the instrument
frequency. It can optionally be divided by 1 up to 2
•Trigger on data
One trigger pulse is generated on every start of the repetitive data
pattern. The trigger output frequency is calculated by dividing the
instrument frequency by the length of the data pattern.
31
- 1 optionally.
Agilent 81133A/81134A Pulse Generator User’s Guide, August 2002 75
Page 76

Using the Agilent 81133A/81134A Pulse Generator Timing of Generated Signals
NOTE The trigger divider does not take the frequency divider of the
channels into account. For a frequency divider of n, n trigger pulses
are generated for each data packet, starting with the first edge of bit
0 of the data packet.
To get one trigger pulse per data packet when the channel divider
factor is not equal to 1, the trigger mode must set to Trigger on
pulse and the divider to n x X, where n is the frequency divider and
X is the data length. For example, if the data length = 32 bits and the
frequency divider of channel 1 = 2, the frequency divider of the
trigger output has to be 64.
The trigger output can be enabled/disabled. The levels of the trigger
output can be set as:
• Low Level – High Level
• Amplitude – Offset
Timing of Generated Signals
The following sections provide information about the signals that can
be generated and shows the typical timings.
The instrument allows you to generate the following signals:
•Clock signals
•Pulses
• Data patterns
•PRBS
• Started bursts
• Repetitive bursts
NOTE You can also set the frequency divider for all channels. The minimum
frequency must remain above 15 MHz.
76 Agilent 81133A/81134A Pulse Generator User’s Guide, August 2002
Page 77

Timing of Generated Signals Using the Agilent 81133A/81134A Pulse Generator
Clock
The following figure shows the typical timing for the clock signal.
Duty Cycle = 50 %
Output
Channel 1
Output
Channel 2
Freq. Divider = 2
Trigger Out
Characteristics • Pulse periods are generated continuously where:
– Delay and deskew of all channels is zero.
– The duty cycle is fixed at 50%.
• The instrument mode is Pulse/Pattern.
• The pattern mode is Square.
• For the clock source, you can select from:
– Internal (YIG Oscillator)
– External signal at Clock Input
– External 10 MHz Reference at Clock Input
– Direct Internal
– Direct External at Clock Input
For more information about the clock sources, see “Clock Sources”
on page 73.
• The Trigger Out is generated with every clock pulse, but can be
optionally divided by any number in the range 1 ... 2
31
– 1.
See also “Trigger Out” on page 75.
Agilent 81133A/81134A Pulse Generator User’s Guide, August 2002 77
Page 78

Using the Agilent 81133A/81134A Pulse Generator Timing of Generated Signals
Pulses
The following figure shows the typical timing for continuous pulses.
Duty Cycle
Output
Channel 1
Delay
Output
Channel 2
Freq. Divider = 2
Trigger Out
Characteristics • Pulse periods can be either generated continuously or can be
started manually or by the arming source.
• Delay, pulse width (or duty cycle) and deskew can be set for each
channel.
• The instrument mode is Pulse/Pattern.
• The pattern mode is Pulse.
• For the clock source, you can select from:
– Internal (YIG Oscillator)
– External signal at Clock Input
– External 10 MHz Reference at Clock Input
For more information about the clock sources, see “Clock Sources”
on page 73.
• The Trigger Out is generated with every clock pulse, but can be
31
optionally divided by any number in the range 1 ... 2
See also “Trigger Out” on page 75.
– 1.
78 Agilent 81133A/81134A Pulse Generator User’s Guide, August 2002
Page 79

Timing of Generated Signals Using the Agilent 81133A/81134A Pulse Generator
Data Pattern
The following figure shows the typical timing for a data pattern.
Data Pattern of 32 bits
Output
RZ
Output
NRZ
Output
R1
Trigger Out
11 0
1
1
01 1
1
Characteristics • A data pattern can be either generated continuously or can be
started manually or by the arming source.
The data length is selectable in the range 32 … 8192 bits (in steps of
32).
• The instrument mode is Pulse/Pattern.
• The pattern mode is Data.
1
• You can select between RZ, NRZ and R1 signal modes for each
output.
In R1 and RZ modes, the pulse width can be selected as either width
or duty cycle.
• You can select between normal and inverted signals for each output.
• For the clock source, you can select from:
– Internal (YIG Oscillator)
– External signal at Clock Input
– External 10 MHz Reference at Clock Input
For more information about the clock sources, see “Clock Sources”
on page 73.
• The Trigger Out marks every start of the repetitive data pattern, as
long as no frequency divider has been applied.
See also “Trigger Out” on page 75.
Agilent 81133A/81134A Pulse Generator User’s Guide, August 2002 79
Page 80

Using the Agilent 81133A/81134A Pulse Generator Timing of Generated Signals
PRBS
See “Data Pattern” on page 79 for for the timing diagram.
Characteristics • A PRBS signal can be either generated continuously or can be
started manually or by the arming source.
The PRBS polynome is selectable from 2
• The instrument mode is Pulse/Pattern.
• The pattern mode is PRBS.
• You can select between RZ, NRZ and R1 signal modes for each
output.
In R1 and RZ modes, the pulse width can be selected as either width
or duty cycle.
• You can select between normal and inverted signals for each output.
• For the clock source, you can select from:
5
– 1 … 231 – 1.
– Internal (YIG Oscillator)
– External signal at Clock Input
– External 10 MHz Reference at Clock Input
For more information about the clock sources, see “Clock Sources”
on page 73.
• The Trigger Out marks every start of the repetitive PRBS, as long as
no frequency divider has been applied.
See “Trigger Out” on page 75.
80 Agilent 81133A/81134A Pulse Generator User’s Guide, August 2002
Page 81

Timing of Generated Signals Using the Agilent 81133A/81134A Pulse Generator
Started Burst
The following figure shows the typical timing for the started burst. The
bursts are started by the rising edge of the arming source.
Arming Source
Triggered by:
External Input
Manual Start
Output
Trigger Out
101
Data Pattern (Burst of 2)
00101
00 0000
Continuous Zeros
Characteristics • A burst of repeated data is started manually or by the arming
source.
• You can select the number of repeated bursts in the range
1 … 16384.
• The instrument mode is Burst.
• The pattern mode is Data.
• You can select between RZ, NRZ and R1 signal modes for each
output.
In R1 and RZ modes, the pulse width can be selected as either width
or duty cycle.
• You can select between normal and inverted signals for each output.
• For the clock source, you can select from:
– Internal (YIG Oscillator)
– External signal at Clock Input
– External 10 MHz Reference at Clock Input
For more information about the clock sources, see “Clock Sources”
on page 73.
• The Trigger Out marks every start of the repetitive data pattern, as
long as no frequency divider has been applied.
See also “Trigger Out” on page 75.
Agilent 81133A/81134A Pulse Generator User’s Guide, August 2002 81
Page 82

Using the Agilent 81133A/81134A Pulse Generator Timing of Generated Signals
Repetitive Burst
The following figure shows the typical timing for the repetitive burst.
Burst = 4 x Data Pattern 4 null data packets
Output
Channel 1
Trigger Out
Data Data
Characteristics • A burst of repeated data can be either generated continuously or
Data Data
can be started manually or by the arming source.
• You can select the number of repeated data in the range 4 ... 16384
(in increments of 4).
• You can specify the factor p for calculating the length of the pause
that follows the repeated data in the range 4 ... 16384 (in increments
of 4):
null data length = Data pattern length x p
• The instrument mode is RBurst.
• The pattern mode is Data.
• You can select between RZ, NRZ and R1 signal mode for each output.
In R1 and RZ mode, the pulse width can be selected as either width
or duty cycle.
• You can select between normal and inverted signals for each output.
• For the clock source, you can select from:
– Internal (YIG Oscillator)
– External signal at Clock Input
– External 10 MHz Reference at Clock Input
For more information about the clock sources, see “Clock Sources”
on page 73.
• The Trigger Out marks every start of the repetitive data pattern, as
long as no frequency divider has been applied.
See also “Trigger Out” on page 75.
82 Agilent 81133A/81134A Pulse Generator User’s Guide, August 2002
Page 83

Jitter Modulation Using the Agilent 81133A/81134A Pulse Generator
Jitter Modulation
The external source for jitter modulation is applied to the delay
control input. Jitter modulation can be turned on and off individually
for each channel. Either one of two fixed sensitivities can be selected.
The source for the jitter modulation input is assumed to be either a
function generator or an arbitrary waveform generator. Both have the
capability of setting the output levels. Therefore, the instrument has no
capabilities of adjusting the jitter modulation input.
Saving and Recalling Settings
For permanently saving the instrument setting, nine save/recall
registers are provided.
All parameters are saved, including the data. User interface specifics,
such as the current visible page, are not saved.
When the instrument is turned on, the last used setting is restored.
Agilent 81133A/81134A Pulse Generator User’s Guide, August 2002 83
Page 84

Using the Agilent 81133A/81134A Pulse Generator Saving and Recalling Settings
84 Agilent 81133A/81134A Pulse Generator User’s Guide, August 2002
Page 85

Updating the Firmware
Firmware updates of the instrument can be done by using one of the
supported programming interfaces.
Updates and patches are available on the Agilent Web at:
http://www.agilent.com/find/pulse_generator
They are applied by downloading the update/patch from the web
(single executable) and running it.
The connection path to the instrument is queried for the time the
executable is run. A warning is issued if a new firmware revision
would be overwritten by an older one. Nevertheless, this down-grade
can be forced.
Updating the Firmware
Prerequisites
The instrument must be connected to a PC through one of the
supported remote programming interfaces. The operating system
running on the PC must be either Windows 98, Windows NT or
Windows 2000.
An upgrade/patch always includes all parts of the software (that is
firmware and BIOS).
For more information, please refer to the Programming Guide
delivered on the product CD.
Agilent 81133A/81134A Pulse Generator User’s Guide, August 2002 85
Page 86

Updating the Firmware
86 Agilent 81133A/81134A Pulse Generator User’s Guide, August 2002
Page 87

Troubleshooting
This chapter provides basic troubleshooting tips that you can use if the
instrument is not performing as expected.
Instrument out of Specs
The specification is valid within +/- 10 degree Celsius after running
Selfcalibration. If the operating temperature changes, you can run the
SelfCal function. SelfCal is started by pressing the SelfCal softkey on
the Main page.
Outputs Disabled
The outputs are automatically turned off to protect the instrument
when they are not terminated correctly.
In the user interface, check the termination mode and voltage for the
output line in question, and make sure that the actual termination
matches this.
Unlock LED Lit
The Unlock LED lights up when an external clock source is used, and
the set frequency/period of the clock source does not match the actual
signal.
In this case, you can either enter the frequency of the clock source
manually, or press Measure to cause the instrument to measure the
frequency of the clock source.
Display is Black
If the display is black, but you are sure the instrument is running, it is
possible that the display was shut off remotely.
To reactivate the display, press any key. As a last resort, you can power
the instrument down and back up. Before you do this, though, make
sure that no one is carrying out remote tests using the instrument.
Agilent 81133A/81134A Pulse Generator User’s Guide, August 2002 87
Page 88

Troubleshooting
Instrument does not Respond
If the instrument does not respond when you press a button, it is
possible that it is being used remotely.
To reactivate the instrument, press the Local key (if this is available).
As a last resort, you can power the instrument down and back up.
Before you do this, though, make sure that no one is carrying out
remote tests using the instrument.
Instrument not Operable via LAN
If the instrument cannot be programmed via LAN, make sure that you
have installed the latest Agilent I/O library on your computer.
Visit the Agilent web site for the newest version.
88 Agilent 81133A/81134A Pulse Generator User’s Guide, August 2002
Page 89

Index
Index
A
advanced signals
setup 27
Aux page 67
B
benefits 14
Burst (instrument mode) 69
burst signal
example 46
C
channel page
pages
channel 66
cleaning recommendations 11
clock
timing 77
Clock Input 16
clock jitter 14
clock signal
example 28
Clock Source
Ext. Direct 73
External 73
External 10 MHz Reference 73
Int. Direct 73
Internal 73
clock sources 73
Config page
pages
Config 67
D
data 14
Data (pattern mode) 70
Data page 67
data pattern
example 40
timing 79
declaration of conformity 12
Delay Control Input 16
delay modulation range 14
delay range 14
E
entering new values 23
environmental conditions
requirements 7
error messages 87
example
burst signal 46
clock signal 28
data pattern 40
pulse signal 36
repetitive burst signal 52
signals for stressed eye diagram
measurement 58
example for jitter modulation 60
example for setting the variable
crossover 60
Ext. Direct (Clock Source) 73
External (Clock Source) 73
External 10 MHz Reference (Clock
Source) 73
F
frequency range 14
front panel 15
front panel inputs 16
front panel outputs 16
G
generated signals
timings 76
generic signal
setup 27
GPIB connector 18
graphical user interface 15
pages 66
ground the instrument 8
I
initial inspection 9
inputs 16
Clock Input 16
Delay Control Input 16
Start Input 16
instrument cover removing 8
instrument mode
Pulse/Pattern 68
instrument modes 68
Burst 69
Repetitive Burst 69
instrument panel 66
Int. Direct (Clock Source) 73
Internal (Clock Source) 73
internal PLL 74
J
jitter modulation 83
example 60
K
key features 14
clock jitter 14
data 14
delay modulation range 14
delay range 14
frequency range 14
PRBS 14
transition times 14
voltage amplitude 14
L
LAN connector 18
M
Main page 66
modes
instrument 68
pattern 70
signal 71
trigger output 75
modifying of units 24
modifying of values 24
N
navigation
through pages 20
through parameters 21
navigation knob 15
NRZ 71
number field
changing 23
numeric keys 15
Agilent 81133A/81134A Pulse Generator User’s Guide, August 2002 89
Page 90

Index
O
outputs 16
inverted Output 16
normal Output 16
Trigger Output 16
P
pages
Aux 67
Data 67
graphical user interface 66
Main 66
scrolling 19
pages overview 20
parameter
selecting 21
parameter values
changing 19
pattern mode
Data 70
PRBS 70
Pulse 70
Square 70
pattern modes 70
PRBS 14
timing 80
PRBS (pattern mode) 70
Pulse (pattern mode) 70
pulse signal
example 36
Pulse/Pattern (instrument mode) 68
pulses
timing 78
R
R1 71
rear panel 18
recalling settings 83
repetitive burst
timing 82
Repetitive Burst (instrument mode) 69
repetitive burst signal
example 52
requirements
cleaning 11
environmental conditions 7
power supply 8
safety 7
ventilation 10
RZ 71
S
safety requirements 7
saving settings 83
scope
setup 63
setting up
advanced signals 27
generic signals 27
signal generation
conbining parameters 68
signal mode
NRZ 71
R1 71
RZ 71
signal modes 71
signals for stressed eye diagram
measurement
example 58
single digits
changing 25
softkeys 15
Square (pattern mode) 70
Start Input 16
start mode 75
T
tab keys 15
timing
clock 77
data pattern 79
PRBS 80
pulses 78
repetitive burst 82
triggered burst 81
transition times 14
Trigger Out
modes 75
Trigger Output 16
trigger output
levels 76
trigger output levels 76
triggered burst
timing 81
troubleshooting 87
U
units
modifying 24
USB connector 18
V
values
entering 23
modifying 24
variable crossover 72
variable crossover setup
example 60
ventilation requirements 10
voltage amplitude 14
W
waveform generator
setup 63
90 Agilent 81133A/81134A Pulse Generator User’s Guide, August 2002
Page 91

Page 92

Copyright Agilent Technologies 2002
Printed in Germany August 2002
sA
 Loading...