

Page 1

Agilent 34410A/11A
6 ½ Digit Multimeter
(includes the L4411A 1U DMM)
User’s Guide
Agilent Technologies
Page 2

Notices
© Agilent Technologies, Inc. 2005, 2006,
2007
No p art o f this manual may be rep roduc ed in
any form or by any means (including electronic storage and retrieval or translation
into a foreign language) without prior agreement and written consent from Agilent
Technologies, Inc. as governed by United
States and international copyright laws.
Manual Part Number
34410-90001
Edition
Fourth Edition. February 2007
Printed in Malaysia
Agilent Technologies, Inc.
3501 Stevens Creek Blvd.
Santa Clara, CA 95052 USA
Microsoft® and Windows® are U.S. registered trademarks of Microsoft Corporation.
Software Revision
This guide is valid for the firmware that was
installed in the instrument at the time of
manufacture. However, upgrading the firmware may add or change product features.
For the latest firmware and documentation,
go to the product page at:
www.agilent.com/find/34410A
or
www.agilent.com/find/34411A
or
www.agilent.com/find/L4411A
Warranty
The material contained in this document is provided “as is,” and is subject to being changed, without notice,
in future editions. Further, to the maximum extent permitted by applicable
law, Agilent disclaims all warranties,
either express or implied, with regard
to this manual and any information
contained herein, including but not
limited to the implied warranties of
merchantability and fitness for a particular purpose. Agilent shall not be
liable for errors or for incidental or
consequential damages in connection with the furnishing, use, or performance of this document or of any
information contained herein. Should
Agilent and the user have a separate
written agreement with warranty
terms covering the material in this
document that conflict with these
terms, the warranty terms in the separate agreement shall control.
Technology Licenses
The hardware and/or software described in
this document are furnished under a license
and may be used or copied only in accordance with the terms of such license.
Restricted Rights Legend
U.S. Government Restricted Rights. Software and technical data rights granted to
the federal government include only those
rights customarily provided to end user customers. Agilent provides this customary
commercial license in Software and technical data pursuant to FAR 12.211 (Technical
Data) and 12.212 (Computer Software) and,
for the Department of Defense, DFARS
252.227-7015 (Technical Data - Commercial
Items) and DFARS 227.7202-3 (Rights in
Commercial Computer Software or Computer Software Documentation).
Safety Notices
CAUTION
A CAUTION notice denotes a haz-
ard. It calls attention to an operating procedure, practice, or the like
that, if not correctly performed or
adhered to, could result in damage
to the product or loss of important
data. Do not proceed beyond a
CAUTION notice until the indicated
conditions are fully understood and
met.
WARNING
A WARNING notice denotes a
hazard. It calls attention to an
operating procedure, practice, or
the like that, if not correctly performed or adhered to, could result
in personal injury or death. Do not
proceed beyond a WARNING
notice until the indicated conditions are fully understood and
met.
2 34410A/11A/L4411A User’s Guide
Page 3
Safety Information
Do not defeat power cord safety ground feature. Plug in to a grounded (earthed) outlet.
Do not use product in any manner not specified by the manufacturer.
Do not install substitute parts or perform
any unauthorized modification to the product. Return the product to an Agilent Technologi es Sales and S ervice Office for service
and repair to ensure that safety features are
maintained.
Safety Symbols
Earth Ground
Chassis Ground
Risk of electric shock
Refer to manual for additional safety information
CAT II (300V) IEC Measurement Category II.
Inputs may be connected to
mains (up to 300 VAC) under
Category II overv oltage conditions.
WARNING
Main Power and Test Input Disconnect: Unplug instrument from
wall outlet, remove power cord,
and remove all probes from all
terminals before servicing. Only
qualified, service-trained personnel should remove the cover from
the instrument.
WARNING
Line and Current Protection
Fuses: For continued protection
against fire, replace the line fuse
and the current-protection fuse
only with fuses of the specified
type and rating.
WARNING
Front/Rear Switch: Do not
change the position of the
Front/Rear switch on the front
panel while signals are present on
either the front or rear set of terminals. The switch is not intended
as an active multiplexer. Switching while high voltages or currents are present may cause
instrument damage and lead to
the risk of electric shock.
WARNING
IEC Measurement Category II. The
HI and LO input terminals may be
connected to mains in IEC Category II installations for line voltages up to 300 VAC. To avoid the
danger of electric shock, do not
connect the inputs to mains for
line voltages above 300 VAC. See
"IEC Measurement Category II
Overvoltage Protection" on the
following page for further information.
WARNING
Protection Limits: To avoid instrument damage and the risk of electric shock, do not exceed any of
the Protection Limits defined in
the following section.
34410A/11A/L4411A User’s Guide 3
Page 4
Protection Limits
The A gilent 3441 0A/11A and L4411A D igital
Multimeters provide protection circuitry to
prevent damage to the instrument and to
protect against the danger of electric shock,
provided the Protection Limits are not
exceeded. To ensure safe operation of the
instrument, do not exceed the Protection
Limits shown on the front and rear panel,
and defined below:
Note: The front-panel terminals are shown
above. The rear-panel terminals are identical. The Front/Rear switch selects the terminal set to be used. Do not operate this
switch while signals are present on the
front or rear terminals. The current-protec-
tion fuse is on the rear panel.
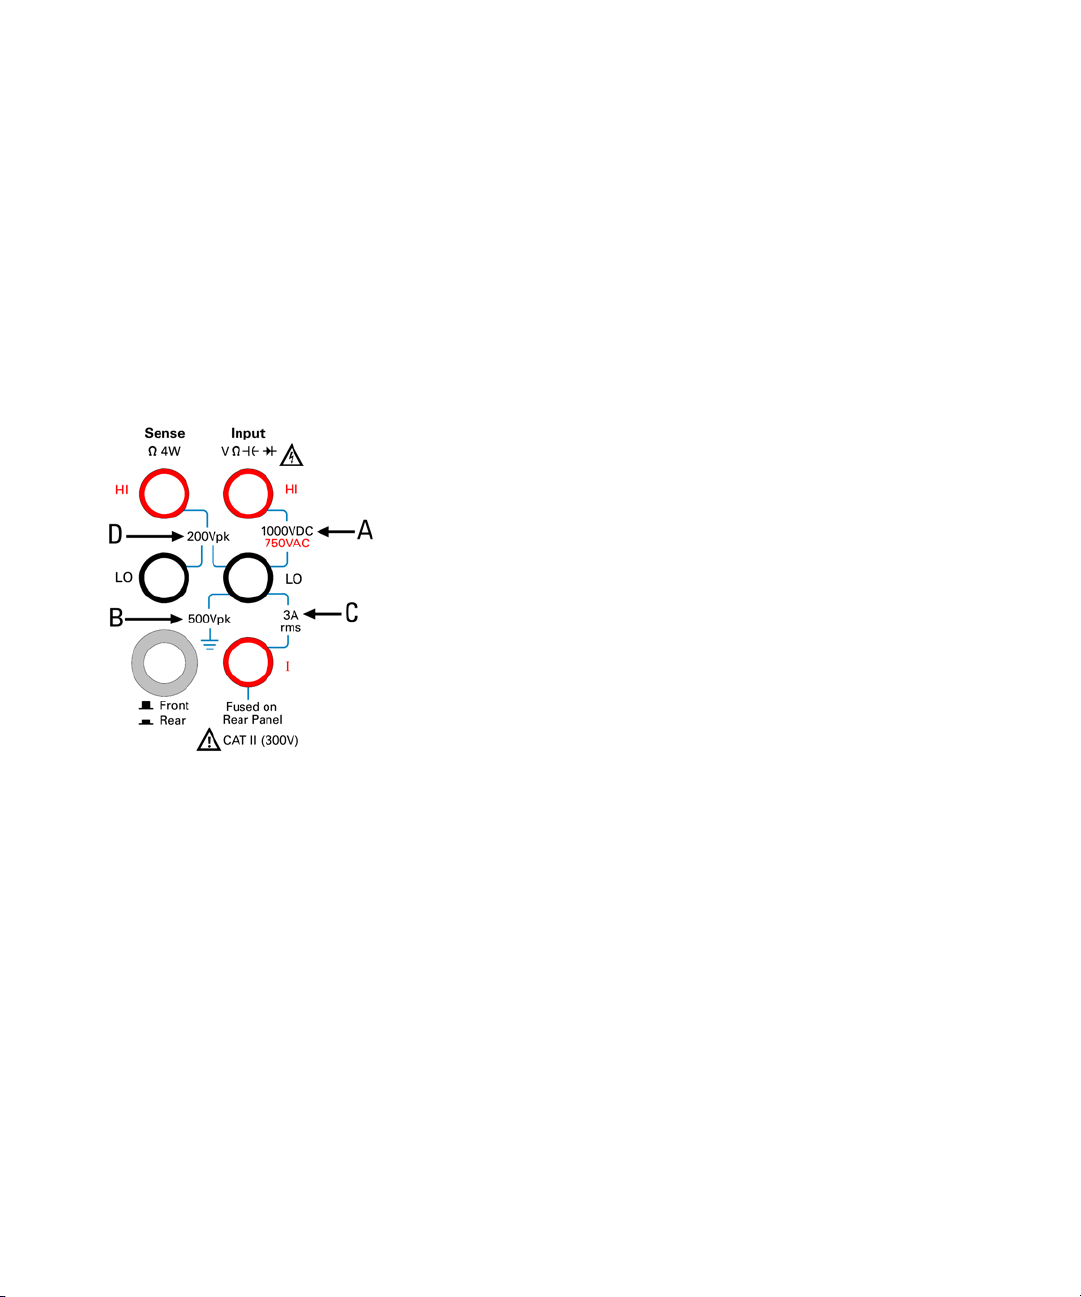
Input Terminal Protection
Limits
Protection Limits are defined for the input
terminals:
Main Input (HI and LO) Terminals. The HI
and LO input terminals are used for voltage,
resistance, capacitance, and diode test
measurements. Two Protection Limits are
defined for these terminals:
HI to LO Protection Limit. The Protection
Limit from HI to LO ("A" in the figure at
left) is 1000 VDC or 750 VAC, which is
also the maximum voltage measurement.
This limit can also be expressed as 1000
Vpk maximum.
LO to Ground Protection Limit. The LO
input terminal can safely "float" a maximum of 500 Vpk relative to ground. T his is
Protection Limit "B" in the figure.
As is implied by the above limits, the Protection Limit for the HI input terminal is a maximum of 1500 Vpk relative to ground.
Current Input Terminal. The current input
("I") terminal has a Protection Limit of 3A
(rms) maximum current flowing from the LO
input terminal. This is Protection Limit "C"
in the figure. Note that the current input terminal will be at approximately the same
voltage as the LO terminal.
Note: The current-protection circuitry
includes a fuse on the rear panel. To maintain protection, replace this fuse only with a
fuse of the specified type and rating.
Sense Terminal Protection
Limits
The HI and LO sense terminals are used
only for four-wire resistance and temperature measurements ("
tion Limit is 200 Vpk for all of the terminal
pairings ("D" in the figure):
LO sense to LO input.
HI sense to LO input.
HI sense to LO sense.
Ω 4W"). The Protec-
Note: The 200 Vpk limit on the sense terminals is the Protection Limit. Operational
voltages in resistance measurements are
much lower — less than 10 V in normal
operation.
IEC Measurement Category II
Overvoltage Protection
To protect against the danger of electric
shock, the A gi lent 34410A/11A and L4411A
Digital Multimeters provide overvoltage protection for line-voltage mains connections
meeting both of the following conditions:
The HI and LO input terminals are connected to the mains under Measurement
Category II conditions, defined below,
and
The mains are limited to a maximum line
voltage of 300 VAC.
IEC Measurement Category II includes electrical devices connected to mains at an outlet on a branch circuit. Such devices include
most small appliances, test equipment, and
other devices that plug into a branch outlet
or socket. The 34410A/11A and L4411A
may be used to make measurements with
the HI and LO inputs connected to mains in
such devices, or to the branch outlet itself
(up to 300 VAC). However, the 34410A/11A
and L4411A may not be used with its HI and
LO inputs connected to mains in permanently installed electrical devices such as
the main circuit-breaker panel, sub-panel
disconnect boxes, or permanently wired
motors. Such devices and circuits are subject to overvoltages that may exceed the
protection limits of the 34410A/11A and
L4411A.
Note: Voltages above 300 VAC may be measured only in circuits that are isolated from
mains. However, transient overvoltages are
also present on circuits that are isolated
from mains. The Agilent 34410A /11A and
L4411A are designed to safely withstand
occasional transient overvoltages up to
2500 Vpk. Do not use this equipment to
measure circuits wh ere transient overvoltages could exceed this level.
4 34410A/11A/L4411A User’s Guide
Page 5

Additional Notices
Waste Electrical and
Electronic Equipment (WEEE)
Directive 2002/96/EC
This product complies with the WEEE Directive (2002/96/EC) marking requirement.
The affixed product label (see below) indicates that you must not discard this electrical/electronic product in domestic
household waste.
Product Category: With reference to the
equipment types in the WEEE directive
Annex 1, this product is classified as a
"Monitoring and Control instrumentation"
product.
Do not dispose in domestic household
waste.
To return unwanted products, contact your
local Agilent office, or see
www.agilent.com/environment/product
for more information.
Agilent 34138A Test Lead Set
The Agilent 34410A/11A is provided with
an Agilent 34138A Test Lead Set, described
below.
Test L e a d Ra t i n g s
Test Leads - 1000V, 15A
Fine Tip Probe Attachments - 300V, 3A
Mini Grabber Attachment - 300V, 3A
SMT Grabber Attachments - 300V, 3A
Operation
The Fine Tip, Mini Grabber, and SMT Grabber attachments plug onto the probe end of
the Test Leads.
Maintenance
If any portion of the Test Lead Set is worn or
damaged, do not use. Replace with a new
Agilent 34138A Test Lead Set.
WARNING
If the Test Lead Set is used in a
manner not specified by Agilent
Technologies, the protection provided by the Test Lead Set may be
impaired. Also, do not use a damaged or worn Test Lead Set.
Instrument damage or personal
injury may result.
34410A/11A/L4411A User’s Guide 5
Page 6
DECLARATION OF CONFORMITY
According to EN ISO/IEC 17050-1:2004
Manufacturer’s Name:
Manufacturer’s Address:
Agilent Technologies, Incorporated
900 South Taft Ave
Loveland, CO 80537
USA
Declares under sole responsibility that the product as originally delivered
Product Name:
Model Number:
Product Options:
6 ½ Digit Multimeter
34410A, 34411A, L4411A
This declaration covers all options of the above product(s)
complies with the essential requirements of the following applicable European Directives, and
carries the CE marking accordingly:
Low Voltage Directive (73/23/EEC, amended by 93/68/EEC)
EMC Directive (89/336/EEC, amended by 93/68/EEC)
and conforms with the following product standards:
EMC
IEC 61326:2002 / EN 61326:1997+A1:1998 +A2:2000+A3:2003
CISPR 11:1990 / EN 55011:1990 Class A Group 1
IEC 61000-4-2:1995 / EN 61000-4-2:1995 4 kV/4 kV contact/air
IEC 61000-4-3:1995 / EN 61000-4-3/1995 3 V/m, 80-1000 MHz
IEC 61000-4-4:1995 / EN 61000-4-4:1995 0.5 kV signal lines, 1 kV power lines
IEC 61000-4-5:1995 / EN 61000-4-5:1995 0.5 kV line-line, 1 kV line-ground
IEC 61000-4-6:1996 / EN 61000-4-6:1996 3 V, 0.15-80 MHz
IEC 61000-4-11:1994 / EN 61000-4-11:1994 1 cycle, >95%
Canada: ICES-001:2004
Australia/New Zealand: AS/NZS CISPR 11:2002
Safety
Standard Limit
Reference Standards
The product was tested in a typical configuration with Agilent Technologies test systems.
IEC 61010-1:2001 / EN 61010-1:2001
168520
Canada: CAN/CSA-C22.2 No. 61010-1-04,
USA: ANSI/UL 61010-1:2005
Supplementary Information:
This DoC applies to above-listed products placed on the EU market after:
17 January 2007
Date
For further information, please contact your local Agilent Technologies sales office, agent or distributor,
or Agilent Technologies Deutschland GmbH, Herrenberger Straße 130, D 71034 Böblingen, Germany.
David L. Kepler
Quality Manager
6 34410A/11A/L4411A User’s Guide
Page 7

Agilent 34410A/11A/L4411A at a Glance
The Agilent 34410A, 34411A, and L4411A multimeters provide
6½-digit, high-performance dc and ac measurements.
• Voltage and Current Measurements. DC and AC
• Resistance Measurements. 2-wire and 4-wire.
•Continuity and Diode Testing.
• Frequency and Period Measurements.
• Capacitance Measurements.
• Temperature Measurements. Thermistor and RTD.
• Auto and Manual Ranging.
• Math Features. Null, dB, dBm, limits, and statistics.
• Data Logging. Into non-volatile instrument memory.
• Instrument State Storage. User-defined named states.
• GPIB (IEEE-488), USB, and LAN. Three standard remote
interfaces. LXI Class C Compliant.
• Web I n t e r fa ce. Direct web browser access to instrument.
• SCPI Compatibility. For easy instrument programming.
• Voltmeter Complete and External Trigger Signals.
Synchronize with other instruments in your test system.
(true-rms).
Note: This manual covers operation of the Agilent 34410A,
34411A, and L4411A 6½ Digit Multimeters. The features
described in this manual, except where otherwise noted, apply
to each of the multimeters.
Key Differences:
Model 34410A Model 34411A/L4411A
• Up to 10,000 readings per second. • Up to 50,000 readings per second.
• Reading memory (buffer) up
to 50,000 readings.
• Reading memory (buffer) up
to 1 million readings.
• Pretriggering, internal level triggering,
and digitizer specifications.
34410A/11A/L4411A User’s Guide 7
Page 8

The Front Panel at a Glance (34410A/11A)
1 On/Off Switch 8 Exit Key (Auto Range)
2 Measurement Function Keys 9 Shift Key (Local)
3 Configuration Key 10 Menu Navigation Keypad (Range)
4 Second Display Key (Reset) 11 Front/Rear Switch
5 Null Key (Math Functions) 12 HI and LO Sense Terminals (4-wire measurements)
6 Data Logger Key (Utility) 13 HI and LO Input Terminals (all functions except current)
7 Trigger Key (Auto Trig) 14 Current Input Terminal (ac and dc current)
WARNING
Front/Rear Switch: Do not change the position of the Front/Rear switch on the front panel while signals are
present on either the front or rear set of terminals. This switch is not intended as an active multiplexer.
Switching while high voltages or currents are present may cause instrument damage and lead to the risk of
electric shock.
8 34410A/11A/L4411A User’s Guide
Page 9
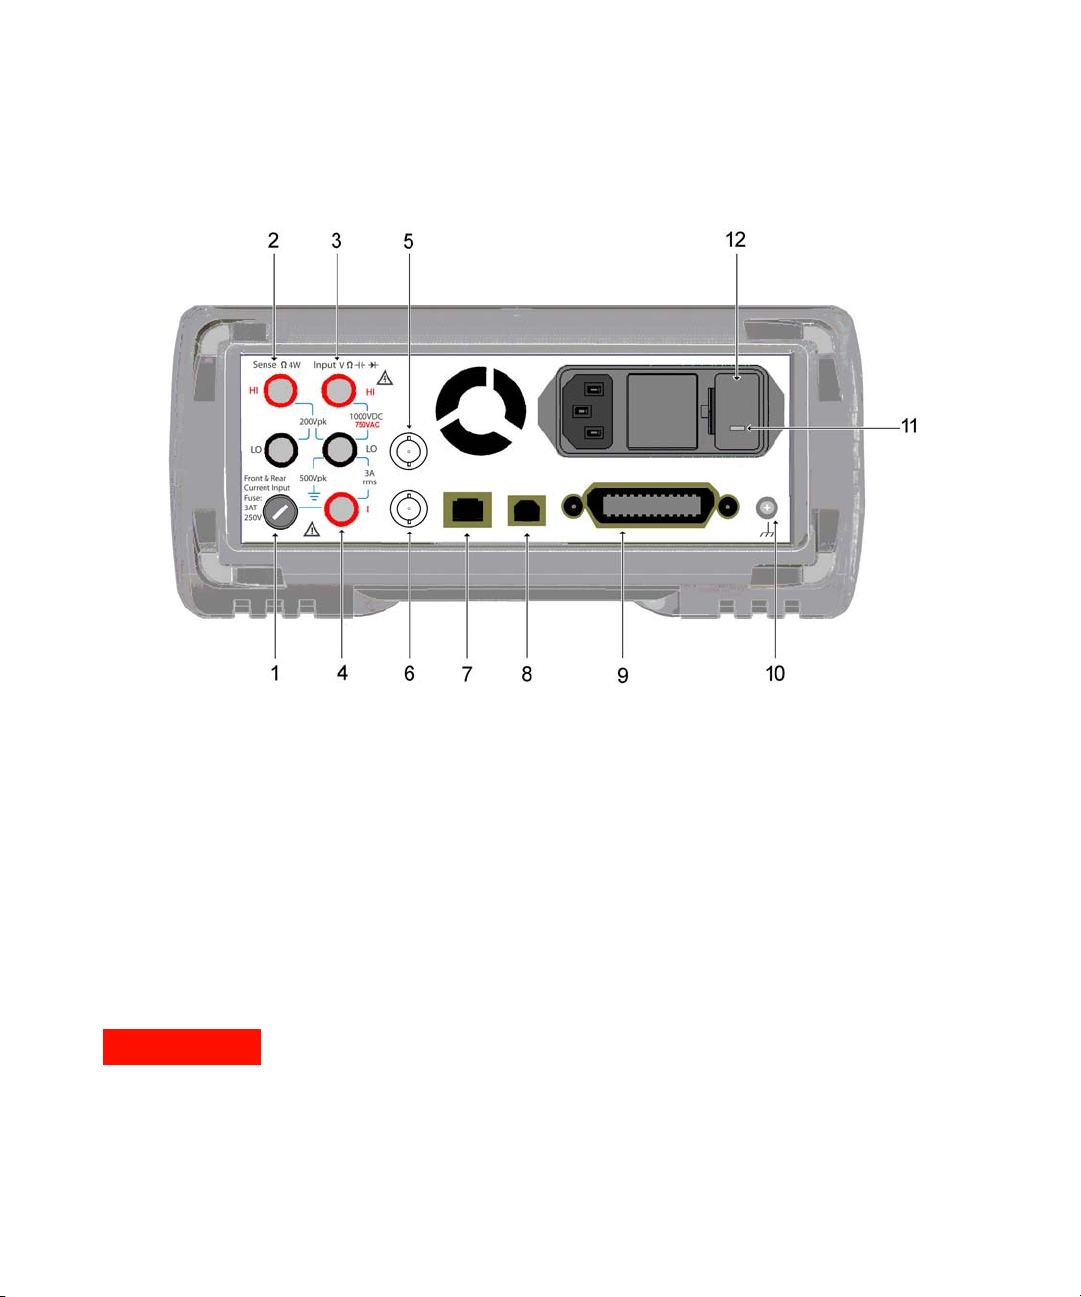
The Rear Panel at a Glance (34410A/11A)
1 Current Input Fuse (front and rear)
2 HI and LO Sense Terminals (4-wire resistance and temperature)
3 HI and LO Input Terminals (voltage, resistance, and other functions)
4 Current Input Terminal (ac current and dc current only)
5 External Trigger Input (BNC)
6 Voltmeter Complete Output (BNC)
7 LAN Interface Connector
8 USB Interface Connector
9 GPIB Interface Connector
10 Chassis Ground
11 Power-Line Voltage Setting
12 Power-Line Fuse-Holder Assembly
WARNING
For protection from electrical shock, the power cord ground must not be defeated. For continued protection
from fire, replace fuses only with fuses of the specified type and rating.
34410A/11A/L4411A User’s Guide 9
Page 10

The Display at a Glance (34410A/11A)
Alphanumeric Displays:
1 Primary display line
2 Secondary display line
Annunciators: Annunciators:
3
(measurement in progress) 12 Shift (shift key just pressed)
*
4 Hi-Z (high input impedance, Vdc only) 13 Math (dB or dBm function enabled)
5 OComp (offset compensation) 14 Stats (statistics functions enabled)
6 ManRng (manual ranging) 15 Limits (limit-test function enabled)
7 Trig (wait-for-trigger state) 16 Rear (rear-panel terminals active)
8 Hold (reading hold) 17 4W (four-wire ohms or temperature)
9 Remote (remote interface operation) 18 (continuity test function enabled)
10 Error (error in queue) 19 (diode-check function enabled)
11 Null (null function enabled)
The following key refers to the primary front-panel display.
For further information, see Chapter 2, “Features and
Functions”.
10 34410A/11A/L4411A User’s Guide
Page 11

In This Guide…
1Quick Start
In this chapter you prepare the multimeter for use and become
familiar with the most common front-panel operations.
2 Features and Functions
In this chapter you will find a detailed description of the
multimeter’s capabilities and operation. This chapter presents
both front-panel and remote interface operation of the
instrument.
Note. Refer to the Agilent 34410A/11A/L4411A Programmer’s
Reference help system for a detailed description of the SCPI
commands.
3Remote Interface
This chapter describes how to connect the multimeter using a
remote interface.
4 Measurement Tutorial
This chapter discusses measurement techniques and
considerations to help you reduce sources of error and obtain
the best accuracy from your instrument.
5 Specifications
This chapter lists the 34410A/11A/L4411A multimeter
specifications and describes how to interpret these
specifications.
34410A/11A/L4411A User’s Guide 11
Page 12

12 34410A/11A/L4411A User’s Guide
Page 13

Agilent 34410A/11A/L4411A 6½ Digit Multimeter
User’s Guide
1
Quick Start
This chapter gives you a quick overview of the 34410A/11A
multimeter’s front panel and basic features. The examples will
help you become familiar with your meter, its measuring
functions, and basic operation.
Basic Multimeter Operations 20
Preparing the Multimeter for Use 20
Using the Front Panel (34410A/11A) 21
Front-Panel Keys 21
Front-Panel Display Shortcuts 22
Making Basic Measurements (34410A/11A) 23
To M ea s ur e D C Vo l ta ge 24
To Measure AC Voltage 24
To Measure DC Current 25
To Measure AC Current 25
To Make a 2-Wire Resistance Measurement 26
To Make a 4-wire Resistance Measurement 26
To Measure Frequency 27
To M ea s ur e P er i od 27
To Measure Capacitance 28
To Make a 2-Wire Temperature Measurement 29
To Make a 4-Wire Temperature Measurement 29
To Te st C on ti nu i ty 30
To Check Diodes 30
Other Basics of Operation 31
If the Multimeter Does Not Turn On 31
To Replace the Power-Line Fuse (34410A/11A) 32
To Ad j us t t h e Ca r r ying H andl e 33
To Rack Mount the Multimeter (34410A/11A) 34
Agilent Technologies
19
Page 14

1Quick Start
Basic Multimeter Operations
This section introduces the basics of the 34410A/11A multimeter, and how to
use it.
NOTE
For basic information unique to the L4411A, refer to the L4411A Getting Started Guide
(p/n L4411-90001).
Preparing the Multimeter for Use
To verify that your 34410A or 34411A multimeter is ready for use:
1 Check the list of supplied items.
Verify that you have received the following items with your multimeter. If
anything is missing, contact your nearest Agilent Sales Office.
• Test Lead Set.
• Power Cord.
• USB 2.0 Cable.
• Agilent 34410A/11A/L4411A Product Reference CD–ROM.
• Agilent Automation Ready (IO Libraries) CD–ROM.
• Certificate of Calibration.
The product documentation, including the Agilent 34410A/11A/L4411A
Programmer’s Reference Help and the product manuals, are included on
the Product Reference CD–ROM. Printed (hardcopy) manuals are optional,
and included only if you ordered them.
2 Connect the power cord and turn on the multimeter.
The front–panel display will light up while the multimeter performs its
power–on self–test. The multimeter powers up in the dc voltage function
with autoranging enabled (unless a previous user has configured power–up
using a non–default stored state (see “Multimeter State Storage” on
page 48).
20 34410A/11A/L4411A User’s Guide
Page 15
Using the Front Panel (34410A/11A)
This section introduces the 34410A/11A multimeter front panel.
Front-Panel Keys
The front panel provides keys to select various functions and operations.
Pressing a measurement function key (e.g. ) selects that function. Press
to enter the configuration menu for the selected measurement function.
Most keys have a shifted function printed in blue above the key. To perform a
shifted function, press , and then press the key that has the desired label
above it.
To view and select menu items, use the menu navigation keypad (for example
the or keys). The current (or default) selection is displayed in FULL
BRIGHTNESS. All other choices are displayed in HALF BRIGHTNESS. The selections
on each menu level scroll, but do not wrap. Arrow annunciators on the second
display line indicate additional selections to the left or right. To accept a
selection, press .
To set numeric parameters, use or to select a digit, and or to
increase or decrease that digit.
Quick Start 1
34410A/11A/L4411A User’s Guide 21
Page 16
1Quick Start
Front-Panel Display Shortcuts
Direct front panel shortcuts are provided for three commonly used display
functions: ranging, digit masking, and integration time.
Ranging. The multimeter’s manual range can be set directly from the
navigation keypad.
To manually change the current multimeter range, press or . The
ManRng annunciator will light, and the selected range (e.g. 100mV RANGE) will
be briefly displayed on the second line.
Digit Masking. The navigation keypad provides a shortcut to mask (change
the number of digits displayed) the reading on the main display, easing
readability.
To enable digit masking during any measurement function, press or
. DIGIT MASK will be displayed, along with a list of choices (3.5, 4.5, 5.5,
6.5 and AUTO) on the second display line. Press
or to scroll through and select one of these settings, and then press
.
Integration Time (Bandwidth, Gate Time). Four measurement functions allow
you to select the multimeter’s integration time: dc voltage, dc current,
resistance, and temperature. The ac voltage and current measurements allow
you to select the ac signal filter (bandwidth). The frequency/period function
allows you to select gate time. The navigation keypad provides a shortcut for
quickly changing these settings.
• If the multimeter is configured to take the measurement using an
integration time in NPLCs, pressing or during front panel
measurement operations will increase or decrease the integration time
setting.
• If either the ac voltage or ac current measurement function is selected,
pressing or during front panel measurement operations will
increase or decrease the bandwidth setting.
• If the frequency/period measurement function is selected, pressing or
during front panel measurement operations will increase or decrease
the gate time setting.
22 34410A/11A/L4411A User’s Guide
Page 17

Making Basic Measurements (34410A/11A)
This section introduces the many types of measurements that you can make
with your 34410A/11A multimeter, and how to make connections for each
measurement. Most basic measurements can be taken using the factory
default settings. A more complete description of all multimeter functions,
measurement parameter configuration and remote interface operation is
provided in Chapter 2.
For each measurement, connect the test leads as shown. The test lead
connections are the same for the front or rear set of terminals.
Before making test lead connections, use the Front/Rear button on the front
panel to select either the front or rear set of terminals. The Rear annunciator
lights if the rear terminals are selected.
WARNING
Do not press the Front/Rear button while signals are present on either the front or rear
set of terminals. Switching while high voltages or currents are present can cause
instrument damage, and may increase the risk of electric shock.
Quick Start 1
NOTE
34410A/11A/L4411A User’s Guide 23
For basic measurement connection information unique to the L4411A, refer to the L4411A
Getting Started Guide (p/n L4411-90001).
Page 18

1Quick Start
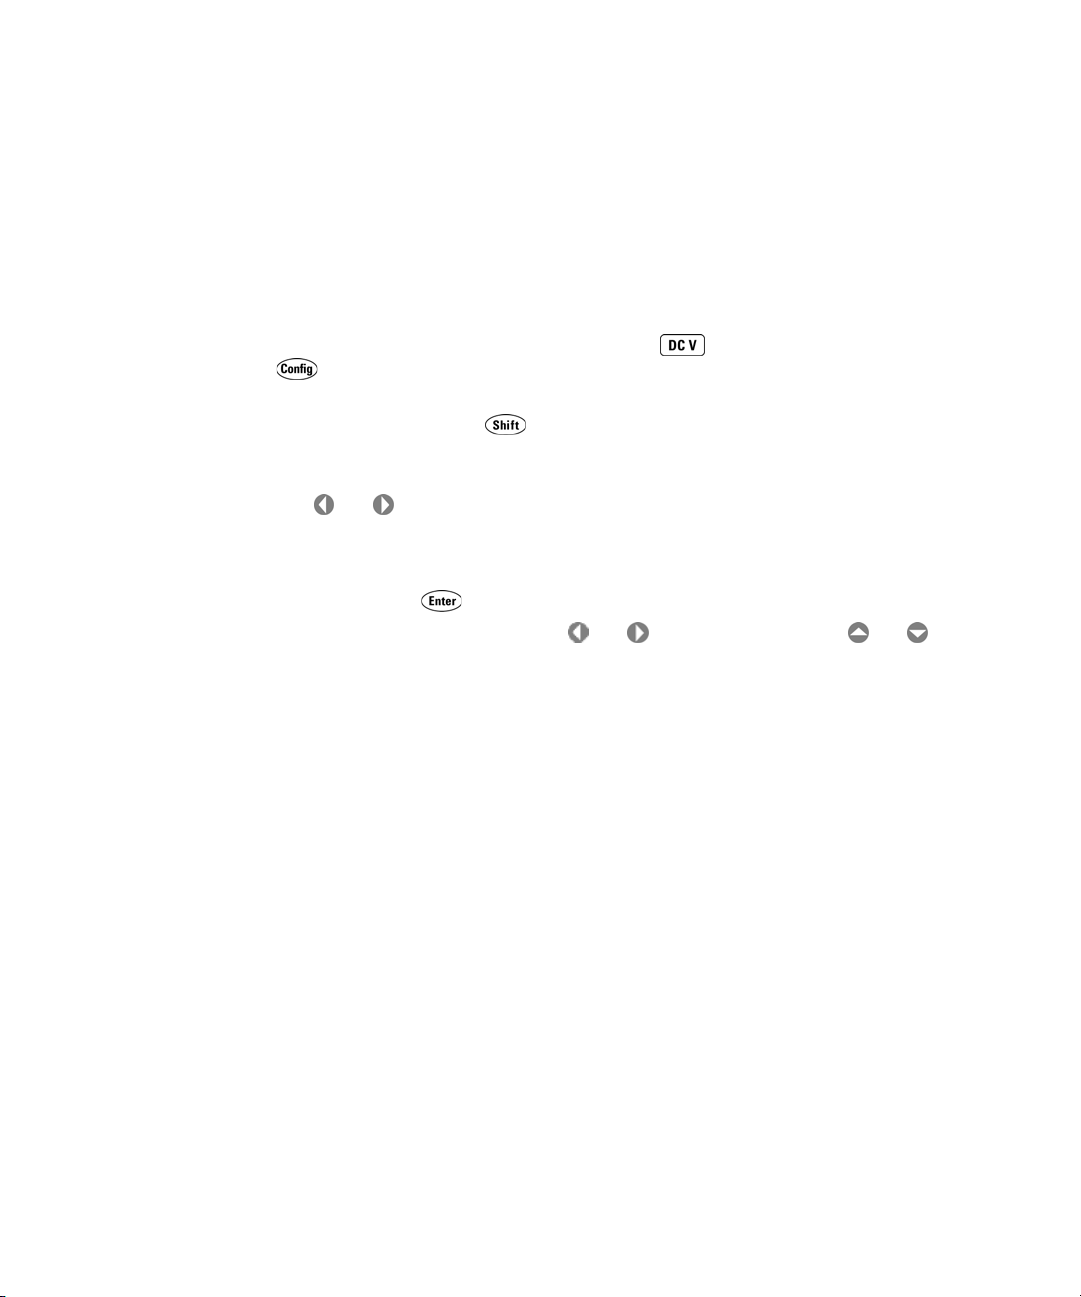
To Measure DC Voltage
Press to select the dc voltage function.
• Ranges: 100 mV, 1 V, 10 V, 100 V, 1000 V
• Configurable parameters: INTEGRATION, RANGE, INPUT Z (input impedance),
AUTO ZERO, NULL, and NULL VALUE
Connect test leads as shown:
DC Voltage
To M ea su r e A C Vo lt ag e
Press to select the ac voltage function.
• Ranges: 100 mV, 1 V, 10 V, 100 V, 750 V
• AC Technique: true–RMS, ac–coupled
• Configurable parameters: AC FILTER, RANGE, NULL and NULL VALUE
Connect test leads as shown:
AC Voltage
24 34410A/11A/L4411A User’s Guide
Page 19
Quick Start 1
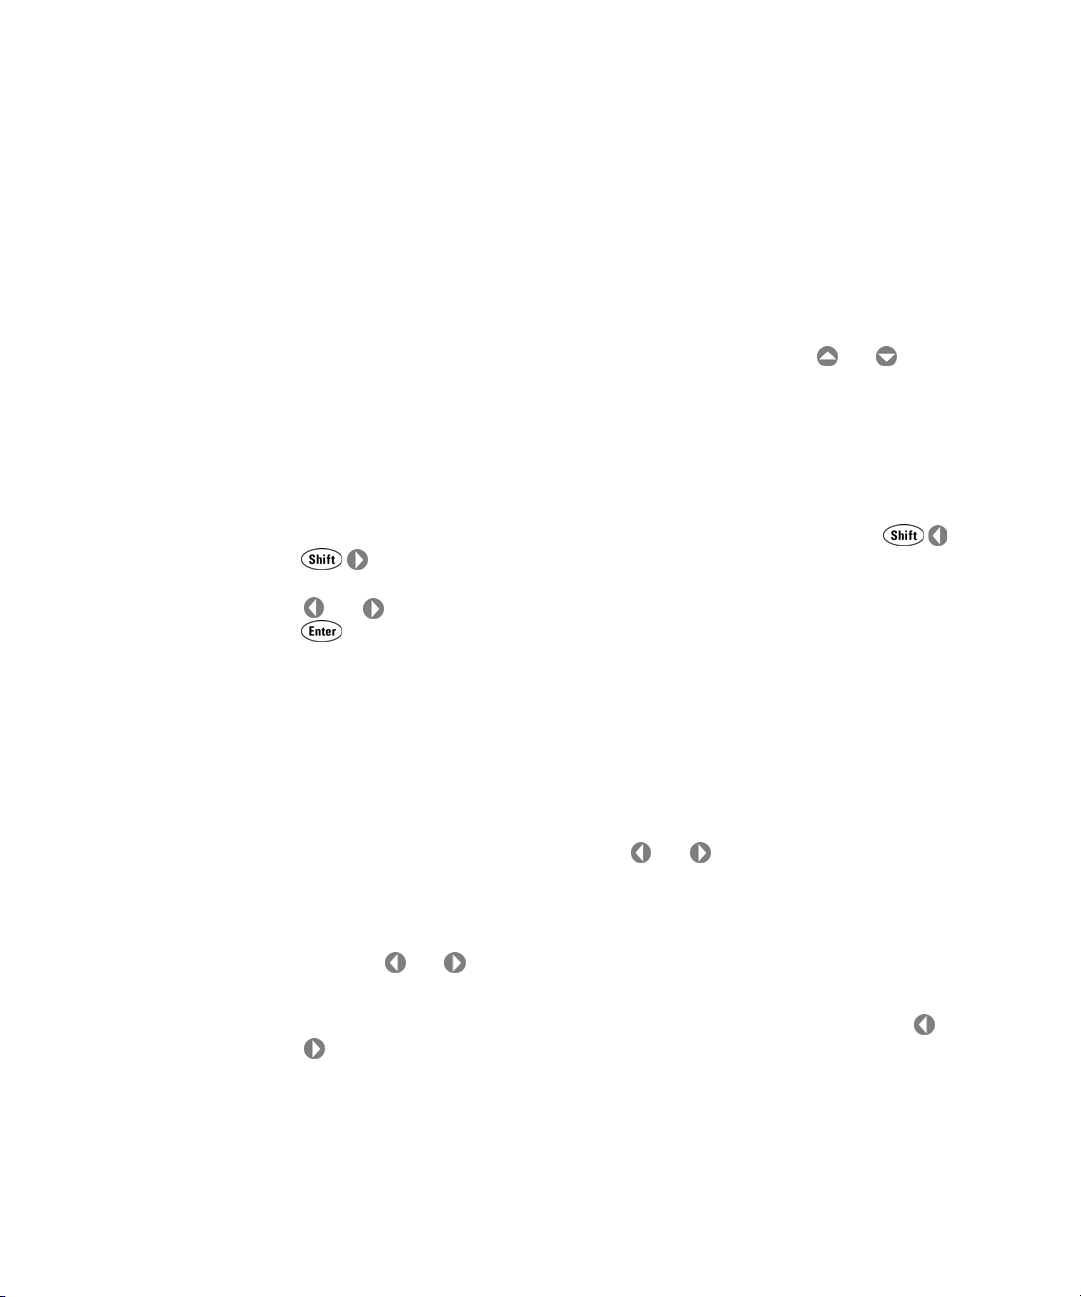
To Measure DC Current
Press to select the dc current function.
• Ranges: 100 mA, 1 mA, 10 mA, 100 mA, 1 A, 3 A
• Configurable parameters: INTEGRATION, RANGE, AUTO ZERO, NULL, and NULL VALUE
Connect test leads as shown:
DC Current
To Measure AC Current
Press to select the ac current function.
• Ranges: 100 mA, 1 mA, 10 mA, 100 mA, 1 A, 3 A
• AC Technique: true–RMS, ac–coupled
• Configurable parameters: AC FILTER, RANGE, NULL and NULL VALUE
Connect test leads as shown:
AC Current
34410A/11A/L4411A User’s Guide 25
Page 20
1Quick Start
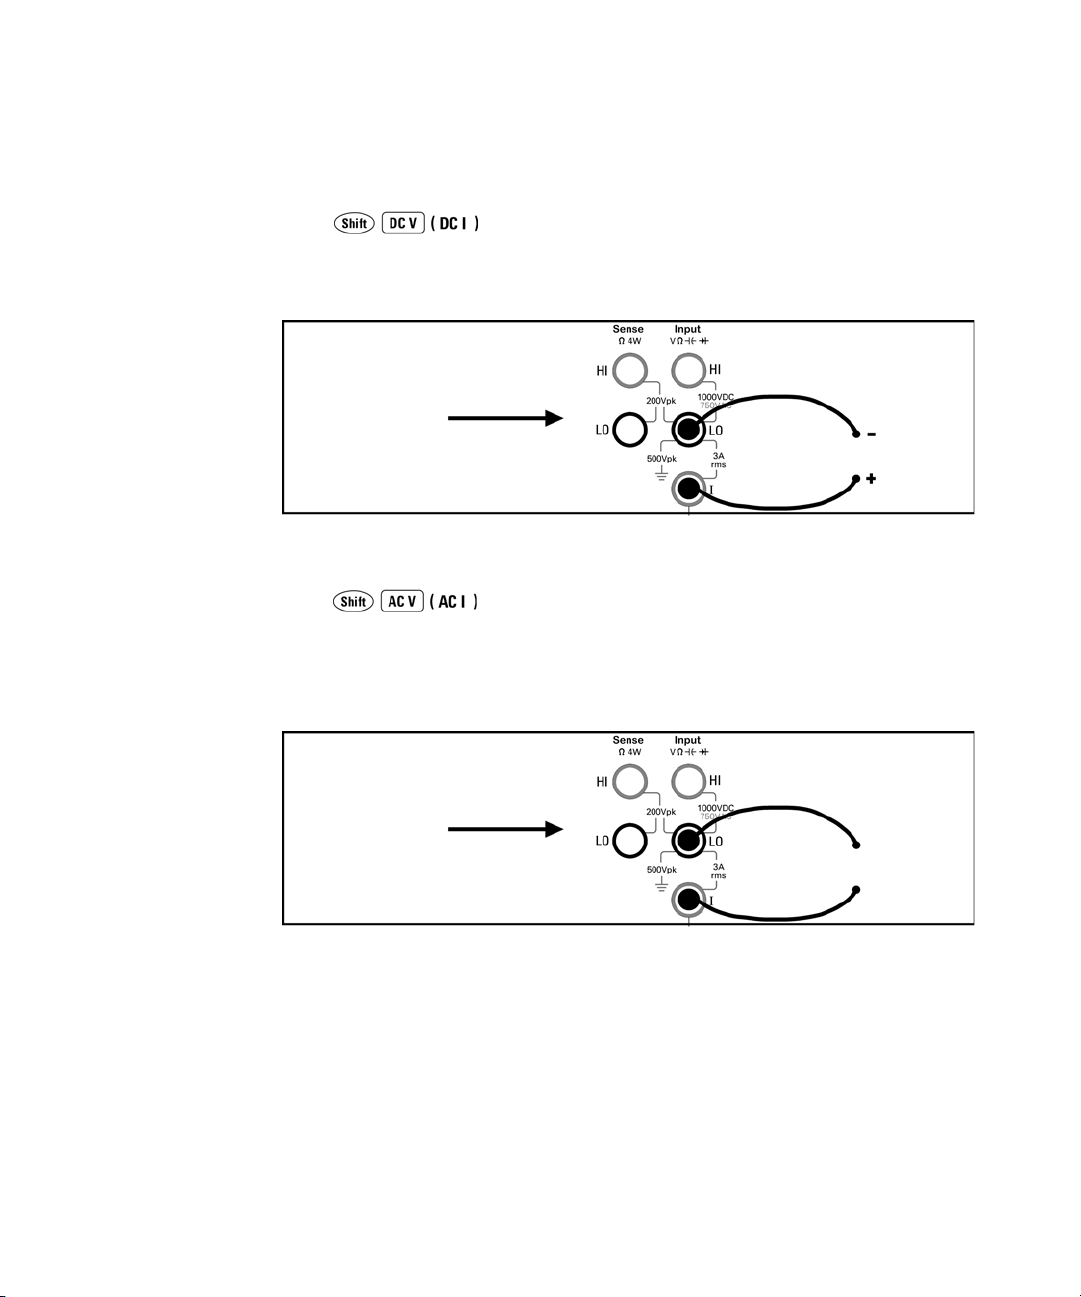
To Make a 2-Wire Resistance Measurement
Press to select the 2-wire resistance function.
• Ranges: 100 W, 1 kW, 10 kW, 100 kW, 1 MW, 10 MW, 100 MW, 1 GW
• Configurable parameters: INTEGRATION, RANGE, OFFSET COMP, AUTO ZERO, NULL,
and NULL VALUE
Connect test leads as shown:
Resistance
To null–out the test lead resistance:
1 Connect one end of the test leads at the meter, and short the probe ends
together.
2 Press null.
3 Connect the probe ends to the test circuit, and measure the corrected
resistance value.
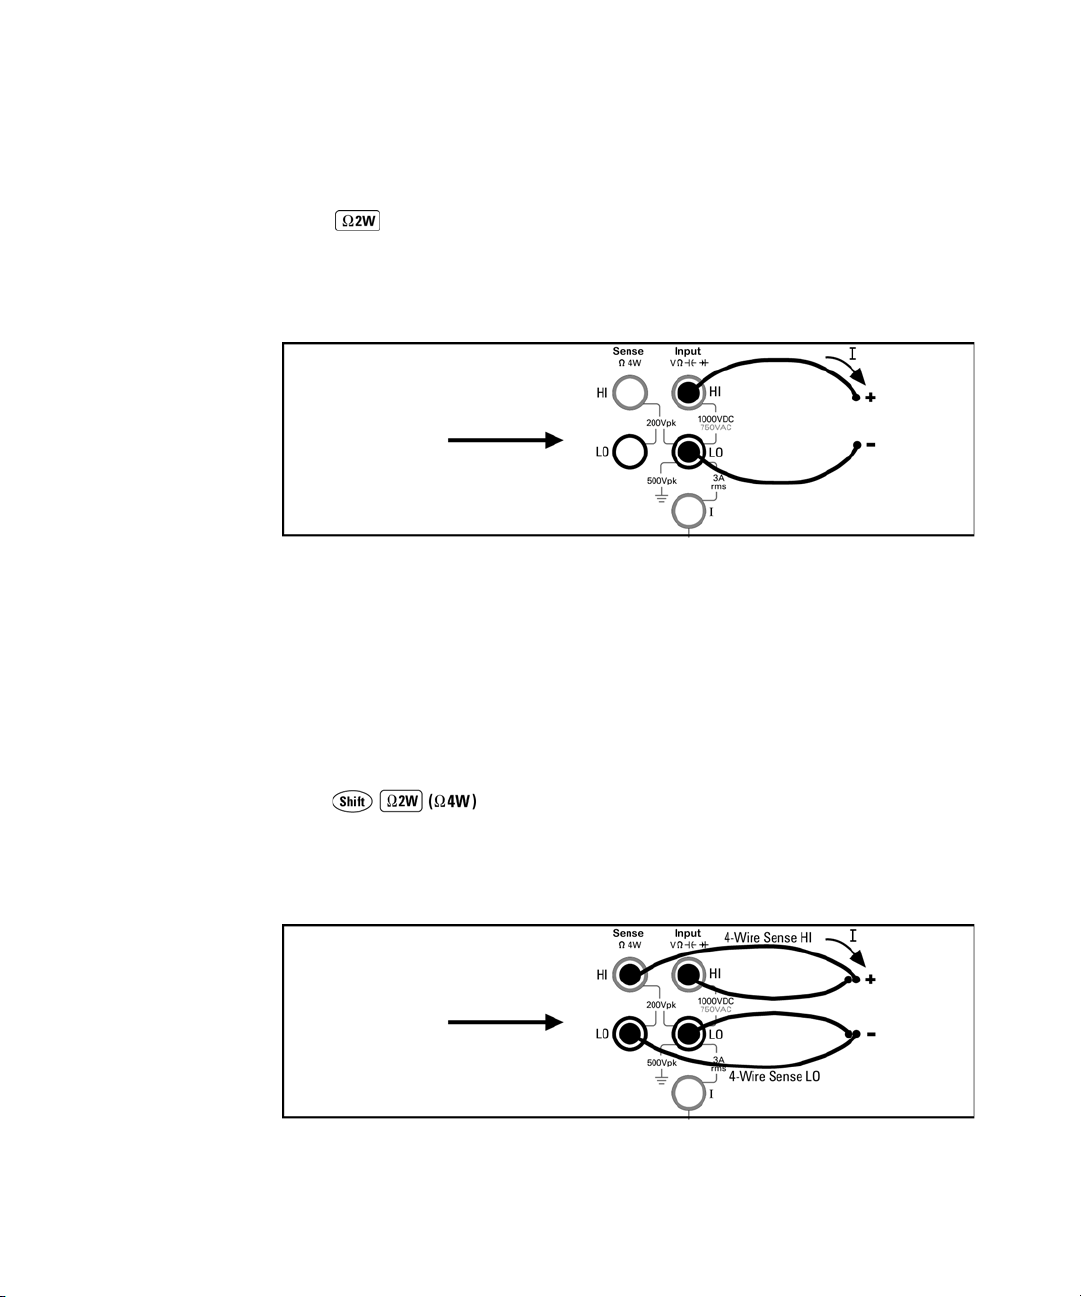
To Make a 4-wire Resistance Measurement
Press to select the 4-wire resistance function.
• Ranges: 100 W, 1 kW, 10 kW, 100 kW, 1 MW, 10 MW, 100 MW, 1 GW
• Configurable parameters: INTEGRATION, RANGE, OFFSET COMP, NULL, and NULL
VALUE
Connect test leads as shown:
Resistance
All 4-wire resistance measurements are made with auto-zero on.
26 34410A/11A/L4411A User’s Guide
Page 21
Quick Start 1
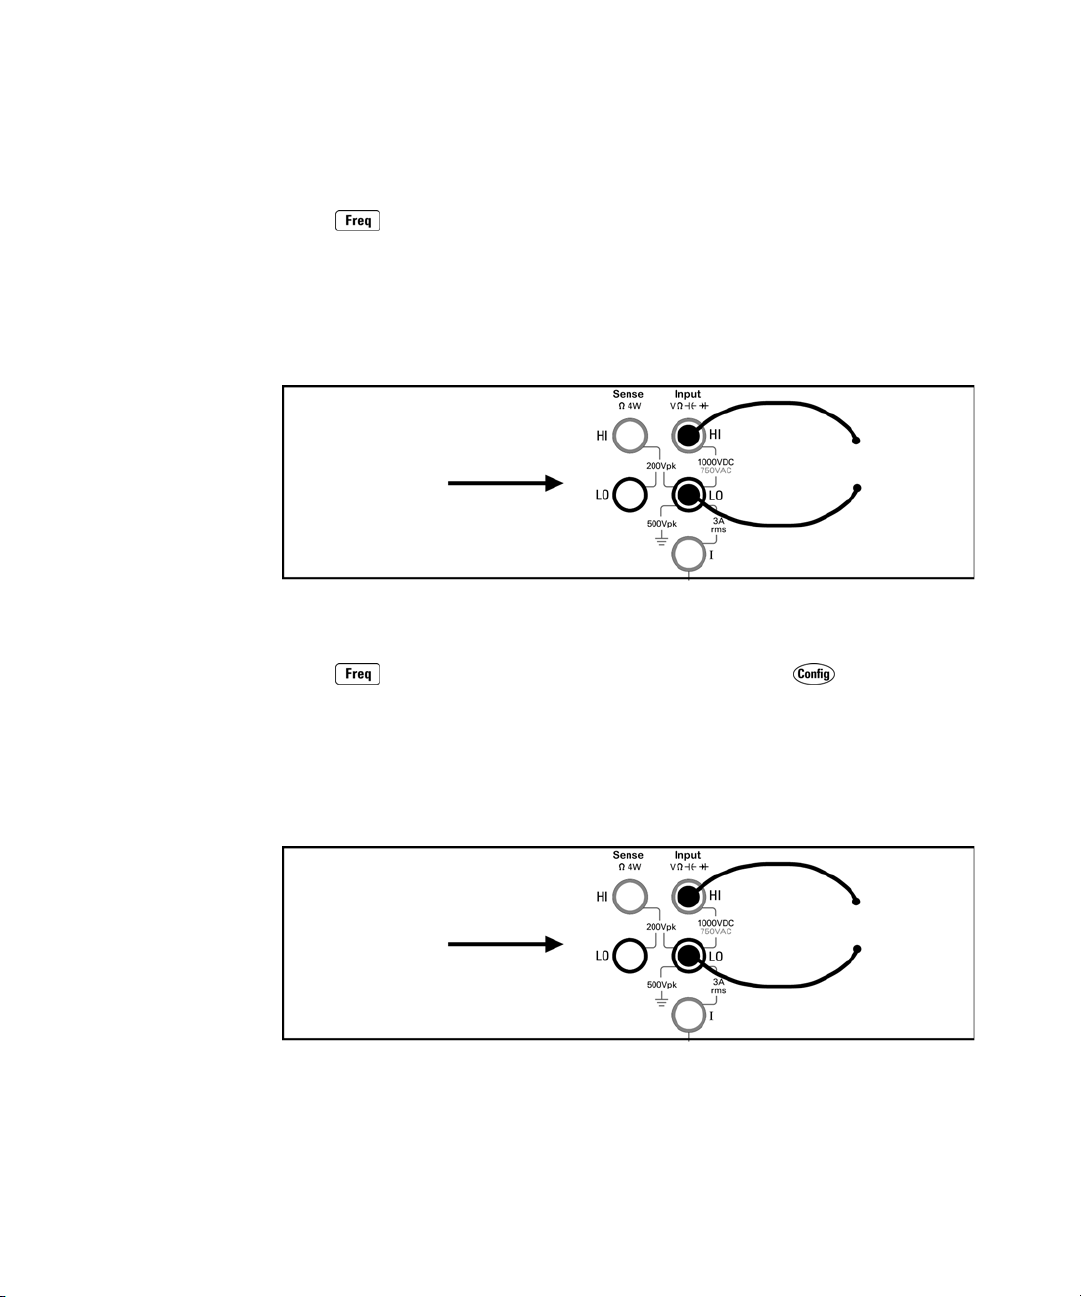
To Measure Frequency
Press to select the frequency function.
• Measurement band: 3 Hz to 300 kHz
• Input signal range: 100 mVAC to 750 VAC
• Technique: reciprocal counting
• Configurable parameters: GATE TIME, RANGE, AC FILTER, NULL and NULL VALUE
Connect test leads as shown:
AC Signal
To M ea su r e P e ri o d
Press to select the frequency function. Then press and select
PERIOD from the menu.
• Measurement band: 0.33 s to 3.3 ms
• Input signal range: 100 mVAC to 750 VAC
• Technique: reciprocal counting
• Configurable parameters: GATE TIME, RANGE, AC FILTER, NULL and NULL VALUE
Connect test leads as shown:
AC Signal
34410A/11A/L4411A User’s Guide 27
Page 22
1Quick Start
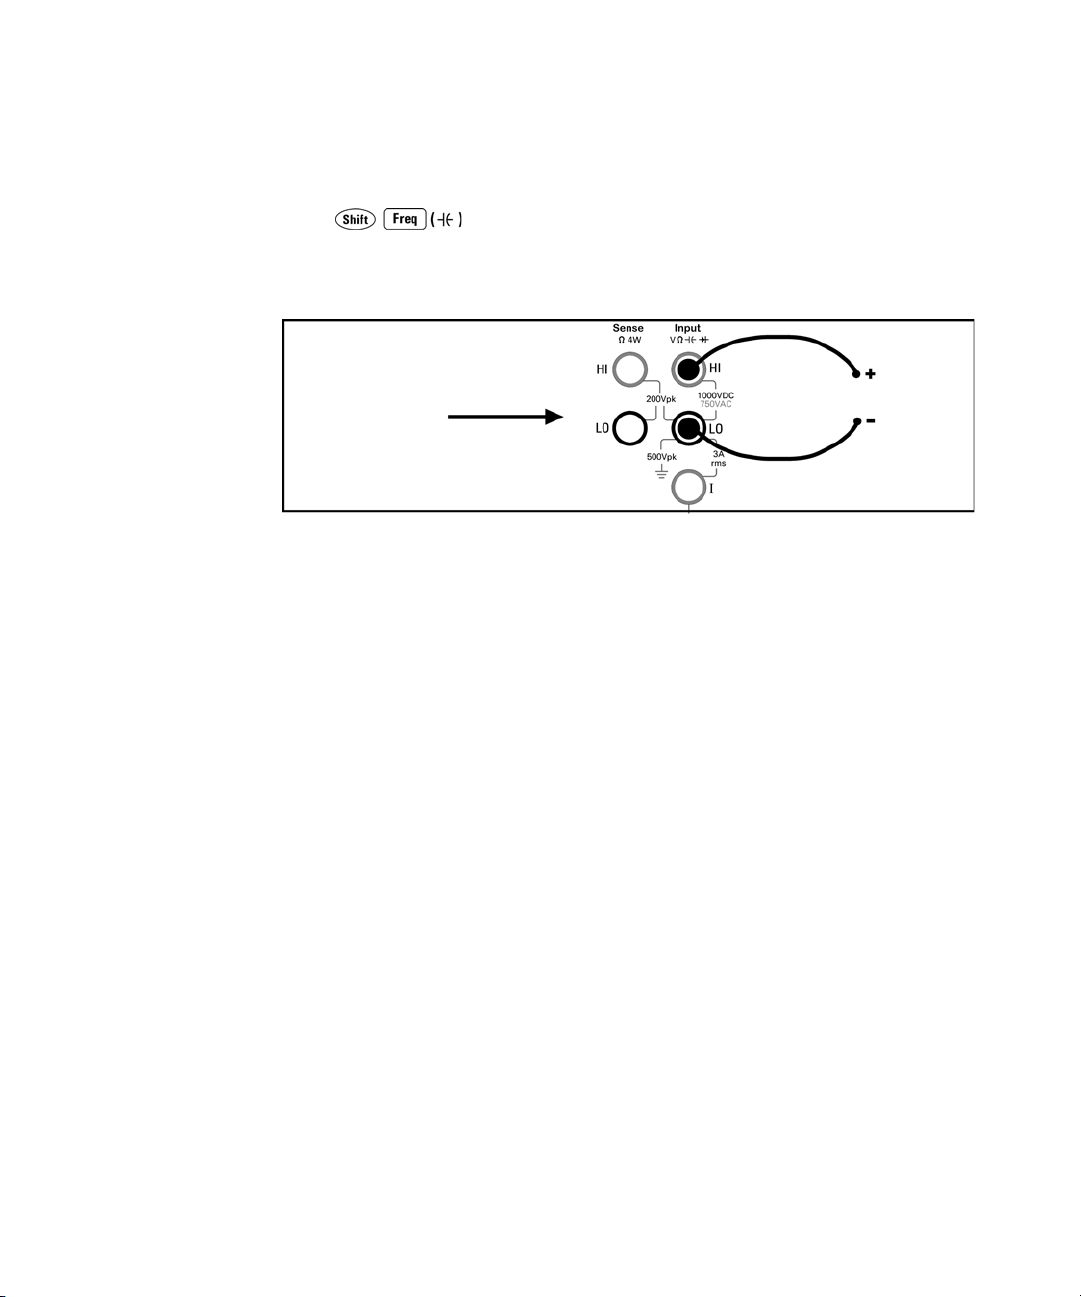
To M ea su r e C ap a ci ta nc e
Press to select the capacitance function.
• Ranges: 1 nF, 10 nF, 100 nF, 1 mF, 1 0 mF
• Configurable parameters: RANGE, NULL, and NULL VALUE
Connect test leads as shown:
Capacitance
To null–out the test lead capacitance:
1 Disconnect the + lead’s probe end from the test circuit, and leave open.
2 Press null.
3 Reconnect the + lead’s probe end to the test circuit, and measure the
corrected capacitance value.
28 34410A/11A/L4411A User’s Guide
Page 23

Quick Start 1
To Make a 2-Wire Temperature Measurement
Press to select the temperature function. Then press
and select RTD-2W or THERMISTOR-2W from the menu.
• Probe types: 2.2 kW, 5 kW, 10 kW thermistors; 0.00385%/ºC RTD
• Configurable parameters: PROBE TYPE, THERMISTOR or RTD value, AUTO ZERO, OFFSET
COMP (RTD probes only), INTEGRATION, UNITS, NULL, and NULL VALUE
Connect test leads as shown:
Thermistor or RTD
To Make a 4-Wire Temperature Measurement
Press to select the temperature function. Then press
and select RTD-4W or THERMISTOR-4W from the menu.
• Probe types: 2.2 kW, 5 kW, 10 kW thermistors; 0.00385%/ºC RTD
• Configurable parameters: PROBE TYPE, THERMISTOR or RTD value, OFFSET COMP
(RTD probes only), INTEGRATION, UNITS, NULL, and NULL VALUE
Connect test leads as shown:
Thermistor or RTD
All 4-wire temperature measurements are made with auto-zero on.
34410A/11A/L4411A User’s Guide 29
Page 24
1Quick Start
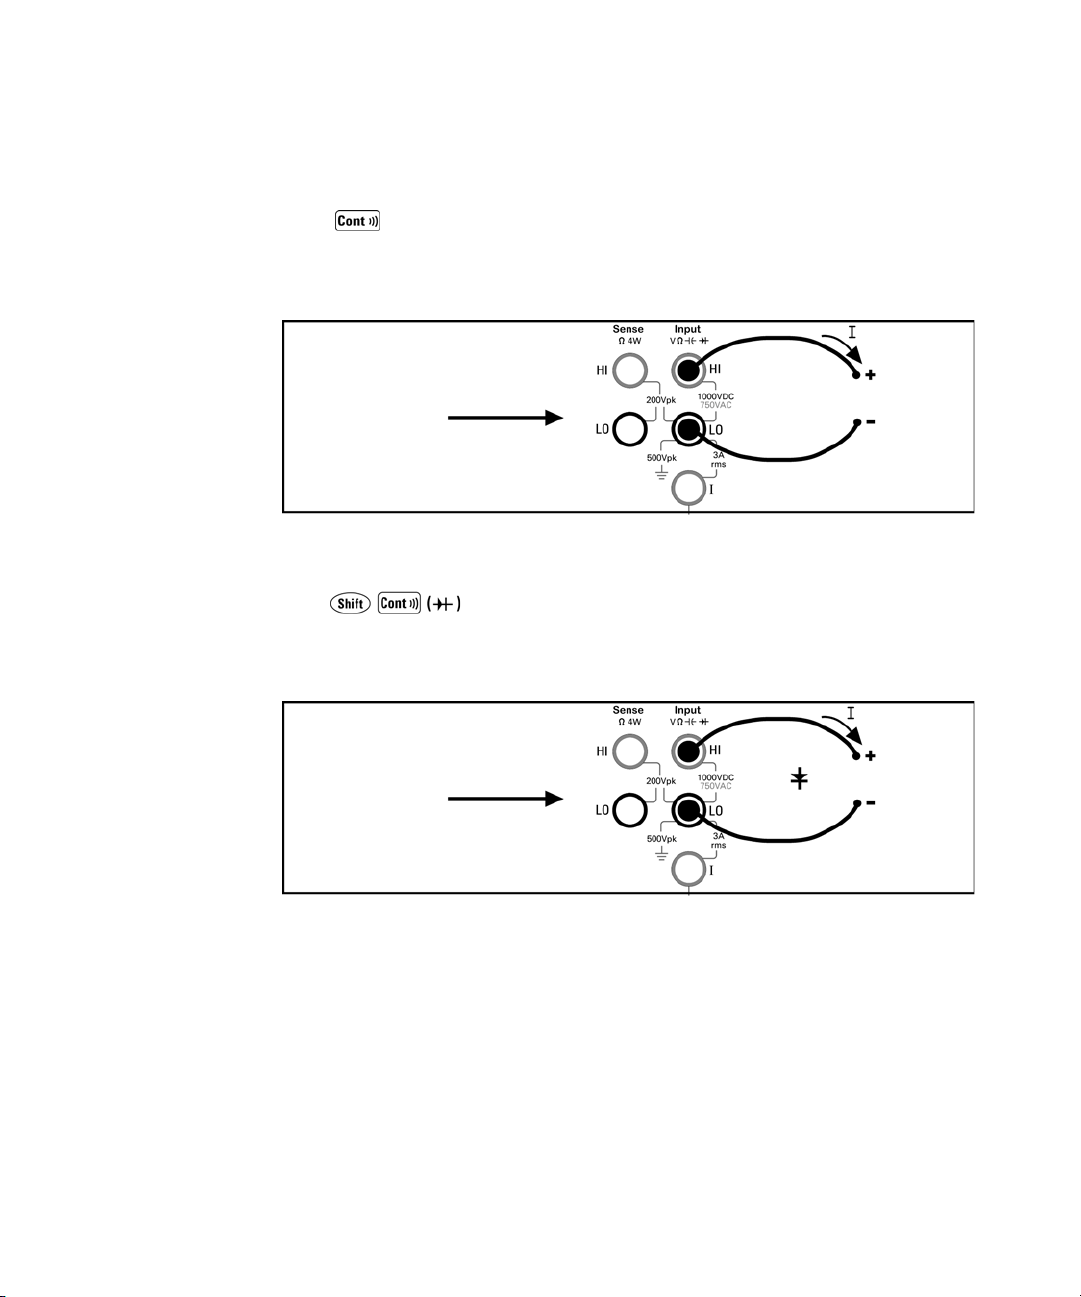
To Te st C o nt i n u i t y
Press to select the continuity function.
• Test current source: 1 mA
• Beeper Threshold: beeps below 10W
Connect test leads as shown:
Open or Closed Circuit
To C h e ck D i o d e s
Press to select the diode test function.
• Test current source: 1 mA
• Beeper Threshold: 0.3V
Connect test leads as shown:
~ voltage
measured
The diode check function is used to indicate correct diode operation;
closed–circuit on forward bias and open–circuit on reverse–bias.
~ 0.8V (not adjustable)
Forward Bias
30 34410A/11A/L4411A User’s Guide
Page 25

Other Basics of Operation
This section covers basic troubleshooting and general use.
If the Multimeter Does Not Turn On
Use the following steps to help solve problems you might encounter when
turning on the multimeter. If you need more help, see the Service Guide for
instructions on returning the multimeter to Agilent for service.
1 Verify that there is ac power to the multimeter.
First, verify that the multimeter’s Power switch is in the “On” position. Also,
make sure that the power cord is firmly plugged into the power module on the
rear panel. You should also make sure that the power source you plugged the
multimeter into is energized.
2 Verify the power–line voltage setting.
The line voltage is set to the proper value for your country when the
multimeter is shipped from the factory. Change the voltage setting if it is not
correct. The settings are: 100, 120, 220, or 240 Vac (for 230 Vac operation, use
the 220 Vac setting).
See “To Replace the Power-Line Fuse (34410A/11A)” on page 32 if you need to
change the line–voltage setting.
Quick Start 1
3 Verify that the power–line fuse is good.
The multimeter is shipped from the factory with a power–line fuse installed.
The supplied fuse is a 250 mAT, 250V, slow–blow, 5x20mm fuse, Agilent part
number 2110–0817. If you determine that the fuse is faulty, replace it with one
of the same size and rating.
See “To Replace the Power-Line Fuse (34410A/11A)” on page 32 if you need to
replace the power–line fuse.
The current input path is also fused. The supplied fuse is a 3 AT, 250V,
slow–blow, 5x20mm fuse, Agilent part number 2110–0780, and is housed in
a standard screw–in fuse holder on the left side of the rear panel. If you
determine that the fuse is faulty, replace it with one of the same size and
rating.
34410A/11A/L4411A User’s Guide 31
Page 26

1Quick Start
To Replace the Power-Line Fuse (34410A/11A)
Remove power cord first. Then follow these steps:
Depress tab (1) and pull fuse holder (2) from Remove line-voltage selector from fuse
rear panel.
Rotate line-voltage selector and reinstall so
correct voltage appears in fuse holder window.
holder assembly.
Agilent Part Number 2110-0817
(250 mAT, 250V, slow-blow, 5x20mm)
Replace fuse holder assembly in rear panel.
Verify that the correct line voltage is selected and the power-line fuse is good.
NOTE
For multimeter operations with a 230 VAC supply, set the line–voltage selector to 220V.
32 34410A/11A/L4411A User’s Guide
Page 27

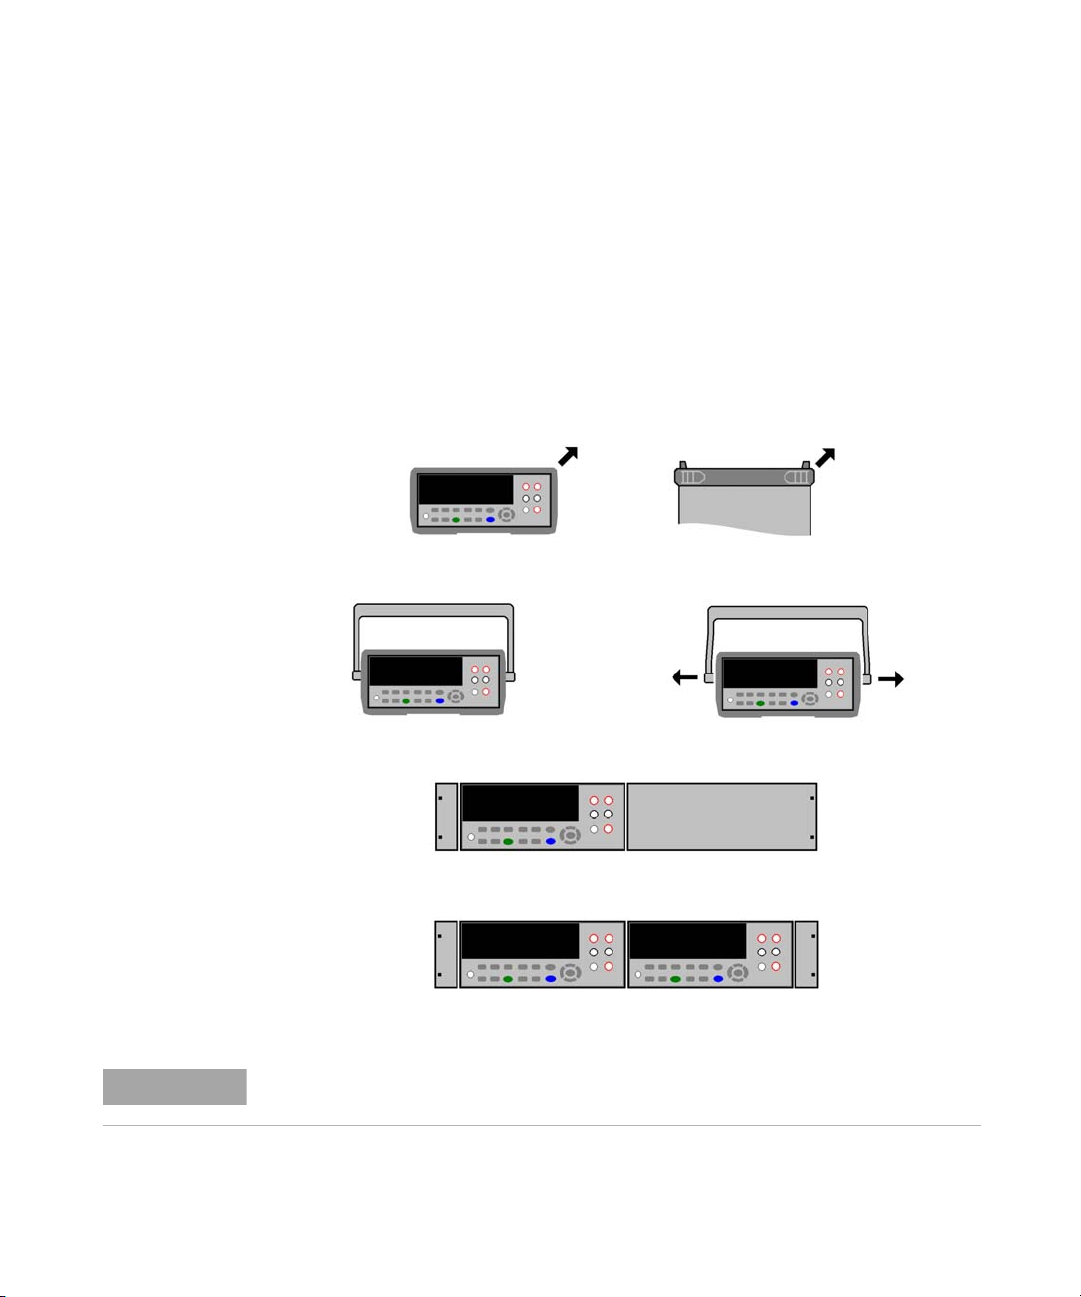
To Adjust the Carrying Handle
To adjust the position, grasp the handle by the sides and pull outward. Then,
rotate the handle to the desired position.
Bench-Top Viewing Positions
Quick Start 1
Carrying Position
34410A/11A/L4411A User’s Guide 33
Page 28
1Quick Start
To Rack Mount the Multimeter (34410A/11A)
You can mount the 34410A/11A in a standard 19–inch rack cabinet using the
available rack–mount kits. Instructions and mounting hardware are included
with each kit. Any Agilent
either the 272.3 mm or the 348.3 mm depth can be rack mounted side–by–side
with the 34410A/11A. For example, a 34410A/11A and a 34401A, or two
34410A/11As, can be mounted side–by–side, as shown below.
You must remove the carrying handle, and the front and rear rubber bumpers,
before rack mounting an instrument.
To remove each bumper, stretch a corner and slide it off.
System II (half-width, 2U height) instrument of
To remove the handle, rotate it to the vertical position and pull the ends outward.
To rack mount a single instrument, order adaptor kit 5063-9240
To rack mount two instruments side-by-side, order lock-link kit
5061-8769 and flange kit 5063-9212
NOTE
34 34410A/11A/L4411A User’s Guide
Refer to the L4411A Getting Started Guide for procedures and part numbers for rack
mounting the L4411A.
Page 29

Contents
1Quick Start19
Basic Multimeter Operations 20
Preparing the Multimeter for Use 20
Using the Front Panel 21
Front-Panel Keys 21
Front-Panel Display Shortcuts 22
Making Basic Measurements 23
To Measure DC Voltage 24
To Measure AC Voltage 24
To Measure DC Current 25
To Measure AC Current 25
To Make a 2-Wire Resistance Measurement 26
To Make a 4-wire Resistance Measurement 26
To Measure Frequency 27
To Measure Period 27
To Measure Capacitance 28
To Make a 2-Wire Temperature Measurement 29
To Make a 4-Wire Temperature Measurement 29
To Test Continuity 30
To Check Diodes 30
Other Basics of Operation 31
If the Multimeter Does Not Turn On 31
To Replace the Power-Line Fuse 32
To Adjust the Carrying Handle 33
To Rack Mount the Multimeter 34
34410A/11A User’s Guide 35
Page 30

Contents
2 Features and Functions 35
SCPI Commands 37
Front Panel Features (34410A/11A) 38
Front Panel Display 38
Displayed Messages 38
Self–Guiding Menus 38
Annunciators 40
Second Display Options 41
Turning the Display Off 41
Front–Panel Display Shortcuts 42
Front Panel Alphanumeric Character Entry 43
Front Panel Measurement Configuration Menus 44
Configuring DC Voltage and DC Current Measurements 44
Configuring AC Voltage and Current Measurements 45
Configuring Resistance Measurements 45
Configuring Frequency and Period Measurements 46
Configuring Temperature Measurements 46
Configuring Capacitance Measurements 47
Continuity and Diode Tests 47
Advanced Configuration Options 48
Multimeter State Storage 48
Accessing Reading Memory 49
Front/Rear Input Terminal Switching (34410A/11A) 49
Multimeter Reset 50
DC Measurements 51
Integration Time and Resolution 51
DC Input Impedance 53
AC Measurements 54
AC Filter 54
Gate Time 55
Auto Zero 56
Ranging 57
Null Measurements 59
36 34410A/11A/L4411A User’s Guide
Page 31

Miscellaneous Configuration Settings 60
Radix Character (34410A/11A) 60
Thousands Separator (34410A/11A) 60
Beeper (34410A/11A) 61
Math Functions 62
dB Measurements 63
dBm Measurements 64
Using Statistics 65
Limit Testing 66
Triggering the Multimeter 67
Selecting a Trigger Source 67
Auto Triggering (34410A/11A) 68
Single Triggering (34410A/11A) 68
Reading Hold (34410A/11A) 69
Immediate Triggering 69
Software (Bus) Triggering 70
Internal (Level) Triggering (34411A/L4411A) 70
Number of Samples per Trigger 71
Number of Pre-Trigger Samples (34411A/L4411A) 71
Trigger Delay 72
Automatic Trigger Delay 73
External Triggering 75
Trigger Slope 77
Contents
Data Logging 78
System-Related Operations 82
Self–Test 82
Error Conditions 83
Reading the Error Queue 84
Calibration 84
Power-On and Reset State 85
34410A/11A/L4411A User’s Guide 37
Page 32

Contents
3 Remote Interface Configuration 87
Configuring the GPIB Interface 89
Configuring the USB Interface 90
Configuring the LAN Interface 91
Configuring LAN Parameters 92
DHCP 92
Auto–IP 92
IP Address 93
Subnet Mask 93
Default Gateway 94
Host Name 94
DNS Server 95
Web Password 95
Instrument Unexpectedly Goes into Remote 95
Setting up a LAN connection from the Front Panel 96
Setting up a LAN connection from the Remote Interface 97
Agilent 34410A/11A Web Interface 98
4 Measurement Tutorial 99
DC Measurement Considerations 101
Thermal EMF Errors 101
Loading Errors (dc volts) 101
Noise Rejection 102
Rejecting Power–Line Noise Voltages 102
Common Mode Rejection (CMR) 102
Noise Caused by Magnetic Loops 103
Noise Caused by Ground Loops 103
Resistance Measurement Considerations 104
4–Wire Ohms Measurements 104
Removing Test Lead Resistance Errors 105
Minimizing Power Dissipation Effects 105
Errors in High Resistance Measurements 105
True RMS AC Measurements 106
38 34410A/11A/L4411A User’s Guide
Page 33

True RMS Accuracy and High–Frequency Signal Content 107
Estimating High–Frequency (Out–of–Band) Error 110
Other Primary Measurement Functions 112
Frequency and Period Measurement Errors 112
DC Current Measurements 112
Capacitance Measurements 113
Temperature Measurements 115
Probe Type Choice 115
2–Wire vs. 4–Wire Measurements 115
Auto Zero On/Off 116
Integration 116
Offset Compensation 116
NULL Reading: 116
High-Speed Measurements 117
Making High–Speed AC Measurements 117
Making High–Speed dc and Resistance Measurements 118
Contents
Other Sources of Measurement Error 119
Settling Time Effects 119
Loading Errors (ac volts) 119
Measurements Below Full Scale 120
High–Voltage Self–Heating Errors 120
AC Current Measurement Errors (Burden Voltage) 120
Low–Level Measurement Errors 120
Common Mode Errors 122
Leakage Current Errors 122
34410A/11A/L4411A User’s Guide 39
Page 34

Contents
5 Specifications 123
DC Characteristics 125
AC Characteristics 128
Frequency and Period Characteristics 130
Capacitance Characteristics 132
Temperature Characteristics 132
Additional 34411A Specifications 133
Measurement and System Speeds 134
System Speeds 135
Data From Memory 136
General Specifications 136
Dimensions 138
To C al c u l a t e To t a l Me a s ur em e nt E rr o r 139
Interpreting Accuracy Specifications 141
Transfer Accuracy 141
24–Hour Accuracy 141
90–Day and 1–Year Accuracy 141
Temperature Coefficients 141
Configuring for Highest Accuracy Measurements 142
DC Voltage, DC Current, and Resistance Measurements: 142
AC Voltage and AC Current Measurements: 142
Frequency and Period Measurements: 142
6 Appendix: Firmware and Driver Updates 143
Downloading the Update Utility and Firmware 144
Downloading and Installing the Firmware Update 144
Downloading IVI-COM Driver Updates 147
40 34410A/11A/L4411A User’s Guide
Page 35

Agilent 34410A/11A/L4411A 6½ Digit Multimeter
User’s Guide
2
Features and Functions
SCPI Commands 37
Front Panel Features (34410A/11A) 38
Front Panel Display 38
Displayed Messages 38
Self–Guiding Menus 38
Annunciators 40
Second Display Options 41
Turn i n g t h e D i s pl a y Off 41
Front–Panel Display Shortcuts 42
Front Panel Alphanumeric Character Entry 43
Front Panel Measurement Configuration Menus 44
Configuring DC Voltage and DC Current Measurements 44
Configuring AC Voltage and Current Measurements 45
Configuring Resistance Measurements 45
Configuring Frequency and Period Measurements 46
Configuring Temperature Measurements 46
Configuring Capacitance Measurements 47
Continuity and Diode Tests 47
Advanced Configuration Options 48
Multimeter State Storage 48
Accessing Reading Memory 49
Front/Rear Input Terminal Switching (34410A/11A) 49
Multimeter Reset 50
DC Measurements 51
Integration Time and Resolution 51
DC Input Impedance 53
AC Measurements 54
AC Filter 54
Agilent Technologies
35
Page 36

2Features and Functions
Gate Time 55
Auto Zero 56
Ranging 57
Null Measurements 59
Miscellaneous Configuration Settings 60
Radix Character (34410A/11A) 60
Thousands Separator (34410A/11A) 60
Beeper (34410A/11A) 61
Math Functions 62
dB Measurements 63
dBm Measurements 64
Using Statistics 65
Limit Testing 66
Triggering the Multimeter 67
Selecting a Trigger Source 67
Auto Triggering (34410A/11A) 68
Single Triggering (34410A/11A) 68
Reading Hold (34410A/11A) 69
Immediate Triggering 69
Software (Bus) Triggering 70
Internal (Level) Triggering (34411A/L4411A) 70
Number of Samples per Trigger 71
Number of Pre-Trigger Samples (34411A/L4411A) 71
Trigger Delay 72
Automatic Trigger Delay 73
External Triggering 75
Trigger Slope 77
Data Logging 78
System-Related Operations 82
Self–Test 82
Error Conditions 83
Reading the Error Queue 84
Calibration 84
Power-On and Reset State 85
36 34410A/11A/L4411A User’s Guide
Page 37

SCPI Commands
The Agilent 34410A/11A/L4411A complies with the syntax rules and
conventions of SCPI (Standard Commands for Programmable Instruments).
Features and Functions 2
NOTE
For complete SCPI command syntax information, refer to the Agilent 34410A/11A/L4411A
Programmer’s Reference Help. This is a standard Windows help system, provided on the
Agilent 34410A/11A/L4411A Product Reference CD-ROM that came with your instrument.
SCPI Language Conventions. Throughout this guide, the following
conventions are used for SCPI command syntax for remote interface
programming:
• Braces ( { } ) enclose the parameter choices for a given command string.
The braces are not sent with the command string.
• A vertical bar ( | ) separates multiple parameter choices for a given
command string.
• Triangle brackets ( < > ) indicate that you must specify a value for the
enclosed parameter. The brackets are not sent with the command string.
• Some parameters are enclosed in square brackets ( [ ] ). This indicates that
the parameter is optional and can be omitted. The brackets are not sent
with the command string. If you do not specify a value for an optional
parameter, the instrument chooses a default value.
SCPI Language Version. You can determine the SCPI version to which your
instrument adheres by sending a command from the remote interface.
• You can query the SCPI version from the remote interface only.
•
Remote Interface Operation: The SYSTem:VERSion? query returns the
SCPI version in the form “YYYY.V”, where “YYYY” represents the year of
the version, and “V” represents a version number for that year (for example,
1994.0).
34410A/11A/L4411A User’s Guide 37
Page 38

2Features and Functions
Front Panel Features (34410A/11A)
Front Panel Display
The Agilent 34410A/11A provides a two–line, alphanumeric display, with
annunciators to indicate certain non–default instrument states.
Displayed Messages
While taking measurements, the primary display line shows the current
reading, with units (for example: “-0.001,02 VDC”). For some functions the
second display line can be enabled to display a secondary measurement.
When a menu is open (for example, to configure a measurement), the primary
display line indicates the menu, or the parameter to be set or selected, while
the second line displays the selections, or a value to be set.
The second line also displays momentary messages to convey instrument state
changes.
Self–Guiding Menus
The Agilent 34410A/11A provides context–sensitive menus to configure
measurements and other functions. The following general guidelines apply to
menu operations.
• In this guide, “navigation keypad” refers to the , , , and keys,
and the key.
• Several keys (or shifted key sequences) open a menu. These include:
• to configure the currently selected measurement function.
• to select a secondary measurement for the second display line.
• to set up and use the data logger function.
• to turn on and select the math functions.
• to return the multimeter to auto trigger mode,
enable reading hold, or select various triggering options.
• to configure utility options or the remote interface.
• to reset the multimeter to its reset state (equivalent
to the *RST command in SCPI).
• When you press , the Shift annunciator is lit. It toggles on and off.
38 34410A/11A/L4411A User’s Guide
Page 39

Features and Functions 2
• If the multimeter is in the remote interface mode (Remote annunciator is
lit), pressing
operation.
• Once you have entered a menu, use the or keys to view and select a
menu item from those displayed on the second line.
The selected (or default) item is displayed in full brightness (for example,
dBM in the menu above). All other choices are displayed in half brightness
(OFF, dB, or STATS above).
The menu selections scroll, but do not wrap. Arrows indicate additional
selections, if any, to the left or right. In the example above, the arrow
indicates at least one more selection to the right of STATS.
• To confirm a selection, press the key, which also takes you to the next
menu level. If you are already at the last level in the menu, pressing
exits the menu.
(Local) once returns the multimeter to local (front panel)
• To review a menu configuration, press repeatedly to view, in order,
the current selections, and then exit the menu.
• To step through the remaining menu choices after making the desired
selections, hold down the key.
• The key that you used to enter the menu (for example, or ),
serves to confirm selections and advance in the menu exactly like the
key.
• To exit a menu before completing its sequence, press . If you have made
changes, you are prompted whether to save or discard them.
NOTE
34410A/11A/L4411A User’s Guide 39
In some menus, the second display is used to enter a number or text. See“Front Panel
Alphanumeric Character Entry” on page 43 for further information.
In a few cases, long strings are displayed in a menu (for example the USB ID string) that
require scrolling with the and keys in order to view the entire string.
Page 40

2Features and Functions
Annunciators
There are several annunciators, mostly in a line at the top of the display. Each
annunciator lights to indicate a particular non–default meter state:
•
* A measurement is in progress (the “sample annunciator”).
• Hi–Z For DC voltage measurements in the 100 mV, 1 V or 10 V ranges, an
input impedance of >10 GΩ is configured.
• OComp For resistance measurements in the 100 Ω, 1 kΩ and 10 kΩ ranges,
offset compensation is enabled.
• ManRng For the selected measurement function, a manual range is
selected (autoranging is off).
• Tr i g Triggering is enabled. The meter is in the “wait–for–trigger” state.
• Hold The reading hold function is enabled.
• Remote The multimeter is operating in the remote interface mode.
• Error A hardware error or remote interface error has been detected, and a
message is in the error queue.
• Null The null feature is enabled for the present measurement function.
• Shift The key has been pressed (toggles on and off).
• Math Either the dB or dBm math function is enabled.
• Stats The statistics math function is enabled.
• Limits The limit test math function is enabled.
• Rear The Front/Rear switch is set to Rear and the rear set of input terminals
is connected internally to make measurements.
• 4W A four–wire resistance or temperature function is selected.
• The continuity function is selected.
• The diode test function is selected.
40 34410A/11A/L4411A User’s Guide
Page 41

Features and Functions 2
Second Display Options
Many measurement functions allow a secondary measurement to be displayed
simultaneously on the second display line:
Primary Function Second Display Function
DC V, DC I, AC V, AC I Peak–to–Peak value
Freq AC Voltage
Temp Raw Resistance**
*
*ac voltage of the input waveform
**actual raw resistance measured across temperature probe and leads
• Front Panel Operation: Press
2ND DISPLAY > PK-TO-PK (Where primary function is voltage or current.)
Once the second display is enabled, you can scroll through all second
display items, including STATS or LIMITS if these functions are enabled.
• Remote Interface Operation: The following command selects the measurement
or math function to be displayed on the second display line. The <feed>
parameter is a quoted ASCII string designating the function to be displayed,
such as VOLTage:PTPeak.
DISPlay:WINDow2:TEXT:FEED <feed>
The following query returns the currently selected
quoted ASCII string:
DISPlay:WINDow2:TEXT:FEED?
Refer to the Agilent 34410A/11A/L4411A Programmer’s Reference Help for
a complete description and syntax for these commands.
<feed>
parameter, as a
Turning the Display Off
This feature is available from the remote interface only.
For security reasons, you may want to disable the front panel display. When
disabled, the entire front panel display (except for the Error and Remote
annunciators) goes dark.
• Remote Interface Operation: The following command turns off the display:
DISPlay OFF
The following command queries the display setting:
DISPlay?
The query returns a “0” (OFF) or “1” (ON).
Refer to the Agilent 34410A/11A/L4411A Programmer’s Reference Help for
a complete description and syntax for these commands.
34410A/11A/L4411A User’s Guide 41
Page 42

2Features and Functions
Front–Panel Display Shortcuts
Direct front–panel shortcuts are provided for three commonly used display
functions: ranging, digit masking, and integration time. These shortcuts are
available only when you are not in a menu.
Ranging. The meter range can be set directly from the navigation keypad.
• To manually change the range, press or . The
lights, and the selected range (for example, 100mV RANGE) is briefly displayed
on the second line.
• To toggle between the selected manual range and autoranging, press
Note: This is a dual–function key, not a shifted key. Pressing when in
a menu will exit the menu.
Digit Masking. The navigation keypad provides a shortcut to mask (change
the number of digits displayed) the reading on the main display.
• To enable digit masking for the selected measurement function, press
(3.5, 4.5, 5.5, 6.5 and AUTO). Select the desired setting (use the keys)
and press .
• Masking digits only affects what is displayed. It does not affect
measurement speed or accuracy.
ManRng annunciator
. The ManRng annunciator toggles on or off, as appropriate.
or . DIGIT MASK will be displayed, along with a list of choices
Integration Time (Bandwidth, Gate Time). Four measurement functions allow
you to select the integration time: dc voltage, dc current, resistance, and
temperature. The ac voltage and ac current measurements allow you to select
the ac signal filter (bandwidth). The frequency/period function allows you to
select gate time. The navigation keypad provides a shortcut for quickly
changing these settings.
• If the multimeter is configured to take the measurement using an
integration time in NPLCs, press or to increase or decrease the
integration time setting and display the new setting briefly. You can scroll
through the entire range of integration time settings:
Agilent 34410A, PLCs: 0.006, 0.02, 0.06, 0.2, 1, 2, 10 and 100
Agilent 34411A/L4411A, PLCs: 0.001, 0.002, 0.006, 0.02, 0.06, 0.2, 1, 2, 10, 100
42 34410A/11A/L4411A User’s Guide
Page 43

Features and Functions 2
• If the multimeter is configured to take the measurement using an aperture
integration time, press or to display APERTURE, with the current setting
on the second line (for example, 101.005mSEC). You can then use the
navigation keypad to change the aperture setting. The and keys
have their usual functions.
• If either the ac voltage or ac current function is selected, press or to
increase or decrease the bandwidth setting, and briefly display the new
setting on the second line. You can scroll through the three available
bandwidth settings: 3 HZ : SLOW, 20 HZ : MEDIUM, or 200 HZ : FAST.
• If the frequency/period measurement function is selected, pressing or
during front panel measurement operations will increase or decrease
the gate time setting, and briefly display the new setting on the second
display line (for example, if the setting was 0.1 GATE TIME, the display will
show 0.01 GATE TIME when you press ). Repeated use of or will
scroll through the selection of gate time settings in seconds (0.001 GATE TIME,
0.01 GATE TIME, 0.1 GATE TIME, and 1 GATE TIME).
Front Panel Alphanumeric Character Entry
When you are in certain menus, particularly the utility menus, you may need
to manually enter a number or alphanumeric string on the second display line.
• To enter a number or character, press or to select the displayed
character (digit or letter) you wish to edit. The selected character will flash
to indicate it can be edited. Use the and keys to modify a digit (from
0 to 9) or a letter (from A to Z).
• To quickly enter large numbers, you may press to scroll over to the most
significant digit allowed and/or add leading zeros. For non–zero
floating–point entries, you may also press to scroll to the magnitude
prefix (for example, u, m, k, M), then use the and keys to change the
numerical entry.
Arrow annunciators on the second display line will indicate if there are
editable characters left or right of the one selected.
34410A/11A/L4411A User’s Guide 43
Page 44

2Features and Functions
Front Panel Measurement Configuration Menus
Each measurement function is configured separately, except for Ω 2W and
Ω 4W (which are partially inter–dependent), and frequency and period,
(which share a configuration menu). The configuration settings (for example,
integration, and range) for each measurement function are retained when
switching between functions.
• To enter the configuration menu for any selected measurement function, press
. The menus are context–sensitive; only the options applicable to the
selected function will appear.
• When digit masking is enabled (see “Digit Masking.” on page 42) the DIGIT
MASK submenu will appear before other configuration choices.
• For further information, see “Advanced Configuration Options” on
page 48.
Configuring DC Voltage and DC Current Measurements
For dc voltage and dc current measurements, the menu selections are:
INTEGRATION, RANGE, AUTO ZERO, NULL and NULL VALUE. For dc voltage
measurements only, you can also configure INPUT Z.
• INTEGRATION: Allows you to set the integration time for the measurement in
two ways; in power–line cycles (select NPLC) or in seconds (select APERTURE).
• RANGE: Allows you to select a fixed range (select MANUAL), or let the
multimeter automatically select the range using the autoranging feature
(select AUTO).
• INPUT Z: Allows you to select an input impedance of 10 MΩ (select 10 M) or
>10 GΩ (select HI–Z) for the 100 mVdc, 1 Vdc and 10 Vdc ranges only.
• AUTO ZERO: Allows you to enable for all readings (select ON), enable for one
reading (select ONCE), or disable (select OFF) the auto zero feature, which
subtracts a zero reading from each measurement.
• NULL: Allows you to enable (ON) or disable (OFF) the null measurement
feature, which measures the difference between a stored null value and the
input signal.
• NULL VALUE: Allows you to view and edit the null value (if enabled).
44 34410A/11A/L4411A User’s Guide
Page 45

Features and Functions 2
Configuring AC Voltage and Current Measurements
For ac voltage and ac current measurements, your menu selections are:
AC FILTER, RANGE, NULL and NULL VALUE.
• AC FILTER: Allows you to select one of three choices (3 HZ : SLOW, 20 HZ :
MEDIUM, 200 HZ : FAST). The ac filter allows you to trade off low–frequency
bandwidth versus ac settling time.
• RANGE: Allows you to let the multimeter automatically select the range using
the autoranging feature (select AUTO), or you may select a fixed range
(select MANUAL).
• NULL: Allows you to enable (ON) or disable (OFF) the null measurement
feature, which measures the difference between a stored null value and the
input signal.
• NULL VALUE: Allows you to view and edit the null value (if enabled).
Configuring Resistance Measurements
For 2–wire and 4–wire resistance measurements, your menu selections are:
INTEGRATION, RANGE, OFFSET COMP, AUTO ZERO, NULL and NULL VALUE.
• INTEGRATION: Allows you to set the integration time for the measurement in
two ways; in power–line cycles (NPLC) or in seconds (APERTURE).
• RANGE: Allows you to let the multimeter automatically select the range using
the autoranging feature (select AUTO), or you may select a fixed range
(select MANUAL).
• OFFSET COMP: Allows you to enable (ON) or disable (OFF) the offset
compensation feature. With offset compensation enabled, the multimeter
makes a normal resistance measurement first, followed by a second
measurement to determine any offset voltage in the input circuitry. The
resultant displayed measurement corrects for this offset. Enabling offset
compensation increases measurement time.
• AUTO ZERO: Allows you to enable for all readings (ON), enable for one reading
(ONCE), or disable (OFF) the auto zero feature, which subtracts a subsequent
zero reading from each measurement.
• NULL: Allows you to enable (ON) or disable (OFF) the null measurement
feature, which measures the difference between a stored null value and the
input signal.
• NULL VALUE: Allows you to view and edit the null value (if enabled).
34410A/11A/L4411A User’s Guide 45
Page 46

2Features and Functions
Configuring Frequency and Period Measurements
For frequency and period measurements, your menu selections are: CONFIGURE,
GATE TIME, RANGE, AC FILTER, NULL and NULL VALUE.
• CONFIGURE: Allows you to select either FREQUENCY or PERIOD as the primary
measurement.
• GATE TIME: Allows you to select one of four choices (0.001, 0.01, 0.1, or 1) for
gate time, in seconds.
• RANGE: Allows you to let the multimeter automatically select the range using
the autoranging feature (select AUTO), or you may select a fixed range
(select MANUAL).
• AC FILTER: Allows you to select from three choices (3 HZ : SLOW,
20 HZ : MEDIUM, or 200 HZ : FAST). The ac filter allows you to trade off
low–frequency bandwidth versus ac settling time.
• NULL: Allows you to enable (ON) or disable (OFF) the null measurement
feature, which measures the difference between a stored null value and the
input signal.
• NULL VALUE: Allows you to view and edit the null value (if enabled).
Configuring Temperature Measurements
For temperature measurements, your menu selections are: PROBE TYPE, OFFSET
COMP, AUTO ZERO, INTEGRATION, NULL, NULL VALUE, and UNITS.
• PROBE TYPE: Allows you to select from four choices (RTD–4W, RTD–2W,
THERMISTOR–2W, or THERMISTOR–4W) of temperature probe type.
• OFFSET COMP (for RTD probes only): Allows you to enable (ON) or disable
(OFF) the offset compensation feature. With offset compensation enabled,
the multimeter makes a normal temperature measurement first, followed by
a second measurement to determine any offset voltage in the input
circuitry. The resultant displayed measurement corrects for this offset.
Enabling offset compensation increases measurement time.
• AUTO ZERO: Allows you to enable (ON) or disable (OFF) the auto zero feature
for 2–wire temperature measurements. This feature subtracts a subsequent
zero reading from each measurement.
Note that 4–wire temperature measurements are automatically made
with auto zero always on.
• INTEGRATION: Allows you to set the integration time for the measurement in
two ways; in power–line cycles (NPLC) or in seconds (APERTURE).
46 34410A/11A/L4411A User’s Guide
Page 47

Features and Functions 2
• NULL: Allows you to enable (ON) or disable (OFF) the null measurement
feature, which measures the difference between a stored null value and the
input signal.
• NULL VALUE: Allows you to view and edit the null value (if enabled).
• UNITS: Allows you to select the temperature scale: Celsius (select C),
Fahrenheit (select F), or Kelvin (select K).
Configuring Capacitance Measurements
For capacitance measurements, your configuration menu choices are: RANGE,
NULL and NULL VALUE.
• RANGE: Allows you to let the multimeter automatically select the range using
the autoranging feature (select AUTO), or you may select a fixed range
(select MANUAL).
• NULL: Allows you to enable (ON) or disable (OFF) the null measurement
feature, which measures the difference between a stored null value and the
input signal.
• NULL VALUE: Allows you to view and edit the null value (if enabled).
Continuity and Diode Tests
There are no parameters to configure, nor any menus for these functions.
• Continuity Test. The range and resolution are fixed for continuity tests.
• The range is 1 kΩ (a 2-wire resistance measurement).
• The meter beeps (even if beep is disabled) for each measurement that is
less than or equal to the continuity threshold (which is 10 Ω), and the
actual resistance reading is displayed on the front panel.
• From 10 Ω to 1.2 kΩ the meter displays the actual resistance reading
with no beep. If the reading exceeds 1.2 kΩ, the meter displays "OPEN" on
the front panel (no beep).
• Diode Test. The range and resolution are fixed for diode tests.
• The range is 1 Vdc (with a 1 mA current source output).
• The voltage is displayed on the front panel if it is in the 0 to 1.2 volt
range. The meter beeps when the signal transitions to the 0.3 to 0.8 volt
threshold (unless beep is disabled). If the signal is greater than 1.2 volts,
"OPEN" is displayed on the front panel.
34410A/11A/L4411A User’s Guide 47
Page 48

2Features and Functions
Advanced Configuration Options
NOTE
The Remote Interface Operation segments within the following topics describes how the
instrument feature is used/accessed from a (remote) programming environment. For the
L4411A, this represents the only method of accessing the instrument. See the L4411A
Getting Started Guide for details.
Multimeter State Storage
The present multimeter state, including all settings for measurement
configuration, math operations, triggering operations, system operations and
I/O configuration, can be saved in one of five non–volatile stored states and
later recalled. State 0 (POWER_DOWN) retains the multimeter configuration at
power down. States 1 – 4 (STATE_1, STATE_2, STATE_3, STATE_4) are available for
storing other configurations.
• Front Panel Operation: Press to open the utility menu.
• To store the present multimeter state (for example, to STATE_1):
UTILITY MENU > STORE/RECALL > STORE > STORE STATE > 1: STATE_1 > CHANGE NAME
Use the navigation keypad to enter a new name (up to 12 characters), or
just press to store with the default name.
• To recall any of five stored states (for example: STATE_1):
UTILITY MENU > STORE/RECALL > RECALL > RECALL STATE > 1: STATE_1
• To delete a state you have stored (for example: STATE_1):
UTILITY MENU > STORE/RECALL > DELETE > DELETE STATE > 1: STATE_1
• To rename a state you have stored (for example: STATE_1):
UTILITY MENU > STORE/RECALL > RENAME > RENAME STATE > 1: STATE_1 > CHANGE NAME
Use the navigation keypad to enter a new name (up to 12 characters), or
just press to store with the current name.
• To select any previously stored state (0 – 4) as the power–on default
state (for example: STATE_1):
UTILITY MENU > STORE/RECALL > PWR-ON > PWR-ON AUTO > ON > PWR-ON STATE > 1: STATE_1
48 34410A/11A/L4411A User’s Guide
Page 49

• Remote Interface Operation: Refer to the MEMory command subsystem in the
Agilent 34410A/11A/L4411A Programmer’s Reference Help for a complete
description and syntax of the commands that store, recall, and name
multimeter states from the remote interface.
Accessing Reading Memory
Reading memory is accessed directly from the remote interface only.
The multimeter’s reading memory is a first–in–first–out (FIFO) buffer holding
up to 50,000 readings (34410A) or 1 million readings (34411A/L4411A). The
oldest readings are preserved.
• Remote Interface Operation: The following command transfers readings stored
in non–volatile memory into the multimeter’s output buffer, from where
you can read them into your compu ter:
FETCh?
The following command will obtain whatever readings are present in
NVMEM, and erase them as they are read:
R?
Features and Functions 2
Refer to the Agilent 34410A/11A/L4411A Programmer’s Reference Help for
a complete description and syntax for these commands.
Front/Rear Input Terminal Switching (34410A/11A)
• Front Panel Operation: The Front/Rear switch manually selects the set of input
terminals (front or rear) that is connected internally for measurements.
Both sets are equivalent and include Sense (LO and HI), Input (LO and HI), and
Current (I) terminals. The Rear annunciator is lit when the rear inputs are
selected. See “The Front Panel at a Glance (34410A/11A)” on page 8, for the
location of the Front/Rear switch. The Front/Rear switch has no effect on the
Ext Trig or VM Comp connectors.
WARNING
34410A/11A/L4411A User’s Guide 49
Do not change the position of the Front/Rear switch while signals are present on either
the front or rear set of terminals. Switching while high voltages or currents are present
may cause instrument damage, and may increase the risk of electric shock.
Page 50

2Features and Functions
• Remote Interface Operation: The Front/Rear switch is manually switchable only,
and cannot be controlled from the remote interface. The following query
returns the current switch setting:
ROUTe:TERMinals?
The query returns either “FRON” or “REAR”
Multimeter Reset
The reset function resets most multimeter settings to their factory settings,
except if the power–on state has been manually set to a stored state (see
“Multimeter State Storage” on page 48). The reset function is faster than
cycling power because the power–on self tests are omitted.
• Certain settings such as I/O addresses are stored in non–volatile memory,
and are not affected by a reset.
• Refer to “Power-On and Reset State” on page 85 for a complete listing of the
settings affected by a (front panel or remote interface) reset command.
• Front Panel Operation: To reset the multimeter, press . RESET
DMM is displayed, along with the options NO (default) and YES. Select YES to
reset the multimeter.
• Remote Interface Operation: The following commands reset the multimeter to
the instrument reset state:
SYSTem:PRESet
*RST
Refer to the Agilent 34410A/11A/L4411A Programmer’s Reference Help for
a complete description and syntax for these commands.
50 34410A/11A/L4411A User’s Guide
Page 51

DC Measurements
Integration Time and Resolution
For dc voltage, dc current, resistance, and temperature measurements, the
multimeter provides two ways to set integration time, both of which affect the
measurement resolution. These are in the number of power–line cycles
(NPLCs) and aperture (settable in seconds).
NPLC mode. Using NPLCs sets the number of power–line cycles during
which the multimeter’s analog–to–digital (A/D) converter samples the input
signal for a measurement. The multimeter automatically detects the AC line
frequency, using it and the NPLC selection to set integration time. Use a larger
NPLC value for better resolution. Use a smaller value for faster measurements.
To obt a in normal mode (line–frequency noise) rejection, you must select NPLC
mode, with an integral number of power–line cycles (for example, 1, 10, or 100
NPLC). The following table shows the resulting resolution for each integration
time value (in power–line cycles) selected.
Integration Time Resolution
0.001 PLC* 30 ppm x Range
0.002 PLC
0.006 PLC 6.0 ppm x Range
0.02 PLC 3.0 ppm x Range
0.06 PLC 1.5 ppm x Range
0.2 PLC 0.7 ppm x Range
1 PLC (default) 0.3 ppm x Range
2 PLC 0.2 ppm x Range
10 PLC 0.1 ppm x Range
100 PLC 0.03 ppm x Range
* 15 ppm x Range
*Model 34411A/L4411A
Features and Functions 2
• Front Panel Operation: Select a dc measurement function (DC V, DC I, Ω 2W,
Ω 4W or Te m p ). Press as required:
...
> INTEGRATION > NPLC
Select the desired NPLC value: 0.006, 0.02, 0.06, 0.2, 1, 2, 10 or 100. (The
34411A also allows you to select 0.001 or 0.002.) Then step through or exit the
configuration menu.
34410A/11A/L4411A User’s Guide 51
Page 52

2Features and Functions
• Remote Interface Operation: The following commands set the integration time
in NPLC:
[SENSe:]VOLTage[:DC]:NPLC {<
[SENSe:]CURRent[:DC]:NPLC {<
[SENSe:]RESistance:NPLC {<
[SENSe:]FRESistance:NPLC {<
[SENSe:]TEMPerature:NPLC {<
Each of these commands also has a query form.
Refer to the Agilent 34410A/11A/L4411A Programmer’s Reference Help for
a complete description and syntax for these commands.
Aperture mode. Aperture is the period, measured in seconds, during which
the multimeter’s analog–to–digital (A/D) converter samples the input signal
for a measurement. A longer aperture yields better resolution; a shorter
aperture provides for faster measurements. This mode allows the user to set a
specific integration time, not based on power–line frequency. Values range
from 100 µs to 1 second for the 34410A, and from 20 µs to 1 second for the
34411A/L4411A.
• To allow for normal mode (line frequency noise) rejection, select the NPLC
option for INTEGRATION, with an integral number of NPLCs. Use the APERTURE
method only if you need precise control over the multimeter’s integration
time, in seconds.
PLCs
>>MIN>MAX>DEF}
PLCs
>>MIN>MAX>DEF}
PLCs
>>MIN>MAX>DEF}
PLCs
>>MIN>MAX>DEF}
PLCs
>>MIN>MAX>DEF}
• Front Panel Operation: Select a dc measurement function (DC V, DC I, Ω 2W,
Ω 4W or Te m p ). Press as required:
...
> INTEGRATION > APERTURE
Use the navigation keypad to set the desired aperture value, and press .
Then step through or exit the configuration menu.
• Remote Interface Operation: The following commands set the aperture value,
in seconds:
[SENSe:]VOLTage[:DC]:APERture {<
[SENSe:]CURRent[:DC]:APERture {<
[SENSe:]RESistance:APERture {<
[SENSe:]FRESistance:APERture {<
[SENSe:]TEMPerature:APERture {<
Each of these commands also has a query form.
52 34410A/11A/L4411A User’s Guide
seconds
seconds
seconds
seconds
seconds
>>MIN>MAX>DEF}
>>MIN>MAX>DEF}
>>MIN>MAX>DEF}
>>MIN>MAX>DEF}
>>MIN>MAX>DEF}
Page 53

Features and Functions 2
The following command (similar queries for current, resistance and
temperature) returns whether aperture mode is enabled:
[SENSe:]VOLTage[:DC]:APERture:ENABled?
This query returns a “0” (disabled) or “1” (enabled).
Refer to the Agilent 34410A/11A/L4411A Programmer’s Reference Help for
a complete description and syntax for these commands.
DC Input Impedance
Applies to dc voltage measurements only.
The default setting for the multimeter’s input impedance is fixed at 10 MΩ for
all dc voltage ranges, to minimize noise pickup. To reduce the effects of
measurement loading errors when making low–voltage measurements, this
fixed resistance can be set to HI–Z (>10 GΩ) for the 100 mVdc, 1 Vdc, and 10
Vdc ranges.
• Front Panel Operation: After the function is selected, press .
INTEGRATION > RANGE > INPUT Z
Select 10 M or HI–Z, and then step through or exit the menu.
Note that when HI–Z is selected, the multimeter will set an input impedance
of >10 GΩ for the three lowest dc voltage ranges. The input impedance
remains 10 MΩ for all measurement ranges above 10 Vdc.
• Remote Interface Operation: The following command turns on the auto input
impedance function for dc voltage measurements. The AUTO function
(equivalent of setting HI–Z from the front panel) uses 10 MΩ for the 100V
and 1000V ranges, and >10 GΩ for the 100 mVdc, 1 Vdc and 10 Vdc ranges.
[SENSe:]VOLTage:DC:IMPedance:AUTO {OFF>0>ON>1}
The following command queries the auto impedance function setting:
[SENSe:]VOLTage:DC:IMPedance:AUTO?
This query returns a “0” (OFF) or “1” (ON).
Refer to the Agilent 34410A/11A/L4411A Programmer’s Reference Help for
a complete description and syntax for these commands.
34410A/11A/L4411A User’s Guide 53
Page 54

2Features and Functions
AC Measurements
AC Filter
Applies to ac voltage, ac current, frequency, and period measurements only.
The multimeter provides three bandwidth (ac signal filter) selections. Set the
bandwidth for the lowest frequency you expect to encounter. Note that a lower
bandwidth setting results in longer settling times, as shown in the table below.
AC Filter Input Frequency Settling Time ACV Settling Time ACI
Slow 3 Hz – 300 kHz 2.5 seconds/reading 1.66 seconds/reading
Medium (default) 20 Hz
Fast 200 Hz
• Front Panel Operation: Select the ac voltage, ac current, frequency, or period
function. Press as required.
...
> AC FILTER
Select 3 HZ: SLOW, 20 HZ: MEDIUM, or 200 HZ: FAST, and then step through or
exit the menu.
– 300 kHz 0.625 seconds/reading 0.25 seconds/reading
– 300 kHz 0.025 seconds/reading 0.025 seconds/reading
• Remote Interface Operation: The following commands set the ac filter (3, 20 or
200 Hz) for ac measurements:
[SENSe:]VOLTage:AC:BANDwidth {<
[SENSe:]CURRent:AC:BANDwidth {<
The following commands query the filter setting:
[SENSe:]VOLTage:AC:BANDwidth? [{MIN>MAX}]
[SENSe:]CURRent:AC:BANDwidth? [{MIN>MAX}]
Refer to the Agilent 34410A/11A/L4411A Programmer’s Reference Help for
a complete description and syntax for these commands.
54 34410A/11A/L4411A User’s Guide
filter
filter
>>MIN>MAX>DEF}
>>MIN>MAX>DEF}
Page 55

Features and Functions 2
Gate Time
Applies to frequency and period measurements only.
The multimeter provides four choices of gate time (also called aperture) for
frequency or period measurements. The gate time selection affects resolution
as shown below.
Gate Time Resolution
1 ms 100 ppm x Range
10 ms 10 ppm x Range
100 ms 1 ppm x Range
1 s 0.1 ppm x Range
• Front Panel Operation: Press and then press .
CONFIGURE > FREQENCY > GATE TIME or
CONFIGURE > PERIOD > GATE TIME
Select a gate time in seconds (.001, .01, .1, or 1), and then step through or exit
the menu.
• Remote Interface Operation: The following commands set the gate time
(aperture) for frequency or period measurements:
[SENSe:]FREQuency:APERture {<
[SENSe:]PERiod:APERture {<
seconds
seconds
>>MIN>MAX>DEF}
>>MIN>MAX>DEF}
The following commands query the gate time setting:
[SENSe:]FREQuency:APERture? [{MIN>MAX}]
[SENSe:]PERiod:APERture? [{MIN>MAX}]
Refer to the Agilent 34410A/11A/L4411A Programmer’s Reference Help for
a complete description and syntax for these commands.
34410A/11A/L4411A User’s Guide 55
Page 56

2Features and Functions
Auto Zero
Auto zero is selectable for dc voltage, dc current, 2–wire resistance, and 2-wire
temperature measurements only. Auto zero is always enabled for 4–wire
resistance or 4–wire temperature measurements.
When auto zero is ON (default) the multimeter internally disconnects the input
signal immediately following each measurement, and takes a zero reading. It
then subtracts the zero reading from the preceding measurement. This method
prevents small offset voltages present on the multimeter’s input circuitry from
affecting measurement accuracy.
When auto zero is OFF, the multimeter takes one zero reading and subtracts it
from all subsequent measurements. A new zero reading is taken each time you
change the function, range or resolution (integration time).
When auto zero is set to ONCE, the multimeter takes one zero reading, then sets
auto zero to OFF. The zero reading taken is used for all subsequent
measurements until the next change to the function, range or integration time.
If the selected integration time is less than 1 PLC, the zero reading is taken at
1 PLC to ensure normal mode noise rejection in the zero reading; then
subsequent readings are taken at the set integration time.
• Front Panel Operation: Select a supported function. Press as required.
...
> AUTO ZERO
Select OFF, ONCE, or ON, and then step through or exit the menu.
• Remote Interface Operation: The following command enables or disables auto
zero:
SENSe:
Auto zero may be also set indirectly using the CONFigure or MEASure
commands.
The following command queries the auto zero feature status:
SENSe:
This query command returns “0” (OFF) or “1” (ON).
Refer to the Agilent 34410A/11A/L4411A Programmer’s Reference Help for
a complete description and syntax for these commands.
56 34410A/11A/L4411A User’s Guide
<function>
where <
TEMPerature.
function
<function>
:ZERO:AUTO {OFF>ONCE>0>ON>1}
> = VOLTage:DC, CURRent:DC, RESistance, or
:ZERO:AUTO?
Page 57

Ranging
Features and Functions 2
Applies to all measurements except continuity and diode test, which use a
fixed range. Temperature measurements always use autoranging.
You can let the multimeter automatically select the range using autoranging,
or you can select a fixed range using manual ranging. Autoranging is
convenient because the multimeter automatically selects the appropriate
range for sensing and displaying each measurement. However, manual ranging
results in better performance, since the multimeter does not have to
determine which range to use for each measurement.
• Autorange thresholds – The multimeter will shift range as follows:
Down range at <10% of present range
Up range at >120% of present range
• Ranging is local to the selected function; the multimeter remembers the
selected ranging method (auto or manual) and selected manual range when
you switch between measurement functions.
• For frequency and period measurements, the selected range is for the ac
voltage level of the input signal.
• For temperature measurements, the multimeter uses autoranging, as
appropriate for the probe type.
• For continuity tests, the multimeter range is fixed at 1 kΩ. For diode tests
the range is fixed at 1 Vdc with a 1 mA current source output.
• Front Panel Operation: For applicable measurement functions, the ranging
method and manual range may be selected by front panel shortcuts (see
“Ranging.” on page 42).
Or, use the configuration menu for the selected function. For the latter
method. Press as required:
...
> RANGE > AUTO or
...
> RANGE > MANUAL (select the desired range.)
Then step through or exit the menu.
For manual ranging: If the input signal is greater than can be measured on
the selected range, the multimeter provides these overload indications:
± OVLD from the front panel or “±9.9E+37” from the remote interface. (The
sign is ±
34410A/11A/L4411A User’s Guide 57
or +, whichever is appropriate.)
Page 58

2Features and Functions
• Remote Interface Operation: Autoranging may be enabled or disabled for the
specified function using the following command:
SENSe:
where <
CURRent:AC, RESistance, FRESistance, or CAPacitance
For <
affect the ac signal input voltage range.
The following command queries the autoranging feature status for the
specified <
SENSe:
This query command returns “0” (OFF) or “1” (ON).
The following command manually sets the multimeter range for the
specified <
SENSe:<
A manual range may also be set using the CONFigure or MEASure
commands.
<function>
function
function
> = FREQuency or PERiod, the range commands
function
<function>
function
function
:RANGe:AUTO {OFF>ONCE>0>ON>1}
> = VOLTage:DC, VOLTage:AC, CURRent:DC,
.
>:
:RANGe:AUTO?
>:
>:RANGe[:UPPER] {<
range
>>MIN>MAX>DEF}
The following command queries the multimeter range setting for the
specified <
SENSe:<
Refer to the Agilent 34410A/11A/L4411A Programmer’s Reference Help for
a complete description and syntax for all commands on this page.
function
function
>:
>:RANGe[:UPPER]? [{MIN>MAX}]
A Word About Ranging and Digits. The 34410A/11A/L4411A is capable of
displaying “6½ digits” for most measurements. The crossover is at a 20 percent
overload for the currently selected range. Let’s look at an example for dc
voltage with autoranging enabled. As the input voltage increases from just
below 1 volt to just above 1.2 volts, you might see the following progression of
readings on the front-panel display:
0.997,385 VDC
1.000,544 VDC
1.099,004 VDC
1.190,188 VDC
0.120,013 VDC
58 34410A/11A/L4411A User’s Guide
Page 59

The first four readings are taken on the 1 Vdc range, but the autoranging
feature switches to the 10 Vdc range for the final reading, which is a 20
percent overload for the 1 Vdc range. This is a typical 6½ digit behavior.
For frequency measurements only, the 34410A/11A/L4411A is capable of
displaying a full seven digits (for example, “999.980,3 HZ”).
Null Measurements
The 34410A/11A/L4411A allows separate null settings to be saved for each of
the following measurement functions: dc voltage, ac voltage, dc current,
ac current, resistance, frequency/period, capacitance, and temperature.
When making null (also called relative) measurements, each reading is the
difference between a stored (selected or measured) null value and the input
signal. One possible application is to increase accuracy of two–wire resistance
measurements by nulling the test lead resistance. Nulling the leads is
particularly important prior to making capacitance measurements. The
formula used for calculating null measurements is:
Result = reading – null value
• The null value is adjustable, and you can set it to any value between
0 and ±120% of the highest range, for the present function. Note that the
null value is entered in fundamental units (for example, Vdc).
• Front Panel Operation: For any measurement function, you can directly
measure and store the null value by pressing with the test leads open
(nulls the test lead capacitance), shorted (nulls the test lead resistance), or
across a desired null value circuit.
Features and Functions 2
Alternately, you can enable null from the menu. Press as required:
...
> NULL > ON > NULL VALUE
Enter the desired null value with the navigation keypad, and then step
through or exit the menu. The Null annunciator is lit and the null function is
enabled.
To turn the null function off: Press again, or use the menu.
• Remote Interface Operation: The following command enables the null
measurement feature for the specified function:
SENSe:<
where <
34410A/11A/L4411A User’s Guide 59
function
function
>:NULL[:STATe] {ON>OFF}
> is any function except CONTinuity or DIODe.
Page 60

2Features and Functions
The following command queries the null measurement feature setting:
SENSe:<
This query returns a “0” (OFF) or “1” (ON).
The following command stores a null value for the specified function:
SENSe:<
The following command queries the null value:
SENSe:<
Refer to the Agilent 34410A/11A/L4411A Programmer’s Reference Help for
a complete description and syntax for these commands.
Miscellaneous Configuration Settings
Radix Character (34410A/11A)
Available from the front panel only. The multimeter can display the radix
character (decimal point) as a period or a comma.
• The factory (default) setting is PERIOD.
function
function
function
>:NULL[:STATe]?
>:NULL[:VALue] {<
>:NULL[:VALue]?
value
>>MIN>MAX}
• The radix character setting is stored in non–volatile memory.
• Front Panel Operation: Press
UTILITY MENU > MISC SETTINGS > BEEPER > RADIX CHAR
Select PERIOD or COMMA, and then step through or exit the menu.
Thousands Separator (34410A/11A)
Available from the front panel only. The multimeter can display front panel
readings with (ON) or without (OFF) a comma (thousands separator) delimiting
the number into 3–digit sets.
• The factory (default) setting is ON.
• Front Panel Operation: Press
UTILITY MENU > MISC SETTINGS > BEEPER > RADIX CHAR > THOUSAND SEP
Select OFF or ON, and then step through or exit the menu.
60 34410A/11A/L4411A User’s Guide
Page 61

Features and Functions 2
Beeper (34410A/11A)
Normally, the multimeter emits a tone from the front panel whenever certain
conditions are met (for example, the multimeter beeps when a stable reading
is captured in reading hold mode). The beeper is factory set to ON, but may be
disabled or enabled manually.
• Turning off the beeper does not disable the key click generated when you
press a front–panel key.
• A beep tone is always emitted (even with the beep state turned OFF) in the
following cases.
• A continuity measurement is less than or equal to the continuity
threshold.
• A SYSTem:BEEPer command is sent.
• A beep tone is emitted only if the beep state is ON in the following cases.
• An error is generated.
• A set LO or HI limit is exceeded in a limit test.
• A stable reading is captured in the reading hold mode.
• A forward-biased diode is measured in the diode test function.
• Front Panel Operation: Press
UTILITY MENU > MISC SETTINGS > BEEPER
Select OFF or ON, and then step through or exit the menu.
• Remote Interface Operation: The following command disables or enables the
front panel beeper:
SYSTem:BEEPer:STATe {OFF>0>ON>1}
The following command queries the state of the beeper:
SYSTem:BEEPer:STATe?
This query returns a “0” (OFF) or “1” (ON).
Refer to the Agilent 34410A/11A/L4411A Programmer’s Reference Help for
a complete description and syntax for these commands.
34410A/11A/L4411A User’s Guide 61
Page 62

2Features and Functions
Math Functions
In addition to providing a separate null–per–function measurement capability,
the multimeter provides four math functions: dB measurements (dB), dBm
measurements (dBm), statistics for accumulated readings (STATS), and limit
testing (LIMITS). Only one of these math functions can be enabled at a time (in
addition to the null measurement), and remains in effect until you turn it off
or change it.
• Front Panel Operation: Press
MATH Select: OFF, dB, dBm, STATS or LIMITS.
See the dB, dBm, statistics, and limit testing sections that follow.
To turn any math function off: Press
MATH > OFF
• Remote Interface Operation: The following command selects the math function
to be used:
CALCulate:FUNCtion {NULL>DB>DBM>AVERage>LIMit}
The following command queries the currently selected math function:
CALCulate:FUNCtion?
This query returns the currently selected function
The following command turns the CALCulate subsystem, and thus all math
functions, on or off:
CALCulate[:STATe] {OFF>ON}
The following command queries the current calculation state:
CALCulate:STATe?
This query returns a “0” (OFF) or a “1” (ON).
Refer to the Agilent 34410A/11A/L4411A Programmer’s Reference Help for
a complete description and syntax for these commands.
NOTE
62 34410A/11A/L4411A User’s Guide
The null function in the CALCulate:FUNCtion command is provided only for SCPI
compatibility with the 34401A Multimeter. This null is not available from the front panel.
The use of this null is deprecated for the 34410A/11A/L4411A. Use the null-per-function
commands found in the [SENSe:] subsystem instead. See “Null Measurements” on
page 59 and the Agilent 34410A/11A/L4411A Programmer’s Reference Help for details.
Page 63

Features and Functions 2
dB Measurements
Applies to ac voltage and dc voltage measurements only.
Each dB measurement is the difference between the input signal and a stored
relative value, with both values converted to dBm.
dB = reading in dBm – relative value in dBm
• The relative value can take any value between 0 dBm and ± 200.0 dBm. The
default relative value is 0 dBm. You can either let the instrument
automatically measure this value, or you can enter a specified value.
• Front Panel Operation: Press
MATH > dB > dB RELATIVE
Select MEASURE or VALUE.
• Select MEASURE if you want the instrument to set the relative value
automatically by measurement. The Math annunciator will light and the
reading will be displayed in dB.
If the configured settings will result in a long measurement time or have
the multimeter waiting for an external trigger, the Math annunciator will
flash until the relative value measurement is taken.
• Select VALUE if you want to enter a specific relative value. Use the
navigation keypad to set the desired dB REL VALUE. The Math annunciator
will light and the reading will be displayed in dB.
You can also select VALUE to view a previously set or measured value.
• Remote Interface Operation: The following command sequence selects the dB
function, turns the function on, and sets a relative value.
CALCulate:FUNCtion DB
CALCulate:STATe ON
CALCulate:DB:REFerence <
Refer to the Agilent 34410A/11A/L4411A Programmer’s Reference Help for
a complete description and syntax for these commands.
34410A/11A/L4411A User’s Guide 63
value
>
Page 64

2Features and Functions
dBm Measurements
Applies to ac voltage and dc voltage measurements only.
The dBm function is logarithmic, and is based on a calculation of power
delivered to a reference resistance, relative to 1 milliwatt.
dBm = 10 x log
(reading2 / reference resistance / 1 m W )
10
• You can choose from several reference resistance values: 50, 75, 93, 110, 124,
125, 135, 150, 250, 300, 500, 600, 800, 900, 1000, 1200, or 8000 (ohms). The default
setting is 600 ohms.
• Front Panel Operation: Press
MATH > dBM > dBm REF R
Select the desired reference resistance. The Math annunciator turns on and
the reading is now displayed in dBm.
• Remote Interface Operation: The following command sequence selects the dBm
function, turns the function on, and sets the reference resistance.
CALCulate:FUNCtion DBM
CALCulate:STATe ON
CALCulate:DBM:REFerence <value>
Refer to the Agilent 34410A/11A/L4411A Programmer’s Reference Help for
a complete description and syntax for these commands.
64 34410A/11A/L4411A User’s Guide
Page 65

Features and Functions 2
Using Statistics
Applies to all measurement functions except continuity and diode test.
From the front panel, you can view the following statistical data for any set of
readings: average or mean (AVG), maximum (MAX), minimum (MIN), standard
deviation (SDEV), and number of samples taken (COUNT). From the remote
interface you can read all of these, plus the peak–to–peak (MAX – MIN) value.
NOTE
The stored statistical data are cleared when statistics are enabled, when the
CALCulate:FUNCtion command is sent while CALCulate:STATe is ON, when the power has
been off, when the CALCulate:AVERage:CLEar command is executed, after a Factory Reset
(*RST command), after an Instrument Preset (SYSTem:PRESet command), or after a
function change.
• Front Panel Operation: Press
MATH > STATS
Scroll the second display with the and keys to view the statistical
data AVG, MAX, MIN, SDEV and COUNT.
• Remote Interface Operation: The following command enables the statistics
function:
CALCulate:FUNCtion AVERage
The following queries return the mean, minimum value, maximum value,
standard deviation, peak–to–peak value, and number of readings,
respectively, since statistics were enabled or cleared.
CALCulate:AVERage:AVERage?
CALCulate:AVERage:MINimum?
CALCulate:AVERage:MAXimum?
CALCulate:AVERage:SDEViation?
CALCulate:AVERage:PTPeak?
CALCulate:AVERage:COUNt?
Refer to the Agilent 34410A/11A/L4411A Programmer’s Reference Help for
a complete description and syntax for these commands.
34410A/11A/L4411A User’s Guide 65
Page 66

2Features and Functions
Limit Testing
Applies to all measurement functions except continuity and diode test.
The limit test function (LIMITS) enables you to perform pass/fail testing to
upper and lower limits that you specify. You can set the upper and lower limits
to any value between 0 and ±120% of the highest range, for the present
function. The upper limit you select must be a more positive number than the
lower limit. The initial factory settings for both are “0”.
NOTE
The instrument clears all limits after a Factory Reset (*RST command) or an Instrument
Preset (SYSTem:PRESet command), or when a function is changed.
• Front Panel Operation: Press
MATH > LIMITS > LOW LIMIT > HIGH LIMIT
Set the desired LOW LIMIT and HIGH LIMIT in turn using the navigation keypad,
and press . The second display line shows a bar graph indicating the
approximate reading on a scale from LO to HI:
The Limits annunciator indicates that the limits function is enabled. If the
reading is lower than the low limit, LO will flash. If the reading exceeds the
high limit, HI will f lash. In either case, when a limit is crossed, the
multimeter will also beep, if the beeper is enabled.
• Remote Interface Operation: The following command sequence selects the limit
test function, turns that function on, and sets the lower and upper limits.
You can assign a lower limit, an upper limit, or both.
CALCulate:FUNCtion LIMit
CALCulate:STATe ON
CALCulate:LIMit:LOWer <
CALCulate:LIMit:UPPer <
The following commands query the selected lower and upper limits.
CALCulate:LIMit:LOWer?
CALCulate:LIMit:UPPer?
Refer to the Agilent 34410A/11A/L4411A Programmer’s Reference Help for
a complete description and syntax for these commands.
value
value
>
>
66 34410A/11A/L4411A User’s Guide
Page 67

Triggering the Multimeter
The 34410A/11A/L4411A triggering system allows you to generate triggers
either manually or automatically, take multiple readings per trigger, and insert
a delay before each reading. The 34411A/L4411A also allows you to set a level
for internal triggering, and to set up pre-triggering.
Selecting a Trigger Source
Specify the source from which the multimeter will accept a trigger. The
power–on default is auto triggering from the front panel. Several types of
triggering are described in the sections that follow.
• Front Panel Operation:
• Press once to go to the single trigger mode. A single reading is
taken, and another reading is taken each time you press , or when a
hardware trigger is received on the Ext Trig connector.
• Press and select:
TRIGGER > AUTO To return to auto trigger mode.
TRIGGER > LEVEL To select internal (level) triggering (34411A only).
TRIGGER > HOLD To select reading hold mode.
TRIGGER > SETUP To enter the trigger setup menu.
Features and Functions 2
• Remote Interface Operation: The following command selects the trigger source
from the remote interface:
TRIGger:SOURce {IMMediate>EXTernal|BUS>INTernal}
Where INTernal triggering applies only to the 34411A/L4411A.
Refer to the Agilent 34410A/11A/L4411A Programmer’s Reference Help for
a complete description and syntax for this command.
34410A/11A/L4411A User’s Guide 67
Page 68

2Features and Functions
Auto Triggering (34410A/11A)
This mode is available from the front panel only.
The power–on trigger default mode for the multimeter is front panel
operation, in auto trigger mode.
• Auto triggering takes continuous readings at the fastest rate possible for the
specified measurement configuration (function, range, resolution, and so
fort h).
• Auto triggering is a front panel mode similar to immediate triggering from
the remote interface, but also sets the sample count to infinite and
automatically initiates continuous measurements.
• To enable auto triggering, press
TRIGGER > AUTO
Single Triggering (34410A/11A)
This mode is available from the front panel only.
• The multimeter takes one reading, or a number of readings specified by a
sample count you enter, each time you press , or upon receiving an
external trigger signal on the rear-panel Ext Trig connector (see “External
Triggering” on page 75). See also “Number of Samples per Trigger” on
page 71.
• The Tr ig annunciator indicates that the multimeter is waiting for a trigger.
68 34410A/11A/L4411A User’s Guide
Page 69

Features and Functions 2
Reading Hold (34410A/11A)
This mode is available from the front panel only.
The reading hold mode allows you to capture and hold a stable reading on the
front panel display. This is useful in situations when you want to take a
reading, remove the test probes, and have the reading remain on the display.
When a stable reading is detected, the multimeter emits a beep (if the
front–panel beeper is enabled) and holds the reading on the display.
• The sensitivity band for reading hold depends on the measurement function
that is selected. The multimeter captures and displays a new value only
when reading stability is detected.
• Reading hold is disabled if you change measurement functions, or if you
change to remote mode.
• The currently configured range (auto or manual) is used for reading hold. If
you manually select a new range, reading hold is disabled.
• To enable reading hold, press
TRIGGER > HOLD
• The Hold annunciator is lit.
• Each time a stable reading is detected, the reading is displayed and the
beeper sounds (if enabled).
Immediate Triggering
This mode is available from the remote interface only.
In the immediate trigger mode, the trigger signal is always present. When you
place the multimeter in the wait–for–trigger state, the trigger is issued
immediately. This is the default trigger source for remote interface operation.
• Remote Interface Operation: The following command selects the immediate
trigger source:
TRIGger:SOURce IMMediate
The CONFigure and MEASure? commands automatically set the trigger
source to IMMediate.
Refer to the Agilent 34410A/11A/L4411A Programmer’s Reference Help for
a complete description and syntax for these commands.
34410A/11A/L4411A User’s Guide 69
Page 70

2Features and Functions
Software (Bus) Triggering
This mode is available from the remote interface only.
The bus trigger mode corresponds in function to pressing the key from
the front panel, except that the trigger is initiated by sending a bus trigger
command, after selecting BUS as the trigger source.
• The following command selects the bus trigger source:
TRIGger:SOURce BUS
Then, any of the following commands will initiate readings:
MEASure?
READ?
INITiate
Refer to the Agilent 34410A/11A/L4411A Programmer’s Reference Help for
a complete description and syntax for these commands.
Internal (Level) Triggering (34411A/L4411A)
Applies only to ac and dc voltage, ac and dc current, and 2-wire and 4-wire
resistance measurements, and only for the 34411A/L4411A.
In the internal trigger mode, the 34411A/L4411A triggers on a positive or
negative crossing (as selected) of a specified input level. You can specify both
the trigger level, and the slope.
• Front Panel Operation: Press
TRIGGER > LEVEL > TRIG LEVEL > TRIG SLOPE
Set TRIG LEVEL with the navigation keys, and then select NEG or POS for TRIG
SLOPE. The Tr i g annunciator indicates “waiting for trigger”.
• Remote Interface Operation: The following command selects the internal
trigger source:
TRIGger:SOURce INTernal
The following command sets the trigger level on which to trigger:
TRIGger:LEVel
The following command sets the trigger slope (positive or negative):
TRIGger:SLOPe {POS|NEG}
Refer to the Agilent 34410A/11A/L4411A Programmer’s Reference Help for
a complete description and syntax for these commands.
70 34410A/11A/L4411A User’s Guide
<level>
Page 71

Features and Functions 2
Number of Samples per Trigger
By default, when the multimeter is in the wait–for–trigger state, it takes one
reading (or sample) each time you trigger the multimeter. You can, however,
instruct the multimeter to take up to 50,000 readings (up to 1 million for the
34411A/L4411A) each time a trigger is initiated, whether from the front panel
or remote interface.
• Front Panel Operation: Press
TRIGGER > SETUP > N SAMPLES
Enter the desired number of samples per trigger using the navigation
keypad, and then step through or exit the menu.
• Remote Interface Operation: The following command selects the number of
samples the multimeter will take per trigger:
SAMPle:COUNt {<
After setting the sample count, you must place the meter in the
wait–for–trigger state before readings are triggered
(see “Software (Bus) Triggering” on page 70).
Refer to the Agilent 34410A/11A/L4411A Programmer’s Reference Help for
a complete description and syntax for this command.
count
>>MIN>MAX}
Number of Pre-Trigger Samples (34411A/L4411A)
The 34411A and L4411A provide pre-triggering. This feature allows you to
specify a pre-trigger sample count of readings to be retained before the trigger
is received. The pre–trigger sample count must be less than the sample count.
Pre–triggering is primarily a remote interface function, and is described
more completely in the Agilent 34410A/11A/L4411A Programmer’s Reference
Help. However, you can set the pre–trigger count from the front panel, and you
can use pre–triggering with the Data Logger feature (see “Data Logging” on
page 78). Pre-triggering is not supported for continuity or diode test.
• Front Panel Operation: Press
TRIGGER > SETUP > N SAMPLES > PRE-TRIG CNT
Enter the desired number of pre–trigger samples per trigger using the
navigation keypad, and then step through or exit the menu. (The PRE-TRIG CNT
selection appears only if NSAMPLES is greater than one.)
34410A/11A/L4411A User’s Guide 71
Page 72

2Features and Functions
• Remote Interface Operation: The following commands set the sample count
(must be >1) and pre–trigger sample count:
SAMPle:COUNt {<count>|MIN|MAX|DEF}
SAMPle:COUNt:PRETrigger {<PT
Refer to the Agilent 34410A/11A/L4411A Programmer’s Reference Help for
a complete description and syntax for this command.
Trigger Delay
You can manually specify a delay between the trigger signal and the first
sample that follows. This may be useful in applications where you want to
allow the input signal to settle before taking a reading, or for pacing a burst of
readings.
• The trigger delay may be set from 0 to 3600 seconds.
• The continuity and diode test functions ignore the trigger delay setting.
• If a trigger delay is not manually set, the default trigger delay is
automatically set, based on function, range, integration time and/or
ac filter setting (see also “Automatic Trigger Delay” on page 73).
• If you manually specify a trigger delay, that delay is used for all
measurement functions (except continuity and diode test).
count
>>MIN>MAX|DEF}
• Front Panel Operation: Press
TRIGGER > SETUP > N SAMPLES > PRE-TRIG CNT > TRIG DELAY
Select AUTO, ZERO, or MANUAL:
• Select AUTO to use the automatic trigger delay.
• Select ZERO for a zero delay.
• Select MANUAL to enter the desired delay using the navigation keypad.
Then step through or exit the menu.
• Remote Interface Operation: The following command specifies the trigger
delay, in seconds:
TRIGger:DELay {<
The following command specifies the automatic trigger delay:
TRIGger:DELay:AUTO
72 34410A/11A/L4411A User’s Guide
seconds
>>MIN>MAX}
Page 73

Features and Functions 2
If the multimeter is configured to take more than one sample per trigger,
the effect of the trigger delay on subsequent samples depends on the sample
source setting. Refer to the SAMPle:SOURce command description in the
Agilent 34410A/11A/L4411A Programmer’s Reference Help for a detailed
description.
After setting the trigger delay, you must use the INITiate or READ
command to place the meter in the wait–for–trigger state before readings
are triggered (see “Software (Bus) Triggering” on page 70). The MEASure?
command sets the trigger delay to AUTO.
Refer to the Agilent 34410A/11A/L4411A Programmer’s Reference Help for
a complete description and syntax for these command.
Automatic Trigger Delay
If you do not specify a trigger delay, the multimeter selects the trigger delay
time automatically. Automatic trigger delays are set to ensure that completely
settled and accurate measurements are taken. The delay is determined by
function, range, integration time, and ac filter setting.
NOTE
For measurements from the remote interface, the automatic trigger delay values are as
shown in the tables that follow. These values are also used for single-trigger, reading-hold,
and level-trigger measurements from the front panel. However, for auto-trigger
measurements from the front panel only, the automatic trigger delay is 50 ms for all
measurement functions.
DC Voltage Measurements (all ranges):
Integration Time Trigger Delay
≥1 PLC 160 µs
0.06 PLC or 0.2 PLC 130 µs
≤0.02 PLC 100 µs
DC Current Measurements (all ranges):
Integration Time Trigger Delay
≥1 PLC 1.5 ms
0.06 PLC or 0.2 PLC 1.0 ms
≤0.2 PLC 1.0 ms
34410A/11A/L4411A User’s Guide 73
Page 74

2Features and Functions
2–wire Resistance Measurements:
Range Trigger Delay
(for ≤0.02 PLC)
100 Ω 80 µs100 µs130 µs
1 kΩ 110 µs130 µs160 µs
10 kΩ 130 µs160 µs190 µs
100 kΩ 540 µs670 µs800 µs
1 MΩ 5.0 ms 6.0 ms 7.5 ms
– 1GΩ 60 ms 70 ms 84 ms
10 MΩ
Trigger Delay
(for 0.06 or 0.2 PLC)
Trigger Delay
(for ≥1 PLC)
4–wire Resistance Measurements
Range Trigger Delay
(for ≤0.02 PLC)
– 100 kΩ 1.0 ms 1.0 ms 1.5 ms
100Ω
1 MΩ 10 ms 10 ms 15 ms
– 1GΩ 100 ms 100 ms 100 ms
10 MΩ
Trigger Delay
(for 0.06 or 0.2 PLC)
Trigger Delay
(for ≥1 PLC)
Capacitance
Trigger Delay
0 s
AC Voltage Measurements (all ranges):
AC Filter Trigger Delay
Slow (3 Hz) 2.5 s
Medium (20 Hz) 625 ms
Fast (200 Hz) 25 ms
AC Current Measurements (all ranges):
AC Filter Trigger Delay
Slow (3 Hz) 1.66 s
Medium (20 Hz) 250 ms
Fast (200 Hz) 25 ms
Frequency and Period
Trigger Delay
1 s
74 34410A/11A/L4411A User’s Guide
Page 75

Features and Functions 2
NOTE
Temperature is measured using the 2–wire or 4–wire resistance function. The above tables
for resistance apply to temperature, but all temperature measurements use autoranging.
The range in use cannot be predicted; thus, nor can the delay. Use the TRIGger:DELay?
command to query the actual trigger delay for a temperature measurement.
For capacitance measurements the automatic trigger delay is zero (capacitor discharge is
part of the measurement). The continuity and diode test functions ignore the trigger delay.
External Triggering
External triggering takes one reading (or the specified number of readings)
each time the multimeter receives a pulse on the rear–panel Ext Trig connector.
You may select whether the multimeter uses the rising edge (POS) or falling
edge (NEG) of the external trigger signal to trigger a reading (see “Trigger
Slope” on page 77). The diagram below shows the Ext Trig connector timing (for
a negative pulse).
• The multimeter buffers one external trigger. If the multimeter is currently
taking a reading while another trigger occurs, that second trigger is
accepted. After the reading in progress is completed, the stored trigger is
issued.
• The Tr ig annunciator turns on when the multimeter is waiting for an
external trigger.
• The rear panel VM Comp (voltmeter complete) connector provides a pulse
after completion of each measurement. Voltmeter complete and external
trigger implement a standard hardware handshake sequence between
measurement and switching devices. The diagram below shows the VM Comp
connector timing (for a negative pulse).
34410A/11A/L4411A User’s Guide 75
Page 76

2Features and Functions
• Front Panel Operation: The external trigger mode corresponds in function to
pressing the key from the front panel, except that you apply the trigger
signal to the Ext Trig connector.
• Remote Interface Operation: The following command selects the trigger source
from the external connector:
TRIGger:SOURce EXTernal
Refer to the Agilent 34410A/11A/L4411A Programmer’s Reference Help for
a complete description and syntax for this command.
Trigger Input/Output Circuitry. The following diagram is representative of the
34410A/11A/L4411A trigger input and output circuitry. In each circuit, a
Schmitt Trigger (74LVC14) is used to prevent multiple triggers.
76 34410A/11A/L4411A User’s Guide
Page 77

Features and Functions 2
Trigger Slope
You may select whether the multimeter uses the rising edge (POS) or falling
edge (NEG) of the external trigger signal to trigger a reading, or
(independently) for the voltmeter complete output signal. The default for both
is NEG.
• Front Panel Operation: Press
TRIGGER > SETUP > N SAMPLES > TRIG DELAY > TRIG SLOPE > VMC SLOPE
For each of TRIG SLOPE and VMC SLOPE, you can select either NEG or POS:
• TRIG SLOPE sets the slope of the Ext Trig input signal (NEG or POS).
• VMC SLOPE sets the slope of the VM Comp output signal (NEG or POS).
Then step through or exit the configuration menu.
• Remote Interface Operation: The following command selects the trigger slope
for the external trigger (Ext Trig) connector:
TRIGger:SLOPe {POSitive>NEGative}
The following query returns the selected trigger slope for the Ext Trig
connector:
TRIGger:SLOPe?
This query returns POS or NEG.
The following command selects the signal slope for the voltmeter complete
(VM Comp) signal:
OUTPut:TRIGger:SLOPe {POSitive>NEGative}
The following query returns the selected trigger slope for the VM Comp
connector:
OUTPut:TRIGger:SLOPe?
This query returns POS or NEG.
Refer to the Agilent 34410A/11A/L4411A Programmer’s Reference Help for
a complete description and syntax for this command.
34410A/11A/L4411A User’s Guide 77
Page 78

2Features and Functions
Data Logging
The Data Logger feature provides a front–panel user interface that allows you
to set up data logging into the instrument’s non–volatile memory without
programming, and without a connection to a computer. Once you have
finished collecting data, you can view it from the front panel, or you can then
connect your computer and import the data. The 34410A/11A/L4411A Web
Interface provides a very convenient way of importing the data into your
spreadsheet or other application.
NOTE
The Data Logger logs data to non-volatile memory. Once the Data Logger has saved the
data, you can turn off the power, move the multimeter, and then view or retrieve the logged
data after turning the power back on. The 34410A, 34411A, and L4411A have non-volatile
memory for up to 50,000 readings, which is the limit for the Data Logger feature.
The 34410A/11A/L4411A allows you to set the following data logging
parameters: START DELAY, INTERVAL, EVENTS/TIME (COUNT or DURATION).
• START DELAY is the delay time (0 to 3600 seconds) after initiating a trigger,
before the data logging function takes its first reading.
• INTERVAL is the time (20 µ
The minimum interval is configuration dependent and may be greater
than 20 µ
• EVENTS/TIME is the total duration of the data logging session. You can set a
COUNT of total readings, with N SAMPLES settable from 1 to 50,000 readings.
Or, you can set a DURATION in hours, minutes and seconds. The maximum
duration that you can set is limited to that which results in 50,000 readings,
but in no event more than HH:MM:SS = 99:59:59 (just under 100 hours).
s to 3599.99999 s) between subsequent readings.
s.
• Front Panel Operation: To set up a data logging session, press
DATA LOGGER > SETUP > START DELAY > INTERVAL > EVENTS/TIME
• For START DELAY, enter the desired delay (use the navigation keypad).
• For INTERVAL, enter the desired interval.
• For EVENTS/TIME, select either COUNT or DURATION. Select COUNT if you want
to enter a total sample count. Select DURATION if you want to enter a time
duration.
• Upon pressing , the message TO START - PRESS TRIGGER KEY appears. The
data logger is now ready to go. Just press to begin logging. (A trigger
pulse on the Ext Trig connector will also initiate the session.)
78 34410A/11A/L4411A User’s Guide
Page 79

Features and Functions 2
• After the specified delay, the main display will show the data as it is
collected, while the second display line shows a progress bar and the
current count (down).
• The multimeter will continue taking readings until the specified count or
duration has been reached, unless the data logger is stopped manually.
After the programmed count or duration has been reached, the display
will show SAVING READINGS, then LOGGING COMPLETE. The readings are stored
in non–volatile memory.
To stop a data logging session in progress, press any key. The display will
show DATA LOGGER? and offer the selections CONTINUE or STOP. The data logger
continues to take readings while this is displayed.
• If you select STOP and press , the display will read DATA TO NV?,
prompting you to SAVE or DISCARD the readings already logged. Select one
of these options and press to terminate data logging.
• If you select CONTINUE and press , the data logging function will
continue as set up, until complete.
To read the data logged from the front panel, press
DATA LOGGER > VIEW–RDGS
Use and to scroll through the stored readings.
NOTE
34410A/11A/L4411A User’s Guide 79
The 34411A and L4411A provide pre-triggering. The data logger function can be used in
conjunction with pre-triggering to collect data both before and after the triggering event.
See “Number of Pre-Trigger Samples (34411A/L4411A)” on page 71 for information about
setting a pre-trigger sample count.
• Remote Interface Operation: The following command returns all readings
stored in non–volatile memory (NVMEM):
DATA:DATA? NVMEM
The following command deletes all readings stored in NVMEM.
DATA:DELete NVMEM
The following command returns the number of data points in NVMEM
DATA:POINts? NVMEM
Refer to the Agilent 34410A/11A/L4411A Programmer’s Reference Help for
a complete description and syntax for these commands.
Page 80

2Features and Functions
• Web Interface Operation: To access the data in the multimeter’s non–volatile
memory, launch the 34410A/11A or L4411A Web Interface (see “Agilent
34410A/11A Web Interface” on page 98):
Click on Browser Web Control to display the Control DMM dialog box:
80 34410A/11A/L4411A User’s Guide
Page 81

Features and Functions 2
Now click on View Data. In the dialog, select Non–volatile Memory Readings and then
click on Get Data to view the logged data:
From this window, you can select and copy (see Web Interface Help) the data
into another application using the Microsoft® Windows® clipboard.
In the example below, the data has been pasted from the clipboard directly
into a Microsoft Excel spreadsheet.
34410A/11A/L4411A User’s Guide 81
Page 82

2Features and Functions
System-Related Operations
The utility menu accesses the following system–related operations: self–test,
display of error conditions, calibration, and instrument information. These
features are described in the subsections that follow.
The utility menu is also used to access the following three menus:
• REMOTE I/O menu (see Chapter 3, “Remote Interface Configuration” for a
complete description of the remote interface features).
• STORE/RECALL menu (see “Multimeter State Storage” on page 48 for a
complete description of the state storage feature).
• MISC SETTINGS menu (see “Miscellaneous Configuration Settings” on
page 60 for a complete description of these features).
Self–Te s t
A power–on self–test occurs automatically when you turn on the instrument.
This limited test assures you that the multimeter is operational. This self–test
does not perform the extensive self test described below.
A complete self–test performs a series of internal tests, and takes about five
seconds to execute.
If the power–on or complete self–test fails, an error is stored in the error
queue. See the Agilent 34410A/11A/L4411A Service Guide for more
information on obtaining service.
• Following the complete self–test, the instrument issues a Factory Reset
(*RST) command.
• Front Panel Operation: Press
UTILITY MENU > SELF-TEST
If the test fails, the Error annunciator will light.
• Remote Interface Operation: The following command returns “+0“ if the
self–test is successful or “+1“ if it fails.
*TST?
Refer to the Agilent 34410A/11A/L4411A Programmer’s Reference Help for
a complete description and syntax for this command.
82 34410A/11A/L4411A User’s Guide
Page 83

Features and Functions 2
Error Conditions
When the front panel ERROR annunciator turns on (34410A/11A), one or more
command syntax or hardware errors have been detected. A record of up to 20
errors can be stored in the instrument’s error queue.
•
The instrument (34410A/11A) beeps once each time a command
syntax or hardware
• Each remote interface I/O session (for example, GPIB, USB, LAN) has its
own interface–specific error queue.
•
A special global error queue holds all power–on and hardware–
related
•
Errors are retrieved in first–in–first–out (FIFO) order. The first error
returned is the first error that was stored. Errors are cleared as you read
them. Once you have read all of the interface–specific errors, the errors in
the global queue are retrieved.
•
Errors are cleared as you read them. When you have read all errors
from the interface–specific and global error queues, the ERROR annunciator
turns off and the errors are cleared.
•
If more than 20 errors have occurred, the last error stored in the
queue
–350,”Error queue overflow”.
No additional errors are stored until you remove errors from the queue. If
no errors have occurred when you read the error queue, the instrument
responds with
+0,“No error”.
•
The front panel reports errors from all I/O sessions as well as the
errors (for example, over–temperature).
(the most recent error) is replaced with
global error queue
• Both the interface–specific and global error queues are cleared by the *CLS
(Clear Status) command and when power is cycled. The errors are also
cleared when you read the error queue. The error queue is not cleared by a
Factory Reset (*RST) comman d or an Instr u m ent Preset (SYSTem:PRESet)
command.
error is generated.
.
34410A/11A/L4411A User’s Guide 83
Page 84

2Features and Functions
Reading the Error Queue
You can read the error queue either from the front panel, or from the remote
interface.
• Front Panel Operation: Press
UTILITY MENU > SCPI ERRORS
Scroll through the errors using the navigation keypad. Press to clear
all errors from the queue.
• Remote Interface Operation: The following command reads and clears one
error from the error queue in
SYSTem:ERRor[:NEXT]?
Refer to the Agilent 34410A/11A/L4411A Programmer’s Reference Help for
a complete description and syntax for this command.
Calibration
Only service–qualified personnel should calibrate the multimeter. Improper
use of the front–panel CALIBRATION procedure in the UTILITY menu could result in
damage to the multimeter. The multimeter is secured with a calibration
security code at the factory.
first–in–first–out order.
Refer to the Agilent 34410A/11A/L4411A Service Guide for calibration
procedures.
84 34410A/11A/L4411A User’s Guide
Page 85

Power-On and Reset State
The tables that follow show the factory defaults for various instrument
settings. The parameters marked with a bullet (
memory, and are not affected by power–on or a system reset. For those
parameters, the initial factory settings are shown. All other parameters are
stored in volatile memory, and are reset to the indicated values at power–on,
after a front–panel Reset command, or after a *RST or SYSTem:PRESet remote
interface command.
Measurement Configuration Factory Setting
Function DC Volts
Range Autorange (for all functions)
Resolution 6.5 digits (0.3 ppm x Range)
Integration Time NPLC On, 1 PLC *
Auto zero On *
Aperture Off, 1 second *
● Input Impedance ● 10 MΩ (fixed for all dc V ranges)
AC Input Filter (bandwidth) 20 Hz (medium filter)
Nulls (for individual measurement functions) Off, 0 (for all functions)
Second Display Off
*for all dc measurements
Features and Functions 2
●) are stored in non–volatile
*
Math Operations Factory Setting
Math State Off
Math Registers Cleared (all registers)
dB Relative Value 0
dBm Reference Resistance 600 Ω
Triggering Operations Factory Setting
Trigger Count 1
Trigger Source Immediate
Trigger Delay Auto Delay
Sample Count 1
Sample Source Auto
Sample Timer 1 second
34410A/11A/L4411A User’s Guide 85
Page 86

2Features and Functions
● Beeper Mode (34410A/11A) ● On
● Radix Character (34410A/11A) ● Period
● Thousands Separator (34410A/11A) ● On
Display State (34410A/11A) On
Reading Memory Cleared
Error Queue Cleared at Power
● Stored States ● No change
● Calibration State ● Secured
Enable Interfaces:
● LAN ● Enabled
● GPIB ● Enabled
● USB ● Enabled
Lan Settings:
● DHCP ● On
● Auto IP ● On
● IP Address ● 169.254.4.10
● Subnet Mask ● 255.255.0.0
● Default Gateway ● 0.0.0.0
● DNS Server ● 0.0.0.0
● Host Name ● A-34410A-nnnnn (for 34410A)
● LAN Services
GPIB Settings:
● GPIB Address ● 22
1 Interface enable or LAN service changes take effect only after you cycle power.
2 LAN setting changes require a LAN restart. From SCPI you must cycle power.
3 Where nnnnn represents the last 5 digits of the instrument serial number.
System–Related Operations Factory Setting
–On.
Not cleared
remote interface Reset command
by a front panel or
Input/Output Configuration Factory Setting
1
2
● A-34411A-nnnnn (for 34411A)
1
● A-L4411A-nnnnn (for L4411A)
● Enable All
3
NOTE
The power-on/reset state may be different than that in the above tables if you have
enabled the power-on state recall mode (PWR-ON AUTO set to On from the Utility menu).
Also, you can recall one of four stored instrument states other than the power-on state. See
“Multimeter State Storage” on page 48 for further information.
86 34410A/11A/L4411A User’s Guide
Page 87

Agilent 34410A/11A/L4411A 6½ Digit Multimeter
User’s Guide
3
Remote Interface Configuration
Configuring the GPIB Interface 89
Configuring the USB Interface 90
Configuring the LAN Interface 91
Configuring LAN Parameters 92
DHCP 92
Auto–IP 92
IP Address 93
Subnet Mask 93
Default Gateway 94
Host Name 94
DNS Server 95
Web Password 95
Instrument Unexpectedly Goes into Remote 95
Setting up a LAN connection from the Front Panel 96
Setting up a LAN connection from the Remote Interface 97
Agilent 34410A/11A Web Interface 98
NOTE
For remote interface configuration information specific to the L4411A, refer to the L4411A
Getting Started Guide (p/n L4411-90001).
Agilent Technologies
87
Page 88

3 Remote Interface Configuration
This chapter tells how to configure the Agilent 34410A/11A for remote
interface communication. For additional information, refer to the:
• Agilent USB/LAN/GPIB Connectivity Guide for interface configuration and
troubleshooting information. This manual is found on the Agilent
Automation–Ready CD–ROM or at www.agilent.com/find/connectivity.
• Agilent 34410A/11A/L4411A Programmer’s Reference Help for information
on programming the instrument using SCPI commands. This help file is
found on the Agilent 34410A/11A/L4411A Product Reference CD–ROM.
The Agilent 34410A/11A supports GPIB, USB, and LAN interfaces. All three
interfaces are enabled at power on. The front panel
on whenever there is activity on the remote interface.
•GPIB Interface You need only set the GPIB address for the instrument (the
factory default is 22) and connect it to your PC using a GPIB cable (sold
separately).
•USB Interface There is nothing to configure on your instrument for a USB
connection. Just connect the instrument to your PC using the USB 2.0 cable
included with the instrument.
•LAN Interface By default, DHCP is enabled on the instrument, which may
enable network communication over the LAN interface
(10BaseT/100BaseTx). You may need to set several configuration
parameters as described in the LAN configuration sections that follow.
Remote annunciator turns
NOTE
88 34410A/11A/L4411A User’s Guide
To configure and verify an interface connection between the 34410A/11A and your PC, use
the Agilent IO Libraries Suite (E2094M Agilent IO Libraries for Windows) or an equivalent.
For more information about Agilent's I/O connectivity software, go to
www.agilent.com/find/iolib.
• Agilent IO Libraries Suite for Windows® 98/2000/ME/XP. For more information and to
install this software see the Agilent Automation–Ready CD-ROM provided with your
34410A/11A.
• To download the latest (or previous) version of this software for Windows®
98/NT/2000/ME/XP from the Web, go to www.agilent.com/find/iolib.
Page 89

Configuring the GPIB Interface
Each device on the GPIB (IEEE–488) interface must have a unique address.
You can set the multimeter’s address to any integral value between 0 and 30.
The address is set to “22” when the instrument is shipped from the factor y.
• Your computer’s GPIB interface card has its own address. Be sure to avoid
using that address for any instrument on the interface bus.
• The GPIB address is stored in non–volatile memory, and does not change
when power has been off, after a Factory Reset (*RST) command, or after
an Instrument Preset (SYSTem:PRESet) command.
• Front Panel Operation: Press
UTILITY MENU > REMOTE I/O > GPIB > ENABLE GPIB? > GPIB ADDRESS
After enabling or disabling GPIB, you must cycle the power for the change
to take effect.
Remote Interface Configuration 3
•
Remote Interface Operation: The following command enables the GPIB
remote interface:
SYSTem:COMMunicate:ENABle ON,GPIB
The following command queries the state of the GPIB interface:
SYSTem:COMMunicate:ENABle? GPIB
This query returns a “0” (OFF) or a “1” (ON).
The following command sets the multimeter’s GPIB (IEEE–488) address:
SYSTem:COMMunicate:GPIB:ADDRess {<
The following query returns the IP address, (for example “+22”):
SYSTem:COMMunicate:GPIB:ADDRess?
Refer to the Agilent 34410A/11A/L4411A Programmer’s Reference Help for
complete description and syntax for these commands.
34410A/11A/L4411A User’s Guide 89
address
>}
Page 90

3 Remote Interface Configuration
Configuring the USB Interface
For the USB interface, no configuration parameters are required to set up the
multimeter. Connect your multimeter to a USB port on your computer. Note
that it may take several seconds for the computer to recognize and establish a
connection to the multimeter.
• Front Panel Operation: Press
UTILITY MENU > REMOTE I/O > USB > ENABLE USB? > USB ID
After enabling or disabling USB, you must cycle the power for the change to
take effect.
Note that you generally do not need to know what the USB ID string is for
your instrument, as connections are automatic for most software. However,
the string is unique to your instrument and has the following format:
USB0::<mfgID>::<modID::<serial#>::INSTR
You will need to scroll the USB ID ( ) to view the entire string.
•
Remote Interface Operation: The following command enables the USB
remote interface:
SYSTem:COMMunicate:ENABle ON,USB
The following command queries the state of the USB interface:
SYSTem:COMMunicate:ENABle? USB
This query returns a “0” (OFF) or a “1” (ON).
Refer to the Agilent 34410A/11A/L4411A Programmer’s Reference Help for
complete description and syntax for these commands.
90 34410A/11A/L4411A User’s Guide
Page 91

Configuring the LAN Interface
By default, LAN connectivity with DHCP (Dynamic Host Configuration
Protocol) is enabled on the 34410A/11A. In many cases you can simply let
DHCP assign the necessary parameters for a LAN connection. However, you
can also turn off DHCP and set parameters manually.
LAN Parameters You may choose to manually set the following parameters,
as described in the subsections that follow. Following these descriptions are
procedures for setting up a LAN configuration from the front panel and the
remote interface.
• IP Address
• Subnet Mask
• Default Gateway
• DNS Server
• Host Name
Remote Interface Configuration 3
• LAN Services (Visa LAN, Sockets, Telnet, Agilent Web Server)
• We b Passwor d
NOTE
34410A/11A/L4411A User’s Guide 91
The IP Address, Subnet Mask, Default Gateway, and DNS Server parameters use
“dot-notation” addresses. Dot–notation addresses (“nnn.nnn.nnn.nnn” where “nnn” is a
byte value) must be expressed with care:
Most computers will interpret byte values with leading zeros as octal numbers. For
example, “255.255.020.011” is actually equivalent to decimal “255.255.16.9” not
“255.255.20.11” because the computer will interpret “.020” as “16” expressed in octal, and
“.011” as “9”.
However, the multimeter assumes that all dot–notation addresses are expressed as
decimal byte values and strips all leading zeros from these byte values. Thus, attempting to
set an IP address
expression). Be sure to enter the exact expression, “255.255.20.11”, in your computer web
software to address the instrument. To avoid confusion, use only decimal expressions of
byte values (0 to 255), with no leading zeros.
of “255.255.020.011” will become “255.255.20.11” (a purely decimal
Page 92

3 Remote Interface Configuration
Configuring LAN Parameters
DHCP
DHCP is a protocol for automatically assigning a dynamic IP address, subnet
mask and default gateway to a device on a network, and is typically the easiest
way to configure your multimeter for remote communication using the LAN
interface.
• Changing the DHCP setting will cause an automatic LAN restart.
• When DHCP is enabled (factory setting), the multmeter will try to obtain an
IP address from a DHCP server. If a DHCP server is found, it will assign a
dynamic IP address, Subnet Mask, and Default Gateway to the instrument.
The DHCP server may also assign the DNS address, and may change the
specified Host Name if a manually specified Host Name is already in use.
• When DHCP is disabled or unavailable, the multimeter will use the static IP
address, Subnet Mask, and Default Gateway during power–on.
• If a DHCP LAN address is not assigned by a DHCP server, then a static IP
will be assumed after approximately 1 minute.
• If Auto–IP is enabled, a dynamic (rather than static) IP address will be
assigned by the server at power–on.
Auto–IP
The Auto–IP standard automatically assigns an IP address to the multimeter
when on a network that does not have DHCP servers.
• Changing the Auto–IP setting will cause an automatic LAN reset.
• Auto–IP allocates IP addresses from the link– local address range
(169.254.xxx.xxx).
• From the factory, the Auto–IP setting is enabled.
• The IP address is stored in non–volatile memory, and does not change when
power has been off, after a Factory Reset (*RST) command, or after an
Instrument Preset (SYSTem:PRESet) command.
92 34410A/11A/L4411A User’s Guide
Page 93

Remote Interface Configuration 3
IP Address
An Internet Protocol (IP) Address is required for all IP and TCP/IP
communications with the instrument. If DHCP is enabled (factory setting), the
specified static IP address is not used. However, if the DHCP server fails to
assign a valid IP address, or if DHCP and Auto–IP are both off, the currently
configured static IP address will be used.
• Changing the IP address will cause an automatic LAN reset.
• The factory–set default IP Address is “169.254.4.10”.
• If you are planning to use a static IP address on a corporate LAN, contact
your network administrator to obtain a fixed IP address to be used
exclusively for your instrument.
• The IP address is stored in non–volatile memory, and does not change when
power has been off, after a Factory Reset (*RST) command, or after an
Instrument Preset (SYSTem:PRESet) command.
Subnet Mask
The multimeter uses the Subnet Mask to determine if a client IP address is on
the same local subnet. When a client IP address is on a different subnet, all
packets must be sent to the Default Gateway. Contact your network
administrator to determine if subnetting is being used and for the correct
Subnet Mask.
• Changing the Subnet Mask setting will cause an automatic LAN reset.
• The default Subnet Mask for the 34410A/11A multimeter is “255.255.0.0”.
• A value of “0.0.0.0” or “255.255.255.255” indicates that subnetting is not
being used.
• The Subnet Mask is stored in non–volatile memory, and does not change
when power has been off, after a Factory Reset (*RST) command, or after
an Instrument Preset (SYSTem:PRESet) command.
34410A/11A/L4411A User’s Guide 93
Page 94

3 Remote Interface Configuration
Default Gateway
A Default Gateway address allows the multimeter to communicate with
systems that are not on the local subnet. Thus, this is the Default Gateway
where packets are sent which are destined for a device not on the local subnet,
as determined by the Subnet Mask setting. Contact your network
administrator to determine if a gateway is being used and for the correct
address.
• Changing the Default Gateway setting will cause an automatic LAN reset.
• The default for the multimeter is “0.0.0.0” (no gateway, and subnetting is
not being used).
• The Default Gateway is stored in non–volatile memory, and does not change
when power has been off, after a Factory Reset (*RST) command, or after
an Instrument Preset (SYSTem:PRESet) command.
Host Name
The Host Name is the host portion of the domain name, which is translated
into an IP address.
• Changing the Host Name will cause an automatic LAN reset.
• The default Host Name for the multimeter is “A–34410A–nnnnn” for the
34410A, and “A–34411A–nnnnn” for the 34411A, where nnnnn is the last
five digits of the instrument’s serial number representation.
• If Dynamic Domain Name System (DNS) is available on your network and
your multimeter uses DHCP, the Host Name is registered with the Dynamic
DNS service at power–on.
• The Host Name is stored in non–volatile memory, and does not change
when power has been off, after a Factory Reset (*RST) command, or after
an Instrument Preset (SYSTem:PRESet) command.
94 34410A/11A/L4411A User’s Guide
Page 95

Remote Interface Configuration 3
DNS Server
The Domain Name Service (DNS) is an Internet service that translates Domain
names into IP addresses. Contact your network administrator to determine if
DNS is being used and for the correct address.
• If you change the DNS address, you must cycle power on the multimeter to
activate the new setting.
• The default DNS Address for the multimeter is “0.0.0.0”.
• The DNS Server address is stored in non–volatile memory, and does not
change when power has been off, after a Factory Reset (*RST) command, or
after an Instrument Preset (SYSTem:PRESet) command.
Web Password
You can control access to certain features of the 34410A/11A Web Interface
(see “Agilent 34410A/11A Web Interface” on page 98) using password
protection. The password is disabled by default. You can enable and set a web
password from the front panel. A web password consists of up to 12
alphanumeric characters.
Instrument Unexpectedly Goes into Remote
If your 34410A/11A unexpectedly goes into remote mode, it is likely because
you have the instrument configured to the LAN on someone else’s host
controller. Operations on that host controller can query your instrument
causing it to go into remote mode. To prevent this, do any of the following:
• Disconnect the instrument from the LAN.
• Disable the LAN interface from the front panel (Utility menu).
• Use SYST:COMM:LAN:HISTory? to determine the IP address that is
causing the problem. Then delete your instrument’s LAN address from that
host controller.
34410A/11A/L4411A User’s Guide 95
Page 96

3 Remote Interface Configuration
Setting up a LAN connection from the Front Panel
Press
UTILITY MENU > REMOTE I/O > LAN > ENABLE LAN? > LAN SETTINGS > VIEW | MODIFY
NOTE
If you disable or re–enable the LAN interface, or any of the LAN services, you must cycle
the power on the instrument to activate the new configuration. Other settings are activated
by a LAN restart when you exit the LAN menu.
• Select VIEW to view the current LAN settings.
• Select MODIFY to change the LAN settings. The following submenus are
displayed:
1 RESET LAN? – NO or YES
2 DHCP – OFF or ON
3 AUTO IP – OFF or ON
4 IP ADDRESS. – Set IP address in dot notation using navigation keypad. This
parameter appears only if both DHCP and AUTO IP are OFF.
5 SUBNET MASK – Set subnet mask in dot notation using navigation keypad.
This parameter appears only if both DHCP and AUTO IP are OFF.
6 DEF GATEWAY – Set default gateway in dot notation using navigation
keypad. This parameter appears only if both DHCP and AUTO IP are OFF.
7 DNS SERVER – Set DNS address in dot notation using navigation keypad.
This parameter appears only if both DHCP and AUTO IP are OFF.
8 HOST NAME – Enter desired host name using navigation keypad. The Host
Name must be an string of alphanum eric characters plus dashes (“–”), up
to 15 characters, with the first character a letter.
9 LAN SERVICES – ENABLE ALL or SELECT. SELECT
the individual services (VISA LAN, SOCKETS, TELNET or WEB SERVER).
If you disable or re–enable any of the L AN services, you must cycle the
power on the instrument for the change to take effect.
10 WEB PASSWORD – DISABLE or ENABLE. Select ENABLE and use the navigation
keypad to enter the desired password, up to 12 alphanumeric characters
in length.
allows you to enable or disable
96 34410A/11A/L4411A User’s Guide
Page 97

Remote Interface Configuration 3
Setting up a LAN connection from the Remote Interface
Use the following SCPI commands to configure the LAN interface.
NOTE
If you disable or re–enable the LAN interface, you must cycle the power for the change to
take effect. You must also cylcle power when you disable or re–enable any of the LAN
services, or change any LAN settings from the remote interface using SCPI commands.
• To enable or disable the LAN remote interface:
SYSTem:COMMunicate:ENABle {OFF>0>ON>1},LAN
• To enable or disable the use of DHCP for the LAN interface:
SYSTem:COMMunicate:LAN:DHCP {OFF>0>ON>1}
• To enable or disable the use of Auto–IP for the LAN interface:
SYSTem:COMMunicate:LAN:AUTOip[STATe] {OFF>0>ON>1}
• To assign the LAN a static IP address:
SYSTem:COMMunicate:LAN:IPADdress “<
• To assign a LAN Subnet Mask:
SYSTem:COMMunicate:LAN:SMASk “<
• To assign a LAN Default Gateway:
SYSTem:COMMunicate:LAN:GATEway “<
• To assign a LAN Host Name:
SYSTem:COMMunicate:LAN:HOSTname “<
• To assign the LAN a static DNS address:
SYSTem:COMMunicate:LAN:DNS “<
address
mask
address
name
address
>”
>”
>”
>”
>”
• To assign a LAN Domain Name:
name
SYSTem:COMMunicate:LAN:DOMain “<
Query forms of these commands are also available. Refer to the Agilent
34410A/11A/L4411A Programmer’s Reference Help for complete command
description and syntax.
34410A/11A/L4411A User’s Guide 97
>”
Page 98

3 Remote Interface Configuration
Agilent 34410A/11A Web Interface
The 34410A/11A provides a built–in Web Interface. You can use this interface
over LAN for remote access and control of the multimeter using a
Java–enabled Web browser, such as Microsoft® Internet Explorer.
To access and use the 34410A/11A Web Interface:
1 Establish a LAN interface connection from your computer to the
multimeter.
2 Open your computer’s Web browser.
3 Launch the 34410A/11A Web Interface by entering t he IP address of your
multimeter, or its fully–qualified host name, in the browser address field.
The following welcome screen appears.
4 For further information, click Help with this Page and follow the instructions
in the Web Interface Help.
98 34410A/11A/L4411A User’s Guide
Page 99

Agilent 34401A/11A/L4411A 6½ Digit Multimeter
User’s Guide
4
Measurement Tutorial
The Agilent 34410A/11A/L4411A multimeter is capable of
making highly accurate measurements. In order to achieve the
greatest accuracy, you must take the necessary steps to
eliminate potential measurement errors. This chapter describes
common errors found in measurements and gives suggestions to
help you avoid these errors.
DC Measurement Considerations 101
Thermal EMF Errors 101
Loading Errors (dc volts) 101
Noise Rejection 102
Rejecting Power–Line Noise Voltages 102
Common Mode Rejection (CMR) 102
Noise Caused by Magnetic Loops 103
Noise Caused by Ground Loops 103
Resistance Measurement Considerations 104
4–Wire Ohms Measurements 104
Removing Test Lead Resistance Errors 105
Minimizing Power Dissipation Effects 105
Errors in High Resistance Measurements 105
True RMS AC Measurements 106
True RMS Accuracy and High–Frequency Signal Content 107
Estimating High–Frequency (Out–of–Band) Error 110
Agilent Technologies
99
Page 100

4 Measurement Tutorial
Other Primary Measurement Functions 112
Frequency and Period Measurement Errors 112
DC Current Measurements 112
Capacitance Measurements 113
Temperature Measurements 115
Probe Type Choice 115
2–Wire vs. 4–Wire Measurements 115
Auto Zero On/Off 116
Integration 116
Offset Compensation 116
NULL Reading: 116
High-Speed Measurements 117
Making High–Speed AC Measurements 117
Making High–Speed dc and Resistance Measurements 118
Other Sources of Measurement Error 119
Settling Time Effects 119
Loading Errors (ac volts) 119
Measurements Below Full Scale 120
High–Voltage Self–Heating Errors 120
AC Current Measurement Errors (Burden Voltage) 120
Low–Level Measurement Errors 120
Common Mode Errors 122
Leakage Current Errors 122
100 34410A/11A/L4411A User’s Guide
 Loading...