

Page 1

Processor Solution
Information for
HP 16600A/700A-Series
Logic Analysis Systems
This booklet provides additional information for using your analysis
probe or emulation module with an HP 16600A/700A-series logic
analysis system.
This booklet answers the following questions:
• What is a processor solution?
• What are the steps for setting up the solution?
• How do I install an emulation module?
• Where can I find more information?
Processor Solution Information—HP 16600A/700A 1
Page 2

The Processor Solution At A Glance
The Processor Solution At A Glance
New Product Names
HP has changed the names of several products. The old names may
appear in the manuals or on the products themselves. The new
names are used in this manual.
Old name New name
Preprocessor Analysis probe
Processor probe Emulation probe or emulation module
If you ordered this... You received this...
Analysis probe Analysis probe board, inverse assembler
Emulation module HP 16610A emulation module, ta rg et
interface module (TIM)
Emulation migration Target interfac e module
Emulation solution Analysis probe board, inverse assembler,
HP 16610A emulation module, target
interface module (TIM) , HP B4620B
Source Correlation Tool Set
2 Processor Solution Information—HP 16600A/700A
Page 3

The Processor Solution At A Glance
The Parts of a Solution
There are several ways to connect an HP logic analysis system to your target
system. These connections use an analysis probe (or custom probing), plus
an emulation module (for an emulation solution).
Analysis Probe
The analysis probe (formerly called a preprocessor) connects your logic
analyzer to your target system for state and timing analysis. The analysis
probe can be used with an HP 16600A/700A-series logic analysis system or
with other HP logic analyzers.
The analysis probe can be purchased alone, or as part of an emulation
solution.
In some cases, if your target system has the appropriate connectors, you can
connect the logic analyzer directly to the target system and use the inverse
assembler without the analysis probe.
Processor Solution Information—HP 16600A/700A 3
Page 4

The Processor Solution At A Glance
Emulation Module
The emulation module (similar to a processor probe) plugs into your
HP 16600A/700A-series logic analysis system frame. The emulation module
lets you use the target processor’s built-in background debugging features,
including run control and access to registers and memory. A high-level
source debugger can use the emulation module to debug code running on the
target system. You can connect the emulation module to the analysis probe
or you can connect it to a debug port on the target system through the
provided target interface module (TIM).
Emulation Solution
The emulation solution includes an analysis probe, an emulation module,
cables and adapters, and the HP B4620B Source Correlation Tool Set (for
analyzing high-level source code). This solution is designed to be used with
an HP 16600A/700A-series logic analysis system.
4 Processor Solution Information—HP 16600A/700A
Page 5

Setup Ch ecklist
Setup Checklist
Follow these steps to connect your equipment:
• If you need to install an emulation module in an HP 16600A/700A
series logic analysis system, see page 8.
• Install the processor support package for your microprocessor.
See the instructions on the CD-ROM jacket. The processor support
package includes the files which will be used by the Setup Assisant, by
the analysis probe, and by the emulation module.
• Use the Setup Assistant to help you connect and configure the
analysis probe and emulation module. See page 7.
The flowchart on the following page is a summary of the steps involved in
connecting and configuring your equipment.
Processor Solution Information—HP 16600A/700A 5
Page 6
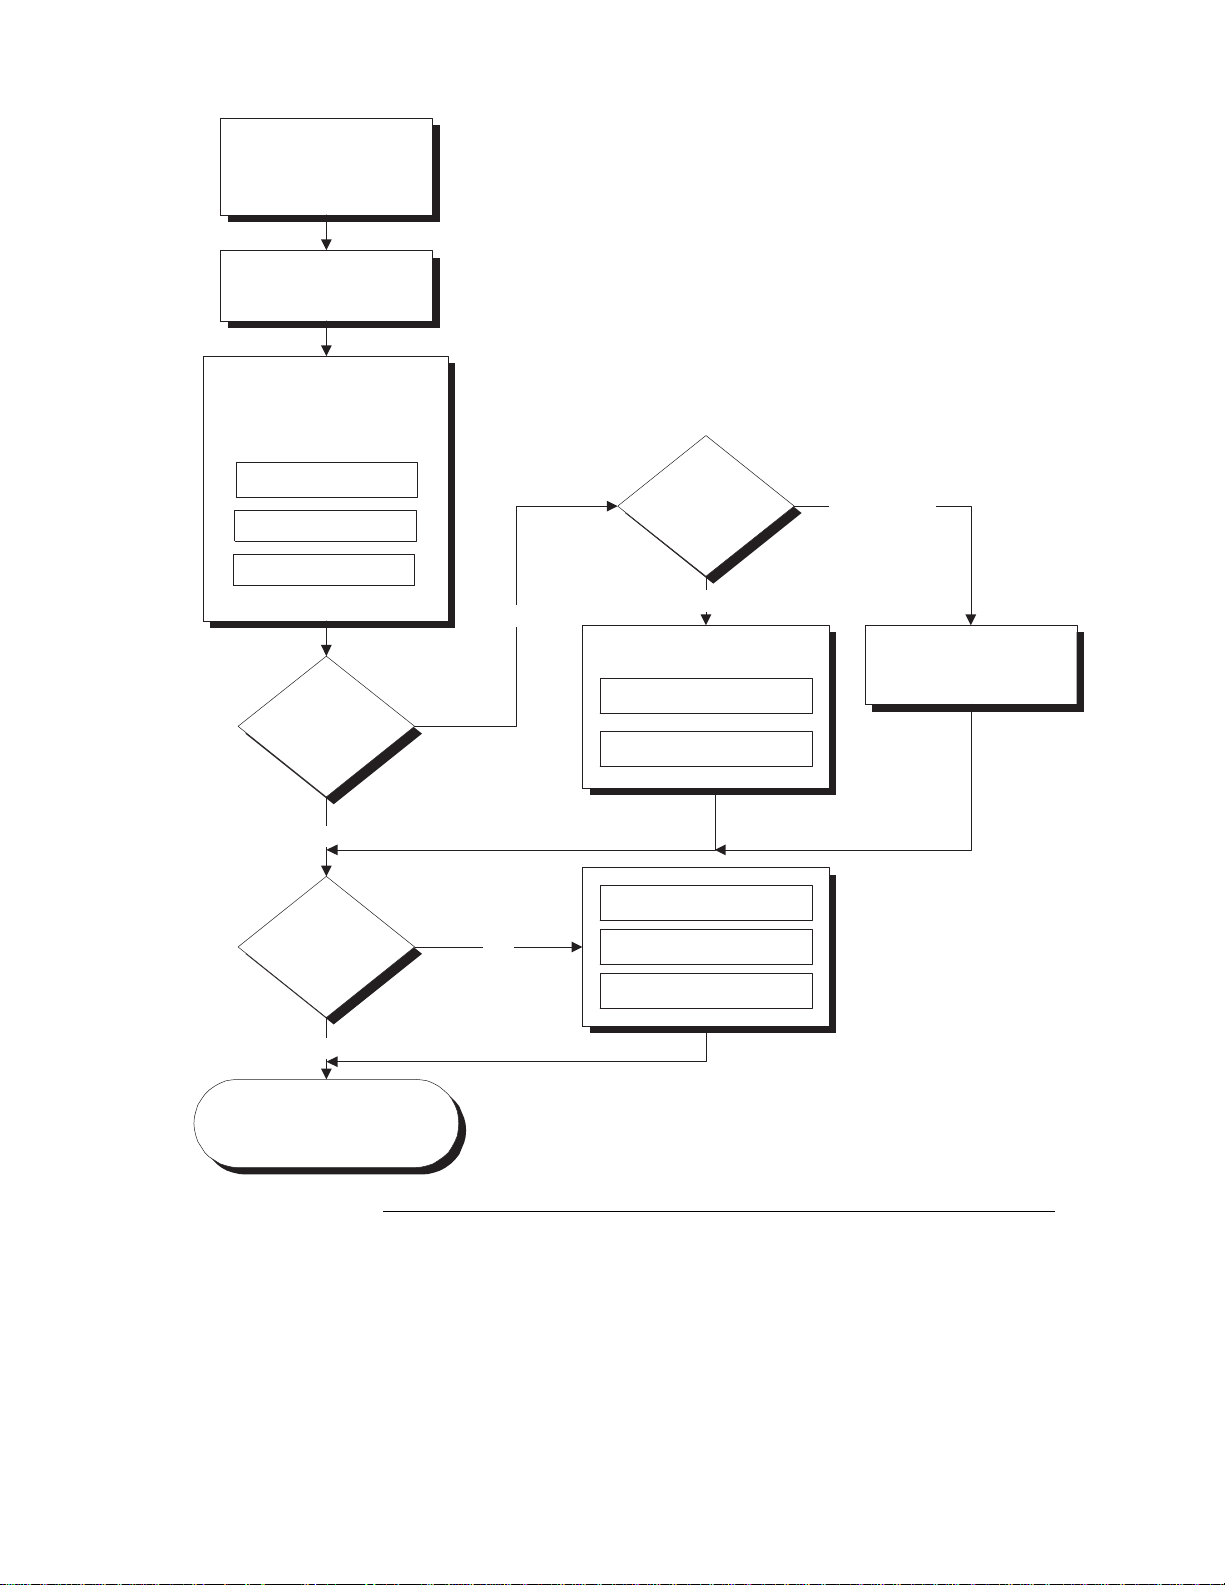
Setup Checklist
Install emulation
module
(if necessary)
Install software
Install analysis probe or
custom probing
Connect analysis
probe to target system
Connect analyzer
cables
Load inverse
assembler
Emulation
solution?
Yes
Connection
type?
Direct
Connect emulation
module
Connect emulation module
to target interface module
Connect target interface
module to target
Analysis Probe
Connect emulation
module to analysis
probe
No
Use source
correlation?
No
Installation done. Begin
making measurements.
6 Processor Solution Information—HP 16600A/700A
Yes
Create executable with
symbol information
Download executable to
target
Load program symbols
into analyzer
E2476F01.VSD
Page 7
Setup Ch ecklist
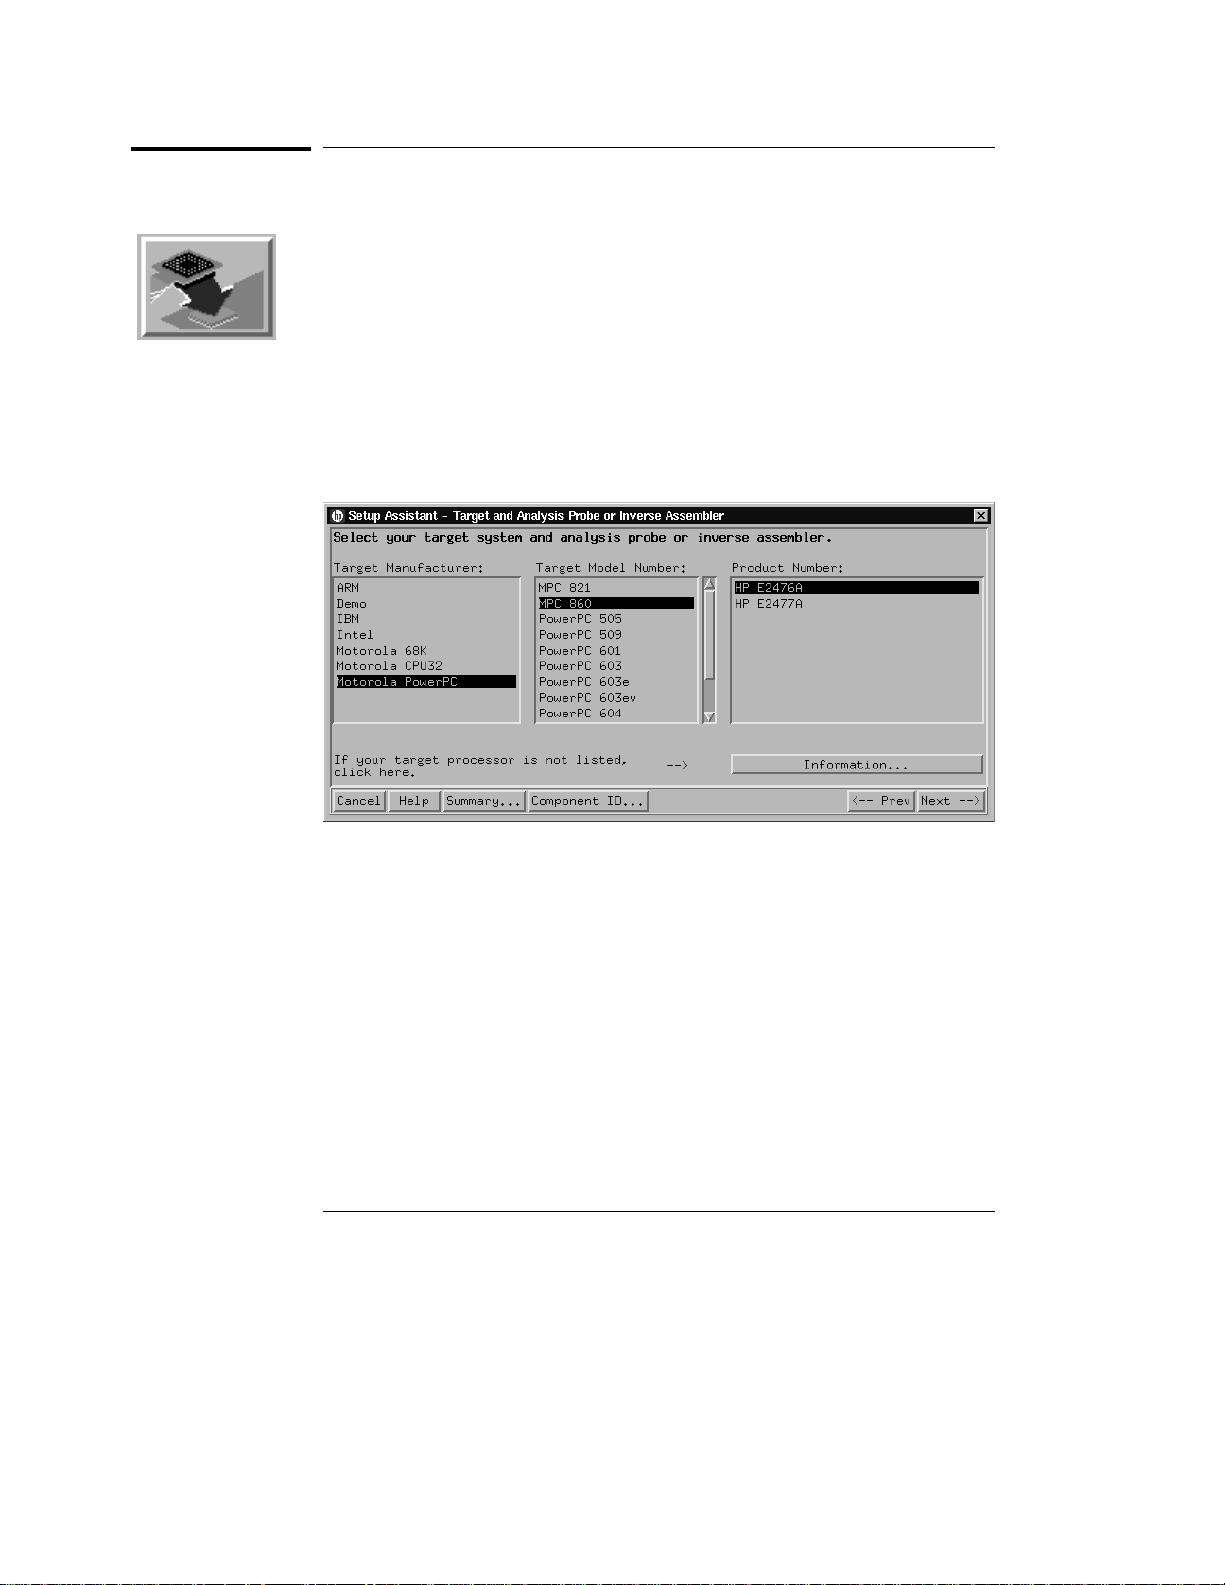
Setup Assistant
The Setup Assistant is an online tool for connecting and configuring
your logic analysis system for microprocessor and bus analysis. The
Setup Assistant is available on HP 16600A/700A-series logic analysis
systems.
This menu-driven tool will guide you through the connection
procedures for connecting the logic analyzer to an analysis probe, an
emulation module, or other supported equipment. It will also guide
you through connecting an analysis probe to the target system.
Start the Setup Assistant by clicking its icon in the system window.
If you ordered this product with your HP 16600A/700A-series logic
analysis system, the logic analysis system has the latest software
installed, including support for this product. If you received this
product after you received your logic analysis system, install the
PROC-SUPPORT package for your processor from the CD-ROM.
Processor Solution Information—HP 16600A/700A 7
Page 8

Installing an Emulation Module
Installing an Emulation Module
If the emulation module is already installed
Your emulation module may already be installed in your logic analysis
system. Use the Setup Assistant or follow the instructions on page 13
to update the emulation module firmware, which will give the
emulation module a "personality" for your microprocessor.
If the emulation module is not already installed
If you need to install an emulation module yourself, follow the
instructions on the pages which follow.
Connecting to the target system
Refer to the processor probe User’s Guide for information about
designing a target system to work with an emulation module and
instructions for connecting the emulation module to the target system.
Specifications and characteristics
The specifications and characteristics in the processor probe User’s
Guide do not apply to an emulation module. Instead, the emulation
module meets the environmental characteristics of the logic analysis
system frame.
Caution These instructions are for trained service personnel. To avoid dangerous
electric shock, do not perform any service unless qualified to do so. Do not
attempt internal service or adjustment unless another person, capable of
rendering first aid and resuscitation, is present.
Electrostatic discharge can damage electronic components. Use grounded
wriststraps and mats when you handle modules.
8 Processor Solution Information—HP 16600A/700A
Page 9

Installing an Emulation Module
To install the emulation module in an HP 16700A-series logic analysis system or an HP 16701A expansion frame
You will need T-10 and T-15 Torx screw drivers (supplied with the module).
1 Turn off the logic analysis system and REMOVE THE POWER CORD.
Remove any other cables (such as probes, mouse, or video monitor).
2 Turn the logic analysis system frame upside-down.
3 Remove the bottom cover.
4 Remove the slot cover.
You may use either slot.
Processor Solution Information—HP 16600A/700A 9
Page 10

Installing an Emulation Module
5 Install the emulation module.
6 Connect the cable and re-install the screws.
You may connect the cable to either of the two connectors. If you have two
emulation modules, note that many debuggers will work only with the "first"
module: the one toward the top of the frame, plugged into the connector
nearest the back of the frame.
Reinstall the bottom cover, then turn the frame right-side-up.
7
8 Plug in the power cord, reconnect the other cables, and turn on the
logic analysis system.
The new emulation module will be shown in the system window.
See Also See page 13 for information on giving the emulation module a "personality"
for your target processor.
10 Processor Solution Information—HP 16600A/700A
Page 11
Installing an Emulation Module
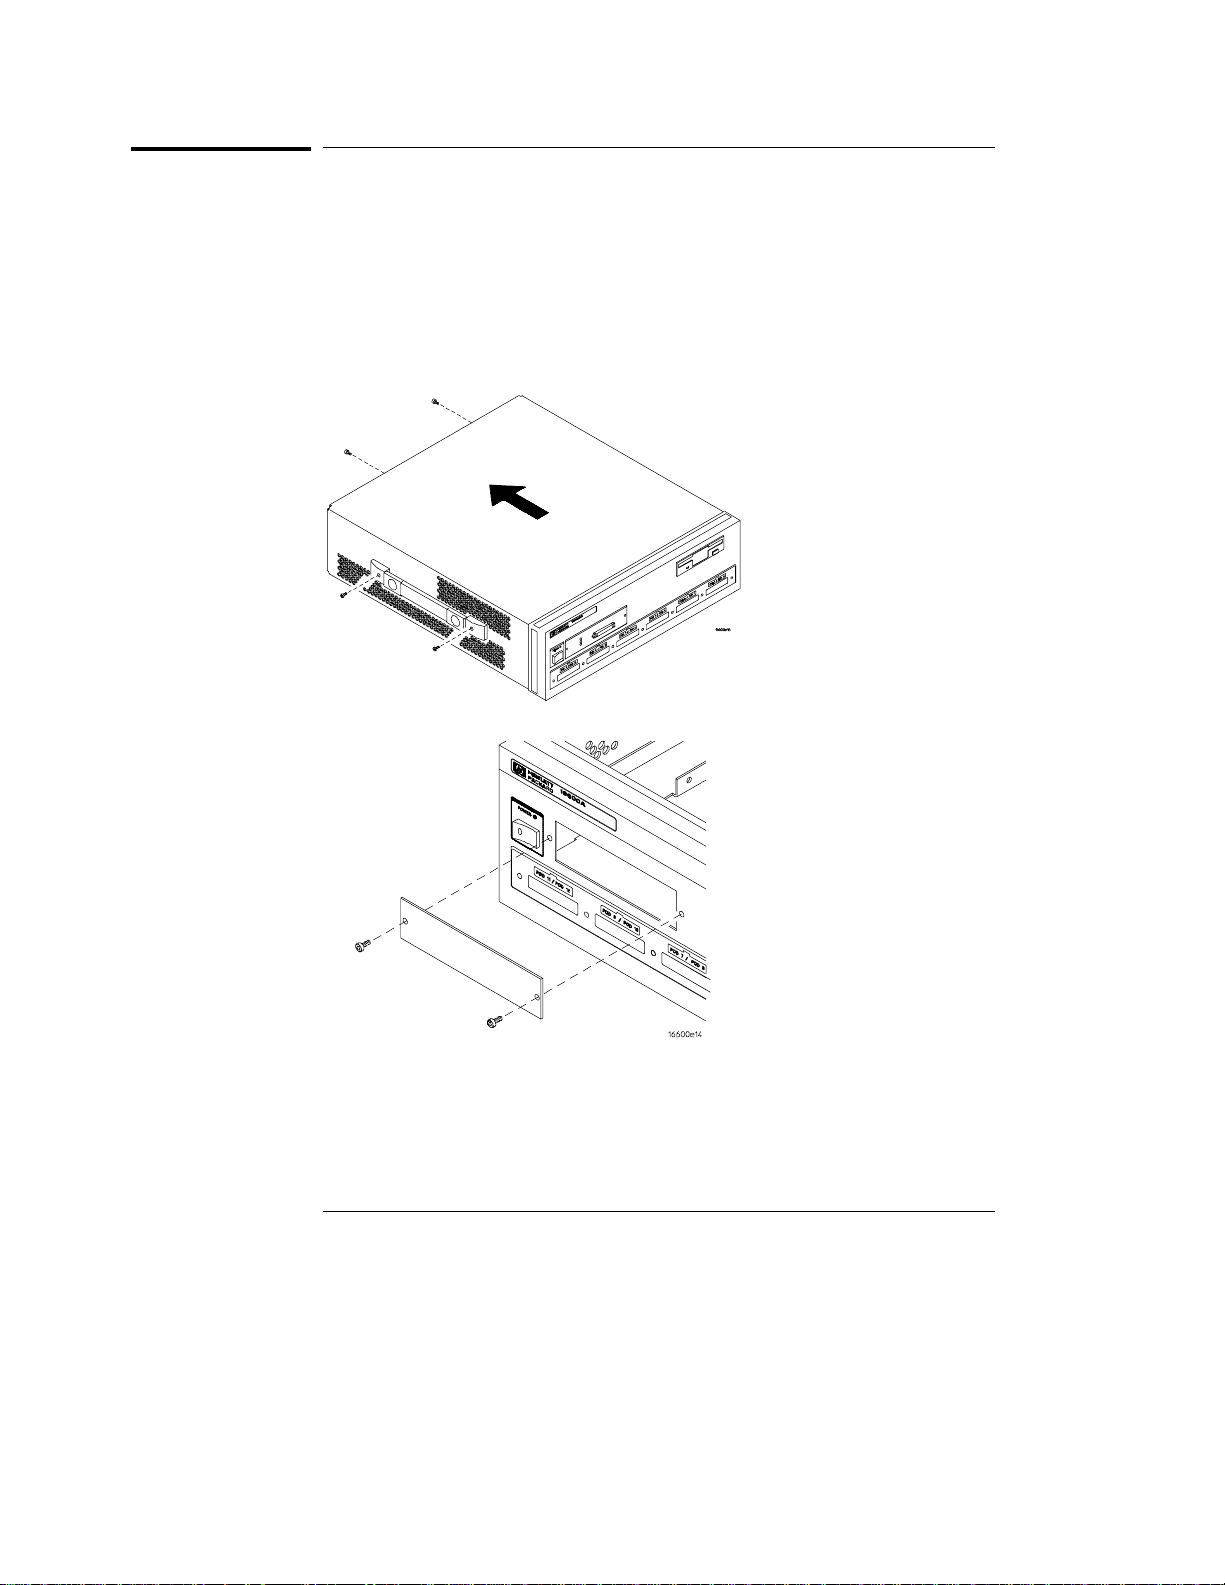
To install the emulation module in an HP 16600A-series logic analysis system
You will need T-8, T-10, and T-15 Torx screw drivers (supplied with the
module).
Turn off the logic analysis system and REMOVE THE POWER CORD.
1
Remove any other cables (such as probes, mouse, or video monitor).
2 Slide the cover back.
3 Remove the slot cover.
Processor Solution Information—HP 16600A/700A 11
Page 12

Installing an Emulation Module
4 Install the emulation module.
5 Connect the cable and re-install the screws.
6 Reinstall the cover.
Tighten the screws snugly ( 2 N•m or 18 inch-pounds).
7 Plug in the power cord, reconnect the other cables, and turn on the
logic analysis system.
The new emulation module will be shown in the system window.
See Also See page 13 for information on giving the emulation module a "personality"
for your target processor.
12 Processor Solution Information—HP 16600A/700A
Page 13

Installing an Emulation Module
To update emulation module firmware
After you have connected the emulation module to your target system, you
may need to update the firmware to give it the right "personality" for your
processor. You must update the firmware if:
The emulation module is being connected to a new analysis probe or TIM,
•
or
The emulation module was not shipped already installed in the logic
•
analysis system, or
You have an updated version of the firmware from HP.
•
To update the firmware:
1 End any run control sessions which may be running.
2 In the Workspace window, remove any Emulator icons from the
workspace.
3 Install the firmware onto the logic analysis system’s hard disk, if
necessary.
4 In the system window, click the emulation module and select Update
Firmware.
5 In the Update Firmware window, select the firmware version to load
into the emulation module.
6 Click Update Firmware.
See Also The software installation instructions on the jacket of the CD-ROM.
If you have an emulation probe, drag the Emulation Probe icon onto the
workspace, select Update Firmware..., then click Help for more
instructions.
To display current firmware version information
• In the Update Firmware window, click Display Current Version.
Processor Solution Information—HP 16600A/700A 13
Page 14

Additional Information Sources
Additional Information Sources
Additional or updated information can be found in the following
places:
• The Preprocessor Interface User’s Guide for your preprocessor
(now called an analysis probe).
• The User’s Guide or Installation/Service Guide for your
processor probe (now called an emulation probe). The information
on configuring a processor probe and connecting it to the target
system applies to your emulation module.
• If you have a probing adapter, the instructions for connecting the
probe to your target microprocessor are in the Probing Adapter
documentation.
• Application notes may be available from your local HP
representative or on the World Wide Web at:
http://www.hp.com/go/logicanalyzer
• The logic analysis system’s online help for the Emulation Control
Interface has additional information on using the emulation module.
• The measurement examples include valuable tips for making
emulation and analysis measurements. You can find the
measurement examples under the system help in your
HP 16600A/700A logic analysis system.
14 Processor Solution Information—HP 16600A/700A
Page 15

Processor Solution Information—HP 16600A/700A 15
Page 16

Publication number 16600-97008, June 1998
© Copyright Hewlett-Packard Company 1998
All Rights Reserved.
For Safety information, Warranties, and Regulatory information, see the
preprocessor, processor probe, or logic analysis system manual.
16 Processor Solution Information—HP 16600A/700A
 Loading...