

AGF Manufacturing Inc.
Model 7900A & 7950A
Owner’s Manual
INST-PURGEnVENT
Model 7900A
Model 7950A
Air Venting Valves
Air Venting Valves

Air Venting Valves
for Wet Pipe Fire Sprinkler Systems
NFPA 13 code requires venting the excess air from wet fire sprinkler systems to
help prevent corrosion.
Table of Contents
Recommended Installation Locations ...........................................................3
Installation Instructions
Model 7900A ........................................................................................................4
Model 7950A .................................................................................................... 4-5
Filling the System .............................................................................................5
Cleaning the Vent Screen
Quick Clean ..........................................................................................................5
Full Clean ..............................................................................................................6
AGF Manufacturing Inc.
100 Quaker Lane • Malvern, PA 19355
Phone: 610-240-4900
Fax: 610-240-4906
www.agfmanufacturing.com
Recommended Installation Locations
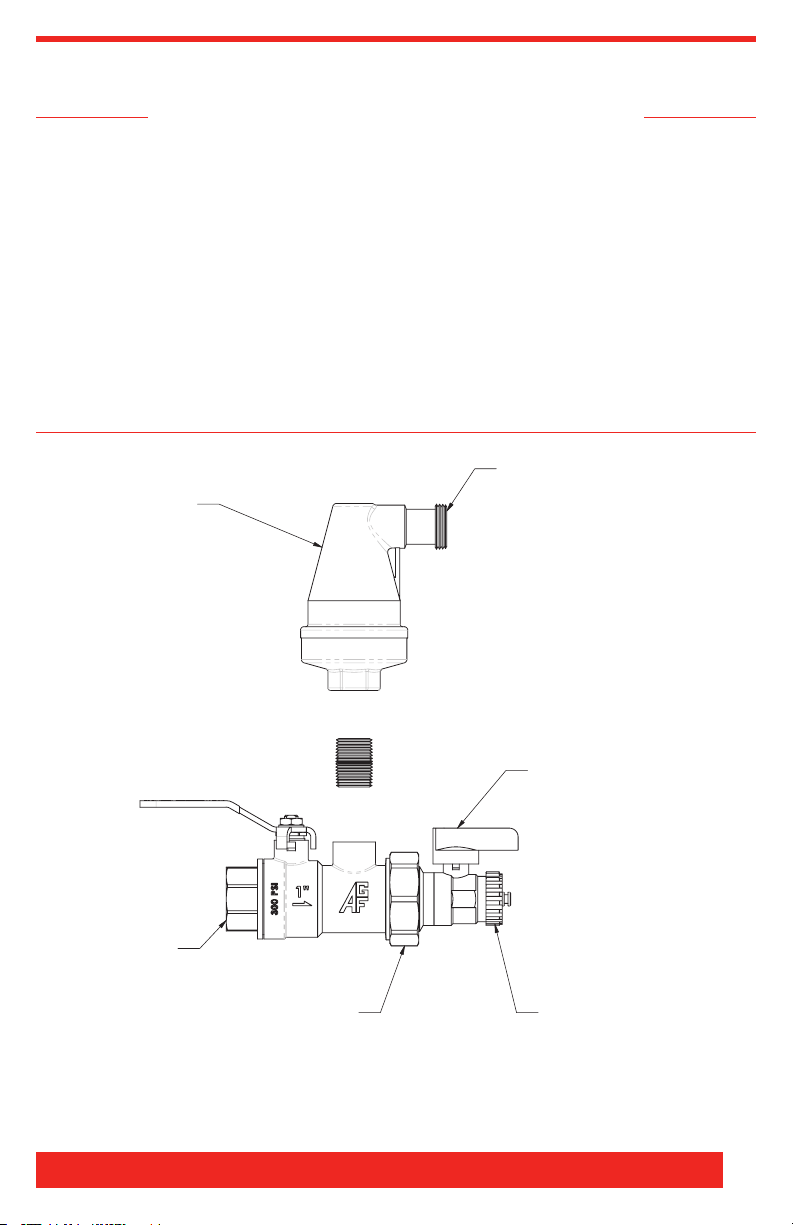
,1/(7137
9(17
385*(9$/9(
&211(&7,1*187
6+2:123(1
*$5'(1+26(7+5($'
&$3
287/(7137
M7900A Valve
Near high points in system per NFPA 13 (2016). Examples are the top of a •
vertical riser, elevated branch lines, and under roof peaks.
At the end of branch lines.•
Locations which have previously experienced internal pipe corrosion due to •
pockets of trapped air.
M7950A Valve
Near the floor control assembly•
Model 7900AAV
MinimumPSIG:2.9•MaximumPSIG:175
AGF Manufacturing Inc. • Phone: 610-240-4900 • Fax: 610-240-4906 • www.agfmanufacturing.com
3

PURGEnVENT Owner’s Manual
Installation Instructions
M7900A Installation
Ensure vent will be vertical (plumb) when finished.1.
Remove plastic shipping plug from the ½” port of valve and discard.2.
Apply PTFE tape to the 1” pipe thread where the M7900A will be mounted.3.
Install valve using a wrench on the inlet flats. Ensure the valve’s ½” outlet port 4.
is oriented in the up position.
Apply PTFE tape to both halves of the provided nipple.5.
Install nipple into the valve’s outlet port.6.
Thread inlet of air vent onto nipple. Tighten using 17.
as desired.
OPTIONAL:
The purge valve may be reoriented as needed by loosening (not removing) •
the nut which connects it to the main M7900A valve. After the purge valve is
rotated to the desired position, ensure the connecting nut is tight.
The Mist Collection Assembly may be connected to the ¾” outlet of the vent.•
A standard drain line may be connected to the ¾” outlet of the vent.•
1
⁄16” wrench on flats; position
M7950A Installation
Ensure vent will be vertical (plumb) when finished.1.
Create required cutout length for the pipe section.2.
Verify flow arrow direction of preassembled PURGE3. nVENT pipe.
Install into sprinkler pipe as directed by code and AHJ.4.
Apply PTFE tape to both halves of the provided nipple.5.
Install nipple into the M7900A valve’s outlet port.6.
Thread inlet of air vent onto nipple. Tighten using 17.
1
⁄16” wrench on flats; position
as desired.
M7950A Alternate Installation
Turn main pipe section 45˚.1.
Install M7900A ensuring vent is positioned vertically.2.
4

OPTIONAL:
The purge valve may be reoriented as needed by loosening (not removing) •
the nut which connects it to the main M7900A valve. After the purge valve is
rotated to the desired position, ensure the connecting nut is tight.
The Mist Collection Assembly may be connected to the ¾” outlet of the vent.•
A standard drain line may be connected to the ¾” outlet of the vent.•
Filling the System
Open the M7900A valve handle to the “Vent” position.1.
Open the purge valve (small handle).2.
Remove the cap from the purge valve and connect a drain line (garden hose) 3.
to it’s port.
Fill the system with water.4.
Monitor the discharge from the drain line and close the purge valve when a 5.
steady stream of water is achieved.
Disconnect the drain line and reinstall the cap onto the purge port.6.
Keep the M7900A valve handle in the “Vent” position to allow any residual air 7.
to escape the system through the automatic air vent.
Cleaning the Vent Screen
If the internal vent screen becomes clogged with debris it can be cleaned using
one of the following methods:
Quick Clean
Close the M7900A valve.1.
Remove the cap from the purge valve and connect a drain (garden hose) to 2.
it’s port.
Open the purge valve.3.
Flush the screen by quickly and repeatedly opening and closing the M7900A 4.
valve.
Close the M7900A valve and allow the residual water to drain out.5.
Close the purge valve.6.
Disconnect the drain hose and reinstall the cap.7.
Slowly open the M7900A valve to vent.8.
AGF Manufacturing Inc. • Phone: 610-240-4900 • Fax: 610-240-4906 • www.agfmanufacturing.com
5

PURGEnVENT Owner’s Manual
Full Cleaning
Close the M7900A valve.1.
If needed, place a bucket under the PURGE2. nVENT to capture the small
amount of residual water which will come out during the next steps.
Using a wrench, loosen the nut which connects the purge valve to the M7900A 3.
valve.
Remove the purge valve from the M7900A valve. Set the purge valve and it’s 4.
flat gasket aside.
Remove the vent screen from the M7900A valve and clean as needed.5.
Place the vent screen back into the M7900A valve. 6.
Reinstall the purge valve making sure the screen is centered and the flat 7.
gasket is properly captured between the two halves of the assembly. DO NOT
apply grease to the at gasket.
Position the purge valve handle as desired and tighten.8.
Make sure that the purge valve is closed.9.
Slowly open the M7900A valve to vent.10.
Check for leaks and tighten the connecting nut if needed.11.
Thank You For Using Our Products!
For our complete family of products, visit
us online at www.agfmanufacturing.com
6

Corrosion Monitors
for Wet or Dry Pipe Fire Sprinkler Systems
M7700
M7800
www.corrinsite.com

AGF Manufacturing Inc.
100 Quaker Lane • Malvern, PA 19355
Phone: 610-240-4900
Fax: 610-240-4906
www.agfmanufacturing.com
 Loading...