


User Manual
AF 5077/5087/5107PS
AF 5077/5087/5107MS
EN
DANGER!
Notice
Introduction
Dear Customer
Thank you for purchasing our photo frame. Get
ready to experience photography like never before! The photo frame allows you to view photos,
audio and video files—all without a computer.
High definition LCD screen
Memory
Your digital photo frame includes a built-in memory, a memory card slot and a USB port. Files on the
built-in memory can be deleted and files on memory card and USB-disc can be copied.
Supports browse mode (thumbnails of 20 images
per page at a time). Your digital photo frame supports photo rotate and stretch function.
An automatic, continuous slide show with background music lets you enjoy all of your photos
with ease.
The included remote control makes it simple to select photo-, music- and movies files, change settings and more.
Additional functions like time and date display,
alarm clock and an automatic on and off switch
are also available.
We hope you enjoy your device and its many functions!
About this User Manual
With the installation guide on the following pages,
you can start using your device quickly and easily.
Detailed descriptions can be found in the following sections of this user manual.
Read the entire user manual carefully. Follow all
safety instructions in order to ensure proper operation of your device. The manufacturer accepts no
liability if these instructions are not followed.
Multiple models of this device series are described
in this user manual. Please note that some functions are only available with specific models.
Symbols Used
Dangers
DANGER!
Warns about dangers for people, damage to the device or other objects as
well as possible loss of data. Injuries or
damage can result from improper handling.
Troubleshooting
Troubleshooting
This symbol designates tips that will
help you to use your device more effectively and easily.
1

Safety Instructions and Recommendations
Introduction 2
Do not make any changes or settings that are not
described in this user manual. Physical injury or
damage to the device or loss of data can result
from improper handling. Take note of all warning
and safety notes indicated.
Setting Up the Device
The device is exclusively for indoor use only.
The device is exclusively for indoor use only. The
device should rest securely on a stabile, flat surface. Position all cables in such a way that no one
will stumble on them, thus avoiding possible injuries to persons or damage to the device itself.
LCD screen
Always handle the unit with care. Avoid touching
the LCD screen. Never place heavy or sharp objects on the LCD panel, frame or power cord.
Protect the device against direct sunlight
Protect the device against direct sunlight, heat,
large temperature fluctuations and moisture. Do
not place the device in the vicinity of heaters or air
conditioners. Observe the information on temperature and humidity in the technical data.
Do not switch the device on immediately a fter transporting it.
The device should not be switched on immediately
after being moved from a cold to a warm room or
vice versa or into a cold room which has been
heated up quickly. In such cases, wait at least
three hours until the device has adapted to the
changed conditions (temperature, humidity…) .
In the event that the device becomes too hot, or if you see smoke coming from the d evice
In the event that the device becomes too hot, or if
you see smoke coming from the device, you must
immediately pull the power cable out of the power
socket. Have your device examined by trained professionals at a technical service location. To prevent the spread of fire, open flames should be
kept away from the device.
Do not plug in the de vice in moist r ooms.
Do not plug in the device in moist rooms. Never
touch the mains cable or the mains connection
with wet hands.
Do not allow liquids to enter into the device.
Do not allow liquids to enter into the device. Disconnect the device from the power socket if liquids or foreign objects have entered the device
and have your device examined by trained professionals at a technical service location.
Do not allow children to handle the devi ce without supervision.
Do not allow children to handle the device without
supervision. The packing materials should be kept
out of the hands of children.
Power Supply
Use only the enclosed power adapter
Use only the enclosed power adapter (see chapter
Appendix / Technical Data). Check whether the
mains voltage of your device (indicated on the
type label) matches the mains voltage available at
the setup location. This equipment complies with
the voltage type specified on the unit.
Never touch the power cable if the insulation is damaged.
Never touch the power cable if the insulation is
damaged. Replace damaged wires immediately.
Use suitable cables only; if necessary please contact our technical customer service or your retailer.
Before cleaning the surface of your device, disconnect it from the power network.
Before cleaning the surface of your device, disconnect it from the power network. Use a soft,
lint-free cloth. Never use liquid, gaseous or easily
flammable cleansers (sprays, abrasives, polishes,
alcohol). Do not allow any moisture to reach the interior of the device.
Only clean the display with a dry, soft cloth.
Only clean the display with a dry, soft cloth. If the
display breaks, a mildly corrosive liquid may escape. Avoid all contact with your skin and eyes.
Repairs
Repairs
Do not make any repairs to the device yourself.
Improper maintenance can result in injuries or
damage to the device. Only have your device repaired by an authorised service centre.
Do not remove the type label from your device;
this would void the warranty.
Photo Memory Media
Photo Memory Media
Only use storage media that are compatible with
the device. In order to prevent damage to the card
or the unit, please turn off the power before removing or inserting the card.
Never pull out the memory card while the device is
accessing it. This could cause data to be damaged
or lost.
EN
2
EN
Overview
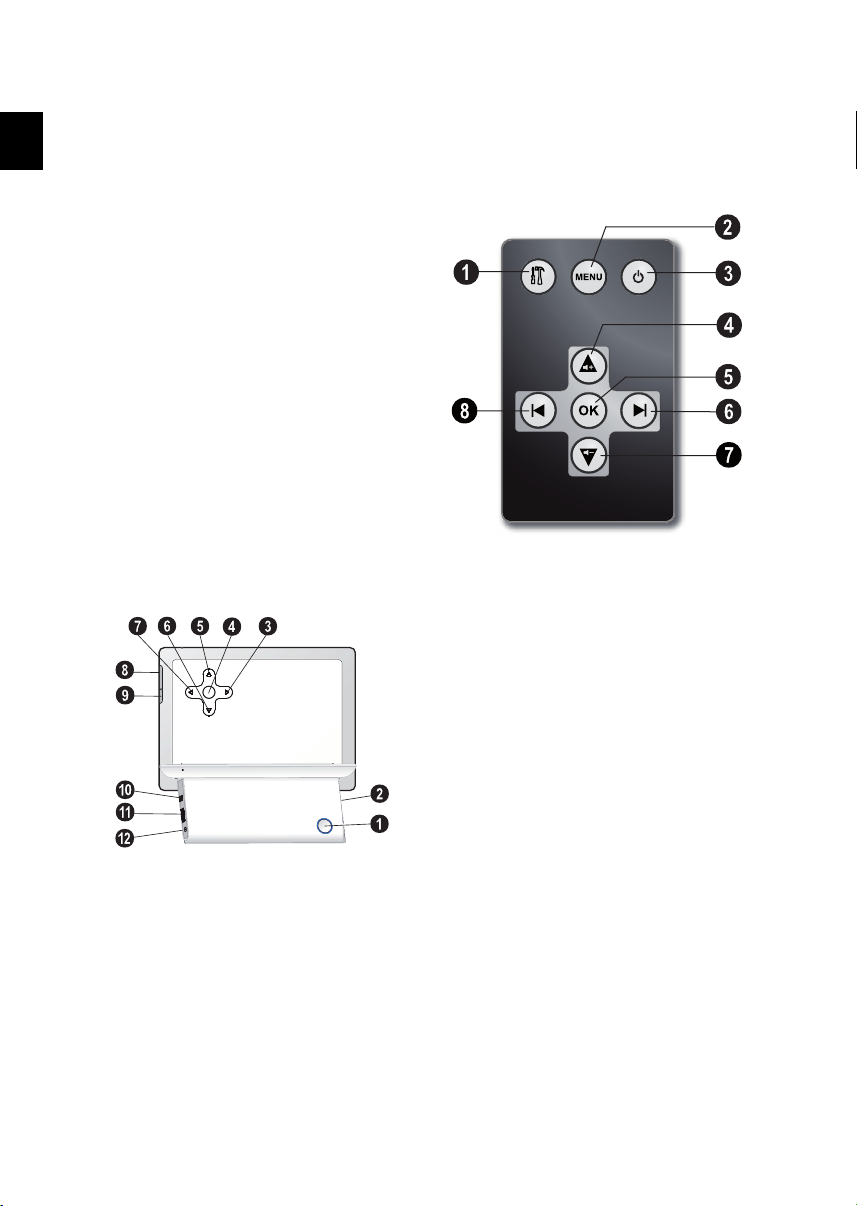
Device Overview
On/Off Switch
1B—On/Off switch
Slot for Memory card
2—Slot for Memory card
Arrow keys left
3 J—Navigating in the Menu / Decrease the
brightness, contrast and colour saturation / Skips
to the previous image, previous row or page
OK
4 OK—Confirms the selection / Starting, interrupting the slide show
Arrow keys up
5 G—Navigating in the Menu / Increase the volume / Switch on the background music during
slide show
Arrow keys down
6 I—Navigating in the Menu / Decrease the
volume
Arrow keys right
7 H—Navigating in the Menu / Increase the
brightness, contrast and colour saturation / Skips
to the next image, next row or page
Menu Key
8 MENU—Calling the main menu / press and
hold: Switch on the analog clock
Adjustment Menu
9 ù—Calling up the settings menu
Mini USB
‹ ý—Mini USB connection – for connecting a
computer
USB Socket
Œ ý- Socket—USB port for a storage medium
USB connection for storage medium
÷ Í - Socket – Port for power supply
Rückseite AF5077
Spaltenumbruch
Remote Control
(AF¦5077/¦5087/5107MS)
Fernbedienung AF5077
1—Calling up the settings menu
2—Calling the main menu / press and hold:
Switch on the analog clock
3—Switching On and Off
4—Navigating in the Menu / Increase the volume
/ Switch on the background music during slide
show
5—Confirms the selection / Starting, interrupting
the slide show
6—Navigating in the Menu / Increase the brightness, contrast and colour saturation / Skips to the
next image, next row or page
7—Navigating in the Menu / Decrease the volume
8—Navigating in the Menu / Decrease the brightness, contrast and colour saturation / Skips to the
previous image, previous row or page
3
Initial Operation
Notice
CAUTION!
DANGER!
Notice
Notice
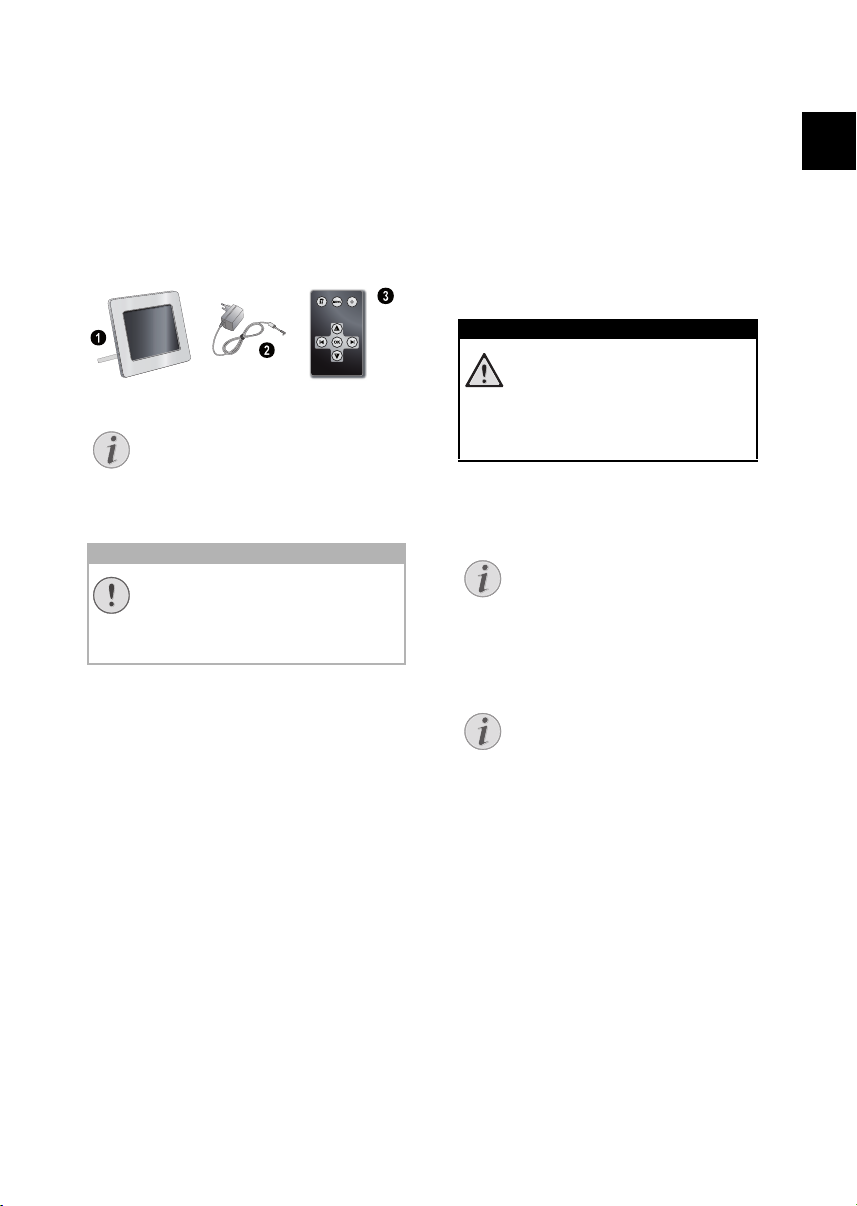
Packing Contents
Digital photo frame
‚ Digital photo frame with bracket
Power supply with exchangeable plugs
ƒ Power supply with exchangeable plugs
Remote control (with battery) Variable
„ A remote control (with battery)
(AF¦5077/¦5087/5107MS)
User Guide (not depicted)
User Guide (not depicted)
Verpackungsinhalt AF 5077
Missing Package Contents
Missing Package Contents
If one of the parts is missing or damaged, please contact your retailer or our
customer service.
Connecting power supply
Mains Voltage at the Site of Installation
Mains Voltage at the Site of Installation!
Check whether the mains voltage of
your device (indicated on the type label)
matches the mains voltage available at
the setup location.
1 Choose the right plug for your country and
slide it onto the power adapter. Ensure that the
plug snaps in completely.
2 Insert the small plug of the power supply into
the socket on the rear side of your device. Insert the power supply unit into the socket.
Connecting to the PC
Using the USB cable, you can connect your photo
frame to a computer to transfer files between the
internal memory and computer.
1 Switch the device off using the on/off switch
on the rear.
2 With the frame turned off, connect the small
end of the cable to the digital picture frame
and the large end to your computer.
3 Switch the device on using the on/off switch
on the rear. Allow the computer a few moments to recognize the new hardware. Compatible photo, music and video files can be copied onto the internal memory.
4 If the connection with the computer is discon-
nected, the digital photoframe will restart automatically.
Inserting a Memory Card
1 Insert a memory card into the appropriate card
slot at the rear of the device. Your photo frame
supports the following memory cards: SD/
MMC/MS/SDHC/XD.
Inserting a Memory Card!
Only use storage media that are compatible with the device.
Never pull out the memory card while
the device is accessing it. This could
cause data to be damaged or lost.
2 Switch the device on using the on/off switch
on the rear. The player will start slide show after the start screen be displayed.
Many Photos on the Memory Card
If the memory card contains many
photos, it can take some time until
the slide show starts.
3 Press OK at the rear during a slide show to
stop the slide show.
Using USB device and memory card at
the same time
If a USB storage device is used at the
same time as a storage card, the images from the memory card are displayed first.
EN
4

EN
DANGER!
Notice
Installing or Changing the Batteries of the Remote Control
Risk of explosion with incorrect type of
batteries
CAUTION! RISK OF EXPLOSION IF BATTERY IS REPLACED BY ONE OF AN INCORRECT TYPE.
1 Take the battery compartment from the re-
mote control by opening the locking mechanism (1) and pulling out the battery compartment (2).
2 Insert the new batteries into the battery com-
partment with the positive and negative poles
as shown on the back of the remote control.
Make sure the polarities(+ and -) are aligned
correctly.
3 Push the battery compartment back into the
remote control until the locking mechanism engages.
Normally the batteries will last for
around one year. If the remote control
does not work, please replace the batteries. If the player is not used for a long
time, take out the batteries. So you can
prevent leakage and possible damage to
the remote control.
The batteries used should be disposed
of according to the recycling regulations
of your country.
Using the Remote Control
Point the remote control to the remote sensor on
the front panel of the device. Its working limits is
within an angle of 30 degrees and a distance of 2
meter. When using the remote control, no obstacle
should be placed between the remote control and
remote sensor.
5

Playback
Notice
Notice
Notice
Overview of the Menu Functions
There are three items on the main menu.
1 Photo Menu
2 Video Menu
(AF¦5077/¦5087/5107MS)
3 Music Menu
(AF¦5077/¦5087/5107MS)
Photomenü AF 5077
Navigating in the Menu
1 Press MENU on the remote control or MENU
on the device.
2 Select the desired menu using Ý/Þ.
3Confirm with .
Photo Playback
1 Select the photo menu in the main menu and
confirm using OK.
2 Then the frame will display 16 thumbnail imag-
es per page.
6 Press J/H to skip top the previous or next
EN
image.
7 End the slide show using MENU.
Calling up Menu
During the slideshow you can return
to the main menu by pressing MENU
at any time.
Setting the Background Music of the Slide Show
(AF¦5077/¦5087/5107MS)
As background music, you can only use
files that are stored together with the
photos in the internal memory on the
memory card or the USB connection.
1 During the slide show press Û on the remote
control or G on the device, to start the background music.
Using Û/Ü, set the volume.
Music Playback
(AF¦5077/¦5087/5107MS)
1 Select the music menu in the main menu and
confirm using .
2Using Ý/Þ or Û/Ü select the music title you
want to play.
3 Press OK to start playback.
Additional informations will be displayed during
playback.
4 To stop, press OK.
3Use G/I or J/H to select the image from
which to start the slide show
4 Press OK to start the slide show.
5 Press OK to pause the slide show. A ‘pause
symbol’ appears on the screen.
6

EN
Notice
Movie Playback
(AF¦5077/¦5087/5107MS)
1 Select the video menu in the main menu and
confirm using .
2Using Ý/Þ or Û/Ü select the video title you
want to play.
3 Press OK to start playback. To stop, press OK.
Additional Playback Functions
During playback , you can skip to the
previous or next song by using Ý/Þ or
Û/Ü.
During playback, press the OK on the
remote control to pause and to
resume playback.
Adjusting Volume Level
(AF¦5077/¦5087/5107MS)
During playback you can adjust the volume using
Ü/Û on the remote control. Press repeatedly Ü
to switch off the volume (mute function).
7

Settings
Notice
The settings menu contains four items and can be
called up using ù on the device or ù on the remote control.
1 ECO Settings (Automatically switch on/off,
Adaption of the LCD brightness automatically
(AF¦5077/¦5087/5107MS))
2 Picture-Settings (Slide show settings, rotating
image)
3 File Management (Copy files, delete files, play-
lists)
4 Basic-Settings (Brighness, contrast, date,
clock)
Settingsmenü AF 5077
ECO Settings
The digital picture frame can be switched on or off
automatically or the brightness of the LCD screen
can be adapted according the ambient light
(AF¦5077/¦5087/5107MS).
Select from the following settings:
Switching On and Off Automatically
The digital photo frame can be switched on or off
at a particular time of the day.
1 Press ù.
2Using J/H select the symbol and confirm
with OK.
3 The symbol is selected.
4Use J/H to select the coloured symbol and
confirm using OK.
5 Select the time at which the digital photo
frame should be switched on using J/H.
6Confirm with OK. The colour of the cursor will
change from white to red.
7 Select the time at which the digital photo
frame should be switched off using J/H.
8Confirm with OK. The colour of the cursor will
change from red to white. The time period
when the digital picture frame is switched on,
is marked green.
9 To delete a time period, mark the time period
again. The green marking will be removed.
10 Press I and select the symbol using J/
H.
11 Confirm with OK.
12 You can exit with ù.
Switching Automatic On/Off
You can deactivate the automatic on/
off. The actual setting is retained.
1 Press ù.
2Using J/H select the symbol
and confirm with OK.
3 The symbol is selected.
4 Select using J/H the black/white
symbol (automatic switched off) or
the coloured symbol (automatic
switched on).
5Confirm with OK.
6You can exit with ù.
Automatic adaption of the LCD brightness
(AF¦5077/¦5087/5107MS)
With this function the brightness of the LCD
screen can be adapted according the ambient
light.
1 Press ù.
2Using J/H select the symbol and confirm
with OK.
3Using I select the symbol and confirm with
OK.
4 Select using J/H the black/white symbol
(automatic switched off) or the coloured sym-
bol (automatic switched on).
5Confirm with OK.
6You can exit with ù.
EN
8

EN
Notice
Notice
Notice
Modifying the Picture Settings
Here you can rotating the images, changing aspect ratio, determine the transition efects or adjusting the slide show speed.
1 Press ù.
2Using J/H select (Picture Setting) and
confirm with OK.
3Use G/I to select the required symbol.
Rotating Image—Change the orientation of
the image
Aspect Ratio—The digital photo frame has
a wide screen with 4:3 aspect ratio. Select
whether you would like to view the image in the
original format, in the wide screen format (16:9)
or if the image should be stretched to match
the shape of the screen.
Transition Effects—Allows you to choose
different styles of slide show effects.
Slide Show Speed—Select from the dis-
played times.
Personal Frame – Select from different
frames for displaying the pictures.
4 Select the required setting using J/H.
5Confirm with OK.
6You can exit with ù.
File Management
Files on the memory card or USB disk can be copied. Files in the internal memory can be deleted.
Copy / Delete Files
1 Press ù.
2Using J/H select (File Management) and
confirm with OK.
3Using G to select (copy) or (delete) and
confirm with OK.
4Using G/I, J/H select the file you want to
copy or delete.
5Mark the file using OK.
7Using J/H to select icon and press OK
to start copying or deleting.
Copy all Files from the Memory Card
Select and confirm using OK to
copy all files from the memory card to
the internal memory.
Cancel Process
Select and confirm using OK to
cancel the process.
8 The screen will display the processing bar. Af-
ter finish copying, you can find the image in the
internal memory.
Starting Mode
Select whether you would like images, movies or
images and movies to be played automatically after Power on.
1 Press ù.
2Using J/H select (File Management) and
confirm with OK.
3Using G select and confirm with OK.
4 Select from the options displayed using J/H
and confirm using OK.
5You can exit with ù.
Cancelling the Selection
Press again OK to cancel the selection.
6Using I to select the symbol line at the bot-
tom of the screen.
9

Playlists
Notice
Create your own playlist for images, movies and
music.
Only images, movies and music in this playlists wil
be played back. You can create up to five playlists.
Creating Playlist
1 Press ù.
2Using J/H select (File Management) and
confirm with OK.
3 Select (Playlists) using G/I and confirm
with H.
4 Select using J/H wether you would like to
create a playlist for music, images or movies.
5Confirm with OK.
6 Confirm 'OFF' using OK to create a new playl-
ist.
7Using J/H select e.g. playlist 1 and confirm
with OK.
8 Select using G/I or J/H the file you want
to add to the playlist. Mark the file using OK.
9Mark further files using OK.
10 Using I to select the symbol line at the bot-
tom of the screen.
11 Using J/H to select icon and press OK
to save the playlist.
12 You can exit with ù.
Switching Playlist On/Off
1 Press ù.
2Using J/H select (File Management) and
confirm with OK.
3 Select (Playlists) using G/I and confirm
with H.
4 Select using J/H wether you would like to
switch on a playlist for music, images or mov-
ies.
5Confirm with OK.
6 Confirm e.g. playlist1 using OK.
7 Select the desired playlist using J/H.
Modifying the Basic Settings
1 Press ù.
2Using J/H select the symbol and confirm
with OK.
3Use Û/Ü to select the setting you would like
to allocate.
4Confirm with .
You can allocate the following settings:
, , (Brightness, Contrast, Colour saturation)—Adjustment of brightness, contrast,
and colour saturation of the LCD screen.
(Clock)—Setting the time and date.
(Alarm) (AF¦5077/¦5087/5107MS)—Setting
of the alarmtime, on/off of the alarm and the
selection of the alarmtone.
(Calendar) – Setting of year, month, day.
(Default)—Restore the settings to the fac-
tory default.
5 Select the desired setting using G/I.
6Confirm with
7 Modify the setting using J/H.
8 Confirm the modified setting using .
9You can exit with ù.
EN
Switching Playlist Off
With the selection of ’OFF’ uising J/
H the playlist will be switched off. All
images, movies or music files are
available again.
10

Service
EN
Changing the frame
You can change the frame of the device using the
picture frames supplied. The frames are held with
magnets.
Problems Solutions
Photo Frame does not power on. Check that you connect the AC adapter to the
Cannot save files Make sure that enough internal memory is availa-
No sound Make sure the file format is supported, the compu-
Memory card can not be recognized If you connected the frame to a computer, the in-
Not all files of the memory card will be shown for
the slide show, movie and music play back.
1 Press on the change frames key on the back of
the device. Remove the frame.
2 Place the picture frame onto the device until it
engages on the magnets.
frame properly.
ble. Re-start the picture frame and delete some
files in order to free up memory space.
ter and the frame are correct connected or the
memory card is not damaged.
serted memory card can not be recognized.
Check whether a playlist is switched on.
11

Appendix
Technical Data AF 5077PS
Dimensions (Type 1)
Dimensions (L¦×¦H¦×¦W)...................... 190¦×¦153¦×¦80¦mm
Weight (Type 1)
Weight................................................................................ 0,4¦kg
Input
Mains Connection Input: 100¦–¦240¦V¦~ / 50¦–¦60¦Hz
Output
............................................................Output: 5¦V¦† / 2¦A
Recommended Ambient Temperature
Recommended Ambient..................................... 5¦–¦45¦ºC
Relative humidity
Relative humidity...................................................20¦–¦80¦%
Power Consumption
Power Consumption
Device Switched On
Device is switched on (slide show) ..............5,0¦W
Screen size..............................................................................7¦“
Aspect ratio .......................................................................... 4:3
Resolution.....................................................800¦×¦600 Pixel
Internal memory
Internal memory.....128¦MB¦MB or up to 500¦photos
USB Connection (Type 1)
USB Port.................................................................. USB-Host
Compatible Memory Cards
Compatible Memory Cards.SD/MMC/MS/SDHC/XD
Photo formats
Photo formats...................................................................JPEG
Technical Data AF 5077MS
Dimensions (Type 2)
Dimensions (L¦×¦H¦×¦W)...................... 190¦×¦153¦×¦80¦mm
Weight (Type 2)
Weight................................................................................ 0,4¦kg
Input
Mains Connection Input: 100¦–¦240¦V¦~ / 50¦–¦60¦Hz
Output
............................................................Output: 5¦V¦† / 2¦A
Recommended Ambient Temperature
Recommended Ambient..................................... 5¦–¦45¦ºC
Relative humidity
Relative humidity...................................................20¦–¦80¦%
Power Consumption
Power Consumption
Device Switched On
Device is switched on (slide show) ..............4,3¦W
Screen size..............................................................................7¦“
Aspect ratio .......................................................................... 4:3
Resolution.....................................................800¦×¦600 Pixel
Internal memory
Internal memory..256¦MB¦MB or up to 1000¦photos
USB Connection (Type 2)
USB Port...................................... USB-Host, USB Device
Compatible Memory Cards
Compatible Memory Cards.SD/MMC/MS/SDHC/XD
Photo formats
Photo formats...................................................................JPEG
Music formats
Music formats ................................................................... MP3
Video formats
Video formats ................................Motion Jpeg, Mpeg-4
Spaltenumbruch
Technical Data AF 5087PS
Dimensions (Type 3)
Dimensions (L¦×¦H¦×¦W)...................... 203¦×¦163¦×¦90¦mm
Weight (Type 3)
Weight................................................................................ 0,5¦kg
Input
Mains Connection Input: 100¦–¦240¦V¦~ / 50¦–¦60¦Hz
Output
............................................................ Output: 5¦V¦† / 2¦A
Recommended Ambient Temperature
Recommended Ambient..................................... 5¦–¦45¦ºC
Relative humidity
Relative humidity...................................................20¦–¦80¦%
Power Consumption
Power Consumption
Device Switched On
Device is switched on (slide show) ..............5,4¦W
Screen size..............................................................................8¦“
Aspect ratio .......................................................................... 4:3
Resolution.....................................................800¦×¦600 Pixel
Internal memory
Internal memory.....128¦MB¦MB or up to 500¦photos
USB Connection (Type 3)
USB Port .................................................................. USB-Host
Compatible Memory Cards
Compatible Memory Cards SD/MMC/MS/SDHC/XD
Photo formats
Photo formats.................................................................. JPEG
Technical Data AF 5087MS
Dimensions (Type 4)
Dimensions (L¦×¦H¦×¦W)...................... 203¦×¦163¦×¦90¦mm
Weight (Type 4)
Weight................................................................................ 0,5¦kg
Input
Mains Connection Input: 100¦–¦240¦V¦~ / 50¦–¦60¦Hz
Output
............................................................ Output: 5¦V¦† / 2¦A
Recommended Ambient Temperature
Recommended Ambient..................................... 5¦–¦45¦ºC
Relative humidity
Relative humidity...................................................20¦–¦80¦%
Power Consumption
Power Consumption
Device Switched On
Device is switched on (slide show) ..............6,3¦W
Screen size..............................................................................8¦“
Aspect ratio .......................................................................... 4:3
Resolution.....................................................800¦×¦600 Pixel
Internal memory
Internal memory........1¦GB¦MB or up to 4000¦photos
USB Connection (Type 4)
USB Port ......................................USB-Host, USB Device
Compatible Memory Cards
Compatible Memory Cards SD/MMC/MS/SDHC/XD
Photo formats
Photo formats.................................................................. JPEG
Music formats
Music formats ................................................................... MP3
Video formats
Video formats ................................Motion Jpeg, Mpeg-4
Spaltenumbruch
EN
12

EN
Technical Data AF 5107PS
Dimensions (Type 5)
Dimensions (L¦×¦H¦×¦W)...................... 255¦×¦203¦×¦90¦mm
Weight (Type 5)
Weight................................................................................ 0,8¦kg
Input
Mains Connection Input: 100¦–¦240¦V¦~ / 50¦–¦60¦Hz
Output
............................................................Output: 5¦V¦† / 2¦A
Recommended Ambient Temperature
Recommended Ambient..................................... 5¦–¦45¦ºC
Relative humidity
Relative humidity...................................................20¦–¦80¦%
Power Consumption
Power Consumption
Device Switched On
Device is switched on (slide show) ..............6,1¦W
Screen size.......................................................................10,4¦“
Aspect ratio .......................................................................... 4:3
Resolution.....................................................800¦×¦600 Pixel
Internal memory
Internal memory.....128¦MB¦MB or up to 500¦photos
USB Connection (Type 5)
USB Port.................................................................. USB-Host
Compatible Memory Cards
Compatible Memory Cards.SD/MMC/MS/SDHC/XD
Photo formats
Photo formats...................................................................JPEG
Technical Data AF 5107MS
Dimensions (Type 6)
Dimensions (L¦×¦H¦×¦W)...................... 255¦×¦203¦×¦90¦mm
Weight (Type 6)
Weight................................................................................ 0,8¦kg
Input
Mains Connection Input: 100¦–¦240¦V¦~ / 50¦–¦60¦Hz
Output
............................................................Output: 5¦V¦† / 2¦A
Recommended Ambient Temperature
Recommended Ambient..................................... 5¦–¦45¦ºC
Relative humidity
Relative humidity...................................................20¦–¦80¦%
Power Consumption
Power Consumption
Device Switched On
Device is switched on (slide show) ..............6,6¦W
Screen size..............................................................................8¦“
Aspect ratio .......................................................................... 4:3
Resolution.....................................................800¦×¦600 Pixel
Internal memory
Internal memory........ 1¦GB¦MB or up to 4000¦photos
USB Connection (Type 6)
USB Port...................................... USB-Host, USB Device
Compatible Memory Cards
Compatible Memory Cards.SD/MMC/MS/SDHC/XD
Photo formats
Photo formats...................................................................JPEG
Music formats
Music formats ................................................................... MP3
Video formats
Video formats ................................Motion Jpeg, Mpeg-4
All data are provided for reference purposes only.
AgfaPhotoreserves the right to make any changes without prior notice.
Spaltenumbruch
AgfaPhoto is used under license of Agfa-Gevaert NV & Co. KG or Agfa-Gevaert NV. Neither
Agfa-Gevaert NV & Co KG nor Agfa-Gevaert NV
manufacture this product or provide any product
warranty or support.
For service, support and warranty information,
contact the distributor or manufacturer.
Contact:AgfaPhoto Holding GmbH,
www.agfaphoto.com
Manufacturer: Sagem Communications,
www.sagem-communications.com
The CE marking certifies that the product meets
the main requirements of the European Parliament and Council directive 1999/5/CE on telecommunications terminal equipment, regarding safety
and health of users and regarding electromagnetic interference.
The declaration of compliance can be consulted
on the site www.agfaphoto.com
Preservation of the environment as part of a sustainable development logic is an essential concern
of AgfaPhoto. The desire of AgfaPhoto is to operate systems observing the environment and consequently it has decided to integrate environmental performances in the life cycle of this products,
from manufacturing to commissioning use and
elimination.
Packaging: The presence of the logo (green dot)
means that a contribution is paid to an approved
national organisation to improve package recovery and recycling infrastructures to facilitate.
Please respect the sorting rules set up locally for
this kind of waste.
Batteries:If your product contains batteries, they
must be disposed of at appropriate collection
points.
13

Product: The crossed-out waste bin stuck on the
product means that the product belongs to the
family of electrical and electronic equipment. In
this respect, the European regulations ask you to
dispose of it selectively;
• At sales points in the event of the purchase of
similar equipment.
• At the collection points made available to you locally(drop-off centre, selective collection, etc.).
In this way you can participate in the re-use and
upgrading of Electrical and Electronic Equipment
Waste, which can have an effect on the environment and human health.
The paper and cardboard packaging used can be
disposed of as recyclable paper. Have the plastic
wrapping and Styrofoam packaging recycled or
dispose of it in the non-recyclable waste, depending on the requirements in your country.
Trademarks: The references mentioned in this
manual are trademarks of the respective companies. The lack of the trademarks É and Ë does
not justify the assumption that these dedicated
terminologies are free trademarks. Other product
names used herein are for identification purposes
only and may be trademarks of their respective
owners. AgfaPhoto disclaims any and all rights in
those marks.
Neither AgfaPhoto nor its affiliates shall be liable
to the purchaser of this product or third parties for
damages, losses, costs, or expenses incurred by
the purchaser or third parties as a result of accident, misuse, or abuse of this product or unauthorized modifications, repairs, or alterations to
this product, or failure to strictly comply with AgfaPhoto operating and maintenance instructions.
AgfaPhoto shall not be liable for any damages or
problems arising from the use of any options or
any consumable materials other than those designated as original AgfaPhoto products or AgfaPhoto approved products.
AgfaPhoto shall not be held liable for any damage
resulting from electromagnetic interference that
occurs from the use of any interface cables other
than those designated as AgfaPhoto products.
All rights reserved. No part of this publication may
be reproduced, stored in a retrieval system or
transmitted in any form or by any means, electronic, mechanical, photocopying, recording, or otherwise, without the prior written permission of AgfaPhoto. The information contained herein is designed only for use with this product. AgfaPhoto
is not responsible, if this information is applied to
other devices.
This user manual is a document that does not represent a contract.
Errors, printing errors and changes are reserved.
Copyright © 2009 Sagem Communications
EN
14

AgfaPhoto is used under license of Agfa-Gevaert NV & Co. KG or
Agfa-Gevaert NV. Neither Agfa-Gevaert NV & Co. KG nor AgfaGevaert NV manufacture this product or provide any product
warranty or support. For service, support and warranty
information, contact the distributor or manufacturer.
AF 5077/5087/5107PS, AF 5077/5087/5107MS
253243477-A
GB
 Loading...