

Page 1
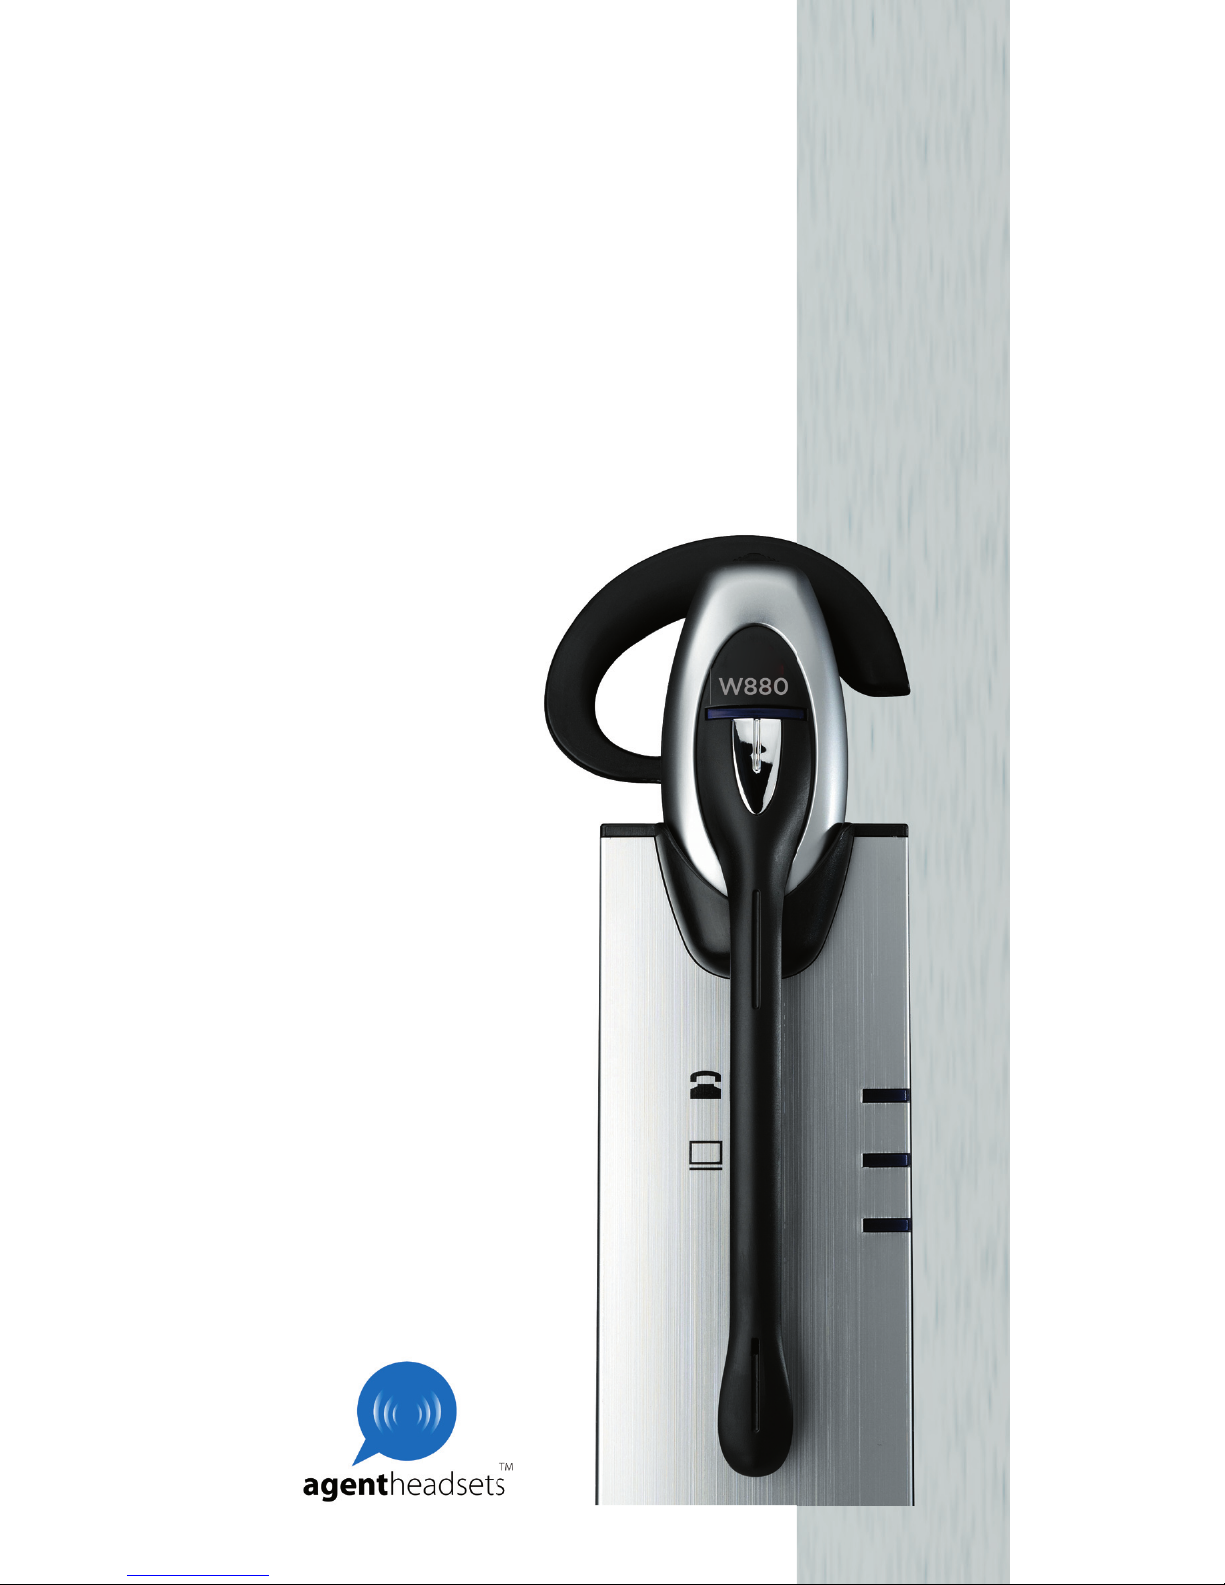
AGENT W880
DECT Headset with USB
Operation Manual
Page 2

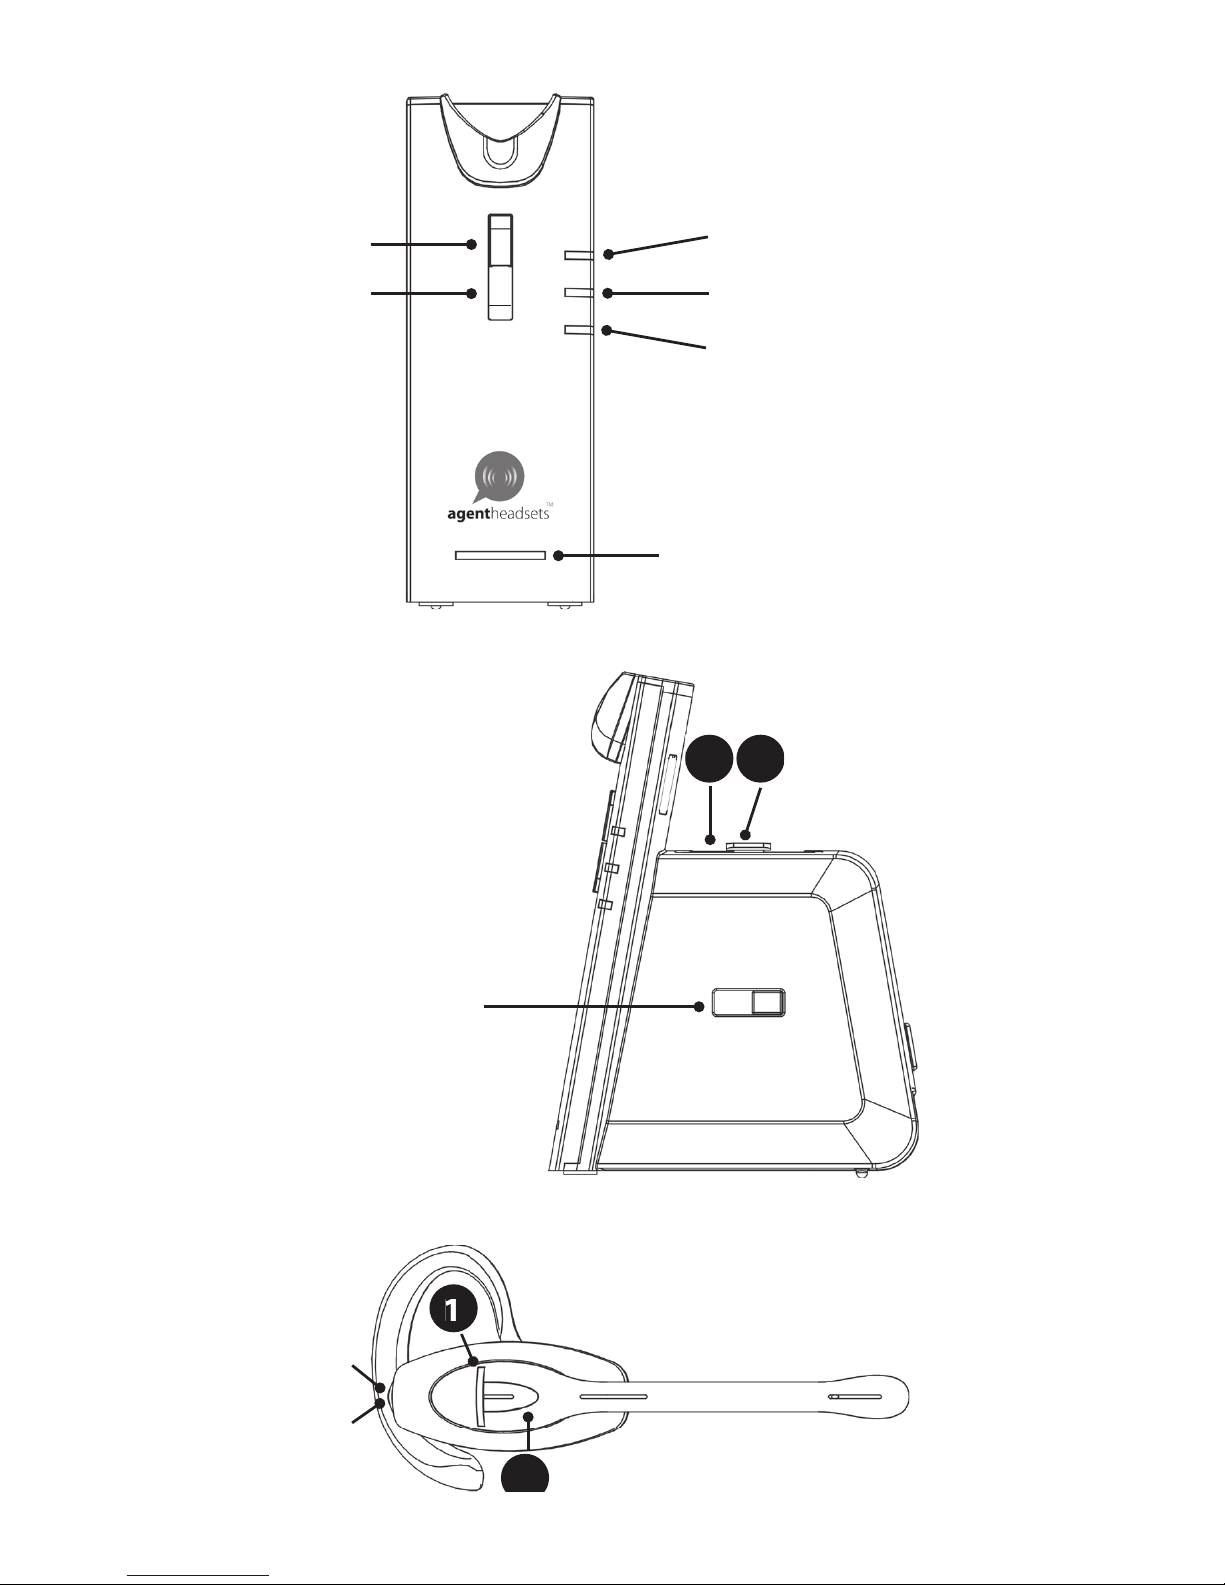
1 Headset ‘ON/OFF’ LED
2 Headset ‘ON/OFF’ button
3 Power LED
4 Headset charge LED
5 Headset ‘IN USE’ LED
6 Battery LED indicator
7 Telephone switch with
ON/OFF LED (‘TEL’ LED)
8 PC/USB Switch with ON/OFF LED
(‘PC/USB’ LED)
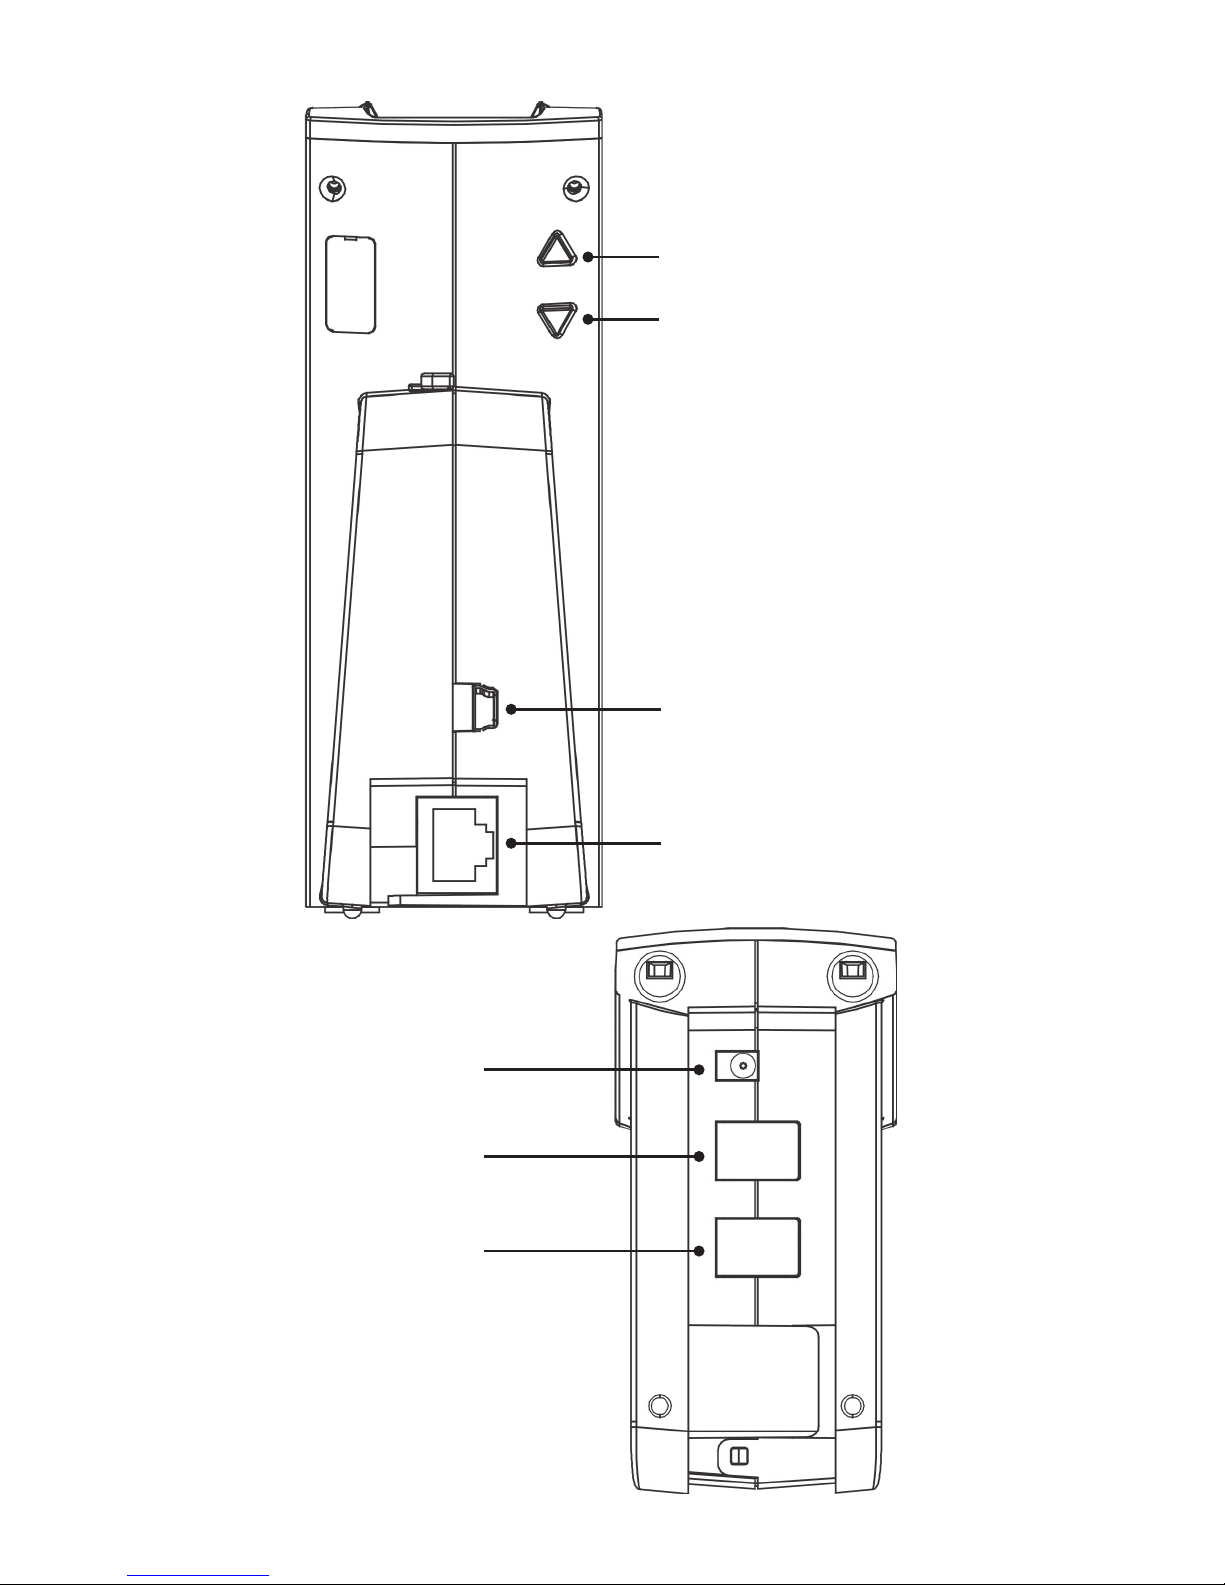
9 Microphone volume up
10 Microphone volume down
11 USB port
12 AUX port
13 Power socket
14 Handset connector
15 Telephone connector (‘TEL’ port)
16 Wiring Switch
17 Receive volume up/down
18 Mute button
19 Battery charging slot
20 Battery remove button
Page 3
●
7
●
8
●
3
●
●
6
●
16
●
●
1
●
18
●●
●
5
●
4
20 19
2
17
Page 4
●
9
●
14
●
15
●
13
●
11
●
10
●
12
Page 5

Contents:
1. Product Description
2. Setup
2.1 Connecting to a telephone or terminal with
a headset port
2.2 Connection to a telephone or terminal
without a headset port
2.3 Connecting to a compatible Headset Lifter
(refer to your supplier)
2.4 Connecting to a computer USB port
2.5 Headset Transmit Volume Setting
2.6 Wearing Style
3. Operation
3.1 Making And Receiving Calls
3.1.1 Making an outgoing call in Telephone mode
3.1.2 Receive an incoming call in Telephone mode
3.1.3 Making an outgoing call in VOIP mode
3.2 Adjusting The Ring Volume
3.3 Muting The Headset Microphone
3.4 Headset transmitting volume setting
3.5 Adjusting Headset Receive Volume
3.6 Out Of Range And Reconnection
3.7 Battery Hotswap
3.8 Battery Level Indication
3.9 Making A Conference Call
3.10 Overview of audio signals
3.11 Registering a new headset to the base
4. Troubleshooting
Page 6

1. Product Description
The AGENT DECT is a fully wireless headset
solution o ering the user the ability to work
‘Handsfree’ with true wireless mobility.
Main Features:
• DECT Wireless Headset solution
• Convertible into 2 wearing styles:
Headband & Earhook
• Up to 8 hour talk time without recharging
• Auxiliary port for connecting Handset Lifter
or Electronic Hookswitch device
• Noise cancelling microphone for reduced
background noise
• Secure high quality audio
• Receive volume control on headset
• Mute button on headset
• Talk button with LED on headset
• Range up to 400m
• ‘Out of range’ warning
• DECT/GAP compatible
• Second battery storage/charging point on base
• PC/USB connectivity (*)
• 3 way conferencing by connecting additional
headset
* Will connect to Apple Mac or PC running
Windows 98, Windows 2000, Windows XP,
Windows Vista and Windows 7
2. Setup
• Connect the power adaptor supplied with the
product to the base unit (13). The base
Power LED (3) will light. If the base is in
Telephone mode, the ‘TEL’ LED (7) will light,
otherwise, the ‘PC/USB’ LED (8) will light.
Page 7

• Install the battery into the headset if not tted.
The little line on the battery has to match the
line on the battery slot, otherwise the battery
will not t.
• The Headset LED (1) will turn on for about
2 seconds then turn o . Now your headset is in
standby mode.
NOTE: The rst time you use your headset, it is
recommended that the headset is charged for a
minimum of 4 hours before use.
2.1 Connecting to a telephone or terminal with a
headset port
• Using the headset cord supplied with the
product, connect the ‘TEL’ port (15) on Headset
Base with the Headset port on your telephone.
• Use the power adaptor supplied with the
product to connect the Headset Base (13) to a
power socket.
• You may need to adjust the wiring switch (16)
that is located on the side of the Headset Base
to nd the correct wiring for your device.
2.2 Connecting to a telephone or terminal without
a headset port
• Using the headset cord supplied with the
product, connect the ‘TEL’ port (15) on Headset
Base with the ‘Handset’ port on your telephone.
• Connect the telephone handset cord to the
Handset (14) port on the Headset Base.
• Use the power adaptor supplied with the
product to connect the Headset Base (13) to a
power socket.
• You may need to adjust the wiring switch (16)
that is located on the side of the Headset Base
to nd the correct wiring for your device.
Page 8

2.3 Connecting to a compatible Handset Lifter
(refer to your supplier)
• Fit the handset lifter to your telephone as
indicated in its user guide.
• Connect the handset lifter to the ‘AUX’ port (12)
located on the back of the Headset Base.
With the handset lifter connect, you will be able to
answer and end calls using the button located on
the headset while away from your desk.
2.4 Connecting to a computer USB port
• Connect the USB cable supplied with the
product to the ‘USB’ port (11) on the back of
the headset base and to a available USB port
on your computer.
• The computer should automatically recognize
the device and install the correct drivers.
2.5 Wearing Style
Your AGENT DECT Headset is supplied with a
Headband for over the head wearing and a Earhook
for over the ear.
• Headband
This can be attached to the headset to allow for
either Left or Right ear wearing and the size
can be adjusted to allow the user to nd the
most comfortable t.
• Earhook
This can also be used on either ear.
To remove the headband or earhook: Put your
thumb on the speaker and carefully pull the
headband or earhook with your other hand
towards you.
Page 9

3. Operation
3.1 Making and Receiving Calls
3.1.1 Making an outgoing call in Telephone mode.
• Ensure that the ‘TEL’ button (7) on the front of
the headset base is selected.
• Lift the headset from the base or press the
headset’s ‘ON/OFF’ button (2) if you are already
wearing it and the base ‘IN USE’ LED (5) will
light. If a handset Lifter or Electronic
Hookswitch device is connected to the headset
base, the line will be seized. Otherwise, you will
also need to activate the Headset port via your
telephone terminal.
• Dial the telephone number on the telephone
terminal
• After nishing the call, replace the headset on
the base or press the ON/OFF button (2) to
disconnect. The ‘IN USE’ LED (5) will turn o .
3.1.2 Receive an incoming call in Telephone mode.
• If there is an incoming call from the telephone
line and the headset base is connected to a
handset lifter or Electronic Hook switch device,
the ‘TEL’ LED (7) and headset LED (1) will ash,
also a ring tone will be heard on the headset.
• Lift the headset from the base or press the
headset’s ‘ON/OFF’ button (2) if you are already
wearing it to answer the call. The base
‘IN USE’ LED (5) will light. If a handset Lifter or
Electronic Hookswitch device is connected to
the headset base, the line will be seized.
Otherwise, you will also need to activate the
Headset port via your telephone terminal.
• To end the call, replace the headset on the base
or press the headset ON/OFF button (2).
Page 10

3.1.3 Making an outgoing call in VOIP mode.
• Ensure that the ‘VOIP’ button (8) on the front of
the headset base is selected.
• Lift the headset from the base or press the
headset’s ON/OFF button (2) if you are already
wearing it and the base ‘IN USE’ LED (5) will
light.
• After nishing your VOIP call, press the
ON/OFF button (2) to disconnect.
The headset LED (1) and the base
‘IN USE’ LED (5) will turn o .
3.2 Adjusting the Ringing Volume
When the headset is ringing to indicated an
incoming call, you can adjust the ring volume by
moving the rocker switch (17) at the back of the
headset.
3.3 Muting The Headset Microphone
To mute the headset microphone when on a call,
press the Mute button (18) on the back of the
headset. While the headset is in Mute mode, a short
beep will be heard on the headset every 8 seconds.
Press the Mute button (18) again to release the
mute.
3.4 Headset transmitting volume setting
During a call you can adjust the transmit volume
of the headset by using the two buttons (9 and 10)
located on the back of the headset base.
3.5 Adjusting Headset Receive Volume
Use the rocker switch (17) at the back of the headset
to adjust the receive volume on your headset. You
will hear a beep sound for each volume step Up or
Down.
Page 11
3.6 Out of range and reconnection
You will hear a warning tone in the headset when
you walk out of range of the base. The headset will
be disconnected from the base and the call will be
automatically placed on hold. If you move back
inside the range of the base the headset will automatically reconnect and the call will be active again.
NOTE: If you do not move back inside the base range
within 5 minutes the call will be disconnected.
3.7 Battery – Hot Swap
The user can “Hot Swap” the headset battery while
on a call. When the battery is removed from the
headset, the base unit will put the call on hold for a
maximum of 5 minutes.
When the new battery is tted to the headset, the
‘IN USE’ LED (1) will turn on and the call will be active
again.
Put the second battery in the Battery charging slot
(19) on the back of the base. The battery can be
removed by sliding the battery remove button (20)
sidewards.
3.8 Battery Level Indication
The four LED’s (6) on the front of the headset base
indicate the battery level of your headset battery.
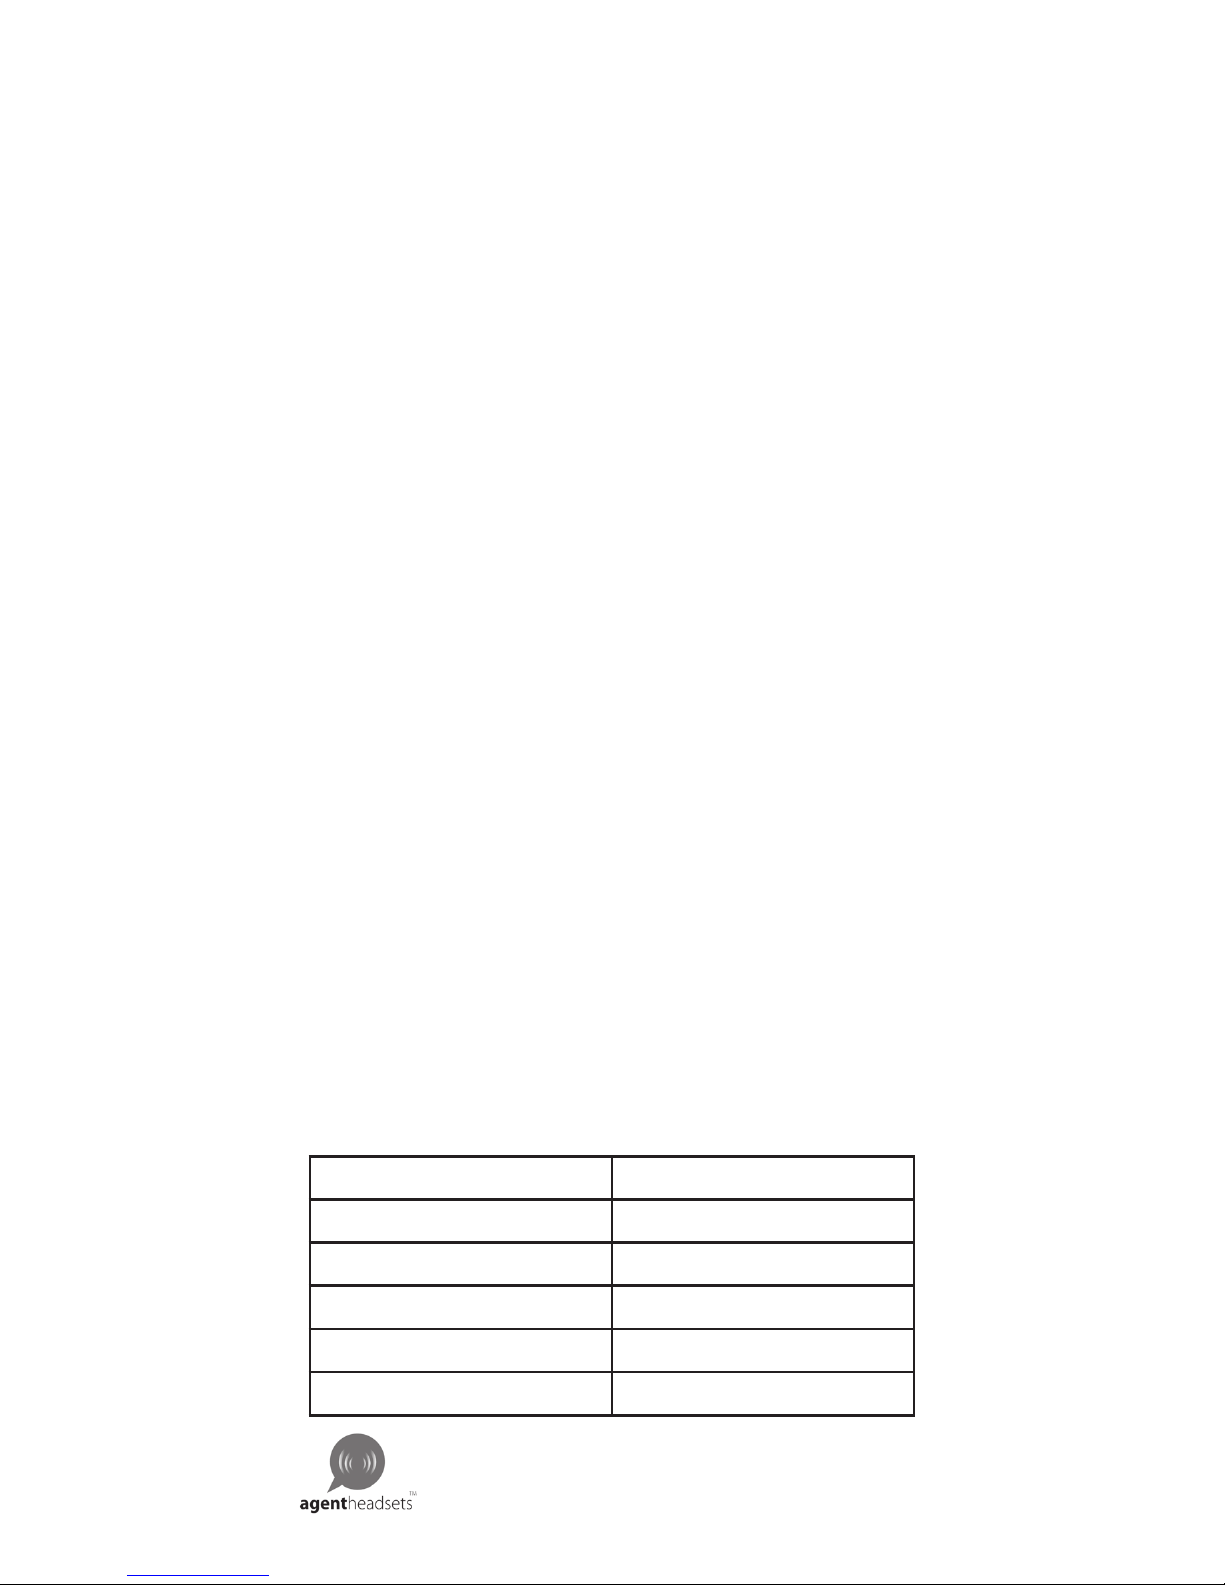
Indication Battery level
One LED ashing < 20%
One LED on 20%-40%
Two LED’s on 40%-60%
Three LED’s on 60%-80%
Four LED’s on 80%-100%
Page 12
3.9 Making A Conference Call
Your AGENT DECT Headset allows a second
headset to be temporally connected to the base
so that you can have a three way conference call.
• Setup the call using the primary headset unit.
• Once on the call, place the second AGENT
DECT headset unit on the base charger.
• After about 1 second, the Headset ‘IN USE’ LED
(1) of the new headset will turn on and the
base ‘IN USE’ LED (5) will ash to indicate the
headset is registering with base unit.
• Once the registering has completed, the base
‘IN USE’ LED (5) will stop ashing and the
additional headset LED will ash.
• Once the registration has completed, a
con rmation sound will be heard on the
primary headset.
• Lift the additional headset from the base and
it will enter talk mode. The two headsets are
now in conference mode.
NOTE: The additional headset will only remain
registered to the base for the duration of the call.
After the primary headset has ended the call, the
unit will return to its normal state.
3.10 Overview of audio signals
Action Audio Indication
Low Battery 2 rapid beeps (60 sec repeat)
Nearly Out Of Range 2 beeps
Out Of Range 2 pitch tone
Back In range 4 rapid beeps
Receiver Volume
Up/Down
1 beep
Mute On 2 pitch tone (8 sec repeat)
Mute O 1 beep
Ringer (EH device) Multi Tone (2 sec repeat)
Page 13

3.11 Registering a new headset to the base
You can register a new primary headset unit to your
AGENT W880 base using the following procedure.
• Press and hold the ‘TEL’ button (7) on the
headset base for 5 seconds to enter the
registration mode. The ‘TEL’ LED (7) will ash to
indicate it is now in registration mode.
• Press and hold the ‘Mute’ button (18) on the
back of the headset for 5 seconds for the
headset to enter registration mode, the
Headset LED (1) will ash twice and then
light-up during the registration mode period.
• The headset will now be registered to the
base which will take around 30 seconds. When
the registration has completed, the headset
LED and the base PSTN LED will stop ashing.
4. Troubleshooting
Q. I have connected my headset base to my
telephone terminal but the headset is not
working.
A. Make sure that you have the removable battery
correctly tted in the headset and that the
battery has been properly charged.
Q. The headset is working but I cannot hear
telephones calls correctly.
A. Ensure that you have the correct wiring setting
by adjusting the switch (16) on the side of the
headset base.
Q. When the headset’s ON/OFF button (2) is
pressed, the handset lifter lifts the handset but
I cannot hear the call on the headset.
A. Ensure that the headset base is connected to
the telephone’s handset port and not the
headset port (if the telephone has one).
Page 14

Health and safety instructions
Please read the following safety and operational instructions before using your AGENT product. Please
keep these instructions for your reference. When
using this product, these basic safety
precautions and warnings should be followed to
reduce the risk of re, electric shock, injury to
persons and damage to property.
General
Operating, charging and storage temperature is 0°C
to 40°C (32°F to 104°F).
Warnings
• CHILDREN. Never allow children to play with
the product – small parts may be a choking
hazard.
• Plug the AC adapter into the outlet nearest the
equipment that is easily accessible.
• To reduce the risk of electric shock, explosion
or re, use only the supplied charger or Class 2
AC adapter to charge the headset. Ensure that
the voltage rating (e.g. 120V, 60 Hz)
corresponds to the power supply you intend to
use.
• Do not disassemble the product or AC adapter
as this may expose you to dangerous voltages
or other risks. Incorrect reassembly can cause
electric shock or re when the product is
subsequently used.
• Do not insert anything into the product
because this may cause damage to the internal
components or cause injury to you.
• Avoid contact with liquids. Do not locate this
product near water, for example, near a
bathtub, or sink, in a wet basement, or near a
swimming pool.
Page 15

• Discontinue use of product and contact
AGENT if the product overheats, has a
damaged cord or plug, if the product has been
dropped or damaged, or if the product has
come into contact with liquids.
• This product should never be placed over or
near a heat register and should not be placed
in locations without which do not have proper
ventilation.
• If you experience a skin irritation after using
this product, discontinue use and contact
AGENT.
• Exposure to high volume sound levels or
excessive sound pressure may cause temporary
or permanent damage tot your hearing.
Although there is no single volume setting
that is appropriate for everyone, you should
always use your headset with the volume set at
moderate levels and avoid prolonged exposure
to high volume sound levels. The louder the
volume, the less time is required before your
hearing could be a ected. You may experience
di erent sound levels when using your headset
with di erent devices. The device you use and
its settings a ect the level of sound you hear.
If you experience hearing discomfort, you
should stop listening to the device through
your headset and have your hearing checked
by your doctor. To protect your hearing, some
hearing experts suggest you:
1. Set the volume control in a low position
before putting your headset on your ears
and use as low volume as possible.
2. Avoid turning up the volume to block out
noisy surroundings. Whenever possible, use
your headset in a quit environment with low
background noise.
Page 16

3. Limit the amount of time you use headsets
at high volume levels.
4. Turn the volume down if the sound from the
headset prevent you from hearing people
speaking near you.
To avoid the risk of electric shock, explosion, re or
leakage of corrosive or toxic chemicals, please
observe the following charging and battery
warnings:
Charging warnings
• Use only the charger supplied by AGENT to
charge the product. Do not use the charger for
any other purpose. Ensure that the voltage
rating corresponds tot the power supply you
intend to use.
• Charge the headset according to the
instructions supplied with the unit.
• Plug the AC adapter or charger into an outlet
that is near the equipment and will be easily
accessible.
• Never charge the battery where the
temperature may fall below 0°C (32°F) or rise
above 40°C (104°F) – for example in an
unattended motor vehicle.
• Avoid charging the battery while it is
unattended.
Headset battery warnings
The headset is equipped with a replaceable battery.
To reduce the risk of re or injury to persons read
and follow these instructions.
Do not attempt to open battery in a re.
The battery may explode. Check the local laws for
disposal instructions.
Page 17

Do not open or mutilate the battery. There may be
corrosive materials which can cause damage to eyes
or skin and may be toxic if swallowed.
Charge the headset according to the instructions
supplied with the headset.
RECYCLING: the battery used in your headset must
be recycled or disposed of properly. Contact your
local recycling center for propel disposal of your
headset.
Page 18
 Loading...