

Page 1
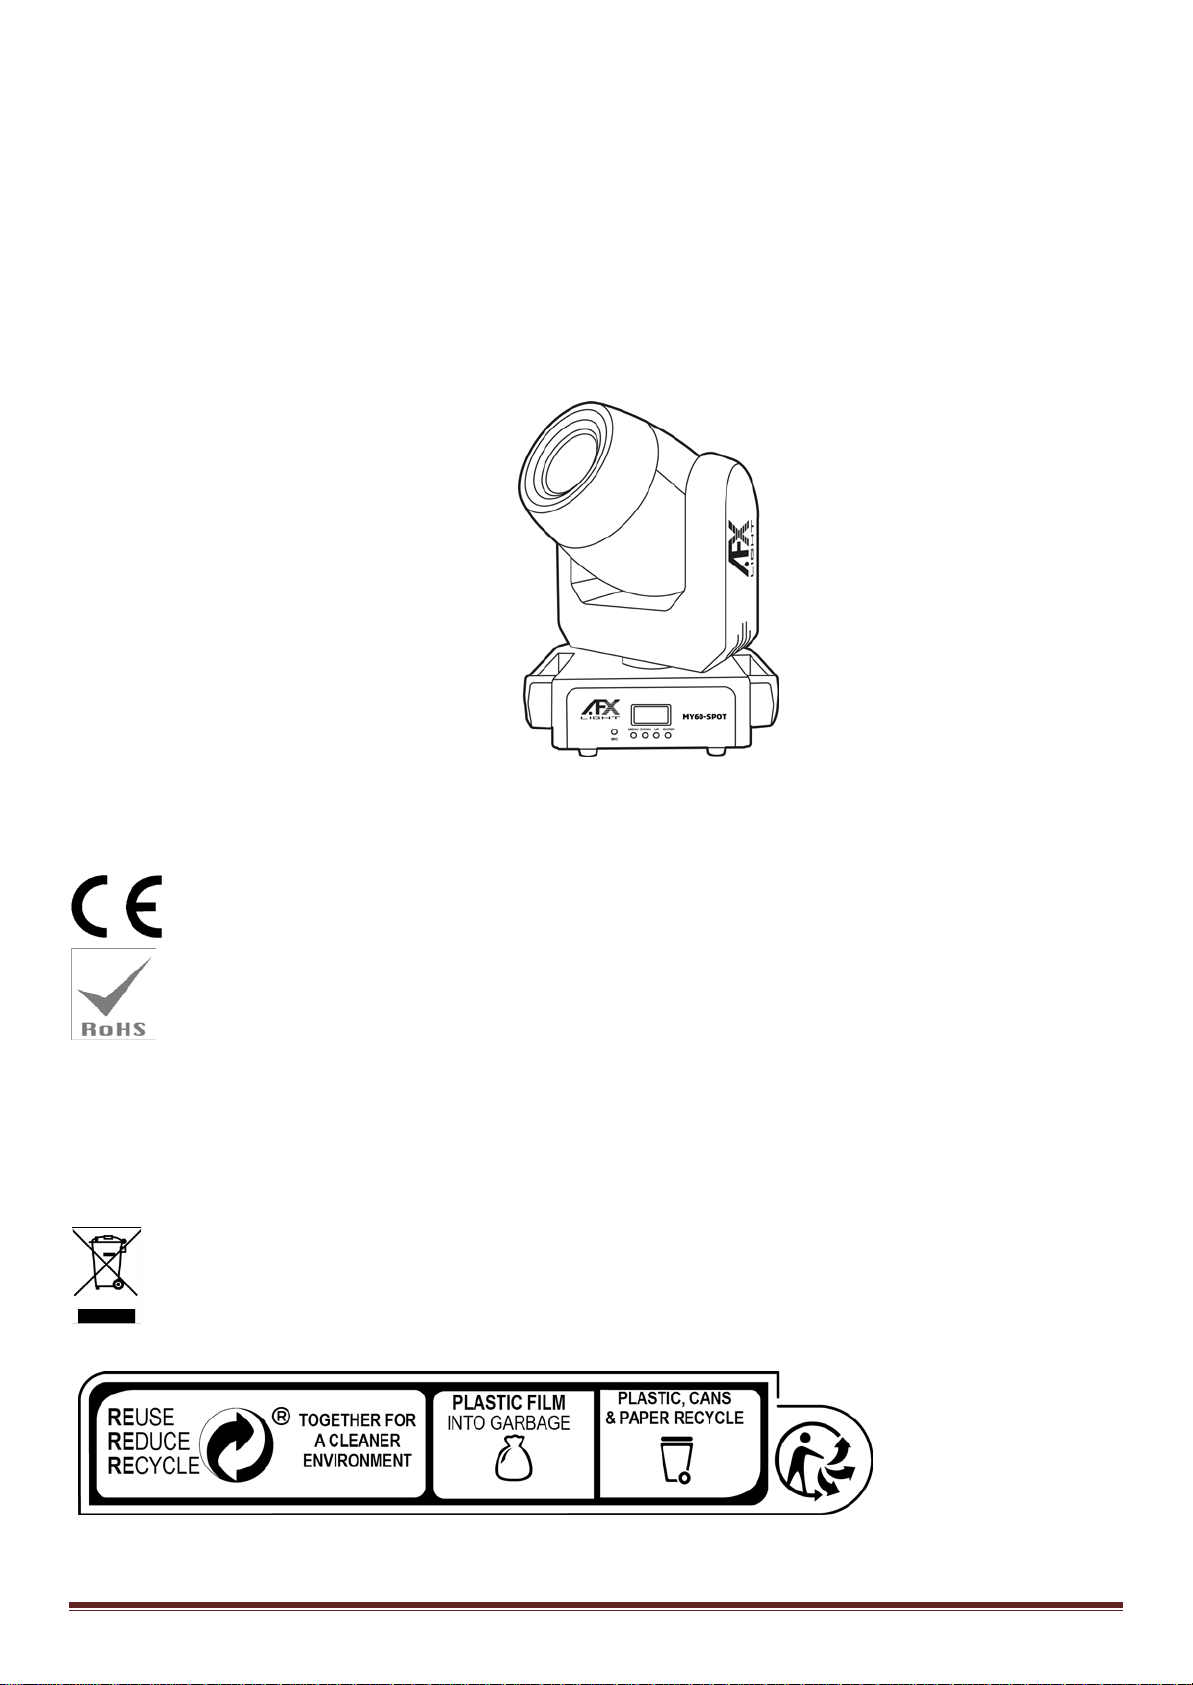
W LLEEDD SSPPOOTT
6600W
WIITTHH OOLLEEDD DDIISSPPLLAAYY
W
Ref.: MY60-SPOT (16-2740)
MOOVVIINNGG HHEEAADD
M
USER
MANUAL
MANUEL D’UTILISATION
BEDIENUNGSANLEITUNG
HANDLEIDING
MANUAL DE INSTRUCCIONES
Imported from China by
LOTRONIC SA – Avenue Zénobe Gramme 9 – 1480 Saintes - Belgium
IMPORTANT NOTE: Electric products must not be put into household waste. Please bring them to a recycling centre. Ask your local authorities or
your dealer about the way to proceed.
NOTE IMPORTANTE : Les produits électriques ne doivent pas être mis au rebut avec les ordures ménagères. Veuillez les faire recycler là où il existe
des centres pour cela. Consultez les autorités locales ou votre revendeur sur la façon de les recycler.
WICHTIGER HINWEIS: Elektrogeräte gehören nicht in den Hausmüll. Sie müssen in speziellen Betrieben recycelt werden. Bringen Sie sie zu einer
BELANGRIJK: De elektrische producten mogen niet naast het huisvuil geplaatst worden. Gelieve deze te laten recycleren daar waar er centra’s hiervoor voorzien
is. Raadpleeg de plaatselijke autoriteiten of uw verkoper ivm de manier van recycleren.
speziellen Entsorgungsstelle für Elektrokleingeräte (Wertstoffhof)!
©Copyright LOTRONIC 2017 MY60-SPOT Page 1
Page 2

GB
BEFORE YOU BEGIN
Contents of the carton:
• 1 x Moving head
• 1x Mains lead
• 1x User Manual
• Omega bracket
Unpacking Instructions
Immediately upon receiving a fixture, carefully unpack the carton, check the contents to ensure that all parts are
present and have been received in good condition. Notify the freight company immediately and retain packing
material for inspection if any parts appear to be damaged from shipping or the carton itself shows signs of
mishandling. Keep the carton and all packing materials. In the event that a fixture must be returned to the factory, it
is important that the fixture be returned in the original factory box and packing.
Safety Instructions
Please read these instructions carefully, they include important information about the installation, usage and
maintenance of this product.
• Please keep this User Guide for future reference. If you sell the unit to another user, be sure that he also receives
this instruction booklet.
• Always make sure that you are connecting to the proper voltage, and that the line voltage you are connecting to is
not higher than that stated on the decal or rear panel of the fixture.
• This product is intended for indoor use only!
It is essential that the device is earthed. A qualified person must carry out the electric connection.
• To prevent risk of fire or shock, do not expose fixture to rain or moisture. Make sure there are no flammable
materials close to the unit while operating.
• The unit must be installed in a location with adequate ventilation, at least 20in (50cm) from adjacent surfaces. Be
sure that no ventilation slots are blocked.
• Always disconnect from power source before servicing or replacing fuse and be sure to replace with same fuse size
and type.
• Secure fixture to fastening device using a safety chain. Never carry the fixture solely by its head. Use its carrying
handles.
• Maximum ambient temperature (Ta) is 104° F (40°C). Do not operate the fixture at temperatures higher than this.
• In the event of a serious operating problem, stop using the unit immediately. Never try to repair the unit by
yourself. Repairs carried out by unskilled people can lead to damage or malfunction. Please contact the nearest
authorized technical assistance center. Always use the same type of spare parts.
• Don’t connect the device to a dimmer pack.
• Make sure the power cord is never crimped or damaged.
• Never disconnect the power cord by pulling or tugging on the cord.
• Avoid direct eye exposure to the light source while it is on.
DISCONNECT DEVICE: Where the MAINS plug or an appliance coupler is used as the disconnect device, the
disconnect device shall remain readily operable.
©Copyright LOTRONIC 2017 MY60-SPOT Page 2
Page 3
Features
• 8 or 14 DMX channels
• 8 built-in programs
• DMX, sound, master-slave or auto operation
• Motorized Focus
• 7-color wheel +white, rainbow effect
• 5 rotating gobo wheel + open
• Gobo shake
• 3-faced prism
• Beam angle 13°
• Linear dimmer 0-100%
• Speed adjustable Pan & Tilt
• Oled screen
• Powercon connectors
Specifications
Power supply ....................................................................................... AC100-240V 50/60Hz
Consumption .................................................................................................................. 90W
Light source ............................................................................................. 1 x 60W white LED
Pan/tilt ............................................................................ 540°/210° with speed adjustment
Strobe ......................................................................................................................... 0-23Hz
Dimensions ............................................................................................. 245 x 145 x 345mm
Weight ......................................................................................................................... 4.35kg
Mounting
ORIENTATION
This fixture may be mounted in any position
provided there is adequate room for ventilation.
RIGGING
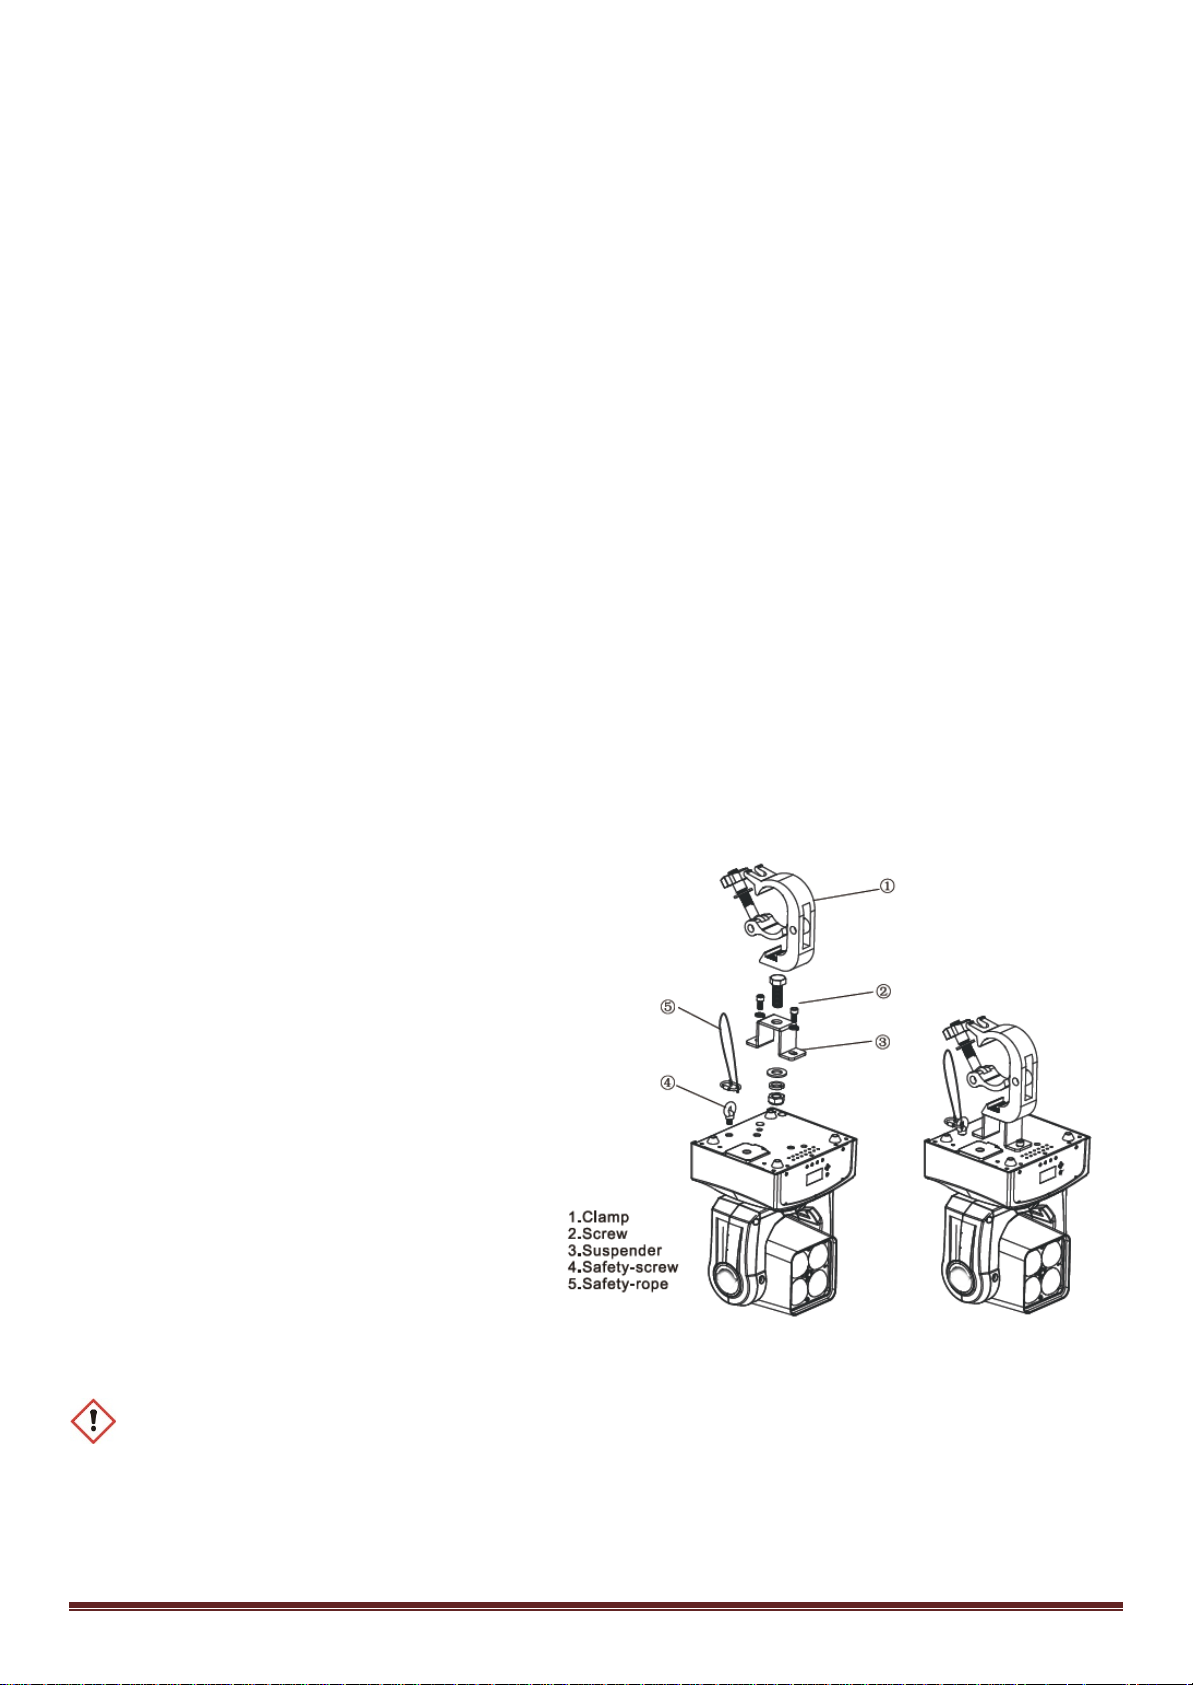
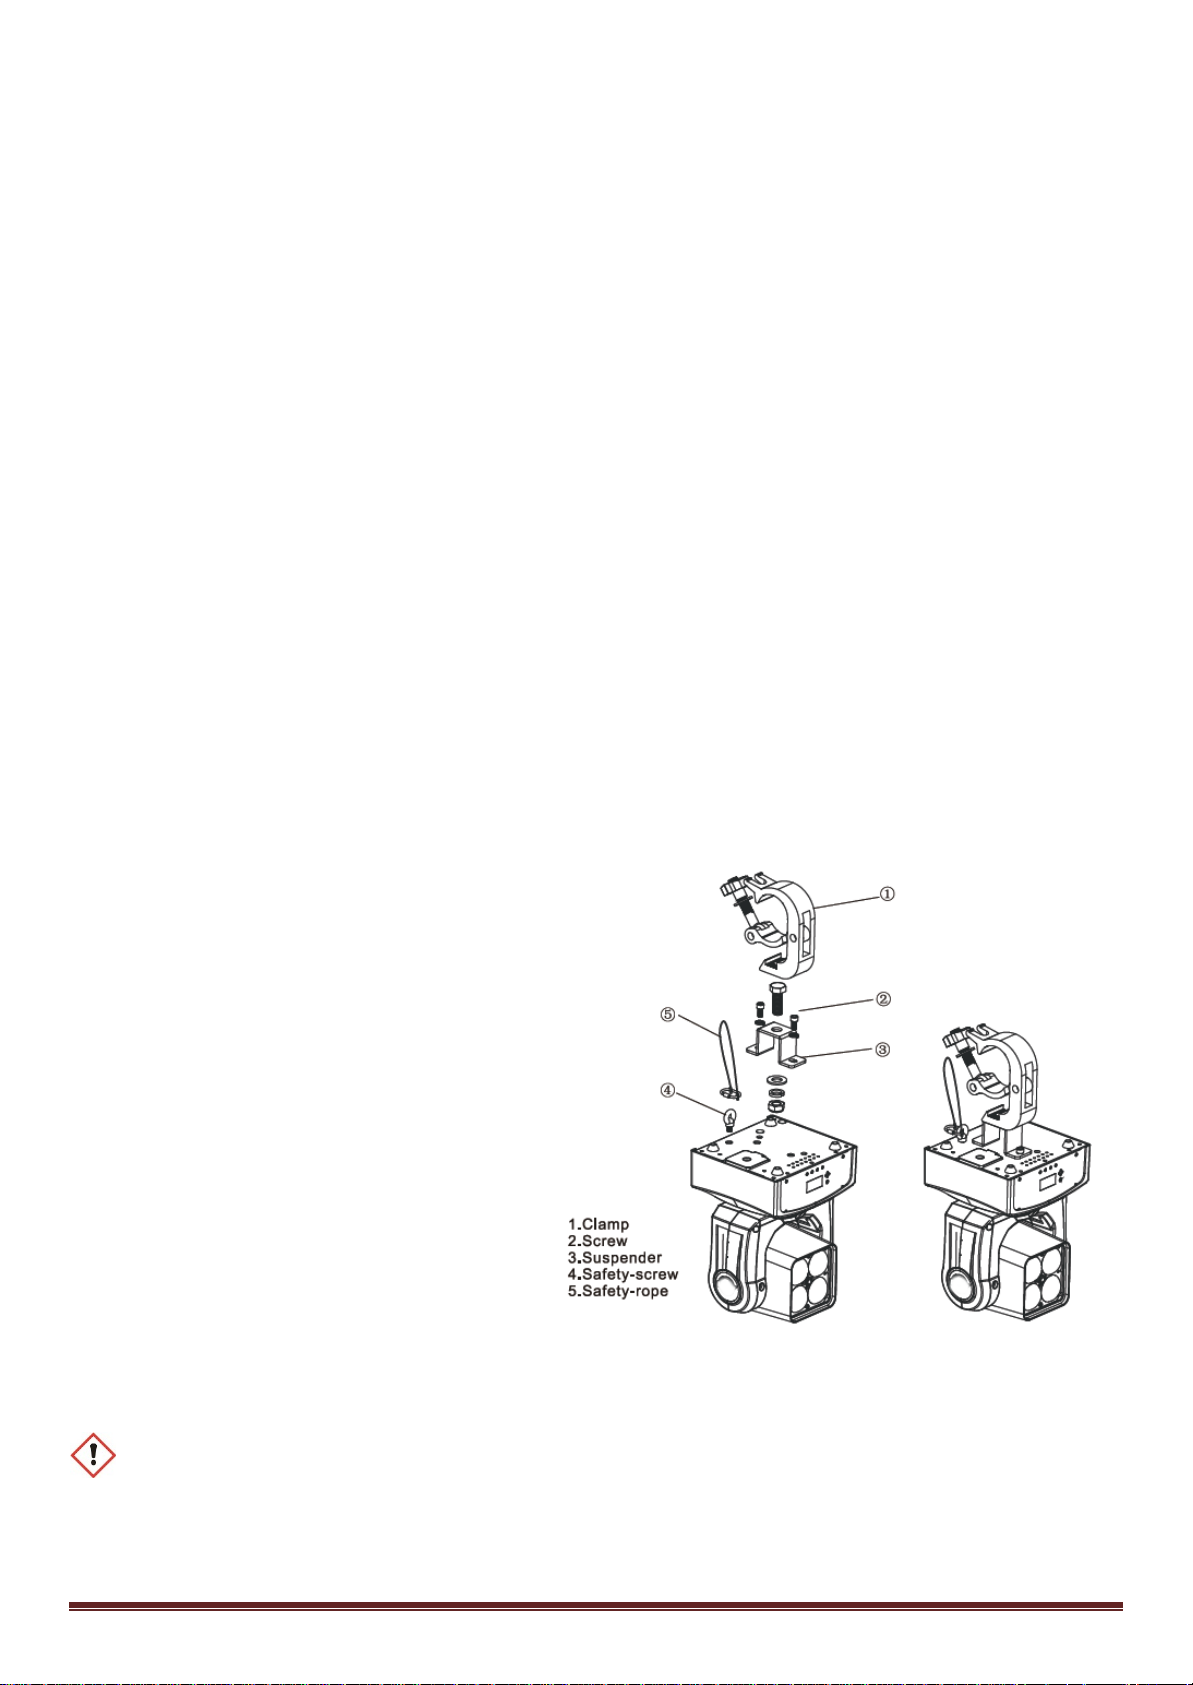
The LED moving head provides a unique mounting
bracket assembly that integrates the bottom of
the base, the included ‘omega bracket’ and the
safety cable rigging point in one unit (see the
illustration on the right).When mounting this
fixture on a truss, be sure to use an appropriate
clamp with the included omega bracket using a
M10 screw fitted through the center hole of the
‘omega bracket’. As an added safety measure, be
sure to attach at least one properly rated safety
cable to the fixture using one of the safety cable
rigging points integrated in the base assembly.
SETUP
Disconnect the power cord before replacing a fuse and always replace with the same type fuse.
Fixture Linking
You will need a serial data link to run light shows of one or more fixtures using a DMX-512 controller or to run
synchronized shows on two or more fixtures set to a master/slave operating mode. The combined number of
©Copyright LOTRONIC 2017 MY60-SPOT Page 3
Page 4
channels required by all fixtures on a serial data link determines the number of fixtures that the data link can
INPUT
COMMON
DMX +
DMX-
Resistance 120 ohm
fixture.
support.
Important: Fixtures on a serial/data link must be daisy chained in one single line. Maximum recommended serial
data link distance: 100 meters (1640 ft.) Maximum recommended number of fixtures on a serial data link: 16 fixtures
Data Cabling
To link fixtures together you must use data cables. If you choose to create your own cable, please use data-grade
cables that can carry a high quality signal and are less prone to electromagnetic interference.
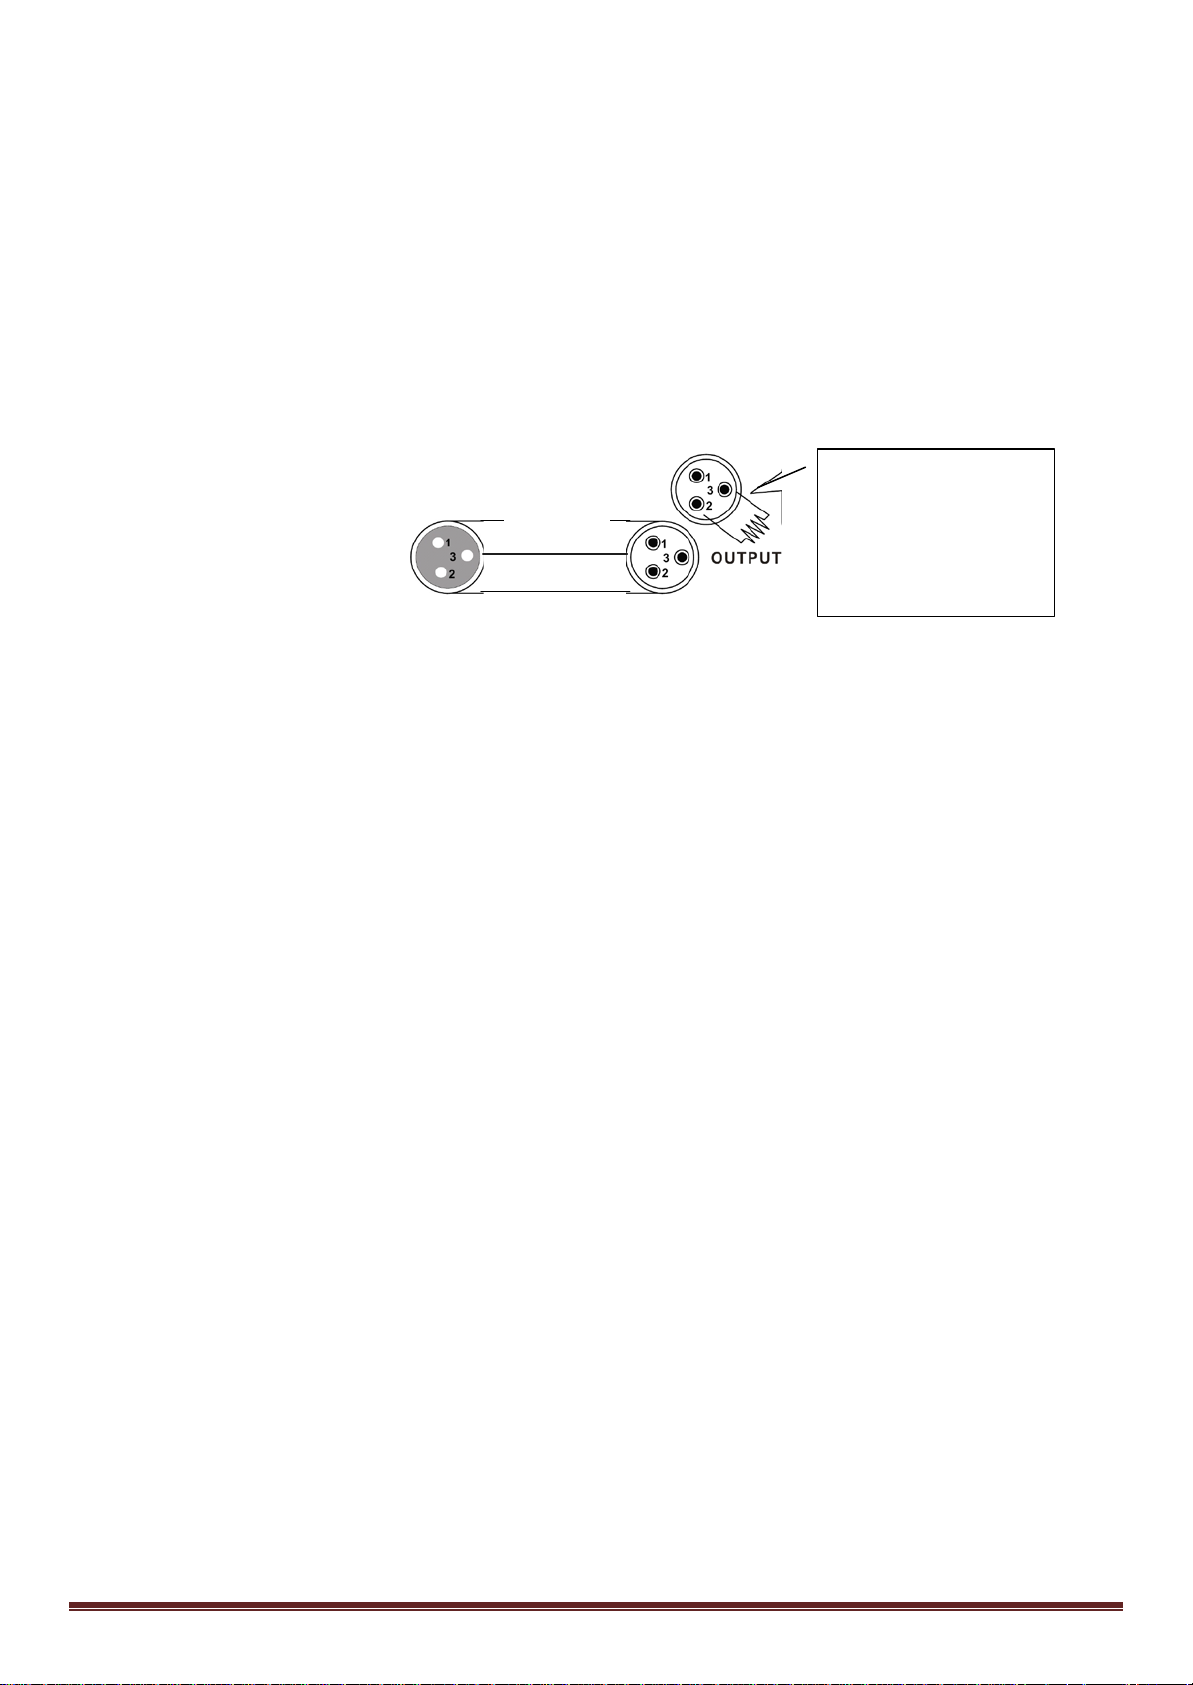
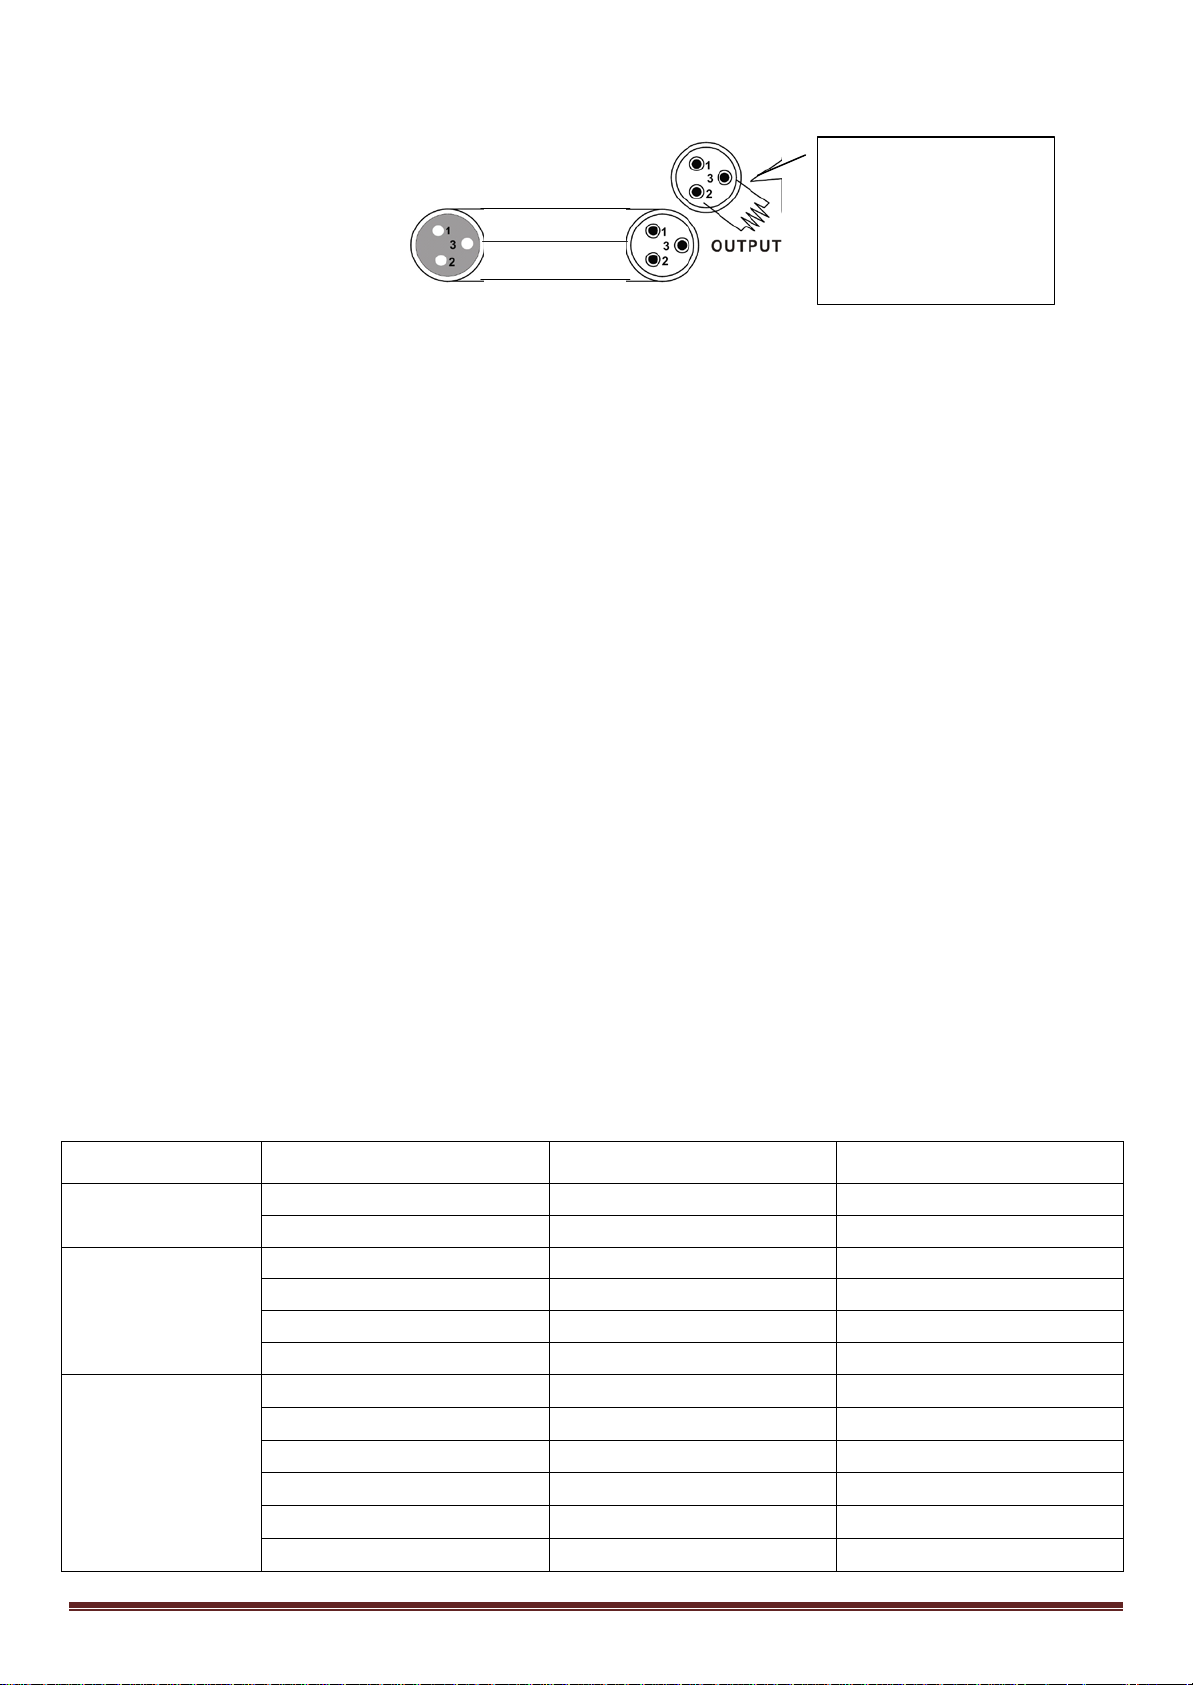
CABLE CONNECTORS
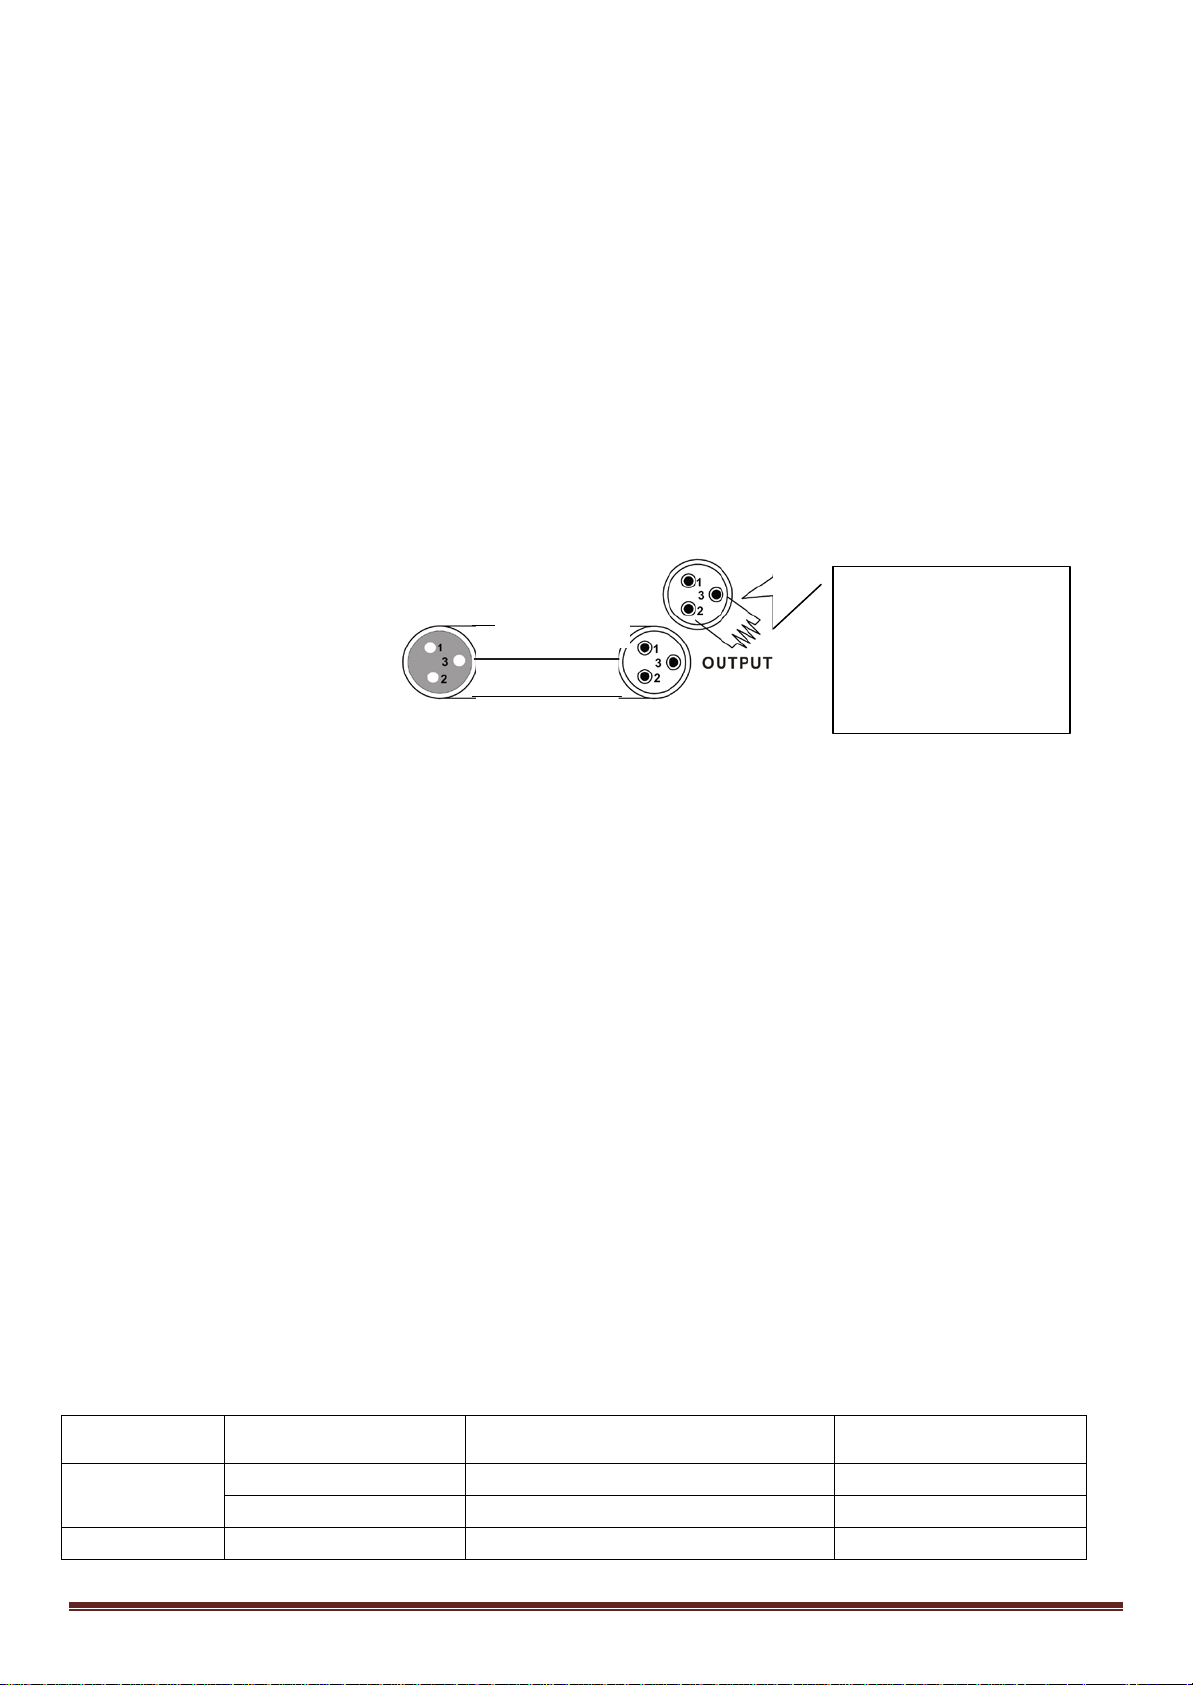
Cabling must have a male XLR connector on one end and a female XLR connector on the other end.
DMX connector configuration
1/ 4w between pin 2
(DMX-) and pin 3
(DMX+) of the last
Termination reduces signal errors. To avoid signal transmission problems and interference, it is always advisable to
connect a DMX signal terminator.
CAUTION
Do not allow contact between the common and the fixture’s chassis ground. Grounding the common can cause a
ground loop, and your fixture may perform erratically. Test cables with an ohm meter to check correct polarity and
to make sure the pins are not grounded or shorted to the shield or each other.
3-PIN TO 5-PIN CONVERSION CHART
Note! If you use a controller with a 5-pin DMX output connector, you will need to use a 5-pin to 3-pin adapter.
The chart below details a proper cable conversion:
3 PIN TO 5 PIN CONVERSION CHART
Conductor 3 Pin Female (output) 5 Pin Male (Input)
Ground/Shield Pin 1 Pin1
Data (-) signal Pin 2 Pin 2
Data (+) signal Pin 3 Pin 3
Do not use Do not use
Do not use Do not use
Setting up a DMX Serial Data Link
1. Connect the (male) 3 pin connector side of the DMX cable to the output (female) 3 pin connector of the controller.
2. Connect the end of the cable coming from the controller which will have a (female) 3 pin connector to the input
connector of the next fixture consisting of a (male) 3 pin connector.
3. Then, proceed to connect from the output as stated above to the input of the following fixture and so on.
©Copyright LOTRONIC 2017 MY60-SPOT Page 4
Page 5
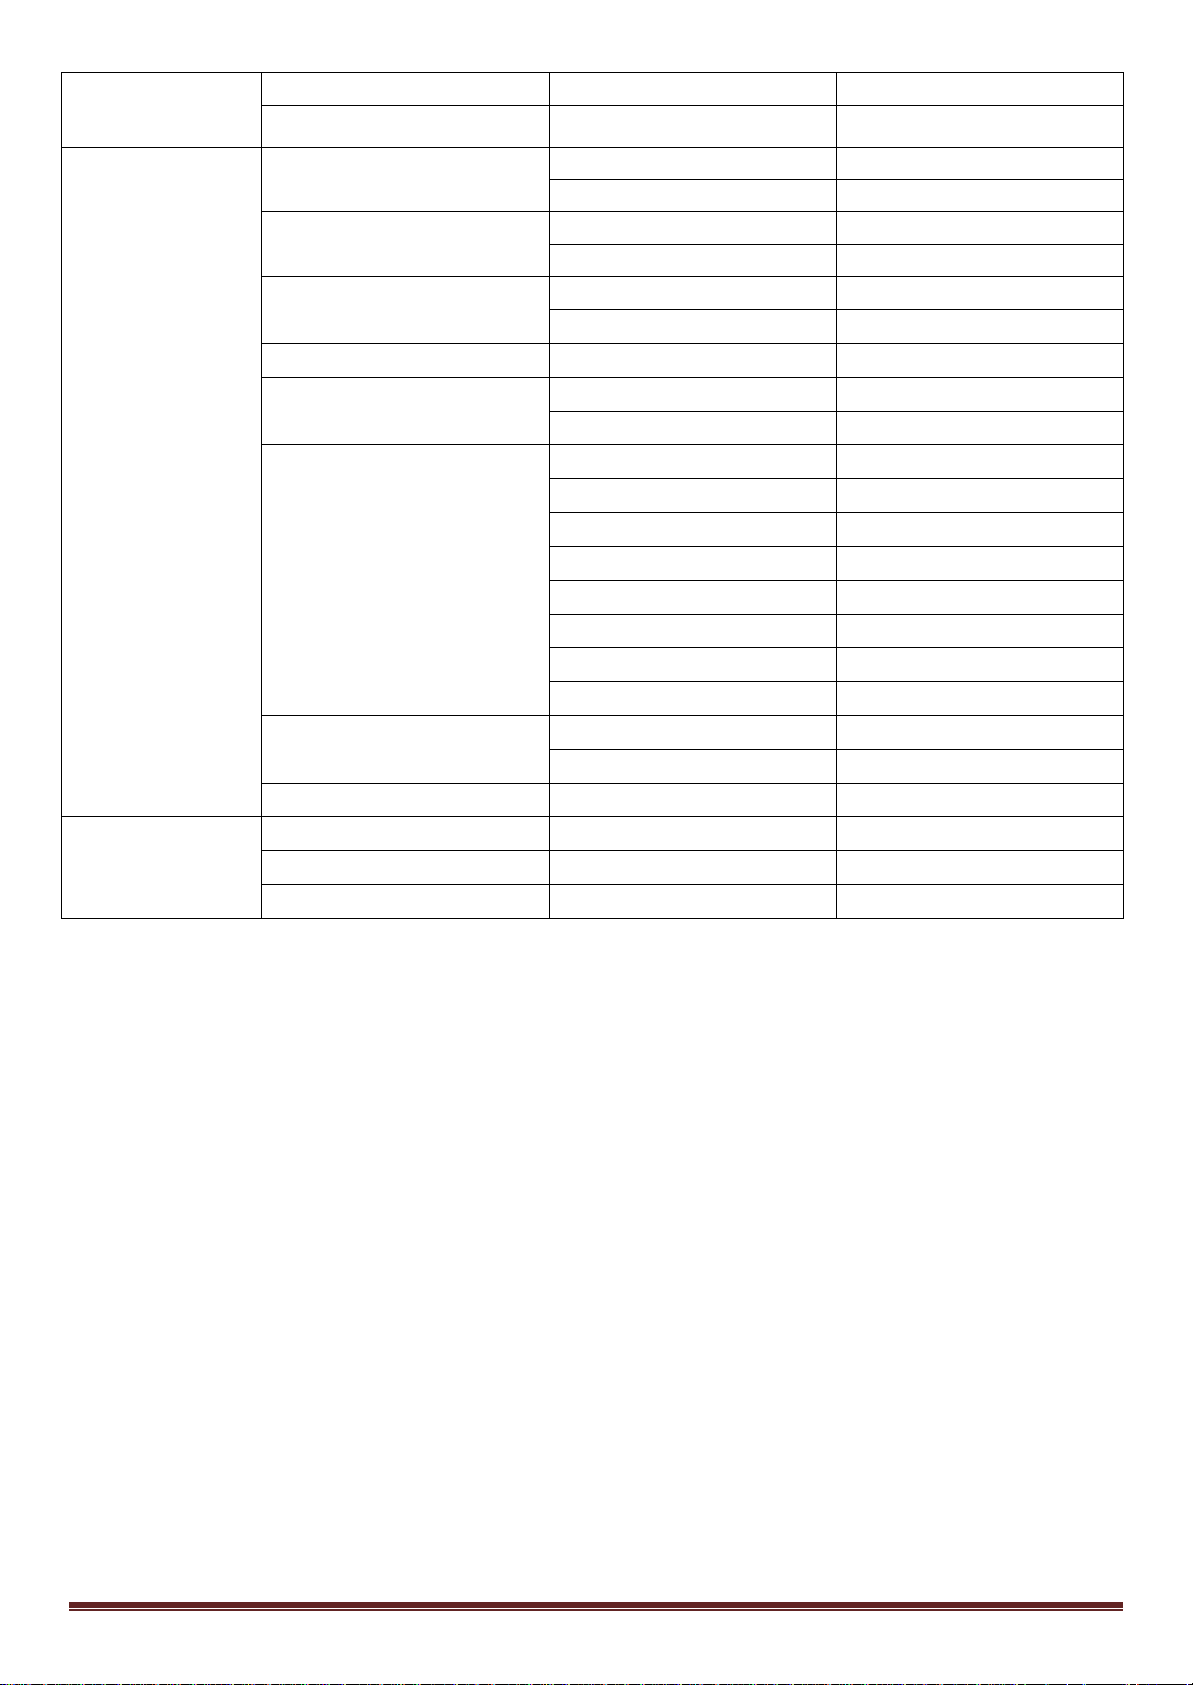
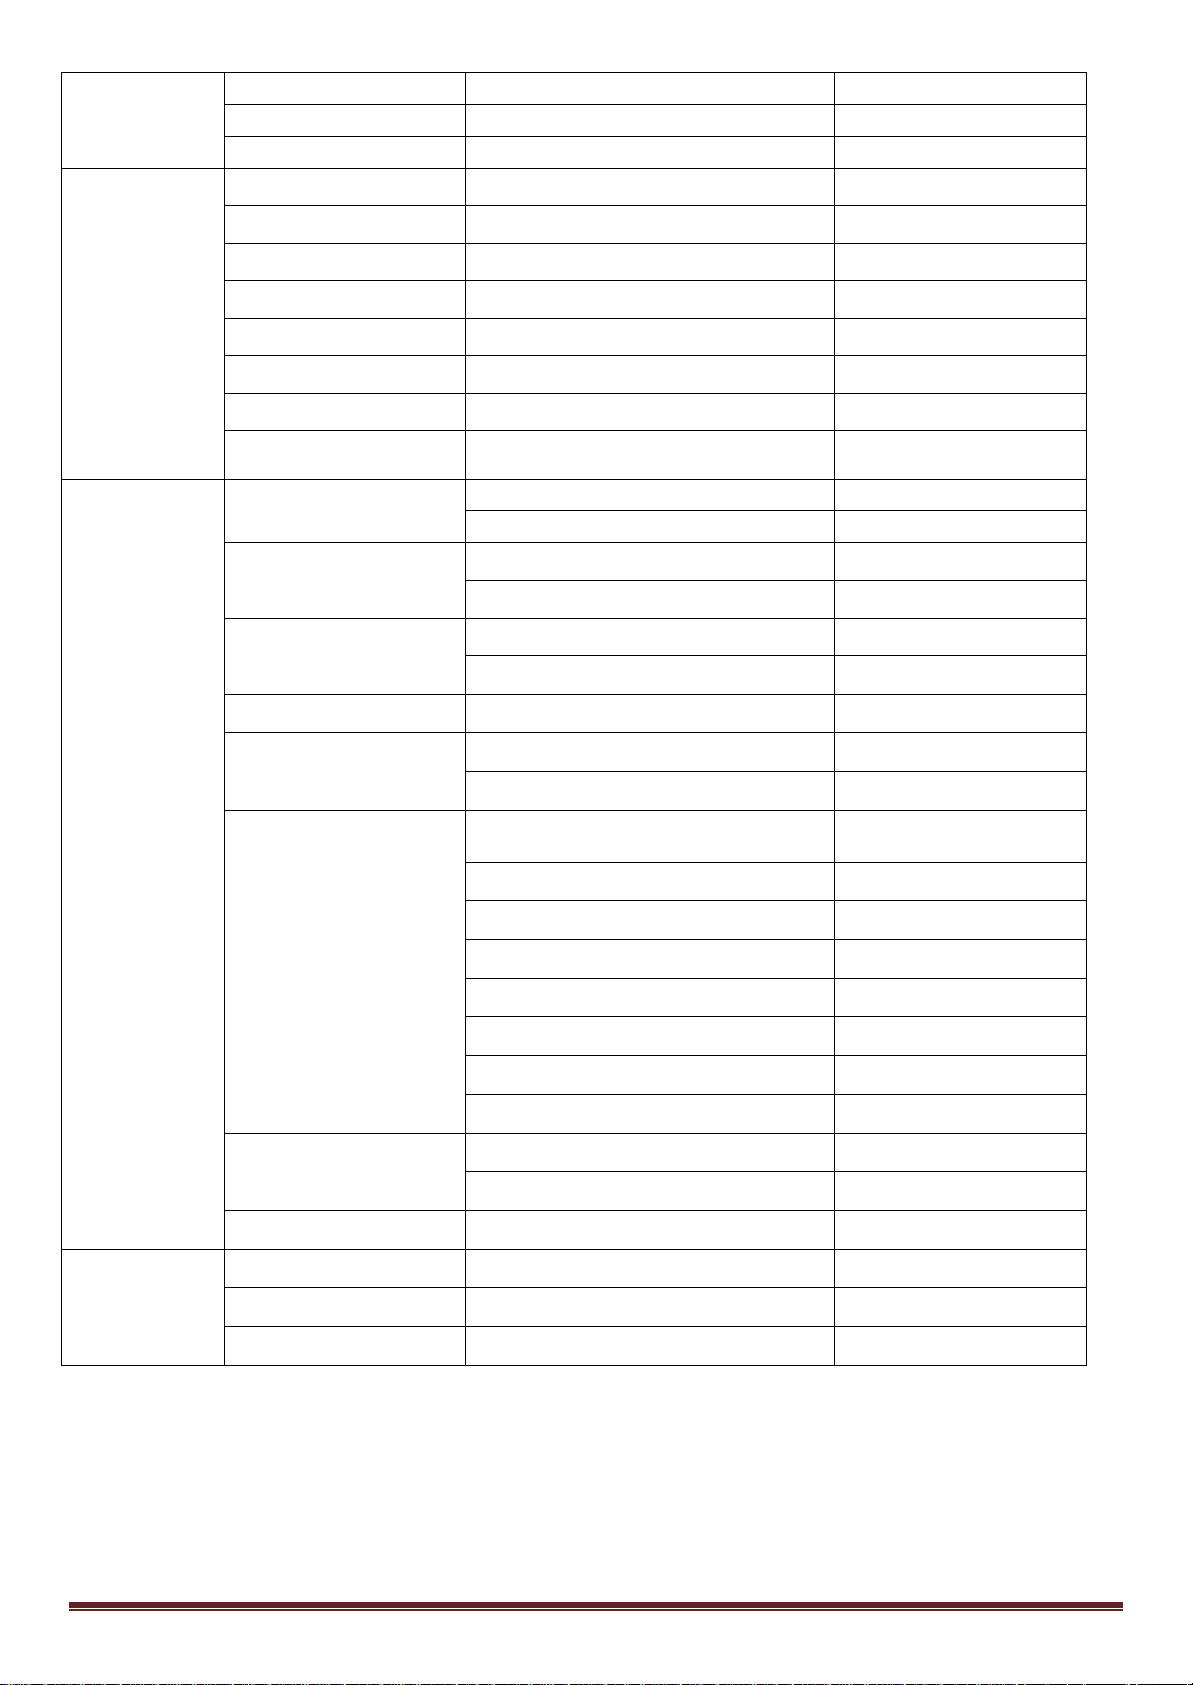
Display Menu
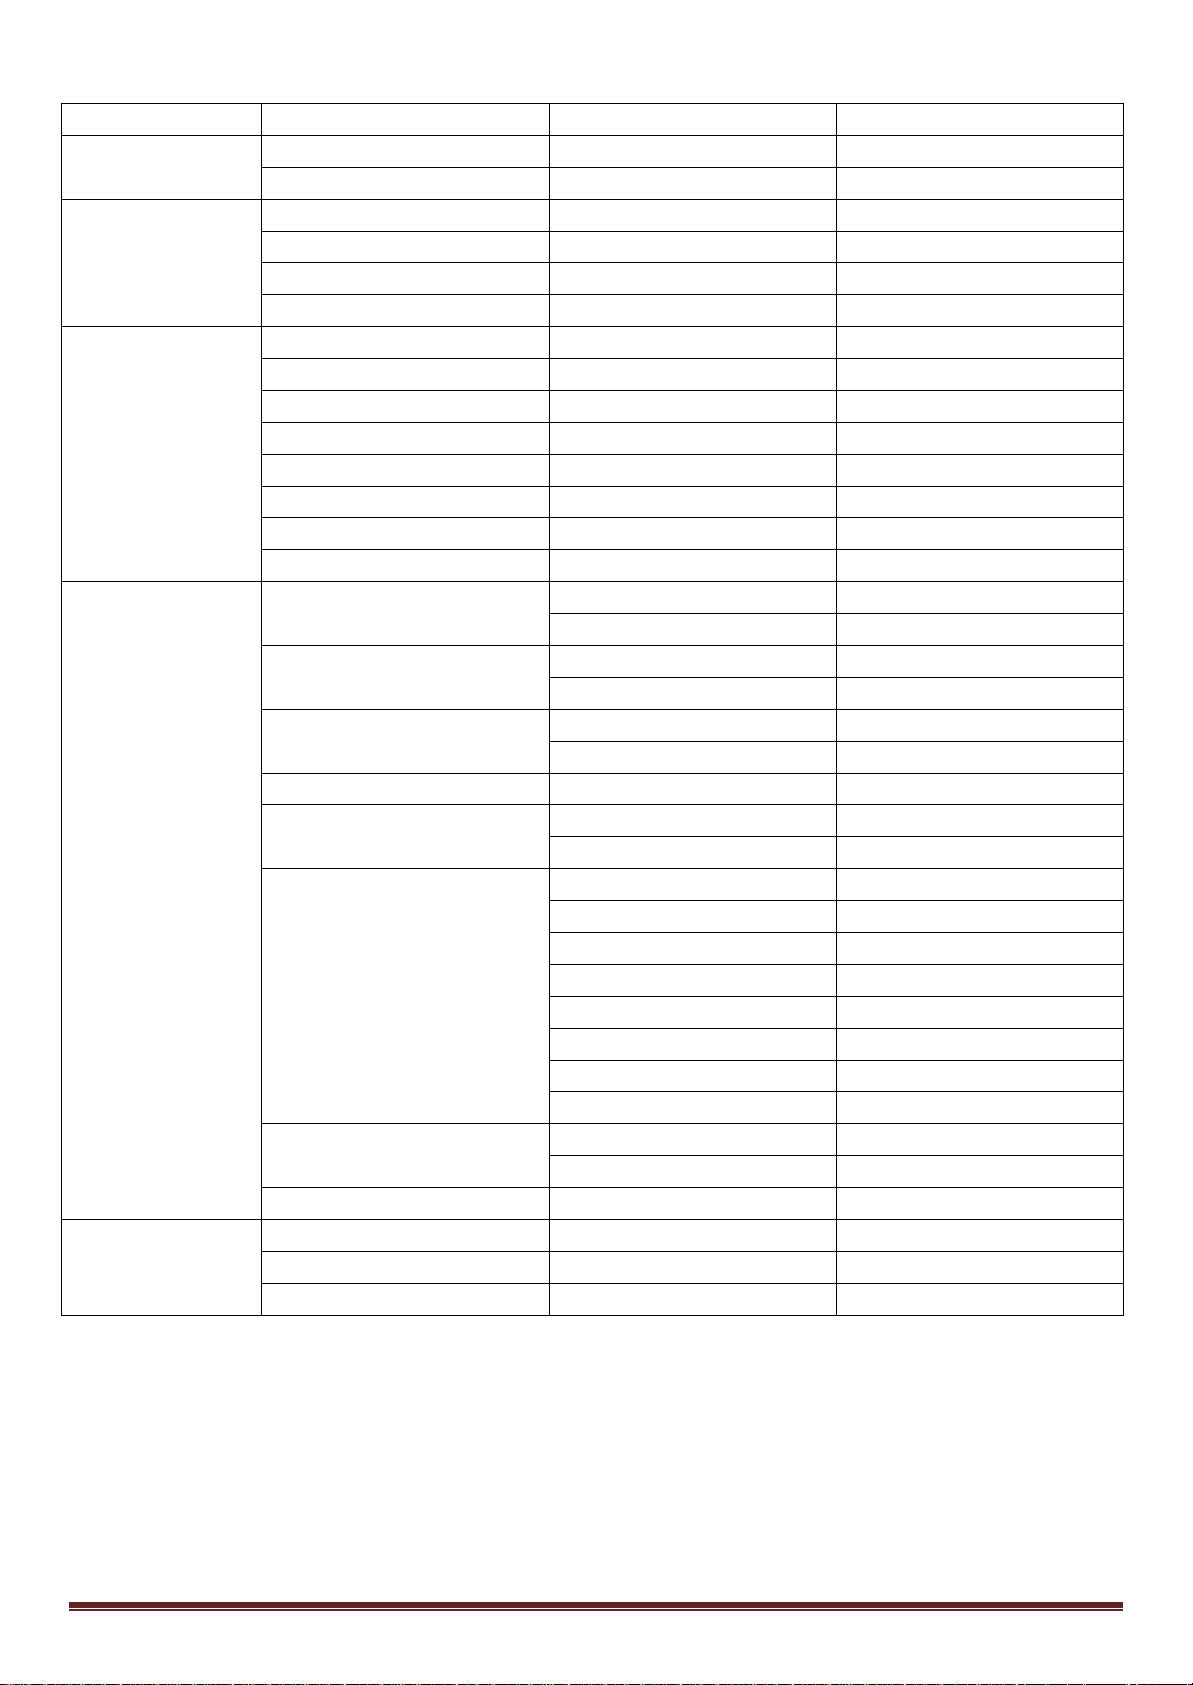
DMX address
001---512
DMX 14CH
DMX 08CH
DMX
Auto
Sound
Slave
Program 1
Program 2
Program 3
Program 4
Program 5
Program 6
Program 7
Program 8
No Yes
No Yes
No Yes Sensitivity
0-100
OFF Hold
Password
Back To Origin
Clear ALL (3s)
Pan
.=0-120
Tilt
.=0-120
Spot Color
.=0-255
Gobo
.=0-255
Focus
.=0-255
Prism
.=0-255
Yes
No Reset Motor
(Reset all Motors)
Software
Mode DMX
Address 001
DMX channel
Running mode
Programs
Pan Rev
Settings
Tilt Rev
Display Rev
DMX fail
Calibration
Factory Reset
System Info
Function Mode
DMX Address
With this function, you can adjust the address from 001 to 512. Press the UP or DOWN button to find your desired
address. Press ENTER to set your desired DMX address.
DMX Channel
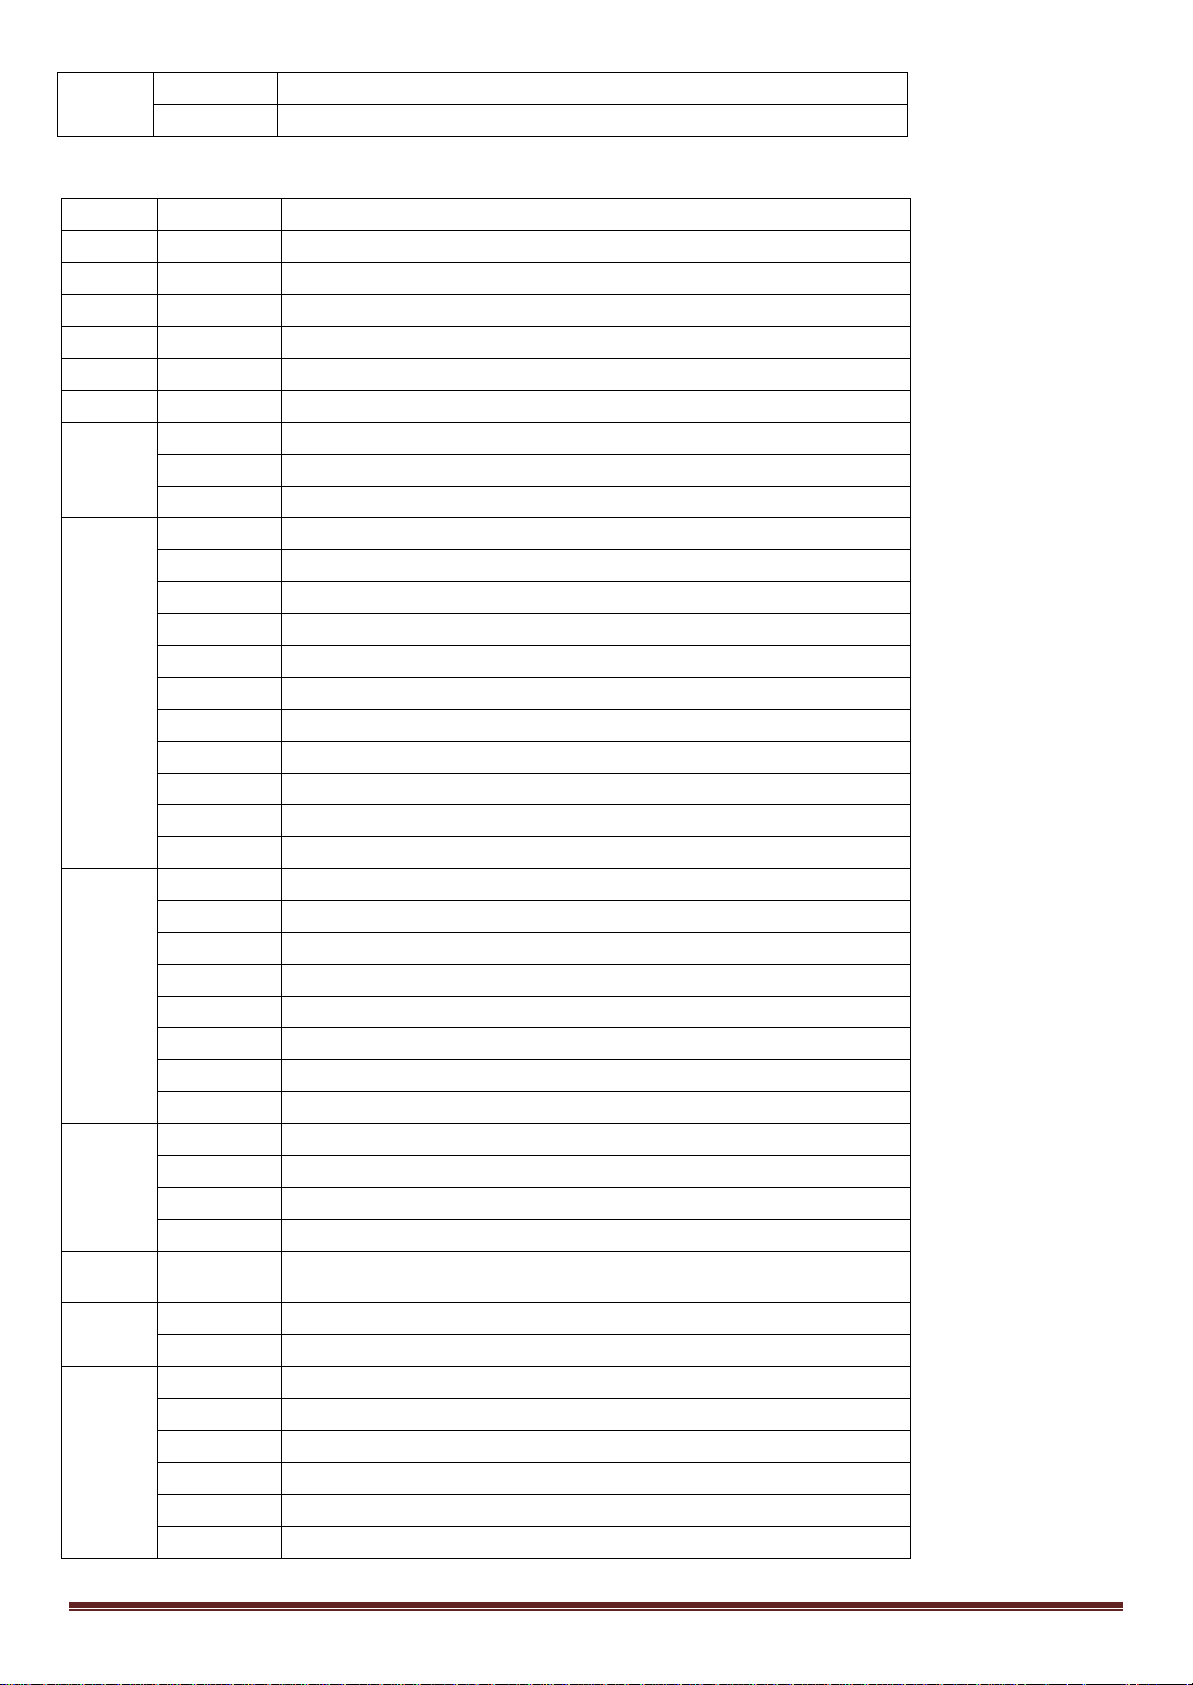
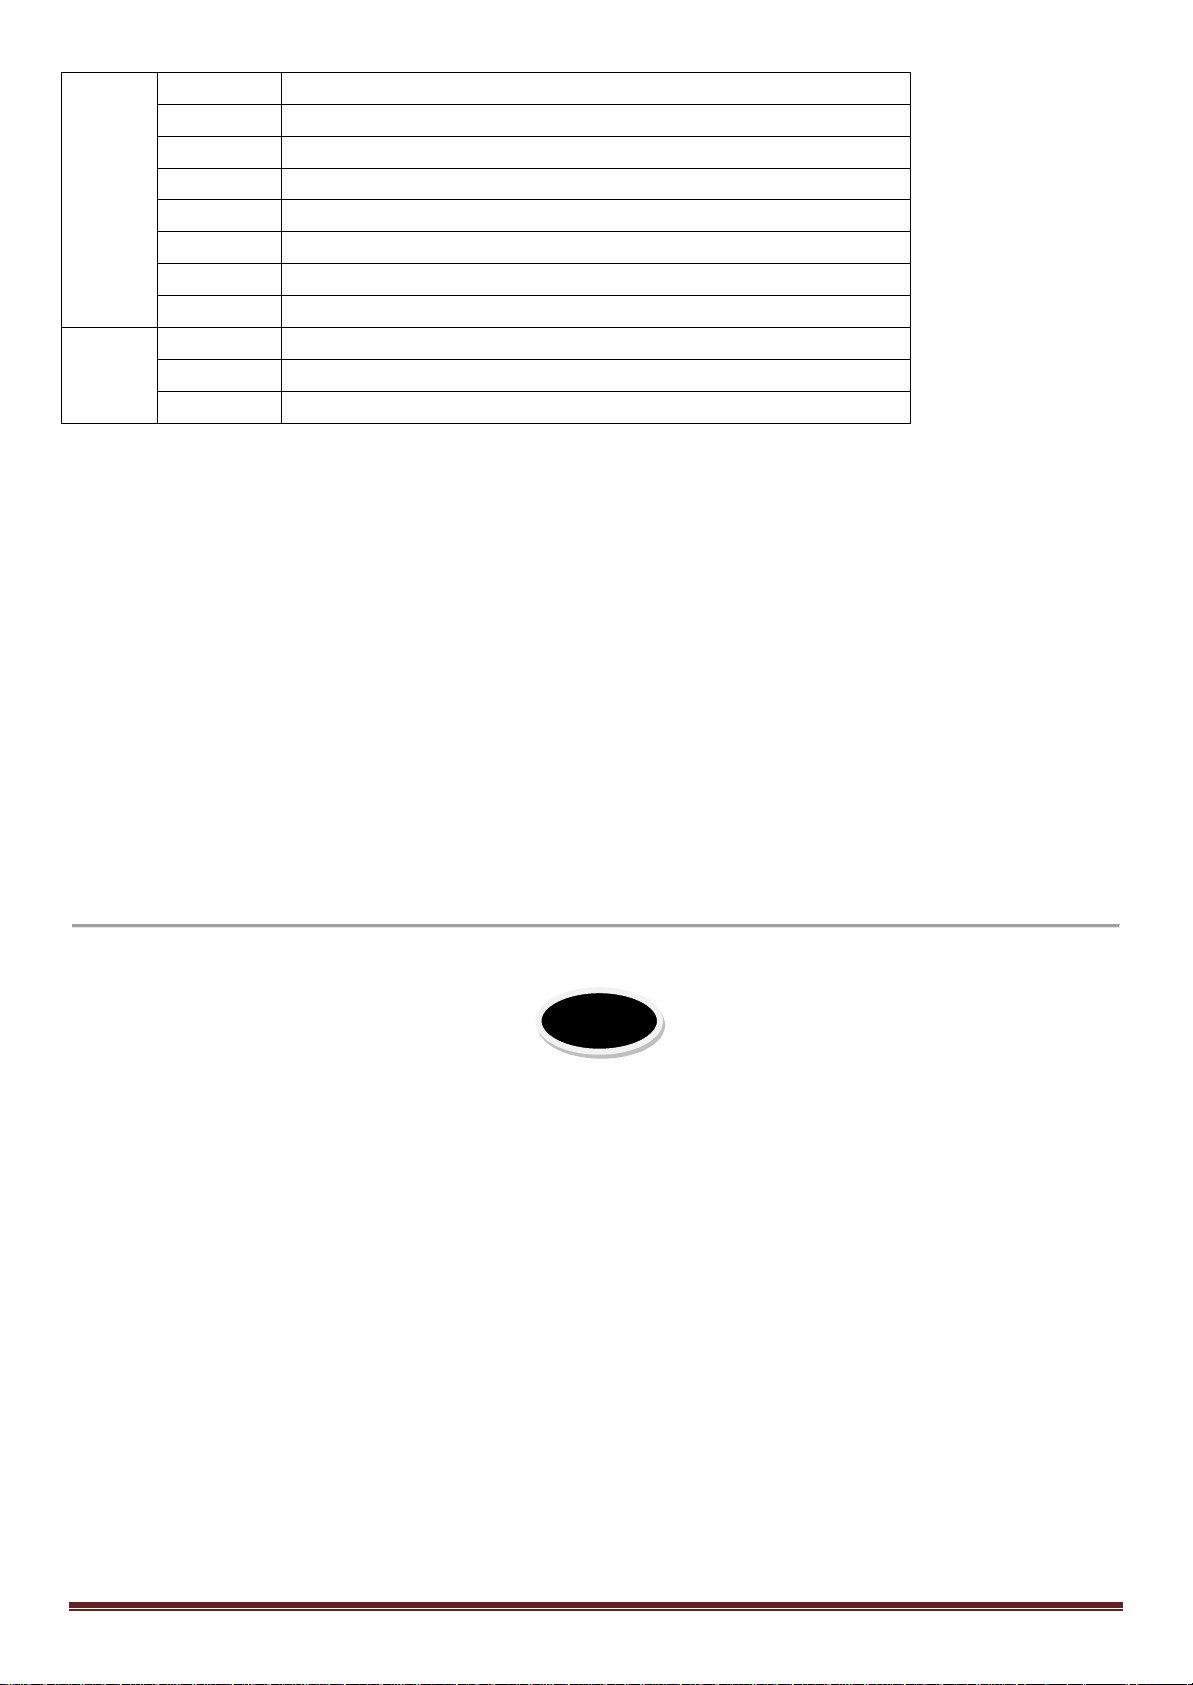
The LED moving head has 8CH and 14CH.
©Copyright LOTRONIC 2017 MY60-SPOT Page 5
Page 6
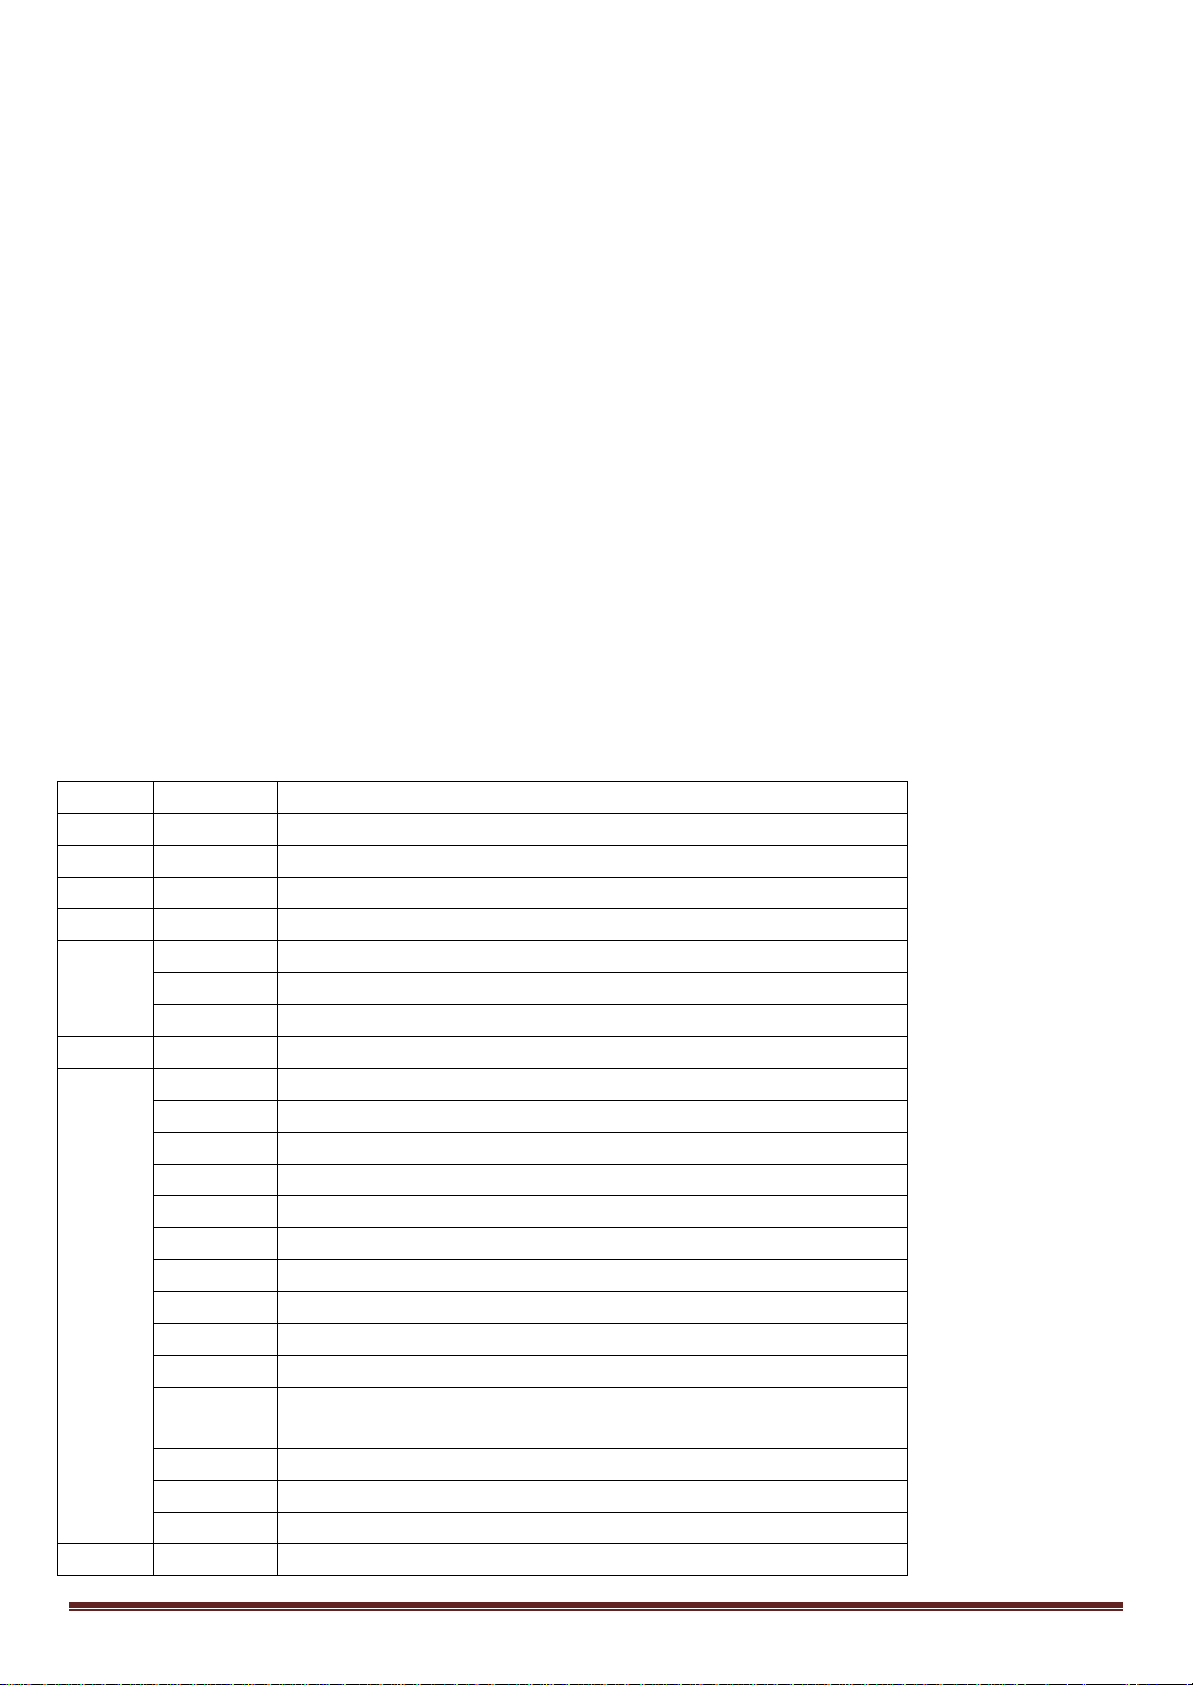
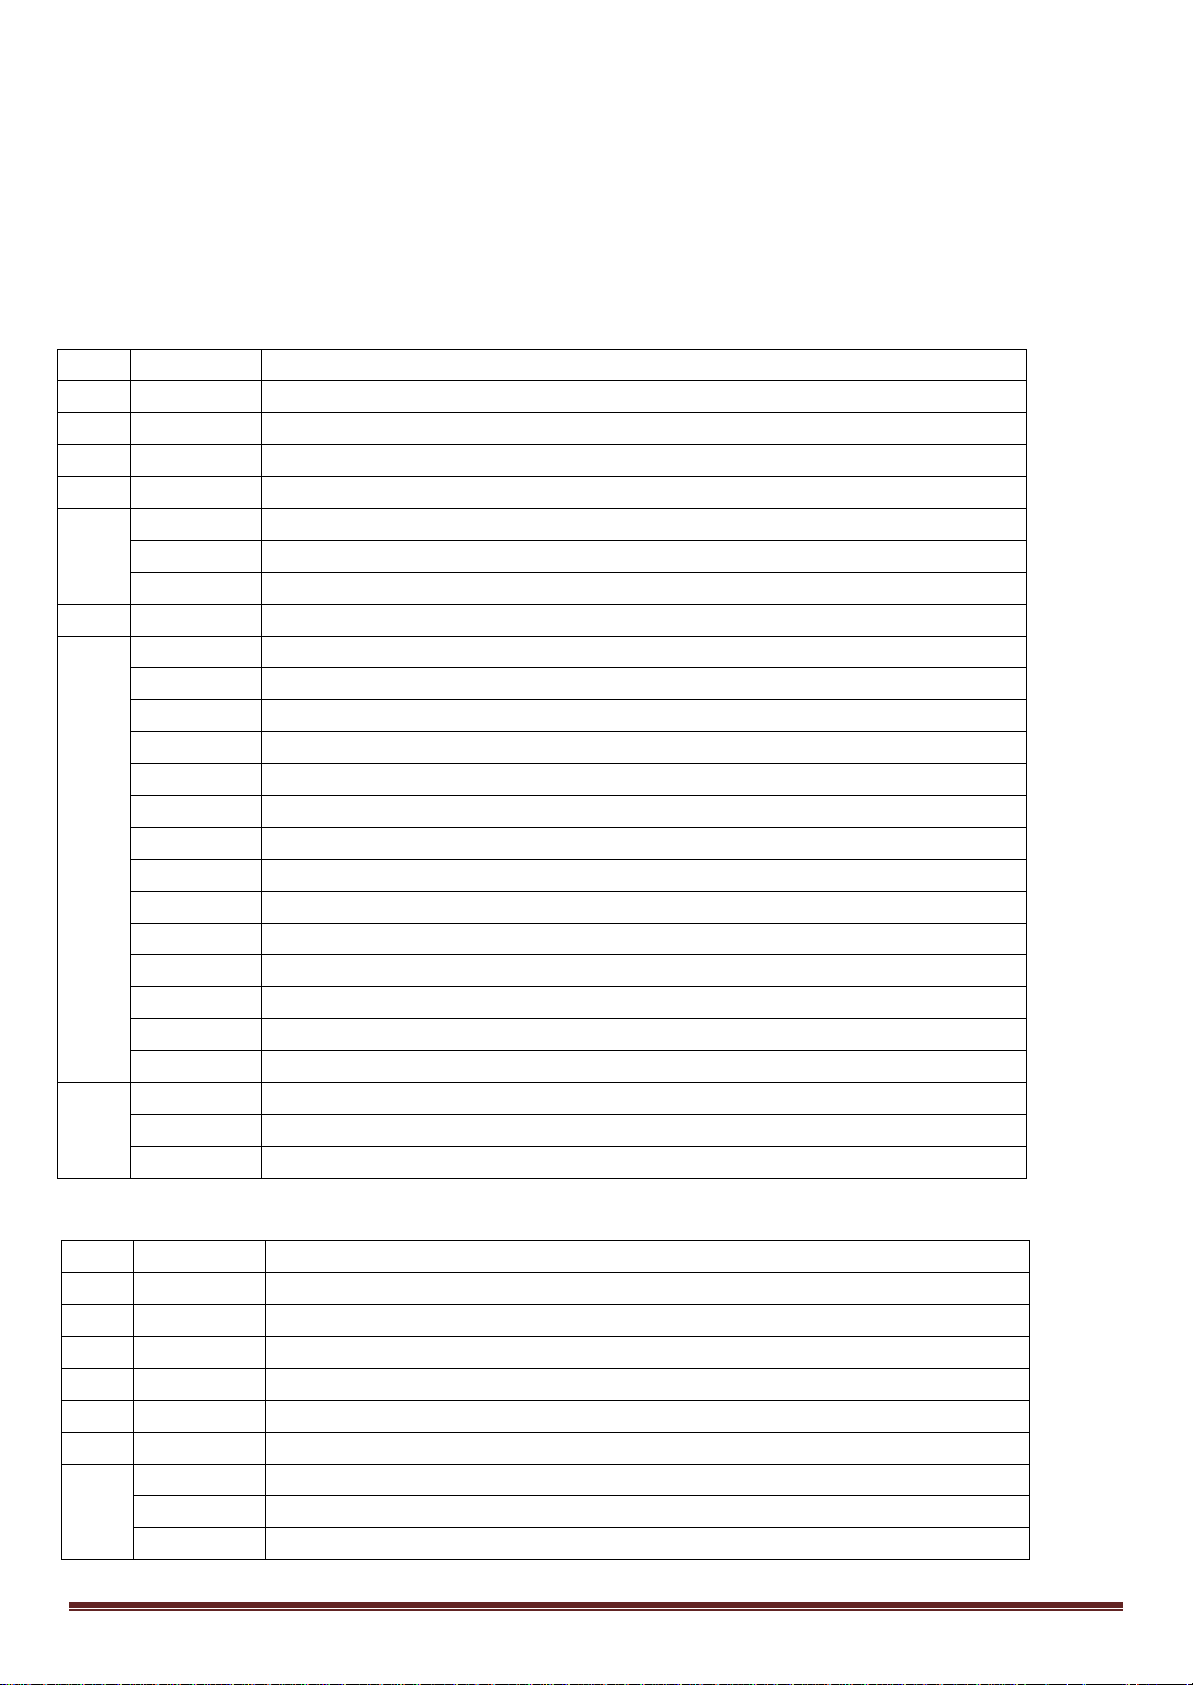
Channel
DMX Value
Function
1
000-255
Pan 2 000-255
Tilt
3
000-255
P/T Speed
4
000-255
Dimmer
0-9
Strobe open
10-250
Strobe from slow to fast
251-255
Strobe open
6
000-255
Focus
0-10
No function
11-20
White + Open
21-40
Auto play color + gobo 1
41-50
Auto play color + gobo 2
51-70
White + Gobo 3
71-80
White + prism + blank gobo
81-100
Auto play color + Prism + gobo 1 rotation
101-110
Auto play color + Prism + gobo 2 rotation
111-130
White + Prism + gobo 3 rotation
131-150
Auto play color + Gobo1 →Auto play color + Prism + gobo 1 rotation
151-160
Auto play color + Gobo2 →Auto play color + Prism + gobo 2 rotation
161-170
Auto play color + Gobo3 →Color change + Prism + gobo 3 rotation
171-180
Auto play color + Prism + gobo 3 rotation
181-255
Color 3 + Prism + gobo 3 rotation
8
0-229
No function
Running Mode
In Running Mode, DMX, Auto, Sound and Slave mode is displayed. Choose the operating mode.
Programs
Run one of the 8 built-in programs in Master mode.
Settings
(1) Pan Rev: Inversion of the Pan-movement.
(2) Tilt Rev: Inversion of the Tilt -movement.
(3) Display Rev: Inversion of the display.
(4)Sensitivity: In Sound-controlled mode, adjust the sensitivity from 0 to100. The higher the value, the higher the
sensitivity.
(5) DMX Fail: If a problem occurs in DMX mode, you can select OFF or HOLD. In OFF position, the unit switches off if
a problem occurs. In HOLD position, it continues to work in the latest setting.
(6) Calibration: Allows to calibrate the unit.
(7) Factory Reset: Return to factory values. The default setting is NO.
(8) Reset Motor: If this function is selected, all motors reset to their original position.
System Info
Check the details of the Software version, operating mode, and DMX address value.
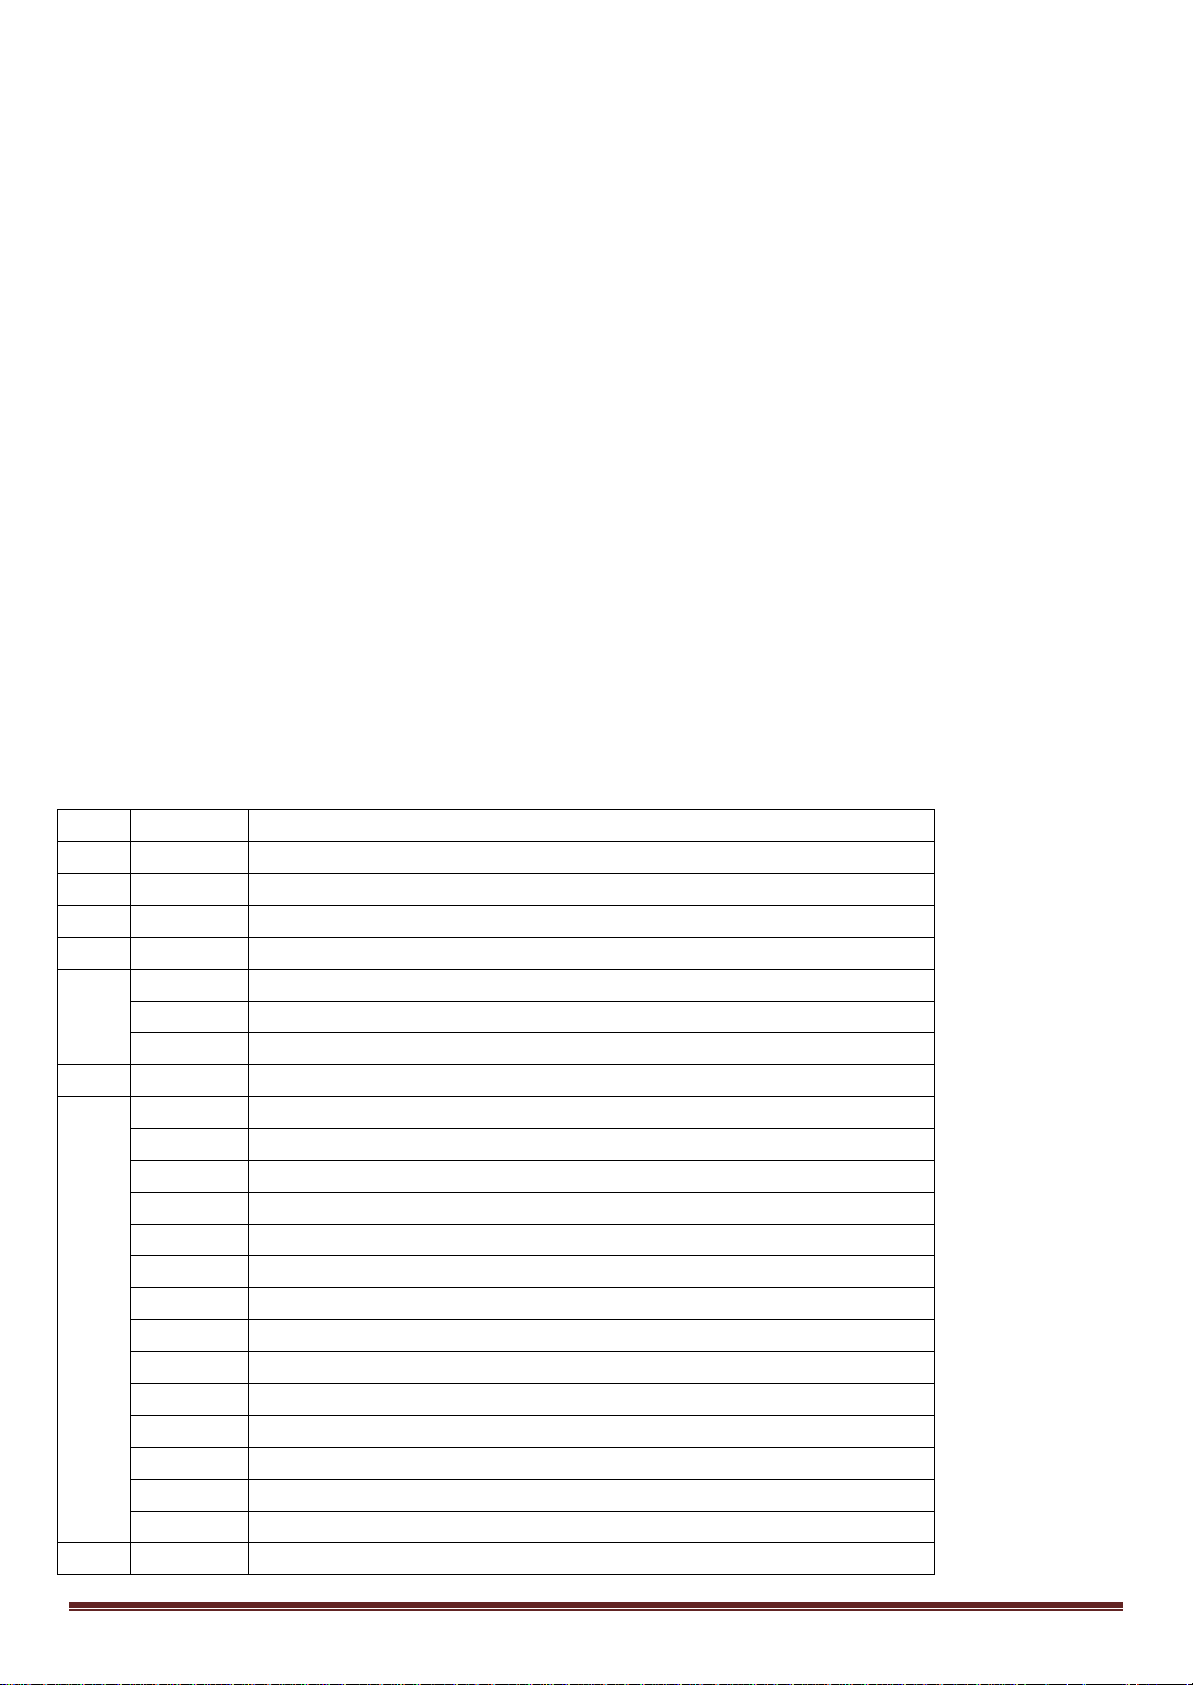
DMX CHANNELS
8 channel definition table
5
7
©Copyright LOTRONIC 2017 MY60-SPOT Page 6
Page 7
230-240
Reset after 3 seconds
240-255
No function
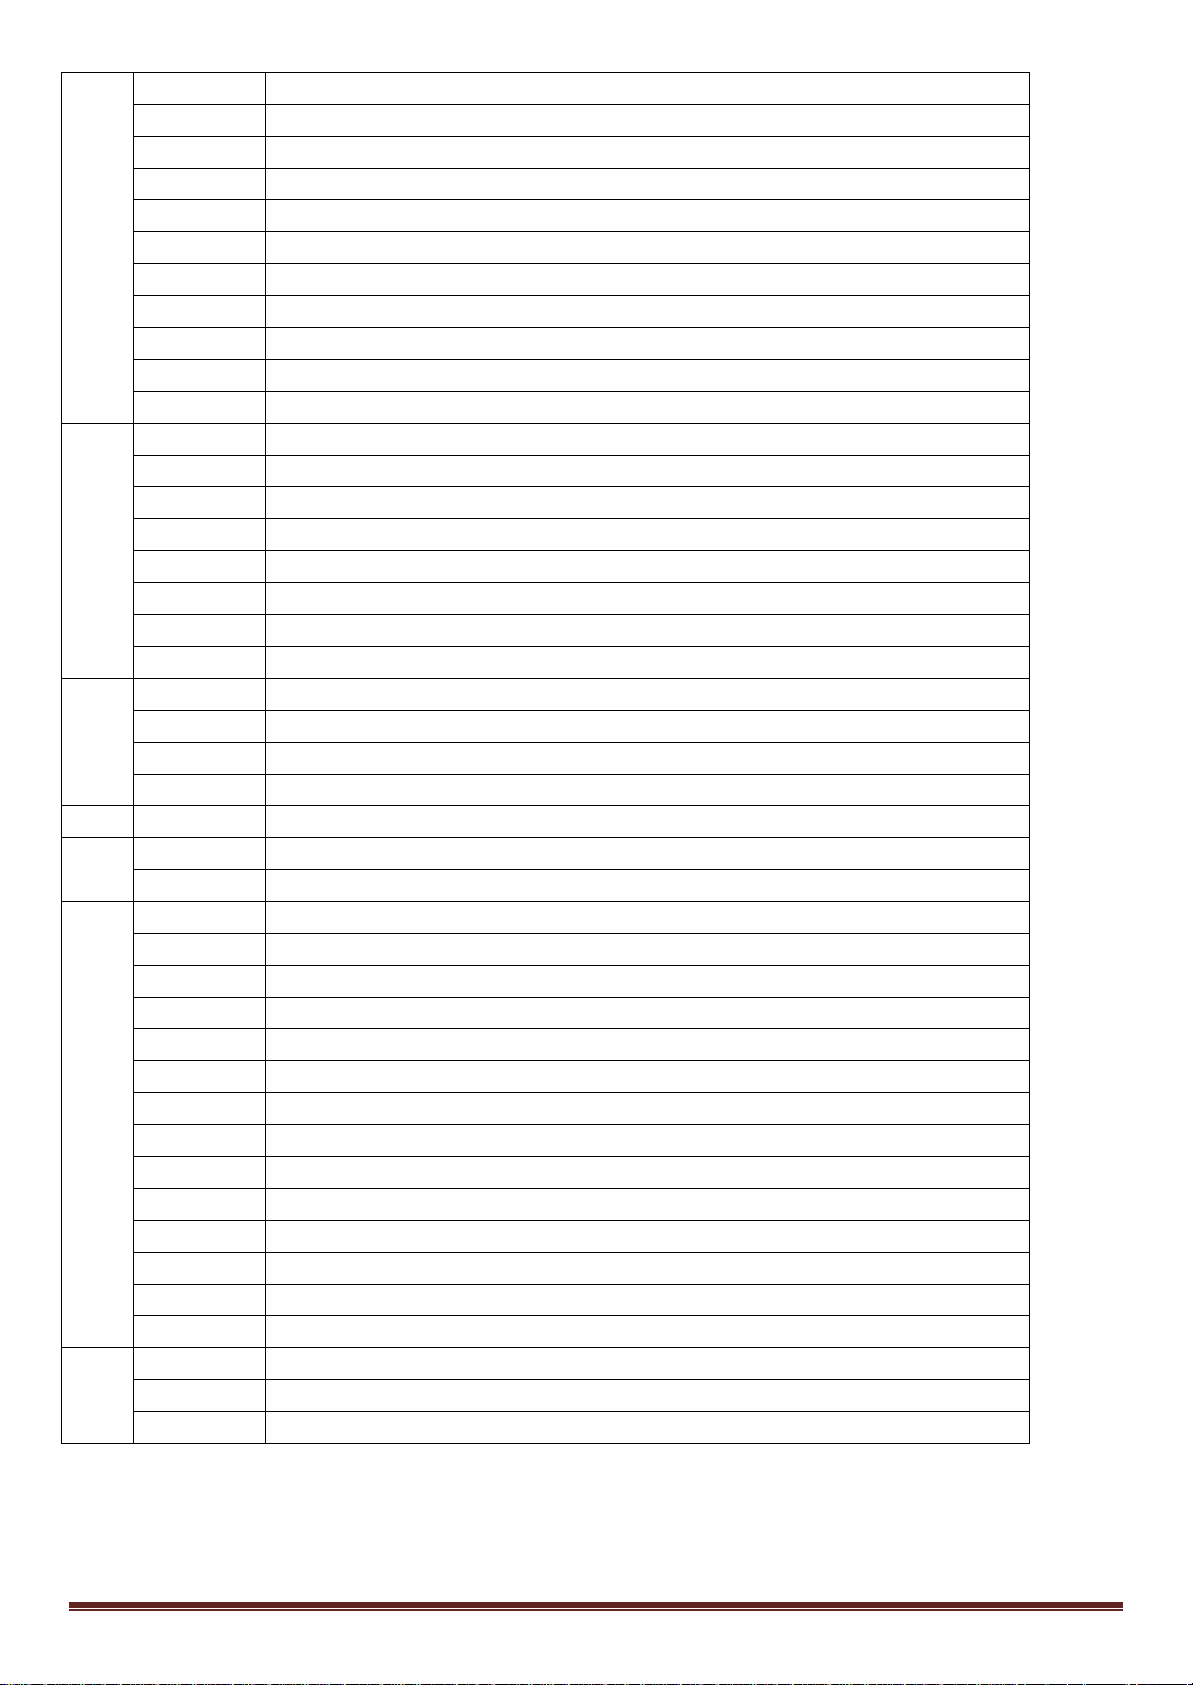
Channel
DMX Value
Function
1
000-255
Pan 2 000-255
Pan Fine
3
000-255
Tilt
4
000-255
Tilt Fine
5
000-255
P/T Speed
6
000-255
Dimmer
0-9
Strobe open
10-250
Strobe from slow to fast
251-255
Strobe open
0-13
White (Open)
14-31
Color1
32-49
Color2
50-67
Color3
68-85
Color4
86-103
Color5
104-121
Color6
122-130
Color7
131-139
White
140-196
Color CCW Change from fast to slow
197-255
Color CW Change from slow to fast
0-8
Open
9-33
Gobo1
34-58
Gobo2
59-83
Gobo3
84-108
Gobo4
109-133
Gobo5
134-194
Gobo CCW Change from fast to slow
195-255
Gobo CW Change from slow to fast
0-9
Stop
10-129
Forward gobo rotation from fast to slow
130-134
Stop
135-255
Backward gobo rotation from slow to fast
11
000-128
No function
129-255
Prism
0-10
No function
11-20
White + Open
21-40
Auto play color + gobo 1
41-50
Auto play color + gobo 2
51-70
White + Gobo 3
71-80
White + prism + blank gobo
14 channel definition table
7
8
9
10
12
13
000-255 Focus
©Copyright LOTRONIC 2017 MY60-SPOT Page 7
Page 8
81-100
Auto play color + Prism + gobo 1 rotation
101-110
Auto play color + Prism + gobo 2 rotation
111-130
White + Prism + gobo 3 rotation
131-150
Auto play color + Gobo1 →Auto play color + Prism + gobo 1 rotation
151-160
Auto play color + Gobo2 →Auto play color + Prism + gobo 2 rotation
161-170
Auto play color + Gobo3 →Color change + Prism + gobo 3 rotation
171-180
Auto play color + Prism + gobo 3 rotation
181-255
Color 3 + Prism + gobo 3 rotation
14
0-229
No function
230-240
Reset after 3 seconds
240-255
No function
F
Fuse Replacement
Locate and remove the unit’s power cord. Once the cord has been removed located the fuse holder located inside the
power socket. Insert a flat-head screw driver into the power socket and gently pry out the fuse holder. Remove the
bad fuse and replace with a new one. The fuse holder has a built-in socket for a spare fuse be sure not to confuse the
spare fuse with active fuse.
Warning: If after replacing the fuse you continue to blow fuses, STOP using the unit. Contact customer support for
further instructions. Continuing to use the unit may cause serious damage.
Cleaning
Due to fog residue, smoke, and dust cleaning the internal and external lenses should be carried out periodically to
optimize light output.
1. Use normal glass cleaner and a soft cloth to wipe down the out-side casing.
2. Clean the external optics with glass cleaner and a soft cloth every 20 days.
3. Always be sure to dry all parts completely before plugging the unit back in.
PREPARATIFS
Contenu de l’emballage:
• 1 Lyre Spot à 1 LED blanche de 60W
• 1 cordon secteur
• 1 Mode d’emploi
• 1 support oméga
Déballage
Dès réception de l’appareil, ouvrez le carton et vérifiez que le contenu est complet et en bon état. Sinon, prévenez
immédiatement le transporteur et conservez l’emballage s’il montre des signes de mauvais traitements. Conservez le
carton et tous les matériaux d’emballage afin de pouvoir transporter l’appareil en toute sécurité.
Consignes de sécurité
Lisez attentivement ce manuel qui contient des informations importantes sur l’installation, l’utilisation et l’entretien
de cet appareil.
• Conservez le manuel pour référence ultérieure. Si l’appareil change un jour de propriétaire, assurez-vous que le
©Copyright LOTRONIC 2017 MY60-SPOT Page 8
Page 9

nouvel utilisateur est en possession du manuel.
• Assurez-vous que la tension secteur convient à cet appareil et qu’elle ne dépasse pas la tension d’alimentation
indiqué sur la plaque signalétique de l’appareil.
• Uniquement pour utilisation à l’intérieur!
• L’appareil doit être impérativement relié à la terre.
• Afin d’éviter tout risque d’incendie ou de choc électrique, ne pas exposer cet appareil à la pluie ou à l’humidité.
Assurez-vous qu’aucun objet inflammable ne se trouve à proximité de l’appareil pendant son fonctionnement.
• Installez l’appareil à un endroit bien ventilé à une distance minimum de 50cm de toute surface. Assurez-vous que
les fentes de ventilation ne sont pas bloquées.
• Débranchez l’appareil du secteur avant toute manipulation ou entretien. Lorsque vous remplacez le fusible, utilisez
uniquement un fusible qui présente exactement les mêmes caractéristiques que l’ancien.
• Sécurisez l’appareil sur le dispositif de fixation au moyen d’une chaîne. Ne portez jamais l’appareil en le tenant par
le boîtier. Tenez-le par l’étrier.
• La température ambiante ne doit pas dépasser 40°C. Ne pas faire fonctionner l’appareil à des températures
supérieures.
• En cas de dysfonctionnement, arrêtez immédiatement l’appareil. N’essayez jamais de réparer l’appareil par vousmême. Une réparation mal faite peut entraîner des dommages et des dysfonctionnements. Contactez un service
technique agréé. Utilisez uniquement des pièces détachées identiques aux pièces d’origine.
• Ne pas brancher l’appareil sur un variateur.
• Assurez-vous que le cordon d’alimentation n’est jamais écrasé ni endommagé.
• Ne jamais débrancher l’appareil en tirant sur le cordon.
• Ne pas exposer vos yeux à la source lumineuse.
• Lorsque le cordon d'alimentation ou un coupleur d'appareil est utilisé comme dispositif de déconnexion, ce
dispositif doit rester facilement accessible;
Si un interrupteur omnipolaire est utilisé comme dispositif de déconnexion, l'emplacement sur l'appareil et la
fonction de l'interrupteur doit être décrite, et le commutateur doit rester facilement accessible
Description
• 8 ou 14 canaux DMX
• 8 programmes intégrés
• Fonctionnement en DMX, contrôle audio, maître-esclave ou automatique
• Focus motorisé
• Roue de 7 couleurs + blanc, effet rainbow
• Roue de 5 gobos rotatifs + open
• Gobo shake
• Prisme à 3 facettes
• Angle du rayon 13°
• Dimmer linéaire 0-100%
• Pan & Tilt à vitesse réglable
• Ecran Oled
• Connecteurs Powercon
Caractéristiques techniques
Alimentation ....................................................................................... AC100-240V 50/60Hz
Consommation ............................................................................................................... 90W
Source lumineuse ................................................................................... 1 LED blanche 60W
Pan/tilt ..................................................................................... 540°/210° à vitesse réglable
Stroboscope ............................................................................................................... 0-23Hz
©Copyright LOTRONIC 2017 MY60-SPOT Page 9
Page 10
Dimensions ............................................................................................. 245 x 145 x 345mm
Poids ............................................................................................................................ 4,35kg
Montage
ORIENTATION
Cet appareil peut être installé dans n’importe
quelle position à condition d’avoir une ventilation
suffisante.
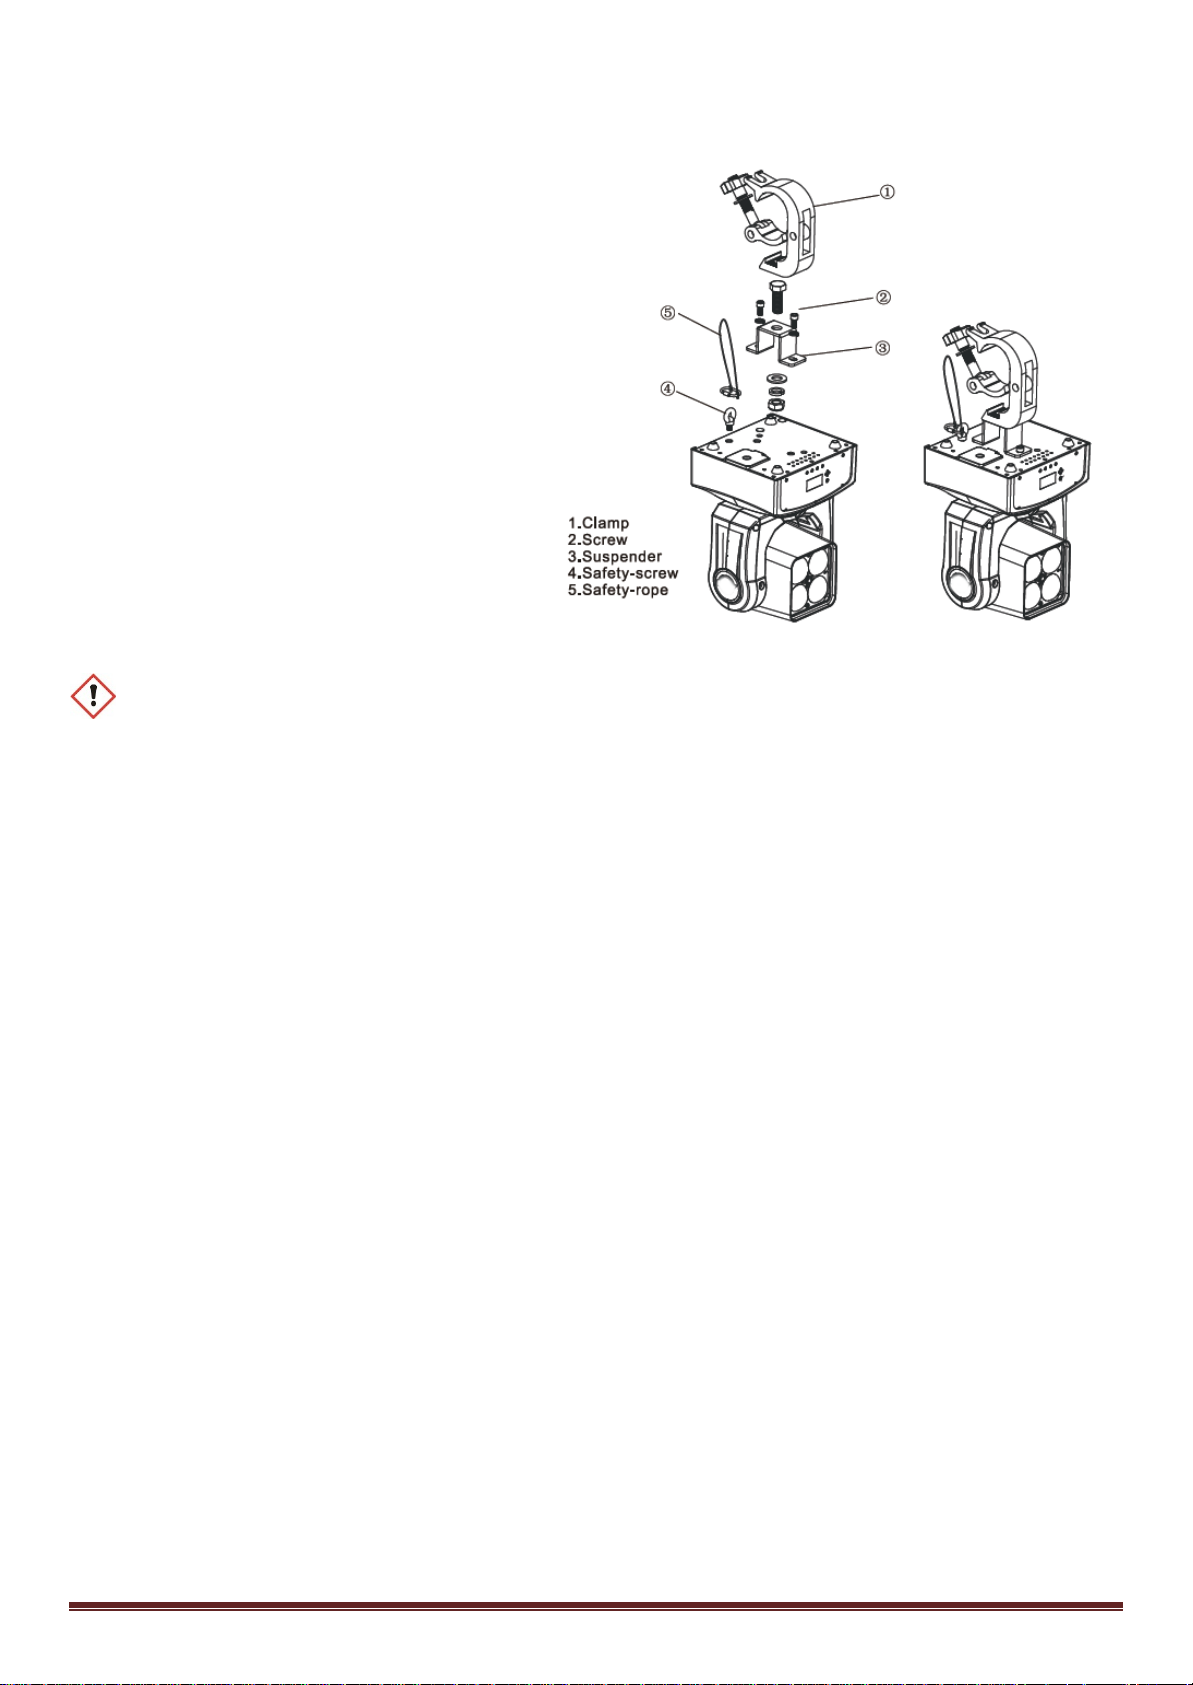
RIGGING
La lyre possède un dispositif de fixation unique qui
comprend le socle, le support omega fourni et
l’oeillet de fixation pour le cable de sécurité.
Lorsque vous installez cette lyre sur une structure,
utilisez une pince qui convient au support oméga
et une vis M10 qui doit passer au centre du
support oméga. Pour une meilleure sécurité,
attachez au moins un cable d’acier à l’appareil et
la structure.
INSTALLATION
Débranchez le cordon d’alimentation avant de remplacer le fusible et utilisez toujours un fusible ayant les
mêmes caractéristiques que l’ancien.
Remplacement du fusible
Sortez le porte-fusible de son logement à l’aide d’un tournevis à lame plate.
Sortez le fusible grillé et remplacez-le par un autre en tous points identiques.
Remettez le porte-fusible dans son logement et rebranchez l’appareil sur le secteur.
Le fusible se trouve à l’intérieur de ce compartiment.
Retirez-le au moyen d’un tournevis à lame plate.
Branchement de plusieurs effets
Vous avez besoin d’un câble de données sériel pour faire fonctionner plusieurs effets au moyen d’une commande
DMX512 ou pour faire fonctionner deux ou plusieurs effets en mode maître/esclave. Le nombre combiné de canaux
requis par l’ensemble des appareils sur un câble de données sériel définit le nombre d’appareils que le câble de
données peut supporter.
Important: Les appareils doivent être branchés en série sur une seule ligne. Pour être conforme à la norme EIA-485 il
ne faut pas brancher plus de 32 appareils sur une ligne. Si plus de 32 appareils sont branchés sur une seule ligne de
données série sans répartiteur DMX à isolation optique, le signal numérique DMX risque d’être détérioré.
La distance maximale recommandée est de 500m. Le nombre maximum d’appareils branchés sur une liaison de
données est de 16.
Câblage
Pour relier des appareils ensemble, vous devez utiliser des câbles de transmission de données. Vous pouvez acheter
des câbles DMX certifiés directement chez un revendeur/distributeur ou construire vos propres câbles. Si vous
souhaitez fabriquer le câble vous-même, utilisez des câbles de données faible capacitance de haute qualité qui sont
moins sujets à des interférences électromagnétiques.
©Copyright LOTRONIC 2017 MY60-SPOT Page 10
Page 11
CONNECTEURS DE CABLE
DMX 14
DMX 08
Mode de
DMX
Automatique
Mode son
Esclave
Programme 1
Programme 2
Programme 3
Programme 4
Programme 5
Programme 6
ENTREE
COMMUN
DMX +
DMX-
Résistance de 120 Ω
appareil
Le câble doit posséder une fiche XLR mâle d’un côté et XLR femelle de l’autre. .
Configuration des connecteurs DMX
1/ 4w entre pin 2
(DMX-) et pin 3
(DMX+) sur le dernier
La résistance de fin de ligne réduit les erreurs de signal. Pour éviter des problèmes de transmission des signaux, il est
toujours conseillé de brancher une résistance de fin de ligne DMX.
ATTENTION
Il ne doit y avoir aucun contact entre le commun et la masse du châssis de l’appareil. La mise à la masse du commun
peut provoquer une boucle de masse et votre appareil fonctionne d’une façon étrange. Testez les câbles à l’aide d’un
ohm-mètre afin de vérifier la polarité et de vous assurer que les broches ne sont pas connectées à la masse ni courtcircuitées sur le blindage ou mutuellement.
CHARTE DE CONVERSION 3-PIN EN 5-PIN
Attention! Si vous utilisez un contrôleur muni d’une fiche de sortie DMX à 5 broches, vous devez utiliser un
adaptateur 5 broches en 3 broches.
La charte ci-dessous montre une conversion correcte:
CHARTE DE CONVERSION 3 PIN EN 5 PIN
Conducteur 3 Pin Femelle (sortie) 5 Pin Mâle (entrée)
Masse/blindage Pin 1 Pin1
Signal données (-) Pin 2 Pin 2
Signal données (+) Pin 3 Pin 3
Ne pas utiliser Ne pas utiliser
Ne pas utiliser Ne pas utiliser
Mise en place d’une ligne de données DMX en série
1. Connectez le côté (mâle) à 3 broches du câble DMX sur la sortie (femelle) à 3 broches de la commande.
2. Connectez l’extrémité du câble provenant du contrôleur qui aura une fiche femelle à 3 broches, sur la fiche
d’entrée de l’appareil suivant qui est un connecteur mâle à 3 broches
3. Ensuite, branchez la sortie comme indiqué ci-dessus sur l’entrée de l’appareil suivant, etc.
Menu sur l'écran
Adresse DMX 001---512
Nombre de Canaux
fonctionnement
Programmes
©Copyright LOTRONIC 2017 MY60-SPOT Page 11
Page 12
Programme 7
Réglages
Non
Oui
Non
Oui
Non
Oui
Sensibilité
0-100
OFF
Hold
Mot de passe
Retour aux réglages d'usine
Tout effacer (3 sec.)
Pan
.=0-120
Tilt
.=0-120
Couleur du spot
.=0-255
Gobo
.=0-255
Focus
.=0-255
Prisme
.=0-255
Oui Non
Reset moteur
(Reset tous les moteurs)
Software
Mode DMX
Address 001
Programme 8
Inversion Pan
Inversion Tilt
Inversion de l'écran
Défaillance DMX
Calibrage
Reset aux réglages d'usine
Info sur le système
Modes de Fonctionnement
Adresse DMX
Cette fonction vous permet de régler l'adresse de 001 à 512 Sélectionnez l’adresse désirée au moyen des touches UP
ou DOWN. Appuyez sur ENTER pour régler l'adresse DMX de votre choix
Canal DMX
La lyre possède 8 et 14 canaux
Mode de fonctionnement
Dans Running Mode, DMX, Automatique, Mode son et Mode esclave affichent. Choisissez le mode de
fonctionnement
Programmes
Choisissez un des 8 programmes intégrés en mode Maître
Réglages
(1) Pan Rev : Inversion du mouvement PAN
(2) Tilt Rev : Inverse le mouvement TILT
(3) Inversion de l'écran : Inversion de l'écran
(4) Sensibilité : En mode son, réglez la sensibilité entre 0 et 100. Plus la valeur est élevée, plus la sensibilité est
élevée
(5) DMX Fail : Si un problème se produit en mode DMX, vous pouvez choisir OFF ou HOLD En position OFF, la lyre
©Copyright LOTRONIC 2017 MY60-SPOT Page 12
Page 13
s'arrête en cas de problème. En position HOLD, elle continue à travailler dans le dernier mode sélectionné
Canal
Valeur DMX
Fonction
1
000-255
Pan
2
000-255
Tilt 3 000-255
Vitesse P/T
4
000-255
Dimmer
0-9
Stroboscope ouvert
10-250
Stroboscope lent rapide
251-255
Stroboscope ouvert
6
000-255
Focus
0-10
Aucune fonction
11-20
Blanc + ouvert
21-40
Couleur + gobo 1 automatique
41-50
Couleur + gobo 2 automatique
51-70
Blanc + gobo 3
71-80
Blanc + prisme + gobo vide
81-100
Couleur + prisme + rotation gobo 1 automatique
101-110
Couleur + prisme + rotation gobo 2 automatique
111-130
Blanc + Prisme + rotation gobo 3
131-150
Couleur + gobo 1 automatique → Couleur + prisme + rotation gobo 1 automatique
151-160
Couleur + gobo 2 automatique → Couleur + prisme + rotation gobo 2 automatique
161-170
Couleur + gobo 3 automatique → Couleur + prisme + rotation gobo 2 automatique
171-180
Couleur + prisme + rotation gobo 3 automatique
181-255
Couleur 3 + prisme + rotation gobo 3
0-229
Aucune fonction
230-240
Reset après 3 secondes
240-255
Aucune fonction
Canal
Valeur DMX
Fonction
1
000-255
Pan 2 000-255
Réglage fin du Pan
3
000-255
Tilt
4
000-255
Réglage Tilt fin
5
000-255
Vitesse P/T
6
000-255
Dimmer
0-9
Stroboscope ouvert
10-250
Stroboscope lent rapide
251-255
Stroboscope ouvert
(6) Calibrage : Permet de calibrer l'appareil.
(7) Reset aux réglages d'usine : Retour aux valeurs d'usine Le réglage par défaut est NO
(8) Reset moteur : Si cette fonction est activée, tous les moteurs retournent à leur position d'origine.
Info Système
Vérifiez la version du logiciel, le mode de fonctionnement et l'adresse DMX.
Canaux DMX
Mode 8 Canaux
5
7
8
Mode 14 Canaux
7
©Copyright LOTRONIC 2017 MY60-SPOT Page 13
Page 14
8
0-13
Blanc (ouvert)
14-31
Couleur 1
32-49
Couleur 2
50-67
Couleur 3
68-85
Couleur 4
86-103
Couleur 5
104-121
Couleur 6
122-130
Couleur 7
131-139
Blanc
140-196
Changement couleur vers la gauche rapide → lent
197-255
Changement couleur vers la droite lent → rapide
0-8
Ouvert
9-33
Gobo1
34-58
Gobo2
59-83
Gobo3
84-108
Gobo4
109-133
Gobo5
134-194
Changement gobo vers la gauche rapide → lent
195-255
Changement gobo vers la droite lent → rapide
0-9
Stop
10-129
Rotation gobo vers l’avant rapide → lent
130-134
Stop
135-255
Rotation gobo vers l’arrière lent → rapide
11
000-255
Focus
000-128
Pas de fonction
129-255
Prisme
0-10
Aucune fonction
11-20
Blanc + ouvert
21-40
Couleur + gobo 1 automatique
41-50
Couleur + gobo 2 automatique
51-70
Blanc + gobo 3
71-80
Blanc + prisme + gobo vide
81-100
Couleur + prisme + rotation gobo 1 automatique
101-110
Couleur + prisme + rotation gobo 2 automatique
111-130
Blanc + Prisme + rotation gobo 3
131-150
Couleur + gobo 1 automatique → Couleur + prisme + rotation gobo 1 automatique
151-160
Couleur + gobo 2 automatique → Couleur + prisme + rotation gobo 2 automatique
161-170
Couleur + gobo 3 automatique → Couleur + prisme + rotation gobo 2 automatique
171-180
Couleur + prisme + rotation gobo 3 automatique
181-255
Couleur 3 + prisme + rotation gobo 3
0-229
Aucune fonction
230-240
Reset après 3 secondes
240-255
Aucune fonction
9
10
12
13
14
Entretien
En raison des résidus de fumée et de poussière, il convient de nettoyer régulièrement les lentilles internes et
externes pour optimiser la puissance lumineuse.
©Copyright LOTRONIC 2017 MY60-SPOT Page 14
Page 15

1. Essuyez le boîtier extérieur avec un nettoyant de vitre classique et un chiffon doux.
D
2. Nettoyez les optiques externs avec du nettoyant à vitres et un chiffon doux toutes les 3 semaines.
3. Séchez soigneusement toutes les pieces avant de rebrancher l’appareil.
1. VORBEREITUNGEN
Verpackungsinhalt:
• 60W LED Spot Moving Head
• 1 Netzkabel
• Bedienungsanleitung
• Omega Halter
Auspacken
Sofort nach Empfang vorsichtig den Karton auspacken und den Inhalt überprüfen. Alle Teile müssen vollzählig und in
einwandfreiem Zustand sein. Sofort die Transportfirma benachrichtigen und das Verpackungsmaterial aufbewahren,
wenn Teile Transportschäden aufweisen. Verpackungsmaterial auch für späteren Transport des Geräts aufbewahren.
Sicherheitshinweise
Diese Anleitung sorgfältig vor der ersten Inbetriebnahme lesen. Sie enthält wichtige Informationen über Installation,
Gebrauch und Instandhaltung des Geräts.
• Die Anleitung für spätere Bezugnahme aufbewahren und an den nächsten Bediener weitergeben.
• Stets die Netzspannung vor Anschluss des Geräts überprüfen Sie muss mit der auf der Rückseite des Geräts
angegebenen Spannung übereinstimmen und darf auf keinen Fall höher sein.
• Dieses Gerät ist nur für Innengebrauch!
• Das Gerät gehört zur Schutzklasse I. Daher muss es unbedingt an eine geerdete Steckdose angeschlossen werden.
• Um Brand und Stromschlag zu vermeiden, das Gerät vor Regen und Feuchtigkeit schützen. Keine brennbaren
Materialien während des Betriebs in der Nähe des Geräts lassen.
• Das Gerät muss an einem gut belüfteten Ort und in mindestens 50cm Entfernung zur nächsten Fläche angebracht
werden. Darauf achten, dass die Belüftungsschlitze nicht blockiert oder verstopft sind.
• Immer erst das Gerät vom Netz trennen, bevor es gewartet oder die Sicherung ersetzt wird. Die Sicherung nur
durch eine identische ersetzen.
• Das Gerät mit einer Sicherheitskette befestigen. Das Gerät niemals nur am Kopf tragen, sondern auch am Sockel.
• Die Raumtemperatur darf 40°C nicht überschreiten. Das Gerät niemals bei höheren Temperaturen betreiben.
• Bei Betriebsstörungen das Gerät sofort ausschalten. Das Gerät niemals selbst reparieren. Reparaturen dürfen nur
von einem Fachmann vorgenommen werden. Alle verwendeten Ersatzteile müssen mit den Originalteilen identisch
sein.
• Das Gerät nicht an ein Dimmerpack anschließen.
• Das Netzkabel niemals quetschen oder beschädigen.
• Beim Abziehen des Netzsteckers nur am Stecker ziehen, niemals am Kabel.
• Niemals direkt in die Lichtquelle blicken.
• Netztrennungsvorrichtungen
a) Wenn das Gerät über den Netzstecker ausgeschaltet wird, muss die Steckdose jederzeit leicht zugänglich
bleiben
b) Wenn das Gerät über einen Schalter ausgeschaltet wird, muss dieser klar gekennzeichnet und leicht zugänglich
sein.
©Copyright LOTRONIC 2017 MY60-SPOT Page 15
Page 16
Features
• 8 oder 14 DMX Kanäle
• 8 eingebaute Programme
• DMX, Sound, Master-Slave oder Automatikbetrieb
• Motorisierter Focus
• Farbscheibe mit 7 Farben + Weiß, Rainbow Effekt
• Drehende Goboscheibe mit 5 Gobos + Open
• Gobo Shake
• 3-seitiges Prisma
• Abstrahlwinkel 13°
• Linearer Dimmer 0-100%
• Pan & Tilt mit Geschwindigkeitsregelung
• Oled Display
• Powercon Verbinder
Technische Daten
Versorgung .......................................................................................... AC100-240V 50/60Hz
Verbrauch ....................................................................................................................... 90W
Leuchtmittel .............................................................................................. 1 weiße LED 60W
Pan/Tilt ................................................................ 540°/210° mit Geschwindigkeitsregelung
Stroboskop ................................................................................................................. 0-23Hz
Abmessungen ......................................................................................... 245 x 145 x 345mm
Gewicht ....................................................................................................................... 4.35kg
Montage
AUSRICHTUNG
Das Gerät kann in jeder beliebigen Lage
angebracht werden, solange für aureichende
Belüftung gesorgt ist.
RIGGING
Das Moving Head besitzt eine einzigartige
Befestigungsvorrichtung, die aus dem Boden, dem
mitgelieferten Omega Halter und einer
Befestigungsöse für ein Sicherheitskabel besteht.
Wenn das Gerät an einemTraversensystem
angebracht wird, muss eine geeignete Klammer
mit dem Omegahalter benutzt und eine M10
Schraube durch das Loch in der Mitte des
Omegahalters geschraubt werden. Darüberhinaus
ist es ratsam, ein Stahlkabel am Boden des Moving
Heads zu befestigen und das andere Ende um die
Traversen zu winden.
AUFBAU
Vor Auswechseln der Sicherung Gerät vom Netz trennen. Nur eine identische Sicherung benutzen.
Hintereinanderschalten mehrerer Geräte
Wenn mehrere Geräte über einen DMX Controller gesteuert werden oder zwei und mehr Geräte im Master/Slave
©Copyright LOTRONIC 2017 MY60-SPOT Page 16
Page 17
Betrieb arbeiten sollen, wird ein serielles Datenkabel benötigt. Die kombinierte Anzahl von Kanälen, die von allen
DMX 14CH
DMX 08CH
Arbeitsweise
DMX
EINGANG
NEUTRAL
DMX +
DMX-
120 Ohm 1/4W
Gerät
Geräten in einer seriellen Datenverbindung benötigt werden, bestimmt die Anzahl von Geräten, die die
Datenverbindung unterstützen kann.
Die empfohlene Höchstlänge einer seriellen Datenverbindung beträgt 500m. Die empfohlene Höchstmenge an
Geräten in einer seriellen Datenverbindung beträgt 16.
Verkabelung
Für den Anschluss der Geräte muss spezielles Datenkabel verwendet werden. Sie können solche DMX Kabel direkt im
Fachhandel erwerben oder selbst ein Kabel fertigen. Wenn Sie Ihr Kabel selbst herstellen möchten, benutzen Sie
bitte Datenkabel, dass eine hochwertige Signalübertragung gewährleistet und weniger anfällig für
elektromagnetische Störfelder ist.
KABELVERBINDER
Die Kabel müssen einen XLR Stecker auf der einen und eine XLR Buchse auf der anderen Seite besitzen.
DMX Steckerbelegung
Widerstand zwischen
Pin2 (DMX-) und Pin 3
(DMX+) am letzten
Der Endwiderstand verringert Signalfehler. Um Signalübertragungsprobleme und Störungen zu vermeiden, ist es
ratsam, einen DMX Signalwiderstand zwischenzuschalten.
3-PIN AUF 5-PIN UMSETZTABELLE
Hinweis! Wenn Sie ein Steuerpult mit 5-pol. DMX Ausgangsverbinder benutzen, müssen Sie einen 5- auf 3-pol.
Adapter benutzen.
In der nachstehenden Tabelle steht die richtige Kabelumsetzung:
Leiter 3 Pin Buchse (Ausgang) 5 Pin Stecker (Eingang)
Masse/Abschirmung Pin 1 Pin1
Datensignal (-) Pin 2 Pin 2
Datensignal (+) Pin 3 Pin 3
Nicht benutzen Nicht benutzen
Nicht benutzen Nicht benutzen
Einrichten einer seriellen DMX Datenverbindung
1. Den 3-pol. Stecker des DMX Kabels in die 3-pol. Eingangsbuchse des Controllers stecken.
2. Das vom Controller kommende Kabel mit der 3-pol. Buchse an den 3-pol. Eingangsstecker des folgenden Geräts
stecken.
3. Dann den Ausgang des Geräts an den Eingang des folgenden Geräts anschließen usw.
Display Menü
DMX Adresse 001---512
Kanalwahl
©Copyright LOTRONIC 2017 MY60-SPOT Page 17
Page 18
Automatikprogramm
Klangaktiviert
Slave
Programme
Programm 1
Programm 2
Programm 5
Programm 6
Nein
Ja
Nein
Ja
Nein
Ja
0-100
OFF
Hold
Tilt
.=0-120
Focus
.=0-255
Ja Nein
(Alle Motoren resetten)
Software
DMX Betrieb
Adresse 001
Einstellungen
Programm 3
Programm 4
Programm 7
Programm 8
Pan Umkehrung
Tilt Umkehrung
Display Umkehrung
Empfindlichkeit
DMX Ausfall
Passwort
Zurück zu den Werkeinstellungen ALLES löschen (3 Sek.)
Pan .=0-120
Eichungsdaten
Spot Color .=0-255
Gobo .=0-255
Prism .=0-255
Reset
Motor Reset
Anlagen Info
Betriebsart
DMX Adresse
Zur Einstellung der DMX Adresse zwischen 001 und 512 Mit den UP & DOWN Tasten die gewünschte Adresse finden.
Mit ENTER die gewünschte DMX Adresse bestätigen.
©Copyright LOTRONIC 2017 MY60-SPOT Page 18
Page 19
DMX Kanal
Kanal
DMX Wert
Funktion
1
000-255
Pan
2
000-255
Tilt 3 000-255
P/T Geschwindigkeit
4
000-255
Dimmer
0-9
Stroboskop offen
10-250
Stroboskop von langsam auf schnell
251-255
Stroboskop offen
6
000-255
Focus
0-10
Unbelegt
11-20
Weiss + Offen
21-40
Automatik Farbe + Gobo 1
41-50
Automatik Farbe + Gobo 2
51-70
Weiss + Gobo 3
71-80
Weiss + Prisma + Leergobo
81-100
Automatik Farbe + Prisma + Gobo 1 Drehung
101-110
Automatik Farbe + Prisma + Gobo 2 Drehung
111-130
Weiss + Prisma + Gobo 3 Drehung
131-150
Automatik Farbe + Gobo 1 → Automatik Farbe + Prisma + Gobo 1 Drehung
151-160
Automatik Farbe + Gobo 2 → Automatik Farbe + Prisma + Gobo 2 Drehung
161-170
Automatik Farbe + Gobo3 →Farbwechsel+ Prisma + Gobo 3 Drehung
171-180
Automatik Farbe + Prisma + Gobo 3 Drehung
181-255
Farbe 3 + Prisma + Gobo 3 Drehung
8
0-229
Unbelegt
Das Moving Head besitzt 8 oder 14 Kanäle
Arbeitsweise
Im Running Mode erscheinen DMX, Auto, Sound und Slave. Wählen sie die Betriebsart.
Programme
Wählen Sie eins der 8 eingebauten Programme im Master-Betrieb.
Einstellungen
(1) Pan Umkehrung: Umkehrung der Pan-Bewegung.
(2) Tilt Umkehrung: Umkehrung der Tilt -Bewegung.
(3) Display Umkehrung: Umkehrung des Displays.
(4) Empfindlichkeit: Im klangaktivierten Betrieb, Einstellung der Empfindlichkeit von 0 bis 100. Je höher der Wert,
umso größer die Empfindlichkeit
(5) DMX Fail: Wenn im DMX Betrieb ein Problem auftritt, kann der Benutzer OFF oder HOLD wählen. Wenn OFF
gewählt wurde, schaltet sich das Gerät im Problemfall ab. Wenn HOLD gewählt wurde, arbeitet das Gerät in der
letzten Einstellung weiter.
(6) Eichungsdaten: Zum Eichen des Geräts.
(7) Reset: Zurück zur Werkeinstellung. Default Einstellung ist NEIN
(8) Motor Reset: Alle Motoren gehen in ihre Ausgangsposition zurück.
System Info
Software Version, Betriebsart und DMX Adresse.
DMX KANÄLE
8 Kanäle
5
7
©Copyright LOTRONIC 2017 MY60-SPOT Page 19
Page 20
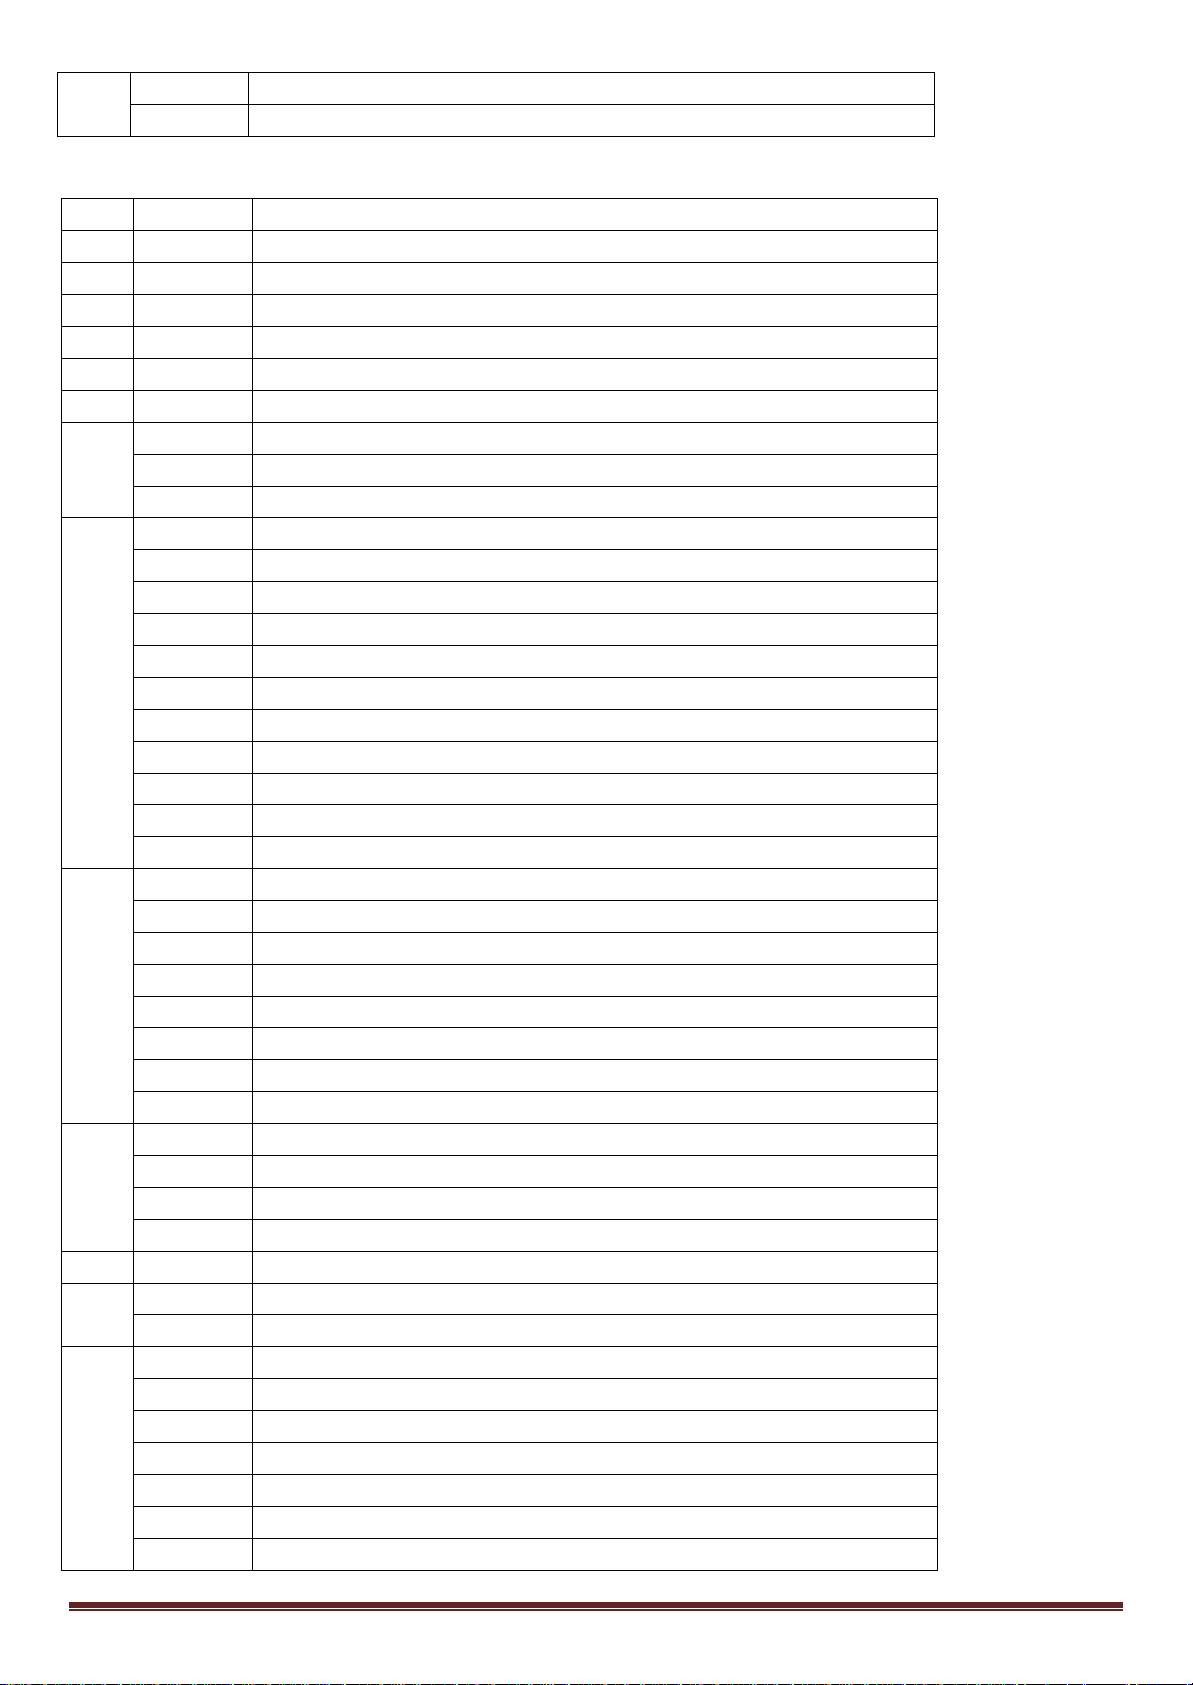
230-240
Reset nach 3 Sekunden
240-255
Unbelegt
Kanal
DMX Wert
Funktion
1
000-255
Pan 2 000-255
Pan Feineinstellung
3
000-255
Tilt
4
000-255
Tilt Feineinstellung
5
000-255
P/T Geschwindigkeit
6
000-255
Dimmer
0-9
Stroboskop offen
10-250
Stroboskop von langsam auf schnell
251-255
Stroboskop offen
0-13
Weiss (Offen)
14-31
Farbe 1
32-49
Farbe 2
50-67
Farbe 3
68-85
Farbe 4
86-103
Farbe5
104-121
Farbe6
122-130
Farbe7
131-139
Weiss
140-196
Farbwechsel links von schnell auf langsam
197-255
Farbwechsel rechts von langsam auf schnell
0-8
Open
9-33
Gobo1
34-58
Gobo2
59-83
Gobo3
84-108
Gobo4
109-133
Gobo5
134-194
Gobowechsel links von schnell auf langsam
195-255
Gobowechsel rechts von langsam auf schnell
0-9
Stopp
10-129
Gobodrehung vorwärts von schnell auf langsam
130-134
Stopp
135-255
Gobodrehung rückwärts von langsam auf schnell
11
000-255
Focus
000-128
Unbelegt
129-255
Prisma
0-10
Unbelegt
11-20
Weiss + Offen
21-40
Automatik Farbe + Gobo 1
41-50
Automatik Farbe + Gobo 2
51-70
Weiss + Gobo 3
71-80
Weiss + Prisma + Leergobo
81-100
Automatik Farbe + Prisma + Gobo 1 Drehung
14 Kanäle
7
8
9
10
12
13
©Copyright LOTRONIC 2017 MY60-SPOT Page 20
Page 21
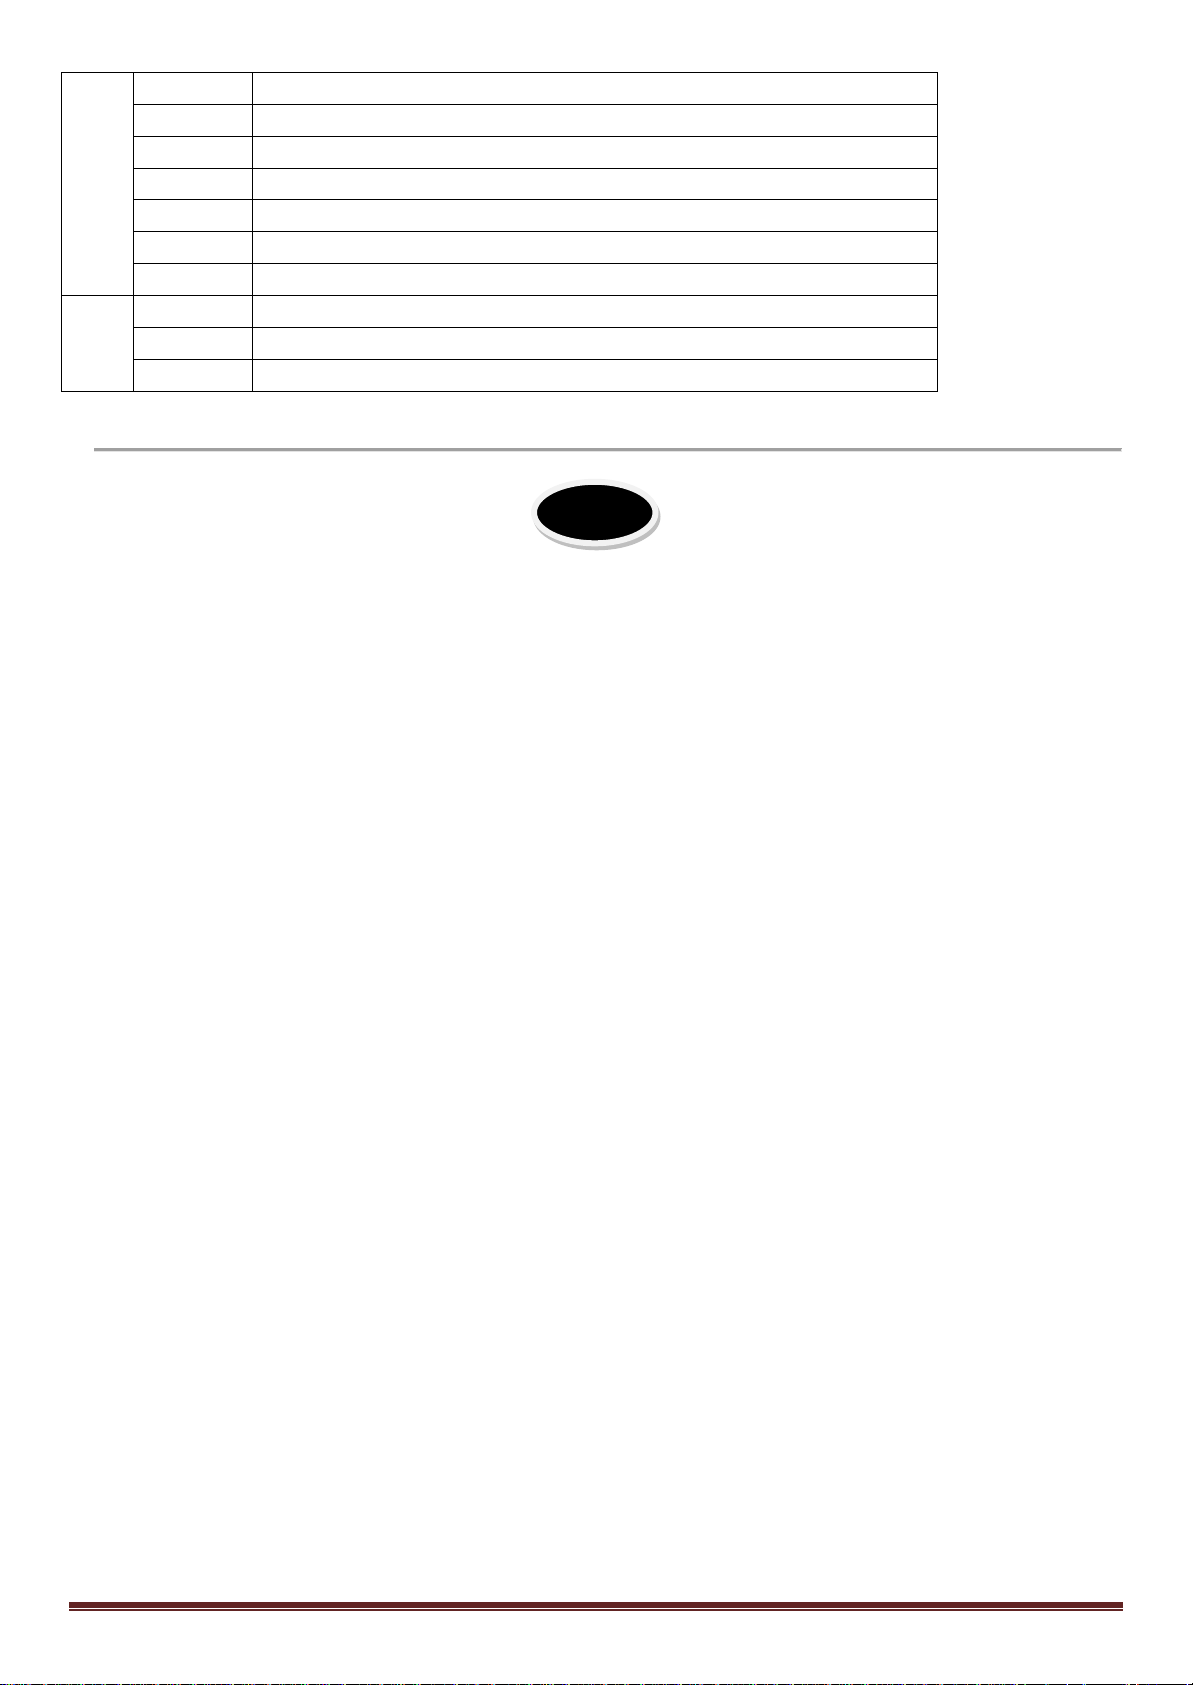
101-110
Automatik Farbe + Prisma + Gobo 2 Drehung
111-130
Weiss + Prisma + Gobo 3 Drehung
131-150
Automatik Farbe + Gobo 1 → Automatik Farbe + Prisma + Gobo 1 Drehung
151-160
Automatik Farbe + Gobo 2 → Automatik Farbe + Prisma + Gobo 2 Drehung
161-170
Automatik Farbe + Gobo3 →Farbwechsel+ Prisma + Gobo 3 Drehung
171-180
Automatik Farbe + Prisma + Gobo 3 Drehung
181-255
Farbe 3 + Prisma + Gobo 3 Drehung
14
0-229
Unbelegt
230-240
Reset nach 3 Sekunden
240-255
Unbelegt
NL
1. ALVORENS U BEGINT
Verpakkingsinhoud:
• 1 x 60W led spot moving head
• 1x Netsnoer
• 1x Handleiding
• Ophanger
Uitpakken
Onmiddellijk naar de aankoop van het toestel, verwijder voorzichtig de verpakking en wees zeker dat het toestel in
geode toestand is. Breng direct uw dealer op de hoogte en bewaar het verpakkingsmateriaal indien onderdelen of
het karton door het transport beschadigd zijn. Bewaar het karton en alle verpakkingsmaterialen. Indien het toestel
moet gerepareerd worden is het belangrijk het toestel in zijn originele verpakking te versturen.
Veiligheidsinstructies
Lees de handleiding aandachtig door. Ze bevat belangrijke informaties voor de installatie, gebruik en onderhoud van
dit toestel.
• Bewaar deze handleiding.
• Wees zeker dat u het toestel op de juiste spanning aansluit en dat de lichtnetspanning niet hoger dan de op de
zijde van het toestel aangegeven spanning is.
• Alleen voor gebruik binnenshuis!
• Dit apparaat behoort tot beschermingsklasse I. Het moet dus verplicht worden geaard. Een bevoegde persoon
moet de elektrische aansluiting uitvoeren.
• Om vuur en elektrische schokken te verhinderen bescherm het toestel tegen regen en vochtigheid. Wees zeker dat
geen ontvlambare materialen in de buurt van het toestel zijn tijdens de werking.
• Plaats het toestel in een ruimte met voldoende ventilatie en in tenminste 50cm afstand van oppervlakken. Wees
zeker dat de ventilatie openingen niet geblokkeerd zijn.
• Verwijder het stopcontact alvorens u het toestel onderhoud of de zekering vervangt. Gebruik alleen een zekering
met dezelfde specificaties.
• Gebruik het toestel niet in ruimtes met een temperatuur van meer dan 40°C.
• In geval van een ernstig probleem stop het toestel direct. Verzoek nooit het toestel zelfs te repareren. Alle
reparaties moeten van een ervarene technicus doorgevoerd worden. Gebruik alleen onderdelen met dezelfde
specificaties.
©Copyright LOTRONIC 2017 MY60-SPOT Page 21
Page 22
• Sluit het toestel niet op een dimmer pack aan.
• Nooit het netsnoer beschadigen of platdrukken.
• Nooit aan de kabel trekken.
• Nooit in de lichtbron kijken.
• Ontkoppeling van het net
a) Indien het toestel via het stopcontact wordt uitgeschakeld, moet de contactdoos altijd gemakkelijk bereikbaar
zijn
b) Indien het toestel via een schakelaar wordt uitgeschakeld, moet deze duidelijk gemarkeerd en gemakkelijk
bereikbaar zijn.
Features
• 8 of 14 DMX kanalen
• 8 ingebouwde programma‘s
• DMX, geluid, master-slave of automatische werking
• Gemotoriseerde focus
• Kleurenschijf met 7 kleuren + wit, rainbow effect
• Draaiende gobo schijf met 5 gobo’s + open
• Gobo shake
• 3-zijdig prisma
• Afstraalhoek 13°
• Lineaire dimmer 0-100%
• Pan & Tilt met snelheidsregeling
• Oled display
• Powercon connectoren
Specificaties
Voeding ............................................................................................... AC100-240V 50/60Hz
Opgenomen vermogen .................................................................................................. 90W
Lichtbron ...................................................................................................... 1 witte led 60W
Pan/Tilt ............................................................................. 540°/210° met snelheidsregeling
Stroboscoop ............................................................................................................... 0-23Hz
Afmetingen ............................................................................................ 245 x 145 x 345mm
Gewicht ....................................................................................................................... 4.35kg
Installatie
De unit kan in iedere positie geïnstalleert worden
mits voor voldoende koeling gezorgt is.
Het is belangrijjk nooit de ventilator of de
koelingsopeningen te verstoppen. Bij de keuze van
d’installatie plaats denk eraan dat de plaats
gemakkelijk bereikbaar is voor onderhouds en
reinigingsdoeleinden.
Gebruik altijd veiligheidskabels.
Bescherm het toestel tegen regern, vochtigheid en
extreme temperatuurveranderingen. Kies een
plaats met voldoende ventilatie.
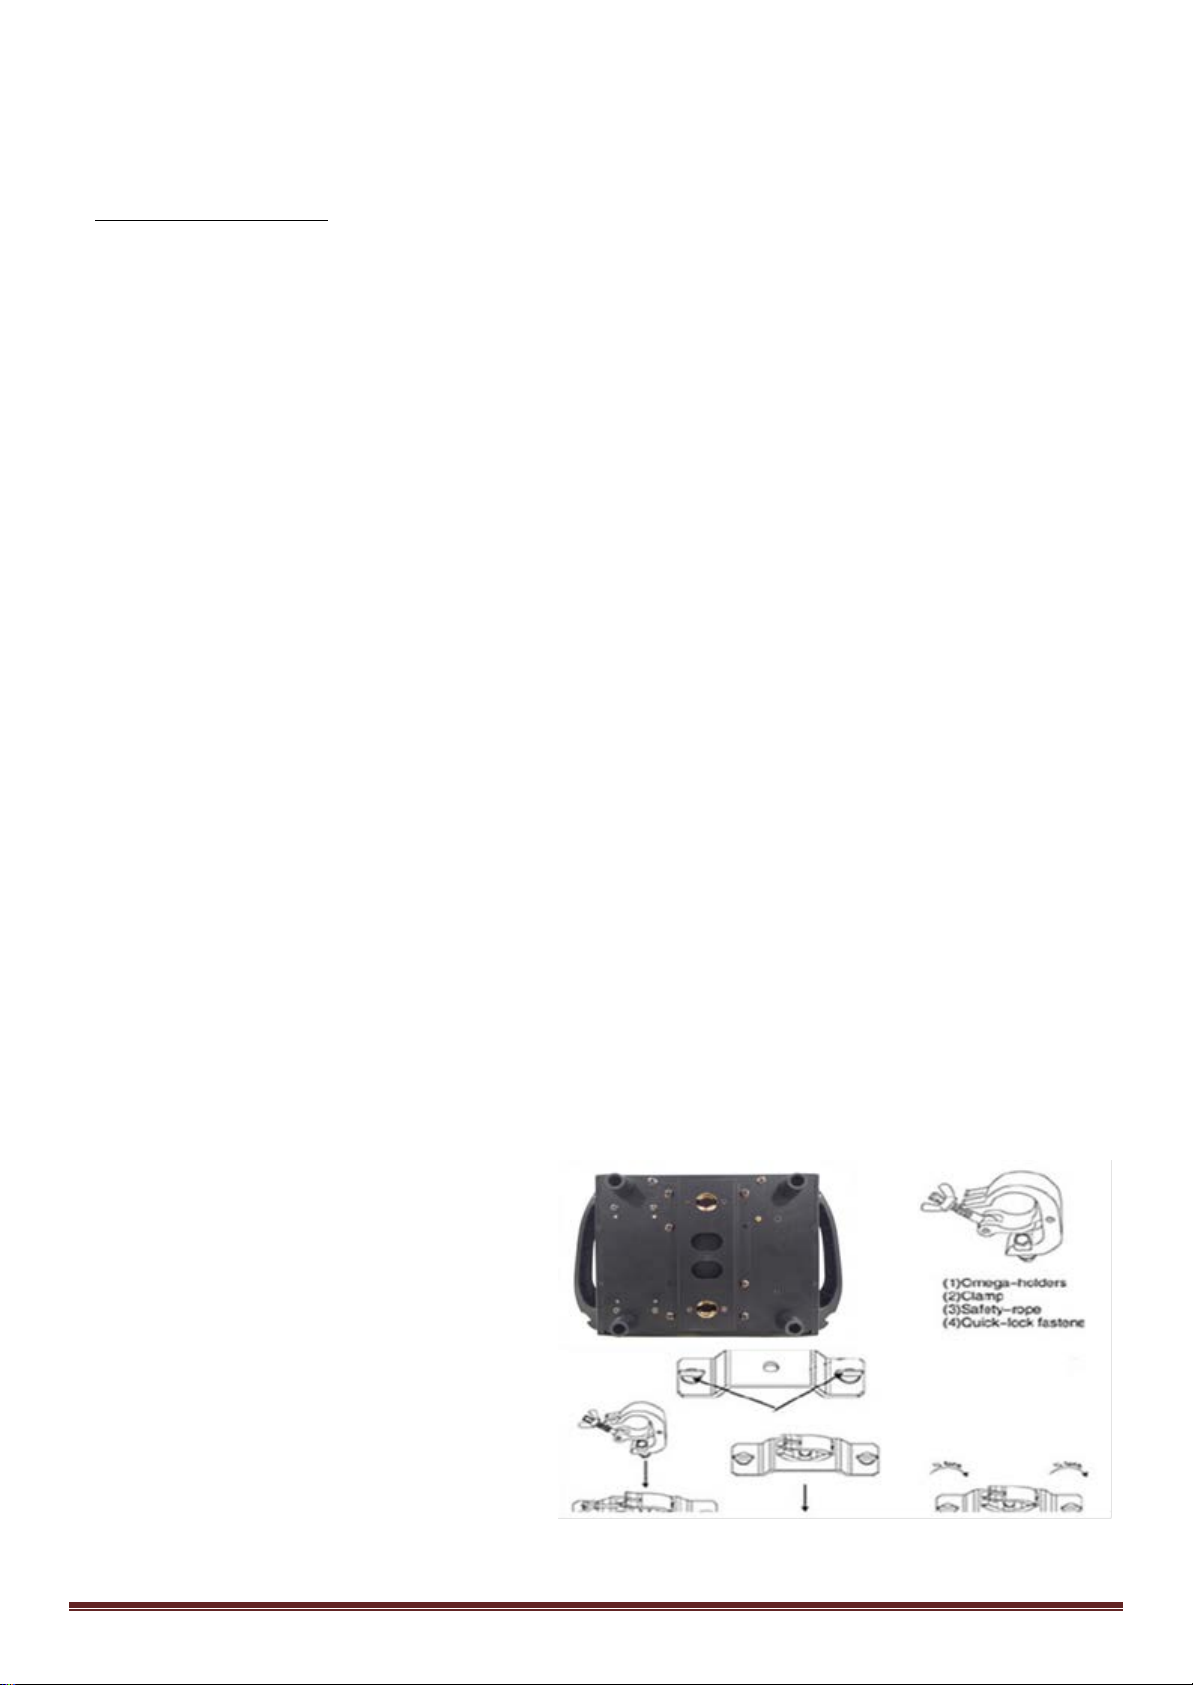
Bevestig de klem (2) op de omega houder (1).
Bevestig deze op de achterzijde van het toestel via de quick-lock schroeven (4).
Bevestig het toestel bovendien met een veiligheidskabel (3). Steek een karabijnhaak in het gat op de onderzijde van
©Copyright LOTRONIC 2017 MY60-SPOT Page 22
Page 23
het toestel. Bevestig de veiligheidskabel op een truss systeem of een ander oppervlak dat 10 keer het gewicht van
DMX 14CH
DMX 08CH
DMX
Auto
Sound
Slave
Programma 1
Programma 2
Programma 3
Programma 4
Programma 5
Programma 6
Programma 7
120 ohm weerstand
het toestel kan dragen. Schuif de veiligheidskabel door de karabijnhaak zoals in de afbeelding vertoont. Haal de
veiligheidskabel aan.
Het toestel moet van een vakman op een plaats monteert worden waar het buiten het bereik van mensen is en
niemand onder kan staan.
Aansluiten van meerdere toestellen
Indien U meerdere toestellen via een DMX controller of gesynchroniseerde lichtshows in een master/slave modus
wilt sturen hebt U een seriële date kabel nodig. Het gecombineerde aantal van kanalen die alle toestellen in een
seriële verbinding nodig hebben bepaalt de hoeveelheid van toestellen die de data verbinding kan ondersteunen.
Belangrijk: Alle toestellen in een seriële data verbinding moeten in één enkele lijn verbonden zijn. Max. lengte van
een seriële data link: 500 meters (1640 ft.) Maximaal aanbevolen aantal van toestellen in een seriële data link: 32.
Data aansluiting
Gebruik data kabels om toestellen met elkaar te verbinden. Indien U uw eigen kabel bouwen wilt gebruik
hoogwaardige kabels die het signaal goed overdragen en niet gevoelig zijn voor elektromagnetische interferenties.
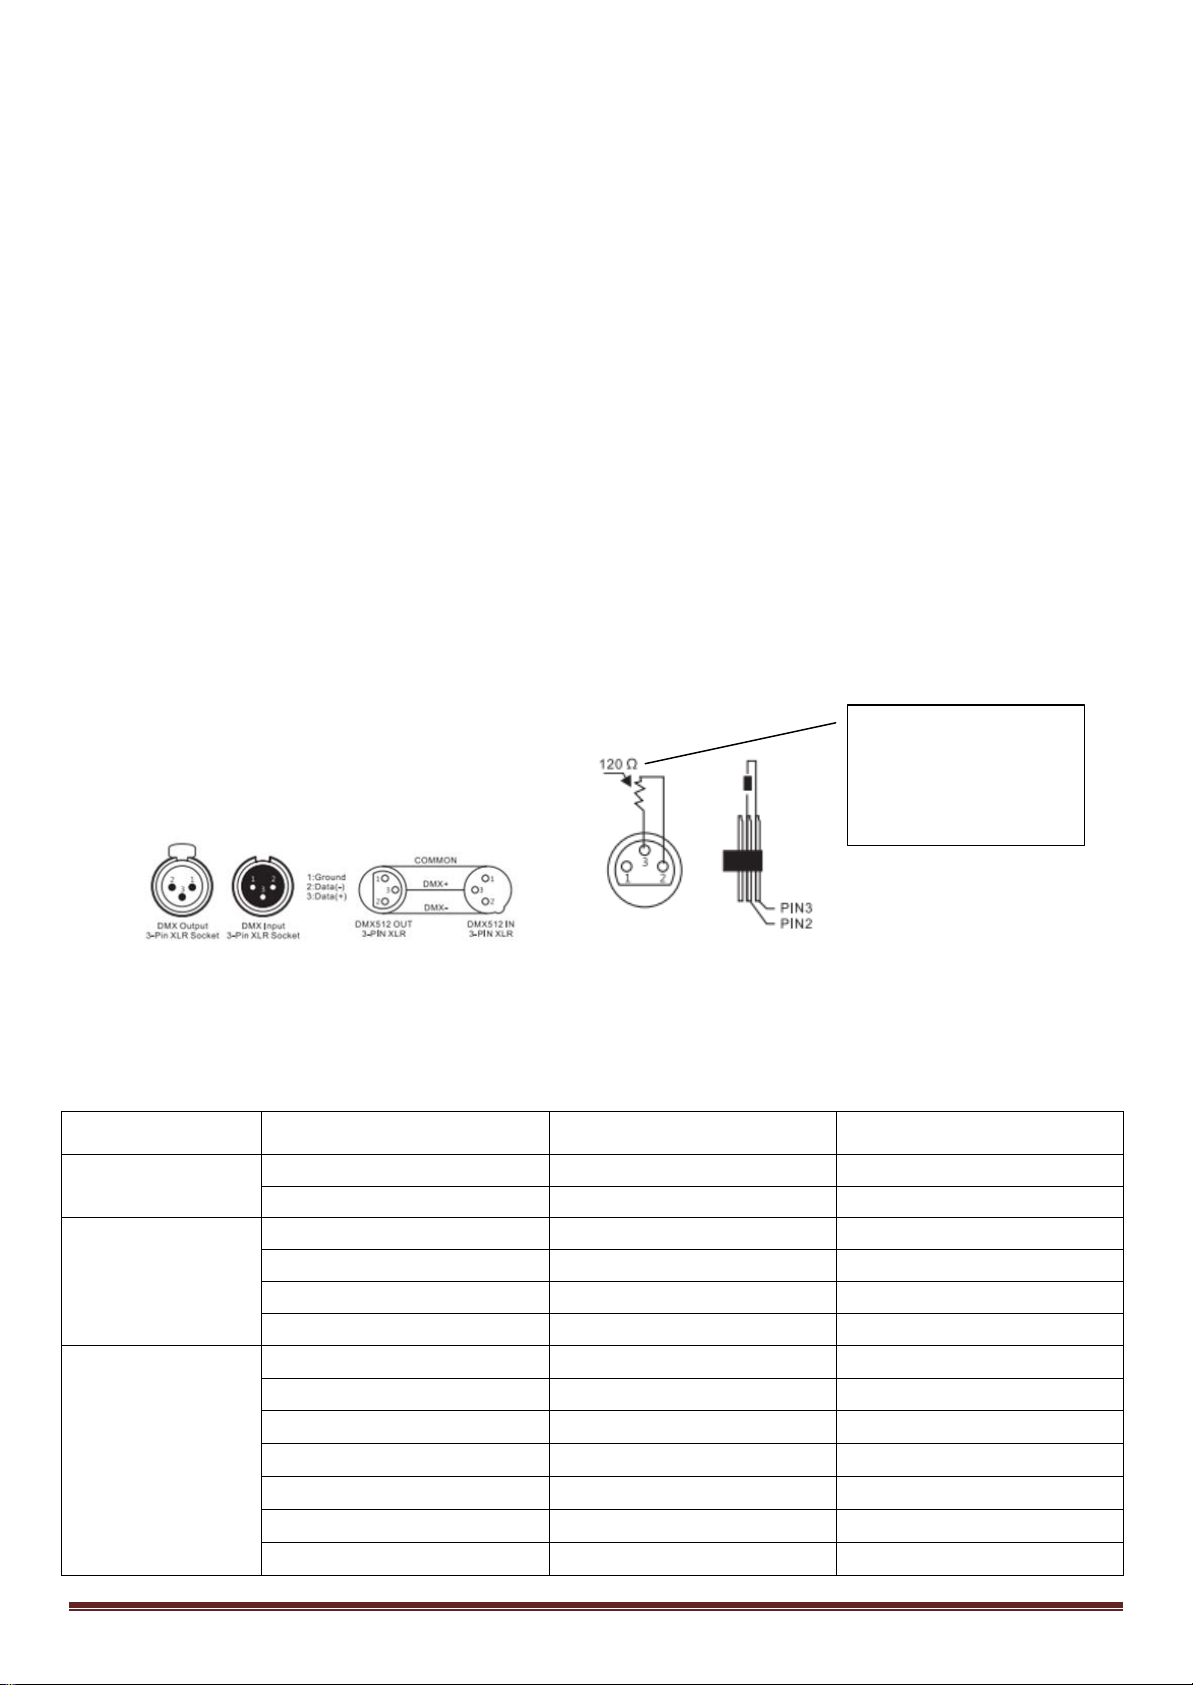
KABELCONNECTOREN
De kabel moet een XLR stekker op één eind en een XLR contra op het andere eind hebben.
DMX connector configuratie
tussen pin 2 (DMX-) en
pin 3 (DMX+) van de
laatste unit.
De eindweerstand vermindert signaalfouten. Om transmissie problemen en storingen te voorkomen is het
aanbevolen een DMX signaal eindweerstand aan te sluiten.
Display Menu
DMX adres 001---512
Kanalen
Modus
Programma's
©Copyright LOTRONIC 2017 MY60-SPOT Page 23
Page 24
Programma 8
Nee
Ja
Nee
Ja
Nee
Ja
Gevoeligheid
0-100
UIT Hold
wachtwoord
Terug naar de
Pan
.=0-120
Tilt
.=0-120
Spot kleur
.=0-255
Gobo
.=0-255
Focus
.=0-255
Prisma
.=0-255
Ja Nee
Reset motor
(Reset alle Motoren)
Software
Mode DMX
DMX 001
Pan Rev
Tilt Rev
Display Rev
DMX fout
Instellingen
fabriekinstellingen
ALLE wissen (3 sec.)
Calibrering
Reset
Systeem Info
Functie Mode
DMX adres
Instelling van de DMX adres van 001 tot 512 Druk de UP of DOWN toets om de gewenste DMX adres te vinden. Druk
op ENTER om de gewenste DMX adres te bevestigen.
DMX Kanaal : De LED moving head heeft 8 en 14 kanalen
Modus: In Running Mode, DMX, Auto, Sound en Slave mode worden getoond. Kies de werkmodus
Programma's: Kies één van 8 ingebouwde programma's in master modus.
Instellingen
(1) Pan Rev: Omkering van de Pan-beweging.
(2) Tilt Rev: Omkering van de Tilt -beweging.
(3) Display Rev: Omkering van de display
(4) Gevoeligheid: In muziek bestuurde modus stel de gevoeligheid van 0 tot 100 in. Je hoger de waarde, je hoger de
gevoeligheid
(5) DMX Fail: Als een probleem in DMX modus optreedt, kunt U OFF of HOLD kiezen. In OFF positie schakelt het
toestel uit. In HOLD positie werkt het toestel in de laatste instelling.
(6) Calibrering: Calibrering van het toestel
(7) Factory Reset: Terug naar de fabriekwarden. De default instelling is NO.
(8) Reset Motor: Als deze functie wordt gekozen, resetten alle motoren naar hun originele positie.
©Copyright LOTRONIC 2017 MY60-SPOT Page 24
Page 25
Kanaal
DMX Waarde
Functie
1
000-255
Pan 2 000-255
Tilt
3
000-255
P/T snelheid
4
000-255
Dimmer
0-9
Stroboscoop open
10-250
Stroboscoop van traag naar snel
251-255
Stroboscoop open
6
000-255
Focus
0-10
Geen functie
11-20
Wit + Open
21-40
Auto kleur + gobo 1
41-50
Auto kleur + gobo 2
51-70
Wit + Gobo 3
71-80
Wit + prisma + blank gobo
81-100
Auto kleur + Prisma + gobo 1 rotatie
101-110
Auto kleur + Prisma + gobo 2 rotatie
111-130
Wit + Prism + gobo 3 rotatie
131-150
Auto kleur + Gobo1 →Auto kleur + Prisma + gobo 1 rotatie
151-160
Auto kleur + Gobo2 →Auto kleur + Prisma + gobo 2 rotatie
161-170
Auto kleur + Gobo3 → kleur wissel + Prisma + gobo 3 rotatie
171-180
Auto kleur + Prisma + gobo 3 rotatie
181-255
kleur 3 + Prisma + gobo 3 rotatie
11-20
Wit + Open
21-40
Auto kleur + gobo 1
41-50
Auto kleur + gobo 2
0-229
Geen functie
230-240
Reset naar 3 seconden
240-255
Geen functie
Kanaal
DMX Waarde
Functie
1
000-255
Pan 2 000-255
Pan fijninstelling
3
000-255
Tilt
4
000-255
Tilt fijninstelling
5
000-255
P/T snelheid
6
000-255
Dimmer
0-9
Stroboscoop open
10-250
Stroboscoop van traag naar snel
251-255
Stroboscoop open
8
0-13
wit (Open)
System Info: Zie de software versie , de modus en de DMX adres.
DMX KANALEN
8 kanalen
5
7
8
14 kanalen
7
©Copyright LOTRONIC 2017 MY60-SPOT Page 25
Page 26
14-31
Kleur 1
32-49
Kleur 2
50-67
Kleur 3
68-85
Kleur 4
86-103
Kleur 5
104-121
Kleur 6
122-130
Kleur 7
131-139
Wit
140-196
Kleurwissel tegen de klok van snel naar traag
197-255
Kleurwissel met de klok mee van traag naar snel
9
0-8
Open
9-33
Gobo1
34-58
Gobo2
59-83
Gobo3
84-108
Gobo4
109-133
Gobo5
134-194
Gobo wissel tegen de klok van snel naar traag
195-255
Gobo wissel met de klok mee van traag naar snel
0-9
Stop
10-129
Vooruit gobo rotatie van snel naar traag
130-134
Stop
135-255
Achteruit gobo rotatie van traag naar snel
11
000-255
Focus
000-128
Geen functie
129-255
Prisma
0-10
Geen functie
11-20
Wit + Open
21-40
Auto kleur + gobo 1
41-50
Auto kleur + gobo 2
51-70
Wit + Gobo 3
71-80
Wit + prisma + blank gobo
81-100
Auto kleur + Prisma + gobo 1 rotatie
101-110
Auto kleur + Prisma + gobo 2 rotatie
111-130
Wit + Prism + gobo 3 rotatie
131-150
Auto kleur + Gobo1 →Auto kleur + Prisma + gobo 1 rotatie
151-160
Auto kleur + Gobo2 →Auto kleur + Prisma + gobo 2 rotatie
161-170
Auto kleur + Gobo3 → kleur wissel + Prisma + gobo 3 rotatie
171-180
Auto kleur + Prisma + gobo 3 rotatie
181-255
kleur 3 + Prisma + gobo 3 rotatie
0-229
Geen functie
230-240
Reset naar 3 seconden
240-255
Geen functie
10
12
13
14
©Copyright LOTRONIC 2017 MY60-SPOT Page 26
Page 27

ES
PREPARATVOS
Contenido del embalaje:
• 1 Cabeza móvil Spot de 1 LED blanco de 60W
• 1 Cable de corriente
• 1 Manual de instrucciones
• 1 Soporte omega
Desembalaje
Una vez reciba el equipo, abra el embalaje y verifique que el contenido está completo y en perfecto estado. Si no es
así, avise inmediatamente al transportista y conserve el embalaje si muestra signos de maltrato. Conserve el
embalaje y todos los materiales de embalaje para poder transportar el equipo con toda seguridad.
Instrucciones de seguridad
Lea atentamente este manual que contiene informaciones importantes de la instalación, uso y mantenimiento de
este equipo.
• Conserve el manual para consultas futuras. Si el equipo cambia de propietario algún día asegúrese de que recibe el
manual.
• Asegúrese de que la tensión del enchufe, se corresponde con las necesidades del equipo y no supera el Voltaje
requerido por el equipo e indicado en la placa indicadora del mismo.
• Únicamente para ser usado en interiores!
• El equipo debe de estar conectado a tierra obligatoriamente.
• Para evitar cualquier riesgo de incendio o descarga eléctrica, no exponga el equipo a la lluvia o la humedad.
Asegúrese de que ningún objeto inflamable se encuentra cerca del equipo durante el funcionamiento del mismo.
• Instale el equipo en un lugar bien ventilado a una distancia como mínimo de 1 metro de cualquier superficie.
Asegúrese de que las rejillas de ventilación del equipo, no quedan obstruidas.
• Desenchufe el equipo de la corriente antes de cualquier manipulación o mantenimiento. Cuándo usted cambie un
fusible, hágalo por uno de idénticas características al original.
• La temperatura ambiente no debe pasar de 40°C. No haga funcionar el equipo a temperaturas superiores.
• En caso de malfuncionamiento, pare inmediatamente el equipo. No intente jamás reparar usted mismo el equipo.
Una reparación mal efectuada, puede provocar daños y malfuncionamientos. Contacte con un servicio autorizado.
Haga que utilicen únicamente recambios originales.
• No conecte el equipo a un regulador.
• Asegúrese de que le cable de corriente nunca esté dañado o pellizcado.
• Jamás desenchufe el equipo tirando del cable, hágalo desde la propia clavija y con cuidado.
• No exponga los ojos a la fuente luminosa.
• Cuándo el cable de corriente o el interruptor del equipo, sean utilizados como método de desconexión, este
dispositivo debe permanecer fácilmente accesible;
Si un interruptor omnipolar se utiliza como dispositivo de desconexión, la ubicación en el dispositivo, así como
función han de estar descritos y el conmutador ha de permanecer fácilmente accesible.
©Copyright LOTRONIC 2017 MY60-SPOT Page 27
Page 28
Description
• 8 o 14 canales DMX
• 8 programa integrados
• Funcionamiento en DMX, automático, controlado por el sonido o Maestro/Esclavo
• Enfoque motorizado
• Rueda de 7 colores + blanco, efecto Arco iris
• Rueda de 5 Gobos rotativos + abierto
• Gobo shake
• Prisma de 3 caras
• Ángulo del haz 13°
• Dimmer linéal 0-100%
• Pan & Tilt de velocidad regulable
• Pantalla OLED
• Connectores Powercon
Caractéristicas técnicas
Alimentación ....................................................................................... AC100-240V 50/60Hz
Consumo ........................................................................................................................ 90W
Fuente luminosa .................................................................................... 1 LED blanche 60W
Pan/tilt ..................................................................................... 540°/210° à vitesse réglable
Estroboscopio ............................................................................................................ 0-23Hz
Dimensiones ........................................................................................... 245 x 145 x 345mm
Peso ............................................................................................................................. 4,35kg
Montaje
ORIENTACION
Este equipo puede ser instalado en cualquier
posición a condición de que tenga una ventilación
suficiente.
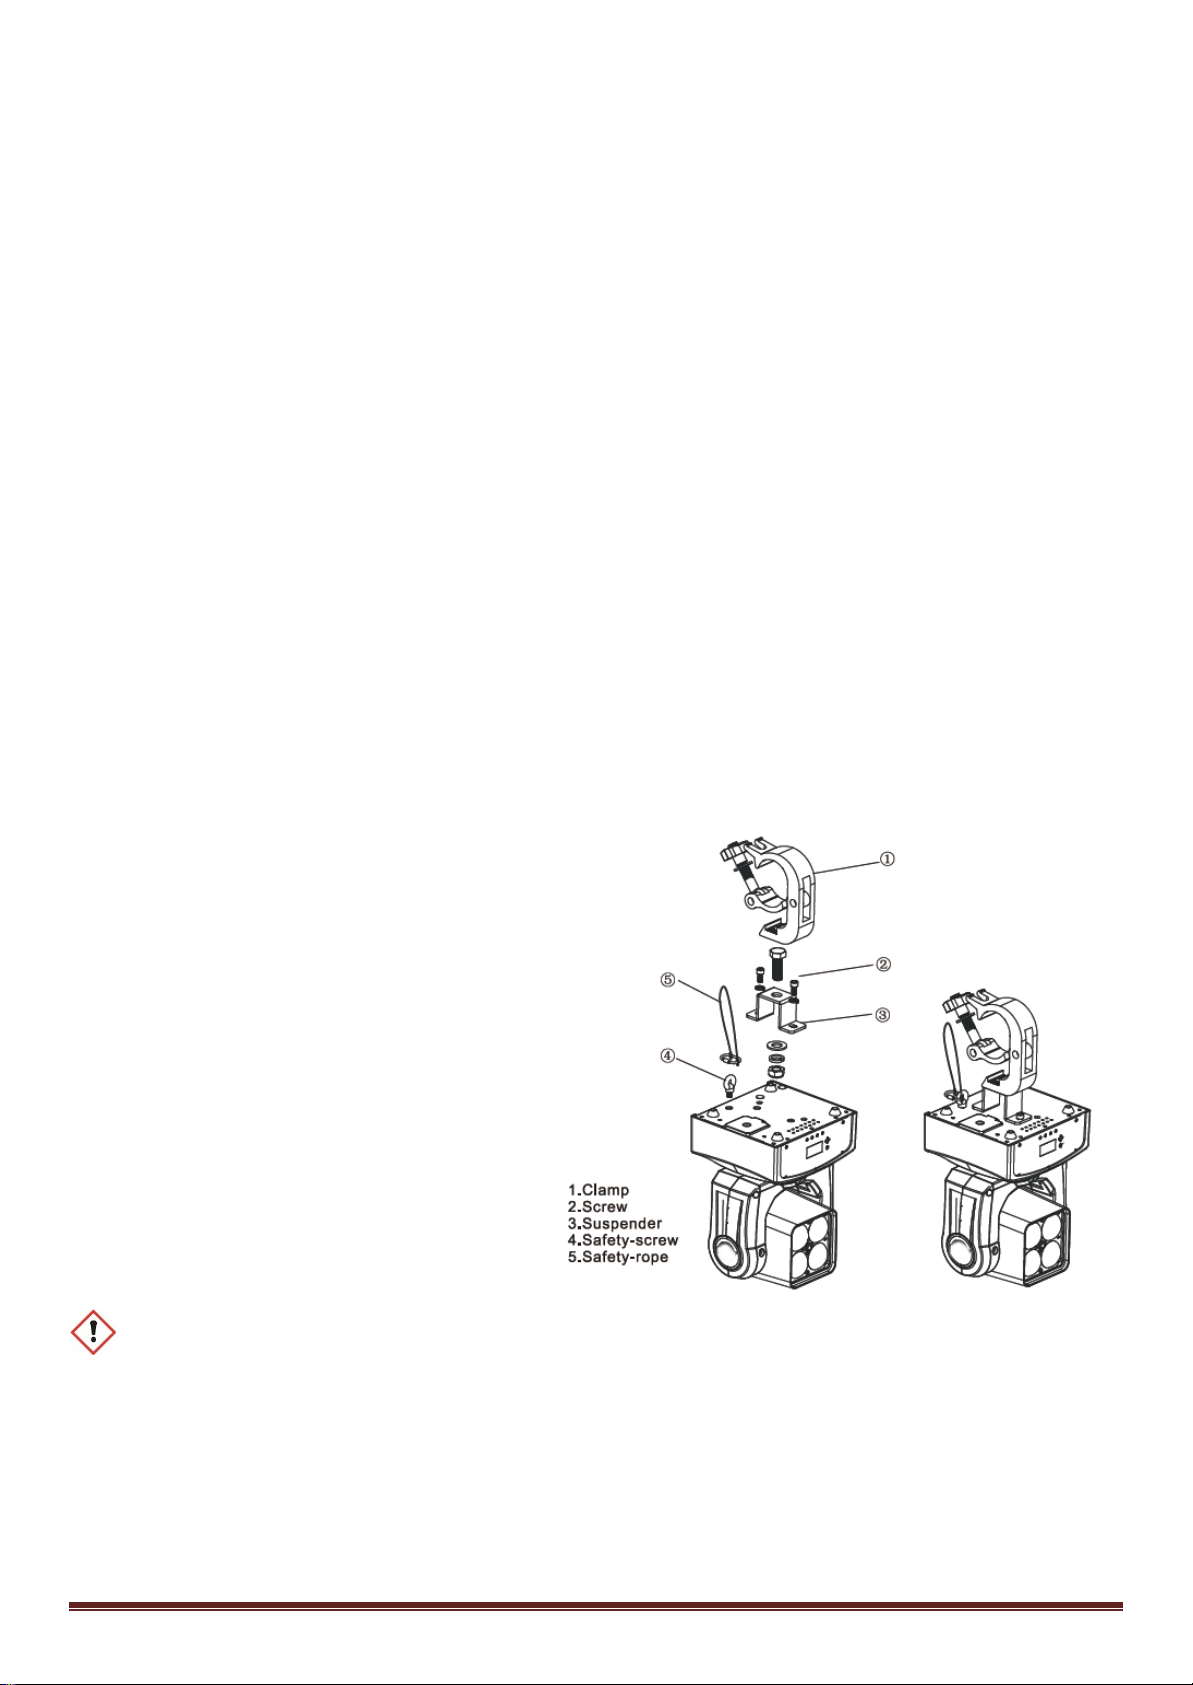
RIGGING
La cabeza, posee un dispositivo de fijación único
que incluye la base, el soporte omega incluido y el
ojo para el cable de seguridad.Cuándo instale esta
cabeza en una estructura, utilice una pinza que
sea adecuada al soporte omega y un tornillo M10
para poner en el centro del soporte omega. Para
una mejor seguridad, asegure el equipo a la
estructura mediante un cable de Acero.
INSTALLATION
Desenchufe el cable de corriente antes de
cambiar el fusible. El nuevo fusible ha de ser de caracteristicas identicas al original.
Cambio de fusible
Desenchufe el equipo y habra el porta fusible con la ayuda de un destornillador en cruz.
Cambie el fusible quemado por uno de idénticas caracteristicas.
Coloque de nuevo el porta fusible y vuelva a enchufar el equipo a la corriente.
©Copyright LOTRONIC 2017 MY60-SPOT Page 28
Page 29
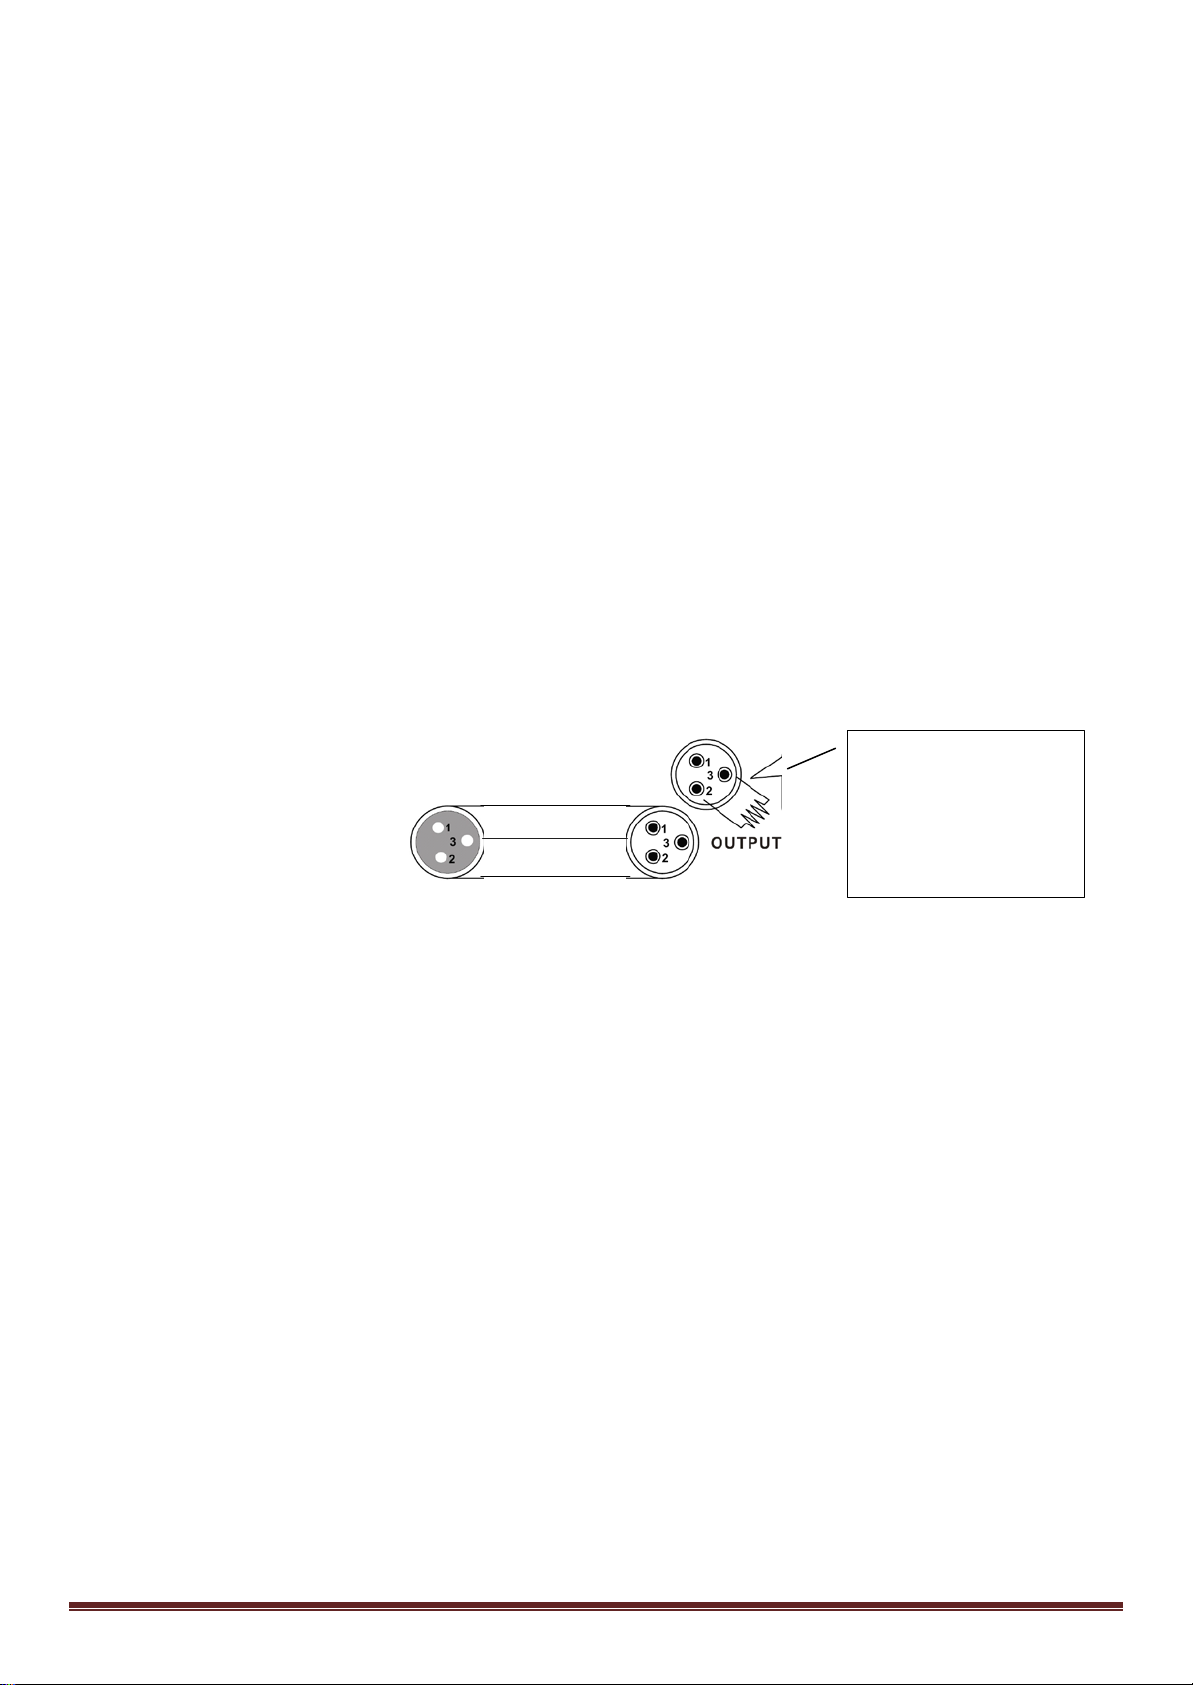
Conexionado de más unidades
Resistencia de 120 Ω
Necesitara un cable de datos para hacer funcionar diferentes equipos mediante una consola DMX512 o para hacer
fncionar más de una unidad en modo Maestro/Esclavo. El número combinado de canales necesarios para el conjunto
de equipos en un cable de datos define el número de equipos que el cable de datos puede soportar.
Importante: Los equipos deben estar conectados en serie en una sola línea. Para estar conforme a la norma EIA-485
no se podrá conectar más de 32 equipos en una línea. Si necesita conectar más de 32 equipos, necesitará un
repartidor DMX con aislación optica para que la señal digital DMX no se deteriore.
La distancia máxima recomendada es de 500m. El número máximp de equipos conectados en una línea de datos es
de 16.
Caleado
Los cables necesarios puede comprarlos hechos o bien realizarlos usted mismo.Para relaizar los cables, debe
comprar un cable de alta calidad y un buen apantallamiento, para evitar interfefrencia electro magneticas, o bien
comprar conexiones hechas, tambien de muy alta calidad.
El cable debe de tener un XLR Macho en un extremo y un XLR Hembra en el otro extremo.
CONECTORES DE CABLE
El cable, debe poseer una clavija XLR macho en uno de los extremos y una clavija XLR hembra en el otro.
Configuración de los conectores DMX
1/ 4w entre pin 2
(DMX-) y pin 3 (DMX+)
en el último equipo
La resistencia de fin de línea reduce los errores de señal. Para evitar los problemas de transmisión de señal, siempre
es recomendable conectar una resistencia al final de la línea DMX.
ATENCION
No debe de haber ningún contacto entre el comun y la masa de chasis del equipo, esto puede provocar que su
equipo se comporte de una manera extraña. Asegúrese con un tester que la polaridad de los cables es la correcta.
CONVERSION 3-PIN EN 5-PIN
Atención! Si usted utiliza un controlador con clavija de 5 pin, deberá utilizar un adaptador de 5 a 3 pins.
CARTA DE CONVERSION 3 PIN EN 5 PIN
Conductor 3 Pin Hembra (salida) 5 Pin Macho (entrada)
Masa/blindaje Pin 1 Pin1
Señal de datos (-) Pin 2 Pin 2
Señal de datos (+) Pin 3 Pin 3
No utilizado No utilizado
No utilizado No utilizado
Puesta en marcha de una línea de datos DMX en série
1. Conecte el lado macho de 3 pin del cable DMX a salida (Hembra) de 3 pin del controlador.
©Copyright LOTRONIC 2017 MY60-SPOT Page 29
Page 30
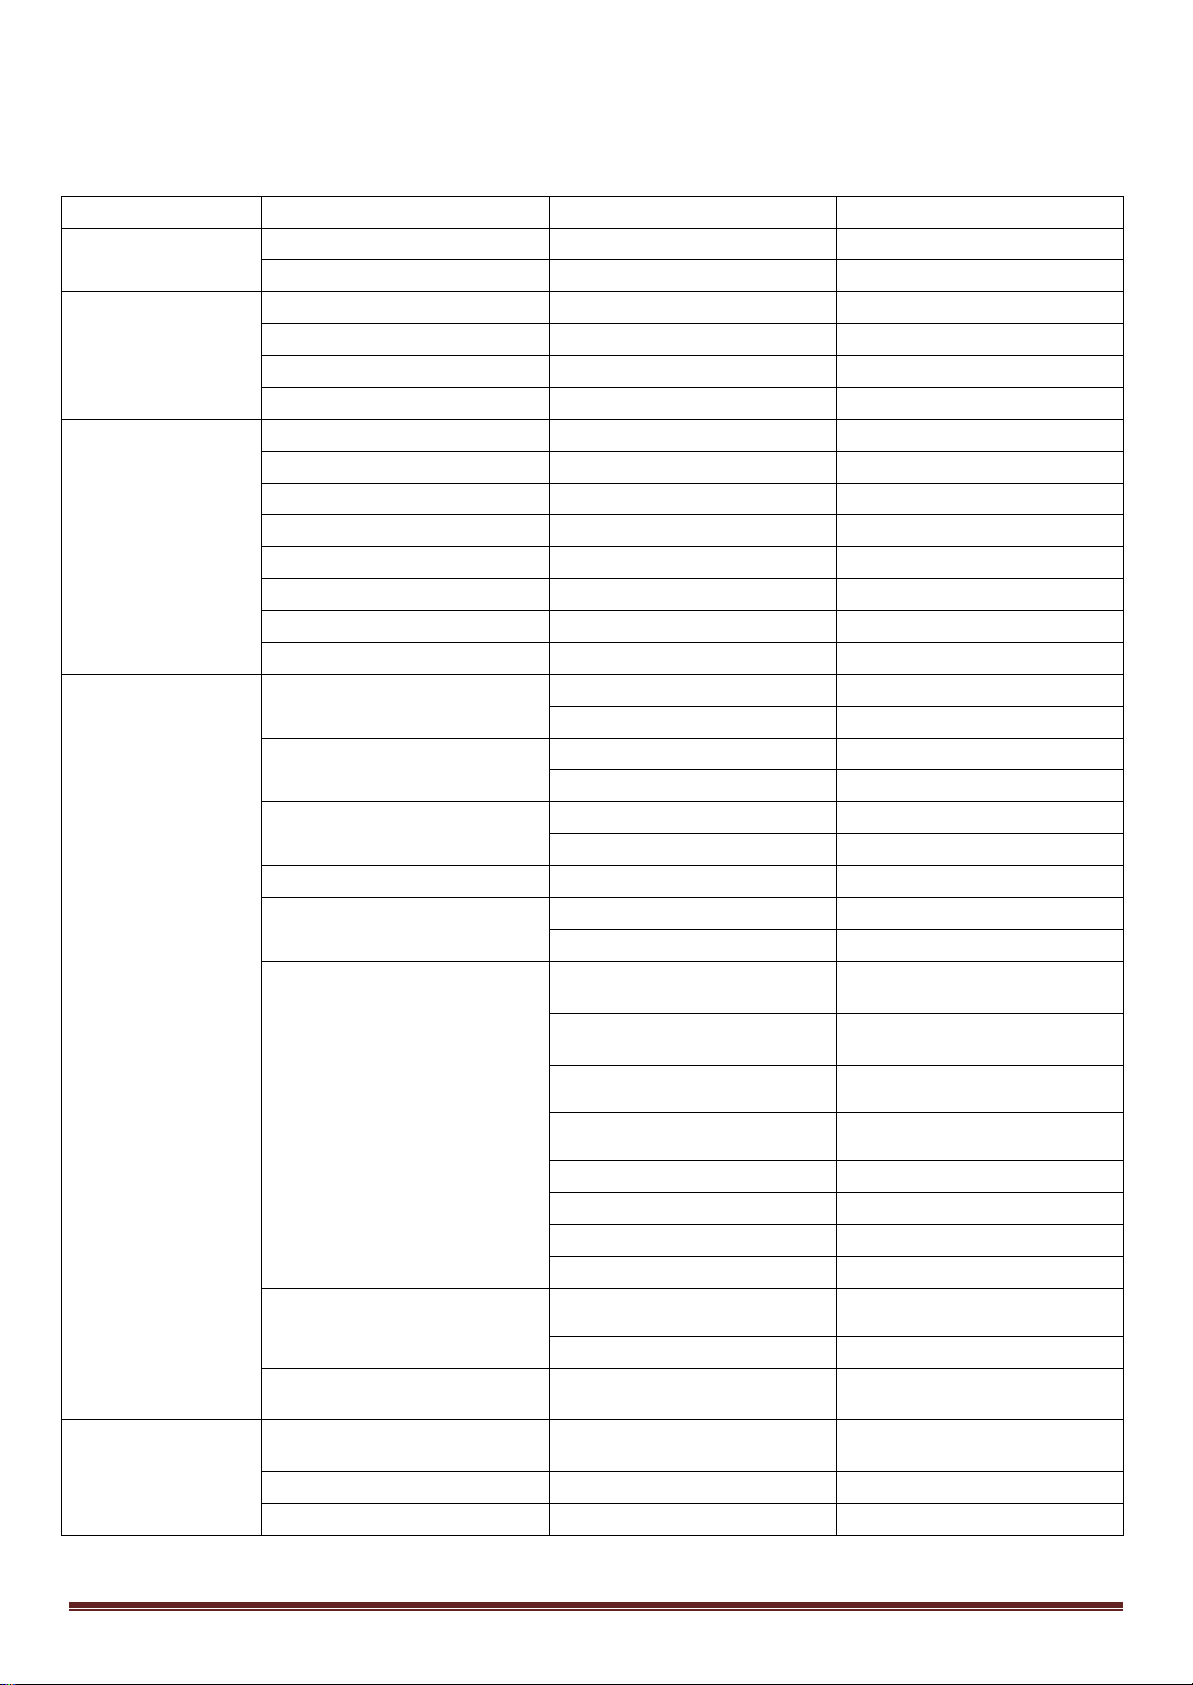
2. Conecte el otro lado del cable al primer equipo con el conector XLR Hembra del cable al XLR macho del equipo.
Dirección DMX
001---512
DMX 14
DMX 08
Modo de
DMX
Automático
Modo sonido
Esclavo
Programa 1
Programa 2
Programa 3
Programa 4
Programa 5
Programa 6
Programa 7
Programa 8
No
Si
No
Si
No Si Sensibilidad
0-100
OFF
Hold
Contraseña
Vuelta a los ajustes originales
Todo borrado (3 sec.)
Pan
.=0-120
Tilt
.=0-120
Color de spot
.=0-255
Gobo
.=0-255
Enfoque
.=0-255
Prisma
.=0-255
Si
No
Reset motor
(Reset todos los motores)
Software
Modo DMX
Dirección 001
3. Y siga conectando cada salida del equipo a cada entrada del siguiente equipo de la cadena DMX y así
sucesivamente.
Menu sur l'écran
Número de canal
funcionamiento
Programas
Ajustes
Inversion Pan
Inversion Tilt
Inversion de la pantalla
DMX
Calibrado
Vuelta a los ajustes originales
Info en el sistema
©Copyright LOTRONIC 2017 MY60-SPOT Page 30
Page 31
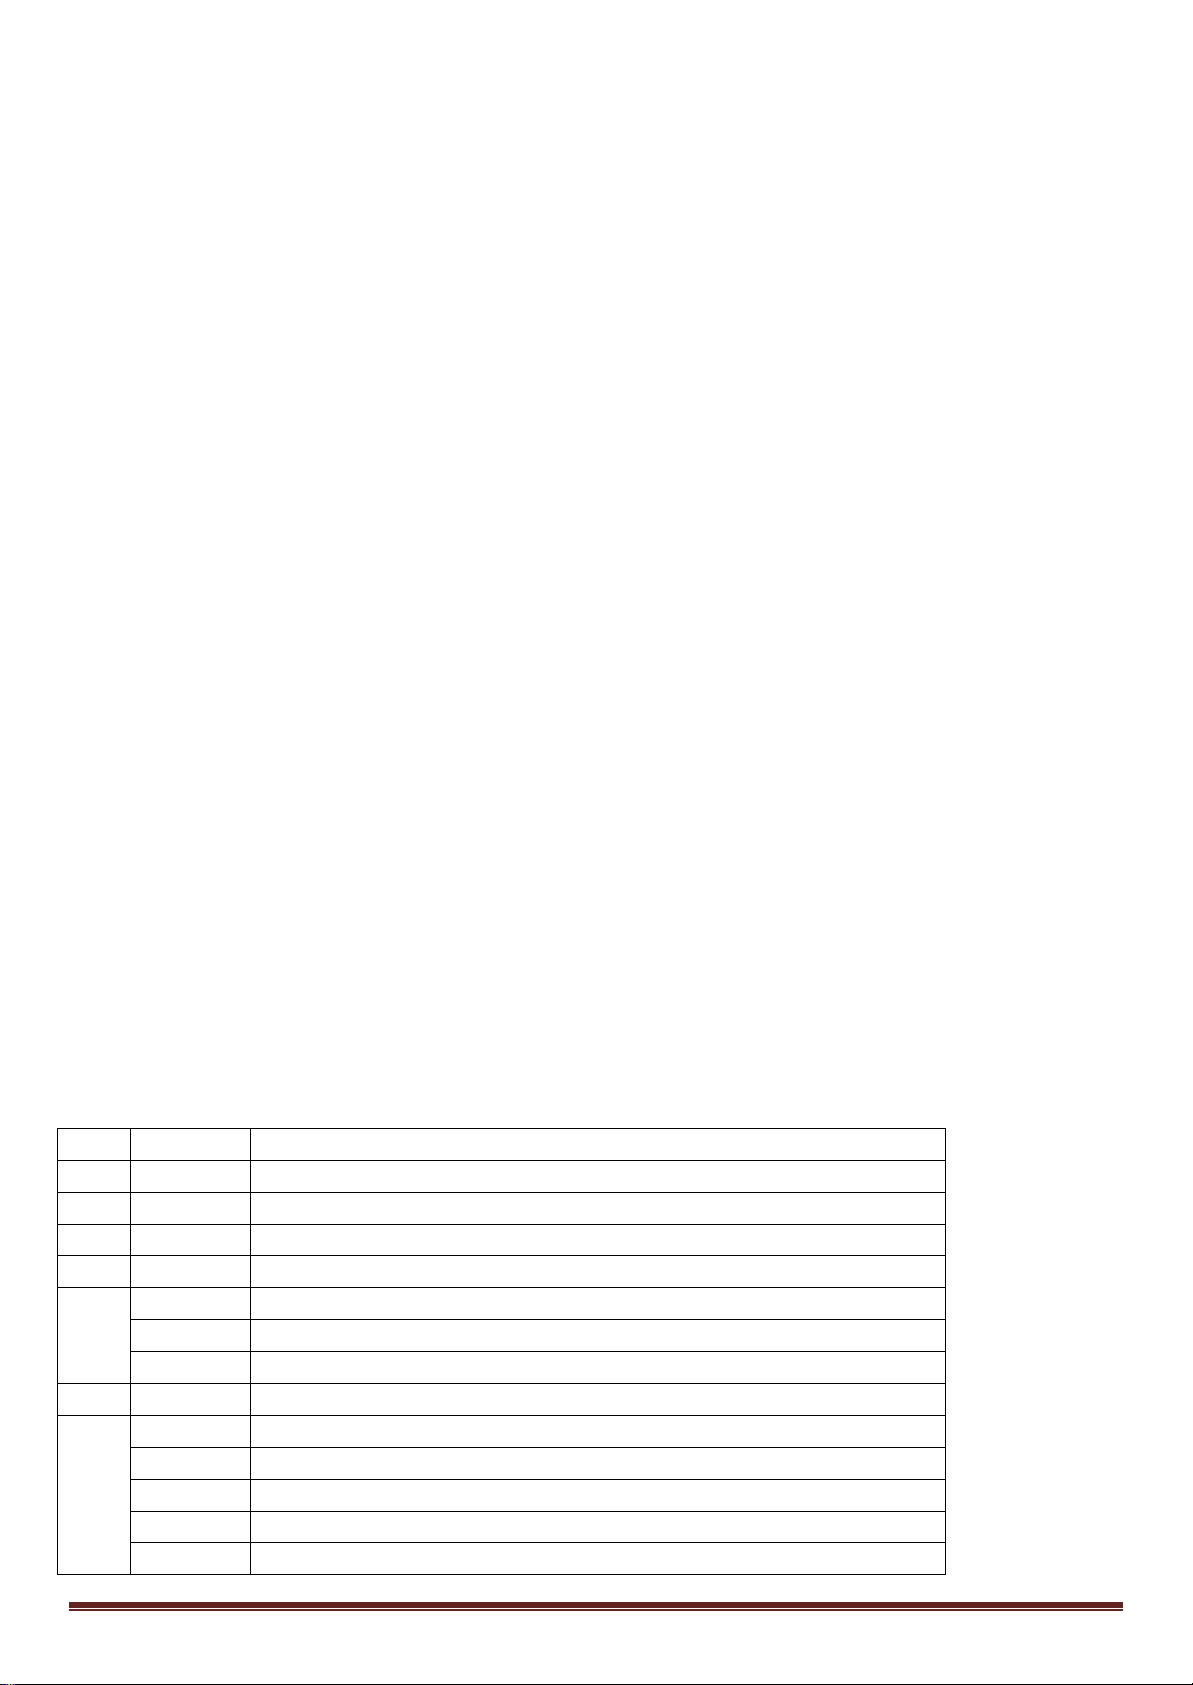
Modos de Funcionamiento
Canal
Valor DMX
Función
1
000-255
Pan
2
000-255
Tilt 3 000-255
Velocidad P/T
4
000-255
Dimmer
0-9
Estroboscopio abierto
10-250
Estroboscopio lento a rápido
251-255
Estroboscopio abierto
6
000-255
Enfoque
0-10
Sin función
11-20
Blanco + abierto
21-40
Color + gobo 1 automático
41-50
Color + gobo 2 automático
51-70
Blanco + gobo 3
Dirección DMX
Esta función le permite ajustar la dirección de 001 a 512 Seleccione la Dirección deseada por medio de las teclas UP o
DOWN. Apriete en ENTER para ajustar la dirección DMX que necesite.
Canal DMX
El equipo cuenta con 8 y 12 canales
Modo de funcionamiento
De entre los modos automático, DMX, Running, sonido y modo esclavo. Seleccione el que necesite.
Programas
Seleccione uno de los 8 programas integrados en modo Maestro
Ajustes
(1) Pan Rev
Inversion del movimiento PAN
(2) Tilt Rev
Inversion del movimiento TILT
(3) Inversion del display
Inversion del display
(4) Sensibilidad
En modo sonido, ajuste la sensibilidad entre 0 y 100. Cuanto más alto es el valor mayor es la sensibilidad
(5) DMX Fallo
Si ocurre cualquier error en modo DMX, puede escojer OFF o HOLD. En posición OFF, la cabeza se para en caso de
problema. En positción HOLD, continúa trabajando con el último modo seleccionado.
(6) Calibrage
Permite calibrar el equipo.
(7) Reset a ajustes de fábrica
Vuelta a los valores de fábrica. El ajuste por defecto es NO
(8) Reset motor
Si esta función está activada, todos los motores vuelven a la posición original.
5.6 Info Sistema
Verifique la versión del software, el modo de funcionamiento y en modo DMX, el valor de la dirección.
Canales DMX
Mode 8 Canales
5
7
©Copyright LOTRONIC 2017 MY60-SPOT Page 31
Page 32
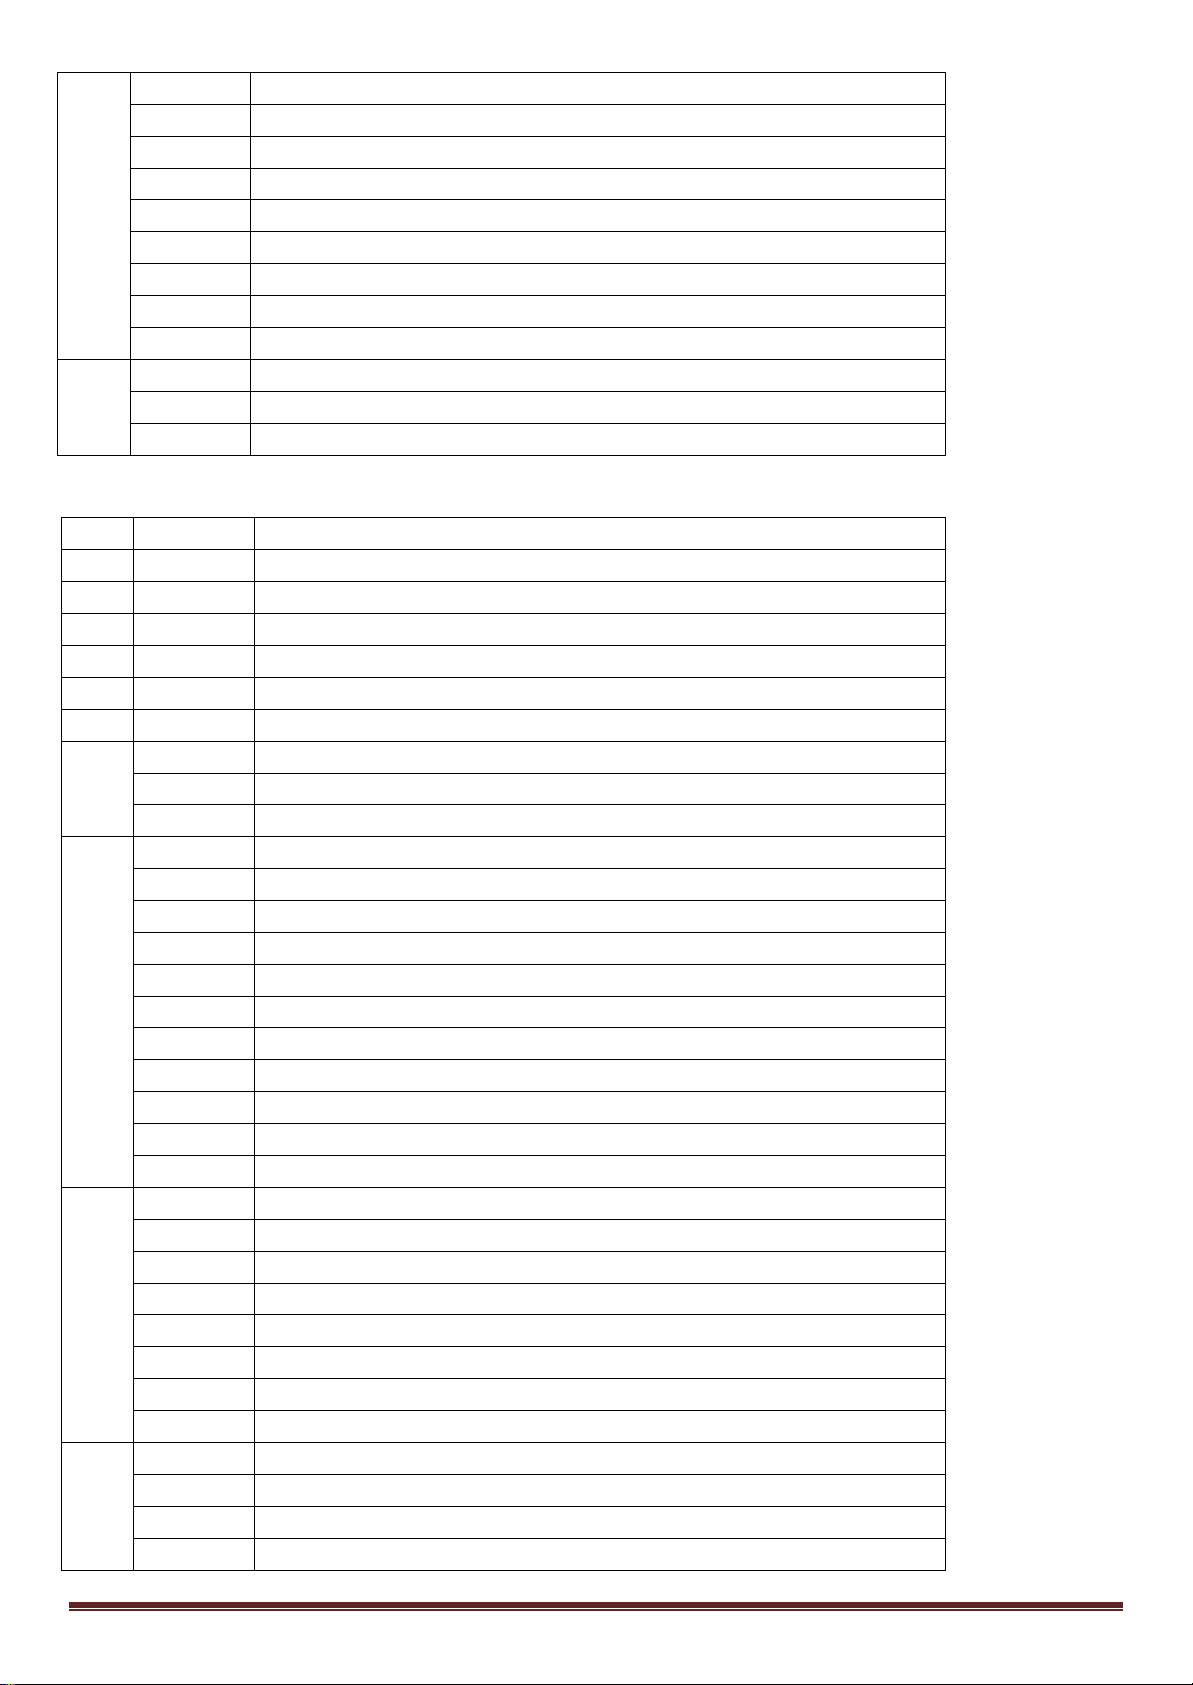
71-80
Blanco + prisma + gobo vacio
81-100
Color + prisma + rotación gobo 1 automático
101-110
Color + prisma + rotación gobo 2 automático
111-130
Blanco + Prisma + rotación gobo 3
131-150
Color + gobo 1 automático → Color + prisma + rotación gobo 1 automático
151-160
Color + gobo 2 automático → Color + prisma + rotación gobo 2 automático
161-170
Color + gobo 3 automático → Color + prisma + rotación gobo 3 automático
171-180
Color + prisma + rotación gobo 3 automático
181-255
Color 3 + prisma + rotación gobo 3
8
0-229
Sin función
230-240
Reset después de 3 segundos
240-255
Sin función
Canal
Valor DMX
Función
1
000-255
Pan 2 000-255
Ajuste fino de Pan
3
000-255
Tilt 4 000-255
Ajuste fino de Tilt
5
000-255
Velocidad P/T
6
000-255
Dimmer
0-9
Estroboscopio abierto
10-250
Estroboscopio lento a rápido
251-255
Estroboscopio abierto
0-13
Blanco (abierto)
14-31
Color 1
32-49
Color 2
50-67
Color 3
68-85
Color 4
86-103
Color 5
104-121
Color 6
122-130
Color 7
131-139
Blanco
140-196
Cambio de color hacía la izquierda rápido → lento
197-255
Cambio de color hacía la derecha lento → rápido
0-8
Abierto
9-33
Gobo1
34-58
Gobo2
59-83
Gobo3
84-108
Gobo4
109-133
Gobo5
134-194
Cambio de gobo hacía la izquierda rápido → lento
195-255
Cambio de gobo hacía la derecha lento → rápido
0-9
Stop
10-129
Rotación gobo hacía delante rápido → lento
130-134
Stop
135-255
Rotación gobo hacía atrás lento → rápido
Modo 14 Canales
7
8
9
10
©Copyright LOTRONIC 2017 MY60-SPOT Page 32
Page 33
11
000-255
Enfoque
12
000-128
Sin función
129-255
Prisma
0-10
Sin función
11-20
Blanco + Abierto
21-40
Color + gobo 1 automático
41-50
Color + gobo 2 automático
51-70
Blanco + gobo 3
71-80
Blanco + prisma + gobo vacio
81-100
Color + prisma + rotación gobo 1 automático
101-110
Color + prisma + rotación gobo 2 automático
111-130
Blanco + Prisma + rotación gobo 3
131-150
Color + gobo 1 automático → Color + prisma + rotación gobo 1 automático
151-160
Color + gobo 2 automático → Color + prisma + rotación gobo 2 automático
161-170
Color + gobo 3 automático → Color + prisma + rotación gobo 3 automático
171-180
Color + prisma + rotación gobo 3 automático
181-255
Color 3 + prisma + rotación gobo 3
0-229
Sin función
230-240
Reset después de 3 segundos
240-255
Sin función
13
14
Mantenimiento
Por motivos de residuos de humo y polvo, es conveniente limpiar regularmente las lentes externas para optimizar la
potencia luminosa.
1. Limpie la carcasa externa con limpiacristales clasico y un paño limpio.
2. Limpie las ópticas externas con un limpia cristales y un paño limpio cada 3 semanas.
3. Desenchufar el equipo antes de cualquier limpieza y manipulación. Asegurese de que este completamente seco el
equipo y las piezas antes de volver a enchufarlo.
©Copyright LOTRONIC 2017 MY60-SPOT Page 33
 Loading...