

Page 1
E12 Indoor Luminaires
Ceiling Mount - Pendant
120VAC / 60Hz
Page 1 of 1 8061536 R0
Model #: GRCP26CBBK
Limited Factory Warranty
AFX Inc. hereby warrants that this fixture is free from defects in materials and workmanship when installed and used under normal operating conditions for a period of 5 years
from date of purchase. This warranty covers all component parts and extends only to replacement of defective fixture or components; it does not cover failure due to improper
installation, misuse, mishandling or damage incurred in transit.
View shown for reference
only. Individual models may
vary.
Safety Precautions
Read all safety precautions and installation instructions carefully before installing or servicing this fixture. Failure to comply with these instructions could result in potentially fatal
electric shock and/or property damage.
It is recommended that a qualified electrician perform all wiring. This fixture must be wired in accordance with all national and local electrical codes.
Do not handle any energized fixture or attempt to energize any fixture with wet hands or while standing on a wet or damp surface or in water.
This fixture is designed for use in a 120VAC, 50/60Hz circuit.
Make sure that the power source conforms to the requirements of the fixture. (See labels on the fixture housing).
To reduce the risk of electrical shock, and to assure proper operation, this fixture must be adequately grounded. To accomplish proper grounding, there must be a separate ground
wire (green) contact between this fixture and the ground connection of your main power supply panel.
This fixture is intended to be used for general indoor lighting in dry or damp locations.
Assembly Instructions
Step 1 – Preparing for installation
A. Disconnect electrical power at fuse or circuit breaker box before installing or
servicing any part of this fixture.
B. Carefully remove the fixture from the carton, remove components from hardware
kit.
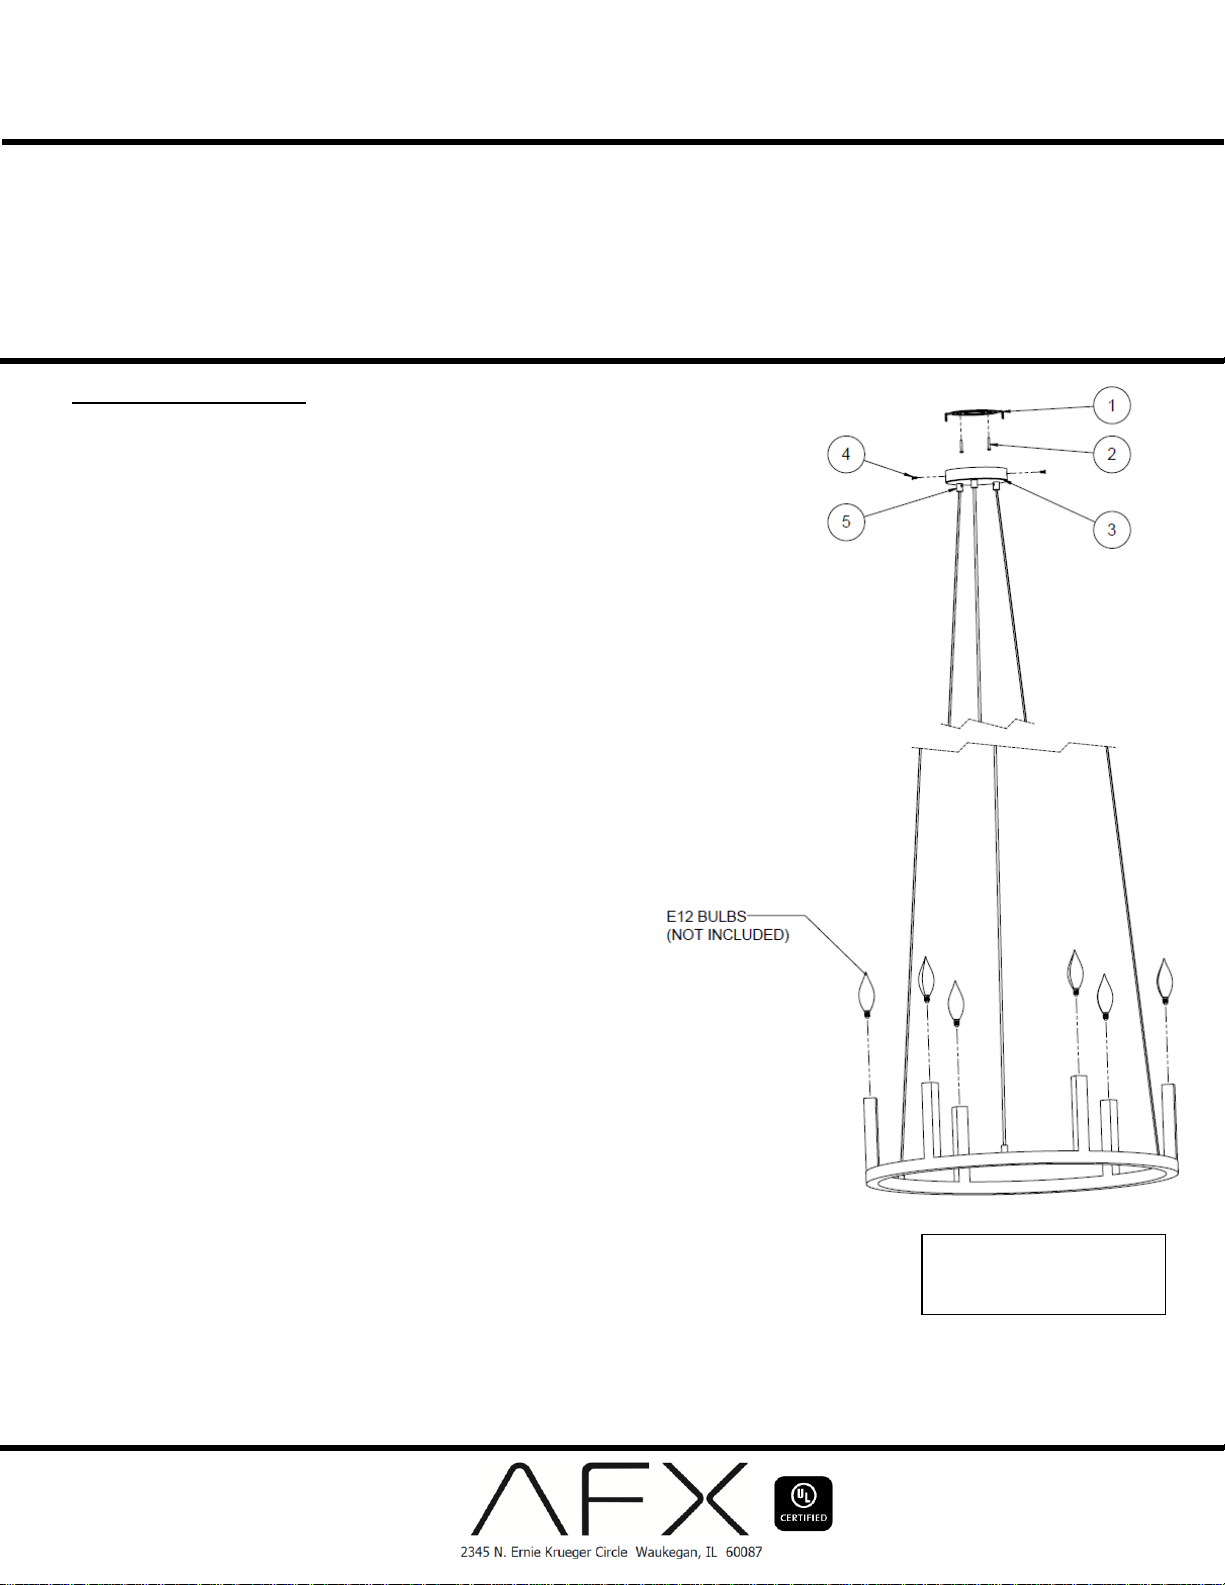
C. Remove mounting bracket (1) from the fixture (3) by removing two side screws
(4).
D. Install mounting bracket (1) to the junction box (not included) using two screws
(2) to secure it.
Wiring – All wiring must take place inside junction box (not included)
Caution: Make sure power is off at fuse or circuit breaker box. Check power
wires for damage or scrapes. Use wire suitable for at least 90°C (194°F). Note:
Most dwellings built before 1985 have supply wire rated to 60°C. Consult a
qualified electrician to ensure correct branch circuit conductor before installing.
Step 2 – Wiring fixture
A. Make all wire connections to appropriate wire. Secure with wire nuts (provided).
B. Connect the green wire from the fixture to the supply power source ground wire.
C. Connect the white wire from the fixture to the white (N) wire from supply power
source.
D. Connect the black wire from the fixture to the black (L) wire from supply power
source.
E. Do not mix wires. Pull on each wire lead to make sure connections are secure.
Make certain no bare wires are exposed outside of wire connectors. Tuck all
connections neatly into the junction box.
Step 3 – Mounting
A. Install fixture (3) by aligning both side holes over the mounting bracket (1) then
using two screws (4) to secure it.
B. Adjust cord as needed by turning set screw (5) counter clockwise only to allow
cord to move. Once cord is adjusted turning the set screw clockwise to secure it.
Repeat on other cords until fixture is adjusted accordingly. Note: 108” power
cord is provided.
Step 4 – Lamping (not included)
A. Install candelabra base (E12) type lamp under 40W max rating into socket and
twist clockwise rotation until securely snug. Repeat until all six lamps are
installed.
Step 5 – Restore power at fuse or circuit breaker box
 Loading...