

Page 1

YEStation Extra Linux
Based Terminal
User's Guide
Version 1.00u.00
Copyright 2002 Affirmative Computer Products®
September 2002
Page 2

.
ii
Page 3

Copyright and Trademarks
Copyright Notice
This manual, as well as the software described in it, is furnished under license. No part of
this publication may be reproduced, transmitted, stored in a retrieval system, or translated
into any human or computer language, in any form or by any means, electronic,
mechanical, magnetic, optical, chemical, manual or otherwise, without the prior written
permission of the copyright owner.
Note: Information in this document is subject to change without notice.
Trademarks Notice
• YEStation is a registered trademark of Affirmative Computer Products.
• YESterm/IP™ is a trademark of Affirmative Computer Products.
• Microsoft
• Windows
• ICA
• TUXIA® is a registered trademark of TUXIA Deutschland GmbH.
• Java® is a registered trademark of Sun Microsystems, Inc.
• Adobe®, the Adobe logo, Acrobat®, the Acrobat logo, and Acrobat Reader are
trademarks or registered trademarks of Adobe Systems Incorporated.
• Linux® is a registered trademark of Linus Torvalds.
®
is a registered trademark of Microsoft® Corporation.
®
is a registered trademark of Microsoft® Corporation.
®
is a registered trademark of Citrix® Systems Inc.
• Netscape®, Netscape Communicator®, and Netscape Navigator® are registered
trademarks of Netscape Communications Corporation.
• Other company and brand, product and service names are trademarks or registered
trademarks of their respective holders.
iii
Page 4

iv
Page 5

Table of Contents
Introduction ..........................................................................................................................................1
About this manual ............................................................................................................................1
LBT Installation ...................................................................................................................................3
Mounting the LBT............................................................................................................................3
Connecting the LBT .........................................................................................................................5
Power-up and Boot Sequence ..............................................................................................................7
The LBT Desktop.................................................................................................................................9
Taskbar ...........................................................................................................................................11
Application Launcher.....................................................................................................................12
Adding and Removing Application Launcher Entries ...............................................................12
Main Menu .....................................................................................................................................13
Working with Application Windows .............................................................................................14
Switching between Windows .....................................................................................................15
Virtual Desktops.............................................................................................................................16
How to get started ..........................................................................................................................17
Mouse Techniques......................................................................................................................17
Client Applications.............................................................................................................................19
Local Shell......................................................................................................................................19
Citrix ICA Client............................................................................................................................21
RDP Client .....................................................................................................................................22
LBT Setup ..........................................................................................................................................23
System Information ........................................................................................................................24
Parameters ......................................................................................................................................25
General .......................................................................................................................................26
Hardware ................................................................................................................................26
Language ................................................................................................................................27
System Update........................................................................................................................28
Security...................................................................................................................................29
Autostart .................................................................................................................................29
Network......................................................................................................................................30
Network..................................................................................................................................30
Ethernet ..................................................................................................................................31
Printer .........................................................................................................................................32
Port 9100 Daemon..................................................................................................................32
LP Daemon.............................................................................................................................33
Display .......................................................................................................................................34
General ...................................................................................................................................34
Resolution...............................................................................................................................36
Applications ...............................................................................................................................36
ICA6 Client Settings ..............................................................................................................37
ICA Sessions ......................................................................................................................38
v
Page 6

Default Session (Session 1)............................................................................................38
New ................................................................................................................................39
RWin Client Settings (RDP) ..................................................................................................39
RWin Sessions....................................................................................................................40
RDP Session 1................................................................................................................41
New ................................................................................................................................42
Set Time .........................................................................................................................................42
Set Host ..........................................................................................................................................43
Update ............................................................................................................................................44
Firmware Upgrade Instructions..................................................................................................44
Log in .............................................................................................................................................46
Log out ...........................................................................................................................................46
Exit .................................................................................................................................................47
YESterm/IP TN5250E Emulator........................................................................................................49
AS/400 Requirements ....................................................................................................................49
Technical Characteristics ...............................................................................................................49
Display Session Characteristics .................................................................................................49
Printer Session Characteristics ...................................................................................................50
Setup...............................................................................................................................................51
Display Session Properties .........................................................................................................51
Session Info ............................................................................................................................51
Attributes................................................................................................................................53
Attribute Settings................................................................................................................53
Edit Column Separator ...................................................................................................54
Hot Spot..................................................................................................................................54
Key Pad ..................................................................................................................................56
Sign On...................................................................................................................................58
Printer Session Properties...........................................................................................................59
Session Info ............................................................................................................................59
Input .......................................................................................................................................60
Language ............................................................................................................................60
Page Layout........................................................................................................................60
Overrides ............................................................................................................................61
Output.....................................................................................................................................61
Time Out ............................................................................................................................61
Printer Driver......................................................................................................................61
Printer Port .........................................................................................................................61
Hex Pass Through (HPT) .......................................................................................................62
Advanced................................................................................................................................63
Default Message Parameters ..............................................................................................63
Host Print Transform..........................................................................................................63
Emulator Operation ........................................................................................................................64
Display Session ..........................................................................................................................64
Menu Bar................................................................................................................................64
File......................................................................................................................................65
Edit .....................................................................................................................................65
Tools...................................................................................................................................66
View ...................................................................................................................................67
Help ....................................................................................................................................67
vi
Page 7

Toolbar ...................................................................................................................................68
Printer Session............................................................................................................................68
Menu Bar................................................................................................................................68
File......................................................................................................................................69
Tools...................................................................................................................................69
View ...................................................................................................................................70
Help ....................................................................................................................................70
Toolbar ...................................................................................................................................71
How To …......................................................................................................................................72
Create a Custom Language Code Page ......................................................................................72
Display Session ..........................................................................................................................75
Record a Keystroke Sequence (Macro)..................................................................................75
Play a Recorded Keystroke Sequence (Macro)......................................................................76
Create a Custom Keyboard Map ............................................................................................76
Printer Session............................................................................................................................78
Modify the Passthrough Driver ..............................................................................................78
General ...............................................................................................................................78
Transcode Table .................................................................................................................79
Escape Sequences...............................................................................................................80
Euro ....................................................................................................................................80
Font ID ...............................................................................................................................81
Support ...............................................................................................................................................83
vii
Page 8

viii
Page 9

Introduction
Welcome to the YEStation Linux Based Terminal User’s Guide describing the Linux Based
Terminal (LBT) desktop environment and configuration. The LBT solution provides a seamless
integration of heterogeneous computing environments including Microsoft
Services, Citrix
enhancing the LBT experience are features such as YESterm/IP, the premier 5250E terminal
emulation, embedded browser capability including a full complement of plug-ins, crash-proof flashbased operating software, and a robust field upgrade mechanism.
®
WinFrame® and MetaFrame®, and a multitude of legacy systems. Additionally
About this manual
This manual is aimed at the end-user and system administrator. It describes the different elements
of the desktop environment, usage methods, and basic configuration techniques.
®
Windows® Terminal
Page 1
Page 10

Page 2
Page 11
LBT Installation
Mounting the LBT
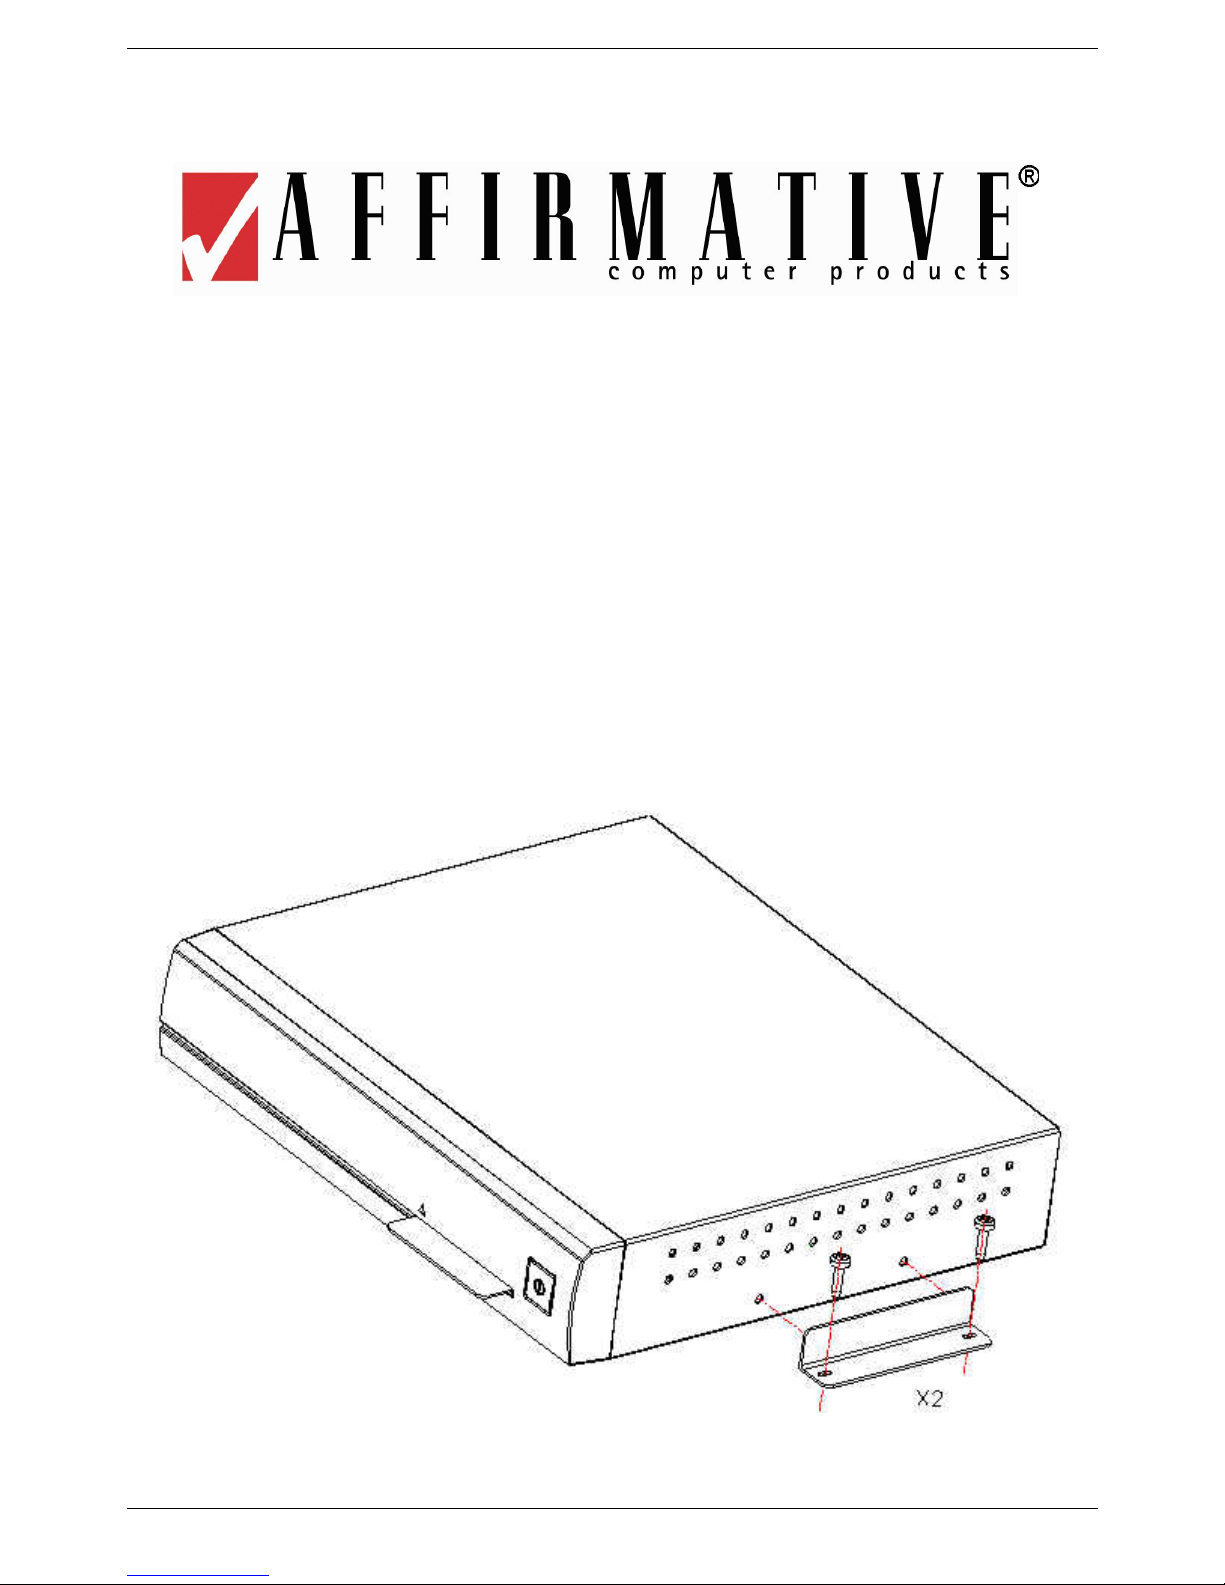
The LBT can be mounted on a desk or under a table or attached to a wall. The LBT has no internal
fan, and relies on natural airflow for cooling. When you mount or place the LBT, make sure to
keep as many ventilation holes, as possible, unobstructed. If the LBT is placed vertically on the
desktop, use the provided stand for support and to provide airflow to the bottom set of ventilation
holes. If the LBT is placed horizontally on the desktop, use the provided rubber feet to elevate the
bottom surface from the desktop, allowing airflow to the bottom of the case.
The following figures show some LBT mounting procedures.
Mounting the LBT on a desk or a wall
Page 3
Page 12
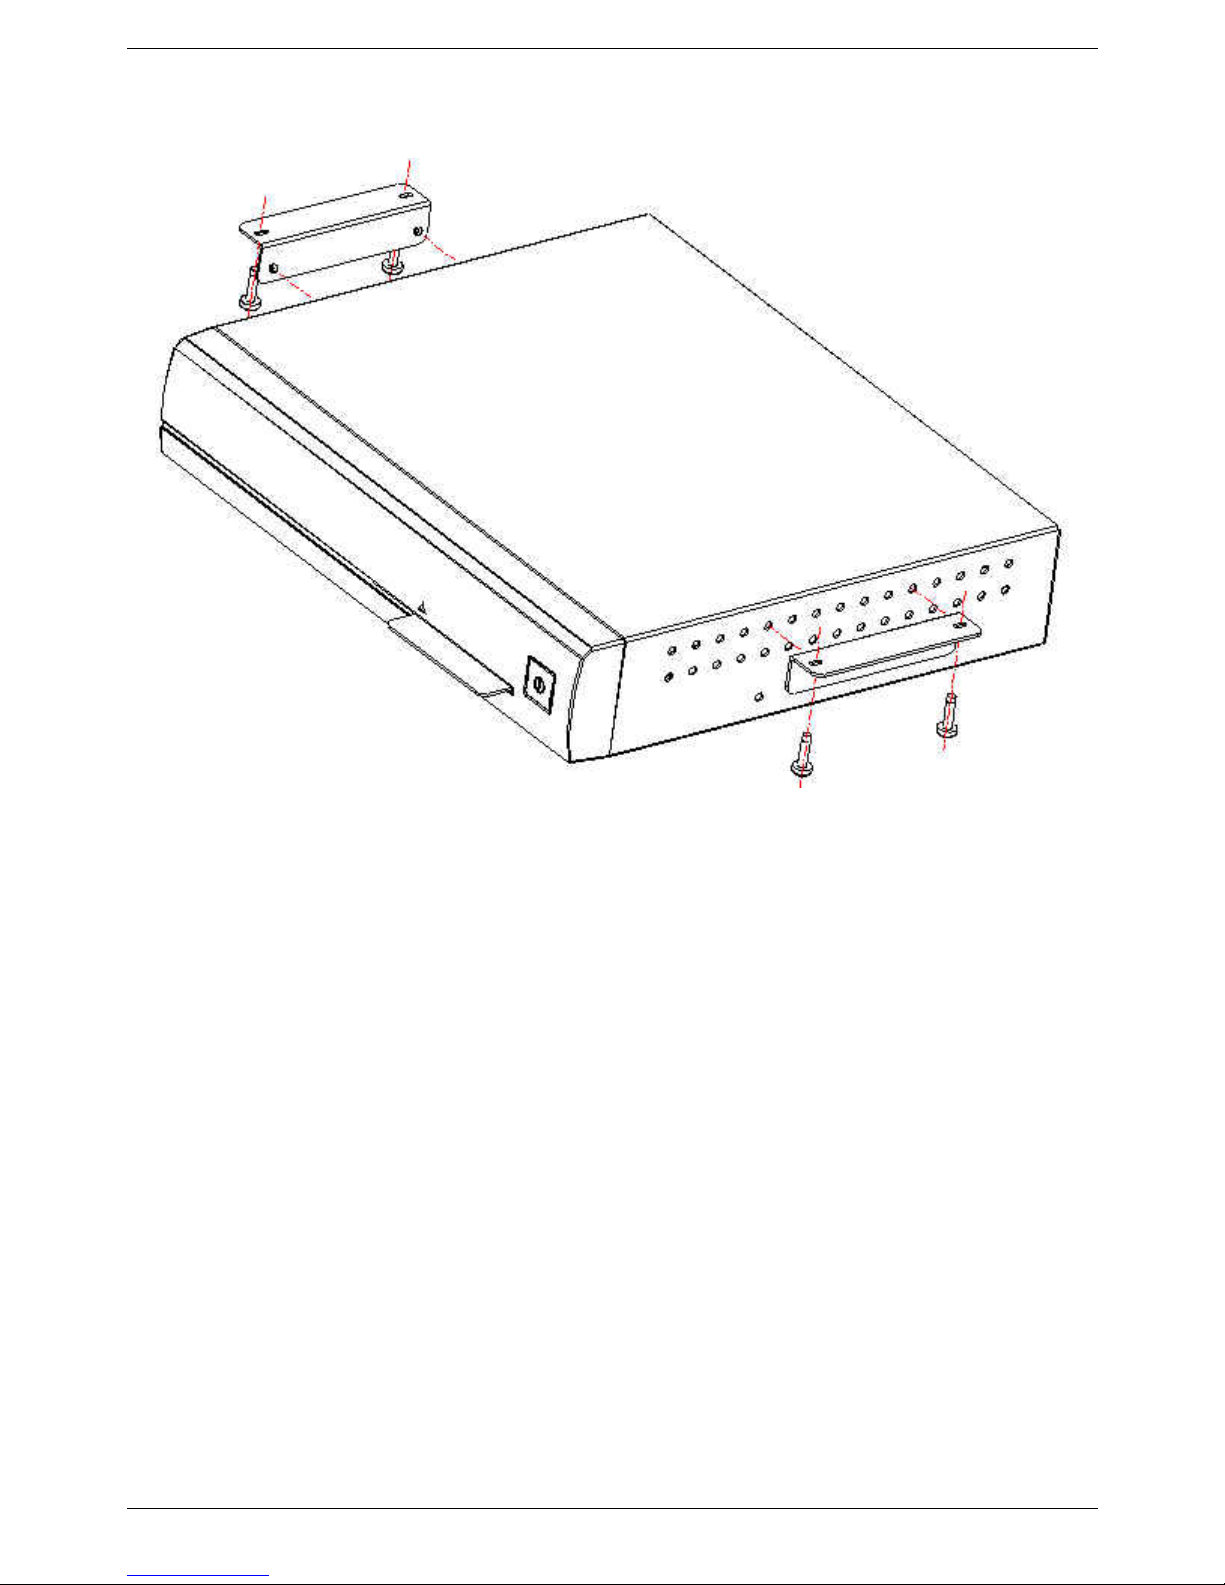
Mounting the LBT under a table
Page 4
Page 13
Connecting the LBT
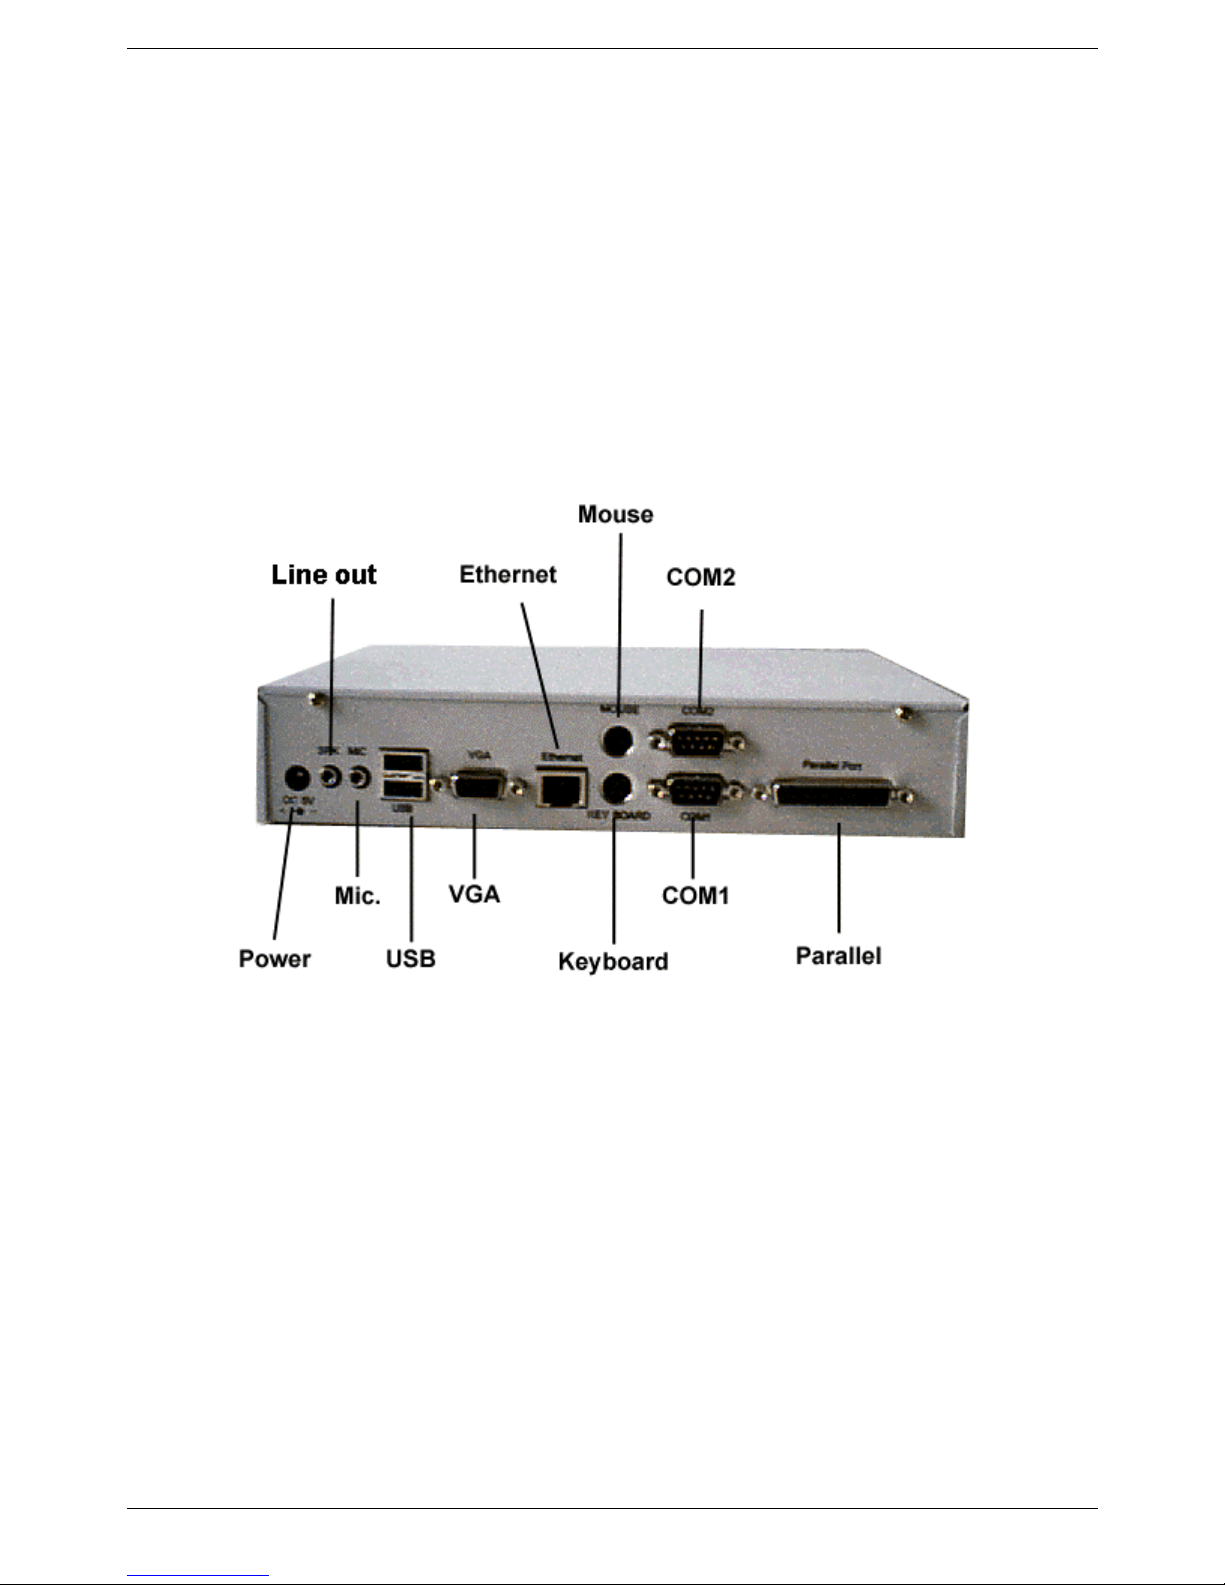
To connect the LBT to your server, please make all connections to the rear panel before turning on
the power. The following figure shows the LBT's rear panel connectors.
Page 5
LBT Rear Panel Connectors
Page 14

Please follow the procedures below:
1. Connect the monitor to the VGA connector.
2. Connect the PS/2 keyboard to the Keyboard connector.
3. Connect the PS/2 mouse to the Mouse connector.
4. If you are ready to use a network connection, connect a CAT5 UTP cable to the Ethernet
connector.
5. Connect the power adapter cable to the Power connector.
6. Plug the power adapter AC cord into an AC outlet.
7. Connect speakers to the Line Out port, if desired.
You are ready to use the LBT now.
Page 6
Page 15

Power-up and Boot Sequence
When you first switch on the LBT, a splash screen is displayed while the system performs self-test
routines and then loads the operating software from the flash memory. When the boot loader takes
over the start-up sequence a corresponding message is shown on the screen:
TASTE boot loader version 1.2
Press <ESCAPE> for boot options
Boot loader start-up message
Normally, you will have no need to select a boot option, since the default is a Quiet Boot. The
following menu appears if you press the Esc key at this time.
Quiet boot
Verbose boot
Setup boot
Boot menu
You can select one of these options from the boot menu:
• Quiet boot. This is the default setting. Quiet boot will bring up the system providing only basic
status information during boot phase. After a successful power-up and boot the system will
display the LBT desktop as discussed in the next section.
• Verbose boot. In this mode the system will output detailed information and status messages.
This option is used for system analysis or error detection. After a successful boot the system will
display the LBT desktop as discussed in the next section.
• Setup boot. This mode starts the Setup application in text mode. Use this mode in case of
configuration problems when the graphical desktop cannot be started or displayed.
Page 7
Page 16

When the boot loader takes over the start-up sequence, a corresponding message is shown on the
screen:
Uncompressing Linux ... OK, booting the kernel
Boot loader start-up message
You can switch off the LBT any time in any stage since the operating software is stored in a flash
memory module and thus protected from data-loss. The boot-up process is slow, so please be
patient
Page 8
Page 17

The LBT Desktop
After power-on, the LBT will first go through several boot sequence procedures. When the
operating system is successfully loaded from the flash memory, the desktop is displayed and you
can start working.
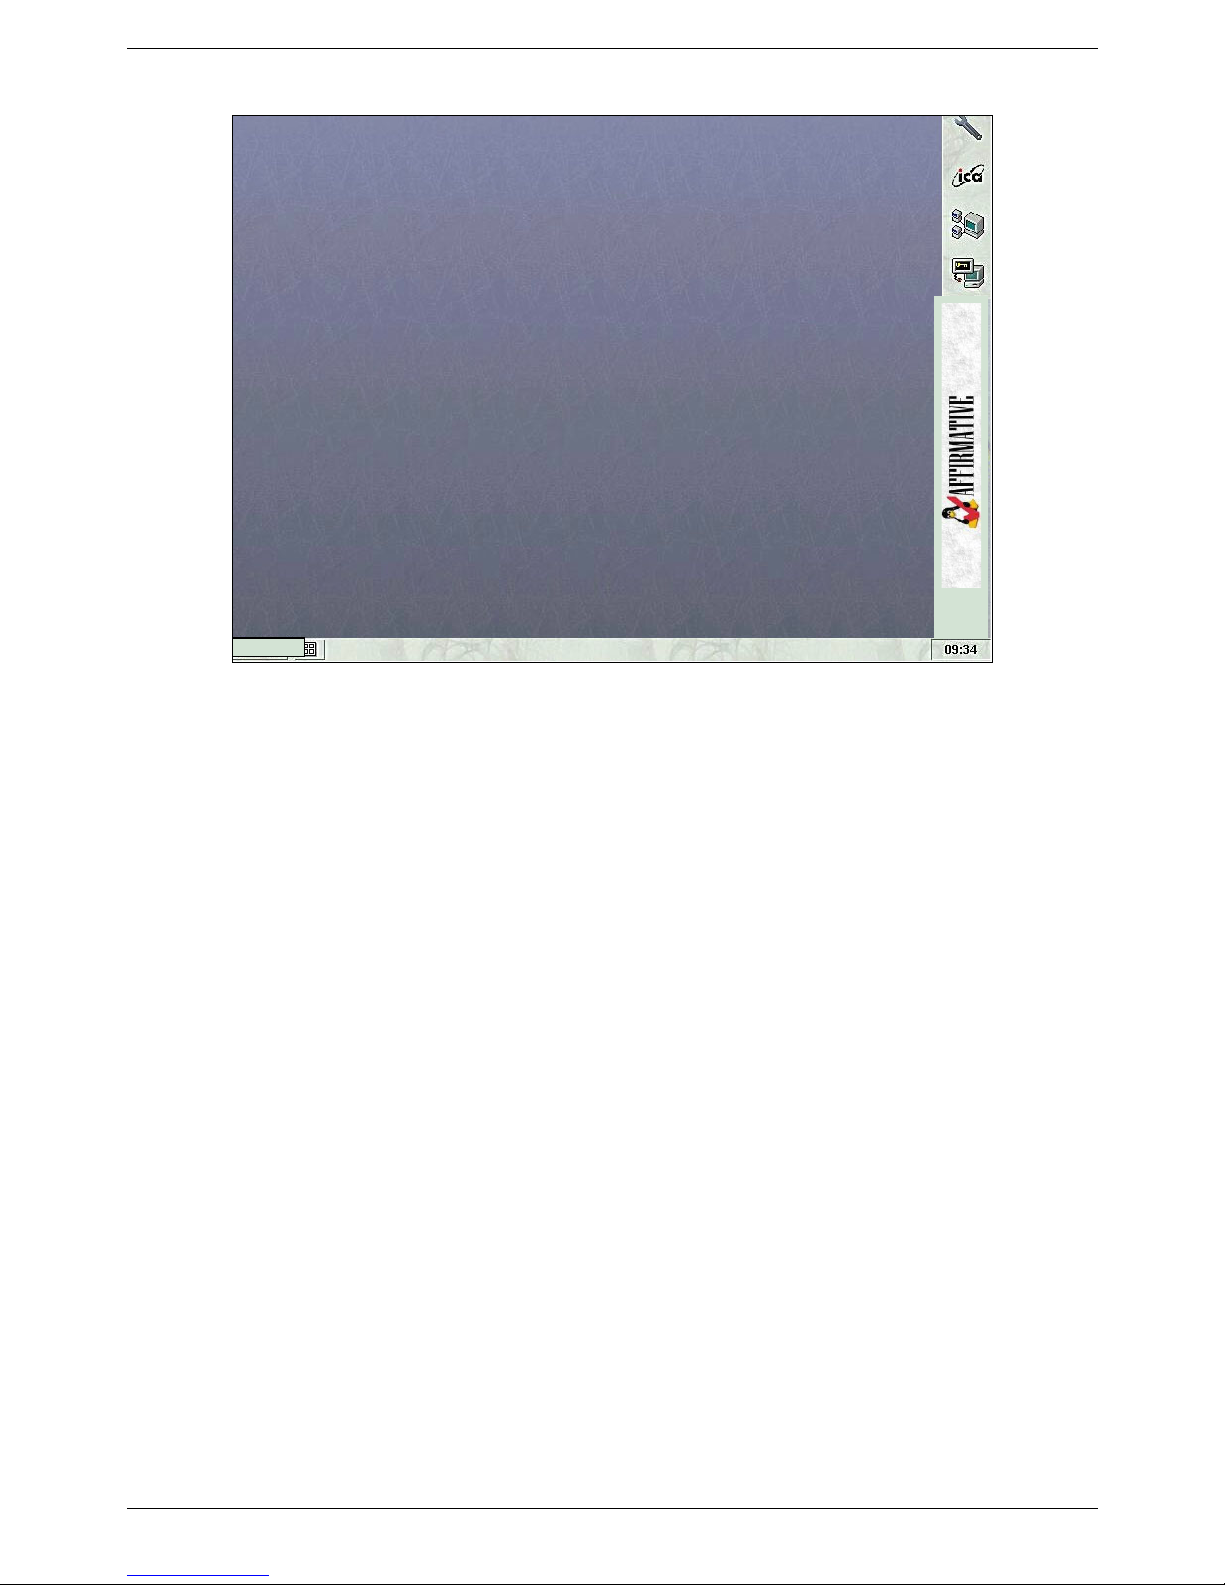
The LBT desktop consists of three areas:
• A panel at the bottom of the screen referred to as the “taskbar”. The taskbar is used to start
applications from the Main menu, to switch between running applications, and to toggle
between virtual desktops. The Main menu, the main application starter, is the button on the left
labeled “Start”. Click on this button to open the Main menu and select an application or Setup.
The icon to the right of the Main menu is the virtual desktop window list, if there is more than
one virtual desktop. The current system time is shown on the right, if the clock display is
enabled (default is no clock display).
• An Application Launcher, which is usually displayed on the right side of the desktop, containing
a selection of applications for easy access. You can add items to the Application Launcher or
remove items from it. By default, this Launcher bar is hidden, but it can be configured to be
always visible.
• The desktop area itself. This area is blank after the initial power-up of the system. Application
software will use this space to display client windows. You can also open the Main menu by
right clicking anywhere on the desktop
.
Page 9
Page 18
Start
LBT desktop with taskbar and Application Launcher
As a default setting, the Application Launcher is paged out of the desktop and “hidden” outside the
visible display area. This method is referred to as Smart Mode. Hiding the Application Launcher
outside the visible screen provides a greater desktop area for the display of application windows.
To display the Application Launcher, simply move the mouse pointer towards the appropriate edge
of the desktop. After clicking on an item, the selected application is started and the Application
Launcher will “hide” again outside the visible section. You can disable Smart Mode in Setup. The
Application Launcher will then be displayed within the visible area all the time. The Application
Launcher is usually displayed on the right side of the desktop. The position can be changed to top or
left side in Setup.
The Taskbar is always displayed at the bottom of the desktop. There is also a Smart Mode
parameter for the Taskbar, so you can hide it if you wish. The default here is Smart Mode off.
You can click the right mouse button over an item, such as an icon, an Application Launcher item,
or the desktop area, to display a context menu with choices that are applicable to the item you
clicked. If you don’t know what to do with an item, clicking the right mouse button on it is an easy
way to find out what can be done with the object. The desktop context menu contains the same
entries as the Main menu.
Move the mouse pointer over an icon and wait for a short while. A built-in context help text, called
“tooltip”, is displayed.
Page 10
Page 19

Taskbar
The taskbar contains the Main menu, the virtual desktop window list, the list of active client
windows and a clock. Click on Start to open the Main menu and select an application from the list.
Click on the window symbol to show a list of virtual desktops and the active windows on these
desktops.
The area to the right of the window list is filled with a placeholder as soon a window opens in the
desktop area. You can click on one of these placeholders to make the selected window the active
window and bring it to the front or right-click to display the window context menu.
Page 11
Page 20
Application Launcher
The Application Launcher is used as a quick access to applications that are frequently used. It can
be adjusted to your requirements by adding or removing items from it. Simply click on an icon with
the left mouse button to start the associated application.
By default, the Application Launcher is in Smart Mode at the right edge of the screen, and thus
hidden until you move the mouse pointer towards the edge of the screen. The Application Launcher
can be configured to be displayed either on the left side of the desktop, on the right or at the top.
Adding and Removing Application
Launcher Entries
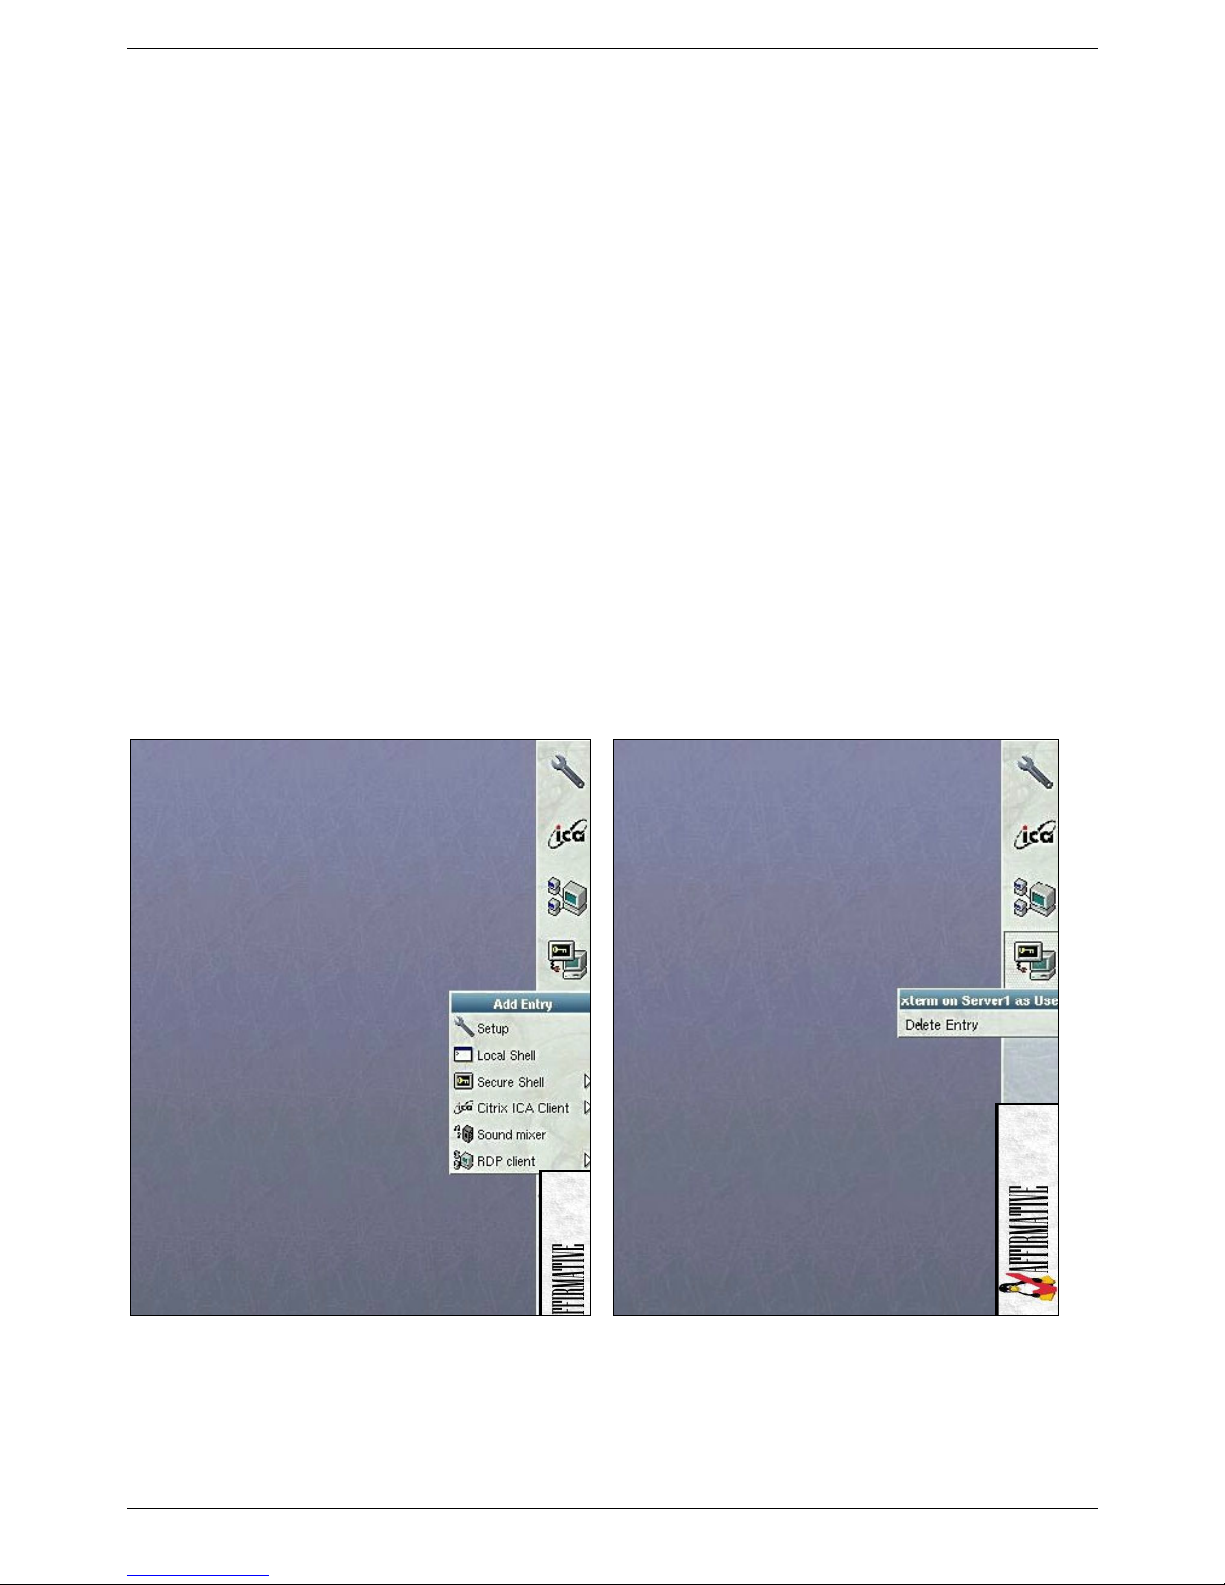
To add or remove entries from the Application Launcher simply do the following:
Right-click within an empty region of the
Application Launcher to display the “Add
Entry” menu. Select an item from the list to be
added to the Application Launcher:
Right-click on an Application Launcher item
to display its context menu. Select “Delete
Entry” to remove the item (and the
corresponding icon) from the Application
Launcher:
. Adding an Application Launcher entry
Page 12
Removing an Application Launcher entry
Page 21
Main Menu
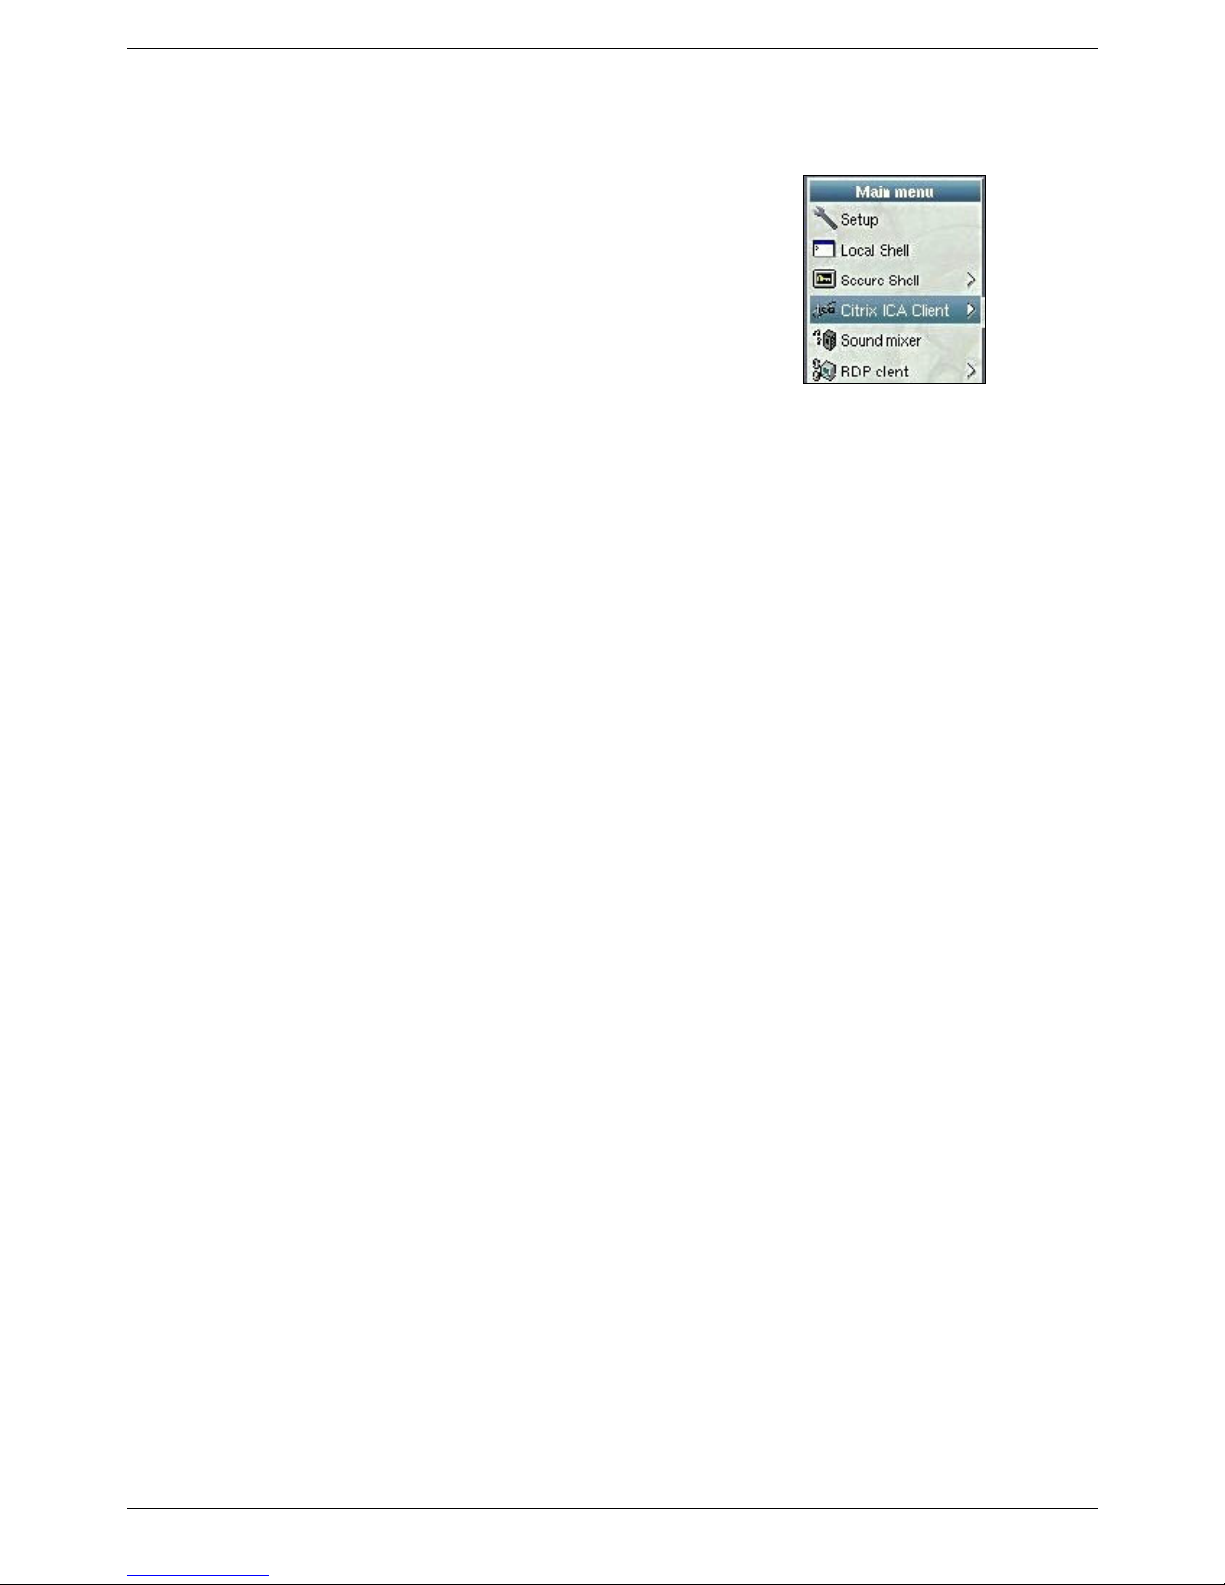
Click on Start in the taskbar or right-click on the desktop
area to open the Main menu and select an application from
the list.
The Main menu usually contains the following entries
(depending on actual system configuration):
• Setup. Use this application to configure the LBT
device and the LBT desktop.
• YESterm IP. Up to four display emulation sessions
and three printer emulation sessions can be configured.
• Citrix ICA Client. Up to three ICA6 clients can be
configured in Setup.
• Netscape Navigator 4.78. Open this browser session
to connect to remote or local Internet servers.
• RDP Client. Up to three RDP clients can be configured
in Setup
• Local Shell. Open a window containing a bash shell
running on the local system. Command line operations
are executed from this window.
Main menu
Page 13
Page 22
Working with Application Windows
Working with application windows on a Linux desktop is very similar to windows manipulation on
a Windows desktop. The major difference is the use of Virtual Desktops in Linux and the Stick
option for each window.
To manipulate a window’s position and/or size, the following functions are available:
• Move. Drag the window’s titlebar, i.e. move the mouse pointer over the titlebar, click the left
mouse button and hold this button while moving the mouse pointer.
• Alternatively, hold the Alt
location.
• Resize. Drag the window’s borders, i.e. move the mouse pointer over a border or the corner of
the window, then hold down the left mouse button while moving the mouse.
• You can also hold down the Alt
• Maximize. Use this function to maximize the window to fill the screen, or if the window is
already maximized, to shrink the window back to it’s original size. Clicking the maximize
button with the middle mouse button will maximize the window vertically; clicking the right
mouse button horizontally.
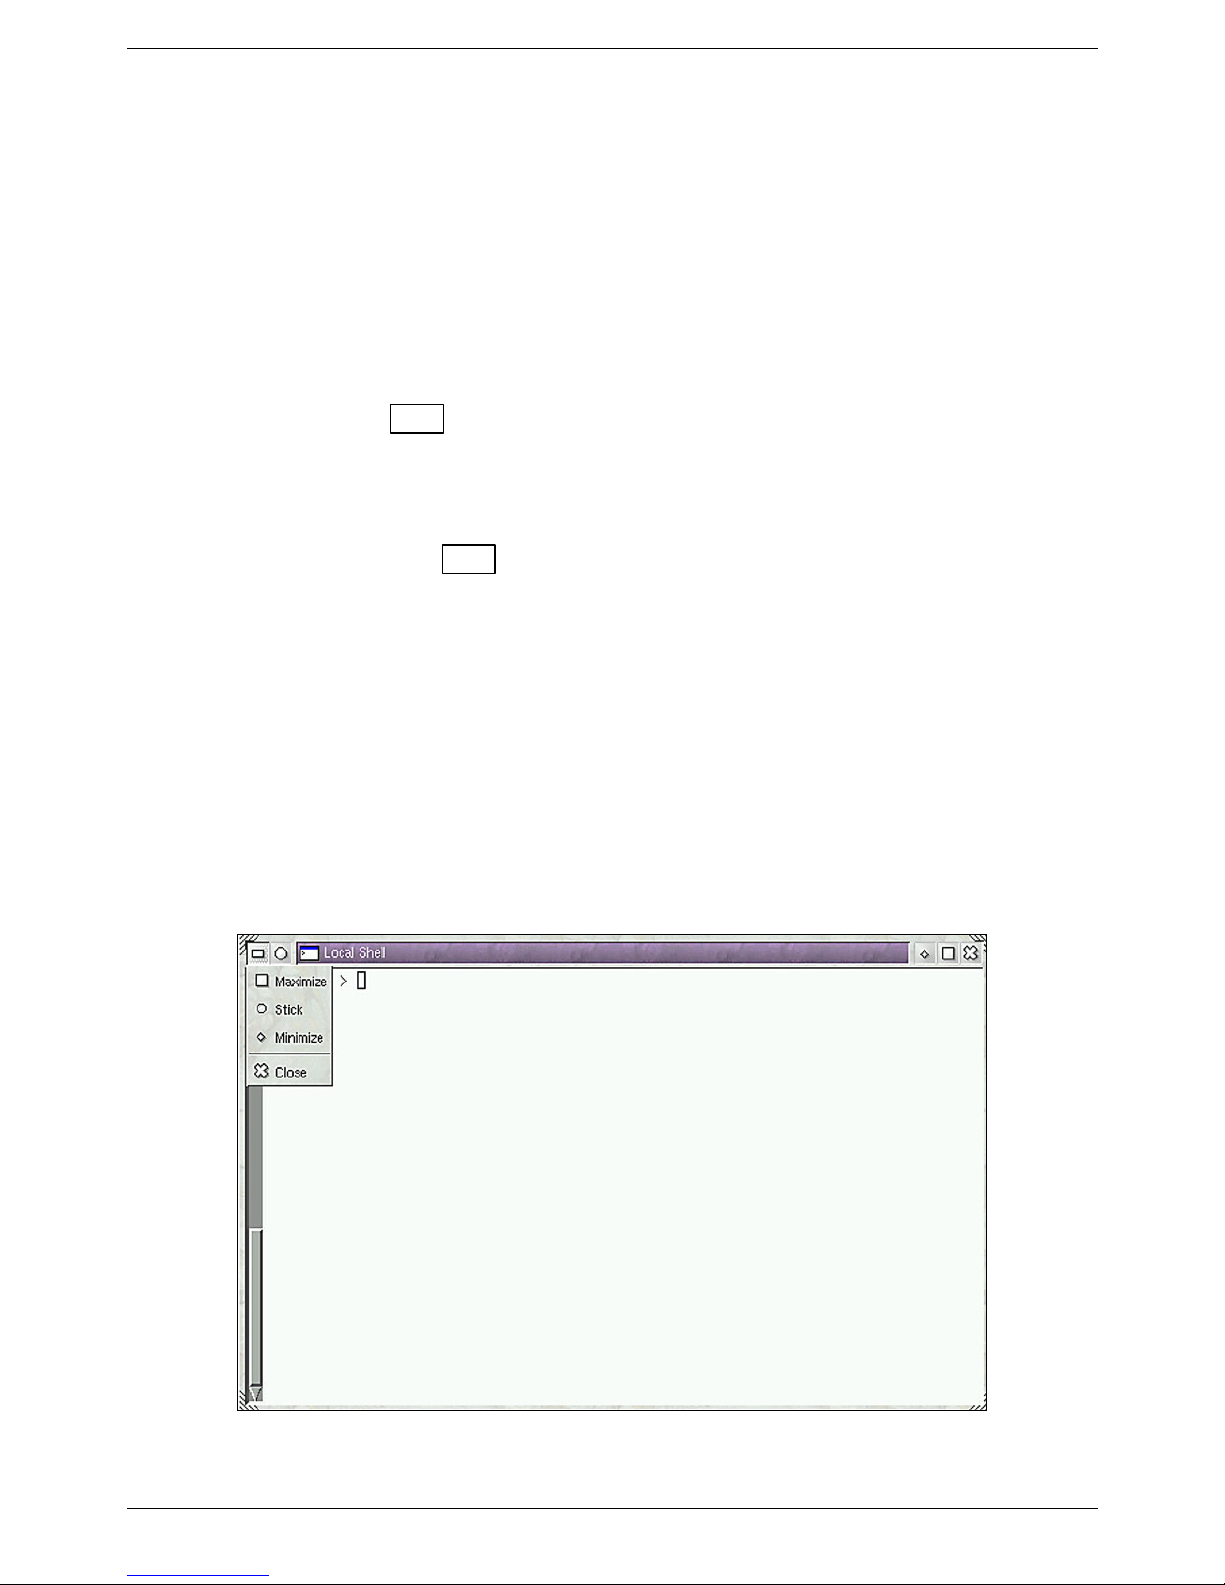
• Minimize. Click this entry to hide the window. A placeholder for the window will still be
displayed in the taskbar. Click on this placeholder to restore the window to its original size.
• Stick. Toggle the sticky state of the window. If sticky is set, the window is displayed on all
desktops.
• Close. Closes the current window.
The window menu provides the same functions as the titlebar buttons:
key + left mouse button and drag the window to the desired
key and the left mouse button while dragging the window.
Page 14
Window menu
Page 23

You can also right-click on the window’s titlebar or the placeholder in the taskbar to display the
window menu.
Switching between Windows
You can have several windows open at the same time. To change between these windows simply:
• Press and hold down the Ctrl
windows,
• Use the taskbar: click on the window title for the window to be displayed, i.e. be brought to the
front or be restored from an minimized state, or
• Click anywhere on a window to bring it to the front and make it the active window for user
input.
• Use Alt
+ Tab for task switching in RDP / ICA clients within the Windows environment.
key and then press the Tab key to toggle through active
Page 15
Page 24
Virtual Desktops
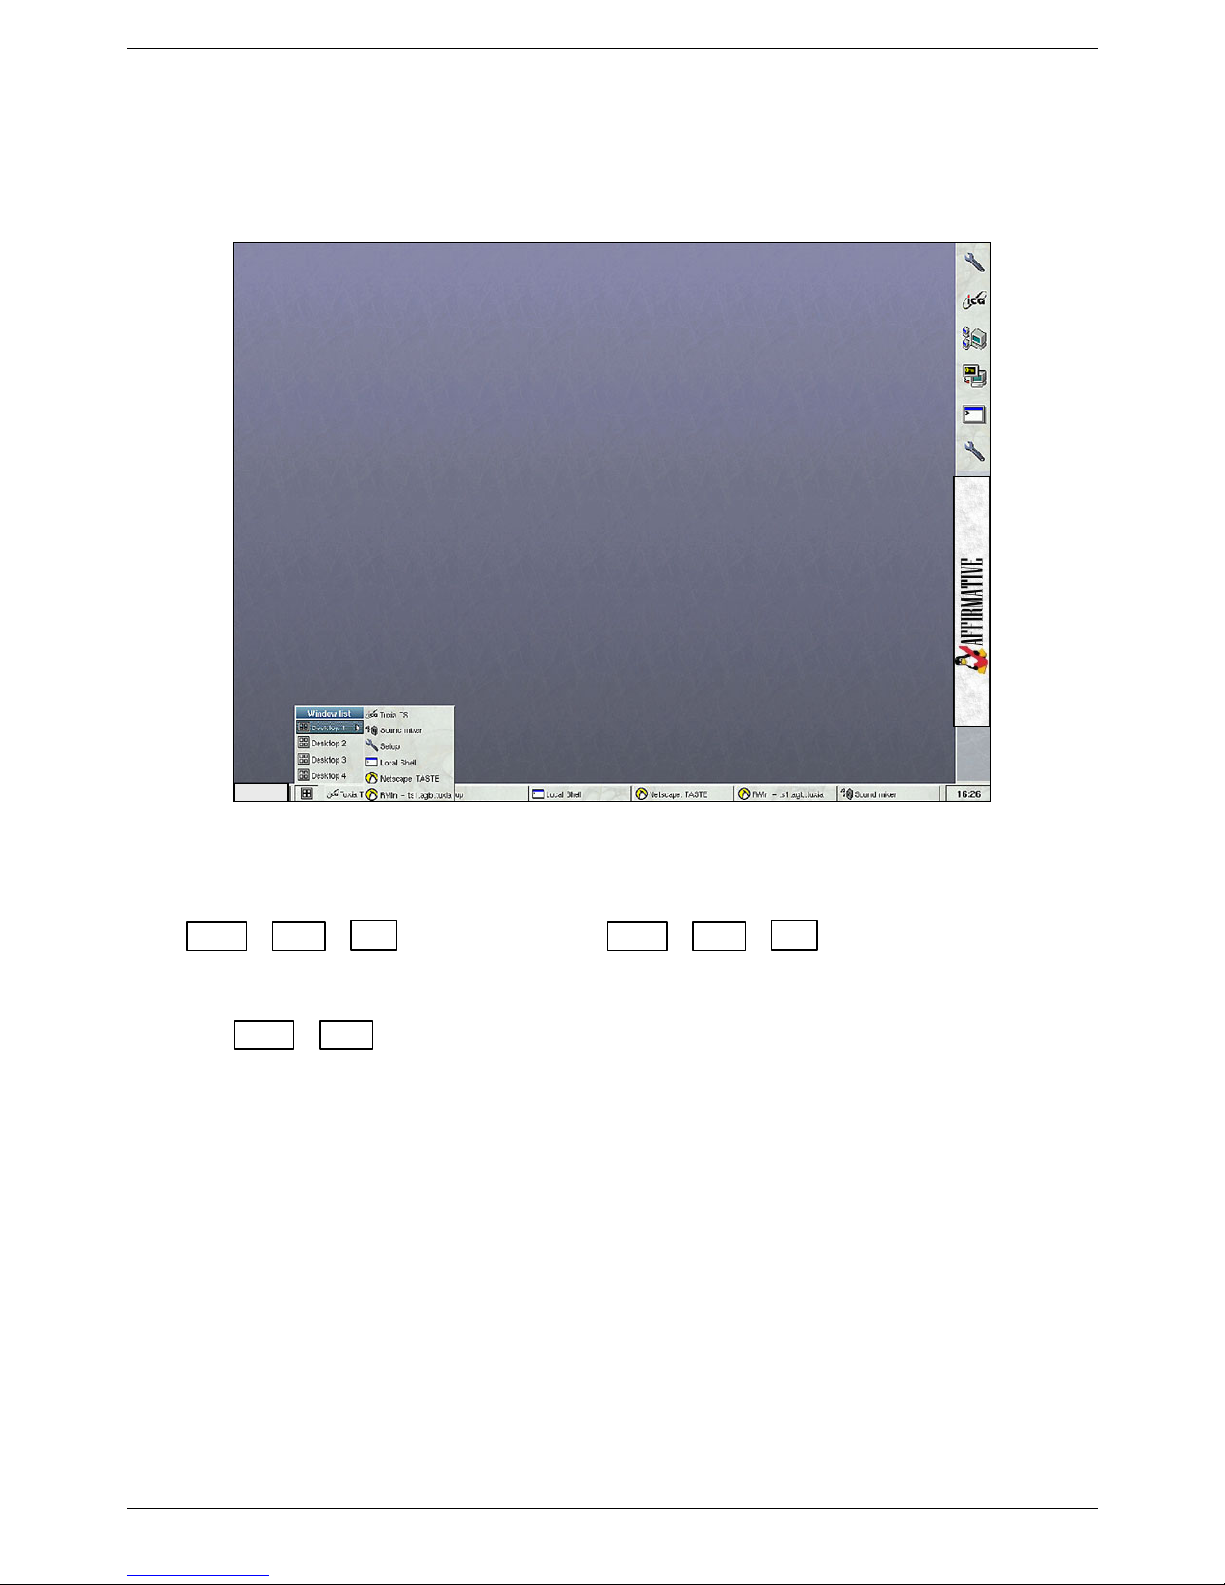
Up to ten desktops can be configured in Setup extending the display area.
Start
Virtual desktops window list
You can easily switch between desktops by clicking on the window list button of the taskbar or
press Ctrl
- Alt - → to toggle forward or Ctrl - Alt - ← to toggle backwards
through the desktops one by one, or click on the “Window list” button to display the desktops and
the active windows within these desktops. Please note that switching from the last desktop to the
first using Ctrl
- Alt and the left/right arrow requires that the progression, i.e. 4 ⇒ 3 ⇒ 2 ⇒ 1,
be followed.
If you want a window to be present on all virtual desktops all the time, simply press the “Stick”
button in the window titlebar or select this function from the window menu or window context
menu. The window will then be “pinned” to the background and will appear on all desktops in the
same position.
Page 16
Page 25

How to get started
Here are a few tips to get you up and running:
• To start an application, click on the Start button on the taskbar panel and choose an entry from
the list or sub-menus.
• Click on an icon in the Application Launcher to start the corresponding application.
• Select “Start Main Menu” > “Local Shell” to open a bash shell (Bourne Again Shell) on the
local system and run a built-in Unix command.
• Choose “Start Main Menu” > “Setup” or the Setup icon in the Application Launcher to
configure the local system.
• Press Ctrl - Alt - → / Ctrl - Alt - ← to switch between virtual desktops
or
Ctrl - Tab to toggle between running applications.
• Use the right mouse button to access context menus for the taskbar, the desktop, and the
Application Launcher.
Mouse Techniques
Modern operating systems with graphical user interfaces make frequent use of the mouse to start
programs, close, minimize, restore or resize windows, etc.
• Left-clicking on the border, the titlebar, or the window content area activates and raises the
window to the top.
• Right-clicking on the titlebar displays the window’s menu if the window is active, otherwise
right-clicking will activate the window
• Dragging the titlebar moves the window.
• Dragging on corners or edges resizes the window.
• Clicking on the right icon in the window title bar X closes the application and the window.
• Clicking on the “Sticky” icon o toggles the window’s sticky state.
• Left-clicking on the Maximize button maximizes the window.
• Middle-clicking on the Maximize button maximizes the window vertically.
• Right-clicking on the Maximize button maximizes the window horizontally.
Page 17
Page 26

Page 18
Page 27
Client Applications
This section describes the built-in client applications on the LBT:
• Local Shell
• Citrix ICA Client
• RDP Client
Local Shell
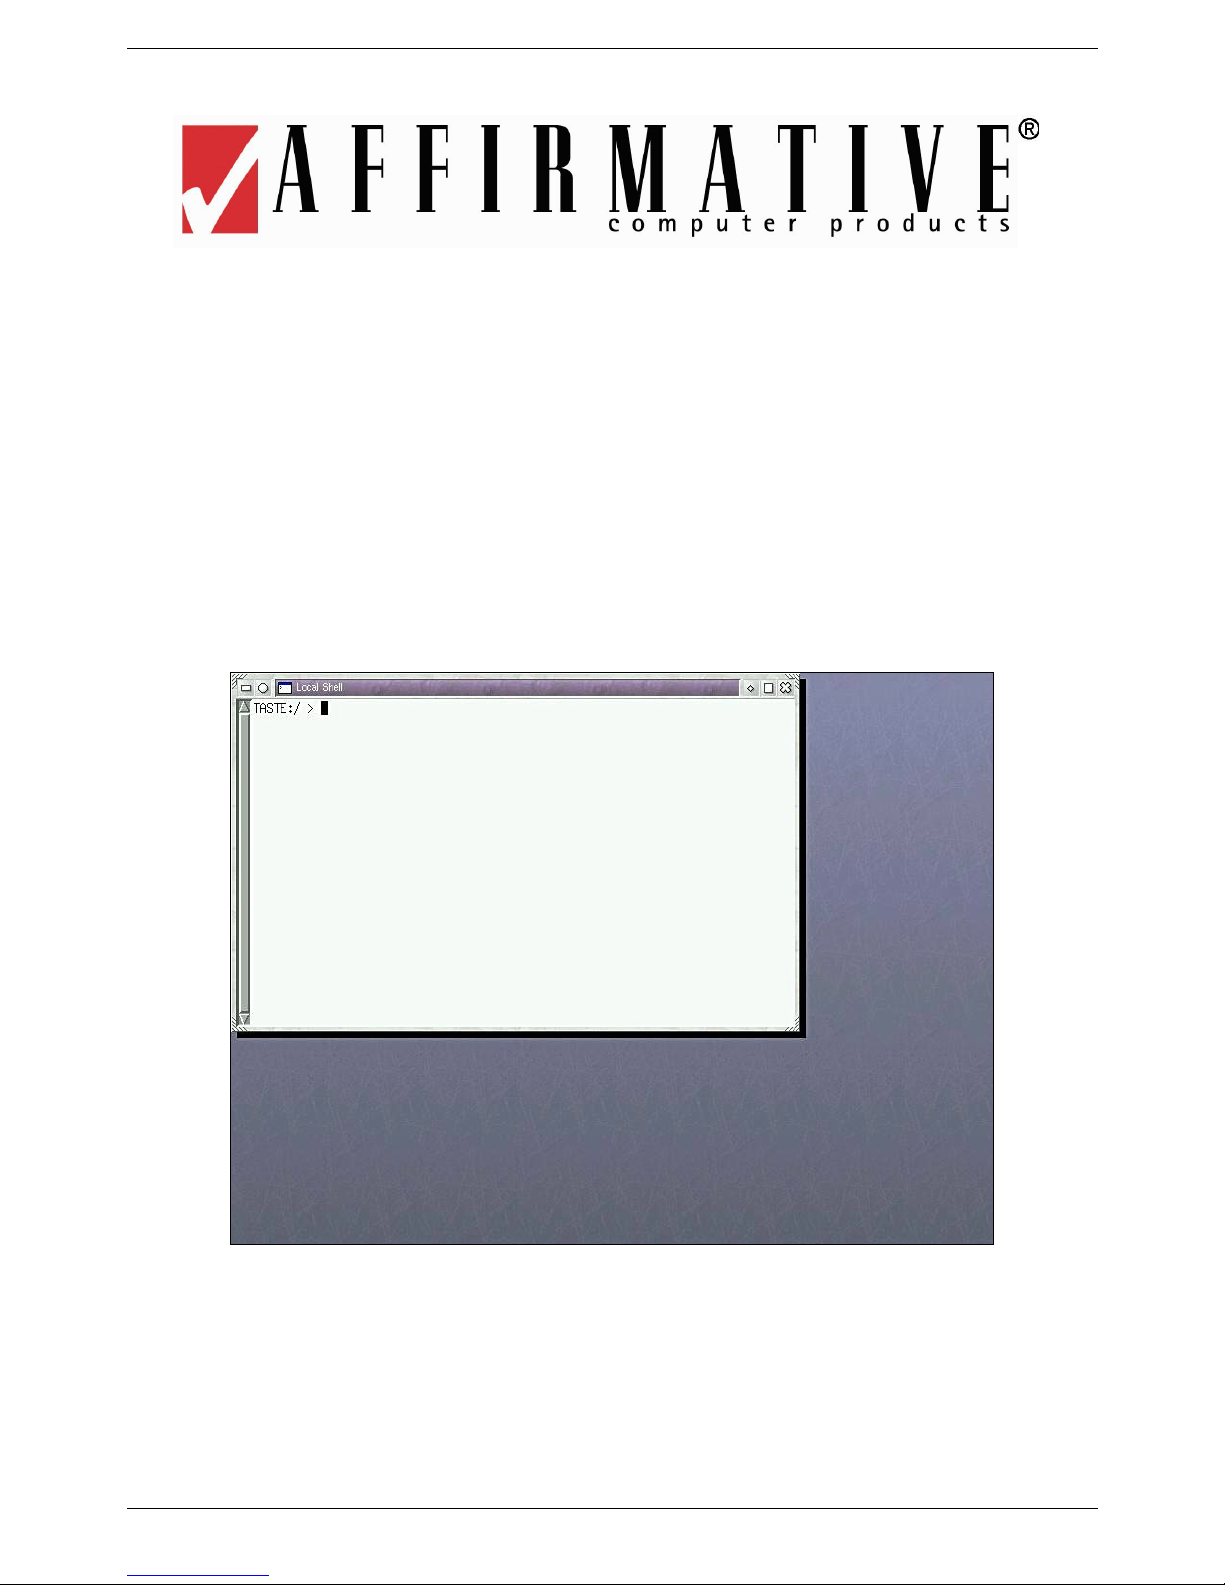
Select “Local Shell” to open a window providing a bash shell (Bourne Again Shell) on the local
host:
The following commands are built into the operating system by default and can be used in the local
shell:
Page 19
Local shell
Page 28

badblocks
basename
bash
cat
cd
cdquery
chat
chmod
cmp
confctrl
configd
cp
cut
date
dd
dhcpcd
dirname
e2fsck
egrep
exit
fdelpart
find
ftool
ftp
fupdate
fversion
getmyip
getsetup
grep
gzip
head
hostname
hwclock
ifconfig
imon
init
insmod
ipppd
isdnctrl
killall
ldd
ln
loadkeys
lpc
lpd
lpq
lpr
lprm
ls
lsmod
mkdir
mke2fs
mknod
mkswap
mount
mv
netcat
netstat
nice
nmbd
ping
pman
pppd
ps
readtrak
reboot
rm
rmmod
route
sed
seq
setserial
sh
sleep
smbd
sort
ssh
ssh-starter
stty
su
swapoff
swapon
sync
syslogd
tail
tail-f
tar
tasteversion
thttpd
touch
tr
trak
trakinfo
tune2fs
umount
vi
vim
writetra
Page 20
Page 29
Citrix ICA Client
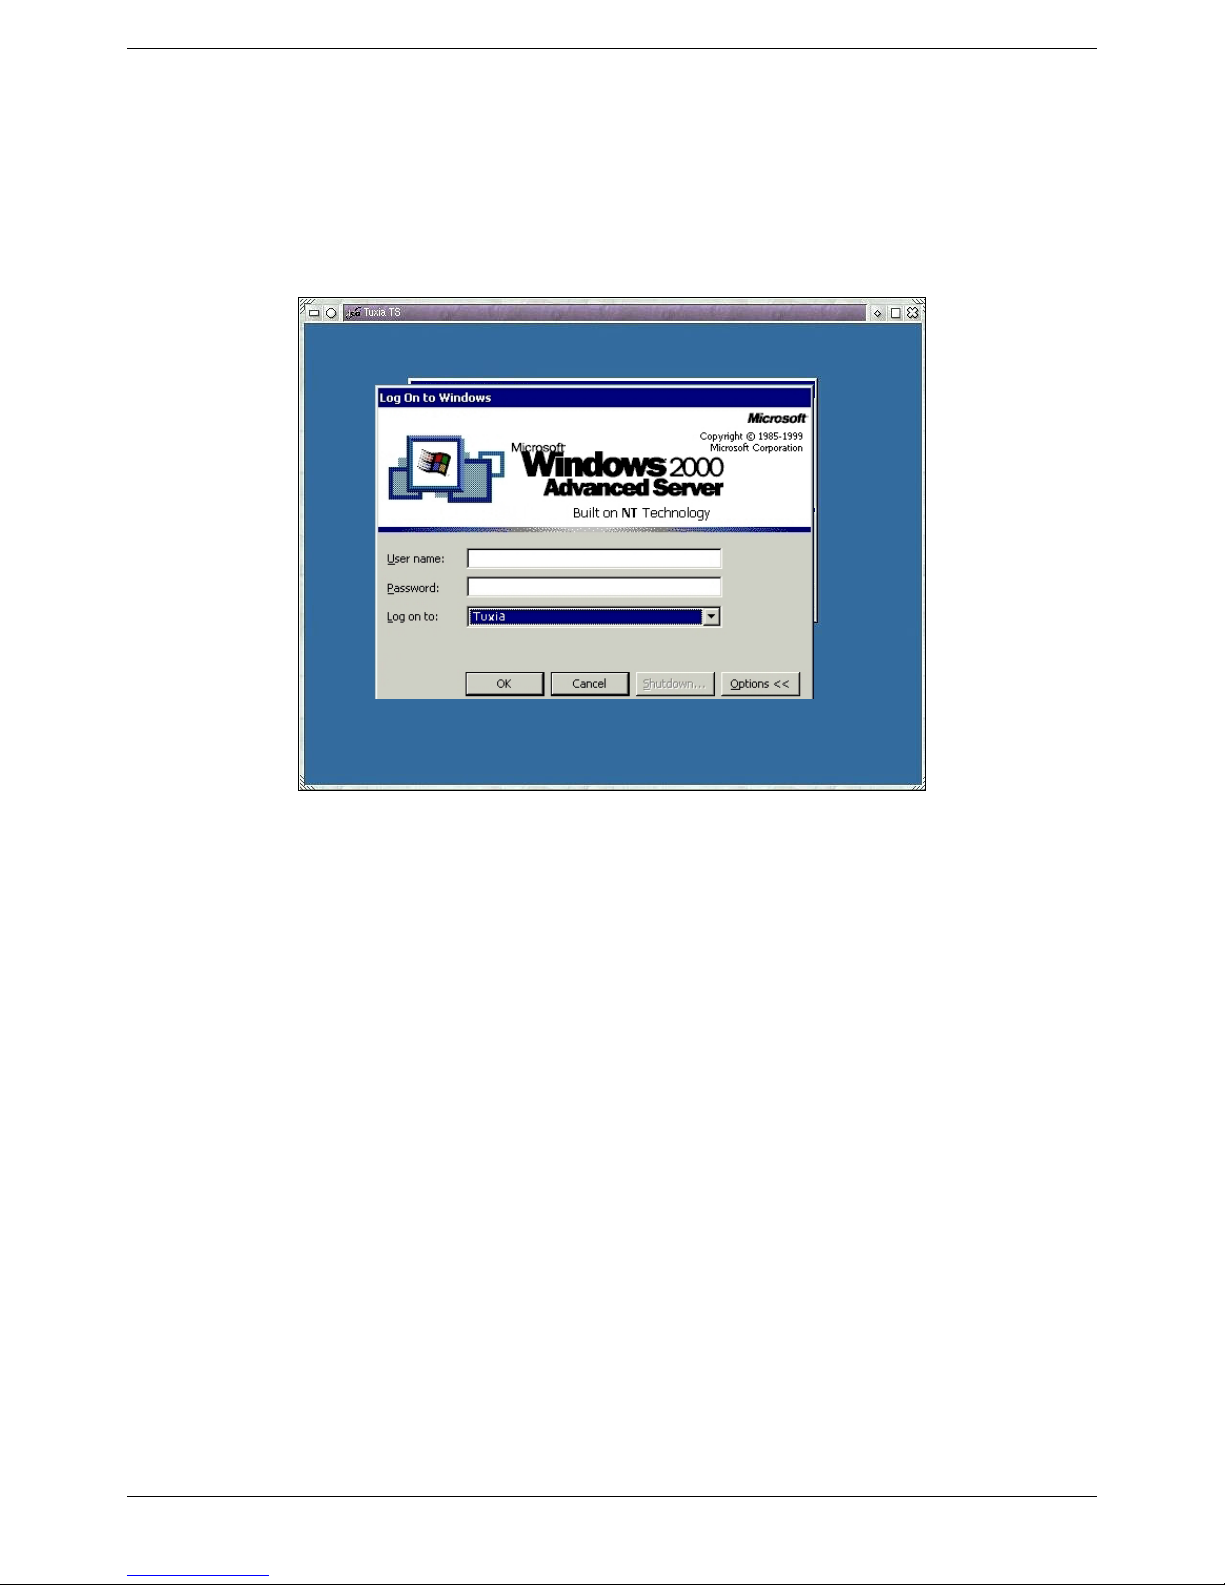
Select from up to three predefined ICA client sessions. The LBT will then connect to the selected
server and initiate the login sequence:
Citrix ICA client user logon screen
After you have successfully logged on to a server running Citrix software, the remote session is
displayed in the pre-configured window state (full screen or selected window size), and the remote
host desktop is shown in the client window.
Page 21
Page 30
RDP Client
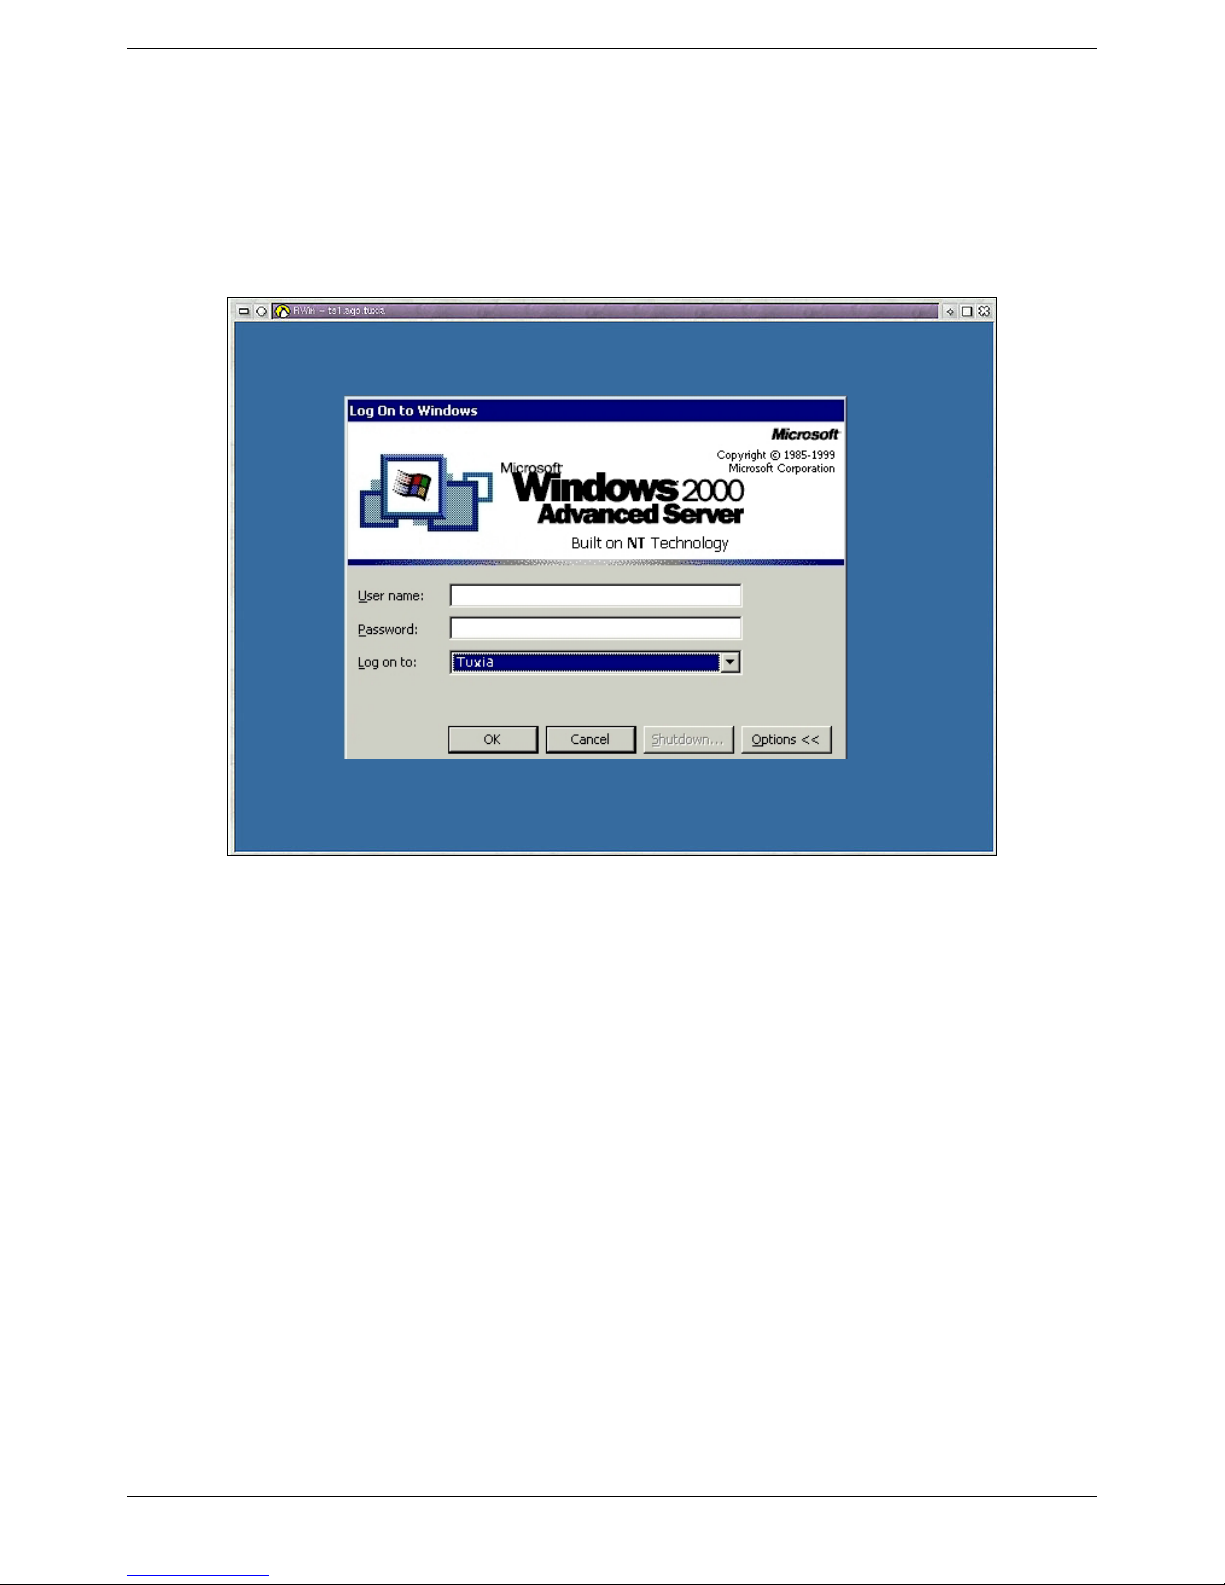
Select from up to three predefined RDP client sessions. The LBT will then connect to the selected
server and initiate the login sequence:
RDP client user logon screen
After a successful log-on to the terminal server, the remote session is started and displayed in the
configured window state (full screen or selected window size), and the remote host desktop is
displayed in the client window (see example below).
Page 22
Page 31

LBT Setup
After bootup, the LBT comes up in Linux desktop mode, with a blank desktop except for the Task
Bar at the bottom and the Start button in the lower left corner. If you move the cursor to the far
right, a Launch Bar will appear.
Activate the Main menu by left clicking on
This menu will provide choices of: Setup, Local shell, and the configured sessions.
Before you activate any of the sessions for the first time, you will have to go into Setup and change,
at a minimum, some network and server parameters
Use the Setup application to configure LBT hardware, client applications, and select desktop
settings. Please be careful when changing parameters, since faulty configuration settings, especially
in display resolution might render the system inoperative.
Highlight
the current firmware version in the upper portion of any Setup screen, shown as TASTE: xx.xxx.
As you navigate the menus, you will want to change some parameters. Whenever you first attempt
to make a change, you will be faced with a logon sub-window for security purposes. In this subwindow, type
menu, press
window, navigate with the
menus to the top-level menu until you are asked if you want to
sub-windows in any other way,
you choose to
and the LBT will either restart the window manager or perform a full system reboot for your
changes to take effect. A reboot is visibly obvious; ignore any ominous looking messages that may
appear on the screen during this reboot. If the window manager is restarted, your only indication
will be the disappearance of the Task Bar at the bottom of the screen. When the Task Bar
reappears, you can proceed.
Setup and left click or hit PC Enter. You will see a menu of choices. You can also see
root for the user name, and leave the password blank. To go back to the next higher
Left Arrow or Right Arrow, or click on <…>. When you get to a parameter sub-
Tab key. To save your changes, you must back up through all the
you will lose all the changes you have made since your last save. If
Apply changes, the configuration file will be updated in the system’s flash memory,
Start, or by right clicking anywhere on the desktop.
.
Apply changes. If you exit the menu
Page 23
Page 32
System Information
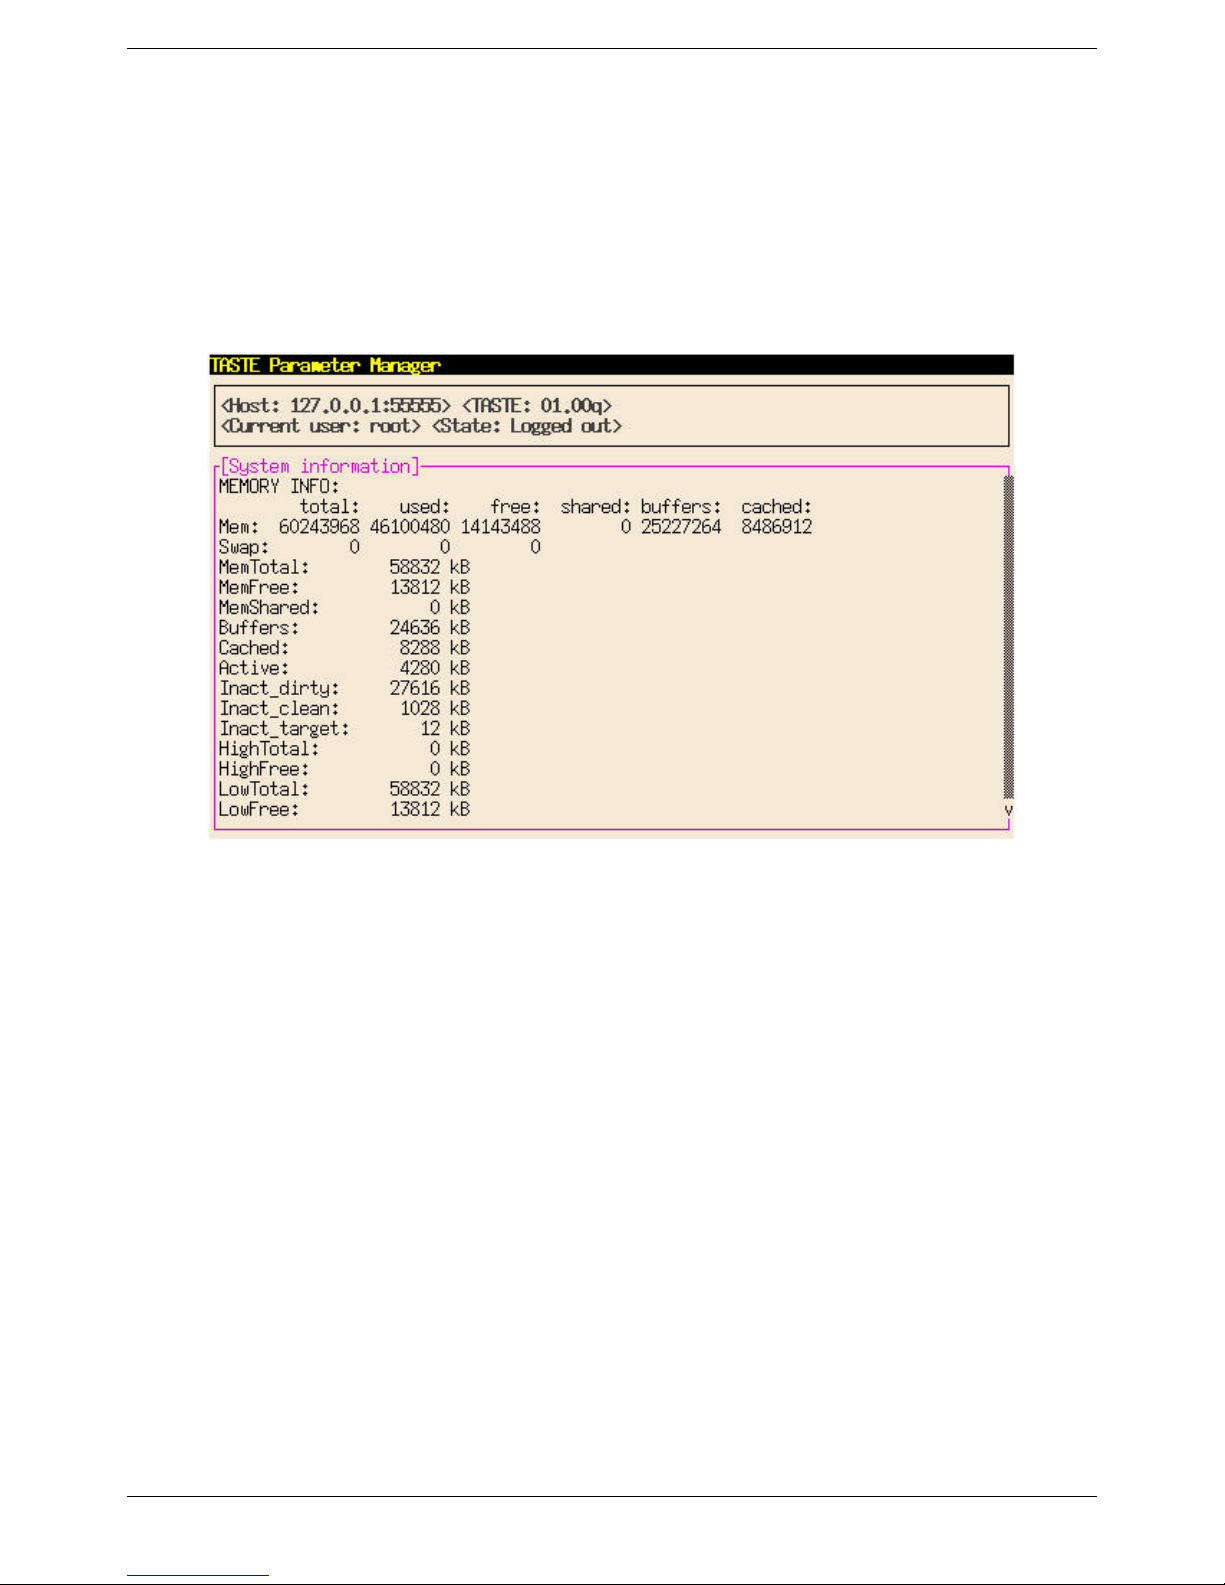
Click on this and you will see a lot of esoteric information, most of which is of interest only to a
Linuxphile. But scroll down to IFCONFIG, using the keyboard arrow keys, and you will see the
LBT IP address, the MAC hardware address, the subnet mask, and the Broadcast IP address. You
can only look; you can’t change anything from here.
System Information Window.
Page 24
Page 33
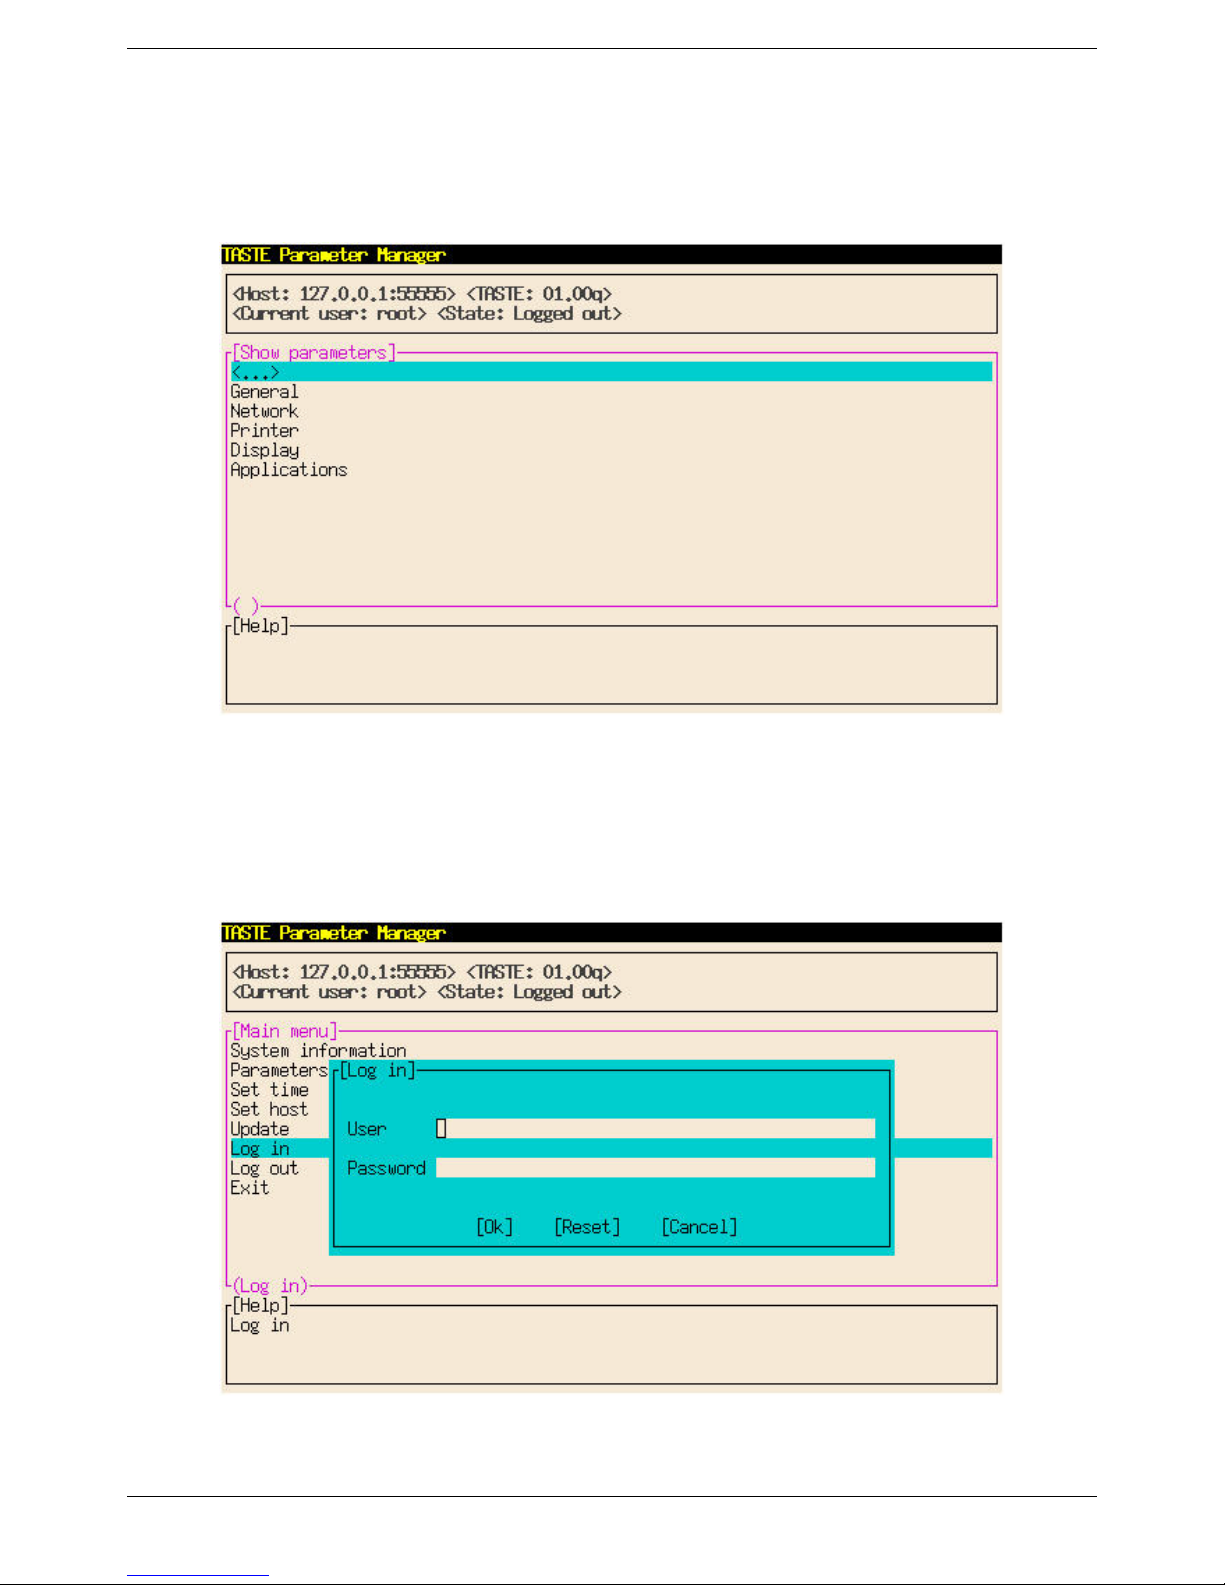
Parameters
Most of the Setup changes you make will be made from this section.
Show Parameters Window.
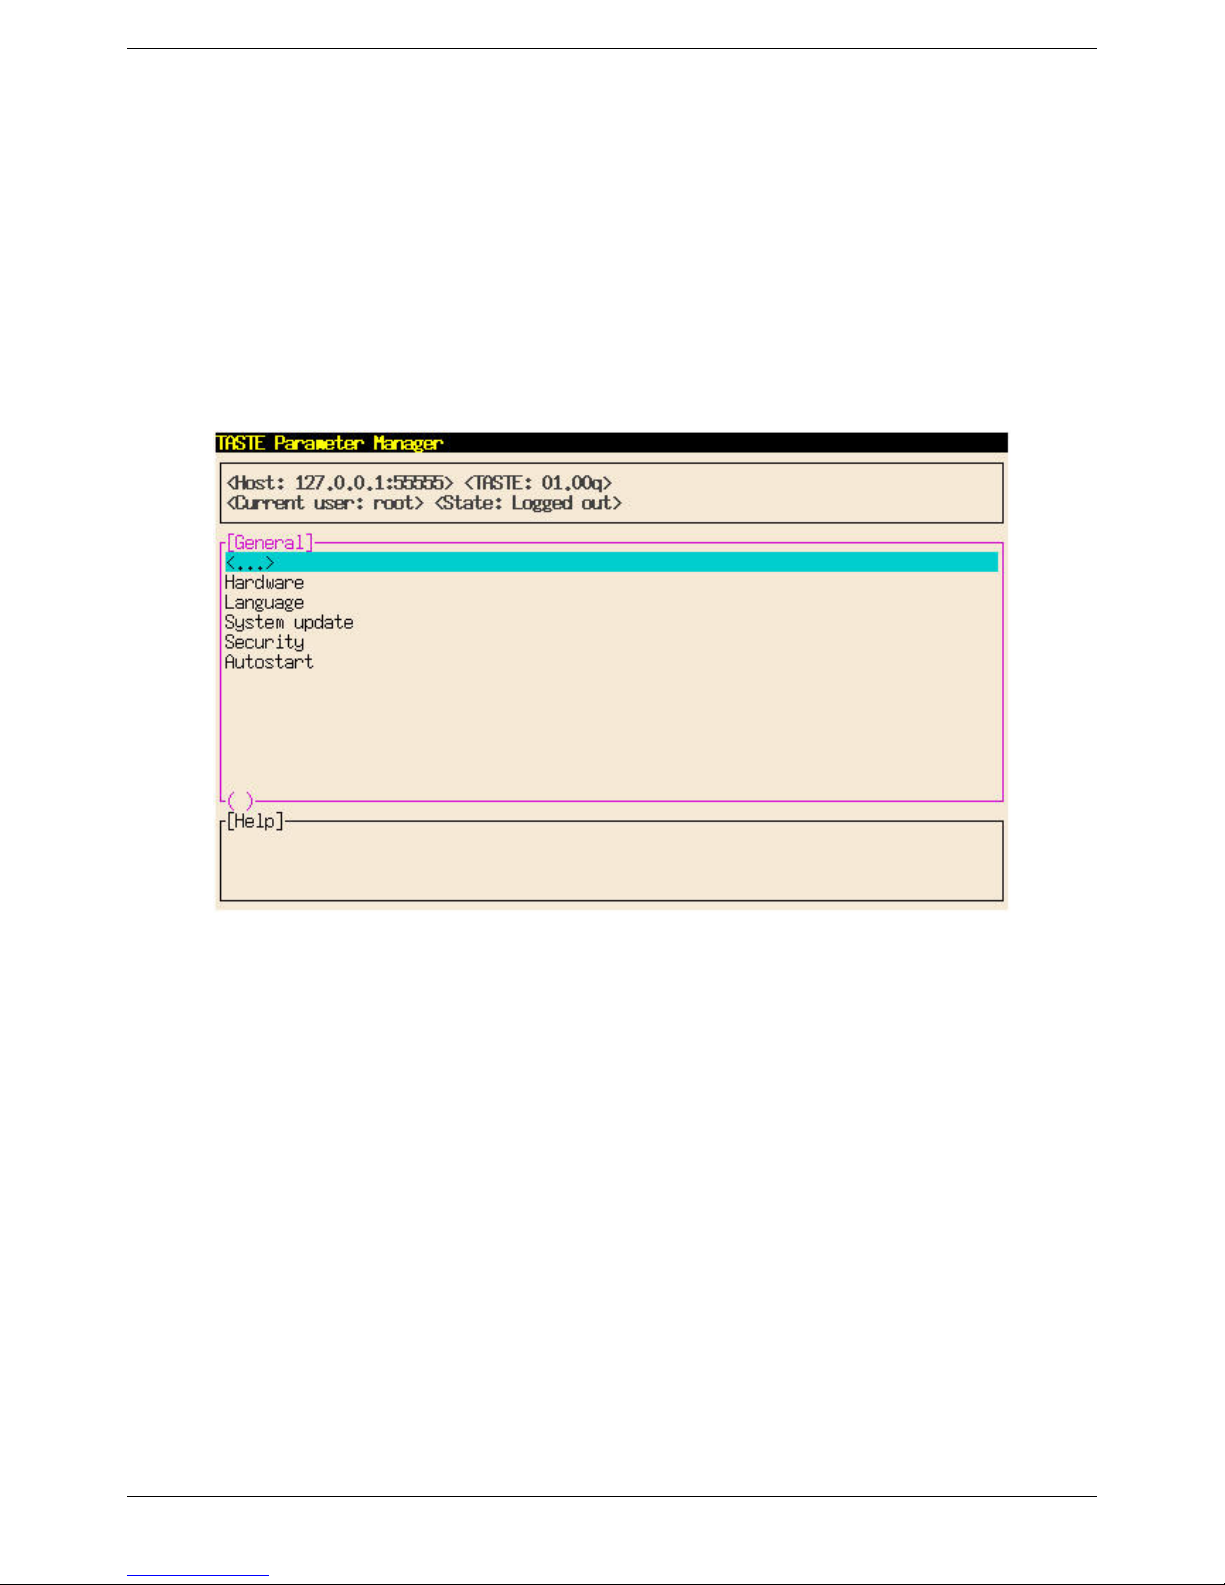
Initially, you must be logged in as “root” to make any changes. If you did not log in previously, a
login screen is displayed the first time you select a parameter. Leave the password blank. Later,
you can change user name and password if you wish.
Page 25
User Login Window
Page 34
To save your changes, you must back up through all the menus until you are asked if you want to
Apply changes. If you exit the menu sub-windows in any other way, you will lose all the changes
you have made since your last save. If you reply
configuration file will be updated in the system’s writeable file system, and the device will either
restart the window manager or perform a full system reboot for your changes to take effect.
Yes to the Apply changes question, the
General
This sub-menu provides entries to change hardware settings (network configuration), select the
desktop language, initiate a software update and run remote diagnostic functions.
General Window
Hardware
The only parameters you might want to change from this menu are “ Start Sound at startup”,
“Monitor horizontal frequency range”, “Monitor horizontal frequency range”, and “Mouse type”.
Page 26
Page 35
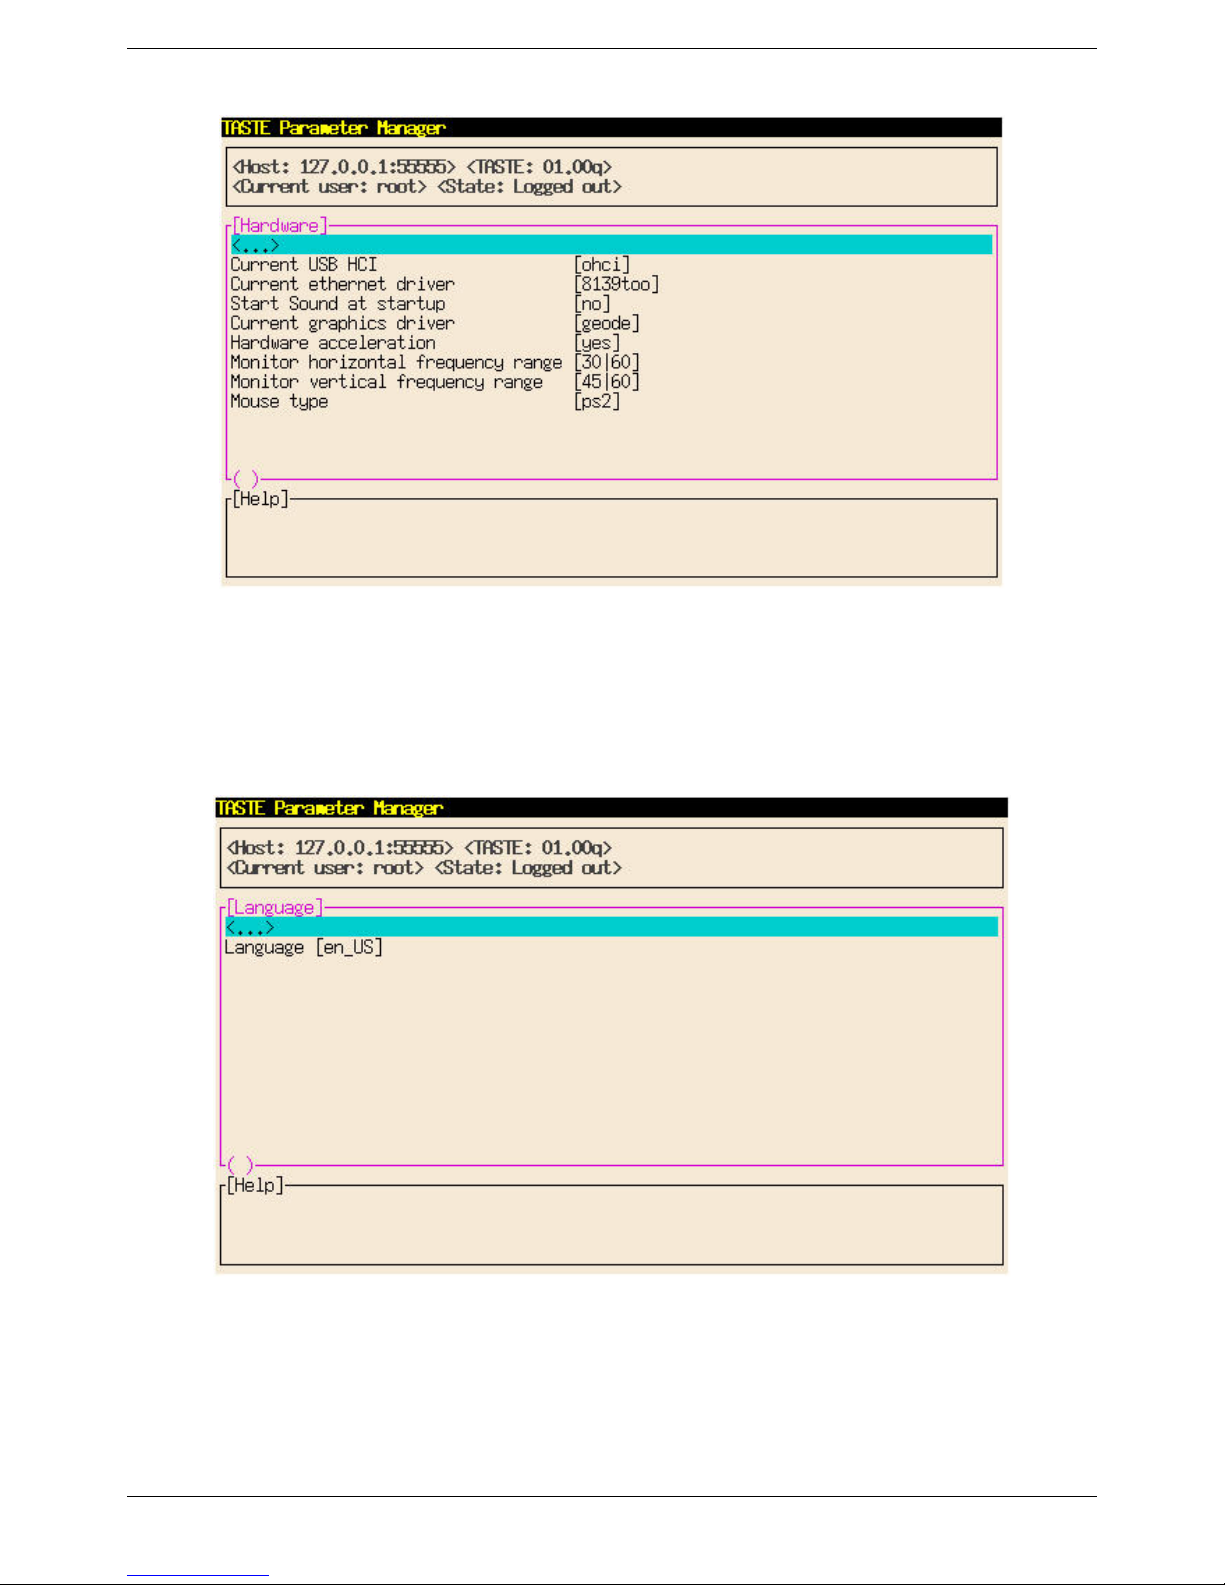
Hardware Window
Language
The first Language window shows the current selected language.
If you wish to change the language, you will be given the choices of English, German, or Italian.
Page 27
Language Window
Page 36
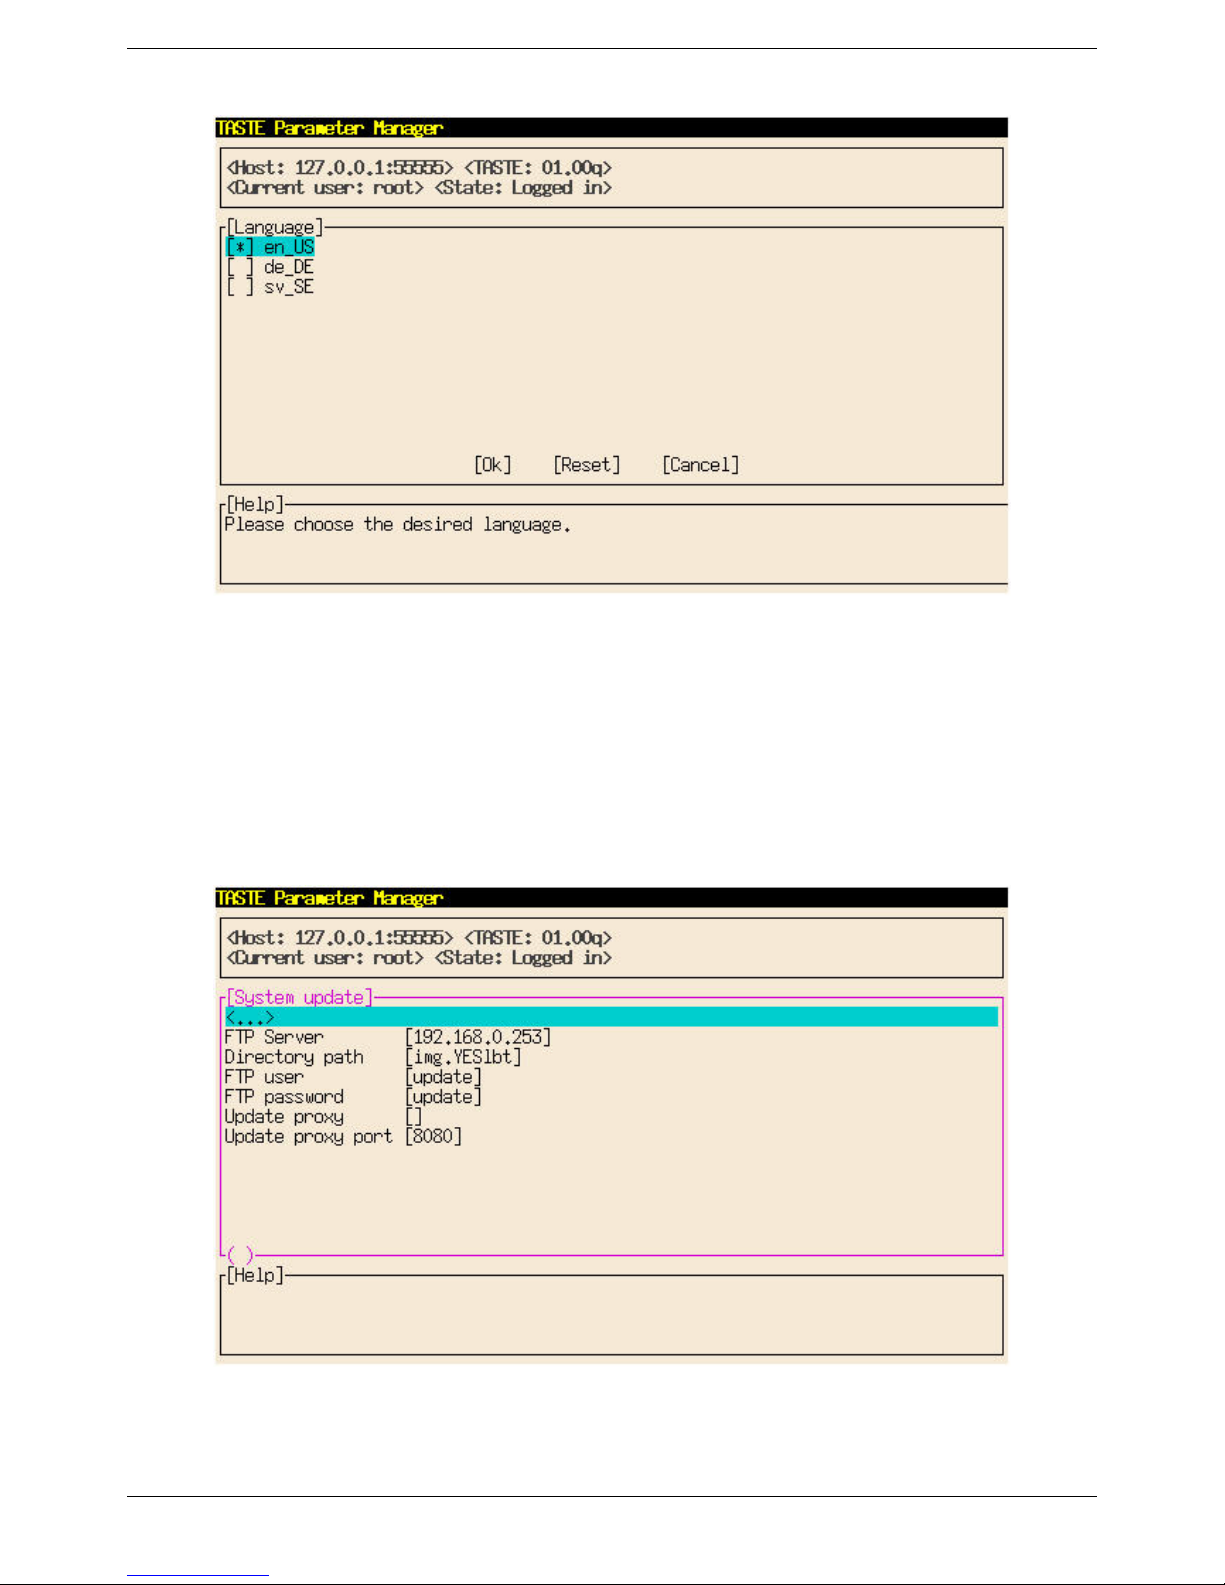
Language Choices Window
System Update
If you want to use FTP to update your firmware, you must first enter the FTP server parameters
here.
Page 28
System Update Window
Page 37
• FTP Server. Enter the IP address of the FTP server providing the update files.
• Directory Path. Your entry here depends upon the specifics of your FTP server software. If the
path to the upgrade files is completely defined in the server’s FTP software configuration, this
field will be left blank. Do not enter any file name here, only path information, if necessary
• FTP User. Enter the FTP user name to login at the FTP server.
• FTP Password. Enter the FTP password to login at the FTP server. Even if you do not require a
password at the server, type something in this field anyway. The Setup software does not like a
blank field here.
• Update Proxy. If you are using a proxy server, enter the IP address here.
• Update Proxy Port. Enter the port to be used on the proxy server.
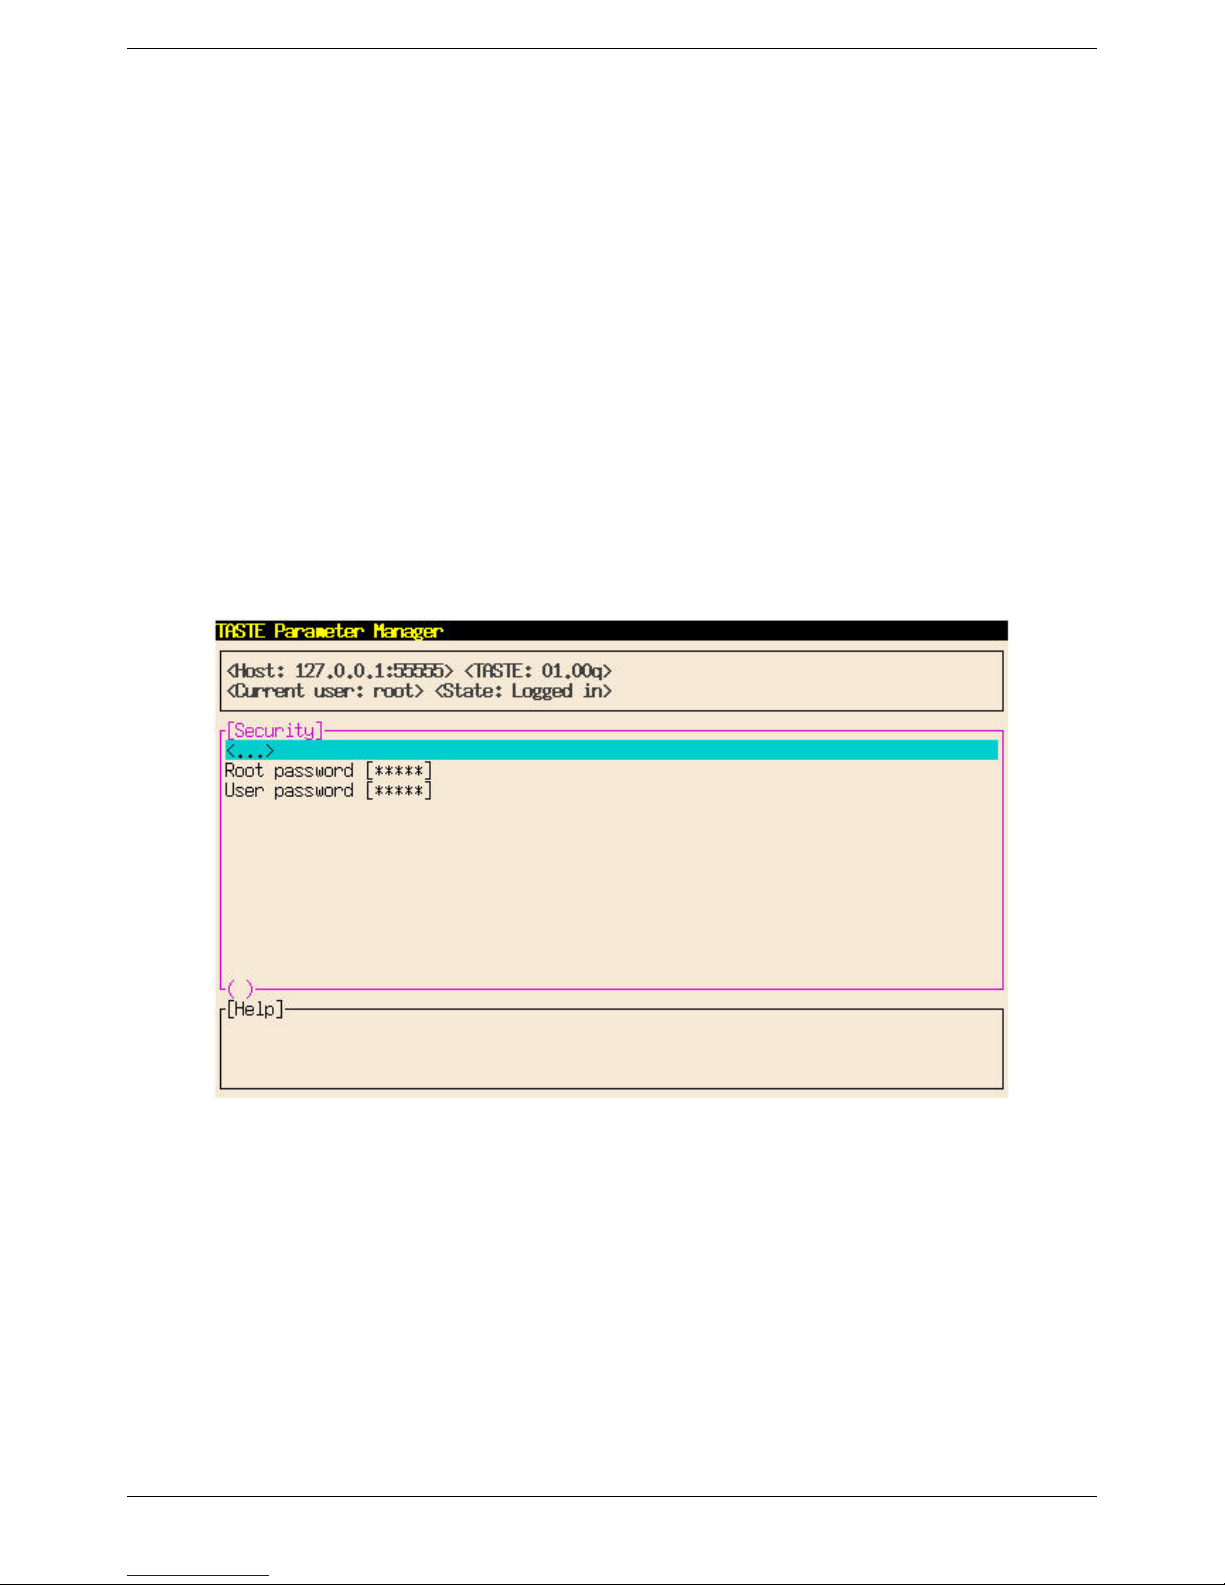
Security
If you want to establish password security for the administrator and for the user, enter passwords here.
• Root Password. This password allows the administrator to change Setup parameters.
• User Password. This password allows the user to log in.
Autostart
Ignore this parameter
Page 29
Security Window
Page 38
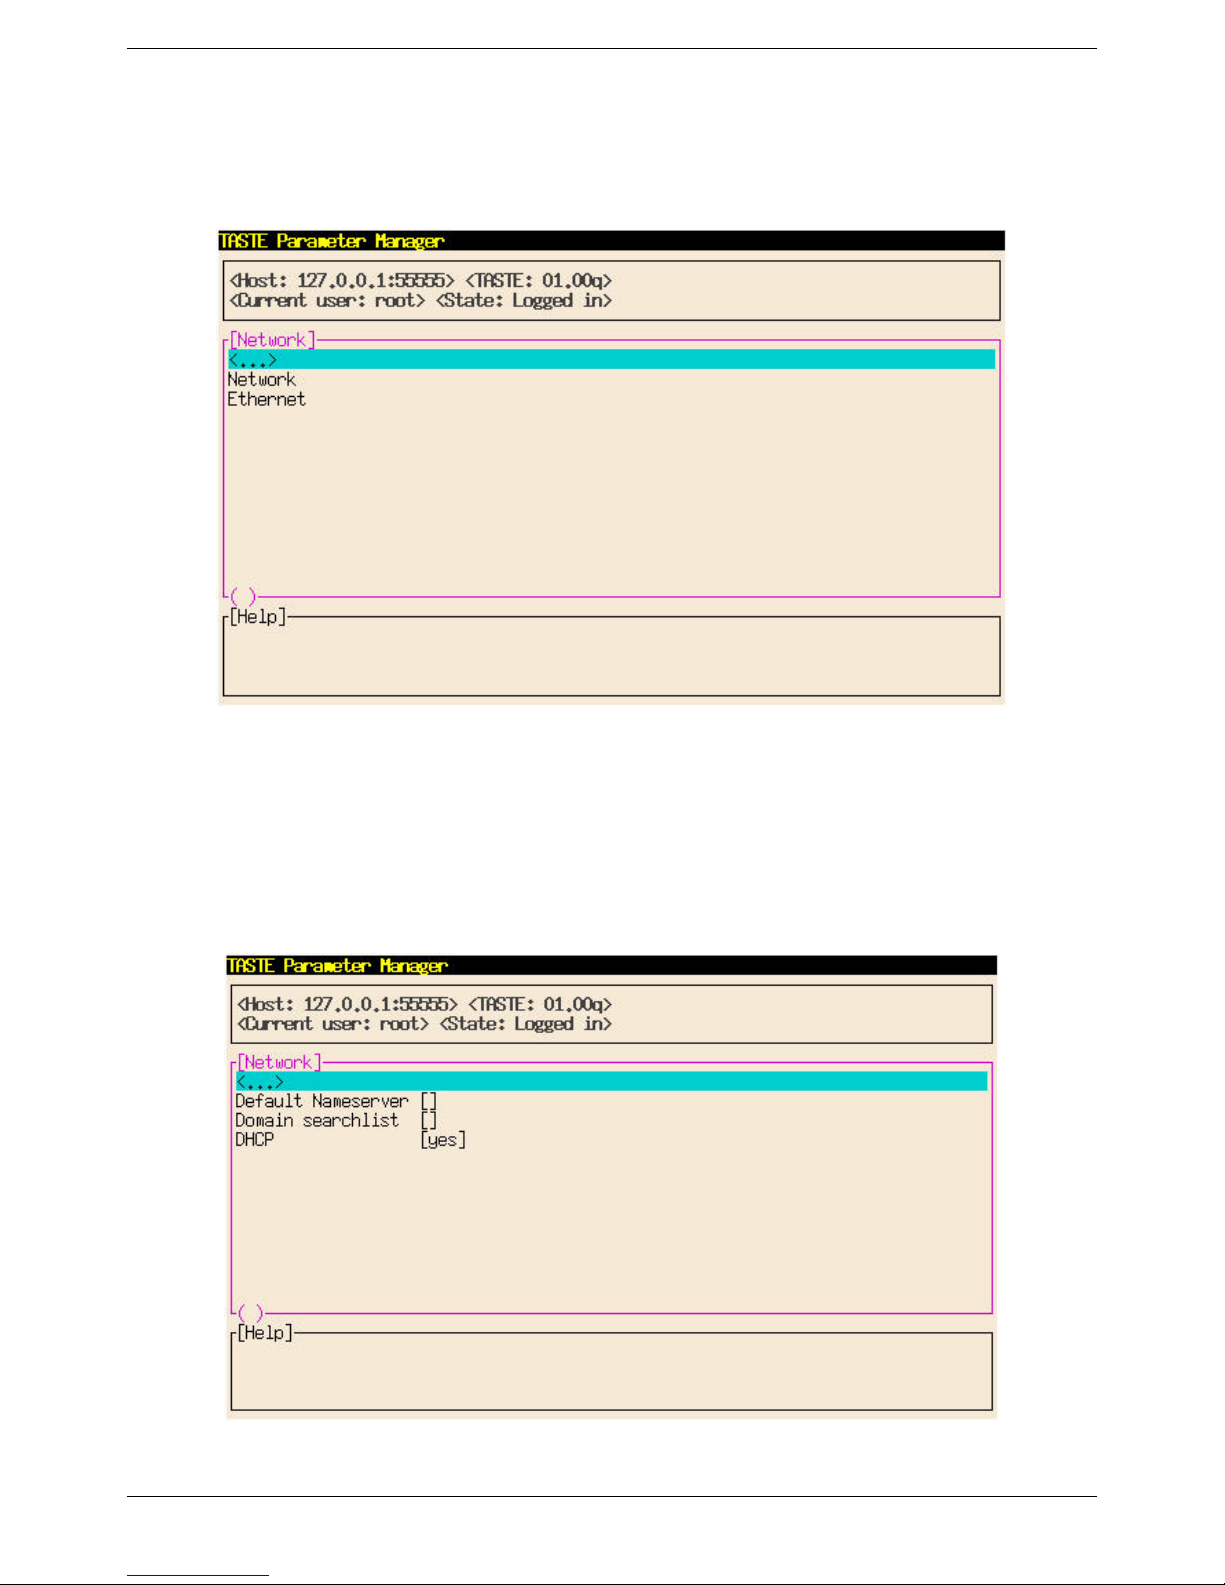
Network
This is used to specify the network parameters for the LBT.
Network Window
Network
Don’t let the double use of the term “Network” confuse you. Click on the second Network to
specify your DNS server IP address and select DHCP. Be sure that Activate is set to
Ethernet sub-window.
no in the
Page 30
Network Window #2
Page 39
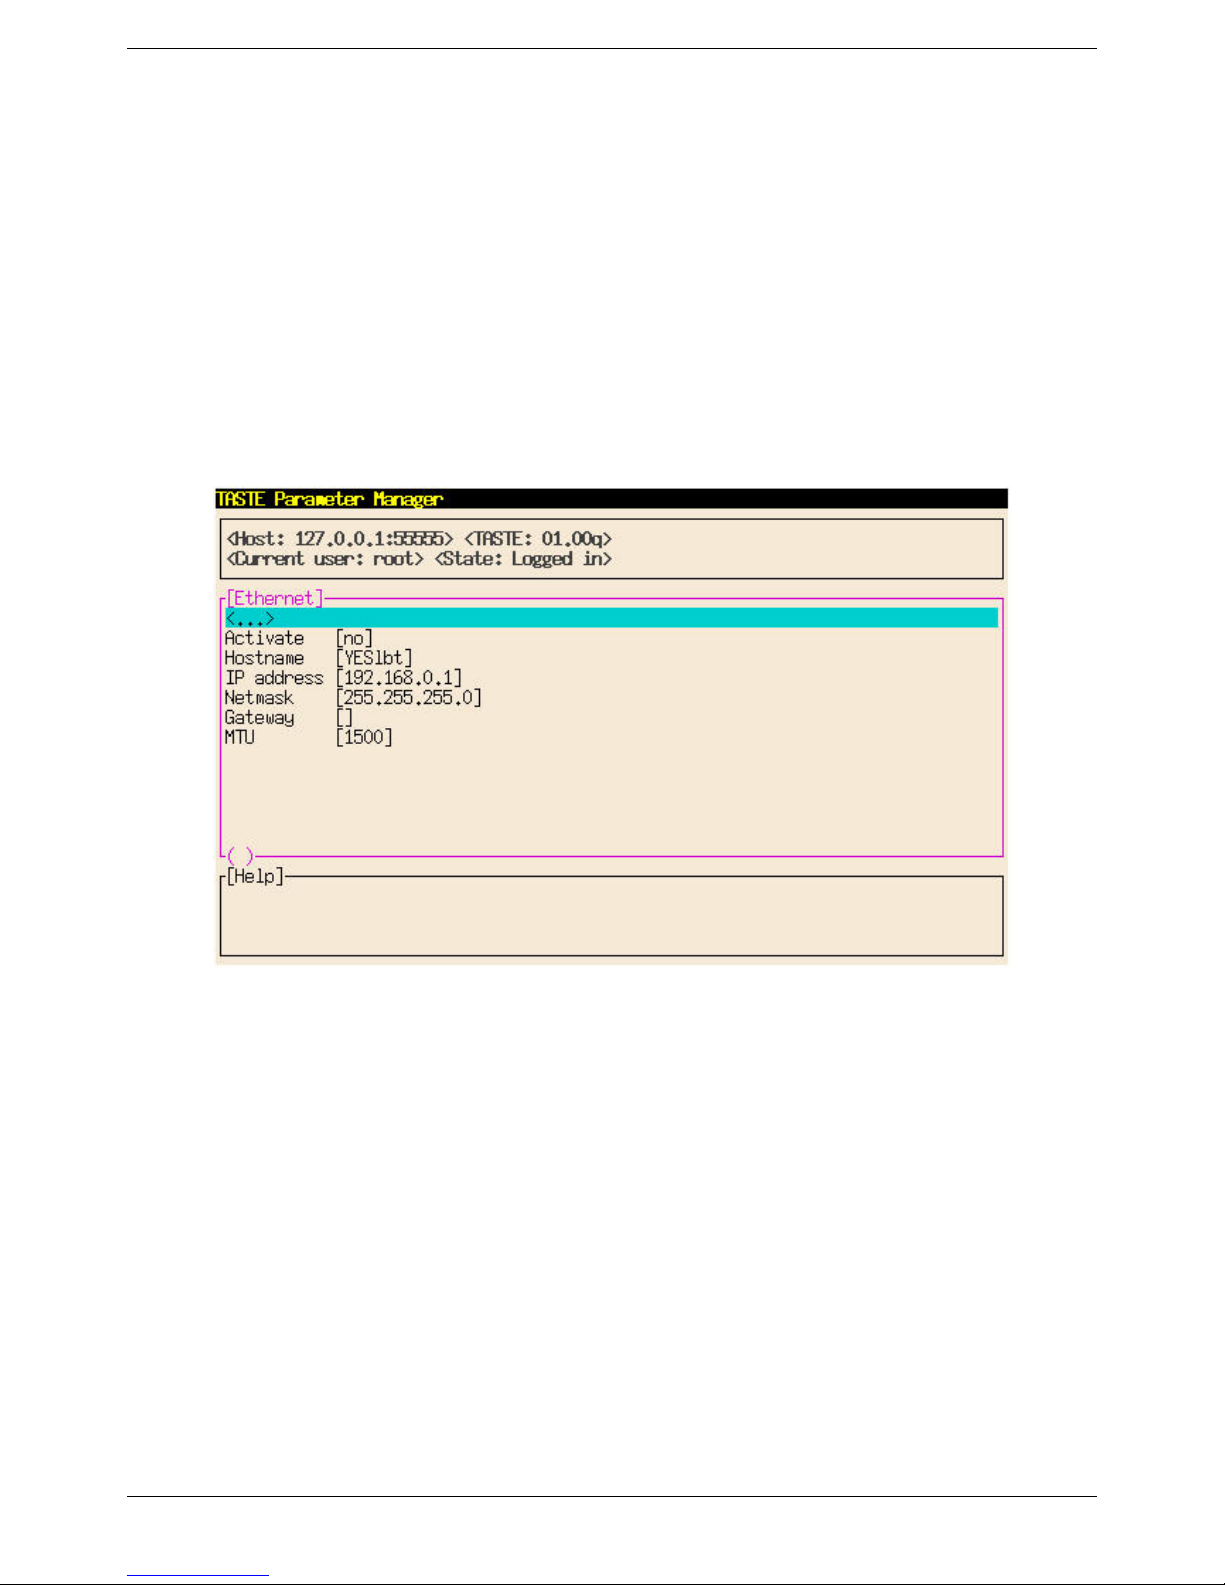
• Default Nameserver. Click here to enter your DNS server IP address. You must have an entry
here if you wish to use the Netscape browser with “friendly” URLs. Without a DNS server
specification, you could only browse web sites for which you had the actual IP address.
• Domain searchlist. Ignore this parameter.
• DHCP. Select yes if you are using DHCP IP address assignment. Be sure to select no if you
intend to specify an address in the Ethernet sub-window.
Ethernet
Select this if you wish to specify an IP address for your LBT, instead of using DHCP assignment.
But be sure that DHCP is set to no in Network Window #2.
Ethernet Window
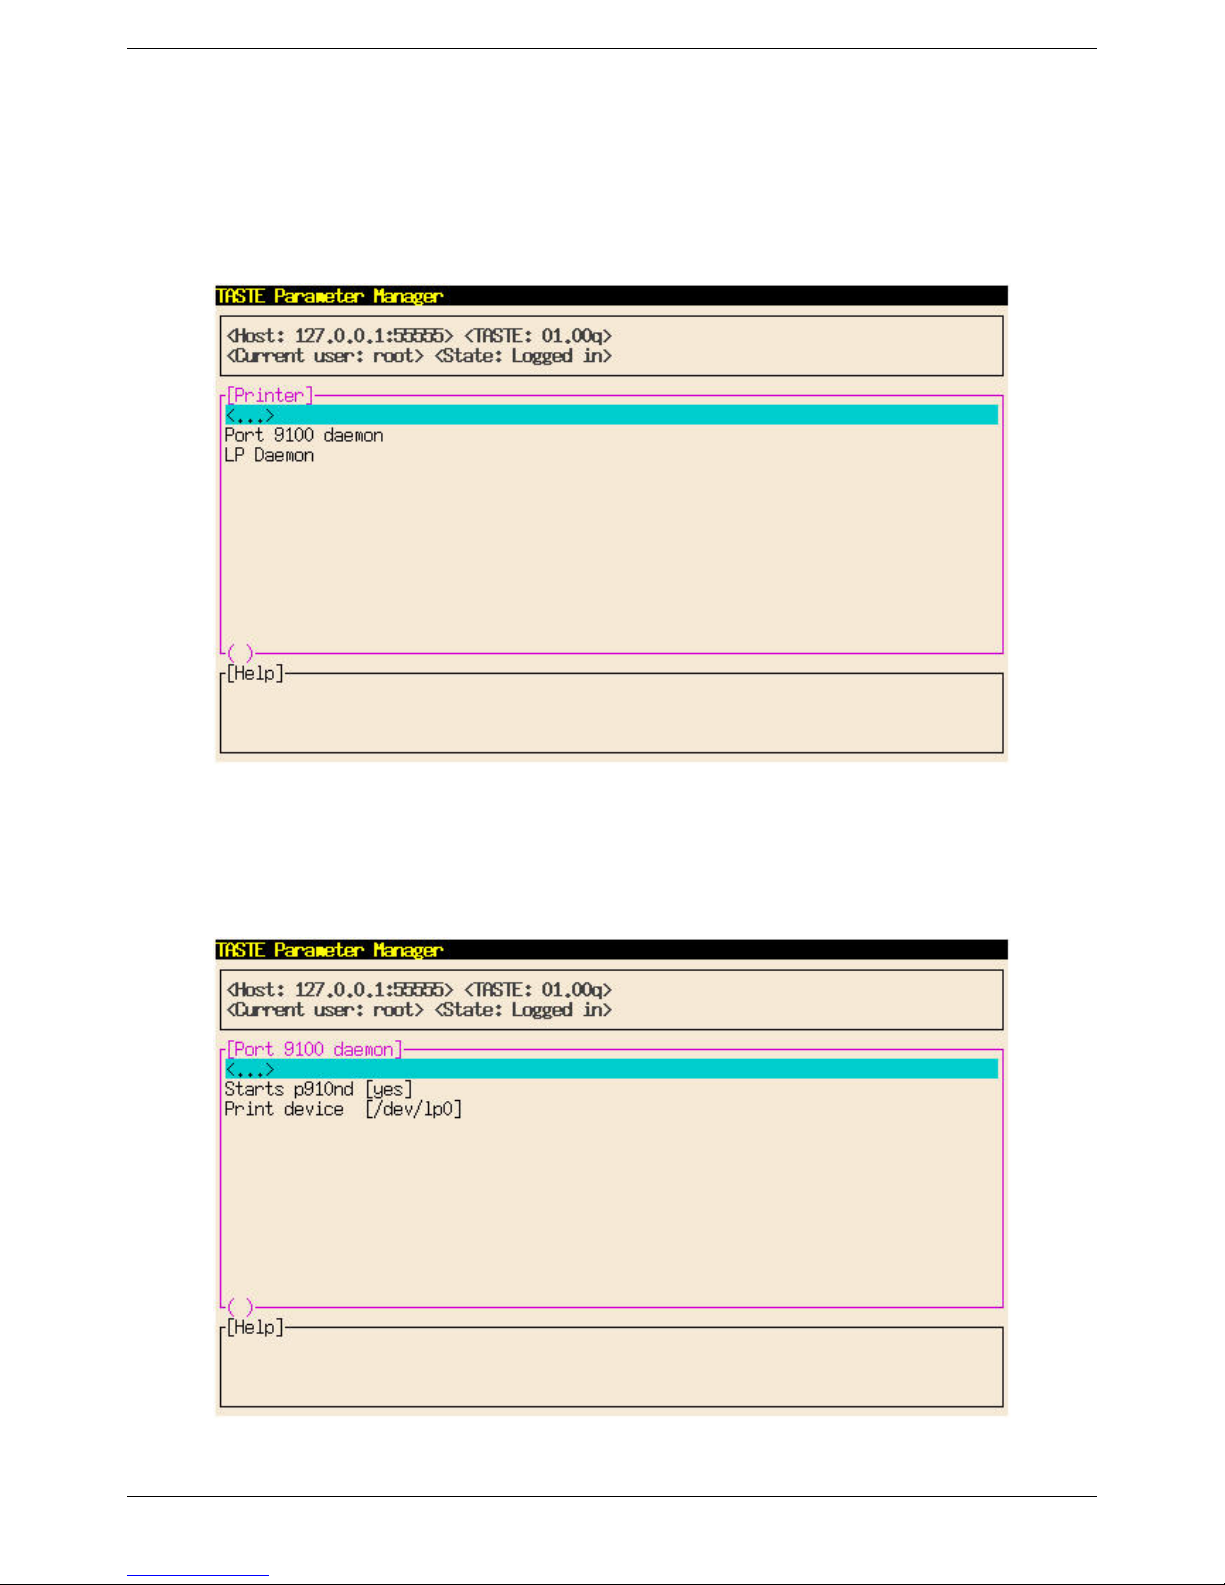
• Activate. Set this to yes if you wish to specify an IP address here. Be sure to set it to no if you
are going to use DHCP address assignment. Note that use of your Netscape browser will
require a specified address unless you use a proxy server for Internet access.
• Hostname. Leave at default.
• IP address. Enter the IP address of the LBT.
• Netmask. Enter the address mask. The default of 255.255.255.0 is typically used.
• Gateway. If you need to access IP addresses outside of your local subnet, such as when using
your Netscape browser without a proxy server, you will need to enter your LAN gateway IP
address here.
• MTU (Maximum Transmission Unit). Leave this at default unless you are experienced and
have a very good reason to change it.
Page 31
Page 40
Printer
When using a local printer on the LBT, only LPD/LPR printing on LPT1 is supported. The COM
ports are not supported for local printing, except when printing from the YES
emulator.
term/IP printer
Port 9100 Daemon
Leave the values in this window at default.
Printer Window
Page 32
Port 9100 Daemon Window
Page 41
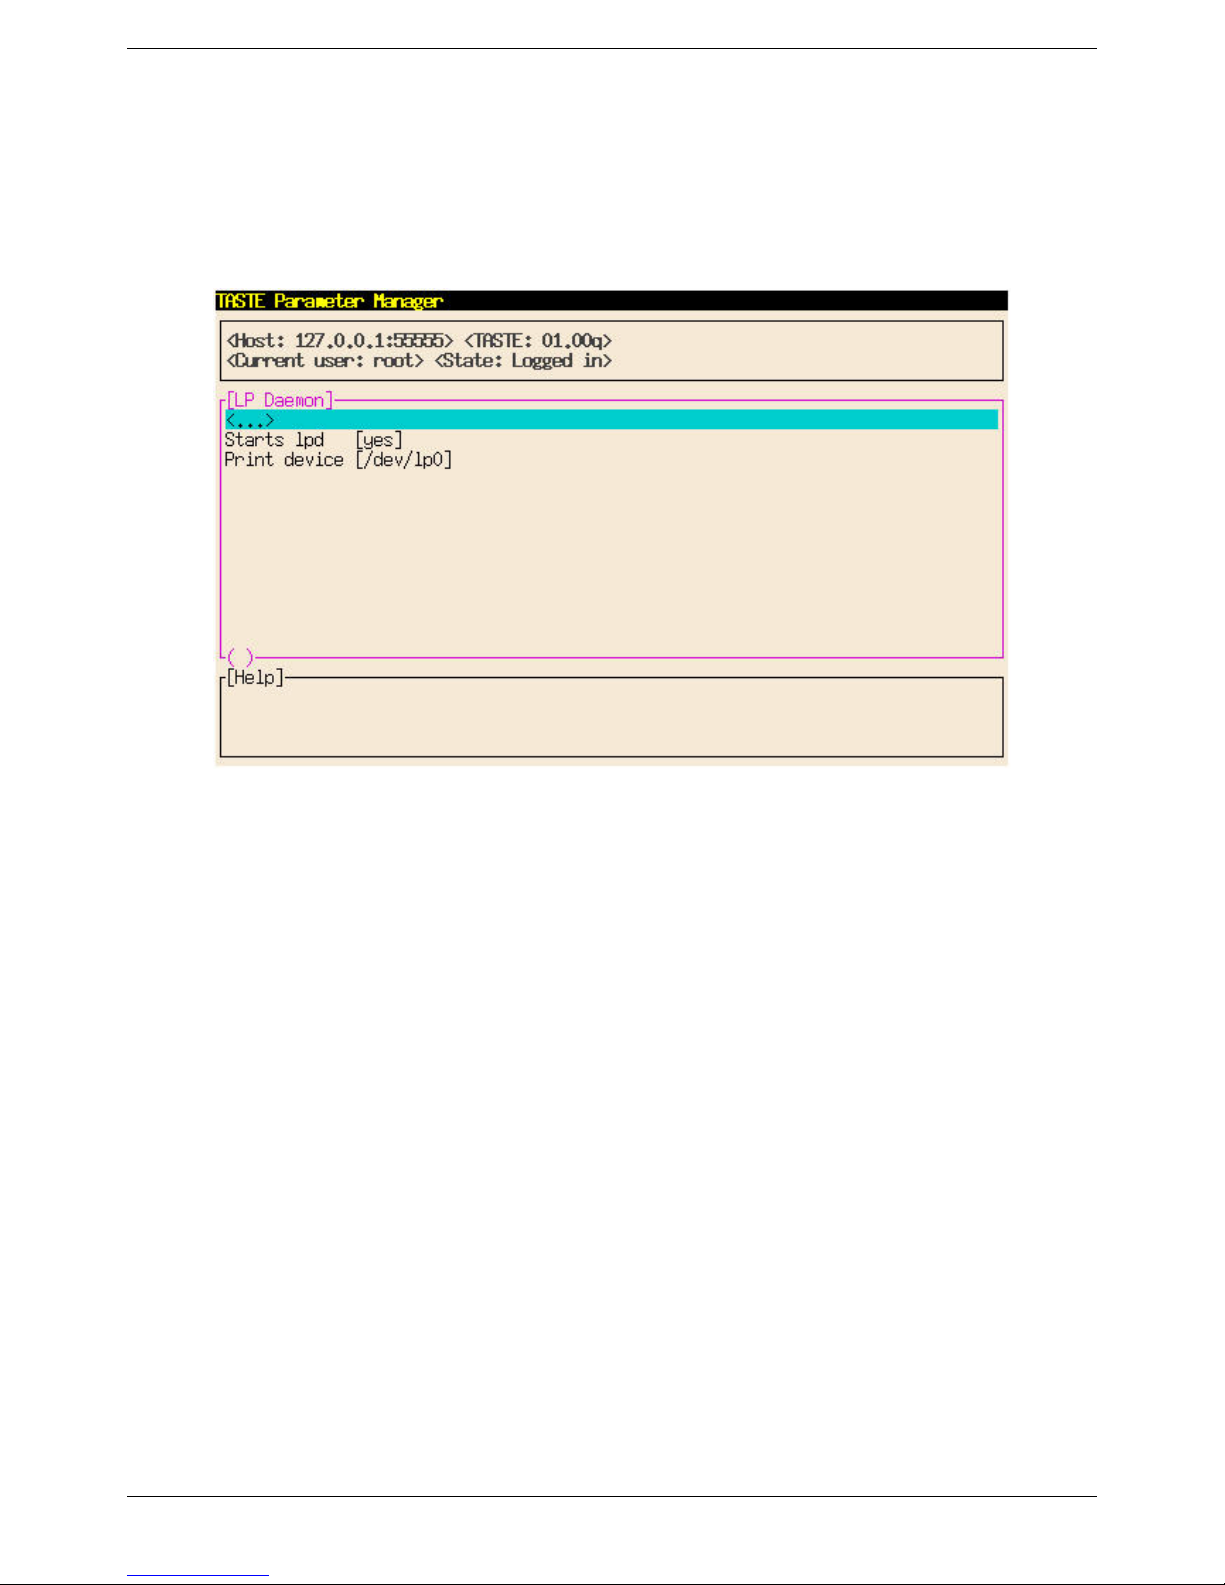
LP Daemon
Leave the values in this window at default.
LP Daemon Window
To use this local printer, set it up as a local printer on your server. For instance, on a Windows
server, you would execute the following steps:
1. Initiate the Add Printer wizard.
2. Select the process for a local printer.
3. Create a TCP/IP port to the IP address of the printer-attached LBT.
4. Assign the new printer to this IP port.
5. Install the appropriate driver for the printer.
6. Name the printer.
7. Enable sharing, if desired.
Page 33
Page 42
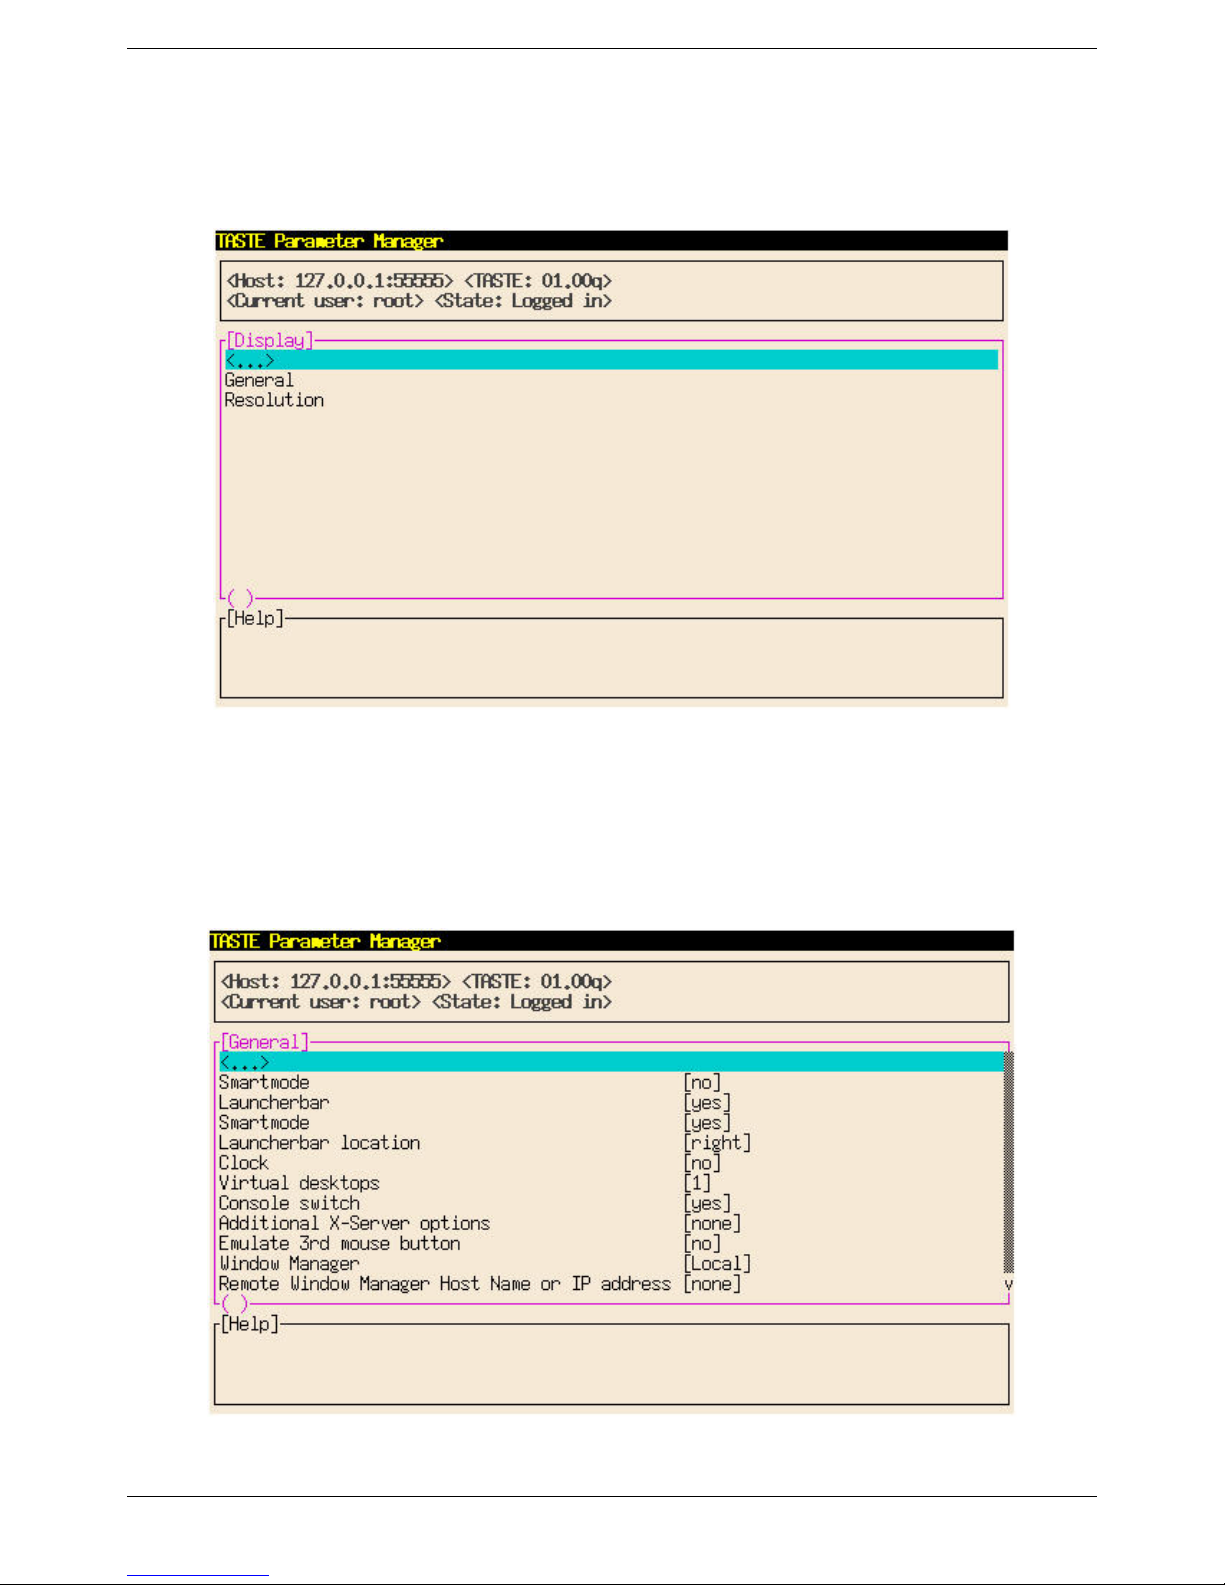
Display
This configuration path sets the display parameters for the LBT desktop.
Display Window
General
All the display parameters except resolution settings are configured here. We show two windows
here because the window must be scrolled to see all the parameters.
Page 34
General Window (Scrolled Up)
Page 43
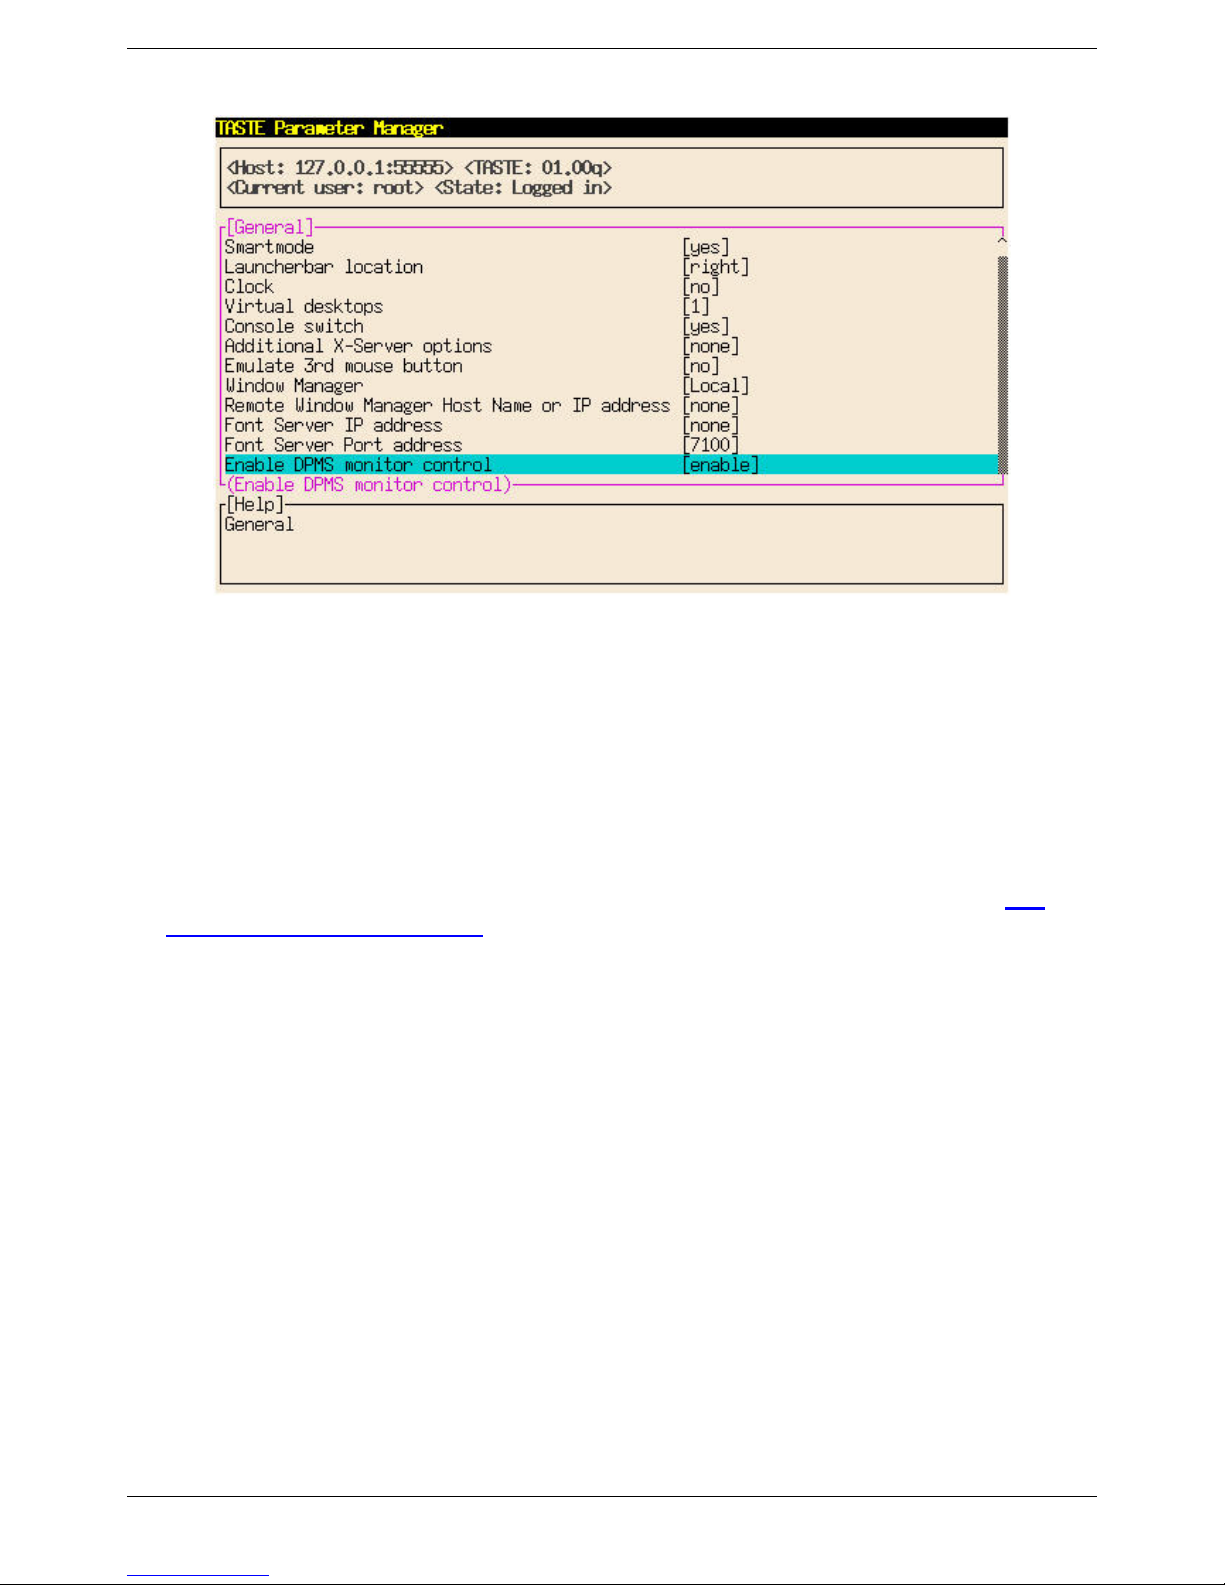
General Window (Scrolled Down)
• Smartmode. Select Yes to hide the Task bar off the bottom edge of the desktop.
• Launcerbar. Select No if you do not want a Launcherbar.
• Smartmode. Select No to hide the Launcherbar off the edge of the desktop.
• Launcherbar location. Select the position of the Launcherbar (if you have one). You can put it
at any edge of the desktop except the bottom, which is reserved for the Task bar.
• Clock. Select Yes to show a clock at the right corner of the Task bar. Since the LBT does not
maintain the clock when power is off, showing a clock is generally of little use.
• Virtual desktops. Enter the number (1-10) of virtual desktops you wish to enable. See The
LBT Desktop|Virtual Desktops for more information.
• Console switch. Leave at the default value.
• Additional X-Server options. Leave at the default value.
• Emulate 3
rd
mouse button. Select Yes to emulate a 3-button mouse with a 2-button mouse. The
third button is emulated by pressing both the right and left mouse buttons simultaneously. The
third button is not supported in the local Netscape browser. Wheel scrolling and third-button
scrolling are supported in ICA sessions to W2000 servers. Third-button scrolling is supported
in ICA sessions to NT4.0 servers. Both wheel scrolling and third-button scrolling are supported
in RDP sessions to W2000 and NT4.0 servers.
• Window Manager. Leave at the default value.
• Remote Window Manager Host Name. Leave at the default value.
• Font server IP address. Leave at the default value.
• Font Server Port address. Leave at the default value.
• Enable DPMS monitor control. Select Enable for monitor power saving..
Page 35
Page 44
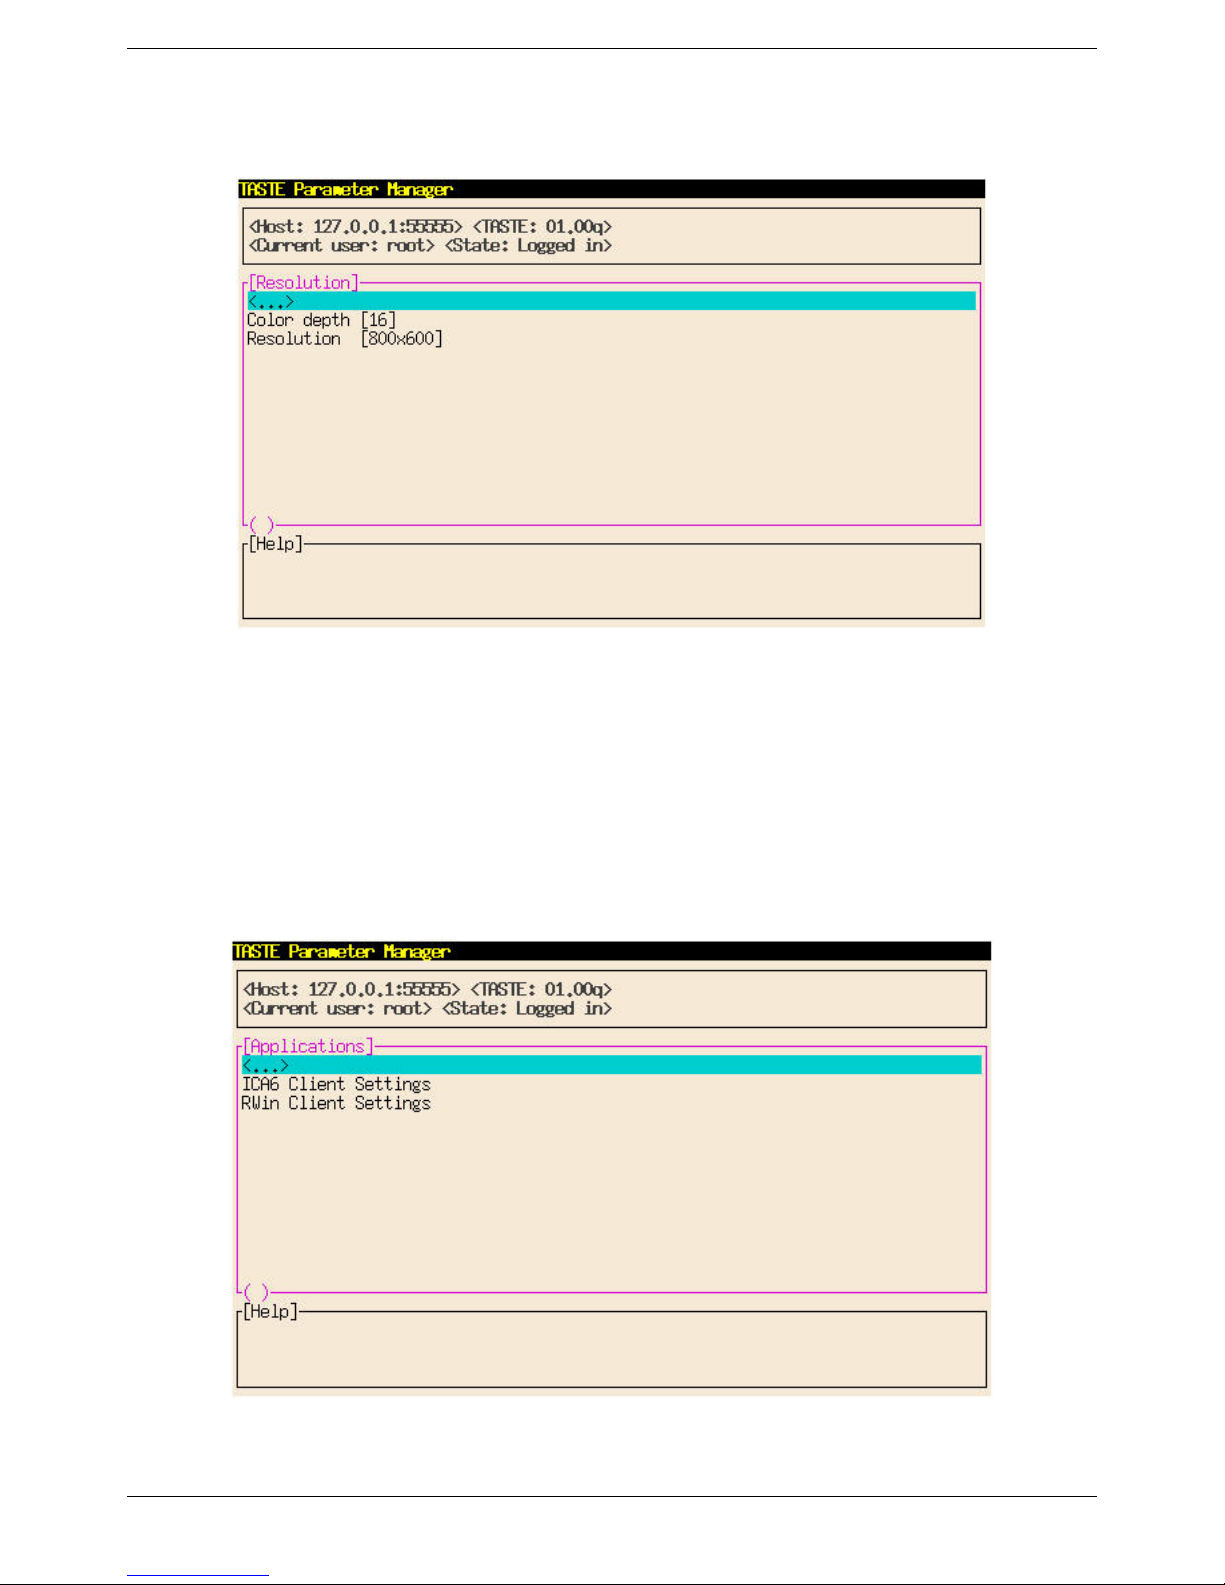
Resolution
Display Resolution Window
• Color depth. Select 8 for 8-bit color or 16 for 16-bit color.
• Resolution. Select one of four resolutions from 640x480 to 1280x1024.
Applications
Here you configure parameters for all your Windows sessions. You can have up to three Citrix ICA
sessions and/or up to three Microsoft RDP sessions.
Page 36
Applications Window
Page 45
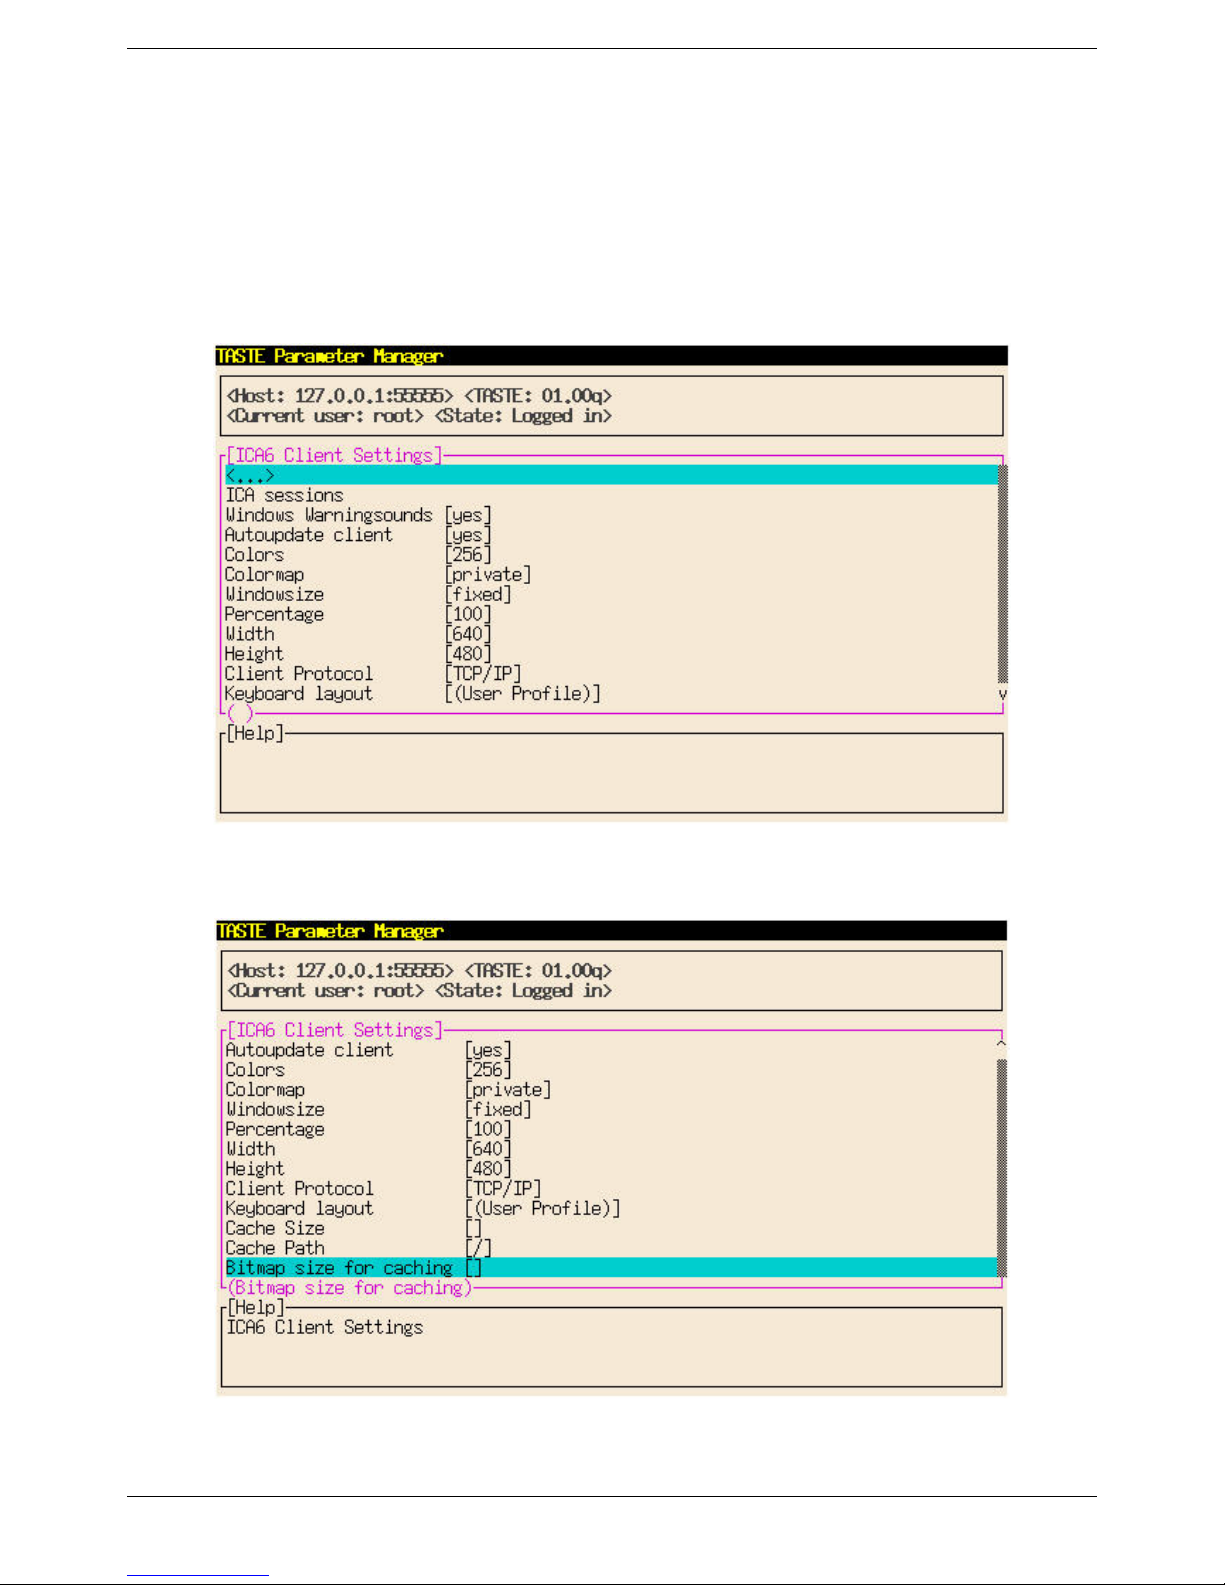
ICA6 Client Settings
In these screens, you set global ICA session parameters as well as individual parameters for each
session. You can configure up to three Citrix Independent Computing Architecture (ICA) channels
to access servers running Citrix WinFrame or Citrix MetaFrame. These items are displayed in the
“Citrix ICA Client” section of the Main menu and the desktop context menu; they may also be
added to the Application Launcher.
ICA6 Client Settings Window (Scrolled Up)
ICA6 Client Settings Window (Scrolled Down)
Page 37
Page 46

• ICA sessions. Select this parameter to add sessions and configure individual parameters for
each session. See below for details about these individual windows.
• Windows Warningsounds. Enable or disable Windows warning sounds.
• Autoupdate client. Enable or disable automatic update of the ICA client firmware, if your
server is set up to do this.
• Colors. Select from 16, 256, 32K, or 64M (True Color) colors. We recommend no more than
256 colors, since Citrix still has some bugs in its support of higher numbers of colors. Also,
more colors require more RAM memory and more network bandwidth.
• Colormap. Select a local or shared color map.
• Windowsize. Select your session window size from full screen, percentage of full screen, for
fixed number of pixels.
• Percentage. If you chose, in Windowsize, a percentage of full screen, enter the percentage (1-
100) here.
• Width. If you chose, in Windowsize, a fixed number of pixels enter the number of pixels (640-
2048) for the width dimension here.
• Height. If you chose, in Windowsize, a fixed number of pixels enter the number of pixels (480-
1536) for the height dimension here.
• Client Protocol. Leave at the default value.
• Browse Server (not shown above). If you have more than one ICA server, and want to refer to
them by name, enter the IP address of the Master Browser server.
• Keyboard layout. Choose a desired country layout, or leave at the user profile setting.
• Cache Size. This setting is not applicable in the LBT.
• Cache Path. This setting is not applicable in the LBT.
• Bitmap size for caching. Enter the minimum size (0-64KB) for bitmap caching.
ICA Sessions
In the above window, click on
• Default Session. Select to set the parameters for the default session (Session 1).
• New. Select to add sessions.
Default Session (Session 1)
Some of these parameters have the same name as the global parameters described in ICA6 Client
Settings. But if they are set here, they will override the global parameters for this session only.
• Session Name. Enter a descriptive name for the session. This string is used to identify the
session in the Main menu and the Application Launcher, if applicable. Please do not use special
characters for the descriptive session title.
• Session Type. Leave at Server. Applications are not supported at this time
• Session Protocol. Leave at the default value of TCP/IP.
ICA Sessions to access the individual session parameters.
Page 38
Page 47

• Session Server. If you identified the Master Browser server in ICA6 Client Settings|Browse
Server, you can put the name of the desired Citrix server here. If not, enter the IP address of the
desired Citrix server.
• Compression. Activate or deactivate data compression over the network.
• Bitmap Cache. Activate or deactivate bitmap caching for this session.
• Sound. Activate or deactivate sound for this session.
• Sound Quality. If you activated sound above, choose from low, medium, or high-quality sound.
Remember that higher quality requires more network bandwidth.
• Encryption. Select the encryption type, from basic up to 128-bit.
• Colors. Select from 16, 256, 32K, or 64M (True Color) colors. We recommend no more than
256 colors, since Citrix still has some bugs in its support of higher numbers of colors. Also,
more colors require more RAM memory and more network bandwidth.
• Colormap. Select a local or shared color map.
• Windowsize. Select your session window size from full screen, percentage of full screen, or
fixed number of pixels.
• Percentage. If you chose, in Windowsize, a percentage of full screen, enter the percentage (1-
100) here.
• Width. If you chose, in Windowsize, a fixed number of pixels, enter the number of pixels (640-
2048) for the width dimension here.
• Height. If you chose, in Windowsize, a fixed number of pixels, enter the number of pixels (480-
1536) for the height dimension here.
• Launch Application. Not applicable at this time.
• Application Working Directory. Not applicable at this time.
• Username. If you wish to automatically log on to the server, enter the Username here.
• Domain If you wish to automatically log on to the server, enter the Domain name here.
• Password. If you wish to automatically log on to the server, enter the Password here.
• Autostart. If you wish to automatically start the session at bootup, select Yes here.
• Restart. Not applicable at this time.
• Delete. If you wish to delete the session, highlight here and press Enter. BE CAREFUL. You
will not get the option to confirm this deletion, although, if you exit Setup without saving
changes, your apparent deletion will be nullified.
New
Select
New to add a session. You will be offered the same set of parameters as Session 1 above.
RWin Client Settings (RDP)
Here you set parameters for each RDP session. There are no global RDP parameters. You may
configure up to three Remote Display Protocol (RDP) channels to access servers running Microsoft
Windows Terminal Services. These items are displayed in the “RDP Client” section of the Main
Menu and the desktop context menu; they may also be added to the Application Launcher
Page 39
Page 48
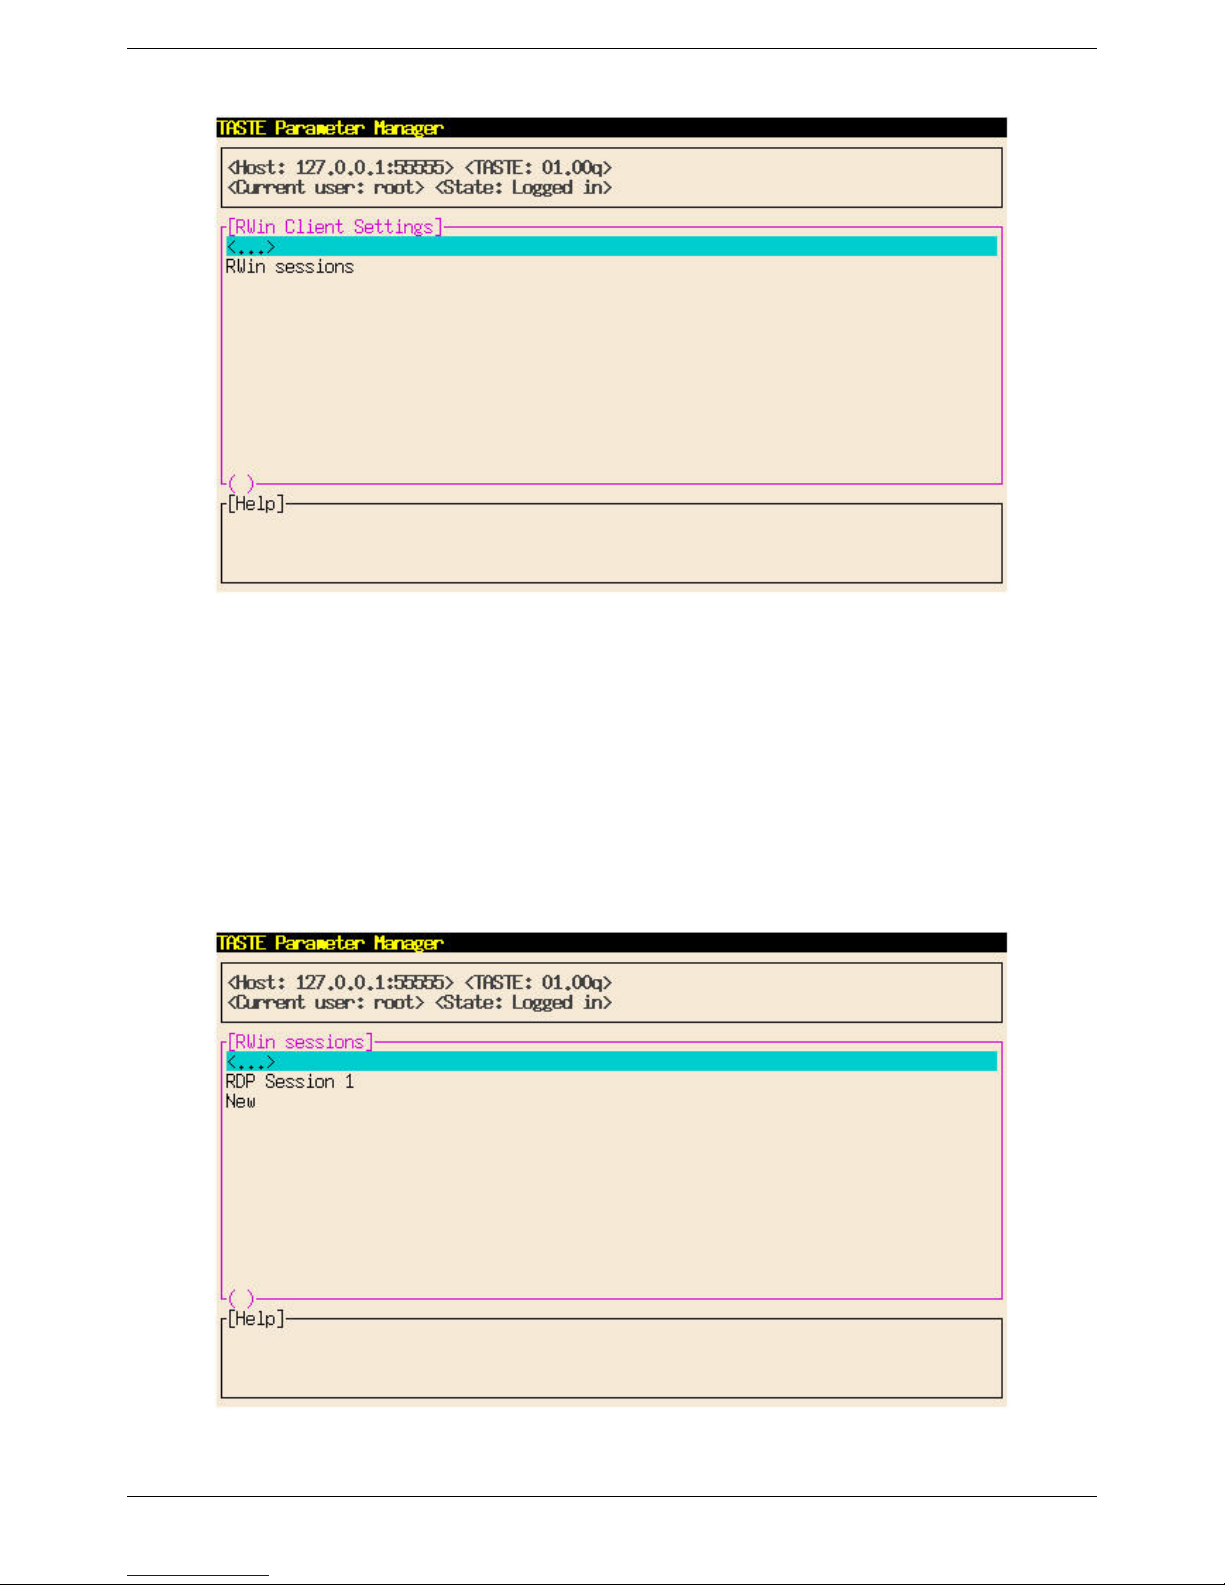
RWin Client Settings Window
• RWin sessions. This is a rather redundant screen. Select the only selection to get to the next
screen.
RWin Sessions
Select the RDP session that you wish to configure, or add a new one.
Page 40
RWin Sessions Window
Page 49
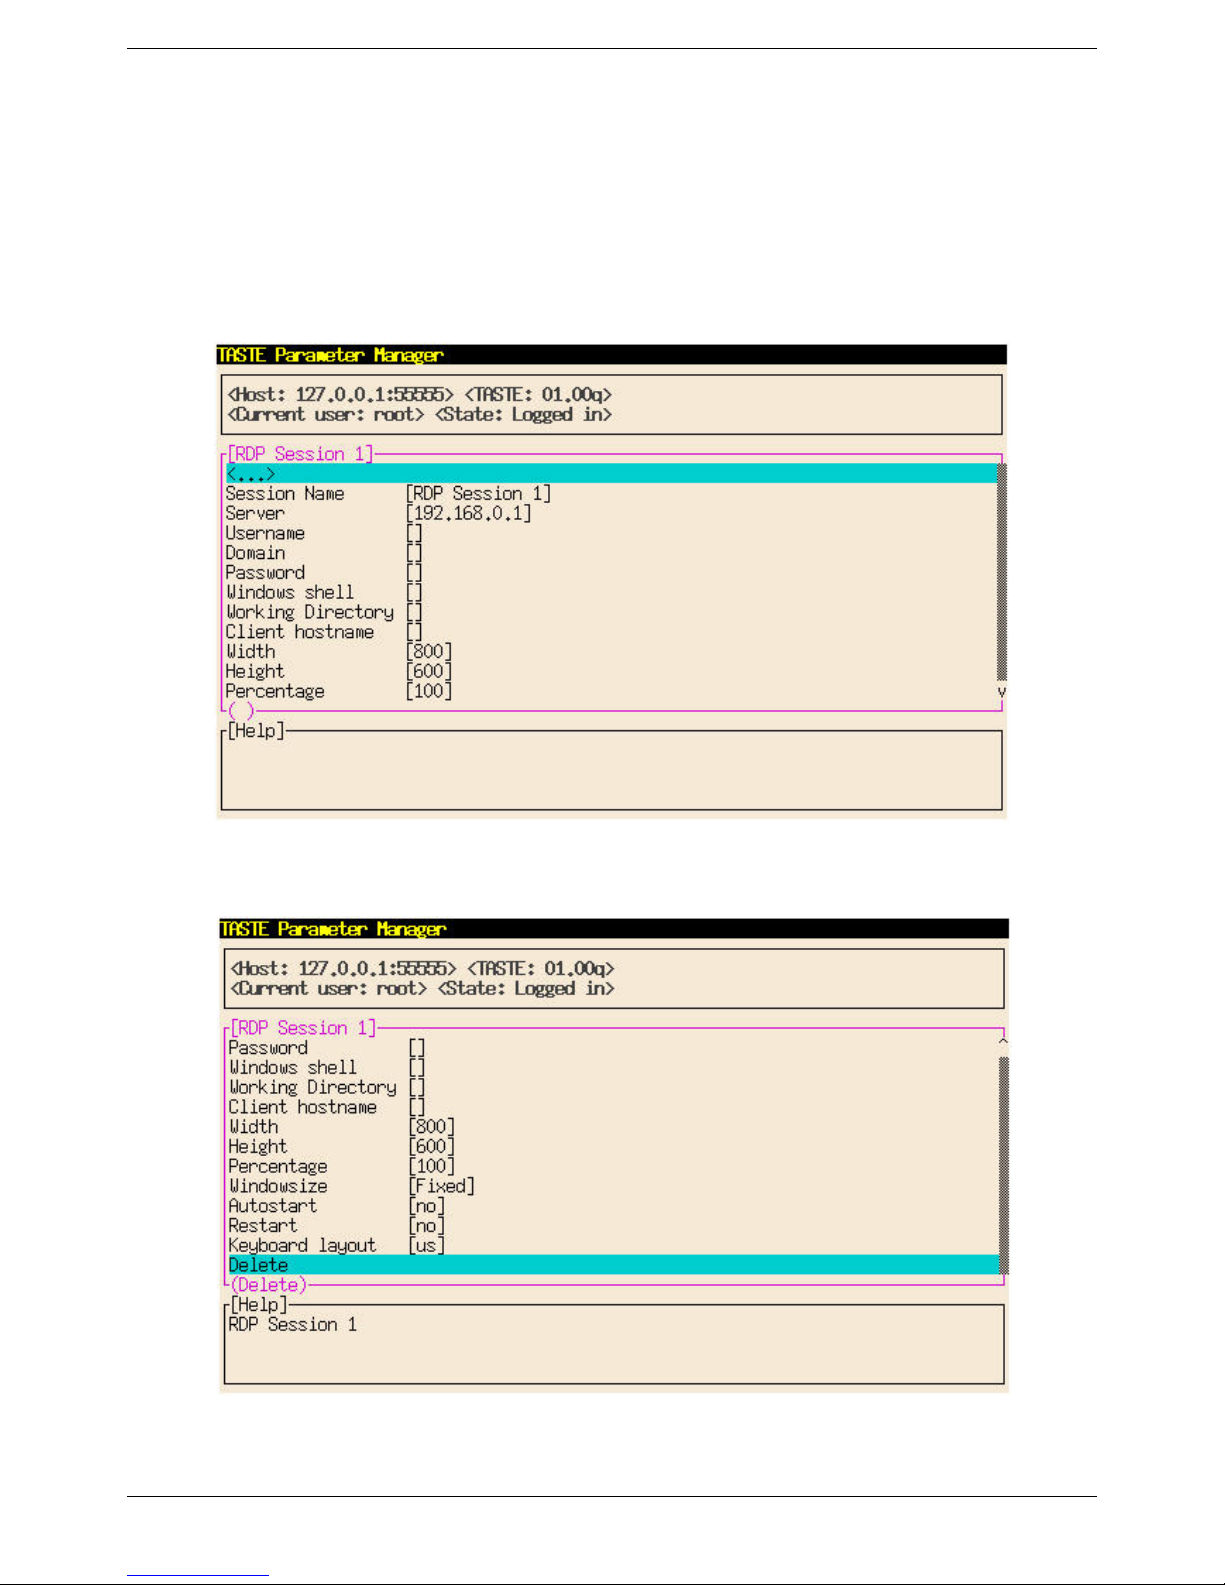
• RDP Session 1. This is the default session. Make this selection to configure your first RDP
session.
• New. Make this selection to configure additional RDP sessions.
RDP Session 1
Configure the default RDP session from this screen.
RDP Session 1 Window (Scrolled Up)
.
Page 41
RDP Session 1 Window (Scrolled Down)
Page 50

• Session Name. Enter a descriptive name for the session. This string is used to identify the
session in the Main menu and the Application Launcher, if applicable. Please do not use special
characters for the descriptive session title.
• Session Server. Enter the IP address of the desired Terminal Server here.
• Username. If you wish to automatically log on to the server, enter the Username here.
• Domain If you wish to automatically log on to the server, enter the Domain name here.
• Password. If you wish to automatically log on to the server, enter the Password here.
• Windows Shell. Not applicable at this time.
• Working Directory. Not applicable at this time.
• Client Hostname. Not applicable at this time.
• Percentage. If you choose, in Windowsize, a percentage of full screen, enter the percentage (1-
100) here.
• Width. If you choose, in Windowsize, a fixed number of pixels, enter the number of pixels
(640-2048) for the width dimension here.
• Height. If you choose, in Windowsize, a fixed number of pixels, enter the number of pixels
(480-1536) for the height dimension here.
• Windowsize. Select your session window size from full screen, percentage of full screen, or
fixed number of pixels.
• Autostart. If you wish to automatically start the session at bootup, select Yes here.
• Restart. Not applicable at this time.
• Keyboard Layout. Choose a desired country layout here.
• Delete. If you wish to delete the session, highlight here and press Enter. BE CAREFUL. You
will not get the option to confirm this deletion, although, if you exit Setup without saving
changes, your apparent deletion will be nullified
.
New
Select
above.
New to add a session. You will be offered the same set of parameters as RDP Session 1
Set Time
Ignore this parameter. There is no battery in the LBT, so time is not maintained when power is
turned off.
Page 42
Page 51
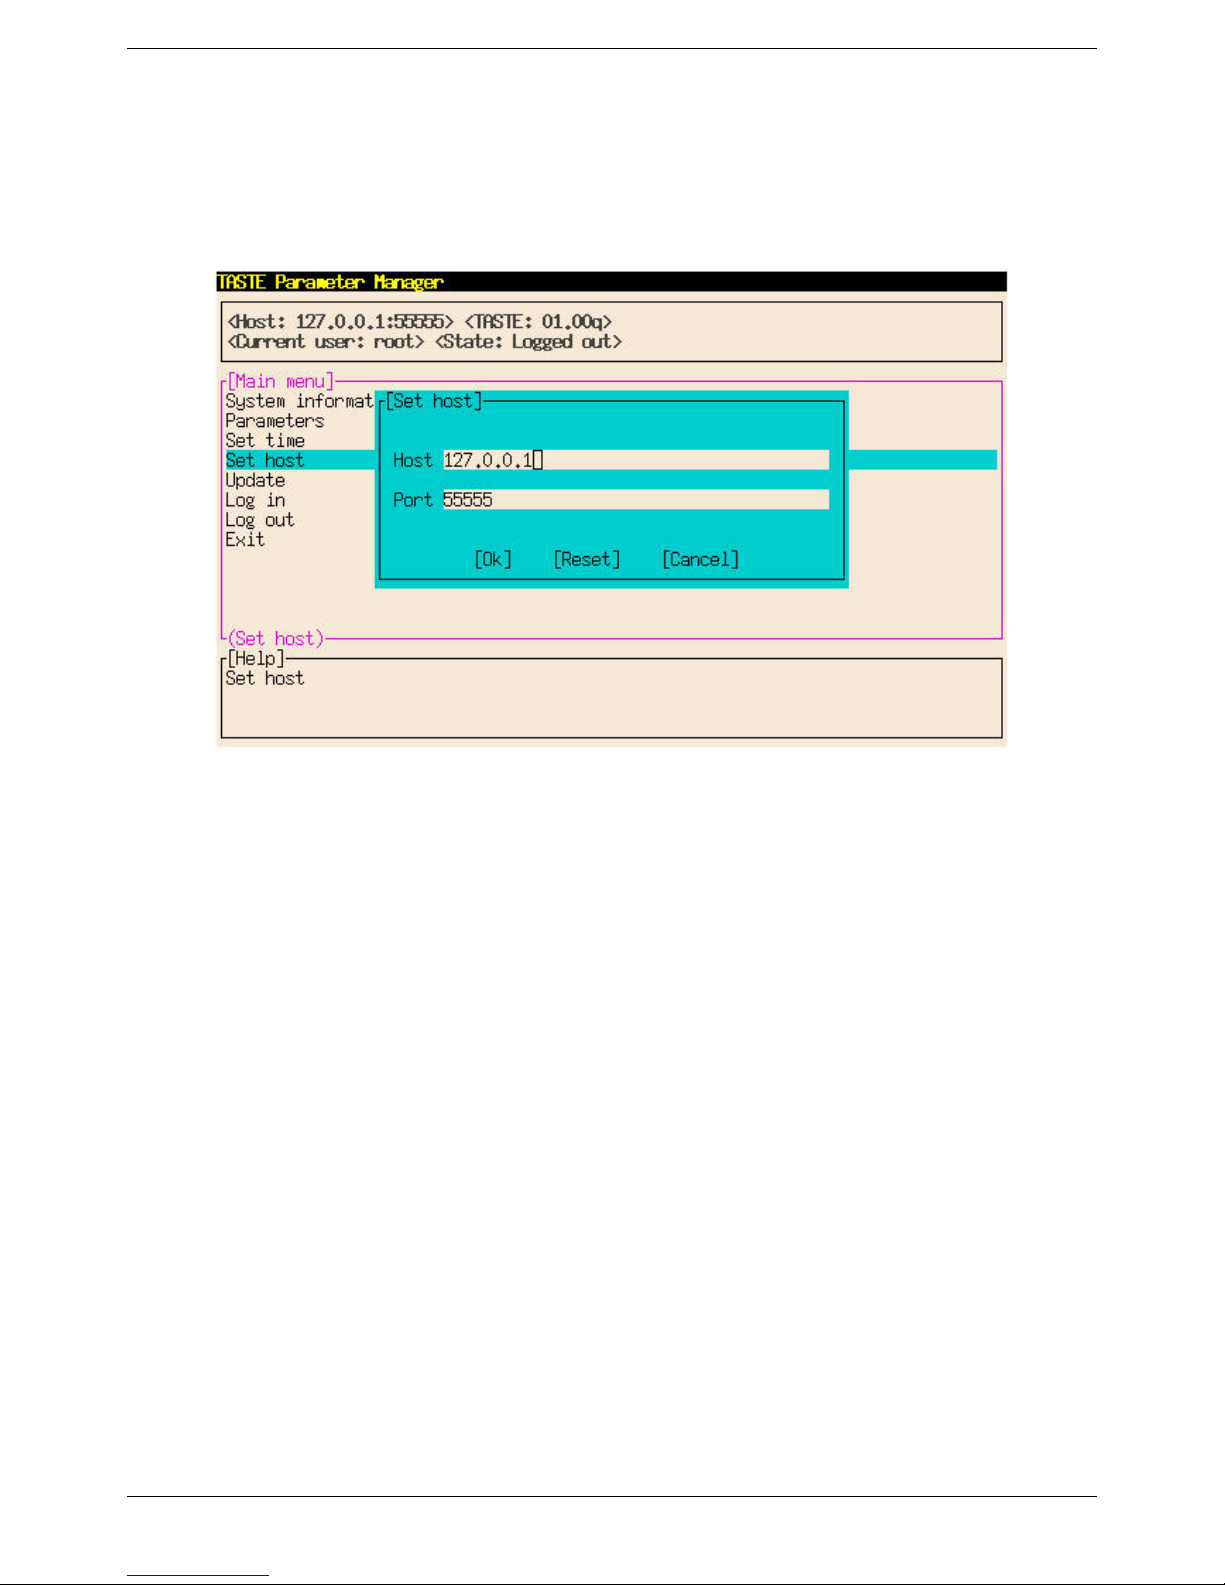
Set Host
Select the IP address and port number for a remote system.
Set Host Window
Page 43
Page 52

Update
Initiate a system firmware update using the update server settings configured in Parameters|System
Update.
.
Firmware Upgrade Instructions
The Linux Based Terminal is upgraded using the FTP process. This process requires an FTP server
accessible via TCP/IP from the terminal. The upgrade steps are:
1. Download the latest-version firmware from the Affirmative Computer Products web site, per the
Affirmative Computer Products Technical Support instructions.
2. Unzip the downloaded file. You will see six files. Five of the files are necessary for the
upgrade. The sixth file, with the .txt extension, contains these upgrade instructions.
3. Save the unzipped files in your local FTP server with a known path. You need not save the .txt
file.
4.
NOTE that you may lose all your configuration information, depending upon the gap between
old and new firmware versions. So record your configuration information before upgrading.
5. Turn on the terminal.
6. Invoke the Main menu by clicking on the
7. Click on
8. In the resulting command line, verify your connection to the FTP server by pinging it with the
ping command to the server’s IP address.
9. Terminate the ping process by pressing
10. Exit the local shell by typing “
11. Now open the Main menu. If you have already made appropriate entries in
Setup|Parameters|General|System Update
12. Highlight
13. Highlight
14. Highlight
15. Highlight
16. Highlight
17. You will be asked for a user I.D. and password. Type “
password blank.
18. Tab to
19. Enter the server’s IP address.
20. Tab to
21. Highlight
22. Your entry here depends upon the specifics of your FTP server software. If the path to the
upgrade files is completely defined in the server’s FTP software configuration, this field will be
left blank. Do not enter any file name here, only path information, if necessary.
23. Tab to
24. Highlight
25. Enter your FTP logon I.D.
26. Tab to
27. Highlight
Local Shell.
exit” and pressing the Enter key.
Setup and press Enter.
Parameters and press Enter.
General and press Enter.
System update and press Enter.
FTP Server and press Enter.
OK and press Enter.
OK and press Enter.
Directory path and press Enter.
OK and press Enter.
FTP user and press Enter.
OK and press Enter.
FTP password and press Enter.
Start button in the Task Bar.
Ctrl+C.
, jump to step 34.
root” for the I.D. and leave the
Page 44
Page 53

28. Enter your FTP logon password. Even if you do not require a password at the server, type
something in this field anyway. The Setup software does not like a blank field here.
29. Tab to OK and press Enter.
30. Enter proxy information only if you are accessing the FTP server through a proxy server.
31. Back out of the menu hierarchy by repeatedly pressing
Esc or End until you are asked if you
want to save the changes. Respond positively.
32. There will be a slight delay, and then the terminal will go through a partial reboot. You will see
some ominous text on the screen. Ignore it, and after another slight delay, you will return to the
desktop screen.
33. Open the Main menu.
34. Highlight
35. Highlight
36. You will be asked if you want to commit to the update. Highlight
37. You may be asked for a login I.D. and password at this point. If so, enter “
leave the password blank. Then tab to
38. It may appear as if nothing is happening, but Linux is working its magic in the background.
Setup and press Enter.
Update and press Enter.
Yes and press Enter.
root” for the I.D. and
OK and press Enter.
DO
NOT BECOME IMPATIENT AND REBOOT THE TERMINAL; A REBOOT OR
NETWORK DISCONNECTION HERE WILL LIKELY CORRUPT THE FIRMWARE
AND MAKE THE TERMINAL INOPERABLE. To monitor the actual upgrade progress,
press
Ctrl+Alt+F5. If you get tired of monitoring and want to return to the desktop screen,
Ctrl+Alt+F3.
press
39. The firmware is actually upgraded in six sections. After the first section is upgraded, the
terminal automatically reboots. After this reboot, the other five sections are upgraded, and then
the terminal automatically reboots again.
40. After the upgrade is complete and the terminal reboots, you will come back to the desktop
screen.
information is valid and
If you upgraded from an older version, or if you encounter strange behavior in the Setup
41.
screens, it may appear that your old configuration is still valid,
If you were upgrading from v0100o or later, all your previous configuration
you can skip step 41.
but don’t be deceived. You now
have to reset to factory defaults and reconfigure. The reset procedure is:
a. Open the Local shell.
b. Execute the command “su” at the prompt.
c. Switch to the
d. Delete all the files in the
wfs directory by executing “cd wfs” at the prompt.
wfs directory by executing “rm -rf *” at the prompt. Note that
there is a space between m and - and between f and *.
e. Reboot the terminal.
f. Reconfigure when you see the desktop screen.
Page 45
Page 54
Log in
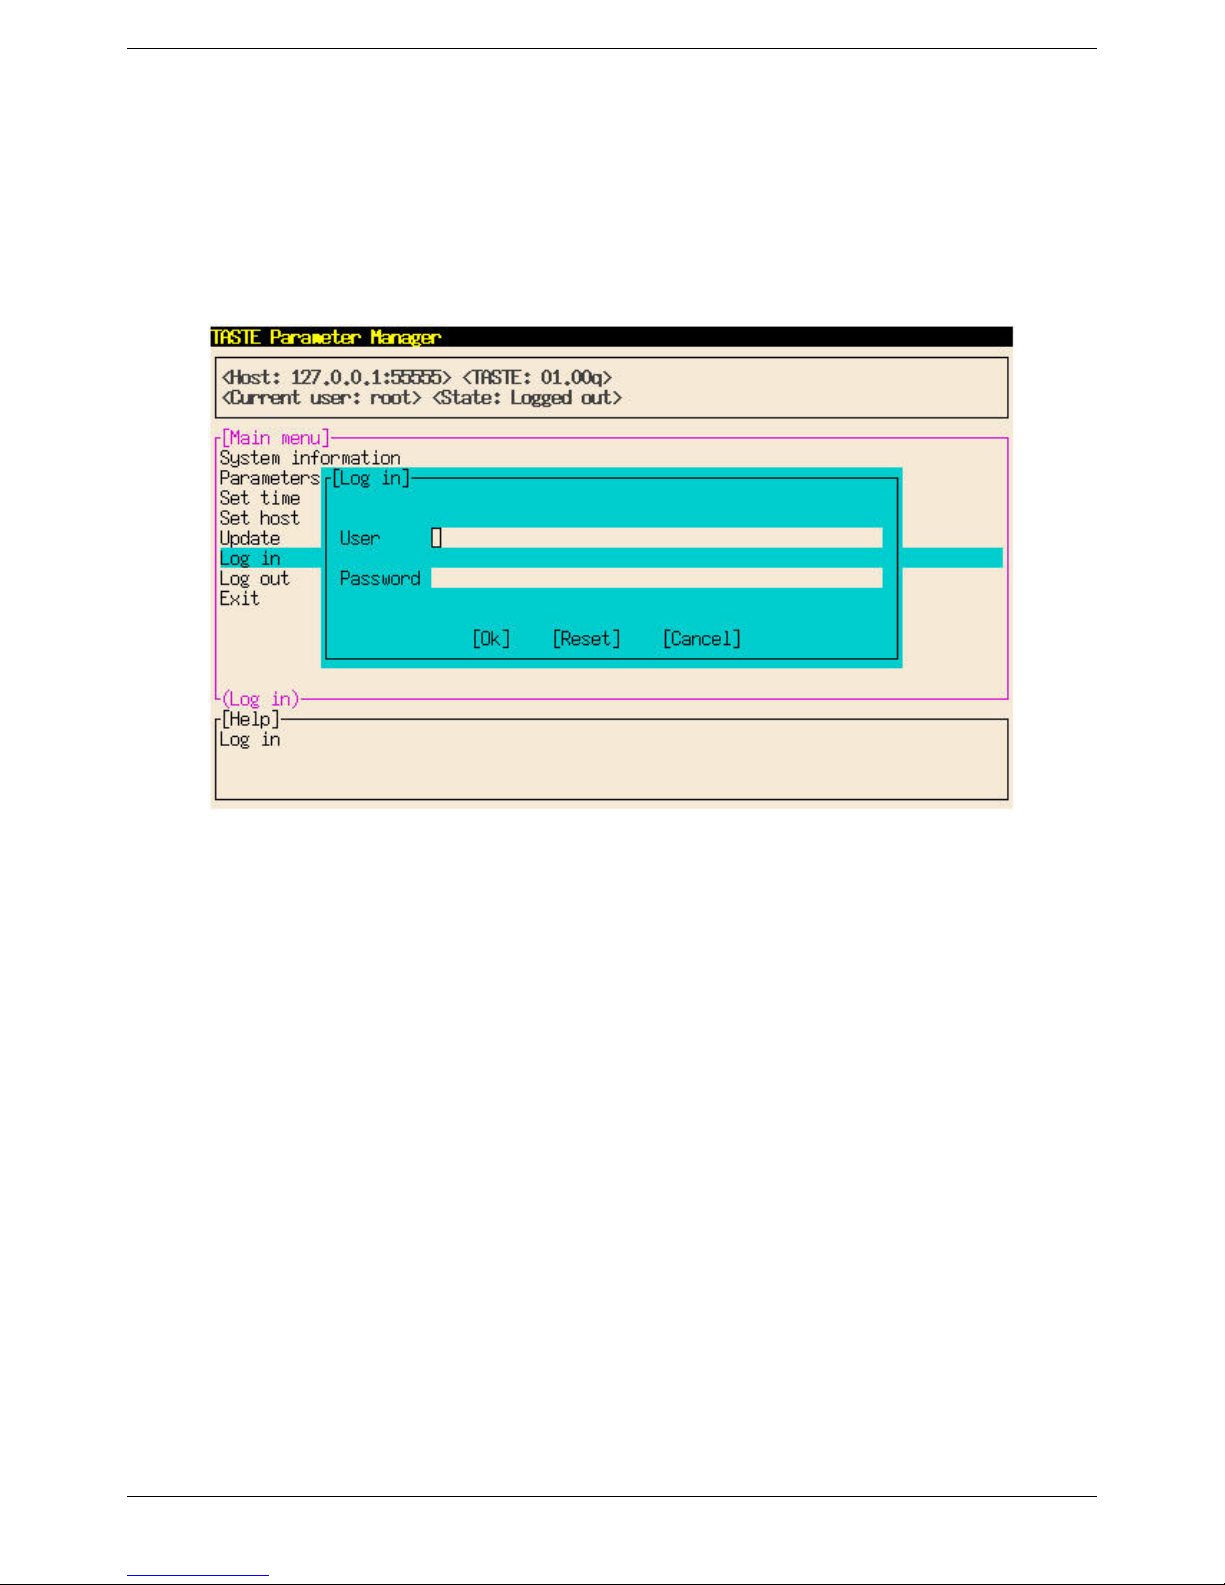
Log in as an authorized user. Currently only “root” is authorized to make changes to the system
configuration. If no login is performed, the user is defaulted as “nobody” and can only display
parameter settings.
Log out
Use this function to log out.
Log In Window
Page 46
Page 55

Exit
Exit Setup and restart the window manager.
If the desktop cannot be displayed on the monitor attached (e.g. unsupported frequency setting) or
the LBT fails to boot properly due to configuration problems, use the Setup boot option in the boot
menu to start Setup in text mode.
If the configuration file is updated through remote access you must first re-read the updated
configuration before changes can be made. Otherwise, Setup will abort the update sequence and
display an error message.
Page 47
Page 56

Page 48
Page 57

YESterm/IP TN5250E Emulator
AS/400 Requirements
• OS/400 V3R2 with appropriate PTFs or higher
Technical Characteristics
YESterm/IP Emulator is one of the YESterm 5250 TCP/IP solutions developed by Affirmative
Computer Products. YES
Based Terminal users with the capability to connect to an AS/400 via the TCP/IP protocol.
YES
term/IP provides enhanced emulation functions for a wide range of IBM terminals and a "true"
IBM 3812 Printer emulation with the support of all the enhanced features normally available only
on very expensive 5250 Printer Interfaces. YES
TCP/IP connections with different Hosts. In addition, YES
Auto-Signon and Password Encryption" allowing a secure connection to the AS/400, with no need
of any SSL option. The configuration of Telnet sessions is made simple by a Wizard application
that guides the user during the configuration process.
term/IP is a powerful Telnet TN5250e emulator that provides Windows
term/IP can easily support up to 7 concurrent
term/IP supports the "Enhanced Display
Display Session Characteristics
• IBM emulations supported: 5251, 5291, 3196, 3180-2, 3477-FG, 3477-FC.
• Includes numerous resident national keyboard templates and Code Pages.
• Includes enhanced keyboard mapping and customization, using Shift, Caps Lock, Alt, Ctrl,
function keys, etc.
• EURO (€) symbol supported.
• Includes enhanced copy and paste options.
• Includes Hotspot, Macros and programmable Keypad.
• Includes tools for keyboard mapping and attributes editing.
• Includes enhanced customizable Hot Spot feature.
• Includes enhanced Record/Playback feature.
• Supports "Enhanced Display Auto-Signon and Password Encryption" allowing a secure
connection to the AS/400.
Page 49
Page 58

Printer Session Characteristics
• IBM Emulation supported: 3812.
• Support for continuous forms, multi drawers, envelope, manual feeders, simplex/duplex, auto
page orientation, and COR (Computer Output Reduction).
• Supports CPI, LPI Override and LQ, NLQ.
• Supports Host Transform Feature.
• Supports Hex Pass-Through (HPT) feature, with customizable leading and ending sequences
and support of "non-printable characters".
• Supports of EURO symbol (€).
Page 50
Page 59

Setup
The LBT is pre-configured with four 5250 display sessions (Display 1-4) and three 5250 printer
sessions (Printer 1-3). The first time that you open one of the sessions, you will be faced with a
blank 5250 window and a small sub-window asking for the setup password. The default password
is no password, so just click on
properties. You can change the password if you wish.
Display Session Properties
In a 5250 display session window, you will see the “Display Session Properties” sub-window
showing six tabs. Click on a tab to bring up the corresponding properties sheet. At the bottom of
the sub-window are four buttons. Ignore the
entered all of your configuration properties in all six sheets, click on either
do the same thing. If you want to cancel your configuration changes, click on
the upper right corner.
OK to open a new sub-window that allows configuration of session
Help button; it won’t help you. After you have
OK or Apply; they both
Cancel or on the X in
Session Info
• Host Name/IP Address: Type in the IP address of the AS/400 server.
• Port Number: Use the default of 23 unless directed to do otherwise by your AS/400
administrator.
• Local Name: This is the friendly name that will appear in the Title Bar at the top of the
emulation window, and on the system Task Bar at the bottom of the screen.
• Device Name: If you are using named sessions, enter the session name here.
• Device Model: Select one from the drop-down list. The default 3477-FC works well unless
you have special needs.
• Session Type. This is an information-only field that tells you what type of device you have
chosen in Device Model. It is redundant here since all the types available in a display session
Video.
are
• Device Capabilities. This information-only field tells you whether the chosen Device Model is
color or monochrome, and tells you the number of columns displayed in the emulation window.
• Autostart. Check this box if you want the session to start automatically whenever the LBT is
booted up.
.
Page 51
Page 60
.General Settings
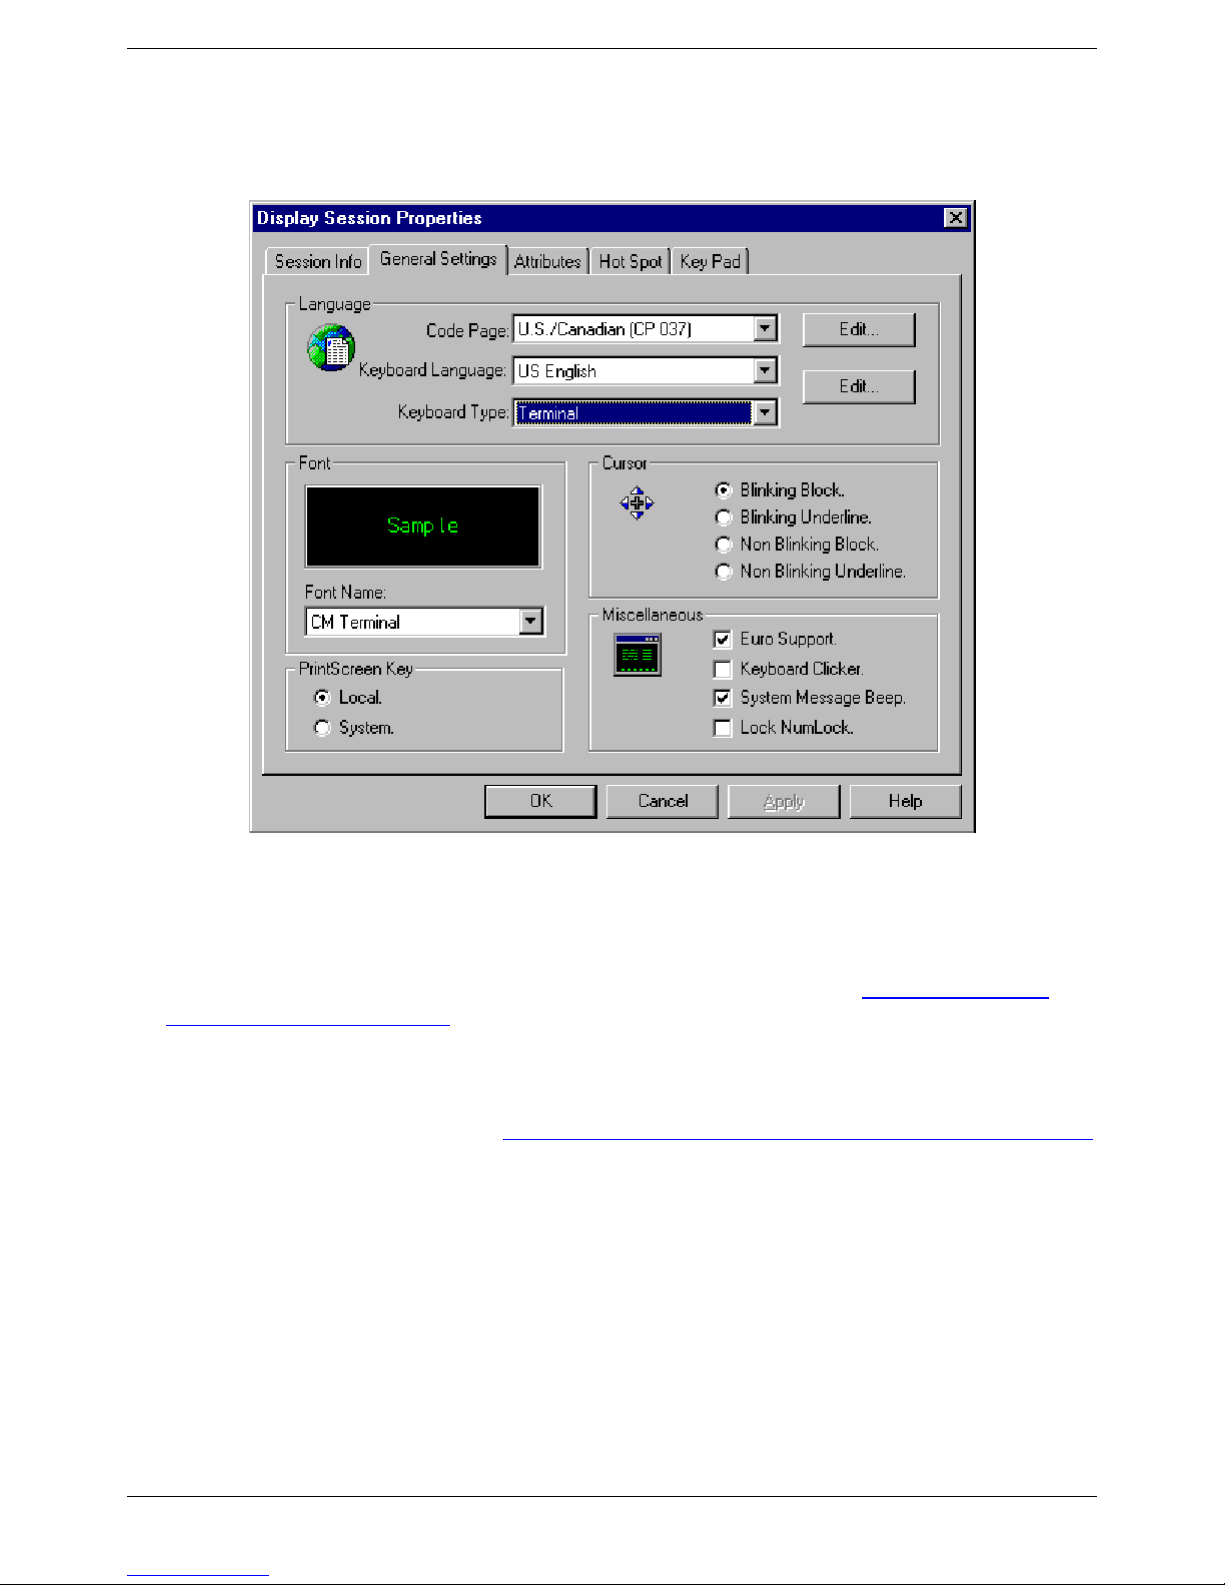
General Settings Sheet
• Code Page. YESterm/IP supports numerous Language Code Pages. The Code Page selected
here from the drop-down list should be the same one configured on the AS/400 for this specific
device. It is also possible to create a new custom Code Page Table. See How To…|Create a
Custom Language Code Page.
• Keyboard Language. U.S. English and several European languages are available for selection in
the drop-down list.
• Keyboard Type. YESterm/IP supports 3 different keyboard types. It is also possible to create a
new custom Keyboard Map. See: How To …|Display Session|Create a Custom Keyboard Map.
• 101 PC. Choose this type if you are using a standard PC keyboard.
• 101 Terminal. Choose this type if you are using an Affirmative Computer Products 101-key
5250/PC keyboard.
• 122 Keys. Choose this type if you are using an Affirmative Computer Products 122-key
5250/PC keyboard.
• Font. Select the font style to be used as the default font for the display session.
• Print Screen Options. Select if the Print Screen function is to be performed on a local printer
(one attached to the terminal) or on a system printer accessed through the AS/400 or is to be
disabled. The Print Screen function be can activated from the:
• Emulator Tool bar.
• Emulator Menu bar (Tool|Print Screen)
Page 52
Page 61
• Keyboard in accordance with the keyboard map, typically the Print (not PrtSc) key.
• Key Pad, if it contains a corresponding button.
• Cursor. Select the type of cursor you want to use.
• Euro Support. When this option is enabled, you can display the Euro symbol when you press
Alt+E.
• Keyboard Clicker. When this option is enabled, you should hear a "click" every time you press a
key on the keyboard.
• System Message Beep. When this option is enabled, you should hear a "beep" when a message
is received from the Host.
Attributes
Changes made in this property sheet affect all sessions. There is only one Attributes configuration
per emulator, not one per session.
Attribute Settings
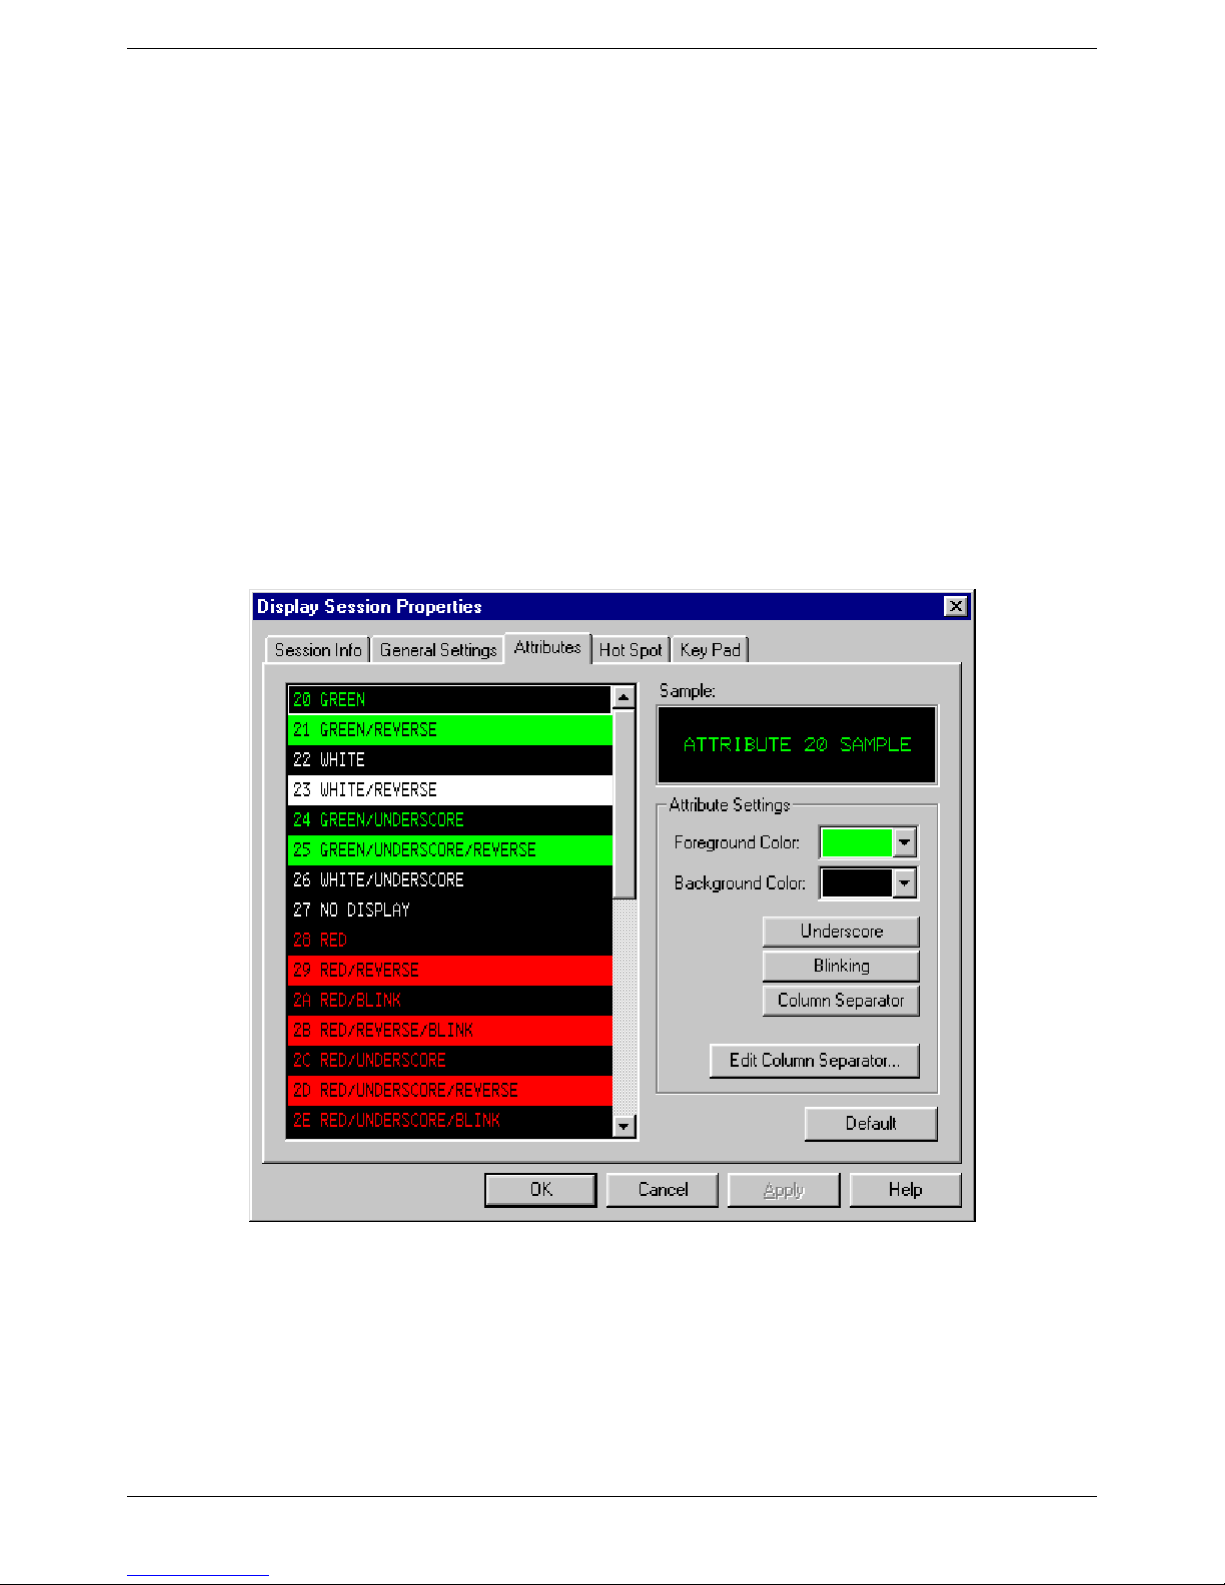
On the left half of this sub-window, you will see a list of all the display attributes that can be used in
a 5250 display screen field, along with their default foreground (the color of the characters) and
background colors. For each attribute, you can make five choices to set how the attribute font
Page 53
Attribute Sheet
Page 62
appears on the screen. You will see a preview of the “new look” in the Sample field. Be careful
with the colors you choose; a wrong choice can cause text or fields to be invisible on the screen
because of lack of color contrast.
• Foreground Color. Select a color for the field characters from this drop-down list.
• Background Color. Select a color for the field background from this drop-down list.
• Underscore. Check this box if you want the field characters to be underscored.
• Blinking. Check this box if you want the field characters to blink repeatedly.
• Column Separator. Check this box if you want a separation mark for each column in the field.
• Default. Click on this button to reset all the attributes to their default settings.
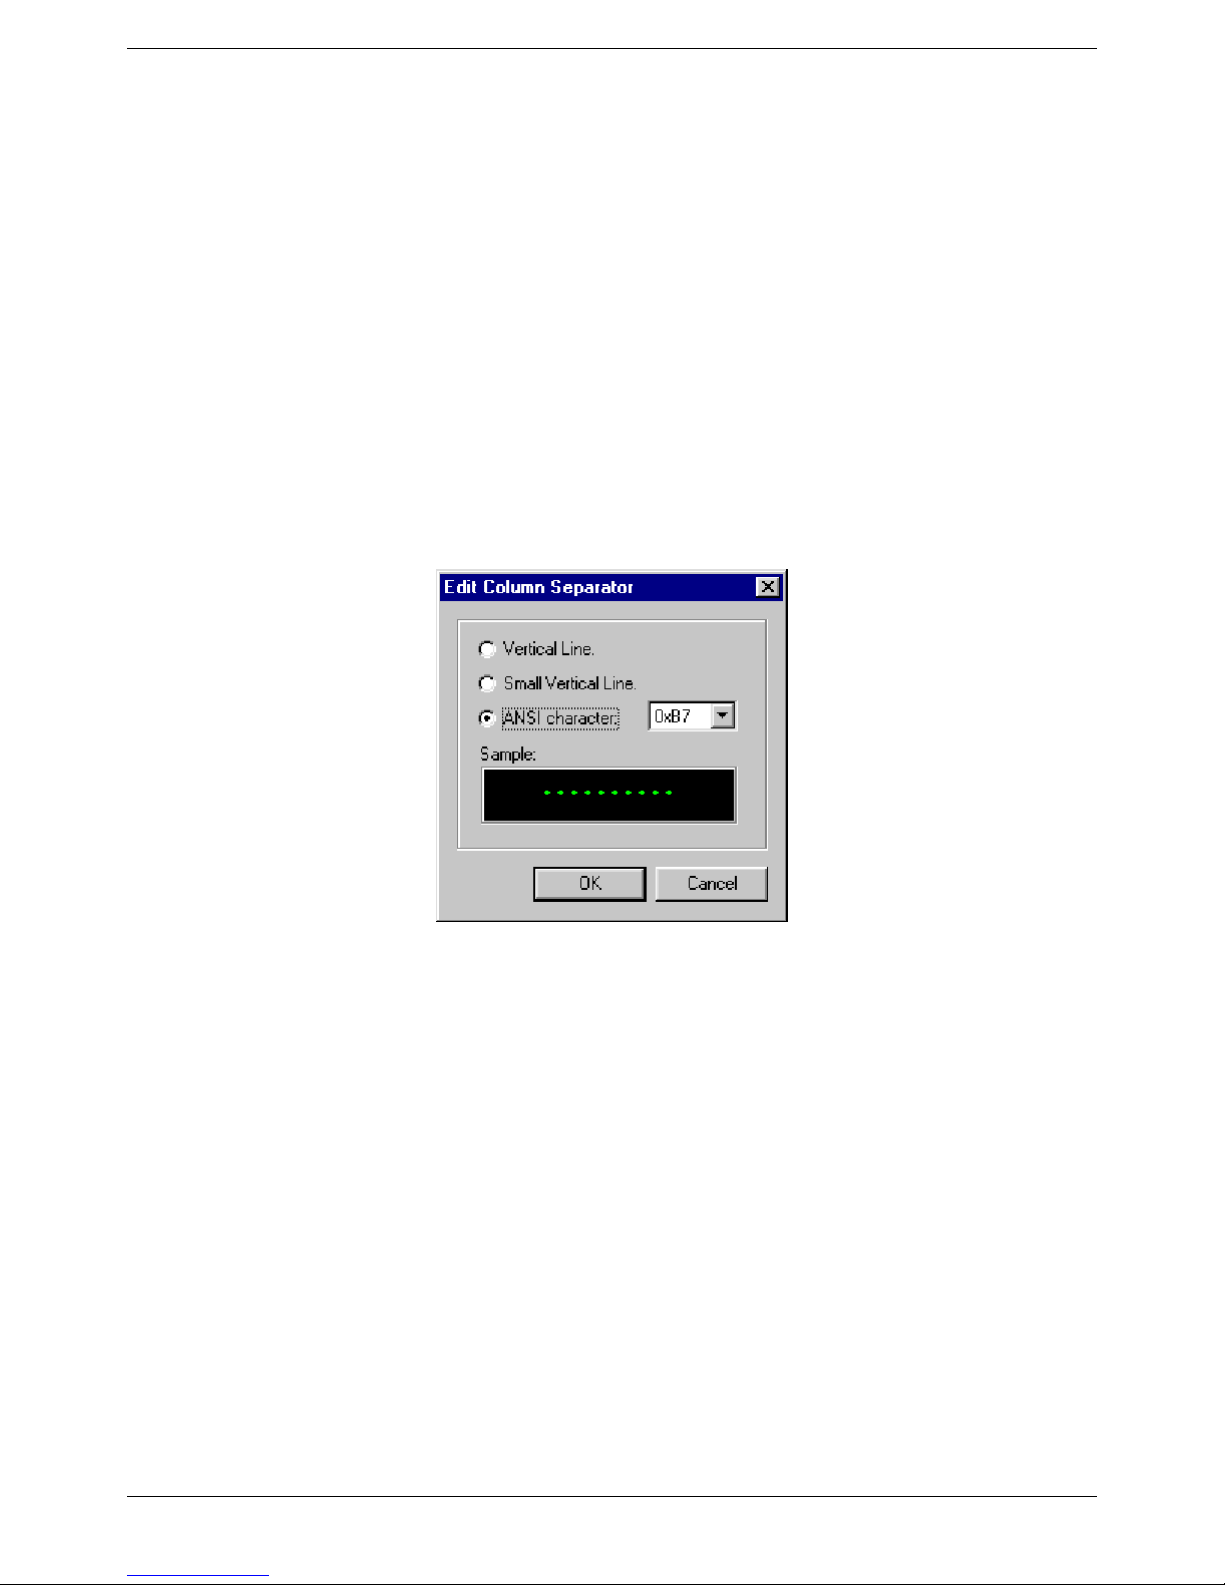
Edit Column Separator
If you chose to use column separators with any of the attributes, you can choose the type of
separator here. Click on this button and the following dialog box will appear:
Edit Column Separator Dialog Box
Make your choice and view it in the Sample field. When you OK out, you will also see this edit
applied to the Sample window in the Attributes sheet. Note that the same column separator type
will be applied to all of the attributes that you have selected to have column separators.
Hot Spot
Changes made in this property sheet affect all sessions. There is only one Hot Spot configuration
per emulator, not one per session. Select the Hot Spot tab, and something similar to the following
properties sheet will appear.
Page 54
Page 63
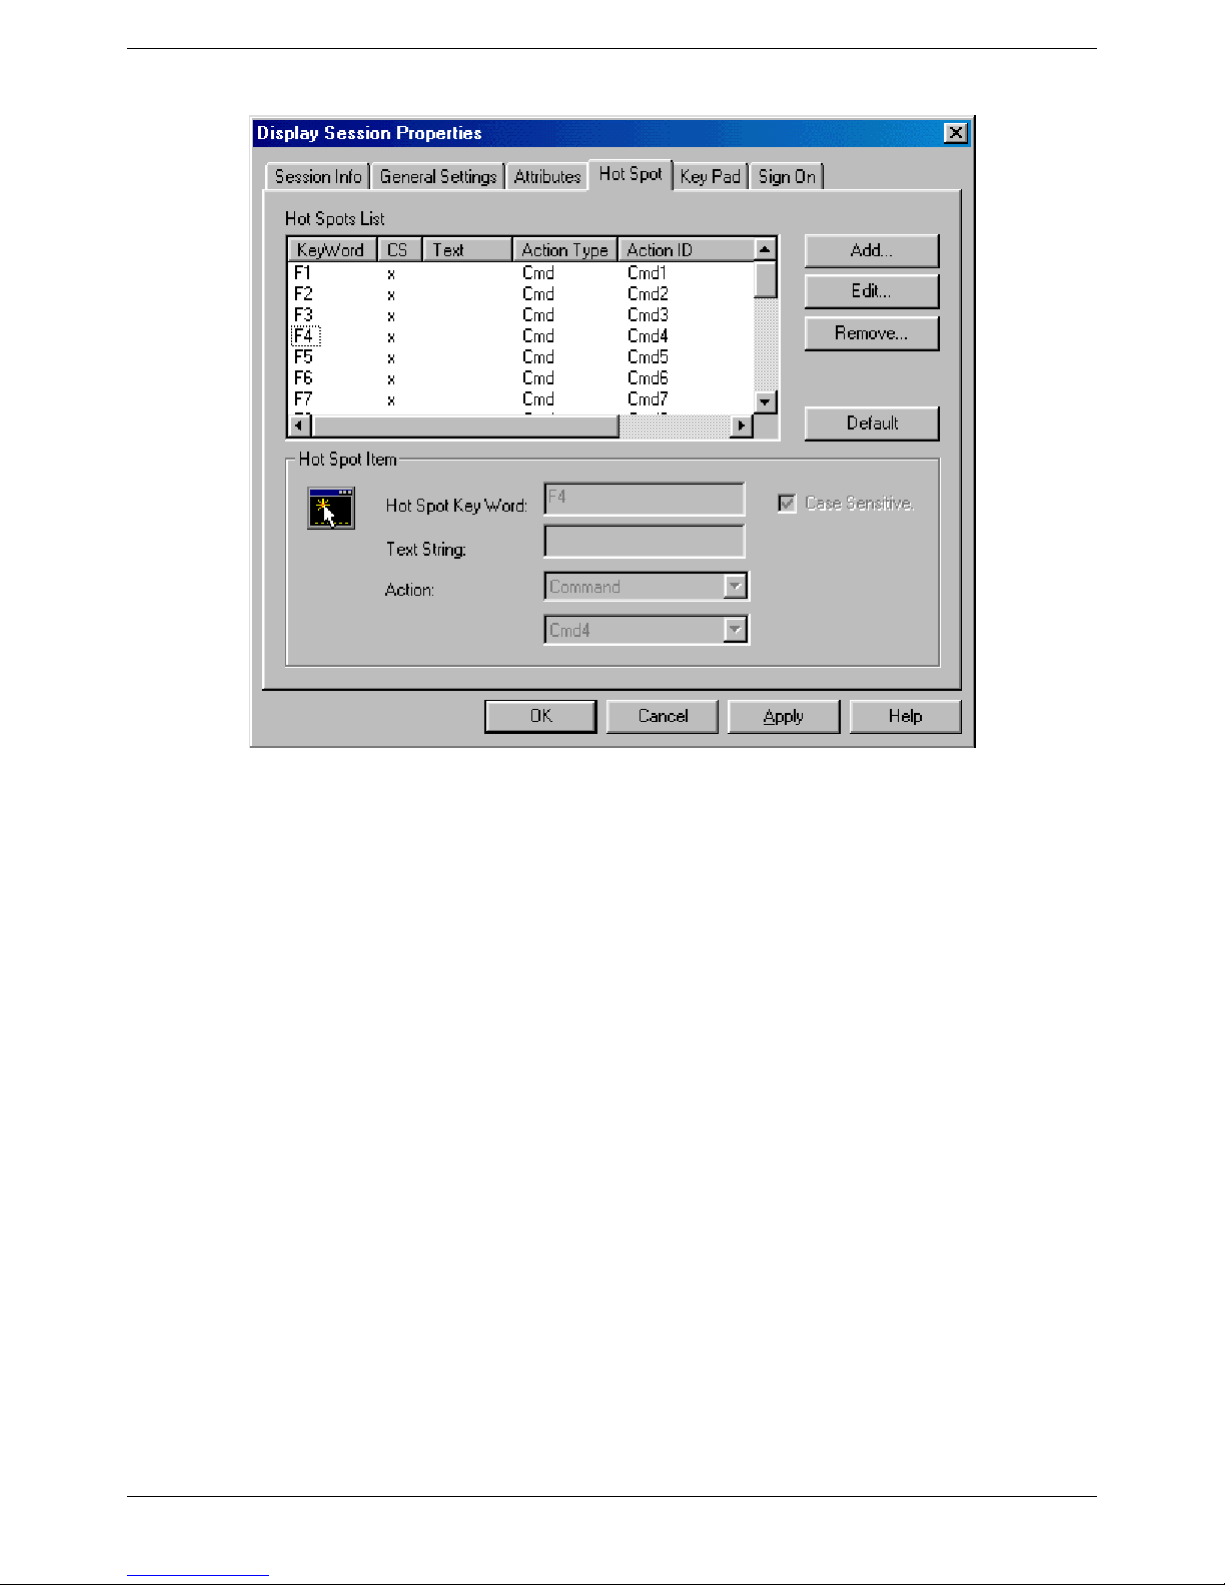
Hot Spot Sheet
A Hot Spot is an area of the session window on which you can double-click the left mouse button to
execute a command or function. Actually, a Hot Spot is the result of a text search by the emulator
for the specified Keyword on the screen. The Function Key and Numeric fields (from 1 to 99
followed by a "period" or "space") Hot Spots are active by default, but you can add other Hot Spot
keys and/or edit/remove them. You must use a mouse for Hot Spots - they really provide a way of
performing functions with a mouse rather than with keys.
A Hot Spot can be used to:
• Simulate a function key.
• Execute a Recorded Sequence that has the same name as the word that you select on the screen.
• Execute a command that you select.
To Edit a Hot Spot:
1. Select the Hot Spot you want to modify.
2. Click on
Edit.
3. If you want to send a Text String to the host every time you click on the Hot Spot, type it into
the Text String field.
4. Select the Action from the drop-down list
5. From the lower drop-down list, select the command or the Recorded Key Sequence that you
want to associate to the Hot Spot key.
6.
In c.80, specify where, in an 80-column screen, the text search engine should start looking for
the specified Keyword. For example, the default start for the word “More” is column 68. So if
Page 55
Page 64

there is a word “More” to the left of that column, it will not be defined as a Keyword or Hot
Spot.
7. In c.132, specify where, in a 132-column screen, the text search engine should start looking for
the specified Keyword.
8. Click on
Accept.
9. When you have made all your configuration changes, click on Apply or OK.
To Remove a pre-defined Hot Spot:
1. Select the Function Key.
2.
Click on Remove.
3. When you have made all your configuration changes, click on Apply or OK.
.
To Add a Hot Spot:
1. Click on
Add.
2. Type the Hot Spot Key Word you want to detect.
3. If you want to send a Text String to the host, type it into the Text String field.
4. Select the Action from the drop-down list
5. From the lower drop-down list, select the command or the Recorded Key Sequence that you
want to associate to the Hot Spot.
6. Specify the text search start columns in c.80 and c.132.
7. Click on
8. When you have made all your configuration changes, click on
Accept.
Apply or OK.
NOTE: If you click on the Default button, you will lose all changes and added Hot Spots
that you have previously made.
Key Pad
A Key Pad is a small window with several customizable push buttons, each having an assigned
function. You can make it visible on the screen by clicking on the button on the Tool Bar, or
selecting
of typing the equivalent command, pressing a key, or running a Recorded Sequence.
The Key Pad tab allows you to change the characteristics of the pop-up Key Pad. Changes made in
this property sheet affect all sessions. There is only one Key Pad configuration per emulator, not
one per session.
View/Key Pad from the menu bar. You can choose a function from the Key Pad instead
Page 56
Page 65
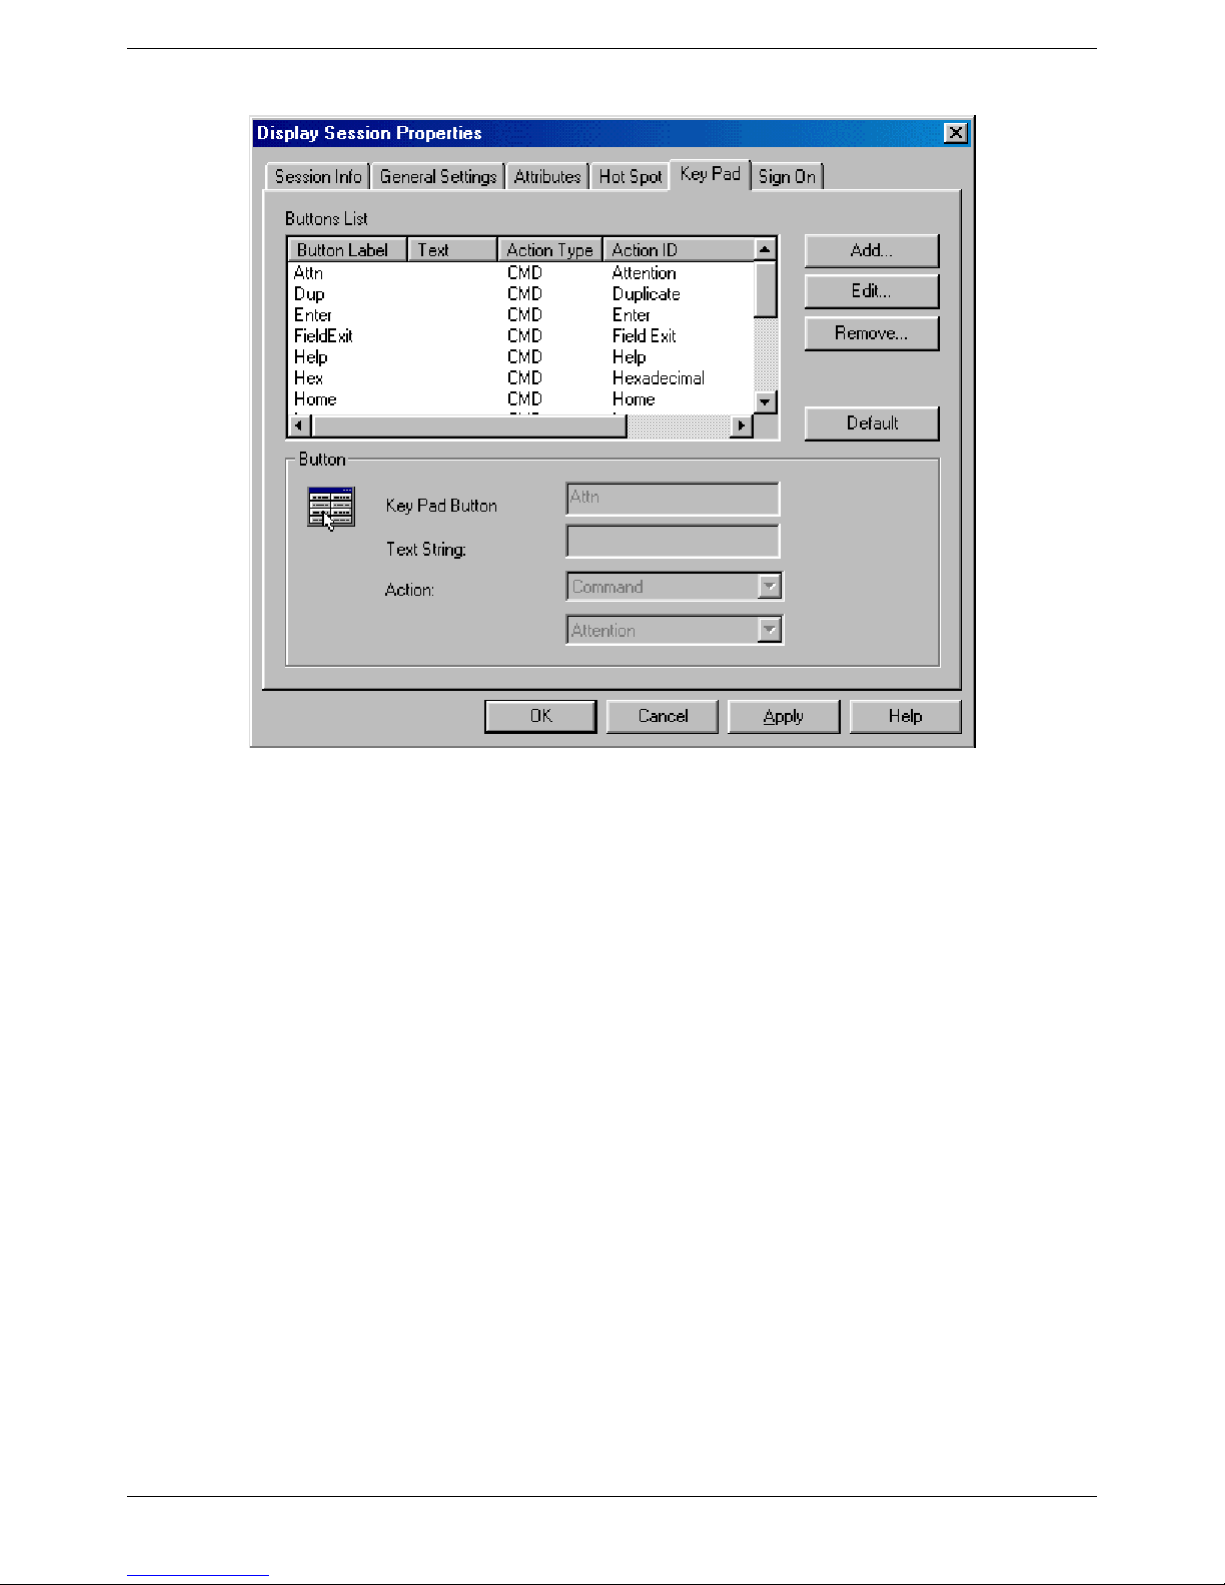
Key Pad Sheet
To Edit a Key Pad button:
1. Select the button you want to modify.
2. Click on
Edit.
3. If you want to send a Text String to the host every time you click on the Hot Spot, type it into
the Text String field.
4. Select the Action from the drop-down list
5. From the lower drop-down list, select the command or the Recorded Key Sequence that you
want to associate to the button.
6. Click on
Accept.
7. When you have made all your configuration changes, click on Apply or OK.
To Remove a pre-defined Key Pad button:
1. Select the button.
2. Click on Remove.
3.
When you have made all your configuration changes, click on Apply or OK.
.
To Add a Key Pad button:
9. Click on
Add.
10. Type the button label you want to see on the Key Pad.
11. If you want to send a Text String to the host, type it into the Text String field.
12. Select the Action from the drop-down list
13. From the lower drop-down list, select the command or the Recorded Key Sequence that you
want to associate to the button..
Page 57
Page 66
14. Click on Accept.
15. When you have made all your configuration changes, click on
Apply or OK.
NOTE: If you click on the Default button, you will lose all changes and added buttons that
you have previously made.
.
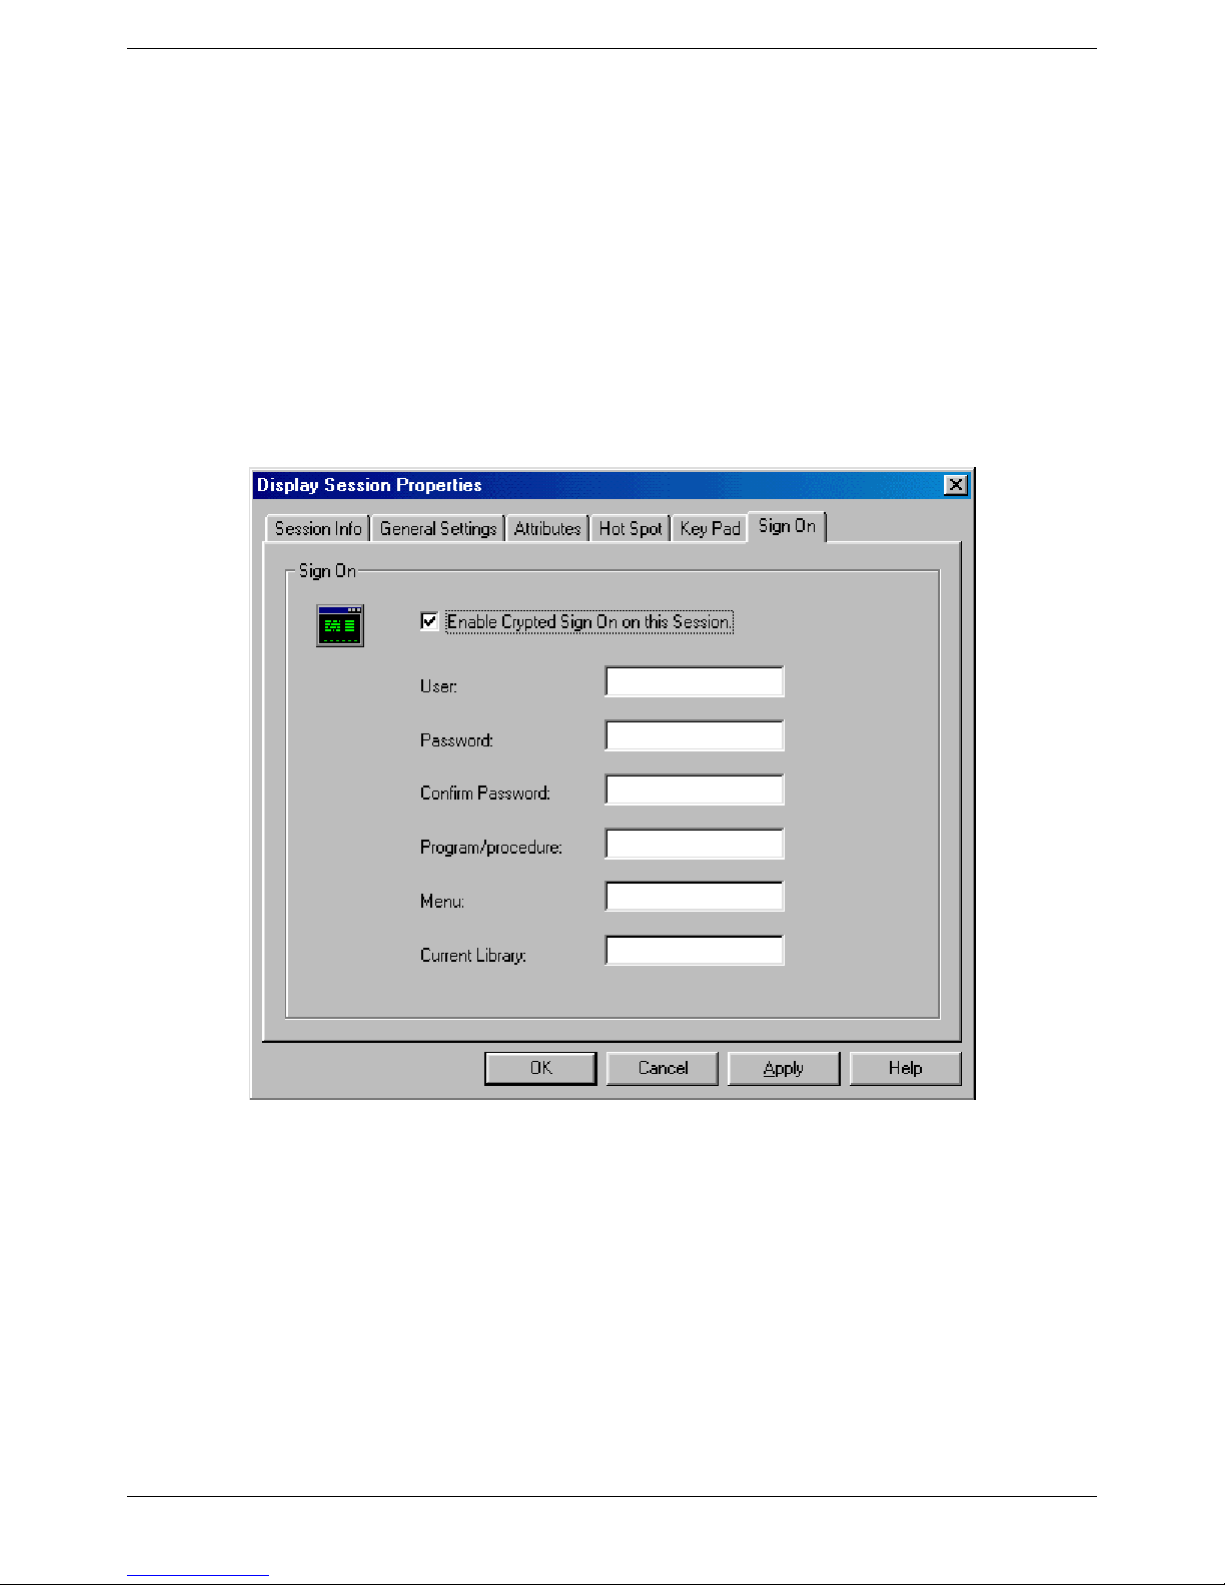
Sign On
The Sign On feature of the emulator uses the "Enhanced Display Auto-Signon and Password
Encryption" feature of the AS/400 to allow a secure connection to the AS/400without using SSL
For this feature to work to your benefit, the "Remote Signon" parameter of the AS/400
configuration should be enabled. To verify if this parameter is enabled, use the WRKSYSVAL
command. To enable this parameter, you may use the following command
CHGSYSVAL SYSVAL(QRMTSIGN) VALUE('*VERIFY')
Page 58
Sign On Sheet
:
Page 67

Printer Session Properties
In a 5250 printer session window, you will see the “Printer Session Properties” sub-window
showing five tabs. Click on a tab to bring up the corresponding properties sheet. At the bottom of
the sub-window are four buttons. Ignore the
entered all of your configuration properties in all six sheets, click on either
do the same thing. If you want to cancel your configuration changes, click on
the upper right corner.
Session Info
• Host Name/IP Address: Type in the IP address of the AS/400 server.
• Port Number: Use the default of 23 unless directed to do otherwise by your AS/400
administrator.
• Local Name: This is the friendly name that will appear in the Title Bar at the top of the
emulation window, and on the system Task Bar at the bottom of the screen.
• Device Name: If you are using named sessions, enter the session name here.
• Device Model: Only 3812 is available for TCP/IP devices.
• Session Type. This is an information-only field that tells you what type of device you have
chosen in Device Model. It is redundant here since the only type available in a printer session is
Printer..
• Device Capabilities. Not applicable for a printer session.
• Autostart. Check this box if you want the session to start automatically whenever the LBT is
booted up.
Help button; it won’t help you. After you have
OK or Apply; they both
Cancel or on the X in
Page 59
Page 68
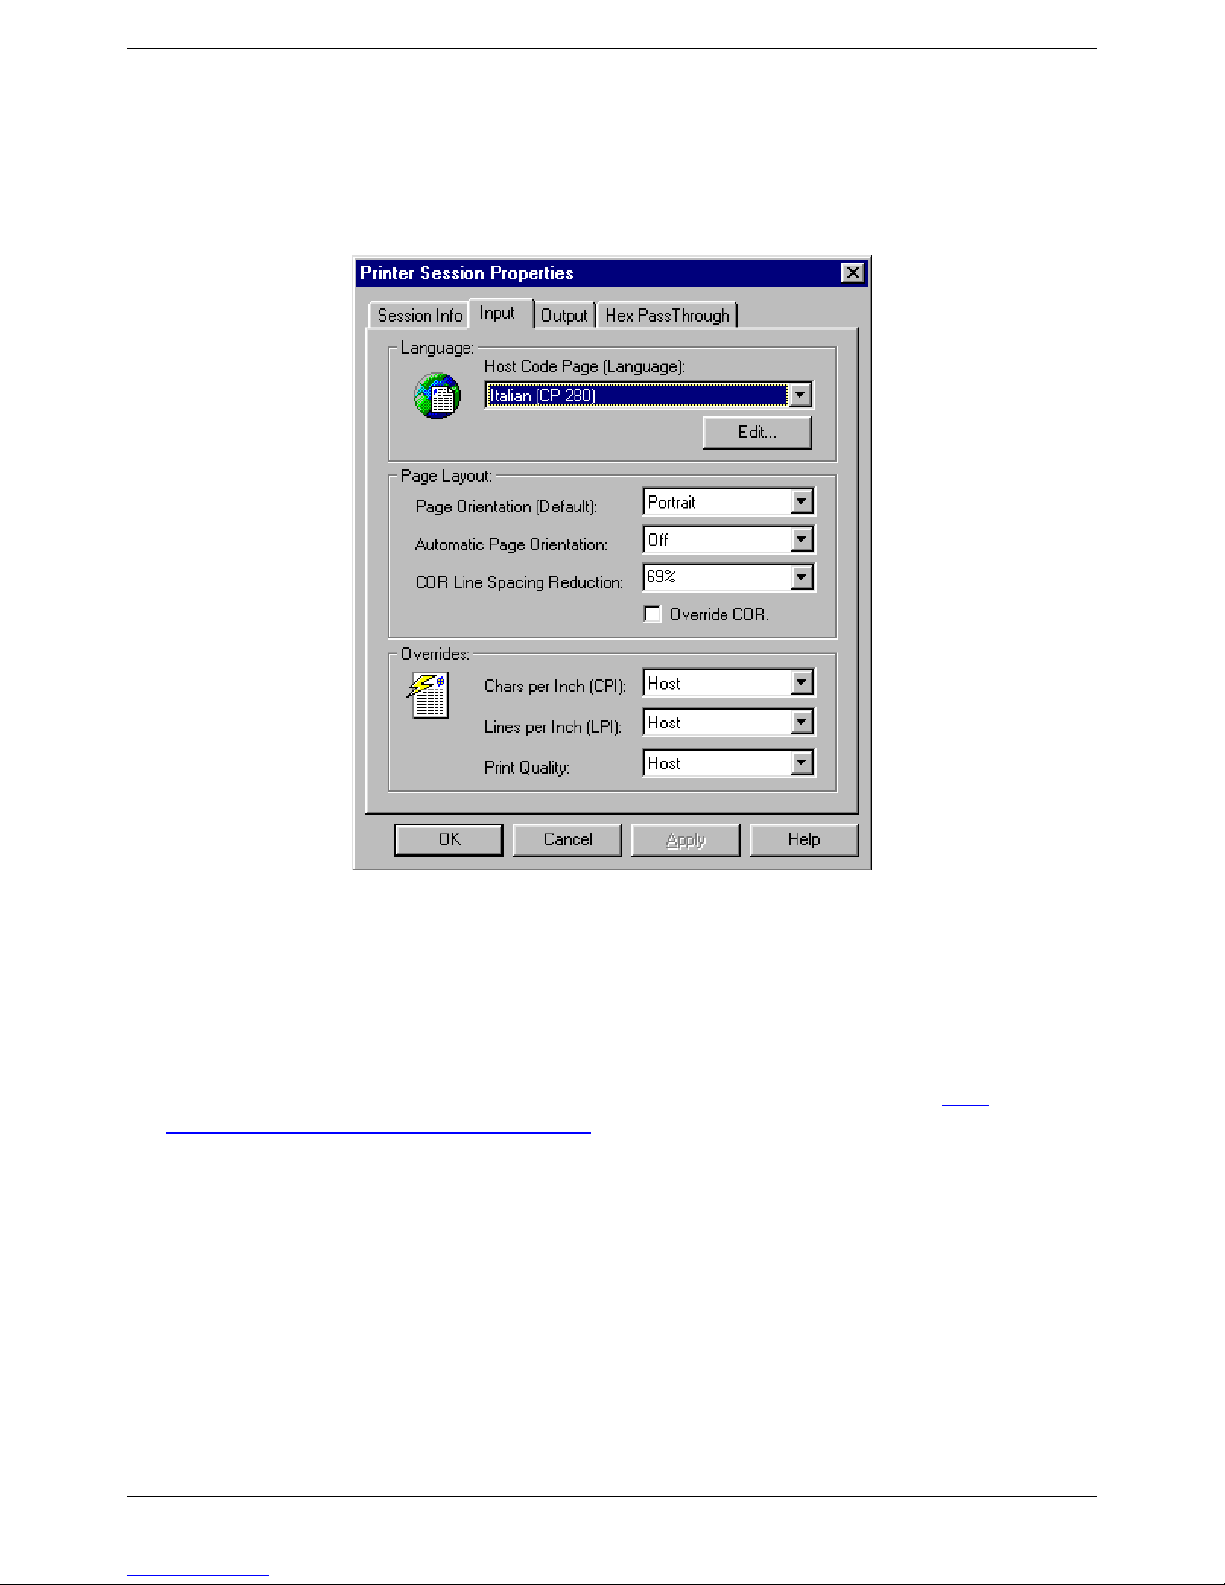
Input
The Input Tab allows you to define specific parameters that will modify the printer data stream
from the host to affect the appearance of the printed page.
Input Sheet
Language
• Host Code Page. YESterm/IP supports numerous Language Code Pages. The Code Page
selected here from the drop-down list should be the same one configured on the AS/400 for this
specific device. It is also possible to create a new custom Code Page Table. See How
To…|Create a Custom Language Code Page.
Page Layout
Set the Default Page layout. Parameters are:
• Page Orientation. Select from Vertical (portrait), Horizontal (landscape), and COR (Computer
Output Reduction).
• Automatic Page Orientation. This option is enabled by default.
• COR Line Spacing Reduction. This feature solves the problem of nonprintable margin area on
the printer.
• COR Override. This function corresponds to the IBM 3812 configuration parameter and defines
that a job with draft quality is printed in COR.
Page 60
Page 69

Overrides
If you wish to override the host system output settings, you can do so here.
Output
The parameters in this sheet control the data stream from the LBT to the local printer.
Time Out
This parameter defines a timer (in seconds) that starts to count down every time, during a printing
job, the host system stops sending data. If no more data are received within the timeout value
selected, the Printer Session will assume that the print job is finished, and a Form Feed command is
sent to the printer.
Printer Driver
The typical Windows Graphic Printer Driver generates a graphic data stream. This means that
everything is sent to the printer in graphic mode, requiring a large amount of data to be sent.
Furthermore, depending upon the type of printer you are using, the performance can dramatically
slow down.
The Passthrough Drivers used here, specifically developed by Affirmative, generate a standard text
data stream. This means that everything is sent to the printer in text mode allowing better control of
the printer and better performance. The data stream is generated by the YES
sent to the printer through the Windows Printer Spooler
term/IP provides a list of pre-configured Printer Profiles for your selection and use. Even if
YES
your printer is not on this list, it probably emulates one of the listed printers.. If you wish, you can
modify parameters of a listed driver. For more information on how to customize or create a new
Passthrough Printer Driver, refer to: How To…|Printer Session|Modify the Passthrough Driver.
term/IP application and
Printer Port
Choose the printer port used by your local printer. You can have multiple local printers. If you
select a COM port. you can display and edit its parameters by clicking on the
These parameters are common to both COM ports.
If you wish to print to a network printer, use the Pipe Unix field to designate your LPD printer on
the network.
Settings button.
Page 61
Page 70
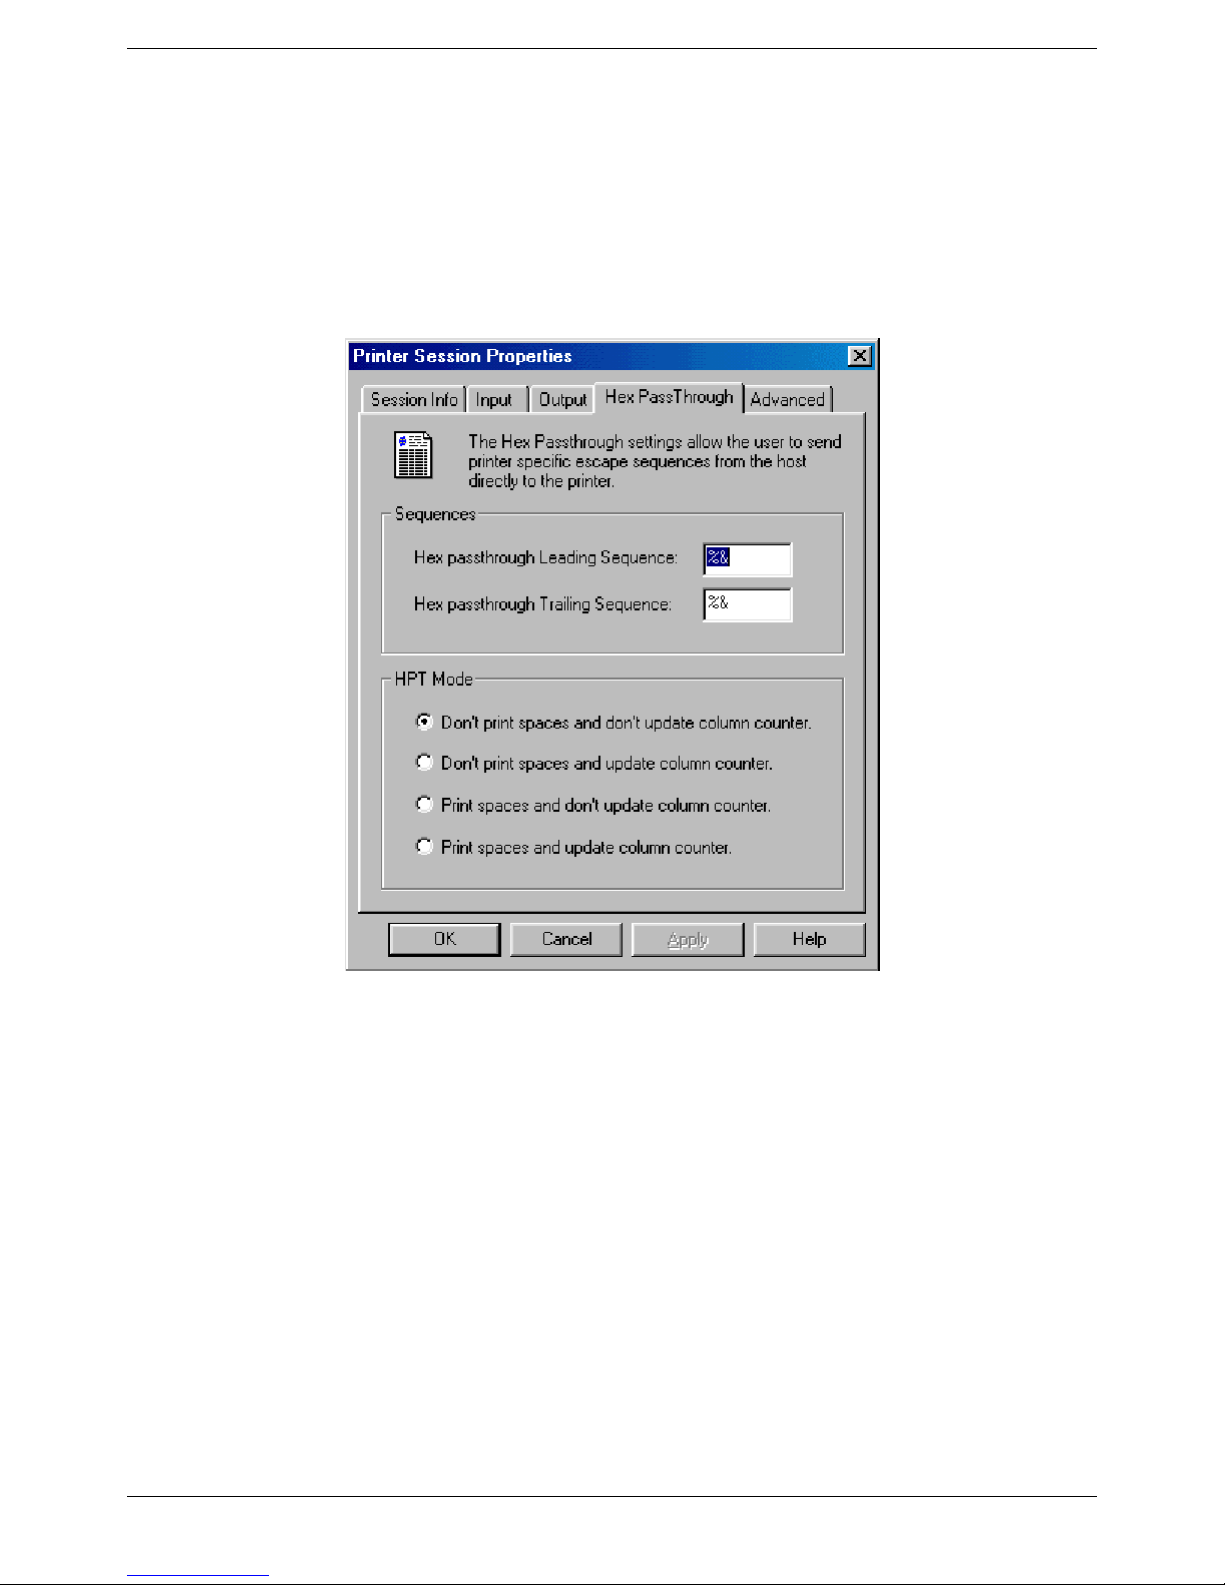
Hex Pass Through (HPT)
Hex Pass Through allows portions of a data stream to be sent directly from the host to the printer.
There is no modification done to these portions by the emulator driver. In order for the emulator to
recognize these inviolate data stream portions, they must be identified at the beginning and end by
escape sequences – a combination of special characters that the emulator can identify.
Hex Pass Through Sheet
• Sequences. Enter the Leading Sequence and the Trailing Sequence you want to use. The
Default sequences are
%&, %&. You can enter up to 4 characters for each sequence.
• HPT Mode. Select one of four modes to define if HPT prints spaces and if it updates the
column counter.
Page 62
Page 71
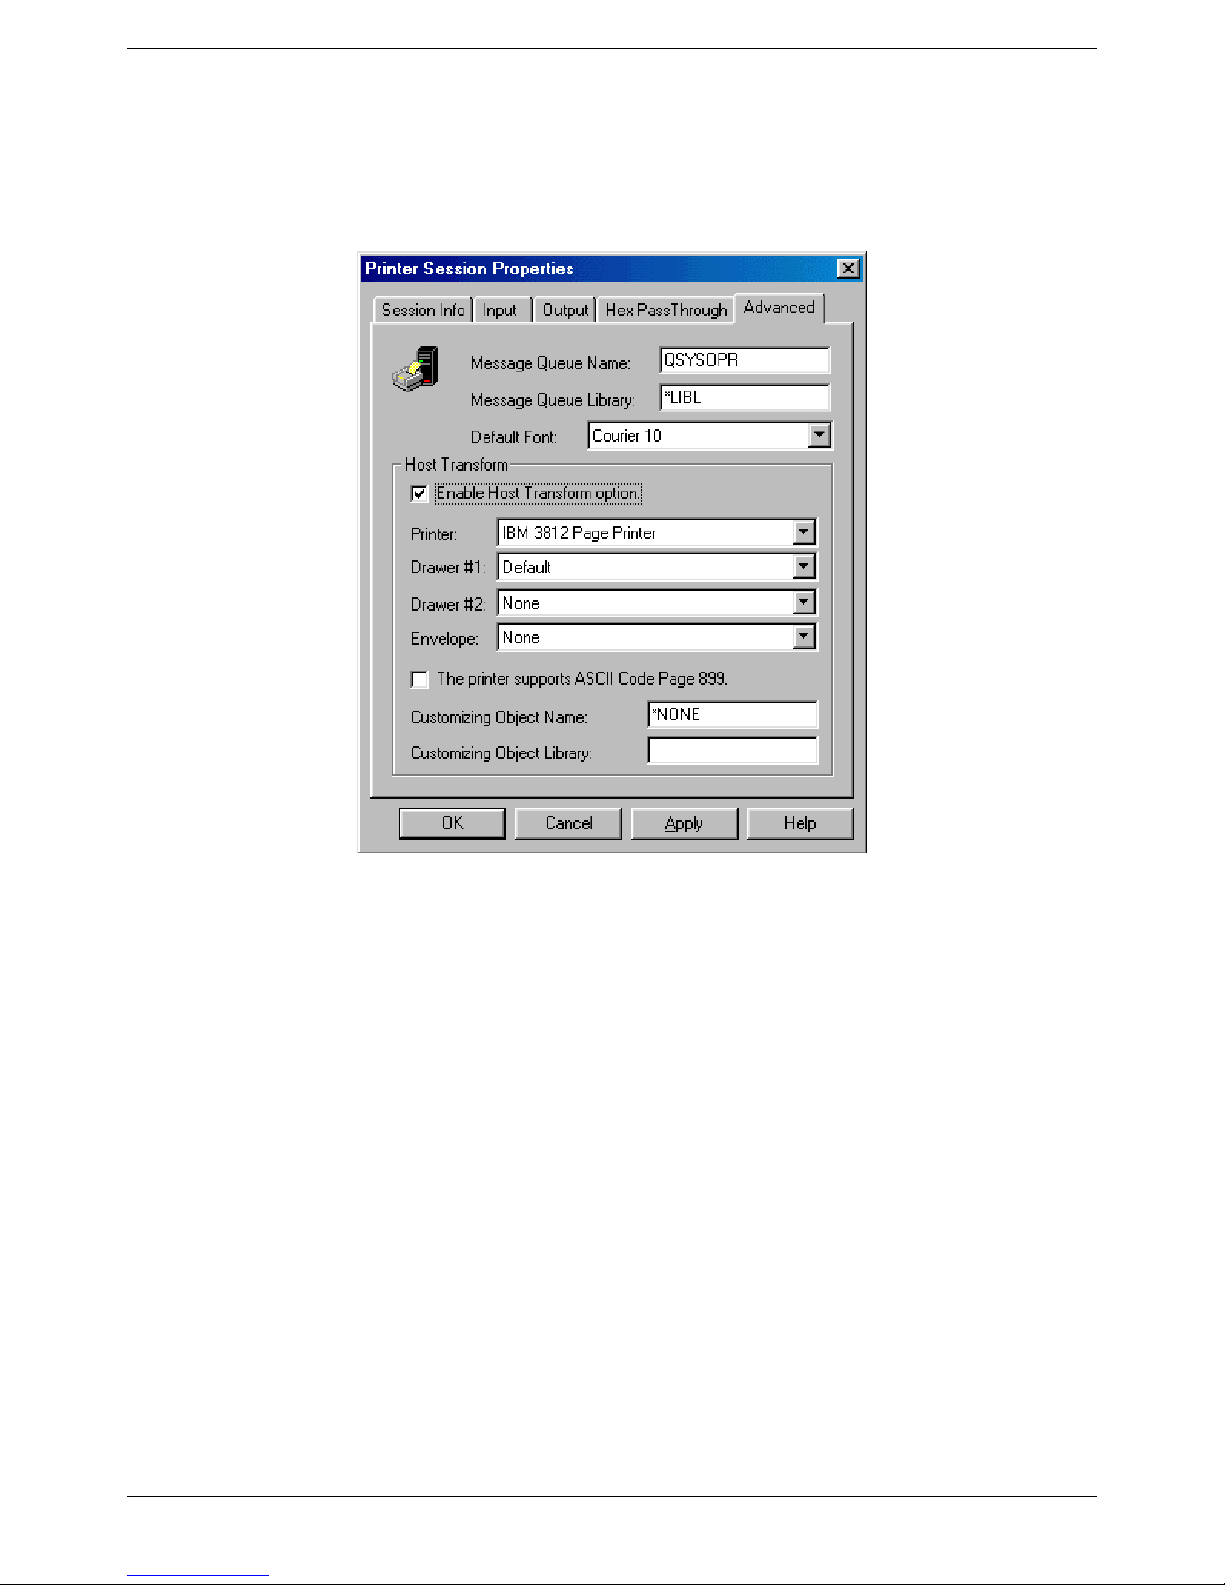
Advanced
The Advanced Tab allows you to set default message parameters and enable the Host Transform
feature.
Advanced Sheet
Default Message Parameters
You can set the following Default options:
• Message Queue Name. Default is QSYSOPR.
• Message Queue Library. Default is *LIBL.
• Default Font. Default is 011.
Host Print Transform
When Host Print Transform is enabled, the host does the EBCDIC-to-ASCII conversion of the print
stream, and the local Passthrough Driver is not used. The following parameters are available for
configuration:
• Printer. You must choose a compatible model from the drop-down list
• Drawer # 1. Choose an input print media size if applicable.
• Drawer # 2. Choose an input print media size if applicable.
• Envelope. Choose an envelope size if applicable.
• ASCII Code Page 899. If you have enabled Host Print Transform, you can enable this code
page.
Page 63
Page 72
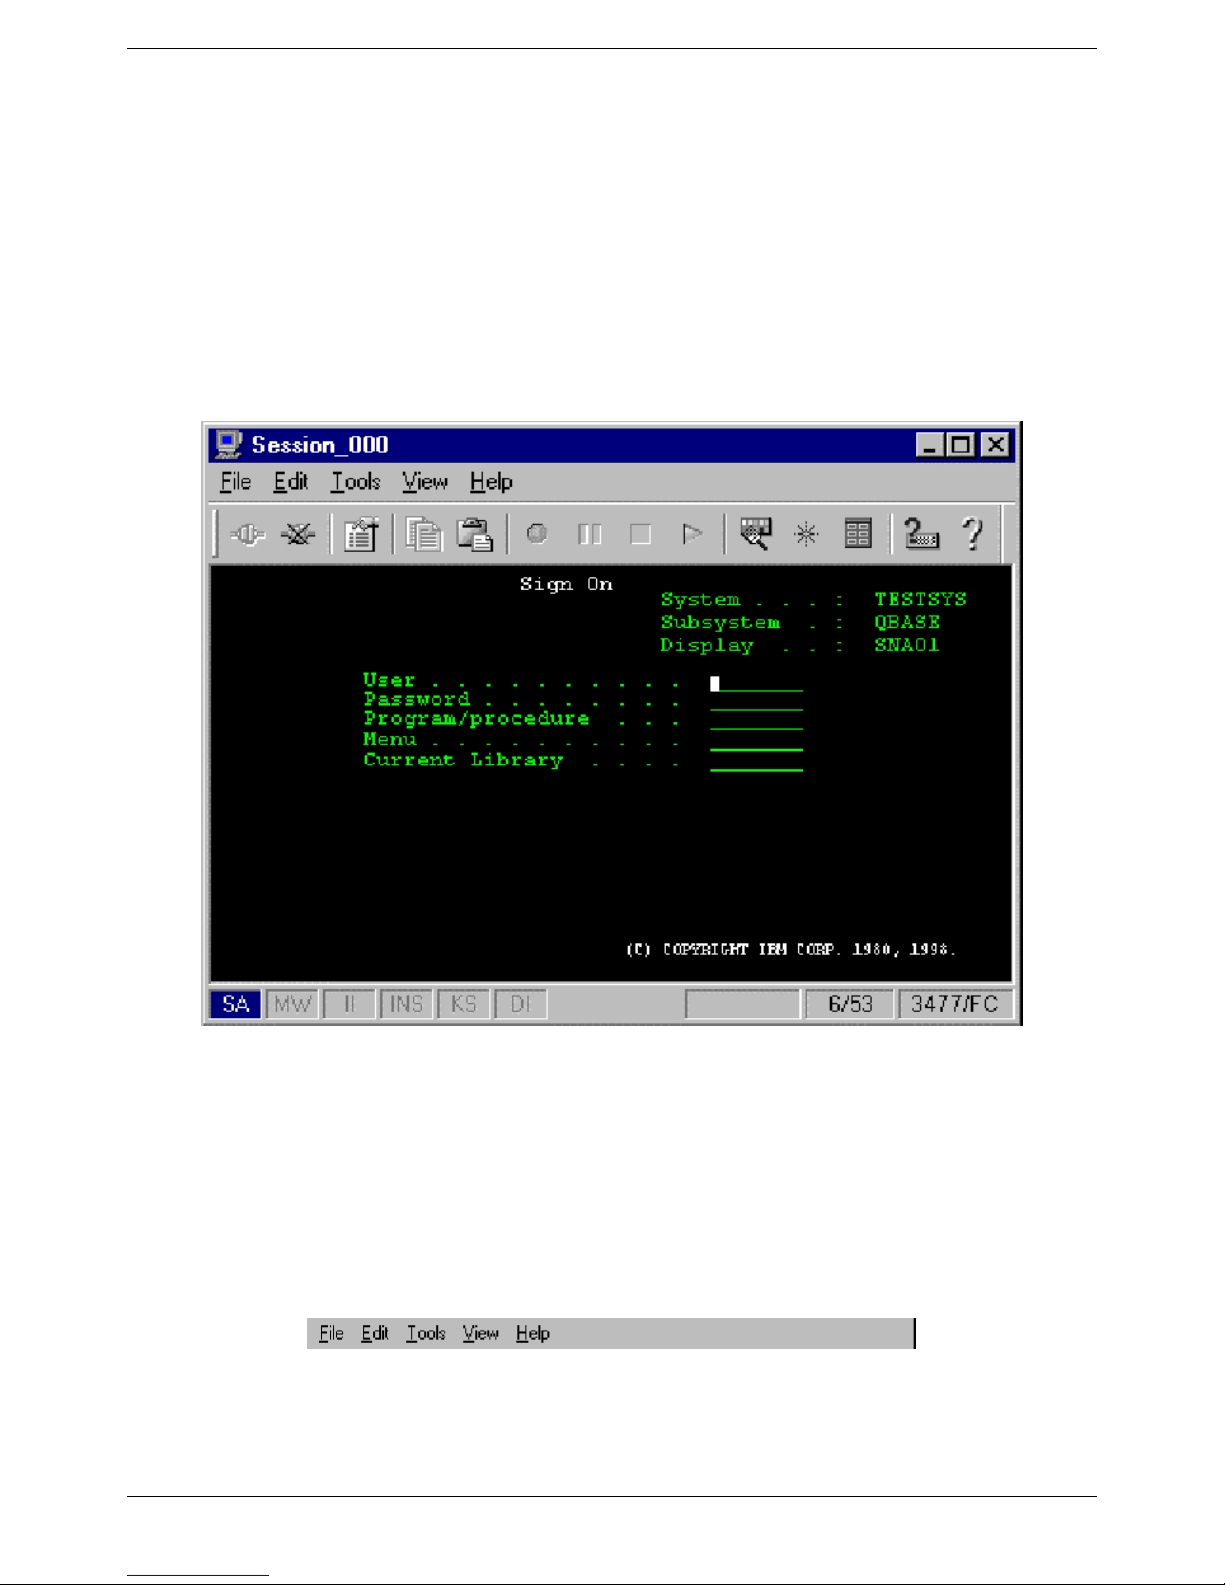
Emulator Operation
Display Session
Here is a typical display session Sign-On screen. The Menu bar, Tool bar, and Status bar will be
identical for all display session screens.
Menu Bar
Menu bar commands of the Display Session window consist of commands and functions that are
unique for each window (session).
Page 64
Display Session Sign-On Screen
Display Session Menu Bar
Page 73
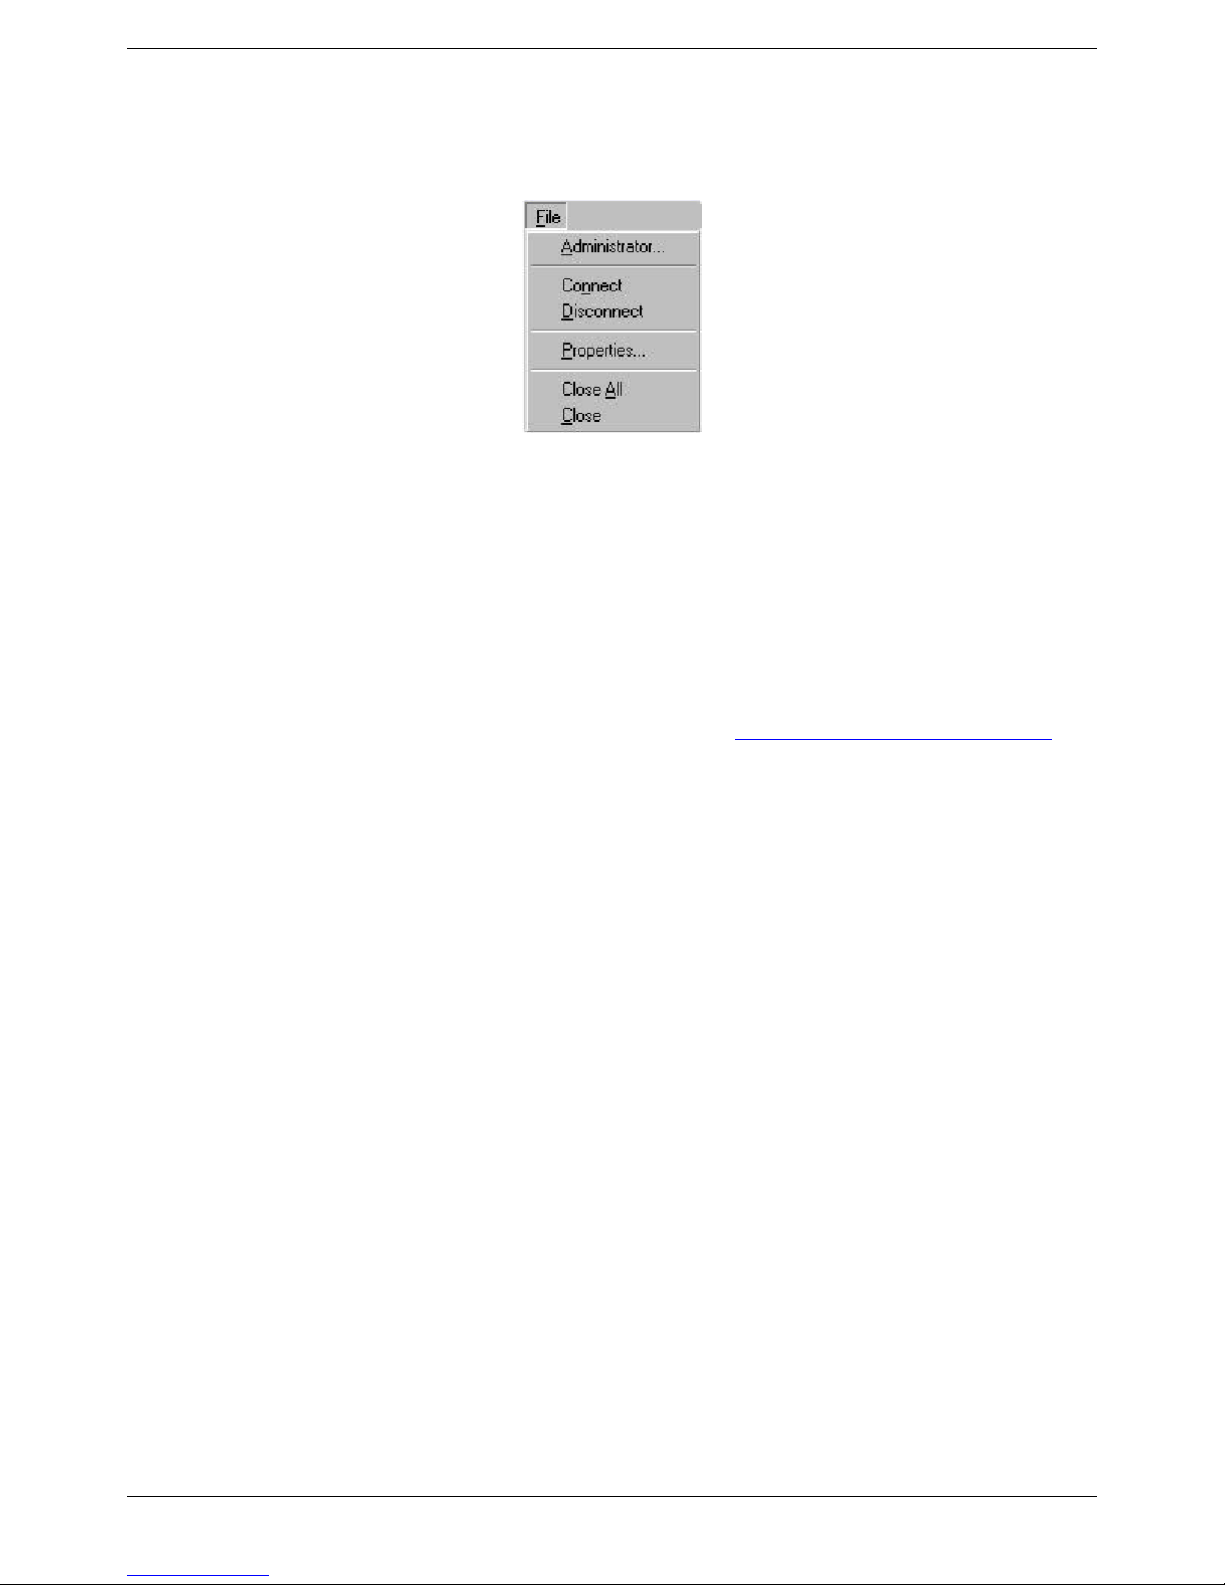
File
File Drop-Down Menu
•
Administrator. This selection is not used in the LBT.
• Connect. A display session typically comes up in the connected state. But if, for some reason,
the session is not connected, this command will attempt to connect the Display Session to the
host.
• Disconnect. This command disconnects the Display Session from the host. It is recommended
that you disconnect only from the Sign-On screen.
• Properties…. This command allows you to edit/modify the Properties of the Display Session in
use. For more information on this function, please refer to Setup|Display Session Properties
When you change properties here, the changes are effective immediately.
• Close All. This selection is not available in the LBT.
• Close. This command closes the Display Session in use.
.
Edit
• Copy. This command copies, into the clipboard, data contained in the selected area without
removing (clearing) it from the display.
o Note: Copy does not duplicate host attributes such as color and intensity.
• Copy All. This command allows you to Copy All the display session data into the clipboard
without removing (clearing) it from the display.
• Paste. This command pastes the current contents of the clipboard onto the session window,
starting at the current cursor position.
o Note: If the contents of the clipboard are larger than the space available in the
presentation space (screen), they are clipped. Paste does not overlay the clipboard
contents onto areas that are protected by the host application.
Page 65
Page 74
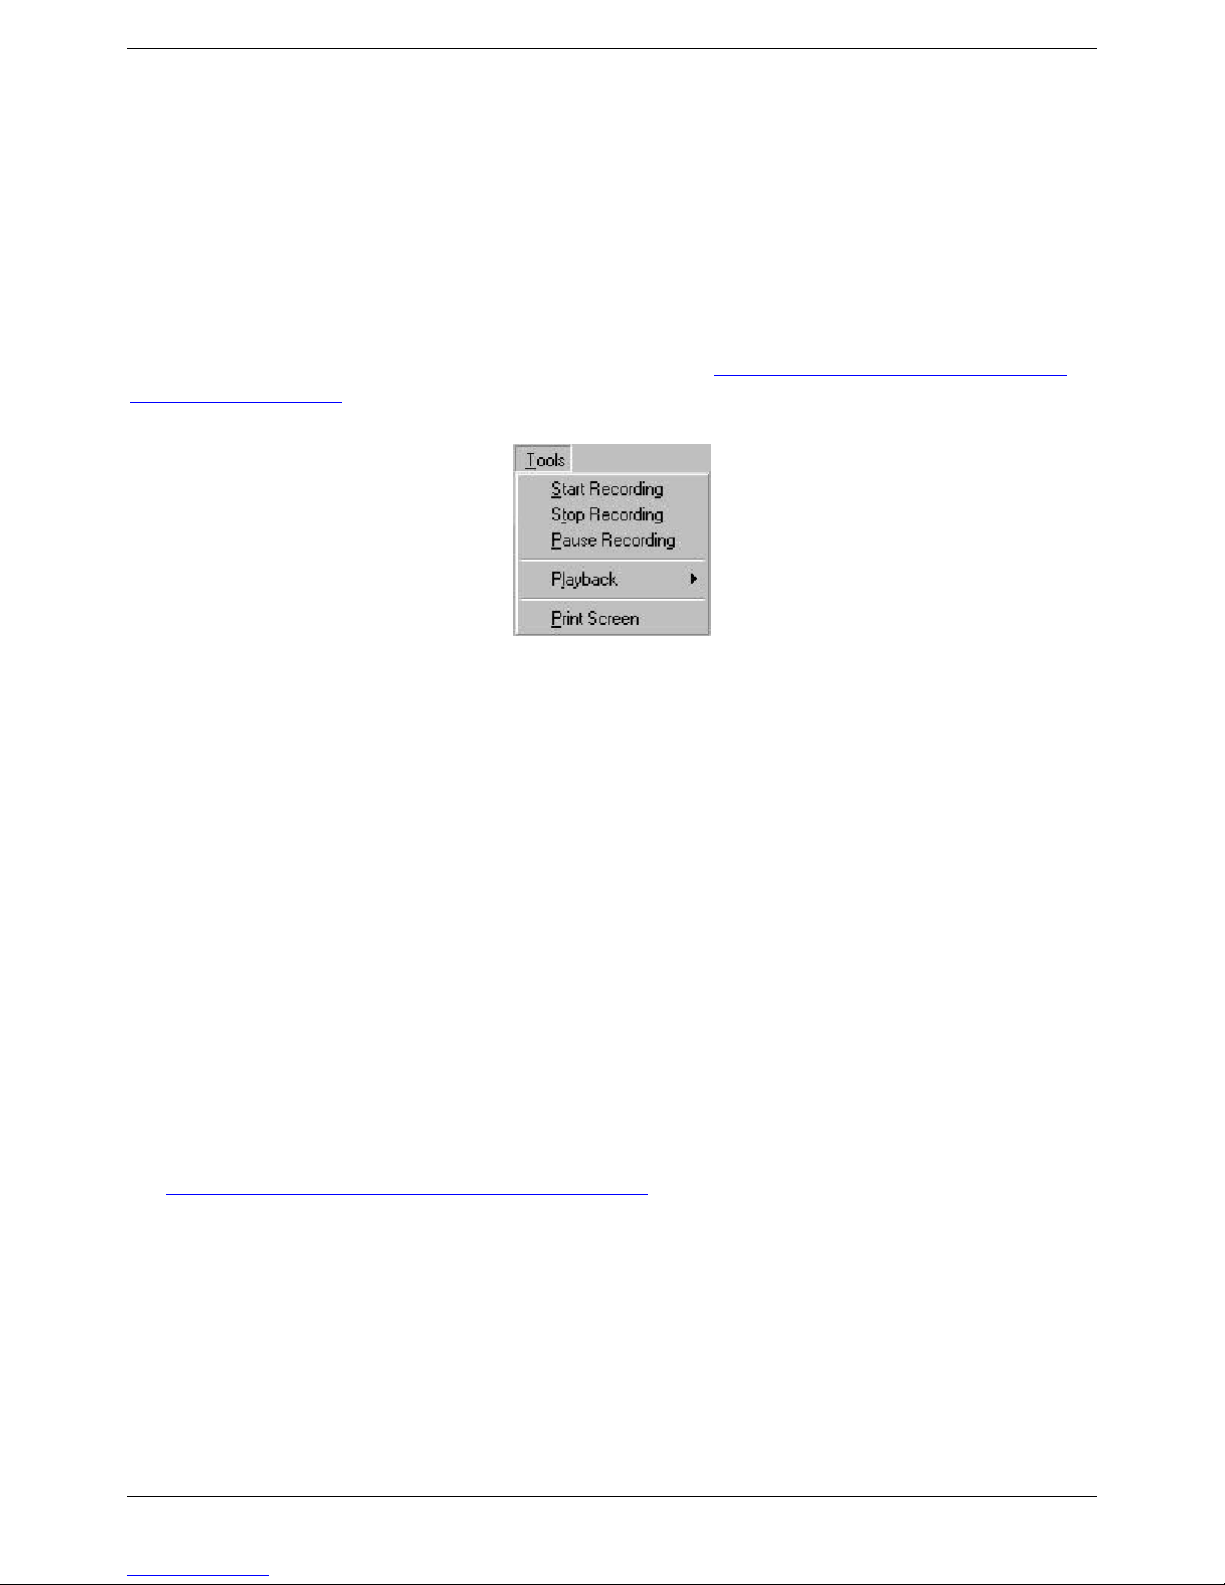
Tools
Tools commands allow you to work with the Record/Playback function. If you regularly do the
same things when you work with a host system, it is convenient to record the keystrokes you make
and have YES
Record/Playback allows you to do this. All your keystrokes can be saved in a file; when you play
the file back (Playback), everything that happened will be reproduced exactly. For more
information on how to work with Record/Playback, refer to: How To…|Display Session|Record a
Keystrokes Sequence.
term/IP play them back when you want to do the same job again.
Tools Drop-Down Menu
• Start Recording. This command starts the Keystroke Recording process. It has the same effect
as pressing the
Recrd button on the keyboard.
• Stop Recording. This command stops the Keystroke Recording process. It has the same effect
as pressing the
o Note: When you Stop the Recording, a dialog box will be displayed allowing you to
save the recorded keystrokes into a named file for subsequent playback.
•
Pause Recording. Including a Pause Recording command into a recorded sequence will cause
Recrd button on the keyboard, since the Recrd button has a toggle action.
the Playback operation to pause at this point in the sequence. This pause is typically used to
enter variable data during Playback. It has the same effect as
Pause Recording a second time to terminate the pause.
Pause on the keyboard. Click on
• Playback. Click on this command to display a list of your recorded sequences. To play a
sequence, just click on the file name. This command has the same effect as pressing the
Play
button on the keyboard.
• Remove Macro. Click on this command to bring up a dialog box showing a list of all your
sequences. Highlight the one you want to remove and click on
OK.
• Print Screen. Click on this command to print the screen contents to the printer designated in
Setup|Display Session Properties|General Settings
pressing the
Print button on the keyboard.
. This command has the same effect as
Page 66
Page 75
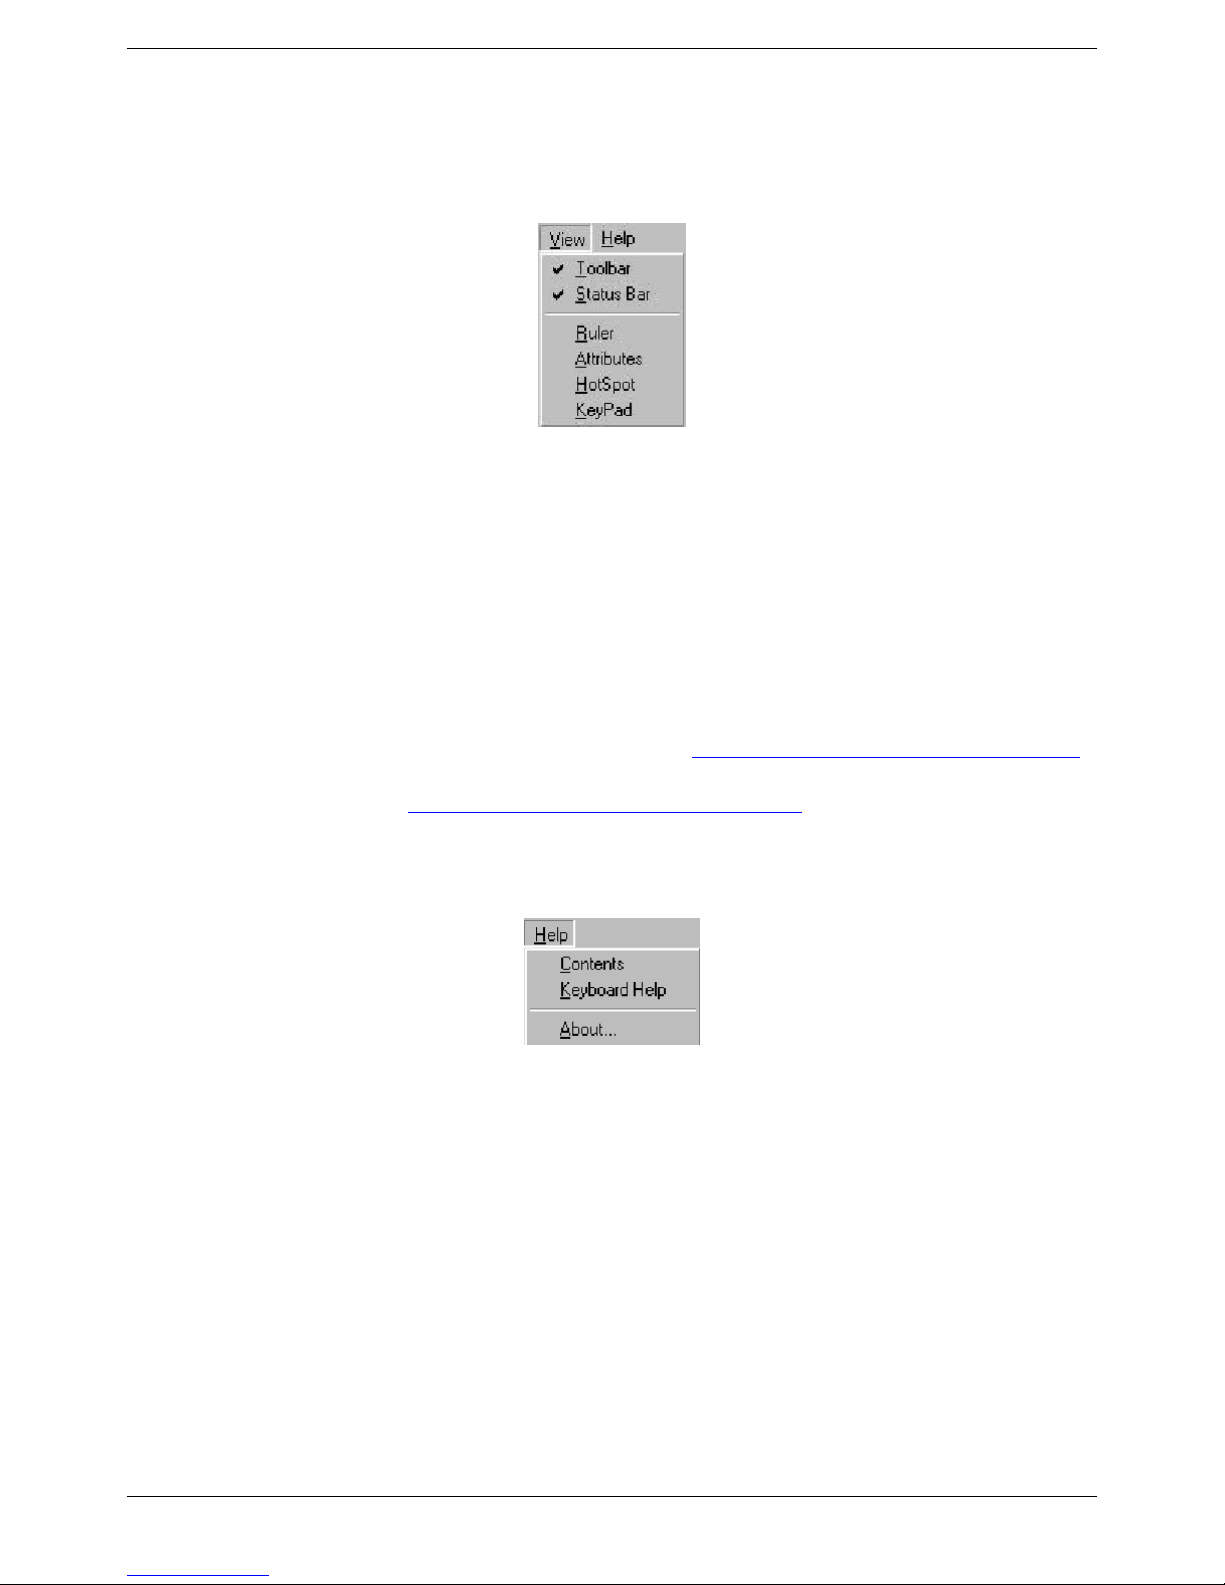
View
Commands in the View menu are used to manipulate the display emulator window.
View Drop-Down Menu
• Toolbar. This toggle command hides or displays the Toolbar near the top of the screen, just
below the Menu bar. When the command is checked, the Toolbar is displayed.
• Status Bar. This toggle command hides or displays the Status bar at the bottom of the screen.
When the command is checked, the Status bar is displayed
•
Ruler. This toggle command hides or displays the crosshairs Ruler. When the command is
checked, the Ruler is displayed.
Attributes. This toggle command hides or displays the 5250 attribute fields.
•
•
HotSpot. This command allows you to hide or display all the fields associated with Hot Spots.
For more information on the Hot Spot feature, refer to Setup|Display Session Settings|Hot Spot
•
Keypad. This toggle command hides or displays the Key Pad. For more information on the
Key Pad feature, refer to Setup|Display Session Sesttings|Key Pad
.
.
Help
Help Drop-Down Menu
• Contents. This command is not used.
• Keyboard Help…. This command displays the keyboard map in use. You can see the mapping,
but you cannot edit it from this screen. This display can be used in two ways:
• If you click on a key to which a command has been mapped, you will see that command
highlighted in the List Box.
• If you highlight a command in the List Box, the key or key combination that executes that
command will be highlighted on the keyboard graphic. Some commands can be executed
from several different key combinations. In that case, you will see the notation (x of y),
which indicates that this is the xth sequence out of y possibilities. To cycle through the
combinations for that command, click on
•
About…. This command displays detailed information on the YESterm/IP firmware such as
version, copyrights, and other useful information.
Next Sequence.
Page 67
Page 76

Toolbar
The Toolbar is displayed across the top of the application window just below the Menu bar. The
Toolbar provides quick access to commands you use on a regular basis, but if you do not need it,
you can hide it and the Menu bar to increase the size of your display window. When the Toolbar is
displayed, a check mark appears next to the Toolbar command on the View menu.
Place the cursor over a Toolbar button to see its command equivalent. From left to right, the
command/button definitions are:
• Connect Session. Duplicates the function of the Menu bar File|Connect command.
• Disconnect Session. Duplicates the function of the Menu bar File|Disconnect command.
• Local Prints. Duplicates the function of the Menu bar Tools|Print Screen command.
• Properties. Duplicates the function of the Menu bar File|Properties command.
• Copy. Duplicates the function of the Menu bar Edit|Copy command.
• Paste. Duplicates the function of the Menu bar Edit|Paste command.
• Record. Duplicates the function of the Menu bar Tools|Start Recording command. In fact, if
you use the menu version, you will see that this button is also depressed.
• Pause. Duplicates the function of the Menu bar Tools|Pause command. If you use the menu
version, you will see that this button is also depressed.
• Stop. Duplicates the function of the Menu bar Tools|Stop Recording command.
• Play. Duplicates the function of the Menu bar Tools|Playback command.
• Show/Hide Ruler. Duplicates the function of the Menu bar View|Ruler command.
• Show/Hide Attributes. Duplicates the function of the Menu bar View|Attributes command.
• Show/Hide HotSpot. Duplicates the function of the Menu bar View|HotSpot command.
• Show/Hide Keypad. Duplicates the function of the Menu bar View|Keypad command.
• Keyboard Help. Duplicates the function of the menu bar Help|Keyboard Help command.
• ?. This command is not used.
Printer Session
Menu Bar
Menu bar commands of the Printer Session window consist of commands and functions that are
unique for each printer window (session).
Page 68
Printer Session Menu Bar
Page 77
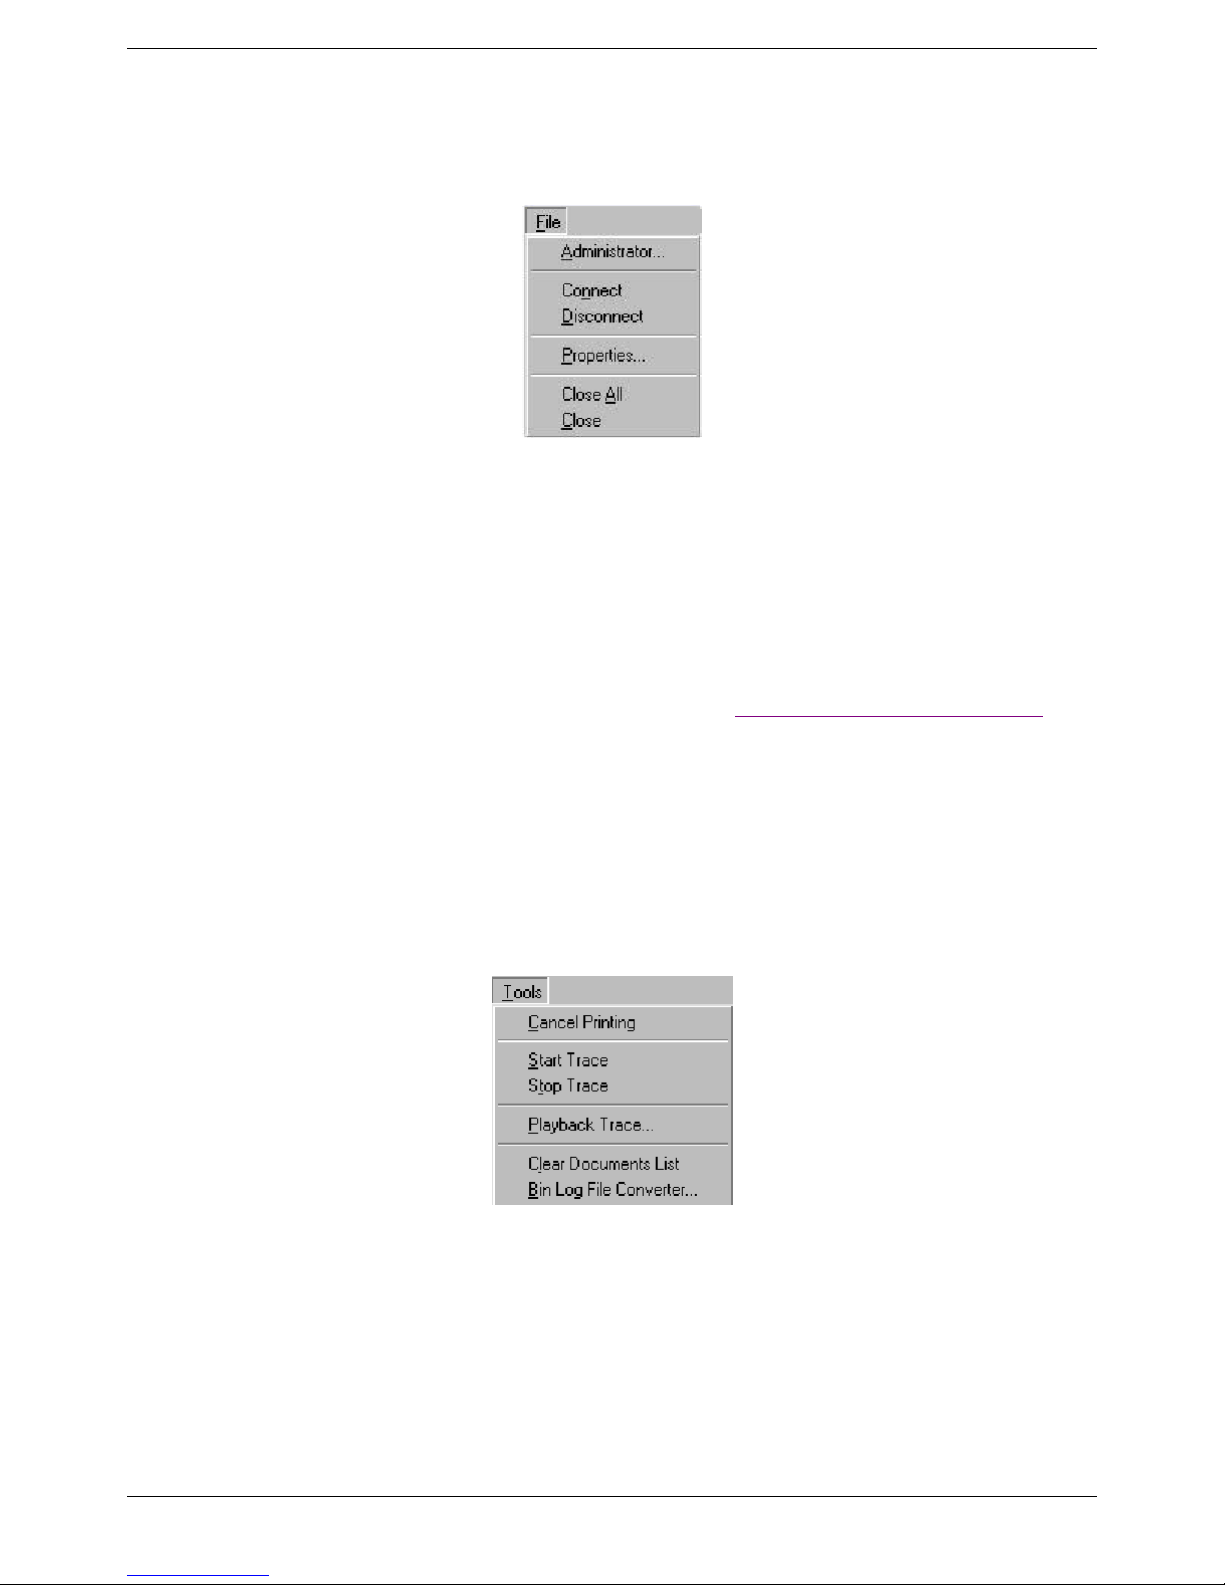
File
File Drop-Down Menu
• Administrator. Not used in the LBT.
• Connect. A printer session typically comes up in the connected state. But if, for some reason,
the session is not connected, this command will attempt to connect the Printer Session to the
host.
• Disconnect. This command disconnects the Printer Session from the host
• Properties…. This command allows you to edit/modify the Properties of the Printer Session in
use. For more information on this function, please refer to Setup|Printer Session Properties
When you change properties here, the changes are effective immediately.
• Close All. Not used in the LBT.
• Close. This command closes the Printer Session in use
.
Tools
The Tools menu allows you to create and use a trace for diagnostic purposes.
Tools Drop-Down Menu
• Cancel Printing. This command cancels the print job in process.
• Start Trace. This command allows you to print a specific print job to a file instead of to a
Printer.
o Note: This command is for diagnostic purpose only.
• Stop Trace. This command allows you to stop recording the trace.
o Note: This command is for diagnostic purpose only.
Page 69
Page 78
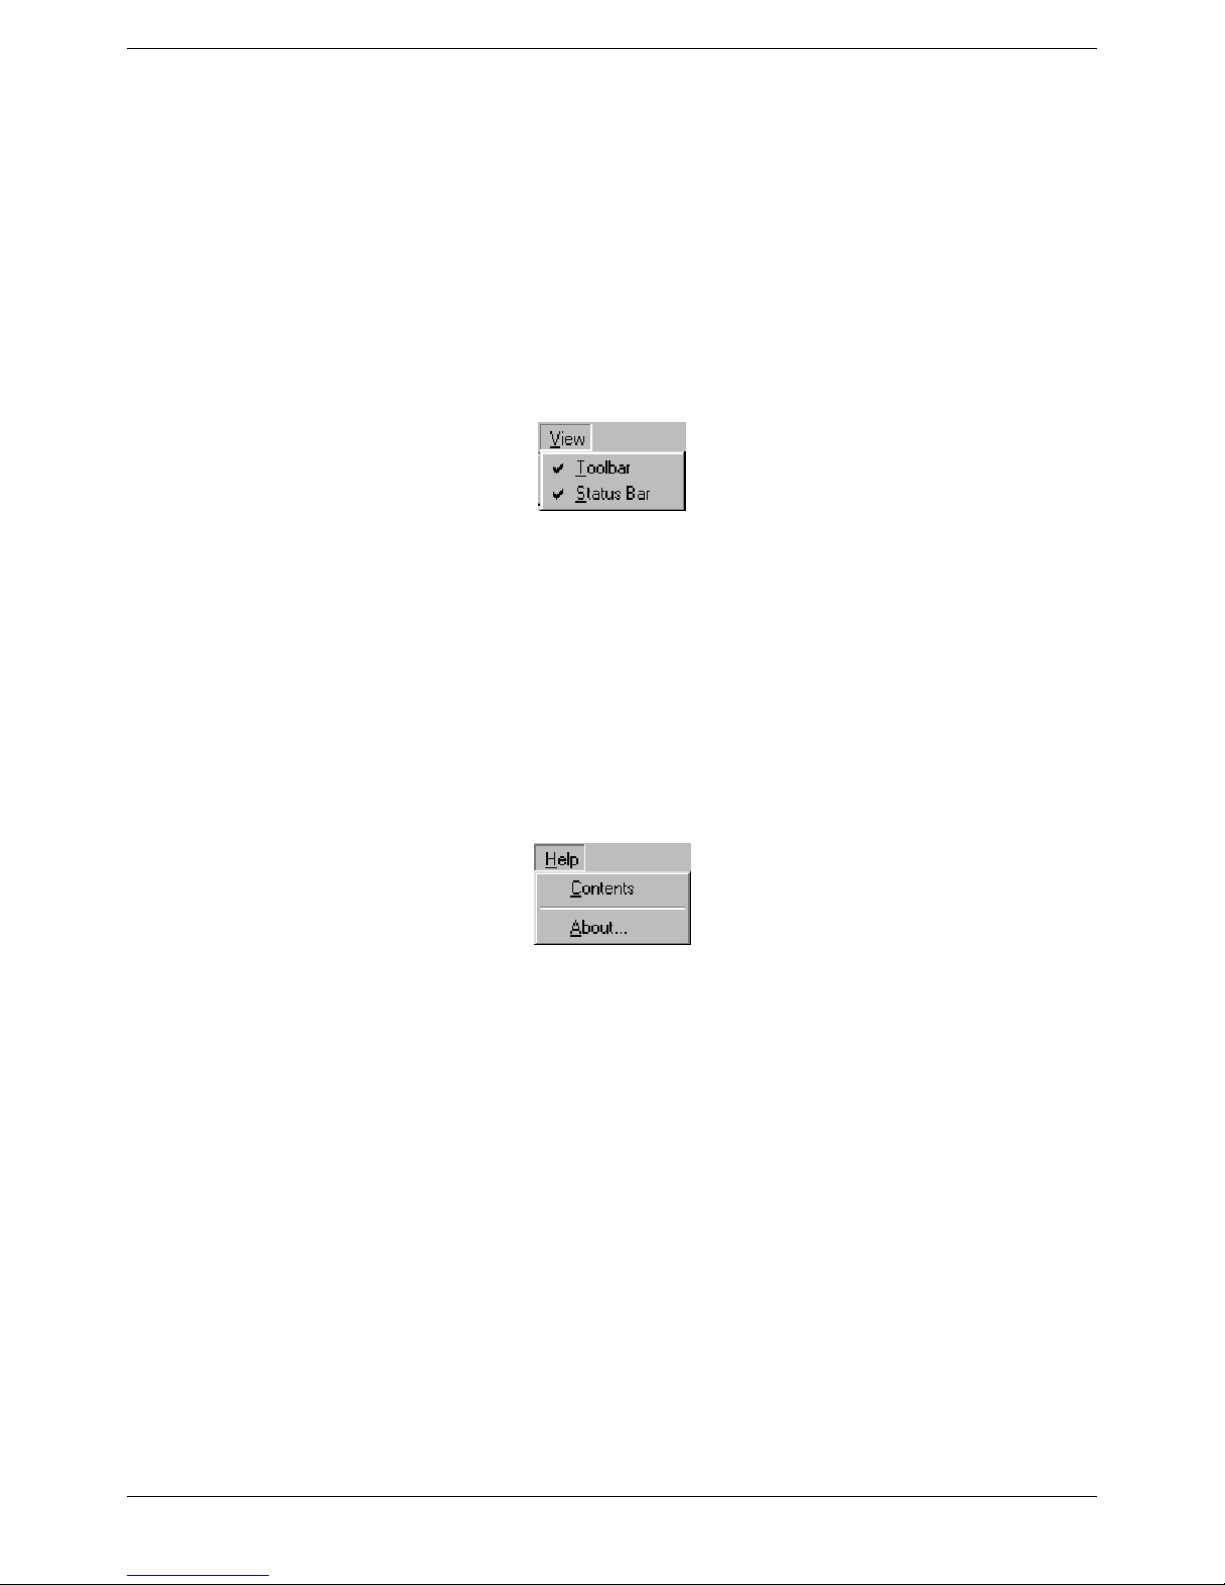
• Playback Trace. This command allows you to play a pre-recorded trace.
o Note: This command is for diagnostic purpose only.
• Clear Document List. This command will clear the Document List. The Document List contains
a history of all printed documents.
• BinLog File Converter. Not used in the LBT.
View
Commands in the View menu are used to manipulate the printer session window
View Drop-Down Menu
.
• Toolbar. This toggle command hides or displays the Toolbar near the top of the screen, just
below the Menu bar. When the command is checked, the Toolbar is displayed.
• Status Bar. This toggle command hides or displays the Status bar at the bottom of the screen.
When the command is checked, the Status bar is displayed
.
.
Help
Help Drop-Down Menu
•
Contents. Not used in the LBT.
• About…. This command displays detailed information on the YESterm/IP program such as
version, copyrights, and other useful information.
Page 70
Page 79

Toolbar
The Toolbar is displayed across the top of the printer application window below the Menu bar. The
Toolbar provides quick access to commands you use on a regular basis.
Printer Session Toolbar
Place the cursor over a Toolbar button to see its command equivalent. From left to right, the
command/button definitions are:
• Connect. Duplicates the function of the Menu bar File|Connect command.
• Disconnect. Duplicates the function of the Menu bar File|Disconnect command.
• Properties. Duplicates the function of the Menu bar File|Properties command.
• Record. Duplicates the function of the Menu bar Tools|Start Trace command.
• Stop. Duplicates the function of the Menu bar Tools|Stop Trace command.
• Play. Duplicates the function of the Menu bar Tools|Playback Trace command.
• ?. Not used in the LBT
Page 71
Page 80
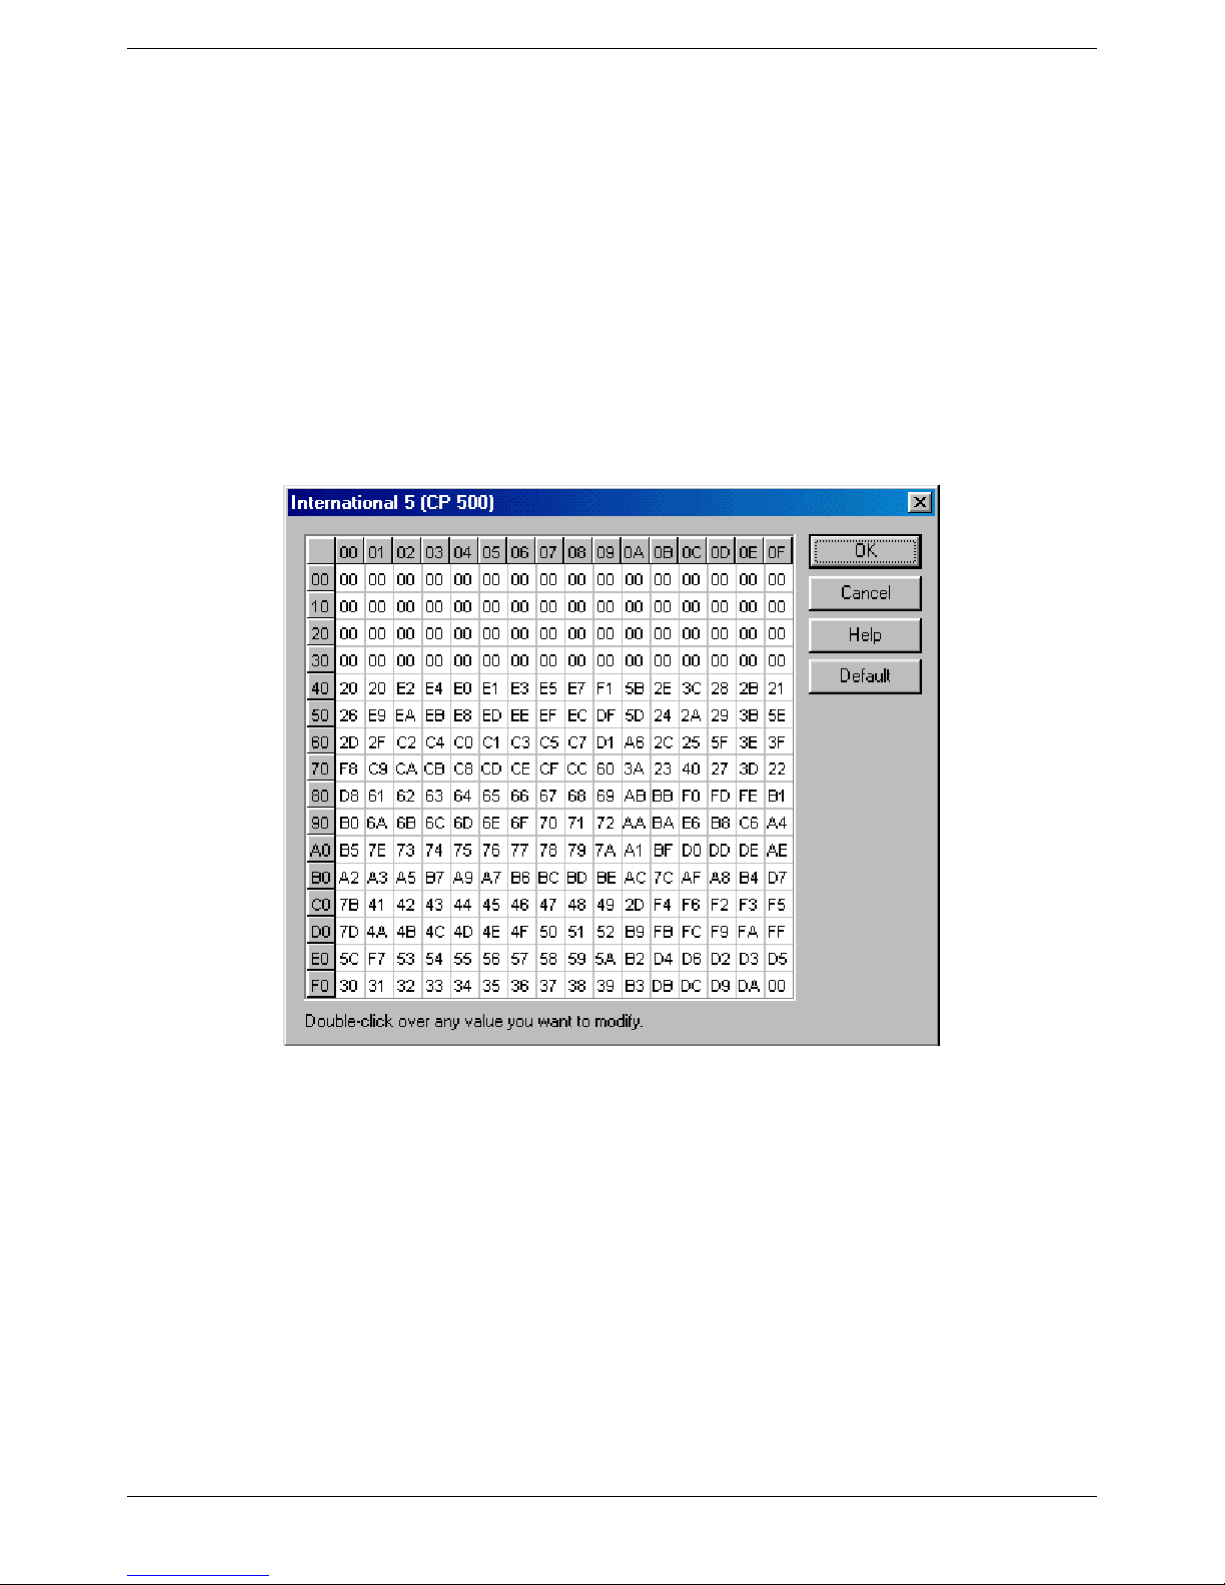
How To ….
This section provides detailed instructions for executing the custom configuration options that are
available for the YESterm/IP emulator sessions.
Create a Custom Language Code Page
This procedure is the same for either a display or a printer session. To do this, select one of the
available Code Pages (the one that comes closest to the one you want to create) and click on
Assuming that your base Code Page is International 5, the following screen should appea
Edit.
r:
To read the table, use the left column for the first hex character of the EBCDIC code, and the top
row for the second hex character of the EBCDIC code. For example, the standard EBCDIC code
for A is C1; the standard ASCII code for A is 41. Look at the table above and you see that the cell
corresponding to EBCDIC C1 has the value 41 in it.
Double-click the cells you want to change and enter the new values. To assist you in your
customization, the standard code tables for EBCDIC and ASCII are shown here.
Page 72
International 5 Code Page Table
Page 81
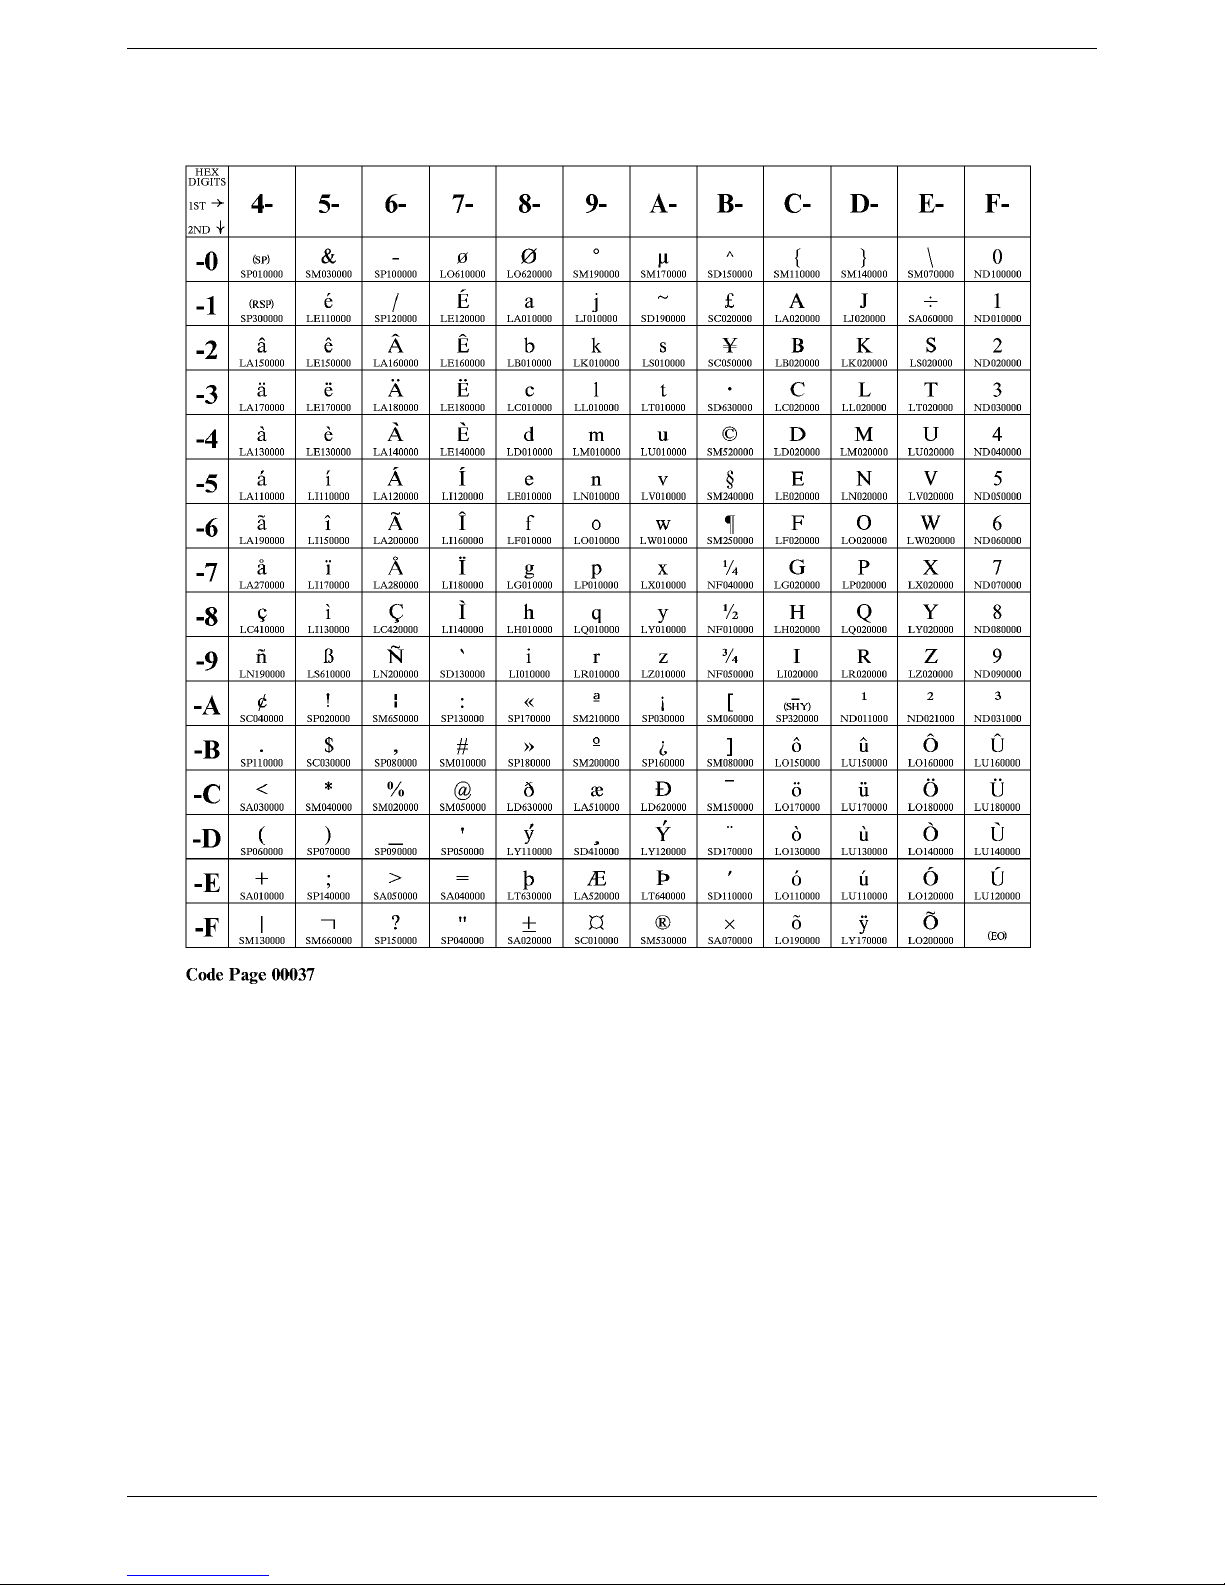
Page 73
EBCDIC Code Page
Page 82
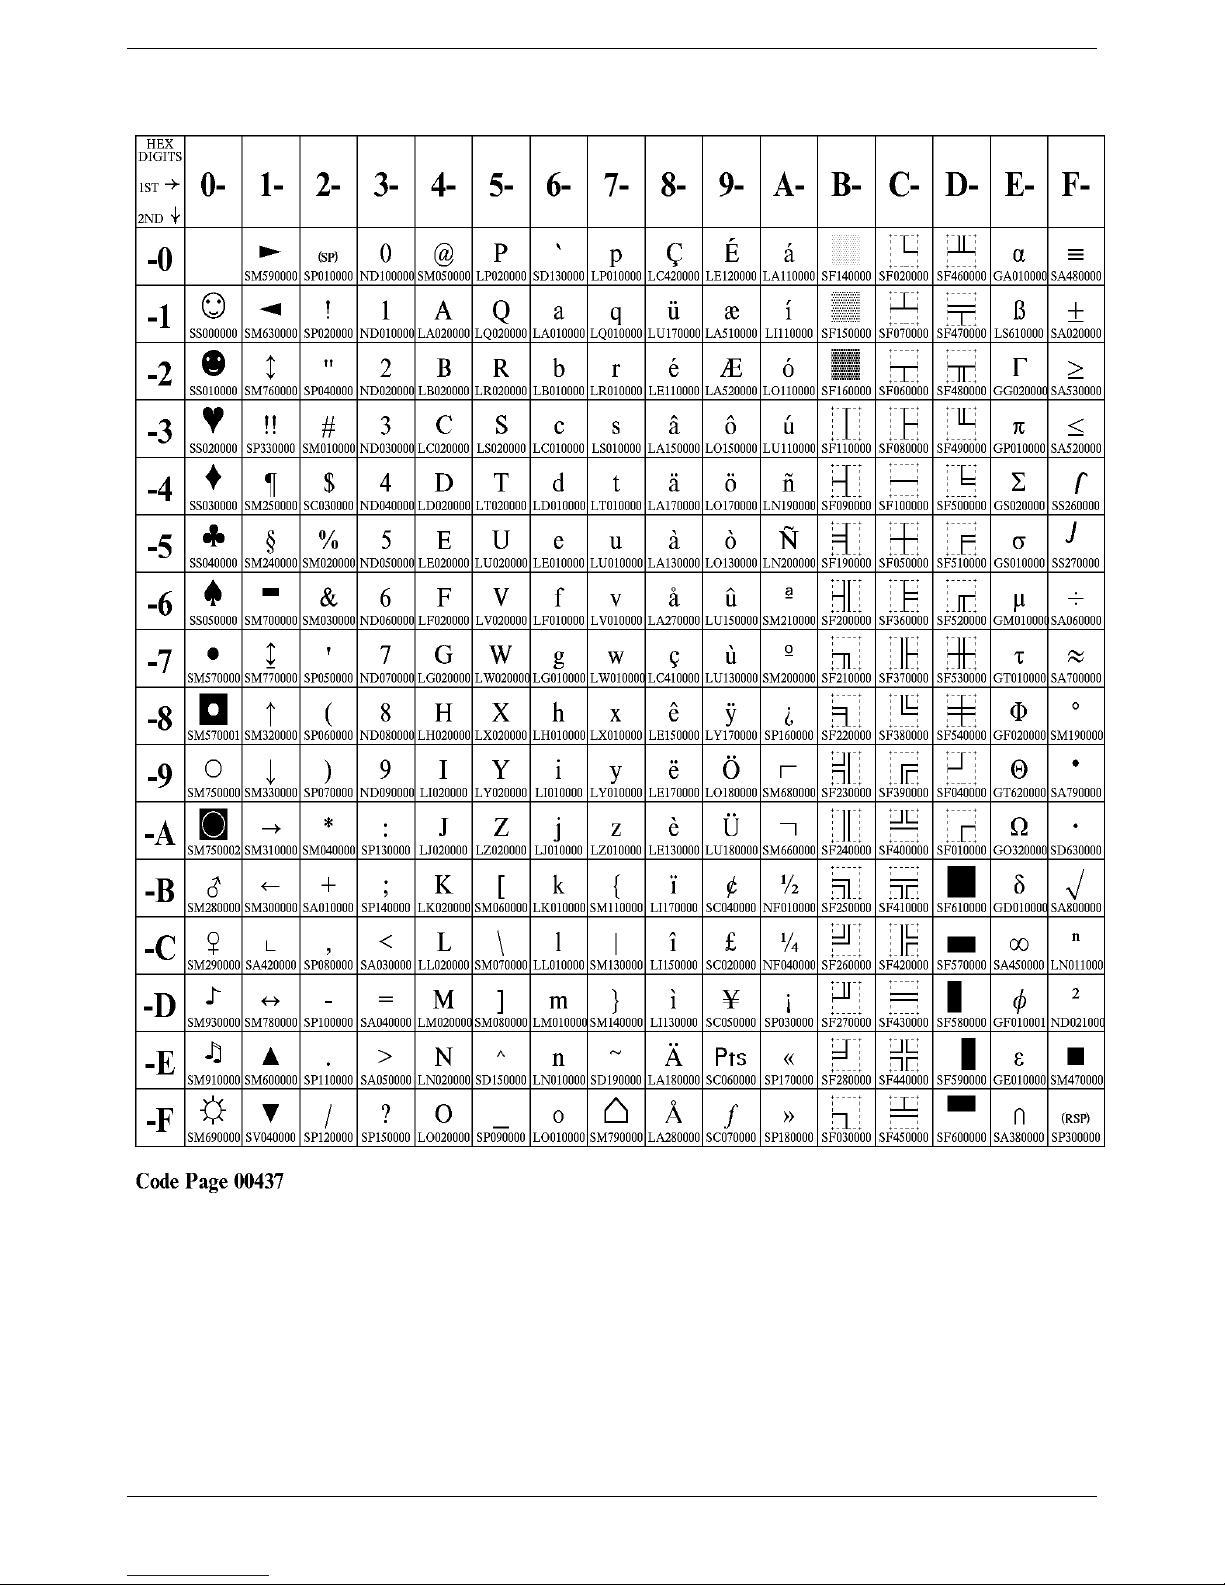
Page 74
ASCII Code Page for Terminal Font
Page 83

Display Session
This section provides detailed instructions for executing the custom configuration options that are
unique to the YESterm/IP display emulator sessions
Record a Keystroke Sequence (Macro)
If you regularly do the same things when you work with a host system, it is convenient to record the
keystrokes you make and have YES
again. Record/Playback allows you to do this. All your keystrokes can be saved in a file; when you
play the file back (Playback), all your keystrokes will be reproduced
In order to create a Keystroke sequence, you have to:
1. Open a display session.
2. Place the cursor in the field where you wish to start the sequence.
3. Click on
Recrd button.
4. Type the data and cursor movements that you want to record.
5. If you want variable data to be entered during execution of the macro, use
Toolbar, or keyboard.
6. Stop the Recording by clicking on
the Toolbar, or press the
7. Name the recorded Keystroke sequence in the pop-up window. There are no naming
restrictions.
The macro will be saved for that session only. If you want to execute the same macro in another
display session, you will have to create it again in that session.
Example:
Assume you want to record the CL command to display the description of a specific device. The
command is WRKDEVD PRTXXXX, where PRTXXXX identifies a specific Printer. So, the
procedure is:
1. Place the cursor.
2. Click on S
3. Type WRKDEVD
4. Click on
5. Type PRTXXXX (the name of the device) and press
6. Click on
keystrokes to a file.
Note: The Pause function will automatically end when you press the Enter key.
Tools|Start Recording or on the Start Recording button in the Toolbar, or press the
Recrd button again.
tart the Recording.
Pause.
Stop the Recording. When you stop, you will be prompted to save the recorded
term/IP play them back when you want to do the same job
Pause from the menu,
Tools|Stop Recording or on the Stop Recording button in
Enter.
Page 75
Page 84
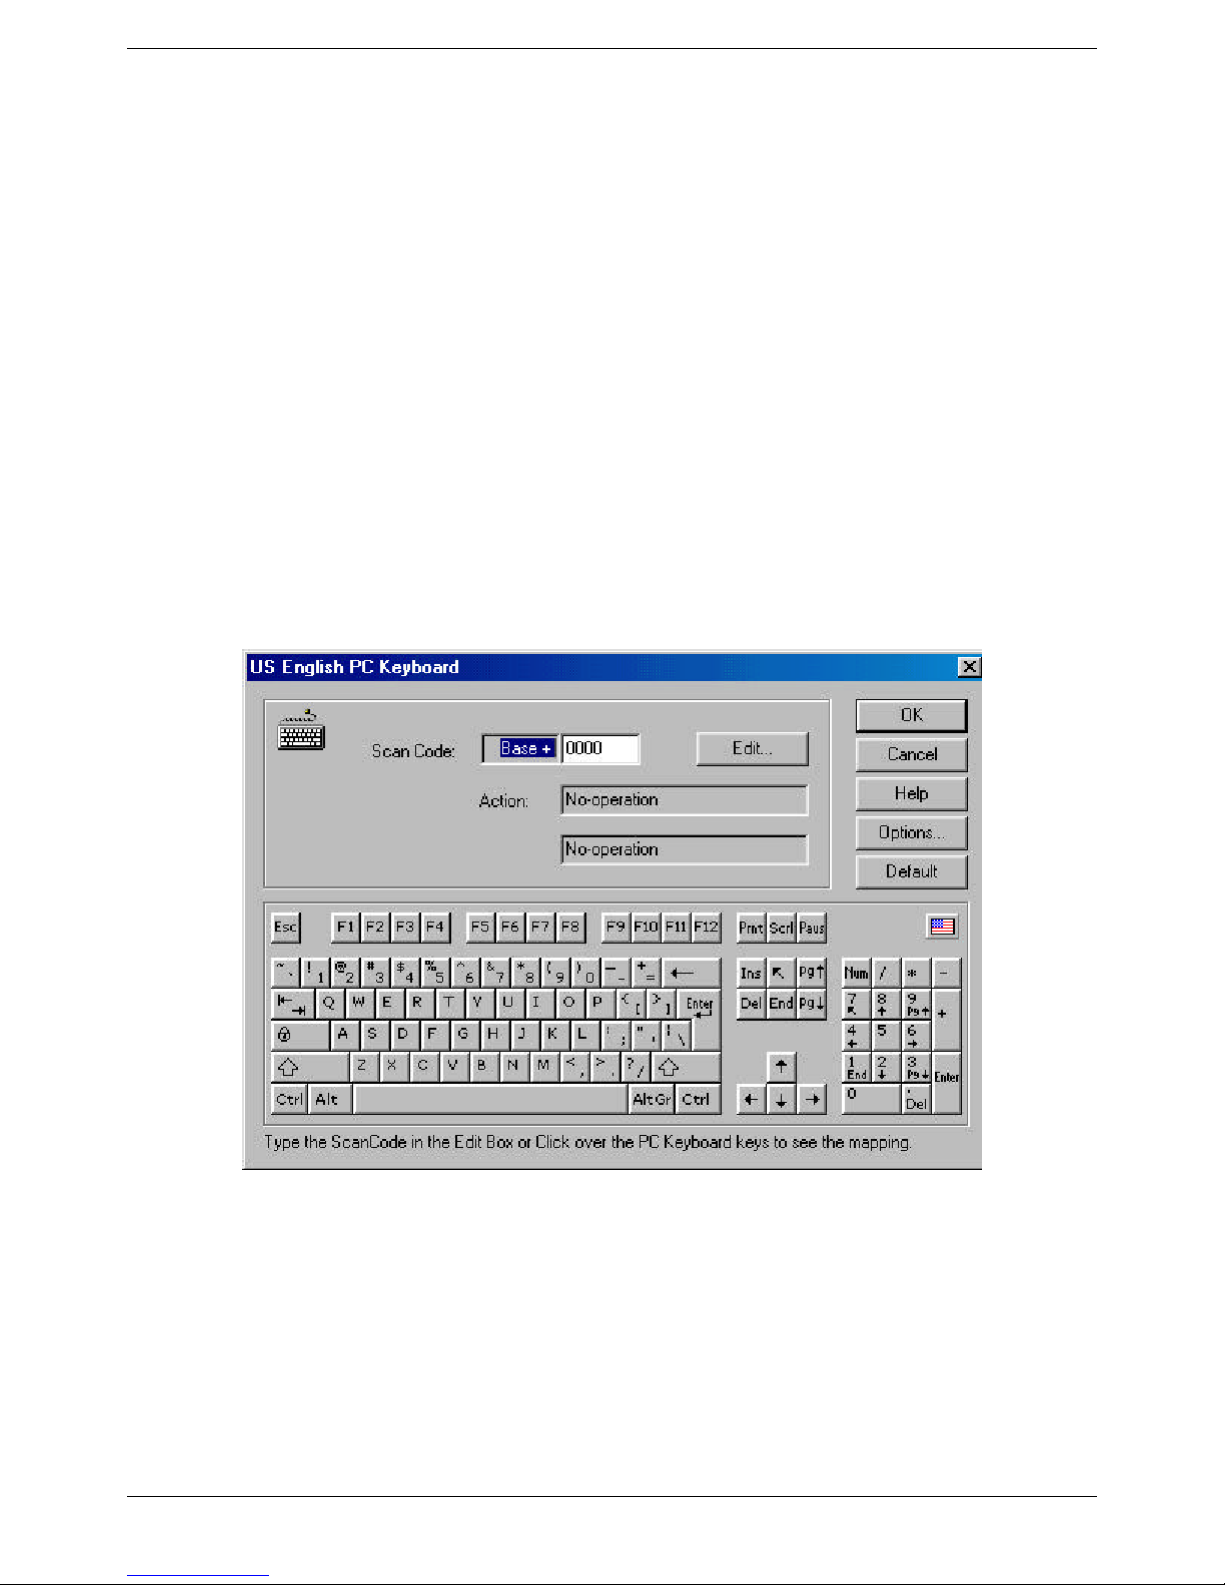
Play a Recorded Keystroke Sequence (Macro)
In order to play a recorded keystroke sequence, you have to:
1. Place the cursor on the screen where you want to play the sequence.
2. Click on
3. Select the sequence from the prompted list of stored sequences. The sequence will be executed.
Tools from the Menu bar, or the Play icon, or the Play button on the keyboard
If you have assigned a sequence to a key, you can also play the sequence as follows:
1. Place the cursor on the screen where you want to play the sequence.
2. Press the designated key. The sequence will be executed.
Create a Custom Keyboard Map
To do this, select, in Display Session Properties|General, one of the available Keyboard Layouts
(the one that best matches the one you want to create) and click on
the 101 PC keyboard for U.S. English, the following screen will appear
Edit. Assuming that you chose
Select the key, or key plus modifier (Ctrl, Alt, Shift) to which you want to associate a specific
action. On the upper half of the window, you can see the keyboard Scan-Code and the associated
default action. To modify the action, click on
Page 76
Keyboard Map Screen
Edit. The following dialog box will appear:
Page 85
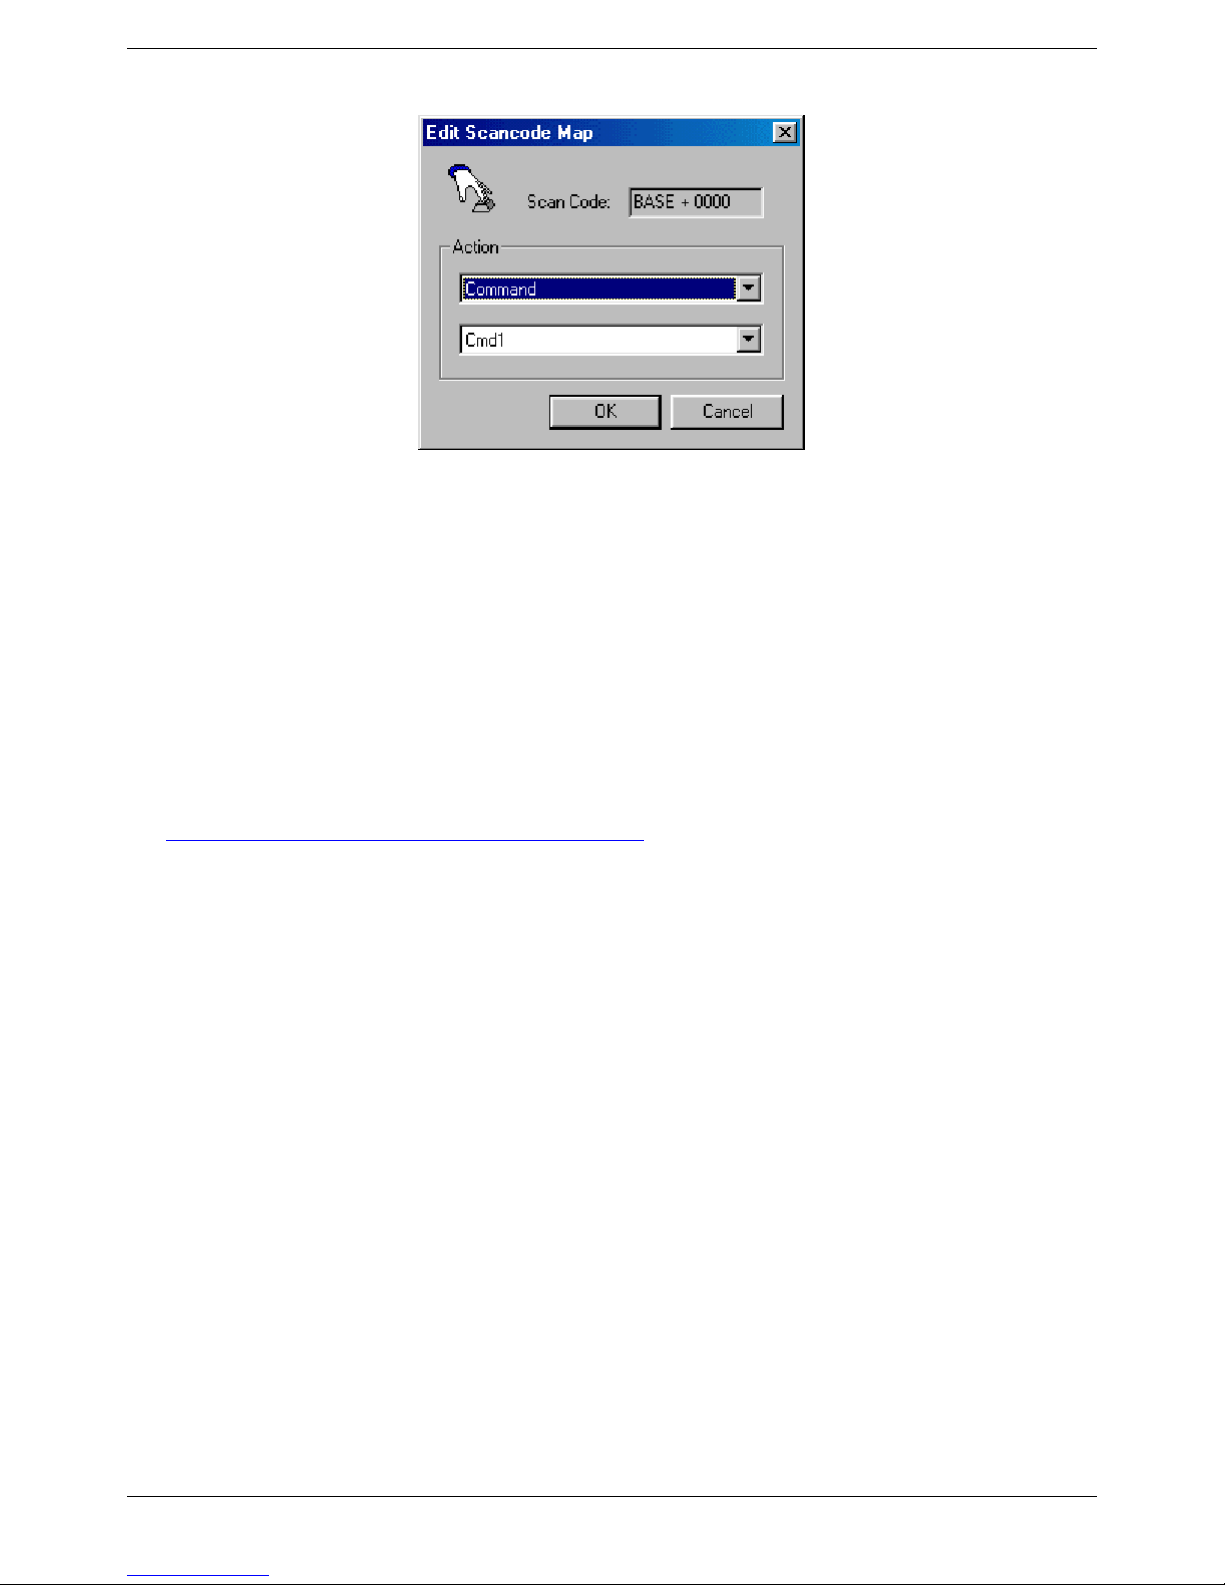
Edit Scancode Map Dialog Box
You can select the action you want to associate to the selected key from among the following
options:
• No operation. No action will be performed when you press the key.
• Command. Choose the desired 5250 command function from the drop-down list.
• Recorded Sequence. If you have previously recorded one or more key sequences, you will see
their names in the drop-down list. Choose the desired Recorded Sequence from this drop-down
list.
• EBCDIC Characters Sequence. Enter the Scan-Code sequence you want to associate to the
key. Although you can use this to enter multiple characters, like a Recorded Sequence, this
option is typically used to access some special character not normally seen on a keyboard
. See
How To…|Create a Custom Language Code Page for a standard code page for EBCDIC.
.
Page 77
Page 86
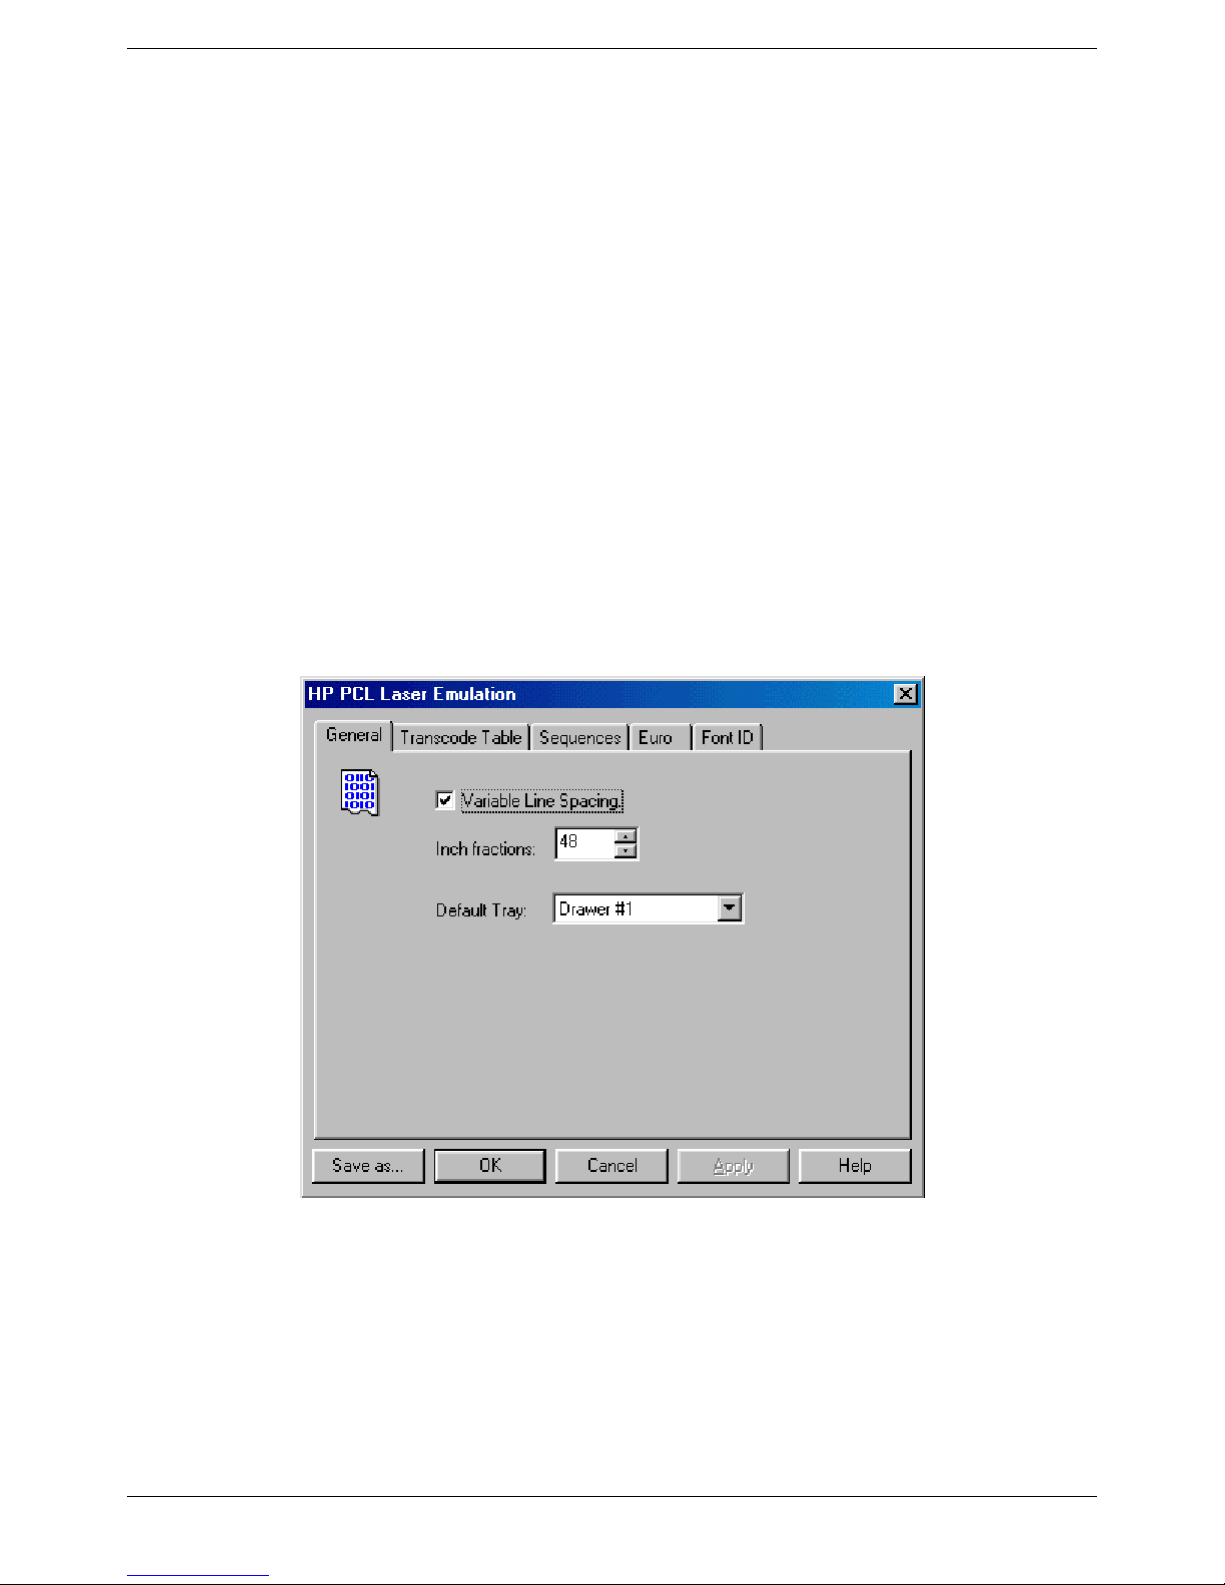
Printer Session
This section provides detailed instructions for executing the custom configuration options that are
unique to the YESterm/IP printer emulator sessions.
Modify the Passthrough Driver
Any Passthrough Driver in the drop-down list can be customized, and it is also possible to create a
new Driver. To edit an existing Passthrough Driver, do the following:
1. Highlight the connection name in the Configure tab of Connection Manager and click on
2. Select the Driver from the drop-down list and click on
You will see a screen with five tabs.
Driver Configuration in the Output.
General
Assuming you are starting from the HP PCL Laser driver, something similar to the following screen
appears for General settings.
Edit.
• Variable Line Spacing. If you enable this function you must enter the Inch fractions.
• Default Tray. Select the paper source tray from the drop-down list.
• New Driver Name. This name will appear in the Passthrough Driver drop-down list if you check
Permanent Save. The default new name is User- in front of the selected driver name. But you can
enter a completely new name if you wish.
Page 78
General Sheet
Page 87
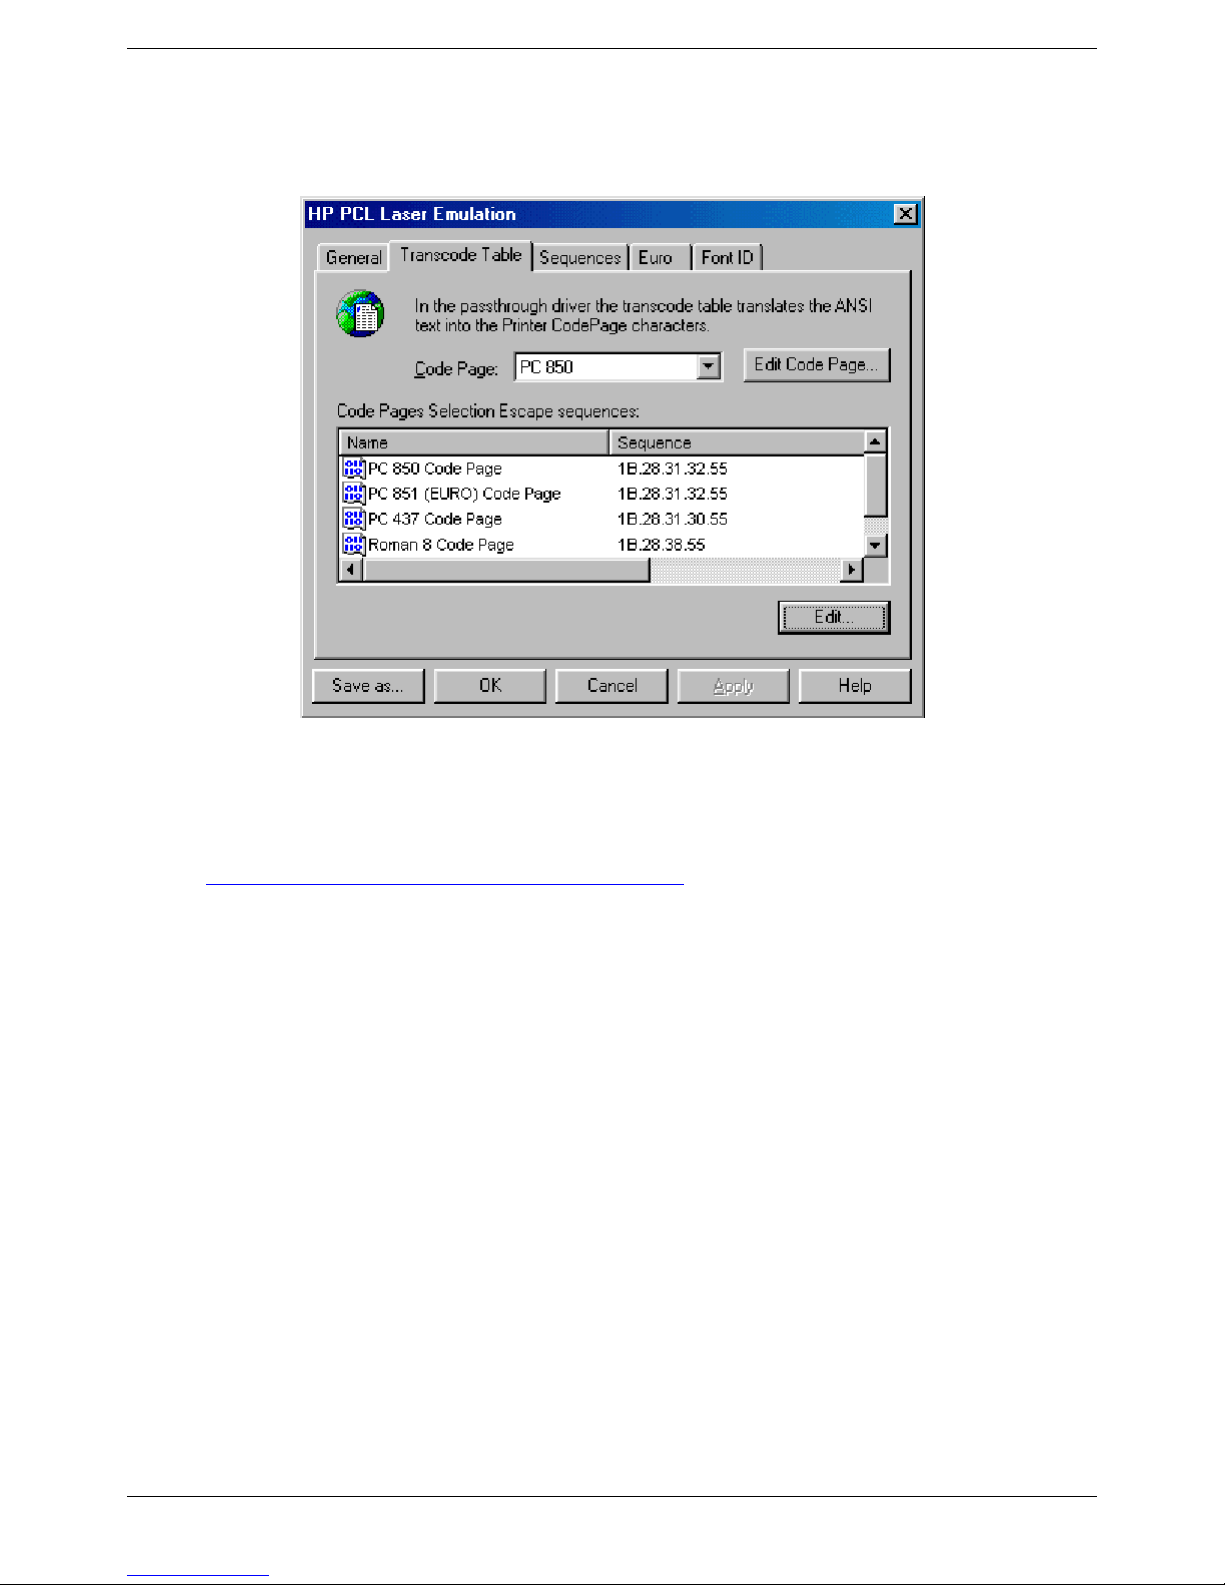
Transcode Table
Transcode Table Sheet
• Code Page. Select a code page from the drop-down list.
• Edit Code Page. If you want, you can also edit the Code Page by clicking on Edit Code Page.
See How To…|Create a Custom Language Code Page
for the procedure.
• Customize the Escape sequence used to call the Code Page. Select the Code Page from the
Code Page Selection Escape Sequences list, click on
Edit, and a Code Page Sequence Edit
screen will appear where you can enter the new values.
Page 79
Page 88
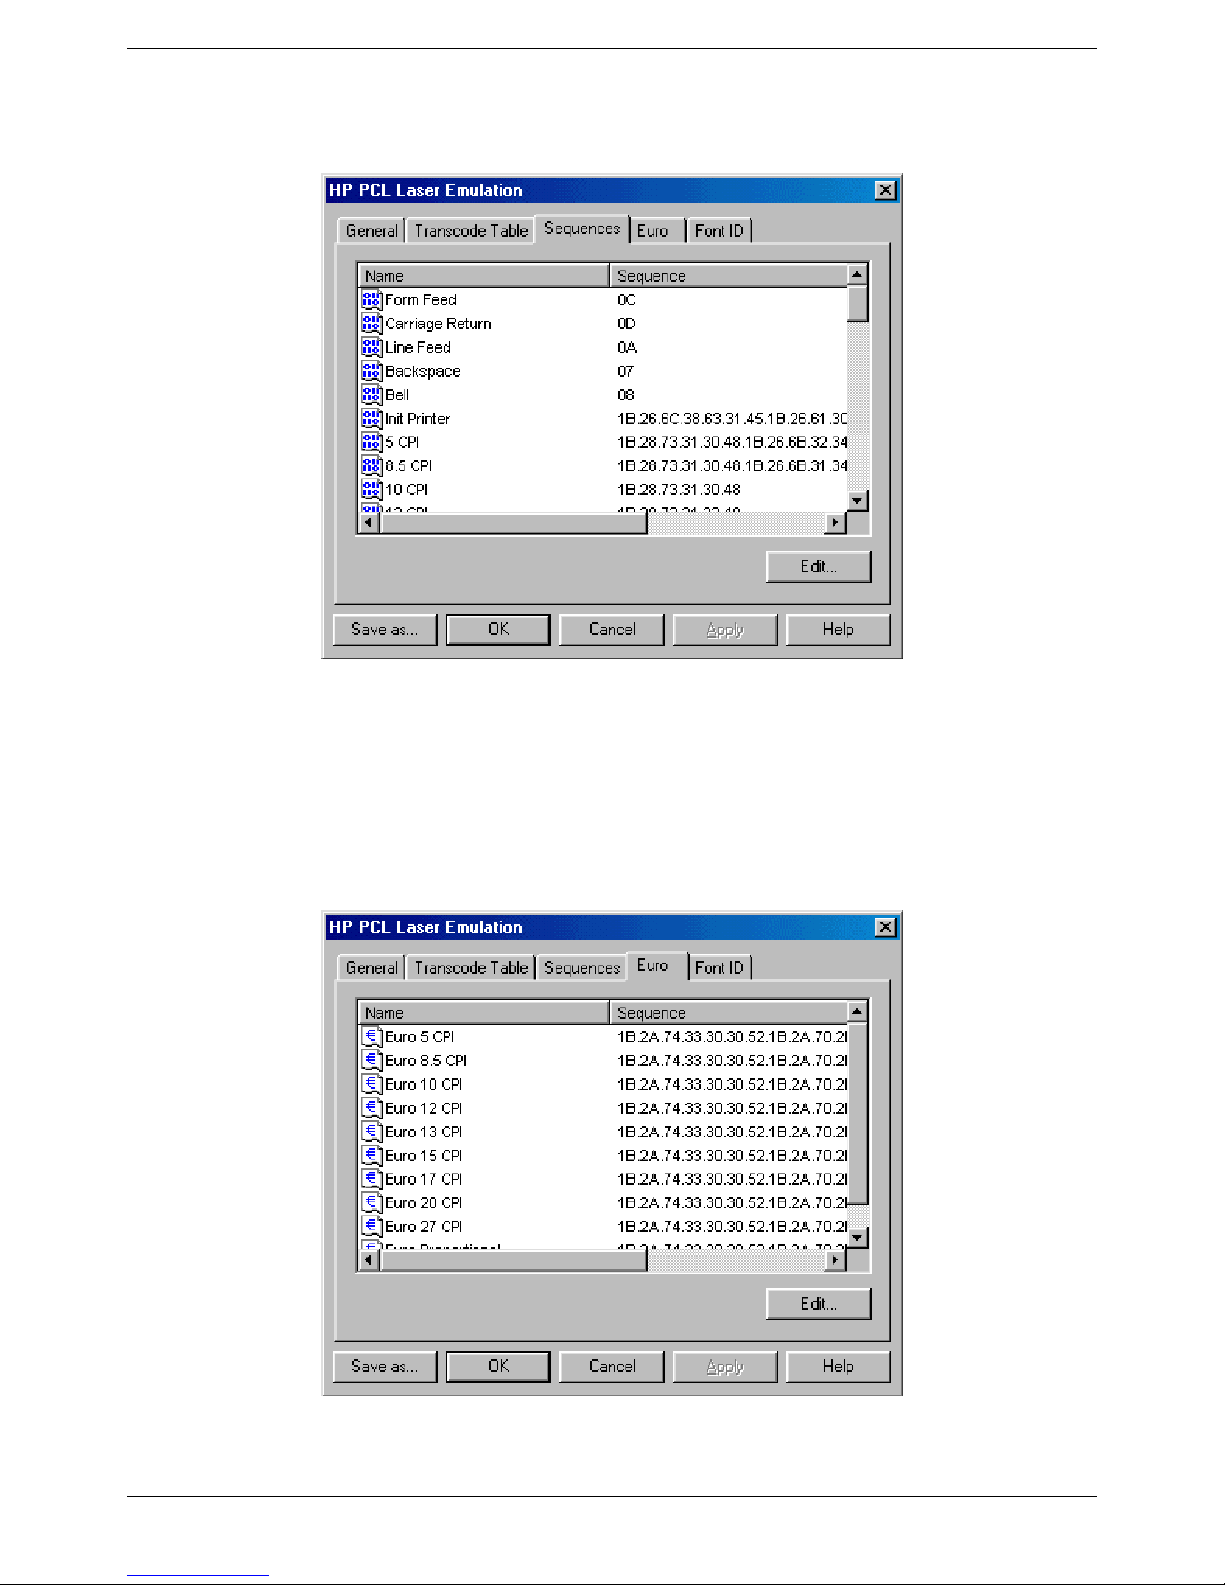
Escape Sequences
Escape Sequences Sheet
This tab allows you to customize all the Escape commands used to perform specific functions.
Select a function, click on
changes there.
Edit, and an Escape Sequence Edit sub-window will appear. Make your
Euro
Page 80
Euro Sheet
Page 89
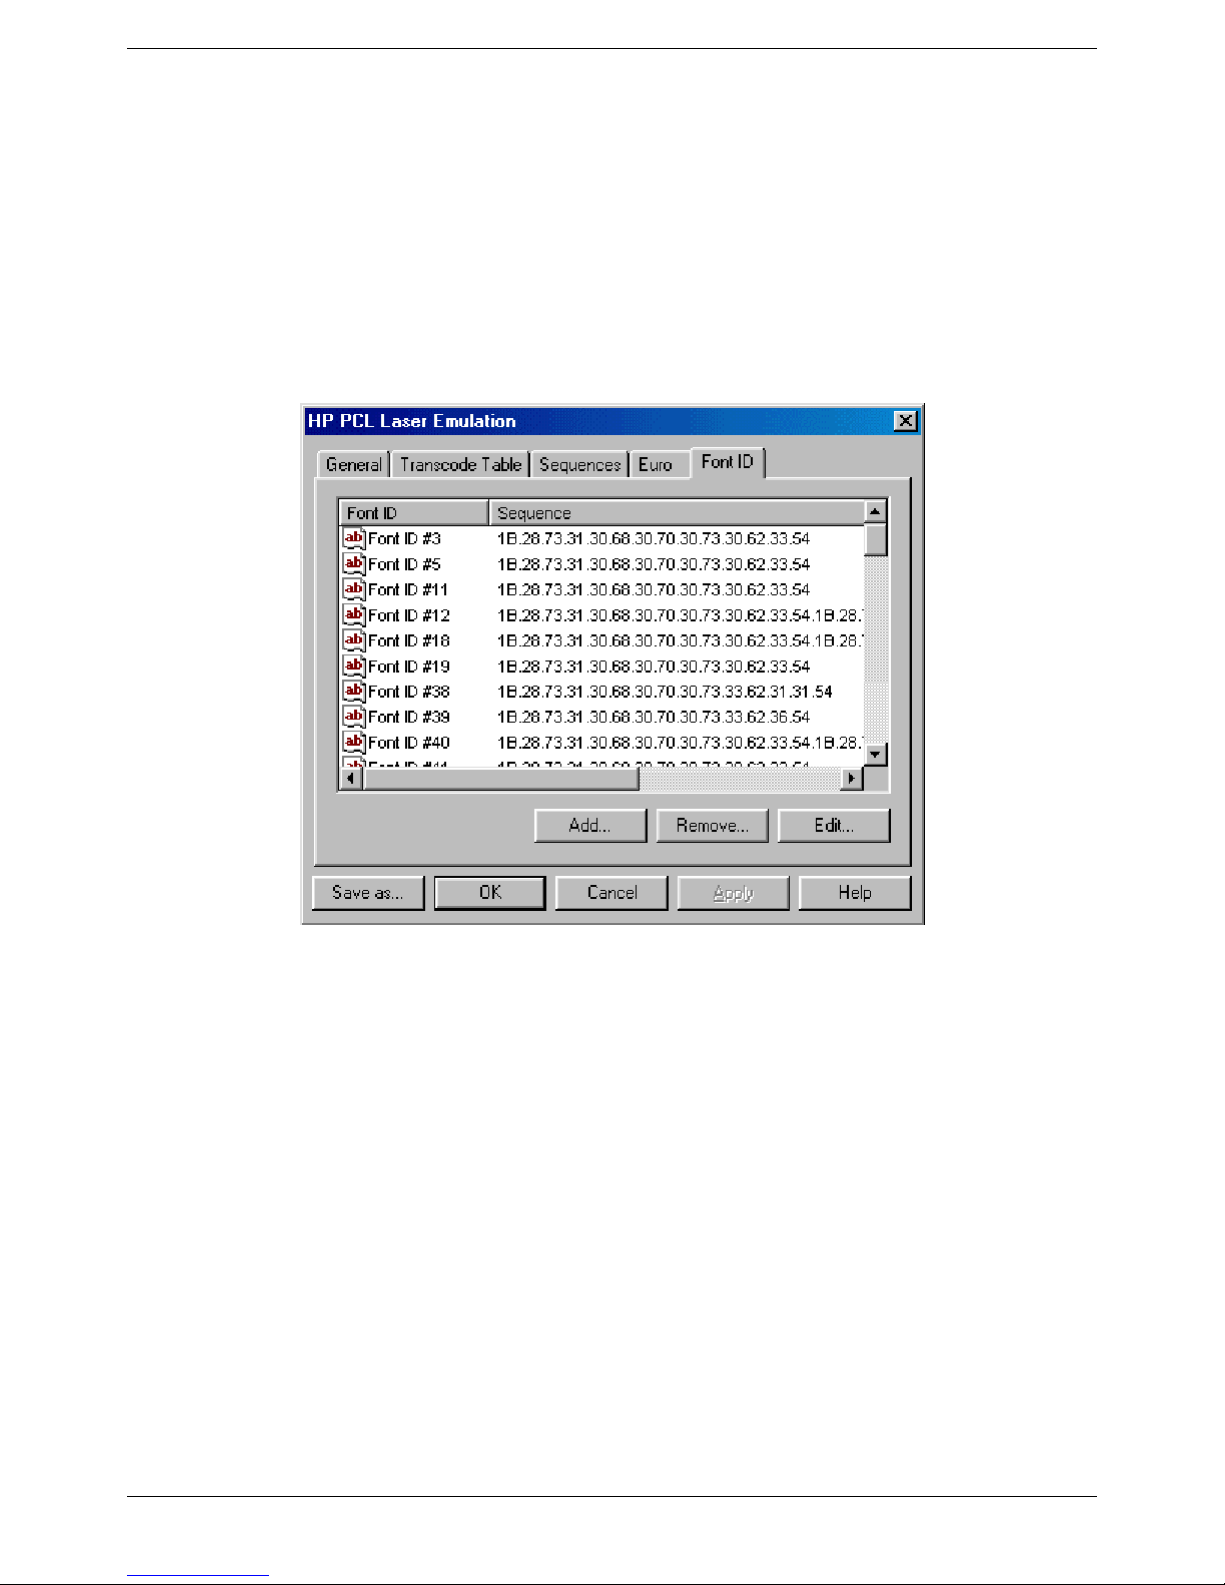
This tab allows you to customize the Escape sequence used to print the Euro symbol. This special
function allows you to print the Euro symbol even on those printers that are not Euro ready. Select
the symbol you wish to customize, then click on
where you can enter the new values.
Edit, and a Euro Sequence Edit screen will appear
Font ID
Font ID Sheet
This tab allows you to customize the Escape commands used to call a Printer Font that has been
associated with a Host System Font ID. To edit a Font ID, select the item, click on
Edit Font ID and Sequence screen will appear where you can enter the new value.
Edit, and an
You can also remove a font or add a new font to the list. If you click on Add, an Edit Font ID and
Sequence screen will appear where you can enter the new values.
Page 81
Page 90

Page 82
Page 91

Support
Affirmative Computer Products offers Technical Support services for all the Affirmative products.
You can access Affirmative Technical Support in one of the following ways:
• via Phone
o 480-946-1444
o 888-353-5250
via Fax
•
o 480-946-9250
• via E-mail
Page 83
 Loading...