

Page 1
YEStation User's Guide for Text
Based Terminal Model 2209
Copyright 2003 Affirmative Computer Products
October 2003
®
Page 2

ii
Page 3

YEStation Limited Warranty
General Terms and Conditions
Limited Product Warranty. Affirmative Computer Products warrants that the YEStation Hardware
Product (Logic unit and keyboard) shall be free from defects in materials and workmanship that arise
under proper and normal use and service for three years from the date of purchase. A warranty
extension of two years is available at extra cost, if obtained at the time of the original YEStation
purchase. In the event that the YEStation Hardware Product fails to comply with the warranty set forth
above, Affirmative Computer Products will repair or replace the Product.
Software Warranty. Affirmative Computer Products warrants that, for a period of ninety (90) days
from the date of purchase by the End User, its Software Products shall conform to its published
specifications under normal usage. AFFIRMATIVE COMPUTER PRODUCTS DOES NOT
WARRANT THAT THE OPERATION OF THE SOFTWARE WILL BE UNINTERRUPTED OR
ERROR FREE, OR THAT ALL SOFTWARE DEFECTS WILL BE CORRECTED. In the event that a
Software Product fails to comply with the warranty set forth above, Affirmative Computer Products
will replace the product. End User must, however, return all copies of the Software, along with proof
of purchase, to Affirmative Computer Products within 90 days from the Software purchase date.
Warranty Limitations. End User’s sole remedy under any Warranty provided by Affirmative
Computer Products shall be limited to the replacement or repair of the Product or, at Affirmative
Computer Products’ sole discretion, a refund of the purchase price. AFFIRMATIVE COMPUTER
PRODUCTS GRANTS NO WARRANTY, EXPRESS OR IMPLIED, OTHER THAN THE
WARRANTIES STATED ABOVE. EXPRESSLY EXCLUDED ARE THE IMPLIED
WARRANTIES OF MERCHANTIBILITY AND FITNESS FOR A PARTICULAR PURPOSE. IN
NO EVENT SHALL AFFIRMATIVE COMPUTER PRODUCTS BE LIABLE FOR SPECIAL,
INCIDENTAL, OR CONSEQUENTIAL DAMAGES, INSTALLATION COSTS, LOST REVENUE
OR PROFITS, OR ANY OTHER COSTS INCURRED AS A RESULT OF THE USE OF ANY
AFFIRMATIVE COMPUTER PRODUCTS PRODUCT, WHETHER OR NOT USED IN
ACCORDANCE WITH INSTRUCTIONS.
Warranty Procedure. Affirmative Computer Products will replace or repair any defective,
undamaged units for which a Return Material Authorization number (RMA#) has been obtained from
the Technical Support Department. (Contact 888-353-5250 or 480-946-1444 or
)
iii
Page 4

Copyright and Trademarks
Copyright Notice
This manual, as well as the software described in it, is furnished under license. No part of this
publication may be reproduced, transmitted, stored in a retrieval system, or translated into any human
or computer language, in any form or by any means, electronic, mechanical, magnetic, optical,
chemical, manual or otherwise, without the prior written permission of the copyright owner.
Note: Information in this document is subject to change without notice.
Trademarks Notice
• YEStation
• YESterm/IP™ is a trademark of Affirmative Computer Products
• Adobe®, the Adobe logo, Acrobat®, the Acrobat logo, and Acrobat Reader are trademarks or
registered trademarks of Adobe Systems Incorporated.
• Linux® is a registered trademark of Linus Torvalds.
• Windows
• Other company and brand, product and service names are trademarks or registered trademarks
of their respective holders.
®
is a registered trademark of Affirmative Computer Products®.
®
.
®
is a registered trademark of Microsoft® Corporation.
iv
Page 5

Table of Contents
Installing Your Terminal..................................................................................................1
Mounting................................................................................................................................................ 1
Cabling................................................................................................................................................... 2
Power On and Boot Up .......................................................................................................................... 3
Terminal Setup ..................................................................................................................5
Terminal Properties................................................................................................................................ 6
Network Settings.................................................................................................................................... 7
Advanced Parameters......................................................................................................................... 8
Input Settings ......................................................................................................................................... 9
Display Settings ................................................................................................................................... 10
Upgrade................................................................................................................................................ 11
Security Settings .................................................................................................................................. 12
Connections.......................................................................................................................................... 13
Viewing Modes.................................................................................................................15
TBT (Text Based Terminal)................................................................................................................. 15
Terminal Properties.......................................................................................................................... 15
Connections Manager ...................................................................................................................... 16
Navigation........................................................................................................................................ 16
WBT (Windows Based Terminal) ....................................................................................................... 17
Terminal Properties.......................................................................................................................... 18
Connections Manager ...................................................................................................................... 19
Navigation........................................................................................................................................ 19
Desktop ................................................................................................................................................ 20
Terminal Properties.......................................................................................................................... 21
Connections Manager ...................................................................................................................... 21
Navigation........................................................................................................................................ 21
Creating an Emulation Connection...............................................................................23
TBT Viewing Mode............................................................................................................................. 24
Display Sessions .............................................................................................................................. 25
Printer Sessions................................................................................................................................ 27
Non-TBT Viewing Mode..................................................................................................................... 31
Display Sessions .............................................................................................................................. 31
Printer Sessions................................................................................................................................ 34
v
Page 6

Connections Manager .....................................................................................................37
Configuration ....................................................................................................................................... 37
Add................................................................................................................................................... 38
Edit................................................................................................................................................... 38
Delete ............................................................................................................................................... 38
Startup.............................................................................................................................................. 39
Connect ............................................................................................................................................ 39
Connections.......................................................................................................................................... 40
Editing Terminal Properties ..........................................................................................41
General................................................................................................................................................. 42
Network................................................................................................................................................ 43
Ping Function................................................................................................................................... 43
Advanced Parameters....................................................................................................................... 44
Hosts Table .................................................................................................................................. 45
DHCP Log File ............................................................................................................................ 46
DHCP Leases............................................................................................................................... 46
Input ..................................................................................................................................................... 47
Display ................................................................................................................................................. 48
Desktop ................................................................................................................................................ 49
Firmware.............................................................................................................................................. 51
Security ................................................................................................................................................ 51
Printers ................................................................................................................................................. 53
LPD.................................................................................................................................................. 53
RAW ................................................................................................................................................ 54
ThinPrint .......................................................................................................................................... 54
Miscellaneous ...................................................................................................................................... 54
Editing an Emulation Connection .................................................................................57
TBT Viewing Mode............................................................................................................................. 57
Non-TBT Viewing Mode..................................................................................................................... 57
Display Sessions .............................................................................................................................. 57
Connection ................................................................................................................................... 58
General......................................................................................................................................... 58
Code Page ................................................................................................................................58
Keyboard Language................................................................................................................. 59
Keyboard Type......................................................................................................................... 59
Edit....................................................................................................................................... 59
Default.................................................................................................................................. 60
Options................................................................................................................................. 60
Font .......................................................................................................................................... 60
Print Screen.............................................................................................................................. 60
Cursor....................................................................................................................................... 60
Miscellaneous .......................................................................................................................... 61
Attributes...................................................................................................................................... 61
Default View............................................................................................................................ 62
Attribute Settings ..................................................................................................................... 63
Hot Spot ....................................................................................................................................... 64
Key Pad........................................................................................................................................ 66
Sign On (5250 only)..................................................................................................................... 68
Advanced .....................................................................................................................................69
vi
Page 7

Appearance .............................................................................................................................. 69
Security Configuration............................................................................................................. 70
Host Device Connection .......................................................................................................... 70
Miscellaneous .......................................................................................................................... 70
Printer Sessions................................................................................................................................ 70
Connection (5250) ....................................................................................................................... 71
Connection (3270) ....................................................................................................................... 71
Input (5250) ................................................................................................................................. 72
Language.................................................................................................................................. 72
Page Layout ............................................................................................................................. 72
Overrides.................................................................................................................................. 73
Input (3270) ................................................................................................................................. 73
Language.................................................................................................................................. 73
Default Page Settings............................................................................................................... 73
Output .......................................................................................................................................... 74
Euro.......................................................................................................................................... 74
Printer Port............................................................................................................................... 75
HPT (Hex Passthrough) (5250 only) ........................................................................................... 76
Advanced (5250 only).................................................................................................................. 77
Host Transform ........................................................................................................................ 78
Miscellaneous .............................................................................................................................. 78
How To… ........................................................................................................................................ 79
Create a Custom Language Code Page........................................................................................ 79
Create a Custom Keyboard Map.................................................................................................. 82
Record a Keystrokes Sequence (Macro)...................................................................................... 83
Graphics Display Session ........................................................................................................ 83
5250 Text Display Session....................................................................................................... 83
Play a Recorded Keystrokes Sequence (Macro).......................................................................... 84
Graphics Display Session ........................................................................................................ 84
5250 Text Display Session....................................................................................................... 84
Modify a Printer Passthrough Driver........................................................................................... 84
General..................................................................................................................................... 85
Transcode Table....................................................................................................................... 85
Escape Sequences ....................................................................................................................86
Euro.......................................................................................................................................... 87
Font ID..................................................................................................................................... 88
Emulation Operation ......................................................................................................89
Display Session Menu Bar................................................................................................................... 89
File (Alt)........................................................................................................................................... 89
Edit................................................................................................................................................... 90
Tools ................................................................................................................................................ 90
View................................................................................................................................................. 92
?........................................................................................................................................................ 93
Display Session Buttons Toolbar......................................................................................................... 94
Printer Session Menu Bar .................................................................................................................... 95
File (Alt)........................................................................................................................................... 96
Tools ................................................................................................................................................ 96
?........................................................................................................................................................ 96
Printer Session Buttons Toolbar .......................................................................................................... 97
vii
Page 8

Firmware Upgrades ........................................................................................................99
“Push” .................................................................................................................................................. 99
“Pull”.................................................................................................................................................. 100
TBT Viewing Mode....................................................................................................................... 101
Non-TBT Viewing Mode............................................................................................................... 103
Troubleshooting Your Terminal..................................................................................105
Support............................................................................................................................................... 106
Appendix 1. Specifications ..........................................................................................107
Appendix 2. TCP/IP Error Codes ..............................................................................109
viii
Page 9
Installing Your Terminal
• Your terminal has no internal fan, and relies on natural airflow for cooling. When you mount it,
make sure to keep as many ventilation holes, as possible, unobstructed.
• DO NOT use any AC-DC adapter other than the one provided with the terminal or acquired from
Affirmative Computer Products or its distributors.
Mounting
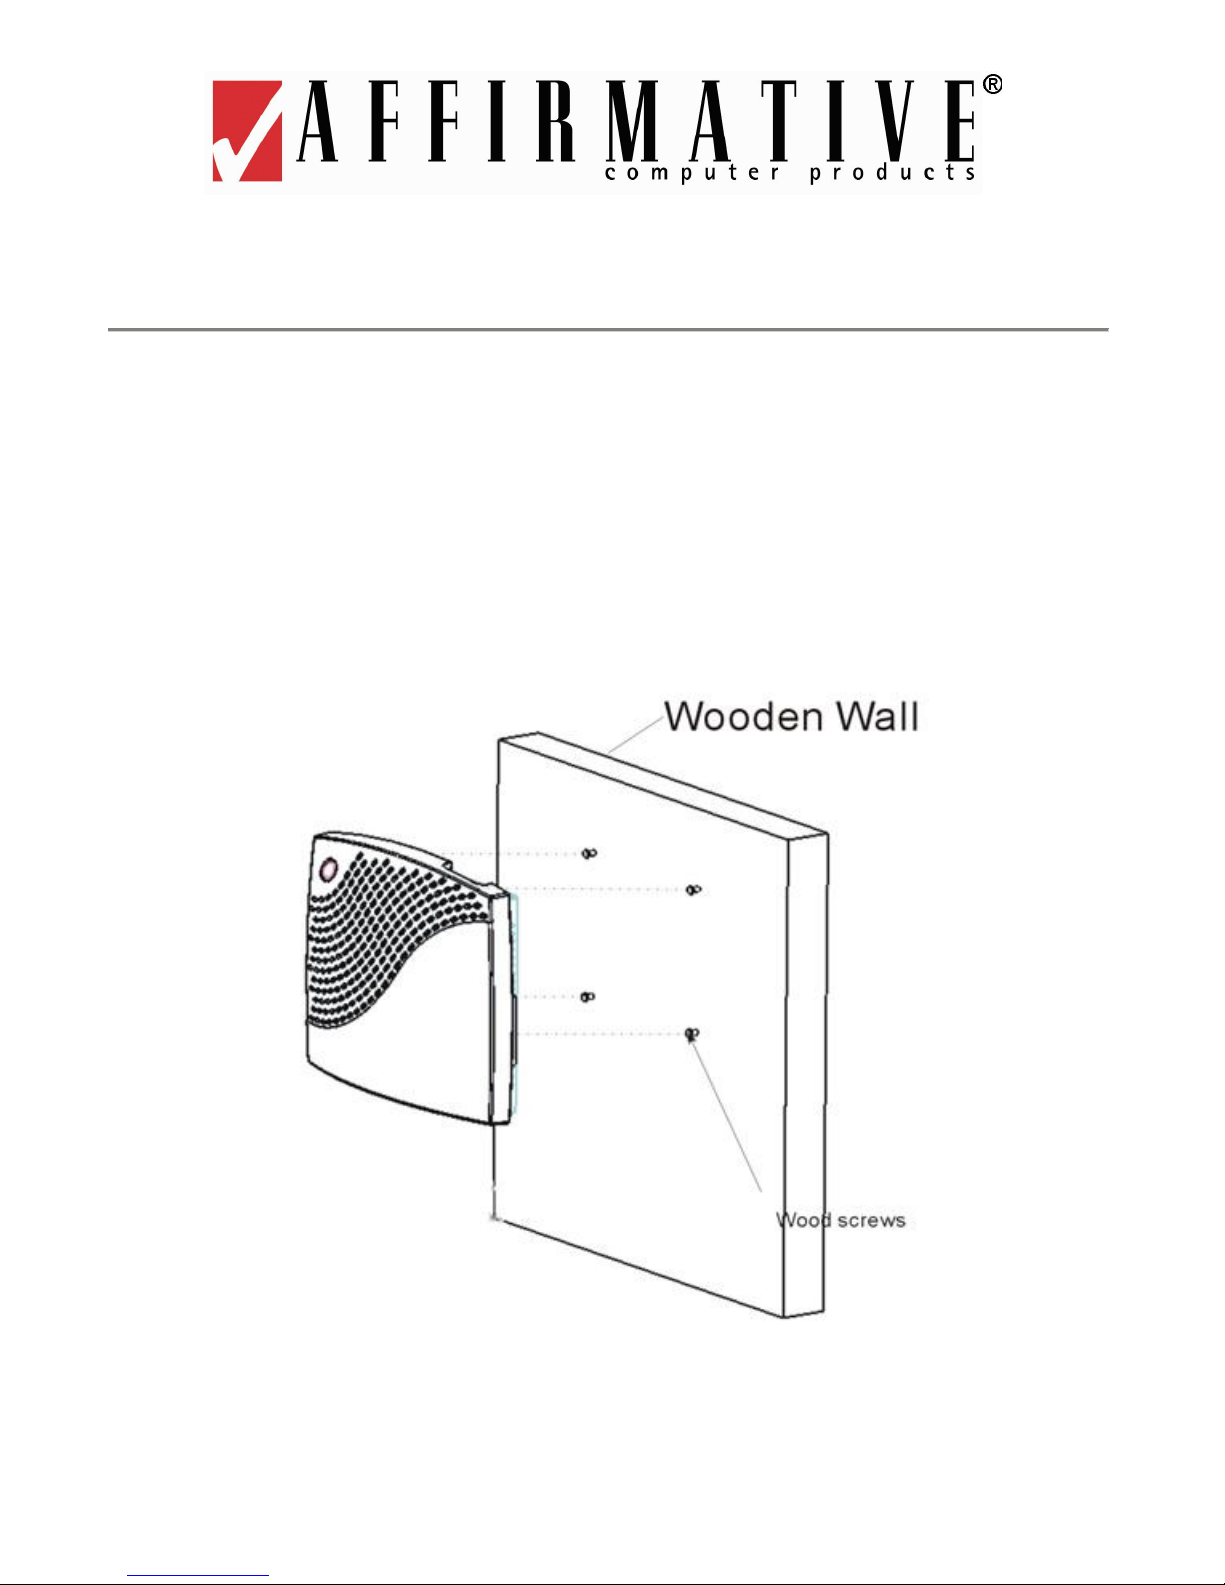
The 2209 terminal can be placed horizontally on a flat surface, or it can be mounted vertically on a
wall. A self-adhesive template and four #3, ½-inch wood screws are included with every terminal.
The following figure shows one mounting possibility.
2209 Wall Mounting
1
Page 10
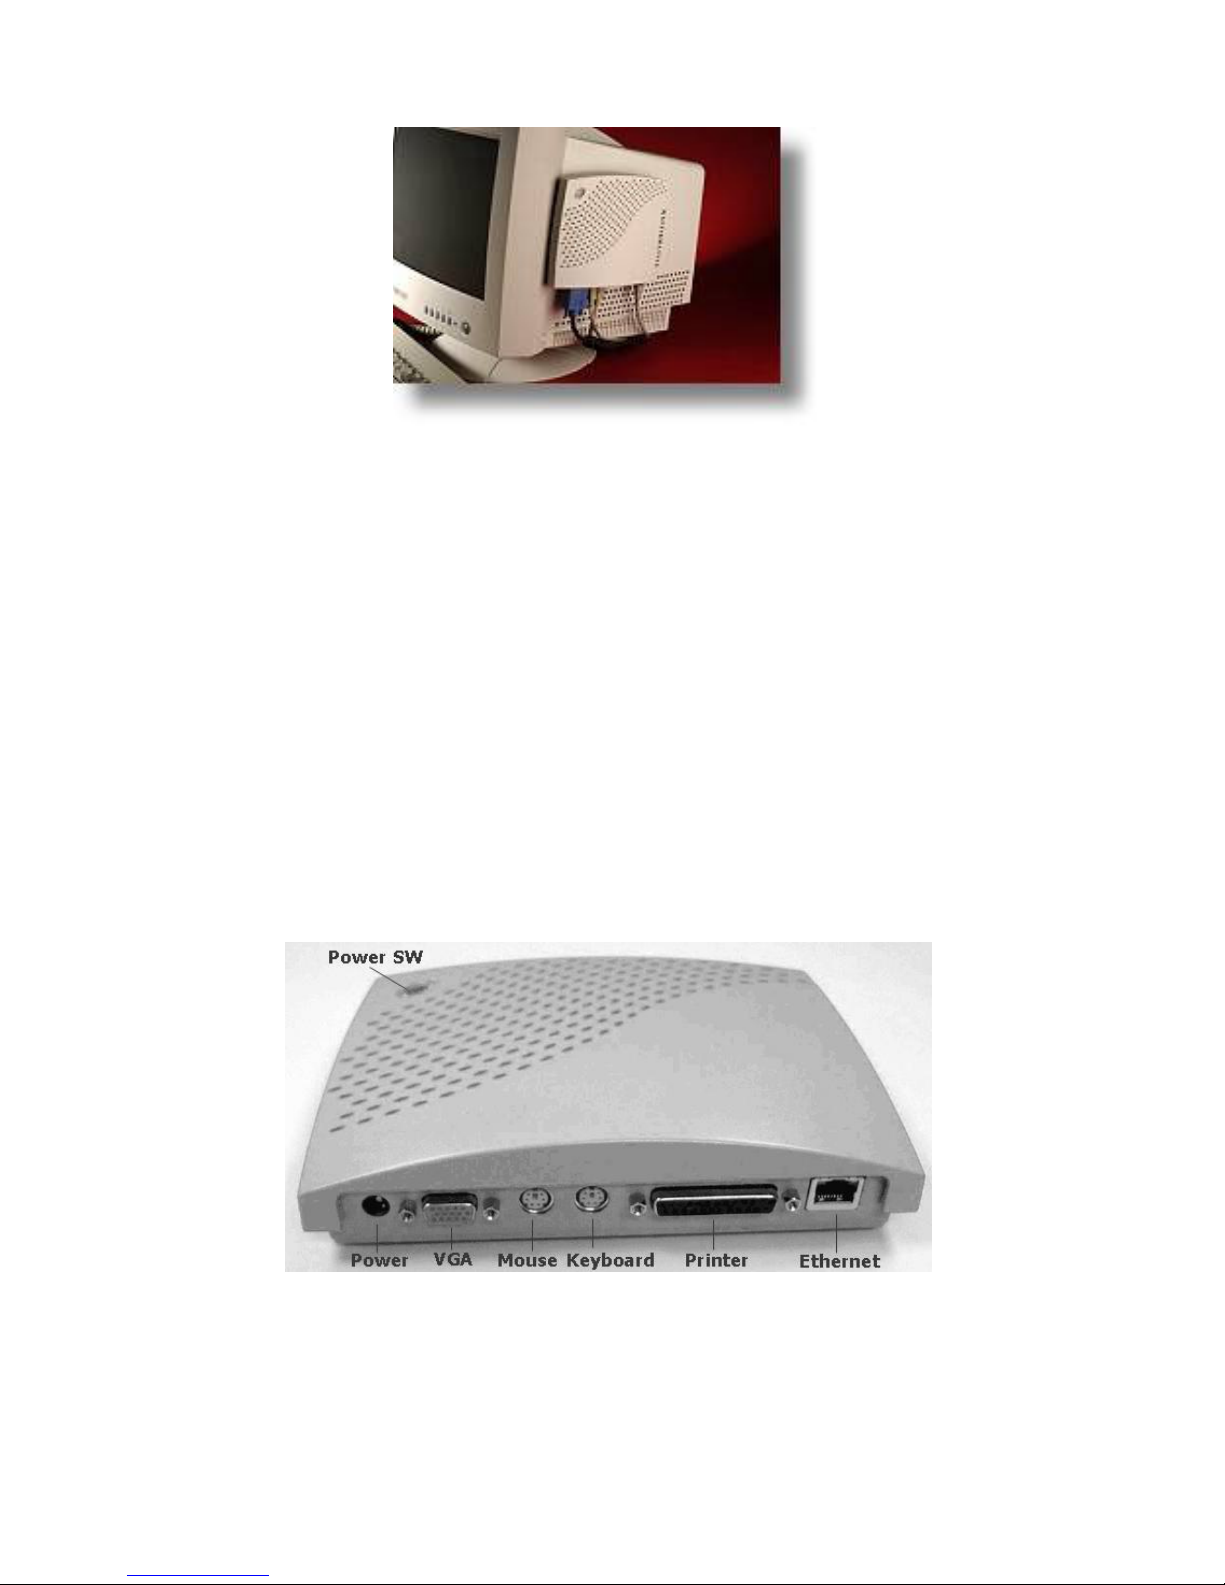
Another possibility is shown here.
2209 Monitor Mounting
We have done some testing with the provided screws, and have the following suggestions:
• In soft wood, such as pine, no pilot holes are needed.
• In hard wood or plastic, such as the side of a monitor, create pilot holes by:
o Drilling with a 3/64” drill bit.
o Using a pushpin.
o Using an ice pick.
• In dry wall, these screws do not hold well; if you must install on dry wall, we suggest that you:
o Drill 3/64” pilot holes and put super glue in the holes before inserting the screws.
Or
o Use longer screws with coarser threads.
Cabling
Please make all cable connections before turning on the power. The following figures show the 2209
rear and front connectors.
2209 Rear Connectors
2
Page 11
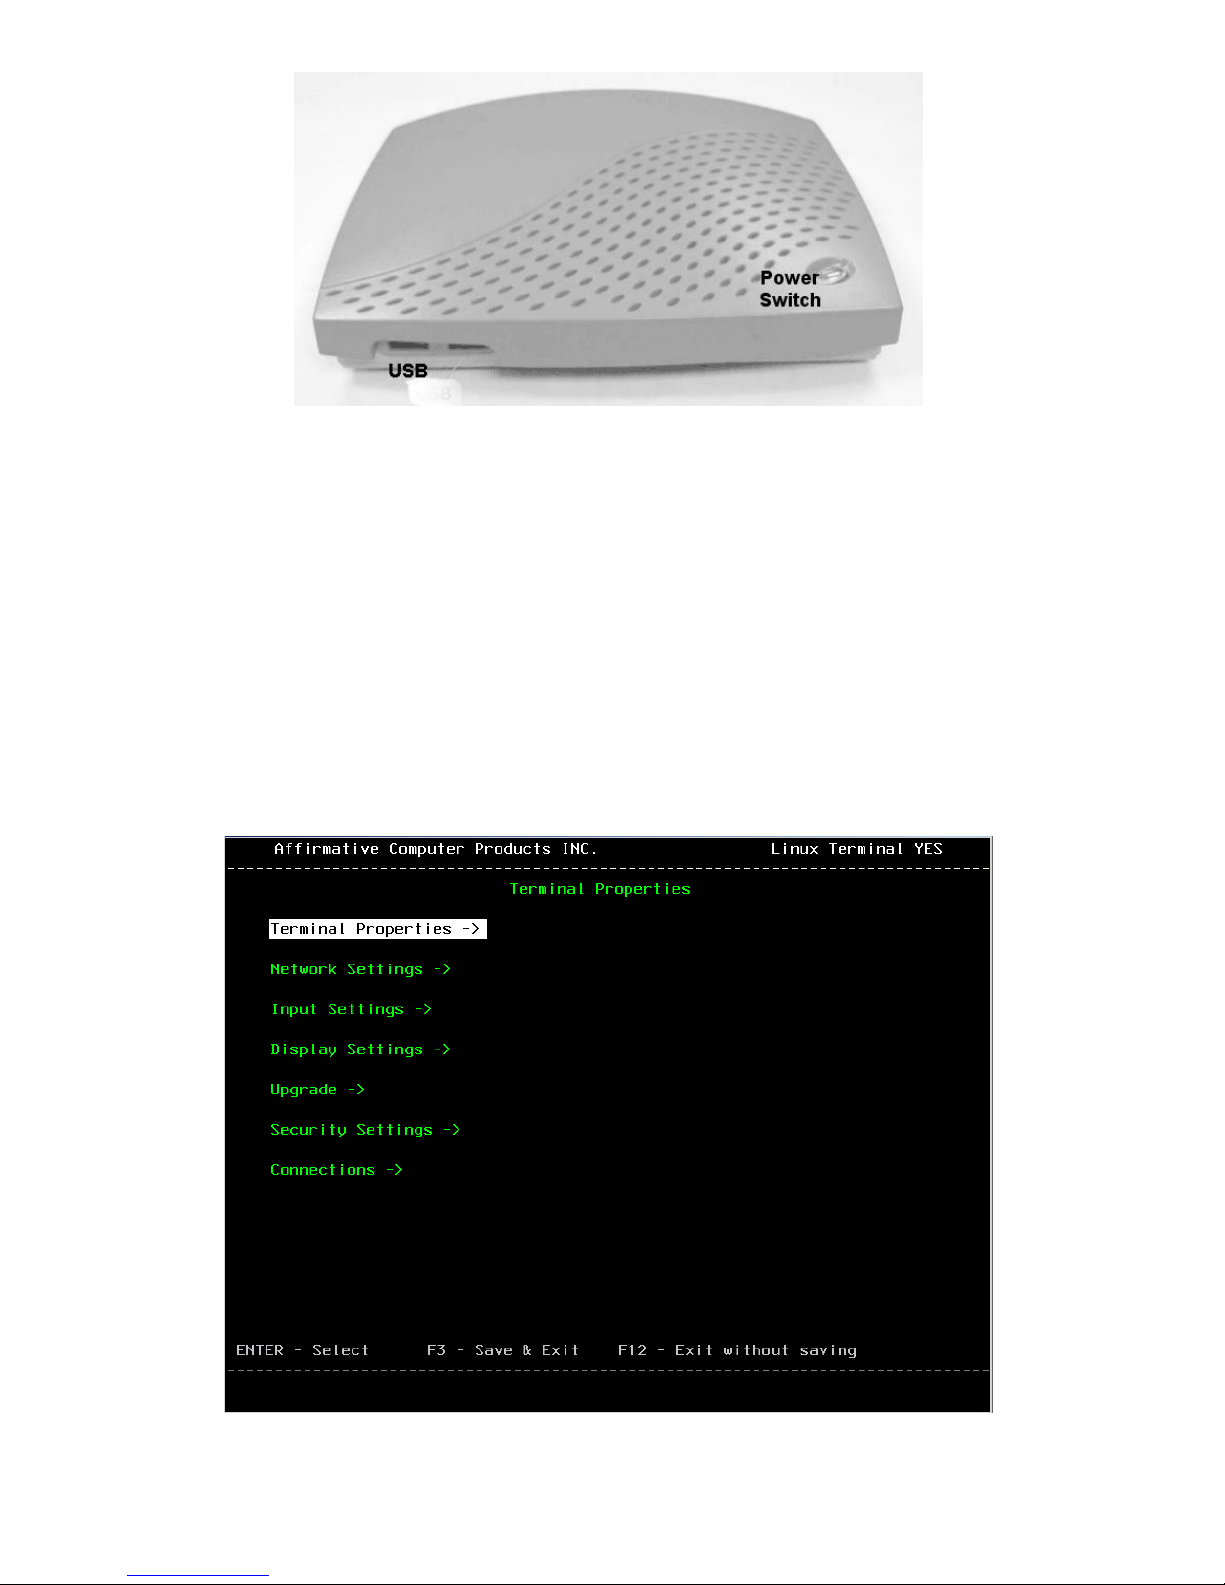
2209 Front Connectors
Power On and Boot Up
1. Turn on the terminal after all rear panel connections have been made.
2. The translucent Power button will change from faint orange to light green.
3. You will see the message Starting System. Please Wait… on a black screen.
4. After several seconds, you will see the YEStation logo screen with a progress bar at the top and a
dialog box at the bottom announcing significant steps in the boot up process.
5. After the progress bar is complete, you will see a blank black screen, followed in several seconds by
a blank grey screen, followed quickly by:
• In the default TBT viewing mode, the grey screen will be quickly followed by a blank black
screen and then by a “green screen” displaying the Terminal Properties categories. If you have
already configured some sessions, you will see a session green screen
Bootup Terminal Properties Screen for TBT Viewing Mode
3
Page 12
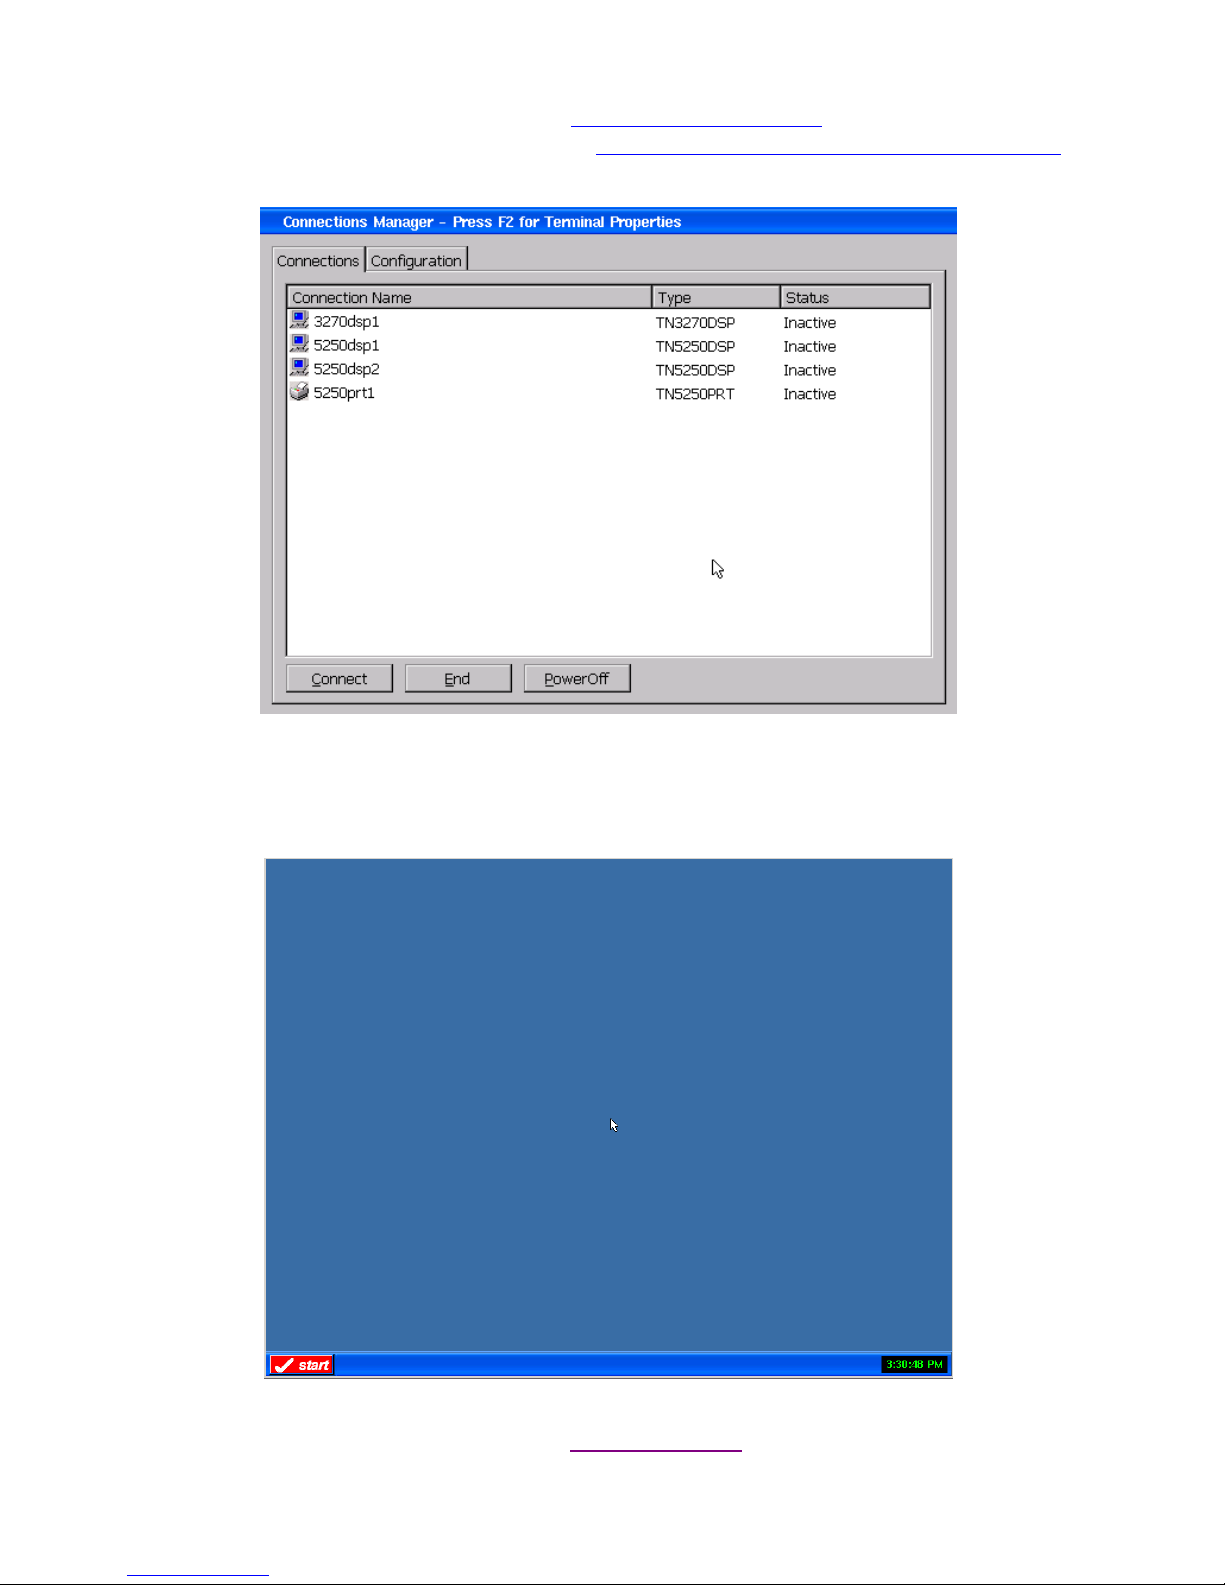
• In the WBT viewing mode, the black screen will be quickly followed by a blue screen that is
overlaid with the Connections tab of the Connections Management
screen. If you have
configured some sessions to Autostart (see Connections Management|Configuration|Startup
you will see a session green screen.
),
Bootup Connections Manager Screen for WBT Viewing Mode
• In the Desktop viewing mode, the black screen will be quickly followed by a blue screen and
then the Desktop screen.
Bootup Desktop Screen for Desktop Viewing Mode
Return to Table of Contents
4
Page 13
Terminal Setup
The 2209 can be operated in one of three viewing modes: TBT (Text Based Terminal), WBT (Windows
Based Terminal), or Desktop. The default is TBT, which provides a familiar terminal “green screen”
look, and the mechanics of TBT setup are covered here. However, the terminal properties and session
properties are identical in the different viewing modes; only the look and feel are different. Initial
terminal setup is done from the Terminal Properties screen in TBT viewing mode. Initial setup is done
when:
• A terminal is first booted up after being received from the factory.
• A terminal is reset to factory defaults and then rebooted.
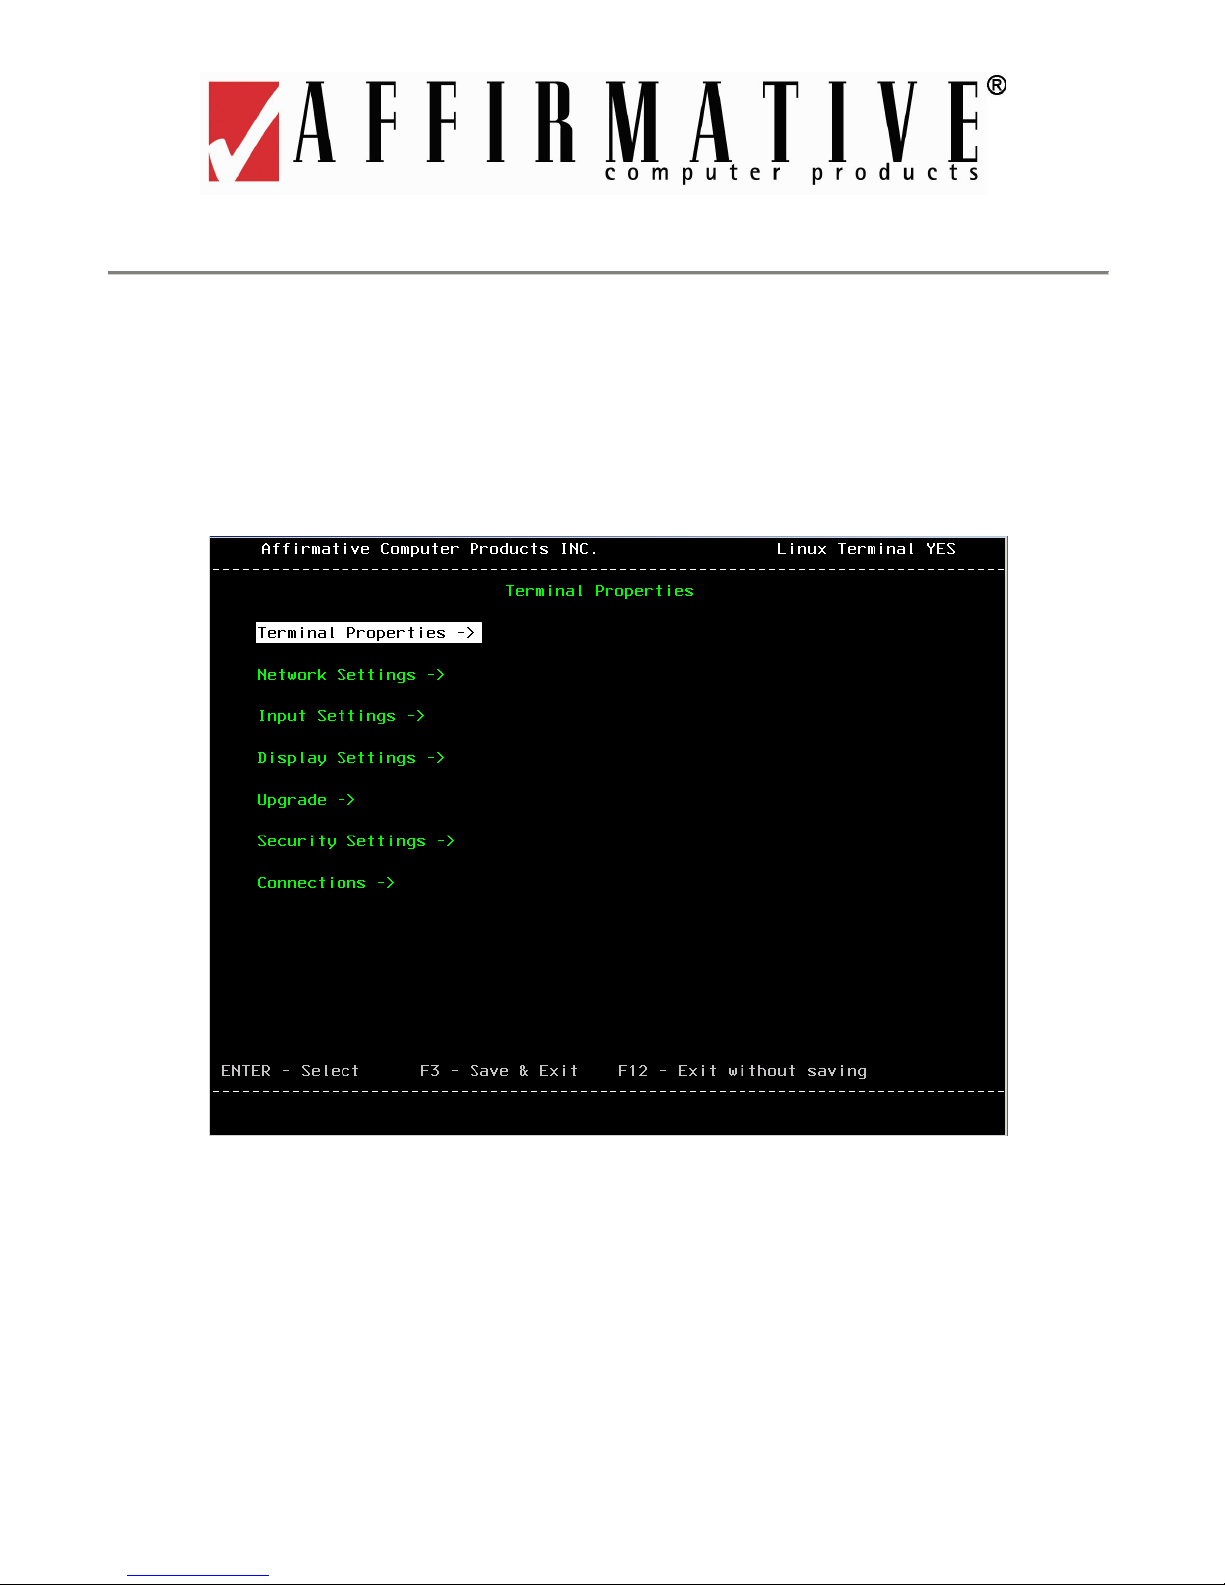
Bootup Terminal Properties Menu for TBT Viewing Mode
The Terminal Properties property sheets set the basic terminal network configuration and display
parameters. Any parameters set here can be changed later.
The Terminal Properties property sheets in TBT viewing mode can be navigated without a mouse; in
fact you cannot use a mouse here. When proceeding through these sheets:
• Move among properties or property sheets using the Tab, UpArrow, or DownArrow keys.
• Move among the property options using the four Arrow keys.
• Select an option by pressing either the PC Enter key or the terminal Enter (RightCtrl) key.
5
Page 14
• When you have completed configuring the properties in a sheet, press F3 to back up one screen.
Note: The input focus must be on a property, not on a property option, for F3 to function.
• To save any changes, you must back up to the Terminal Properties screen and then press F3. Some
settings will take effect immediately after you F3 out of this screen. Others may cause the screen to
go blank for several seconds, and some will cause the terminal to reboot.
• After you have saved your changes, you will often encounter a blank black screen. Press
LeftCtrl+Alt+End to return to a regular screen.
The Terminal Properties property sheets are discussed here in the order in which they appear on the
Terminal Properties menu.
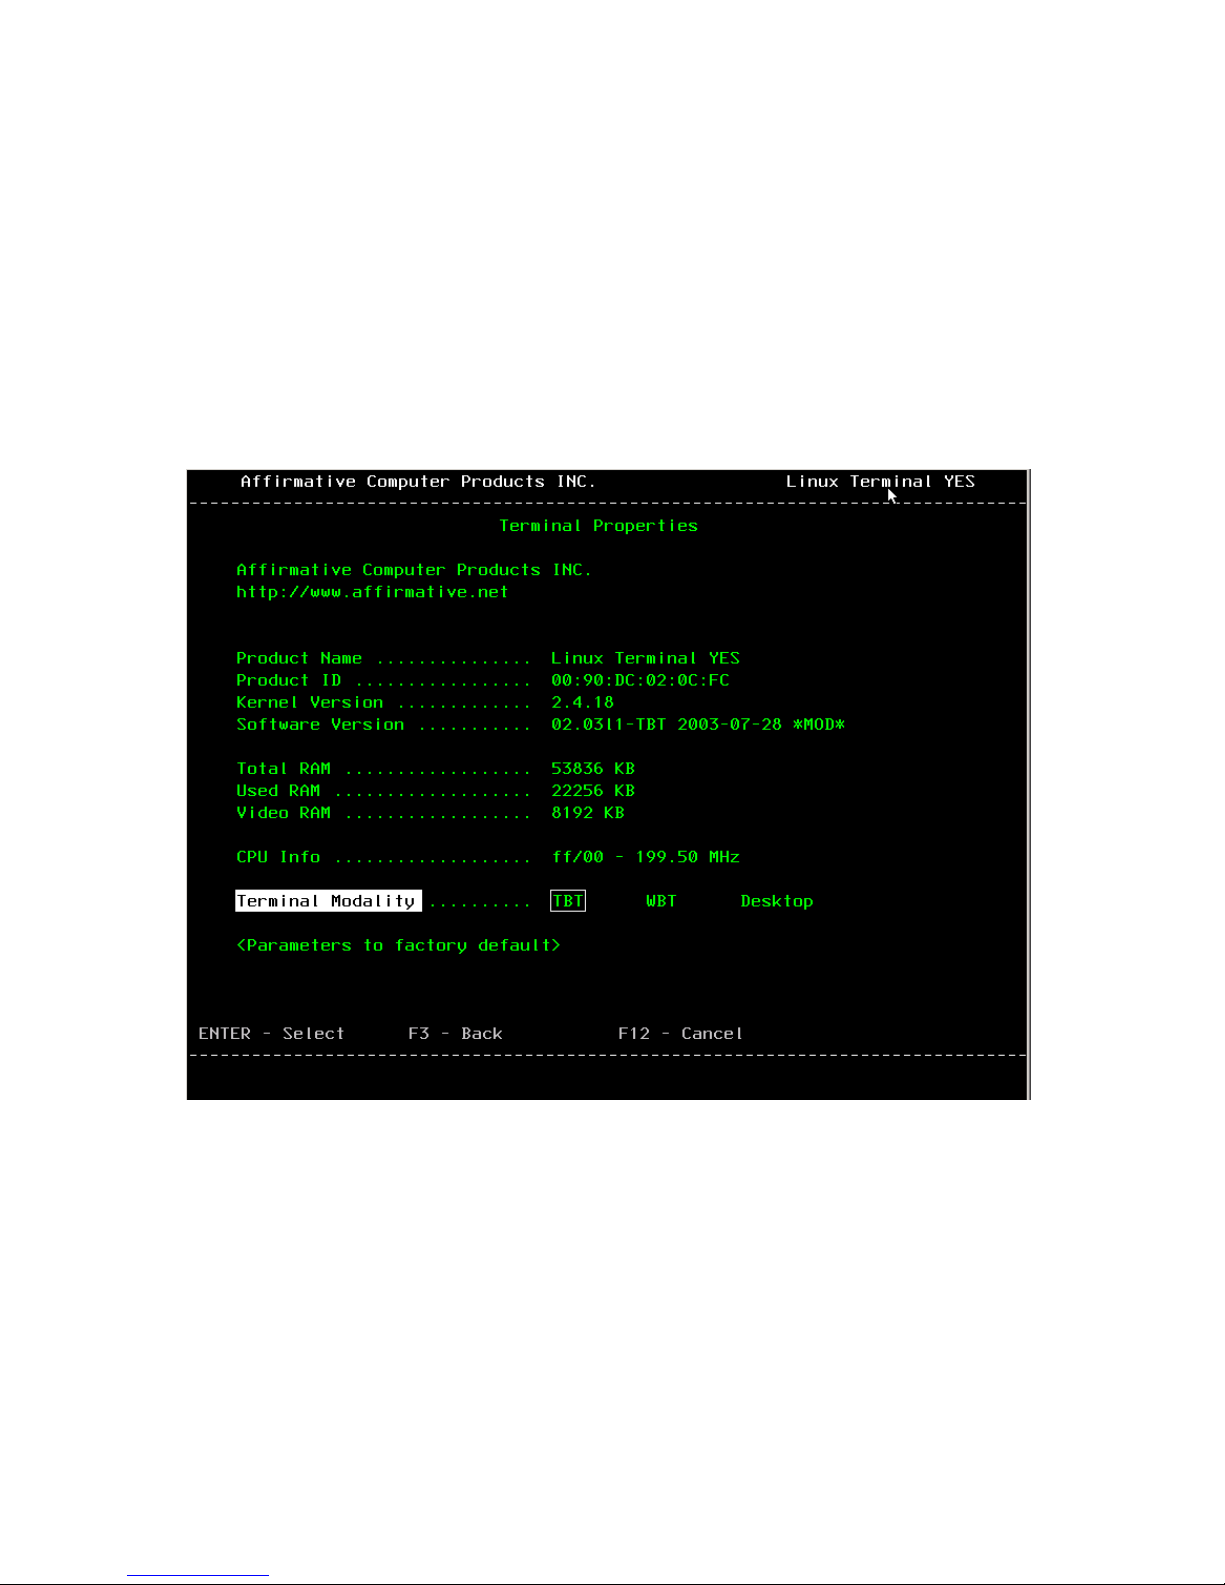
Terminal Properties
Terminal Properties Property Sheet for TBT Viewing Mode
• Product ID. This is a unique product identification code that also happens to be the terminal MAC
address. Every device on every LAN in the world is supposed to have a unique MAC address.
• Kernel Version. This is the version of the Linux kernel used on the terminal.
• Software Version. This is the version of the firmware installed in this terminal. If you contact
Affirmative Computer Products Tech Support about a problem, please have this version information
available.
• Total RAM. This is the amount of DRAM in the terminal after subtracting the memory used for
some basic functions and the memory reserved for video.
• Used RAM. This is the amount of total RAM that is currently being used.
6
Page 15
• Video RAM. This is the amount of RAM that has been reserved for video display. This amount is
set in the terminal BIOS and is not a configurable parameter.
• CPU Info. This shows some basic information about the CPU in the terminal.
• Terminal Modality. You can choose one of three viewing modes.
o TBT. The Text Based Terminal mode is what you are seeing in this section. It is designed
to allow terminal operation and basic configuration without a mouse. The screens are very
familiar to those users who have stared at dumb terminal “green screens”. Sessions are
Autostart at bootup by default, and only one session can be viewed on the screen at a time.
o WBT. The Windows Based Terminal mode presents the kind of screens that you normally
see in an Affirmative Computer Products YEStation that uses the Windows CE operating
system. More configuration options are accessible in the WBT and Desktop modes than in
the TBT mode, so if you want to do some fine-tuning, you will have to switch to WBT or
Desktop mode. Sessions are launched from the Connections Manager, although they can be
configured to Autostart at bootup. All sessions can be viewed simultaneously in a splitscreen mode, if desired; each session will get the same amount of space on the screen.
o Desktop. The Desktop mode presents a desktop screen with a Taskbar and a Start button,
very similar to a standard Windows desktop. The same configuration options are available
here as in WBT mode. Sessions are launched from the Start menu or from Connections
Manager, although they can be configured to Autostart at bootup. In Desktop mode, you
can size and show multiple sessions on the screen in normal Windows fashion.
See Viewing Modes
• Restore the terminal parameters to factory default. Activate this check box to reset the terminal
to its factory default settings. When you do this, you will get a dialog box asking you to confirm
your intentions.
for examples and more details.
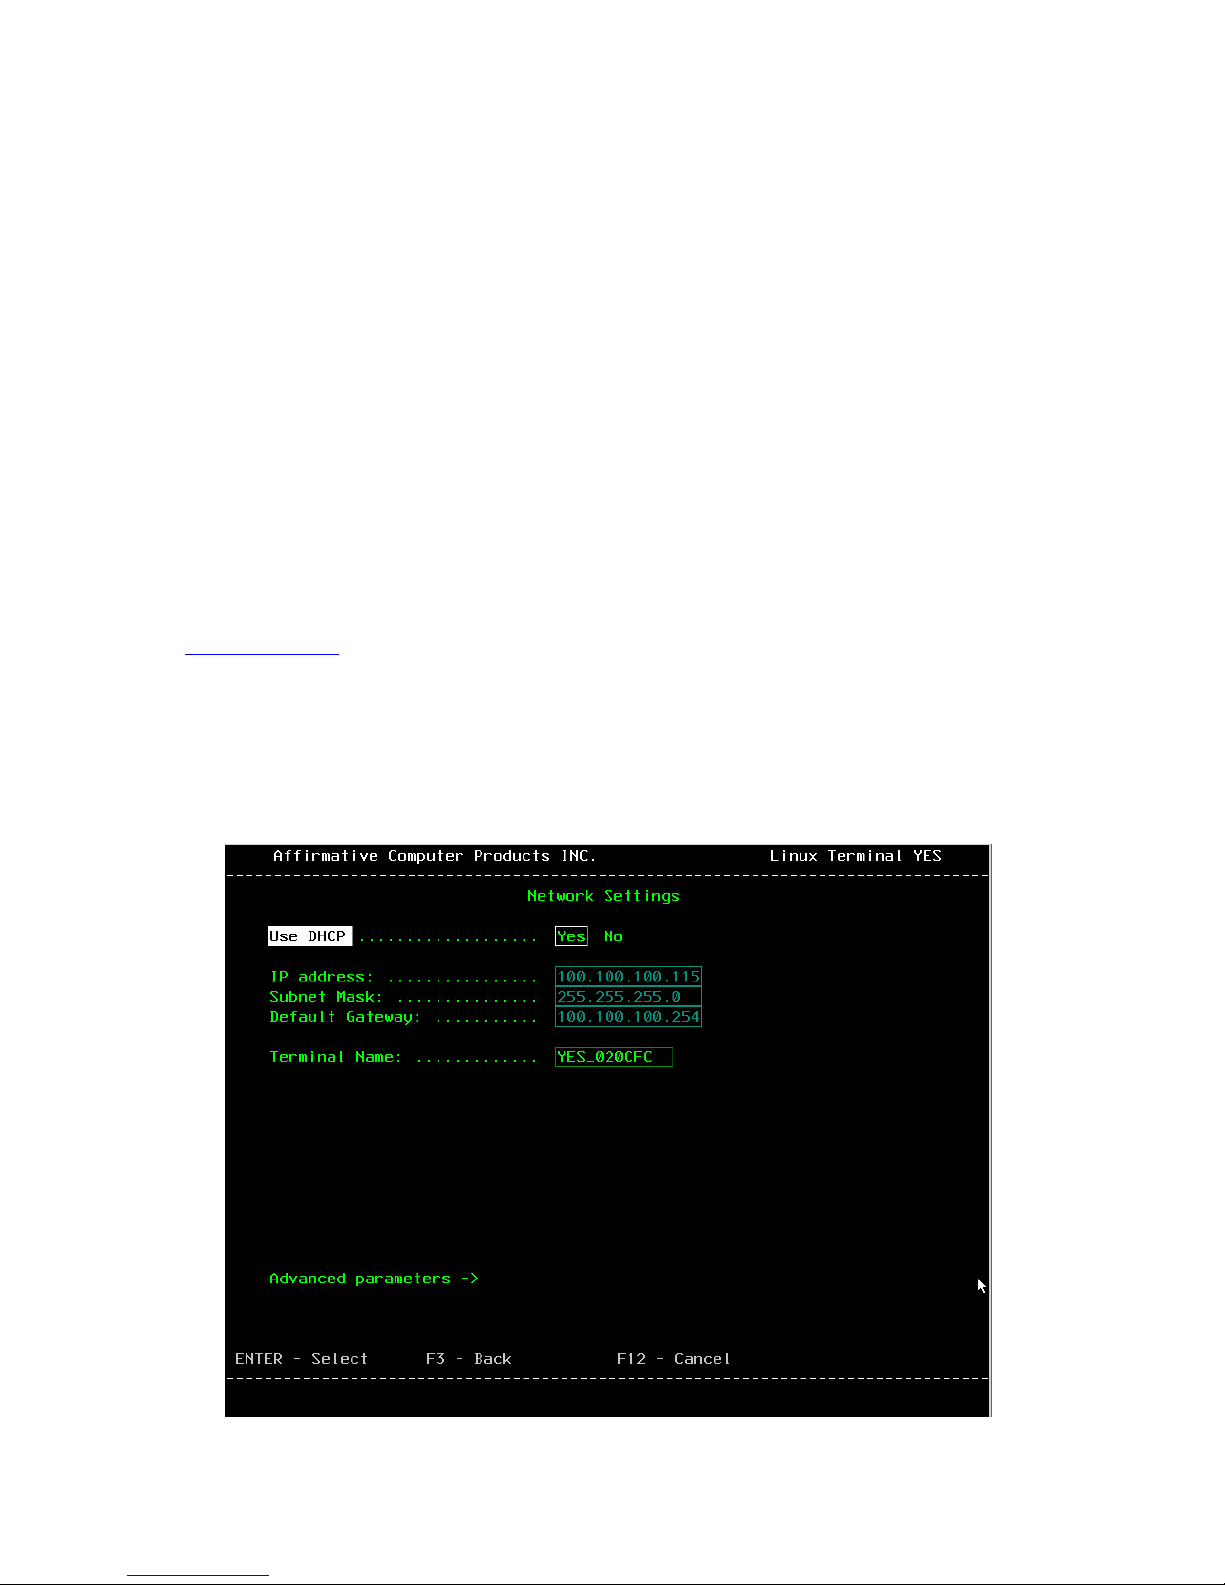
Network Settings
Network Settings Property Sheet for TBT Viewing Mode
7
Page 16
• Use DHCP. Leave this setting at the default Yes to enable DHCP addressing. Select No to enable
the following three fields for a specific IP address setting.
o IP Address. Enter a static IP address in this field. If you have selected DHCP addressing,
the assigned address will appear in grey in this field.
o Subnet Mask. Enter the subnet mask of the local network. If you have selected DHCP
addressing, the assigned subnet mask will appear in grey in this field
o Default Gateway. Enter the IP address of a gateway if any server is not on the local sub-
net. If you have selected DHCP addressing, the assigned gateway will appear in grey in this
field
• Terminal Name. The default name uses the last six characters of the terminal MAC address to
provide a unique name for easy identification when using network management and administration
software. You can change it to a more-friendly name if you wish.
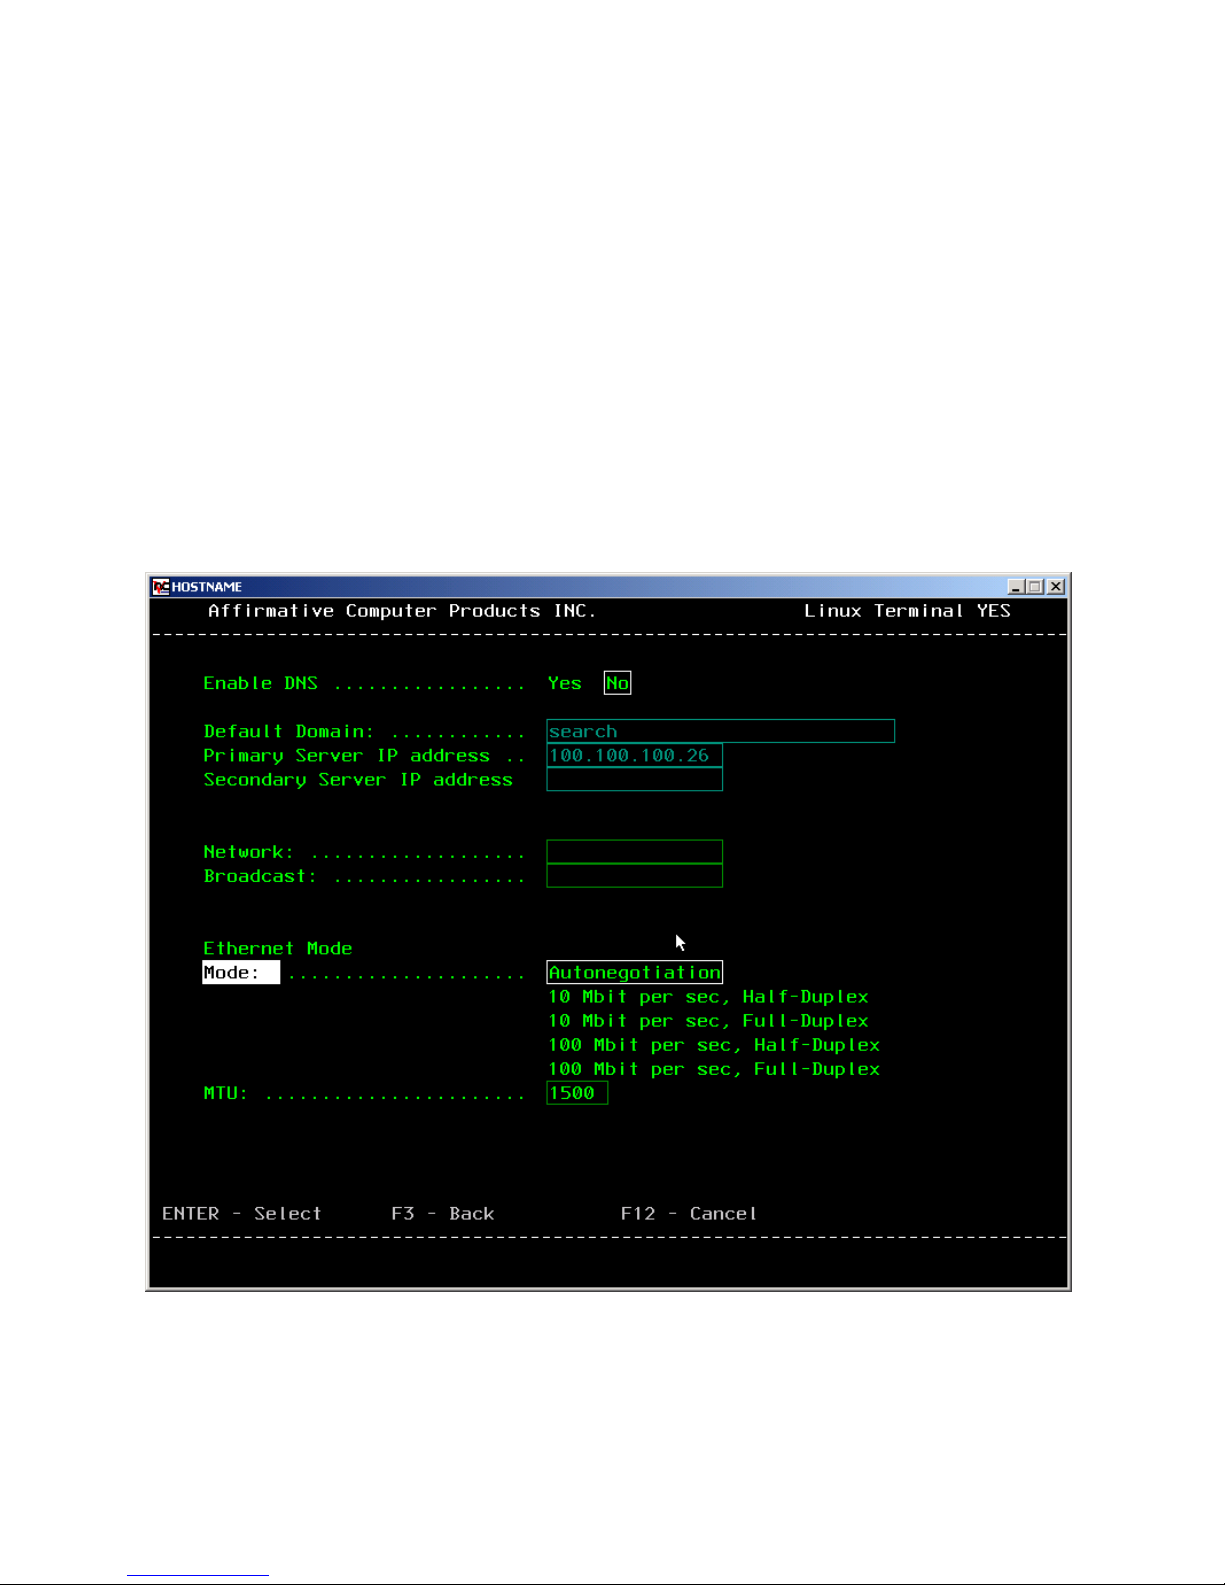
Advanced Parameters
Select this property set to see the following screen.
Network Settings Advanced Parameters Sub-Property Sheet for TBT Viewing Mode
• Enable DNS. This entry will be active only if you chose not to use DHCP in the previous screen.
You will need to identify a Domain Name System server only if you wish to identify session hosts
by network name rather than IP address. Select Yes to enable the three fields for the DNS setting.
Get the entries from your network administrator.
8
Page 17
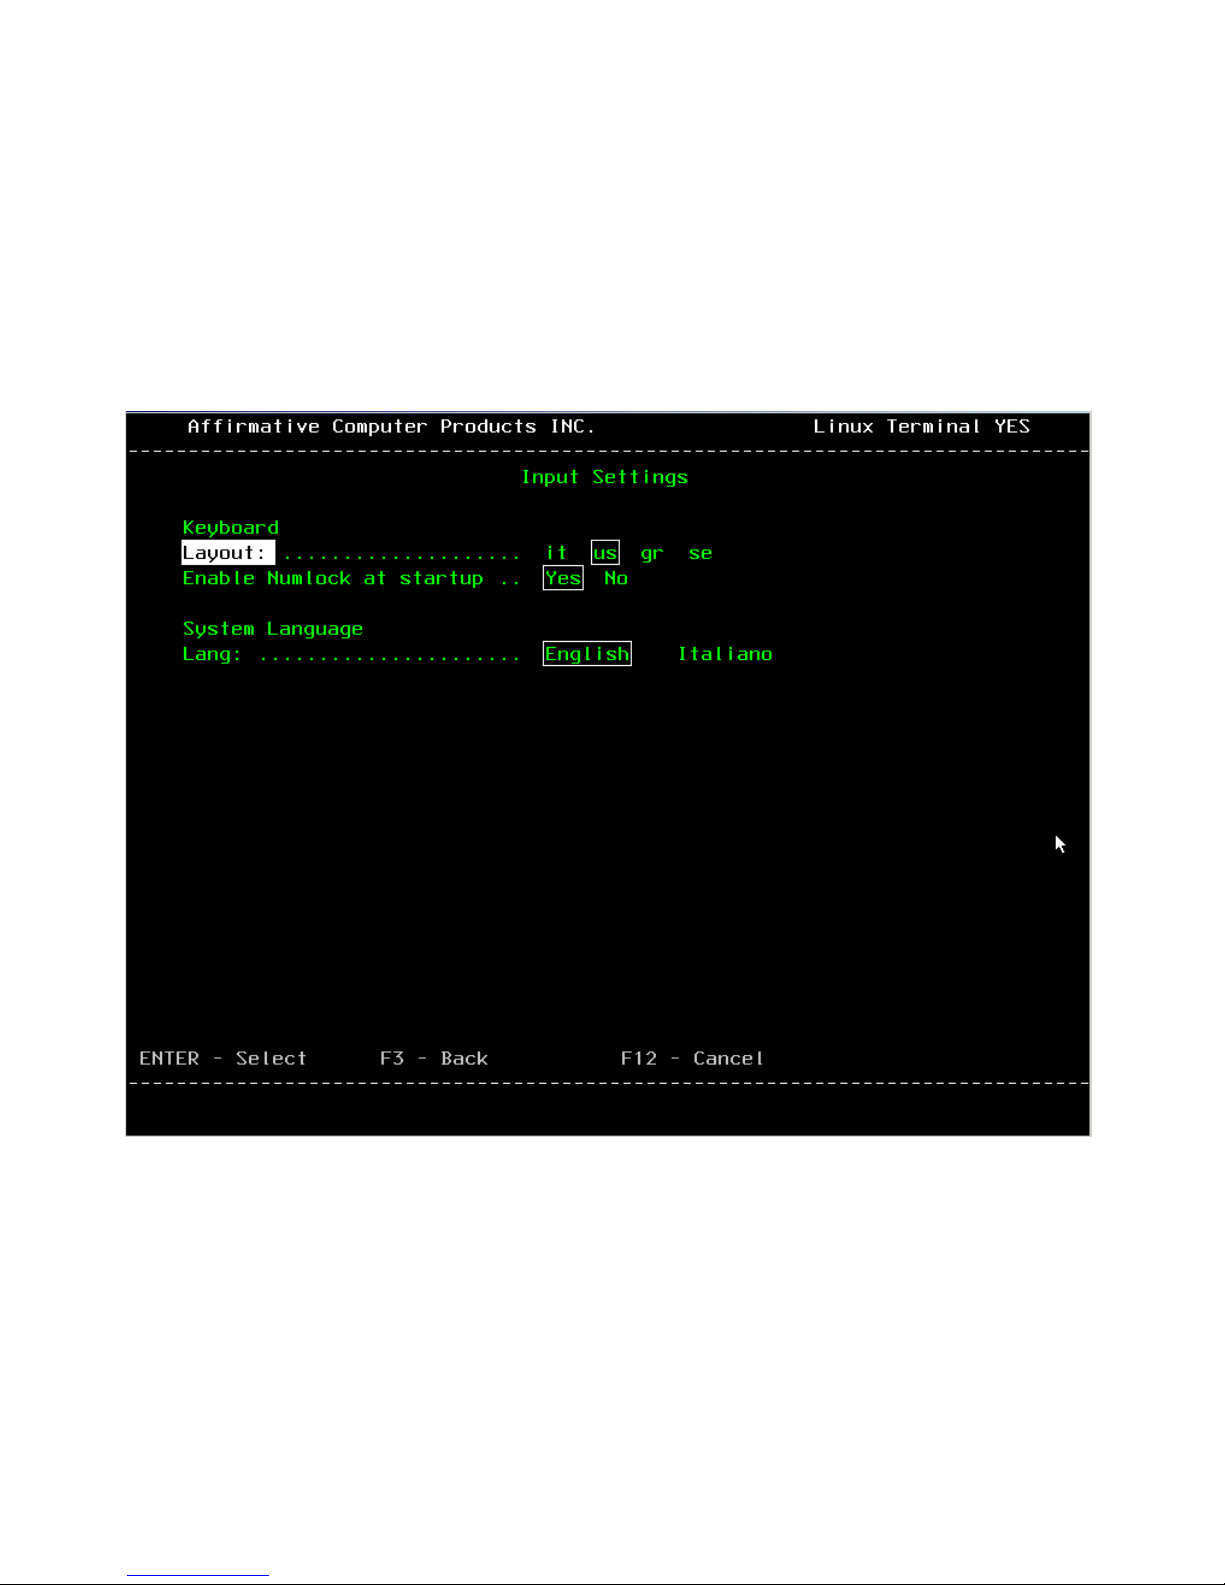
• Network/Broadcast. These entries will be active only if you chose not to use DHCP in the
previous screen. For typical networks, nothing need be entered here. But some networks will
require that you enter the first three octets of the network IP address in Network and the IP address
of the network gateway in Broadcast. Let your network administrator determine the need.
• Ethernet Mode.
o Mode. Select network speed and traffic mode from the list, or let the network circuitry
perform auto-negotiation with the hub or switch.
o MTU. Leave this number alone unless your network administrator dictates a change
Input Settings
Input Settings Property Sheet for TBT Viewing Mode
• Keyboard
o Layout. Select a language for the keyboard.
o Enable NumLock on Boot. Select Yes to force Numeric Pad NumLock when the TBT
starts up.
• System Language. Select the language to be used for most non-session screens.
9
Page 18
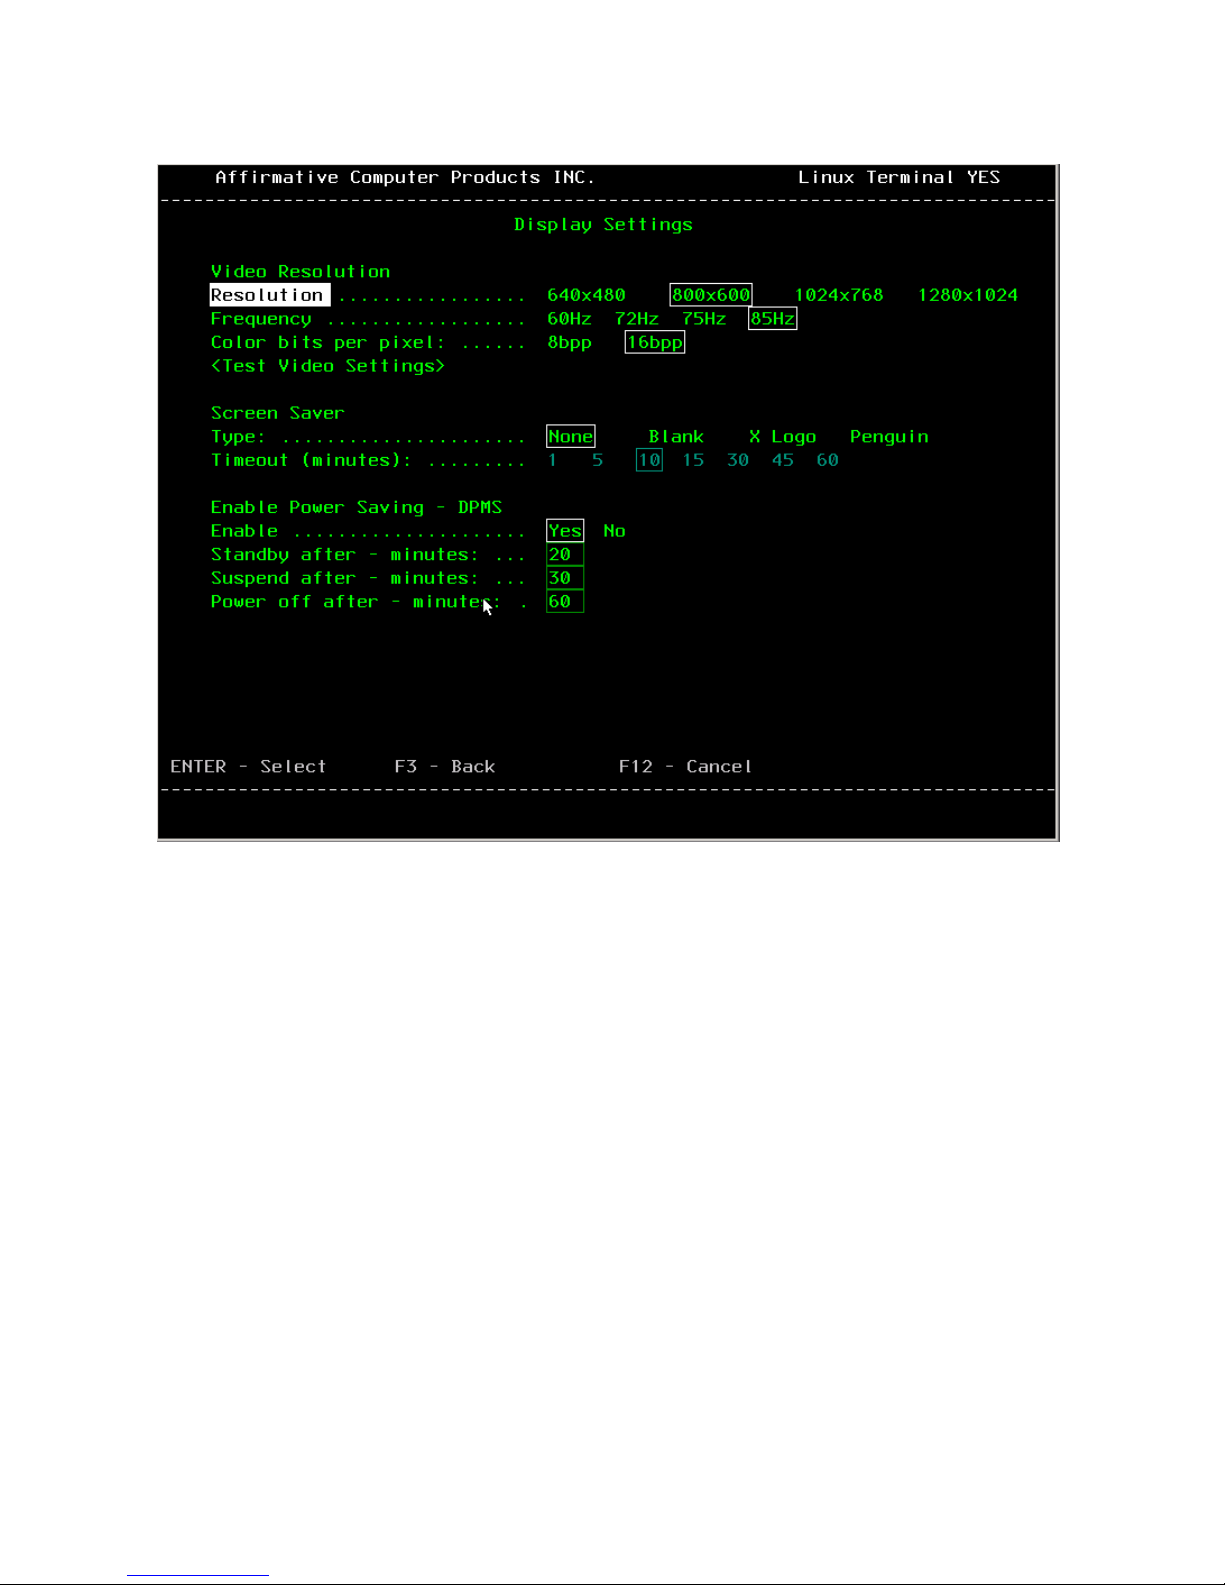
Display Settings
Display Settings Property Sheet for TBT Viewing Mode
• Video Resolution. Select your resolution, refresh frequency, and color depth here. Even in the
TBT viewing mode, the Video Resolution settings will have an effect on the green screen font
since higher resolutions provide more pixels per character.
o Test Video Settings. Use this to preview the selected resolution and frequency. Testing is
required before locking in your settings; if the monitor will not support your selection, you
will be faced with an unreadable screen after boot-up. If you have ventured into the Video
Resolution settings in any way, you will not be allowed to back out of this screen until you
have performed the test.
• Screen Saver. By default this function is not enabled.
o Type. Choose none or one of three screen saver types.
o Timeout. Select the screen saver timeout
• Enable Power Saving. If you select Yes to enable power saving, you will activate the following
three settings:
o Standby. Enter the number of minutes (1-999) for the Standby timeout. Standby acts much
like a blank screen saver.
o Suspend. Enter the number of minutes (1-999) for the Suspend timeout.. Suspend turns off
most terminal functions, such as the video sync signal.
o Power off. Power Off is not supported at this time.
Note: The timeout numbers are not cumulative; if the Suspend timeout is shorter than the Standby
timeout, the terminal will go into Suspend without ever going into Standby.
10
Page 19
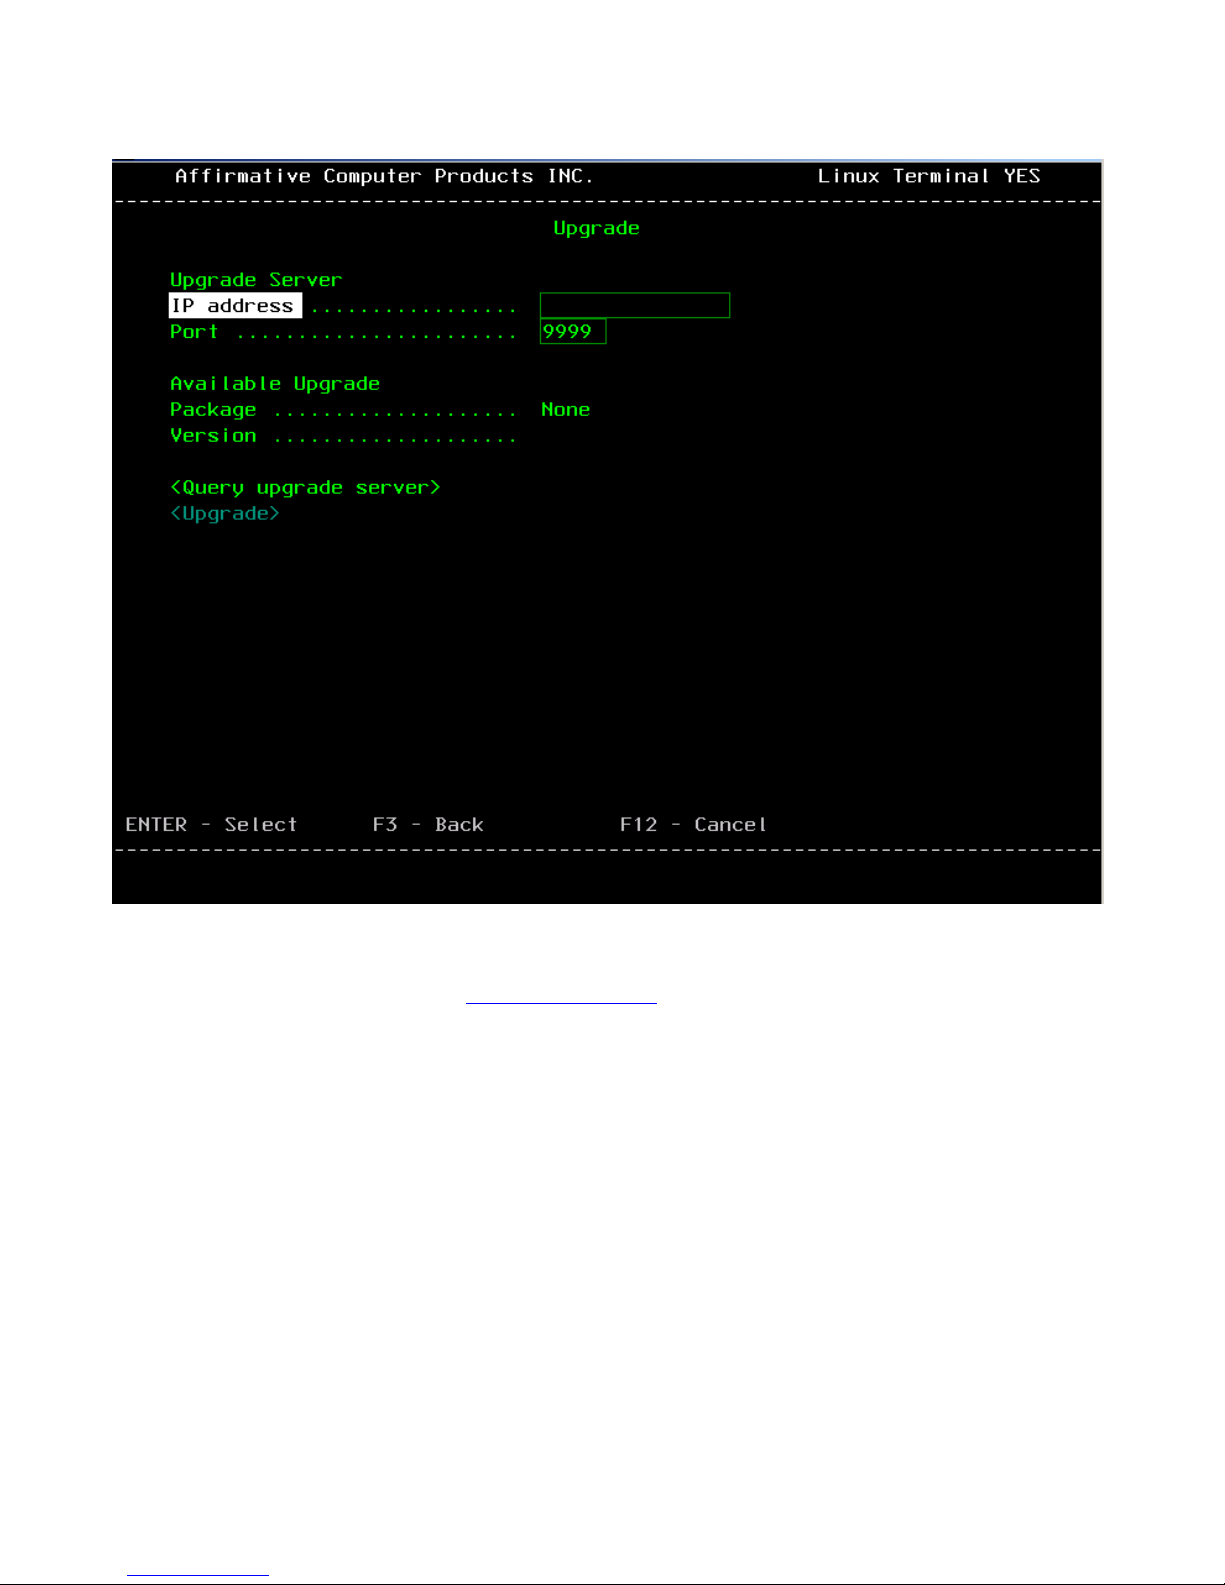
Upgrade
Upgrade Property Sheet for TBT Viewing Mode
Use the Upgrade sheet if you wish to update your terminal's firmware from a YESmanager host. For
more information, please refer to the Firmware Upgrades section.
11
Page 20
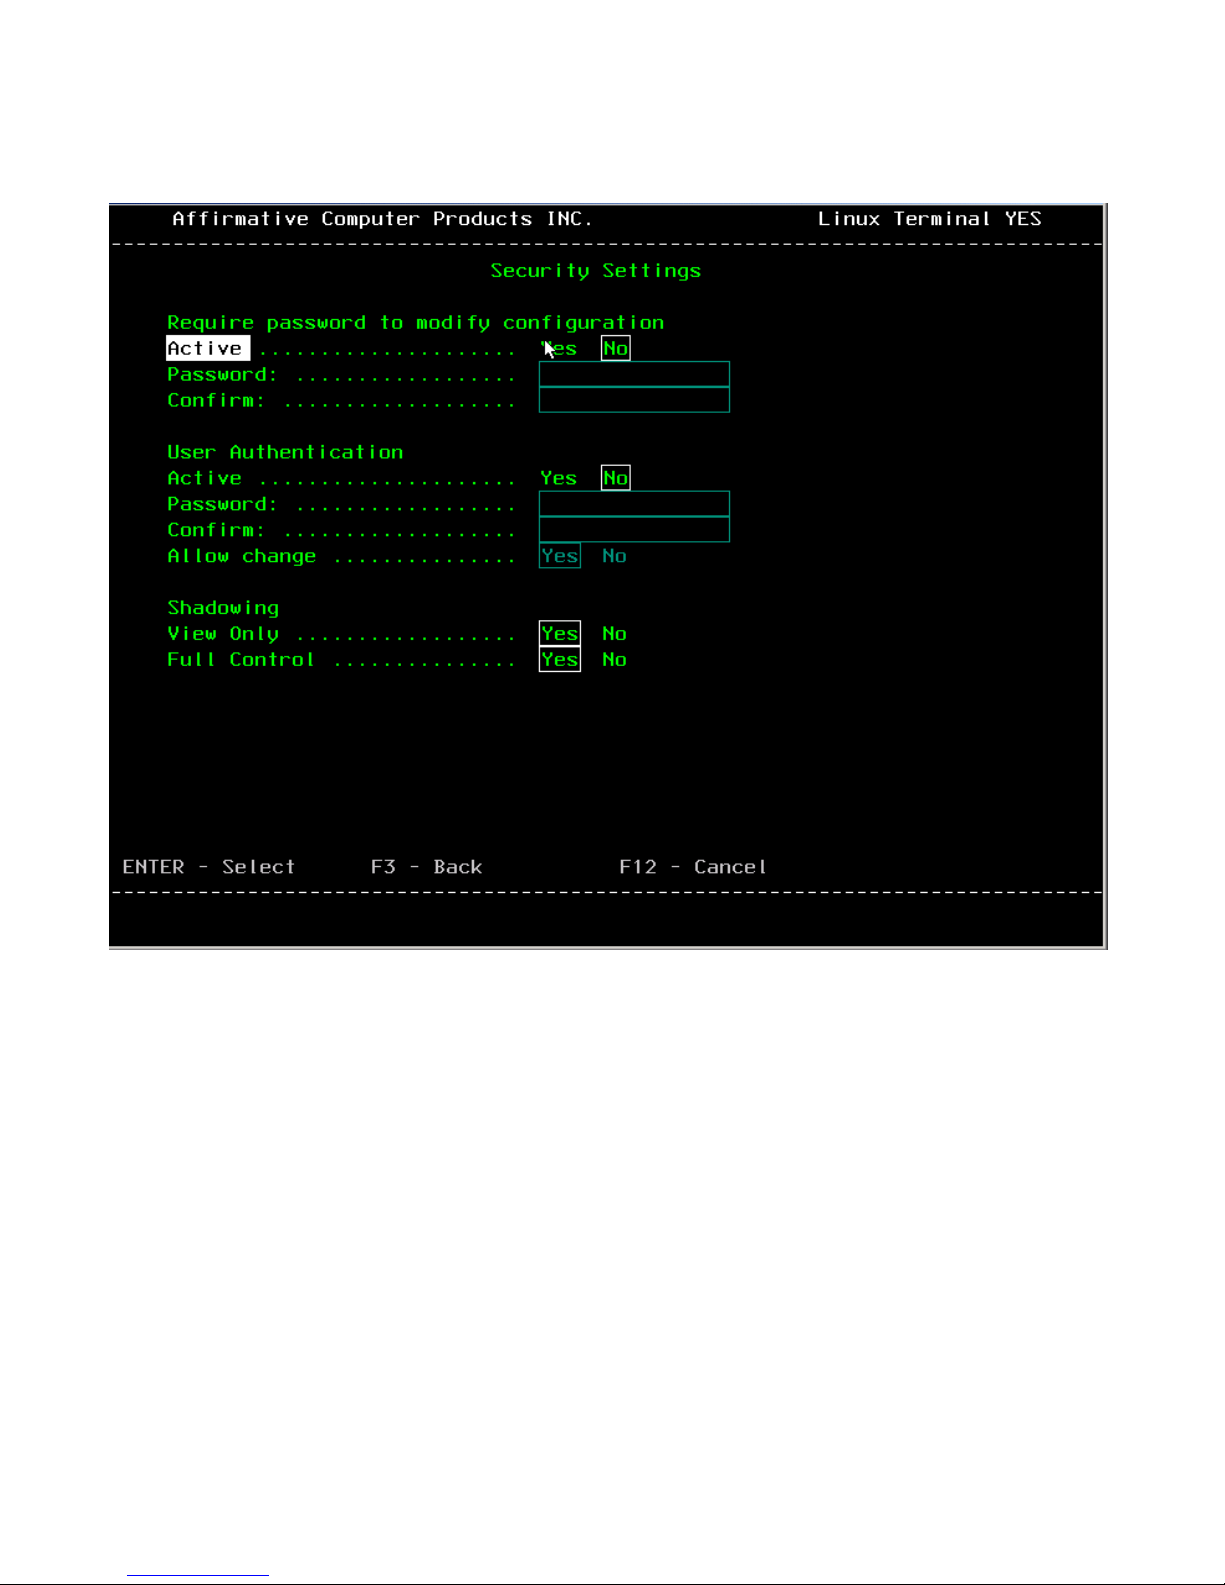
Security Settings
Select various levels of configuration, access, and shadowing security here.
Security Settings Property Sheet for TBT Viewing Mode
• Require Password…. Select Yes to enable password security for terminal configuration. Then
enter and confirm a password in the boxes.
Note: The password is designed to avoid any unreasonable change to the Terminal Properties
Settings. Please do NOT activate the password unless you are the administrator. If you forget the
password, it will be difficult to recover. There is only one method of local recovery if you forget
the password.
o Ask your system administrator to use the secret hot key sequence to reset Terminal
Properties to factory defaults.
• User Authentication. Select Yes to enable password security for user access to sessions. Then
enter and confirm a password in the boxes. You can also allow or forbid the user to change the user
password.
Note: Even if a user password is required, the user can still access Terminal Properties without
entering the correct password. Therefore, it is strongly recommended that you also enable Require
Password… if you are going to use user authentication.
12
Page 21
• Shadowing. When used in conjunction with YESmanager, Affirmative Computer Products’
powerful Remote Central Manager, the terminal’s screens can be viewed remotely, and full remote
control of the terminal can be enabled.
o View Only. Select Yes to allow the terminal screens to be viewed at the remote
YESmanager console.
o Full Control. Select Yes to allow full control of terminal functions from the remote
YESmanager console. Actually, when shadowing is activated in YESmanager, control will
be shared between the remote administrator and the local user. Note: Enabling Full
Control will have no effect unless you also enable View Only.
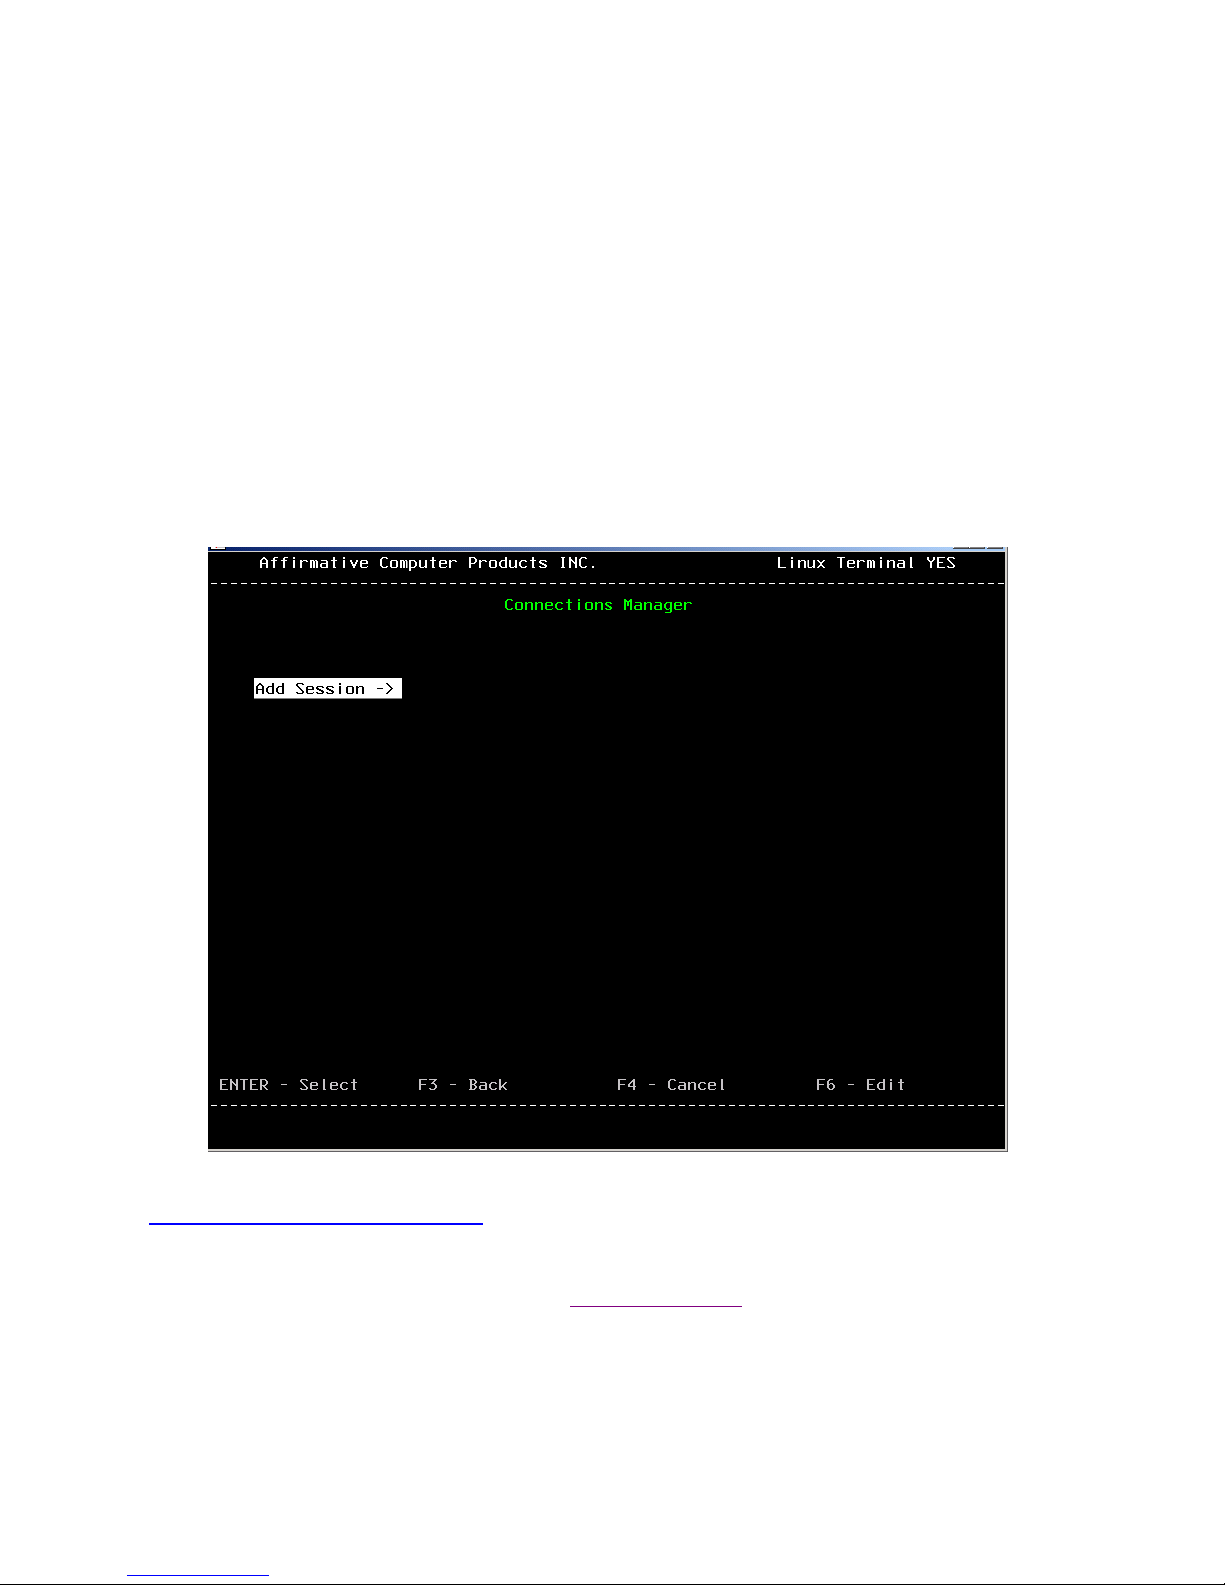
Connections
Select this category to display the Connections Manager sheet. In this sheet, you can add and edit
emulation sessions. Initially, there will be no sessions shown on this screen, so you will have to add at
least one in order to get any use out of the terminal.
Connections Manager Sheet for TBT Viewing Mode
See Creating an Emulation Connection for details on adding emulation sessions.
Return to Table of Contents
13
Page 22

THIS PAGE INTENTIONALLY LEFT BLANK
14
Page 23
Viewing Modes
You can choose one of three viewing modes (see Terminal Setup|Terminal Properties) to be used
during configuration and terminal operation.
NOTE: In the remainder of this document, a reference to the Ctrl key actually means the LeftCtrl
key, a reference to the Alt key actually means the LeftAlt key, and a reference to a click actually means
a mouse left click.
TBT (Text Based Terminal)
The Text Based Terminal mode is the default mode. It is designed to allow terminal operation and
basic configuration without a mouse. The screens are very familiar to those users who have stared at
dumb terminal “green screens”. Sessions are Autostart at bootup by default, and normally only one
session can be viewed on the screen at a time. However, all sessions can be viewed simultaneously in a
split-screen mode, if desired; each session will get the same amount of space on the screen.
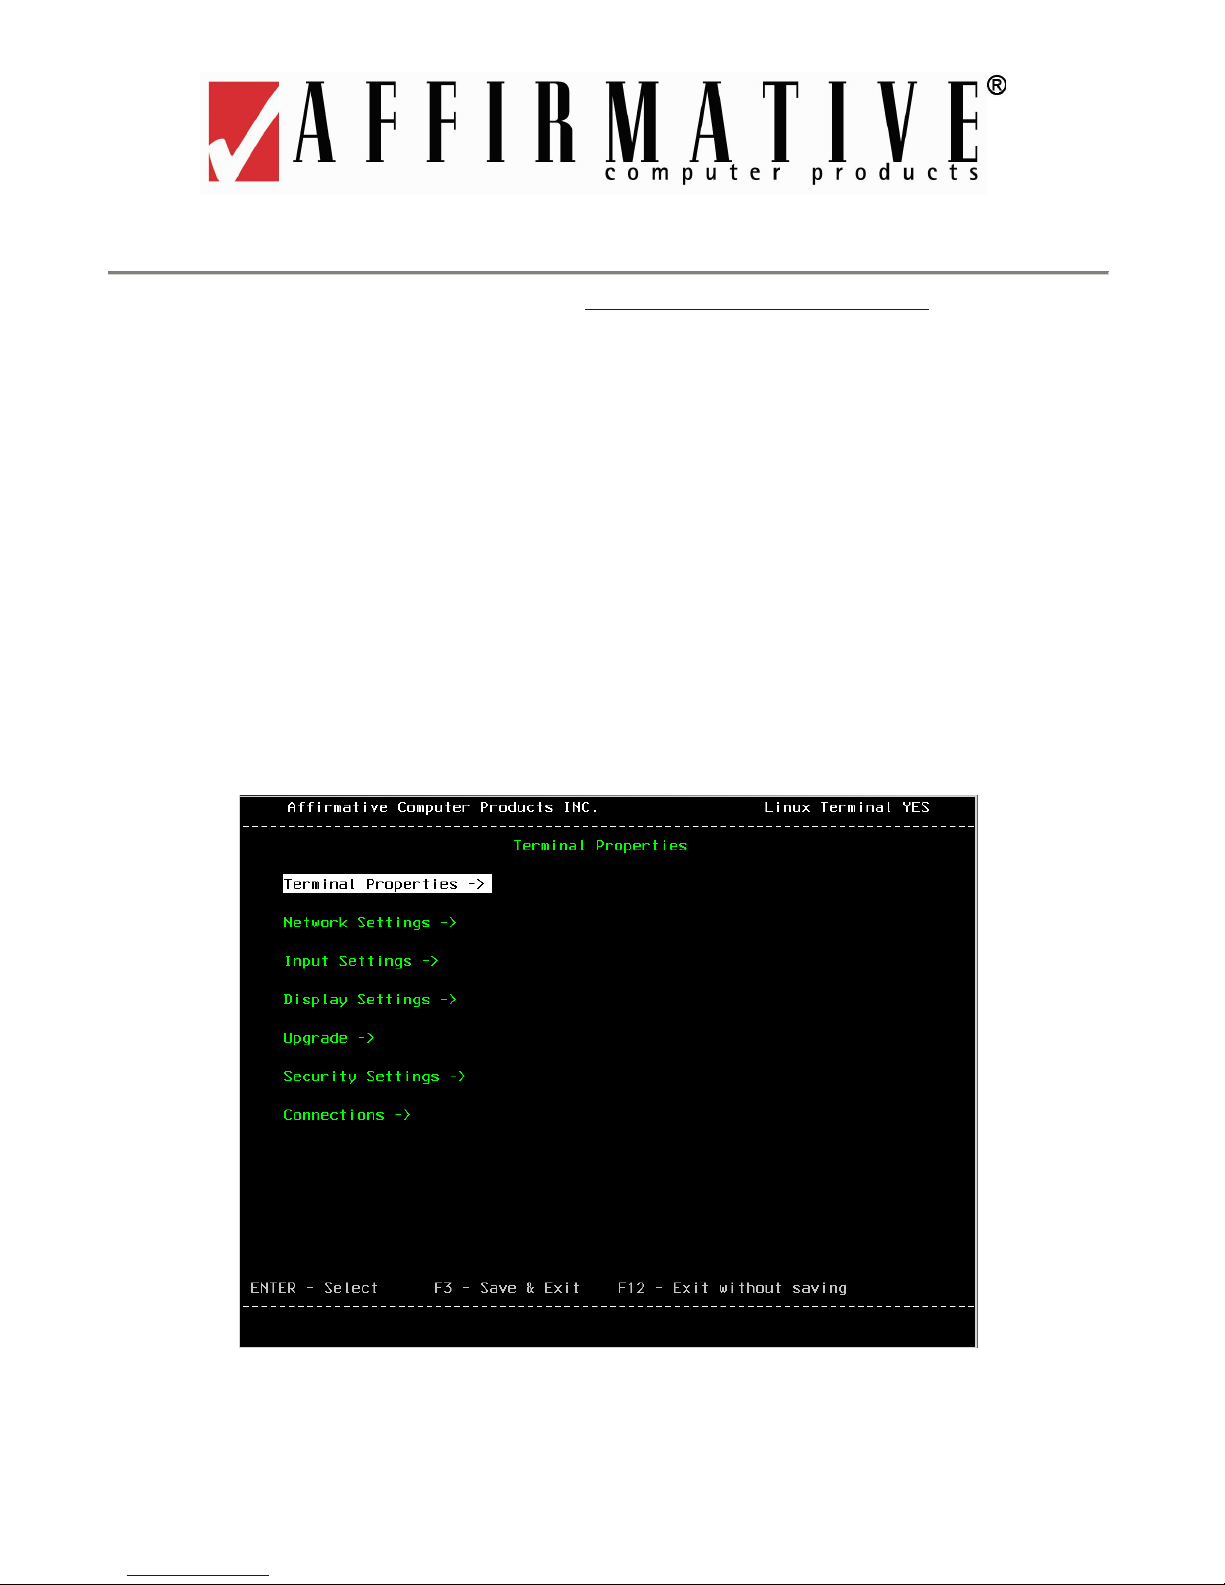
Terminal Properties
Terminal Properties Menu Screen in TBT Viewing Mode
15
Page 24
The Terminal Properties screens in TBT mode provide a basic set of configuration parameters. Details
are given in Terminal Setup
. To access the complete set, you will have to be in WBT or Desktop
modes.
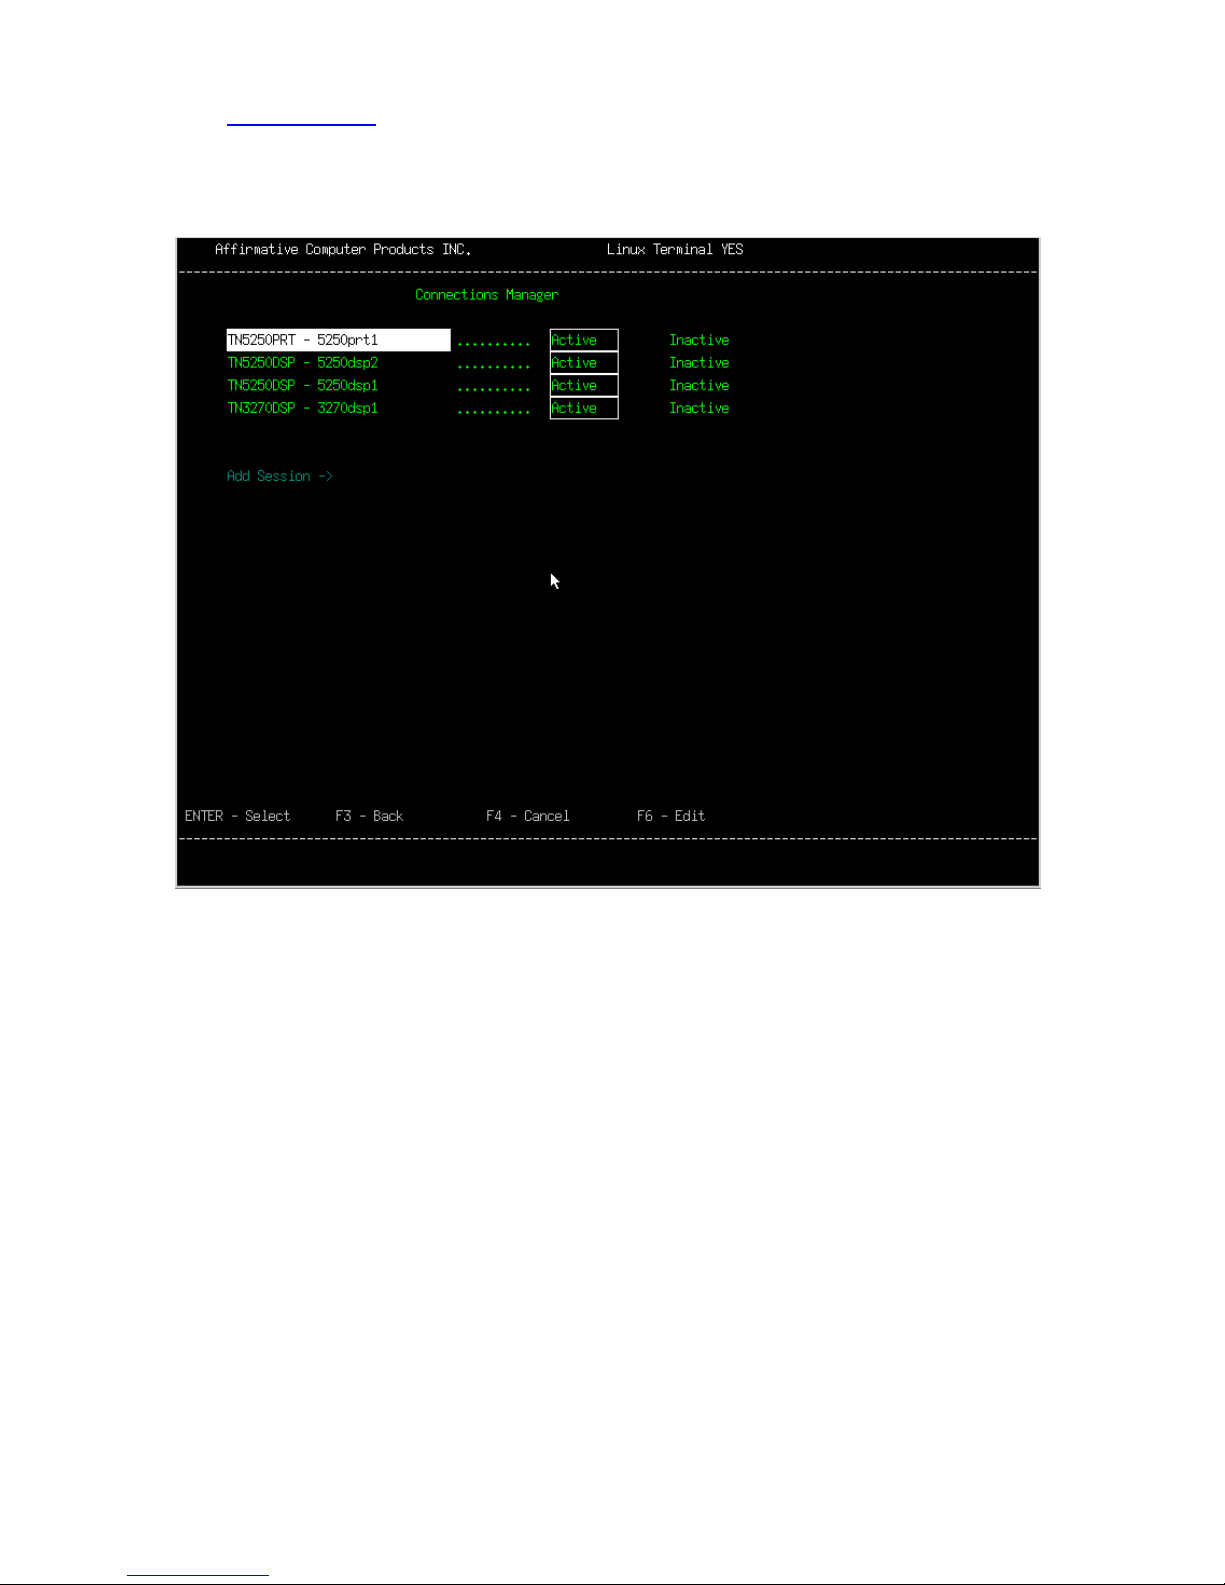
Connections Manager
Connections Manager Screen for TBT Viewing Mode
The Connections Manager screen is accessed from the Connections category of the Terminal
Properties screen. Sessions can be added, edited, and deleted from this screen. You can prevent a
session from being launched at bootup by marking it as Inactive in this screen.
Navigation
• In TBT viewing mode, you can get to the Terminal Properties screen by:
Pressing Ctrl+Alt+End, even from a blank screen.
o
o If you are using an Affirmative Computer Products 122-key keyboard and are in an active
session, you can press the SetUp key.
•
To get back to an active session from Terminal Properties, use the Esc key if no changes are to be
saved.
• To move among active emulator sessions:
Press Alt+PgUp for 101 keyboards.
o
o
Press Alt+PgDn for 122 keyboards.
o Press Ctrl+Alt+UpArrow/DownArrow for all keyboards.
16
Page 25
o Press RightAlt+Up/Down Arrow for all keyboards, if this sequence is enabled (see Editing
Terminal Properties|Desktop).
o Click on the appropriate button (I, II, III, or IV) in the tool bar.
• To show multiple sessions in a split-screen, activate them and then press Shift+Alt+F2. Each
session will get the same amount of space on the screen. To return to a single-session screen, move
the input cursor to that session and again press Shift+Alt+F2.
• If your display session is configured to hide the Menu and Tool bars, you can invoke the File menu
by pressing Alt. Then you can get to other menus by using the RightArrow and LeftArrow keys.
• To close a display session, go to the Sign On screen, open the File menu, and activate Close or
Close All. Also, if all your display sessions are at the Sign On screen, you can just power down.
Note: If you close a session, you cannot reopen it without rebooting the terminal.
WBT (Windows Based Terminal)
The Windows Based Terminal mode presents the kind of screens that you normally see in an
Affirmative Computer Products YEStation that uses the Windows CE operating system. More
configuration options are accessible in the WBT and Desktop modes than in the TBT mode, so if you
want to do some fine-tuning, you will have to switch to WBT or Desktop mode. Sessions are launched
from the Connections Manager, although they can be configured to Autostart at bootup. All sessions
can be viewed simultaneously in a split-screen mode, if desired; each session will get the same amount
of space on the screen.
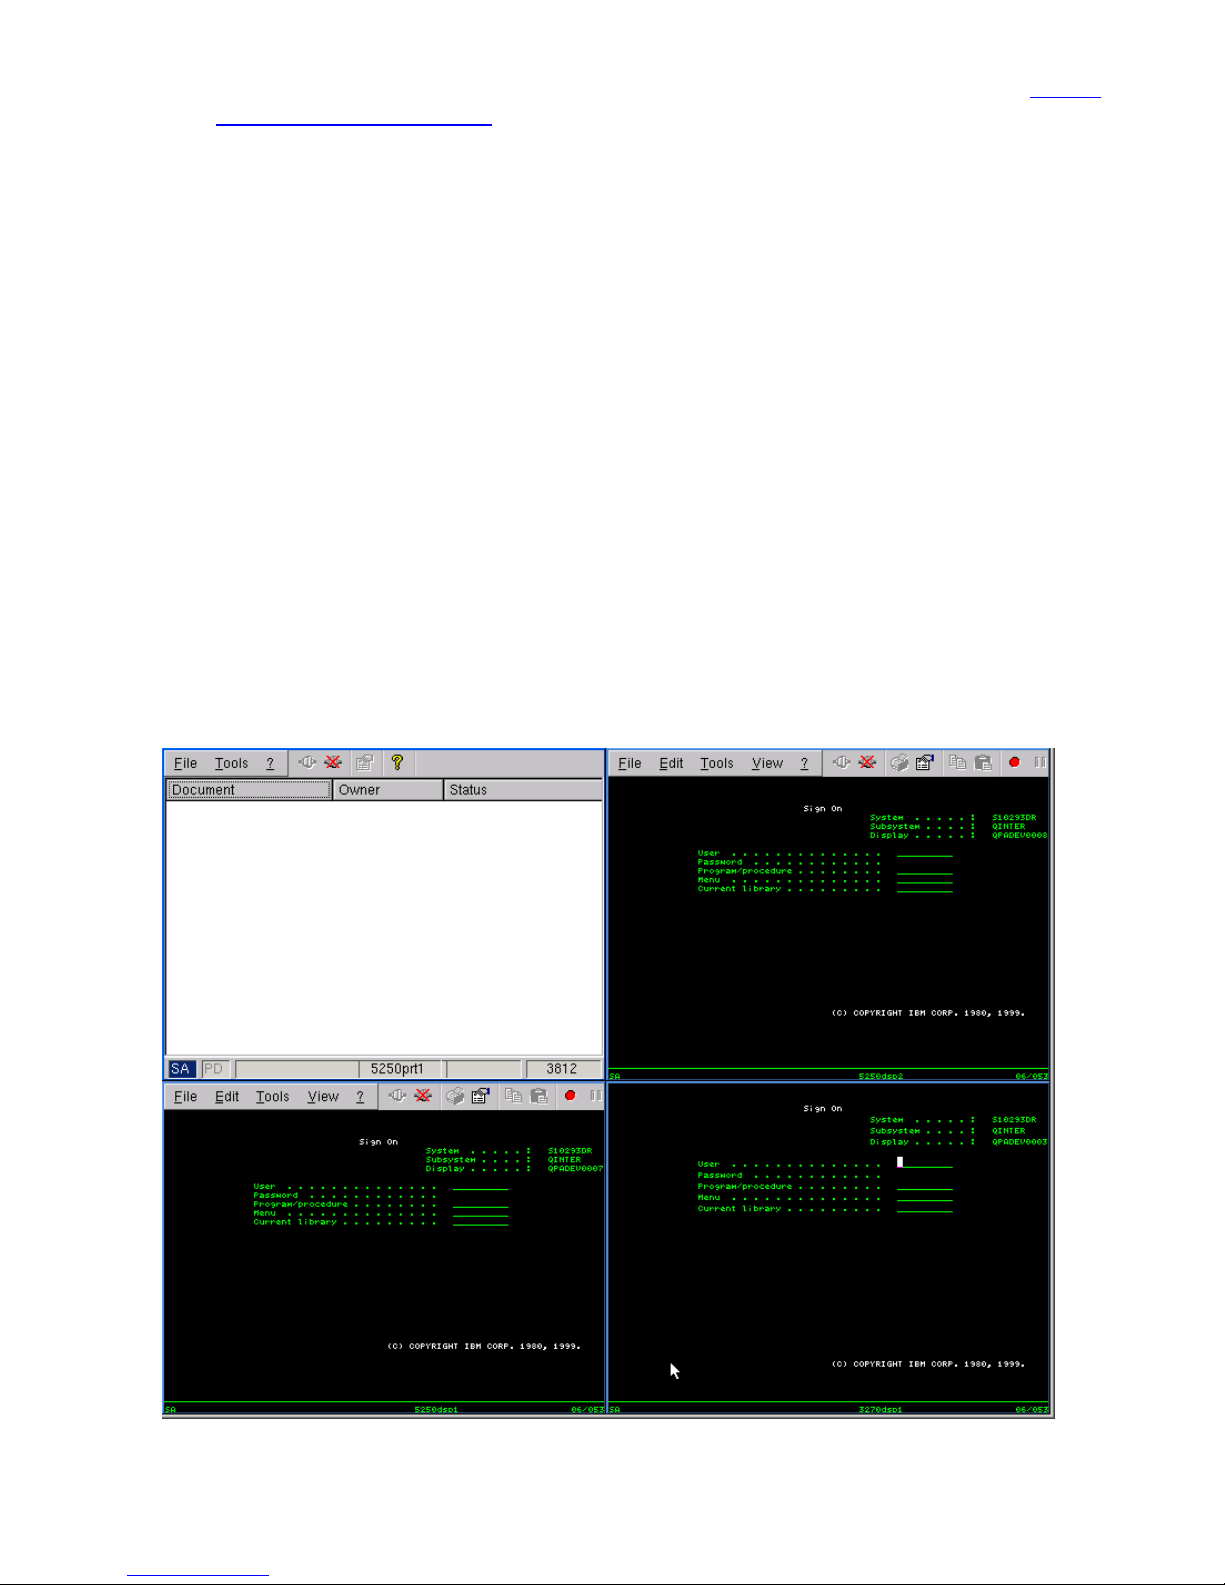
A split screen with four sessions is shown below.
Split Session Screen in WBT Viewing Mode
17
Page 26
Terminal Properties
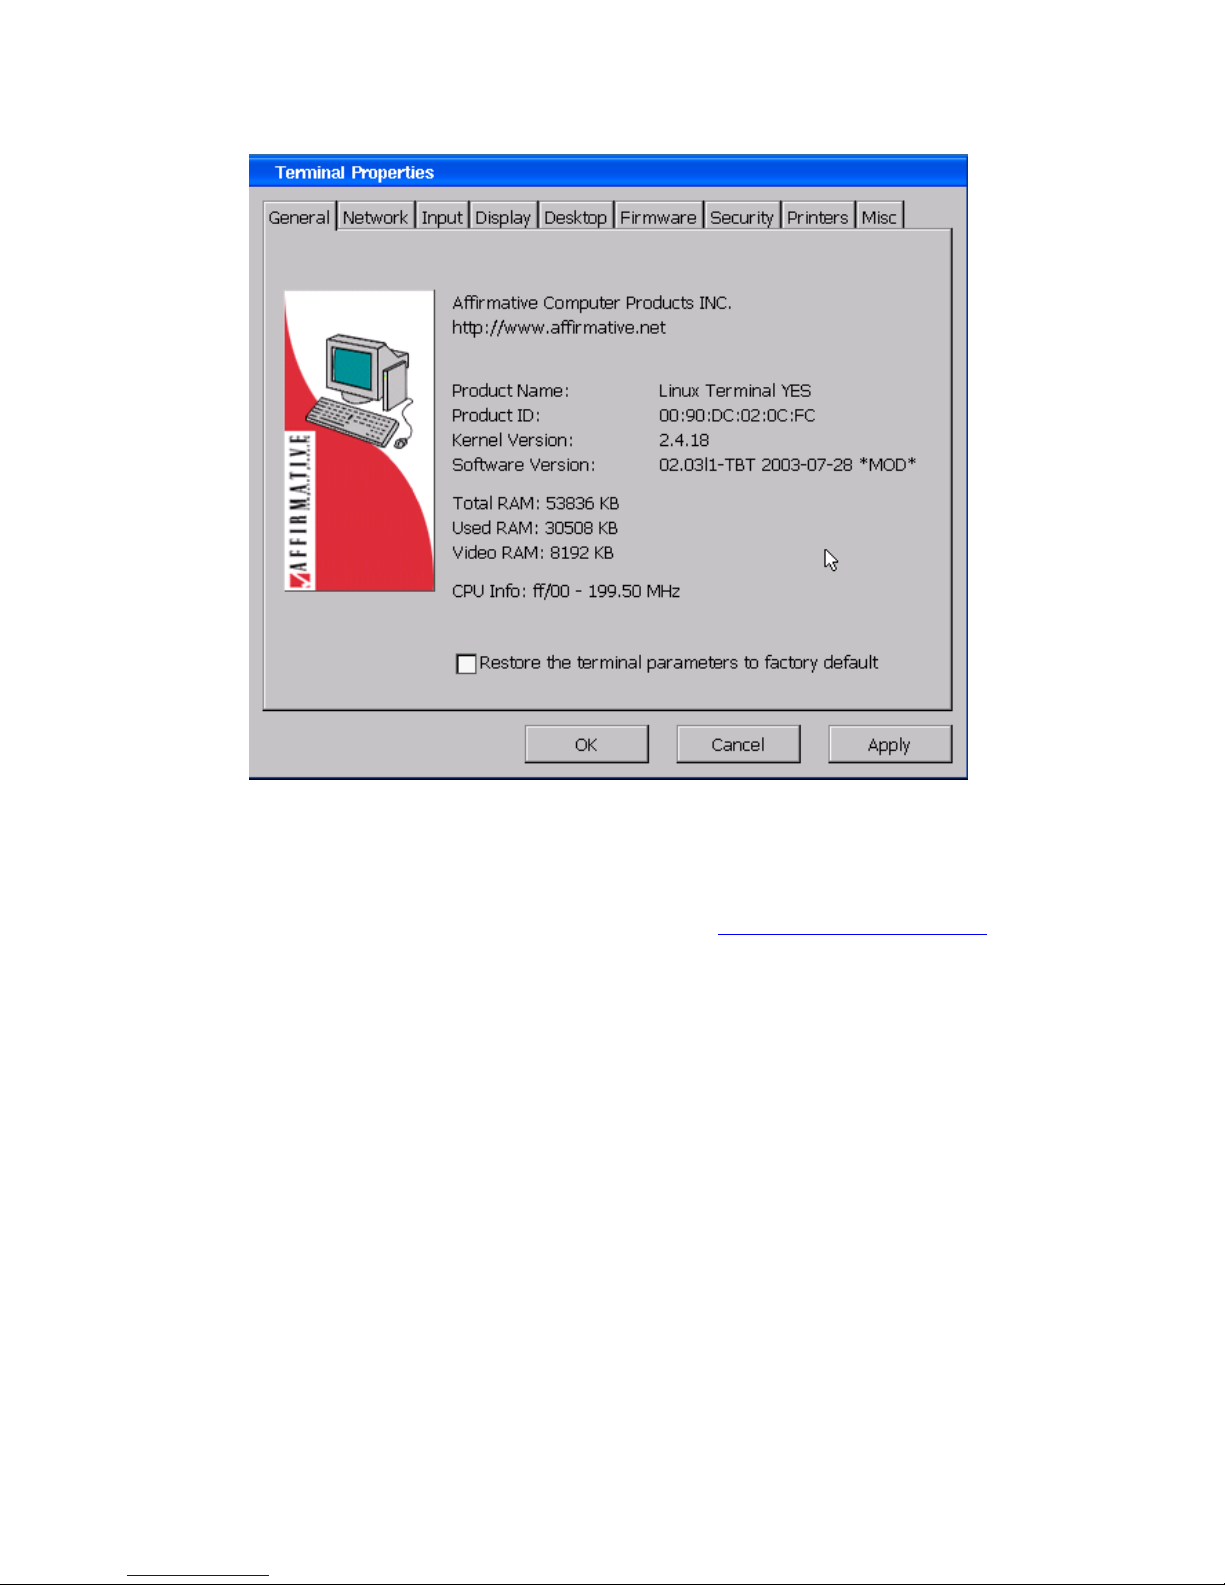
Terminal Properties Screen for WBT and Desktop Viewing Modes
The Terminal Properties screen is exactly the same in the WBT and Desktop viewing modes. Note that
there are more Properties tabs here than there are Category line items in the TBT Terminal Properties
sheet. More configuration parameters are available here than in TBT mode, so you may have to move
to WBT or Desktop mode to fine-tune your configuration. See Editing Terminal Properties
information.
for more
18
Page 27
Connections Manager
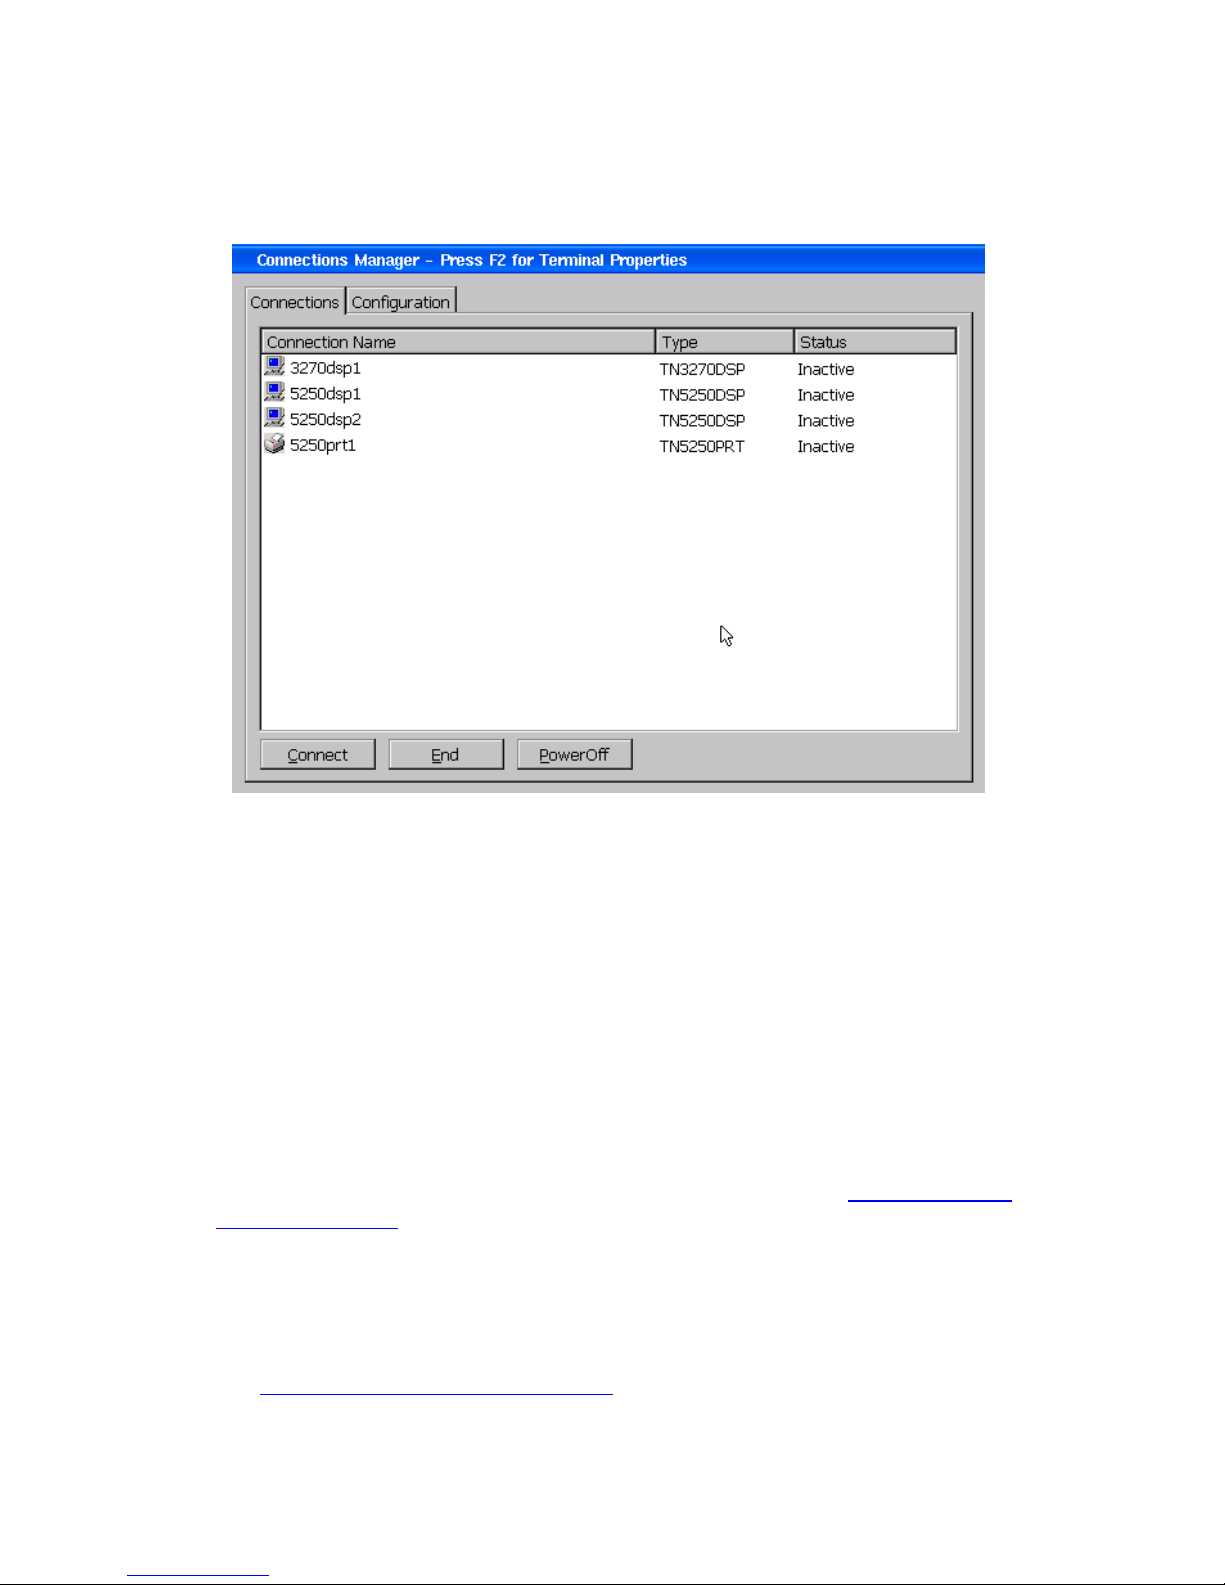
The Connections Manager screen in the WBT viewing mode has two tabs and provides more control
over launching and editing sessions than in TBT mode.
Connections Manager Screen for WBT Viewing Mode
Navigation
• To access Terminal Properties, press F2 while in the Connections Manager screen.
• If you wish to activate more than one session in WBT viewing mode, press Ctl+Alt+End to be
returned to the Connection Manager window. You can now select another session for activation.
All sessions can be activated at the same time. You can also set any or all sessions to start
automatically at boot-up.
• To move among active emulator sessions, use one of the following methods:
o Press Alt+PgUp for 101 keyboards or Alt+PgDn for 122 keyboards.
o Press Ctrl+Alt+UpArrow/DownArrow for all keyboards.
o Press RightAlt+Up/DownArrow for all keyboards, if enabled in Editing Terminal
Properties|Desktop.
o Click on the appropriate button (I, II, III, or IV) in the tool bar.
o Return to Connections Manager and select another session.
o Move your mouse cursor to a new session if you are showing multiple sessions on the
screen.
Note: The first two hot key methods listed above are only valid if the default WBT is selected for
HotKeys in Editing Terminal Properties|Desktop
.
19
Page 28
• To show multiple sessions in a split-screen, activate them and then press Shift+Alt+F2. Each
session will get the same amount of space on the screen. To return to a single-session screen, move
the input cursor to that session and again press Shift+Alt+F2.
• If your display session is configured to hide the Menu and Tool bars, you can invoke the File menu
by pressing Alt. Then you can get to other menus by using the RightArrow, LeftArrow, and Tab
keys.
• To close a display session, go to the Sign On screen, open the File menu, and activate Close or
Close All. Also, if all your display sessions are at the Sign On screen, you can just power down.
Desktop
The Desktop viewing mode presents a desktop screen with a Taskbar and a Start button, very similar to
a standard Windows desktop. The same configuration options are available here as in WBT mode.
Sessions are launched from the Start menu or from Connections Manager, although they can be
configured to Autostart at bootup. In Desktop mode, you can move, size, and show multiple sessions
on the screen in normal Windows fashion.
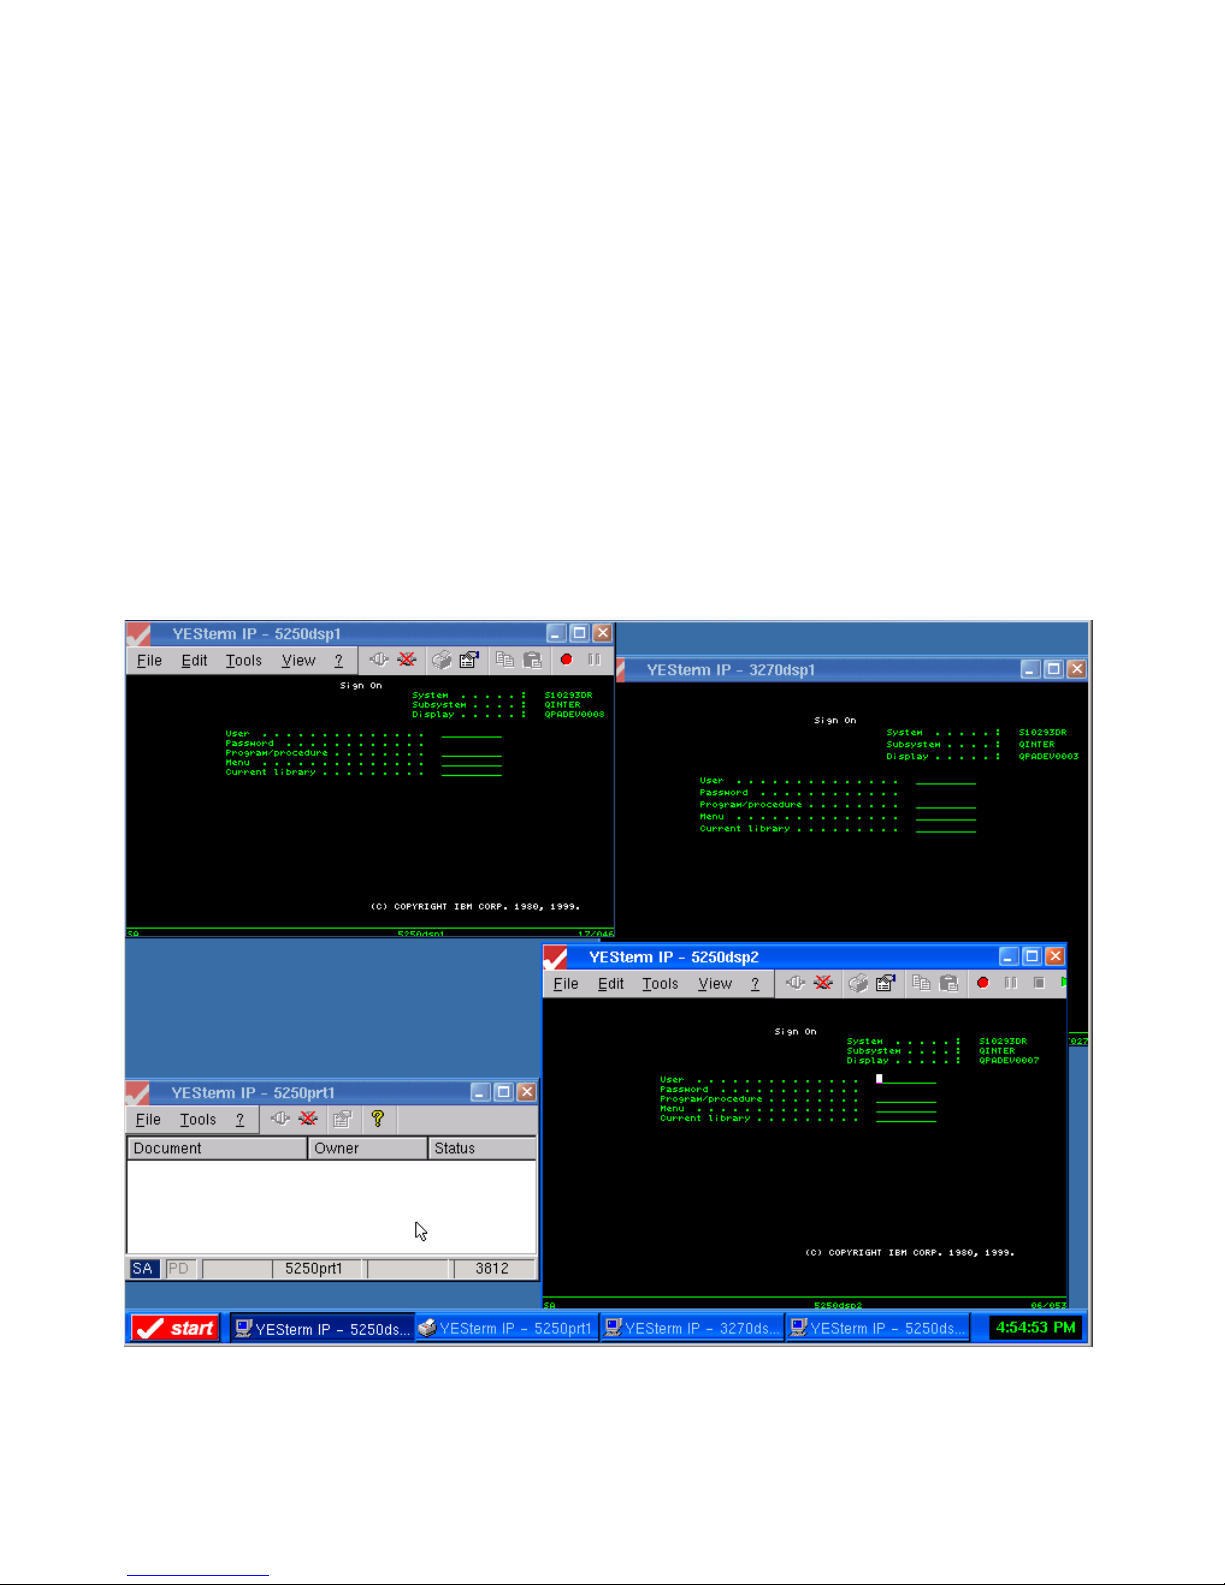
An example of a Desktop screen with four sessions is shown below.
Four-Session Screen in Desktop Viewing Mode
Sessions can be minimized, maximized, or midsized just as on a Windows desktop, and placeholders
appear in the Taskbar.
20
Page 29
Terminal Properties
The Terminal Properties screen is exactly the same in Desktop viewing mode as in WBT viewing
mode.
Connections Manager
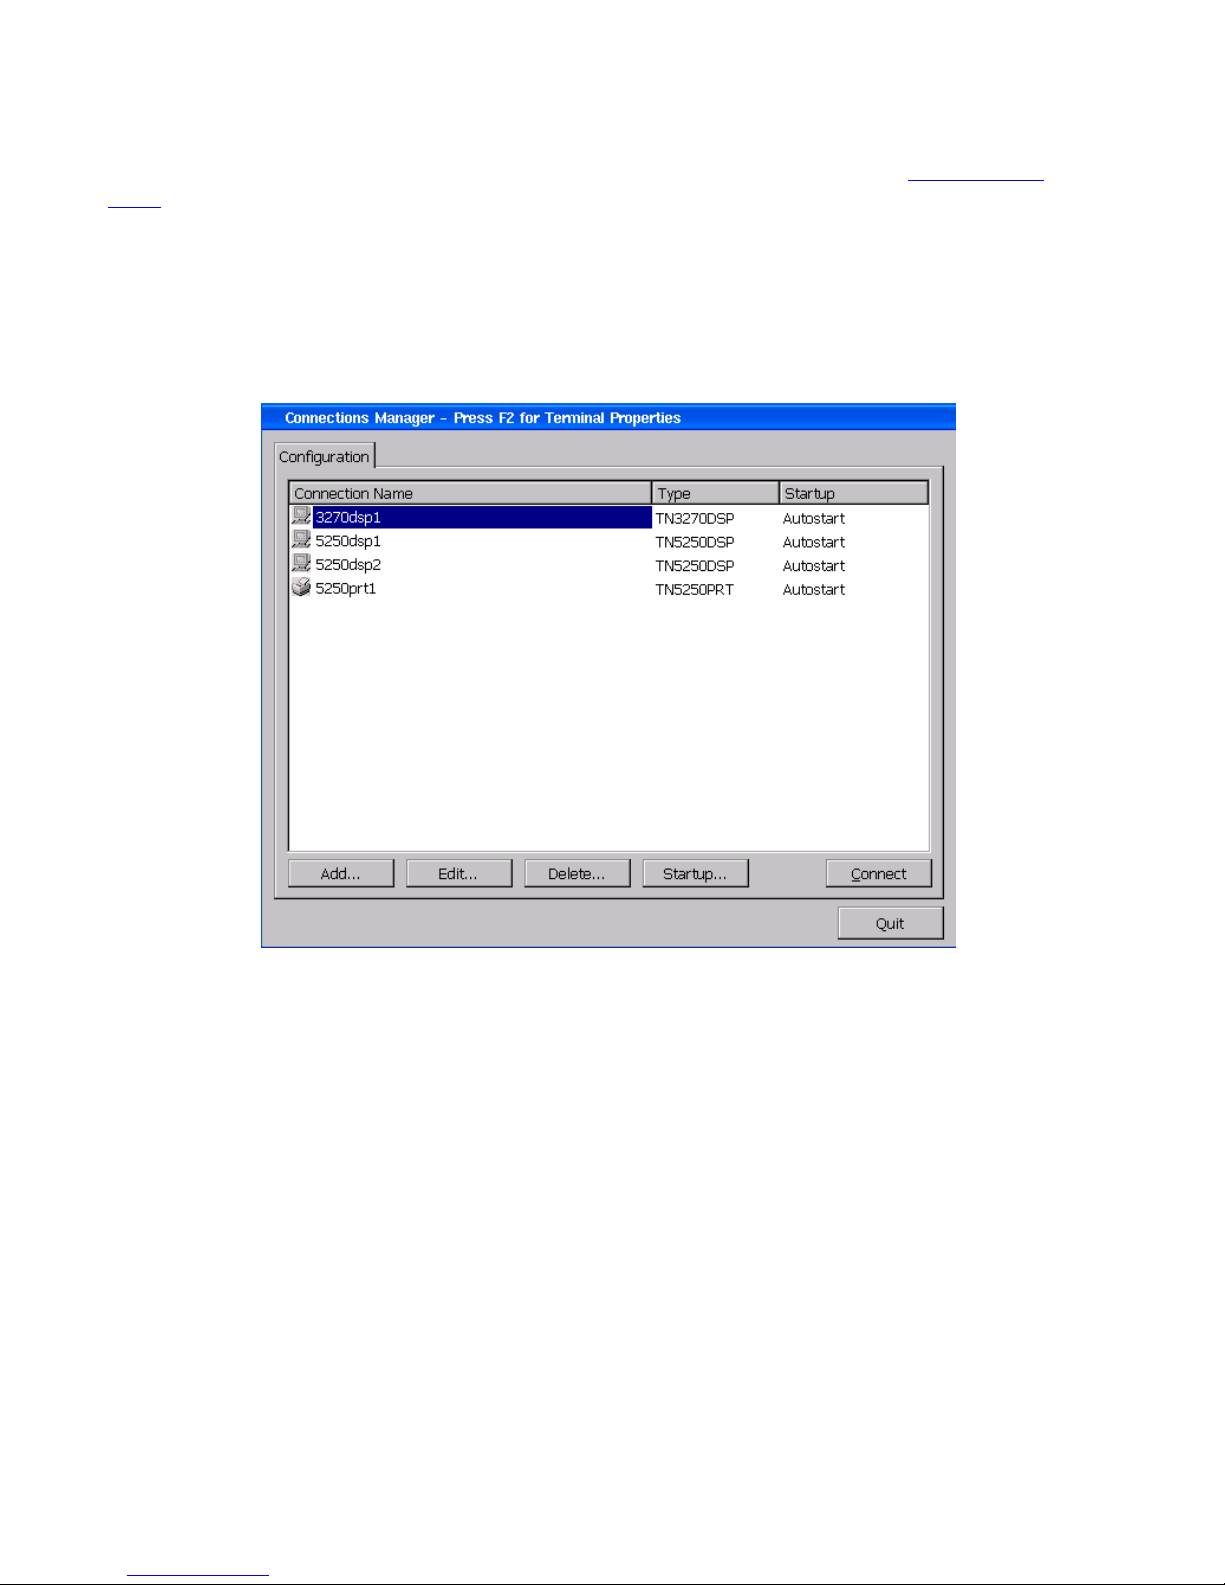
The Connections Manager screen has only one tab, Configuration, in the Desktop viewing mode.
However, an extra button, Connect, is added to allow launching from this tab.
Connections Manager Screen in Desktop Viewing Mode
Navigation
• To open the Start menu, use either of the following methods:
o Click on the Start button in the Taskbar.
o Right-click on any unused portion of the Desktop.
• To access Terminal Properties, use one of the following methods:
o Press F2 while in the Connections Manager screen.
o Select it from the Start menu.
o If you are using an Affirmative Computer Products 122-key keyboard and are in an active
session, press the SetUp key
• To open the Connections Manager screen, use either of the following methods:
o Select it from the Start menu.
o Press Ctrl+Alt+End at any time.
21
Page 30

• To open non-Autostart sessions, use either of the following methods:
o In the Connections Manager screen, highlight the session name and click on Connect.
o Select it from the Start menu.
• If your display session is configured to hide the Menu and Tool bars, you can invoke the File menu
by pressing Alt. Then you can get to other menus by using the RightArrow and LeftArrow keys.
• To close a display session, go to the Sign On screen, open the File menu, and activate Close or
Close All. If all your display sessions are at the Sign On screen, you can just power down.
• To move among active emulator sessions, use one of the following methods:
o Press Alt+PgUp for 101 keyboards or Alt+PgDn for 122 keyboards.
o Press Ctrl+Alt+UpArrow/DownArrow for all keyboards.
o Press RightAlt+Up/DownArrow for all keyboards, if enabled in Editing Terminal
Properties|Desktop.
o Click on the appropriate button (I, II, III, or IV) in the tool bar.
o Return to Connections Manager and select another session.
o Move your mouse cursor to a new session if you are showing multiple sessions on the
screen.
o Click on the placeholder in the Taskbar.
Note: The first two hot key methods listed above are only valid if the default WBT is selected in
HotKeys in Editing Terminal Properties|Desktop
.
• In Desktop mode, you can size and show multiple sessions on the screen in normal Windows
fashion.
• To power down or reboot, select Shutdown from the Start menu, and then select Shutdown or
Reboot.
Return to Table of Contents
22
Page 31

Creating an Emulation Connection
Note: The terms “connection” and “session” are used interchangeably in this manual.
The YESterm IP emulators are powerful Telnet emulators that provide users with the capability to
connect to an AS/400, iSeries, or IBM mainframe via the TCP/IP protocol. They provide enhanced
emulation functions for a wide range of IBM terminals and "true" IBM 3812 or 3287 Printer emulation
with the support of all the enhanced features normally available only on very expensive printer
interfaces. The 2209 terminal can easily support up to four concurrent TCP/IP connections with
identical or unique hosts. In addition, YESterm/IP TN5250E supports the "Enhanced Display AutoSignon and Password Encryption" allowing a secure connection to the AS/400, with no need of any
SSL option. Basic session configuration is made simple by a Wizard application that guides the user
during the configuration process.
Significant characteristics of YESterm IP display sessions are:
• IBM emulations supported: 3180-2, 3196, 3278/9, 3477-FG, 3477-FC, 5251, 5291.
• Numerous resident national keyboard templates and Code Pages.
• Enhanced keyboard mapping and customization, including macro assignment.
• EURO (€) symbol supported.
• Enhanced copy and paste options.
• Programmable Keypad.
• Attributes editing.
• Enhanced customizable Hot Spot feature.
• Enhanced macro Record/Playback feature.
• Supports "Enhanced Display Auto-Signon and Password Encryption" allowing a secure connection
to the AS/400.
• Choice of Windows or 5250 Text presentation modes.
Significant characteristics of YESterm IP printer sessions are
• IBM Emulation supported: 3287, 3812.
• Support for continuous forms, multi drawers, envelope, manual feeders, simplex/duplex, auto page
orientation, and COR (Computer Output Reduction).
• Supports CPI, LPI Override and LQ, NLQ.
• Supports Host Transform Feature (TN5250e only).
• Supports Hex Pass-Through (HPT) feature, with customizable leading and ending sequences and
support of "non-printable characters".
• Supports EURO symbol (€).
Connections are created in Connections Manager, but the Add path is somewhat different in TBT and
non-TBT viewing modes. Initially, there will be no sessions configured in the terminal, so you will
have to add at least one in order to get any use out of the terminal.
23
Page 32
TBT Viewing Mode
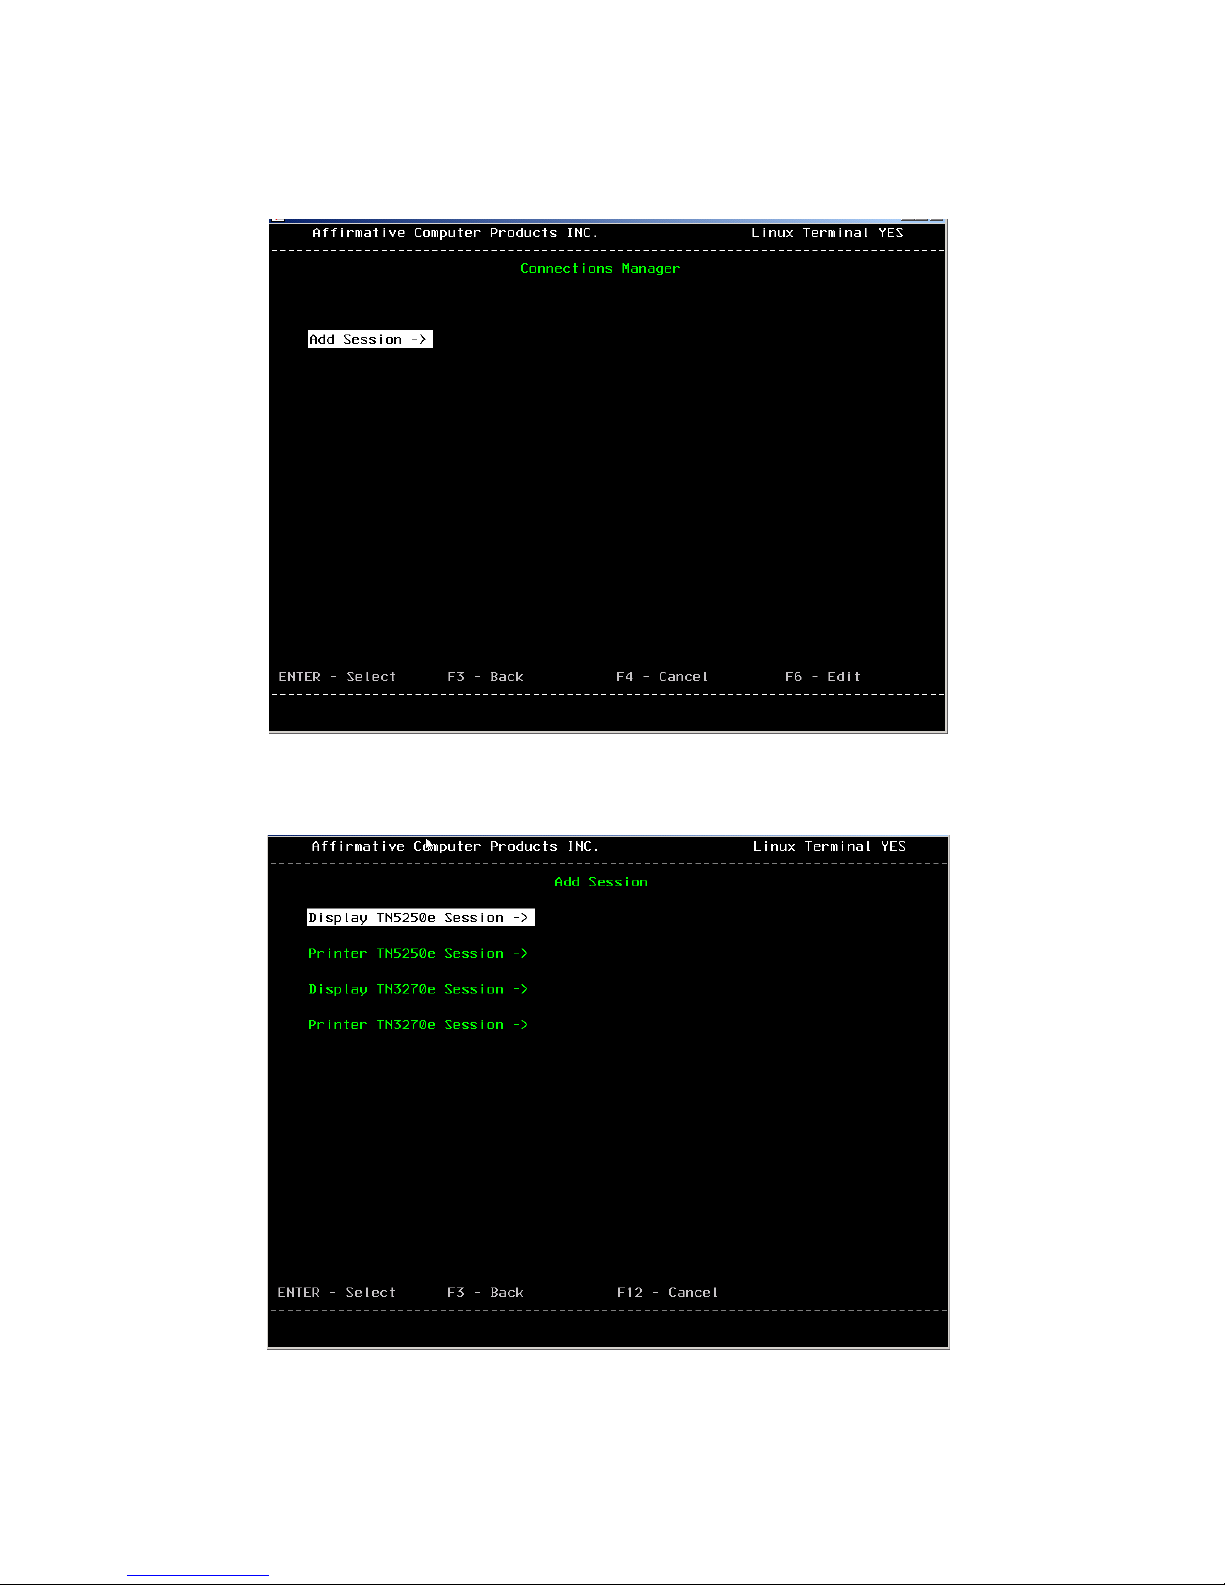
Select the Connections category in Terminal Properties to display the Connections Manager property
sheet. In this sheet, you can add and edit emulation sessions.
Connections Manager Property Sheet for TBT Viewing Mode
Activate Add Session to see the session menu.
Select the desired menu type to begin the appropriate Add Wizard. In each wizard, press F3 to advance
to the next screen, or F12 to cancel the add.
Add Session Menu
24
Page 33
Display Sessions
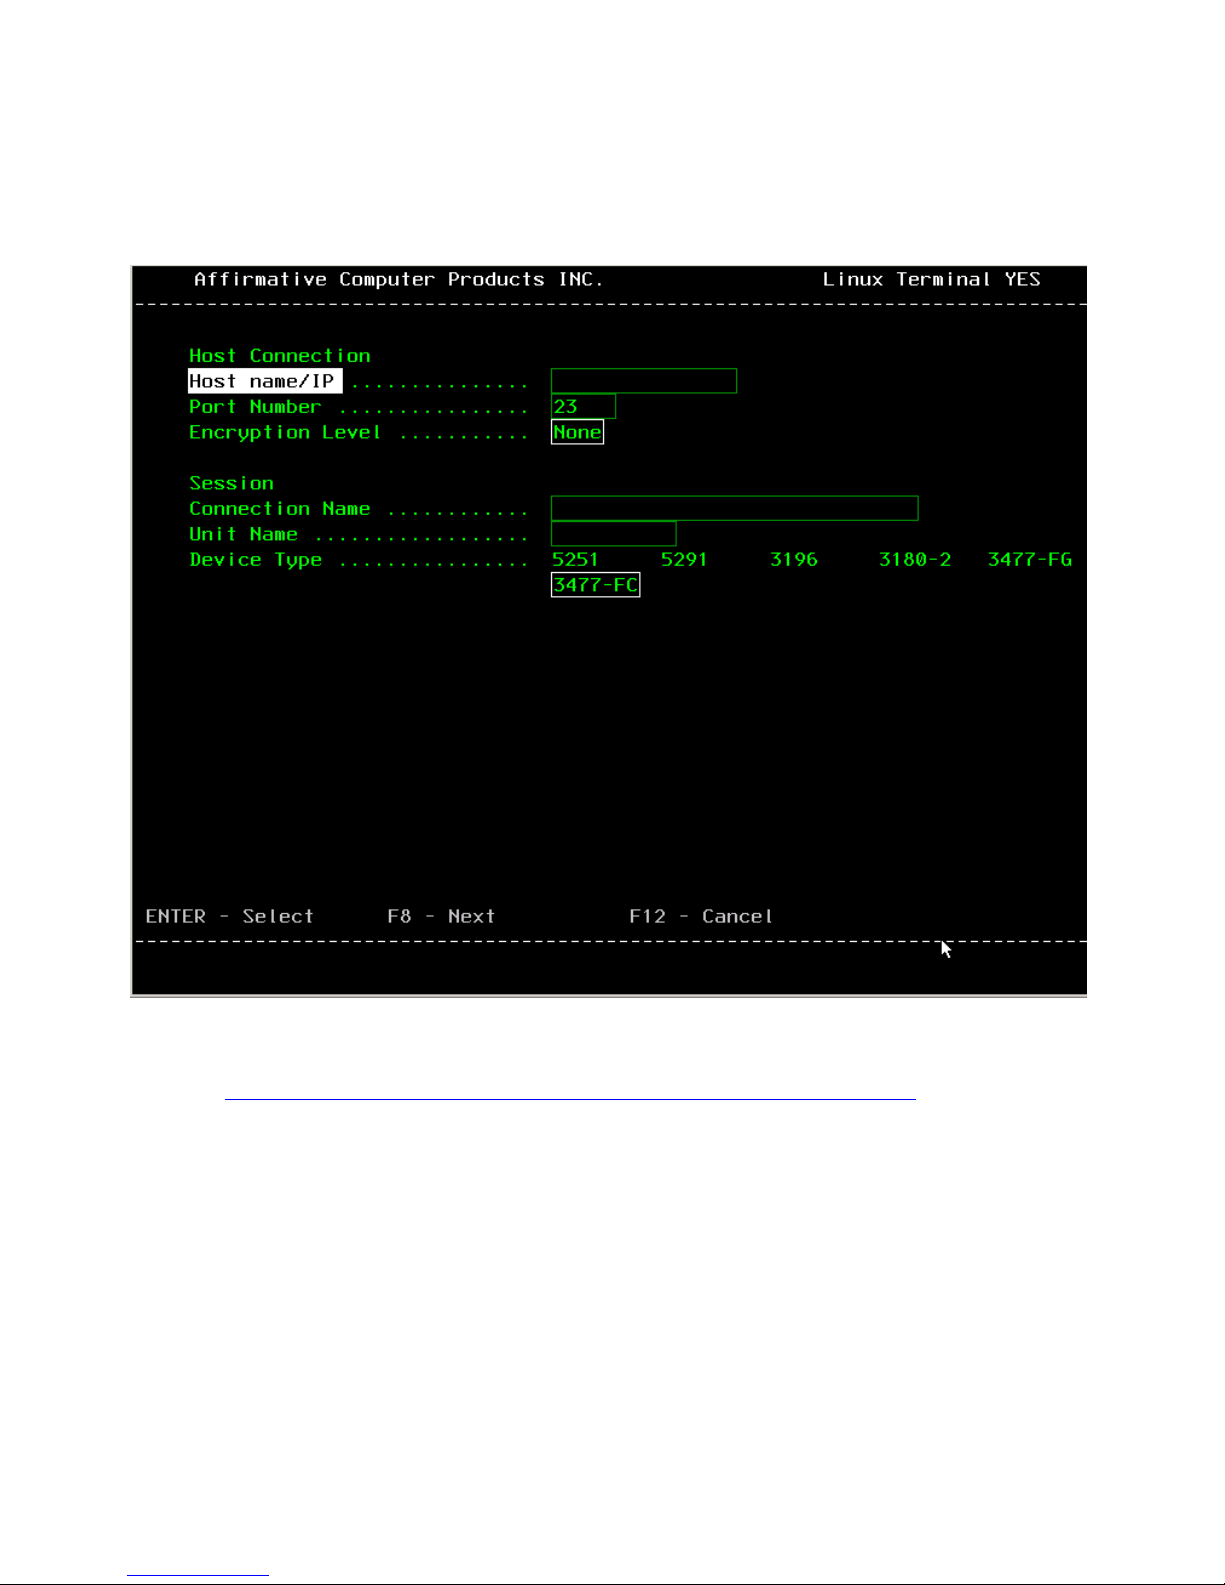
Use TN5250e protocol to connect to AS/400 or iSeries hosts. Use TN3270e protocol to connect to
IBM mainframes. You will be led through two configuration screens.
1.
• Host Name/IP Address. If you have a local DNS or WINS server or are using a hosts table
(see Editing Terminal Properties|Network|Advanced Parameters|Hosts Table), you can type in
the host network name. Otherwise, type in the IP address of the host.
• Port Number. Use the default of 23 unless directed to do otherwise by your system
administrator.
• Encryption Level. You have no choice here.
• Connection Name. This is the friendly name that will appear in the Connection Manager
screen and at the bottom of your session screens and in the Taskbar (in Desktop Mode).
• Unit Name (aka Device Name). If you are using named sessions, enter the session name here
• Device Type. The default 3477-FC works well for TN5250e emulation, unless you have
special needs. If you are adding a TN3270e session, you will see a choice of 3278/9 terminal
types here.
Display Session Add Wizard Screen #1
25
Page 34
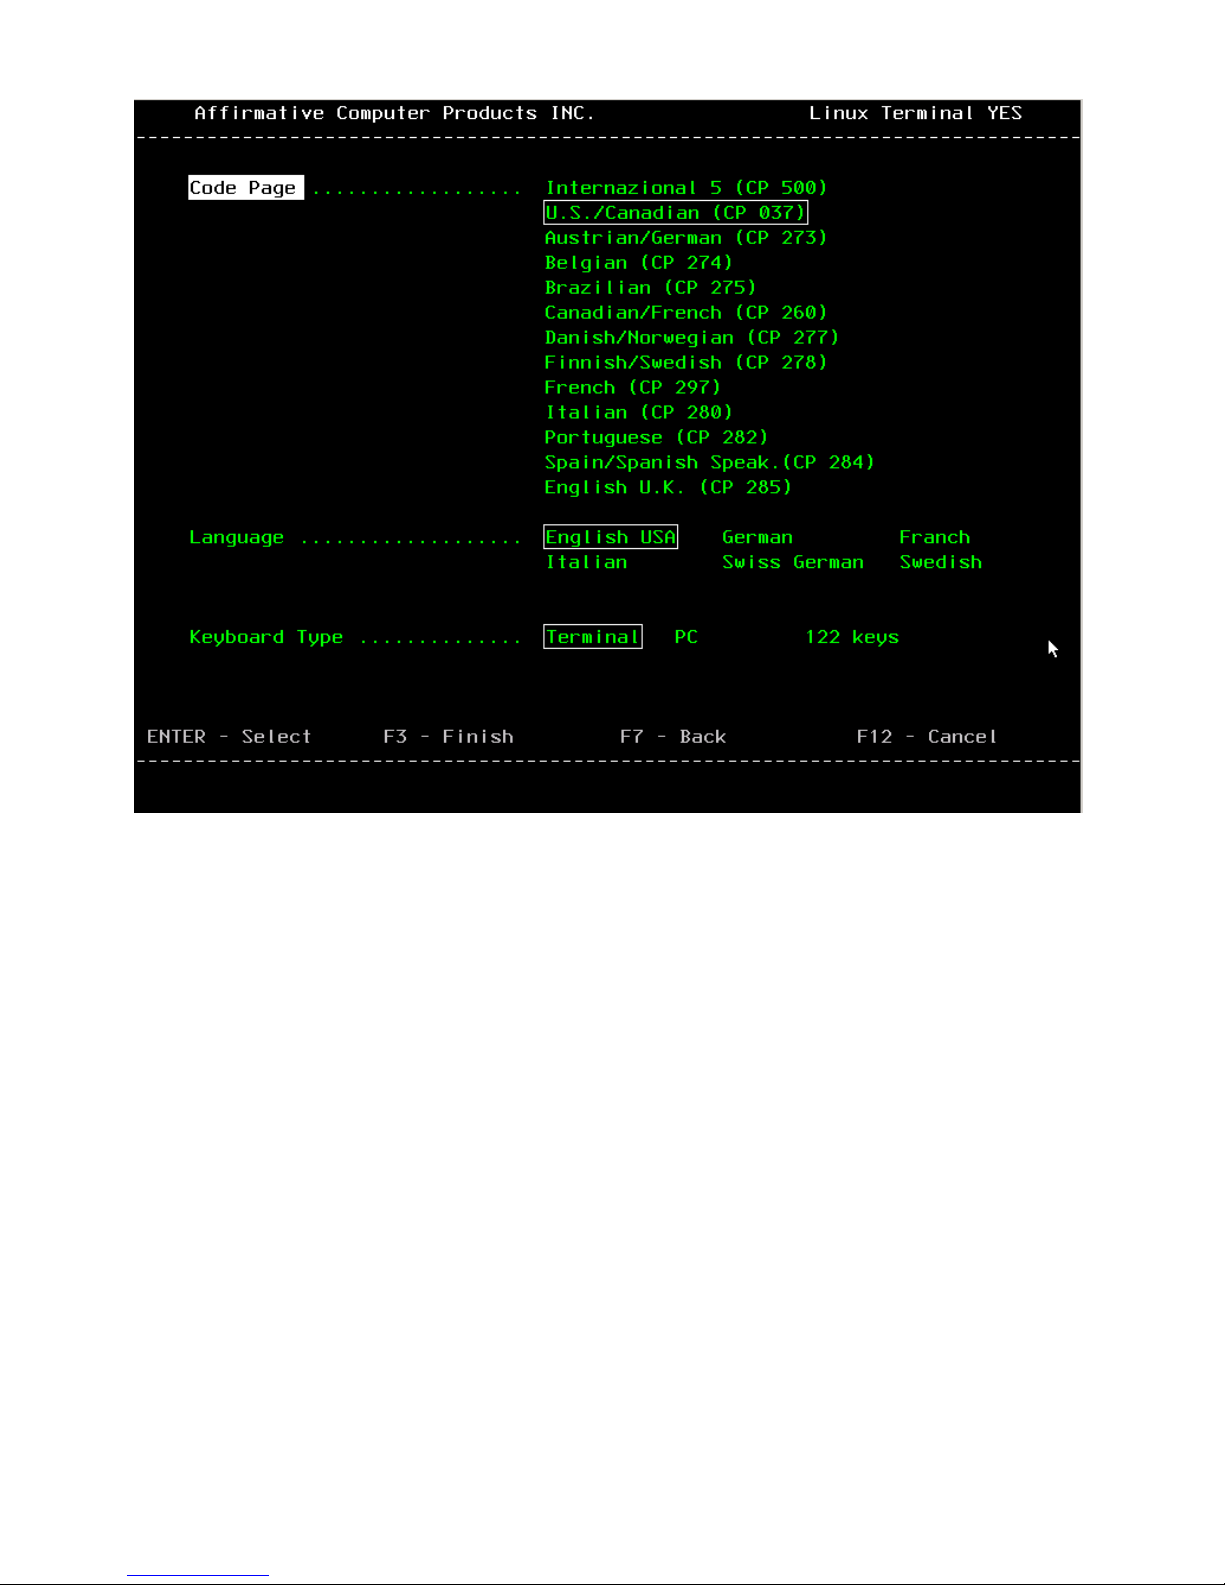
2.
Display Session Add Wizard Screen #2
• Code Page. Choose the applicable country from the list.
• Language. Choose a keyboard language.
• Keyboard Type. Choose Terminal if you are using the Affirmative Computer Products
1010T, 1019T, 1023T, or 1027T 101-key keyboard; choose 122 keys if you are using the
Affirmative Computer Products 1220T, 1223T, or 1227T 122-key keyboard; otherwise, choose
PC.
This concludes the configuration parameters covered by the wizard. However, you can customize
many more parameters in each display session by using a non-TBT viewing mode and editing from the
Configure tab of Connection Manager
26
Page 35
Printer Sessions
You can have multiple local printers, but you must create a printer session for each one. If you want to
create a session for extended local Print Screens
have to edit it in non-TBT mode since the default in TBT mode is for standard host printing..
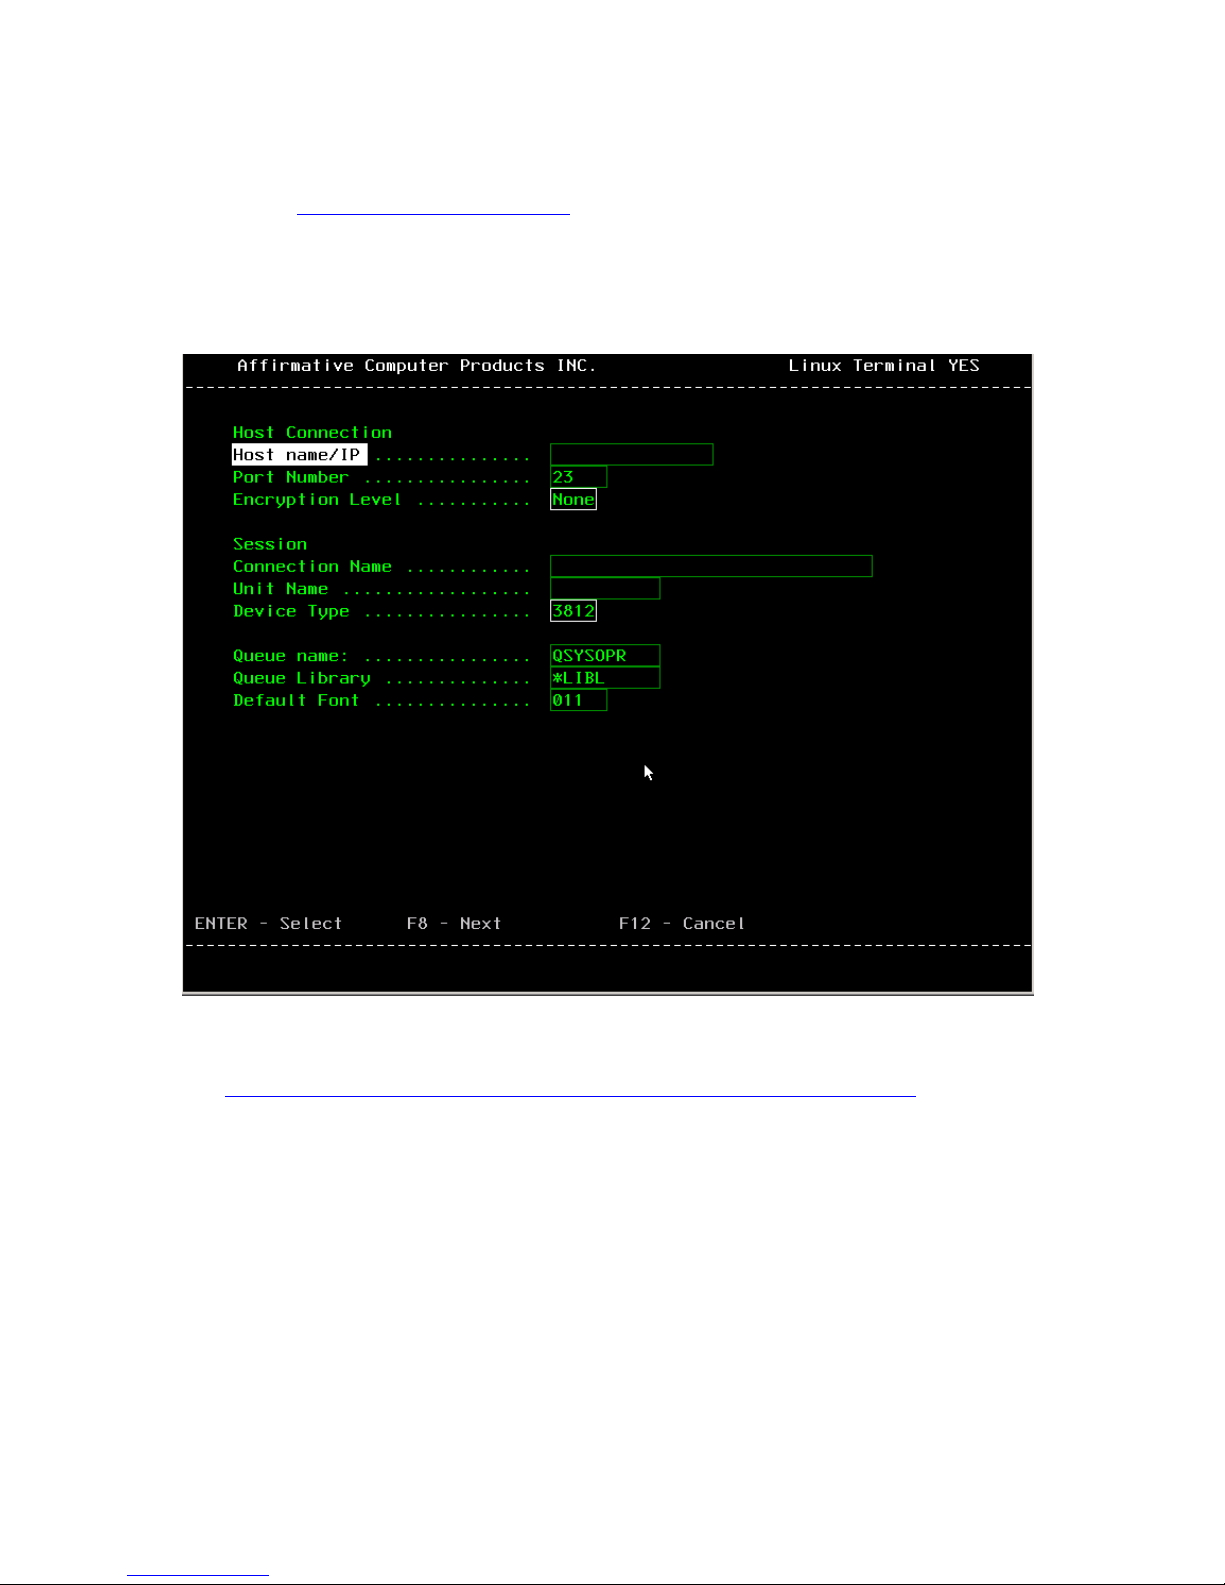
When you add a printer session, you will be led through three configuration screens.
1.
(TN5250e only), you can create it here, but you will
• Host Name/IP Address. If you have a local DNS or WINS server or are using a hosts table
(see Editing Terminal Properties|Network|Advanced Parameters|Hosts Table
the host network name. Otherwise, type in the IP address of the host. If you are creating this
session for extended local print screens, an IP address is irrelevant, but you must enter at least
one character to satisfy the wizard.
• Port Number. Use the default of 23 unless directed otherwise by your system administrator.
• Encryption Level. You have no choice here.
• Connection Name. This is the friendly name that will appear in the Connections Manager
screen and at the bottom of your session screens and on the Taskbar (in Desktop mode).
• Unit Name (aka Device Name). If you are using named sessions, enter the session name here.
• Device Type. Only 3287 (3270) or 3812 (5250) is available for TCP/IP devices.
• Queue Name/Queue Library/Default Port. These are host parameters and should be given to
you by your host administrator. If this session is for extended local print screens, these
parameters are ignored.
Printer Session Add Wizard Screen #1
), you can type in
27
Page 36
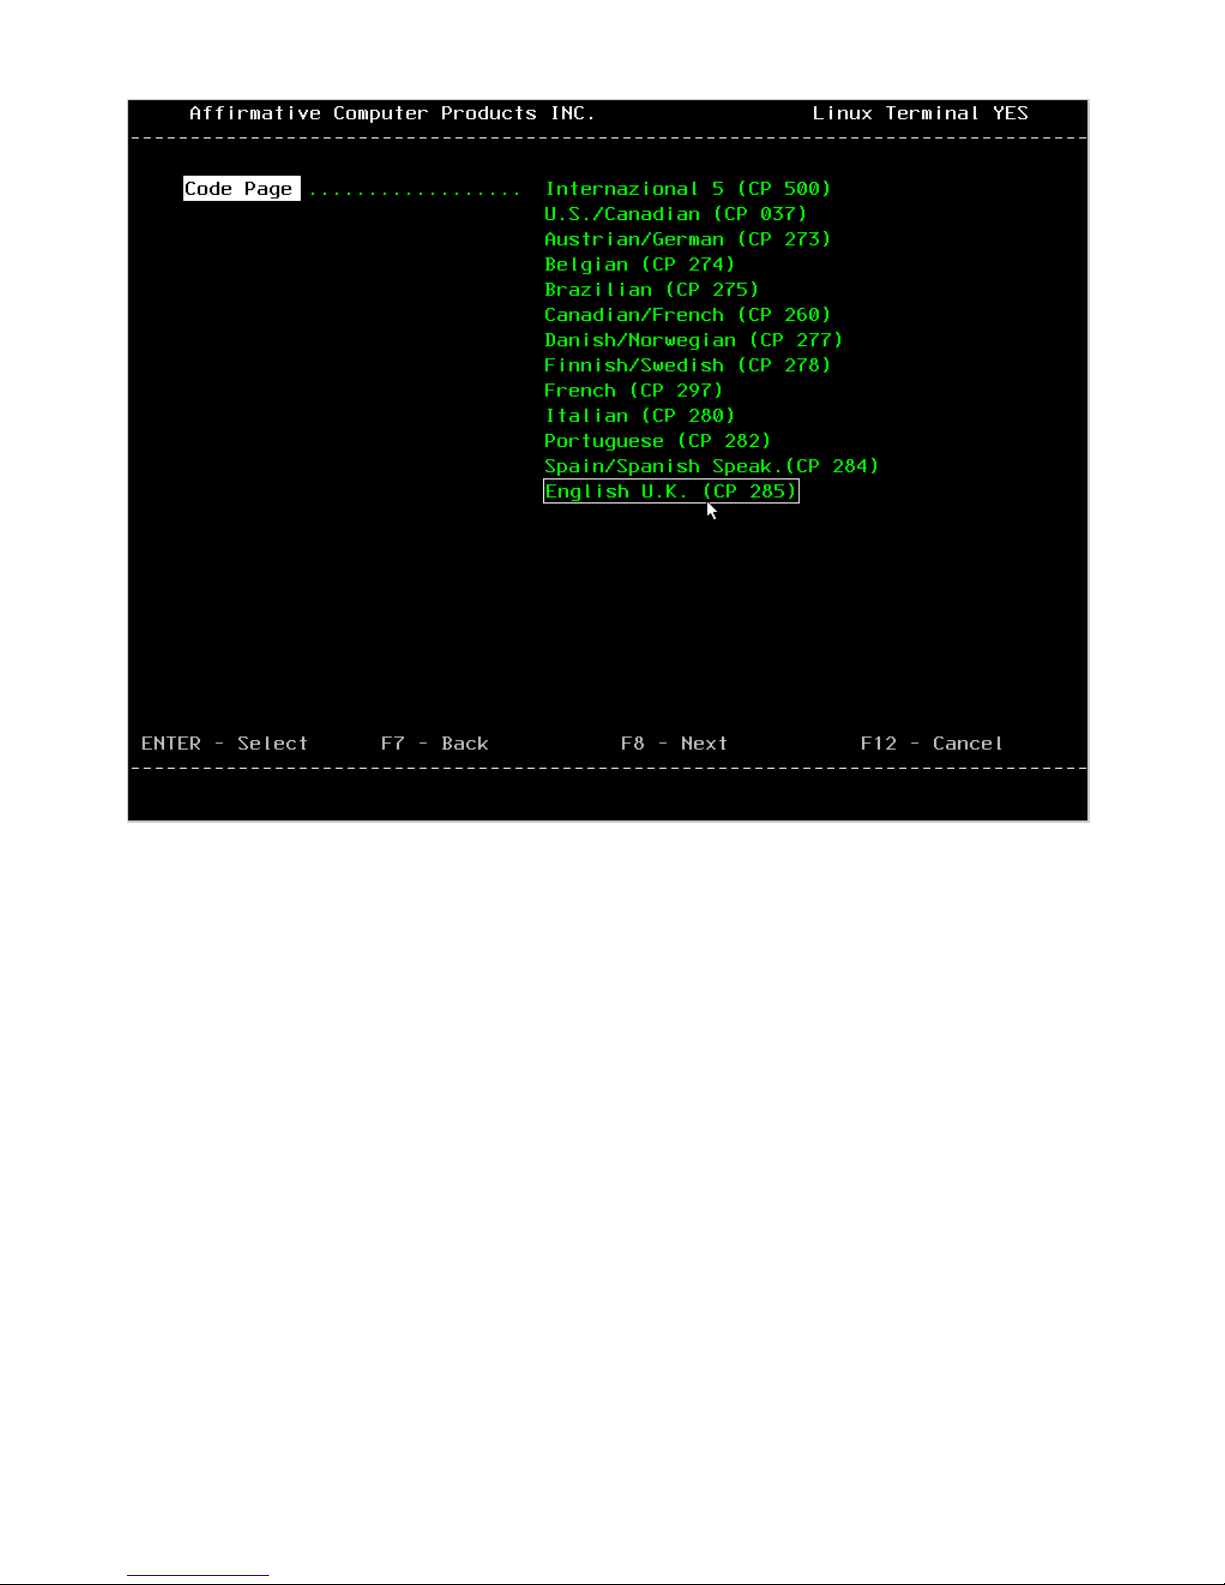
2.
Printer Session Add Wizard Screen #2
• Host Code Page. Choose the applicable country from the list.
28
Page 37
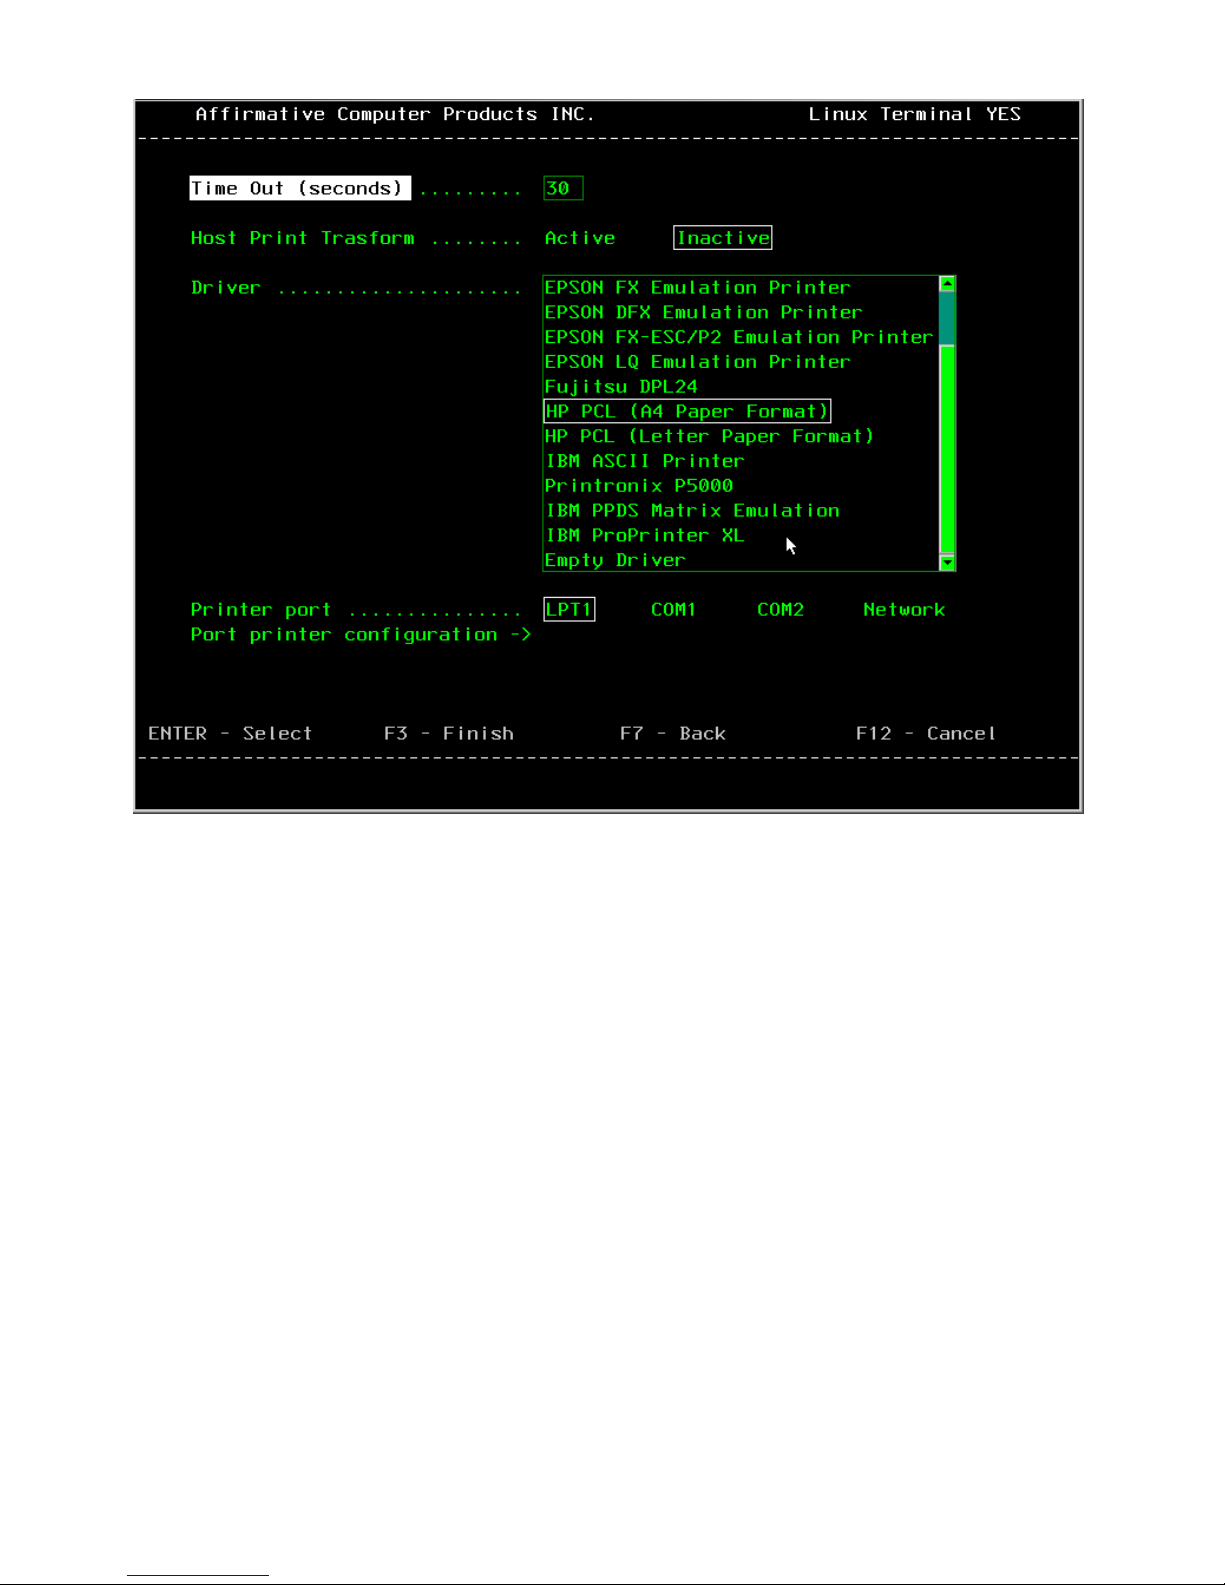
3.
Printer Session Add Wizard Screen #3
• Time Out. This parameter defines a timer (in seconds) that starts to count down every time,
during a printing job, that the host system stops sending data. If no more data are received
within the timeout value selected, the printer session will assume that the print job is finished,
and a Form Feed command is sent to the printer.
• Host Print Transform (TN5250e only). When Host Print Transform is enabled, the host does
the EBCDIC-to-ASCII conversion of the print stream, and the local Passthrough Driver is not
used.
• Driver. If you are doing extended local Print Screens, or if you are not using the AS/400 Host
Print Transform, choose a driver here that is compatible with the local-attached or LAN printer.
If you can’t find one in the list, try Empty Driver.
• Printer port. Choose LPT1 or Network, since the 2209 has no COM ports.
• Port printer configuration. After you choose a printer port, you need to configure it.
• LPT1. Click on Port printer configuration to configure whether or not to reset the printer at
the start of every print job.
• Network. Click on Port printer configuration to see the Network Printer configuration
screen.
29
Page 38
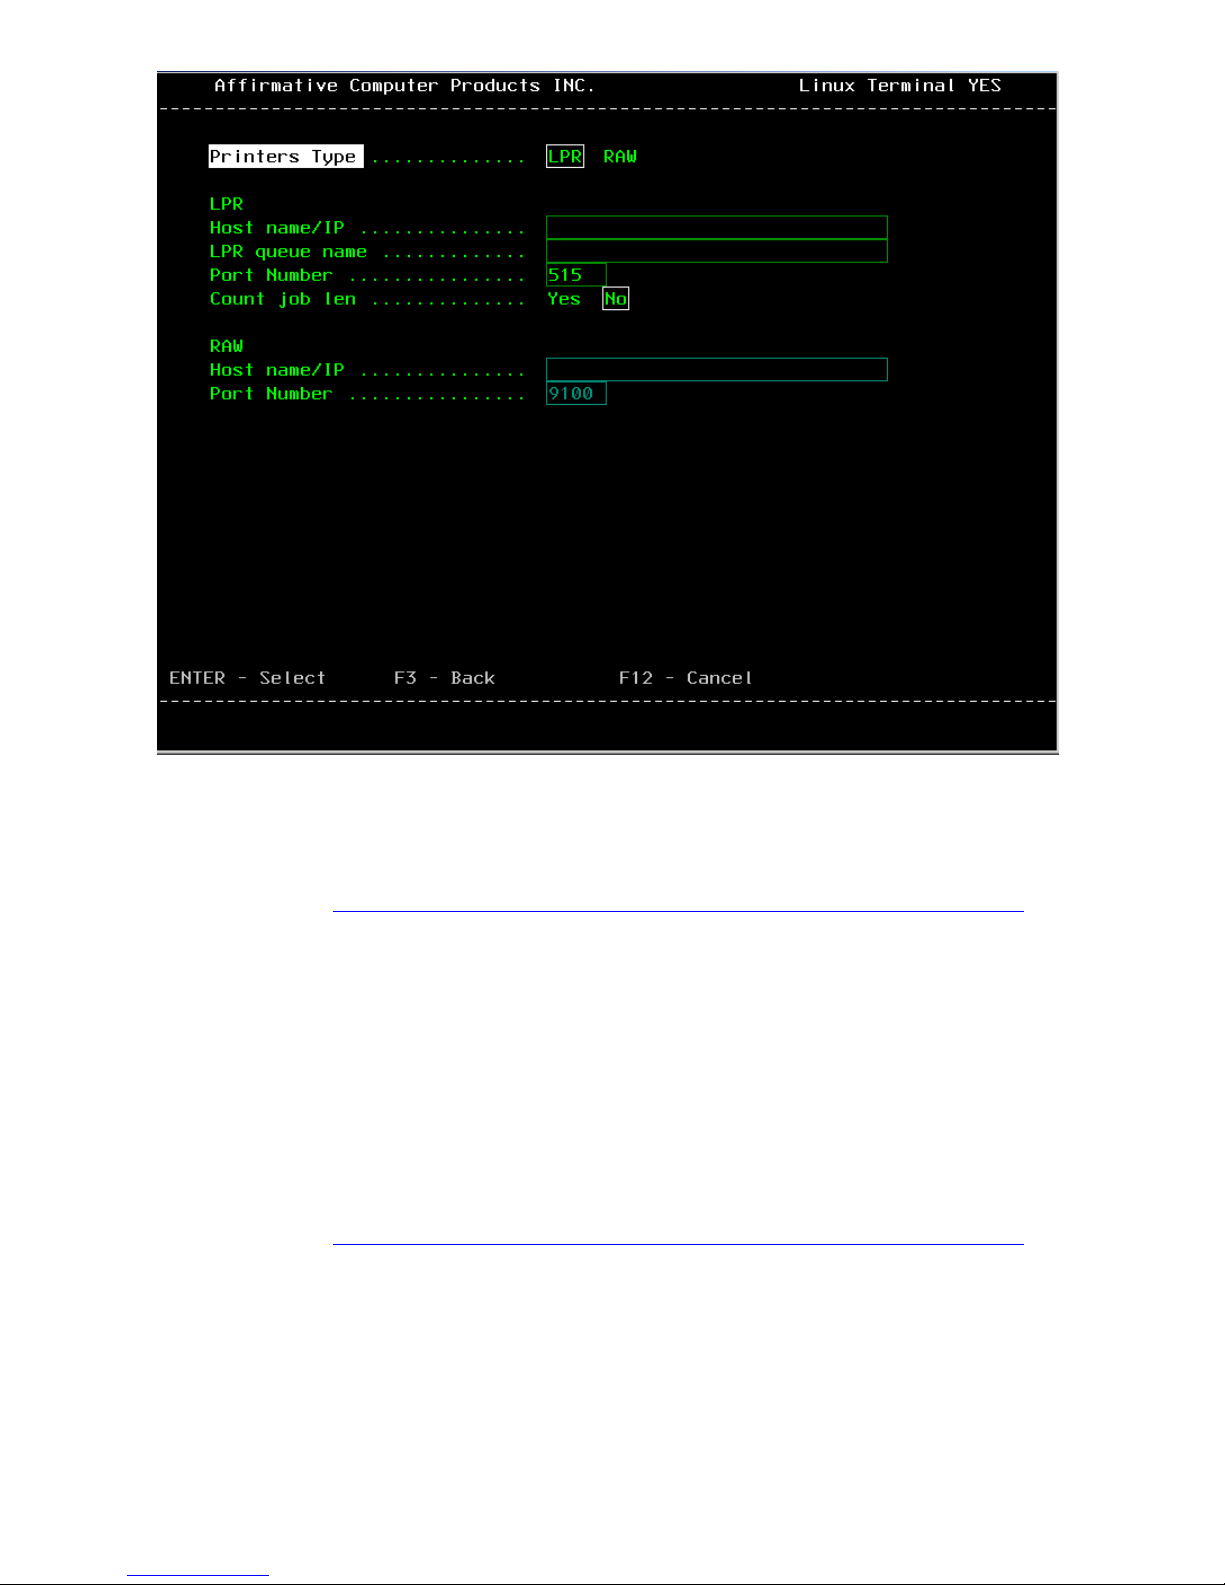
Network Printer Configuration Screen
• Printer type-LPR. Choose LPR (Line Printer Remote) to assign print jobs to a network
printer that is configured as an LPD server.
o Host name/IP. If you have a local DNS or WINS server or are using a Hosts table
(see Editing Terminal Properties|Network|Advanced Parameters|Hosts Table
), you
can type in the host network name. Otherwise, type in the IP address of the LPD
host
o LPR queue name. This will be the queue name assigned at the LPD host to be used
by LPR devices to assign print jobs.
o Port Number. Leave at the default unless otherwise directed by your network
administrator.
o Count job length. Leave at the No default unless otherwise directed by your system
administrator.
• Printer type-RAW. RAW is the default protocol for most TCP/IP networks. RAW data is
not modified by the spooler at all, but is sent directly to the printer.
o Host name/IP. If you have a local DNS or WINS server or are using a hosts table
(see Editing Terminal Properties|Network|Advanced Parameters|Hosts Table
), you
can type in the host network name. Otherwise, type in the IP address of the RAW
host.
o Port Number. Leave at the 9100 default unless otherwise directed by your system
administrator.
30
Page 39
This concludes the configuration parameters covered by the wizard. However, you can customize
many more parameters in each printer session by using a non-TBT viewing mode and editing from the
Configure tab of Connection Manager.
Non-TBT Viewing Mode
In WBT and Desktop viewing modes, sessions are added from the Configure tab of Connections
Manager. Each session can be to a unique server, if desired. Click on Add to see the New Connection
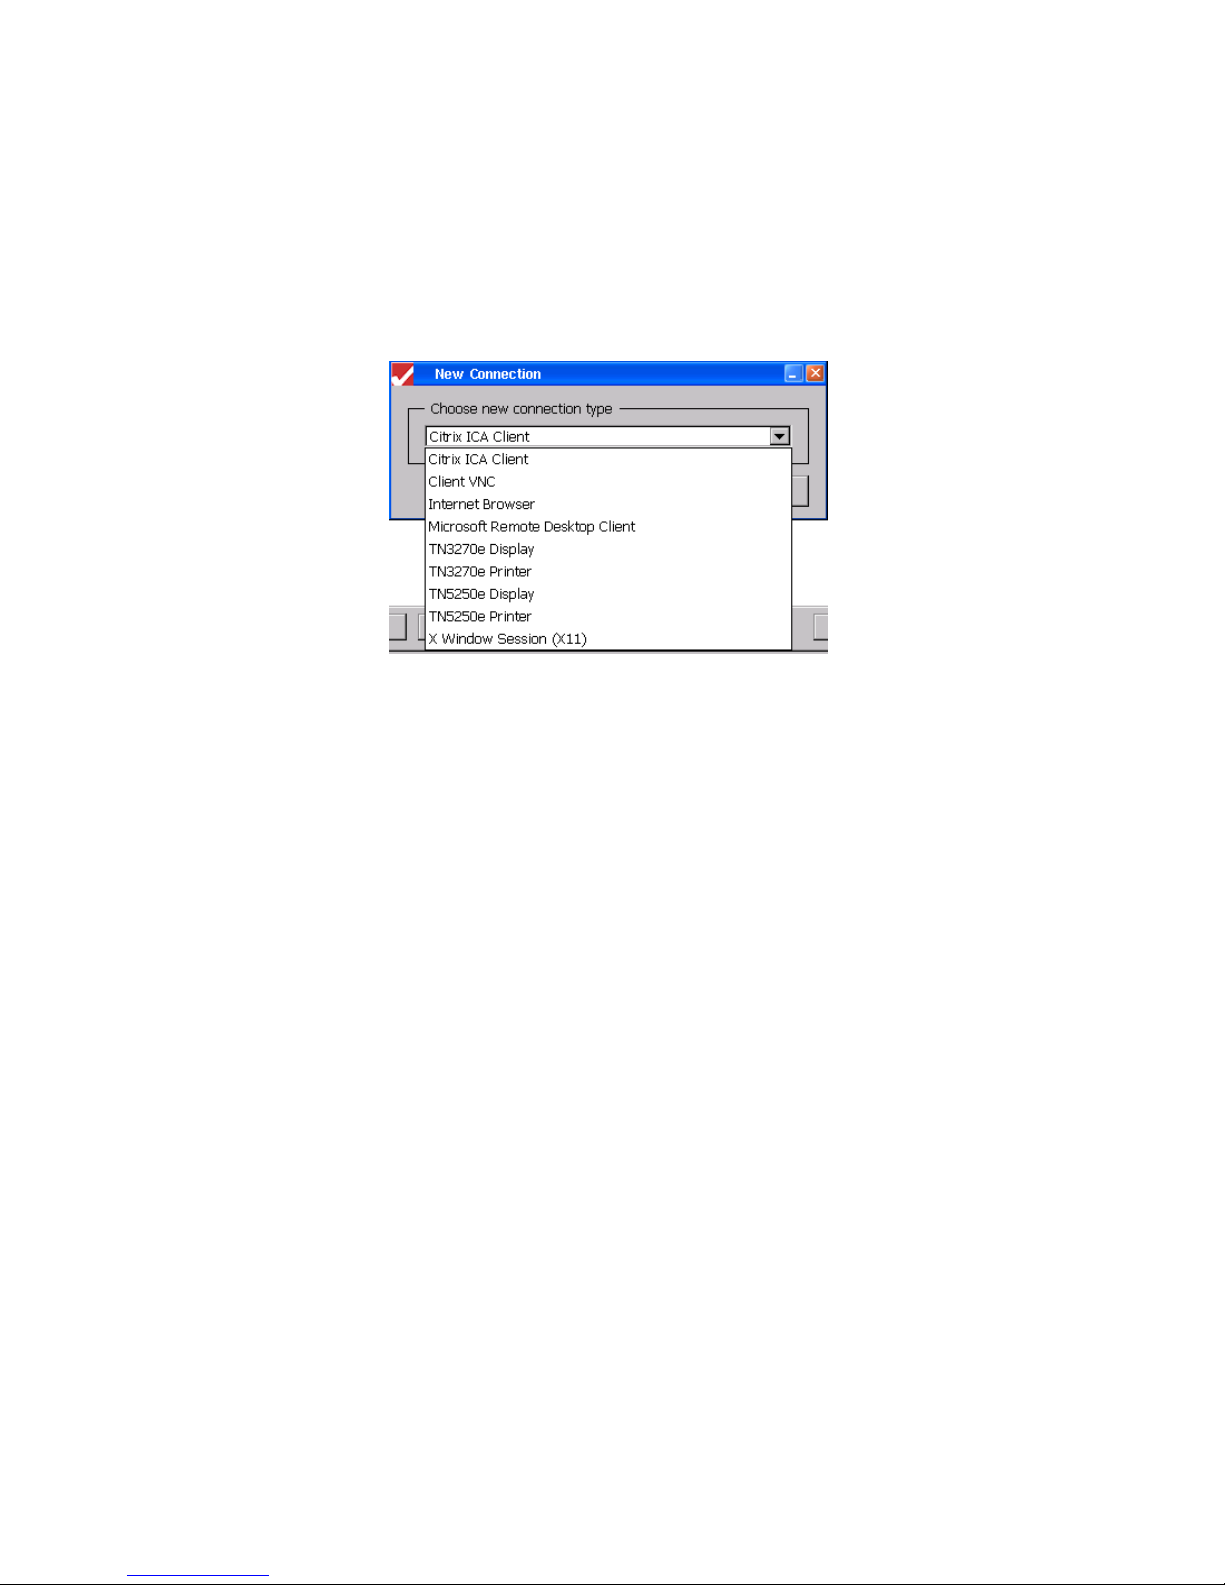
dialog box. Then click on the drop-down arrow to see the drop-down list of possible connections.
New Connection Dialog Box
Your sharp eye has immediately noticed that there are some non-emulation choices here. You can, if
you wish, add these non-emulation choices to your Connections list. However, they cannot be activated
until a license key, available from Affirmative Computer Products for a fee, is installed. Only
emulation sessions will be discussed here.
Display Sessions
In the Add drop-down list, you are faced with a choice of TN3270e or TN5250e emulation types. After
choosing one, a wizard will guide you through setup. The Setup Wizard will take you through three
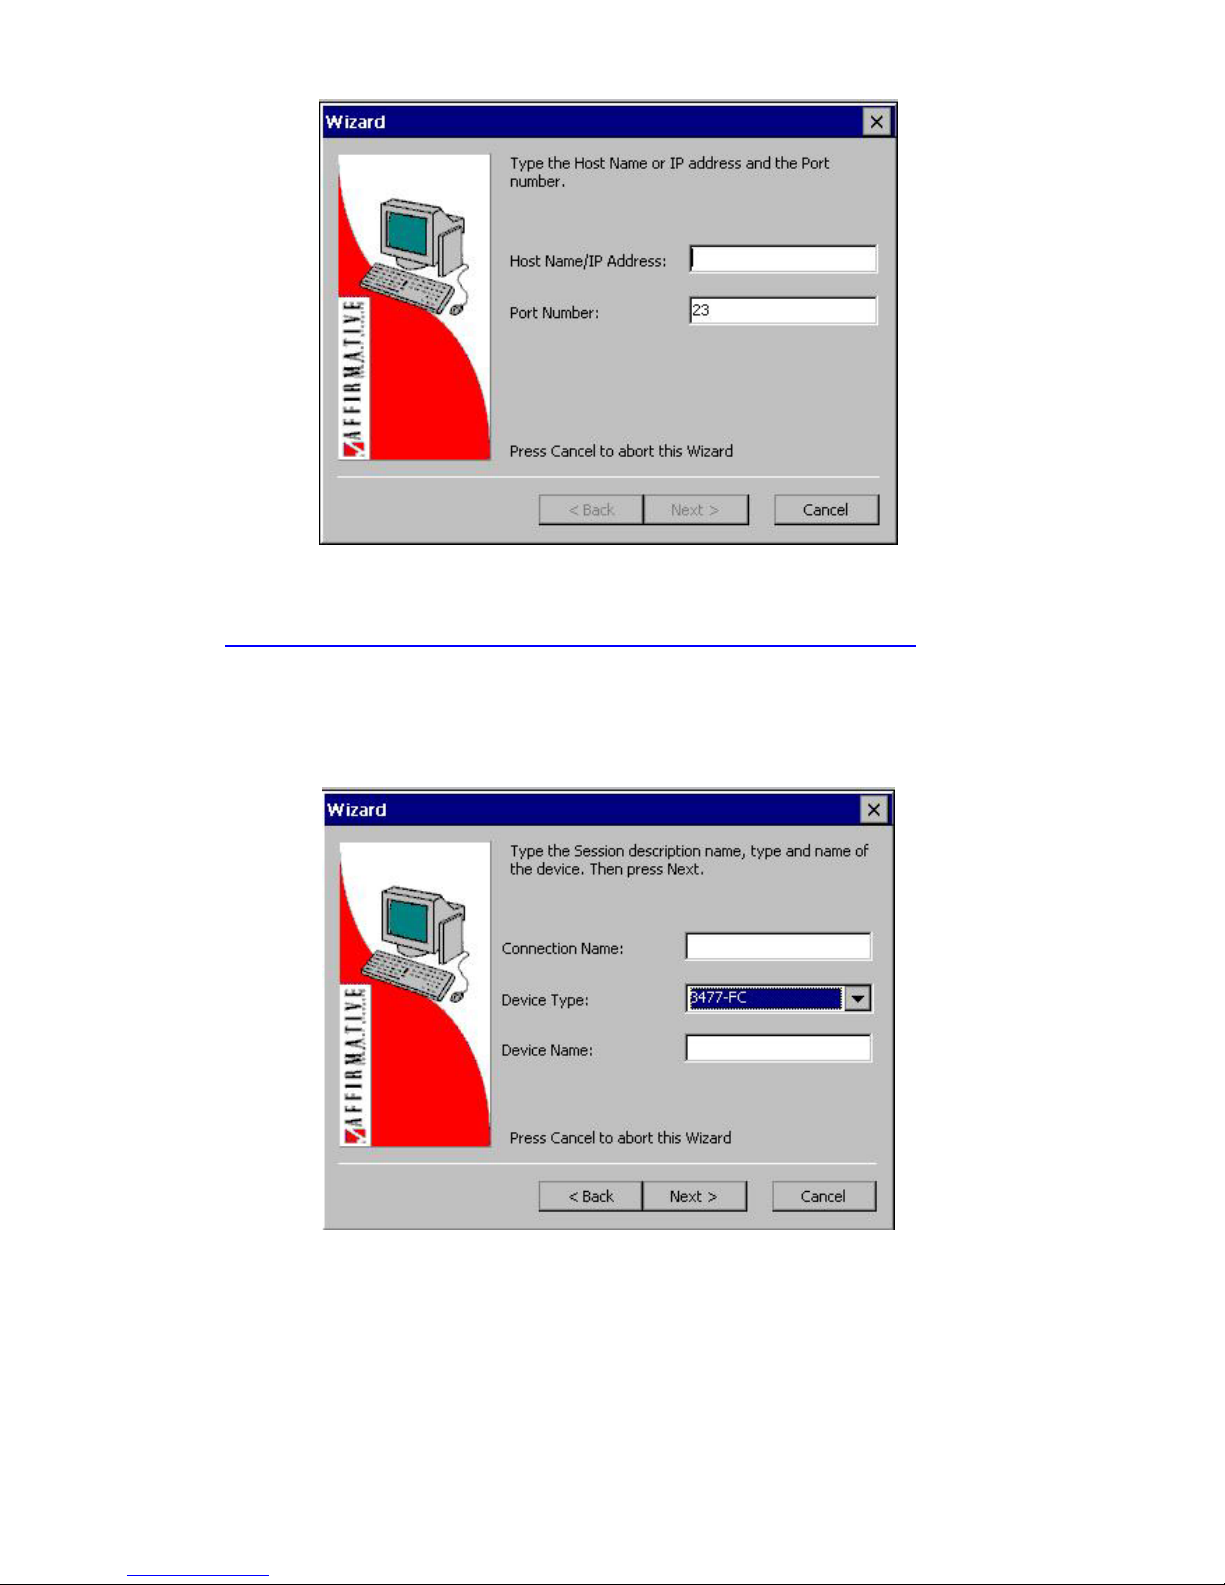
dialog boxes. Activate Next to go to the next box, Back to return to the previous dialog box, and
Cancel or the Esc key to abort the process.
31
Page 40
1.
Display Setup Wizard Dialog Box #1
• Host Name/IP Address. If you have a local DNS or WINS server or are using a hosts table
(see Editing Terminal Properties|Network|Advanced Parameters|Hosts Table
), you can type in
the host network name. Otherwise, type in the IP address of the host.
• Port Number. Use the default of 23 unless directed to do otherwise by your system
administrator.
2.
• Connection Name. This is the friendly name that will appear in the Connection Manager
screen and at the bottom of your session screens and in the Taskbar (in Desktop Mode).
• Device Type. Select one from the drop-down list. The default 3477-FC works well for
TN5250e emulation, unless you have special needs. If you are adding a TN3270e session, you
will see a choice of 3278/9 terminal types here.
• Device Name. If you are using named sessions, enter the session name here.
Display Setup Wizard Dialog Box #2
32
Page 41
3.
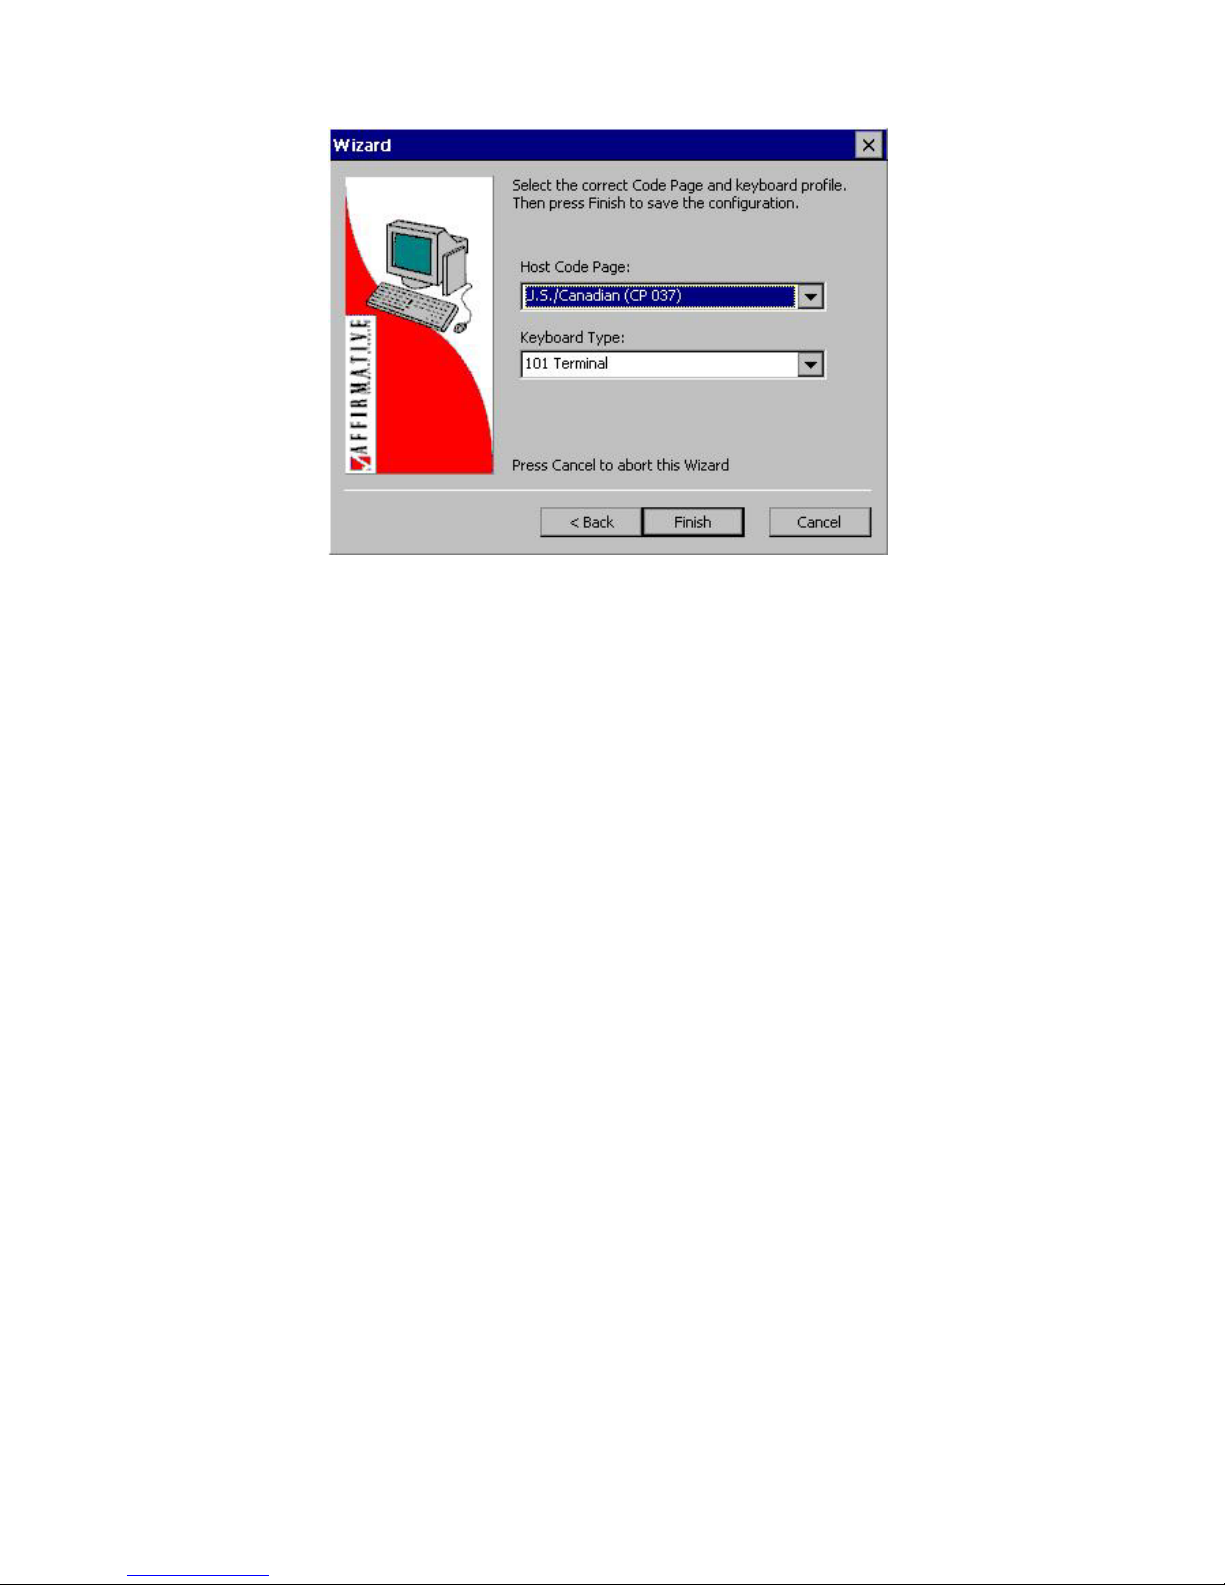
Final Display Setup Wizard Dialog Box
• Host Code Page. Choose the applicable country from the drop-down list.
• Keyboard Type. Choose 101 Terminal if you are using the Affirmative Computer Products
1010T, 1019T, 1023T, or 1027T 101-key keyboard; choose 122 keys if you are using the
Affirmative Computer Products 1220T, 1223T, or 1227T 122-key keyboard; otherwise, choose
101 PC.
This concludes the configuration parameters covered by the Wizard. However, you can customize
many more parameters in each display session by highlighting the connection name in the Configure
tab of Connection Manager and activating Edit.
33
Page 42
Printer Sessions
You can have multiple local printers, but you must create a printer session for each one. After you
choose a session type, a Setup Wizard will take you through three dialog boxes.
1.
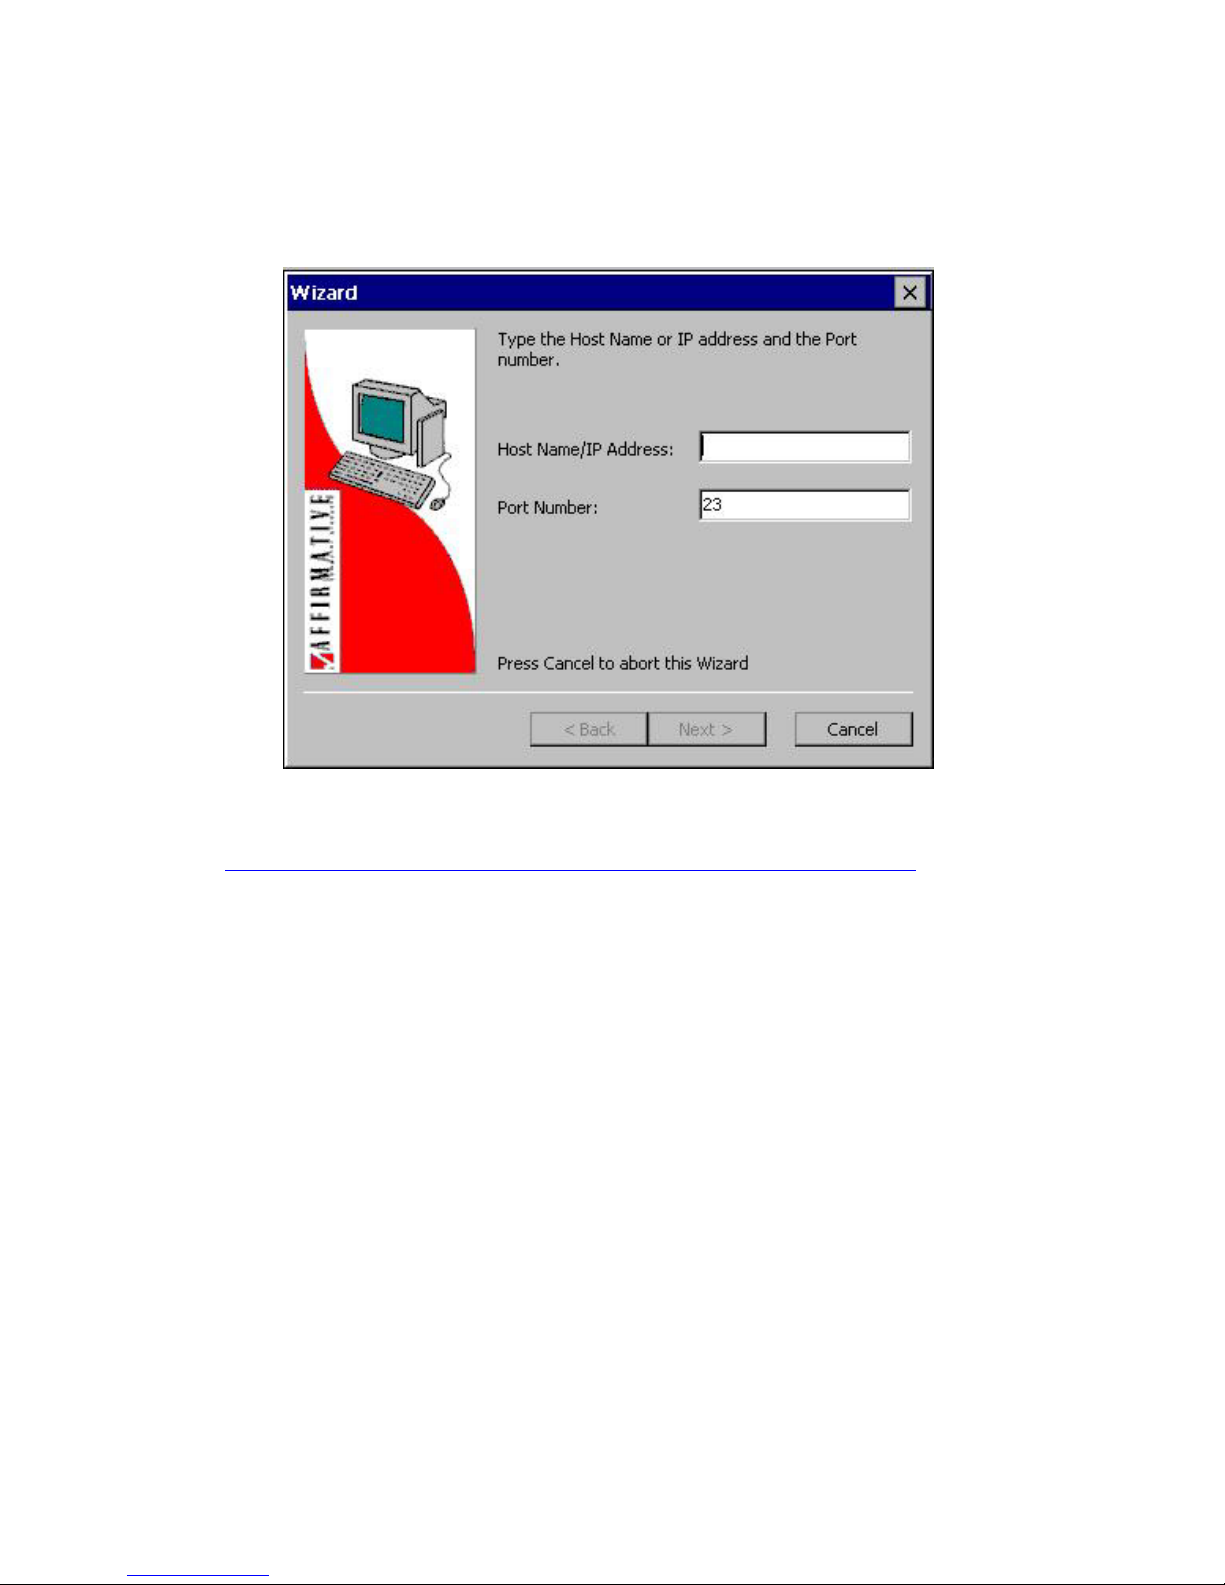
Printer Setup Wizard Dialog Box #1
• Host Name/IP Address. If you have a local DNS or WINS server or are using a hosts table
(see Editing Terminal Properties|Network|Advanced Parameters|Hosts Table
), you can type in
the host network name. Otherwise, type in the IP address of the host. If you are creating this
session for extended local print screens, an IP address is irrelevant, but you must enter at least
one character to satisfy the Wizard.
• Port Number. Use the default of 23 unless otherwise directed by your system administrator.
34
Page 43
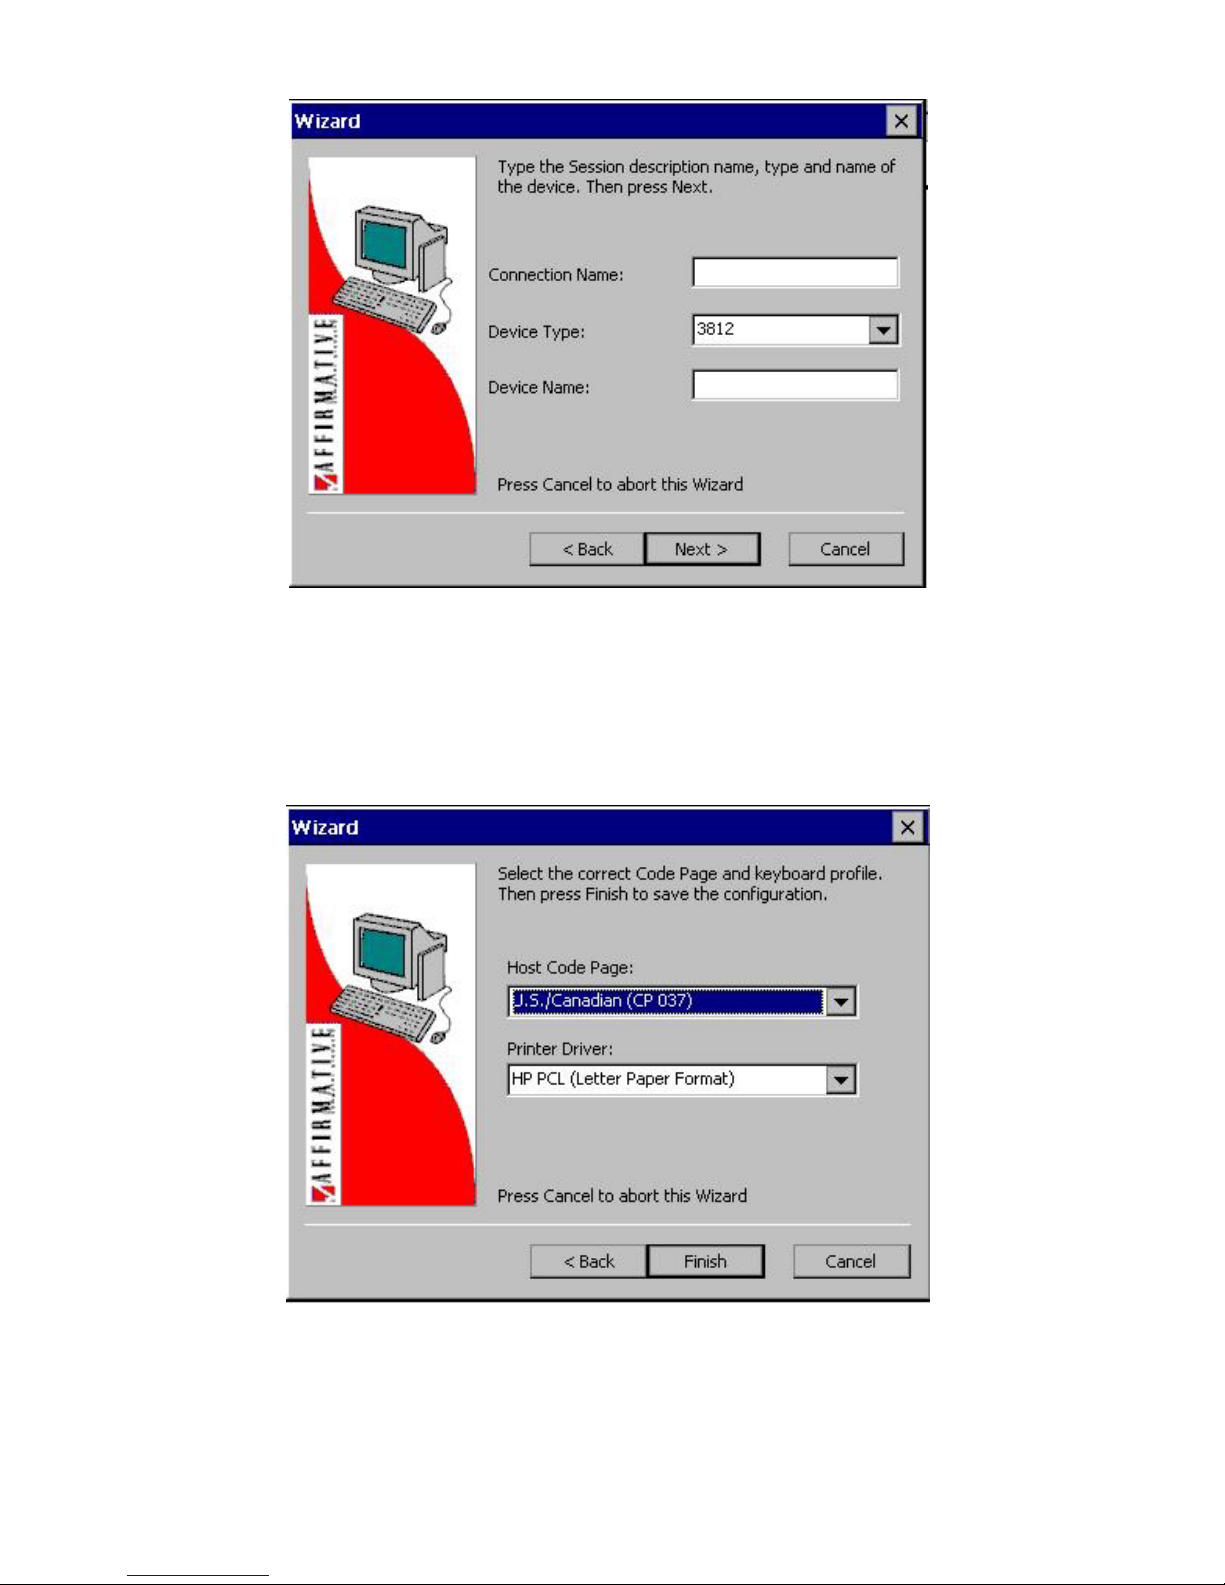
2.
Printer Setup Wizard Dialog Box #2
• Connection Name. This is the friendly name that will appear in the Connections Manager
screen and at the bottom of your session screens and on the Taskbar (in Desktop mode).
• Device Type. Only 3287 (3270) or 3812 (5250) is available for TCP/IP devices.
• Device Name. If you are using named sessions, enter the session name here.
3.
• Host Code Page. Choose the applicable country from the drop-down list.
Printer SetupWizard Dialog Box #3
35
Page 44

• Printer Driver. If you are doing extended local Print Screens, or if you are not using the
AS/400 Host Print Transform, choose a driver here that is compatible with the local-attached or
LAN printer. If you can’t find one in the list, try Empty Driver.
This concludes the configuration parameters covered by the wizard. However, you can customize
many more parameters in each printer session by highlighting the connection name in the Configure tab
of Connection Manager and activating Edit. If you are adding multiple printer sessions, you will have
to edit the sessions in this manner in order to assign a unique port to each session.
Return to Table of Contents
36
Page 45
Connections Manager
Note: The terms “connection” and “session” are used interchangeably in this section.
The Connections Manager window is used to manage or activate your terminal's emulation sessions in
WBT and Desktop viewing modes. In WBT mode, Connections Manager has both a Connections tab
and a Configuration tab. In Desktop mode, there is only a Configuration tab since connections are
usually made from the Start menu.
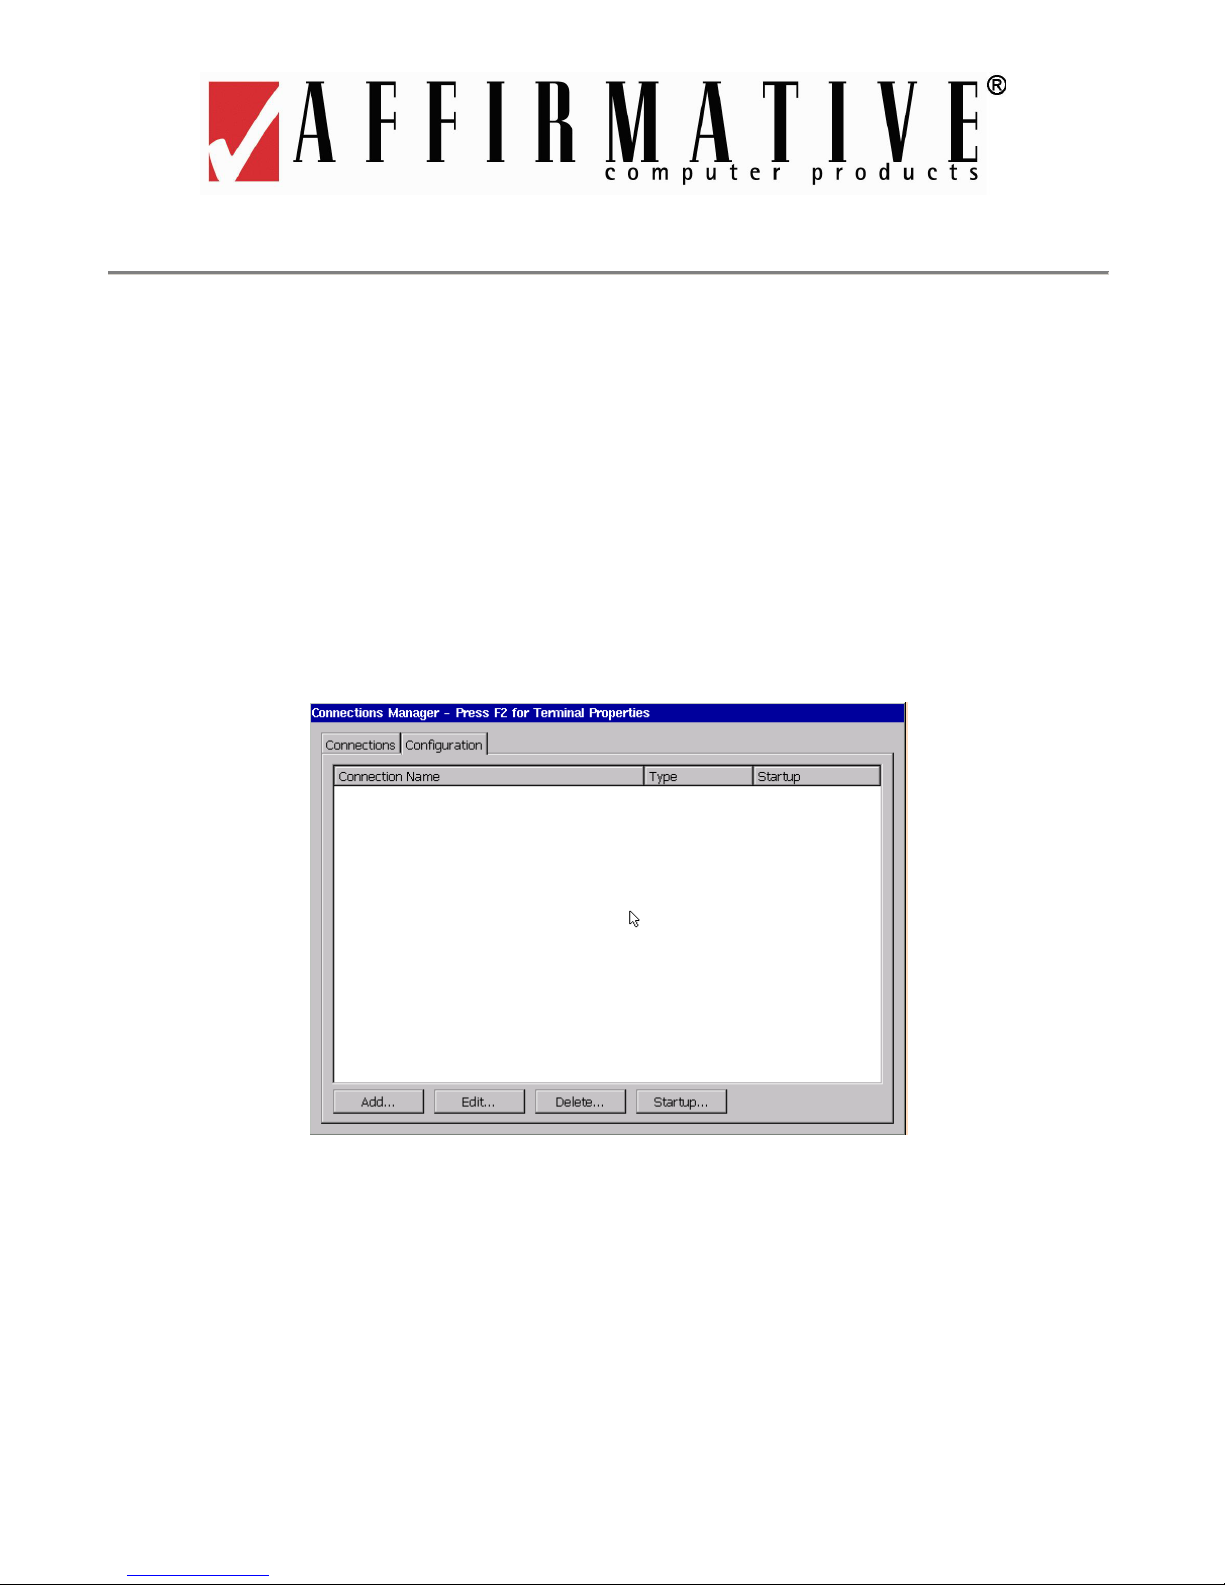
Initially, Connections Manager starts without any sessions. Sessions are added from the Configuration
tab.
Configuration
The Configuration tab allows four basic functions.
Configuration Tab in WBT Viewing Mode
37
Page 46
Add
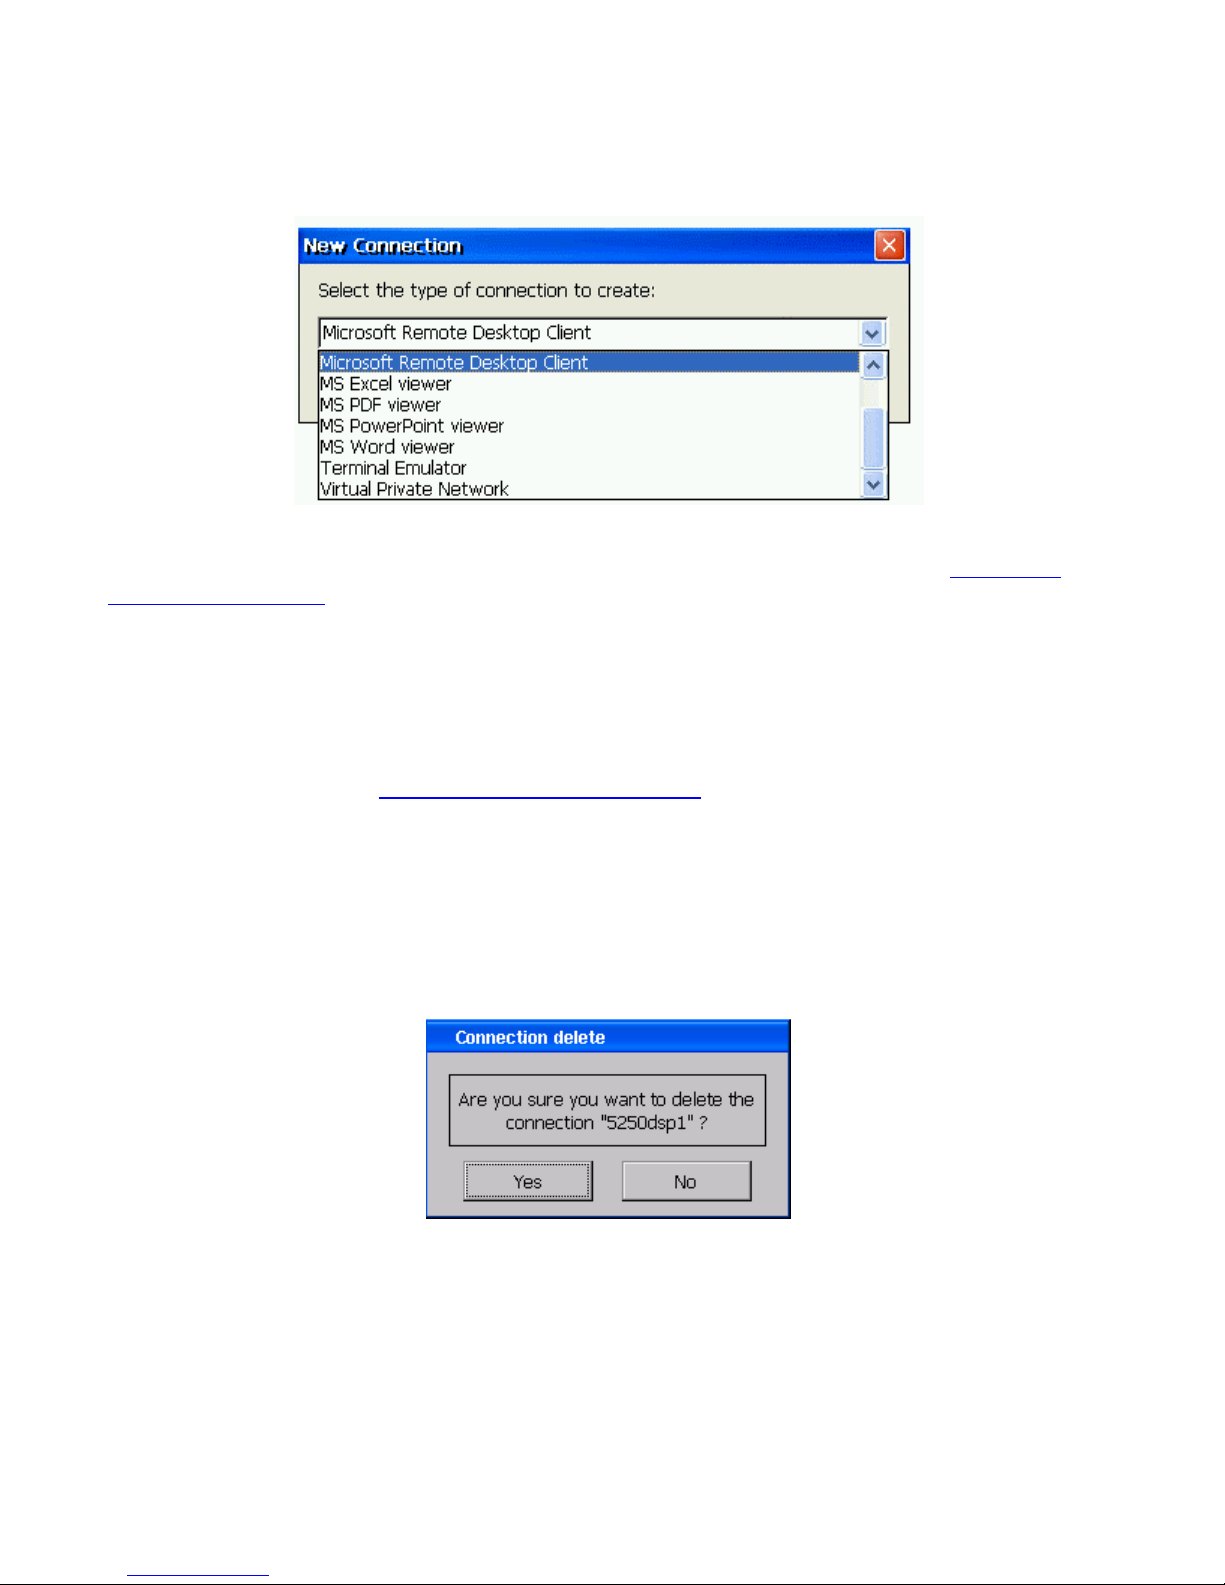
Activate the Add button to create a new session. A New Connection dialog box is displayed.
New Connection Dialog Box
Click on the drop-down arrow to see a list of four possible emulation connections. See Creating an
Emulation Connection for information on adding specific connections. As sessions are added, they will
be displayed alphabetically.
Edit
Activate the Edit button to edit the properties of a selected connection. A Sessions Properties window
will pop up. Please refer to Editing an Emulation Connection
connection
.
for more information about editing a
Delete
Activate the Delete button to delete the highlighted connection. When you activate this button, a
Connection Delete dialog box is displayed.
Connection Delete Dialog Box
Activate the Yes button to complete the deletion. Activate No to cancel the deletion.
38
Page 47
Startup
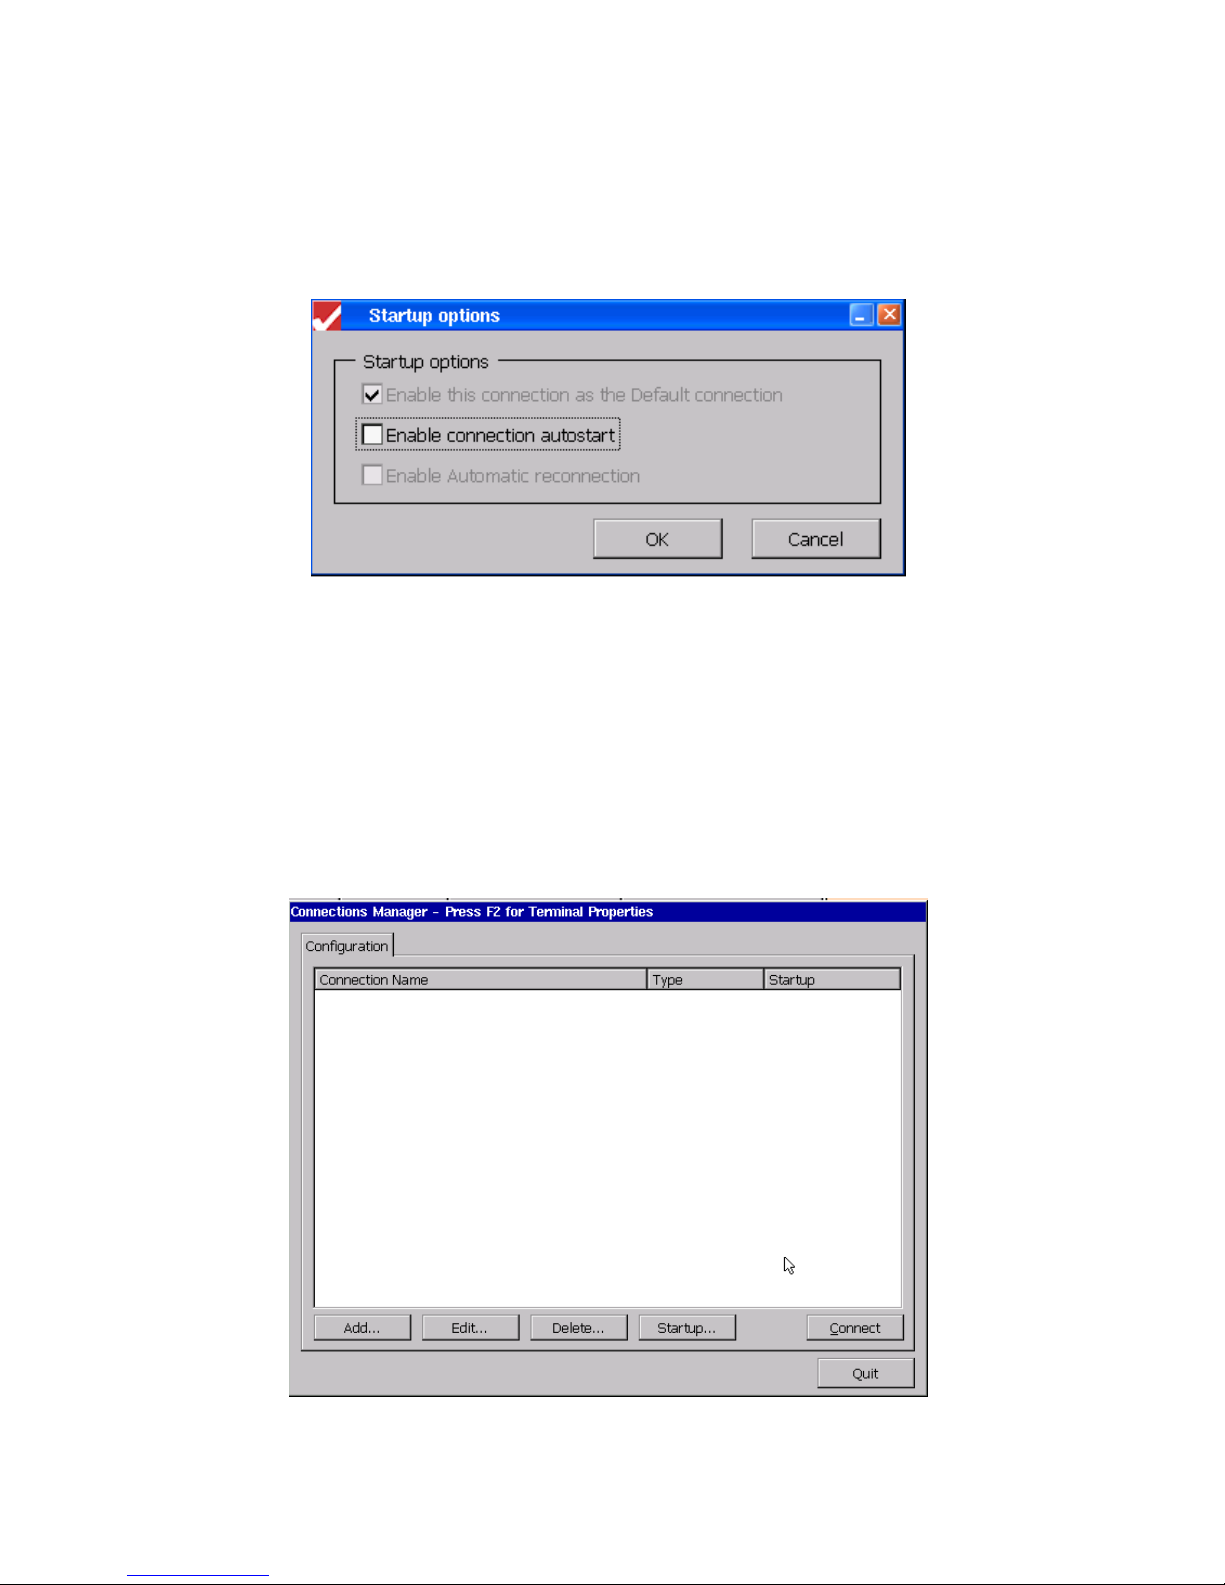
Activate the Startup button to configure startup options when the terminal boots up. The Startup
Options dialog box displays after the Startup button is pressed. Using the dialog box, your terminal can
be set to automatically connect to a server when the terminal is booted. Any or all sessions can be
configured for automatic startup.
Connection Startup Dialog Box
Enable the connection as the Default connection. Check this box to use the selected connection
•
as the default connection. This connection will be highlighted in Connection Manager when the
terminal is powered up. If there is only one configured session, this option is grayed out.
• Enable connection autostart. Check this box to automatically start the selected connection when
the terminal boots up.
• Enable Automatic reconnection. This is not supported in the 2209.
Connect
Connections Manager for Desktop Viewing Mode
39
Page 48
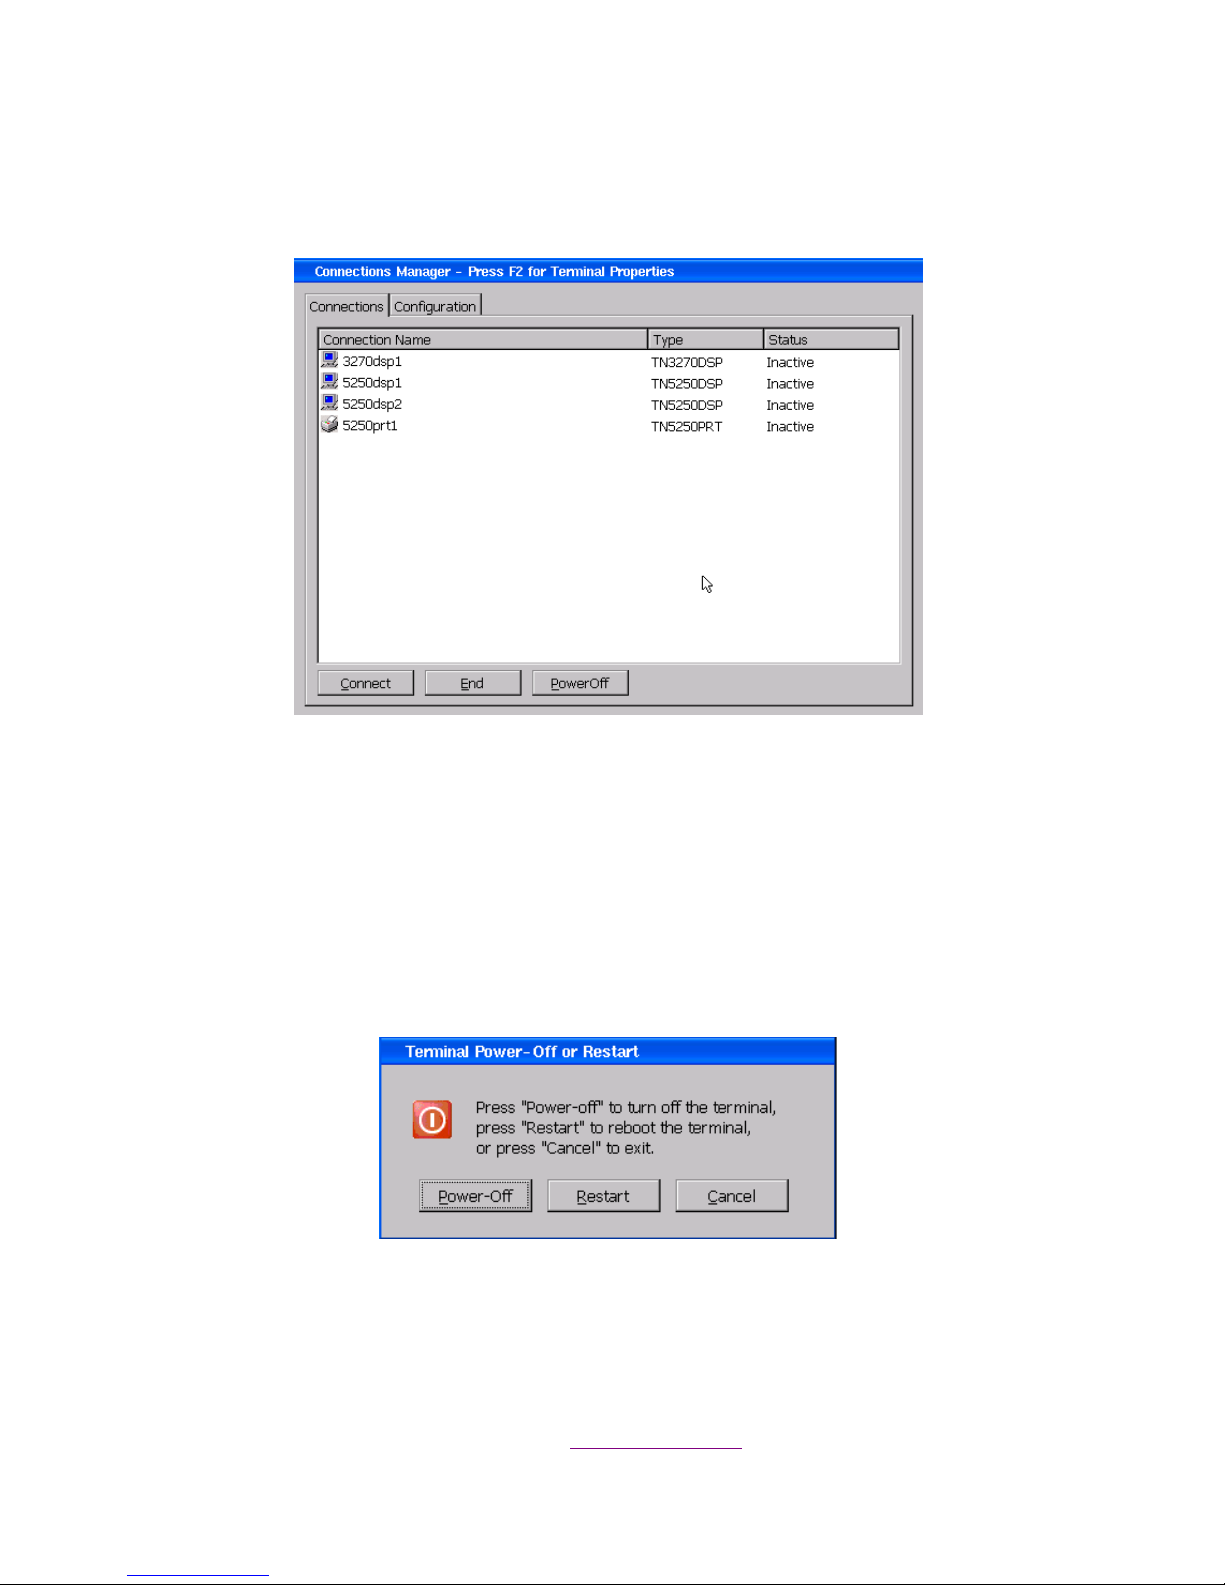
In Desktop viewing mode, you will see a Connect button in addition to the four buttons previously
discussed. This allows you to start a session from Connections Manager even though the Connections
tab is not available.
Connections
Connections Tab in WBT Viewing Mode
The Connections tab is used to make or end network connections with the server(s).
• Connect. Highlight the session name and activate the Connect button to make a network
connection. You can also activate a connection by double-clicking on it.
• End. Highlight the session name and activate the End button to end a connection shown as Active
in the status field. A dialog box will pop up asking for confirmation. You can also end a session
from the session screen itself, without going to Connections, and that is the recommended way to
end a session.
• PowerOff. It is recommended that you shut down your terminal using this button, although usually
just shutting off the power does no harm. You will see the following dialog box.
Power Off Dialog Box
Power-Off. Click on this button to turn off terminal power.
•
• Restart. Click on this button to reboot without turning off terminal power.
• Cancel. Click on this button to cancel any power-off action and return to Connections.
Return to Table of Contents
40
Page 49

Editing Terminal Properties
If you are in TBT viewing mode, you can edit many terminal properties using the property sheets
described in Terminal Setup
the Terminal Properties window of the WBT or Desktop viewing modes, and that comprehensive set
will be discussed in this section.
You must use a mouse to navigate Terminal Properties as discussed here. Invoke this window by
pressing the F2 key in the Connections Manager window or by selecting it from the Start menu. If a
password has been enabled (see Security
you press F2. Type in your password and activate OK.
The Terminal Properties window consists of nine property sheets that can be invoked by activating their
individual tabs. At the bottom of each sheet are three buttons:
• OK. Activate OK to save changes and exit Terminal Properties after you have set desired
properties in all the property sheets. Some settings will take effect immediately after you OK out,
while others may cause the screen to go blank for several seconds, and some will cause the terminal
to reboot.
• Cancel. Activate Cancel to quit Terminal Properties without saving any changes. You can also do
this by clicking on X in the upper right corner.
• Apply. Activate Apply to immediately apply the settings on the current properties sheet without
exiting Terminal Properties. Note: You must subsequently OK out of Terminal Properties to save
any changes in these settings. If you Cancel out, the changes will be lost after the next reboot.
. However, you can see a more comprehensive set of terminal properties in
) for this terminal, you will see the Password dialog box when
41
Page 50
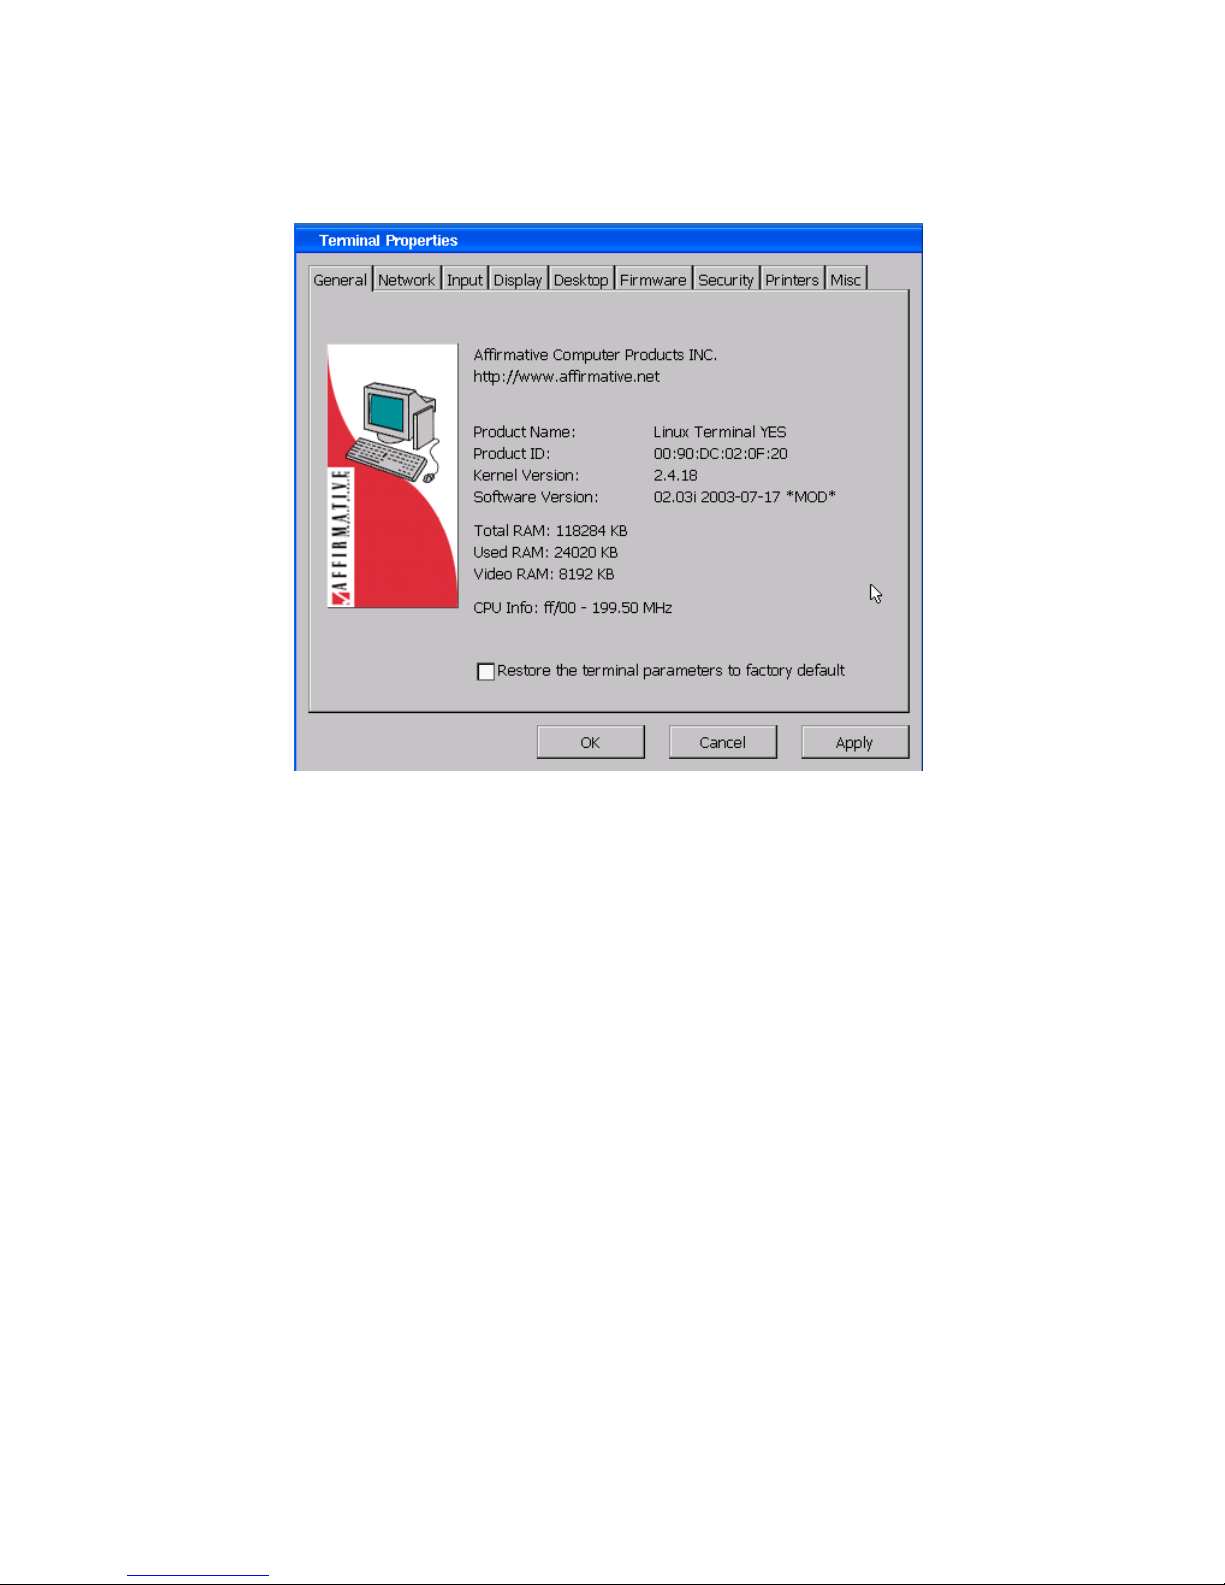
General
This property sheet is informational except for Restore….
General Property Sheet
• Product ID. This is a unique product identification code that also happens to be the terminal MAC
address. Every device on every LAN in the world is supposed to have a unique MAC address.
• Kernel Version. This is the version of the Linux kernel used on the terminal.
• Software Version. This is the version of the firmware installed in this terminal. If you contact
Affirmative Computer Products Tech Support about a problem, please have this version information
available.
• Total RAM. This is the amount of DRAM in the terminal after subtracting the memory used for
some basic functions and the memory reserved for video.
• Used RAM. This is the amount of total RAM that is currently being used.
• Video RAM. This is the amount of RAM that has been reserved for video display. This amount is
set in the terminal BIOS and is not a configurable parameter.
• CPU Info. This shows some basic information about the CPU in the terminal.
• Restore the terminal parameters to factory default. Activate this check box to reset the terminal
to its factory default settings. When you do this, you will get a dialog box asking you to confirm
your intentions.
42
Page 51
Network
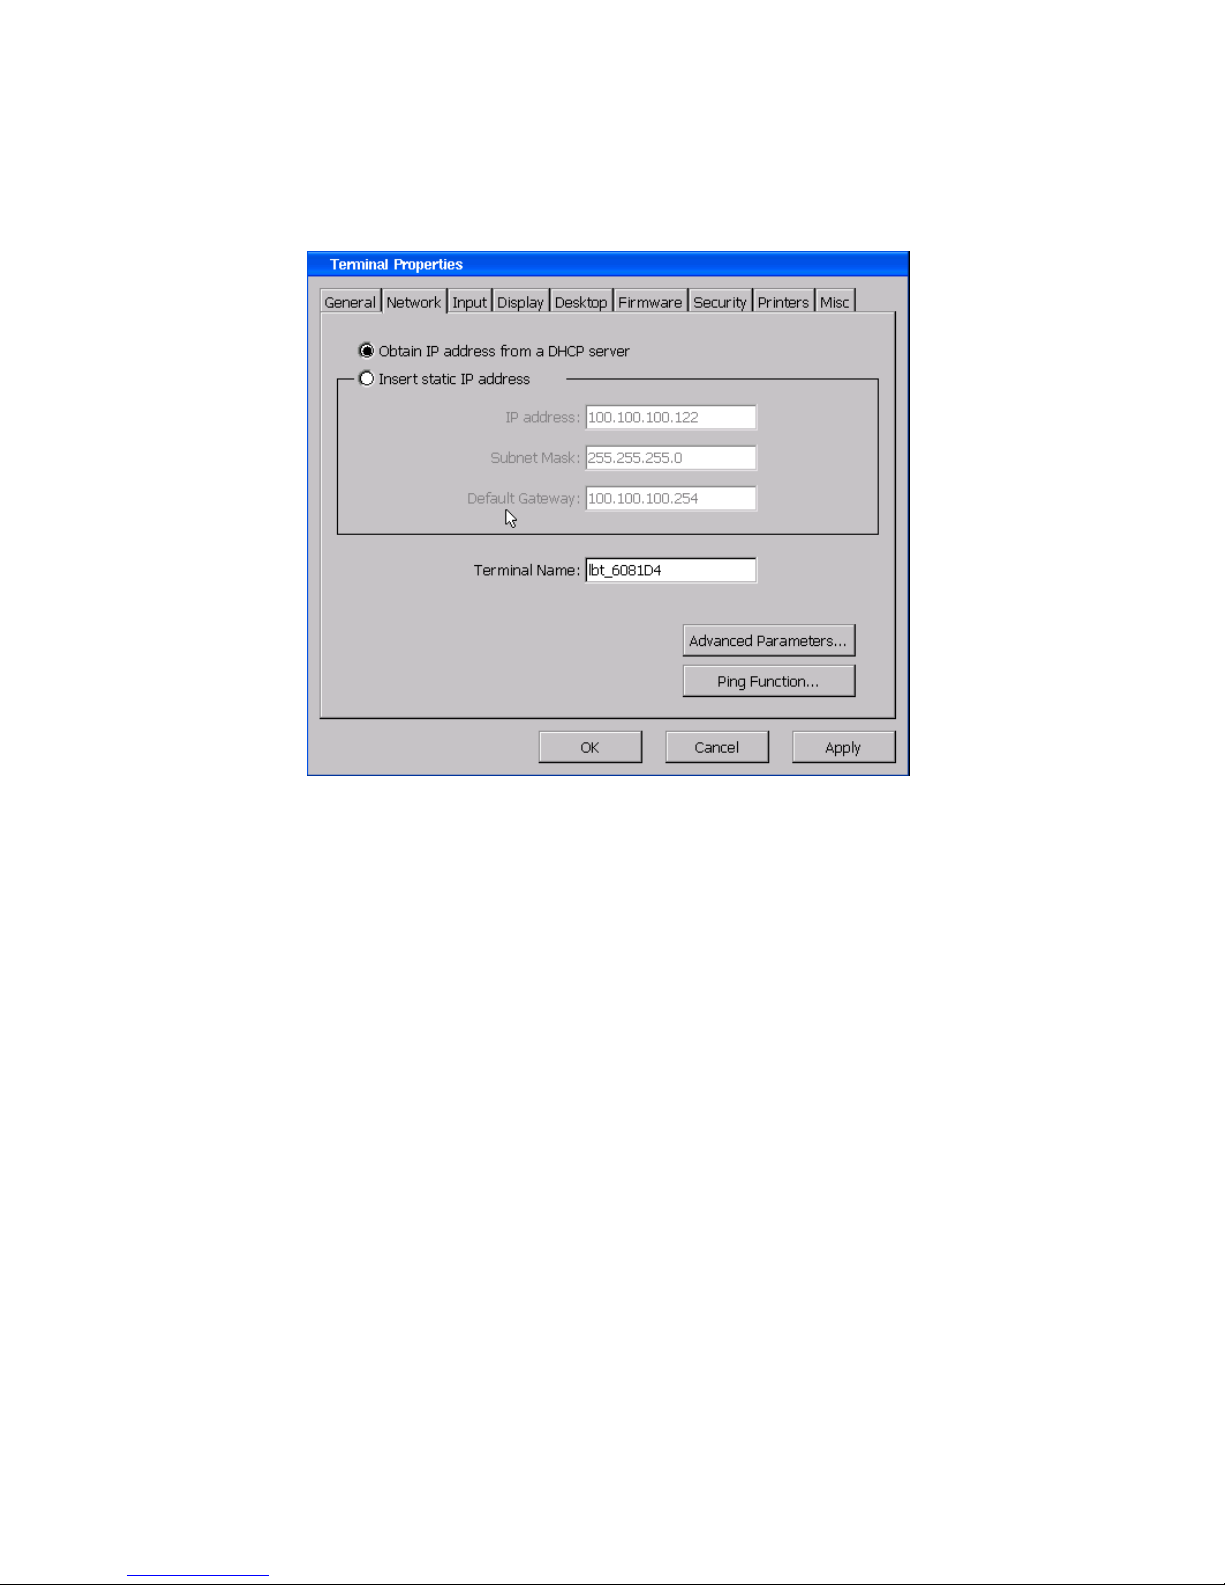
The Network property sheet lets you control the terminal IP address, name server addresses, and
network speed, as well as providing the useful ping function.
Network Property Sheet
• Obtain an IP address from a DHCP Server. Select this radio button to enable DHCP addressing.
• Insert static IP address. Select this radio button to enable the following three fields for a specific
IP address setting.
o IP Address. Enter a static IP address in this field. If you have selected DHCP addressing,
the assigned address will appear in grey in this field.
o Subnet Mask. Enter the subnet mask of the local network. If you have selected DHCP
addressing, the assigned subnet mask will appear in grey in this field
o Gateway. Enter the IP address of a gateway if any server is not on the local sub-net.
• Terminal Name. We recommend that you enter a unique name here for easy identification when
using network management and administration software.
Ping Function
Activate this button to display the Ping dialog box. You can ping the name or IP address of a host or
any other device connected on the network. You can even ping a web site through a gateway.
43
Page 52
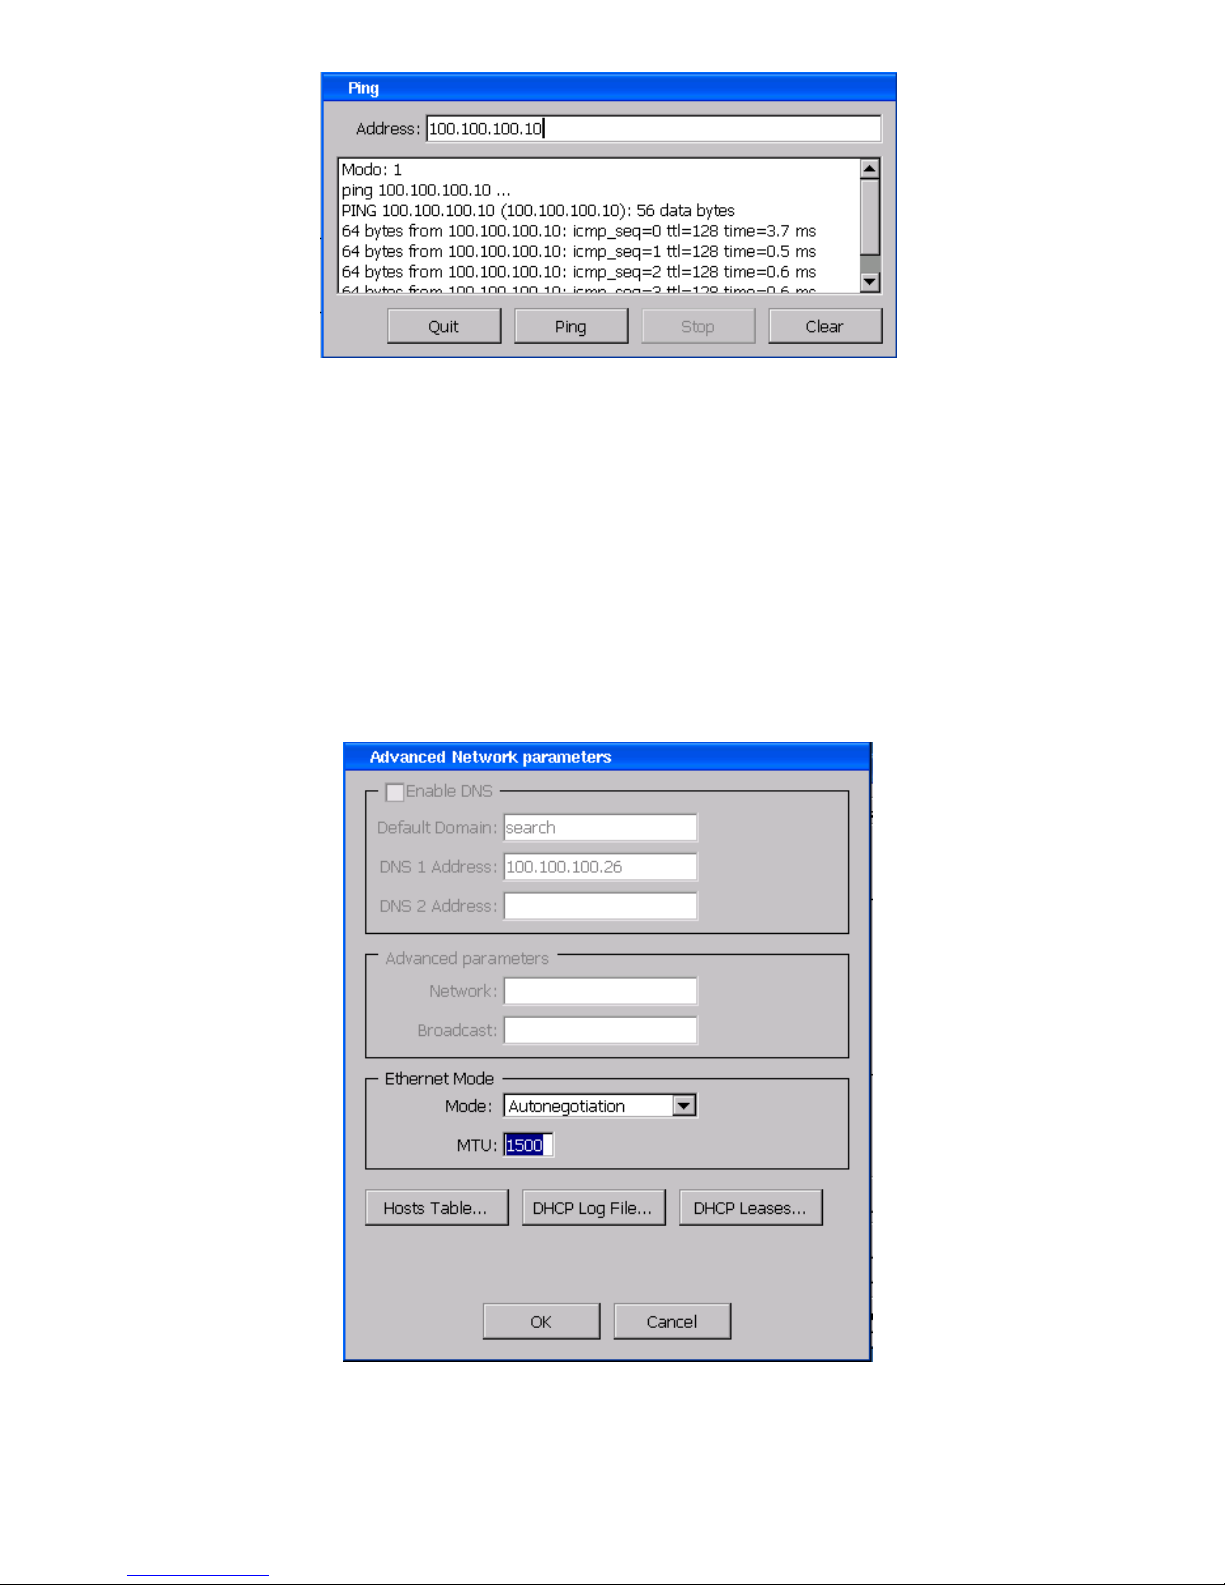
Ping Dialog Box
• Address. Enter the network name or the IP address of the device to be pinged.
• Ping. Activate this button to begin the ping action. Results will be displayed in the scroll box.
• Stop. After you start pinging, the ping action will continue until you press Stop.
• Clear. Activate this button to clear the scroll box.
• Quit. Activate this button to exit the Ping dialog box.
Advanced Parameters
Activate this button to configure name server settings or proceed to other advanced parameters. You
will see the Advanced Network Parameters dialog box.
Advanced Network Parameters Dialog Box
44
Page 53
• Enable DNS. You will only see this box if you if you have selected the radio button for Insert
static IP address. Activate this check box to enable the three fields for the DNS setting. Get the
entries from your network administrator. If you have selected DHCP addressing and are not using a
USB wireless LAN adapter, the assigned DNS information will appear in grey in these fields.
• Advanced parameters. These entries will be active only if you have selected the radio button for
Insert static IP address. For typical networks, nothing need be entered here. But some networks
will require that you enter the first three octets of the network IP address in Network and the IP
address of the network gateway in Broadcast. Let your network administrator determine the need.
• Ethernet Mode.
o Mode. Select network speed and traffic mode from the drop-down list, or let the network
circuitry perform auto-negotiation with the hub or switch.
o MTU. Leave this number alone unless your network administrator dictates a change.
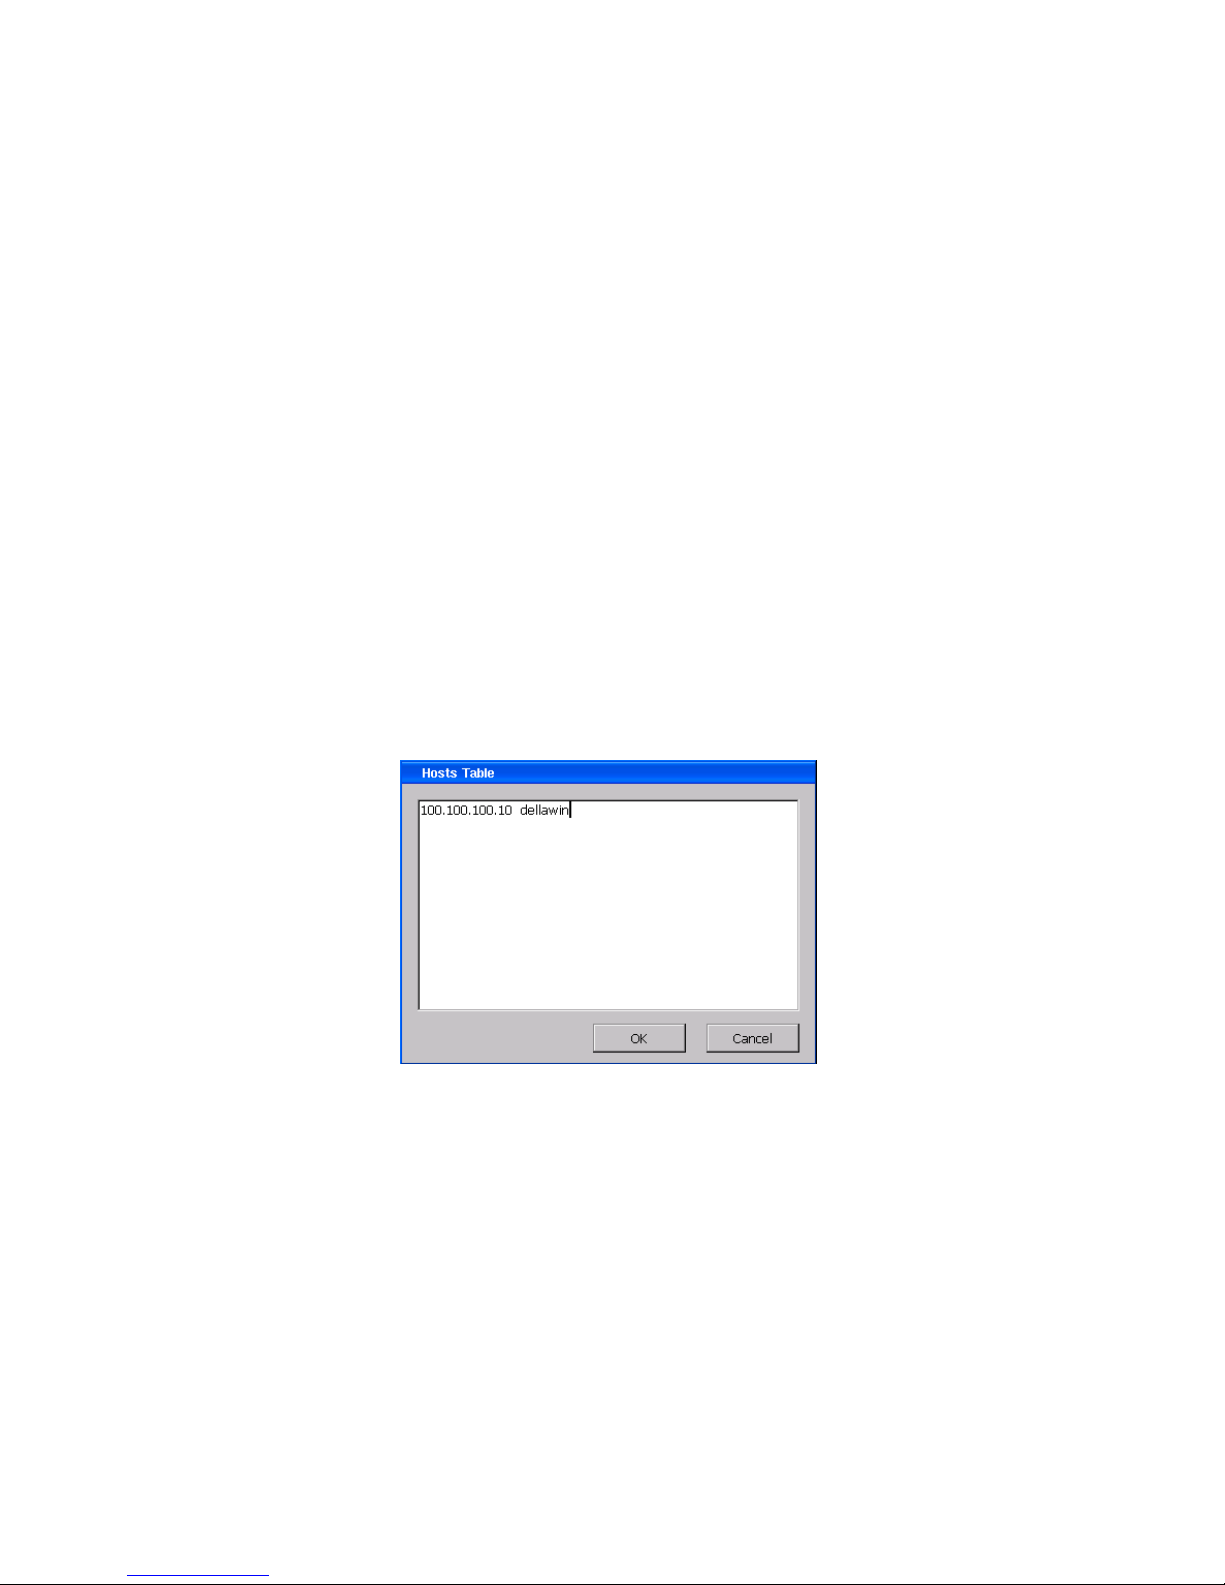
Hosts Table
A Hosts table allows you to create your own mini-DNS server, for use by your terminal only. You can
make one or more entries in the table—each entry correlating an IP address with a friendly name for
that address. These friendly names can be your sole creations; they do not have to be identical to the
network names for that address. After you make these entries, you can then use the friendly names in
place of IP addresses in any configuration dialog box or utility on your terminal that requires an IP
address. Of course, if you have a local network DNS server, you probably won’t need to use a Hosts
table.
Activate the Hosts Table button to see the Hosts Table dialog box.
In this example, the friendly name “dellawin” is equated to the IP address 100.100.100.10. Make all
your entries in this format, one per line.
Hosts Table Dialog Box
45
Page 54
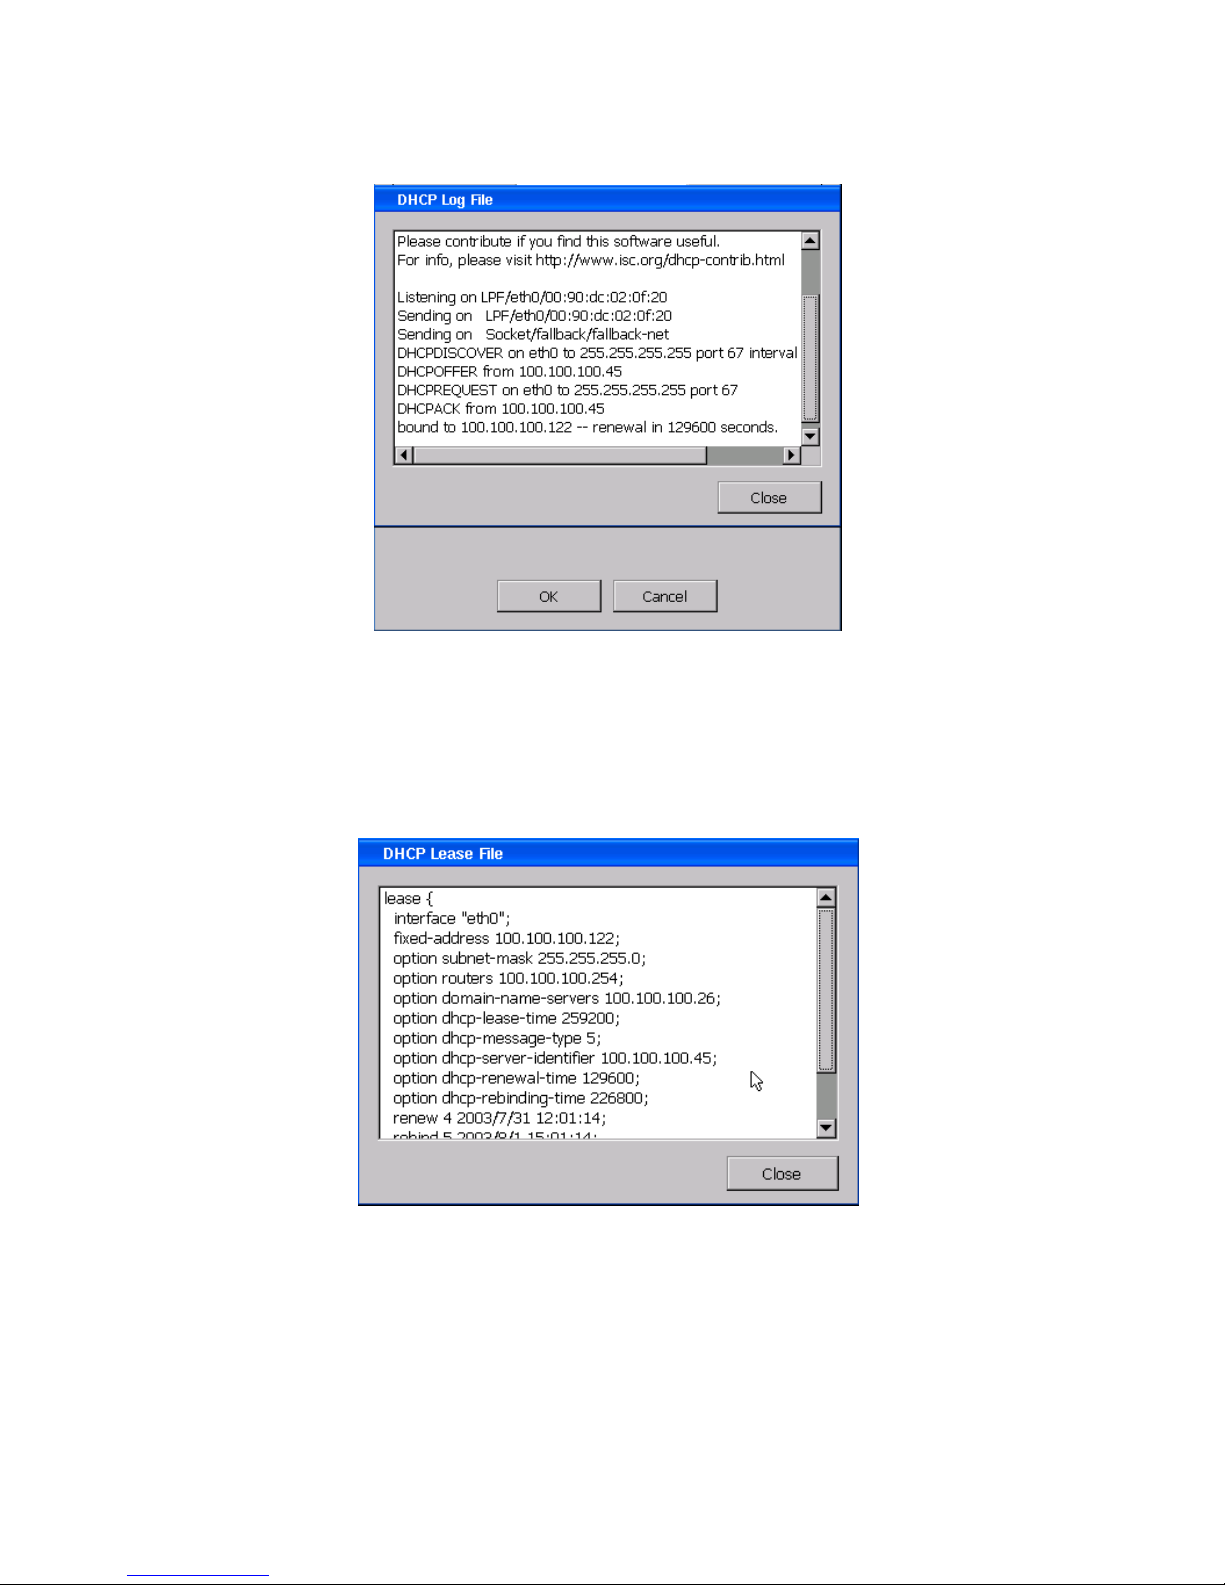
DHCP Log File
Activate this button to see the DHCP Log File.box.
DHCP Log File Box
This file logs the steps encountered by the terminal in obtaining a DHCP address.
DHCP Leases
Activate this button to see the DHCP Lease File box.
DHCP Lease File Box
This file shows the current state of the DHCP address lease, as well as showing a list of the options
configured at the DHCP server.
46
Page 55
Input
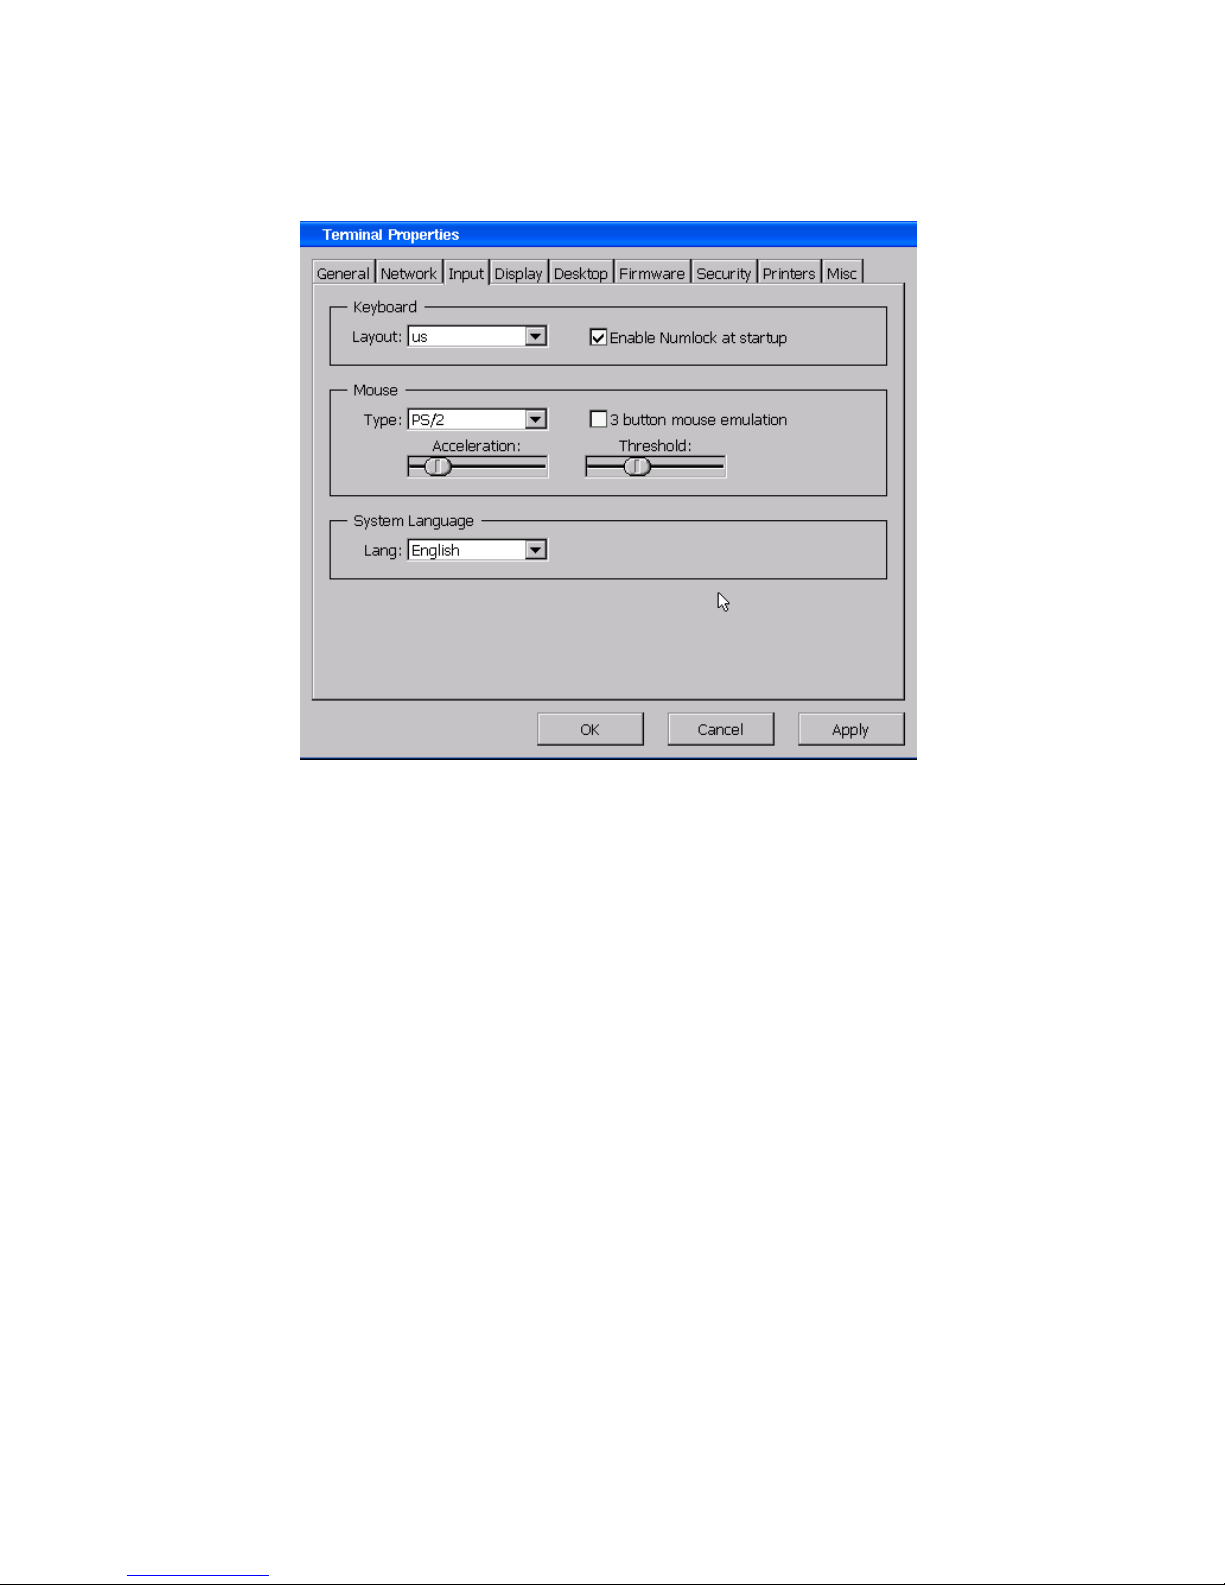
This property sheet allows you to configure your keyboard and mouse parameters.
Input Property Sheet
• Keyboard
o NumLock on Boot. Check to force Numeric Pad NumLock when the TBT starts up.
o Locale. Use the scroll list to select a language and number of keys for the keyboard.
Default is OEM 122 USA, which is the setting required if the Affirmative Computer
Products 122-key keyboard is used with the terminal. If “122” is not shown, the number of
keys is assumed to be 101.
• Character Repeat
o Repeat Delay. Use this slider control to define how long a character key must be held down
before that character will start to repeat on the screen.
o Repeat Rate. Use this slider control to define how often a character will repeat when that
character key is held down.
You can test your repeat settings in the test box.
• Volume Control.
o Use the slider control to adjust the volume of the audio.
o Use the "Mute" check box to disable the audio of the TBT.
47
Page 56
Display
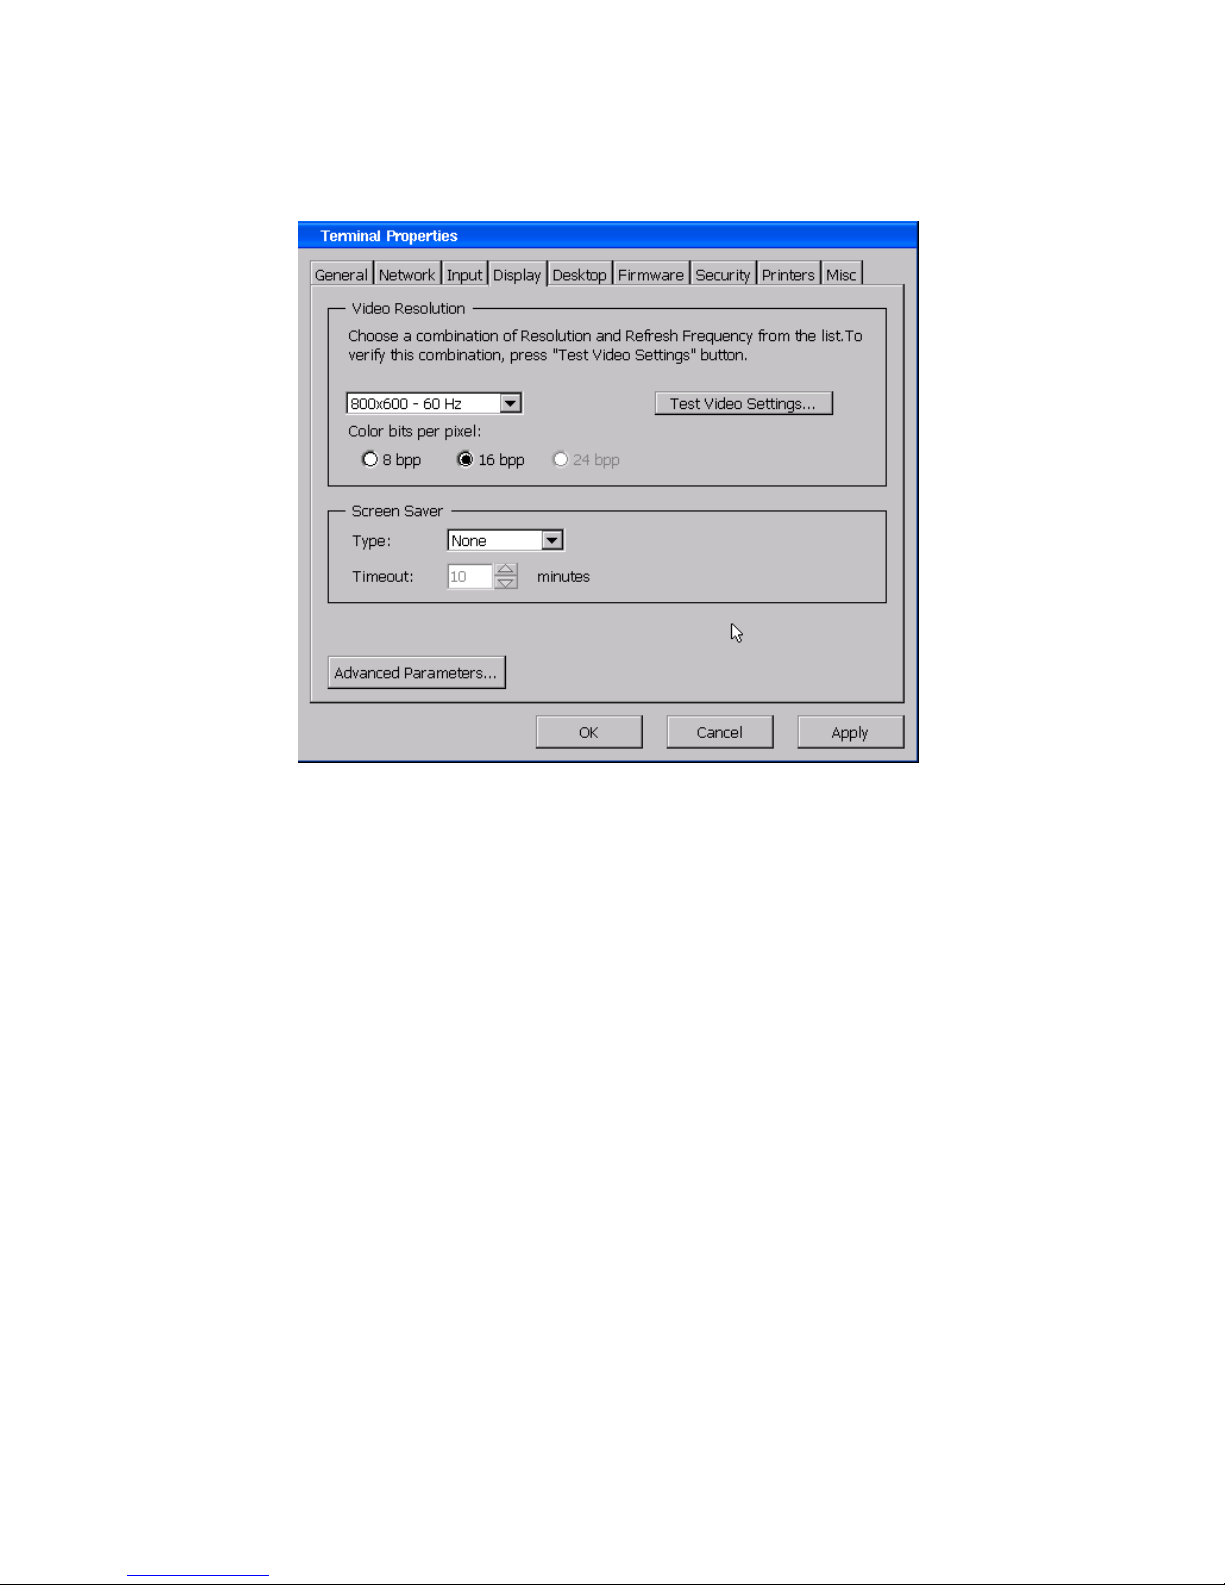
Use the Display property sheet to configure the terminal's display screen properties.
Display Property Sheet
• Video Resolution. Use the drop-down list to select the terminal display resolution, and the radio
buttons to select the color depth. The terminal will support resolutions from 600x480x8x60 up
to1280x1024x16x75 if the monitor will support them. Eight-bit color is typically sufficient for
emulator sessions
o Test Video Settings. Use this button to preview your video changes. If you make any
change in the video settings, you will not be allowed to advance from this sheet until you
have tested the new settings.
• Screen Saver. By default this function is not activated.
o Type. If you want a screen saver, choose, from the drop-down list, a blank screen, X logo,
or the Linux penguin.
o Timeout. Adjust the amount of idle time before either your Screen Saver is activated.
48
Page 57
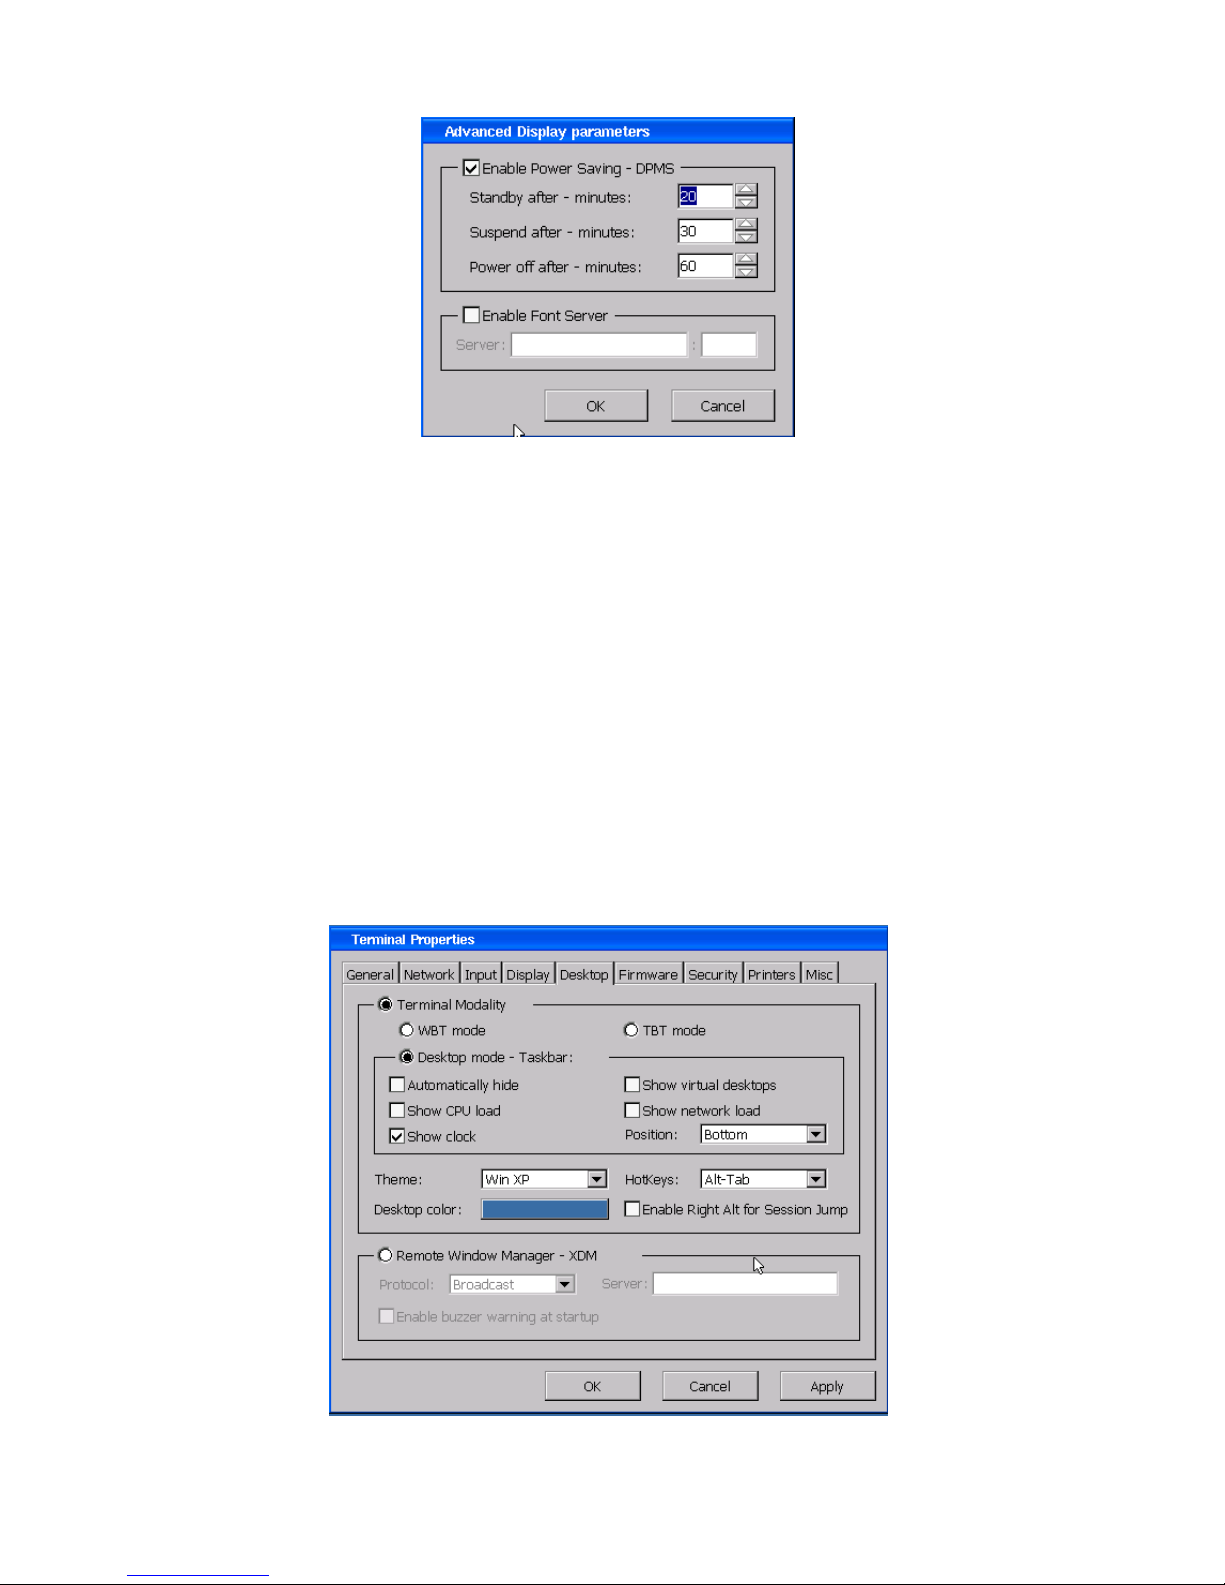
• Advanced Parameters. Click on this button to see the following dialog box.
Advanced Display Parameters Dialog Box
o Enable Power Saving. If you check this box to enable power saving, you will activate the
following three settings:
Standby. Enter the number of minutes (1-999) for the Standby timeout. Standby
acts much like a blank screen saver.
Suspend. Enter the number of minutes (1-999) for the Suspend timeout.. Suspend
turns off most terminal functions, such as the video sync signal.
Power off. Power Off is not supported at this time.
Note: The timeout numbers are not cumulative; if the Suspend timeout is shorter than
the Standby timeout, the terminal will go into Suspend without ever going into Standby.
o Enable Font Server. Font servers are used with Linux X-Windows terminals and have no use here.
Ignore this parameter.
Desktop
This tab provides a number of desktop appearance and session-jump Hot Key options.
Desktop Property Sheet
49
Page 58

• Terminal Modality. These are the three viewing modes discussed in Viewing Modes
. Change to a
different mode here if you wish.
• Desktop mode-Taskbar. If you choose Desktop mode, you are presented with a number of
Taskbar appearance options.
o Position. You may choose to place the Taskbar at either the top or bottom edge of the
Desktop screen.
o Automatically hide. Check this box to hide the Taskbar. With this setting, the Taskbar will
appear only when you move the cursor to the Desktop edge where the Taskbar is hidden.
o Show CPU load. Check this box to display a small moving line graph representing the load
on the terminal CPU.
o Show clock. Check this box to display the system clock. You can set the clock in the Misc
tab.
o Show virtual desktops. Virtual desktops are not supported in the 2209.
o Show network load. Check this box to display a small moving bar graph representing the
load on the terminal network.
o Theme. Select a Windows XP or a Windows 2000 appearance in the Taskbar and the Start
menu.
• Desktop color. Click on the color bar to display a color palette from which to choose the
background screen color. This choice will be applied in both WBT and Desktop viewing modes.
• HotKeys. This drop-down list provides a number of options for task switching in WBT and
Desktop viewing modes.
o WBT. This is the default task-switching option, and is the only one available for the TBT
viewing mode. See Viewing Modes|TBT|Navigation
for an explanation of WBT Hot Keys.
o Alt-Tab. Switch among tasks by pressing Alt+Tab.
o Ctrl-Tab. Switch among tasks by pressing Ctrl+Tab.
o Alt-Tab List. This is very similar to Alt-Tab task switching in Windows. Press Alt+Tab to
see an iconed list of tasks. Each depression of the Alt key will highlight the next icon, and
lifting the Tab key will select the highlighted task.
• Enable Right Alt…. Check this box to allow the hot key combinations
RightAlt+Up/DownArrow for task switching in all viewing modes.
• Remote Window Manager. This is not supported in the 2209.
.
50
Page 59
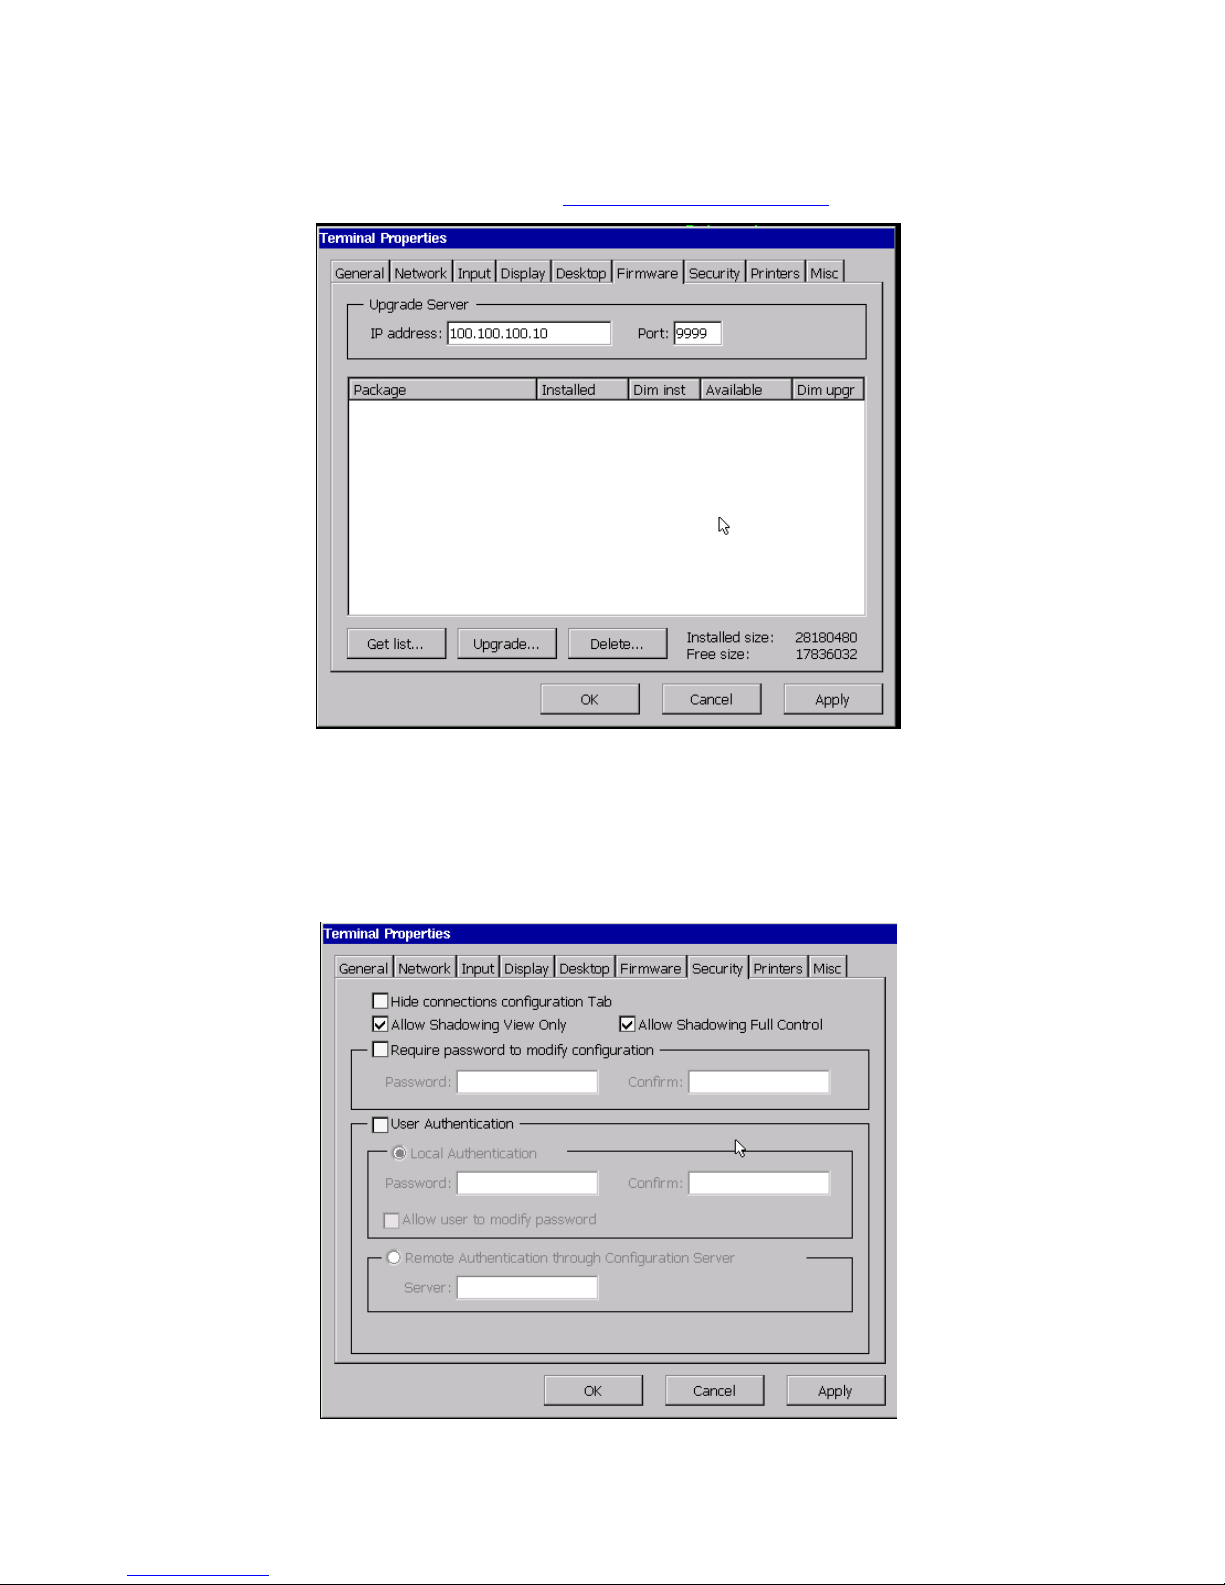
Firmware
Use the Firmware properties sheet if you wish to update your terminal's firmware from a YESmanager
host. For more information, please refer to the Firmware Upgrade Utilities
section.
Firmware Property Sheet
Security
The 2209 provides four levels of security.
Security Property Sheet
51
Page 60

• Hide connections configuration tab. Check this box to hide the Connections tab in Connections
Manager. This prohibits a user from adding, deleting, or editing sessions. Note: In Desktop
viewing mode, this renders the Connections Manager useless.
• Shadowing. When used in conjunction with YESmanager, Affirmative Computer Products’
powerful Remote Central Manager, the terminal’s screens can be viewed remotely, and full remote
control of the terminal can be enabled.
o Allow Shadowing View Only. Check this box to allow the terminal screens to be viewed at
the remote YESmanager console.
o Allow Shadowing Full Control. Check this box to allow full control of terminal functions
from the remote YESmanager console. Actually, when shadowing is activated in
YESmanager, control will be shared between the remote administrator and the local user.
Note: Enabling Full Control will have no effect unless you also enable View Only.
• Require Password…. Check this box to enable password security for terminal configuration.
Then enter and confirm a password in the boxes.
Note: The password is designed to avoid any unreasonable change to the Terminal Properties
Settings. Please do NOT activate the password unless you are the administrator. If you forget the
password, it will be difficult to recover. There is only one local method of recovery if you forget
the password.
o Ask your system administrator to use the secret hot key sequence to reset Terminal
Properties to factory defaults.
• User Authentication. Check this box to enable password security for user access to sessions.
o Local Authentication. This radio button is always enabled. If you checked User
Authentication, enter and confirm a password in the boxes. You can also allow or forbid
the user to change the user password.
o Remote Authentication…. This is not supported in the 2209 terminal.
Note: Even if a user password is required, the user can still access Terminal Properties without
entering the correct password. Therefore, it is strongly recommended that you also enable Require
Password… if you are going to use user authentication.
52
Page 61
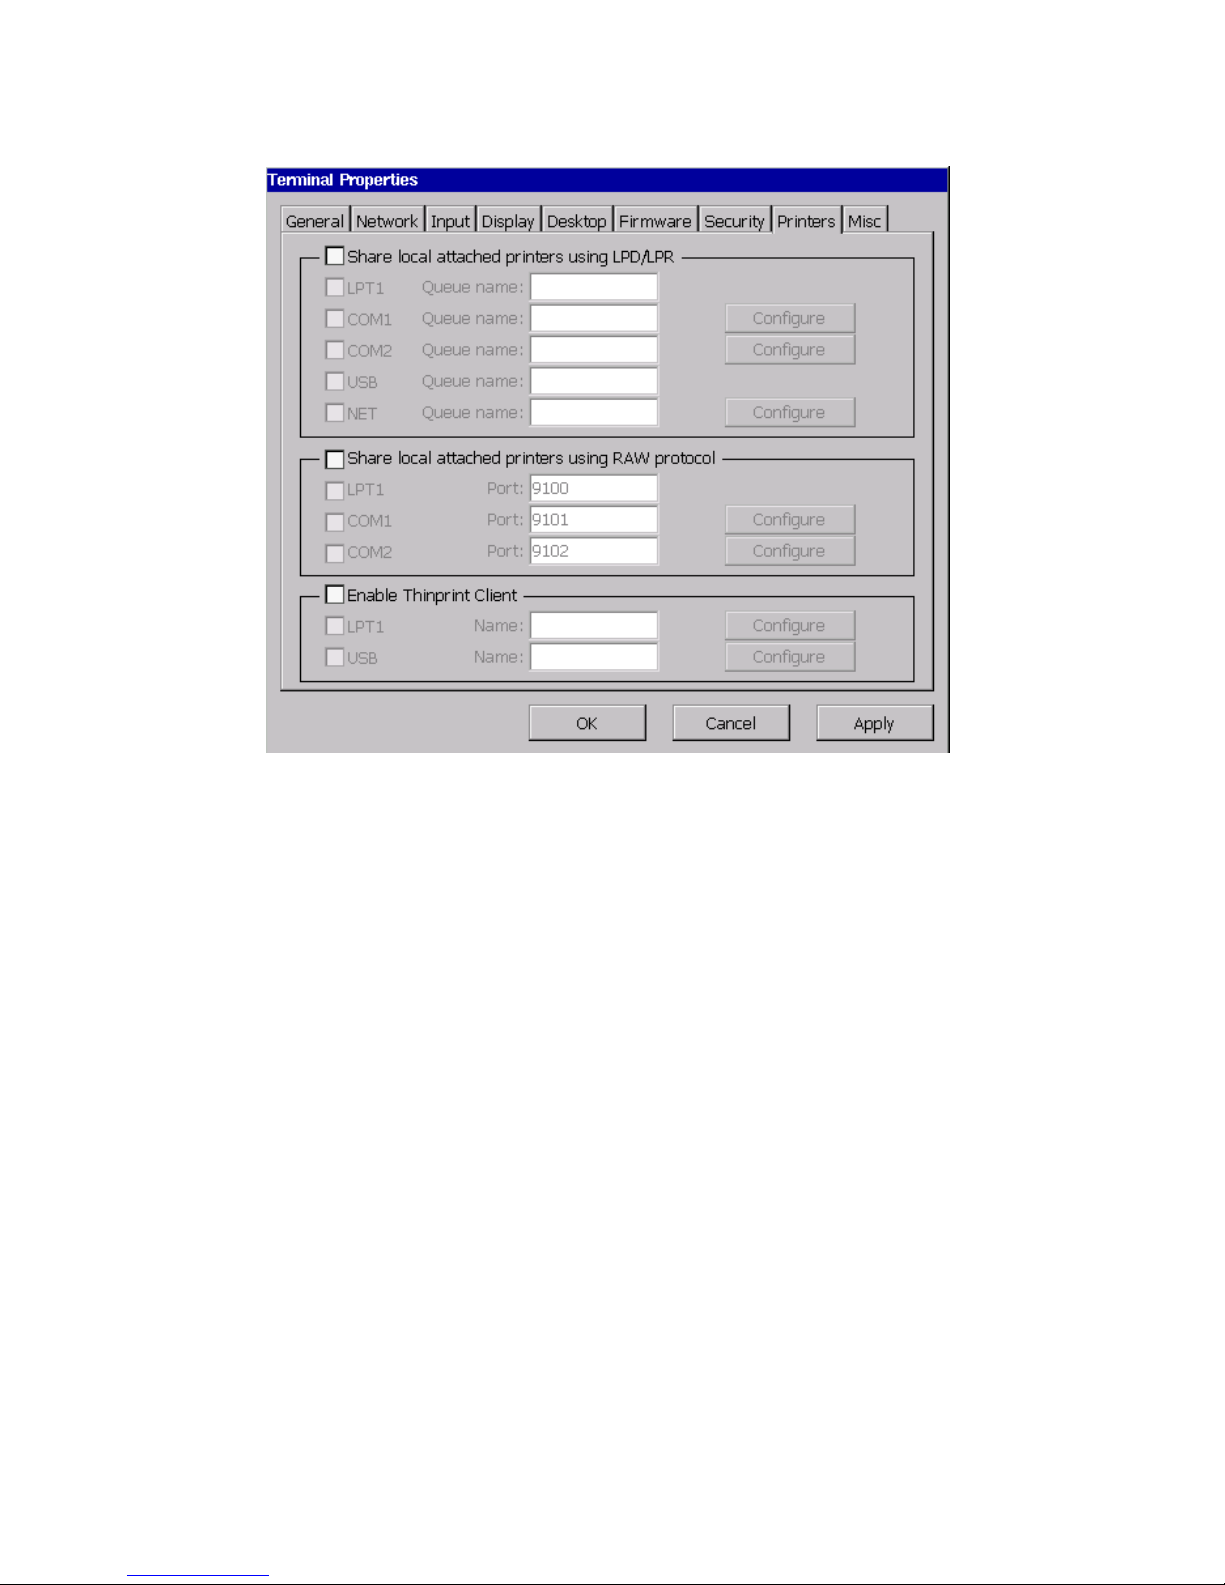
Printers
Printers Property Sheet
In addition to using local printers for printer emulation sessions, 2209 terminals can be configured as
network print servers for use from other stations on the network. Either local printers or network
printers can serve as the printing devices. Two modes of network printing are possible.
LPD
The Berkeley versions of the UNIX™ operating system provide printer spooling with a collection of
programs: lpr (assign to queue), lpq (display the queue), lprm (remove from queue), and lpc (control the
queue). These programs interact with an autonomous process on network print servers called the line
printer daemon (LPD).
Each 2209 terminal includes an LPD module that allows an LPR device on the network to assign print
jobs to a local printer or network printer attached to the terminal. Check the Share local…using
LPD/LPR box to enable LPD printing.
.
• Printer Port. Select one, two, or three ports from LPT1, Net, and USB. There are no COM ports
on a 2209.
• Queue name. Define a queue name for each printer port. This will be the queue name used by
LPR devices to assign print jobs to that port.
• Configure. If you chose Net, you will have to configure the network printer. Click on the
Configure button to see the Network Printer Configuration dialog box.
53
Page 62
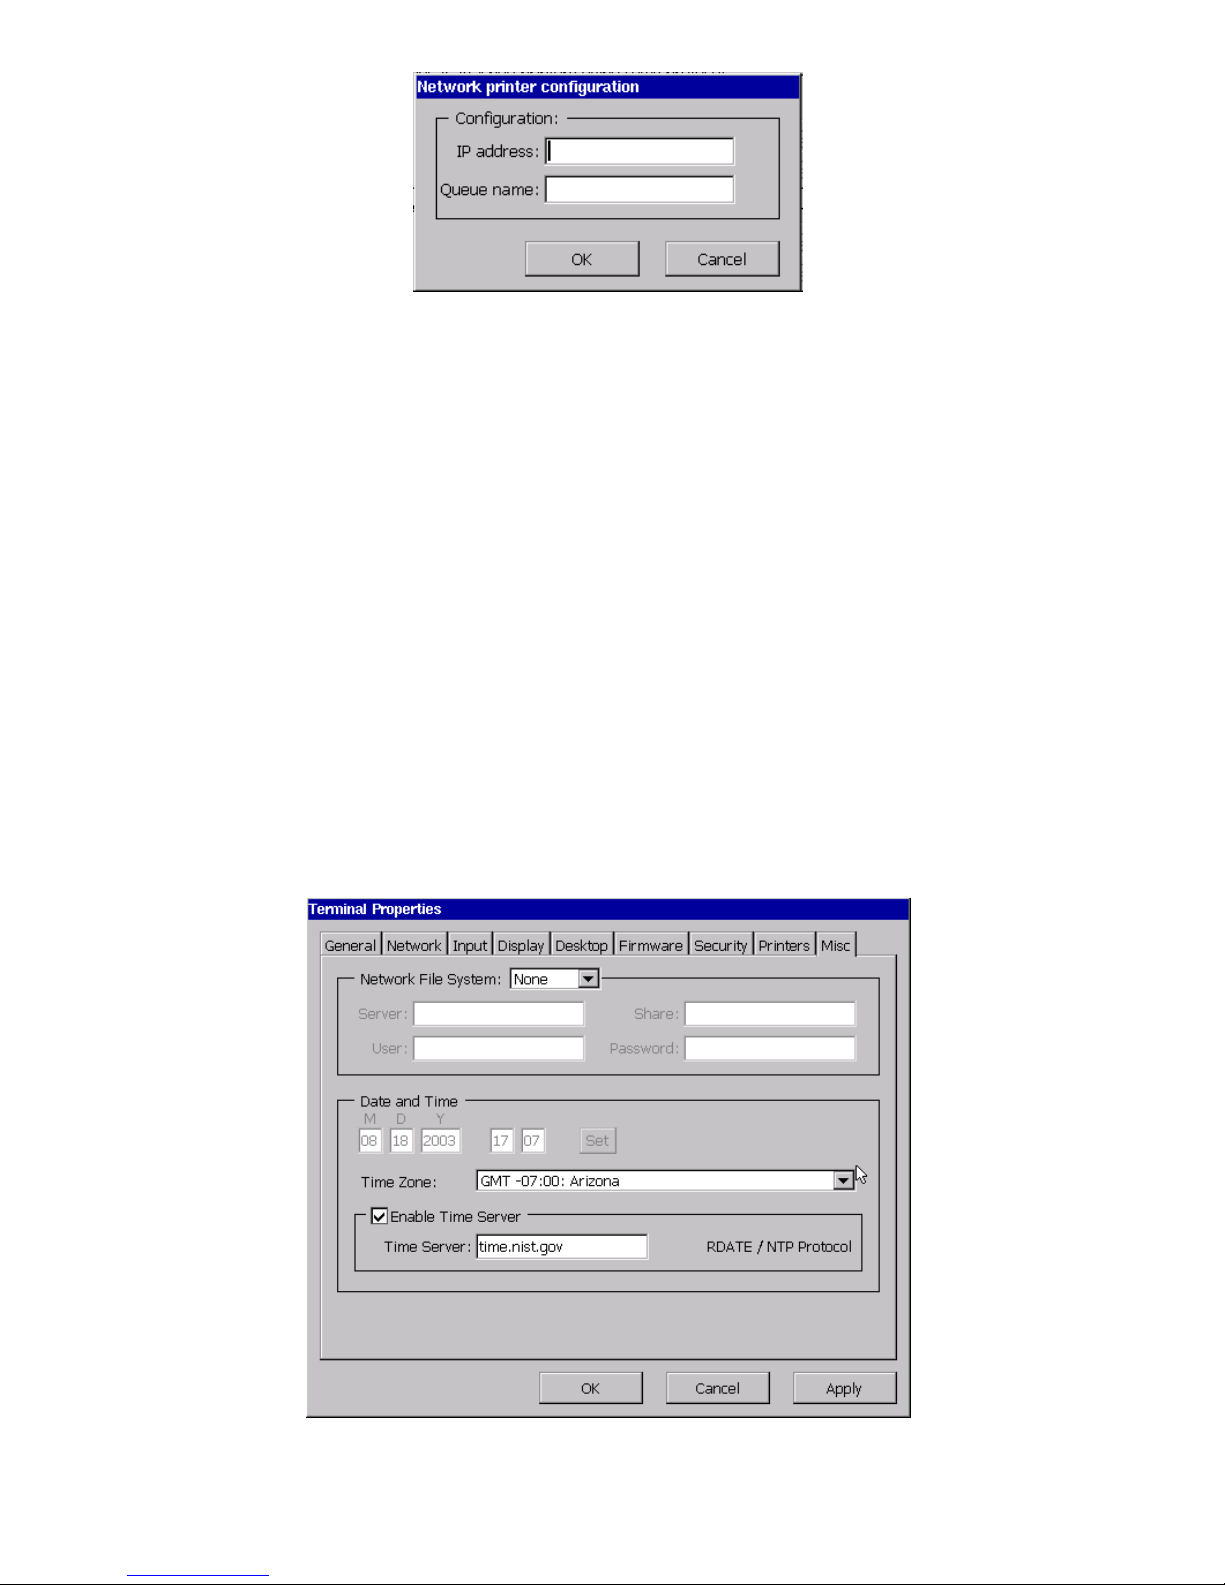
Network Printer Configuration Dialog Box
• IP address. Enter the IP address of the network printer.
• Queue name. Enter the queue name used to assign print jobs to the network printer. It is not
the same name as the Net Queue name assigned in the Printers properties sheet.
RAW
RAW is the default protocol for network printing from a Windows client. RAW data is not modified by
the spooler at all, but is sent directly to the printer. Check the Share local…using RAW protocol box
to enable RAW printing. Then check LPT1, since this is the only port available on a 2209 for RAW
printing. There should be no reason to change the default port number, 9100.
ThinPrint
ThinPrint is not supported in the 2209.
Miscellaneous
Miscellaneous Property Sheet
54
Page 63

• Network File System. This is a parameter for mounting network drives as local drives. It is not
applicable for the 2209, so leave it at the default None.
• Date and Time. You can enter the date and time here. Actually, the date may do you little good
since it is not used for anything on a 2209, but the time may be useful if you have enabled the clock
display (see Desktop) on the Taskbar.
• Time Zone. You can choose your time zone here from the drop-down list, but it will be of no use
unless you also enable a timeserver.
• Enable Time Server. Check this box to allow the terminal to sync the local current time, shown in
the Date/Time dialog box, with a timeserver on the Web. Obviously, it only works if you have a
Web connection (but you don’t need a browser session). If you check the box, and then enter a valid
timeserver (time.nist.gov works well for us) in the Time Server box, the local clock will sync up
with the timeserver every time the terminal is booted up.
Return to Table of Contents
55
Page 64

THIS PAGE INTENTIONALLY LEFT BLANK
56
Page 65

.
Editing an Emulation Connection
Editing an existing emulation connection is quite different in TBT and non-TBT viewing modes. Many
more configuration parameters are accessible in non-TBT mode, and you may have to edit from one of
those modes in order to get the emulation settings you need. Settings made in non-TBT mode remain in
effect if you return to the TBT viewing mode.
TBT Viewing Mode
Editing in TBT mode is done from the same parameter screens used when adding a connection.
Highlight the connection name in Connections Manager and press F6 to open the parameter screens for
that connection. Refer to Creating an Emulation Connection|TBT Viewing Mode
for parameter details.
Non-TBT Viewing Mode
Connection properties are edited in the Configure tab of Connections Manager. Highlight the session
of interest and click on Edit.
Display Sessions
For TN5250e sessions, you will see a Displays Sessions Properties sheet with seven property tabs. For
TN3270e sessions, you will see a Displays Sessions Properties sheet with six property tabs. The
opening view is of the Connections tab and property sheet.
57
Page 66
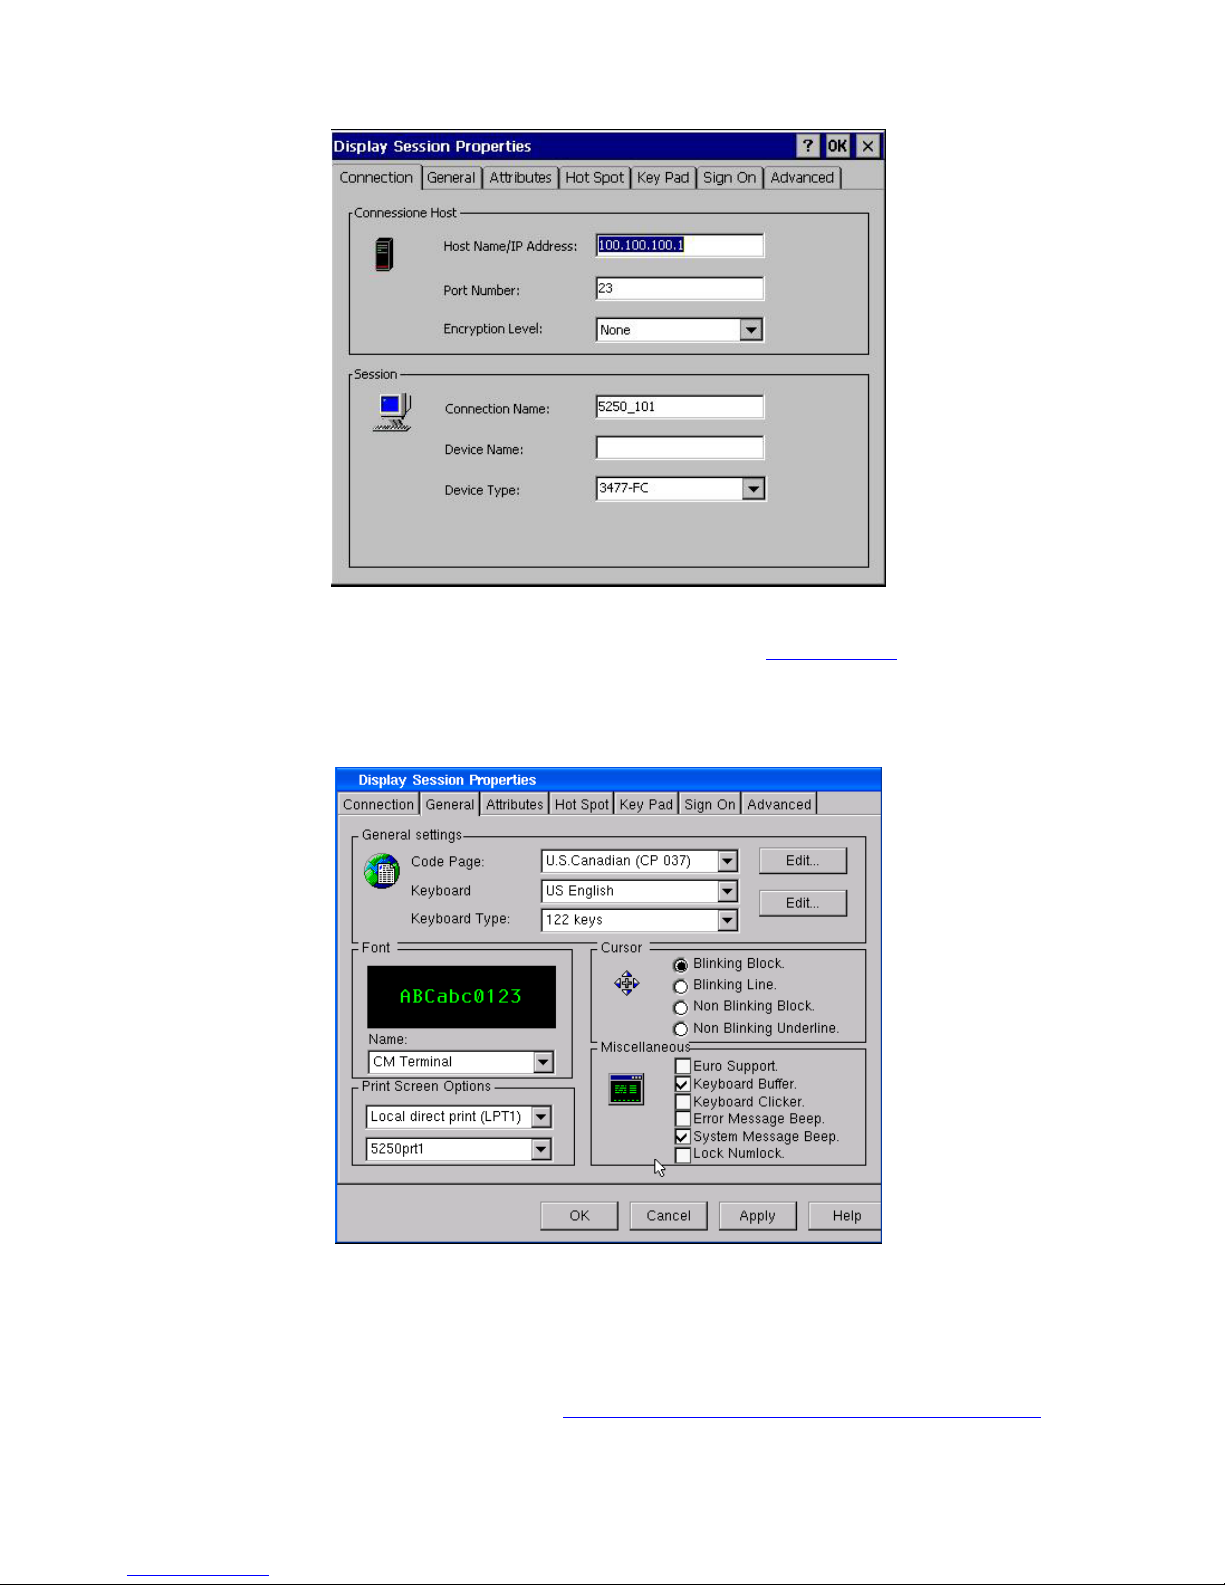
Connection
Connection Property Sheet for TN5250e Display
The properties on this property sheet were already configured in the Setup Wizard, although you can
change them here if you wish
General
General Property Sheet for TN5250e Display
Code Page
YESterm/IP supports numerous language Code Pages. The Code Page selected here from the dropdown list should be the same one configured on the AS/400 for this specific device. It is also possible
to create a new custom Code Page Table. See How To…|Create a Custom Language Code Page
instructions.
for
58
Page 67
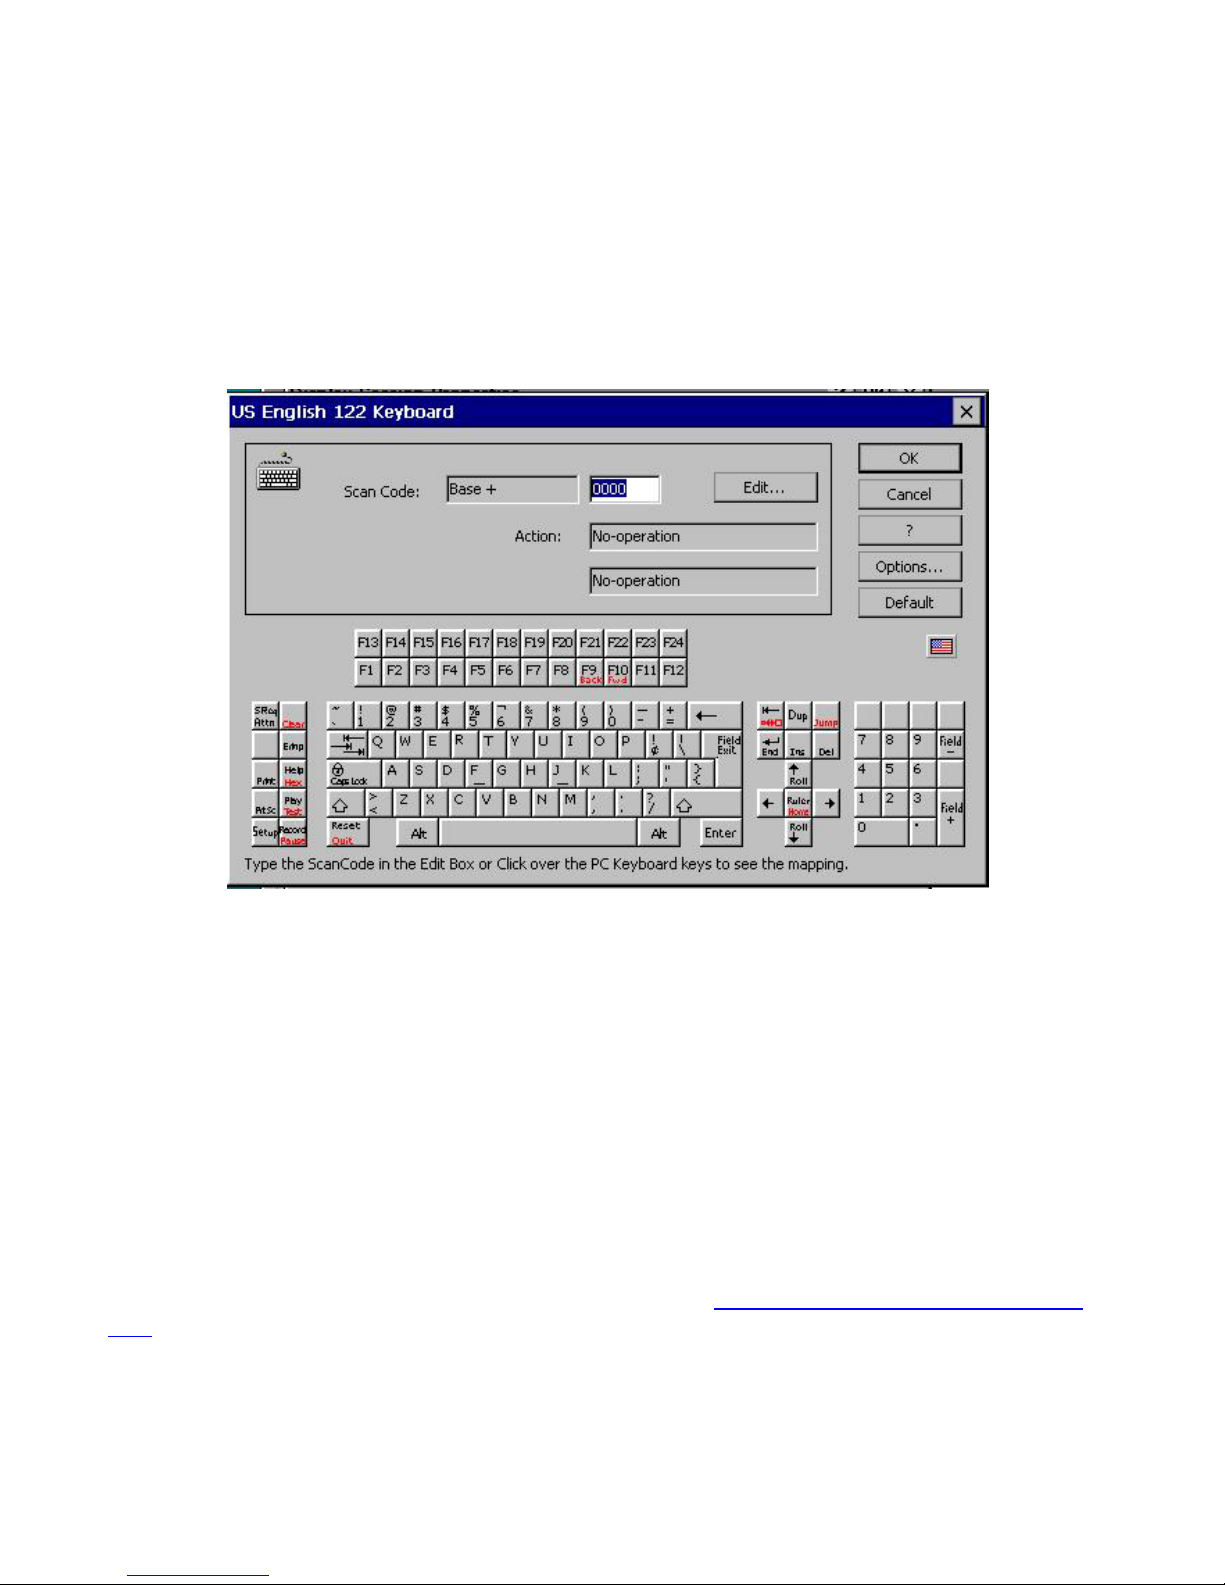
Keyboard Language
YESterm/IP supports several non-English keyboard languages. If you wish to use one of them, select it
from the drop-down list.
Keyboard Type
YESterm/IP supports 3 different keyboard types (101 PC, 101 Terminal, and 122 Key) for several
different languages. It is also possible to create a custom keyboard map, if desired. Activate Edit to
get to the keyboard map page.
Keyboard Map Page for 5250 122-Key U.S. English Keyboard
You can check the current mapping in one of two ways:
• Scan Codes. The keyboard sends a unique scan code to the terminal when a key is pressed. If you
want to see what key is associated with a specific scan code, type that code in the Edit box, shown
highlighted in the above figure. The associated key will highlight, and any command mapped to
that key will show in the Action boxes. Of course, most people couldn’t care less about scan codes,
so this method may be of little use to you.
• Mouse Clicks. Position the cursor over the key of interest and click. The scan code for that key
will show in the Edit box, and any mapped command will show in the Action boxes. If you want to
see the effect of that key plus a modifier key (Shift, Alt, Ctrl), click on the modifier key and then
on the action key.
Edit
Activate this button to initiate custom keyboard mapping. See How To…|Create a Custom Keyboard
Map for the mapping procedure.
59
Page 68
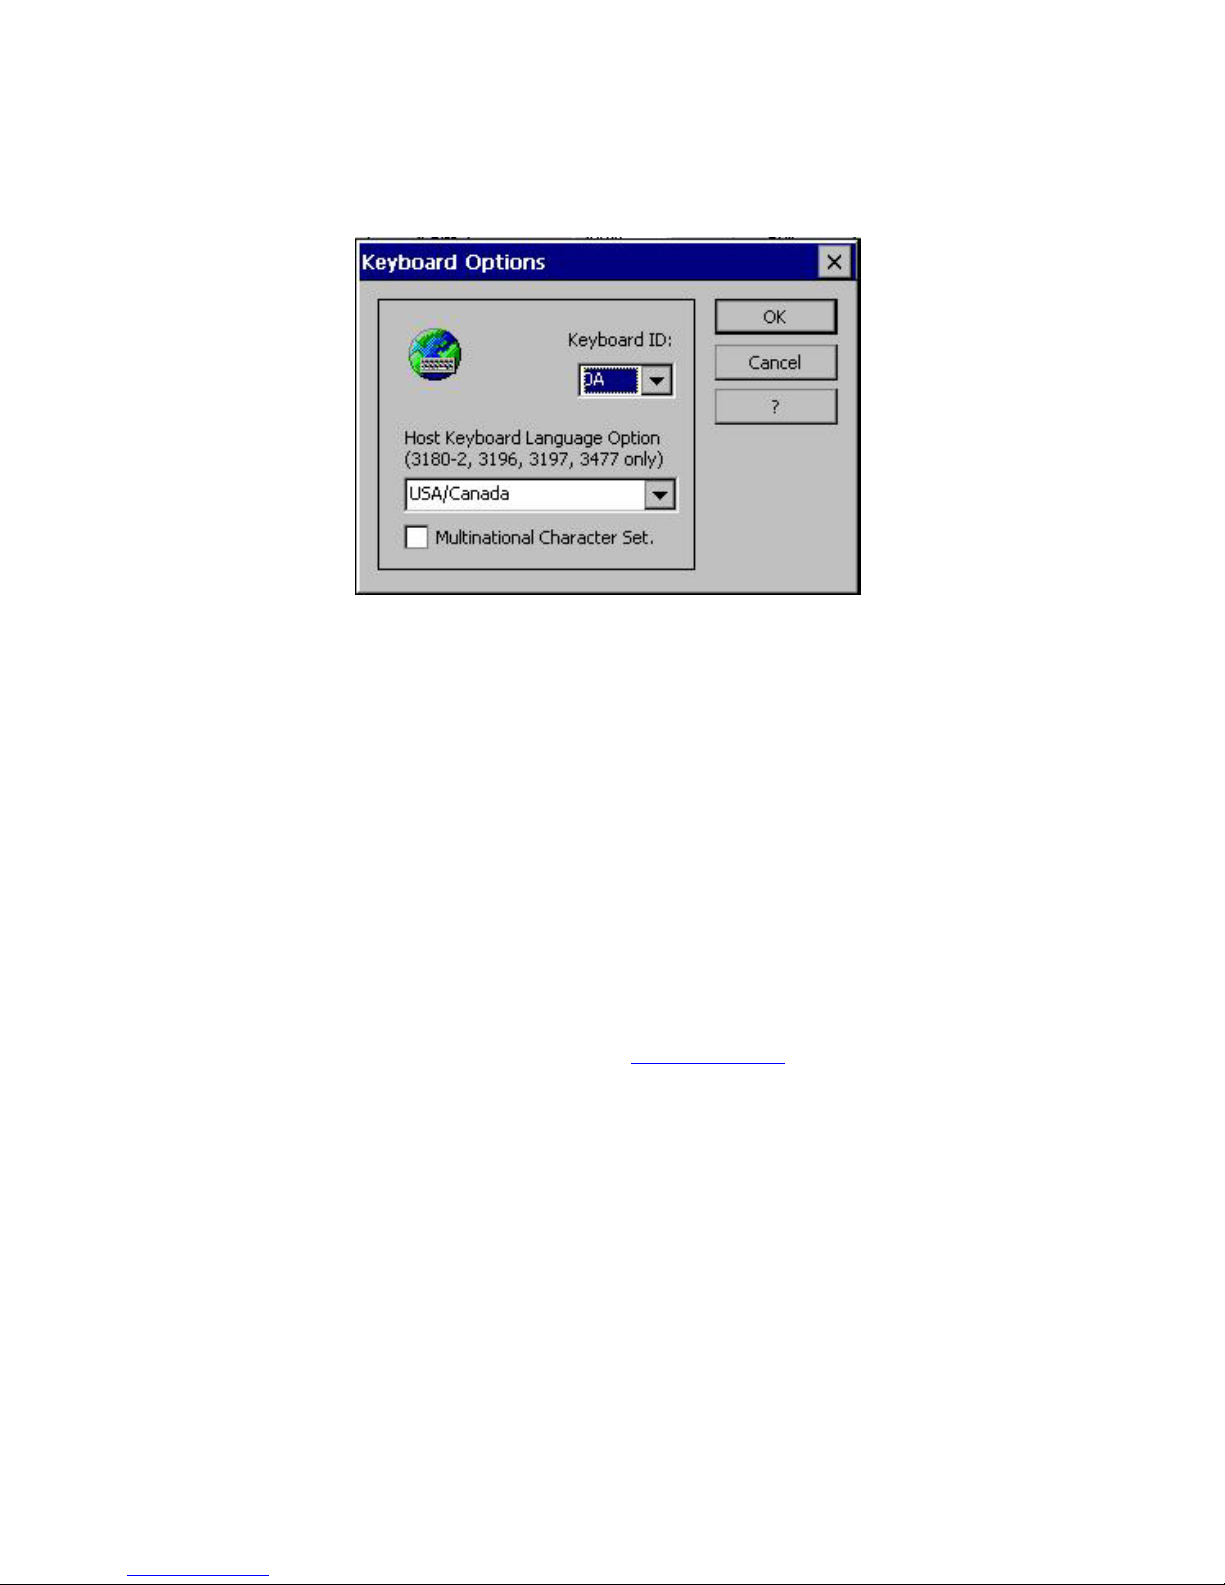
Default
This button will erase any custom mapping that exists in this map. Everything goes back to defaults.
Obviously, you want to be very careful around this key if you have done much custom mapping.
Options
Keyboard Options Dialog Box
This button opens a special dialog box where you can specify the Host Keyboard Language Option, and
enable the Multinational character set. Keyboard ID is not used in the 7370.
Font
Select one of two Font styles to be used as the default Font for the display session.
Print Screen
From the drop-down list, select how the Print Screen function is to be performed:
• Local Direct Print. Make this selection if you wish to print to a local printer attached to the LPT1
port.
• Through the Host. Make this selection if you wish to print to a remote printer through the AS/400.
• Extended Local Print. This selection provides local printing on steroids. To use it, you must
create a printer emulation session. This session can be used with either a local or a network printer,
and it allows you to format your print output. See Printer Sessions
select this option, you must choose a printer session from the lower drop-down list.
• Function Disabled. Screens cannot be printed.
The Print Screen function can be activated from:
• Emulator Button bar.
• Emulator Menu bar (File|Print)
• Keyboard in accordance with the keyboard map.
• Key Pad, if it contains a corresponding button.
for more information. If you
Cursor
Select the type of cursor you want to use.
60
Page 69
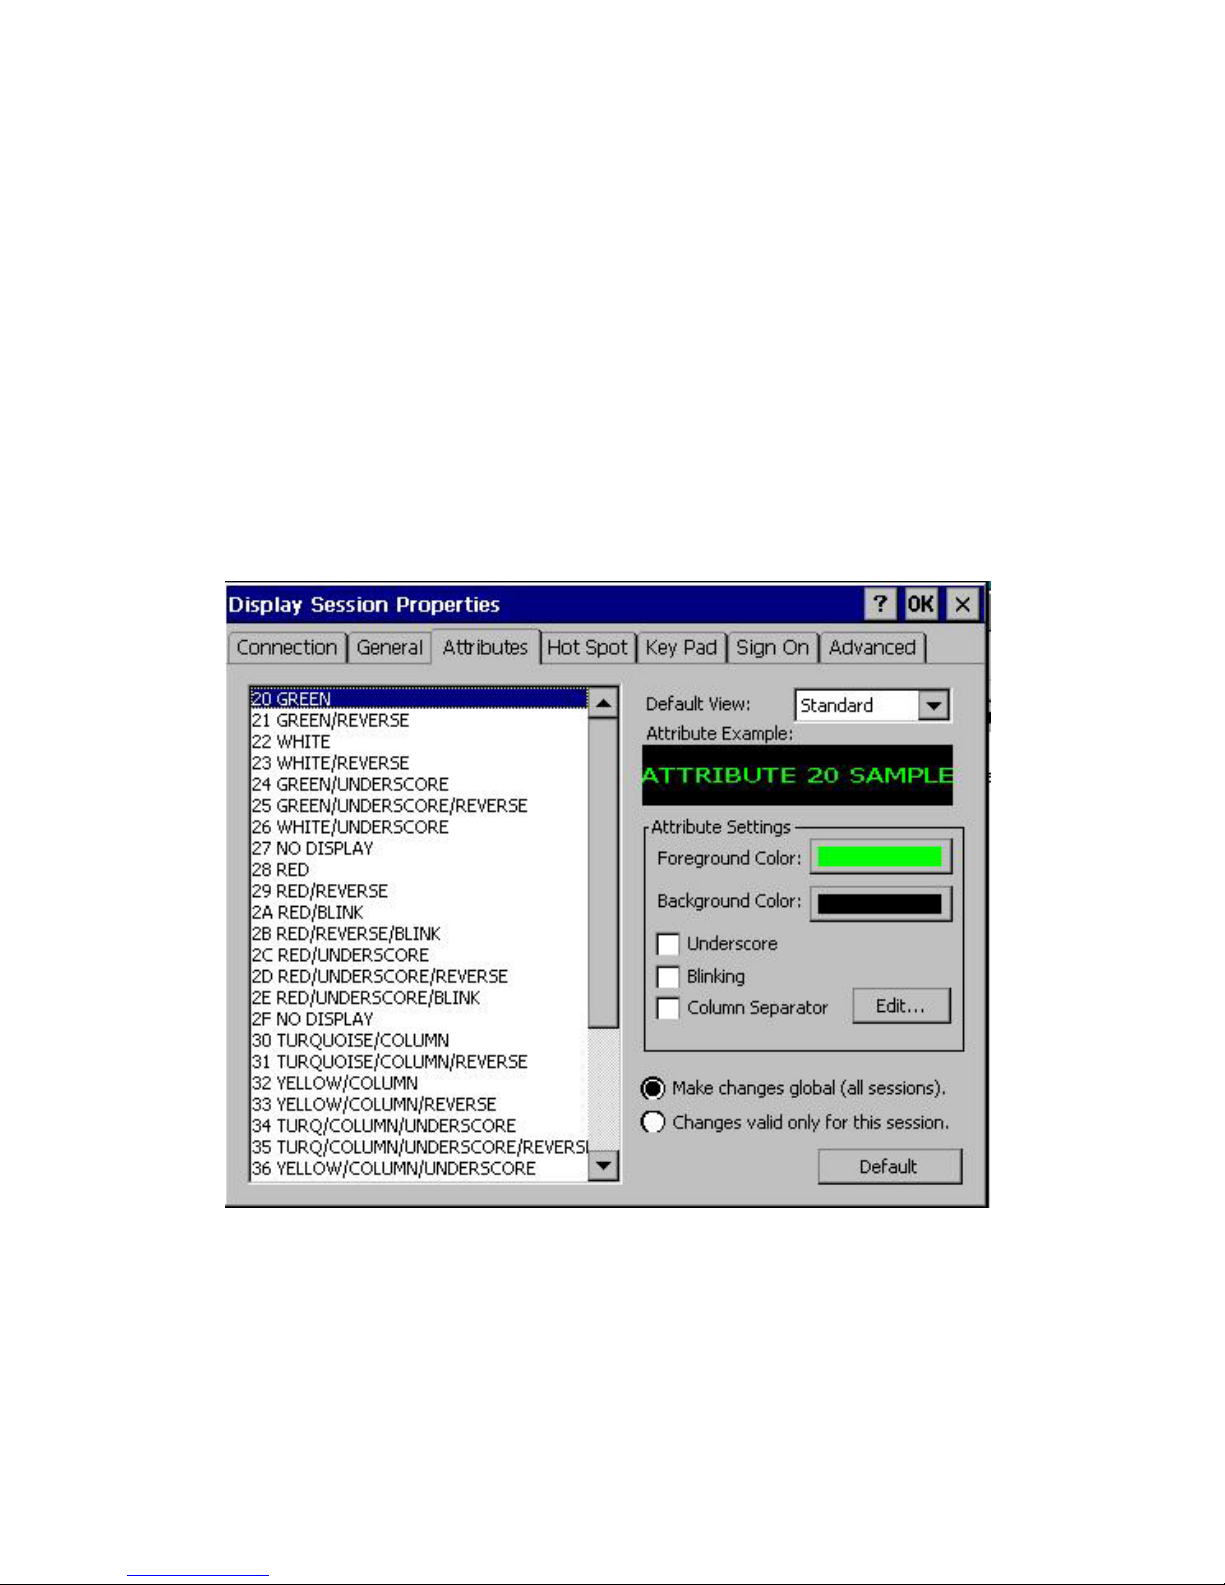
Miscellaneous
• Euro Support. When this option is enabled, you will enter the Euro symbol when you press Alt+E.
• Keyboard Buffer. This option enables Typeahead, but this option is of little use with a virtual
keyboard.
• Keyboard Clicker. If this option is enabled, you can hear an enhanced click every time you press a
key on the keyboard.
• Error Message Beep. If this option is enabled, you can hear a "Beep" when an input error is made.
• System Message Beep. If this option is enabled, you can hear a "Beep" when a message is received
from the Host.
• Lock NumLock. This option has no effect since NumLock is always enabled in an emulator
session.
Attributes
This properties sheet allows extensive editing of your screen appearance. At the lower right corner of
this sheet are two radio buttons allowing you to make these edits global for all sessions, or restrict their
use to this session only.
Attributes Property Sheet
61
Page 70
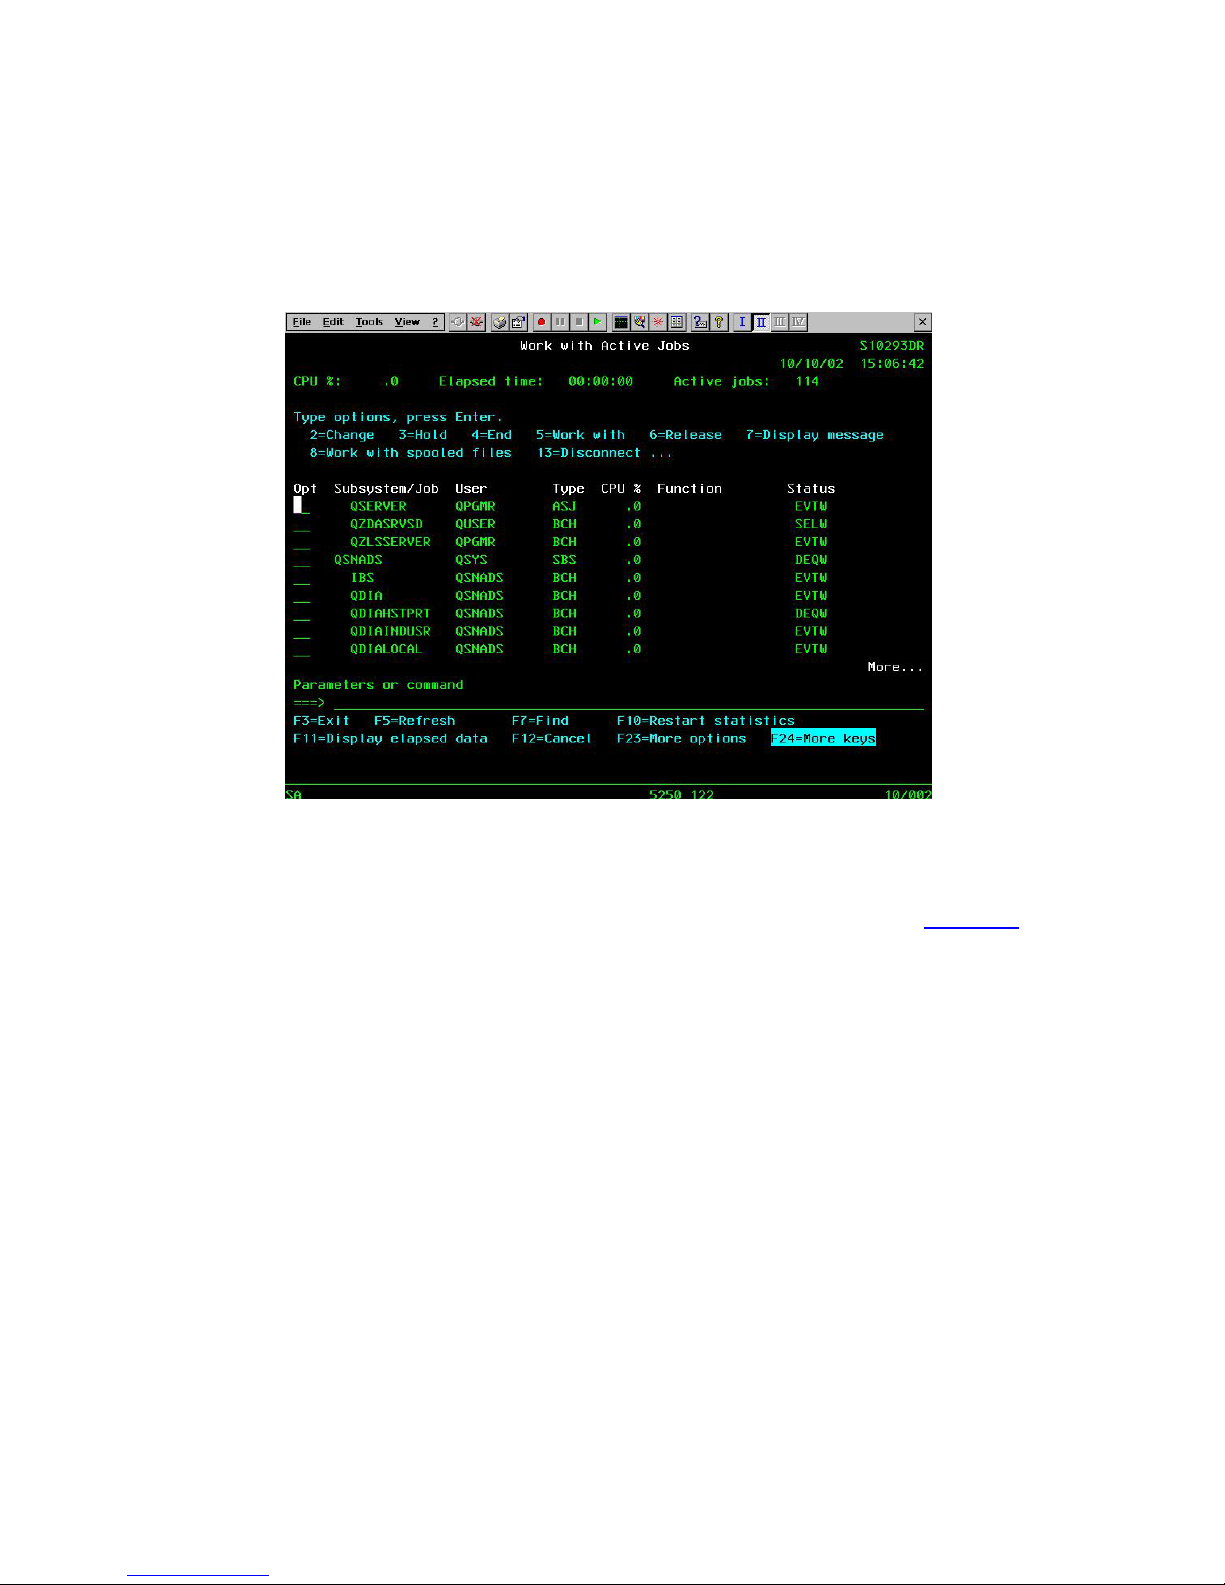
Default View
• Standard. This selection provides the standard green screen “text” appearance for your session
screens, duplicating terminal screens. Hot Spots are invisible unless the mouse cursor is placed
over one of them, and then only that one Hot Spot is visible. If you are in TBT mode, the Standard
view is most familiar to you. But you can operate in the Advanced view if you wish, although the
efficiency of the Advanced view is lost without use of a mouse.
Display Emulation Screen with Standard View and Hot Spots
• Advanced (Recommended for WBT and Desktop modes). This selection provides a “graphics”
appearance for your session screens, resembling a Windows application. All the Hot Spots
shown as raised buttons. Advanced View is the most productive way to operate in non-TBT
viewing modes since all menu items, Function Keys, sub-file options, and custom hot spots are
always visible and accessible as raised buttons. The use of custom Hot Spot keywords, which can
be linked to keyboard commands, often eliminates the need to use the virtual keyboard and reduces
the number of screen taps required to run applications.
are
62
Page 71
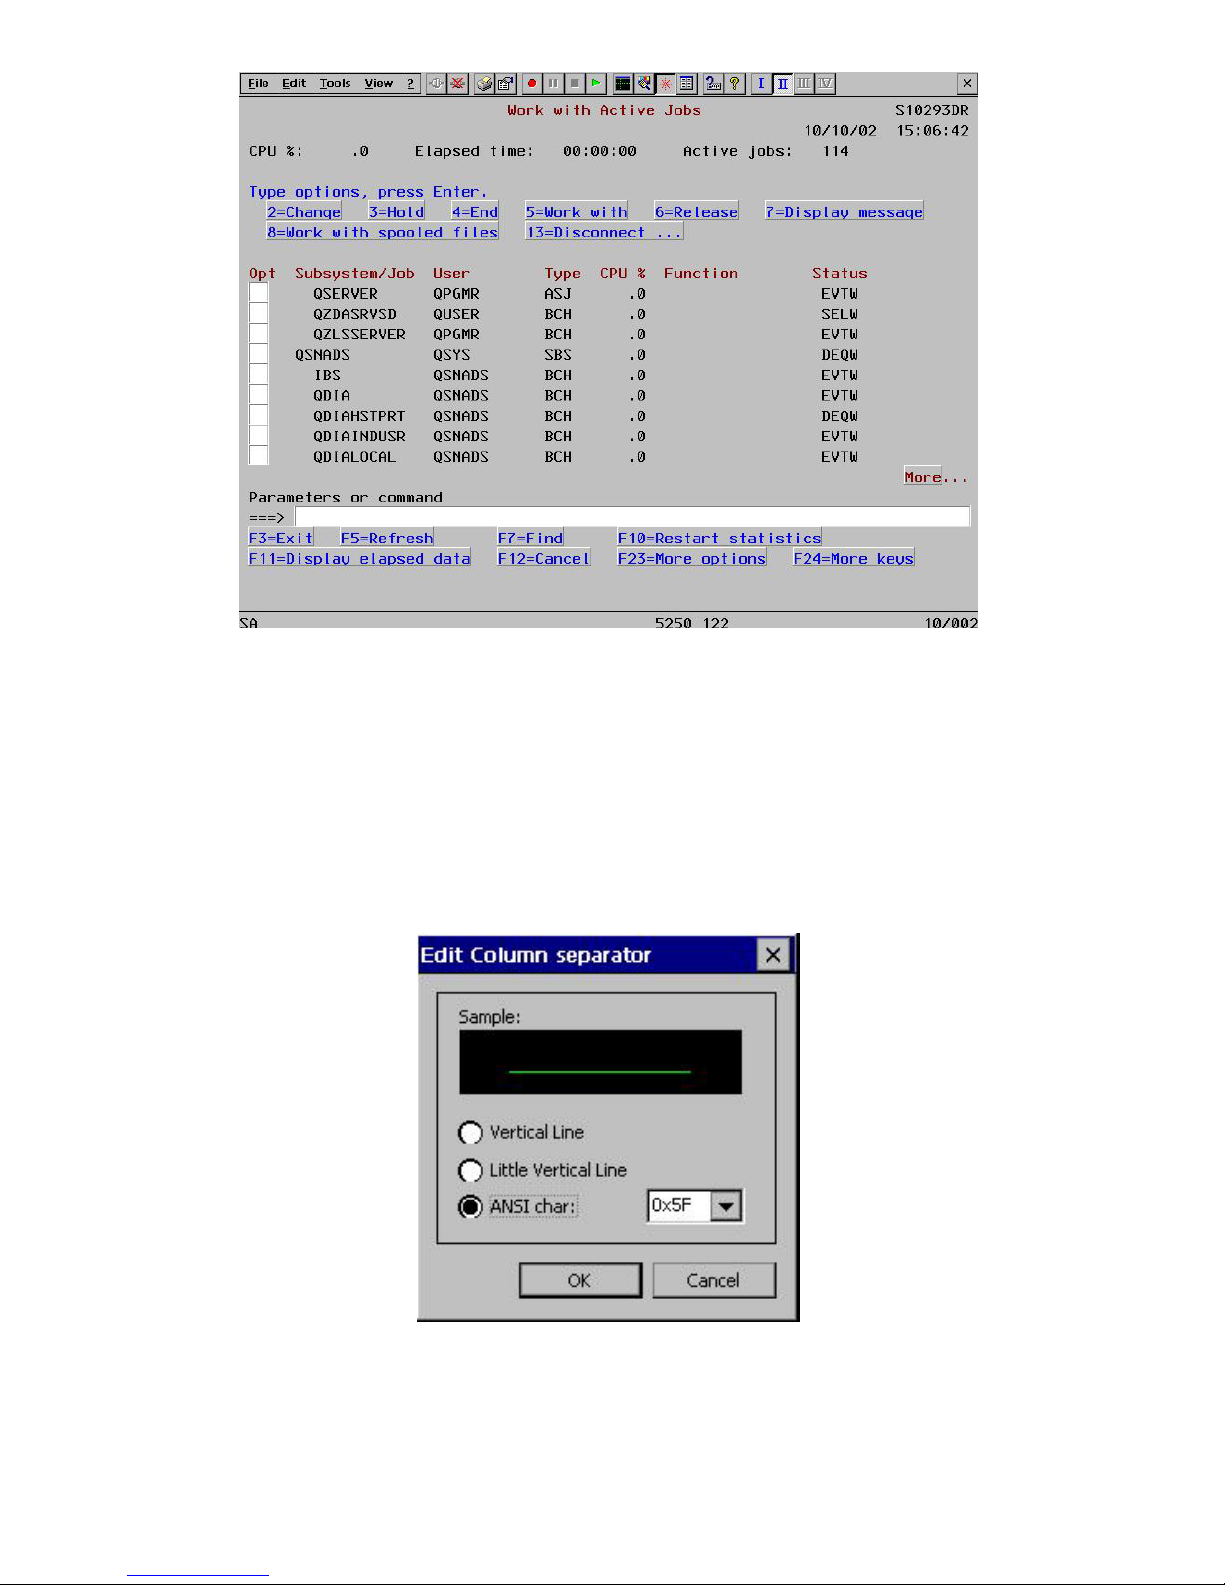
Display Emulation Screen with Advanced View and Hot Spot
Either view can be overridden from the emulation screen Toolbars if desired.
Attribute Settings
Set the appearance of the attribute font on the screen. This includes properties such as foreground and
background color, blinking, underscore, and the use of column separators. You will see a preview of
the “new look” in the Sample field. Be careful with the colors you choose; a wrong choice can cause
text or fields to be invisible on the screen because of lack of color contrast.
• Edit (Column Separator). Activate this button to invoke this dialog box.
Make your choices and view them in the Sample field.
Edit Column Separator Dialog Box
63
Page 72
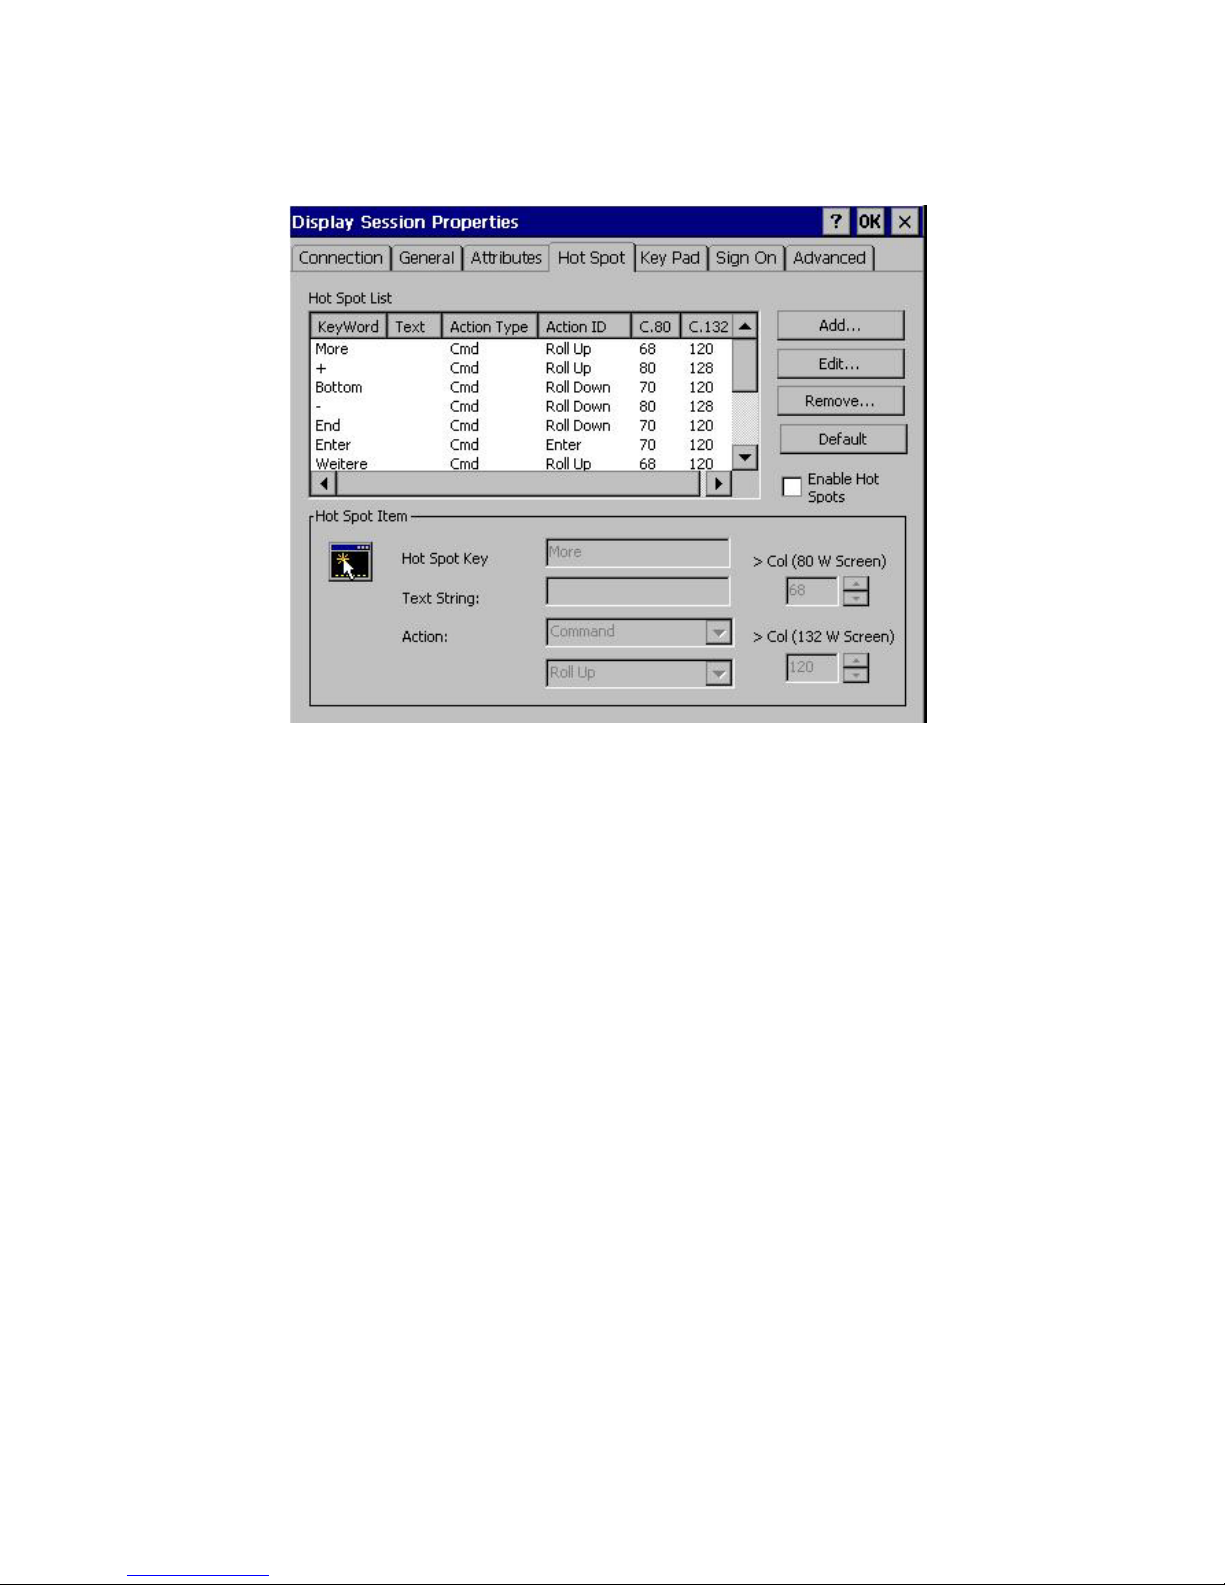
Hot Spot
Changes made in this property sheet affect all sessions. There is only one Hot Spot configuration per
emulator, not one per session. Hot Spots are of little value if you are using the TBT viewing mode.
Hot Spot Property Sheet
A Hot Spot is an area of the session window on which you can single-click the left mouse button to
execute a command or function. Actually, a Hot Spot is the result of a text search by the emulator for
the specified Keyword on the screen. The Function Key and Numeric fields (from 1 to 99 followed by
a "period" or "space") Hot Spots are active by default, but you can add other Hot Spot keys and/or
edit/remove them.
A Hot Spot can be used to:
• Simulate a function key.
• Execute a Recorded Sequence that has the same name as the word that you select on the screen.
• Execute a command that you select.
To enable the use of Hot Spots, you must check the Enable Hot Spots box.
Standard View
If Standard View is selected in the Advanced tab or the emulation screen Toolbars, Hot Spots are
invisible unless a mouse cursor is dragged over them, and then only the one under the mouse cursor
becomes visible.
64
Page 73
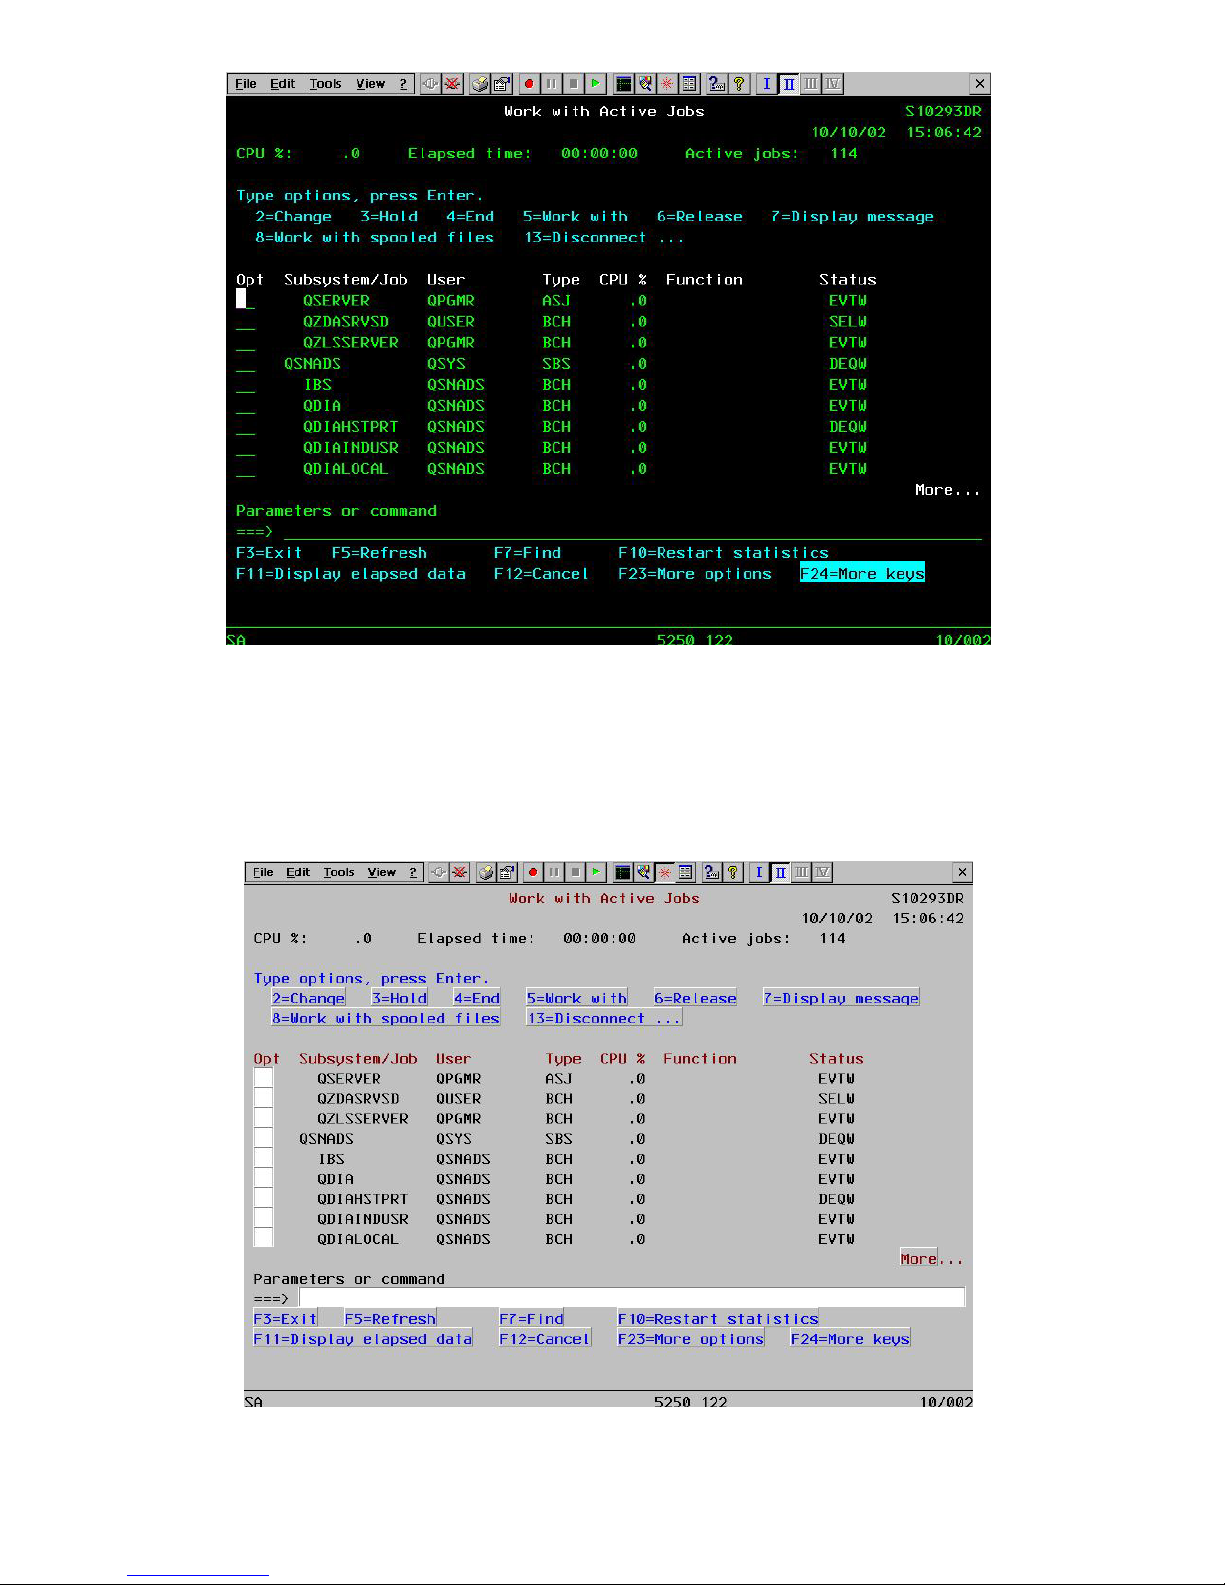
Emulation Screen with Standard View and Hot Spots
Advanced View
Hot Spots are displayed as raised buttons if the Advanced View option is selected in the Attributes tab
or the emulation screen Toolbars. Advanced View is the most productive way to operate in non-TBT
viewing mode since all menu items, Function Keys, sub-file options, and custom hot spots are always
visible and accessible as raised buttons.
Emulation Screen with Advanced View and Hot Spots
65
Page 74

To Edit a Hot Spot:
1. Select the Function Key you want to modify.
2. Click on Edit.
3. If you want to send a Text String to the host every time you press the Function key, type it into the
Text String field.
4. Select the Action from the Drop-Down List
5. From the drop-down list, select the command or the Recorded Sequence that you want to associate
to the Hot Spot key.
6. In c.80, specify where, in an 80-column screen, the text search engine should start looking for the
specified Keyword. For example, the default start for the word “More” is column 68. So if there is
a word “More” to the left of that column, it will not be defined as a Keyword or Hot Spot.
7. In c.132, specify where, in a 132-column screen, the text search engine should start looking for the
specified Keyword.
8. Click on Accept.
9. Click on Apply.
To Remove a pre-defined Hot Spot:
1. Select the Function Key.
2. Click on Remove.
.
To Add a Hot Spot:
1. Click on Add.
2. Type the Hot Spot Key Word you want to detect. If you want to send a Text String to the host, type
it into the Text String field.
3. Select the Action from the Drop-Down List
4. From the drop-down list, select the command or the Recorded Sequence that you want to associate
to the Hot Spot.
5. Specify the text search start columns in c.80 and c.132.
6. Click on Accept.
7. Click on Apply.
Key Pad
A Key Pad is a small window with several customizable push buttons, each having an assigned
function. You can make it visible on the screen by clicking on the Key Pad button on the Buttons
toolbar, or selecting View/Key Pad from the Menu bar. You can choose a function from the Key Pad
with your mouse instead of typing the equivalent command, pressing a key, or running a Recorded
Sequence.
66
Page 75
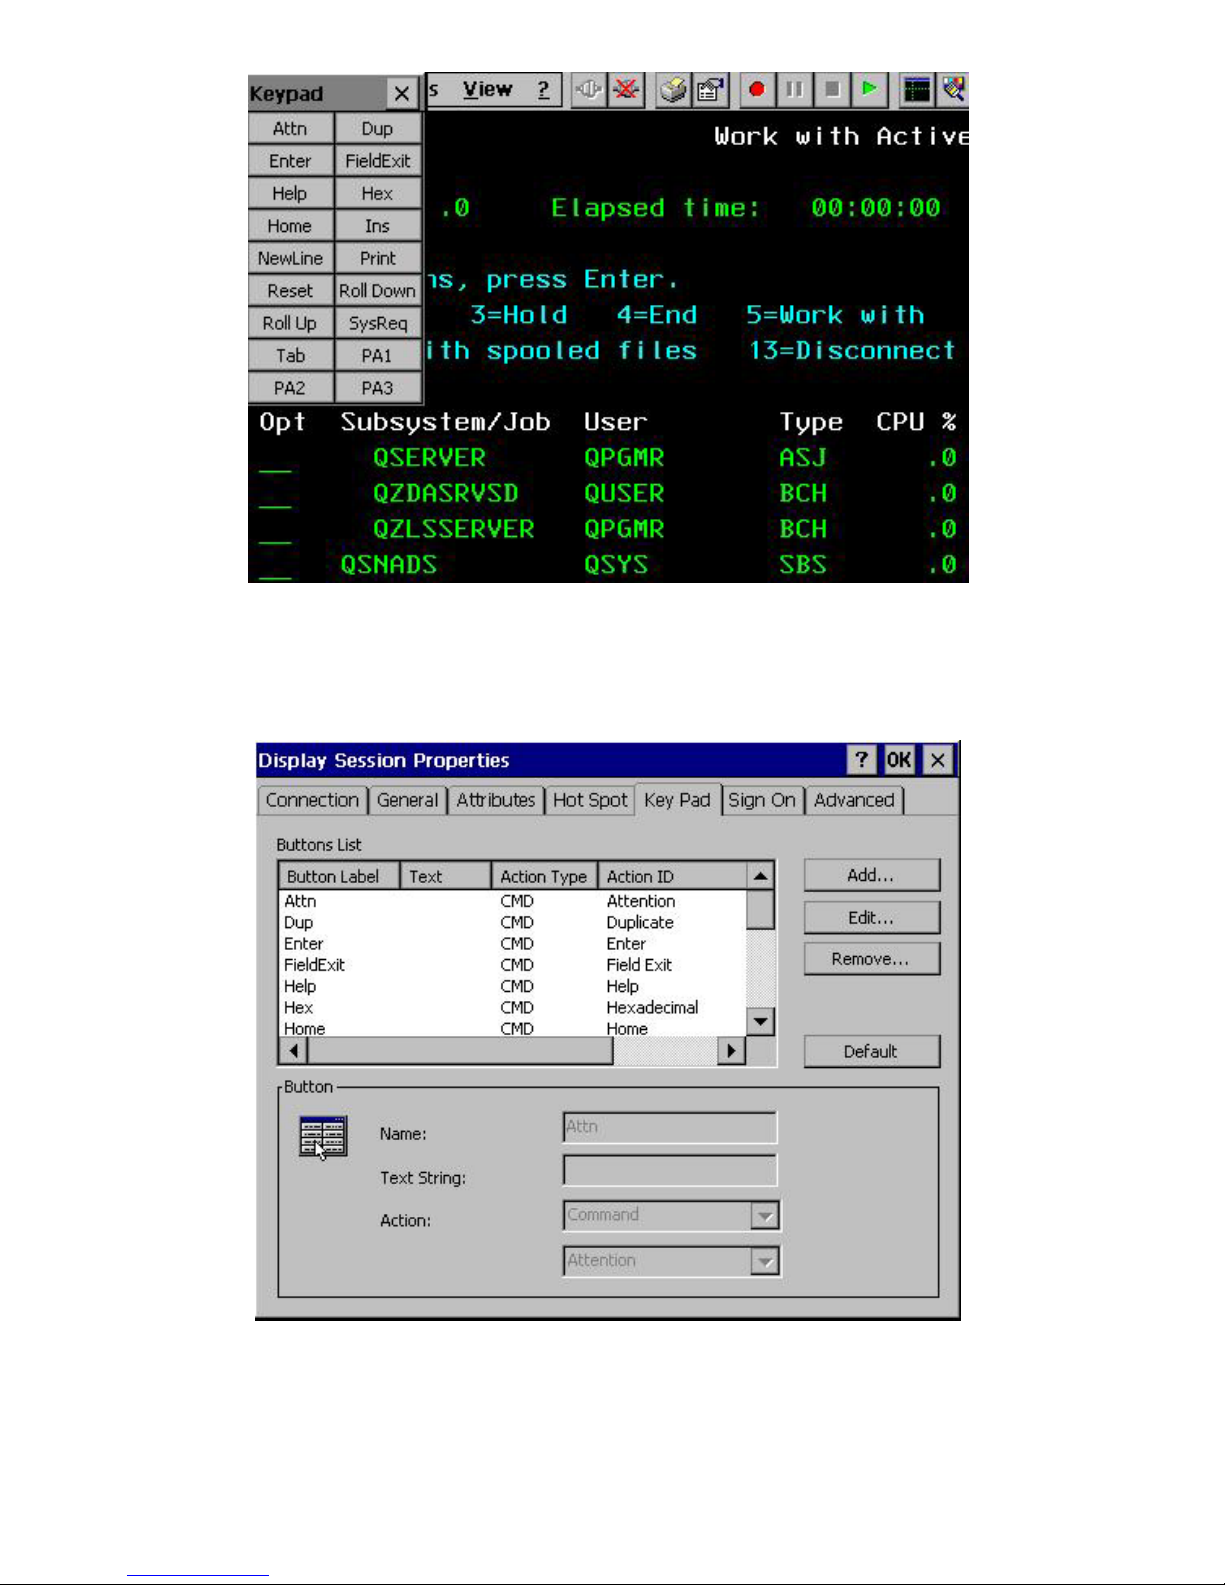
Emulation Screen with Key Pad
The Key Pad tab allows you to change the characteristics of the pop-up Key Pad. Changes made in this
property sheet affect all sessions. There is only one Key Pad configuration per emulator, not one per
session.
To Edit a Key Pad button:
1. Select the Function Key you want to modify from the Button Label list.
2. Click on Edit.
Key Pad Property Sheet
67
Page 76
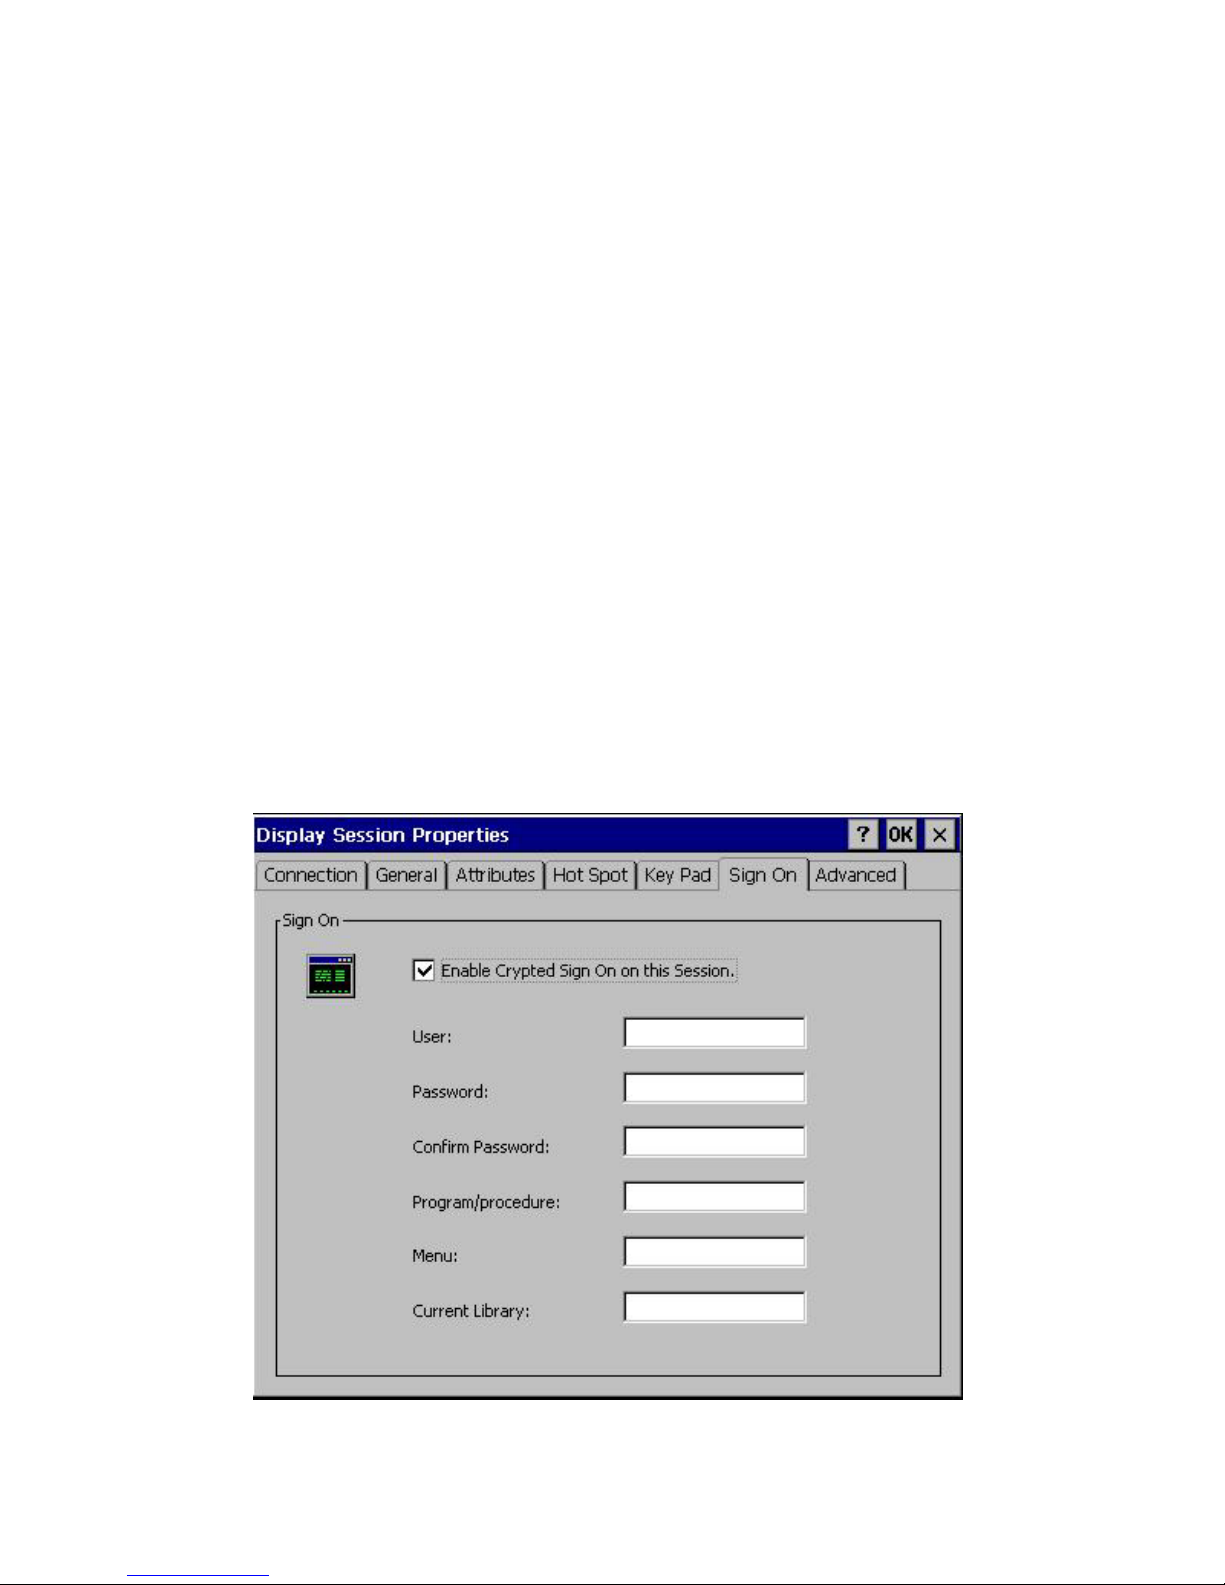
3. If you want to send a Text String to the host every time you press the Function key, type it into the
Text String field.
4. Select the Action from the Drop-Down list
5. Select the command or the Recorded sequence from the Drop-Down list that you want to associate
to the Hot Spot key.
6. Click on Accept.
7. Click on Apply.
To Remove a Key Pad button:
1. Select the Function Key you want to remove.
2. Click on Remove.
To Add a Key Pad button:
1. Click on Add.
2. In the Name field, type the text you want to associate to the button when you pop up the Key Pad.
3. If you want to add a Text String to be sent to the host, type it into the Text String field.
4. Select the Action from the Drop-Down List.
5. From the Drop-Down list, select the command or the Recorded sequence that you want to associate
to the Key Pad button.
6. Click on Accept.
7. Click on Apply.
Sign On (5250 only)
The Sign On feature of the emulator uses the "Enhanced Display Auto-Signon and Password
Encryption" feature of the AS/400 to allow a secure connection to the AS/400 without using SSL.
Sign On Property Sheet
68
Page 77
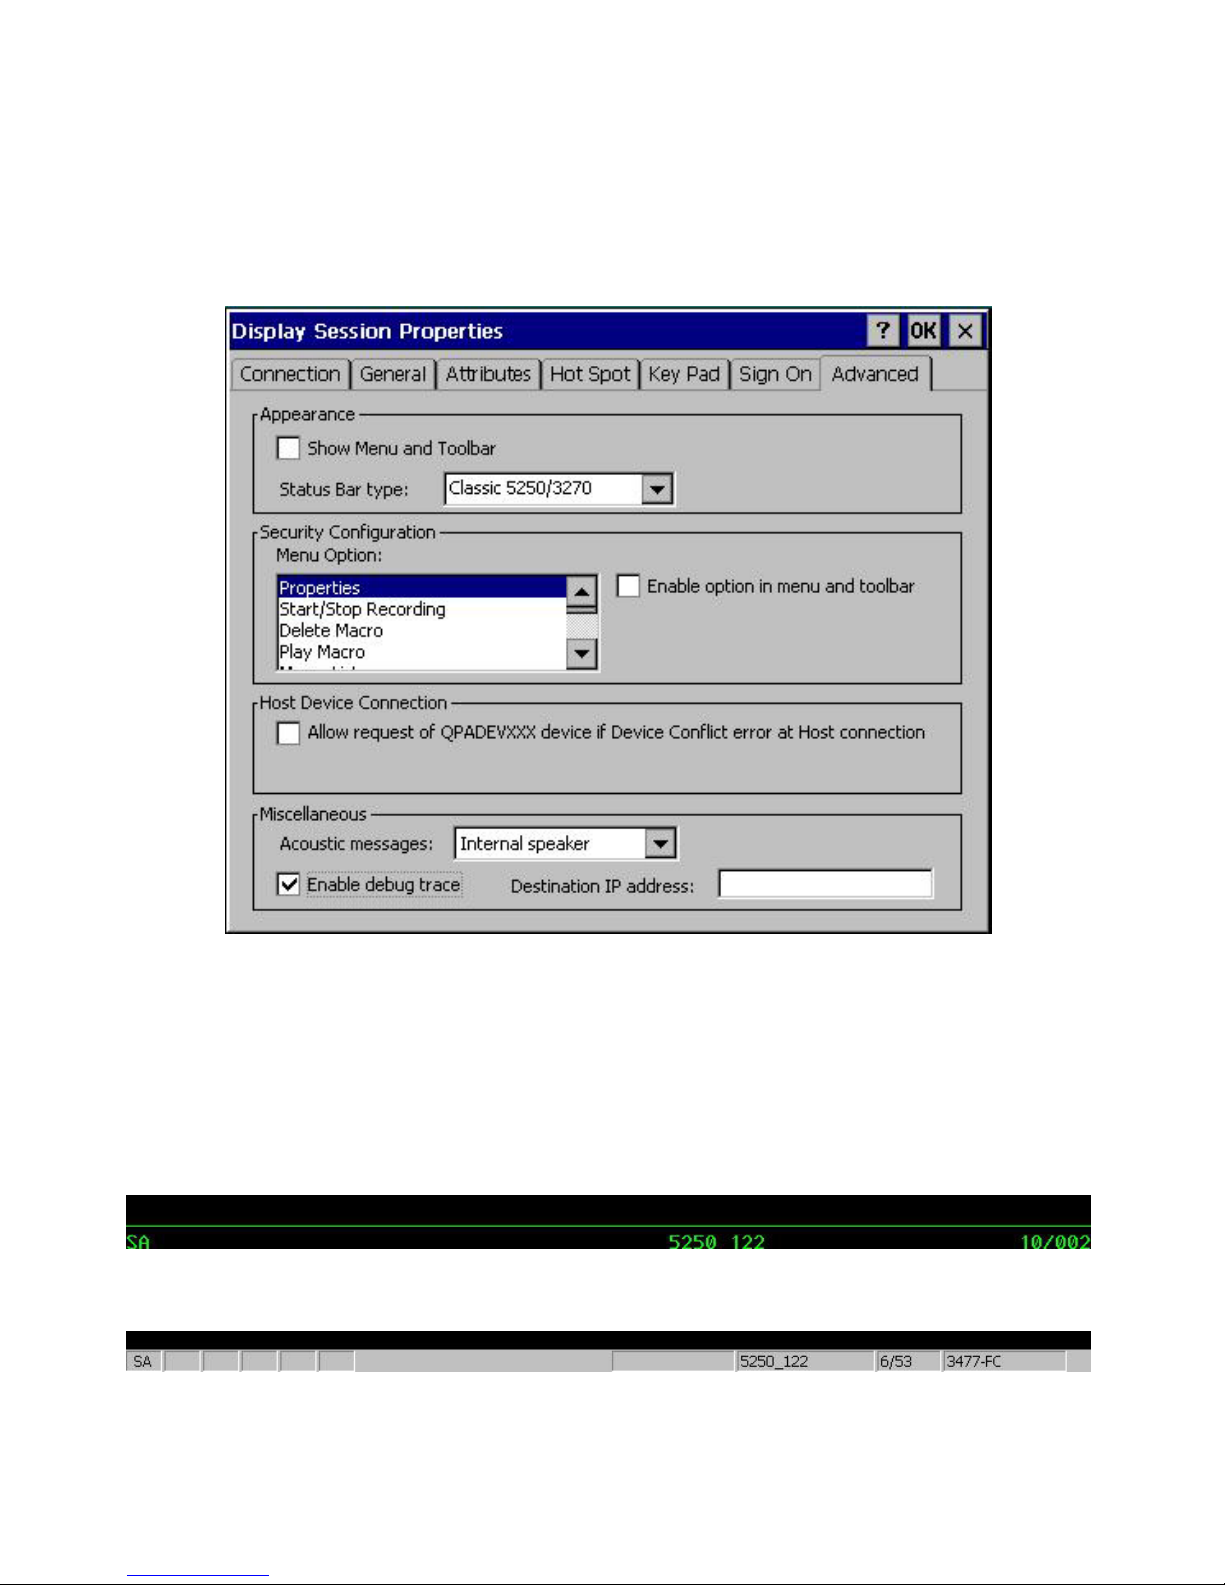
For this feature to work to your benefit, the "Remote Signon" parameter of the AS/400 configuration
should be enabled. To verify if this parameter is enabled, use the WRKSYSVAL command. To enable
this parameter, you may use the following command
CHGSYSVAL SYSVAL(QRMTSIGN) VALUE('*VERIFY')
:
Advanced
The Advanced property sheet allows enabling/disabling of several useful features.
Advanced Property Sheet
Appearance
• Show Menu and Toolbar. If you want to eliminate the “Windows” look, uncheck this box. In
addition to changing the appearance, this will also prevent the user from using Hot Spots or Key
Pad, and from viewing the keyboard mapping.
• Status Bar type.
o Classic 5250. Provides the classic “green screen” look in the status bar.
o Graphic. Provides the “Windows” look to the status bar and displays the connection name.
69
Page 78

Security Configuration
YESterm/IP provides extreme flexibility in allowing, or prohibiting, the user to view and change the
characteristics of the display screen. If you choose to show the Menu and Tool bars in Appearance
above, you can choose to individually enable or hide every option item shown in the Menu bar, and its
corresponding button in the Buttons bar. The default is that all options except Properties are enabled.
1. Select the appropriate item from the drop-down list
2. Click on the Enable… check box. to insert a check in the check box, or to remove one that is
already there.
Host Device Connection
When using named devices, careless name assignment or unusual session activation circumstances,
such as a power failure/reconnect, can cause two sessions to request the same name. In such a case, the
host will not open the second session. Checking the Allow request of…. box will cause the emulator
to request a virtual assignment for the second session if it is rejected because of name conflict. This
doesn’t fix the basic problem, but at least the session can be opened.
For IBM recommends setting the AS/400 “Keep Alive Timeout” to 40 seconds in order to facilitate
reconnection of named sessions. The AS/400 command CHGTELNA, executed from an AS/400 green
screen, followed by the F4 key will display the screen that controls the setting of this parameter.
Miscellaneous
• Acoustic messages. Only the Internal speaker selection is valid, since Wave device requires
external speakers.
• Enable debug trace. If you enable the trace, enter the Destination IP Address.
Printer Sessions
For TN5250e sessions, you will see a Printer Sessions Properties sheet with six properties tabs. For
TN3270e sessions, you will see a Printer Sessions Properties sheet with four properties tabs. The
opening view is of the Connections tab and properties sheet.
70
Page 79
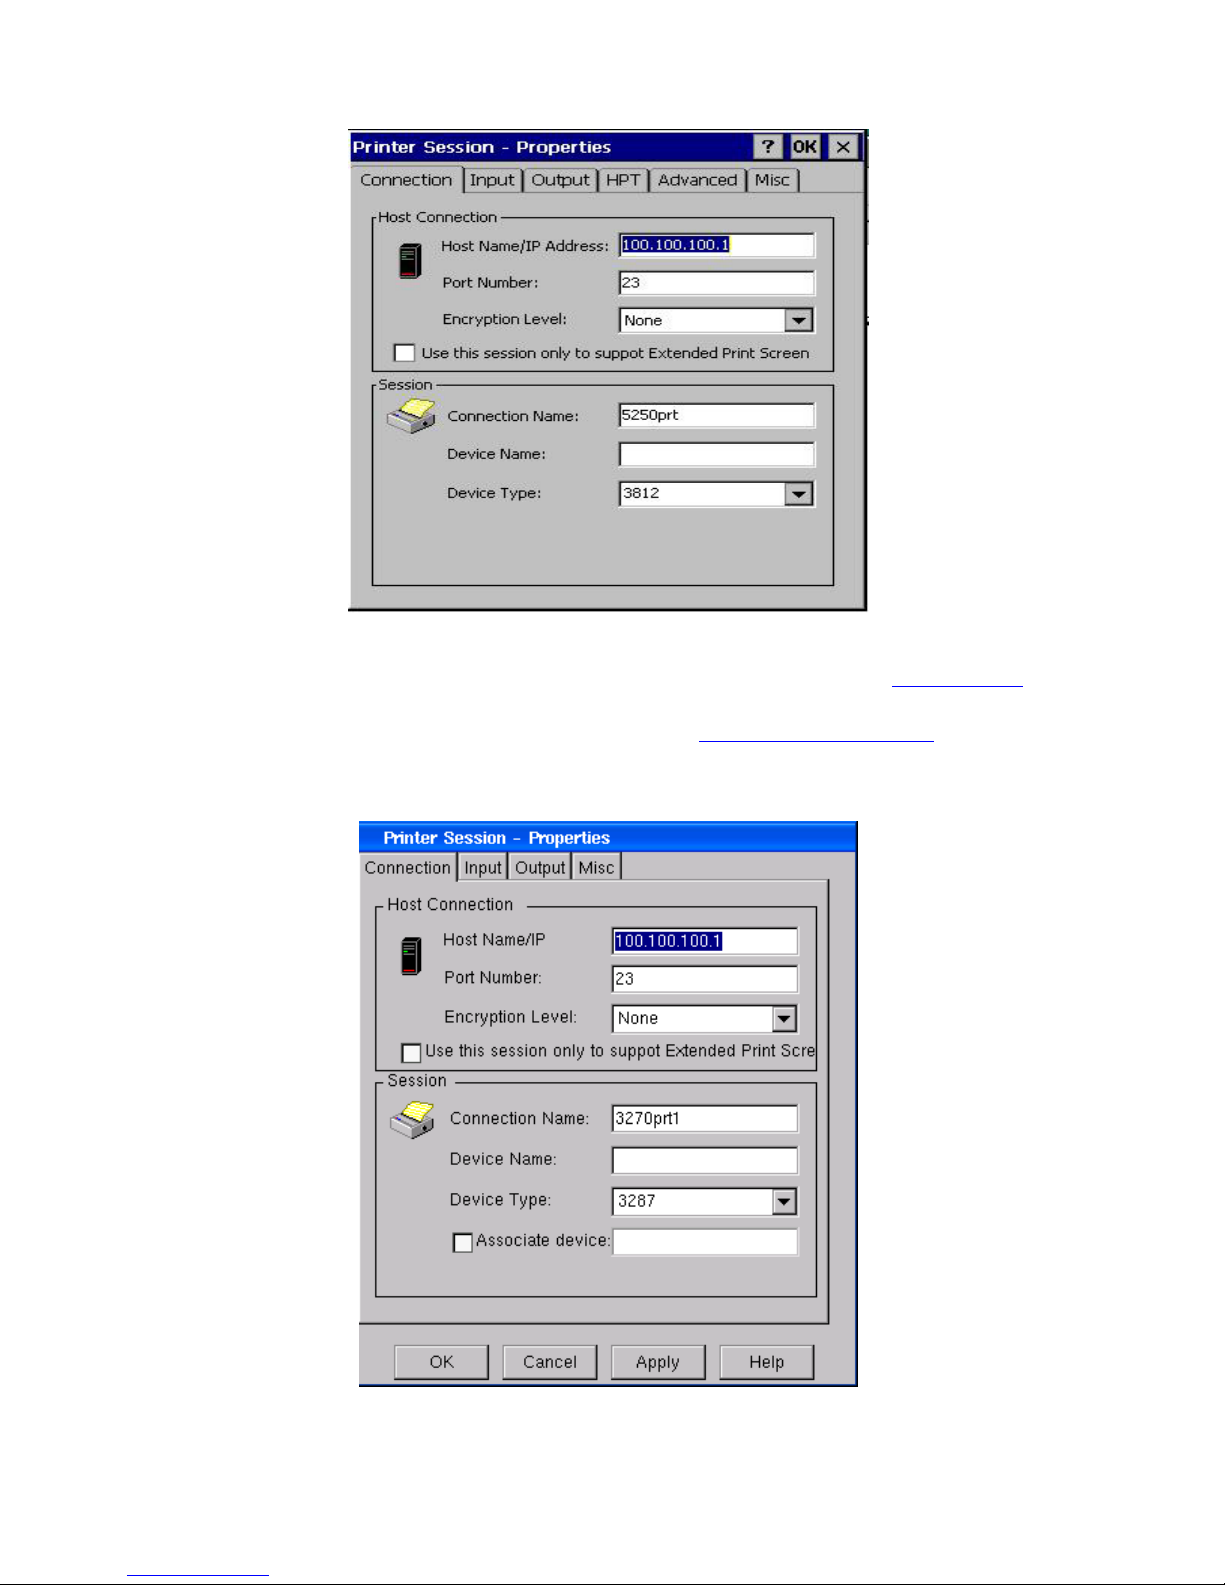
Connection (5250)
Connection Property Sheet for TN5250e
Six of the seven parameters on this property sheet were already configured in the Setup Wizard,
although you can change them here if you wish. The additional parameter is:
• Use this session to support…. If this session is used for Extended Local Printing, check this box.
.
Connection (3270)
Connection Property Sheet for TN3270e
71
Page 80
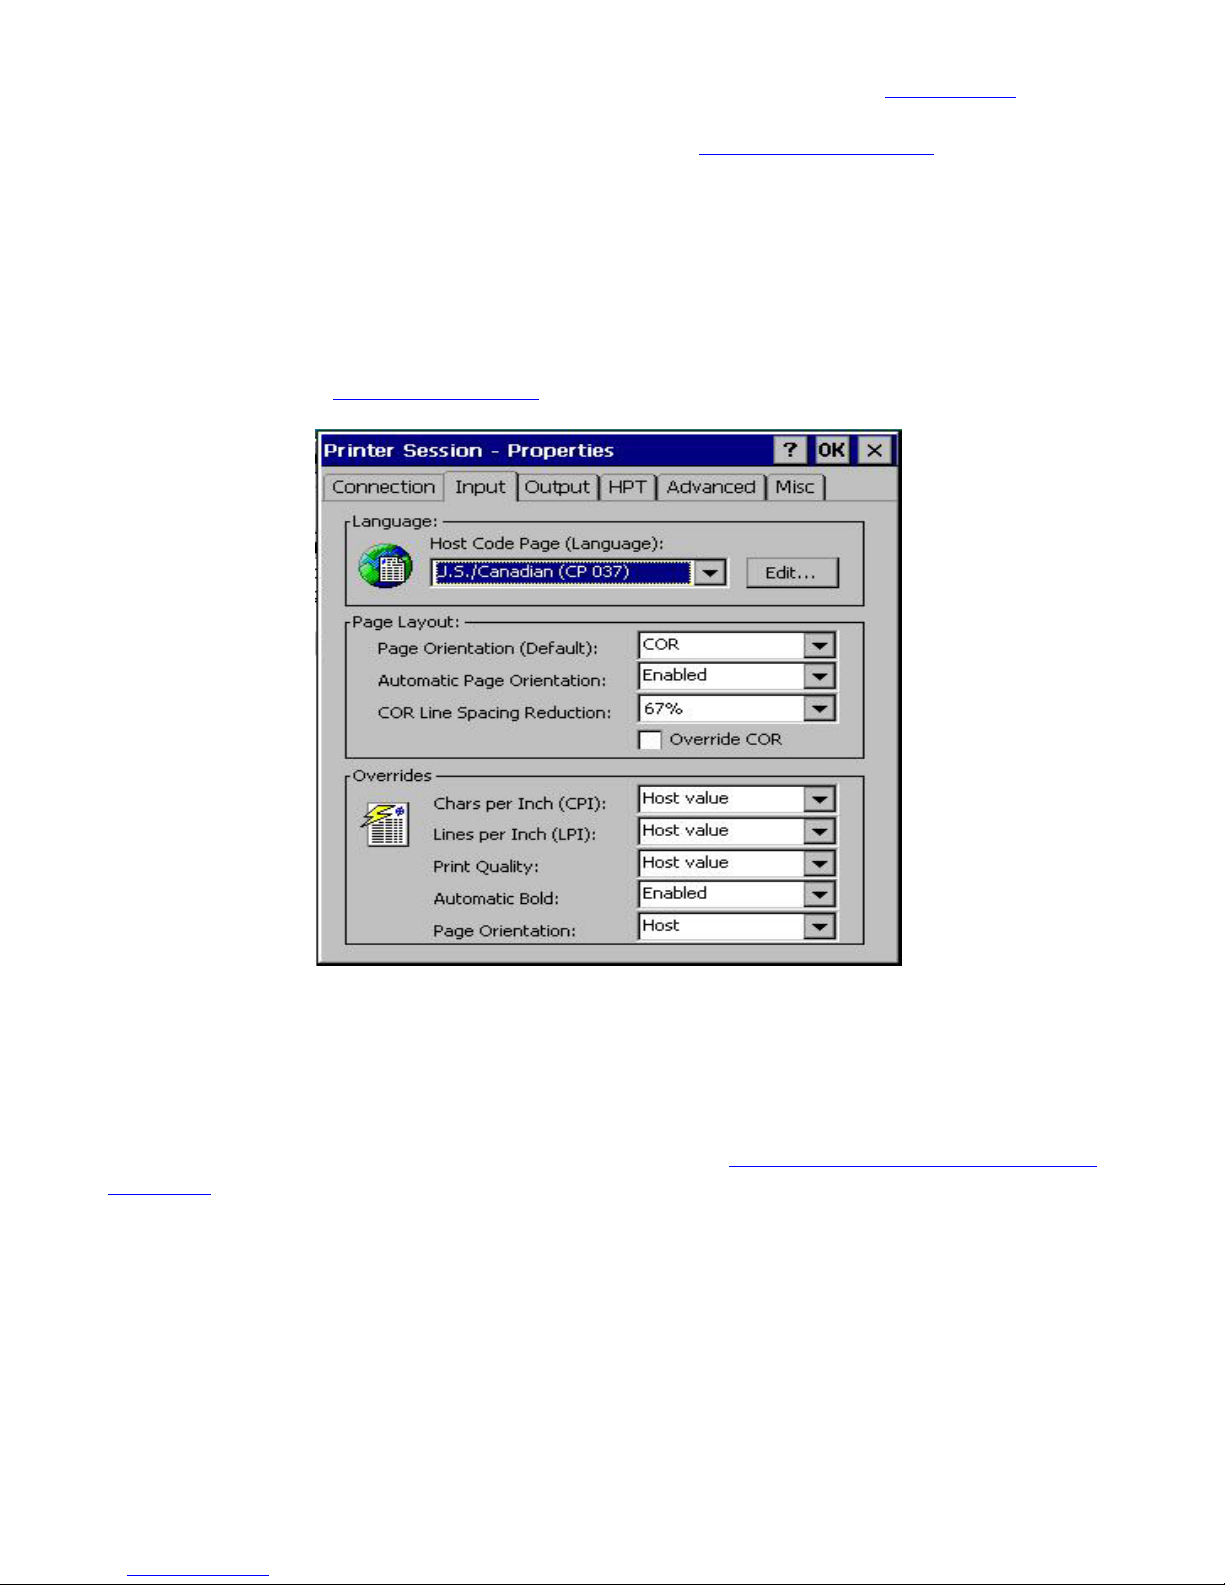
Six of the eight parameters on this property sheet were already configured in the Setup Wizard
although you can change them here if you wish. The additional parameters are:
• Use this session to support…. If this session is used for Extended Local Printing, check this box.
• Associate device. Usually a printer session is associated with a specific printer device name.
However, there are some mainframe configurations with no "free" printer devices, but only printer
devices associated to specific display devices. In this case, you have to specify a display session
name to which a printer is associated.
,
Input (5250)
The Input tab allows you to define specific parameters that affect the appearance of the printed page.
Note: If you are using Host Print Transform
, the Input settings do not apply.
Input Property Sheet for TN5250e
Language
YESterm/IP supports a number of different Code Pages. The Code Page selected here from the dropdown list should be the same as that configured on the AS/400 for the specific device.
It is also possible to create a new custom Code Page Table. See How To…|Create a Custom Language
Code Page for instructions.
Page Layout
Set the default page layout. Parameters are:
• Page Orientation. Select from Portrait, Landscape, and COR (Computer Output Reduction).
Note: If you are using an impact dot-matrix printer, Portrait is recommended.
• Automatic Page Orientation. This option is enabled by Default. Note: If you are using an impact
dot-matrix printer, it is recommended that this be Disabled.
72
Page 81
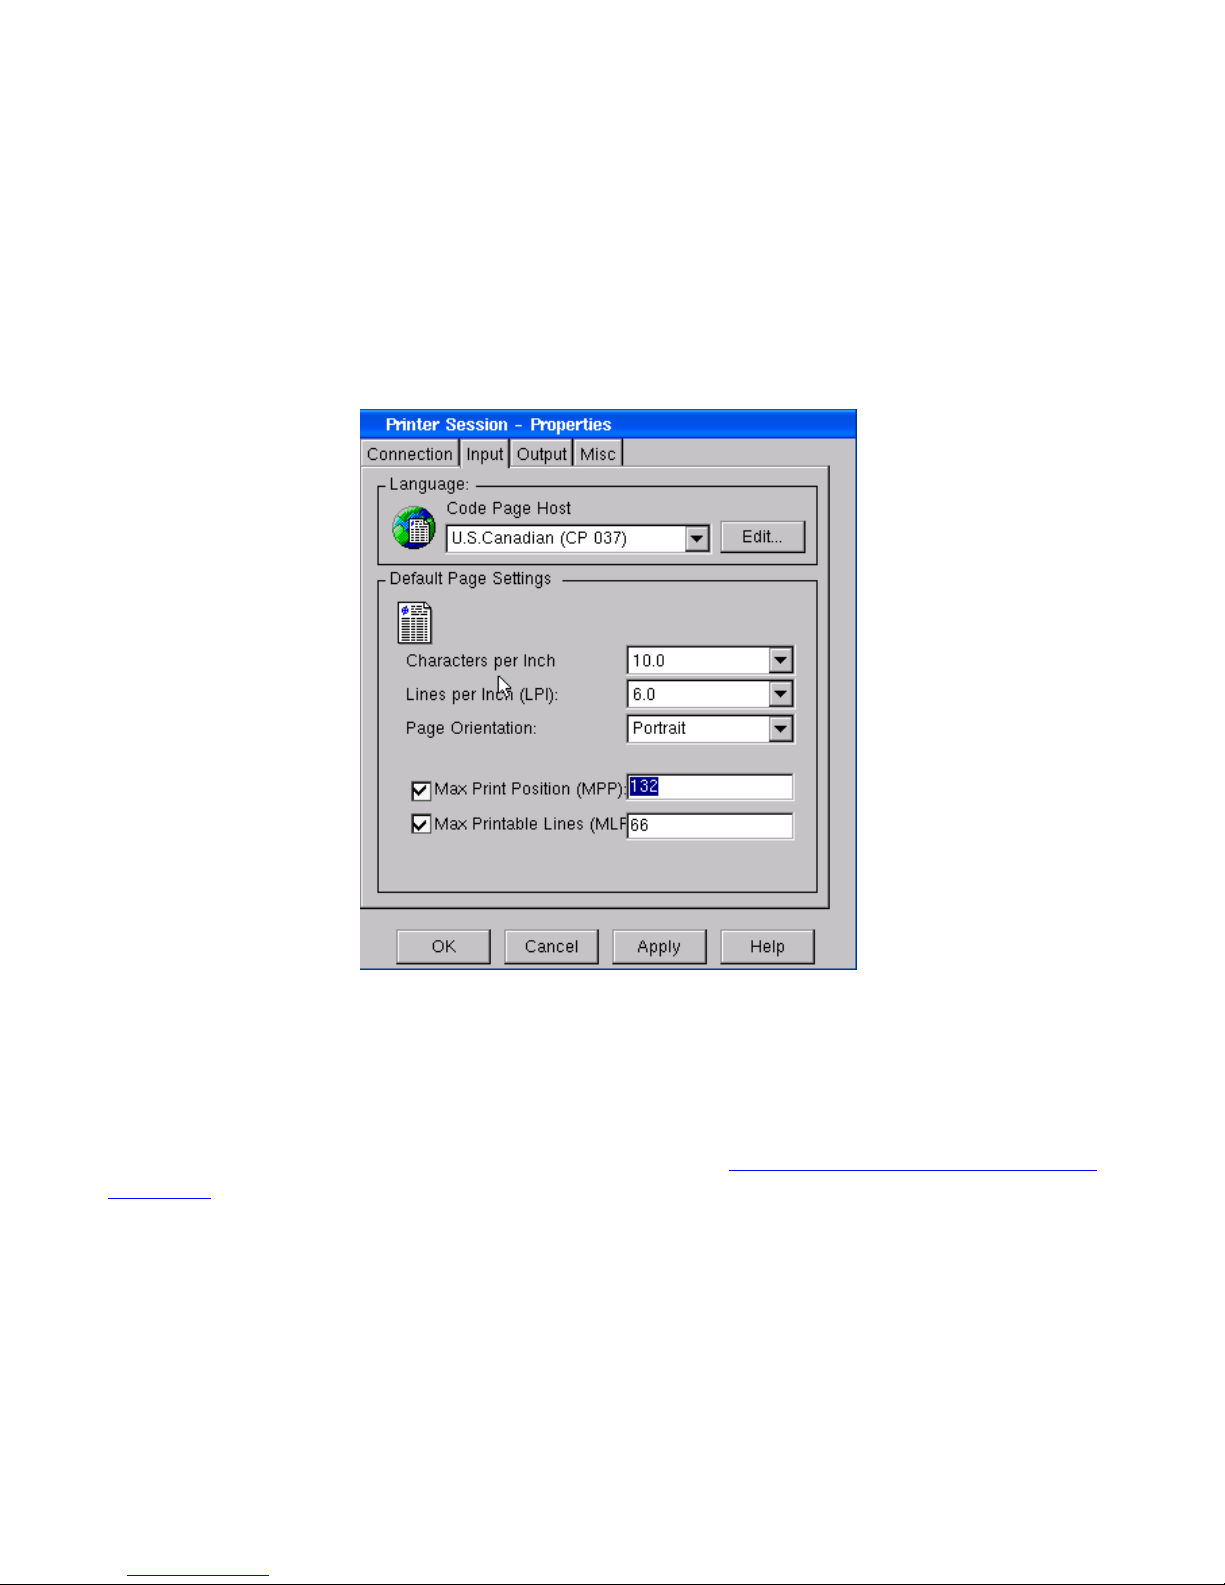
• COR Line Spacing Reduction. This feature solves the problem of nonprintable margin area on the
printer. Note: It is recommended that this feature be used only with laser printers.
• COR Override. This function corresponds to the IBM 3812 configuration parameter and defines
that a job with draft quality is printed in COR.
Overrides
If you wish to override the host system output settings, you can do so here.
Note: If you are using an impact dot-matrix printer, it is recommended that you set Print Quality to
Force Draft.
Input (3270)
Input Property Sheet for TN3270e
Language
YESterm/IP supports a number of different Code Pages. The Code Page selected here from the dropdown list should be the same as that configured on the mainframe for the specific device.
It is also possible to create a new custom Code Page Table. See How To…|Create a Custom Language
Code Page for instructions.
Default Page Settings
Select the desired default settings from the drop-down lists and enter the maximum print parameters.
Note: If you are using an impact dot-matrix printer, Portrait is recommended for Page Orientation.
73
Page 82
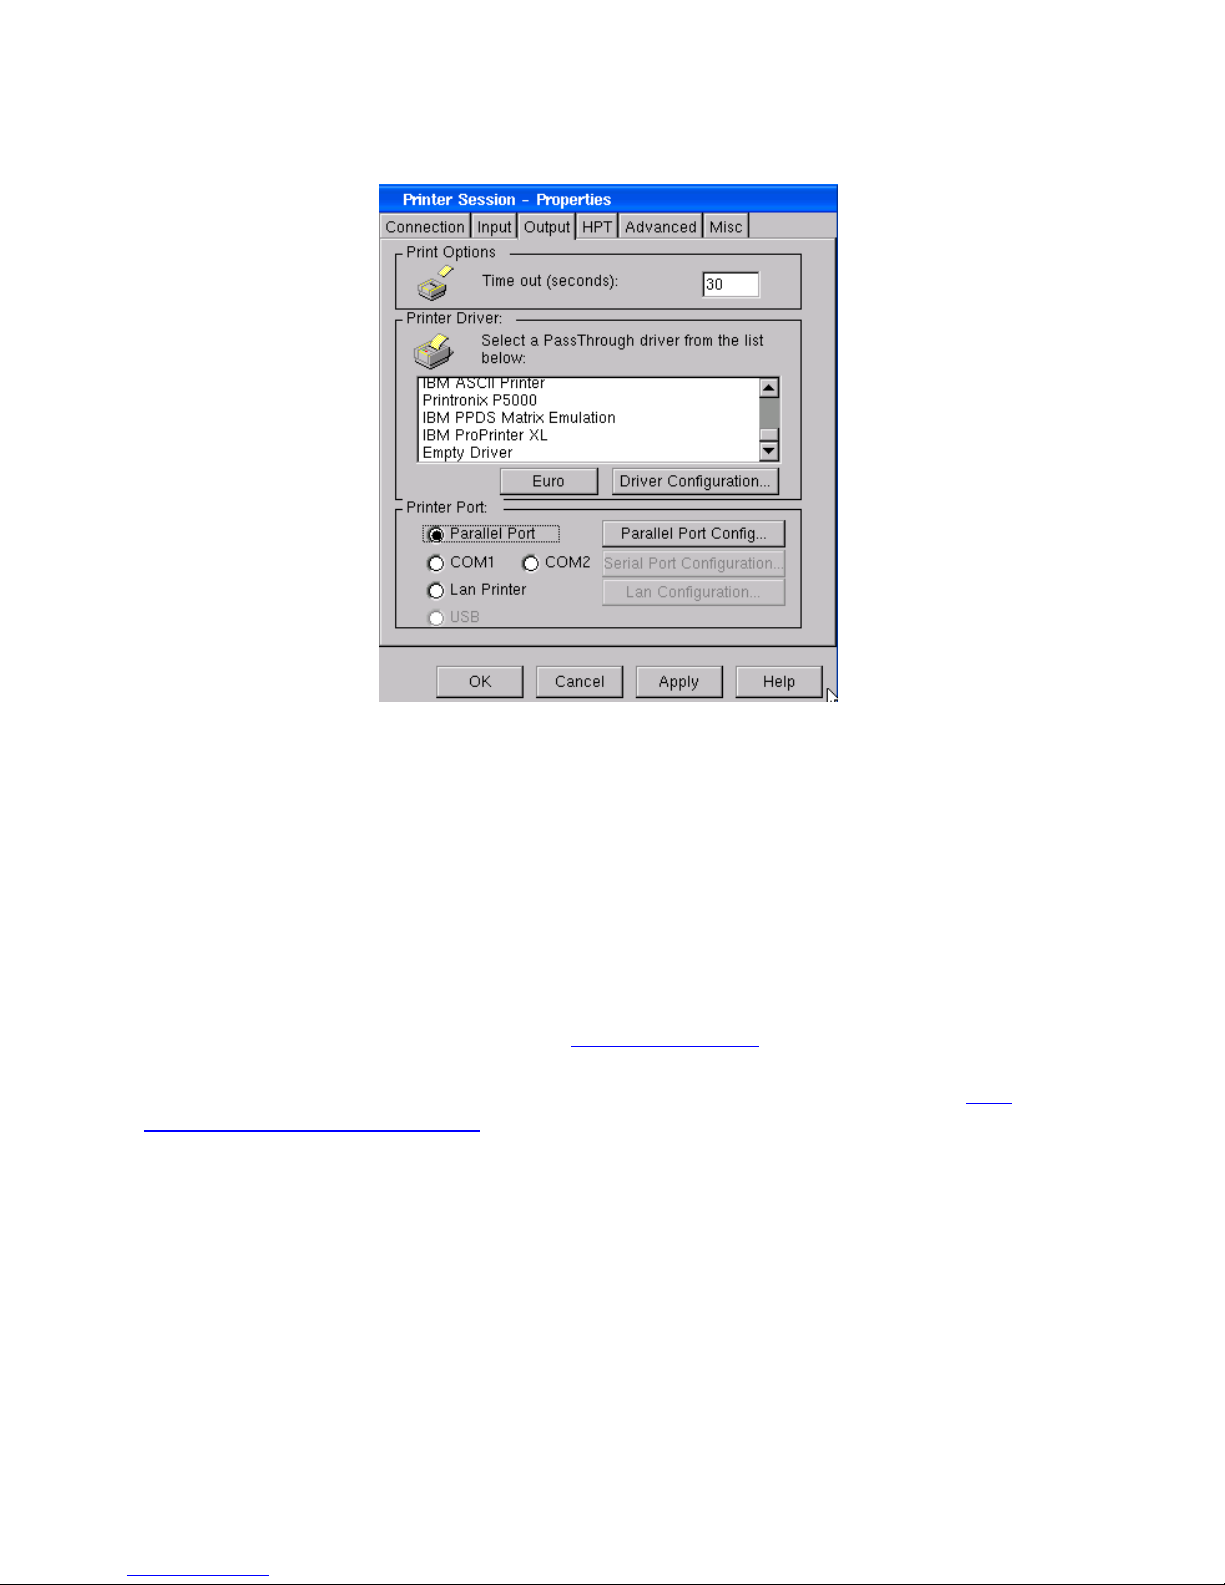
Output
The Output properties define the communication with the printer.
Output Property Sheet
• Time Out. This parameter defines a timer (in seconds) that starts to count down every time, during
a printing job, that the host system stops sending data. If no more data are received within the
timeout value selected, the printer session will assume that the print job is finished, and a Form
Feed command is sent to the printer.
• Printer Driver. The PassThrough Drivers offered here, specifically developed by Affirmative,
generate a standard text data stream. Everything is sent to the printer in text mode allowing better
control of the printer and better performance. Select a PassThrough Driver from the drop-down list
of pre-configured Printer Profiles for your selection and use. Even if your printer is not on this list,
it probably emulates one of the listed printers. Note
recommended that you use HP PCL (Standard COR) for U.S. operation and HP PCL Laser Emulation
for European operation. Note: If you are using Host Print Transform
: If you are using an HP PCL printer, it is
, select Empty Driver.
• Driver Configuration. If you wish, you can modify parameters of a listed driver. For more
information on how to customize or create a new Passthrough Printer Driver, refer to How
To…|Modify a Passthrough Driver.
Euro
If your printer is Euro ready, you may wish to bypass the PassThrough Euro sequence. To do so,
activate the Euro button to bring up the Euro Printing Mode dialog box
74
Page 83
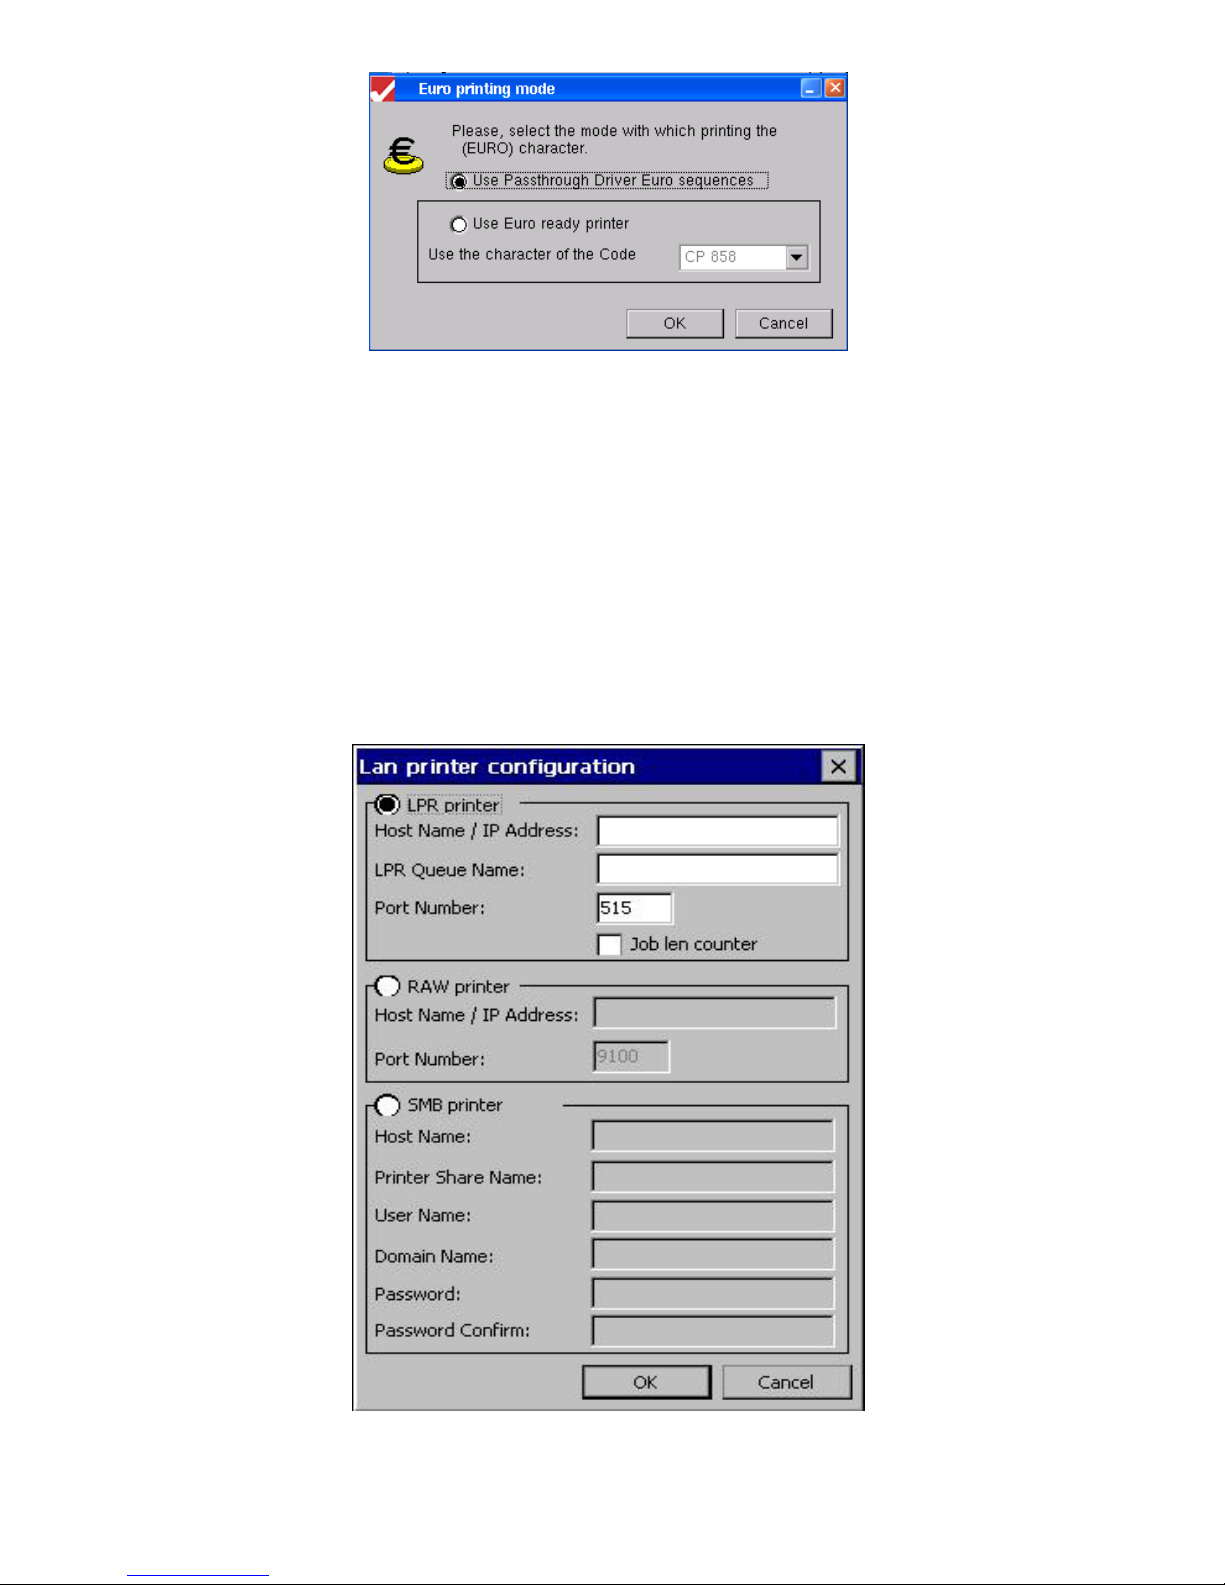
Euro Printing Mode Dialog Box
Select the Use Euro ready printer radio button and choose a Code Page character.
Printer Port
Choose and configure the local or network printer port used in this session. Choose Parallel port or
Lan printer, since the 2209 has no COM ports and direct USB printing is not supported in an
emulation session.
• Port printer configuration. After you choose a printer port, you need to configure it.
o Parallel Port. Click on Parallel Port Config… to configure whether or not to reset the
printer at the start of every print job.
o Lan Printer. Click on Lan Configuration to see the Lan Printer Configuration dialog box.
Note that SMB printer is grayed out, since it is not supported in emulation sessions.
LAN Printer Configuration Dialog Box
75
Page 84

o LPR printer. Make this selection to assign print jobs to a network printer that is
configured as an LPD server.
Host name/IP Address. If you have a local DNS or WINS server or are
using a hosts table (see Editing Terminal Properties|Network|Advanced
Parameters|Hosts Table), you can type in the host network name. Otherwise,
type in the IP address of the LPD host.
LPR queue name. This will be the queue name assigned at the LPD host to
be used by LPR devices to assign print jobs.
Port Number. Leave at the default unless otherwise directed by your
network administrator.
Job length counter. Leave unchecked unless otherwise directed by your
system administrator.
o RAW printer. RAW is the default protocol for most TCP/IP networks. RAW data
is not modified by the spooler at all, but is sent directly to the printer.
Host name/IP. If you have a local DNS or WINS server or are using a hosts
table (see Editing Terminal Properties|Network|Advanced Parameters|Hosts
Table), you can type in the host network name. Otherwise, type in the IP
address of the RAW host.
Port Number. Leave at the 9100 default unless otherwise directed by your
system administrator.
• USB. Even though USB is grayed out, there is a circuitous way to print to a local USB
printer. If you wish to do this, proceed as follows:
1. Set up the printer as an LPD printer, as described in Editing Terminal
Properties|Printers|LPD.
2. Select Lan printer under Printer Port.
3. Configure the LAN printer as an LPR printer.
o Host name/IP Address. Enter the IP Address of this terminal.
o LPR queue name. Enter the queue name that you assigned in step 1.
o Port Number. Leave at the default.
o Job length counter. Leave unchecked.
4. Now you should be able to print to this printer from this session.
HPT (Hex Passthrough) (5250 only)
Hex Passthrough allows portions of a data stream to be sent directly from the host to the printer. There
is no modification done to these portions by the emulator driver. In order for the emulator to recognize
these inviolate data stream portions, they must be identified at the beginning and end by escape
sequences – a combination of special characters that the emulator can identify.
76
Page 85
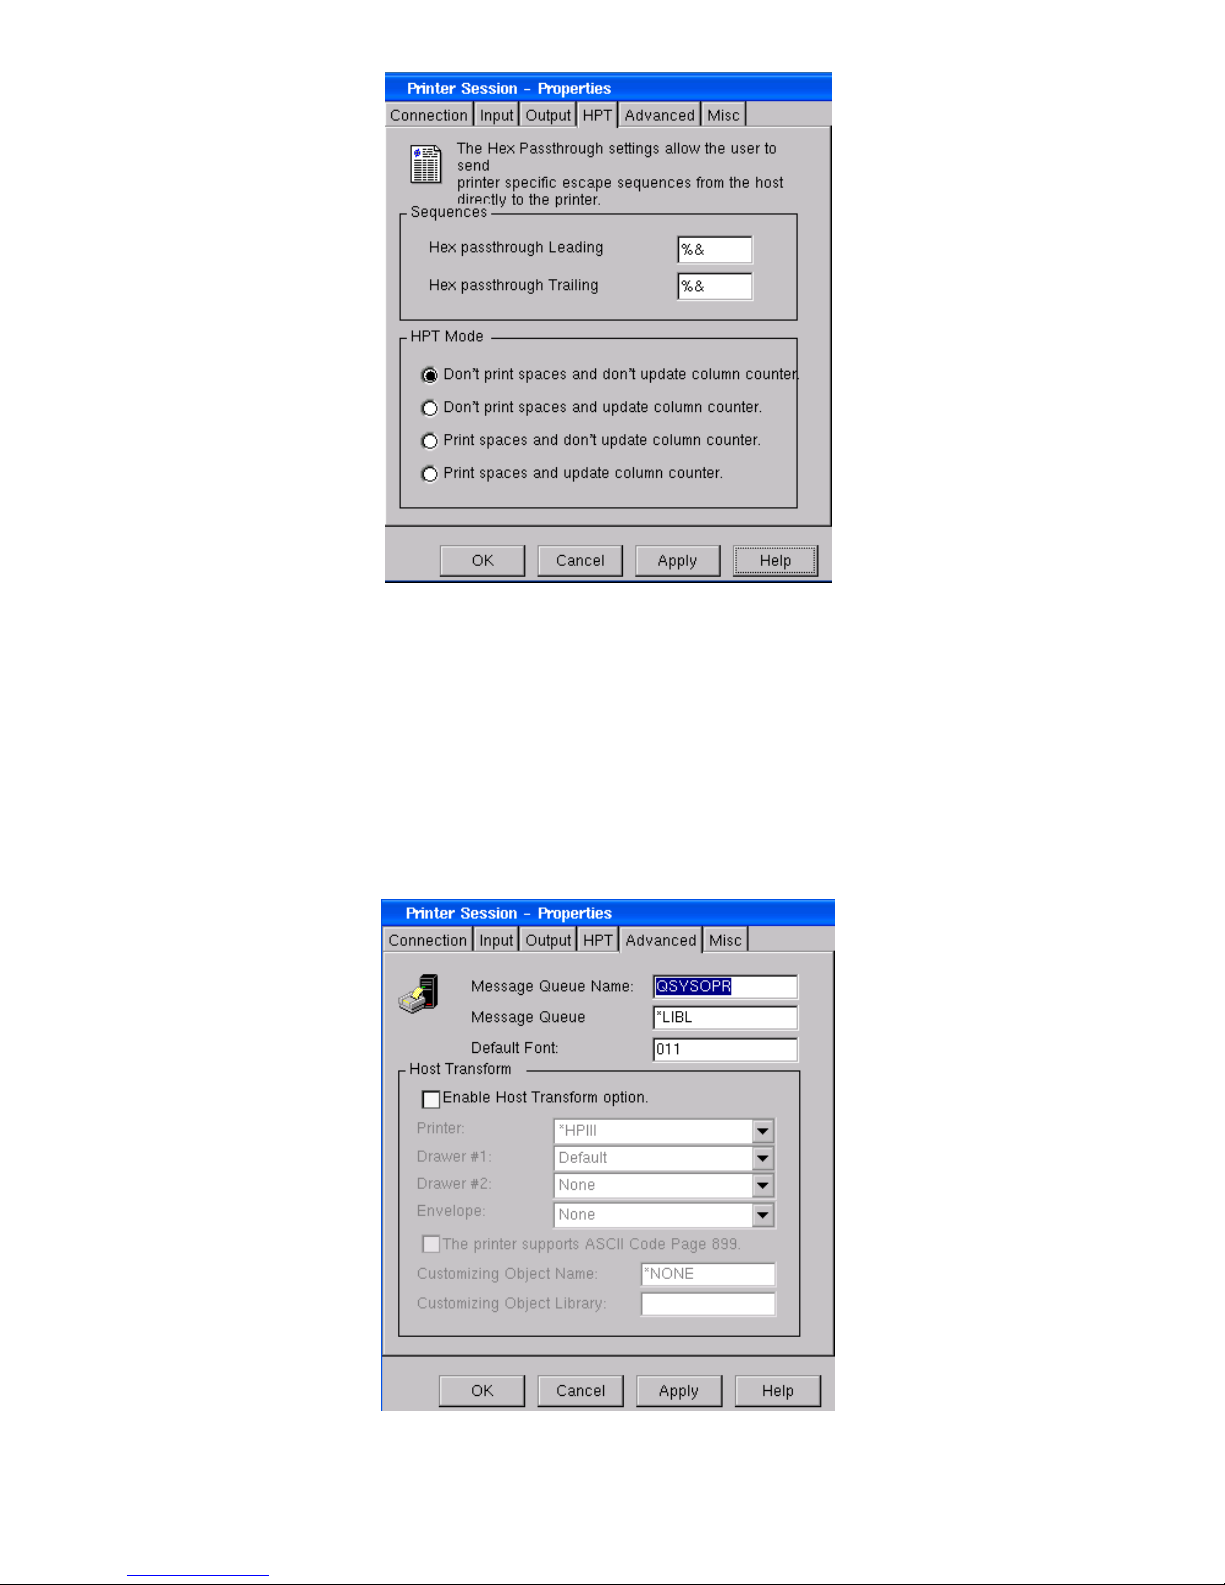
Hex Passthrough Property Sheet
• Sequences. Enter the Leading Sequence and the Trailing Sequence you want to use. The default
sequences are %& and %&; however, most printers use the reverse (&%). You can enter up to 4
characters for each sequence.
• HPT Mode. Select one of four modes to define rather or not HPT prints spaces and rather or not it
updates the column counter.
Advanced (5250 only)
The Advanced Tab allows you to set Default parameters and enable the Host Print Transform feature.
Advanced Property Sheet
77
Page 86
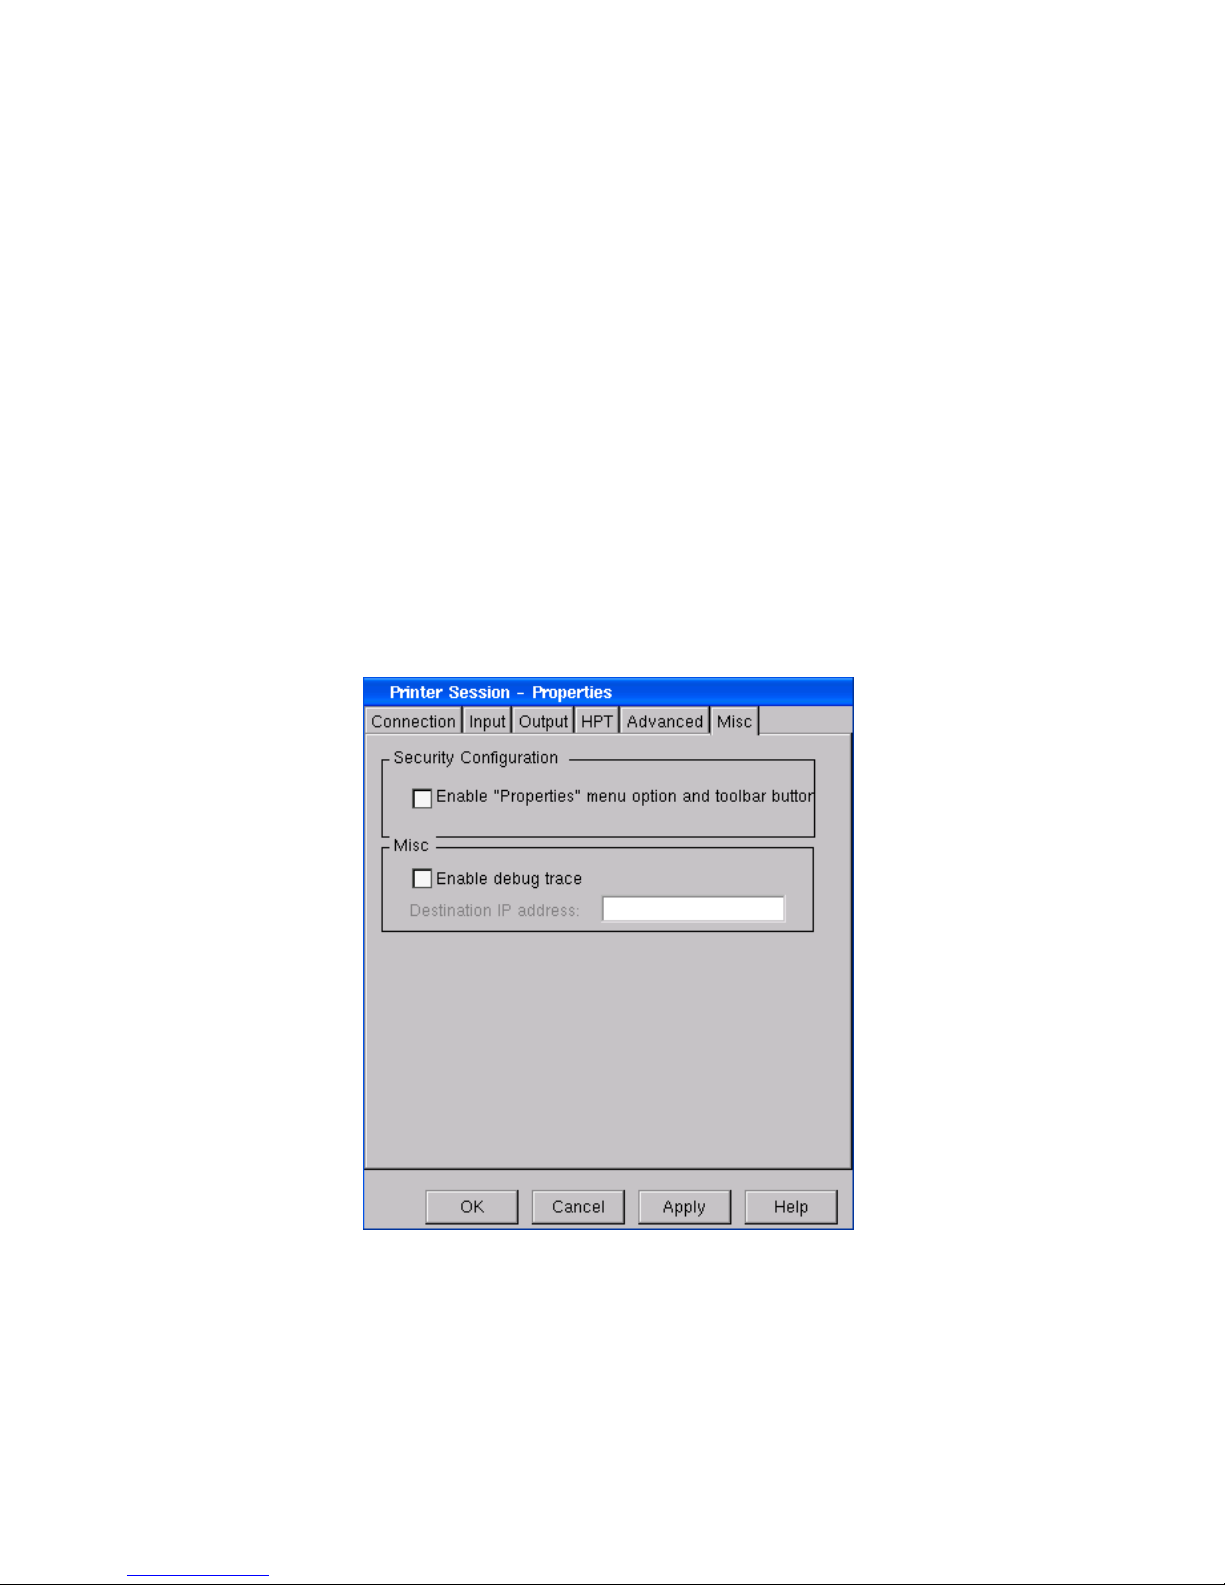
• Queue Name/Queue Library/Default Port. These are host parameters and should be given to you
by your host administrator.
Host Transform
When Host Print Transform is enabled, the host does the EBCDIC-to-ASCII conversion of the print
stream, and the local Passthrough Driver is not used.
• Printer. You must choose a compatible model from the drop-down list. Your AS/400 may
have a more extensive list of compatible printers. If your printer is on the AS/400 list, but not
on our list, you can type in the printer model here as it appears in the AS/400 list; be sure to put
an asterisk in front of the model name.
• Drawer # 1. Choose an input print media size if applicable.
• Drawer # 2. Choose an input print media size if applicable.
• Envelope. Choose an envelope size if applicable.
• Customizing Object Name. Enter the object name here if you have chosen *WSCTS from the
Printer drop-down list.
• Customizing Object Library. Enter the object library name here if you have chosen *WSCTS
from the Printer drop-down list.
Miscellaneous
• Security Configuration. Default mode is to hide the Properties entries from the Tool bar and the
Menu bar so that the user cannot make configuration changes. Check this box if you wish to
provide user access to the configuration parameters.
• Misc. If you enable the debug trace, enter the Destination IP Address.
Miscellaneous Property Sheet
78
Page 87
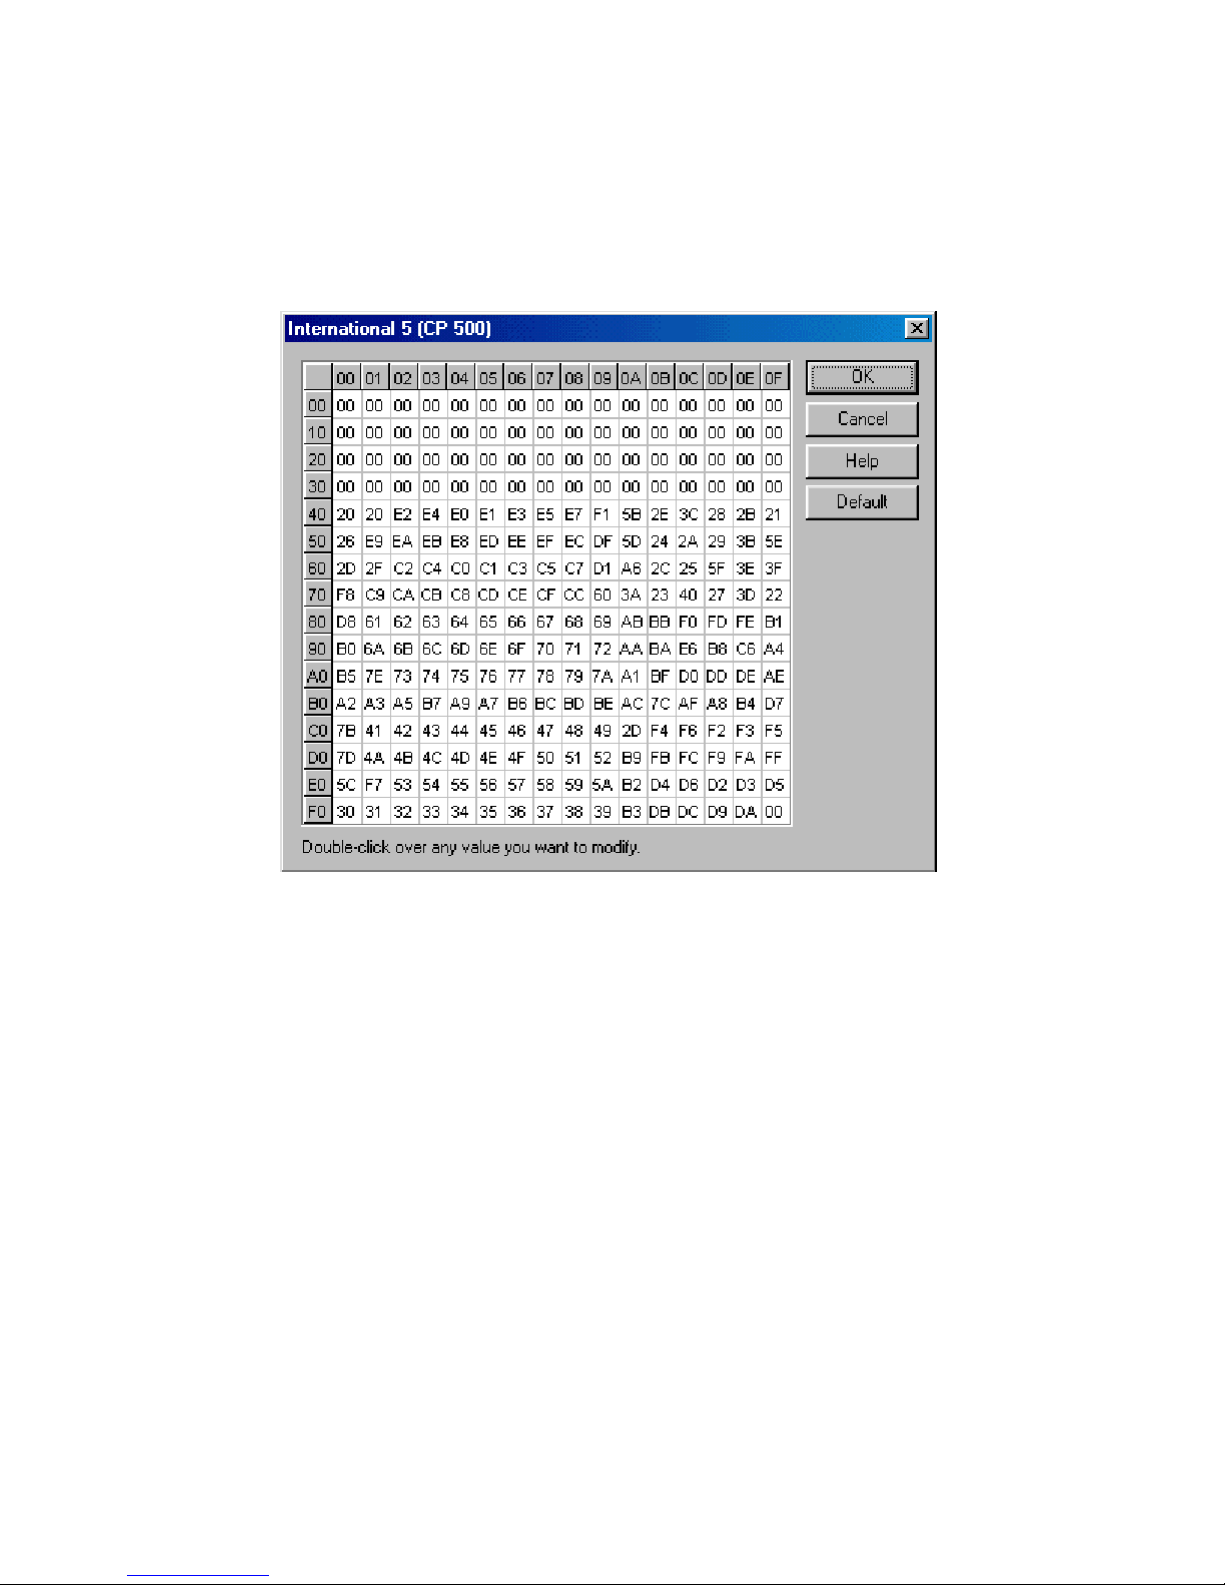
How To…
Create a Custom Language Code Page
This procedure is the same for either a display or a printer session. To do this, select one of the
available Code Pages (the one that comes closest to the one you want to create) and click on Edit.
Assuming that your base Code Page is International 5, the following screen will appea
r:
International 5 Code Page Table
To read the table, use the left column for the first hex character of the EBCDIC code, and the top row
for the second hex character of the EBCDIC code. For example, the standard EBCDIC code for A is
C1; the standard ASCII code for A is 41. Look at the table above and you see that the cell
corresponding to EBCDIC C1 has the value 41 in it.
Double-click the cells you want to change and enter the new values. To assist you in your
customization, the standard code tables for EBCDIC and ASCII are shown here.
79
Page 88
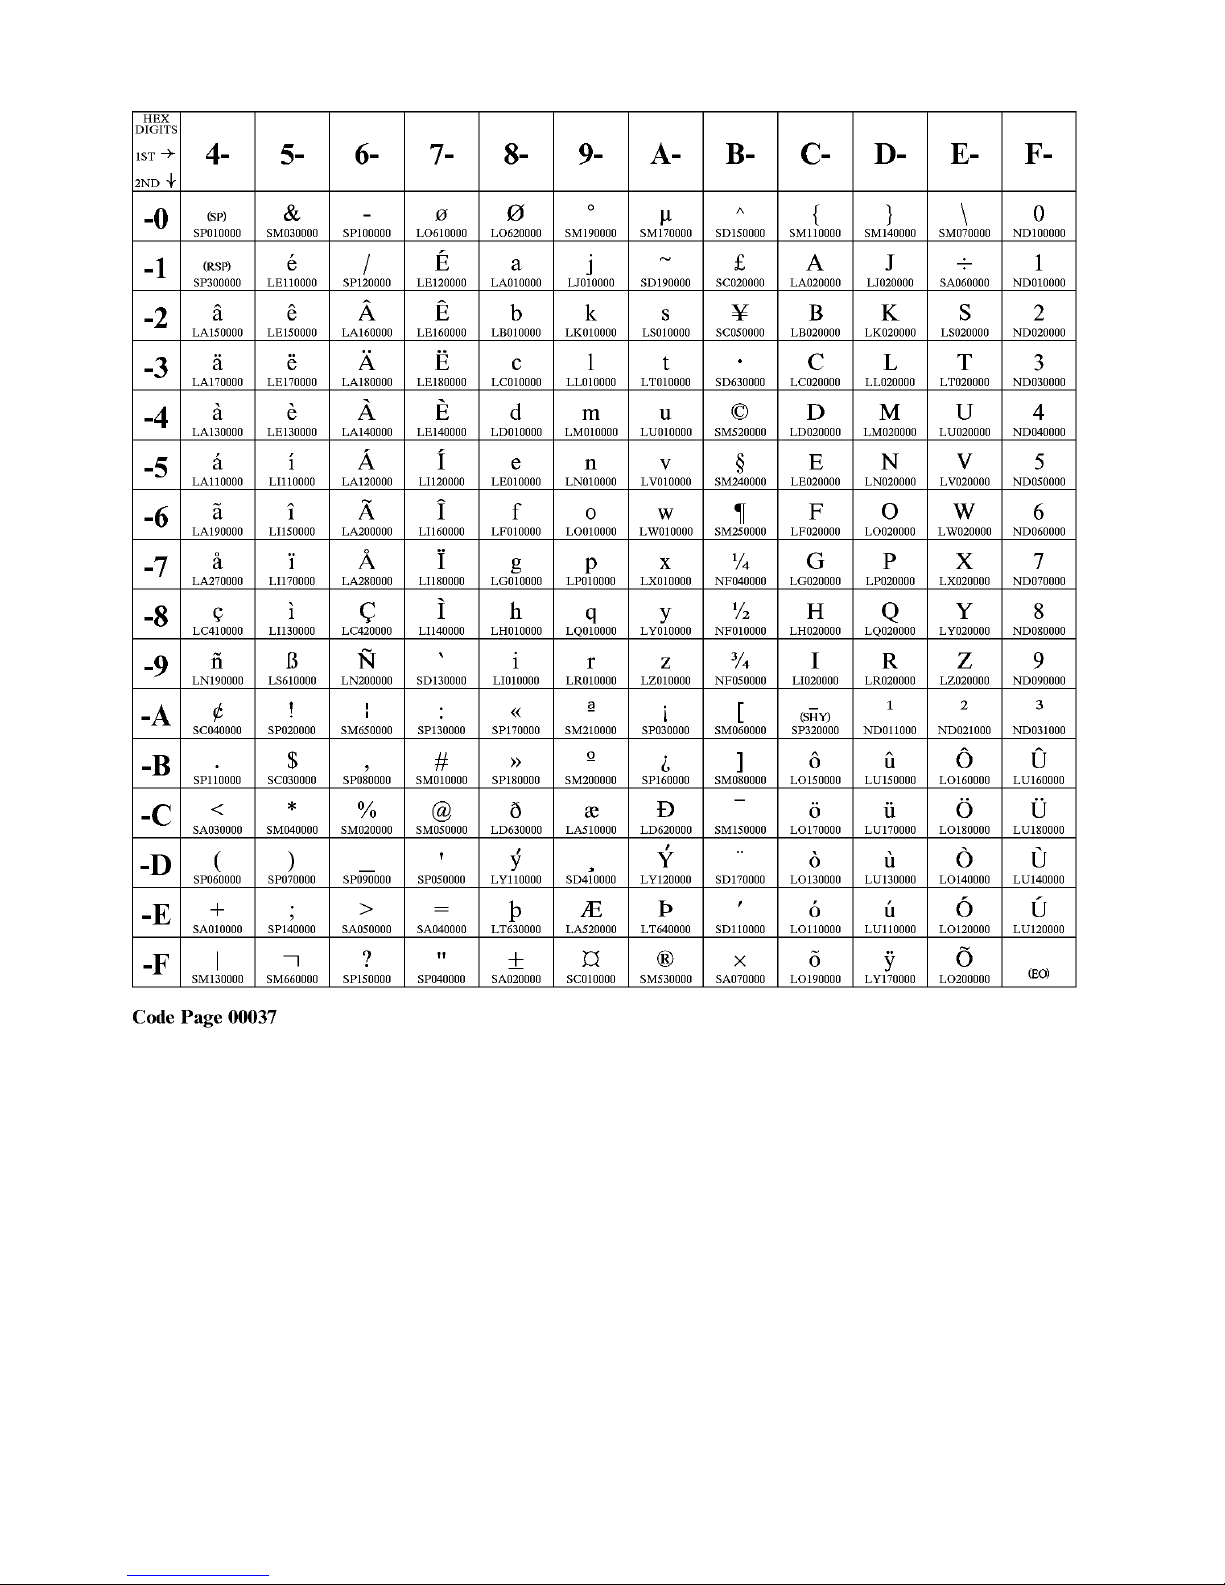
EBCDIC Code Page
80
Page 89
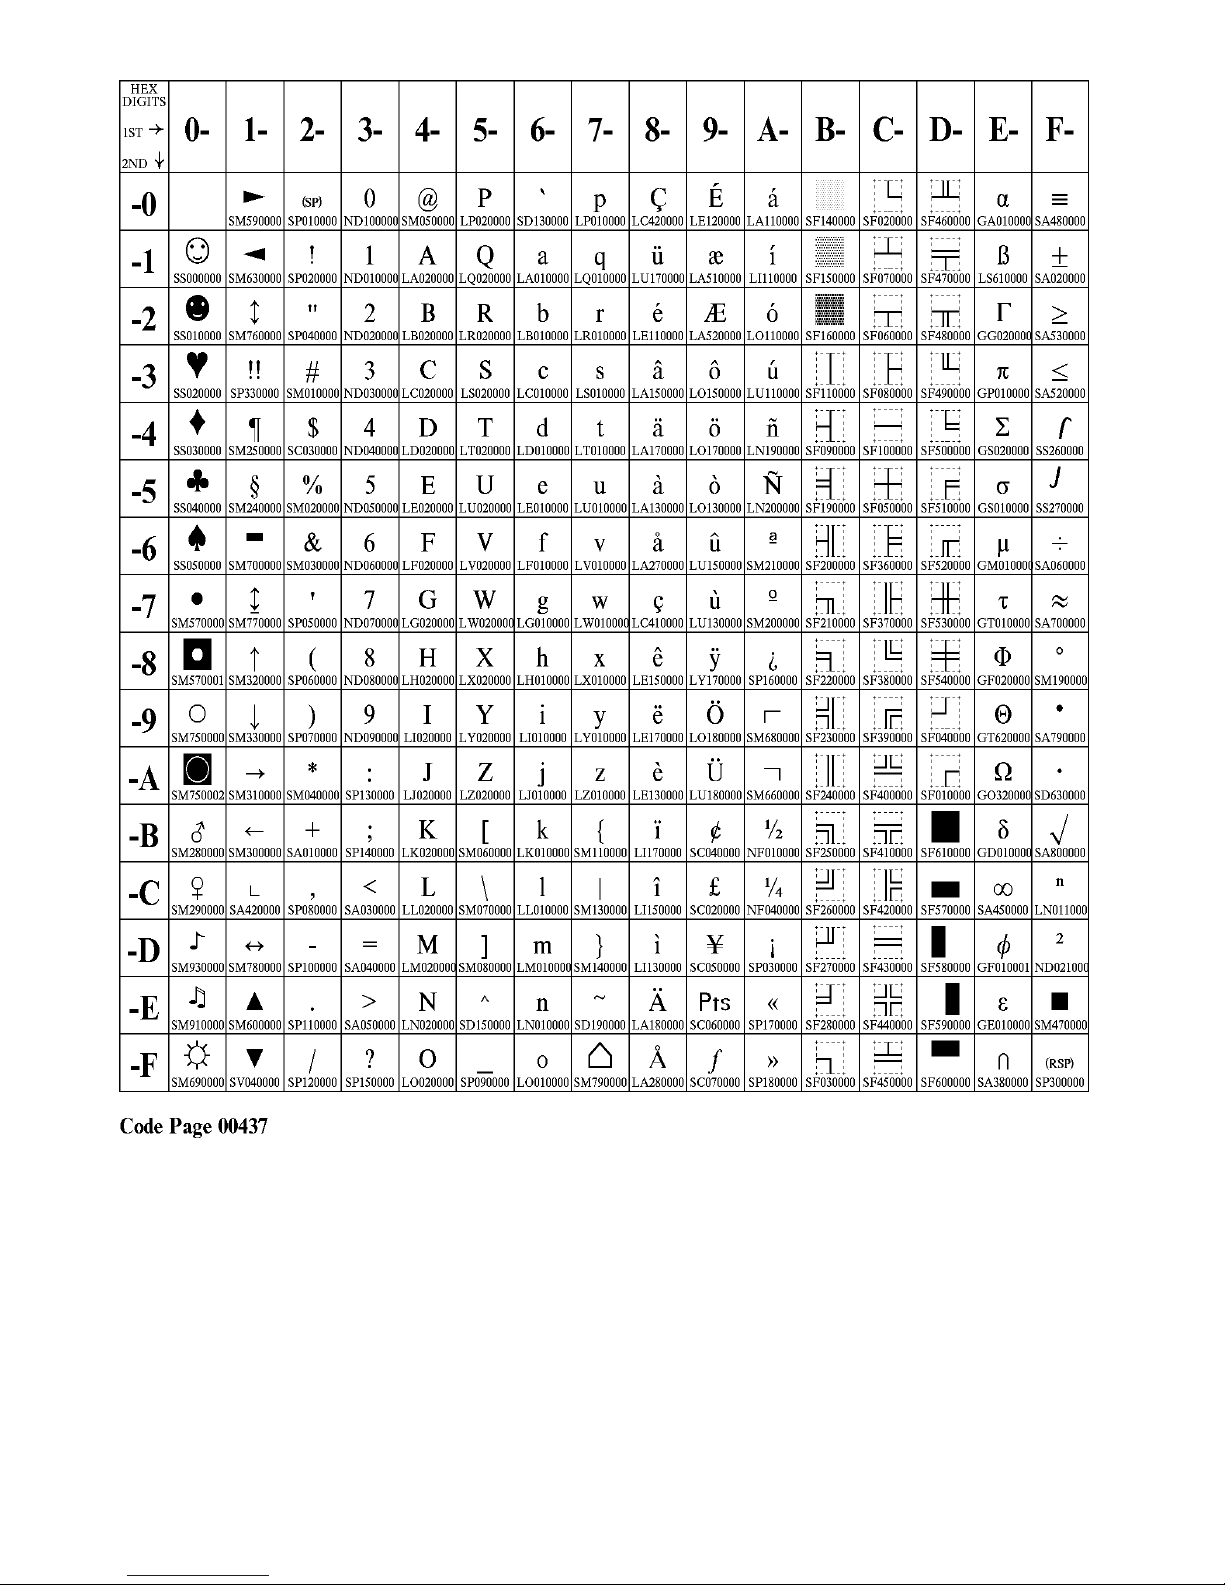
ASCII Code Page for Terminal Font
81
Page 90
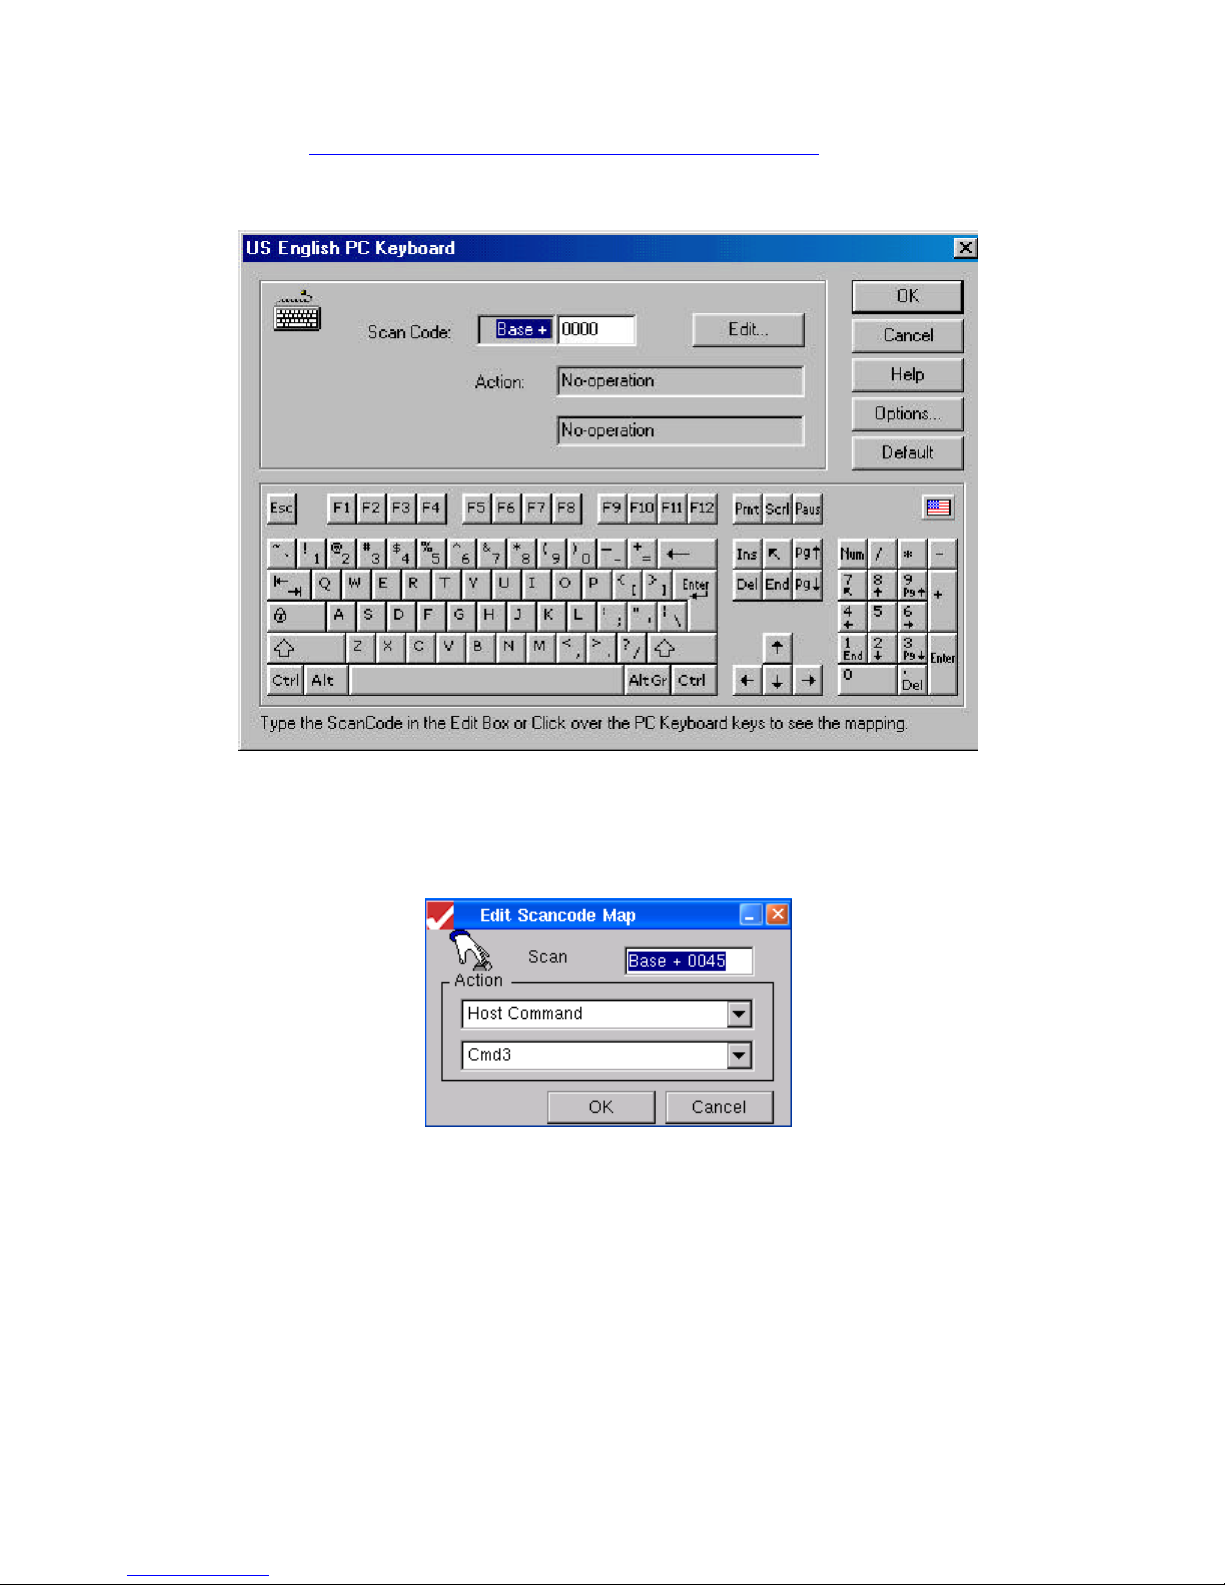
Create a Custom Keyboard Map
To do this, select, in Display Session Properties>General>Keyboard Type, one of the available
Keyboard Layouts (the one that best matches the one you want to create) and click on Edit. Assuming
that you chose the 101 PC keyboard for U.S. English, the following screen will appear
Keyboard Map Page for 101 PC Keyboard
Select the key, or key plus modifier (Ctrl, Alt, Shift) to which you want to associate a specific action.
On the upper half of the window, you can see the keyboard Scan-Code and the associated default
action. To modify the action, click on Edit. The following dialog box will appear:
Edit Scancode Map Dialog Box
From the Action drop-down list, you can select the action that you want to associate with the selected
key from among the following options:
• No operation. No action will be performed when you press the key.
• Host Command. Choose the desired 5250 command function from the lower drop-down list.
• Recorded Key Sequence. If you have previously recorded one or more key sequences, you will see
their names in the lower drop-down list. Choose the desired Recorded Sequence from this list.
• EBCDIC Characters Sequence. Enter the Scan-Code sequence you want to associate to the key.
Although you can use this to enter multiple characters, like a Recorded Sequence, this option is
82
Page 91

typically used to access some special character not normally seen on a keyboard
Custom Language Code Page for a standard code page for EBCDIC.
. See Create a
Record a Keystrokes Sequence (Macro)
If you regularly do the same things when you work with a host system, it is convenient to record the
keystrokes you make and have YESterm/IP play them back when you want to do the same job again.
Record/Playback allows you to do this. All your keystrokes can be saved in a file; when you play the
file back (Playback), everything that happened will be reproduced. The macro that you create is
available in all display emulation sessions.
Note: Macros are limited to 512 data “items”. A character keystroke counts as one item, while a cursor
movement keystroke counts as two items. If you try to enter more than 512 items, an error message
will appear and a spurious character will be attached to the macro that may make the macro useless.
Graphics Display Session
When configuring a display emulation session, you have the choice of a graphics display mode or a
5250 text display mode. See Display Sessions|Advanced|Appearance
In order to create a macro in a graphics display session, you have to:
1. Open a display session.
2. Place the cursor in the field where you wish to start the sequence.
3. Activate Tools|Start Recording or press the Recrd key or click on the corresponding Toolbar
button. You will see, in the right side of the Status bar, the information REC: 0. This tells you how
much information has been entered into the macro.
4. Type the data and cursor movements that you want to record. As you type, the information counter
will advance by one for each character and by two for each cursor movement.
5. Stop the recording by activating Tools|Stop Recording or pressing the Recrd or clicking on the
corresponding Toolbar button.
6. Name the macro. There are no naming restrictions.
Example:
Assume you want to record the CL command to display the description of a specific device. The
command is WRKDEVD PRTXXXX, where PRTXXXX identifies a specific printer. So, the
procedure is:
1. Place the cursor.
2. Activate Start the Recording.
3. Type WRKDEVD
4. Activate Pause.
5. Type PRTXXXX (the name of the device) and press Enter.
6. Activate Stop the Recording. When you stop, you will be prompted to save the recorded
keystrokes to a file.
Note: The Pause function will automatically end when you press the Enter key.
for details on making this choice.
5250 Text Display Session
In a 5250 text display session, you can record a macro by using Menu commands or Toolbar icons in
exactly the same way as in a graphics display session (see above). But, if you are using a 122-key
keyboard, the Recrd key works differently. This additional procedure for recording macros is as
follows:
83
Page 92

1. Place the cursor in the field where you want to record the macro.
2. Press Recrd. You will see, in the center of the Status bar, an R indicating Record mode and a
countdown counter. For the first macro, this count starts at 8161. (Why 8161? I have no idea.)
3. Press the F key, Fx, that you wish to associate with the forthcoming macro. You will see the R in
the status bar replaced by Fx.
4. Type the data and cursor movements that you want to record. The counter will count down by one
for each character keystroke and down by two for each cursor movement keystroke
5. When you are finished with the desired keystrokes, press Recrd again. This ends the recording
process. You now have a macro named Fx. This macro will appear in the Macro list as Fx.
6. When you record the next macro, the counter will start at the final count of the preceding macro.
This count is for information purposes only; there is no limit to the total number of keystrokes in all
the macros.
Note: You must use the keyboard Recrd key. Activating Start Recording from the Menu or Button
bars will result in the graphical procedure explained in the previous section.
Play a Recorded Keystrokes Sequence (Macro)
Graphics Display Session
In order to play a recorded keystrokes sequence in a graphics display session, you have to:
1. Place the cursor on the screen where you want to play the sequence.
2. Activate Tools or press the Play key or click on the corresponding Toolbar button. You will see a
list of available macros.
3. Select the sequence from the list. The sequence will be executed.
If you have assigned a sequence to a key as part of a custom keyboard map, you can also play the
sequence as follows:
1. Place the cursor on the screen where you want to play the sequence.
2. Press the designated key. The sequence will be executed.
5250 Text Display Session
In a 5250 text display session, you can play back a macro from the Tools menu or from the Toolbar in
exactly the same way as in a graphics display session (see above). But you also have another option if
you are using a 122-key keyboard and if you have used the alternate method of sequence recording.
This additional procedure for playing macros is as follows:
1. Place the cursor on the screen where you want to play the sequence.
2. Press the Play key. You will see, in the center of the Status bar, a P indicating playback mode and
a count that has no bearing whatsoever on the macro execution.
3. Press the F key corresponding to the desired macro. The macro will be executed, and the Status bar
will resume its regular appearance.
Modify a Printer Passthrough Driver
Any Passthrough Driver can be customized, and it is also possible to create a new Driver. To edit an
existing Passthrough Driver, do the following:
1. Highlight the connection name in the Configure tab of Connection Manager and activate Edit.
2. Follow the path Printer Session Properties>Output>Printer Driver
3. Select the Driver from the drop-down list and activate Driver Configuration in the Output. You
will see a screen with five tabs.
.
84
Page 93
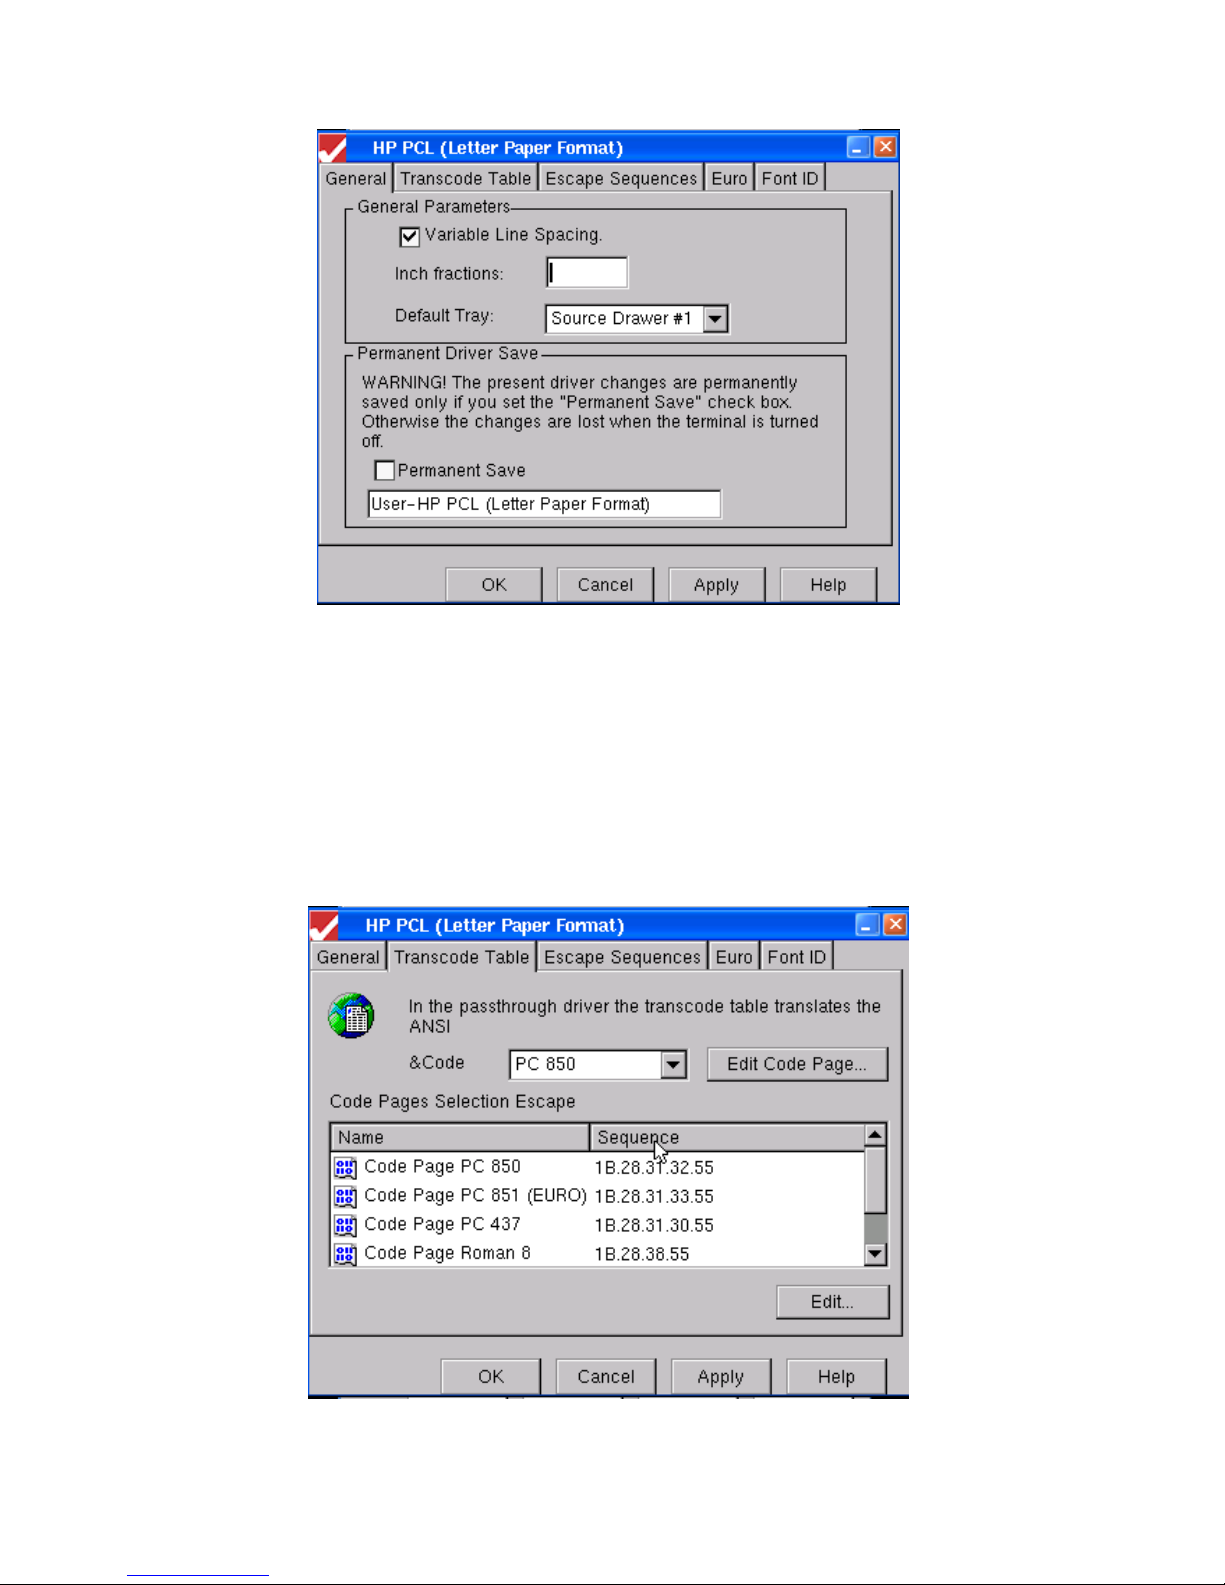
General
Driver General Property Sheet
This sheet allows you to select:
• Variable Line Spacing. If you enable this function you must enter the Inch fractions.
• Default Tray.
• Permanent Save. You must check this box if you wish to save the driver changes.
• New Driver Name. This name will appear in the Passthrough Driver drop-down list if you check
Permanent Save. The default new name is User- in front of the selected driver name. But you can enter a
completely new name if you wish.
Transcode Table
Driver Transcode Property Sheet
85
Page 94
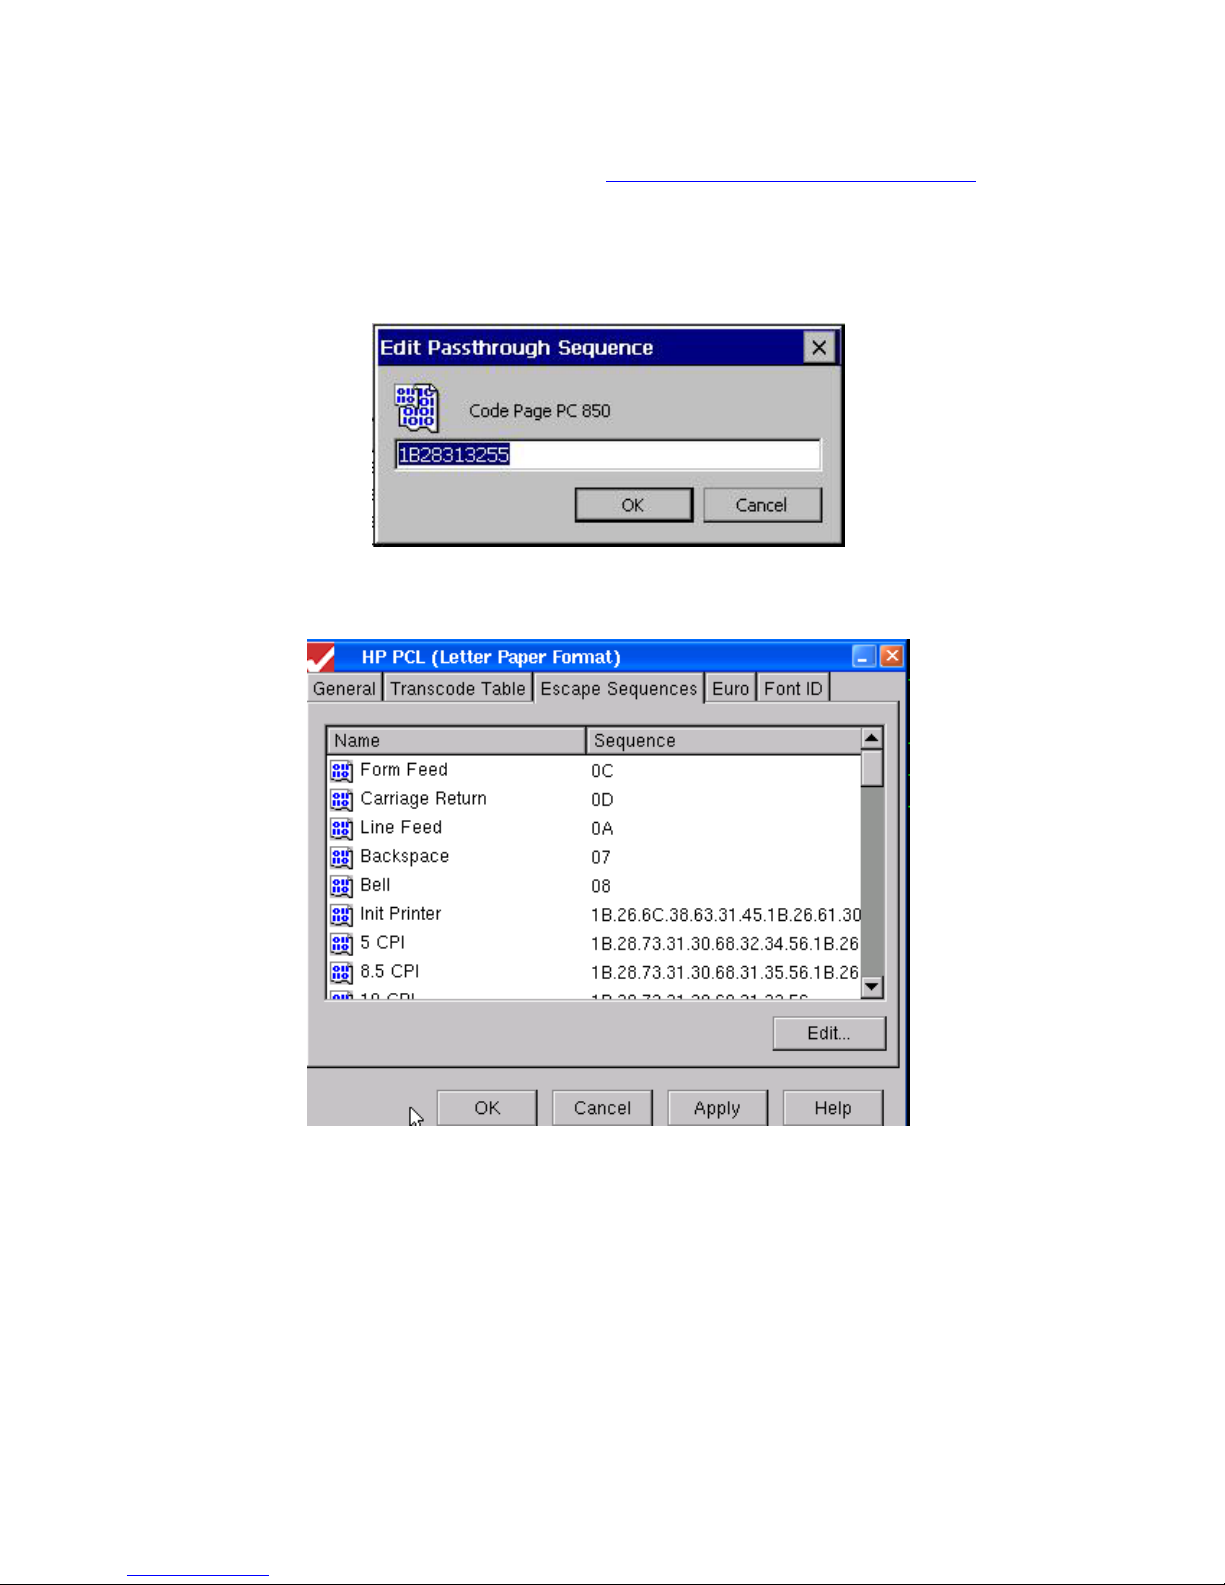
This sheet allows you to:
• Define the Default Code Page. If you want, you can also edit the Code Page by clicking on Edit
Code Page. Select a value that you wish to modify, click on Edit, and a Code Page screen will
appear where you can enter the new value. See Create a Custom Language Code Page for editing
instructions.
• Customize the Escape sequence used to call the Code Page. Select the Code Page from the list,
activate Edit, and an Edit Passthrough Sequence dialog box will appear where you can enter the
new value.
Transcode Edit Passthrough Sequence Dialog Box
Escape Sequences
This sheet allows you to customize all the Escape commands used to perform specific functions. Select
a function, activate Edit, and an Edit Passthrough Sequence dialog box will appear. Make your
changes there.
Driver Escape Sequences Property Sheet
86
Page 95
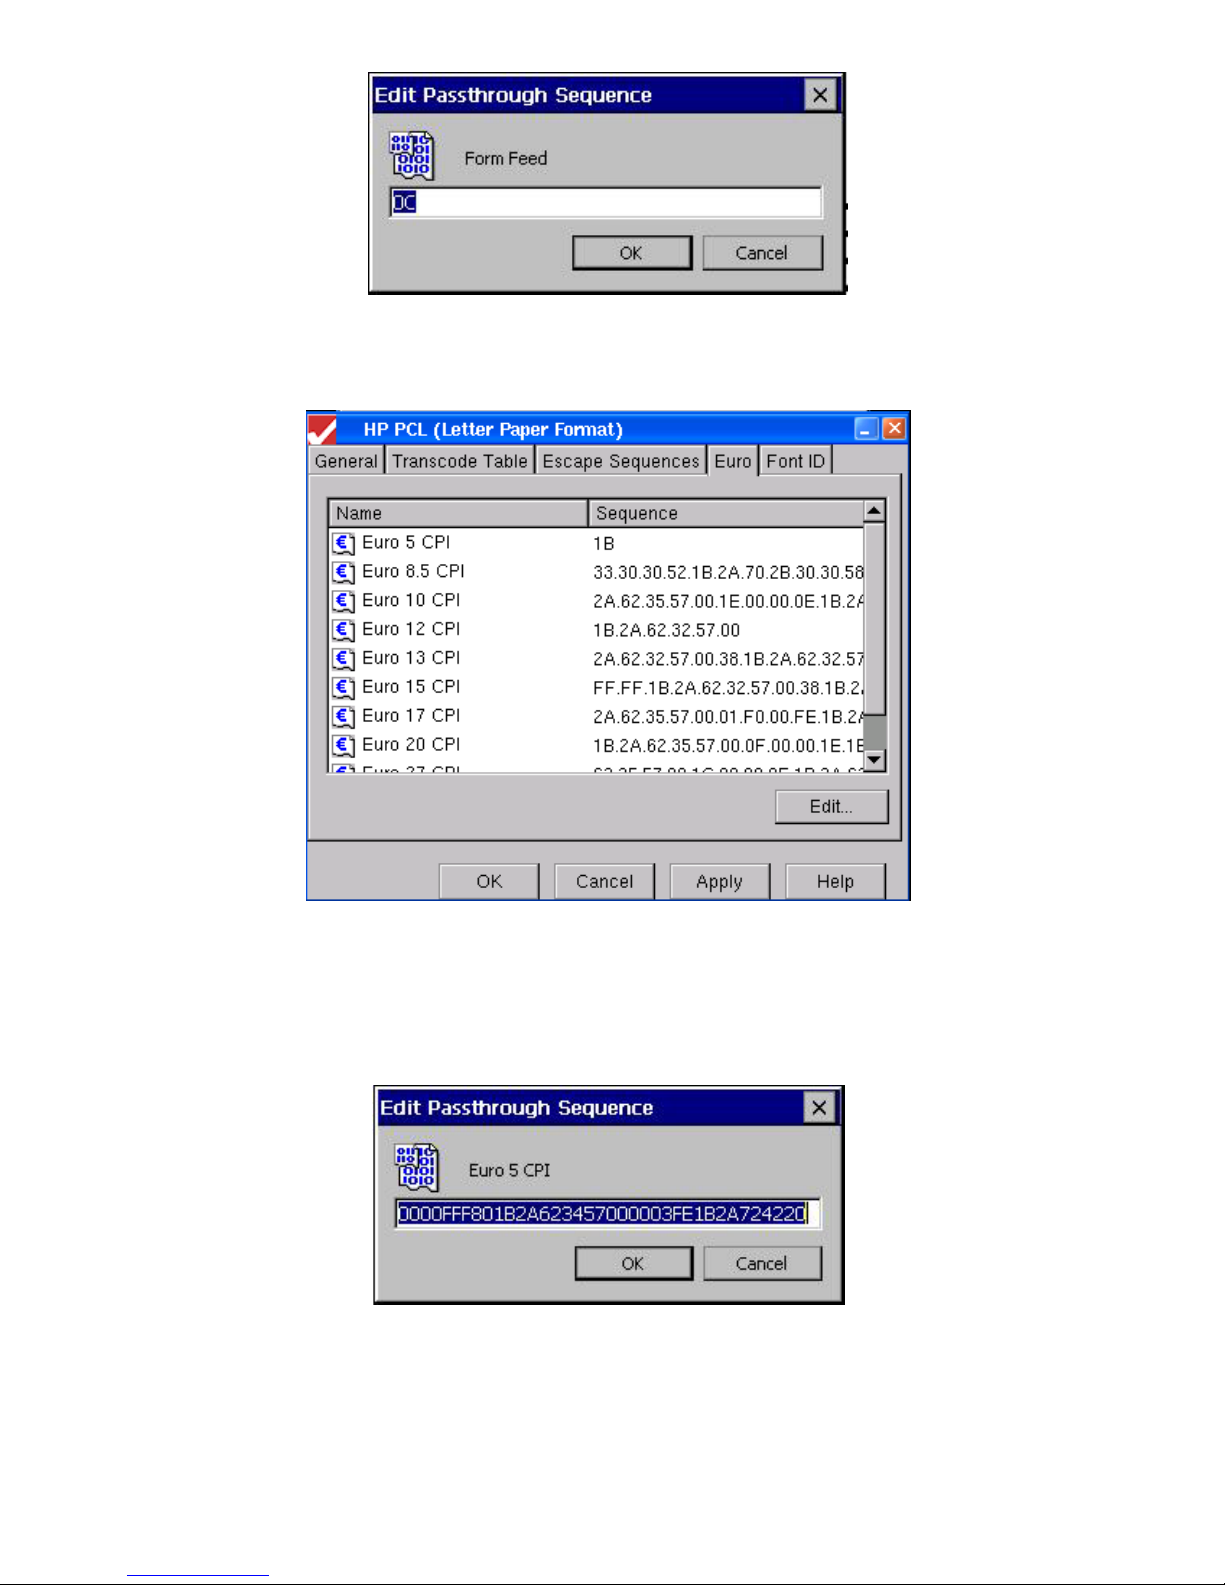
Euro
Edit Passthrough Sequence Dialog Box
Driver Euro Property Sheet
This sheet allows you to customize the Escape command used to print the EURO symbol. This special
function allows you to print the EURO symbol even on those printers that are not EURO ready. Select
the command you wish to customize, then activate Edit, and an Edit Passthrough Sequence dialog box
will appear where you can enter the new value.
Edit Passthrough Sequence Dialog Box
87
Page 96
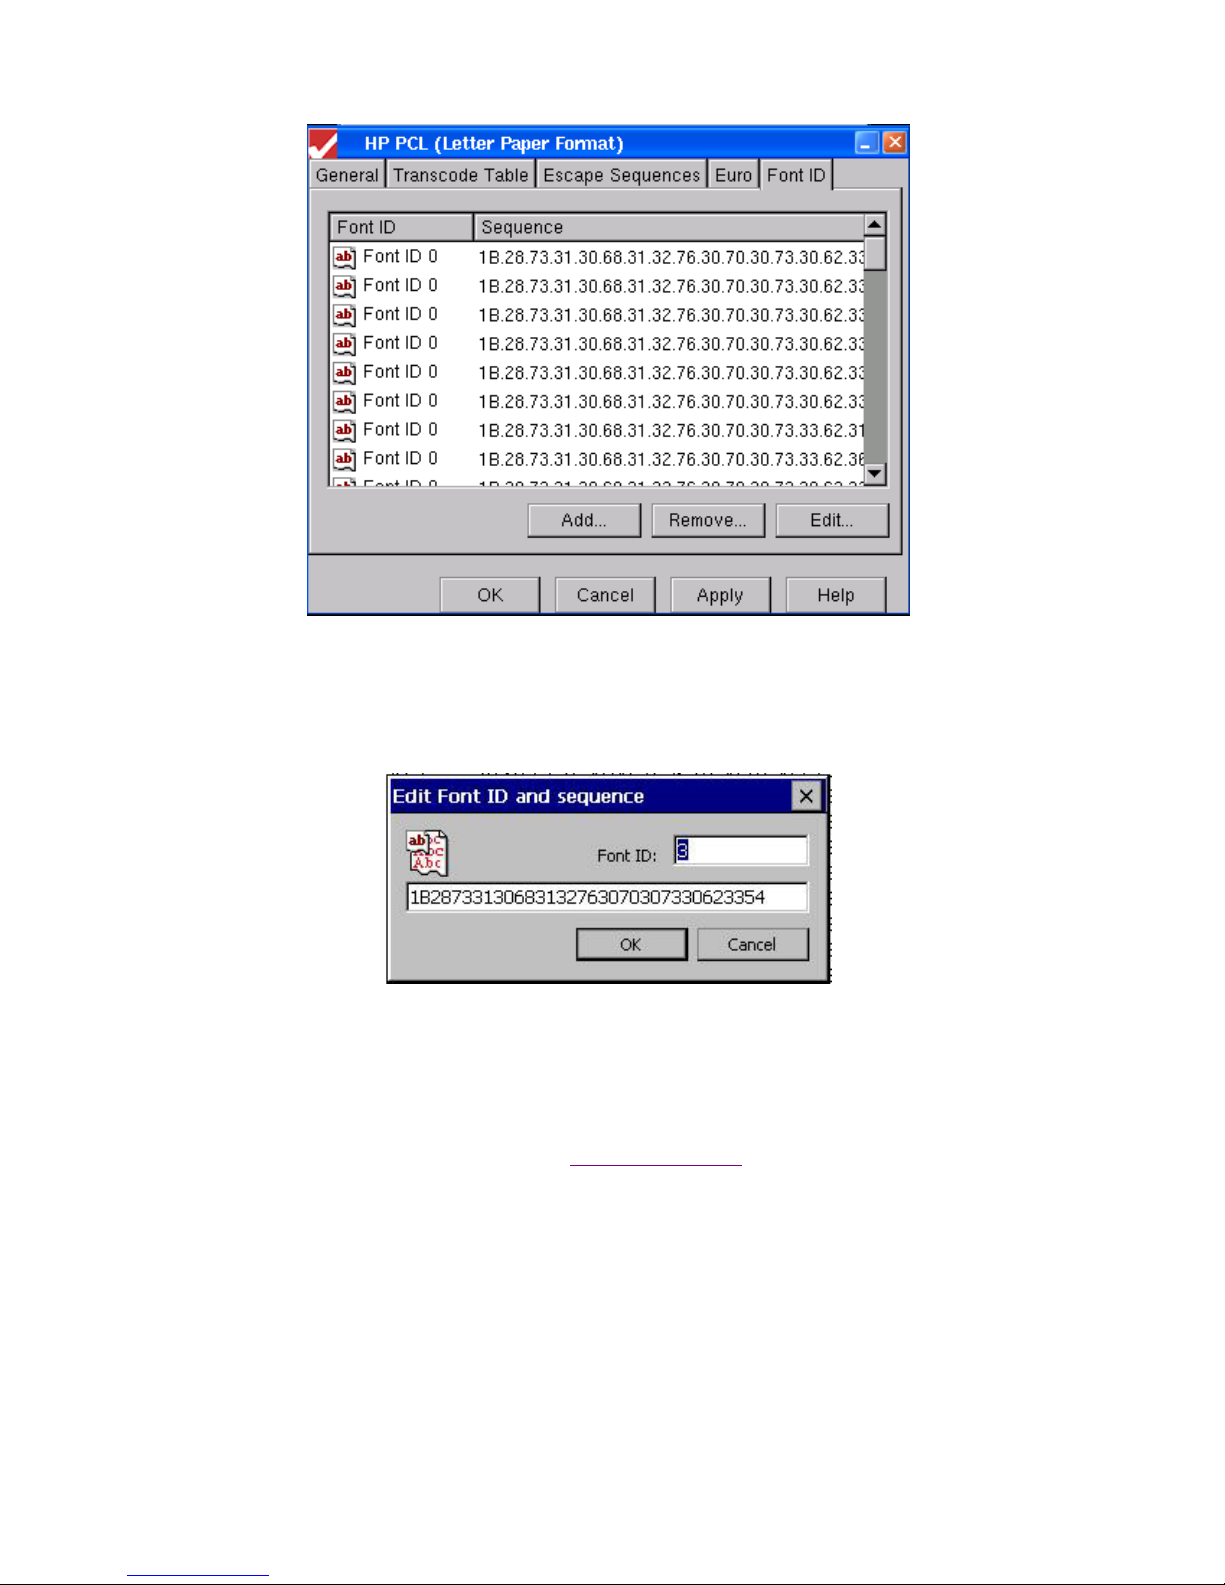
Font ID
Driver Font ID Property Sheet
This sheet allows you to customize the Escape commands used to call a Printer Font that has been
associated with a Host System Font ID. To edit a Font ID, select the item, activate Edit, and an Edit
Font ID and Sequence dialog box will appear where you can enter the new value.
Edit Font ID and Sequence Dialog Box
You can also remove a font or add a new font to the list. If you activate Add, an Edit Font ID and
Sequence dialog box will appear where you can enter the new values.
Return to Table of Contents
88
Page 97
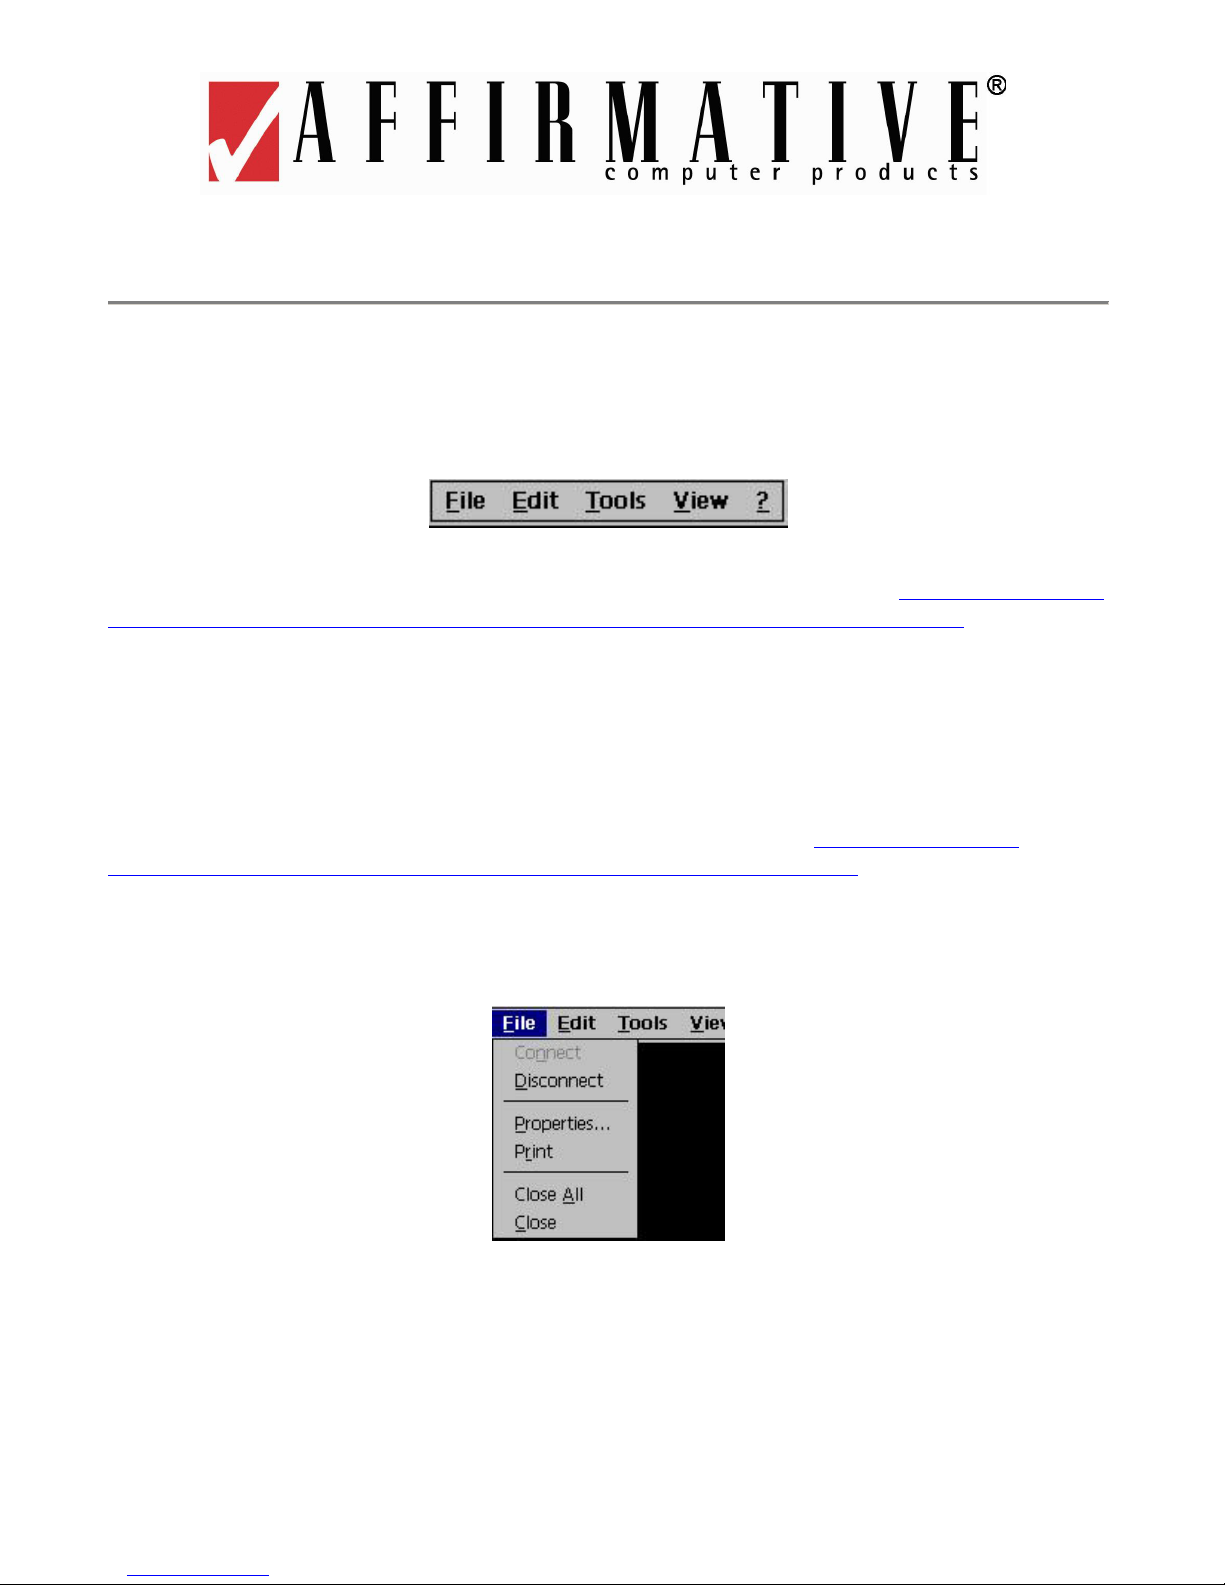
Emulation Operation
Display Session Menu Bar
Menu-bar commands of the display session window consist of commands and functions that are unique
for each window (session).
Display Session Menu Bar
The system administrator may disable any or all of the Menu bar commands. See Editing an Emulation
Connection|Non-TBT Viewing Mode|Display Sessions|Advanced|Security Configuration.
If you have a mouse, open the desired menu by left-clicking on the menu name. Without using a
mouse, you can view the File menu by pressing and releasing the LeftAlt key. Then you can use the
Tab or Left/RightArrow keys to move to other menus. Or you can press Alt+e/t/v/? to open the
Edit/Tools/View/? menu.
The Menu bar may be enabled but invisible, if visibility is not enabled in Editing an Emulation
Connection|Non-TBT Viewing Mode|Display Sessions|Advanced|Appearance. In this case, use the
mouseless method of menu viewing described above
File (Alt)
Display File Menu
• Connect (n). A display session typically comes up in the connected state. But if, for some reason,
the session is not connected, this command will attempt to connect the display session to the host.
• Disconnect (d). This command disconnects the display session from the host. It is recommended
that you disconnect only from the Sign-On screen.
89
Page 98
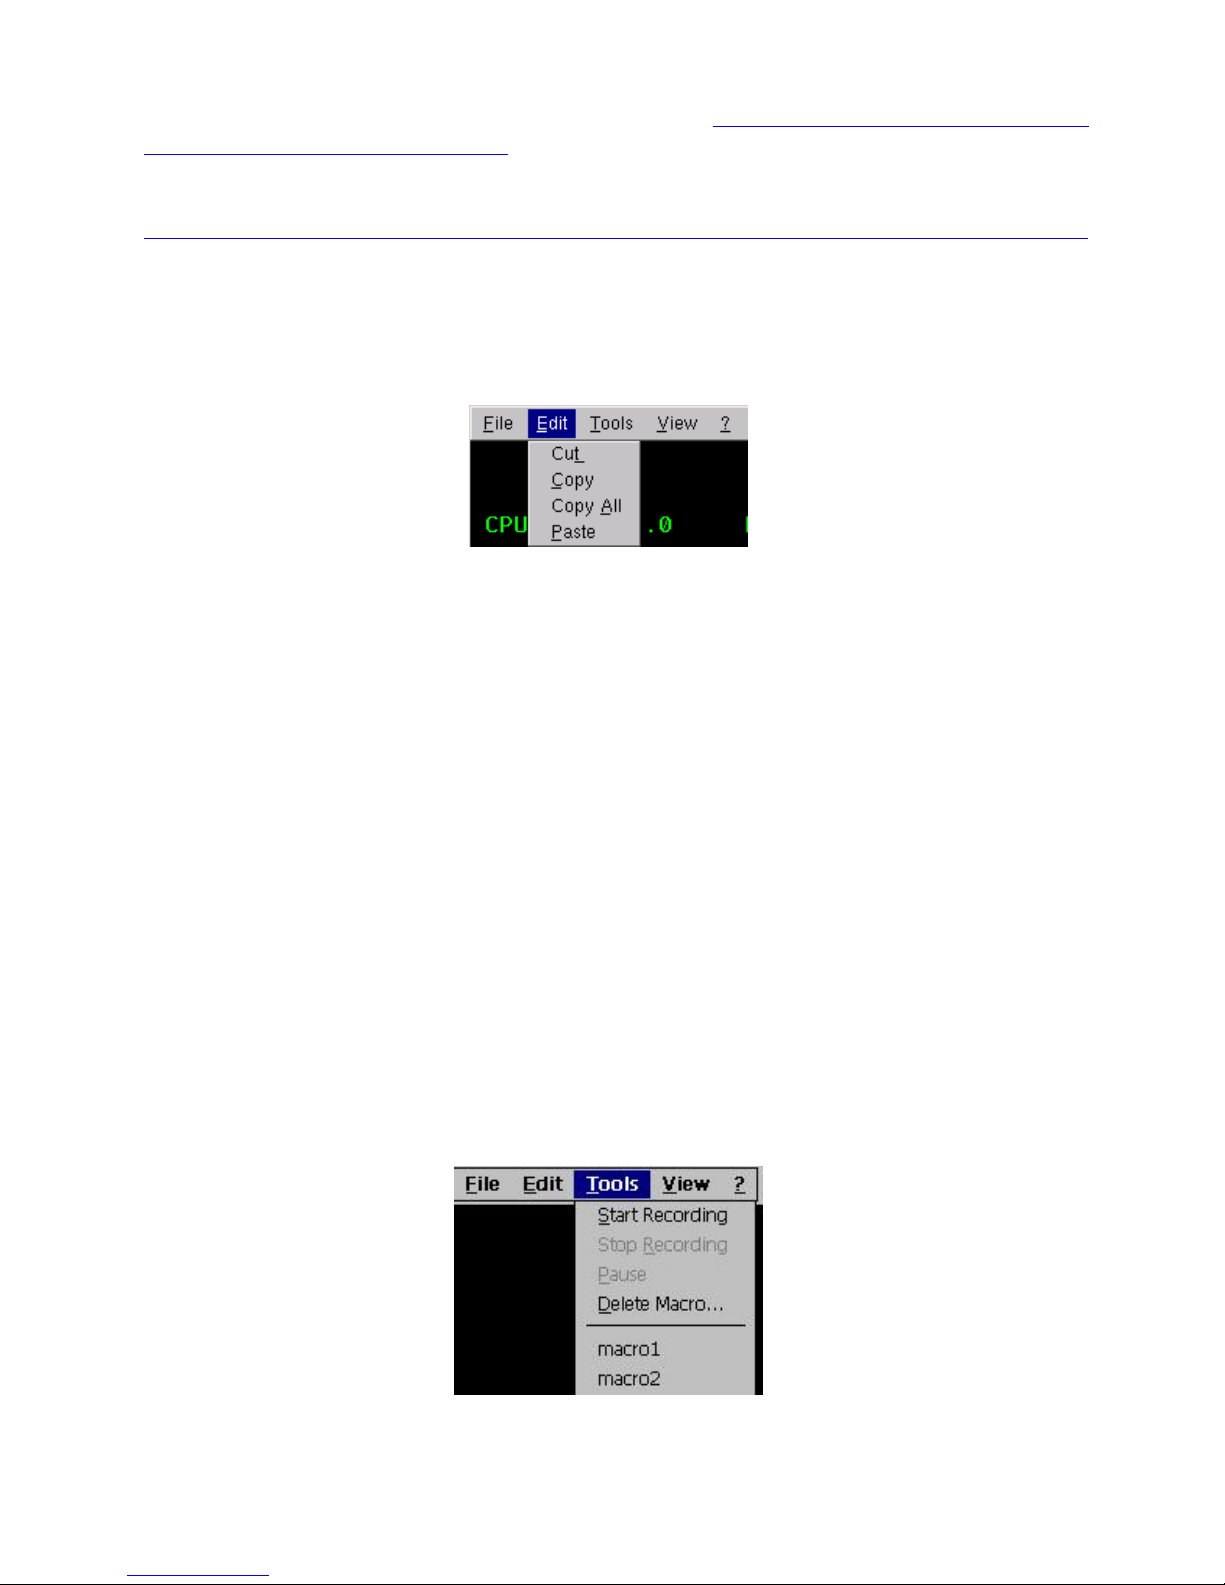
• Properties (p)… This command allows you to edit/modify the Properties of the display session in
use. For more information on this function, please refer to Editing an Emulation Connection|Non-
TBT Viewing Mode|Display Sessions. When you change properties here, most changes are
effective immediately, but some require that you exit the session and reopen it.
• Print (r). This command prints the contents of the display screen to the printer designated in
Editing an Emulation Connection|Non-TBT Viewing Mode|Display Sessions|General|Print Screen
• Close All (a). This command closes all active sessions, including printer sessions.
• Close (c). This command closes the display session in use.
Edit
Display Edit Menu
Cut (t). This command copies, into the Clipboard, data contained in the selected area and removes
•
it from the display. A mouse is required for this operation, since the mouse cursor is used to draw a
box around the selected area. The Cut process is:
1.
Use the mouse cursor to draw a box around the area to be copied. Be precise when you draw
the box, or else the paste process may try to copy the data into a restricted area. The selected
area will be highlighted in white.
2.
Open the Edit menu.
3.
Activate Cut. Note: Cut does not duplicate host attributes such as color and intensity.
4.
Return the mouse cursor to the green screen and left click. The white highlight will disappear.
• Copy (r). This command accomplishes the same function as Cut, except that the selected data is
not removed from the display. The Copy process is the same as the Cut process, except that you
activate Copy in Step 3.
• Copy All (a). This command copies the entire screen into the Clipboard.
• Paste (p). This command pastes the current contents of the Clipboard onto the session window,
starting at the current cursor position. If the contents of the clipboard are larger than the space
available in the presentation space (screen), they may be clipped. Paste does not overlay the
clipboard contents onto areas that are protected by the host application.
.
Tools
Display Tools Menu
90
Page 99
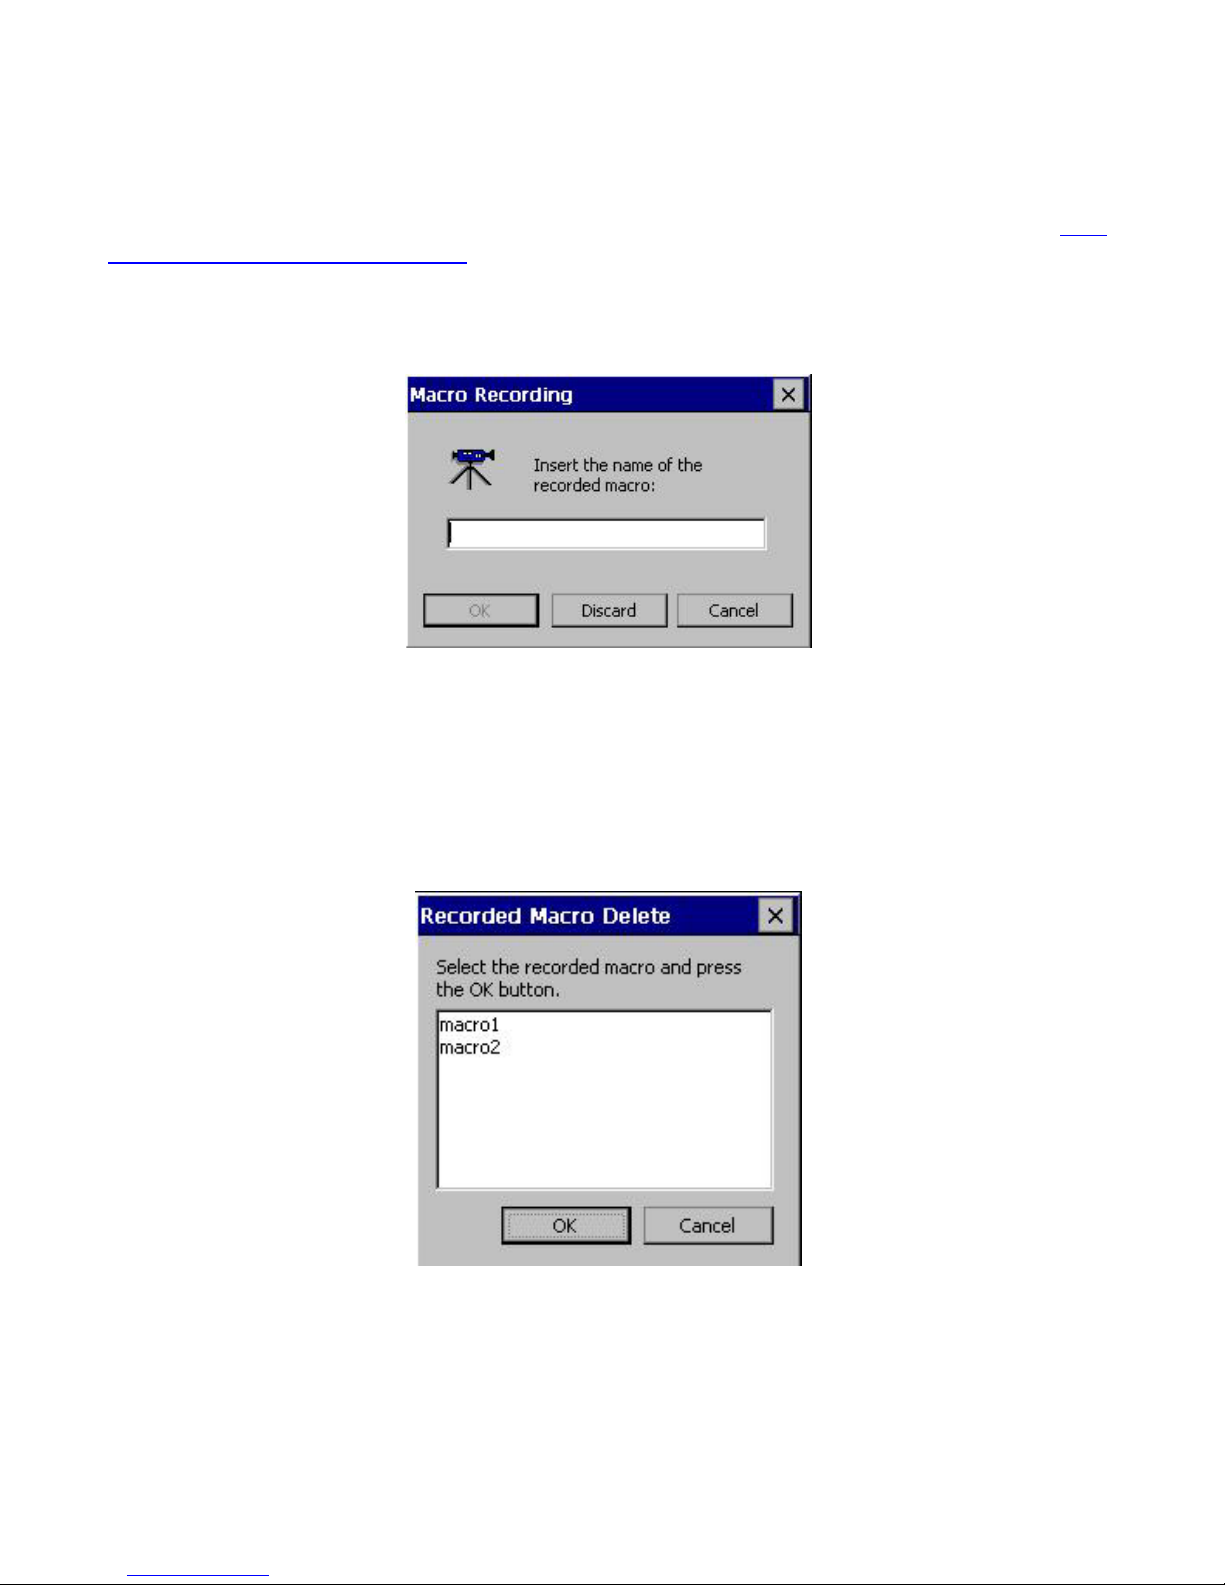
Tools commands allow you to work with the Record/Playback function. If you regularly do the same
things when you work with a host system, it is convenient to record the keystrokes you make and have
YESterm/IP play them back when you want to do the same job again. Record/Playback allows you to
do this. All your keystrokes can be saved in a macro file; when you play the file back (Playback),
everything that happened will be reproduced exactly. Any macro that you create is available in all
display emulation sessions. For more information on how to work with Record/Playback, refer to: How
To…|Record a Keystrokes Sequence.
• Start Recording (s). This command starts the Keystrokes Recording process.
• Stop Recording (r). This command stops the Keystrokes Recording process.
Macro Recording Dialog Box
When you Stop Recording, the Macro Recording dialog box will be displayed, allowing you to save
the recorded keystrokes into a named file for subsequent playback.
• Pause Recording (p). Including a Pause command into a recorded sequence will cause the
Playback operation to pause at this point in the sequence. This pause is typically used to enter
variable data during Playback.
• Delete Macro (d). This command will bring up the Recorded Macro Delete dialog box.
Recorded Macro Delete Dialog Box
In this box will be a list of the available macros for this session. Select the one to be deleted and
activate OK. This macro will now be deleted from all display emulation sessions.
• Playback. No, you don’t see an actual Playback command. But, at the bottom of the Tools menu
below the line, you will see a list of the available macros for this session. Select the one to be
played and press the PC Enter key; that macro will then be executed.
91
Page 100
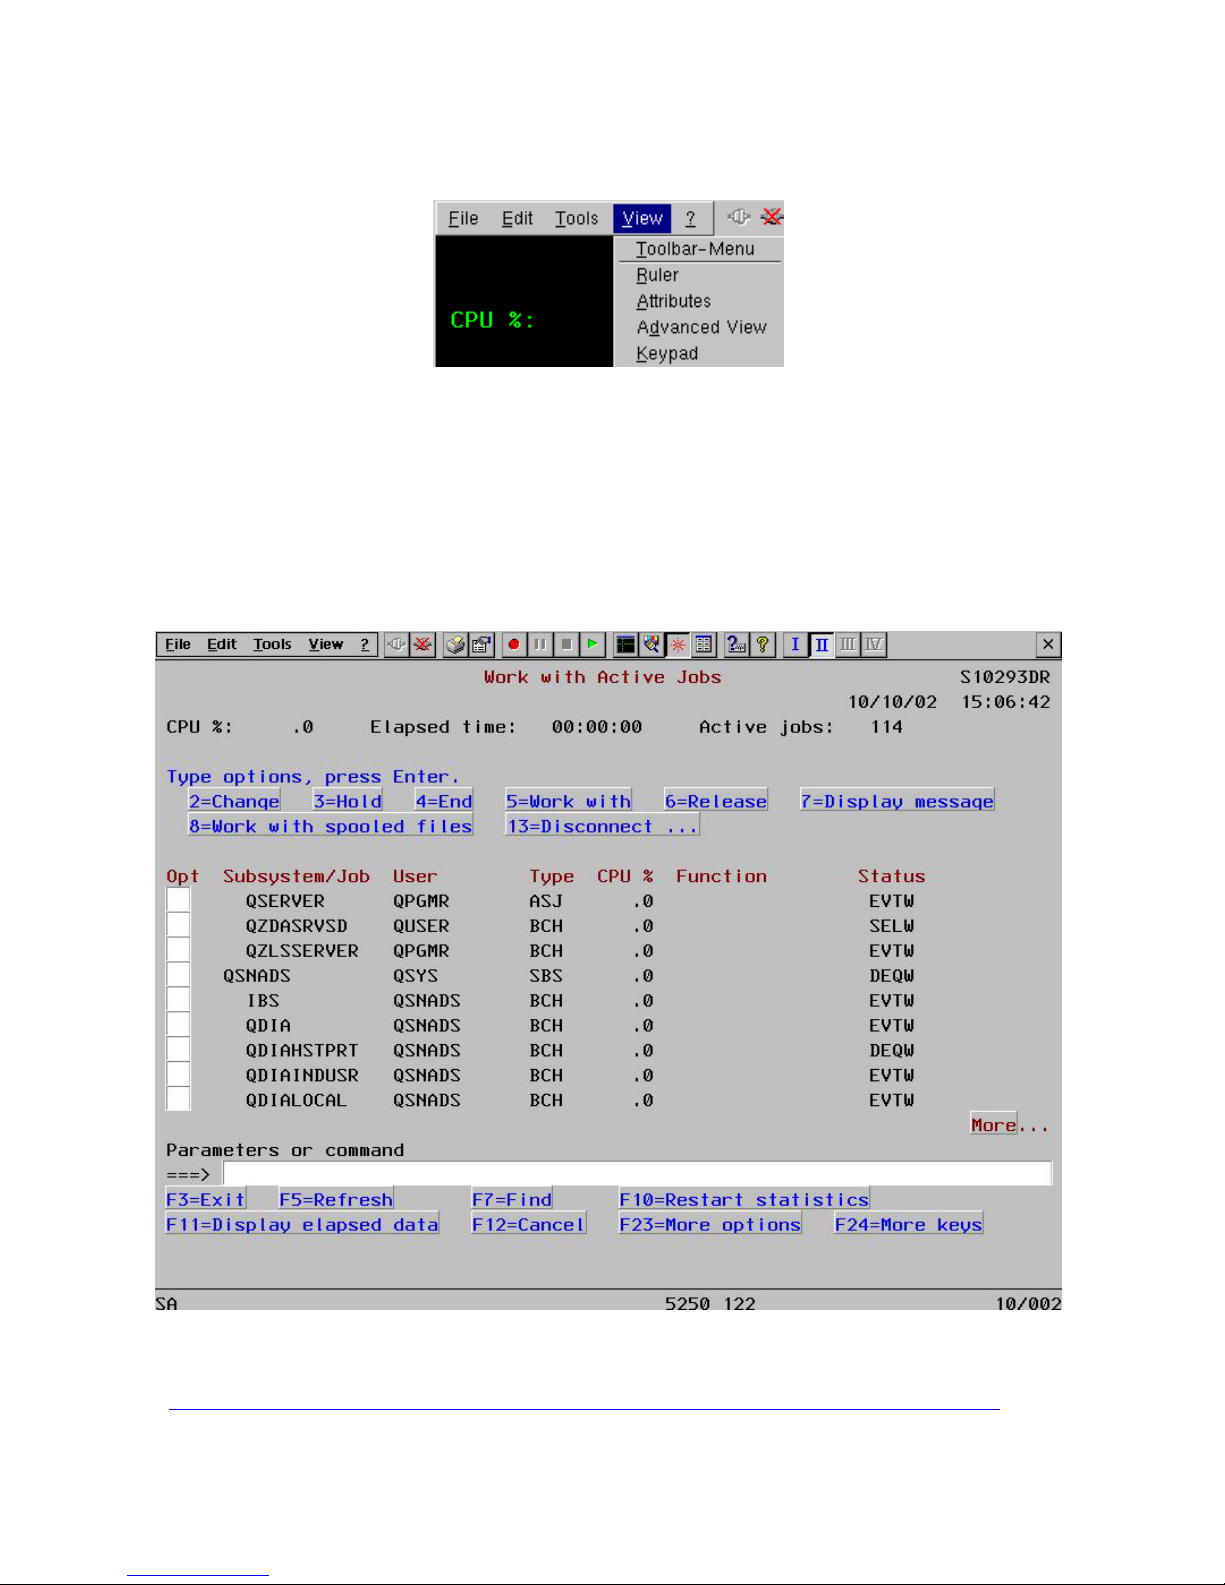
View
Commands in the View menu are used to manipulate the Emulator display window.
Display View Menu
• Toolbar-Menu (t). This toggle command hides or displays the Menu and Buttons toolbars. After
you hide the toolbars, you will have to use LeftAlt and the Arrow keys to access menu options.
• Ruler (r). This toggle command hides or displays the crosshairs Ruler. It has the same effect as
the Rule key on the keyboard. When the command is checked, the Ruler is displayed.
•
Attributes (a). This toggle command hides or displays the 5250 attribute fields.
•
Advanced View (d). This toggle command activates/deactivates the graphics Windows look, with
Hot Spots displayed as raised buttons if they have been enabled.
Emulation Screen with Advanced View and Hot Spots
Hot Spots are only useful if you have a mouse. For more information on the Hot Spot feature, refer
to Editing an Emulation Connection|Non-TBT Viewing Mode|Display Sessions|Hot Spot
.
92
 Loading...