

Page 1
MEMPHIS
XTREME AUDIO
MXAMCAPP
APP CONTROLLED HIDEAWAY HEAD UNIT
SHOW US YOUR INSTALL
WWW.MEMPHISCARAUDIO.USA
@MEMPHISCARAUDIO
Page 2

The Headless Unit
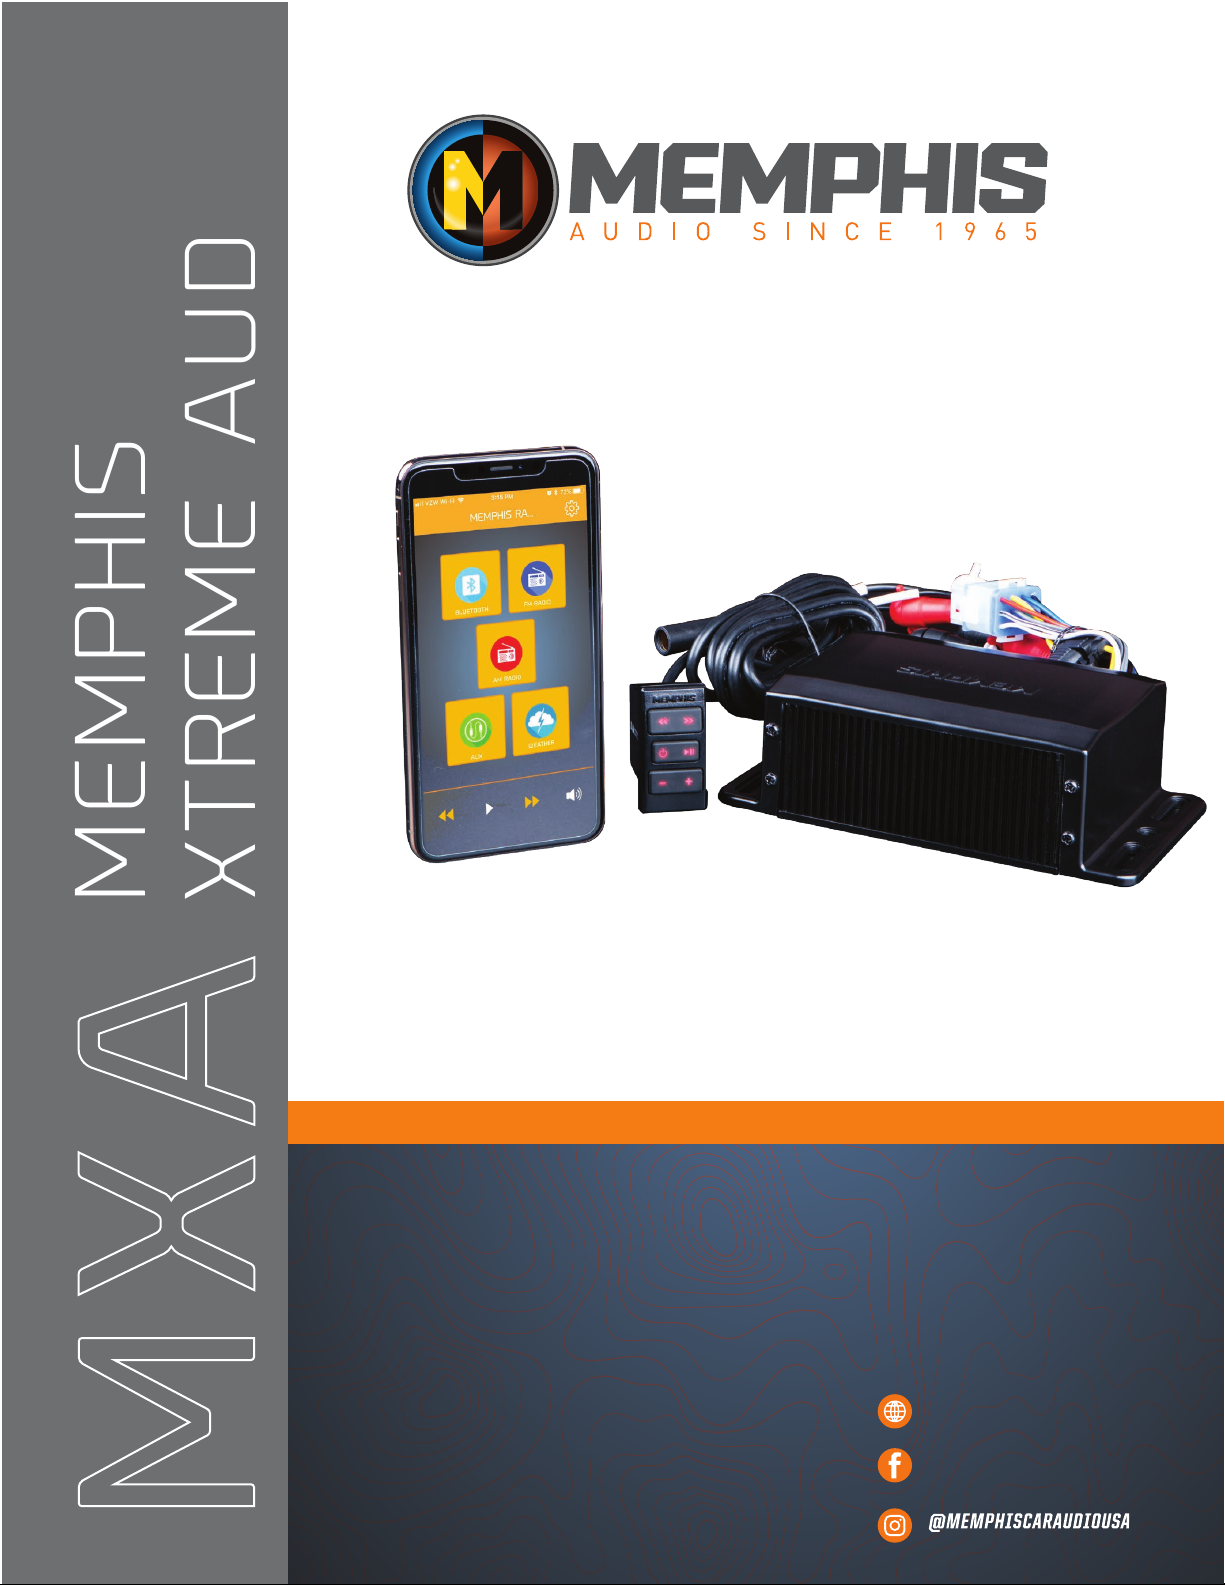
The MXAMCAPP is an extremely innovative solution for creating a complete audio experience in your vehicle without the need to alter
your vehicles dash to accommodate an aftermarket head unit. Much more than a simple Bluetooth controller, this is an entire head
unit packed into a hideaway box. The MXAMCAPP features a built-in 50x4 amplifier, 5 source options, and front/rear/subwoofer RCA
outputs allowing you to build your entire system directly off the unit. The hideaway box is controlled via the Memphis APP allowing
you to control your EQ, AM/FM presets, RGB LEDs and more. The attached wired remote fits in standard knock out locations but is not
required. This is the ultimate for powersports, marine, hot rod and classic car audio integration where you don’t want to alter the
appearance of your dash.
Features
• 5 Source options: AUX, BT, AM/FM, Weatherband
• USB Charging
• 50w x 4 built-in amplifier
• RGB LED control output
• Front/Rear/Subwoofer RCA output
• 2.5-Volt preamp output
• Conformal coated PCB IP66 rated
• Wired remote fits standard rocker switch cutout
• Wired remote w/ illuminating buttons
App Controls The Following
• RGB Settings
• Custom EQ settings
• Balance, fade, subwoofer control
• AM/FM Preset Control
• Radio search settings
• Manual/Seek/Presets
Warranty
Electronics limited warranty (including Memphis accessories) When purchased from an Authorized Memphis Dealer, Memphis warrants this product to be free from
defects in material and workmanship under normal use for a period of ONE (1) YEAR from date of original purchase (receipt required),THREE (3)YEARS years if installed by
an authorized Memphis dealer (receipt required). If this product is identified as “Refurbished” or “B Goods”, the warranty is limited to a period of THREE (3) MONTHS from
date of original purchase. In all cases you must have the original receipt. Should service be necessary under this warranty for any reason due to manufacturing defect or
malfunction during the warranty period, Memphis will repair or replace (at its discretion) the defective merchandise with equivalent merchandise. Warranty replacements may have cosmetic scratches and blemishes. Discontinued products may be replaced with more current equivalent products. Warranty is valid only for the original
purchaser and is not extended to owners of the product subsequent to the original purchaser. Any applicable implied warranties are limited in duration to a period of the
express warranty as provided herein beginning with the date of the original purchase at retail, and no warranties, whether express or implied, shall apply to this product
thereafter. NOTE: This equipment has been tested and found to comply with the limits for a Class B digital device, pursuant to part 15 of the FCC Rules. These limits are
designed to provide reasonable protection against harmful interference in a residential installation. This equipment generates, uses and can radiate radio frequency
energy and, if not installed and used in accordance with the instructions, may cause harmful interference to radio communications. However, there is no guarantee that
interference will not occur in a particular installation. If this equipment does cause harmful interference to radio or television reception, which can be determined by
turning the equipment off and on, the user is encouraged to try to correct the interference by one or more of the following measures: Reorient or relocate the receiving
antenna. Increase the separation between the equipment and the receiver. Connect the equipment into an outlet or a circuit different from that to which the receiver is
connected.
Consult the dealer or an experienced radio/TV technician for help.
Warning: Changes or modifications to this unit not expressly approved by the part responsible for
Compliance could void the user's authority to operate the equipment.
FCC Radiation Exposure Statement
This equipment complied with FCC radiation exposure limits set forth for an uncontrolled environment. This equipment should be installed and operated with minimum
distance 20cm between the radiator & your body.
Page 3
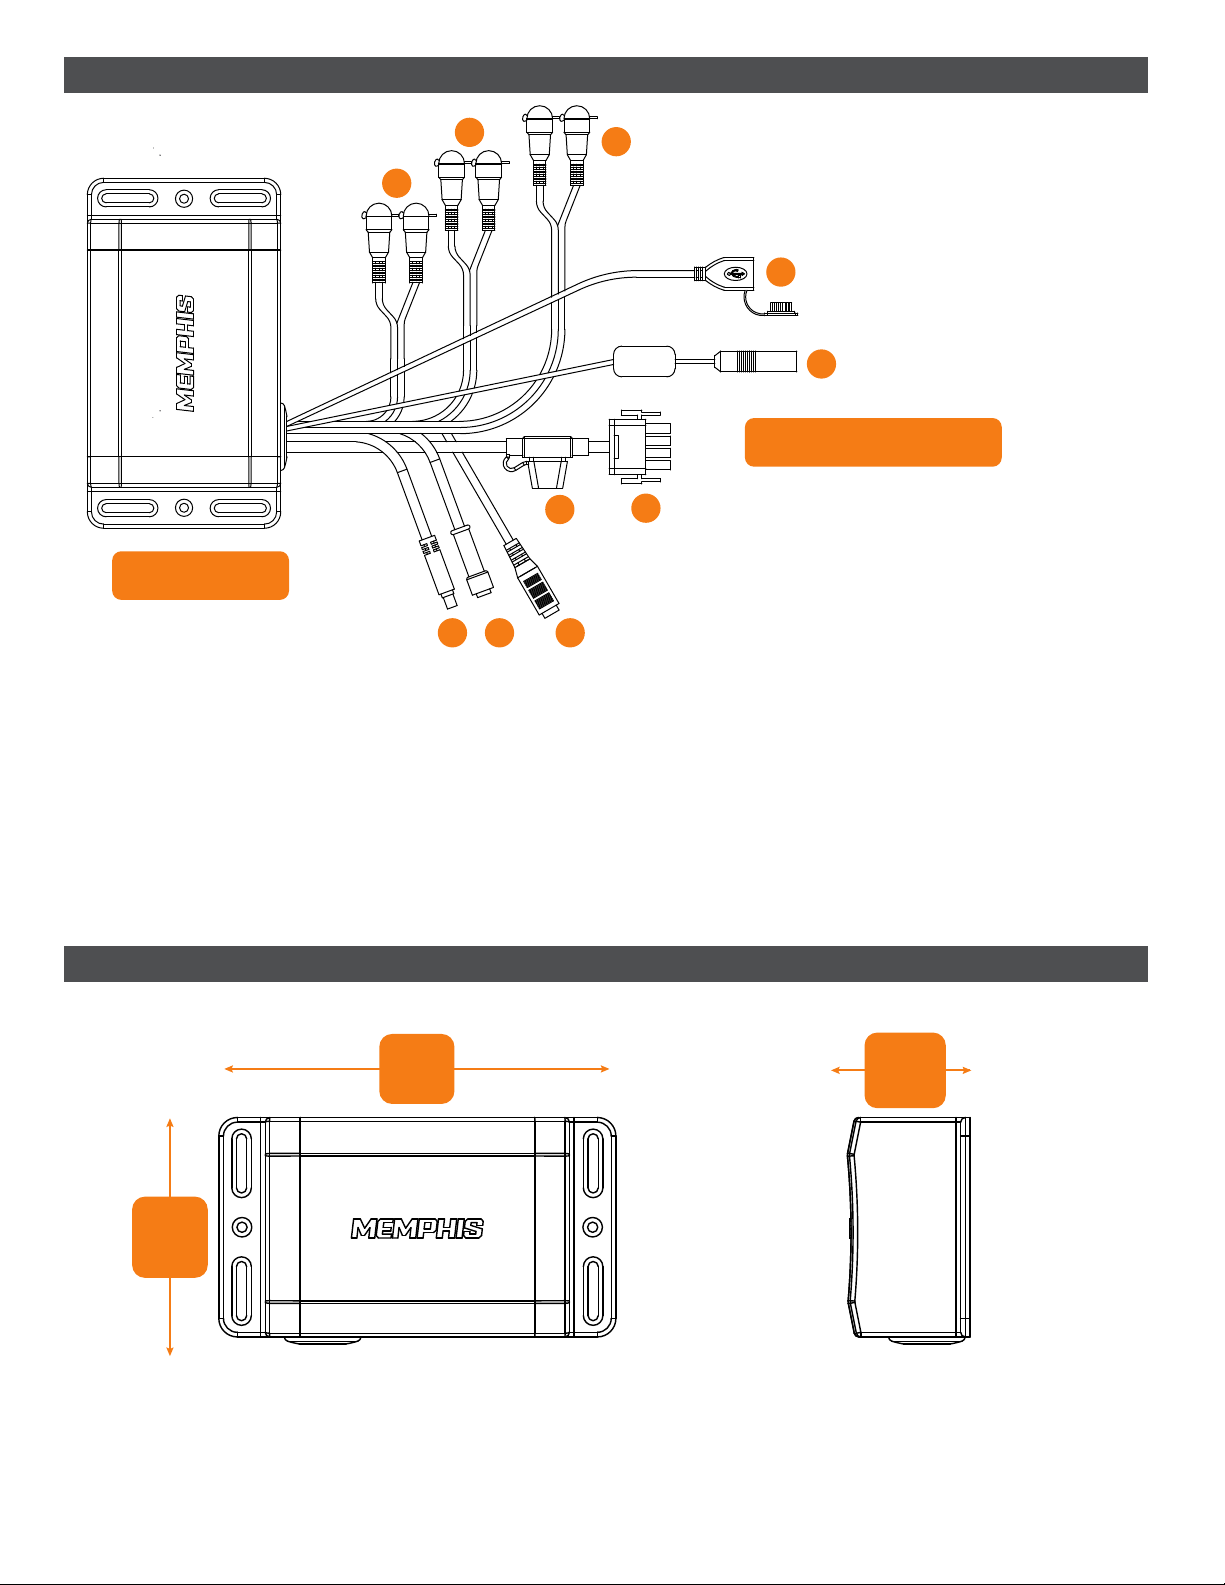
Wiring Overview
CONNECTIONS
1. Front Outputs
2. Rear Outputs
3. Subwoofer Outputs
4. USB For Charging
5. Antenna Input
6. Power/Audio Outputs
7. Line Input
8. RGB LED Output
9. Remote Control
2
3
1
10
789
10. In-Line 15A Fuse and Fuse Holder
4
5
POWER/AUDIO OUTPUTS
6
Red// 12V+ Ignition
Black // Ground
Blue // Remote Turn On
Yellow // B+ Battery
White & Black // Left Front Speaker (-)
White // Left Front Speaker (+)
Grey & Black // Right Front Speaker (-)
Grey // Right Front Speaker (+)
Green & Black // Left Rear Speaker (-)
Green // Left Rear Speaker (+)
Purple & Black // Right Rear Speaker (-)
Purple // Right Rear Speaker (+)
Dimensions
6.73”
171MM
3.84”
97.5MM
*Note: Mounting depth is 90mm but room is required for wires and connections. Check available depth prior to mounting.
Measure before cutting and be certain you will not be drilling into any items that will damage your vehicle.
2.067”
52.5MM
Page 4
Button Function
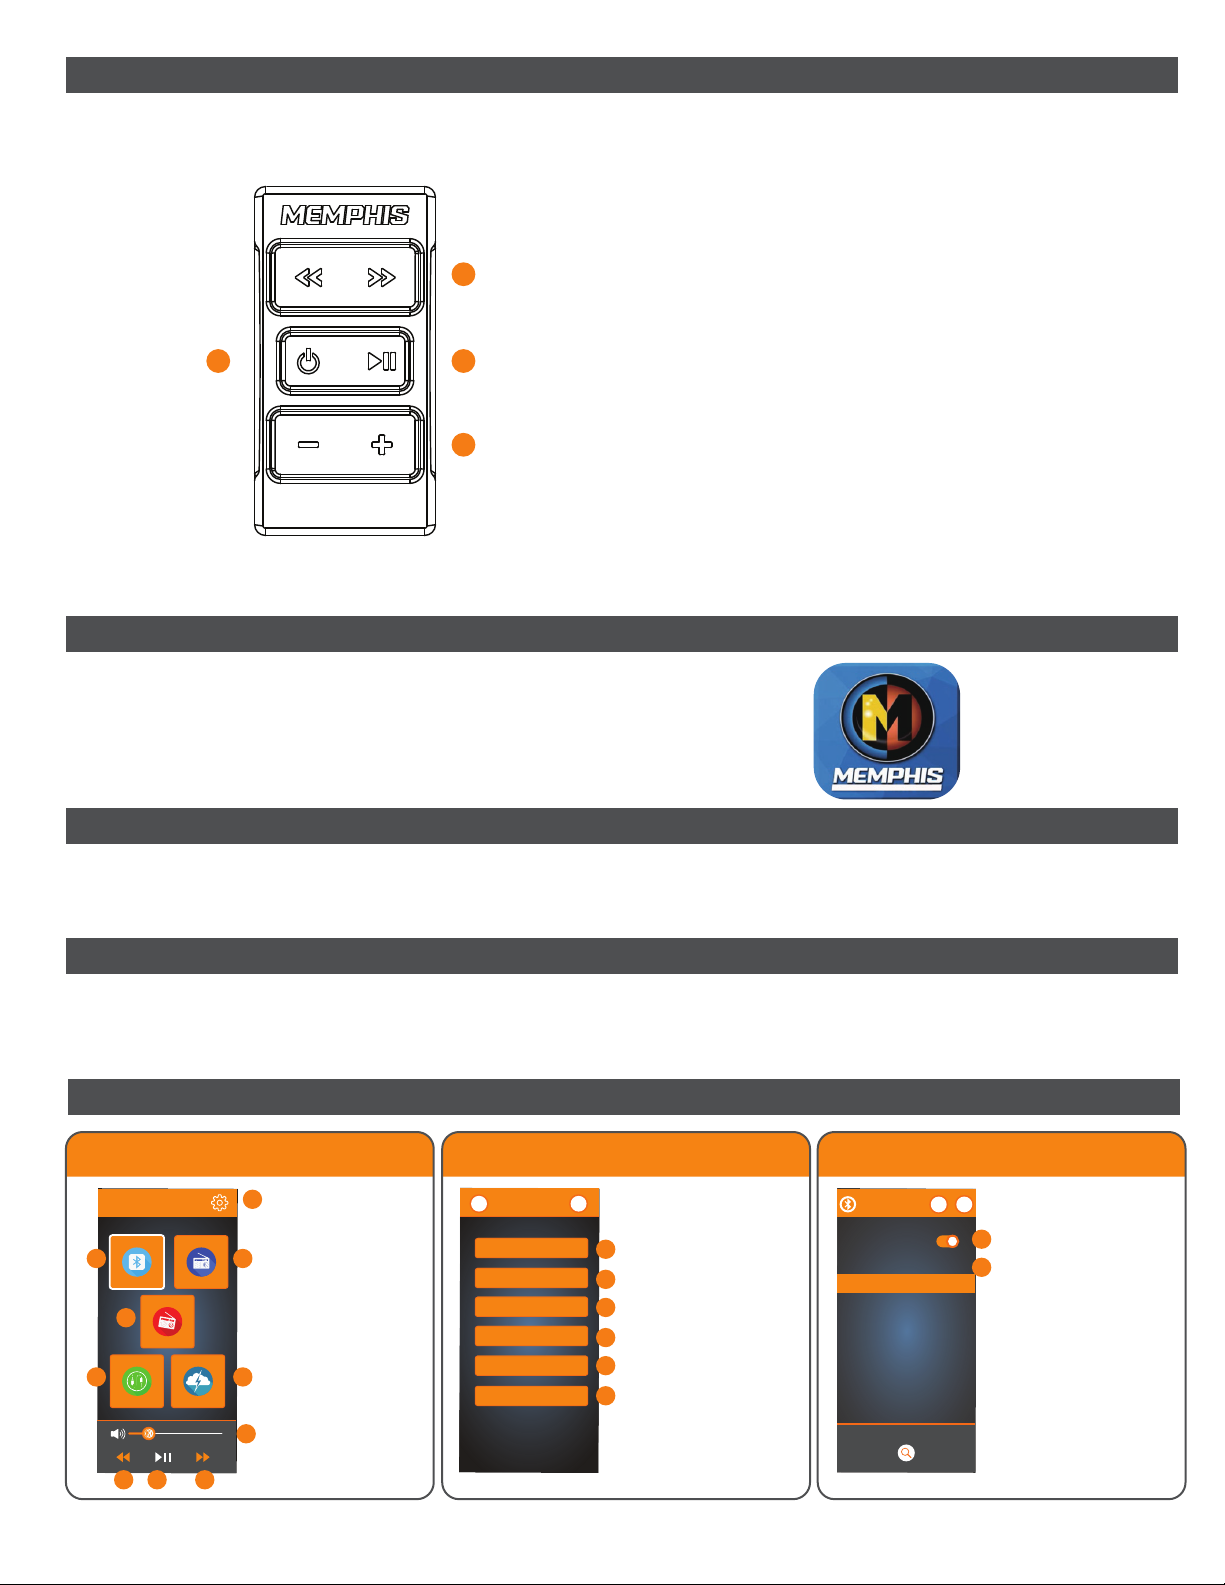
Wired remote control is optional and is not required to use the MXAMCAPP. This unit fits into standard rocker switch knockout
locations.
1
CONTROLS
1. Track Skip
2 3
2. Short Press: Change Source // Long Press: Power Down Device
3. Play/Pause
4. Volume Down/Up
4
Downloading Memphis App
The Memphis App is available on iOS & Android in the app store. Search for
“MEMPHIS RADIO” and locate the MEMPHIS RADIO App. Download and
install the app to begin controlling your MXAMCAPP.
Bluetooth Pairing (Audio Streaming Only)
When unit is powered on, search for Bluetooth Devices. Look for MXAMCAPP on your Bluetooth Device. Select this device to pair with
the MXAMCAPP unit. When connected via Bluetooth you can stream music to your MXAMCAPP unit.
Bluetooth Pairing The APP
To control you MXAMCAPP units settings and radio stations via the MEMPHIS RADIO App, you must establish a Bluetooth connection
using the MEMPHIS RADIO App. Open the BLUETOOTH SETTINGS menu on the MEMPHIS RADIO App and follow the instructions on the
next page to pair your MEMPHIS RADIO App with you MXAMCAPP unit.
App Instructions
Main Menu/Source Selection
MEMPHIS AUDIO
PHO NE MUSI C
CURR ENTLY PLAY ING SON
INFO D ISPLAY ED HERE .
2
BLUET OOTH
X
4
AM RA DIO
5 6
WEATHE R
AUX
7 8 9
FM RA DIO
1
1. Settings
2. Bluetooth Source
3. FM Radio Source
4. AM Radio Source
3
5. AUX Source
6. Weather Band Source
7. Previous Track
8. Play/Pause
9. Next Track
10. Volume Control
2.5 2
10
Settings
SETTIN GS
VOLU ME/FADE /BALANCE
EQ S ETTINGS
BLUE TOOTH S ETTINGS
LED COLOR SETTINGS
RESTORE DEFAULTS
ABOUT APP
HOMEBACK
1. Adjust volume, fade, balance
2. EQ settings Menu
3. Bluetooth configuration
1
4. Adjust LED color settings
5. Restore Default settings
2
6. App version information
3
4
5
6
Bluetooth Settings Menu
BLU ETO OTH SETTI NGS
CON NECT BL UETOO TH
AVAIL ABLE DE VICES
MXA MCAPP (BLE) CON NECTE D
DISCO VER ADD ITION AL DEVI CES
HOME BACK
Use this menu to connect your
MEMPHIS RADIO App via Bluetooth
1
to your MXAMCAPP unit. This
connection allows the MEMPHIS
2
RADIO App to control your
i
MXAMCAPP. You should only have to
make this connection once to pair
the MEMPHIS RADIO App to the
MXAMCAPP.
1. Connect/Disconnect Bluetooth
2. Select MXAMCAPP(BLE) to pair
your Bluetooth Device with the
MXAMCAPP.
Page 5
App Instructions Continued
Volume/Fade/Balance Menu
VOLU ME SETTINGS
VOL UME:
HOME BACK
5
FAD E/BAL ANCE
RESE T TO DEFA ULT
AM/FM/WB Source Screen
FM RA DIO
FM1 FM2 FM3
97. 1 89. 7 98. 2
97. 1 99. 5
4
APS
89.7
5
7
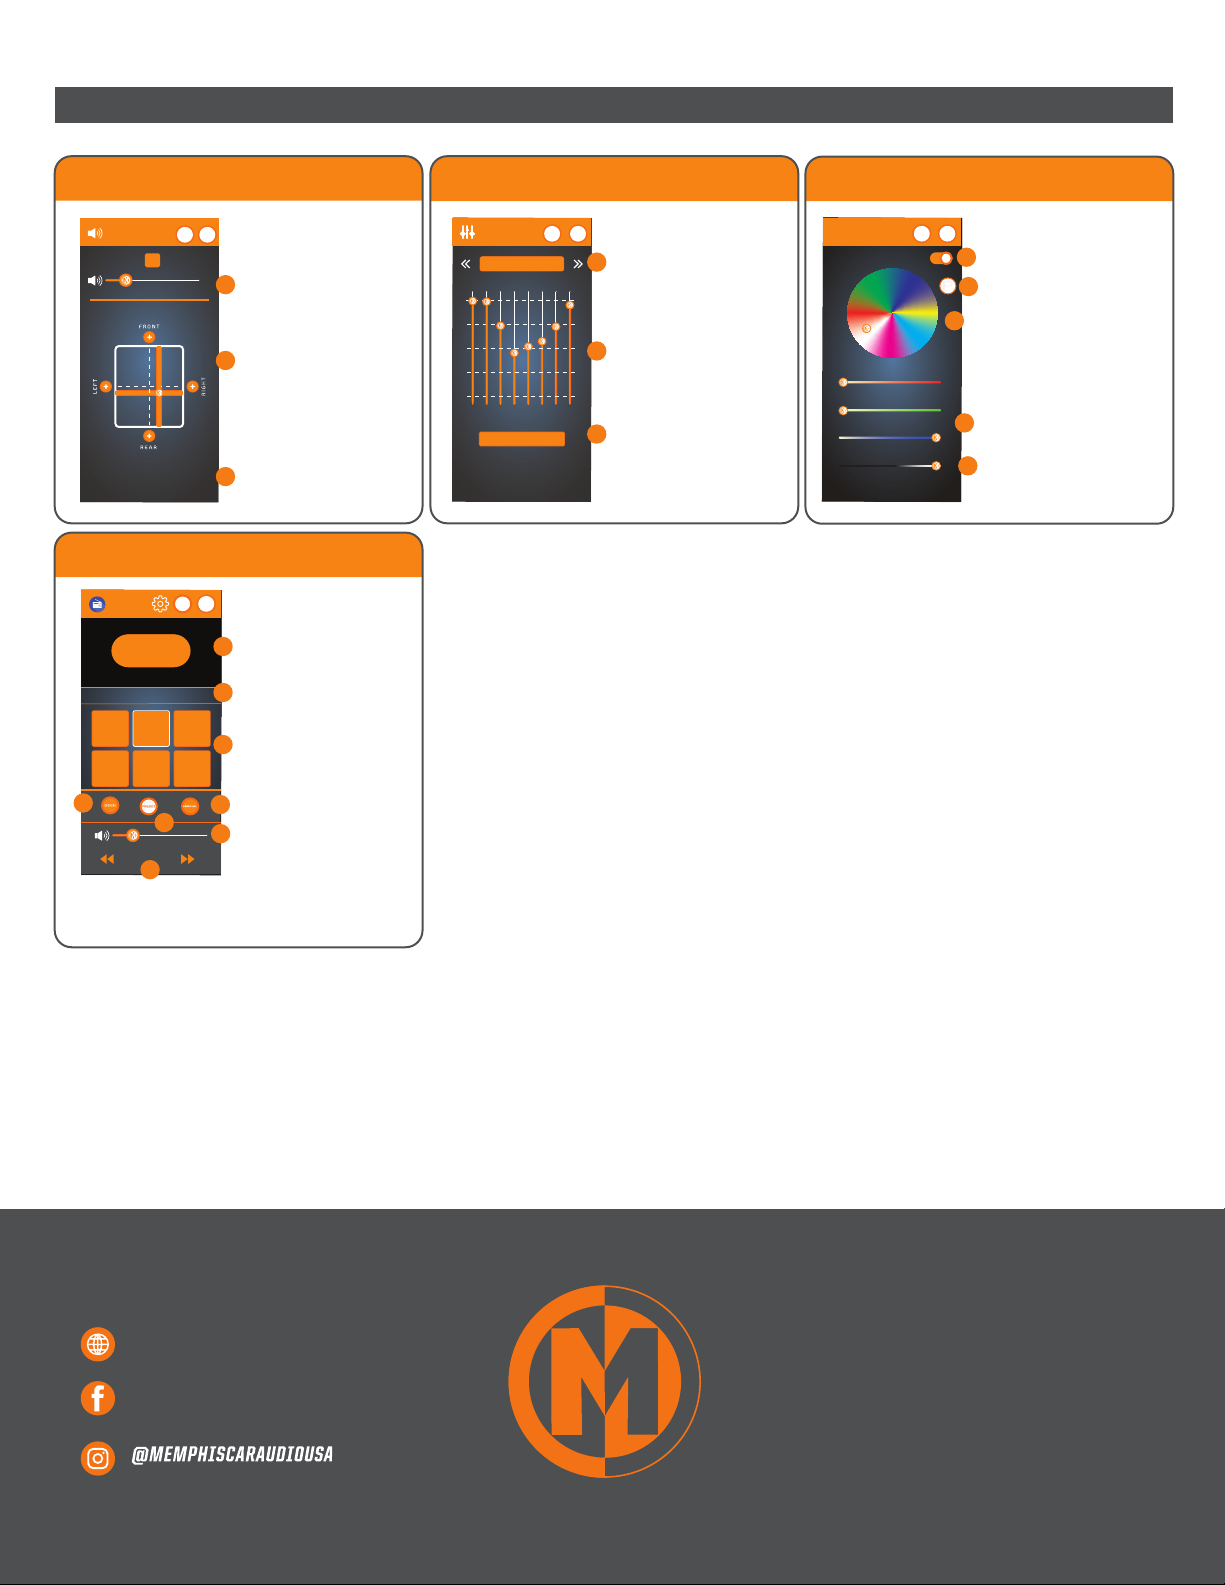
1. Volume slider adjusts volume of
system. Volume level is indicated in
the box above slider.
1
2. Fade/Balance Adjuster:
Adjust the fade/balance of your
system by positioning the center of
the slider to the location that best
2
fits your listening needs. You can
also tap the Front/Rear/Left/Right
“+” icons to increase the level by +1
in the desired direction.
3. Reset the screen to the factory
default settings.
3
1. Indicates current radio station
HOME
2. Select radio preset category (FM1,
FM2, FM3, AM1, AM2, AM3 allows you to
store 3 stations in each preset
1
category)
3. Presets 1-6. Use Seek/manual tuning
to locate desired station. Press and hold
2
desired preset button for several
seconds to save station as a preset.
4. Puts unit into SEEK mode. Arrows will
now seek for the next station.
3
98. 2
5. Puts unit into PRESET mode. Tapping
Left or Right arrows skips to the next
programmed preset station.
6
6. Puts unit into MANUAL TUNER mode.
The arrows will now manually tune to
8
the next station.
7. Changes to the next available station.
Select SEEK or MANUAL above to change
the way the system locates the next
station.
8. Adjusts volume of the unit
EQ Settings Menu
HOME BACK
EQ SE TTINGS
+6dB
+3dB
0
-3dB
-6dB
32HZ64Hz125Hz250Hz1KHz2
RESE T TO DEFA ULT
HIP H OP
1
2
KHz4KHz8KHz
3
1. EQ Preset options. Tap arrows to
toggle through presets settings.
2. Manually adjust EQ settings. Slide
the band you wish to adjust into the
desired position. Desired EQ setting
will be saved as “Custom Setting”
3. Restore to the factory default
settings
LED COLOR SETTINGS MENU
HOME BACK
LED COLOR SETTINGS
RGB L ED ON /OFF
RED :0
GRE EN:0
BLUE:2 55
INTENSITY:2 55
1. Turns the connected RGB LED
Lighting on/off
1
2. Lighting color cycle on/off
CYCLE
Light button system RGB LED color
2
cycle
3. Use the wheel to select your
3
systems RGB LED color. Touch the
wheel and slide the indicator point
to the desired color.
2550
4. You can use the RGB sliders to dial
2550
in a specific color value. Adjust Red,
4
Green and Blue individually until
2550
you’ve reached your desired color.
2550
5
5.You can adjust the brightness using
the slider.
SHOW US YOUR INSTALL
WWW.MEMPHISCARAUDIO.USA
@MEMPHISCARAUDIO
CONTACT INFO
122 GAYOSO AVE
MEMPHIS, TN USA 38101
TECH SUPPORT
800-903-6979
 Loading...