

Page 1
Page 2
Manual
2
Page 3
Table of Contents
Manual
Chapter 1 - Introduction
Chapter 2 - Installing and Configuring Software
Chapter 3 - Using the iStep Software
Chapter 4 - Menu Options - part 1
Chapter 5 - Menu Options - part 2
Chapter 6 - Hardware Requirements
5
7
10
15
22
27
Aetrex Worldwide, Inc.
iStep User Manual
“For the blueprints of your feet”
iStep User Manual
Version 5
Aetrex W
414 Alfred A
Teaneck, NJ 07666
Phone 800-526-2739
orldwide, Inc.
ve
3
Page 4
Manual
4
Page 5

Introduction
Manual
Chapter
1
he technological breakthroughs of the
past decade have helped science
T
advance at an astounding pace. Yet, in
ten years, what currently passes as modern
medicine will seem antiquated.
In June of 2000, scientists completed mapping
the human genome, identifying the sequence
of all layers of genetic code. This enormous
breakthrough will help bring to market
individualized programs of preventative
medicine that focus on keeping people well. By
understanding the Blueprints of the Body,
doctors will be able to identify potential health
threats ahead of time, and pharmaceutical
companies will provide more precise treatment
options tailored to the individual patient. Just as
you will know the Blueprints of your Body, so
should you know the Blueprints of your Feet.
The introduction of computerized foot analysis
systems in the early 90's brought the science
of pressure and gait analysis to an exciting
phase. Using this new technology, scientific
studies demonstrated that there is a dir
cause and effect relationship between
unbalanced pressure distribution during the
gait cycle and lower extremity pain in areas
such as the knee, ankle, or foot. The availability of the iStep system is significant because
access to this advanced technology will be made
available to all health conscious consumers. The
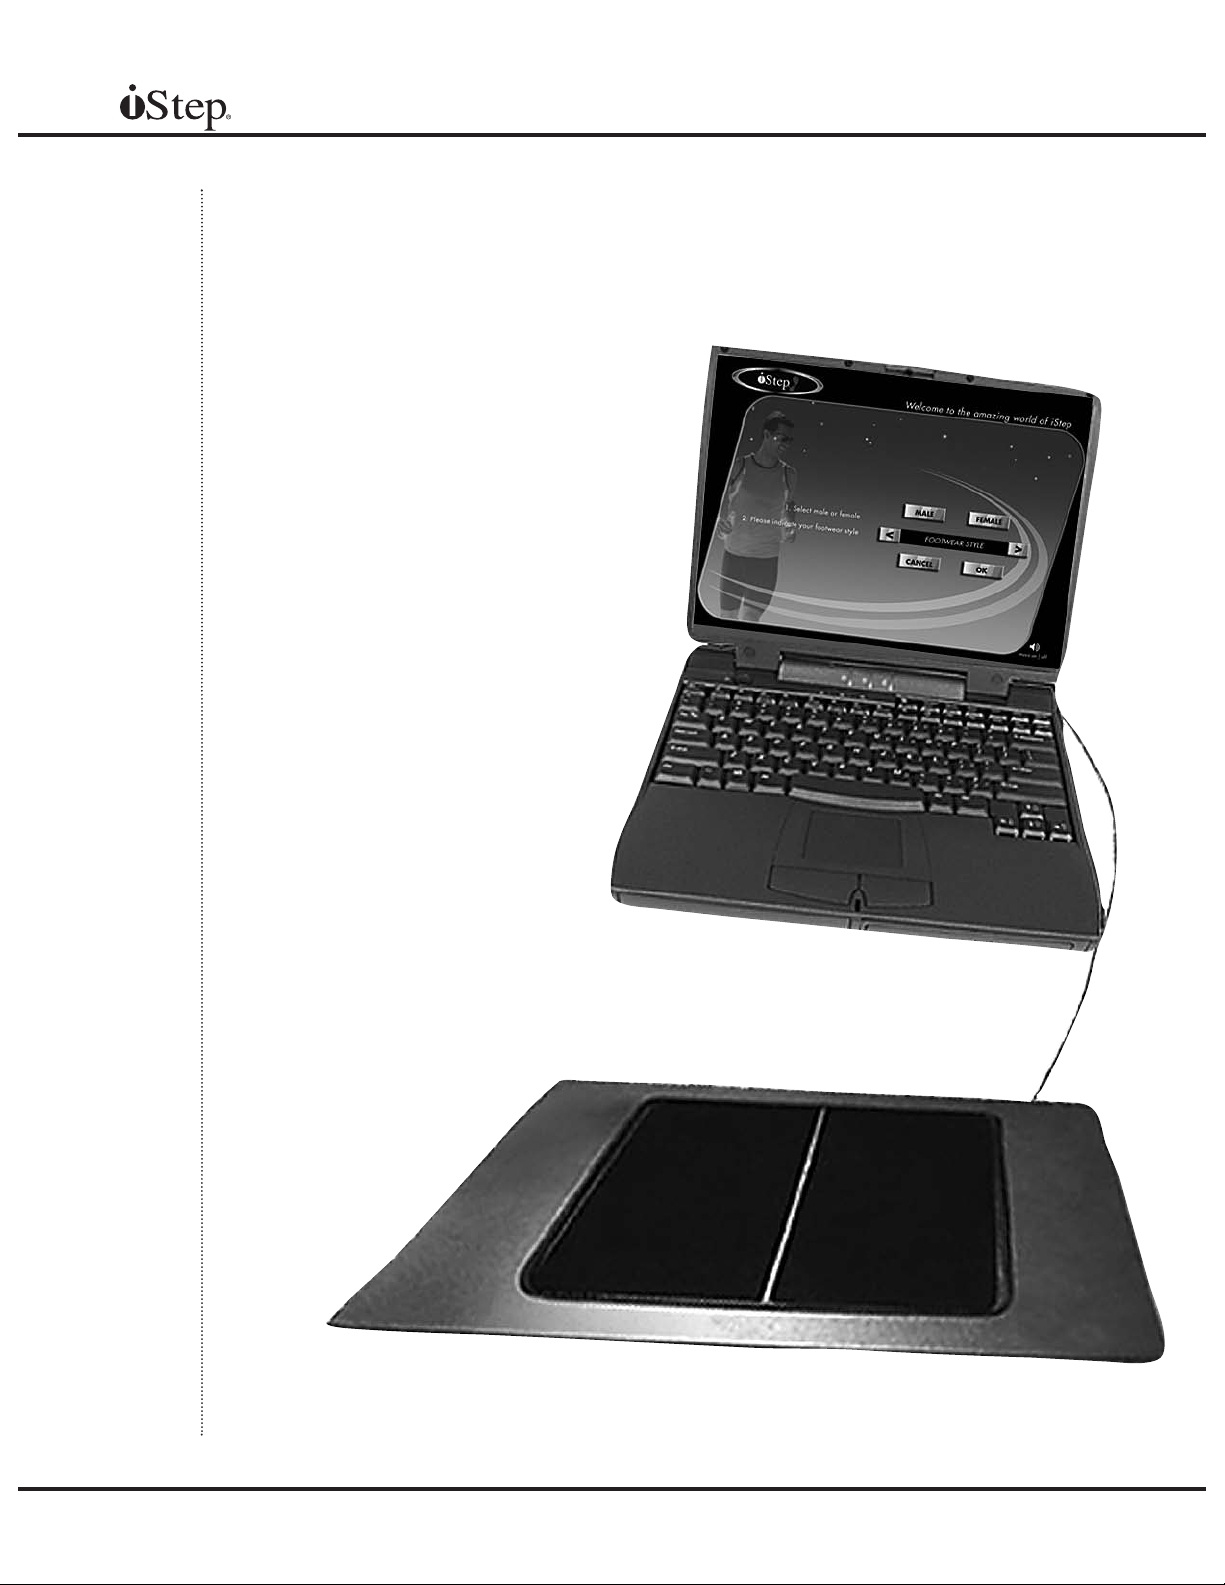
iStep by Aetrex is an easy-to-use pressure
analysis and orthotic diagnostic tool,
consisting of a baropedometer containing
1024 barosensitive sensors which can be
connected to any desktop or laptop PC. This
user friendly system performs a complete
mapping of the plantar pressure generated
from the person's feet in only 30 seconds.
For a very affordable price, foot health
professionals and retailers can add a new
profit center to their business, dramatically
ect
enhance their image, and offer a service
that will change the way people think about
their feet.
iStep's relatively small dimensions enable
the system to be placed in any medical
practice or retail facility. The software gives
you the option to conduct a variety of tests,
including “postural” and “dynamic”. The
results are displayed on screen in either two
or three dimensions, and the images can be
immediately printed or burned onto a CD.
iStep version 5.0 software has been updated
and improved to enhance those features
most desired by podiatrists, pedorthists,
orthotists, chiropractors, physiotherapists,
shoe retailers, orthopedists and other health
professionals, combining simplicity of use
with human engineering characteristics.
In addition, with the introduction of the iStep
F.I.T. system, retail outlets as well as health
professionals will be able to accurately
measure the length and width
and the system will make shoe recommendations. By maintaining the built-in shoe
database, recommendations can be drawn
from shoes in stock.
By combining the technology of the iStep and
iStep F.I.T. systems with user-friendly software
and features such as iStep Mail, Customized
screens, CD Business Cards and others, each
business can tailor the iStep system to their
needs.
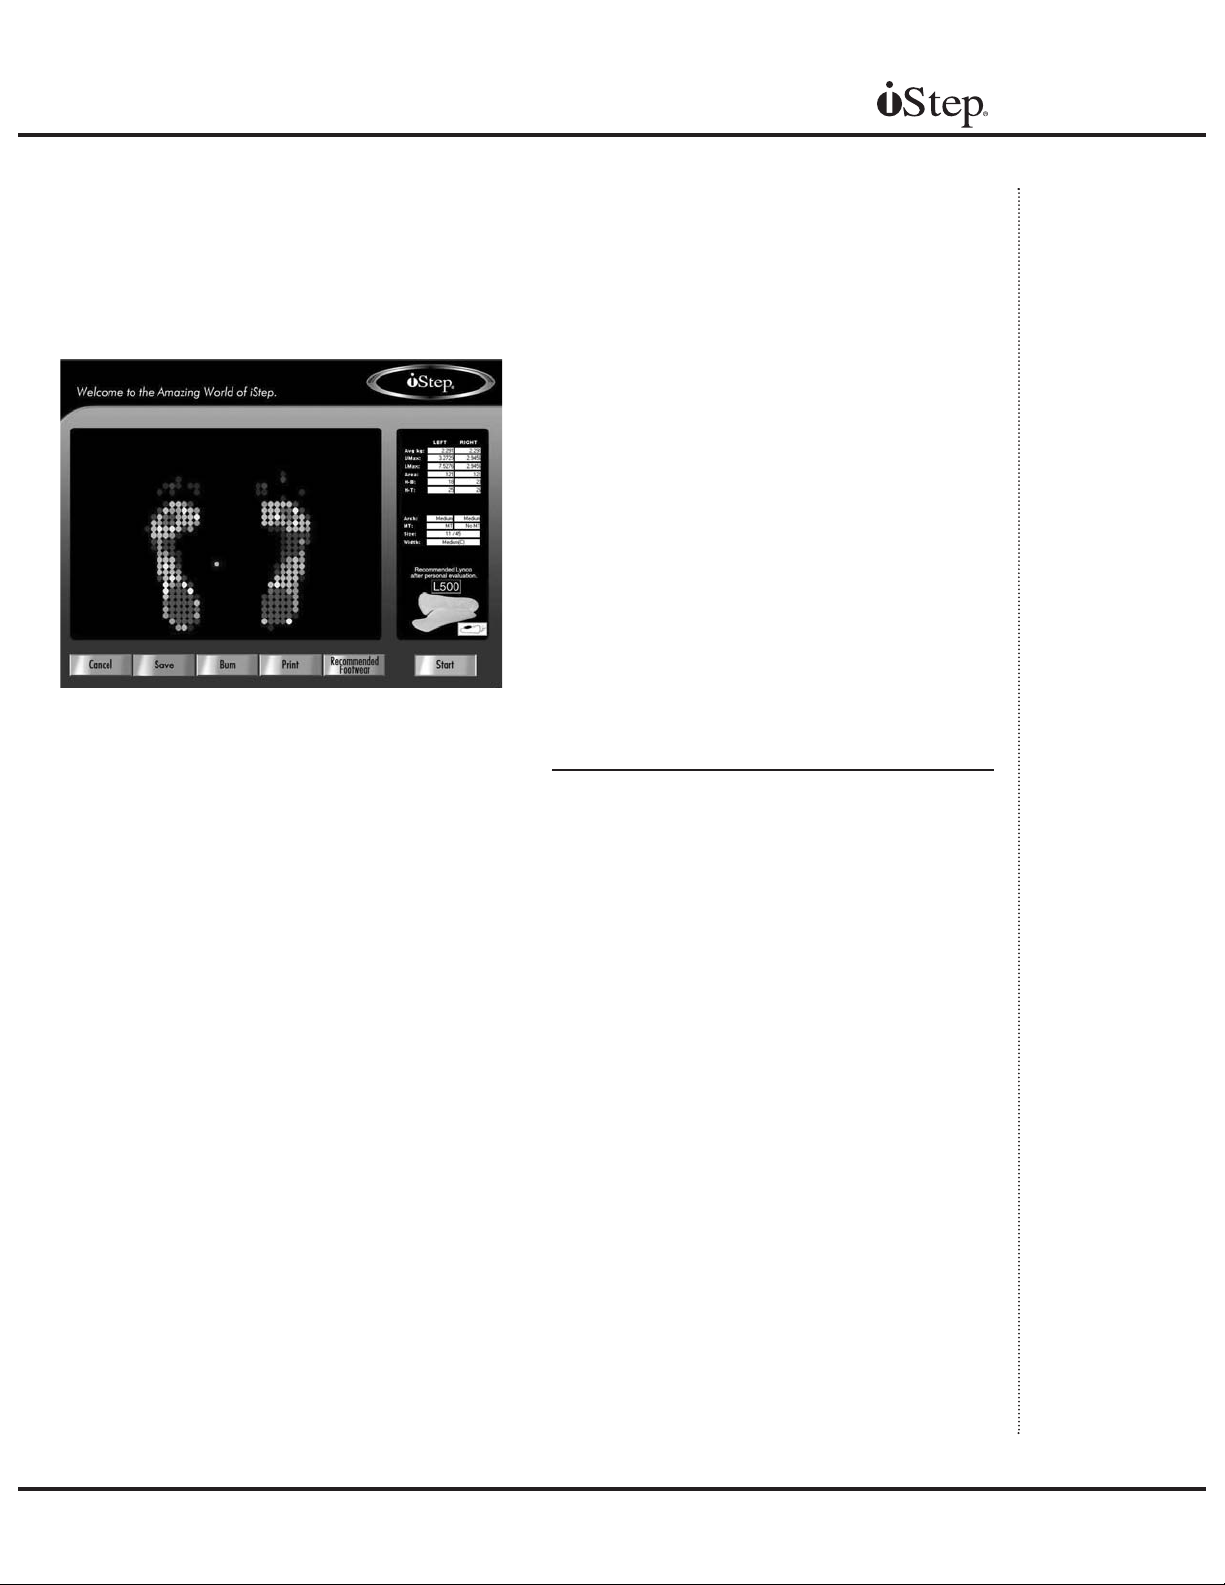
Welcome to the amazing world of iStep!
of the foot,
5
Page 6
Manual
6
Page 7
Installing and Configuring the Software
Manual
Chapter
Chapter
2
2
If you purchased an iStep package with a
computer (iStep Deluxe, Viper, Millennium,
R2, Horizon, Voom or Laptop), your iStep
has been tested and configured with your
computer, and all software has been
installed. If, however, you have purchased
only the iStep scanner(or iStep with F.I.T.
upgrade) and software, or have replaced
your scanner or computer, you will need to
install the software and configure it.
Installing the Software
While your computer is running, place the
iStep CD in your computer’s CD drive. The
installation program should start automatically.
There may be a delay while files are being
decompressed and loaded, so wait for 30
seconds. If the program does not start automatically, double-click on the ‘My Computer‘
icon, and then double-click on the icon for
your CD drive. Double-click on the ‘Start
Program’ icon and the installation should
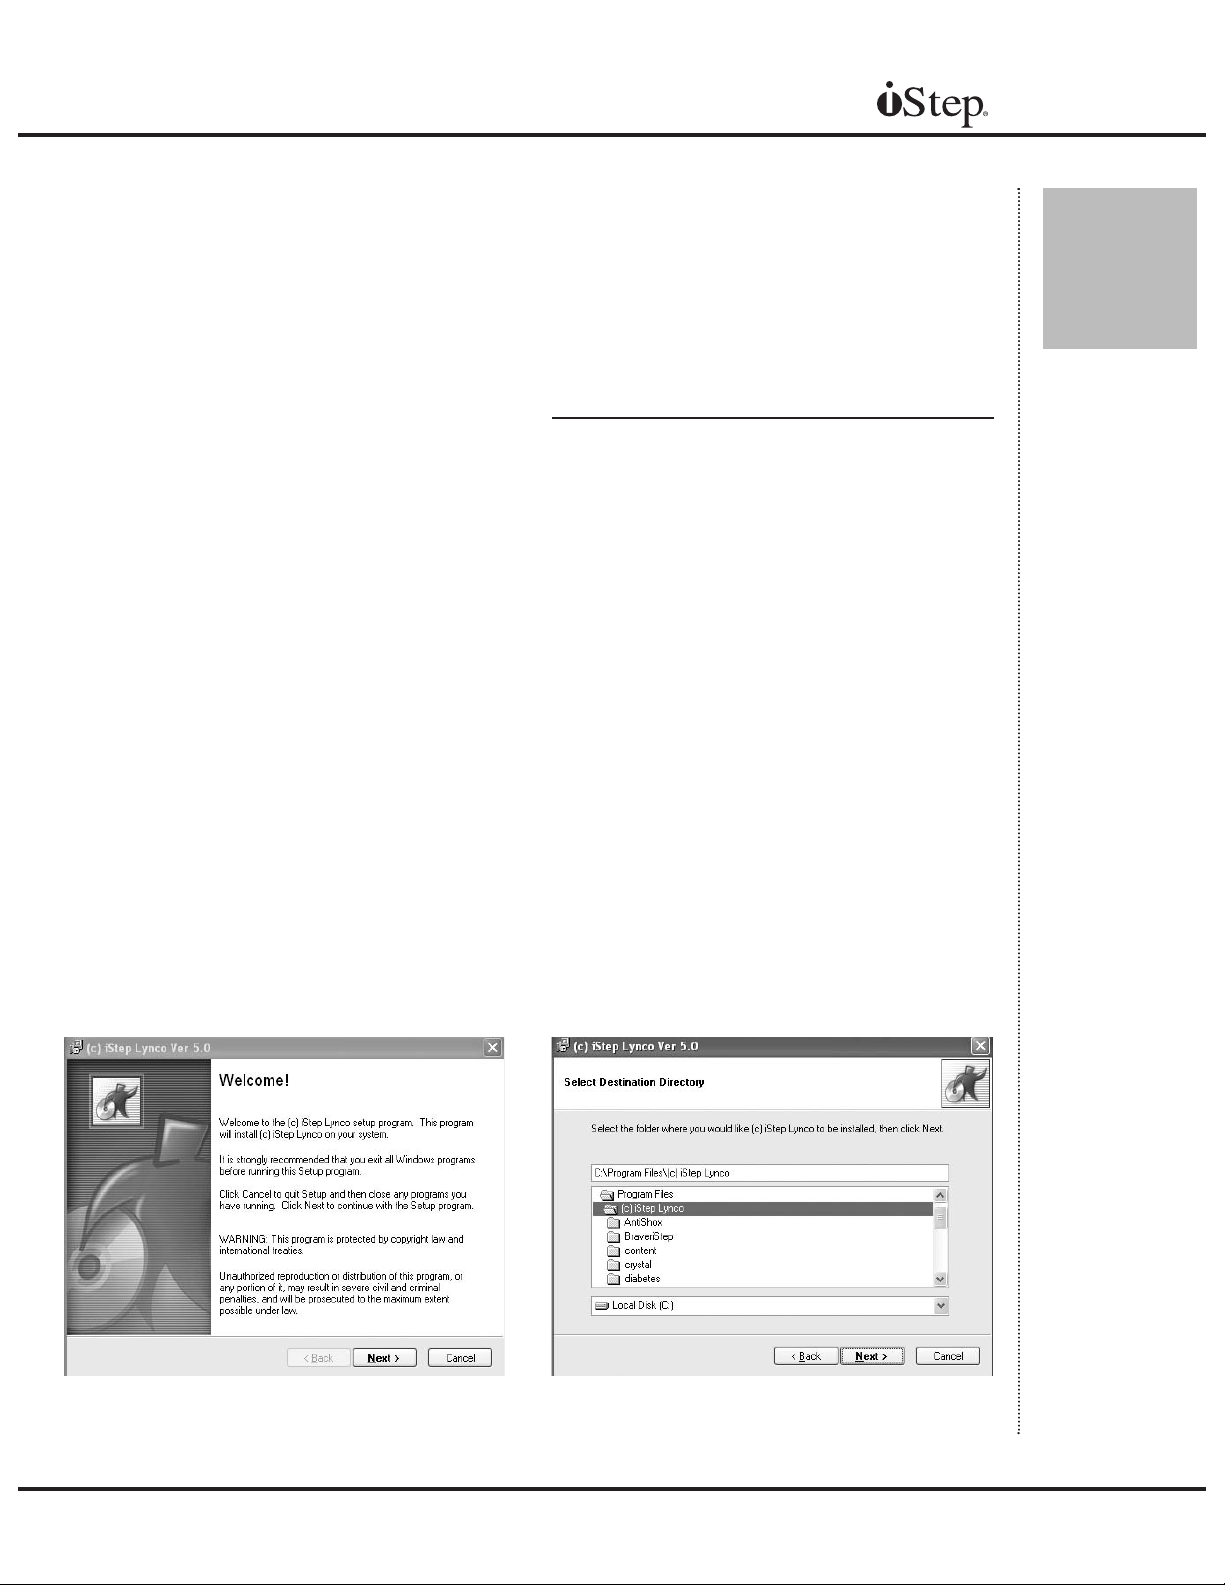
begin. The Welcome Screen will display.
(Figure 2A.) Click ‘Next’ and the Select
Destination Directory screen will appear
(Figure 2B).
This screen will allow you to choose a different
directory in which to install the iStep software.
By selecting the default directory, your previous version may be overwritten.
Fig. 2A
Fig. 2B
7
Page 8
Manual
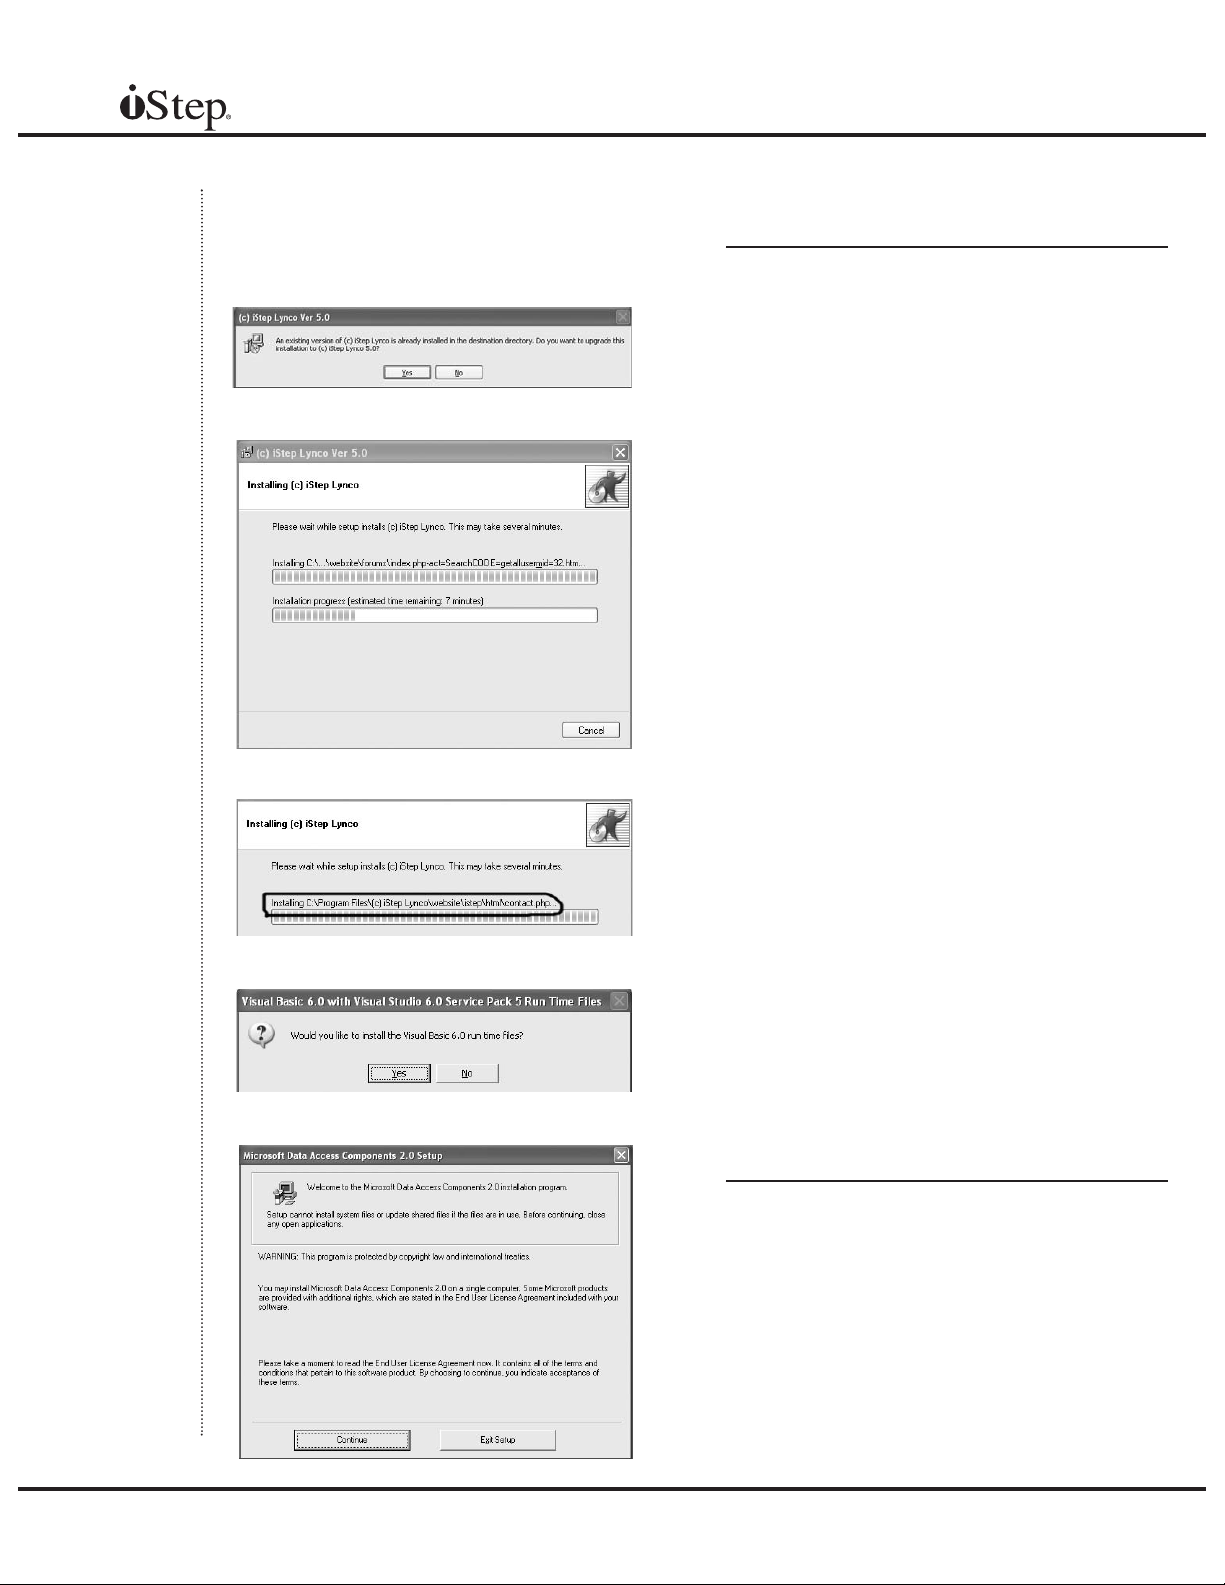
Overwrite warning screen (Figure 2C).
The iStep system will now begin copying files
onto your hard drive. If you want to cancel for
any reason, click the ‘Cancel’ button on the
copy progress screen
(Figure 2D).
Fig. 2C
Fig. 2D
Fig. 2E
Figure 2E displays the destination drive and
folder where the iStep system is being
installed. Should the progress indicators
stop moving, and the destination file name
does not change, your system may be hung
up. Wait a few minutes and restart. For
technical assistance contact iStep Technical
Support at 1-800-644-3514.
Once iStep has copied the necessary files onto
your hard drive, it will ask if you want to install
the VB runtime. (Figure 2F. VB Runtime screen.)
This installation is necessary to make your
iStep system run properly. Click the ‘Yes’ button.
After the VB runtime has been installed correctly,
click ‘OK.’ The Microsoft Data Access
Components 2.0 program installation will then
begin. Click ‘Yes’
Click ‘Continue’ to accept the user
agreement.
(Figure 2G)
Click ‘Complete’ to install the complete
package. When all of the files have been
copied onto your computer
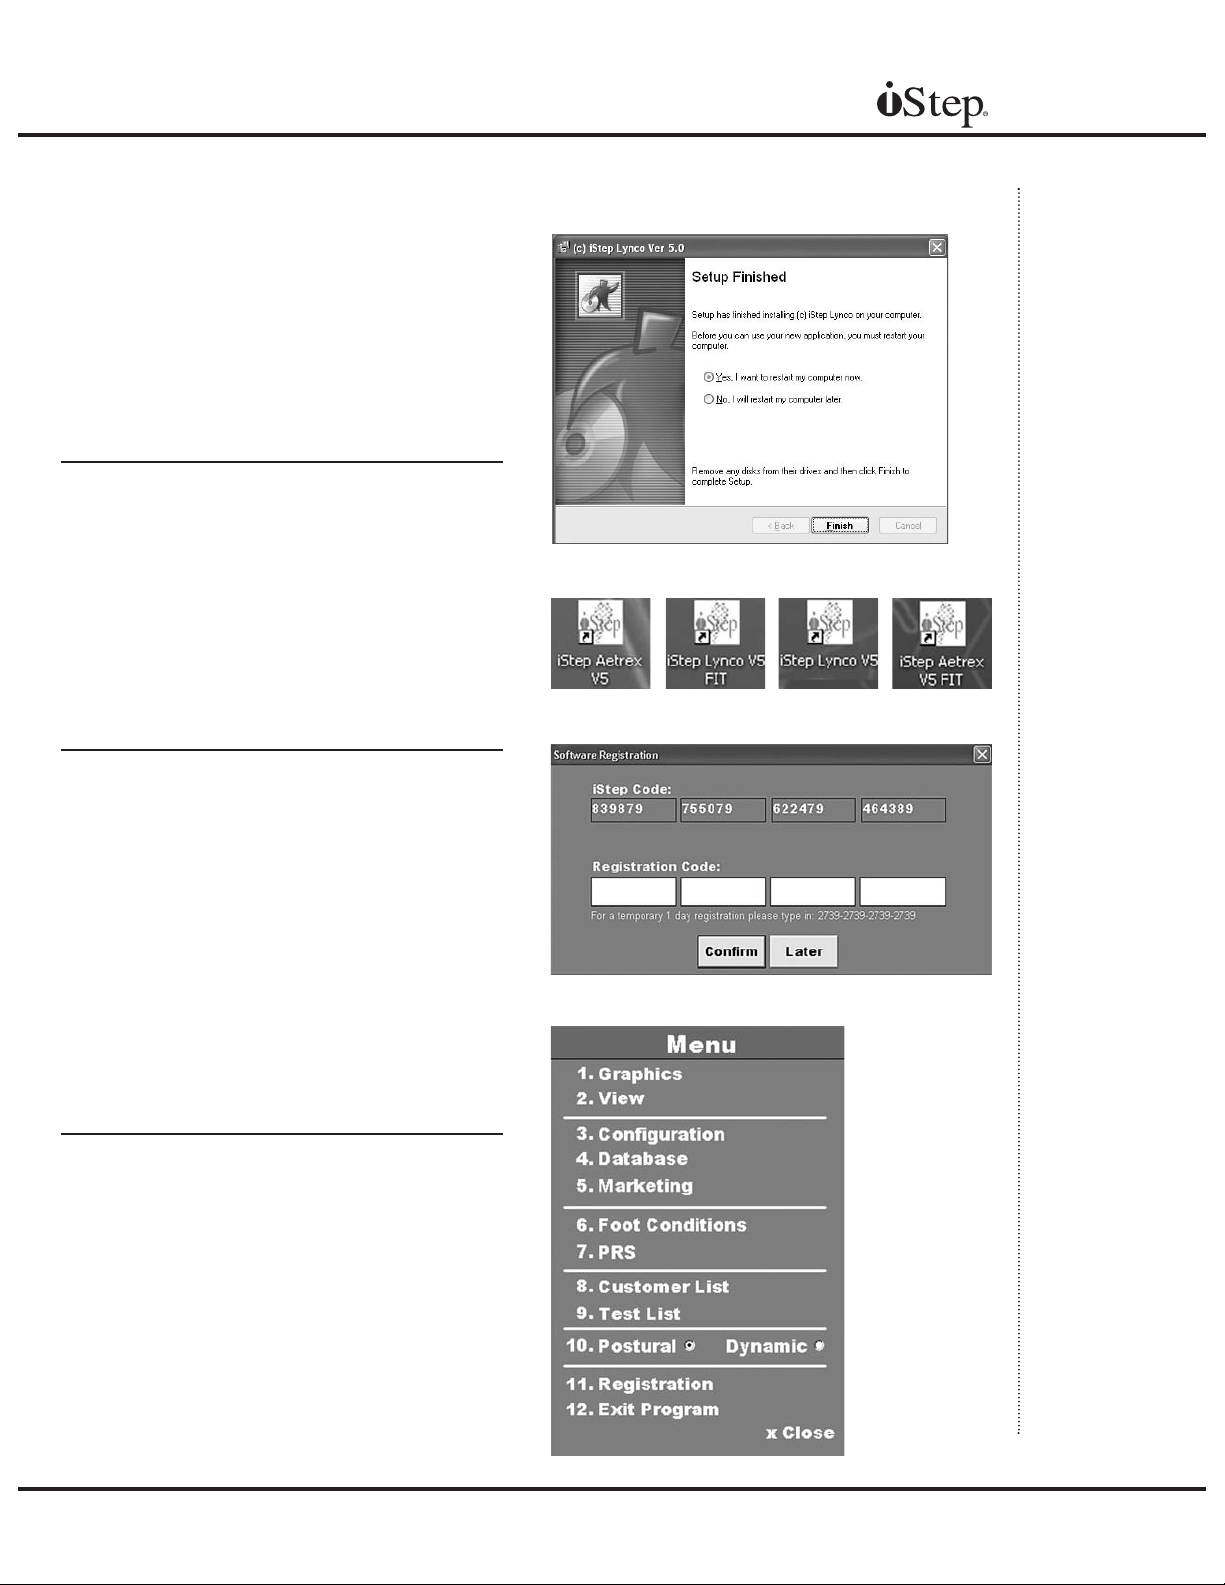
, the Setup Finish
screen (Figure 2H) will appear.
Note: Please do
not make changes
to the configuration
without contacting
Technical
iStep
Support first!
8
Fig. 2F
Fig.
You will now need to restart your computer
in order to begin using the iStep program.
Click ‘Finish’ to complete the installation.
Launching the Program
The installation will place four icons on
your desktop (Figure 2I). They are: iStep
Aetrex V5 F.I.T.; iStep Aetrex V5; iStep Lynco
V5 F.I.T.; and iStep Lynco V5. The iStep F.I.T.
icons will launch the iStep program that will use
the F.I.T. features. If you do not have the F.I.T.
upgrade device, launch the iStep Lynco or
Aetrex programs, which will use the iStep
device only.
2G
Page 9
The iStep Aetrex V5 F.I.T. and iStep Aetrex V5
versions will make recommendations of the
Aetrex insert.
The iStep Lynco V5 F.I.T. and
iStep Lynco V5 versions will recommend the
Lynco insert. Launch the program by doubleclicking on the appropriate icon. The main
screen will open, with a Flash animation.
Registering your software
In order to better serve our customers, we
ask that you register your copy of the iStep
software with us. At the main screen, click
on the iStep logo, and then select choice
#11, ‘Registration.’ Contact iStep Technical
Support at 1-800-644-3514 with your iStep
Code to receive the proper Registration
Code. Select ‘Confirm’ and registration is
complete
(Figure 2J).
Configuring your iStep Program
Manual
Fig. 2H
Fig. 2I
The iStep program can be configured and
customized for your business needs. You can
enter your company information to appear on
every test printed, as well as a customized
coupon. Technical details can also be adjusted.
However, iStep arrives preconfigured with
default data. Any changes to the system
configuration should be done only with the
direct assistance of an Aetrex representative.
To begin, click on the iStep logo located at
the upper right corner of the screen. The
(Figure 2K) menu will appear.
iStep
Exiting the Program
To exit the iStep program, click on the logo and
select #12, ‘Exit Program.’ When prompted,
enter the iStep Code in order to exit.
The code
is 0007.
Fig.
2J
Note: The flash animation can be
turned off. See configuration chapter 4.
Note: Don’t f
to remove any
disks that are in
y
our drives before
restar
computer
orget
ting the
.
Fig.
2K
9
Page 10

Chapter
3
Manual
Using the iStep Software
Note: An internet
connection is not
necessar
y to vie
these pages
Fig. 3A Fig. 3B
iStep Version 5.0 begins with a simple
interface (Figure 3A).
Menu choices
Test: Begins an iStep test
Foot Conditions: Opens the browser window
to the Foot Conditions pages.
Foot.com: Displays the Foot.com web pages
loaded on your hard drive during installation.
Prehab: Opens the iStep Prehabilitation
Program.
Computerized Foot
our computerized foot analysis consists of two
Y
parts (depending on whether you have the
iStep with or without the F.I.T. Upgrade).
w
.
Analysis
points of your feet, with the greater pressure
indicated by red, and the lesser pressure indicated by blue.
There are two types of iStep tests available—
postural (standing), and dynamic (walking).
Postural Test
The Postural test is the default selection for all
versions of the iStep program. Click on test,
then select gender, shoe size, and the footwear
style to recommend (Figure 3B).
sizes are shown in US and European sizes.
Once you have made your choices, left click
to continue.
‘OK’
Have the customer remove his or her shoes
and stand each foot on either side of the con
ductive mat, facing forward. Hands should
remain relaxed to their sides during the test.
The test screen will appear
The shoe
.
-
Note: If ‘shoe
size selections’
u does
men
appear (figure
3B) the F.I.T.
ersion is not
v
unning.
r
10
iStep Pressure Sensor
The iStep Pressure Sensor pad converts pres
sure from weight pressing down on the rubber
mat into a digital readout, which displays on the
screen. What you are seeing are the pressure
While the customer stands correctly on the
iStep scanner, click on the ‘Start’ button to
-
begin the test.
During the test, the pressure distribution image
of the feet will appear
, changing from frame to
Page 11
Manual
Fig. 3C
frame. Frames will count down to zero, and at
the end of the test all frames will be averaged
to produce the final image. After the test is
complete, ask the patient to step off the iStep.
After the test
At the bottom of the completed test results
screen (Figure 3C) are five buttons:
Cancel: Left click to cancel out of the test and
return to the main screen.
Save: Left click to save the test.
Burn: Left click to burn a CD card of the
patient’
CD burner
Print: Left click to print the patient’
an attached (optional) printer
s results through an attached (optional)
.
s results to
.
Start: Left click to begin a new test.The screen
button will appear
‘Recommended Footwear
’
giving the option of displaying a list of shoes
from the Shoe Inventory Database, chosen by
the program based upon test findings. Before
making recommendations, you will need to add
shoes to your inventory (see chapter 5).
Dynamic Test
The Dynamic, or Walking, test is used for measuring pressure and analyzing gait. In the Dynamic
test, rather than standing on the mat facing front,
the patient walks across the mat from left to right.
Start the test and have the patient walk across the
iStep scanner so that the left foot lands on the left
side of the scanner. Then have the patient return
to the left side and stride again, this time so the
right foot lands on the right side. Click Stop.
Use the ‘VCR’
buttons to replay the frames of
the footsteps across the scanner (Figure 3E).
The controls are, from left to right:
• Go to beginning of test
• Reverse frame by frame
• Forward frame by frame
• Go to the end of test
• Stop play
,
• Replay test
Click on the ‘Replay Test’ button to display the
test frame by frame.
At the end of the test the
‘Center of Force’ icon will appear, as well as a
white line of force showing the balance through
each step (Figure 3F).
oot
ou
n
ur
Note: When y
k on the ‘Burn’
clic
b
utton, the CD
drawer will automatically pop open.
Insert a CD-business card, close the
drawer, and the
iStep system will
automatically b
the test onto the CD,
along with f
condition information from the
oot.com web pages.
f
11
Page 12

Manual
F.I.T. Upgrade—Measuring Shoe Size
The F.I.T. Upgrade is a device that covers
the iStep Pressure Scanner
. It has light sensors that measure the length and widths of
your feet. From these readings, your shoe
size is calculated.
The iStep software behaves differently,
depending on which iStep devices you have.
If you do not have the F.I.T. Upgrade device,
you may ignore sections that speak of foot
measurements.
Viewing Test Results
After the test is completed, there are several
viewing options available. The default screen,
seen above, displays the pressure reading of
the feet in 2-D (Low Resolution) with 15 colors.
Other options are accessible through the
‘Options’ menu (see Chapter 4, Menu of items).
Interpreting the Test
In addition to the image, test results displayed in the fields to the right include
(Figure 3E):
UMax: Upper-half Maximum kilograms per
sensor is the largest value kilogram of a
single sensor.
LMax: Lower-half Maximum kilograms per
sensor is the largest value kilogram of a
single sensor.
Area: The total number of sensors with
readings is displayed for each foot.
H-B: Heel to Ball distance (in centimeters)
The distance between the sensors under
the heel and those at the ball of the foot.
Each sensor is one centimeter in diameter. This number is an approximation only.
H-T: Heel to Toe distance (in centimeters)
The distance between the sensors under
the heel and those at the toe of the foot.
Each sensor is one centimeter in diameter. This number is an approximation only.
Arch: Arch description
Arch type is based on the number of sensors from the far outside of each image
and the furthest indent at the instep.
Note: Numerical
Data is displa
after the test b
default. This can
be changed to a
color chart. See
‘Configuration;
w Options’ in
Vie
y
the Menu.
ed
Avg kg: Average kilograms per sensor
These numbers show the actual pressure
averaged over the total number of sensors
read. Note that this number will not yield an
accurate measurement of weight. It is only
displayed for professional use.
Fig. 3E
y
MT: Metatarsal Pressure
If sensors in the upper quadrants meet the
requirements of color and density
, a
metatarsal pad is recommended.
Fig. 3F
12
Page 13

Manual
Shoe Size
The iStep F.I.T. upgrade will accurately measure shoe size and display it
here. If you have an iStep only, shoe
size must be entered at the beginning
of the test.
Recommended product
Based on the shoe size and type of
input at the beginning of the test, an
orthotic is recommended here.
Annotation Tool
After the test, the cursor can be used to
“write” over the display. Left click and
hold to draw lines on top of the image.
These drawings can be printed but not
saved. The tool is useful, however, for
explaining problems and educating the
patient
tions, change the display option (see
Graphics below). Once the screen
refreshes, the annotations will be
erased.
(Figure 3H). To clear the annota-
Burn
Click ‘Burn’ to save the results of the test to
a CD. Information on Foot Conditions will
also be saved.
Save
Clicking on ‘Save’ will allow you to save the
test in a database on the computer, to be
viewed, printed, or burned at a later date.
Center of Force
After every test, a small icon will appear
to show the center of force for the body.
Analysis Mode
The actual numeric data from an iSTEP/ F.I.T.
test can be displayed at the top of the screen.
This is used by technical support to configure
and test the equipment. You should never
need to display this information.
Other Options
The test results can be printed, saved
to a CD, or saved to the computer.
Print
Clicking the ‘Print’ button will print the
results to your computer
printer.
’s default
Fig. 3G
Fig. 3H
13
Page 14
Manual
14
Fig. 4A
Fig. 4A-1
Fig. 4A-2
Page 15

Manual
Chapter
Menu Options - Part One
Click on the iStep logo at the top right corner of
the screen. A menu will appear in the upper left
corner. The menu choices will remain available
until used or canceled.
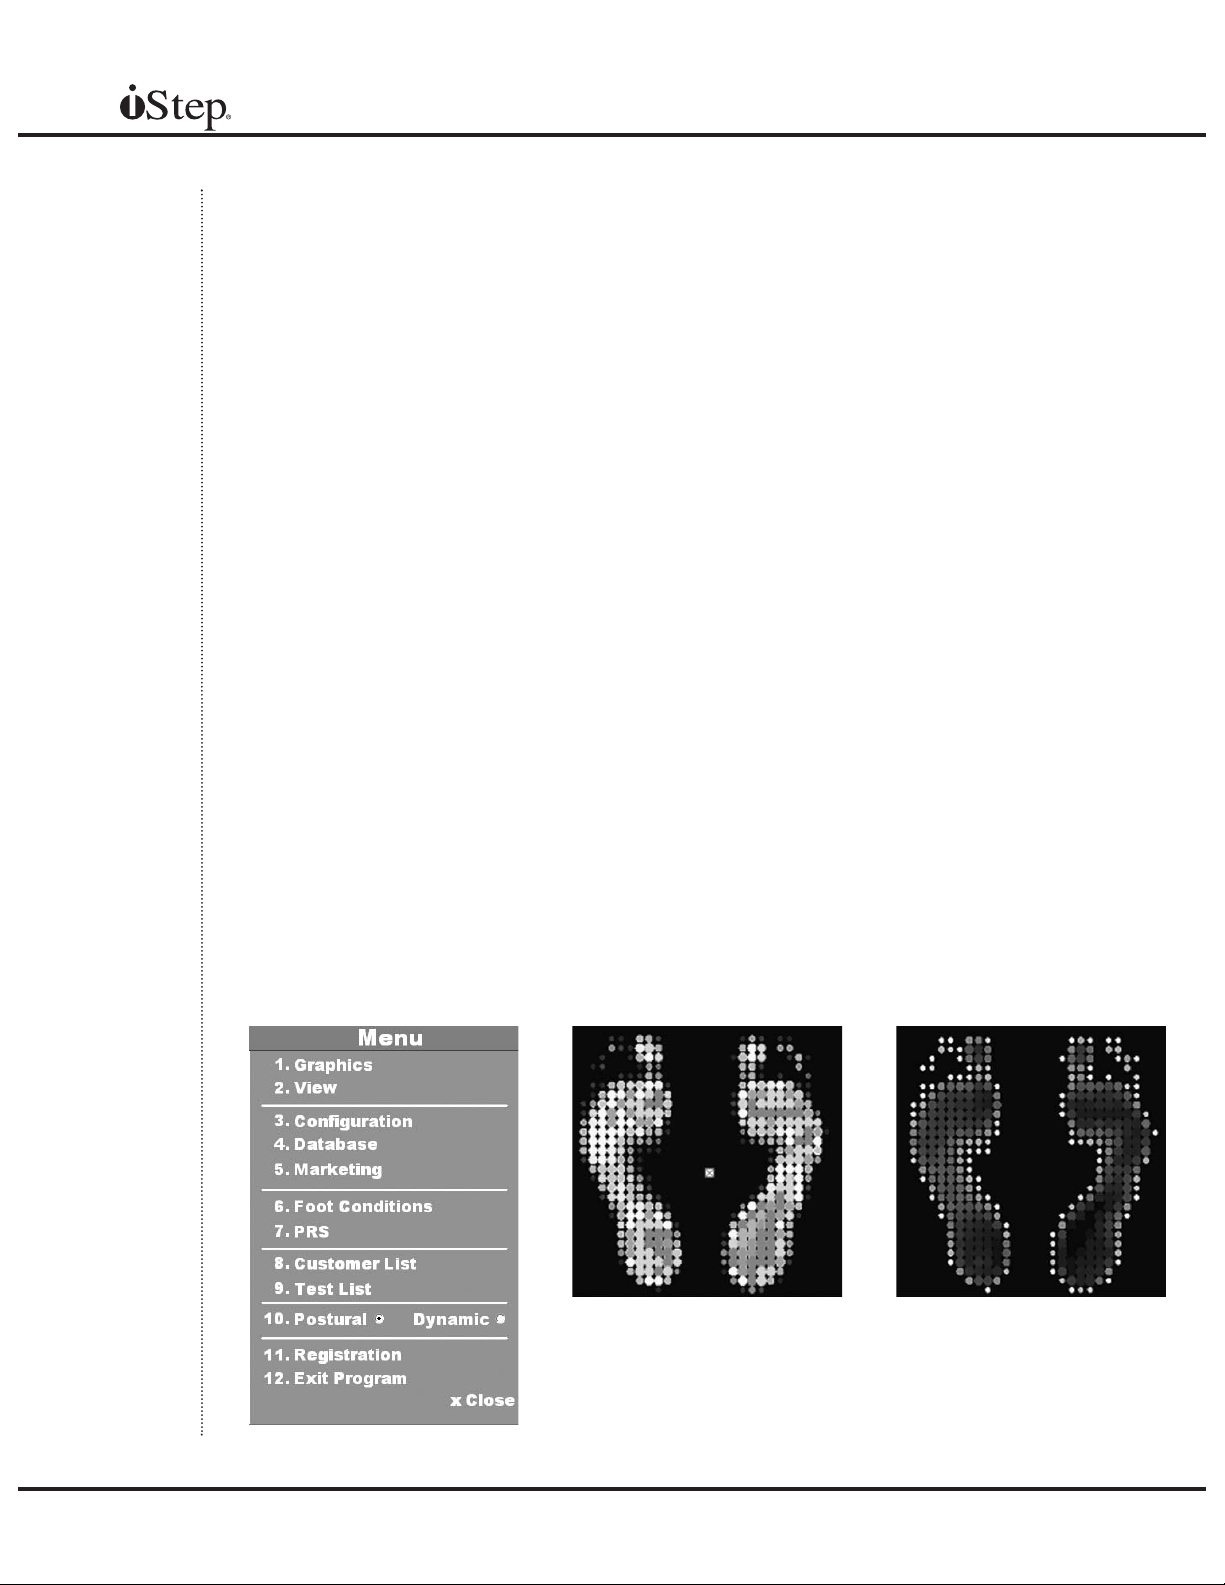
Menu
options. From the main test screen, click the
iStep logo to bring up the menu, and then click
‘Graphics’ and your display choice. Examples
shown below.
(Figure 4A) options begin with display
Graphics
2D Low Resolution 15 Colors (Figure 4A-1)
This is the default image displayed after a test.
2D Low Resolution 2 Colors (Figure 4A-2)
edefault image displayed in black and white.
Th
2D High Resolution 15 Colors (Figure 4A-3)
The image is shown with the same data, but
interpreted at greater resolution.
2D High Resolution 2 Colors (Figure 4A-4)
The high resolution in black and white most
resembles the classic Harris Mat image.
Numeric (Figure 4A-5)
This display shows the numeric values of the
colors displayed. Useful for diagnostic and
technical work.
4
Fig. 4A-3 Fig. 4A-4 Fig. 4A-5
15
Page 16

Manual
3D 15 Colors(Figure 4A-6)
The values of the colors are given “depth”. The
image can be rotated by using the cursor keys.
3D 2 Colors (Figure 4A-7)
Same as above, in black and white. Can also
be rotated using the cursor keys.
View (Figure 4B)
In addition to these images, a reference
chart of foot types is available, as well as
the color code chart.
Color Code (Figure 4C)
The Color Code chart will help you illustrate the
meanings of the colors shown in the display.
Click on the iStep logo to bring up the menu.
Click ‘View,’ click ‘Color Code.’ The chart as
displayed below will come up.
Foot Types
The ‘Foot Types’ selection will allow you to
show examples of various arch types. Click
on the iStep logo to bring up the menu.
Click ‘View’, Click ‘Foot Types.’ Click on the
drop down selector at the lower corner of the
Arches window to select different arch types.
(Figure FD)
Display Options
In addition to display options, the test
results can be illustrated with additional
enhancements by clicking on the ‘check’
box to select an option.
Arch Line (Figure 4E)
A white line will appear from the heel to ball,
along the inside of each foot, to illustrate the
depth of the arch.
Highest Pressure Points
The highest pressure points for each foot
will be labeled.
Heel to Ball
A purple line will show the length of the foot
from heel to ball.
Heel to Toe
A yellow line will show the length of the foot
from heel to toe.
Median Line
A white line displays on the screen to show
the midline of the scanning surface.
16
Fig.
4A-6
Fig. 4A-7
Fig. 4B
Fig. 4C
Page 17

Manual
Configuration
Your iStep program can be configured to
meet the unique needs of your customers,
and to gain the most from your equipment.
iStep Settings
Click on iStep settings in the configuration
menu to access the following choices:
Frames: Adjust the number of scans taken
during a test. More frames will usually give the
conductive mat more time to compress and
produce hotter colors. The default is 20.
Static Reduction: Adjusts the overall
sensitivity of the iStep. If there is too
much red, or dots appearing where there
is no pressure, increase the Static
Reduction. Can be set between 0 and 50.
Postural Sensitivity: Adjust the sensitivity
during the standing test. Sensitivity can be
set between 0 and 255.
Dynamic Sensitivity: Adjust the sensitivity
during a walking test. Sensitivity can be set
between 0 and 255.
Sensitivity Test: To adjust the sensitivity
of your iStep scanner, click on the Test
button. A box will appear (Figure 4F).
Stand on the iStep scanner and click on
‘Start Test.’ When the test has finished,
move the slider located below the test
window until the desired test results
appear. Click ‘Save Sensitivity’ and
‘Close.’ This test can be done for both
Postural and Dynamic tests.
MT Pressure (1-15): Metatarsal PressureEnter a number from 1 to 15 to represent the
metatarsal (MT) pressure levels, with 15
representing the highest level. These levels
are used to determine at what pressure level
the system will recommend a metatarsal pad
for the patient. The default pressure level of
13 has been set as recommended by Aetrex
Worldwide, Inc.
MT # of Sensors (1-10): Metatarsal Number
of Sensors - Enter a number to represent the
number of sensors that must record at the set
MT pressure from above, in order for the system to recommend a metatarsal pad. The
default number of 4 sensors has been set as
recommended by Aetrex Worldwide, Inc.
Fig.
4D
Fig.
4E
Fig.
4F
17
Page 18

Manual
PRS Pressure (1-15): Similar to the MT
Pressure feature, the PRS settings will determine the recommendations after the completion
of a test for the Pressure Relief System. PRS
pressure shows the color range value above
which a recommendation will be given.
PRS # of Sensors (1-10): Similar to the MT
number of sensors, the PRS # of sensors will
make a recommendation if the number of
sensors above the PRS pressure number is
equal to or greater than the number of sensors
set here.
Postural Orientation: ‘Straight’ will display
the feet pointing towards the top of the
screen if the customer stands facing the front
of the iStep device. ‘Side’ will appear
towards the top of the screen if the customer
faces the right side of the iStep.
Dynamic Orientation: Since most Dynamic
tests are done side to side across the iStep
device, the default setting is ‘Side.’ This will
display the results of the iStep Dynamic test
with the toes at the top of the screen.
FIT Settings
The F.I.T. settings page (Figure 4G) will
allow you to configure your FIT by running
tests against a known foot size and making
adjustments to the length and width until
readings are accurate. Diagnostic information can also be obtained here.
Section 1: The ‘Test’ button in section one
will allow you to run a test of the F.I.T. device
without running an iStep test. Stand on the
F.I.T. as usual, click ‘Test,’ and the results
will be reported in the first seven fields.
M: foot size: Reports the size of the measured
foot for a man.
M: width: Reports the width of the widest
measured foot for a man.
W: foot size: Reports the size of the measured
foot for a woman.
W: width: Reports the width of the widest
measured foot for a woman.
Calibrate iStep: Enter your weight in
pounds and run the calibration test. This will
generate a value that the iStep program will
use to adjust the readings of every subse
quent test. These numbers are reflected in
the ‘kilograms per sensor’ output at the end
of each test.
Fig. 4G
LM: Displays the actual foot length measurement in centimeters.
-
LW: Displays the actual left foot width measurement in centimeters.
Fig. 4H
18
Page 19

Manual
RW: Displays the actual right foot width
measurement in centimeters.
Section 2: Length Adjustment - Allows you to
add or subtract from the reported numbers in
order to achieve the correct shoe size. Use
after measuring a known shoe size and adjust
accordingly. For each half shoe size, add or
subtract approximately 0.4.
Section 3: Width Adjustment: Allows you
to adjust the width of the recommended
shoe size. M: adjusts for men’s sizes,
while W: adjusts for woman’s sizes. An
adjustment of 0.4 will vary approximately
one letter size of width.
Section 4: Display Width- The test results can
be displayed with letter widths, descriptive
widths, or both.
Reset: Click the ‘Reset’ button to reset the F.I.T.
This will send the sensors to the ‘Park’ position, and
then return to the ‘Home’ position, ready for a test.
Park: Click the ‘Park’ button to send the
sensors to the ‘Park’ position, before shutting
down the F.I.T. for transport. This will ensure
that the sensors will be correctly positioned
before the next time it is plugged in.
Home: Click the ‘Home’ button to send the
sensors to the ‘Home’ position, ready to
begin a new test.
Footwear / Orthotics Categories
At the beginning of a test, you have an option to
select the footwear type. The default choices are
‘Dress,’ ‘Walking,’ ‘ Athletic,’ and ‘Casual.’ For
each footwear type there are associated
‘Orthotics,’ ‘Socks’ and ‘Gender’ choices. This
screen (Figure 4H) will allow you to add or delete
new footwear types or modify existing ones.
Arches / Conversion
Arches
The iStep program determines arch type
based on the depth of sensors on the instep.
In the following test (Figure 4I), the arch line
shows an instep depth of four columns of
sensors. For a size 12 foot, a medium arch is
any depth between three and five. If the foot
shows fewer than three sensors, a low arch is
determined. For more than five sensors, a
high arch is determined.
Conversion
Since European sizes can vary compared to
American sizes, the customer can customize
the US/EU conversion chart of sizes. Enter the
desired European shoe size that compares
with the US shoe size for accurate conversions
(Figure 4J). Click on the ‘Sizes’ tab to select
the size range to adjust.
Fig.
4I
Fig. 4J
19
Page 20

Manual
Widths
The ‘Widths’ chart displays the conversion
from letter sizes to descriptive sizes in
widths. To change a width letter in relation
to a description, select the letter and click
the up or down arrows to move to the
desired location. (Figure 4K)
Lynco Selection
The Lynco Selection page will determine
which Lynco orthotics will be recommended
at the end of a test. Based on the MT settings
in the iStep configuration page, as well as
the arch settings, the Lynco selection allows
you to choose whether to recommend the
proper orthotics. Choices are: ‘Neutral,’
‘Posted,’ ‘Metatarsal Pad,’ ‘Posted and
Metatarsal Pad,’ or ‘Custom Orthotic.’
Aetrex Selection
The Aetrex Selection page will determine
which Aetrex insert is chosen, based on the
arch type. Choices are ‘Low,’ ‘Medium,’
‘High’ and, ‘Custom.’
View Options
Input Weight: Prompts for the customer’s
weight to be entered before each test. This
is the same as doing a weight calibration
before each test and ensures that the
numbers reported at the end of the test
are accurate.
Password Protect: Requires a password
be entered when the logo is clicked, protecting the menu system from unauthorized
users. The password is 2739.
Play Audio: The vocal instructions played
during each test are turned on by default.
Uncheck the box to run a test without voice
instructions.
Fade Effect: Retail screen changes will
fade in and fade out with this option. The
default is a rapid blink change.
Scroll Effect: Configuration screen changes
will scroll from left to right instead of just
blinking in and out.
Numerical Data: The numerical data reported
at the end of each test is displayed by
default. By unchecking the box, a color code
display will show in its place.
20
The ‘V
tomize how the tests appear.(Figure 4L)
iew Options’ page allows you to cus-
3D Peak (10-100): This number represents
the scale of the 3D image that you will be
able to view after each test. One hundred
percent represents a full-scale image. The
default setting is 30%.
Default View: Select the default view for the
Fig. 4K
Page 21

foot scan results. Program default is 2D Low
Resolution, 15 Colors.
Manual
Display Size: Determines whether the rec
ommended shoe size is displayed in
European or US sizes, or both.
Intro Screen: Allows the selection of more
than six different introduction screens, both
with and without flash animations. Select a
screen and click on ‘Preview’ to see how the
screen will appear.
Serial Port Settings (Figure 2M)
Serial Port: The iStep program needs to
know which serial port number the hardware
is attached to. Choose the appropriate port
number by clicking on the drop down. The
default is Com Port 1.
Find Serial Port: If you need to know which
serial port your iStep hardware device is
connected to, click the ‘Scan’ button. The
iStep program will search your computer for
all valid serial ports and display them. If you
have chosen the wrong serial port, you will
get an error message indicating that you are
not connected.
-
Set INI: The ‘Set INI’
iStep Technical Support only. Making unauthorized changes can ruin the iStep installation and cause data loss. Please do not
modify these settings without the direction or
guidance of an iStep technician.
Fig. 4L Fig. 4M
fields are for use by
Note: You cannot
move a letter
over or past an
adjacent letter
.
21
Page 22

Chapter
Chapter
5
5
Manual
Menu Options - Part Two
The ‘Database’ menu option will take you to
the ‘Footwear Database,’ where you can
select from hundreds of brands and customize your iStep program to recommend
shoes you carry in your store.
Footwear Database
The ‘Footwear Database’ screen will let you
copy from over 200 brands (over 10,000
shoes) into your store inventory. To use,
select the brand from the master list, select
the style that will appear, and then click on
the ‘PLACE IN CART’ button.
Follow the on-screen instructions to place
shoes in your cart, selecting the brand,
then the styles. For further assistance,
click on the ‘Help’ checkbox and follow the
red numbers as they guide you through
the process.
Once brands and styles have been chosen
and sent to inventory, click on the ‘Your
Inventory’ button at the top of the screen
to move to the next page.
Your Inventory
Your inventory screen will let you modify
any changes to your footwear inventory.
You can add / delete / modify brands and
ou can also make changes to the
styles.
sizing of each shoe – depending on the
last of the shoe; you can input information
declaring the shoe to be a certain size,
making it bigger or smaller than a normal
shoe.
Y
Brands
Add New Brand
If the shoe database does not have the
brand you are looking for, you can add it
here. Just click ‘Add New Brand’ and type
the name of the brand.
Remove Brand
Highlight the brand you wish to remove
and click ‘OK.’ All associated styles will
be removed from ‘your inventory.’
Change Logo
If you have added a brand, you can also
add a logo. Highlight the desired brand,
click ‘Change Logo’ and navigate to the
location of the logo on your computer.
Note that the logo must be 65 X 65 pixels.
Styles
Modify Style
Click ‘Modify Style’ to make changes to
the highlighted style of shoe. Options are:
‘Brand Name,’ ‘Style Name,’ ‘Gender,’ and
‘Sizing.’ Sizing can be modified up or
down as much as two shoe sizes to correct for variations in lasts.
Remove Style
Click ‘Remove Style’ to remove the
highlighted style from the database.
Change Picture
Click ‘Change Picture’
desired image. The image must be 135 X
135 pixels.
to navigate to the
22
Page 23

Add New Style
Similar to ‘Modify Style,’ you can add a style
here and set its name, gender and shoe sizing
recommendations.
Print Inventory
‘Print Inventory’ will display a window showing
your customized shoe database, which can
then be printed.
Your Recommendations
Your ‘recommendations’ screen will let you
match up shoes with their appropriate arches
and/or widths. These recommendations will be
used as the output of the program.
Manual
Fig. 5A
Begin by highlighting the brand you wish to
add to your recommendation database.
Then select ‘Gender.’ You can click either
selection or click and drag to select all, or hold
the Ctrl key while clicking to select multiples.
Make your selections of ‘Gender,’ ‘Styles,’
‘Footwear Types,’ and ‘Arches’ and/or ‘Widths.’
When you click on the ‘Recommend’ button,
every possible choice by Gender, Style,
ype, Arch or Width will be added to the
T
database.
Print Recommendations
‘Print Recommendations’ will display a window
with all the possible recommendations, which
can then be printed.
Recommendation Tips
This will take you to a window that explains
in depth how best to determine shoes for
your customers.
Fig. 5B
Note: A manager’
word is
pass
required to modify
coupons. The password is 2739.
s
Fig.
5C
23
Page 24

Manual
Marketing
‘Print Settings’
Print Settings will allow you to customize the
printout of the customer’s test. You can add your
company name, address, telephone number,
web address, email address and even a logo.
Note: The logo should be 100 X 50 pixels.
Coupon Creation
A coupon can be printed with each customer
test, allowing you to add incentive for your
customers to purchase or return to the store.
The coupon can be customized with images
and text of your choice
(Figure 5A). Begin
by clicking on the leftmost window and typing
your message. Continue the message by
clicking or tabbing to the right window. You
can modify the text by selecting it and clicking
on the text icons (Figure 5B).
Editing icons from left to right are:
Font color: Select text and click icon to
choose a color.
Increase Indent: Indents the selected text.
Decrease Indent: Decreases the indent of
the selected text.
Clear Format: Clears Underline, Bold and
Italics formatting.
Click on the ‘Update Coupon’ button to enter
changes in the coupon view.
An image can be displayed in the center of
the coupon. Select from the images provided
by clicking on the left and right arrows in the
‘Choose Image’ field.
You can use an image of your own by clicking the ‘Get Image’ button and navigating to
your image file. By checking the
‘Stretch/Resize Image’ box, the program will
best fit your image to the coupon. You can
save your coupons by clicking on ‘Save
as…’ and reload them by clicking ‘Retrieve.’
Coupons are saved as Windows Bitmap files
and stored in the root of the C: drive.
our iStep
Note:Y
computer must
have an Internet
connection bef
the Email f
help with Email
iStep Technical
Suppor
eature
will work! For
setup, contact
t at 1-800-
644-3514.
ore
Font: Select text and click icon to choose a
font.
Underline: Underlines selected text.
Bold: Select text and click icon to bold text.
Italics: Select text and click icon to italicize text.
Justification: Left, Center or Right justify text.
Decrease Font size: Select text and click
icon to decrease size of font.
Increase Font size: Select text and click
icon to increase size of font.
5A
Fig.
Email Configuration
You now have the capability to stay in touch
with your customers and patients. By selecting the ‘Email’
option, an email can be sent
after each test, or at specific times.
Authenticate: If your ISP requires a password, check this box.
Send Unsent Email: If you do not send an
email after each test, you can connect to the
internet and then click ‘Send Unsent Email.’
All pending emails will be sent. The number
of unsent emails is shown below this button.
5B
Fig.
24
Page 25

Manual
Caution: If you attempt to send unsent email
when not connected, your system may freeze.
Username: The username of the authorizing
account. This is not necessarily your company email address.
Password: Your password to log into your
ISP or Email server.
Email Server (SMTP): The name of your
email server.
From: The name or email address to show
as the sender of the email.
Personalized Message (500 max characters):
This field will allow you to write a standard
greeting or message to the customer.
Display: The email can be sent with or without
the following information shown: Shoes;
Socks, Coupon, Content.
Email after Test: Check to have the program
send an email after each test.
Weekly: Displays a page with the total number
of tests run, by week.
Foot Conditions
The ‘Foot Conditions’ web pages are stored
with the program. Included is the ‘Foot Pain
Identifier,’ an interactive tool to help you
learn about conditions that affect the feet.
PRS
The Pressure Relief System is incorporated
into the Aetrex line of footwear. PRS allows
you to easily customize the comfort and fit of
the shoe by trimming the insole at the areas of
pressure. PRS Insoles may also be completly
removed for additional depth.
The PRS option can only be selected after a
test has been run, with the results displayed on
screen. The red circles will be the recommended
points of removal that will allow greater fit and
comfort.
Customer List
Personalized Message: Check this box to
have the program prompt you to personalize
each message before sending.
Bulk Email: Allows you to compose and
send an email message to every customer
email address in your database.
Statistics
ou can run two reports from ‘Statistics.’
Y
Orthotic: Displays a page with the number
of each type of orthotic recommended by all
the iStep tests run.
Capturing information on the customer at the
conclusion of a test is the best way to build
information that can be used to better market
your products. Customer lists can be created
and modified, and specific information on your
customers can be gathered and analyzed.
Foot care professionals also have a powerful
tool to assist them in caring for their
patients’ feet. The iStep version 5.0 will
maintain a database of thousands of tests
for thousands of patients.
From the iStep main screen, customer files
can be created and modified, tests can be
25
Page 26

Manual
compared, new tests administered, and a
wealth of information about the customer’s feet
can be viewed.
Saving the Test Results
The test results can be saved at the end of a
test, either to an existing customer file, or a
new customer file can be created on the fly.
Creating New Customer Files
Click on Customer List. Select ‘New Customer.’
Customer lists can be sorted by Last Name,
First Name, City, State, Zip and Customer
Number.
Select ‘New Customer’ from the Customer
Files screen to enter new customer information. Certain fields are required before the
record can be saved: First Name, Last
Name, Gender and Shoe Size
Click on ‘Additional Info’ to capture address
information and to record notes on the customer. If you do not want to send email to the
customer, uncheck the ‘Send Email’ option.
(Figure 5C).
View Notes
Opens a window to allow you to add notes
on a customer
Test List
With a customer selected, click on ‘View
Tests’ to show a list of all tests recorded for
that customer. You can open multiple tests,
displaying them side by side for comparison.
View Large
Another way to view the test is by doubleclicking on the image. The foot image will
expand to full screen.
Postural and Dynamic
For stores with the iStep only, selecting the
‘Dynamic’ option allows you to perform a walking
test in addition to the static Postural test.
See chapter 3 for instructions on Dynamic
tests.
Registration
.
Select Customer
Highlight a customer in the list and Select. A
window will open showing all tests saved for
that customer.
Edit Customer
This button will open the ‘New/Edit Customer’
window (Figure 5D) to allow you to make
changes to customer information.
Delete Customer
This option will delete the customer and all
tests from the database. Once deleted, this
data cannot be recovered.
Contact iStep technical support to register
your copy of iStep version 5.0.
Exit
Exit code is 0007.
Fig. 5C
Fig. 5D
26
Page 27

Hardware Requirements
Manual
Chapter
6
Depending on the system you purchased,
your hardware requirements may vary. If you
purchased the iStep Deluxe, Viper,
Millennium or Laptop package, a computer
was provided with your system. If you
purchased the iStep scanner alone, you
received the following items:
•
iStep scanner
•
Conductive mat
•
Installation CD with the current
version of the iStep program
•
Serial data cable
•
12 volt power adaptor
•
User manual
The F.I.T. upgrade includes the following
items:
MINIMUM SYSTEM REQUIREMENTS
Your iStep scanner and/or F.I.T. upgrade should
•
be connected to a computer with these minimum
system requirements:
•
PC with Intel Celeron or AMD
Duron processor running a
1.0 Ghz or faster
•
128 Megabytes of RAM
•
20 Gigabyte hard drive
•
VGA video adaptor with 8
Megabytes or better memory
•
Color monitor with 1024 X 768
SVGA or better resolution
•
One available DB9 Serial port
•
One available Parallel printer port
or USB port
•
F.I.T. upgrade with integrated
iStep
•
Conductive mat
•
Installation CD with current version of the
. software
iStep program with F
included
•
Serial data cable
•
15 volt power adaptor
•
User manual
.I.T
•
Keyboard
•
Mouse
•
48X or better CD ROM drive
•
Optional Floppy disk drive
•
indows 98SE or better operating
W
system
iStep version 5.0 has been tested with Microsoft
indows versions 98SE, ME, 2000 Professional,
W
XP Home and Professional.
27
Page 28

©2005 Aetrex W
P: 800.526.2739 |
orldwide, Inc. 414
P: 201.833.2700 | F: 800.526.0073
www.aetrex.com
Alfred Avenue T
eaneck, NJ 07666
 Loading...