

Aerpro apsky720 User guide
apsky720
RC WIFI Quadcopter DroneRC WIFI Quadcopter DroneRC WIFI Quadcopter Drone
4CH REMOTE CONTROL QUADCOPTER APSKY720
QuadCopter with 6-axis Gyroscope
Propeller
Colour shell
Motor
Propeller
Guards
Please read this manual carefully before operang this product
and keep it for future reference.
What’s in the box
Quadcopter
Transmitter
Main blades
Blade protectors
Screwdriver
X12
Screws 12PCS
Camera & mount
Rechargeable battery
Installing landing skids & blade protecon frames
1. Install the landing skids to the bottom of the quadcopter (Figure 1)
2. Install the blade protecting frame to every corner, then secure using the
supplied screws (Figure 2)
1
2
Installing the baery & camera
1. Open battery cover on the drone and attach battery (Figure 1) then close
cover and secure with screw
2. Attach camera by sliding into groove on battery cover (Figure 2) and
connect 3-pin plug into camera port on the side (Figure 3)
1
1 2 3
Baery
connecon
Baery cover Camera port ON/OFF
switch
Camera
connected
Baery installaon and charging the Drone
Remove the battery from the drone. Once the battery is fully disconnected,
insert the connector of the battery into the USB charge cable and insert into
a PC/Mac, laptop, or USB mains adapter. The red LED on the USB will appear
whilst charging and will turn off once it is fully charged and ready to use.
NOTE: Fully recharge the battery after use / before storing drone.
Controller
To install batteries into the controller:
Carefully remove the screw from the battery cover, remove the cover and
insert 3 x 1.5 V, AA batteries, according to indicated polarity.
NOTE: Batteries are not included. Please refrain from mixing old and new
batteries as well as different brands.
Baery cover
3 x 1.5V, AA
Baeries
Gyroscope Calibraon
Pushing both the left stick and right stick to the left (45 degree angle) at
the same time, the calibration is successful once the lights stop flashing.
(when the aircraft drifts any direction, and the trim-turning adjustment
can not play the role, this operation can repair it).
Instrucon for Controller with Altude Hold
Headless flying
Speed select
Low - 1 beep
Med - 2 beeps
High - 3 beeps
Le sck/Throle
Ascend/Descend
Horizontal spin
LED switch
Emergency Stop
Le spin trim
Photo
One key reverse
Right spin trim
Taking off using hover
1. Power on the drone and place it on a flat surface
2. Turn on the remote control
3. Push the left stick up to top position then pull it down, a beep
sounds and the LED stops flashing, the drone has been unlocked
4. Push the left stick to left (45 degree angle) and right stick to right
(45 degree angle) at the same time, motors start rotating, ready to fly
5. Push up the left stick, the drone takes off and ascends manually.
6. Or press the button ‘Take off’, the drone takes off and ascends automatically
7. Release the throttle, the left stick backs to central position, and drone hovers
automatically
Landing the drone
Method 1: Pull down the left stick to bottom position, the drone descends and lands
manually
Method 2: Press the button ‘Landing’, the drone descends, lands and stop motors
automatically.
NOTE: Before final landing to ground, the drone can
still be flown up by pushing up the throttle.
Emergency stop
Press the button ‘Emergency stop’ to stop the motors immediately to avoid
further damage or injury.
Note: If it’s not necessary, please do not try this Emergency button to bring possible
damage to the drone by violent crashes.
Power switch
Leward trim Rightward trim
Video
Backward trim
Forward trim
Flip
Right sck/Rudder
Forward/Backward
Leward/Rightward
Take off
Landing
Starng motors
Pushing up
1.Pushing down
Basic flying and Trim tuning
Ascend
Descend
Le spin
Right spin
Forward
Backward
Leward fly
Rightward fly
Le/Right
spin trimming
Leward/
Rightward
trimming
2
Forward/
Backward
trimming
Flips and rolls
After you have the basics of flying, you’re ready to learn flip and roll your drone.
To perform a flip or roll, press the Flip button, make sure the drone is at least 3 meters
off the ground and quickly push the Rudder, in either direction to make the drone flip
or roll. Once the manoeuvre is completed, steady the drone.
NOTE: For the version with altitude hold function, the drone can flip forward,
backward, left and right.
Push the le sck up, the drone ascends
Pull the le sck down, the drone descends
Push the le sck to le, the drone spins counter-clockwise
Push the le sck to right, the drone spins clockwise
Push the right sck up, the drone flies forward
Pull the right sck down, the drone flies backward
Push the right sck to le, the drone flies leward
Pull the right sck to right, the drone flies rightward
When the drone dris counter-clockwise, press right
spin trim buon to tune it. When the drone dris
clockwise, press le spin trim buon to tune it.
When the drone dris rightward, press the leward
trim buon to tune it. When the drone dris leward,
press the rightward trim buon to tune it.
When the drone dris backward, press the forward
trim buon to tune it. When the drone dris forward,
press the backward trim buon to tune it.
Headless flying
Headless mode supports beginners in the initial stages of learning how to fly the drone.
Regardless of where the drone turns, the direction of flight always corresponds exactly to
the direction specified with the control for forwards/backwards and sideways movements.
1. Place the drone on the level surface facing away from you. Turn on the drone and
connect the controller.
2. Press the Headless mode button, and you will hear a beep and LED light flashes to
indicate that the drone is in Headless mode. You can press the Headless model button
again to deactivate.
3. For one key backwards mode, press the One key reverse button, and you will activate it
and the drone will now attempt to fly back to its initial starting point. If you want to
deactivate this mode, then push the Right control lever in any direction.
Note: The drone will not land itself, you still need to control the height of the drone when
using the one key backwards flying mode.
NOTE: Please operate the drone in a spacious indoor or outdoor environment.
Do not operate the drone in rain,snow or strong winds. Keep away from people,
animals and other obstacles.
App download and Installaon
NOTE: In order to use the WiFi camera, you must download and install the App.
Install App: For Android and Apple iOS devices, please go to the Google Play or
App Store to download the app
• Turn on the power switch of your drone and the LED indicator lights will flash
• On your iOS or Android device, go to the WiFi settings and search for a new network
• After a few seconds, you will see a network listed “APSKY720”. Tap to connect
• Once connected to the drone, launch the drone App.
: APSKY720
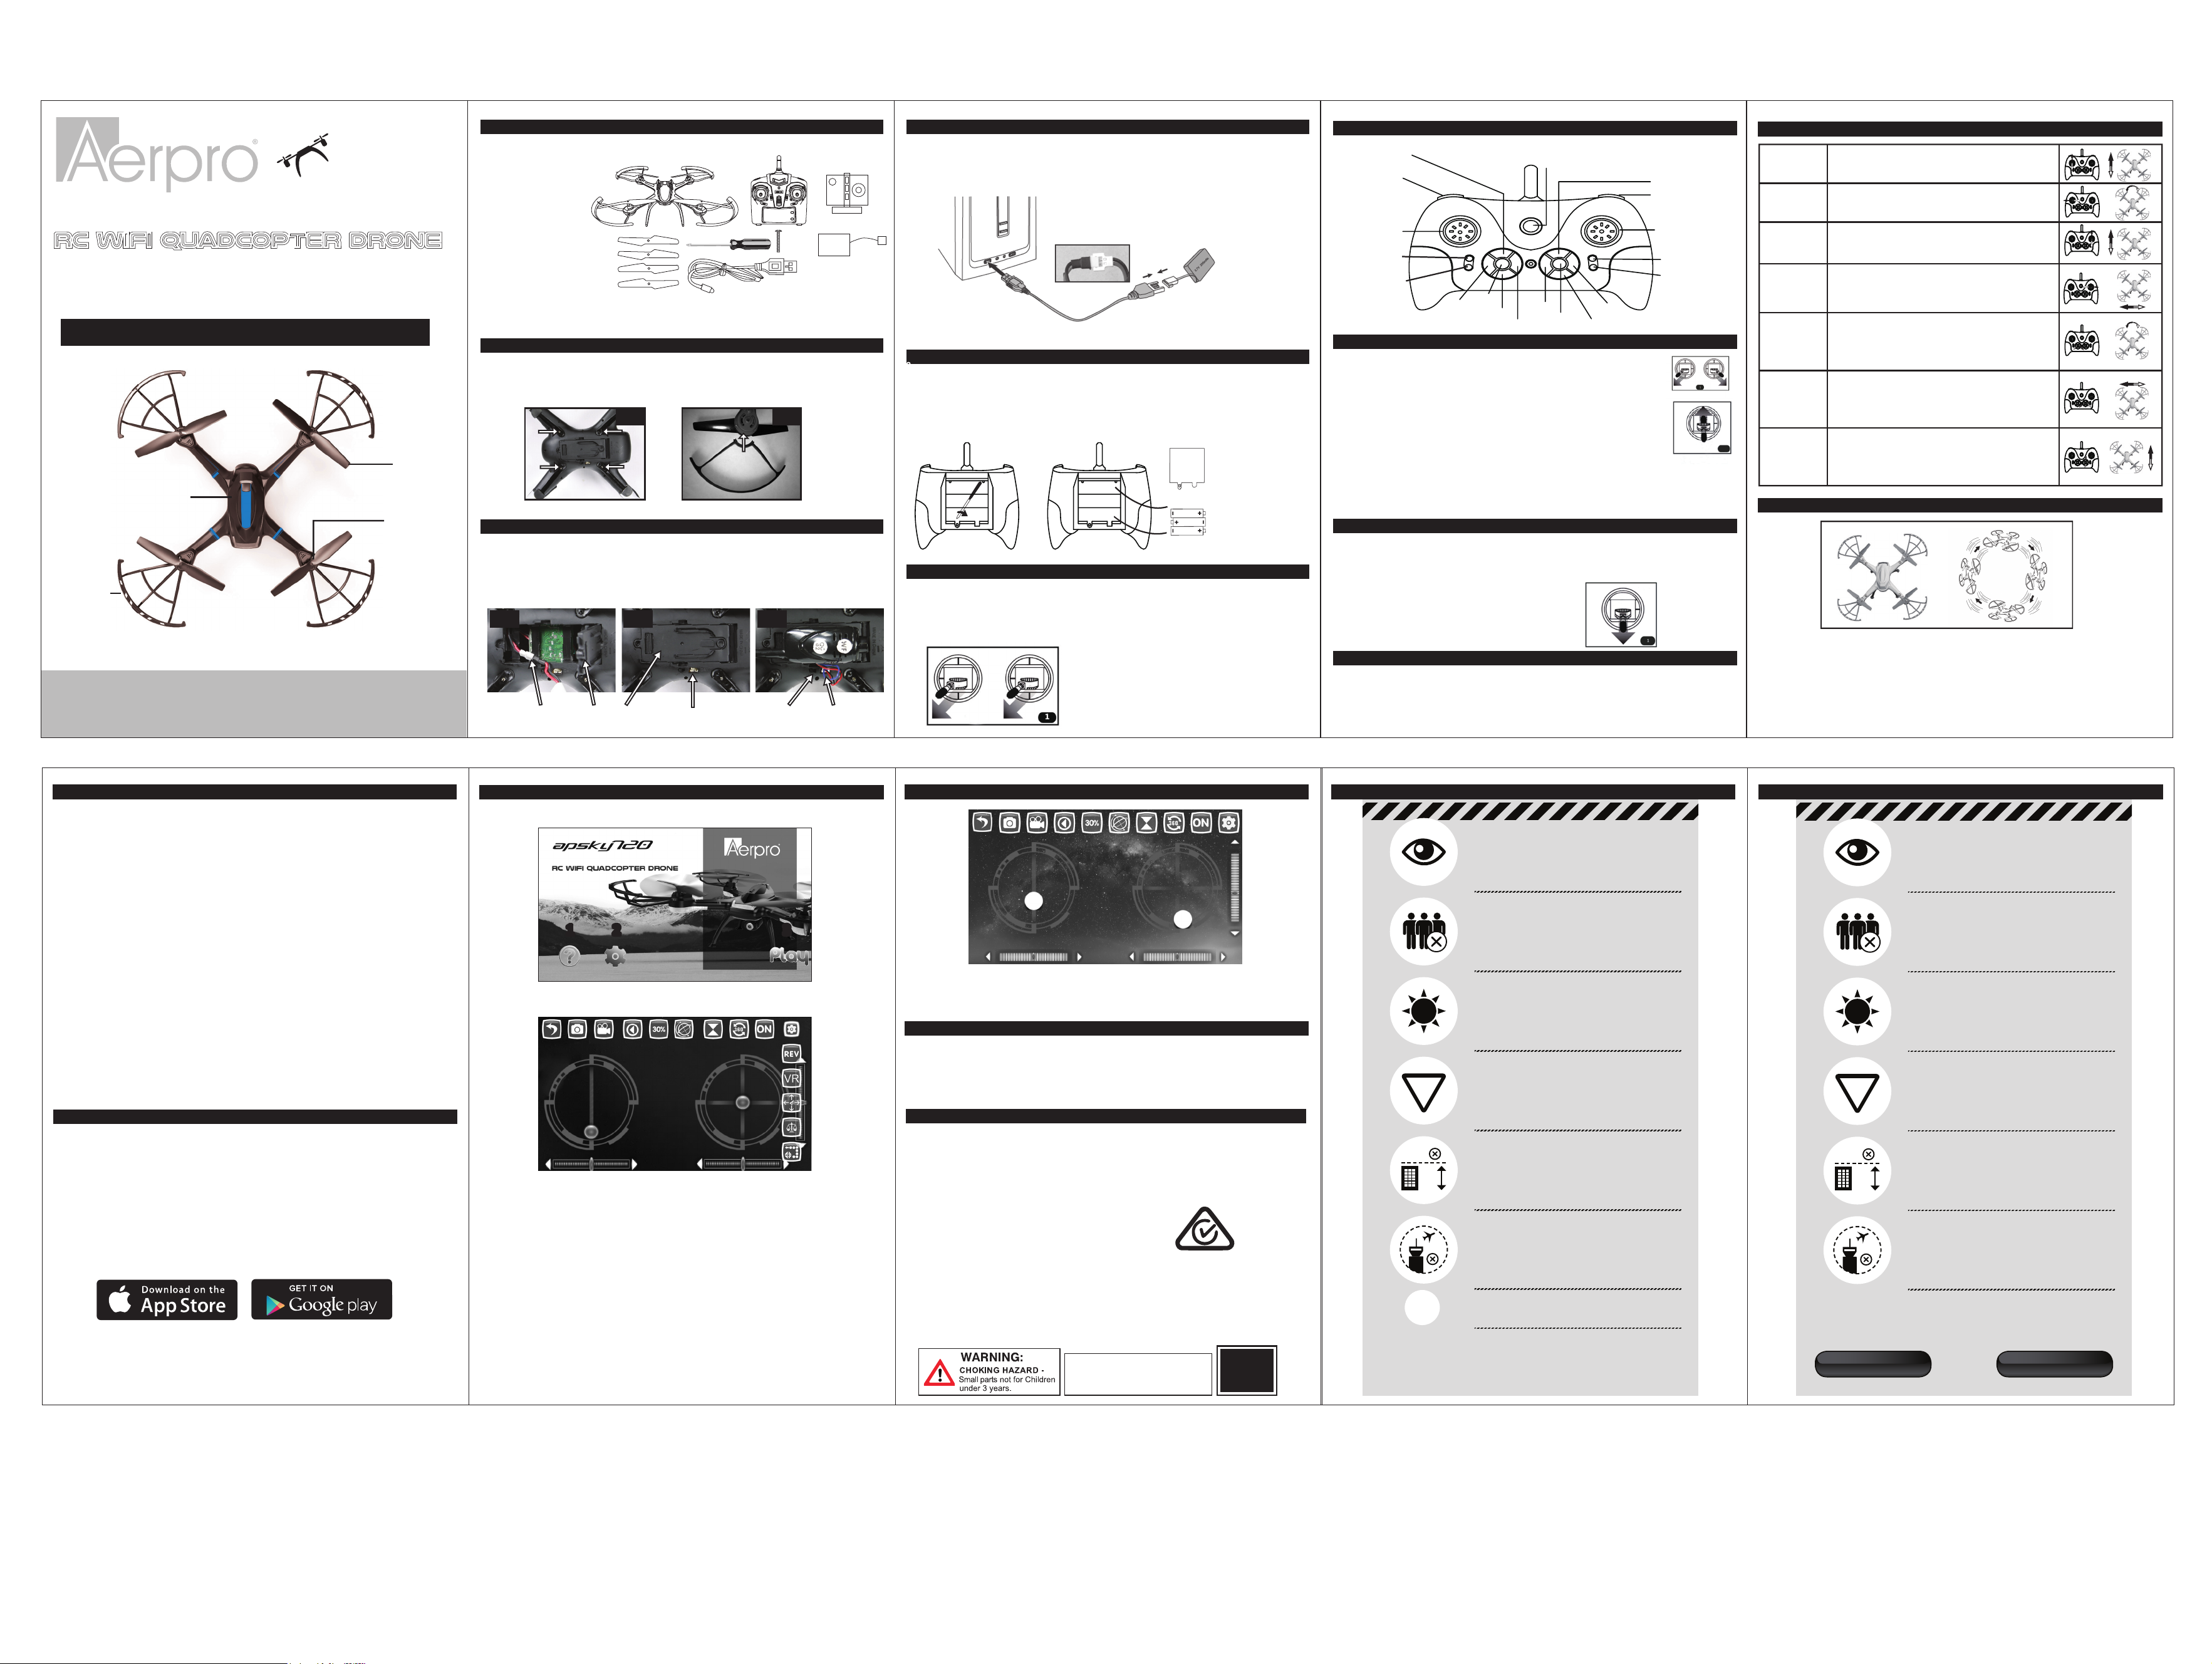
Interface and camera controls via smartphone App
Home Screen
1 2 31 2 3
1. Instrucons 2. Sengs 3. Controls
Control Screen
1 2 3 4 5 6 7 8 9
1. Home screen return
2. Take a photo
3. Record video
4. Photo & video playback
5. Speed: Slow/Medium/Fast
6. Gravity sensor mode
7. Altude hold
8. 360° flip
9. Show/Hide control interface
10. Show/Hide mode sengs
11. Reverse the screen
12. VR mode
13. Headless mode
14. Calibrate gyro
15. Track mode
10
11
12
13
14
15
Flying the drone via smartphone App Laws & Regulaons on flying your drone (AUS) Laws & Regulaons on flying your drone (NZ)
You need to be able to see the aircraft, with your
own eyes (eg, without binoculars) at all times.
Don’t let it get too far away from you!
You need to fly the aircraft so it isn’t a hazard to
other aircraft, property, and people.
That means not flying it over areas where
there are people.
NOTE: Full instructions on flying your drone using your smartphone included in the
instructions part of the drone App on the Home screen.
Fly the aircraft in daylight only.
You need to be able to see the aircraft, with your
own eyes (eg, without binoculars) at all times.
Don’t let it get too far away from you!
You need to fly the aircraft so it isn’t a hazard to
other aircraft, property, and people.
That means not flying it over areas where
there are people.
Fly the aircraft in daylight only.
Flying in VR mode
• Press the VR button on the App interface. The screen will split to fit the VR headset
• Place your smartphone into the VR headset
• Use the remote controller to fly the drone
Technical assistance
If you need assistance setting up or using your Aerpro product now or in the future, call
or email Aerpro Support (Australia and International inquires).
NOTE: Maintaining control of the drone while flying is the sole responsibility of
the pilot. Any loss or damage caused while flying is NOT covered by warranty.
Email: service@tdj.com.au
TEL: +61 3 8587 8898
FAX: +61 3 8587 8866
Mon-Fri 9am – 5pm AEST
Please retain this user guide for future reference.
This manual is considered correct at time of printing but is subject to change.
For latest manuals and updates refer to the website.
https://tdj.com.au/firmware/Aerpro
To avoid quadcopter damage and
injury, please read the user manual
carefully before flying.
FOR AGES
14+
AND ABOVE
GIVE
WAY
120m
It’s illegal to fly for money or economic reward
$
unless you have correct certification from (CASA)
For Further Information:
Model Aeronautical Association of Australia www.maaa.asn.au
or
CASA casa.gov.au/rpa casa.gov.au/sportaviation
Phone 131 757
Give way to all other aircraft.
You don’t want your aircraft destroyed in a collision
with a bigger aircraft, or be responsible for
damaging it, or for putting people’s lives at risk.
You cannot fly your aircraft higher than
120 metres (400 feet) above ground level.
You cannot fly closer than 5.5 kilometres
from an airfield.
You cannot fly in controlled airspace without
a clearance from Air Traffic Control. For more
information, see the CASA web site.
Give way to all other aircraft.
GIVE
WAY
120m
You can fly outside some of these conditions, but there are more
rules to keep you and your aircraft safe, so contact Model Flying
New Zealand or the Civil Aviation Authority.
www.nzmaa.org.nz www.caa.govt.nz/rpas
You don’t want your aircraft destroyed in a collision
with a bigger aircraft, or be responsible for
damaging it, or for putting people’s lives at risk.
You cannot fly your aircraft higher than
120 metres (400 feet) above ground level.
You cannot fly closer than four kilometres
from any aerodrome.
You cannot fly in controlled airspace without
a clearance from Air Traffic Control. For more
information, see the CAA web site.
 Loading...