

Page 1

User Manual
Model Q
Page 2

TABLE OF CONTENTS
INTRODUCTORY INFORMATION ................................. 4
CONVENTIONS ..................................................................................................4
CE COMPLIANCE ...............................................................................................5
FCC COMPLIANCE STATEMENT AND RF RADIATION EXPOSURE STATEMENT ...........5
IC (INDUSTRY CANADA) COMPLIANCE STATEMENT ..............................................6
GENERAL NOTES ...............................................................................................8
SAFETY INFORMATION .......................................................................................9
COPYRIGHT NOTICE ........................................................................................ 13
GEOSKEEPER DESCRIPTION...................................... 14
GEOSKEEPER OVERVIEW ................................................................................ 14
GEOSKEEPER LAYOUT.................................................................................... 16
GEOSKEEPER OPERATION ......................................... 17
TURNING THE GEOSKEEPER ON ....................................................................... 17
TURNING THE GEOSKEEPER OFF ...................................................................... 20
GEOSKEEPER INDICATIONS ............................................................................. 21
MAKING A SAFETY CALL ................................................................................ 24
MAKING A SAFETY CALL WHEN GEOSKEEPER IS OFF ....................................... 26
MAKING A SILENT SAFETY CALL ..................................................................... 29
MAKING A SAFETY CALL WITHOUT A SIM CARD ............................................. 30
MAKING AN OUTGOING CALL .......................................................................... 31
ENDING A CALL ............................................................................................. 33
ADJUSTING THE SPEAKER VOLUME .................................................................. 34
MUTE MODE .................................................................................................. 35
SENDING A TEXT MESSAGE (SMS) ................................................................... 36
RECEIVING INCOMING PHONE CALLS ................................................................ 37
GPS .............................................................................................................. 39
CHARGING THE BATTERY ................................................................................ 41
BATTERY INFORMATION .................................................................................. 44
GEOSKEEPER SETUP VIA THE INTERNET ............... 46
SKEEPER LOGIN ............................................................................................. 46
DEVICE SETUP ............................................................................................... 48
GeoSkeeper™ - Q User Manual Rev: 1.5 Draft Page 2
Page 3

CLEAR FIELDS ................................................................................................ 49
SPEED DIALING BUTTONS SETTINGS ................................................................. 50
SAFETY CALL BUTTON SETTINGS ..................................................................... 51
DEFINING ALERTS .......................................................................................... 52
PRESETTING AUTHORIZED INCOMING CALLS ..................................................... 53
ANSWERING MODE ......................................................................................... 55
INCOMING CALLS INDICATION .......................................................................... 55
SOUNDS ......................................................................................................... 56
UPDATE SETTINGS .......................................................................................... 58
CARE AND MAINTENANCE ......................................... 61
CARING FOR YOUR GEOSKEEPER ..................................................................... 61
TROUBLESHOOTING ........................................................................................ 63
LIMITED WARRANTY ...................................................................................... 65
GEOSKEEPER SPECIFICATIONS ................................ 67
GeoSkeeper™ - Q User Manual Rev: 1.5 Draft Page 3
Page 4
INTRODUCTORY INFORMATION
CONVENTIONS
This guide uses the following conventions to convey
instructions and information:
A warning calls for attention to a situation that can result in
physical harm to the user or equipment.
A note calls for attention to an important item in the text.
GeoSkeeper™ - Q User Manual Rev: 1.5 Draft Page 4
Page 5
DECLARATION OF CONFORMITY
Aerotel Medical Systems (1998) Ltd hereby declares that
the GeoSKeeper is in compliance with the essential
requirements and other relevant provisions of Directive
1999/5/EC. A copy of the Declaration of Conformity may
be obtained from Aerotel Medical Systems (1998) Ltd.
Within the European Union the product
must be taken to separate collection at the
product end of life. Do not dispose of this
device as unsorted municipal waste.
CE COMPLIANCE
FCC COMPLIANCE STATEMENT AND RF
RADIATION EXPOSURE STATEMENT
This device complies with Part 15 of the FCC Rules.
Operation is subject to the following two conditions:
(1) this device may not cause harmful interference, and
(2) this device must accept any interference received,
including interference that may cause undesired operation.
This equipment complies with FCC RF radiation exposure
limits set forth for an uncontrolled environment. SAR has
been evaluated with highest reported SAR levels for
vicinity of head (1 cm in front of mouth) and extremity
(hand) use conditions of 1.26 W/kg and 3.78 W/kg,
GeoSkeeper™ - Q User Manual Rev: 1.5 Draft Page 5
Page 6

respectively. End users must follow the specific operating
instructions for satisfying RF exposure compliance. This
transmitter must not be co-located or operating in
conjunction with any other antenna or transmitter.
FCC ID: VZU-GEOSKEEPER-Q
IC (INDUSTRY CANADA) COMPLIANCE STATEMENT
This device complies with Industry Canada licence-exempt
RSS standard(s). Operation is subject to the following two
conditions:
(1) this device may not cause interference, and
(2) this device must accept any interference, including
interference that may cause undesired operation of the
device.
Le présent appareil est conforme aux CNR d'Industrie
Canada applicables aux appareils radio exempts de
licence. L'exploitation est autorisée aux deux conditions
suivantes:
(1) l'appareil ne doit pas produire de brouillage, et
(2) l'utilisateur de l'appareil doit accepter tout brouillage
radioélectrique subi, même si lebrouillage est susceptible
d'en compromettre le fonctionnement.
The GeoSKeeper Model Q has been designed to comply
with safety requirements for exposure to radio waves
(SAR). SAR testing has been performed in accordance
with RSS-102, with the GeoSKeeper Model Q transmitting
at its highest certified power level in all used frequency
bands. The highest SAR value for the GeoSKeeper Model
Q when tested was 1.26 W/kg and 3.78 W/kg, for vicinity
of head (1 cm in front of mouth) and extremity (hand) use
GeoSkeeper™ - Q User Manual Rev: 1.5 Draft Page 6
Page 7

conditions respectively. Please follow the instructions
included in the user guide for product installation and use.”
Le GeoSKeeper Model Q est conçu pour se conformer
aux exigences de sécurité pour l'exposition aux ondes
radio (SAR). Tests SAR a été effectué conformément à la
norme RSS-102, avec le S10621 à son niveau de
puissance maximum certifié dans toutes les bandes de
fréquences utilisées. La valeur SAR maximale pour le
GeoSKeeper Model Q lorsqu'il est testé était 1.26 W/kg
pour les environs de la tête (en face de la bouche de 1
cm), et 3.78 W/kg pour la main. S'il vous plaît suivez les
instructions incluses dans le guide utilisateur pour
l'installation du produit et son utilisation.
IC: 6931A-GEOSKEEPERQ
GeoSkeeper™ - Q User Manual Rev: 1.5 Draft Page 7
Page 8
GENERAL NOTES
In order to ensure SAR compliance, the GeoSKeeper
must only be used as a wrist worn device. No other usage
configuration is permitted.
The GeoSKeeper is NOT a medical device
The highest measured SAR value is 1.26 W/kg with the
GeoSKeeper situated at a distance of 1 cm in front of the
mouth. To reduce RF energy absorbed to your body, do
not use the GeoSKeeper too close to your head/mouth.
Allow at least 10cm distance between the device and your
head/mouth.
GeoSkeeper™ - Q User Manual Rev: 1.5 Draft Page 8
Page 9
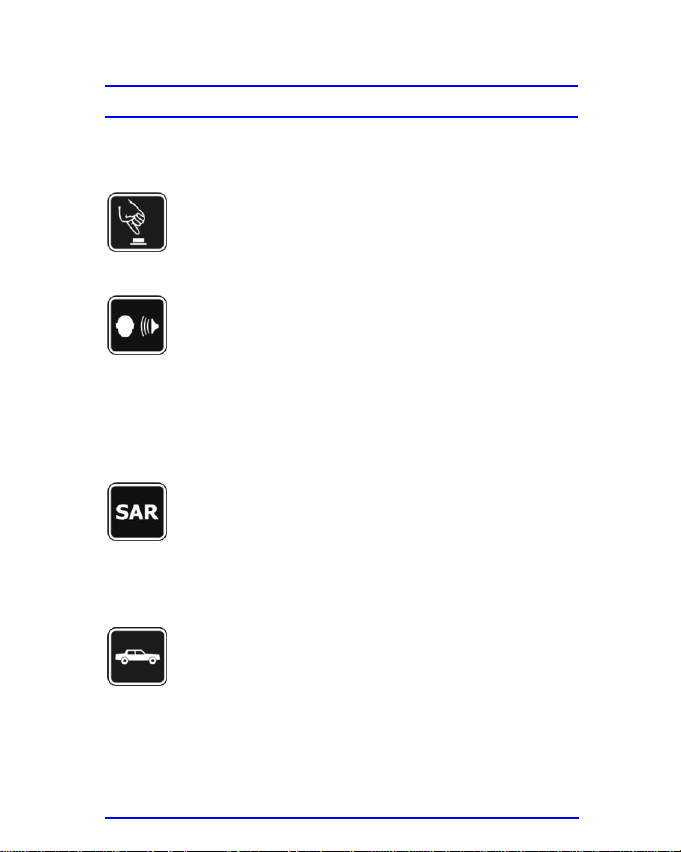
SWITCH ON SAFETY
Do not switch the GeoSKeeper on where
wireless phone use is prohibited or when it may
cause interference or danger.
LOUDSPEAKER
The GeoSKeeper has built-in loudspeaker that
allows you to speak and listen from a short
distance without having to hold the device to
your ear.
Do not hold the device near your ear (less than
10cm) because the volume may be extremely
loud.
SAR
In order to keep RF energy absorption (SAR) to
a minimum, it is recommended that the
GeoSKeeper is used at a minimum distance of
at least 10cm between the device and the head
or ear.
ROAD SAFETY COMES FIRST
Obey all local laws. Always keep your hands
free to operate the vehicle while driving. Your
first consideration while driving should be road
safety.
SAFETY INFORMATION
To ensure safety and to maintain the GeoSKeeper in good
working condition, please read and follow these rules:
GeoSkeeper™ - Q User Manual Rev: 1.5 Draft Page 9
Page 10

SWITCH OFF IN HOSPITALS
When in a hospital or any other health care
facility, observe the restrictions on the use of
mobile phones. Switch the GeoSKeeper off if
instructed to do so by the guidelines posted in
sensitive areas. Medical equipment may be
sensitive to RF energy.
MEDICAL EQUIPMENT
The operation of cardiac pacemakers, other
implanted medical equipment and hearing aids
can be affected by interference from the
GeoSKeeper when placed close to the device. If
in doubt about potential danger, contact your
physician to verify that the equipment is properly
shielded. Pacemaker patients are advised to
keep their GeoSKeeper away from the
pacemaker while it is on.
SWITCH OFF IN AIRCRAFT
Follow any restrictions. Wireless devices can
cause interference in aircraft.
SWITCH OFF WHEN REFUELING
Do not use the GeoSKeeper at a refueling point.
Do not use near fuel or chemicals.
GeoSkeeper™ - Q User Manual Rev: 1.5 Draft Page 10
Page 11
SWITCH OFF NEAR BLASTING
Do not operate the GeoSKeeper in the presence
of flammable gases or fumes. Switch off the
GeoSKeeper when you are near petrol stations,
fuel depots, chemical plants or where blasting
operations are in progress. Operation of any
electrical equipment in potentially explosive
atmospheres can constitute a safety hazard.
RADIO INTERFERENCE
Your GeoSKeeper receives and transmits radio
frequency energy while switched on. Remember
that interference can occur if it is used close to
TV sets, radios, computers or inadequately
shielded equipment.
Follow any special regulations and always
switch off the GeoSKeeper wherever prohibited
or when you suspect that it may cause
interference or danger.
INTERFERENCE
All wireless devices may be susceptible to
interference, which could affect performance.
WATER-RESISTANCE
Your GeoSKeeper is not water-resistant. Keep it
dry.
ENVIRONMENT
Never leave the GeoSKeeper exposed to direct
sunlight or in environments with high humidity or
dust levels.
GeoSkeeper™ - Q User Manual Rev: 1.5 Draft Page 11
Page 12
CLEANING
Do not use liquids or strong detergents to clean
the GeoSKeeper. Follow the cleaning
instructions given hereunder in this guide.
QUALIFIED SERVICE
Only qualified personnel may install or repair the
GeoSKeeper. Battery and SIM card
replacement must be executed only by an
authorized service facility.
Never attempt to disassemble the GeoSKeeper
by yourself. Contact an authorized service
facility in case of malfunctions or any other
problems.
EMERGENCY CALLS
The GeoSKeeper operates using radio signals
and cellular networks that cannot be guaranteed
to connect in all conditions. Therefore, you
should never rely solely upon any wireless
device for essential communication, for example
emergency calls.
In order to make or receive calls, the
GeoSKeeper must be switched on, its battery
charged and in a service area with adequate
cellular signal strength.
AGE
GeoSKeeper is not recommended for children
under the age of 3.
GeoSkeeper™ - Q User Manual Rev: 1.5 Draft Page 12
Page 13

COPYRIGHT NOTICE
All rights reserved.
Copyright © 2008-2010 Aerotel Medical Systems (1998)
Ltd.
Aerotel Medical Systems (1998) Ltd.
5 Hazoref St.
Holon 58856, Israel
Fax: +972-3-5596111
E-mail: Info@aerotel.com
Web: www.aerotel.com
All information contained in this manual is copyrighted and
all rights are reserved. No part of this document, in whole
or in part, may be reproduced or copied in any form
without prior written consent from Aerotel Medical Systems
(1998) Ltd.
All product names mentioned in this manual are
trademarks of Aerotel Medical Systems (1998) Ltd.
Document Control: 1.5 Draft
Valid for device firmware version 1.6.4-X.X.X
GeoSkeeper™ - Q User Manual Rev: 1.5 Draft Page 13
Page 14

GEOSKEEPER DESCRIPTION
GEOSKEEPER OVERVIEW
The GeoSKeeper™ (“GeoSKeeper” or the Product) is a
small wrist wearable wireless communication device that
lets you stay in touch anytime, anywhere. You do not have
to dial a number to establish contact. All you have to do is
press a single button and you are able to contact people
who may help you in case of need.
GeoSKeeper has a built-in GPS receiver to allow locating
your position. The position data is automatically sent to a
secured website.
Authorized people will be able to locate your position on
an interactive map displayed on that website.
One can limit the permissible zone of movement
(Geofencing). Any violation of the defined limits will be
automatically reported via an SMS to a selected cellular
phone or a pre defined email address and will clearly show
on the map.
The GeoSKeeper is designed for use on quad band GSM
networks (850/900/1800/1900).
With GeoSKeeper you can:
1. Contact a safety number by pressing a single button.
When pressing the safety button – your location will be
automatically detected.
2. Initiate a call to a safety number even when the device
is turned off.
3. Send current position via SMS or GPRS.
4. Receive a sound notification if you left the predefined
zone or returned to it. Your authorized relatives will
GeoSkeeper™ - Q User Manual Rev: 1.5 Draft Page 14
Page 15

receive the appropriate SMS and email notifications to
locate your position via website including driving
instructions to that location.
5. Contact up to 3 additional phone numbers with a single
touch of a button (speed dialing).
6. Send preset text messages to the speed dialing
numbers.
7. Receive calls from anyone or limit the GeoSKeeper to
receive phone calls only from authorized callers (up to
10 contacts).
8. Use GeoSKeeper in silent mode (without speaker
activation). The other party can listen in to the
GeoSKeeper environment.
9. Use the Internet to remotely configure the
GeoSKeeper.
10. Configure the GeoSKeeper to answer automatically or
manually.
11. Wear the GeoSKeeper on your wrist.
This guide explains how to use the dual band
GeoSKeeper and make the most of its features.
GeoSkeeper™ - Q User Manual Rev: 1.5 Draft Page 15
Page 16
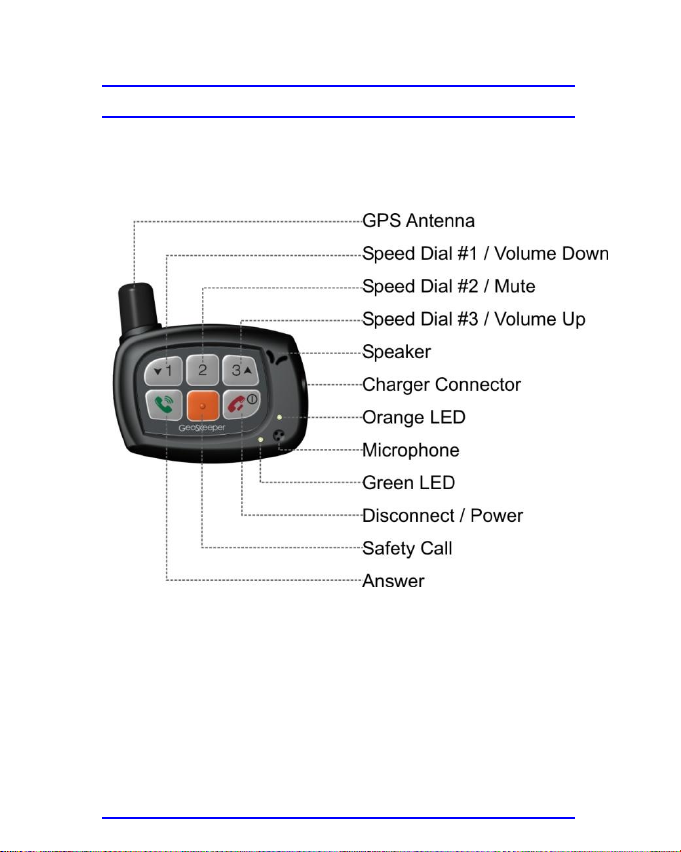
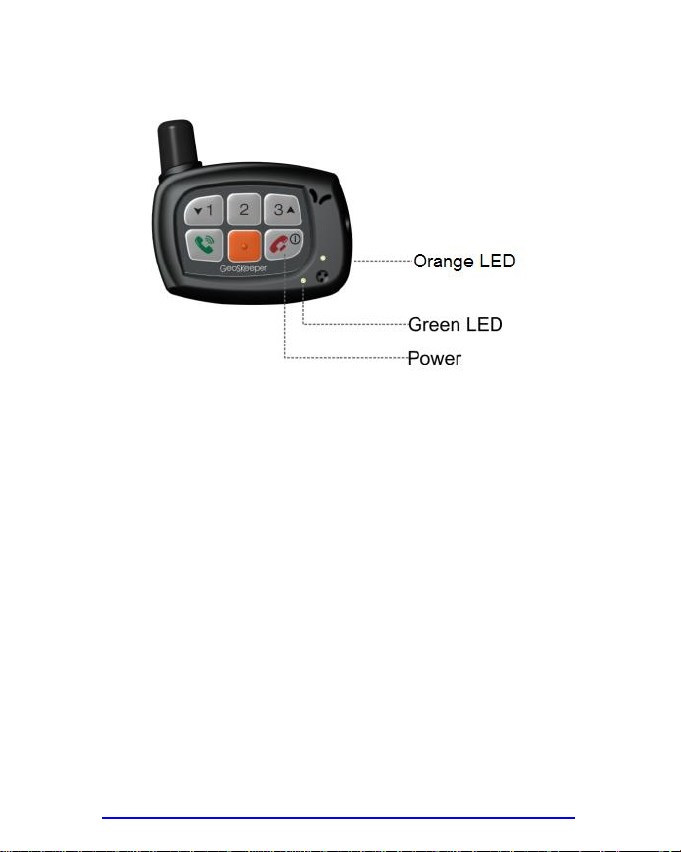
GEOSKEEPER LAYOUT
The following figure shows the GeoSKeeper’s layout:
GeoSkeeper™ - Q User Manual Rev: 1.5 Draft Page 16
Page 17
GEOSKEEPER OPERATION
TURNING THE GEOSKEEPER ON
Before using the GeoSKeeper for the first time, charge
the battery for at least 12 hours.
Always make sure the GeoSKeeper is charged prior to
turning it on (See Charging the Battery on page 41).
Make sure your provider installed SIM card into the device.
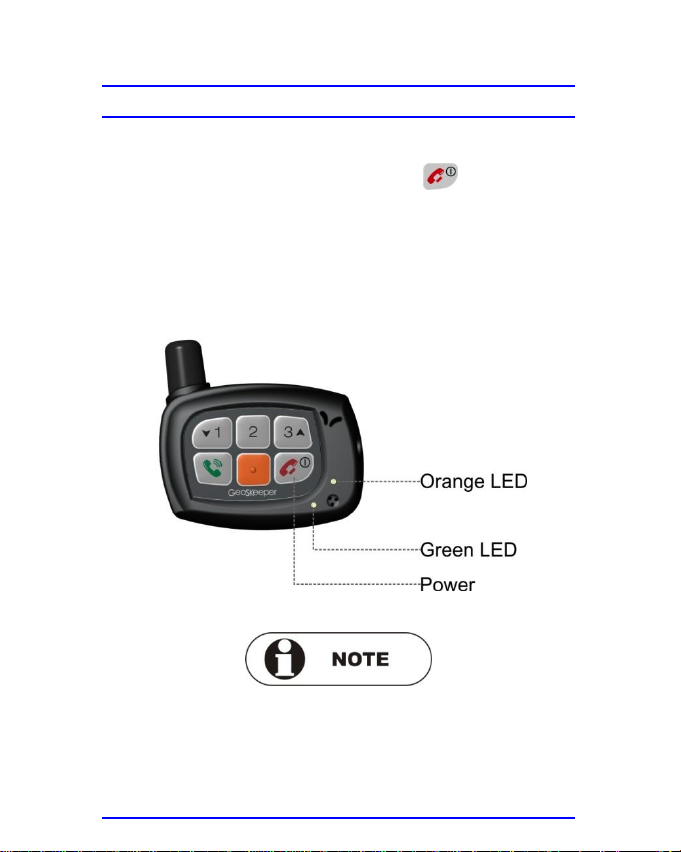
Follow any of the listed steps to turn the GeoSKeeper ON:
Press and hold the Power button for 1-2
seconds.
Press and hold the Safety button for 1-2
seconds
Plug in the charger and connect AC wall outlet.
Removing the charger – will NOT switch off the device
GeoSkeeper™ - Q User Manual Rev: 1.5 Draft Page 17
Page 18
1. The green & orange LEDs will turn on and will be lit till a
beep is emitted.
2. The green LED flashes rapidly (initialization and
network searching) for about one minute.
3. The GeoSKeeper will go into GPRS mode to download
configuration data from the server. The green LED will
be on continuously during this process (about 40
seconds).
4. The GeoSKeeper will play a series of beeps to indicate
that the device is ready for use. The green LED will
flash ONCE every 2 seconds, indicating normal standby
operation in the GSM network.
GeoSkeeper™ - Q User Manual Rev: 1.5 Draft Page 18
Page 19

If the GeoSKeeper failed to connect to the network (SIM
not ready etc.), SOS dialing is still enabled when pressing
the Safety Call button.
See Making A Safety Call Without A SIM Card on page 30
for more details.
GeoSkeeper™ - Q User Manual Rev: 1.5 Draft Page 19
Page 20
TURNING THE GEOSKEEPER OFF
Follow these steps to turn the GeoSKeeper OFF:
1. Press and hold the Power button for at least 2
seconds.
2. A beep will sound.
3. Green & orange LEDs light continuously.
4. Wait for a few seconds. The GeoSKeeper will turn off.
Both LEDs will be off.
Power off duration can be longer (up to 1 minute) in case
the device is configured to update “power off” condition.
If the charger is plugged in, then the GeoSKeeper cannot
be powered off.
GeoSkeeper™ - Q User Manual Rev: 1.5 Draft Page 20
Page 21
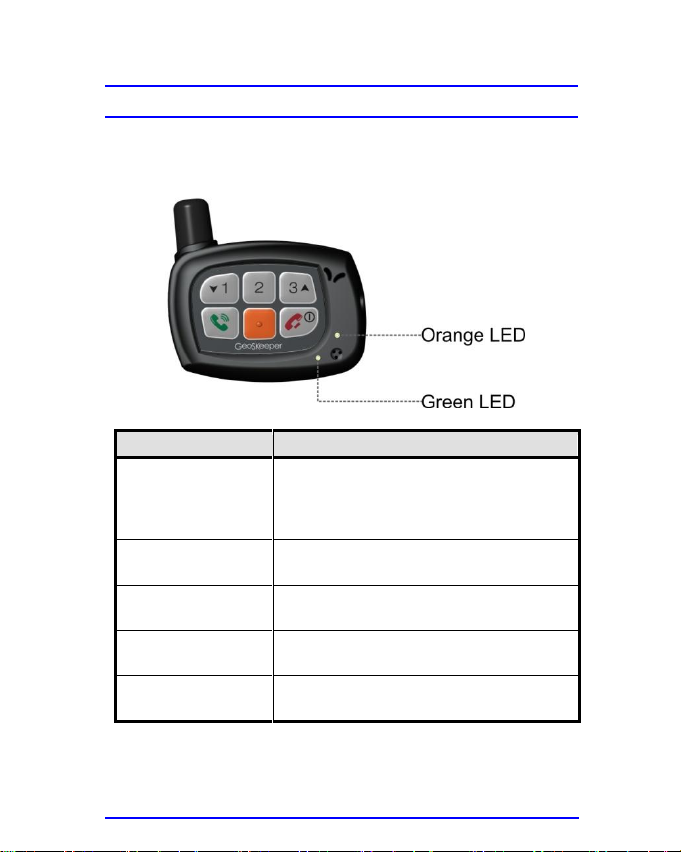
Status
Indication
Turned on
(Initialization and
searching for GSM
network)
Green & orange LEDs light
continuously, then green LED flashes
rapidly for about one minute.
Standby (connected
to the GSM network)
Green LED flashes once every 2
seconds.
Voice call (outgoing
and incoming)
Green & orange LEDs flash in
alternating mode.
GPS
(Fix location)
Green LED flashes twice every 2
seconds.
Sending SMS
Green & orange LEDs flash in
alternating mode.
GEOSKEEPER INDICATIONS
The GeoSKeeper's current status is indicated by the green
& orange LEDs on its top panel.
The following are the different indications:
GeoSkeeper™ - Q User Manual Rev: 1.5 Draft Page 21
Page 22

Status
Indication
Data
communication
(Sending or receiving
data)
Green LED is on continuously.
In this status, buttons are disabled.
Battery charging
Orange LED is on continuously.
Battery reaches
full charge
Orange LED lights continuously with
a flash every 2 seconds.
Low battery
Orange LED is continuously off but
flashes every 2 seconds.
Turn off
Green & orange LEDs light
continuously until the GeoSKeeper
turns off.
In addition, when the sound beeps are enabled (see
Sounds on page 56) The GeoSKeeper will play beeps
depending on the action:
1. When pressing the dialing buttons - The device will
sound 2 beeps and then 2 beeps every few seconds
until the dial tone is heard.
2. When pressing the emergency button - The device
will sound 4 beeps and then 2 beeps every few
seconds until the dial tone is heard.
3. At the end of a conversation call – Single beep.
4. Low battery - The device will beep once every 5
minutes.
5. After sending a text message (SMS) - Single beep.
6. When leaving or returning to the Geo-Fence zone - 5
beeps.
GeoSkeeper™ - Q User Manual Rev: 1.5 Draft Page 22
Page 23

7. When the device is being remotely updated - Single
beep.
GeoSkeeper™ - Q User Manual Rev: 1.5 Draft Page 23
Page 24

MAKING A SAFETY CALL
Follow these steps to initiate a Safety Call:
1. Press and hold the Safety Call button until 4
beeps are heard. The GeoSKeeper sounds 2 beeps
every few seconds until the dial tone is heard. The
green & orange LEDs flash in alternating mode.
2. The GeoSKeeper will dial the first emergency number
set, and the beeps will be replaced by the network
dial tone.
3. If there is no answer, or the first number is busy, the
GeoSKeeper will try to call the next stored number
(up to 4 numbers can be preset, see Safety Call
Button Settings on page 51) in sequence until there is
an answer.
GeoSkeeper™ - Q User Manual Rev: 1.5 Draft Page 24
Page 25

4. The user can cancel the process at any time by
pressing the Disconnect button .
5. Wait for the other party to answer the phone call.
6. When the call is answered, the ring tone will stop.
Listen to the other party and speak into the
microphone in front of the device.
7. If the call is answered by an automatic answering
machine or automatic answering service, one may
press the Safety Call button again to cancel the
current call and to call the next stored number in
sequence.
8. In parallel to the emergency call, the device will try to
get GPS location and send it to the call center
automatically.
9. Furthermore, former locations (history of up to 64
locations) will also be sent to call center.
10. During the next 30 minutes after pressing the Safety
button, the GeoSKeeper will send GPS locations
every 2 minutes to the call center (depending on the
provider’s settings).
GeoSkeeper™ - Q User Manual Rev: 1.5 Draft Page 25
Page 26

MAKING A SAFETY CALL WHEN GEOSKEEPER IS
OFF
One can initiate a Safety Call even when the GeoSKeeper
is turned off, by following these steps:
1. Press and hold the Safety Call button for at least
1 second. The green & orange LEDs will turn on and
will be lit till a beep is been emitted.
2. GeoSKeeper turns on and the green LED flashes
rapidly.
3. The device will perform all the power on procedures
(see Turning the GeoSKeeper On on Page 17).
GeoSkeeper™ - Q User Manual Rev: 1.5 Draft Page 26
Page 27

4. The GeoSKeeper will sound 2 beeps every few
seconds. The green & orange LEDs will flash in
alternating mode.
5. The GeoSKeeper will dial the first emergency number
set, and the beeps will be replaced by the network
dial tone.
6. If there is no answer, or the first number is busy, the
GeoSKeeper will try to call the next stored number
(up to 4 numbers can be preset, see Safety Call
Button Settings on page 51) in sequence until there is
an answer.
7. The user can cancel the process at any time by
pressing the Disconnect button .
8. Wait for the other party to answer the phone call.
9. When the call is answered, the ring tone will stop.
Listen to the other party and speak into the
microphone in front of the device.
10. If the call is answered by an automatic answering
machine or automatic answering service, one may
press the Safety Call button again to cancel the
current call and to call the next stored number in
sequence.
11. In parallel to the emergency call, the device will try to
get GPS location and sent it to the call center
automatically.
12. Furthermore, former locations (history of up to 64
locations) will also be sent to call center.
GeoSkeeper™ - Q User Manual Rev: 1.5 Draft Page 27
Page 28

13. During the next 30 minutes after pressing the Safety
button, the GeoSKeeper will send GPS locations to
the call center every 2 minutes (depending on the
provider’s settings).
GeoSkeeper™ - Q User Manual Rev: 1.5 Draft Page 28
Page 29

MAKING A SILENT SAFETY CALL
When Silent Mode is enabled (see Safety Call Button
Settings on page 51) Safety Calls will be dialed without
any sound from the GeoSKeeper.
Follow these steps to initiate a Silent Safety Call:
1. Press and hold the Safety Call button .
2. The GeoSKeeper will not sound any beep or tone. The
green & orange LEDs will flash in alternating mode.
3. The entire dialing process is identical to Safety Call
process (see Making a Safety Call on page 24) except
for the fact that one cannot here the other party but the
receiving party can hear you.
GeoSkeeper™ - Q User Manual Rev: 1.5 Draft Page 29
Page 30

MAKING A SAFETY CALL WITHOUT A SIM CARD
In case of SIM card problems such as:
No SIM card installed
SIM card is blocked by network
SIM card is faulty/broken
SIM card was not installed properly
Only SOS calls are enabled.
Pressing the Safety Call button will dial the national
SOS number.
The availability of SOS numbers depends on the services
offered by the provider according to national regulations.
The user can cancel the process at any time by
pressing the Disconnect button .
GeoSkeeper™ - Q User Manual Rev: 1.5 Draft Page 30
Page 31

MAKING AN OUTGOING CALL
You can make calls to up to 3 preset numbers by pressing
the speed dial buttons.
For instructions on how to store the numbers, see Speed
Dialing Buttons Settings on page 50.
1. Press and hold one of the speed dial buttons
until 2 beeps are heard.
GeoSKeeper sounds 2 beeps every few seconds.
The green & orange LEDs flash in alternating
mode.
2. The GeoSKeeper will dial preset number set, and the
2 beeps will be replaced by the network dial tone.
GeoSkeeper™ - Q User Manual Rev: 1.5 Draft Page 31
Page 32

3. The user can cancel the process at any time by
pressing the Disconnect button .
4. Wait for the other party to answer the phone call.
5. When the call is answered, the ring tone will stop.
Listen to the other party and speak into the
microphone in front of the device.
GeoSkeeper™ - Q User Manual Rev: 1.5 Draft Page 32
Page 33

ENDING A CALL
At any time, you can hang up a call by momentarily
pressing the Disconnect button .
The voice call is also terminated if the other party hangs
up.
At the end of the call a beep is emitted.
After the call ends, the green LED flashes every 2
seconds indicating normal standby operation.
GeoSkeeper™ - Q User Manual Rev: 1.5 Draft Page 33
Page 34

ADJUSTING THE SPEAKER VOLUME
During voice call, the left (1) and right (3) speed dialing
buttons function as volume controls.
During a call you can increase or decrease the speaker
volume by pressing the volume up or volume down
buttons respectively.
GeoSkeeper™ - Q User Manual Rev: 1.5 Draft Page 34
Page 35

MUTE MODE
During voice call, the middle speed dialing button
functions as speaker mute control. At any time during the
call you can mute the speaker by pressing the Mute button
.
In Mute mode the speaker is muted, resulting in a one-way
conversation from the GeoSKeeper to the other party.
Mute mode is not active during a Safety Call (when the
call was initiated by pressing the Safety Call button)
Pressing the Mute button again or pressing any of the
volume control buttons (left or right) will cancel the Mute
mode.
GeoSkeeper™ - Q User Manual Rev: 1.5 Draft Page 35
Page 36

SENDING A TEXT MESSAGE (SMS)
You can send pre - stored text messages (SMS) to up to 3
predefined numbers by pressing the speed dialing buttons.
For instructions on how to store the numbers and the text,
see Speed Dialing Buttons Settings on page 50.
1. Press and hold one of the speed dial buttons
until 2 beeps are heard.
2. GeoSKeeper sounds 2 beeps every few seconds. The
green & orange LEDs flash in alternating mode while
the message is being sent.
3. After the message has been sent the beeps stops.
GeoSkeeper™ - Q User Manual Rev: 1.5 Draft Page 36
Page 37

RECEIVING INCOMING PHONE CALLS
The GeoSKeeper can receive incoming phone calls.
Answering incoming calls can be preset to automatic or
manual. For instructions on how to preset the answering
mode, see Answering Mode on page 55.
The GeoSKeeper can also be preset to answer all
incoming calls or only those from authorized phone
numbers. If set to answer only calls from authorized phone
numbers, the GeoSKeeper will ignore calls from non
authorized phone numbers and will not sound a ring tone
as a result.
For instructions on how to preset authorized incoming
calls see Presetting Authorized Incoming Calls on page
53.
To receive a call:
1. When there is an incoming phone call, the green &
orange LEDs will flash in alternating mode. The
GeoSKeeper also generates an incoming call
indication (ring tone) as predefined (see Incoming
calls Indication on page 55).
2. In case that the GeoSKeeper has been preset to Auto
Answer mode, the call will be answered automatically
after 2 rings.
3. In case that the GeoSKeeper has been preset to
Manual Answer mode, you can answer the call by
pressing the Answer button .
GeoSkeeper™ - Q User Manual Rev: 1.5 Draft Page 37
Page 38

4. Pressing one of the speed dial buttons
or the Safety call button will also answer the
incoming call.
5. One can reject the incoming call by momentarily
pressing the Disconnect button .
6. Listen to the other party and speak into the
microphone in front of the device.
GeoSkeeper™ - Q User Manual Rev: 1.5 Draft Page 38
Page 39

GPS
The GeoSKeeper has a built-in GPS receiver with omnidirectional high sensitivity GPS antenna that can receive
GPS signals from all direction.
Once the GPS is activated it will get its location (longitude
and latitude coordinates), speed and direction.
The GPS location data is send from the GeoSKeeper to:
1. A Cell phone by SMS (short message service) or;
2. Internet website by GPRS or SMS.
Whenever you press the Safety Call button to
generate a Safety Call, the GPS is activated in the
background to try to get the location.
If location is fixed it will be send to the call center.
Otherwise, No GPS message will be sent and the GPS will
keep trying getting a fixed location.
The GPS can also be activated remotely from the call
center (by sending GPS activation SMS to your
GeoSKeeper). In this case, the GPS will also send its
location data.
In order for the GPS to acquire location accurately or to
acquire location at all, the GeoSKeeper must be in an
open place under clear sky.
GeoSkeeper™ - Q User Manual Rev: 1.5 Draft Page 39
Page 40

If the GeoSKeeper is not under an open (for example,
near buildings, or on balcony) the position data might not
be accurate, nor available or delayed.
GeoSkeeper™ - Q User Manual Rev: 1.5 Draft Page 40
Page 41

CHARGING THE BATTERY
A rechargeable battery that must be charged periodically
powers the GeoSKeeper.
Before using the GeoSKeeper for the first time, charge
the battery for at least 12 hours.
WHEN SHOULD I CHARGE THE BATTERY?
When the battery is low, the orange LED flashes every 2
seconds and a beep sounds every 5 minutes. When this
occurs, charge the battery as soon as possible.
It is recommended to charge the battery every day in order
to maintain maximum performance.
TO CHARGE THE BATTERY:
1. Connect the supplied charger to the wall outlet and
then to the GeoSKeeper charger connector.
2. The orange LED lights continuously indicating the
charging process.
GeoSkeeper™ - Q User Manual Rev: 1.5 Draft Page 41
Page 42

If the device is in off position – plugging in the charger will
turn it on. Disconnecting the charger will NOT turn the
device off.
3. When the battery becomes fully charged the orange
LED lights continuously and flashes every 2 seconds.
4. Disconnect the charger from the device, then from the
wall outlet.
Do not charge the battery with a charger other than the
one supplied with the GeoSKeeper.
The use of any other charger may cause permanent
damage to the GeoSKeeper.
Do not connect the GeoSKeeper charger to any other
device except to the GeoSKeeper.
GeoSkeeper™ - Q User Manual Rev: 1.5 Draft Page 42
Page 43

You can purchase Car charger from your provider to
charge your device in the car.
The socket-outlet for the direct plug-in AC/DC adapter
should be installed near the equipment and should be
easily accessible.
GeoSkeeper™ - Q User Manual Rev: 1.5 Draft Page 43
Page 44

BATTERY INFORMATION
A rechargeable battery powers the GeoSKeeper. The
battery can be charged and discharged hundreds of times
but it will eventually wear out. When the talk and standby
times are noticeably shorter than normal, the battery
should be replaced.
Unplug the charger from the wall outlet and from the
GeoSKeeper when not in use.
Do not leave GeoSKeeper with a fully charged battery
connected to the charger, since overcharging may shorten
its lifetime. If left unused, a fully charged battery will lose
its charge over time.
Use the battery only for its intended purpose. Never use
any charger or battery that is damaged.
Do not short-circuit the battery. Accidental short-circuiting
can occur when a metallic object such as a coin, clip, or
pen causes direct connection of the positive (+) and
negative (-) terminals of the battery (These look like metal
strips on the battery). Short-circuiting the terminals may
damage the battery or the connecting object.
Leaving the GeoSKeeper in hot or cold places such as in
closed cars in summer or winter conditions will reduce the
capacity and lifetime of the battery. Always try to keep the
GeoSKeeper between 15°C and 25°C. A device with hot
or cold battery may not work temporarily, even when the
battery is fully charged. Battery performance is particularly
limited in temperatures well below freezing.
GeoSkeeper™ - Q User Manual Rev: 1.5 Draft Page 44
Page 45

Do not dispose of batteries in a fire as they may explode.
Batteries may also explode if damaged. Dispose of
batteries according to local regulations. Please recycle
when possible. Do not dispose as household waste.
Do not dismantle, open, or shred cells or batteries. In the
event of battery leak, do not allow the liquid to come in
contact with the skin or eyes. In the event of leak or a
hazard seek medical help immediately.
TO REPLACE THE BATTERY PLEASE CONTACT A
GEOSKEEPER AUTHORIZED SERVICE FACILITY.
NO ATTEMPT SHOULD BE MADE TO OPEN THE
GEOSKEEPER OR TO REPLACE THE BATTERY BY
YOURSELF OR THIS MAY VOID YOUR WARRANTY.
CAUTION RISK OF EXPLOSION IF BATTERY IS
REPLACED BY AN INCORRECT TYPE
GeoSkeeper™ - Q User Manual Rev: 1.5 Draft Page 45
Page 46

GEOSKEEPER SETUP VIA THE INTERNET
Your GeoSKeeper service provider may provide you with
a website address for configuring or updating your
GeoSKeeper settings remotely online.
Prior to submitting configuration or changes make sure
that the GeoSKeeper is turned ON and has network
connection (green LED flashes every 2 seconds).
When the GeoSKeeper is being updated beep(s) will be
emitted.
SKEEPER LOGIN
Access the GeoSKeeper website. The GeoSKeeper Login
window is displayed as shown below:
GeoSkeeper™ - Q User Manual Rev: 1.5 Draft Page 46
Page 47

The actual website may appear different than the pictures
in this document, depending on your service provider.
1. Select Language from the upper left list.
2. Enter your user name and password as received from
your provider upon purchase.
3. Click the Login button.
4. Click on SETUP.
5. Point on the user’s name and select DEVICE SETUP.
To get assistance or technical support about the website
please contact your provider.
GeoSkeeper™ - Q User Manual Rev: 1.5 Draft Page 47
Page 48

DEVICE SETUP
The device setup page appears as shown below.
GeoSkeeper™ - Q User Manual Rev: 1.5 Draft Page 48
Page 49

CLEAR FIELDS
Press Clear Fields button to clear all the displayed data.
GeoSkeeper™ - Q User Manual Rev: 1.5 Draft Page 49
Page 50

SPEED DIALING BUTTONS SETTINGS
To configure outgoing call settings:
1. Fill in the telephone numbers in the Tel field. For a
number with internal extension – fill in the extension
number in the Ext field.
2. To specify that a button should make a voice call,
select the radio button: Call only.
3. To specify that a button should send text message
(SMS) only, select the radio button: SMS only.
4. To specify that a button should make a voice call first
and then send a text message in case the voice call
failed, select the radio button: Call or SMS.
5. To make the key unusable select the Disable check
box.
Text messages can be received only by phones that
support SMS services.
GeoSkeeper™ - Q User Manual Rev: 1.5 Draft Page 50
Page 51

SAFETY CALL BUTTON SETTINGS
Fill in the desired safety telephone numbers (up to four
numbers) and the extensions (optional).
Select the Silent mode check box to enable making silent
safety calls (see Making a Silent Safety Call on page 29).
Some service providers will not allow you to change the
Safety Call button designation. In this case the Safety Call
Button information will not be displayed.
GeoSkeeper™ - Q User Manual Rev: 1.5 Draft Page 51
Page 52

DEFINING ALERTS
The GeoSKeeper can send preset text (SMS) alerts in
various events.
For the GeoSKeeper to send an alert while the Safety
button is pressed:
1. Select the Enable SMS alert on Safety Call check
box.
2. Compose the text to be sent in the text field (up to
30 characters).
3. Update the destination mobile number in the To
Phone field.
For the GeoSKeeper to send an alert when the battery is
low:
1. Select the Enable SMS alert on low battery check
box.
2. Compose the text to be sent in the text field (up to
30 characters).
3. Update the destination mobile number in the To
Phone field.
For the GeoSKeeper to send an alert when turning the
device on:
1. Select the Enable SMS alert on Power on check box.
GeoSkeeper™ - Q User Manual Rev: 1.5 Draft Page 52
Page 53

2. Compose the text to be sent in the text field (up to
30 characters).
3. Update the destination mobile number in the To
Phone field.
For the GeoSKeeper to send an alert when turning the
device off:
1. Select the Enable SMS alert on Power off check box.
2. Compose the text to be sent in the text field (up to
30 characters).
3. Update the destination mobile number in the To
Phone field.
PRESETTING AUTHORIZED INCOMING CALLS
To preset authorized incoming phone numbers, select the
check box Answer authorized numbers only. Enter up
to 10 authorized numbers.
In this mode, ONLY calls from authorized numbers will be
answered by the device. Calls from non-authorized
numbers will be blocked without any indication on the
GeoSKeeper (ring or LEDs).
To authorize any phone number to call your GeoSKeeper,
verify that the check box Answer authorized numbers
only is cleared.
GeoSkeeper™ - Q User Manual Rev: 1.5 Draft Page 53
Page 54

The authorized numbers must be entered in complete
(including prefix) for proper identification.
Make sure that the authorized numbers send their ID
during dialing
The SIM installed in the GeoSKeeper must be enabled for
caller ID service.
GeoSkeeper™ - Q User Manual Rev: 1.5 Draft Page 54
Page 55

ANSWERING MODE
To preset the answering mode select the desired radio
button.
Auto answer all – The GeoSKeeper will answer
automatically (after 2 rings) to incoming calls.
Auto answer authorized numbers only – The
GeoSKeeper will answer automatically (after 2
rings) to incoming calls from authorized numbers
ONLY. Incoming calls from non-authorized
numbers must be answered manually.
Manual answer – Manual answer by answer
button to all incoming calls.
INCOMING CALLS INDICATION
To preset the incoming call indication, select the desired
radio button.
GeoSkeeper™ - Q User Manual Rev: 1.5 Draft Page 55
Page 56

When selecting Silent, the GeoSKeeper will automatically
answer an authorized number only, with no ring tone and
with a muted speaker.
In this mode, at least one authorized number must be
defined.
See Presetting Authorized Incoming Calls on page 53.
SOUNDS
Select the Enable beeps check box to enable sound
indications.
GeoSkeeper™ - Q User Manual Rev: 1.5 Draft Page 56
Page 57

If Enable beeps is not selected no beeps will be emitted
by the device.
GeoSkeeper™ - Q User Manual Rev: 1.5 Draft Page 57
Page 58

UPDATE SETTINGS
After presetting the desired functions, click the Update All
button at the bottom of the page. This will update ALL the
settings of the GeoSKeeper.
If only changes were made (not complete definition of all
the fields), click on Update Changes button.
Prior to submitting configuration or changes make sure
that the GeoSKeeper is turned ON and has network
connection (green LED flashes every 2 seconds).
The website will send an update command to the
GeoSKeeper and will open an update status window.
The parameters that were not yet updated in the
GeoSKeeper (in updating process) will be marked by:
Update Saved, Waiting Device.
When all updates have been completed then all the
parameters should be in Up to date status.
You can click on Refresh to refresh the status table.
If after a few minutes the parameters status does not
change to Up to date, make sure that the GeoSKeeper is
turned on and has network connection (green LED flashes
every 2 seconds).
You can also try turning the GeoSKeeper off and on.
During power on process, the GeoSKeeper downloads
parameters updates.
GeoSkeeper™ - Q User Manual Rev: 1.5 Draft Page 58
Page 59

If all the above doesn’t change the parameters status
please contact your supplier.
1. When the GeoSKeeper receives an update command
a double beep will be heard. Afterwards, the green
LED will turn on continuously to indicate data
communication.
2. Depending on the settings, a few updates may be sent
simultaneously, generating several beep sounds.
3. Please verify that GeoSKeeper was correctly updated
by performing trial calls and test of functionality.
4. In particular, it is highly recommended to test the
settings of the Safety Call button after each device
setup.
Following is an example of Updates window:
GeoSkeeper™ - Q User Manual Rev: 1.5 Draft Page 59
Page 60

GeoSkeeper™ - Q User Manual Rev: 1.5 Draft Page 60
Page 61

CARE AND MAINTENANCE
CARING FOR YOUR GEOSKEEPER
Your GeoSKeeper is a high quality sensitive product and
should be treated with care. To promote the continued
operation of your GeoSKeeper, make sure to follow the
directions below.
1. Use only a soft, clean, dry cloth to clean the device.
2. Keep the GeoSKeeper dry. Precipitation, humidity, and
all types of liquids or moisture can contain minerals
that will corrode electronic circuits. If your GeoSKeeper
does get wet, turn it off and allow it to dry completely
before turning it on.
3. Do not use or store the GeoSKeeper in a dusty, dirty
area. Its moving parts and electronic components can
be damaged.
4. Do not use or store the GeoSKeeper in hot areas (like
a car in hot day). High temperatures can shorten the
life of electronic devices, damage batteries, and wrap
or melt certain plastics.
5. Do not use or store the GeoSKeeper in cold areas.
When the GeoSKeeper returns to its normal
temperature, moisture can form inside the device and
damage electronic circuit boards.
6. Do not attempt to open the GeoSKeeper.
7. Do not drop, knock, or shake the GeoSKeeper. Rough
handling can break internal circuit boards and fine
mechanics.
GeoSkeeper™ - Q User Manual Rev: 1.5 Draft Page 61
Page 62

8. Do not use harsh chemicals, cleaning solvents, or
strong detergents to clean the device.
9. Use chargers indoors.
10. Turn the GeoSKeeper off before storage.
GeoSkeeper™ - Q User Manual Rev: 1.5 Draft Page 62
Page 63

TROUBLESHOOTING
Symptom
After turning the GeoSKeeper on, the GeoSKeeper
turns off.
Problem
Battery is empty.
Possible solution
Charge the GeoSKeeper for at least two hours. Then
check again.
If not charged – please contact the authorized service
center.
Symptom
After turning the GeoSKeeper on, the green LED
flashes rapidly for more than 2 minutes and does not
enter standby mode (green LED flashes every 2
seconds).
Problem
The GeoSKeeper failed to connect to the network.
Possible solution
1. No network
coverage. Change
location and retry.
2. SIM card problem
(not present, not
installed correctly
or blocked). Give
the GeoSKeeper
to authorized
service facility.
Symptom
GeoSkeeper™ - Q User Manual Rev: 1.5 Draft Page 63
Page 64

The GeoSKeeper does not operate (no incoming or
outgoing calls) and the LEDs flash or light in an
unexpected pattern (see GeoSKeeper Indications on
page 21).
Problem
Undefined error.
Possible solution
Turn the GeoSKeeper off, wait for 1 minute and turn it
on again. If the GeoSKeeper still does not function,
turn it off and give it to a GeoSKeeper authorized
service facility.
GeoSkeeper™ - Q User Manual Rev: 1.5 Draft Page 64
Page 65

LIMITED WARRANTY
Aerotel Medical Systems (1998) Ltd. (“Aerotel”) warrants
that the GeoSKeeper™ (“the Product”) is free from defects
in material and workmanship that result in failure during
normal usage, according to the following terms and
conditions:
1. The limited warranty for the Product is for one (1) year
beginning on the date of purchase.
2. The limited warranty for the battery, straps and
accessories is for six (6) months beginning on the date
of purchase.
3. Never attempt to disassemble the Product by yourself.
Contact an authorized service facility if malfunctions or
other problems occur.
4. Battery and SIM card replacement must only be
performed by an authorized service facility.
5. This limited warranty will be void if the Product has
been damaged by accident, or has been misused,
abused, or altered, or if the consumer opens or
disassemble the Product or if any attempt has been
made to disassemble, repair or replace the Product or
any part thereof, including the battery and SIM card,
other than by an authorized service facility.
6. During the limited warranty period, Aerotel will repair
or replace, at Aerotel’s sole discretion, any defective
parts, or any parts that will not properly operate for
their intended use with new or refurbished
replacement items if such repair or replacement is
needed because of Product malfunction or failure
GeoSkeeper™ - Q User Manual Rev: 1.5 Draft Page 65
Page 66

during normal usage. No charge will be made to the
consumer for any such parts or labor.
7. The limited warranty does not cover defects in
appearance, cosmetic, decorative or structural items,
including framing, and any non-operative parts.
8. Aerotel's liability under this limited warranty shall be
limited to the actual cash value at the time the
consumer returns the Product for repair, determined
by the price paid by the consumer for the Product.
Aerotel shall not be liable for any other losses or
damages, whether direct or indirect.
9. Upon Aerotel's request, the consumer must provide
proof of the date of the original purchase through a
dated bill of sale or dated receipt.
10. The consumer shall bear the cost of shipping the
Product to Aerotel’s authorized service center.
11. This warranty is in lieu of all other warranties,
expressed or implied, including any implied warranty
of merchantability or suitability for a particular purpose
and no person is authorized to assume for Aerotel any
other liability in connection with the sale of this
Product.
GeoSkeeper™ - Q User Manual Rev: 1.5 Draft Page 66
Page 67

Feature
Implementation
Value
Physical
Dimensions
67 x 48 x 19 mm
Weight (battery included)
75 grams
Environmental
Operating Temperature
0 ÷ 45 OC
Power
Rating
5V DC, 600mA
AC Adapter
Input: 100-240VAC, 50-60Hz, 0.2A
Output: 5VDC, 1A
Battery
Type
Lithium Ion 3.7V/660mAH
Low battery alert
LED + sound + automatic SMS*
Charging
External charger (supplied)
User Interface
On/Off button
x 1
Safety call button*
x 1 (Voice call or SMS)*
Speed dialing buttons*
x 3 (Voice call or SMS)*
Speaker
Internal
Speaker volume control
Yes
Microphone
Internal
Battery/charge indicator
Orange LED + automatic SMS*
Status indicator
Green LED
Cellular
Wireless module
Telit GE863-GPS
Network
GSM/GPRS
Frequency bands
850/900/1800/1900MHz
Antenna
Integrated
Data communication
GPRS and SMS
GPS
GPS
SiRFstar III
GPS Antenna
Integrated omni-directional active
antenna
GEOSKEEPER SPECIFICATIONS
* These features are remotely programmable using a Web-based
interface.
Specifications are subject to change without notice.
GeoSkeeper™ - Q User Manual Rev: 1.5 Draft Page 67
 Loading...