

AeroScout EX5700, WDKEYPAD User Manual

WANDERGUARD BLUE
WANDER MANAGEMENT SOLUTION
USER AND DEPLOYMENT GUIDE

Disclaimer
The information and know-how included in this document are the exclusive property of STANLEY Healthcare and are intended
for the use of the addressee or the user alone. The addressees shall not forward to another their right of using the information,
know-how or document forwarded herewith, in whole or in part in all matters relating or stemming from or involved therein,
whether for consideration or without consideration, and shall not permit any third party to utilize the information, know-how
or the documents forwarded herewith or copies or duplicates thereof, unless at the company’s consent in advance and in
writing. Any distribution, advertisement, copying or duplication in any form whatsoever is absolutely prohibited. The Company
reserves the right to sue the addressee, user and/or any one on their behalves, as well as third parties, in respect to breaching its
rights pertaining to the intellectual rights in particular and its rights of whatever kind or type in the information, know-how or
the documents forwarded by them herewith in general, whether by act or by omission.
This document is confidential and proprietary to STANLEY Healthcare and is not to be distributed to any persons other than
licensed AeroScout Visibility System users or other persons appointed in writing by STANLEY Healthcare.
Copyright Notice
Bluetooth is a registered trademark of Bluetooth SIG, Inc.
© 2017 STANLEY Healthcare. All rights reserved.
Doc: 0980-349-000 Rev A Published: 2017/07/16 KB Article: 10152.

Table of Contents
Introduction ............................................................................. 7
Document Conventions ................................................................................... 8
Reference Documents ...................................................................................... 8
WanderGuard BLUE Documents .................................................................. 8
Accessory Documents .................................................................................. 9
Terminology, Abbreviations and Acronyms ................................................... 9
System Overview and Architecture ...................................... 11
How It Works ................................................................................................. 12
Architecture and Workflow ........................................................................... 12
WanderGuard BLUE Tag ........................................................ 14
WanderGuard BLUE Tag Battery Life ........................................................ 15
WanderGuard BLUE Tag Communication ..................................................... 15
Tag Communication with the Detector ..................................................... 15
Tag Back Label and Certifications ................................................................. 16
Tag Delivery ................................................................................................... 17
WanderGuard BLUE Securaband Starter Kit ................................................. 17
Attaching Tags ............................................................................................... 18
Removing Tags ............................................................................................... 19
Cleaning Tags ................................................................................................. 19
WanderGuard BLUE Tag Specifications ......................................................... 20
WanderGuard BLUE Tag Disposal ................................................................. 20
EX5700 Controller .................................................................. 21
Controller's Hardware Components ............................................................. 22
BLE Transceiver .......................................................................................... 23
Clock ........................................................................................................ 23
Rear Recessed Connection Panel ................................................................... 24
Cable Ports.................................................................................................. 24
User and Deployment Guide
2

Power Supply ............................................................................................ 25
Reset Button ............................................................................................. 25
Wire Terminal Block Description ............................................................... 26
Connecting Programmable Outputs 3 and 4 ............................................ 29
Controller Modes and Relays ........................................................................ 29
Controller LED Status Indicators.................................................................... 33
External LF Antenna (ANT4200) .................................................................... 34
Slave Exciter ................................................................................................... 35
Configuring the Slave Exciter .................................................................... 36
Mounting the EX5700 Controller .................................................................. 39
WanderGuard BLUE Manager ....................................................................... 40
Integration with Arial (Phase 1) .................................................................... 41
EX5700 Controller Firmware Upgrade .......................................................... 42
Setting up the PC ....................................................................................... 42
Configuring the Engine .............................................................................. 43
Adding the Controller ................................................................................ 43
Upgrading the Firmware ........................................................................... 44
EX5700 Controller Specifications................................................................... 46
Indoor Keypad ....................................................................... 48
Overview ........................................................................................................ 49
Wired Connections ......................................................................................... 49
Communication .......................................................................................... 50
Buttons and LED Display ............................................................................... 51
Mute/Unmute Indoor Keypad Sounds ...................................................... 52
Time ............................................................................................................ 53
Help ............................................................................................................ 54
Function Button Options ........................................................................... 55
Function Button A – Access Granted .......................................................... 55
Function Button B – Alarm Reset ................................................................ 56
Function Button C ..................................................................................... 56
Function Button D ..................................................................................... 56
Keypad Display .......................................................................................... 57
Keypad LEDs ................................................................................................... 58
Indoor Keypad Firmware Upgrade ................................................................ 59
User and Deployment Guide
3

Indoor Keypad Specifications ........................................................................ 62
Outdoor Keypad .................................................................... 64
Door Opening Using the Outdoor Keypad ................................................... 65
Outdoor Keypad Specifications ..................................................................... 66
Standalone Outdoor Keypad ......................................................................... 67
WanderGuard BLUE Detector ................................................ 68
Physical Characteristics .................................................................................. 69
Turning a WanderGuard BLUE Detector ON and OFF ............................... 69
LEDs ............................................................................................................ 70
USB Connector ........................................................................................... 70
Communication .............................................................................................. 71
Activating a WanderGuard BLUE Tag with the Detector ............................. 72
Checking the WanderGuard BLUE Tag Battery Level ................................... 73
Tag Scan Using the Detector ......................................................................... 73
WanderGuard BLUE Detector Firmware Upgrade ........................................ 74
Connecting the Detector to a PC ............................................................... 74
Using the TED Device Manager ................................................................. 74
Establishing a Connection to the Detector ............................................... 75
Viewing Detector’s Battery Status .................... Error! Bookmark not defined.
Viewing and Updating the Detector’s Firmware ...................................... 77
Cleaning the Detector .................................................................................... 79
WanderGuard BLUE Detector Specifications ................................................ 80
WanderGuard BLUE Manager ............................................... 81
Getting Started with Your Tablet ................................................................. 82
Launch WanderGuard BLUE Manager and Log in ........................................ 83
Automatic Logout .......................................................................................... 85
Scanning for Controllers and Tags ................................................................ 85
How It Works ............................................................................................. 85
Performing a Scan for Controllers and Tags ............................................. 86
Viewing Scan Results ..................................................................................... 87
Tag Scan Results ......................................................................................... 87
Controller Scan Results .............................................................................. 88
Controller Configuration ............................................................................... 89
User and Deployment Guide
4

Controller Pages User Interface ................................................................. 90
Settings ....................................................................................................... 91
List of Possible Errors from the Controller: .................................................. 93
Clock Settings ............................................................................................. 93
Daylight Savings Time: ............................................................................... 95
Outputs ....................................................................................................... 99
Users ......................................................................................................... 101
Schedule ................................................................................................... 104
Toolbar Actions ............................................................................................ 106
Start/Stop Day/Night Mode .................................................................... 107
Start/Stop Override Mode ....................................................................... 108
Copy / Paste Configuration ..................................................................... 109
Refresh Configuration.............................................................................. 111
More ......................................................................................................... 112
Apply All ................................................................................................. 113
Blink ....................................................................................................... 114
Clear Log and Save Log ........................................................................... 115
Restart .................................................................................................... 116
Restore ................................................................................................... 117
Save Log ................................................................................................. 117
Save Configuration .................................................................................. 118
Snack Bar ...................................................................................................... 119
Troubleshooting the Tablet Installation ..................................................... 120
Location services ...................................................................................... 120
Bluetooth® ............................................................................................... 120
WanderGuard BLUE Manager Access ...................................................... 120
TeamViewer ............................................................................................. 120
Detector Tag ........................................................................ 121
LED Indicators............................................................................................... 122
Activating the Detector Tag and Dormant Mode ....................................... 122
Using the Detector Tag to Measure Controller Coverage .......................... 123
Detector Tag Specifications ......................................................................... 124
Appendix A: Mounting the EX5700 Controller .................. 125
User and Deployment Guide
5

Mounting Limitations .................................................................................. 125
Fixing the Controller to a Floating Ceiling: ................................................. 125
Mounting on a Wide Grid with Flush Tiles ............................................. 126
Mounting Off-Grid ................................................................................... 127
Mounting on a Narrow-Grid T-Bar .......................................................... 131
Mounting on a Wide Grid with Recessed Tiles ....................................... 134
Mounting on a Slotted Grid..................................................................... 137
Mounting the Controller on a Wall ................... Error! Bookmark not defined.
Appendix B: Mounting the EX5700 Controller (Wall-mount
Bracket) ................................................................................ 140
Installation Components ............................................................................. 143
Installation Instructions ............................................................................... 144
Appendix C: Controller Default Configuration Settings .... 147
User and Deployment Guide
6

1
Introduction
The WanderGuard BLUE Wander Management Solution is STANLEY Healthcare’s
new, standalone solution for monitoring and preventing at-risk-resident
wandering.
This Deployment and User Guide describes the processes for successful
deployment of the system and the procedures for its proper operation.
This guide contains the following chapters:
x Introduction
x System Overview and Architecture
x WanderGuard BLUE Tag
x EX5700 Controller
x Indoor Keypad
x Outdoor Keypad
x WanderGuard BLUE Detector
x WanderGuard BLUE Manager
x Detector Tag
x Appendix A: Mounting the Controller
x Appendix B: Controller Mounting with Wall-mount Bracket
x Appendix C: Controller Default Configuration Settings
User and Deployment Guide
7
Document Conventions
The following conventions are used in this guide.
Best Practice: A best practice is a recommended activity based on
STANLEY Healthcare's accumulated professional knowledge and
experience with the product.
Notes contain additional information that supplements the material in
the main body of the document.
Note
Reference Documents
The following relevant documents are accessible in STANLEY Healthcare's
Support Community site at the following URL:
www.stanleyhealthcare.com/support
.
WanderGuard BLUE Documents
Document Name KB Article No.
Quick Reference Guide 10154
WanderGuard BLUE Wander Management Solution
Release Notes
WanderGuard BLUE Tag Data Sheet 10158
WanderGuard BLUE Manager Data Sheet 10161
WanderGuard BLUE Detector Data Sheet 10164
WanderGuard BLUE EX5700 Controller Data Sheet 10167
WanderGuard BLUE Indoor Keypad Data Sheet 10170
10155
User and Deployment Guide
8

Accessory Documents
Document Name KB Article No.
AeroScout Exciter EX3210 Installation and
Configuration Guide
External LF Antenna Installation Guide 8380
Exciter EX5200 Installation and Configuration Guide 7814
1269
Terminology, Abbreviations and Acronyms
The following terms, abbreviations and acronyms are used in this User Guide
and have the meaning and significance as described in the following table.
These terms and data definitions may have slightly different meanings from
their usage in the healthcare industry in general or by other healthcare
companies and providers in particular.
Term Definition
BD
BLE
Door Ajar
Bidirectional
Bluetooth Low Energy
A situation where a door remains opened for more
than a preconfigured duration
DST
ID
LF
Loitering
MAC
NC
NO
PoE
REX
User and Deployment Guide
Daylight Savings Time
Identification
Low Frequency
A situation where a Tag stays in the Door Controller
exciter field for more than a preconfigured duration
Media Access Control
Normally Closed (electrical)
Normally Open (electrical)
Power over Ethernet
Request for Exit
9

Term Definition
RSSI
TIF
TNIF
UD
UI
Unsupervised
Tag
Wi-Fi
Received Signal Strength Indicator. RSSI is a common
name for the signal strength in a wireless network
environment. It is a measure of the power level that an
RF client device is receiving from an access point, for
example.
Tag In Field or exit alarm. Applies to a Tag that is located
within the exciter field and is communicating with the
host device (Controller)
Tag Not In Field. A TNIF message is sent by a Tag to the
Controller when it leaves the exciter field.
Unidirectional
User Interface
A Tag that transmits only within the Controller's range.
The Tag does NOT transmit periodically (NOT every x
seconds)
Technology for wireless local area networking with
devices based on the IEEE 802.11 standards.
User and Deployment Guide
10

2
System Overview and Architecture
The WanderGuard BLUE Wander Management Solution consists of the
following components:
x WanderGuard BLUE EX5700 Controller – is the WanderGuard BLUE door
control center. The EX5700 is the repository for all system data related to
controlling the door that it supervises.
x WanderGuard BLUE Tag – transmits a signal to the EX5700 Controller
when a monitored resident is in proximity to a controlled door. The EX5700
Controller can lock the door or sound an audible alarm if the door is
opened.
x WanderGuard BLUE Indoor Keypad – located inside the controlled area,
the Indoor Keypad enables staff (or visitors) to exit through the door
(unique codes enable cancelling any existing system alarms).
x Outdoor Keypad – located outside the controlled door, the Outdoor
Keypad enables entry through the door using unique codes.
x WanderGuard BLUE Detector – activates the WanderGuard BLUE Tag,
displays Tag battery indications and assists during WanderGuard BLUE
Manager scanning for Tags.
x WanderGuard BLUE Manager – is the STANLEY Healthcare dedicated
mobile application for configuration and maintenance of the WanderGuard
BLUE Wander Management Solution. The application is installed on an offthe-shelf Asus Tablet (ZenPad 8 Z380M).
Mag locks for added door protection can be purchased separately.
Note
User and Deployment Guide
11

How It Works
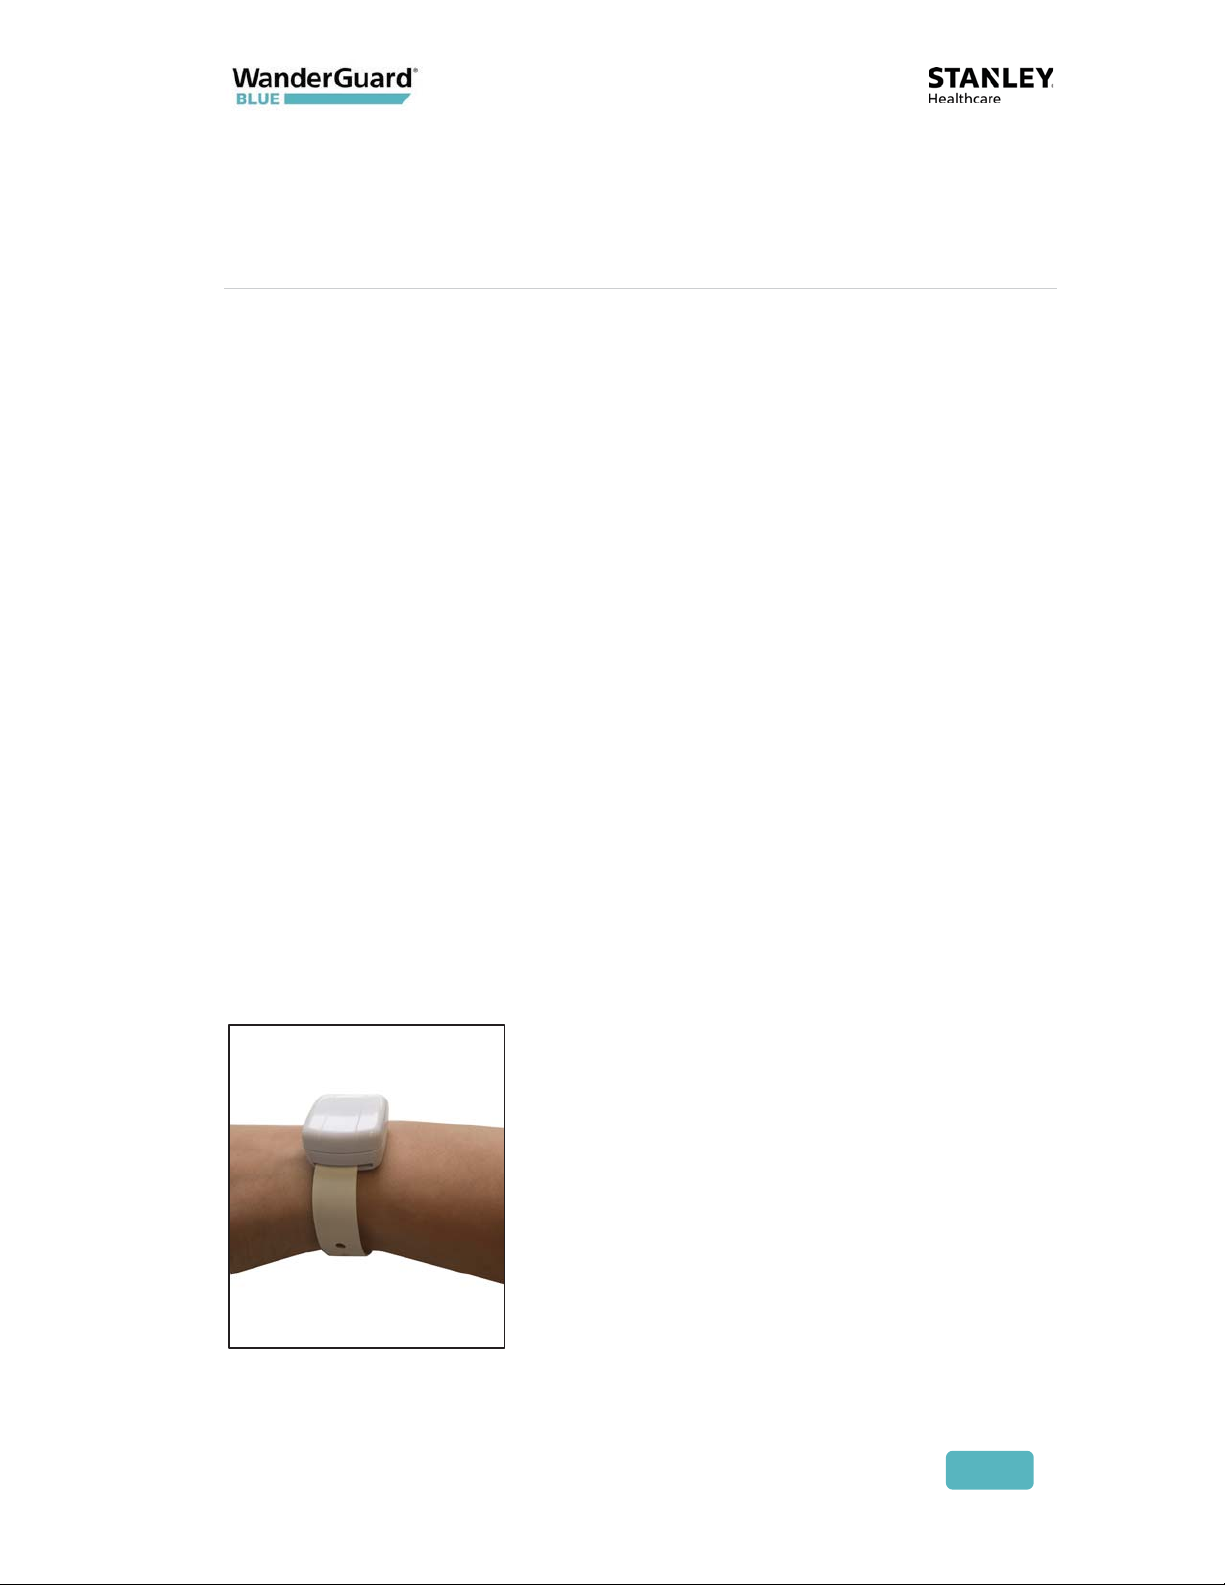
Each at-risk resident wears a WanderGuard BLUE radio frequency Tag that
contains a unique ID. The Tag is usually worn on the resident's wrist but can also
be worn on the ankle. STANLEY Healthcare provides a standard strap with its
basic kit but offers an optional waterproof and hypoallergenic tear-proof strap
to prevent unsupervised removal.
Door Controllers monitor the facility doors. Typically, one Controller monitors
one door and generates a low frequency (LF) field that defines a coverage area.
When a Tag enters this field, the Tag is identified. An alarm is issued and the
door can be automatically locked. A Loiter Alarm can also be issued if the
resident does not move away from the door within a configurable period of
time.
An Indoor Keypad allows staff to open or close the door or cancel an existing
alarm. The Indoor Keypad screen shows alarms (e.g., resident in area) and
system status messages. The Outdoor Keypad has the same functionality as the
Indoor Keypad, but does not have a screen. Alarms can be cleared at either
Keypad.
In addition, the system supports non-staff visits such as visits by relatives.
Architecture and Workflow
The basic system concept is that an alarm is issued and the door can be locked
when a resident Tag is within the Controller field. A Controller is typically
installed above a door and constantly transmits a signal in a certain frequency; a
resident Tag listens in that same frequency. When the Tag is "excited" by the
Controller signal (the Tag entered the Controller field), it sends a signal back to
the Controller in a different frequency. When the Controller receives the
message from the Tag, it can lock the door. The Controller can also be setup not
to lock/unlock the door when the Tag is in field. The Tag is non-supervised,
which means it transmits only when in range of the EX5700 Controller.
The WanderGuard BLUE Tag has a small form factor. Tags are available with
either a 90-day or 3-year battery life.
The EX5700 Controller controls the door lock via dedicated relay output. It has
additional relay output that is dedicated for siren control. It can be connected
to a Door Sensor from which it receives input on door status (open/closed). The
EX5700 has the following features:
x Configurable via the WanderGuard BLUE Manager
x Holds users credential information
x Switches between night and day modes per configured schedule
x Supports Indoor and Outdoor Keypads
User and Deployment Guide
12
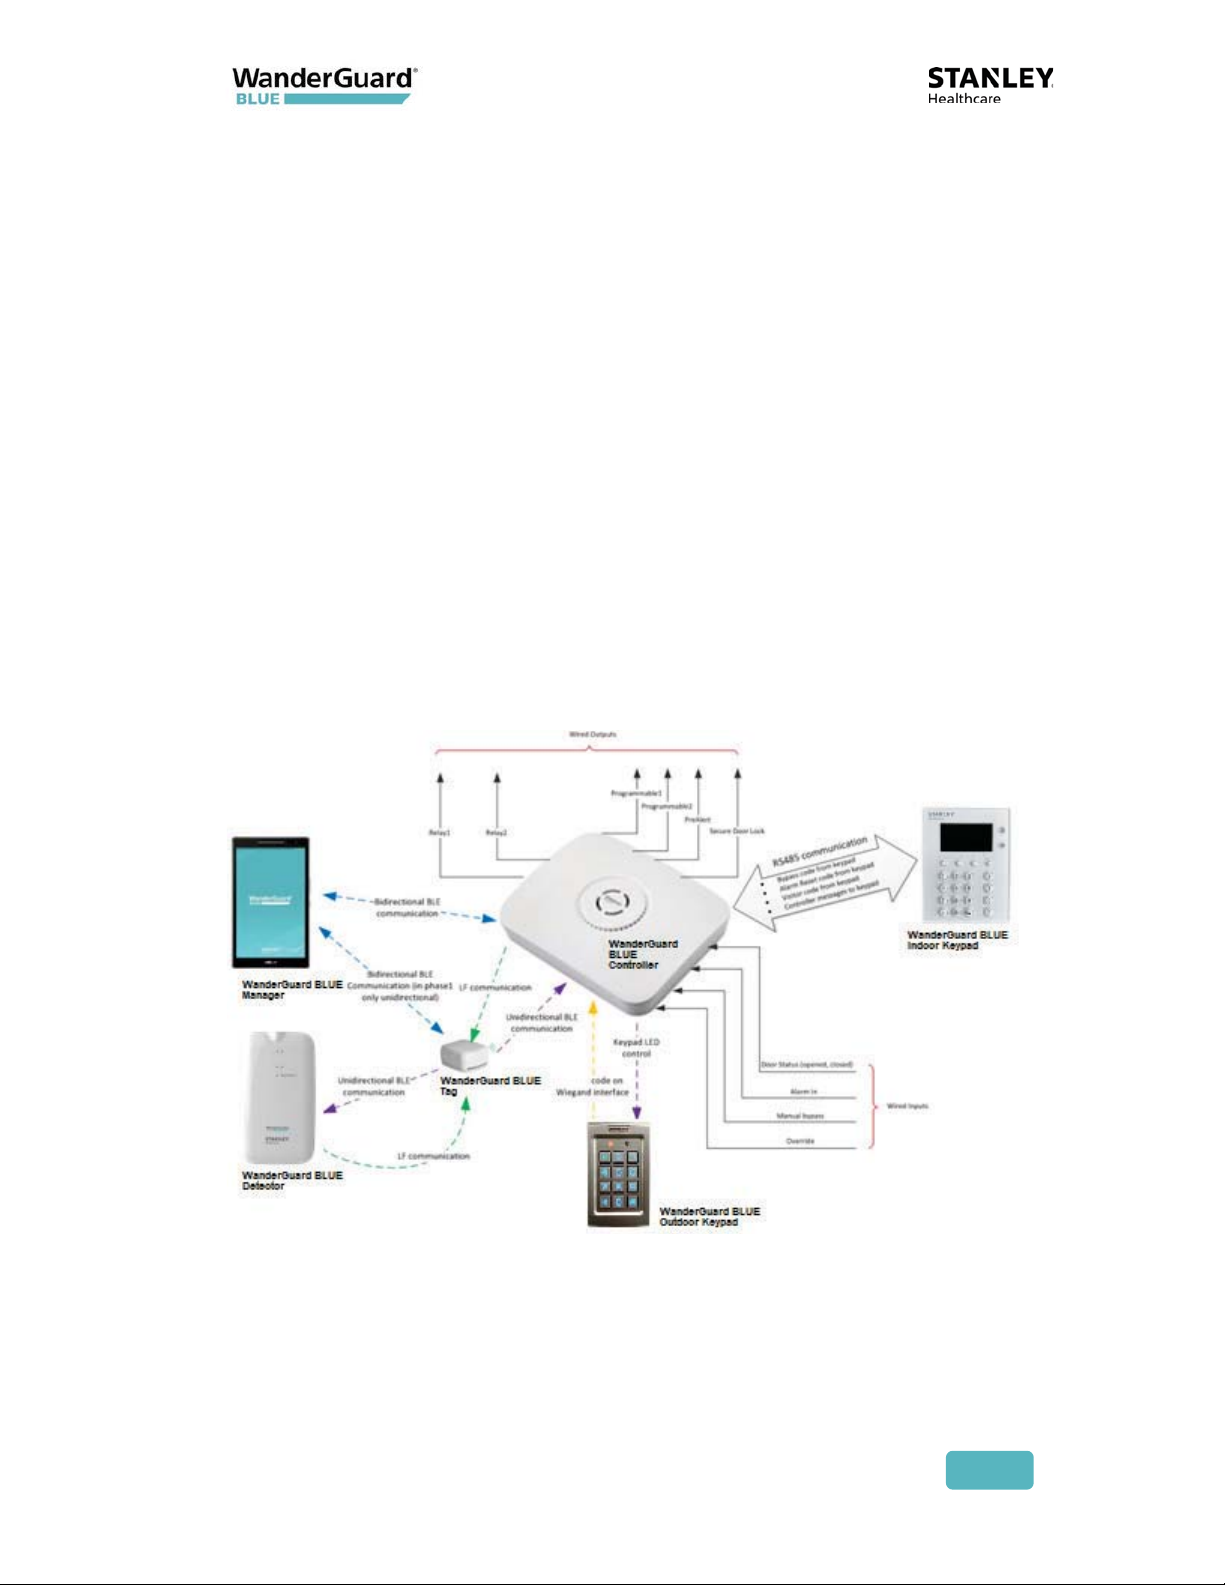
If it is necessary to extend the EX5700 Controller LF range, for example, to
control two proximate doors by the same Controller, an additional EX5200
Exciter can be chained to the Controller using dedicated ports and a special
cable.
The WanderGuard BLUE Indoor Keypad receives power from the Controller.
Communication between the Controller and Indoor Keypad is by RS485. It has a
display that shows the mode of operation of the system and also reports events.
The Outdoor Keypad also receives its power from the Controller. It
communicates with the Controller via Wiegand output.
The WanderGuard BLUE Manager application is installed on an Asus tablet
(ZenPad 8 Z380M). The application can establish bi-directional BLE
communication with the Controller. The communication is used to configure the
Controller’s settings, day/night mode schedule, users’ credentials, and other
system properties.
The WanderGuard BLUE Detector is used for several activities:
x Tag activation
x Checking Tag battery level
x Supporting scanning for Tags by WanderGuard BLUE Manager
User and Deployment Guide
13
3
WanderGuard BLUE Tag
The WanderGuard BLUE Tag's function is to transmit messages to the Controller.
The Tag is triggered by signals from the Controller when it is in proximity to the
door. When the Tag message is received by the Controller, the Controller can
lock the door, preventing the resident from exiting the protected area. If the
door is open and the Tag is in proximity to the door, the system generates an
alarm.
The WanderGuard BLUE Tag is provided with a standard strap that can be worn
on an individual’s wrist or ankle. An optional cut-resistant WanderGuard BLUE
strap (Securaband™) is also available to provide a robust physical barrier to
unauthorized Tag removal.
Each WanderGuard BLUE Tag is identified by its own unique ID. The ID is can be
located on the side of the Tag.
The WanderGuard BLUE Tag has a 125 kHz Low Frequency (LF) receiver. When
the Tag is within the Controller range, it receives LF signals transmitted by the
Controller's transmitter. The Tag then transmits 2.4 GHz BLE messages. The
messages are received by the Controller BLE receiver. Using LF ensures that the
adverse impact on Tag battery life is negligible.
User and Deployment Guide
14

WanderGuard BLUE Tag Battery Life
Two types of WanderGuard BLUE Tags are available:
x Ninety-day battery life
x Three-year battery life
Tag battery life can be tested by the WanderGuard BLUE Detector. It is
recommended to use the WanderGuard BLUE Detector to check the Tag battery
at least once a week.
Ninety-day Tag
The ninety-day Tag begins sending a Low battery message to the Detector two
weeks prior to the 90-day expiration date.
Three-year Tag
The three-year Tag indicates the low battery two months prior to the three-year
term.
Battery lifetime is guaranteed only if the Tag was activated prior to the
‘Activated By’ date listed on the back label.
WanderGuard BLUE Tag Communication
The WanderGuard BLUE Tag is initially activated by the WanderGuard BLUE
Detector (for activation instructions, see here in this User Guide).
Best Practice: It is recommended to perform Tag activation when the
Tag is out-of-range of the Controller and other Tags. It is OK for the Tag
to be in range of the WanderGuard BLUE Manager.
Tag Communication with the Detector
The WanderGuard BLUE Tag sends a BLE message with the following data when
it receives an LF message from the Detector:
x MAC ID
x Status – Dormant/Activated
x Firmware version
x Battery – Good/Low
x Battery Type – 90 days / 3 years
x Activation date
x Manufacturing Date
User and Deployment Guide
15
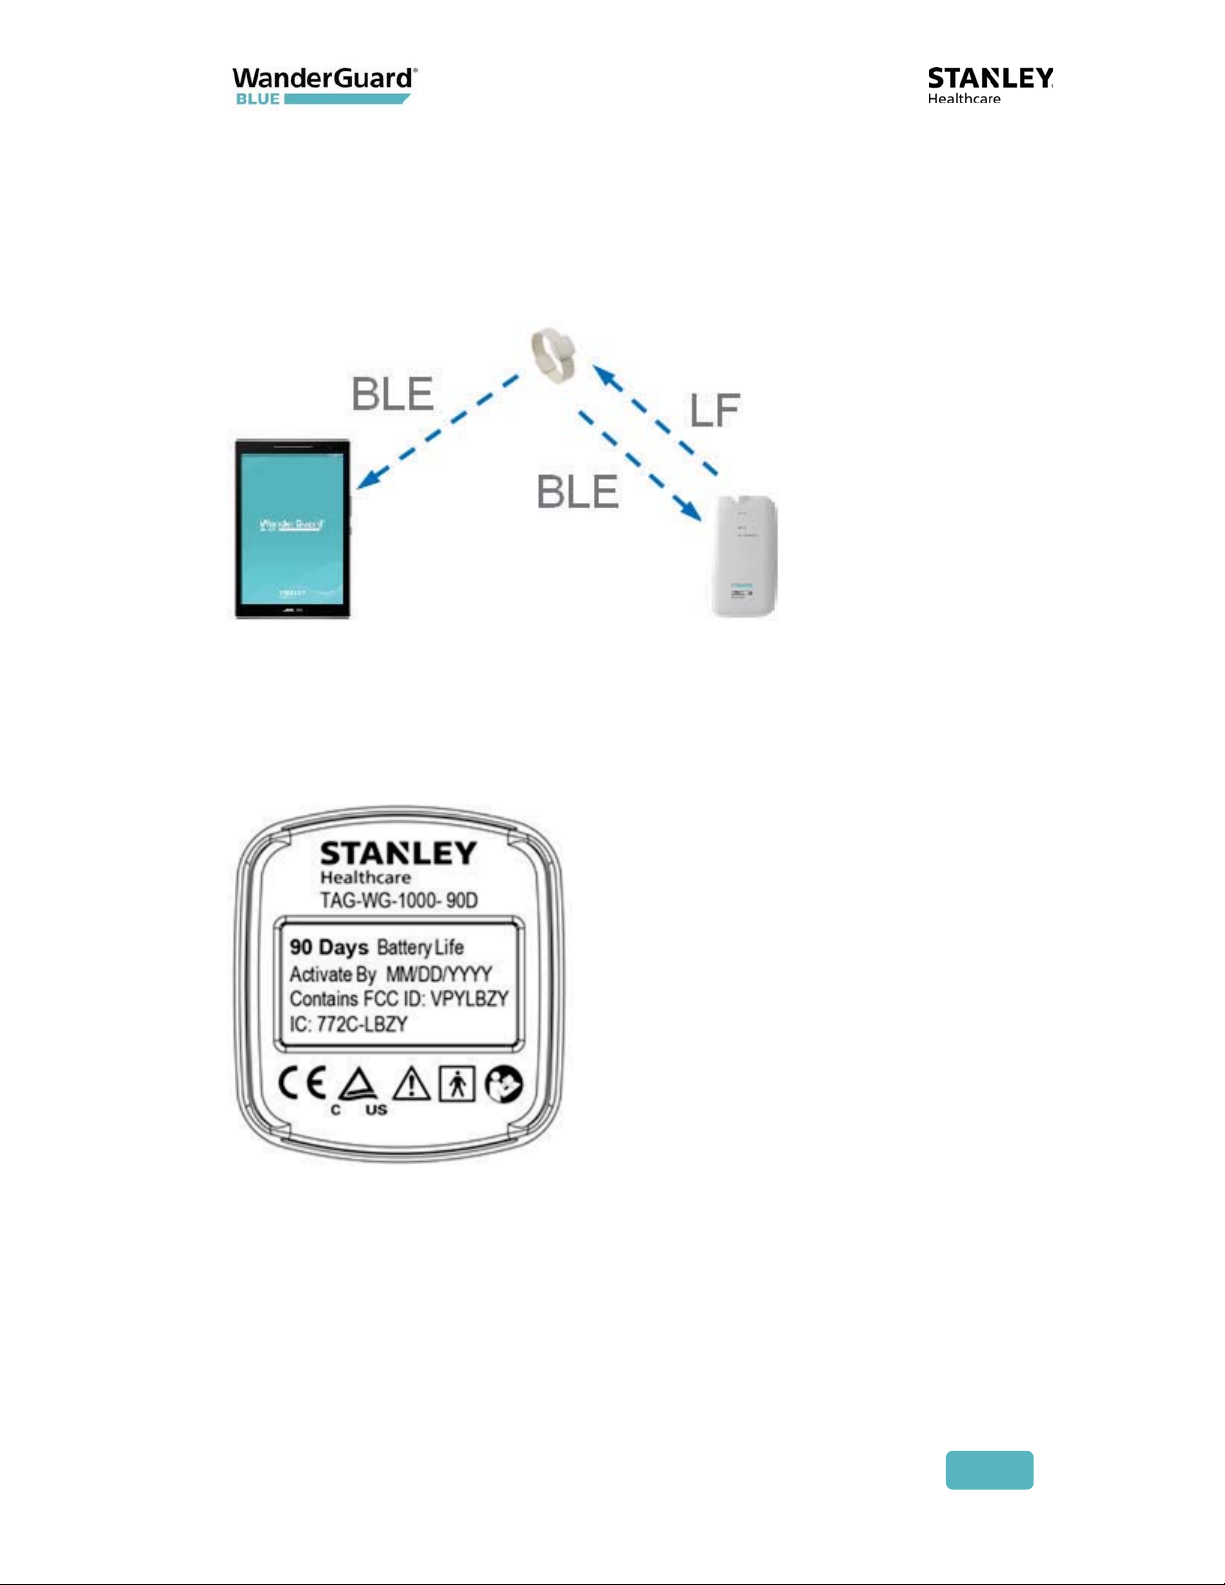
These Tag messages are received by both the Detector and the WanderGuard
BLUE Manager:
x The Tag information is displayed on the WanderGuard BLUE Manager when
running a "Scan" for Tags and Controllers.
x A Detector LED shows the battery status of the Tag.
Tag Back Label and Certifications
The label includes the Tag SKU, Type, and Activated By date. Tag compliance
and certification are also displayed.
User and Deployment Guide
16

Tag Delivery
The Tag is delivered with one (1) standard strap and the Tag User Guide.
If a heavy duty band is needed, Securaband straps can be used.
WanderGuard BLUE Securaband Starter Kit
A WanderGuard BLUE Securaband Starter Kit with a ruggedized cut-resistant
strap contains the following:
x WanderGuard BLUE Tag
x Sizing tool
x Removal tool
x WanderGuard BLUE Securaband strap – one (1) of each size
x Pocket Guide
x User Guide
Note
The following attachment, removal, cleaning and storing procedures are
applicable for the ruggedized cut-resistant Securaband strap for
WanderGuard BLUE Tags.
User and Deployment Guide
17
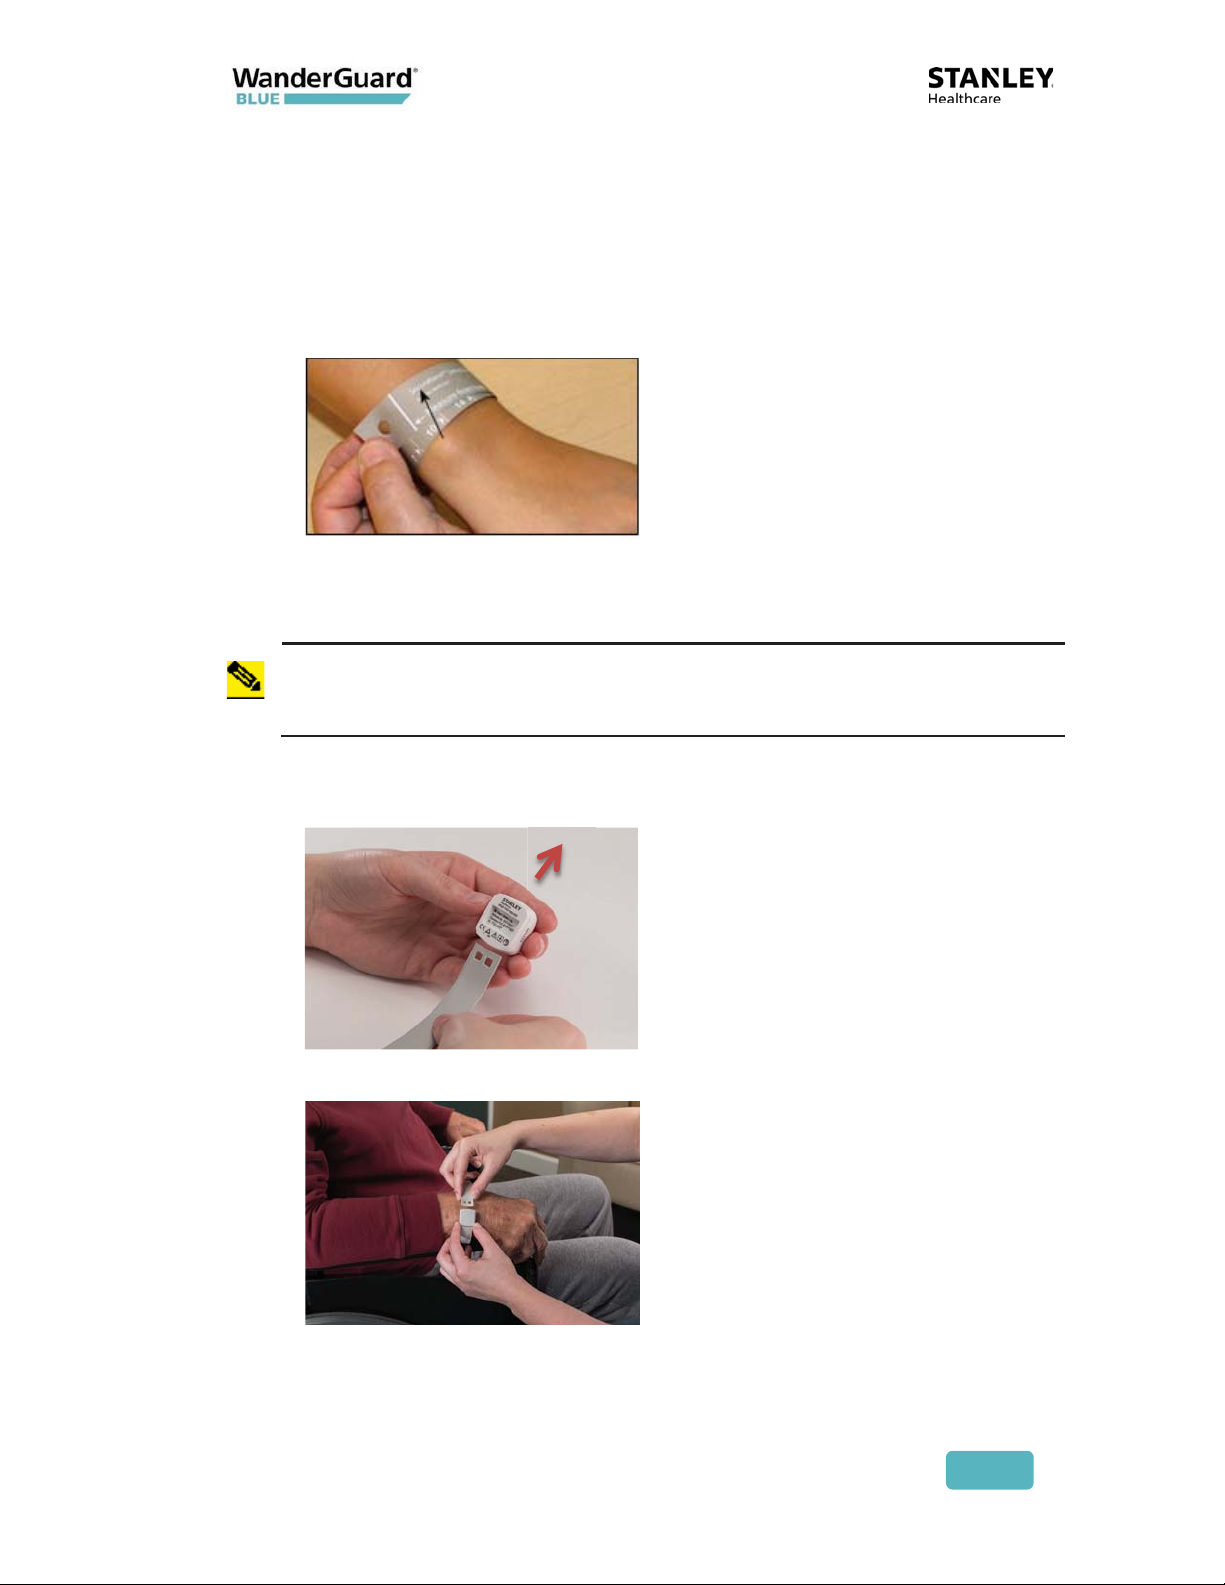
Attaching Tags
To attach the Tag:
1. To determine the strap size, wrap the sizing tool around the resident’s
wrist or ankle, making sure that the logo is facing you. The strap size is
the first number to the right of the measuring bar (in this example, size
10).
2. Select the appropriate WanderGuard BLUE strap from storage (the size is
printed on the box as well as on the inside of the strap).
Measure carefully to ensure that the appropriate strap size is selected.
Once the strap has been attached, it cannot be used again.
Note
3. Slide a WanderGuard BLUE Tag onto the strap, making sure that both
the serial number on the Tag and the size stamp on the strap are facing
you.
4. Position the strap around the resident’s wrist or ankle and insert the
free end of the strap into the clasp until it clicks into place.
5. Discard the sizing tool (it may be recycled but not used again).
User and Deployment Guide
18
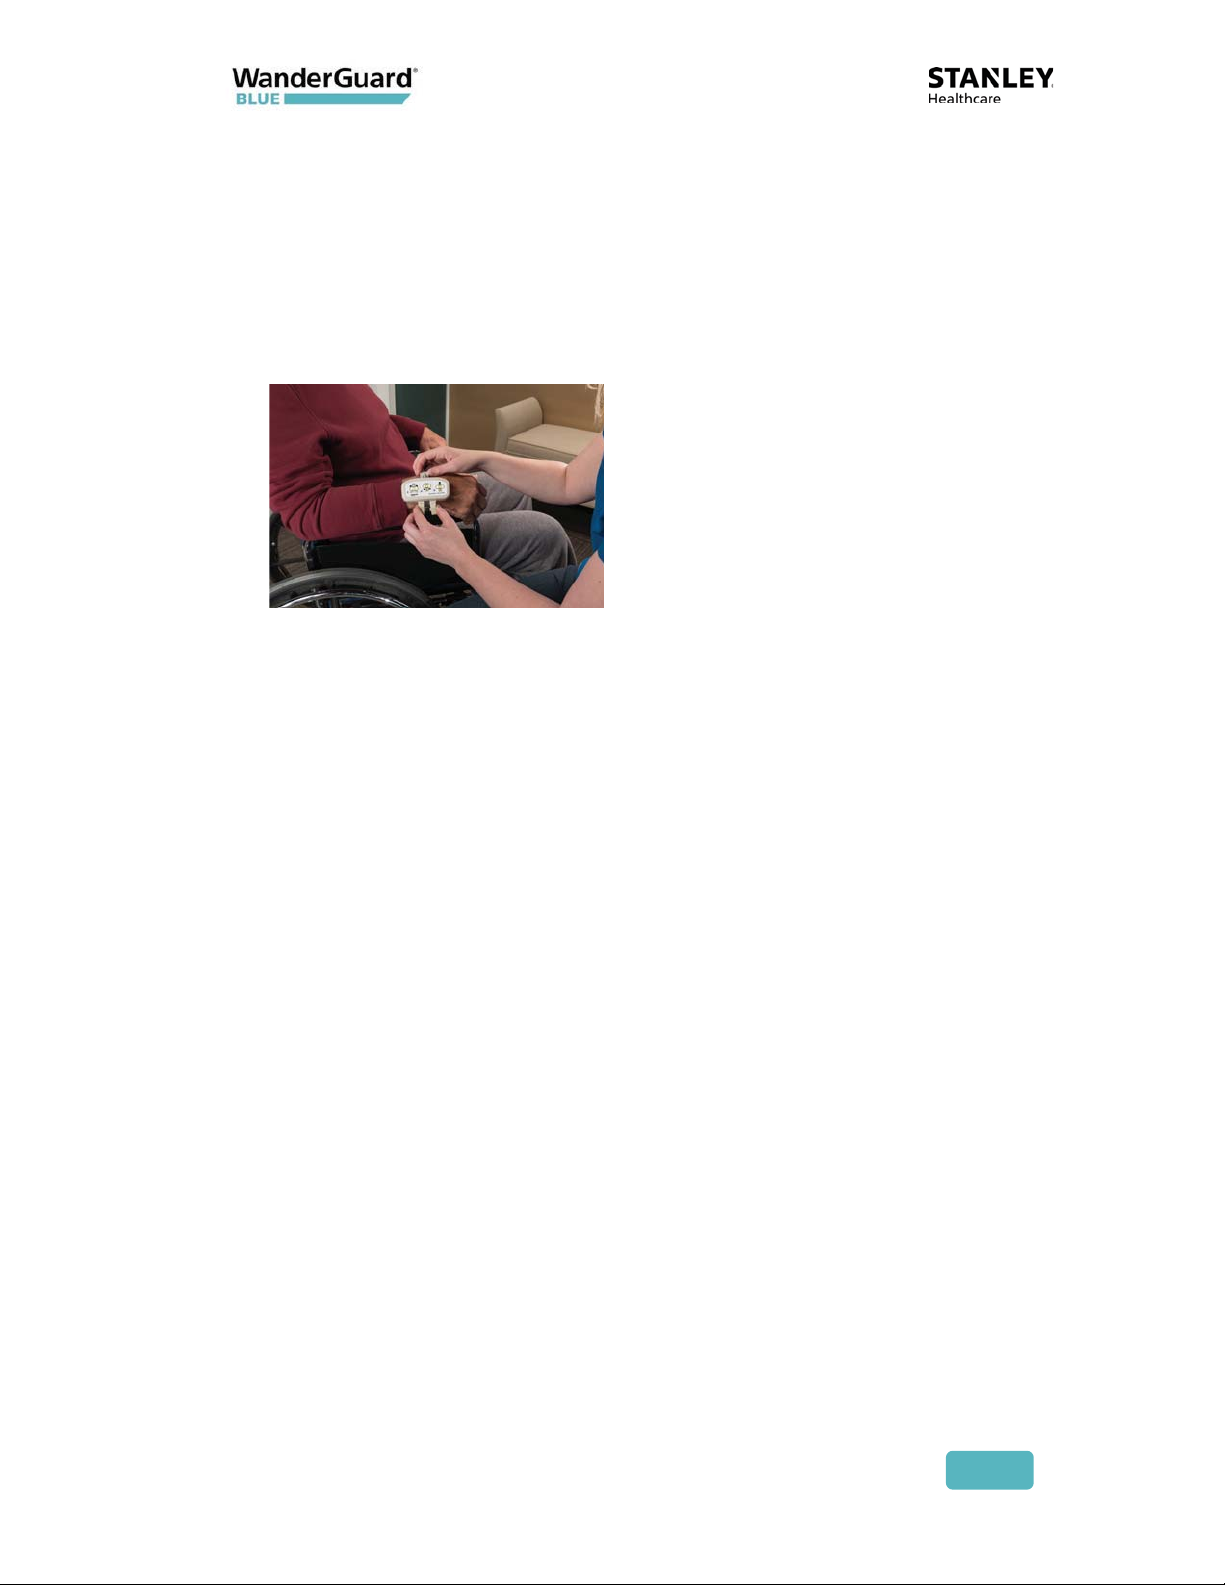
Removing Tags
To remove the Tag:
1. Place the removal tool over the clasp, making sure that the chevron on
the clasp and the lanyard ring on the tool are facing in the same direction.
2. Squeeze the tool handles together to unlock the clasp.
3. While holding the tool handles together, pull the strap end out of the clasp.
4. Slide the Tag off the strap, clean and store the Tag, and discard the strap.
Cleaning Tags
Follow these recommendations for cleaning the Tag. WanderGuard BLUE straps
are single-use and cannot be re-attached.
x Use a mild soap and water to remove any apparent debris.
x Disinfect Tags by wiping with an alcohol sanitizer or germicidal cleaner for
60 seconds. Use only cleaners marked as safe for plastics. Tags are
incompatible with disinfectants containing Glycol Ether.
x Dry with a soft, clean cloth.
x Do not use an autoclave to clean Tags or serious damage may result.
User and Deployment Guide
19

WanderGuard BLUE Tag Specifications
Product Specification
Part Number
Model
LF Frequency
BLE Frequency
Battery Life
Options
Temperature
Humidity
Dimensions
Weight
SKU for Ninety-day Tag: WGB-TAG-1000-90D
SKU for Three-year Tag: WGB-TAG-1000-3Y
WGB-TAG-1000-90D
WGB-TAG-1000-3Y
125 kHz
2400-2483.5 MHz
Ninety days
Three years
32° to 122°F (0 to 50°C)
0-95% RH @ 70°F (21°C), non-condensing
Approx. 1.08 x 1.16 x 0.6” (2.74 x 2.95 x 1.5 cm)
Approximately 0.26 oz. (7.5 g)
WanderGuard BLUE Tag Disposal
At the end of its life, contact STANLEY Healthcare for instructions regarding Tag
disposal in accordance with Federal and other regulations governing this type of
device.
User and Deployment Guide
20
4
EX5700 Controller
The WanderGuard BLUE EX5700 Door Controller is a main component of
STANLEY Healthcare’s WanderGuard BLUE Wander Management Solution for
monitoring and securing facility doors against resident wandering. The
WanderGuard BLUE Door Controller controls the WanderGuard BLUE system by
receiving messages from Tags, Keypads, and the WanderGuard BLUE Manager
and can lock the door, as necessary. It also stores all system configuration
parameters.
The Controller is typically installed above or in proximity to the monitored door.
The Controller does the following:
x Controls the door lock
x Configured via WanderGuard BLUE Manager
x Holds user credentials data (up to 45 users)
x Switches between night and day mode per configured schedule
x Supports Indoor and Outdoor Keypads
User and Deployment Guide
21

Controller's Hardware Components
x One (1) LF (125 kHz) Transmitter
x One (1) BLE Receiver to receive messages from Tags
x One (1) BLE Transceiver for BLE communication with the WanderGuard BLUE
Manager
x Reset button
x Two (2) 2 A output relays
x Relay 1 – lock/unlock door
x Relay 2 – alarm annunciation
x 12 VDC power for Indoor/Outdoor Keypads
x External LF for additional Exciter/Antenna
x RS485 for Indoor Keypad
x Wiegand Input for Outdoor Keypad
x Real-time clock and battery
x Three (3) Grounds
x Four (4) 100mA output relays
x 1 - Secure Door Lock (Lock)
x 2 - Tag In Field (TIF) (preAlert)
x 3 - Programmable
x 4 - Programmable
x Four (4) inputs
x Door status
x Manual bypass (REX – request for exit)
x Override
x Alarm in
User and Deployment Guide
22
 Loading...