

Aeromotive 18688 User Manual
AEROMOTIVE
Part # 18688 & 18689
Phantom Fuel Pump / Baffle System
For Tank Depths 6"-11"
INSTALLATION INSTRUCTIONS
Patent Pending
WARNING!
Always be aware of flammable situations. Drilling and grinding can be
potential ignition sources. Extinguish all open flames, prohibit smoking and
eliminate all sources of ignition in the area of the vehicle and workspace before
proceeding with the installation. Ensure you are working in a well ventilated area
with an approved fire extinguisher nearby.
WARNING!
Installation of this product requires modification to a fuel tank, failure to
satisfy all safety considerations will result in fire, explosion, injury and/or loss of
life to yourself and/or others.
WARNING!
Mechanical and hydraulic lifting devices can tip over or lower accidentally
due to incorrect maneuvering or technical errors. A falling object can cause
injury and/or loss of life to yourself and/or others. When working under the
vehicle always use stands and ensure that the ground or floor is stable and level.
Never crawl under a vehicle which is only supported by a jack.
WARNING!
The fuel system is under pressure. Do not open the fuel system until the
pressure has been relieved. Refer to the appropriate vehicle service manual for
the procedure and precautions for relieving the fuel system pressure
.
CAUTION!
When installing this product always wear safety glasses and other
appropriate safety appeal. A drilling operation will cause flying metal chips.
Flying metal chips can cause eye injury.
CAUTION:
Installation of this product requires detailed knowledge of automotive systems
and repair procedures. We recommend that this installation be carried out by a
qualified automotive technician. Careless installation of this product can result in
damge to the product, injury or loss of life to yourself and/or others.
Parts Included:
1ea Fuel Pump (11142 for 18688 or 11137 for 18689)
1ea Fuel Pump Sleeve (11142)
1ea Fuel Pump Strainer
1ea Fuel Pump Hanger Assembly
1ea Fuel Pump Foam Baffle Assembly
1ea Gasket, 1/2" Thick
1ea Retainer Ring
1ea Installation Ring
Tools Needed:
3-1/4" Metal Cutting Hole Saw
Drill
Straight Slot Screwdriver
3/8" Socket and Ratchet
2ea Ring Terminal
2ea Ring Terminal Cap
1ea Hose Clamp
2ea Pump Clamp
10ea 10-24 Nylon Locking Stainless Steel Nut
10ea #10 Nylon Washer
1ea #2 Drill (.221 dia.)
2ea 10-24 x 2-1/2" Machine Screw
30in 1" Wide x 1/2" thick Foam Spacer
Tape Measure
Bread Knife or
Hacksaw blade

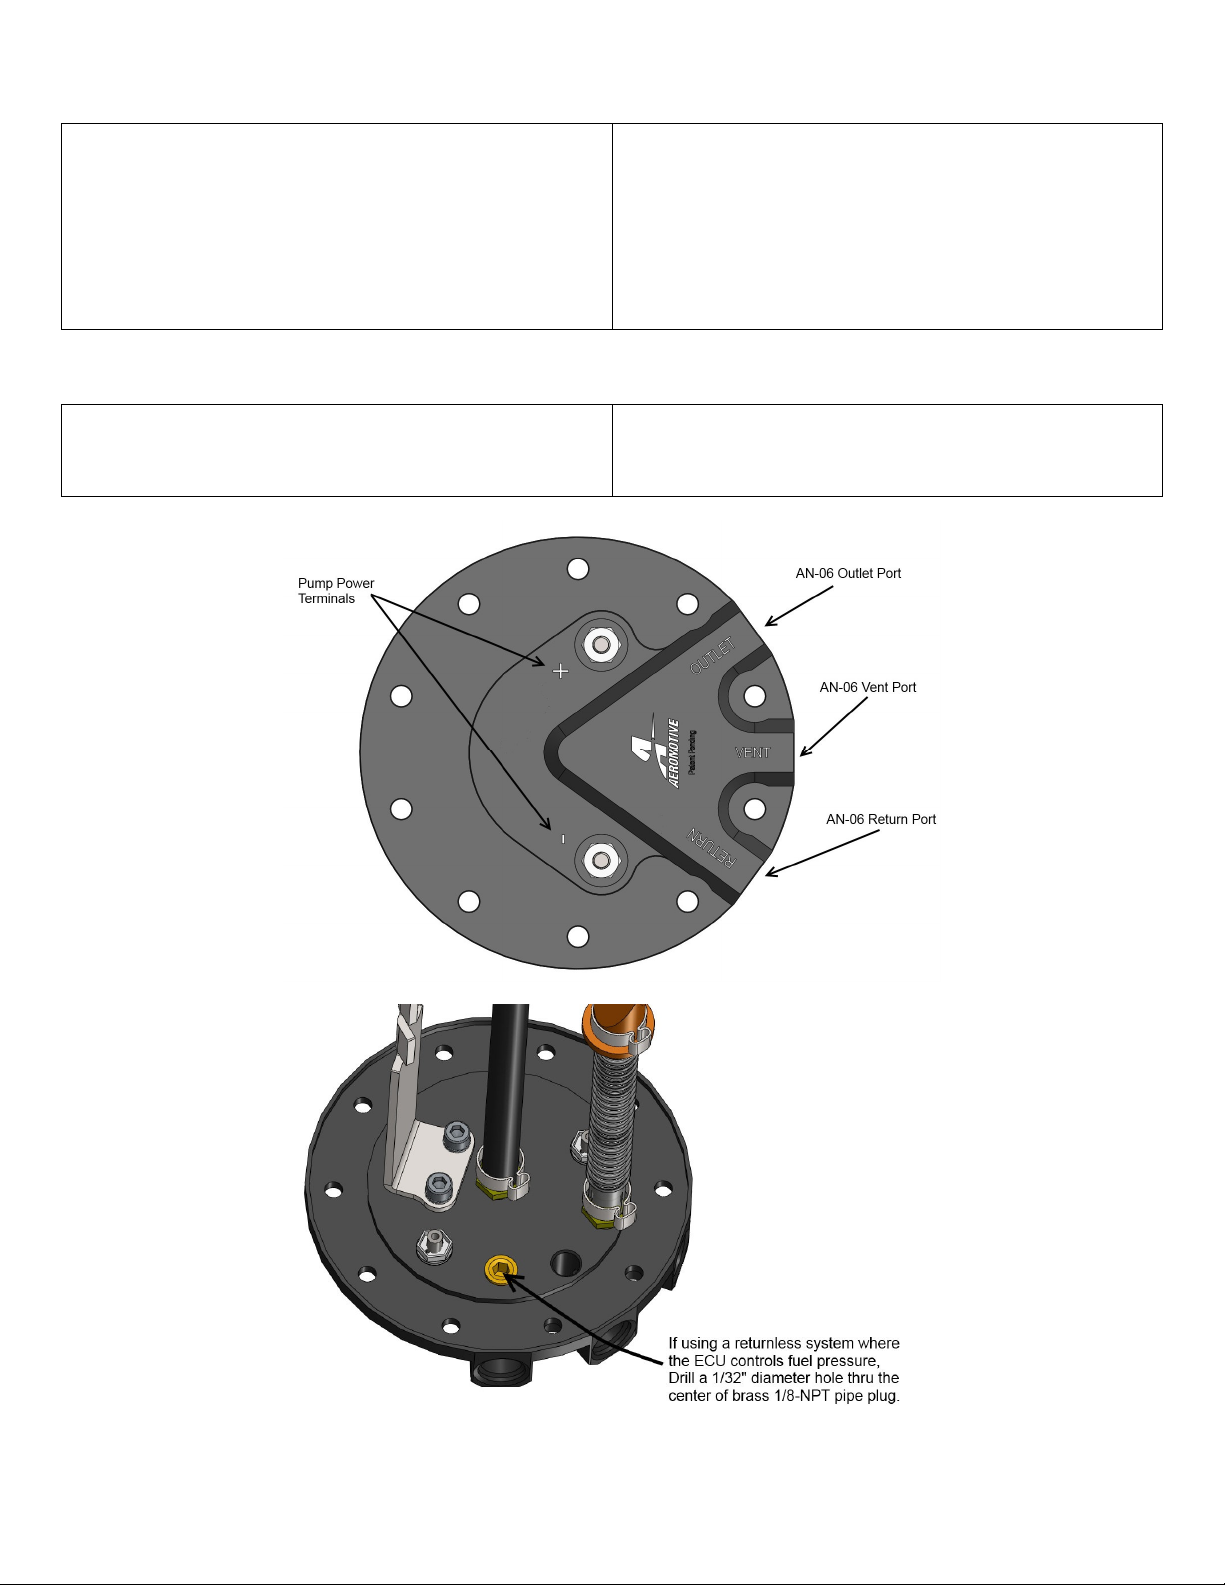
The enclosed Aeromotive fuel pump assembly utilizes an o-ring sealed AN-06 style feed, return and vent ports. These
ports seal with o-rings; these ports are NOT PIPE THREAD and utilize NO THREAD SEALANT.
The fuel pump used in this tank is either the Aeromotive Stealth 340 (part # 11142) for kit 18688 or the Aeromotive Stealth
(part# 11137) for kit 11189. To insure proper pump function and life, we strongly recommend the following:
• Utilize AN-06 (EFI) and AN-08 (carb) size high pressure fuel lines, fittings and o-rings for all connections
from the fuel tank to the engine.
• Install a 10 micron post-filter (Aeromotive p/n 12301 or 12321).
• Install a remote-mount rollover valve. It must be mounted in a vertical position and mounted as high or
higher than your filler tube.
• Fuel pump wiring should be 10 gauge wire and triggered with a relay rated at a minimum of 20 amps
(Aeromotive fuel pump wiring kit 16301).
• A return style regulator must be used with the exception of running an ECU that supports a returnless
systems where the ECU controls fuel pressure via PWM. (Aeromotive p/n 13105, 13109 or 13129 for EFI,
13204 for carb).
Failure to follow the above recommendations may result in fuel leakage, bursting of the fuel lines, poor vehicle
performance and/or decreased fuel pump life! Improper installation will void all warranties for this product!
Pump Specifications:
Outlet pressure/typical flow:
Continuous Operating Range:
Pump internal By-Pass Pressure:
Current Draw:
18688 Kit
10 psi / 408 LPH @ 13.5 V
40 psi / 340 LPH @ 13.5 V
60 psi / 284 LPH @ 13.5 V
5 psi – 65 psi @ 13.5 V
105 psi
13 amps @ 40 psi
(Pump #11142)
18689 Kit
10 psi / 272 LPH @ 13.5 V
40 psi / 215 LPH @ 13.5 V
60 psi / 189 LPH @ 13.5 V
5 psi – 65 psi @ 13.5 V
80 psi
8.3 amps @ 40 psi
(Pump #11137)
Aeromotive Commonly Used Fittings
15606 AN-06 ORB to AN-06 Flare (Inlet/outlet/vent fitting)
15649 AN-06 ORB to AN-08 Flare (Inlet/outlet/vent fitting)
15609 AN-10 ORB to AN-06 Flare (fuel filter fitting)
15610 AN-10 ORB to AN-08 Flare (fuel filter fitting)
For AN-06 fuel lines
For AN-08 fuel lines
For AN-06 fuel lines
For AN-08 fuel lines
Aeromotive AN-10 Fuel Filter P/N’s
12301 Red 10 micron Fuel Filter
12321 Black 10 micron Fuel Filter
12351 Chrome 10 micron Fuel Filter
12335 Red 40 micron Fuel Filter
12305 Fuel Filter Bracket
Aeromotive Electrical Components
16301 Fuel Pump Wiring Kit
16306 Fuel Pump Speed Controller
12304 Red 100 micron Fuel Filter
12324 Black 100 Micron Fuel Filter
12354 Chrome 100 micron Fuel Filter
12331 Black 100 micron Fuel Filter w/ Shutoff Valve
Aeromotive system components are not legal for sale or use on emission controlled motor vehicles.

The following steps are typical of most installations:
1. Once the engine has been allowed to cool, disconnect the negative battery cable and relieve the fuel system
pressure, referring to the appropriate vehicle service manual for the procedure and precautions for doing so.
2. Raise the vehicle on stable level ground and support it with jack stands.
3. Referring to the appropriate vehicle service manual for instructions, drain, disconnect any electrical and fuel
component connections and remove the OEM fuel tank. The removal of the vehicles exhaust system may be
necessary for fuel tank removal.
This Aeromotive Phantom Fuel Pump System is intended to be installed into a
NEW
fuel tank that does
NOT
, and has
NEVER
contained fuel.
If you choose to install this product into a fuel tank that has had fuel introduced
to it, proceed at your own risk.
The fuel tank must be professionally cleaned to remove all traces of any
combustible fluids. Failure to properly clean and remove all combustible fluids
from the fuel tank will result in injury or loss of life to yourself and/or others.
4. With the new cleaned fuel tank on your preferred work surface, start to determine the desired pump mounting
location on top of the fuel tank by identify mounting areas to avoid. Avoid areas of the tank where level sending unit,
float arm or float are present. Also, avoid areas where the fuel filler neck may protrude inside the fuel tank.
Never mount the fuel pump on the side or bottom of the fuel tank.
 Loading...