

AeroGrow 1009 Users Manual
IMPORTANT SAFETY INSTRUCTIONS
Quick Setup Guide
Welcome to the world of indoor gardening!
AeroGarden
AeroGarden
AeroGarden
AeroGarden
Keep this Guide!
Bounty Wi-Fi
Bounty Elite Wi-Fi
Bounty Elite Wi-Fi
Bounty Elite Wi-Fi
Model number: 100901-BLK Electrical Rating: 120V~60Hz, 0.45A
Model number: 100910-BSS Electrical Rating: 120V~60Hz, 0.45A
Model number: 100910-PRE Electrical Rating: 120V~60Hz, 0.45A
Model number: 100910-PPL Electrical Rating: 120V~60Hz, 0.45A
Simple Steps to Get Your AeroGarden Up and Growing (No tools required)
Bounty Wi-Fi
Bounty Elite Wi-Fi
LED
LED
Date Code
When using this AeroGarden electrical furnishing, basic precautions should always be followed, including the following:
Read all instructions before using this AeroGarden furnishing.
1. To reduce the risk of electric shock, the AeroGarden has a specific plug.
Do not change the plug in any way.
DANGER
2. Always unplug the AeroGarden from electrical outlet before cleaning.
WARNING
electric shock, or injury to persons:
3. Unplug AeroGarden from outlet before putting on or taking off parts.
5. Use AeroGarden only for its intended use as described in the instructions. Do
not use attachments not recommended by manufacturer.
6. Never operate AeroGarden if it has a damaged cord or plug, if it is not
working properly, if it has been dropped and damaged, or if it has been
dropped in water. If any of these conditions occur/exist, contact customer
servce.
7. Keep cord away from heated surfaces.
8. Never operate furnishing with air openings blocked. Keep air openings free
of lint, hair, and the like.
9. Never drop or insert any object into any electrical openings.
10. Do not use outdoors.
11. Do not operate where aerosol (spray) products are being used or where
Warning: Changes or modifications to this unit not expressly approved by the party responsible for compliance could void the user’s authority to operate the equipment.
Note: This equipment has been tested and found to comply with the limits for a Class B digital device, pursuant to Part 15 of the FCC Rules. These limits are designed to
provide reasonable protection against harmful interference in a residential installation. This equipment generates, uses and can radiate radio frequency energy and, if not
installed and used in accordance with the instructions, may cause harmful interference to radio communications. However, there is no guarantee that interference will not
occur in a particular installation. If this equipment does cause harmful interference to radio or television reception, which can be determined by turning the equipment off
and on, the user is encouraged to try to correct the interference by one or more of the following measures:
—Reorient or relocate the receiving antenna. —Connect the equipment into an outlet on a circuit different from that to which the receiver is connected.
—Increase the separation between the equipment and receiver. —Consult the dealer or an experienced radio/TV technician for help.
– to reduce risk of electric shock:
– to reduce risk of burns, re,
oxygen is being administered.
12. Do not touch moving parts or hot parts such as pumps, lights, reflective
surfaces, and the like.
13. To disconnect, remove plug from outlet.
14. Do not place or submerge base, cord, plug, or Light Hood in water or other
liquid to clean it.
15. Do not allow water to contact hot LED Grow Lights.
16. Use only approved and supplied parts and accessories. Use only AeroGarden
LED Grow Lights with this AeroGarden model. Use of any other kind of
accessory is not recommended.
17. Do not use AeroGarden for other than intended purpose.
18. This product is intended for household and residential use only. This product
is not approved for commercial applications.
19. If supply cord is damaged, it must be replaced by manufacturer, its service
agent, or similarly qualified technician in order to avoid a hazard.
20. Electrical wiring must be in accordance with local regulations.
21. This appliance is not intended for use by persons (including children) with
reduced physical, sensory or mental capabilities, or lack of experience and
knowledge, unless they have been given supervision or instruction
concerning use of appliance by a person responsible for their safety.
22. Children should be supervised to ensure they do not play with the appliance.
SAVE THESE INSTRUCTIONS
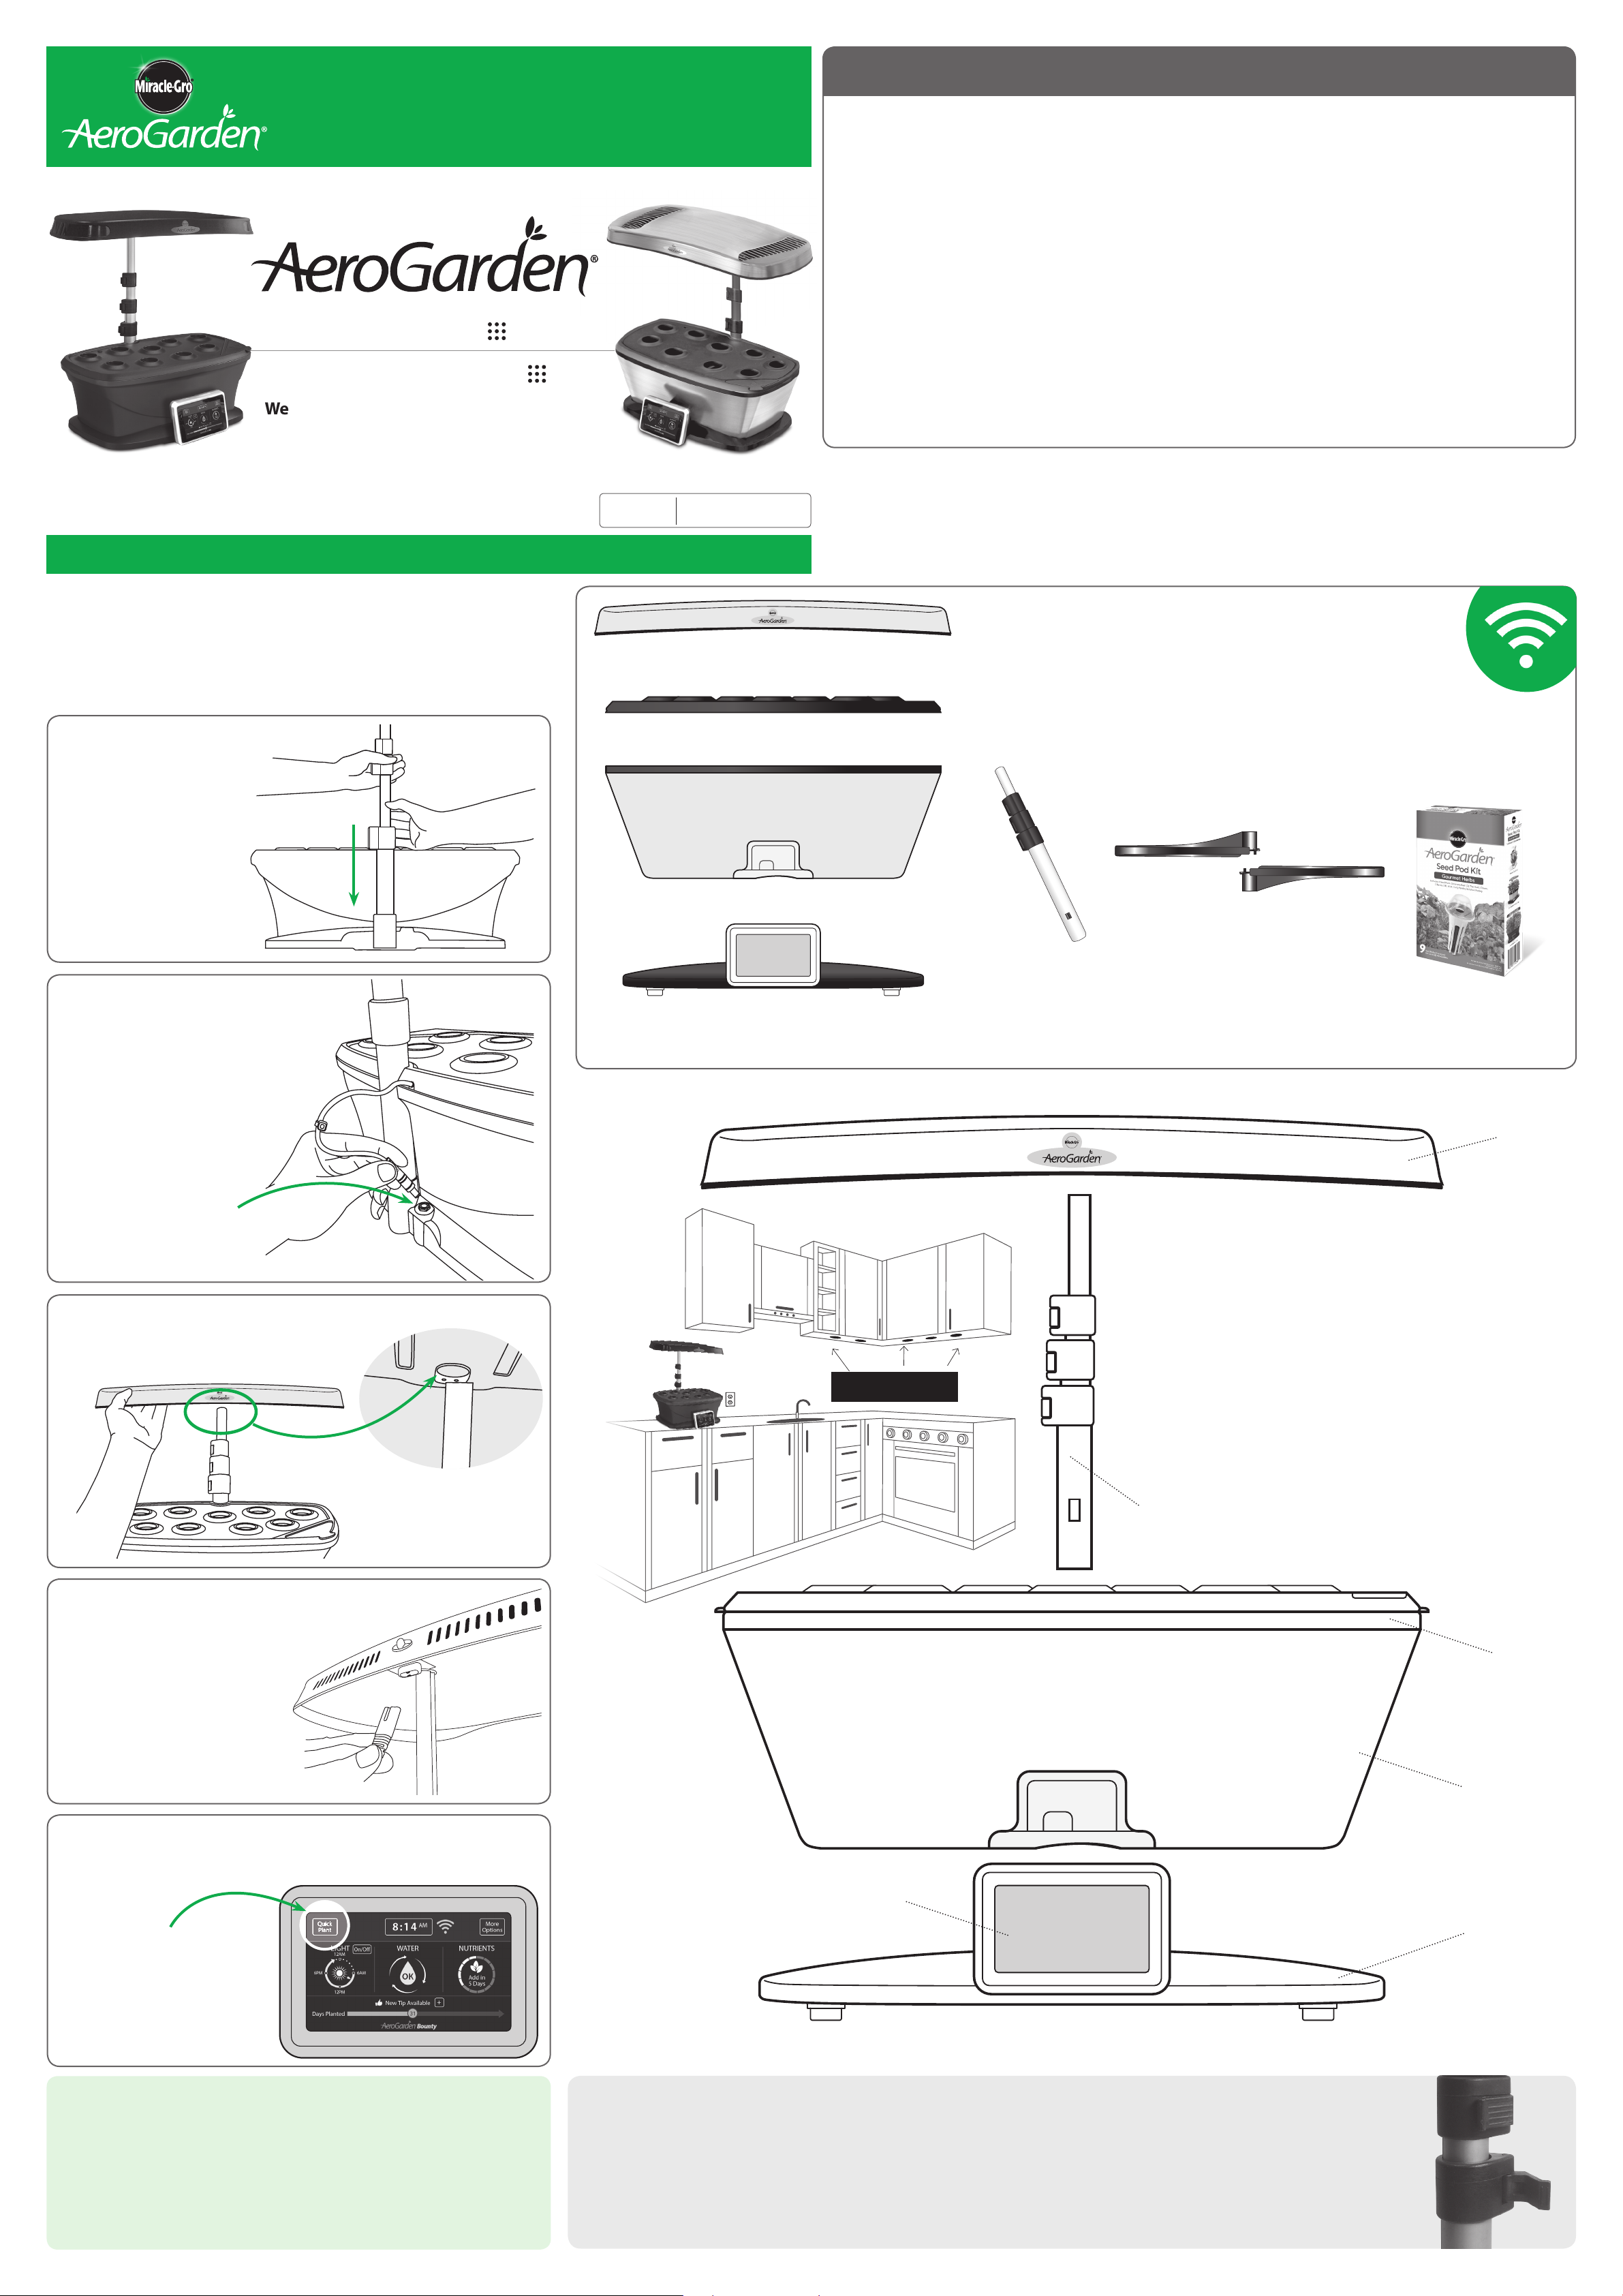
5 Easy Steps
To Get Your AeroGarden Up and Growing
Insert Light Post
1
into Base
Push Light Post straight
down rmly into Base.
Plug Pump Power
2
Cord into Base
Base
(back view)
Light Post
(back view)
LED Light Hood
(45 Watts)
Grow Deck
Bowl
Download the AeroGarden App by searching
“AeroGarden” in your mobile App Store.
Included in Package
Light Post Trellis System Seed Pod KitBase
} Order extra Seed Pod Kits and Accessories at www.aerogarden.com
}
Plug Pump power cord into
the connection on the back
of the base.
Pump Power Cord
(back view)
Place Light Hood
3
onto Light Post
Push Light Hood rmly
on to Light Post
Note: Do not place beneath
under-cabinet lights.
Light Hood
Place Your Garden...
• On a sturdy, water-tolerant surface
• Near a standard electrical outlet, per local
regulations
• In a 65-76°F (16-24°C) environment (optimal)
• Away from reach of children or pets
• Away from direct sources of heat (e.g., stove,
furnace vents) or cold (e.g., window drafts, A/C vents)
• AeroGardens do not need additional light or a
sunny window. In fact, too much direct sunlight
can overheat your plants
Plug Light Cord
4
into Light Hood
Push Light Cord rmly into
socket in Light Hood. Do not
connect Light Hood to any
other power source.
Plug Power Cord into Electrical Outlet
5
Touch ‘
on the control panel for
step-by-step instructions on
planting your garden.
and Touch ‘Quick Plant’
Quick Plant’
Light Post
Grow Deck
Bowl
Touch Screen
Control Panel
Base
CONGRATULATIONS!
Your garden is ready to grow.
It really is that easy!
For more details on planting, growing and
harvesting your AeroGarden, please turn the page.
}
- Front View -
To Raise and Lower the Light Hood
To raise the Light Hood, push open the lever on the ‘buckle’
attached to the Light Post to allow the post to slide up and
down. Pull up on the Light Post until you reach the desired
position, then push the buckle shut to lock Light Post into
place.
When planting a new Seed Pod Kit, the Light Hood should be
set to the lowest possible position. For instructions and tips
about when to raise (or not to raise) the Light Hood, refer to
Gardening Tips (on ip side) and/or Seed Pod Kit Instruction
booklet included with each seed kit.
NEXT: Planting Your Garden
FILL LEVEL
Record the planting date on
a calendar or in a notebook.
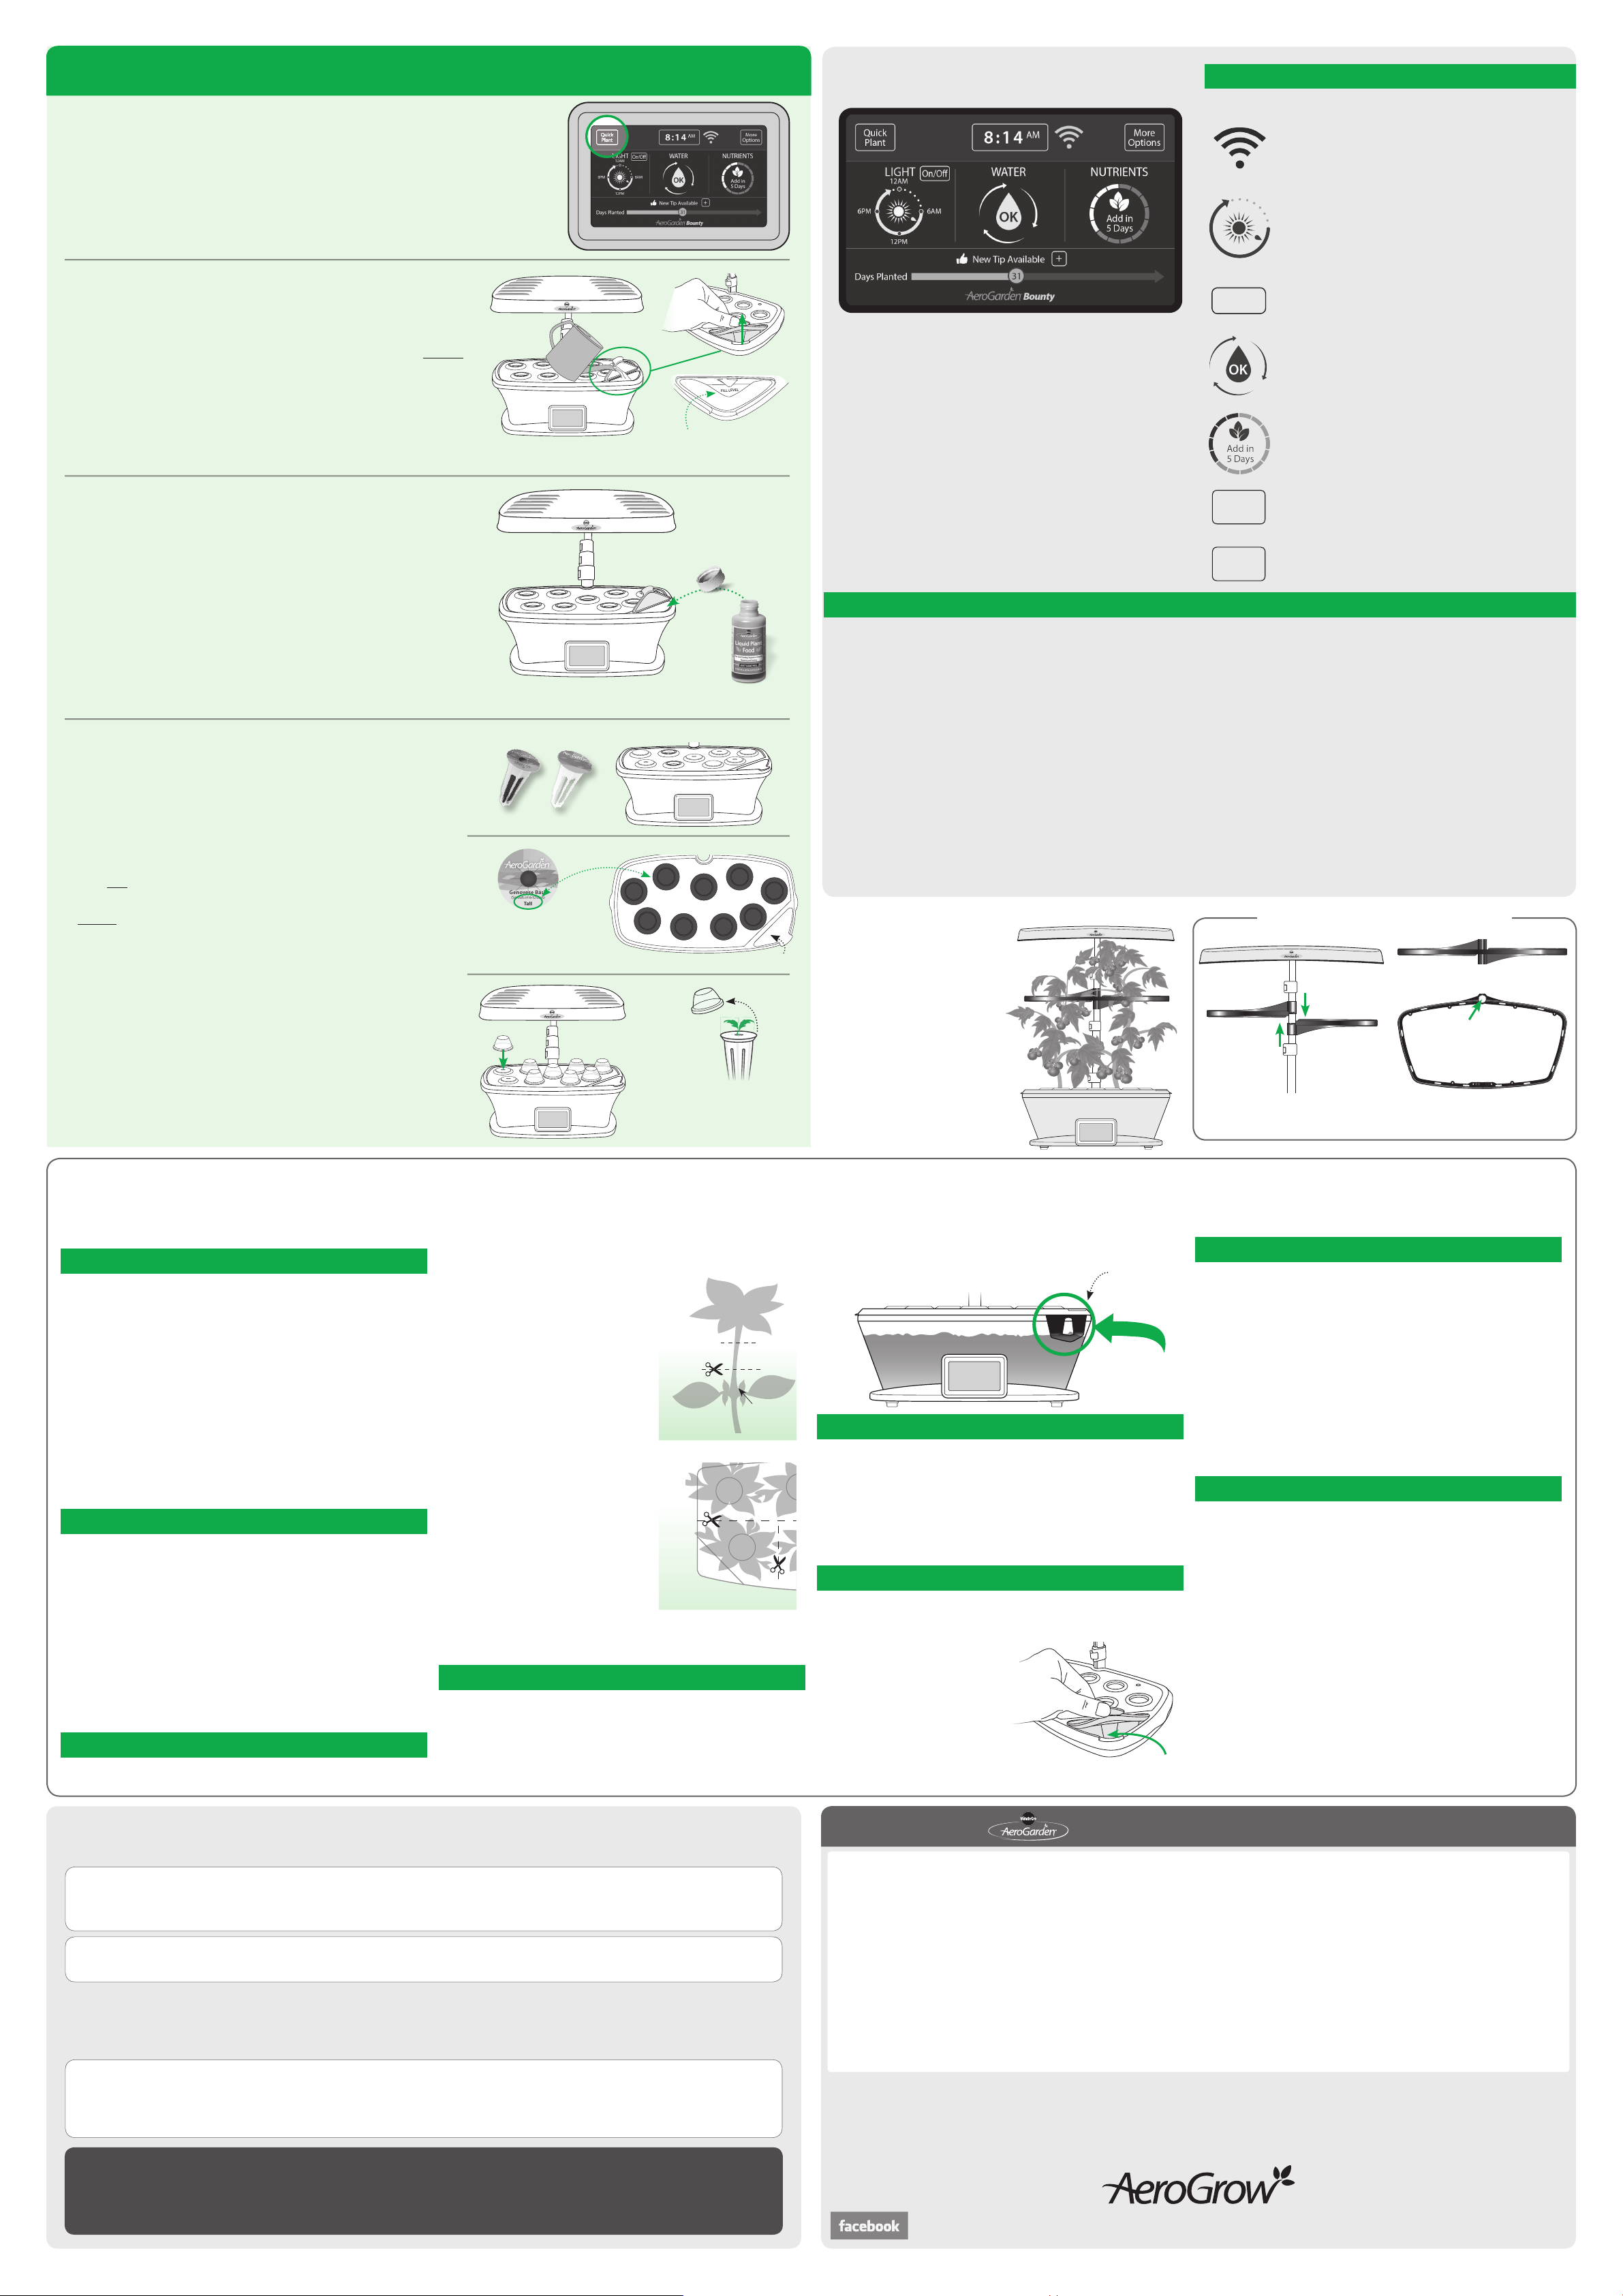
Control Panel Settings
home options
Touch ‘Quick Plant’ to Start a New Garden
Before planting, touch Quick Plant option on the control panel for
step-by-step planting instructions.
Quick Plant is the fastest and easiest path to starting a new garden. Settings for grow
lights, pump, and nutrient cycles are pre-set in the Quick Plant option to provide
optimal growth based on the plant type you select.
1. Add Water
•
Add water to “Fill To Here” indicator located under the Water Port ap.
• Use room temperature tap water or bottled distilled water. Do not
use well water which may interfere with our nutrients, or softened
water, as it contains levels of sodium usually harmful to plants.
• The 'Add Water' reminder alert will appear on the control panel when
the water level is low. For best results, keep the water level topped up
to the ll line at all times.
Add 1.1 gallons Water (4.1 Liters)
A spouted container is recommended
2. Add Nutrients
•
Nutrient instructions are printed on the packaging, as well as in the Seed
Pod Kit Instructions booklet. Read and follow the instructions carefully!
•
Use only the recommended amount of Liquid Nutrient.
•
Add nutrient directly into Bowl when rst planting your Seed Pod Kit, and
when the ‘Add Nutrient’ reminder activates (every 2 weeks).
•
Do not overfeed! More isn’t better. Too much nutrient may be harmful to
your plants.
Nutrient Feeding Tip: Always top o water level when adding
Liquid Nutrients. For best results, top o the water level in your
garden regularly.
Read and follow Seed Pod Kit Instructions booklet carefully!
Lift up
Water Port
Lift up
Water Port
Fill with water to
“Fill To Here” Indicator
(
under Water Port ap
Add nutrients directly
into Bowl
Wi-Fi Enabled:
•
to the Internet and manage your AeroGarden
using our App. For set up instructions, download
the AeroGarden App on your preferred mobile
device.
LIGHT:
•
as well as when your light is scheduled to turn on
and o each day.
ON/OFF:
•
On/O
HOME Screen
The AeroGarden BOUNTY touch screen control panel
makes it easy for anyone to grow indoors. Beginners
get step by step instructions of the planting process
and tips to improve gardening skills. And it allows
Advanced Users to customize every aspect of their
AeroGarden, expanding the possibilities of what can be
)
grown indoors.
Simply touch the control panel screen on the selection
that you want to access. The panel view will change to
display current settings, as well as instructions to reset
or change settings if needed.
From any other screen, press the ‘HOME’ button to
return to the default Home screen.
Quick
Plant
More
Options
Your lights will automatically go back to their
programmed settings at the start of the next on/
o cycle.
Water:
•
is time to add water, and when pressed also
displays the current pump setting and test pump
feature.
NUTRIENTS:
•
many days are left until it is time to add nutrients,
and reminds you when it is time to add more.
Quick Plant:
•
start a new garden, and follow the simple step by
step instructions to set up all garden functions.
More Options:
•
a wide variety of garden functions, as detailed at
right.
The Light icon shows the current time
The Water icon reminds you when it
Connect your AeroGarden
Temporarily turns lights on or o.
The Nutrients icon shows how
Press the Quick Plant button to
More Options button to access
more options
} Clock – Use this to set your clock to the current time (initially
set during Quick Plant).
} Light – Use this if you want to change the times your LED
Grow Light will go on and o, or to customize the number of
hours your grow lights turn on per day.
growing. Use this for the fastest and easiest path to planting
a new garden.
} Set Audio Alert – Audio Alerts can audibly remind you when
it is time to add water and nutrients. You can also turn Audio
Alerts on or o, and set start/stop times here.
3.
Add Seed Pods & Grow Domes
• Insert Seed Pods into openings in Grow Deck.
• Seed Pod Labels often identify plant height to assist with
placement. Look for height noted on Labels.
• Plants grow best and look best if medium or tall plants are in back
openings, and short plants are in front openings (see diagram).
•
Seed Pod Kits for Tomatoes and Peppers often include both Seed
Pods and Plant Spacers. Plant Spacers allow your Tomato/Pepper
plants ample room to grow.
• Do not remove Labels from Seed Pods. The labels identify the
plant type and plant height, show the germination time, and
inhibit algae growth.
• Place a Grow Dome over each Seed Pod.
• Grow Domes rest on Seed Pods and may not ‘snap’ into place. Also,
it is not necessary for Grow Domes to cover any Plant Spacers in your
AeroGarden.
• Leave Grow Domes on the Seed Pods until plants have sprouted and
their leaves nearly touch the domes.
• Once removed, Grow Domes may be reused/recycled.
You’re on your way
Congratulations!
to a beautiful garden.
Insert a Seed Pod or Plant Spacer into every opening in Grow Deck
Seed Pod Plant Spacer
Seed Pod Label
Use height labeled on Seed Pod
to decide placement in Grow Deck
Place Grow Domes
Back
Tall Tall
Med
or
Tall
Med
or
Short
Removing
Grow Domes
Tall
Grow Deck
Short Short
Front
(Top view)
Med
Short
♻♳
When plants sprout through hole
in Seed Pod Labels, and are almost
touching Grow Domes, remove
domes and reuse or recycle.
or
Water Port
Med
or
Tall
} Nutrients – Allows you to customize or reset your nutrient
reminders. The nutrient alert is preset to activate every 14
days to remind you to add nutrients, but can be changed if
your plants have other nutrient requirements. This would
not be necessary in normal use.
} Pump –
and also to test the pump..
} Quick Plant – With just a few touches, Quick Plant helps you
select the settings you need for the type of plants you are
Allows you to customize or reset your Pump settings
Using The
Trellis System
The included Trellis System will
support your large plants, such
as Tomatoes and Peppers, by
wrapping around the plants as
they grow.
Once your plants reach a height
where they would benet from
extra support, attach the Trellis
System to the top Light Post
section as pictured. The Trellis can
be repositioned as plants grow.
} Garden Status – All your current settings (Lights, Pump, etc.)
can be viewed in Garden Status.
} Help & TIps – Use this for easy access to helpful gardening
tips and customer support information.
} Reset Defaults – Returns settings for key garden functions
to original factory defaults.
} Order Supplies – Easy access to replacement part numbers
and customer support contact information.
How to assemble Trellis System
Trellis assembled (front view)
Trellis pieces
Light Post
Trellis Top-down view
on Light Post
1) Snap on each part separately to
top section of the Light Post.
2) Snap together in front to
connect pieces.
Gardening Tips for
Maximum Harvests
planting
} Many Seed Pods are labeled for height. Gardens grow and look their
best when tall plants are planted in back, medium plants along the
sides, and short plants in front. If plants are all the same size, like
Salad Greens, they can be planted anywhere.
} Do not remove Labels from Seed Pods. The labels identify the plant
type and plant height, show the germination time, and inhibit algae
growth.
} Grow Domes help regulate moisture and temperature for optimal
germination. Leave them on until plants are nearly touching the
domes.
} Seed Pod Kits for large plants like Tomatoes and Peppers often
receive fewer than 9 pods to compensate for the large plant size.
Place Seed Pods in each back/side opening and in the center front
opening. Put Plant Spacers in the remaining openings.
germination
} Some seeds germinate in less than 24 hours. Some take 24 days or
more. Most labels give an estimate of how long your seeds will take
to germinate but many factors impact germination.
} As a rule of thumb, if you are comfortable, so are your plants.
However, plants are impacted by temperature. Cold weather
plants like Salad Greens germinate better in cooler weather. Heat
lovers like Tomatoes and Peppers will germinate faster in warmer
temperatures (above 70 degrees F). But don’t sweat it! While they
may take a bit more time, your seeds will germinate.
} If you are growing your own seeds, plant 5-6 seeds per pod and
check the seed packet for information regarding temperature and
days to germination.
pruning
} Lower your plants, don’t raise your lights! You will achieve more
compact, beautiful growth and bigger harvests if you prune plants
to keep the lights closer to all plants.
} Fast growing plants (like Basil) make gardeners want to raise the
lights too soon. Resist! Pruning the plant just above a new leaf set
(Diagram A) and leaving the lights down low will ensure that slowgrowing and low-growing plants in your garden get all the light they
need to ourish.
} Not pruning is the number
one mistake made by new
AeroGardeners! Prune early and often
and enjoy the small harvests!
} Prune often to maintain a healthy
garden, but never take more than 1/3
of each individual plant at a time.
} Plants compete for light. Left
untended, more aggressive growers
can actually block enough light to
suppress growth of their slower
growing neighbors, and eventually
they can die o due to lack of light.
Spreading leaves must be trimmed
(Diagram B) to make sure that slow
growers get enough light to thrive
and produce big yields.
} Finally, pruning = harvesting. Each
time you prune you get to enjoy fresh
herbs in a salad, soup on pizza or a
sandwich. And, a full, bushy garden
looks much better than one giant, spindly plant surrounded by
straggly, light starved neighbors. Pruning also releases a wonderful
scent. So prune!
Too High
Cut Here
Diagram A
Diagram B
Starter
Leaves
water
} While the AeroGarden control panel will remind you when water
gets low, best results are achieved by topping o water regularly.
} Plants grown in the AeroGarden are designed to thrive with most
municipal tap water. Improved results can be seen with distilled
water or reverse osmosis water, but this is not needed in most cases.
} Do not use well water, as most well water contains a high amount
of dissolved solids that upset the balance of our nutrients. This can
result in plants suddenly browning, or just not growing well.
} Do not use softened water as it contains too much sodium and will
usually harm your plants.
} Do not ll Bowl past ll line mark.
Water Port
Fill Bowl up to
Fill Line Mark
lights
} Plants love light! Always keep your Grow Lights as close to your
plants as possible. Plants should be 1-2 inches below Grow Lights.
Always check to see if you can prune plants instead of raising Grow
}
Lights.
After pruning, lower your lights back down to within 1-2
inches of plants if possible.
} You do not need to replace your LED lights unless individual diodes
start to fail. Diodes have a 3-5 year life span.
nutrients
} Typically, your plants will need nutrients every 2 weeks.
} Follow instructions for feeding amounts printed on the nutrient
packaging.
} Add nutrients directly into the
Bowl through the Water Port.
} Nutrient requirements may change
as plants grow. See nutrient
packaging for details.
} More isn’t better. Resist the
temptation to add “just a little
extra.” Too much nutrient can hurt your plants.
Water Port
} For best results, try a “Rinse and Rell” once a month when it’s
time to add nutrients. Simply empty all water from the bowl, add
fresh water and nutrients and reset your “Add Nutrient” alert. This
balances the nutrients, delivering an instant pick up to plants.
pollinating
Because most people don’t have bees in their home, you will need to
start pollinating your fruiting plants (tomatoes, peppers, strawberries,
etc) once they begin to ower (approximately 4 – 6 weeks after
planting). To pollinate, use one or more of the following methods:
} Place an open hand inside plant branches and gently move your
hand back and forth to shake the plant and spread the pollen.
} Place a fan near your plants and the moving air will pollinate your
plants.
} Use our “Be the Bee Pollinator” to spread the pollen.
} Strawberries can benet from more aggressive pollination. Using an
electric toothbrush, touch each ower with the brush, moving from
ower to ower.
harvesting
} Many rst-time growers are hesitant to harvest. Don’t be! Most
gardens will produce more, for a longer period, with frequent
harvests. You almost can’t begin to harvest (prune) early enough.
} AeroGardens work best with a harvesting method called “cut and
come again.” Simply put, you enjoy frequent small harvests and
then watch as the plants rapidly regrow - ready for harvest again and
again.
} Enjoy frequent, smaller harvests for the rst month or two until
plants mature and larger harvests are available.
} Harvest often to maintain a healthy garden, but never take more
than 1/3 of each individual plant at a time.
} For Salad Greens, cut the top 2 inches o the entire garden, or
harvest large leaves individually by cutting o at the base of the
plant.
U.S. CAUTION
–
You are cautioned that any changes or modications not expressly approved in this manual could
void your authority to operate this equipment.
User Maintenance:
Any servicing is to be performed by an authorized service representative.
Use original packaging for storage when the appliance is not used.
Disconnect power before servicing or replacing lights. Use only AeroGarden LED Light Hood replacement.
DO NOT SUBMERGE HOUSEHOLD USE ONLY
Do not immerse cord in water or other liquid, and unplug cord from outlet when not in use.
To reduce the risk of electric shock, this furnishing has a polarized plug (one blade is wider than the other). This
plug will t in a polarized outlet only one way. If the plug does not t fully in the outlet, reverse the plug. If it
still does not t, contact a qualied electrician to install the proper outlet. Do not change the plug in any way.
TO PREVENT ELECTRIC SHOCK, MATCH WIDE BLADE
CAUTION!
POUR ÉVITER UN CHOC ÉLECTRIQUE, PRÉSENTER LA LAME LARGE À LA FENTE LARGE ET POUSSER JUSQU’AU FOND.
OF PLUG TO WIDE SLOT, FULLY INSERT.
LIMITED WARRANTY
WHAT IS COVERED – This warranty covers any defects in materials or workmanship, with the exceptions stated below.
HOW LONG COVERAGE LASTS – This warranty runs for one (1) year on this AeroGarden and LED Grow Lights, from the date
purchaser/user.
WHAT IS NOT COVERED – The warranty shall not apply to problems arising from: normal wear; failure to adhere to enclosed operating
products if the serial number has been removed or defaced; products subject to
circumstances beyond AeroGrow International Inc.’s control; loss or damage to removable parts; or products modied (including, but not limited to, modications
through the use of unauthorized parts or attachments) or repaired by anyone other than AeroGrow International, Inc., or its designee. This warranty excludes all
incidental or consequential damages.
WHAT AEROGROW WILL DO – AeroGrow International, Inc., at its option, will repair any defects in materials or workmanship or will replace
of similar features and price. AeroGrow International, Inc.’s sole obligation and your exclusive remedy under this warranty shall be limited to such repair or replacement.
TO RETURN THIS PRODUCT – If you have questions or concerns regarding your AeroGarden, please contact Customer Service at 1-800-476-9669. Please do not return
any product without contacting AeroGrow for return authorization. Unauthorized returns, as well as C.O.D. shipments, will be refused. For more information regarding
returns, please see the Returns section at www.AeroGarden.com
Due to continuing improvements, actual product may differ slightly from the product described herein. Some states do not allow the exclusion or limitation of incidental
or consequential damages, so the above limitation or exclusion may not apply to you. This warranty gives you specific legal rights, and you may have other legal rights
that vary from state to state.
If you have any questions please feel free to contact our customer service representatives at 1-800-476-9669 (USA) or 1-800-611-9058 (Canada)
NEED SUPPLIES, ACCESSORIES OR INFORMATION? Visit Our Website: www.AeroGarden.com
We also have an active Facebook Community that loves to answer questions
at facebook.com/aerogarden. “Like” us for special offers and community fun!
negligenc
e, accident, improper use, maintenance or storage; products damaged by
AeroGrow International, Inc., P.O. Box 18450, Boulder, CO 80308-1450
of original pur
©2016 AeroGrow International, Inc.
chase, for the original
uctions; serial numbered
instr
oducts with ones
these pr
091015 AA
 Loading...