

Aerocool TD4801, TD6801, TD4812, TH3800, TH4801 Owner's Manual
...
OWNER’S GUIDE
USE AND CARE MANUAL
DUCTED COOLER MODELS:
TD3800, TD4801, TD4812, TD6801, TD6812
TH3800, TH4801, TH4812, TH6801, TH6812,
TUP6801, TUP6812
For Customer Assistance
CALL 1-800-325-6952
DO NOT RETURN TO PLACE OF PURCHASE!
Congratulations: You have purchased a product of superior performance and design,
Safety
Installation
Start-up
Operation
Maintenance
Trouble Shooting
which will give the best service when properly installed, operated and maintained.
This guide will provide you with information needed to mount, operate, inspect, maintain,
and troubleshoot your evaporative air cooler.
The first section, Installation and Start-Up, gives details for installation. The second
section, Maintenance, contains operational and maintenance instructions , while
Troubleshooting includes information on commonly encountered problems.
INSTALLER: Please deliver this guide to owner.
WARNING - TO REDUCE THE RISK OF FIRE, ELECTRIC
SHOCK, OR INJURY TO PERSONS, OBSERVE THE FOLLOWING.
Read all instructions carefully before installation.
Use only the blower motor and circulating pump(s)
combinations marked on the Model Nameplate indicating
suitability for use in this model. Any other motors or pumps
cannot be substituted.
Installation work and electrical wiring must be done by
qualified person(s) in accordance with all applicable codes
and standards, including fire rated construction.
When cutting or drilling into a wall or ceiling, do not
damage electrical wiring or other concealed utilities (water
or gas lines, sewer lines, etc.).
Cooler motor, pump, cabinet and junction box must be
grounded in accordance with all local and national codes.
A ground wire must be used between the power supply
and the cooler.
Be sure that the cooler is connected to proper line voltage
stamped on the pump and blower (fan) motor specification
plate. NOTE: Improper voltage will void the pump and/or
motor warranties and may cause serious personal injury
or property damage.
Do not operate this blower (fan) motor with any solid-state
speed control device.
Always disconnect electrical power to unit before working
on or servicing cooler. More than one disconnect switch
may be required to de-energize the equipment for
servicing.
Do not remove access panels while cooler is running, this
may cause the blower (fan) motor to overload and damage
the motor windings.
NOTE:
Do not locate unit near exhaust or vent pipes as odors or
fumes may be drawn into cooler.
Use of anode devices, chemical additives or treatments in this
cooler will void the warranty.
Your warranty does not cover shipping damage. Report all
shipping damage at once to dealer or carrier making the
delivery.
For future reference, record the model and serial numbers,
date and place of purchase of your evaporative cooler here:
Model #
Serial #
Date of Purchase:
Place of Purchase:
1-999-2467 Date: 1/14
INTRODUCTION
Your Trophy evaporative air cooler was thoroughly tested and
inspected before leaving the factory. This manual is your guide to
proper installation procedures along with information about
reasonable care and maintenance that will ensure safe, economical
and trouble free cooling. Failure to follow these instructions may
damage your cooler, impair its operation, create the potential for
serious personal injury and/or void the warranty. Read it carefully.
Installation normally involves the connection of the blower opening to
a duct system or to a short duct with a ceiling diffuser. For an
installation in an existing building, modifications may be necessary. If
installation is being done by someone other than a professional HVAC
contractor, it is suggested that the installation be thoroughly discussed
with a professional person familiar with cooler installation.
attempt to perform any part of the installation described in this manual
unless you are fully qualified to do so.
Carefully read the contents of this manual before beginning the
installation process.
Don't
Location
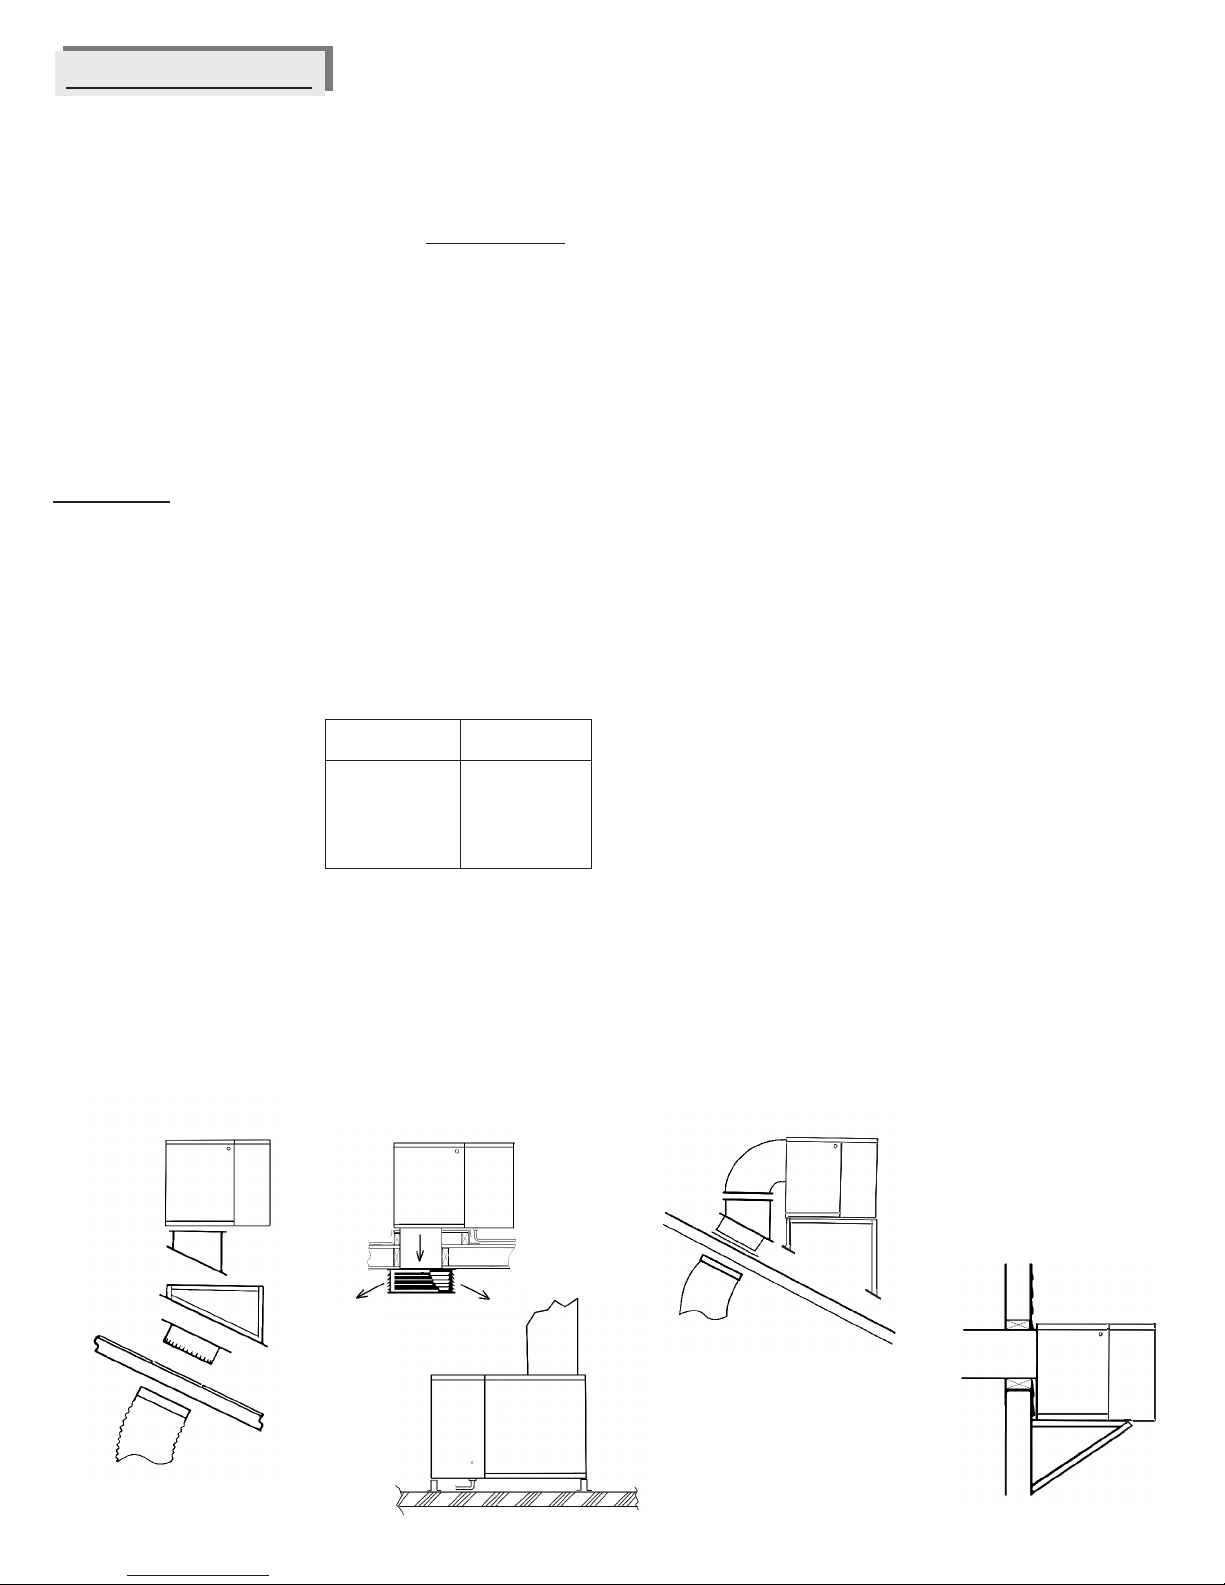
Your cooler may be a down (TD), horizontal (TH) or up (TUP)
discharge model. Down discharge coolers are designed for
installation on either flat or pitched roofs (see Fig. 1). Horizontal
discharge coolers are designed for installation on the side of a building
or, using a 90-degree transition duct, on a flat or pitched roof (see Fig.
2). Up discharge coolers are designed for ground level installation,
mounted on a slab (see Fig 3). Evaporative air-cooling systems
(down, side or up discharge) can be connected to a duct distribution
system with outlet registers for each area to be cooled.
Install coolers in a location where only fresh outside air can enter the
cooling system. Avoid installing units in closed-in areas, such as an
attic or storeroom, which restricts free air movement around and into
the cooler, or near vent pipes, kitchen exhaust, etc.; as obnoxious
odors or fumes may be drawn into unit.
NOTE: When coolers are installed within the jurisdiction of the City of
Los Angeles (C.O.L.A.) Building codes, they can only be installed on
the outside of buildings.
CAUTION: All mechanical, plumbing and electrical
installations must comply with local and national building
and safety codes, and must be performed by qualified
personnel only.
NOTE - References in this manual to local or national codes means
that those items must comply with applicable installation codes as
specified by the building code authority having jurisdiction at the
installation location. It is the installer's duty to comply with all building
code requirements.
Before attempting to install the cooler, confirm that the following
preparations have been made:
Verify that the supporting
surface is strong enough to
bear the weight of the cooler
when in use; remember that
when the system fills with
water, the cooler will be much
heavier than when dry.
Make sure you have adequate resources for lifting the cooler.
Check the electric power supply to see that it matches the
requirements shown on the model and motor nameplates.
Verify that the supporting surface is level in all directions; this is
necessary to ensure proper distribution of water into the pad,
maximizing cooling performance.
Confirm that any planned ductwork and electrical supply installation
needs comply with local and national codes.
Model Number Operating
TD / TH 3800 175
TD / TH 4801 190
TD / TH 4812 215
TD / TH 6801 220
TD / TH 6812 260
TUP 6801 220
Weight (lbs.)
Air Exhausting / Maximum Cooling
Evaporative air coolers will function correctly only if there is a way for
the cooled air to exit the building. Windows, vents, doors or other
exhaust openings at a point most distant from cooled air inlet should
be open to permit free movement of air out of the area being cooled,
and to avoid building up excessive pressure inside the space. Proper
location of exhaust openings is important as they guide flow of air
through areas where cooling is desired.
Since coolers function best when there is plenty of exhaust air, you
can leave doors or windows open so your house can breathe.
the maximum capacity of your cooler, and to help keep insects, dust,
dirt, etc out of the cooled space, the building/space should be
maintained at a slightly positive air pressure (airflow going into the
building should be slightly more than the air that is leaving).
How much should you open your windows? You should open your
windows until the air pressure inside the house is nearly balanced
with the air outside. One method used to determine when the air is
reasonably balanced is to place a tissue paper against the screen
in the window furthest from the cooler and adjust the opening of the
other windows in the house until the tissue paper stays lightly on the
screen. This is usually about 2 square feet of opening per 1000 cfm
of air produced by the cooler. You can adjust different windows in
the house to direct the most airflow to the areas that are occupied
during different times of the day or night (example: living room
windows during the daytime, bedroom windows at night.)
To eliminate a rush of warm air when starting the cooler be sure to
turn on the pump for a few minutes to completely wet out the pads
before turning the blower on.
To get
FIGURE 1
2 Trophy Ducted Evaporative Cooler Use and Care Manual
FIGURE 2
FIGURE 3

Duct System
Air can be delivered over a distance to individual rooms or areas by
means of a duct system. The duct system, which is tailored to fit the
building, should be designed, fabricated and installed by a competent
HVAC sheet metal contractor, preferably while building is under
construction.
INSTALLATION
CAUTION: Disconnect all electrical power to the cooler
before attempting to install, open, or service your cooler.
More than one disconnect may be required to de-energize
the equipment for servicing. If the cooler is
thermostatically controlled, the thermostat must not be
used as the power supply disconnect, as it may reset and
start the unit unexpectedly.
Even while routinely inspecting or servicing the inside, the cooler can
be accidentally started. Keep all personnel away from the cooler and
electrical supply when you are working on it. Before servicing or
cleaning unit, switch power off at the service disconnects and lock the
disconnecting means to prevent power from being switched on
accidentally. When the service disconnects cannot be locked,
securely fasten a prominent warning device, such as a tag, to the
service disconnect or panel. Do not turn power to unit on until
installation or service work is complete.
Electrical Installation
CAUTION: All electrical installations must comply with local
and national building & safety codes; all work must be performed
by qualified personnel only.
Locate the junction box installed in the cabinet. Note
That there are two receptacles; one for the pump and
one for the motor. The power supply for the cooler
must be connected to these receptacles to provide
power to the pump and motor. Wire the pump and motor receptacles
per the wiring diagram as shown. Make sure that both the pump and
blower motor are matched to the power supply voltage. DO NOT MIX
VOLTAGES, for example; a 120 Volt pump and a 240 Volt motor.
NOTE: Improper voltage connections will void all warranties.
Electrical Ground
For maximum safety, make sure cooler cabinet, blower motor and
pump are properly grounded to a suitable ground connection as
required by all local and national codes.
Motor Installation
Mount blower motor to the motor cradle using the motor straps as
shown. Position motor so that the vent holes in the motor case are
pointing downward and the motor nameplate label is upwards. Insert
motor cord plug into the receptacle in the junction box.
Install belt over motor and blower pulleys. Align belt vertically by
loosening the set screw holding the motor pulley to the shaft and
moving the pulley in or out on the shaft until aligned. Tighten set
screw.
Adjust Motor Pulley
When the cooler is connected to extended ductwork, the cooler
capacity and motor amperage may decrease due to the increased
duct resistance. The adjustable motor pulley is to be used ONLY to
return the cooler motor to it's maximum allowable amperage and
should not be readjusted except for this purpose.
CAUTION: Do not exceed the maximum motor
amperage (FLA) stamped on the motor specification plate
or motor can be overloaded, damaging motor.
Check amperage with all doors, windows and exhaust
vents open and/or all relief systems operating.
Improper pulley adjustment will overload and severely
damage motor windings (this damage will NOT be covered
under warranty). Only qualified persons with proper
electrical equipment and knowledge should adjust
variable pitch motor pulleys.
CAUTION: Never operate unit with access panels
removed. This will result in an overloaded condition and
may damage the blower motor.
WIRING DIAGRAM
This wire is not used. Isolate bare wire with a wire nut or double it over
A
and securely cover the bare wire with electrical tape.
The red wire is not used on single speed motors. Isolate bare
B
wire with a wire nut or double it over and securely cover the bare
wire with electrical tape.
NOTE:
For 230 Volt installations, it will be necessary to replace the
115 Volt pump receptacle with a 230 Volt pump receptacle
obtained from your dealer. Please see the Replacement Parts
List for the correct part number.
Trophy Ducted Evaporative Cooler Use and Care Manual 3
Belt Tension Adjustment
CAUTION: Disconnect all electrical power to the cooler
and insure that belt is not rotating before adjusting belt
tension. Do not adjust belt tension by changing diameter
of motor pulley. Adjust belt tension only by adjusting
motor bracket.
Correct belt tension and alignment is
important, proper setup reduces power
consumption and prolongs life of belt and
motor. Check belt tension by squeezing belt.
Proper tension will allow deflection of ½ to ¾
inch. To increase or decrease belt tension,
loosen bolt in slot of motor support bracket.
Adjust belt to proper tension and retighten bolt.
Do not tighten belt by adjusting motor pulley.
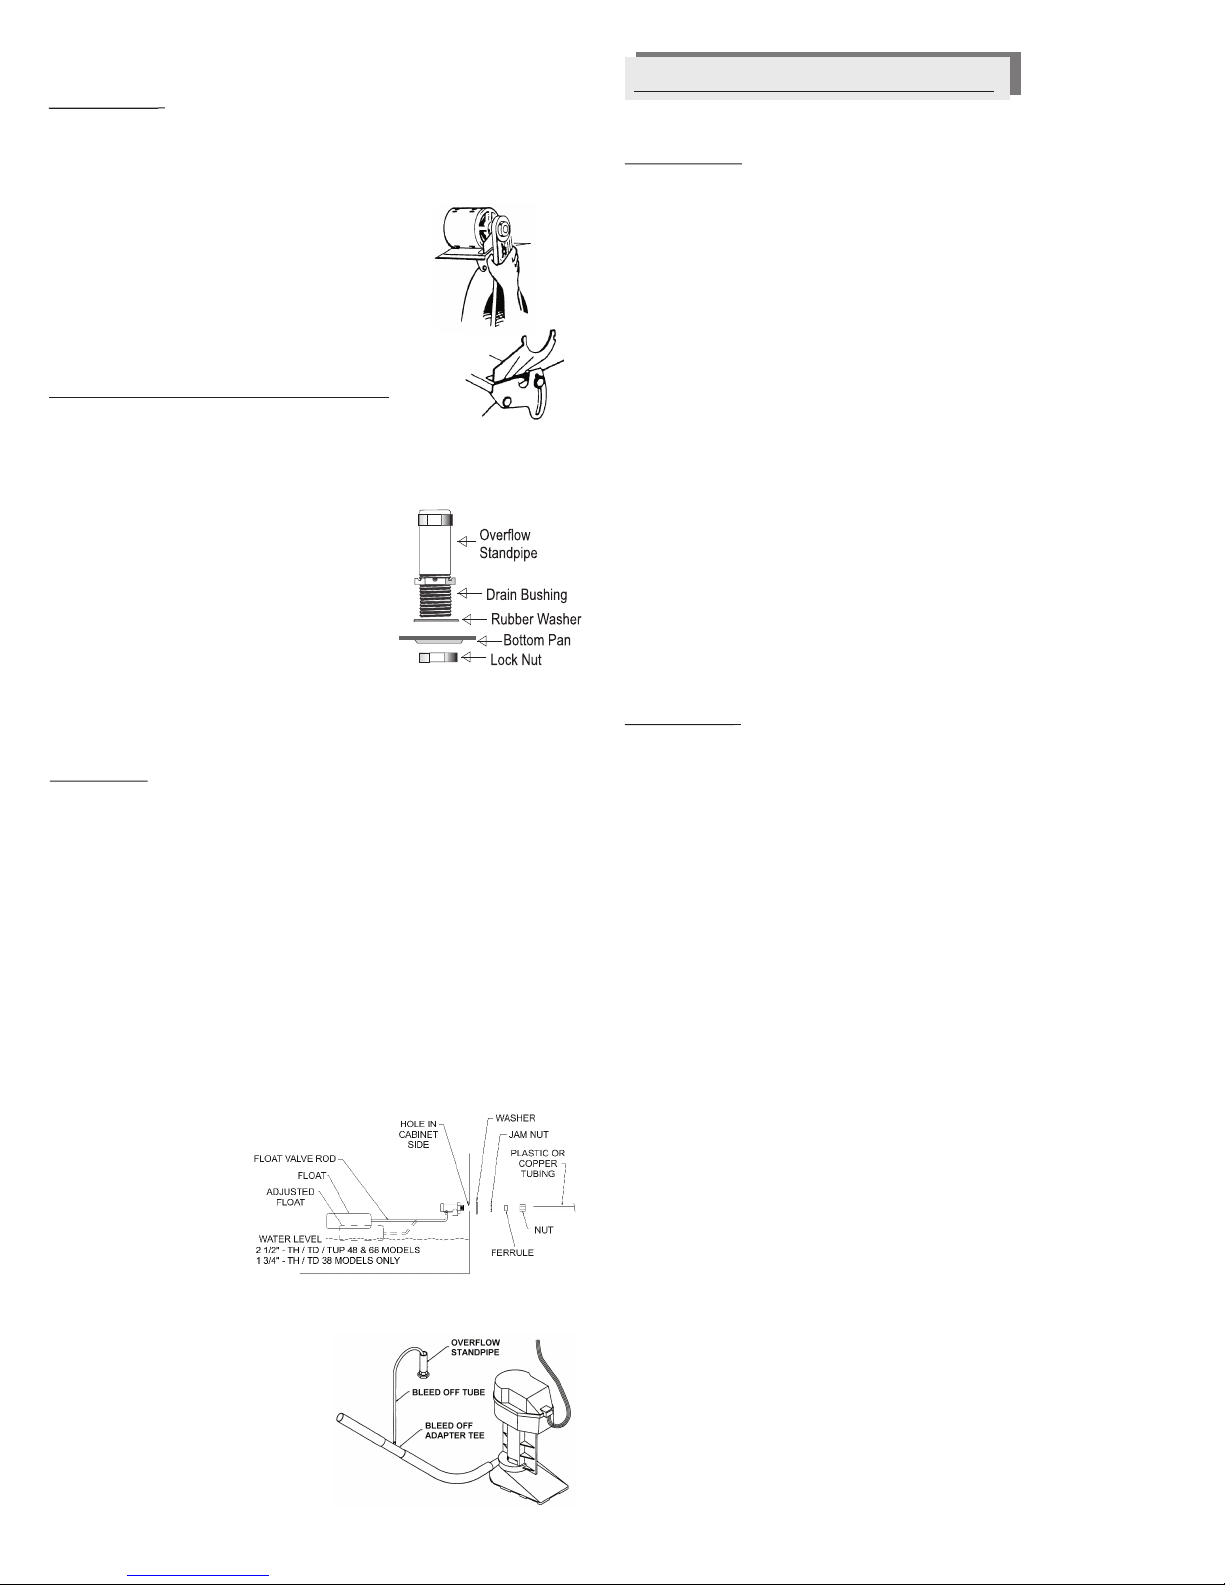
Install Overflow Standpipe /
Drain Line
Install overflow drain bushing in bottom of cooler as follows:
Slide rubber washer over drain bushing.
Push drain bushing through bottom of
cooler, assemble and tighten lock nut.
Screw plastic overflow standpipe into
the drain bushing and tighten snugly
(hand tight) to prevent leakage.
Connect a suitable drain line (copper /
PVC / garden hose) to drain bushing.
Never drain water onto a roof; mineral
build-up or damage to roof may occur.
NOTE: Drain water in accordance with local plumbing codes.
Connect Water Supply
CAUTION: All plumbing installations must comply with
local building and safety codes, and must be performed by
qualified personnel only.
NOTE: Coolers should not be connected to “soft” water systems. Soft
water will accelerate corrosion and decrease the effective life of pads
and cooler cabinet. Connect water line as follows:
A water supply valve should be installed at a convenient location, to
allow the water supply to be turned on and off for servicing or
winterizing. Minimum 1/4“ diameter tubing should be used to
provide water to the cooler, larger tubing is recommended if the
distance from the valve to the cooler is greater than 100 feet, then
reduced to 1/4” at the unit.
Install float valve in the bracket provided.
Connect tubing from water supply to float valve. Place
compression nut and ferrule over end of tubing, insert tube into
float valve then tighten compression nut to secure.
Install Bleed-off
To minimize mineral scale “buildup” use the included bleed-off
assembly. Remove the cap from
the bleed-off tee; insert the black
tubing and route the tubing
through standpipe opening into
the drain line
siphoning of the water, make sure
that the bleed-off tee is a
water level.
4 Trophy Ducted Evaporative Cooler Use and Care Manual
. To prevent
bove the
GENERAL INSPECTION
Initial Start-up or Annual Inspection
CAUTION: Disconnect all electrical power to the cooler
before attempting to install, open, or service your cooler.
More than one disconnect may be required to de-energize
the equipment for servicing. If the cooler is
thermostatically controlled, the thermostat is not to be
used as the power supply disconnect, as it may reset and
start the unit unexpectedly.
Before start-up the cooler for the first time, or at the beginning of each
cooling season, make sure that all required connections,
adjustments, etc. have been made. Verify that:
P Cooler mounting is level; ductwork is sealed.
P Cabinet is securely fastened to mounting.
P Cooler cabinet is properly grounded. Electrical connections are
correctly made, safe and secure.
P Motor, pump, drain, bleed-off, float valve, etc. are correctly
installed and fully functional.
P Water line securely connected, turned on, no leaks noted.
P Float adjusted for proper water level.
P Pump impeller turns free and smooth. If in doubt, remove
impeller cover (see “Cleaning Pump”) and check rotation.
P Blower wheel, shaft, pulley and motor sheave bolts /
setscrews are tight.
P Motor sheave / Blower pulley alignment okay; belt correctly
tensioned, blower wheel turns freely.
Start-up Check List
CAUTION: Never operate cooler with access panels
removed. This will result in an overloaded condition and
may damage the blower motor.
To verify and check out the cooler installation on initial or annual startup, the following procedure should be followed.
P Turn electrical supply to pump on.
P Verify that pump starts and pads are evenly wet.
P Open building exhaust / relief vents (windows, doors, etc.)
P Turn electrical supply to blower motor on.
P Observe that motor starts and runs, check each speed
(where applicable) and confirm air delivery.
P Verify motor amperage does not exceed nameplate.
In case of trouble on any of these steps, refer to the Troubleshooting
Chart on
Cabinet Inspection Checklist
After initial start-up and for a few weeks afterwards, check for and/or
observe the following: Refer to the Troubleshooting Chart on f
necessary.
P Leaks from water lines, cabinet, etc.
P Cooler pads: even wetting, no dry streaks.
P Confirm water level depth setting is correct.
P Verify full, even flow in water distribution system.
P Blower wheel / motor rotates freely, no unusual noises.
P Belt condition / tension / alignment OK.
P Check motor mounting, cabinet hardware, setscrews on pulleys,
page 6.
page 6 i
blower wheel are tight
 Loading...