

Aero Raised AeroBed User guide

English 1Espanol 7Français 14
Raised AeroBed
™
Instruction Manual
Manual de Instrucciones
Mode d'emploi
© Aero Products International, Inc., 1225 Karl Court, Wauconda, IL 60084-1098 USA
Made in China
WARRANTY DEPARTMENT
AERO PRODUCTS INTERNATIONAL, INC.
1225 KARL COURT
WAUCONDA IL 60084-1098
_______________________________________________
_______________________________________________
_______________________________________________
_______________________________________________
PLACE
STAMP
HERE
9016 Rev. 4/02
Questions?
Please visit our web site anytime at
www.thinkaero.com
or
Call our Customer Service Department at
1-888-462-4468
(operators are available Monday - Friday, 9 AM - 5 PM CST)
1
EnglishEnglish
Raised AeroBed™
Thank you for joining the aero
®
family by purchasing one of our upscale products.
You can expect topnotch quality, innovation and imagination from every aero
product.
You are about to enjoy the comfort of the Raised AeroBed, the finest alternative
sleeping system available anywhere. It is your responsibility to read and always
follow the safety, care and maintenance instructions for your new aero product.
Always instruct and supervise others on the proper use, maintenance and safety
of your bed.
IMPORTANT: Preparation of your Raised AeroBed requires no tools. Use of tools
may damage your bed.
IMPORTANT SAFETY INFORMATION
AND WARNINGS
— WARNING: Adult supervision required. Follow all safety instructions to avoid
serious injury.
— WARNING: This is an electrical product - not a toy. To avoid risk of fire, burns,
injury, and shock, it should not be played with or placed where small children can
reach it. Do not use in or around water.
—Remove all sharp objects from area where bed will be set up and used.
—Product is intended for use as an indoor bed only. Do not step or jump on bed or
use as a trampoline. Bed may puncture.
—Place bed in a safe area before use, making sure that there are no sharp edges,
steps, drops, or breakable items nearby. Use on flat surfaces only. Bed may tip
over on uneven surface.
—Do not use this bed on abrasive surfaces or near pointed/sharp items or surfaces.
Protruding objects may puncture the bed.
—This bed is made of plastic and therefore may melt or burn if it comes in contact
with any flame or heat source. Do not place it near or against heaters, open flame
or other hot objects.
—Unplug product when not in use.
—Do not attempt to dissemble, repair, or service the pump. No serviceable parts
are contained inside. Contact Aero Products International, Inc. at 1225 Karl Court,
Wauconda, IL 60084, for repair or servicing information.
—Read and follow the instruction manual which accompanies this product.
!
!
aero
Raised AeroBed
www.thinkaero.com
or
1-888-462-4468
(Mon.- Fri. 9AM – 5PM CST)
™
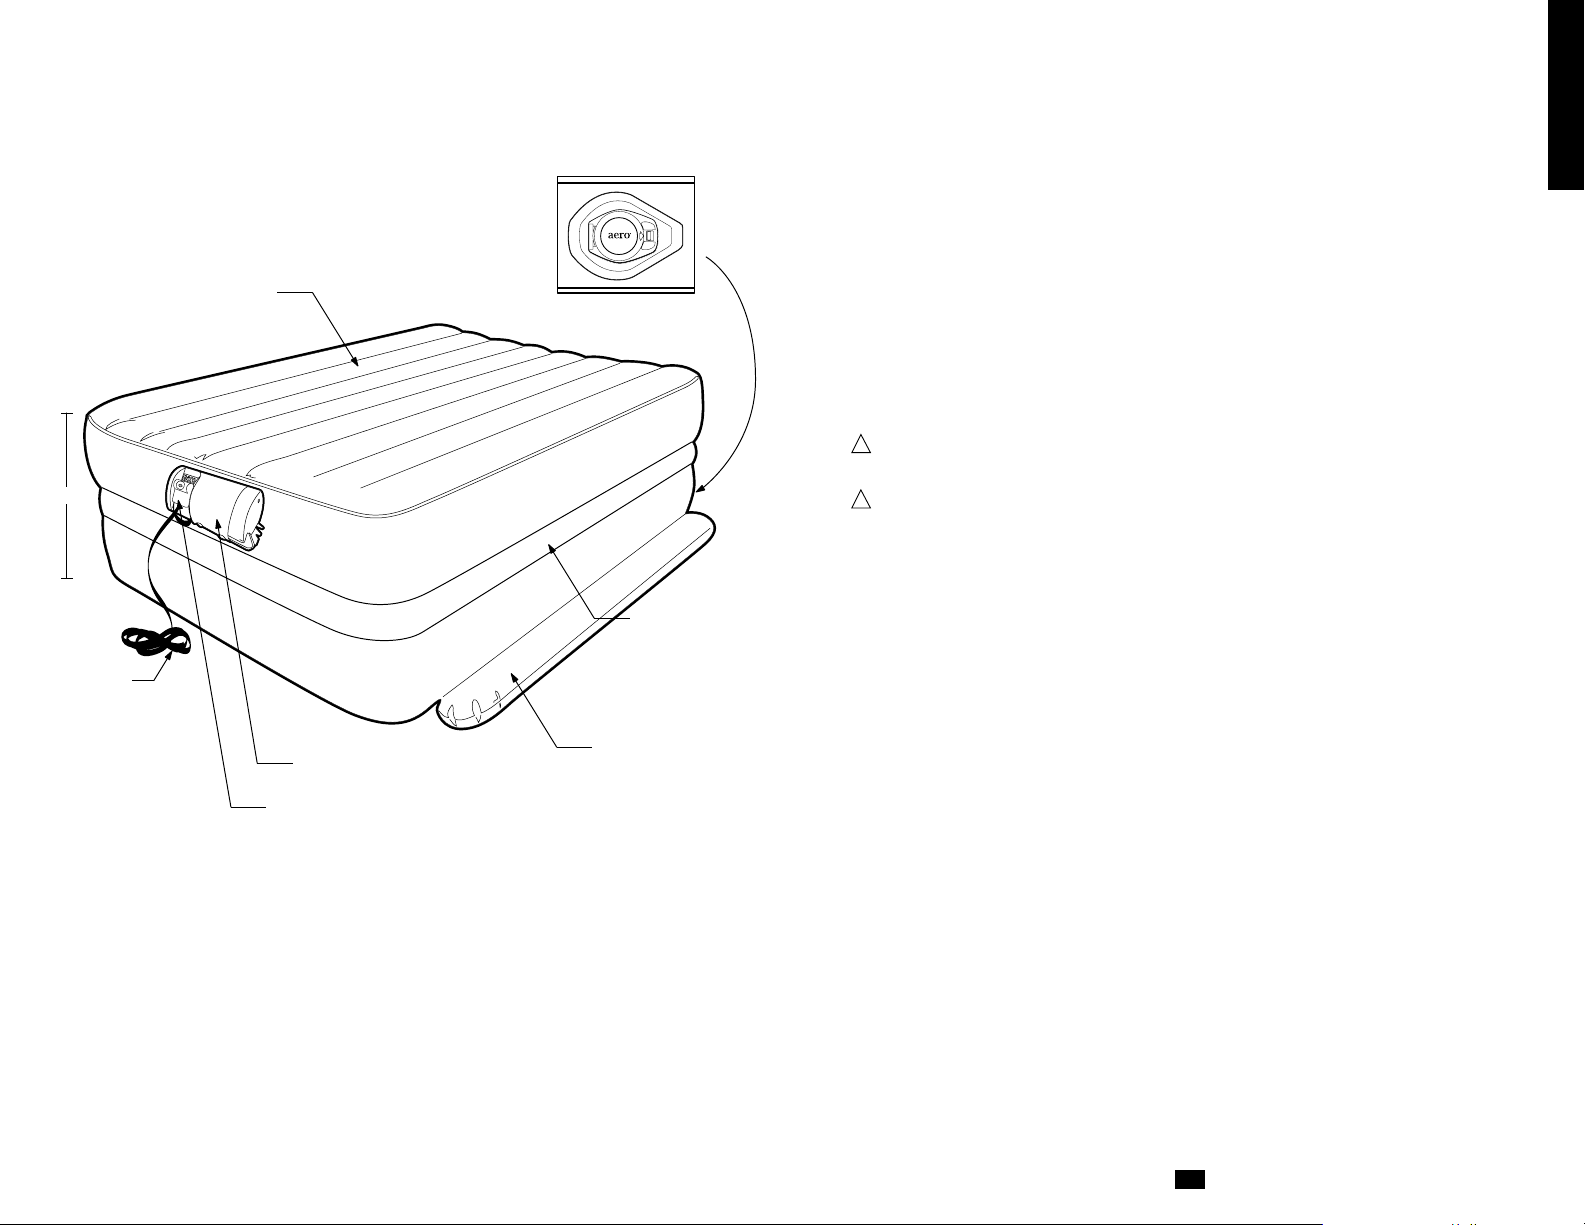
Durable channel construction
24"
14" cord
May also Include:
• Mattress cover
• Dust ruffle
• Durable carry bag
Powerful Recessed AC Pump
One Touch® Comfort Control
Secure Seal ™
Quick Release Valve
(Centered on bottom chamber)
Side support chamber
Stability Bars
(Rest on floor along long sides of bed)

3
EnglishEnglish
DEFLATION AND STORAGE
1. Make sure bed is unplugged from the electric outlet prior to deflation.
2. Open the Quick Release Valve at the foot of the bed to
release the air.
With your thumb or forefinger squeeze the tab toward
the center of the Quick Release Valve until it opens.
Your Raised AeroBed™ will deflate in approximately
one minute.
3. Roll or fold the AC cord with One Touch
®
Comfort
Control block and secure it. Fold sides of bed into the
center along its length. Tightly roll your Raised
AeroBed around the pump towards the Quick Release
Valve end.
4. Roll the bed completely until all air is expelled. When the bed is completely
rolled, push the Quick Release Valve closed until it locks.
5. Slide the duffel bag over your Raised AeroBed. Store your bed until its next use.
MATTRESS COVER AND DUST RUFFLE
If a mattress cover and/or dust ruffle is included with your Raised AeroBed, please
follow these use and care instructions.
Use
1. Inflate bed about half way. Top half of bed should be partially inflated while the
bottom half is still partially deflated. Pull dust ruffle over top half of bed into the
space between the top and bottom parts of the bed around entire bed. Make
sure the two long sides of dust ruffle match up with long sides on bed.
2. Fully inflate your Raised AeroBed. Pull mattress cover over the top half of bed
fitting the square opening around the pump and the straps around the corners.
Adjust ruffle and cover to your liking. Your Raised AeroBed is now ready for use.
3. After deflation, you may remove the mattress cover/dust ruffle from the bed.
Or, you may store your Raised AeroBed with the mattress cover/dust ruffle on
the bed. Some wrinkling may occur.
Care
1. The mattress cover and dust ruffle are made of polyester/cotton blended fabric.
Machine wash in warm water with a mild soap or detergent. Tumble dry on LOW
HEAT. You may use a cool iron if necessary.
English
2
English
INFLATION
NOTE: If a mattress cover and/or dust ruffle is included with your Raised AeroBed™,
see MATTRESS COVER AND DUST RUFFLE section (page 3) prior to inflation.
Note: Product must be at room temperature prior to inflating.
Remove your Raised AeroBed from its lightweight duffel bag. Keep bag for storage.
1. Place your rolled up bed on the floor free of obstructions or sharp objects.
2. Make certain the Secure Seal™ Quick Release Valve located at the foot of the
bed is closed.
If the Quick Release Valve is open, close it by using 2 thumbs to push cover and
snap into valve. Be careful to avoid pushing valve cover to the right or left as it
snaps into the valve opening.
3. Remove AC plug, cord and One Touch
®
Comfort Control from plastic bag and
shrink wrap.
4. Plug into any standard polarized 110 Volt AC electrical outlet. North American
Electrical rating: 120 VAC 60HZ 1.0A(NOTE: 230VAC product sold outside of
North America.)
This product has a polarized attachment plug (one blade is wider than the other)
as a safety feature. This plug will fit into a polarized outlet only one way. If the
plug does not fit fully in the outlet, reverse the plug. If it still does not fit, contact a
qualified electrician. Never use with an extension cord unless the plug can be
fully inserted. Do not attempt to defeat this safety feature.
5. Push and hold the button of the One Touch Comfort
Control for approximately 3 minutes to inflate the Raised
AeroBed to full (firmest) capacity. Bed will not over-inflate.
6. Place side stability bars flat on the floor next to the bed.
Make sure bars are not underneath the bed. Stability bars
will automatically inflate with entire bed.
7. Attach the One Touch Comfort Control block to the inflator
by sliding it over the rubber nipple.
8. Lie on the bed to control the firmness to your desired level.
a. To make the bed softer, depress the One Touch
Comfort Control block (not the button) and rubber
nipple together.
b. To make the bed firmer, depress only the button of
the One Touch Comfort Control.
CAUTION: Do not sleep on edges of the bed. Edges are less
supportive and may crush under weight.
This is the closed position. Open Air Release Valve
aero
aero
aero
Close Valve Using 2 Thumbs

English
4
English
5
EnglishEnglish
CARE AND MAINTENANCE
1. Inspect your Raised AeroBed™ prior to each use.
2. Keep your Raised AeroBed away from any sharp objects. Large cuts or snags
may not be repairable and will not be covered by your warranty.
3. When not in use, store your Raised AeroBed in a clean, dry place out of extreme
temperatures. Product must be at room temperature prior to inflating.
4. In case of incidental damage to your bed, a repair kit has been included. Please
follow repair instructions carefully.
5. You may clean your Raised AeroBed with a mild dishwashing detergent or
household cleaner. Do not use strong chemicals or other compounds. Allow your
bed to air dry completely after cleaning and before storing.
TROUBLESHOOTING
Very rarely, your Raised AeroBed may fail to inflate properly. Should this occur,
please use the following check list.
1. If your Raised AeroBed doesn’t appear to be inflating:
First, make sure the Quick Release Valve is closed
and locked securely.
If the valve is open, close it by using 2 thumbs to
push cover firmly into valve. Be careful to avoid
pushing valve cover to the right or left as it snaps
into valve opening.
2. If air leakage from the Quick Release Valve occurs:
Carefully inspect the soft round gasket on inside of Quick Release Valve cover.
Make sure there is no dirt or debris, cuts, nicks or tears to the gasket.
If there is dirt or debris; clean and use. If cut, nicked or torn, call our Customer
Service center or visit our website to order a replacement part.
3. If trouble persists, please phone our Customer Service center for assistance.
U.S. and Canada: 1-888-462-4468
Monday through Friday, 9 AM to 5 PM Central Standard Time
Or visit our website at : www.thinkaero.com
LIMITED WARRANTY
Aero Products International, Inc. warrants to the original purchaser only when the
Raised AeroBed™ is used for normal indoor sleeping purposes, that the mattress
will be fully guaranteed against defects in material and workmanship for a period of
one (1) year from the date of purchase, provided further that the Raised AeroBed
has been operated according to the provided instructions. (Included in your
purchase is a repair kit with instructions.)
The motor (exclusive of the controller) will be guaranteed to the original purchaser
against defects in materials and workmanship for a period of one (1) year from the
date of purchase provided the motor has been operated according to the
instructions.
Our obligation under this warranty shall be limited to the repair or exchange of any
part or parts which may prove defective under the conditions and during the periods
described above.
Our obligation under this warranty shall not apply if our inspection shows:
A. Any product or part that has been damaged by alteration.
B. Any product or part that has been subject to accident, misuse, abuse or has
been operated contrary to Aero Products International, Inc. instructions for the
product.
All purchasers must obtain an authorization from Aero Products International, Inc.
before returning a defective product. The product should be carefully packaged and
delivered postage or delivery charges prepaid. The customer shall be responsible for
all damages incurred in shipping.
WARRANTY DISCLAIMER
EXCEPT FOR THE EXPRESS LIMITED WARRANTY SET FORTH ABOVE, AERO
PRODUCTS INTERNATIONAL, INC. MAKES NO EXPRESS OR IMPLIED
WARRANTIES IN THIS AGREEMENT OR OTHERWISE. TO THE FULLEST
EXTENT PERMITTED BY LAW, AERO PRODUCTS INTERNATIONAL, INC.
DISCLAIMS ALL WARRANTIES, WRITTEN, EXPRESS OR IMPLIED, INCLUDING
ALL WARRANTIES OF MERCHANTABILITYAND/OR FITNESS FOR A
PARTICULAR PURPOSE. AERO PRODUCTS INTERNATIONAL, INC. EXPRESSLY
DISCLAIMS ANYAND ALL LIABILITY TO PURCHASER FOR ANY
CONSEQUENTIAL DAMAGES, DAMAGES FOR LOSS OF USE, LOSS OF
PROFITS, PROPERTY DAMAGE, OR ANY OTHER INCIDENTAL,
CONSEQUENTIAL OR SPECIAL DAMAGES ARISING OUT OF THIS AGREEMENT
OR THEIR OPERATION, FUNCTION OR CHARACTERISTICS OF THE
PRODUCTS PURCHASED HEREUNDER. IT IS EXPRESSLY UNDERSTOOD
THATTHE LIMITED WARRANTY SET FORTH ABOVE IS THE SOLE AND
EXCLUSIVE REMEDY OF PURCHASER. NOTWITHSTANDING THE TERMS OF
ANY LIMITED WARRANTY, AND/OR IN THE EVENT ANY LIMITED WARRANTY
PROVIDED TO THE PURCHASER FAILS OF ITS ESSENTIAL PURPOSE, IN NO
EVENT WILL AERO PRODUCTS INTERNATIONAL, INC. ENTIRE LIABILITY TO
PURCHASE EXCEED THE PURCHASE PRICE ACTUALLY PAID BY PURCHASER
FOR THE PRODUCTS HEREUNDER, OR ANY DEFECTIVE PORTION THEREOF,
 Loading...