

PGS
PGS
0311
6616101_01
The PGS accessory, designed for installation on units in the
NRA, NRC, NRS, NBW, NRW, AN and CR series, is used to
activate the timer programmer function.
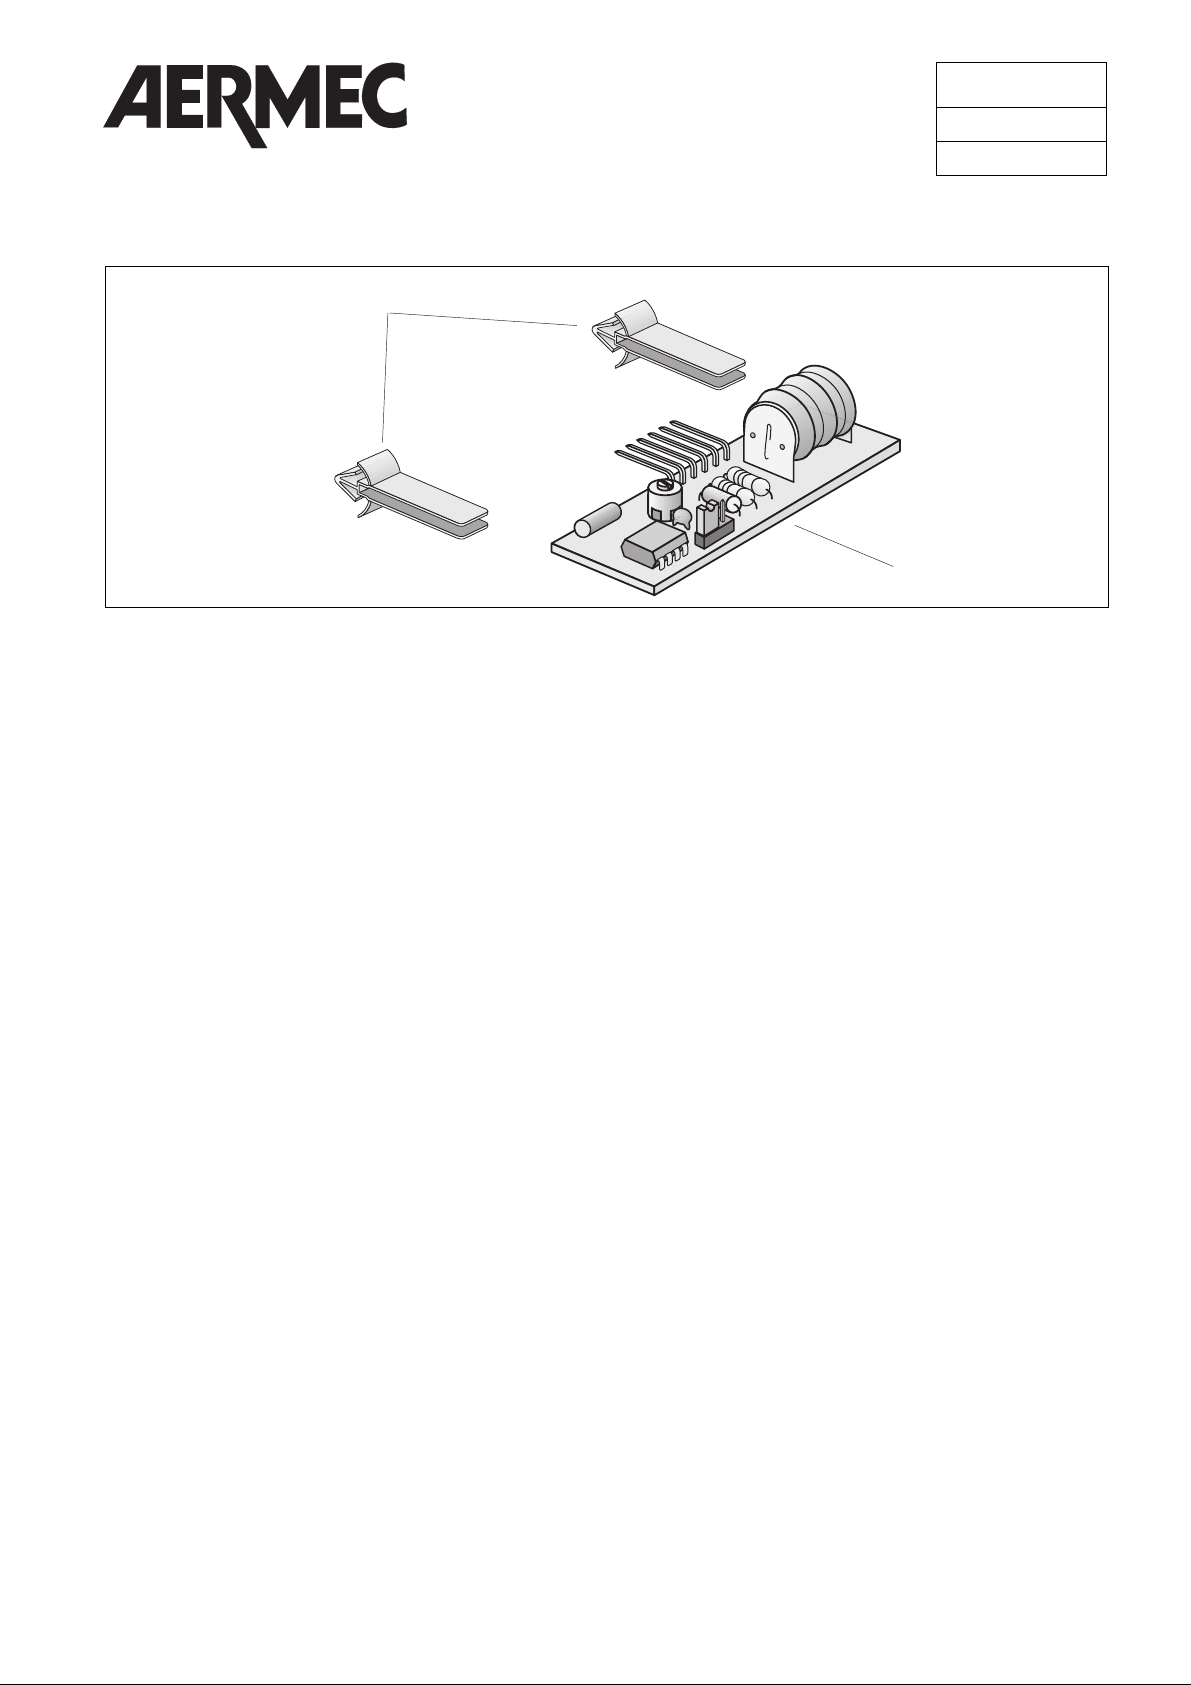
The compact PGS electronic board features an integrated
circuit with clock function, a timer setting memory and
rechargeable buffer battery to ensure continuous clock operation when the unit is not operating.
The timer function allows the user to program machine startup during 2 daily time periods. Both daily and weekly programming is possible: in the case of daily settings, programmed operating time is the same; in the case of weekly settings, operation time can vary for each day of the week.
L'accessorio PGS, installabile sulle macchine delle serie
NRA, NRC, NRS, NBW, NRW, AN, CR, permette di attivare
la funzione timer programmatore.
E' una scheda elettronica di dimensioni ridotte sulla quale è
montato un circuito integrato con funzione di orologio, una
memoria nella quale vengono salvate le impostazioni del
timer e una batteria tampone ricaricabile per il funzionamento dell'orologio a macchina spenta.
La funzione timer consente di programmare l'accensione
della macchina durante due fasce orarie nell'arco della giornata.
La programmazione può essere giornaliera oppure settimanale: nel primo caso le fasce orarie di funzionamento sono
ogni giorno le stesse; nel secondo caso possono essere
diversificate per ogni giorno della settimana.
2
1
Fig. 1
L'accessoire “PGS”, installable sur les machines série NRA,
NRC, NRS, NBW, NRW, AN, CR, permet d'activer la fonction temporisateur programmateur.
C'est une carte électronique aux dimensions réduites sur
laquelle sont montés un circuit intégré ayant fonction d'horloge, une mémoire dans laquelle sont enregistrées les programmations du temporisateur et une batterie tampon
rechargeable pour le fonctionnement de l'horloge lorsque la
machine est éteinte.
La fonction temporisateur permet de programmer la mise en
marche de la machine durant 2 tranches horaires sur l'espace de la journée. La programmation peut être journalière ou
hebdomadaire: dans le premier cas, les tranches horaires
de fonctionnement sont chaque jour les mêmes; dans le
second cas, elles peuvent être diversifiées pour chaque jour
de la semaine.
Das auf die Geräte der Serie NRA, NRC, NRS, NBW, NRW,
AN, CR installierbare Zubehör PGS gestattet die Aktivierung
der Timer-Funktion.
Es handelt sich um eine Elektronikkarte kleinen Formats mit
einem IC (Uhrfunktion), einem Speicher für die Eingaben
der Uhr, einem Speicher für die Eingaben des Timer und
einer ladbaren Pufferbatterie zur Uhrfunktion bei abgeschaltetem Gerät.
Mit der Timer-Funktion kann die Einschaltung der Einheit in
zwei Zeitschienen/Tag programmiert werden. Es ist eine
tägliche bzw. wöchentliche Programmierung möglich: im
ersten Fall erfolgt der Betrieb an jedem Tag zu den gleichen
Uhrzeiten, im zweiten Fall lassen sich pro Wochentag unterschiedliche Zeitschienen eingeben.
El accesorio PGS se puede instalar en las máquinas de las
series NRA, NRC, NRS, NBW, NRW, AN, CR y permite activar la función de temporizador programador.
Es una tarjeta electrónica de tamaño reducido en el que
está montado un circuito integrado con función de reloj, una
memoria en la que se guardan las predisposiciones del temporizador y una batería tampón recargable para el funcionamiento del reloj con la máquina apagada.
La función temporizador permite programar el encendido de
la máquina durante dos bandas horarias a lo largo del día.
La programación puede ser diaria o semanal: en el primer
caso, las bandas horarias de funcionamiento son cada día
las mismas; en el segundo caso, pueden ser diferentes para
cada día de la semana.
2
INSTALLAZIONE
Macchine delle serie NRA, NRC, NBW, NRS.
1) togliere tensione alla macchina;
2) inserire le due guide porta-scheda in plastica (2, Fig.1);
negli appositi fori rettangolari ai lati del connettore femmina M2 sulla faccia posteriore della scheda visualizzatore;
3) installare la scheda PGS (1, Fig.1) inserendo il connettore
maschio a 6 poli nel connettore M2; si presti la massima
attenzione affinché al polo n°1 della scheda PGS corrisponda il n°1 del connettore M2 della scheda visualizzatore;
4) restituire tensione alla macchina: la scheda elettronica di
controllo riconoscerà la presenza della scheda PGS e si
configurerà per la nuova funzione;
5) verificare che sul visualizzatore appaia, in alto a destra,
l’ora corrente
Macchine delle serie NRW, AN, CR.
1) togliere tensione alla macchina;
2) inserire le due guide porta-scheda in plastica (2, Fig.1)
negli appositi fori rettangolari ai lati del connettore femmina M17 sulla faccia posteriore della scheda di controllo;
3) installare la scheda PGS (1, Fig.1) inserendo il connettore
maschio a 6 poli nel connettore M17; si presti la massima
attenzione affinché al polo n°1 della scheda PGS corrisponda il n°1 del connettore M17 della scheda di controllo;
4) restituire tensione alla macchina: la scheda elettronica di
controllo riconoscerà la presenza della scheda PGS e si
configurerà per la nuova funzione.
PROGRAMMAZIONE DEL TIMER
Macchine delle serie NRA, NRC, NBW, NRS.
Con l'installazione della scheda PGS, vengono attivati i SET
riportati nella tabella seguente:
SET FUNZIONE
Time impostazione ora e giorno della settimana
Timer selezione della modalità di funzionamento
Giornaliero impostazione fasce orarie
Lunedì impostazione fasce orarie lunedì
Martedi impostazione fasce orarie martedì
Mercoledi impostazione fasce orarie mercoledì
Giovedi impostazione fasce orarie giovedì
Venerdi impostazione fasce orarie venerdì
Sabato impostazione fasce orarie sabato
Domenica impostazione fasce orarie domenica
La programmazione del timer prev ede le seguenti operazioni:
-impostazione dell’ ora e del giorno della settimana:
1) premere il tasto
SET;
2) agendo sui tasti visualizzare il set “Time”;
3) premere il tasto ;
4) digitare il codice di accesso;
5) agendo sui tasti modificare l'ora;
6) premere il tasto
SET;
7) agendo sui tasti modificare il giorno della settimana
8) premendo nuovamente il tasto i valori impostati vengono memorizzati;
-selezione della modalità di funzionamento del timer:
1) premere il tasto
SET;
2) agendo sui tasti visualizzare il set “Timer”;
3) premere il tasto ;
4) digitare il codice di accesso;
5) agendo sui tasti selezionare la modalità di funzionamento desiderata tra le seguenti alternative:
- GIORNO
- SETTIMANA
- NESSUNO
6) premendo nuovamente il tasto la selezione effettua-
INSTALLATION
Series NRA, NRC, NBW, NRS.
1) Isolate the machine from the power supply.
2) Insert the two plastic board guides in the rectangular
holes on the sides of female connector M2 on the rear
surface of the display board.
3) Install the PGS board by inserting the 6-pole male connector in connector M2; make sure that pole no. 1 on the
PGS board corresponds to no. 1 of connector M2 on the
display board.
4) Power up the unit; the electronic control board will acknowledge the presence of PGS board and will self configure for the new function.
5) Check that the display shows the correct time upstream
on the right side.
Series NRW, AN, CR.
1) Isolate the machine from the power supply.
2) Insert the two plastic board guides in the rectangular
holes on the sides of female connector M17 on the rear
surface of the control board.
3) Install the PGS board by inserting the 6-pole male connector in connector M17; make sure that pole no. 1 on
the PGS board corresponds to no. 1 of connector M17 on
the control board.
4) Power up the unit; the electronic control board will acknowledge the presence of PGS board and will self configure for the new function.
PROGRAMMING THE TIMER
Series NRA, NRC, NBW, NRS.
When the PGS board is installed, the settings shown in the
table below are activated:
SET FUNCTION
Time
setting of time and day of the week
Timer
selection of timer operating mode
Day
setting of time periods
Monday
Monday time settings
Tuesday
Tuesday time settings
Wednesday
Wednesday time settings
Thursday
Thursday time settings
Friday
Friday time settings
Saturday
Saturday time settings
Sunday
Sunday time settings
To program the timer, proceed as follows:
-setting time and day of the week
1) Press the
SET
button;
2) By means of the buttons, display the “
Time
” setting;
3) Press the button;
4) Enter the access code;
5) Change the time setting by means of buttons ;
6) Press the
S
ET
button;
7) Change the day setting by means of buttons ;
8) Press the button again to store the new settings;
-selecting the timer mode
1) Press the
SET
button;
2)
By means of the buttons, display the “
Timer
” setting;
3) Press the button;
4) Enter the access code;
5) By means of the buttons, select one of the following
time modes:
- DAY
- WEEK
- NONE
6) Press the button again to store the selection.
+
+
+
+
+
-
-
-
-
-
-
+
-
+
-
+
-
+
-
+

3
ta viene memorizzata.
Modalità “GIORNO”:
-
consente di impostare nell’arco della giornata due fasce orarie di funzionamento, uguali per tutti i giorni della settimana;
- viene visualizzato il set “Giornaliero”;
- non vengono visualizzati i set da “Lunedì” a “Domenica”.
Modalità “SETTIMANA”:
- consente di impostare due fasce orarie di funzionamento
per ciascun giorno della settimana;
- non viene visualizzato il set “Giornaliero”;
- vengono visualizzati i set da “Lunedì” a “Domenica”.
Modalità “NESSUNO”:
- il timer programmatore viene disattivato;
-
i set da “Giornaliero” a “Domenica” non vengono visualizzati.
-impostazione delle fasce orarie
1) premere il tasto
SET;
2) agendo sui tasti visualizzare il set “Giornaliero” se
“Timer=GIORNO”, oppure il giorno della settimana per il
quale si vogliono impostare le fasce orarie se
“Timer=SETTIMANA”;
3) premere il tasto ;
4) digitare il codice di accesso;
5) modificare il valore di “START 1” per mezzo dei tasti
6) premere il tasto ;
7) modificare il valore di “STOP 1” per mezzo dei tasti
8) premere il tasto ;
9) modificare il valore di “START 2” per mezzo dei tasti
10)premere il tasto ;
11)modificare il valore di “STOP 2” per mezzo dei tasti
12)premendo nuovamente il tasto le fasce orarie impostate vengono memorizzate.
Per eliminare una fascia oraria impostare la stessa ora per
START e STOP; es.: START 1=10.30, STOP 1=10.30.
Il timer non consente di far precedere l’inizio della seconda
fascia oraria alla fine della prima.
-configurazione della scheda di controllo:
Sulla scheda di controllo della macchina dev’essere impostato il comando remoto, altrimenti il timer viene ignorato.
Inoltre il pannello remoto dev’essere posizionato su ”ON”,
altrimenti la macchina rimane spenta (OFF) nonostante il
consenso del timer.
Macchine delle serie NRW, AN, CR.
Con l'installazione della scheda PGS, vengono attivati i set
riportati nella tabella seguente:
SET FUNZIONE
h h impostazione ora e minuti
g g impostazione giorno della settimana
t i M selezione della modalità di funzionamento
q u o impostazione fasce orarie
l u n impostazione fasce orarie lunedì
M a r impostazione fasce orarie martedì
M e r impostazione fasce orarie mercoledì
g i o impostazione fasce orarie giovedì
V e n impostazione fasce orarie venerdì
S a b impostazione fasce orarie sabato
d o M impostazione fasce orarie domenica
La programmazione del timer prevede le seguenti operazioni:
-impostazione dell’ora e del giorno della settimana:
1) premere ripetutamente il tasto
SEL fino a che il led giallo
si posiziona sul simbolo
SET;
2) agendo sui tasti visualizzare il set “h h” (Time);
3) premere il tasto ;
Mode “
DAY
”:
- allows programming of two unit operating times in a day;
settings remain identical for each day of the week;
- displays the “
Day
” setting;
- does not display settings of “
Monday
” to “
Sunday
”.
Mode “
WEEK
”:
- allows programming of two unit operating times for each
day of the week;
- does not display the “
Day
” setting;
- displays settings of “
Monday
” to “
Sunday
”.
Mode “
NONE
”:
- timer programmer is deactivated;
-“
Day”
and “
Weekly
” settings are not displayed.
- setting operating times
1) Press the
SET
button;
2) By means of the buttons, display the “
Day
” settings
(if “
Timer = DAY
”), or the day of the week for which set-
tings are to be made (if “
Timer = WEEK
”);
3) Press the button;
4) Enter the access code;
5) Adjust the “START 1” setting with the buttons;
6) Press the button;
7) Adjust the “STOP 1” setting with the buttons;
8) Press the button;
9) Adjust the “START 2” setting with the buttons;
10)Press the button;
11)Adjust the “STOP 2” setting with the buttons;
12)Press the button again to store the new time settings.
To deactivate a time setting, simply set the same time for
START and STOP (e.g. START 1=10.30, STOP 1=10.30).
The timer will not allow commencement of the second setting before the end of the first.
-board settings
The remote control on the machine control board must be
configured, otherwise the timer will be ignored. The remote
panel must also be set to the ”ON” position (if not, the
machine will remain off despite the permissive given by the
timer).
Series NRW, AN, CR.
When the PGS board is installed, the settings shown in the
table below are activated:
SETTING FUNCTION
h h
setting of time
g g
setting of day of the week
t i M
selection of timer operating mode
q u o
setting of time periods
l u n
Monday time settings
M a r
Tuesday time settings
M e r
Wednesday time settings
g i o
Thursday time settings
V e n
Friday time settings
S a b
Saturday time settings
d o M
Sunday time settings
To program the timer, proceed as follows:
-setting the time and day of the week:
1) Press the
SEL
button repeatedly until the yellow led is
over the
SET
symbol;
2) Press the buttons to display the “
h h
” set Time;
3) Press the button;
4)
If the yellow led over the
SET
symbol starts flashing,
proceed to the next point; if the display shows the message , enter the access code by means of the
+
-
-
+
-
+
-
+
-
+
-
+
-
+
-
+
-
+
-
+
-
+
-
+

4
4) se il led giallo in corrispondenza del simbolo SET inizia a
lampeggiare, passare al punto successivo; se invece sul
display appare la scritta introdurre il codice di
accesso agendo sui tasti ; premere quindi il tasto
per confermare il valore impostato; se il led giallo in
corrispondenza del simbolo
SET inizia a lampeggiare,
passare al punto successivo; in caso contrario (codice
errato) reinserire il codice ripetendo l’operazione;
5) modificare l’ora mediante i tasti ;
6) premere il tasto ;
7) modificare i minuti mediante i tasti ;
8) premere il tasto ;
9) agendo sui tasti visualizzare il set “g g” (Weekday);
10)premere il tasto ;
11)modificare il giorno della settimana agendo sui tasti
12)premendo nuovamente il tasto l’ora e il giorno della
settimana impostati vengono memorizzati;
-selezione della modalità di funzionamento del timer:
1) premere ripetutamente il tasto
SEL fino a che il led giallo
si posiziona sul simbolo
SET;
2) agendo sui tasti visualizzare il set “t i M”.(Timer);
3) premere il tasto ;
4) se il led giallo in corrispondenza del simbolo
SET inizia a
lampeggiare, passare al punto successivo; se invece sul
display appare la scritta introdurre il codice di
accesso agendo sui tasti ; premere quindi il tasto
per confermare il valore impostato; se il led giallo in
corrispondenza del simbolo
SET inizia a lampeggiare,
passare al punto successivo; in caso contrario (codice
errato) reinserire il codice ripetendo l’operazione;
5) agendo sui tasti selezionare la modalità di funzionamento desiderata tra le seguenti alternative:
- q u o
- S e t
- n o
6) premendo nuovamente il tasto la selezione effettuata viene memorizzata.
q u o: (Timer Giornaliero)
-
consente di impostare nell’arco della giornata due fasce orarie di funzionamento, uguali per tutti i giorni della settimana;
- viene visualizzato il set “q u o”;
- non vengono visualizzati i set da “ l u n” a “d o M”;
S e t: (Timer Settimanale)
- consente di impostare due fasce orarie di funzionamento
per ciascun giorno della settimana;
- non viene visualizzato il set “q u o”;
- vengono visualizzati i set da “l u n” a “d o M”;
n o : (Timer non impostato)
- il timer programmatore viene disattivato;
- i set da “q u o” a “d o M” non vengono visualizzati;
-impostazione delle fascie orarie:
1) premere ripetutamente il tasto
SEL fino a che il led giallo
si posiziona sul simbolo
SET;
2)
agendo sui tasti visualizzare il set
“q u o” se “t i M =
q u o”, oppure il giorno della settimana (“l u n” ...”d o M”) per
il quale si vogliono impostare le fasce orarie se “t i M= S e t”;
3) premere il tasto ;
4) se il led giallo in corrispondenza del simbolo
SET inizia a
lampeggiare, passare al punto successivo; se invece sul
display appare la scritta introdurre il codice di
accesso agendo sui tasti ; premere quindi il tasto
per confermare il valore impostato; se il led giallo in
corrispondenza del simbolo
SET inizia a lampeggiare,
passare al punto successivo; in caso contrario (codice
errato) reinserire il codice ripetendo l’operazione;
buttons, then press the button to confirm the
settings. If the yellow led over the
SET
symbol starts flashing, proceed to the next point. If the led does not flash,
an incorrect code has been entered; repeat the procedure to enter the code;
5) Adjust the time setting by means of the buttons;
6) Press the button;
7) Adjust the minutes by means of the buttons;
8) Press the button;
9) Press buttons to display the Weekday “
g g
” setting;
10)Press the button;
11)Press the buttons to select the day of the week;
12)Press the button again to store the time and the day
of the week selected;
- selecting the timer mode:
1) Press the
SEL
button repeatedly until the yellow led is
over the
SET
symbol;
2)
Press the buttons to display the Timer “
T i M
” setting;
3) Press the button;
4) If the yellow led over the
SET
symbol starts flashing, pro-
ceed to the next point; if the display shows the message
, enter the access code by means of the buttons, then press the button to confirm the settings. If
the yellow led over the
SET
symbol starts flashing, proceed to the next point. If the led does not flash, an incorrect code has been entered; repeat the procedure to
enter the code;
5) By means of the buttons, select the desired operating mode from one of the following:
- q u o
- S e t
- n o
6) Press the button again to store the selection made.
q u o
: (Daily Timer)
- allows programming of two unit operating times in a day;
settings remain identical for each day of the week;
- displays the “
q u o
” setting;
- does not display settings of “
l u n
” to “
d o M
”;
S e t
: (Weekly Timer)
- allows programming of two unit operating times for each
day of the week;
- does not display the “
q u o
” setting;
- displays settings of “
l u n
” to “
d o M
”;
n o
: (Timer not set)
- timer programmer is deactivated;
- settings from “
q u o
” to “
d o M
” are not displayed;
-time settings:
1) Press the
SEL
button repeatedly until the yellow led is
positioned over the
SET
symbol;
2) By means of the buttons, display the “
q u o
” settings
(if “
t i M
” = “
q u o
”), or the day of the week (“
l u n
” ...”
d o M
”)
for which the settings are to be made (if ““
t i M
” = “
S e t
”);
3) Press the button;
4) If the yellow led over the
SET
symbol starts flashing, pro-
ceed to the next point; if the display shows the message
, enter the access code by means of the buttons, then press the button to confirm the settings. If
the yellow led over the
SET
symbol starts flashing, proceed to the next point. If the led does not flash, an incorrect code has been entered; repeat the procedure to
enter the code;
5) The start time of the first daily setting will appear, e.g.
= 7.10 a.m.; adjust the time by means of the
buttons;
6) Press the button;
-
+
-
+
-
+
-
+
-
+
-
+
-
+
-
+
-
+
-
+
-
+
-
+
-
+
-
+
-
+
-
+
-
+
-
+
-
+
-
+
 Loading...