

Page 1
IANKPV.11.11.6755521_01 replaces 6755521_00 dated 10.06
AIR-COOLED REVERSIBLE HEAT PUMP - Technical - Installa on manual
ANK
020-085
H|HP|HA
Aermec
participates in the EUROVENT
Program LCP/A/P/R.
The products of interest can be found on the
website www
. eurovent-certification . com
REVERSIBLE HEAT PUMPS
• OUTDOOR UNIT
• HIGH EFFICIENCIES
• PRODUCTION OF HOT WATER UP TO 60 °C
Page 2

2 Aermec code 6755521_01 11.11
ANK 025-085H
AERMEC S.p.A. reserves the right to make any modifications considered necessary to improve its products at any moment and is not obliged to add these modifications to
machines that have already been manufactured, delivered or are under construction.
Dear Customer,
Thank you for choosing an AERMEC product. This product is the result of many years of experience and
in-depth engineering research, and it is built using top quality materials and advanced technologies.
In addition, the CE mark guarantees that our appliances fully comply with the requirements of the European
Machinery Directive in terms of safety. We constantly monitor the quality level, and as a result AERMEC products are synonymous with Safety, Quality, and Reliability.
The data may be subject to modifications deemed necessary for improving the product at any time and
without forewarning.
Thank you again.
AERMEC S.p.A
Page 3
3Aermec code 6755521_01 11.11
ANK 025-085H
SERIAL NUMBER
DECLARATION OF CONFORMITY We, the undersigned, hereby declare under our own responsibility that the assembly in question,
defined as follows:
NAME ANK
TYPE AIR/WATER REVERSIBLE HEAT PUMP
MODEL
To which this declaration refers, complies with the following harmonised standards:
IEC EN 60335-2-40 Safety standard regarding electrical heat pumps, air conditioners and dehumidifiers.
IEC EN 61000-6-1
IEC EN 61000-6-3
Immunity and electromagnetic emissions for residential environments.
IEC EN 61000-6-2
IEC EN 61000-6-4
Immunity and electromagnetic emissions for industrial environments
EN378 Refrigerating system and heat pumps - Safety and environmental requirements.
UNI EN 12735
UNI EN 14276
Seamless, round copper pipes for air conditioning and refrigeration.
Pressurised equipment for cooling systems and heat pumps.
Thereby, compliant with the essential requirements of the following directives:
- LVD Directive: 2006/95/CE
- Electromagnetic Compatibility Directive 2004/108/CE.
- Machinery Directive 2006/42/CE
- PED Directive regarding pressurised devices 97/23/CE (Form A)
- The person authorised to draw up the technical file is: Massimiliano Sfragara - 37040 Bevilacqua (VR) Italy–Via Roma, 996
Bevilacqua 01/04/2011
Marketing Manager
Signature
ANK
AERMEC S.p.A.
37040 Bevilacqua (VR) Italy–Via Roma, 996
Tel. (+39) 0442 633111
Telefax 0442 93730–(+39) 0442 93566
www . aermec . com - info @ aermec . com
Page 4

4 Aermec code 6755521_01 11.11
ANK 025-085H
1. Descrip on and choice of the unit.................................................5
2. Product iden fi ca on ...................................................................5
3. Confi gurator .................................................................................6
4. Main cooling layout ......................................................................8
5. Descrip on of components ...........................................................9
5.1. Cooling circuit ................................................................................... 9
5.2. Water features .................................................................................. 9
5.3. Structure and fans ............................................................................. 9
5.4. Hydraulic circuit ................................................................................ 9
5.5. Safety and control components ........................................................ 9
5.6. Electric control and power board.................................................... 10
6. Accessories .................................................................................11
7. Technical data EHPA 400V/3N/50Hz ...........................................12
8. Eurovent technical data ..............................................................16
9. Opera onal limits .......................................................................19
9.3. Design data ..................................................................................... 19
9.1. Opera ng limits in cooling mode graphics ...................................... 19
9.2. Opera ng limits in hea ng mode graphics ..................................... 19
10. Effi ciencies and temperatures diff erent from the nominal value
in hea ng mode ..........................................................................20
11. Effi ciencies and temperatures diff erent from the nominal
opera ng value in cooling mode .................................................40
12. Pressure drops|useful heads to the system .................................60
12.1. System + pipes side exchanger pressure drops ............................... 60
12.2. Filter pressure drops ....................................................................... 60
12.3. Useful heads to the system ............................................................. 60
13. Ethylene glycol solu on ..............................................................61
14. Expansion vessel calibra on........................................................62
15. Minimum water content .............................................................62
16. Sound data .................................................................................63
17. Calibra ons of safety and control parameters .............................63
18. General warnings for the installer ...............................................64
18.1. Preserva on of the documenta on ................................................ 64
18.2. Warnings regarding safety and installa on standards ................... 64
19. Selec on and place of installa on .............................................. 65
20. Posi oning ..................................................................................65
21. Main hydraulic circuits ................................................................66
21.1. Internal and external hydraulic circuit to ANK “H”(standard) ........ 66
21.2. Internal and external hydraulic circuit to ANK “HP” ....................... 67
21.3. Internal and external hydraulic circuit to ANK “HA” ....................... 68
22. Example of ANK 50 HP system with dhw produc on with
VMFDHW ACCESSORY .............................................................69
23. Barycentre and an -vibra on mount posi on ............................. 70
23.1. Minimum technical spaces (mm) .................................................... 70
24. Posi on of hydraulic connec ons ................................................ 71
24.1. ANK 020 H HP .............................................................................. 71
24.2. ANK 030 040 045 050 085 H HP ......................................... 71
24.3. ANK 020 HA ................................................................................... 72
24.4. ANK 030 040 045 050 085 HA .............................................. 72
25. Electric connec ons ....................................................................73
25.1. Electric power connec on to the electrical mains .......................... 73
25.2. Auxiliary connec ons under the responsibility of the user/installer 74
26. Control and commissioning .........................................................74
26.1. Prepara on for commissioning ....................................................... 74
26.2. Commissioning ............................................................................... 74
26.3. Machine commissioning ................................................................. 74
26.4. Season changeover ......................................................................... 75
26.5. Season changeover on machine ..................................................... 75
26.6. Season changeover from PR3 (ACCESSORY) .................................. 75
27. Opera ng features ...................................................................... 76
27.1. Set-point in cooling mode ............................................................... 76
27.2. Set-point in hea ng mode .............................................................. 76
27.3. Compressor start-up delay .............................................................. 76
27.4. Circula on pumps ........................................................................... 76
27.5. An -freeze alarm ............................................................................ 76
27.6. Water fl ow rate alarm ..................................................................... 76
28. Rou ne maintenance .................................................................. 77
28.1. Hydraulic circuit .............................................................................. 77
28.2. Electric circuit .................................................................................. 77
28.3. Cooling circuit ................................................................................. 77
28.4. Mechanical checks .......................................................................... 77
29. Extraordinary maintenance .........................................................77
30. Disposal ......................................................................................77
31. Procedure for selec on of the type of system .............................78
31.1. How to modify a parameter from the user menu ........................... 78
31.2. How to modify a parameter from the installer menu ..................... 78
32. Troubleshoo ng ..........................................................................79
33. Spare parts .................................................................................80
34. A er-sales technical service centres ............................................81
Page 5
5Aermec code 6755521_01 11.11
ANK 025-085H
Standards complied with
WHEN DESIGNING and
MANUFACTURING the unit:
SAFETY
1. Machinery Directive
2006/42/CE
2. Low Voltage Directive
LVD 2006/95/CE
3. Electromagnetic Compatibility
Directive EMC 2004/108/EC
4. Directive regarding pressurised
devices
PED 97/23/CE, EN 378,
5. UNI12735, UNI14276
ELECTRIC PART
1. IEC E N 60335240,
2. IEC E N 6100061/2/3/4
ACOUSTIC PART
1. ISO DIS 9614/2
intensimetric method
PROTECTION RATING
IP24
CERTIFICATIONS
1. EUROVENT
2. EHPA
REFRIGERANT GAS
This unit contains fluoride gases with
greenhouse effect covered by the Kyoto
Protocol. Maintenance and disposal must
only be performed by qualified staff, in
compliance with standards in force.
1. DESCRIPTION AND CHOICE
OF THE UNIT
The OUTDOOR air-cooled heat pumps in the ANK
range with R410A, have been designed and
manufactured to satisfy the heating/cooling and
production of DHW requirements of small to medium
utilities in residential or commercial buildings.
The units are characterised by extremely silent
operation and are highly efficient and reliable, thanks
to the use of exchangers with a large exchange surface
and low-noise high-efficiency scroll compressors.
The following versions are available:
1. ANK "H" Wärmepumpe
At the same time, the versions are available with
different set-ups in order to satisfy a wide range of
system solutions:
1. "°" BASE
2. "P" PUMP ONLY
3. "A" STORAGE TANK AND PUMP
2. PRODUCT IDENTIFICATION
ANK can be identified by:
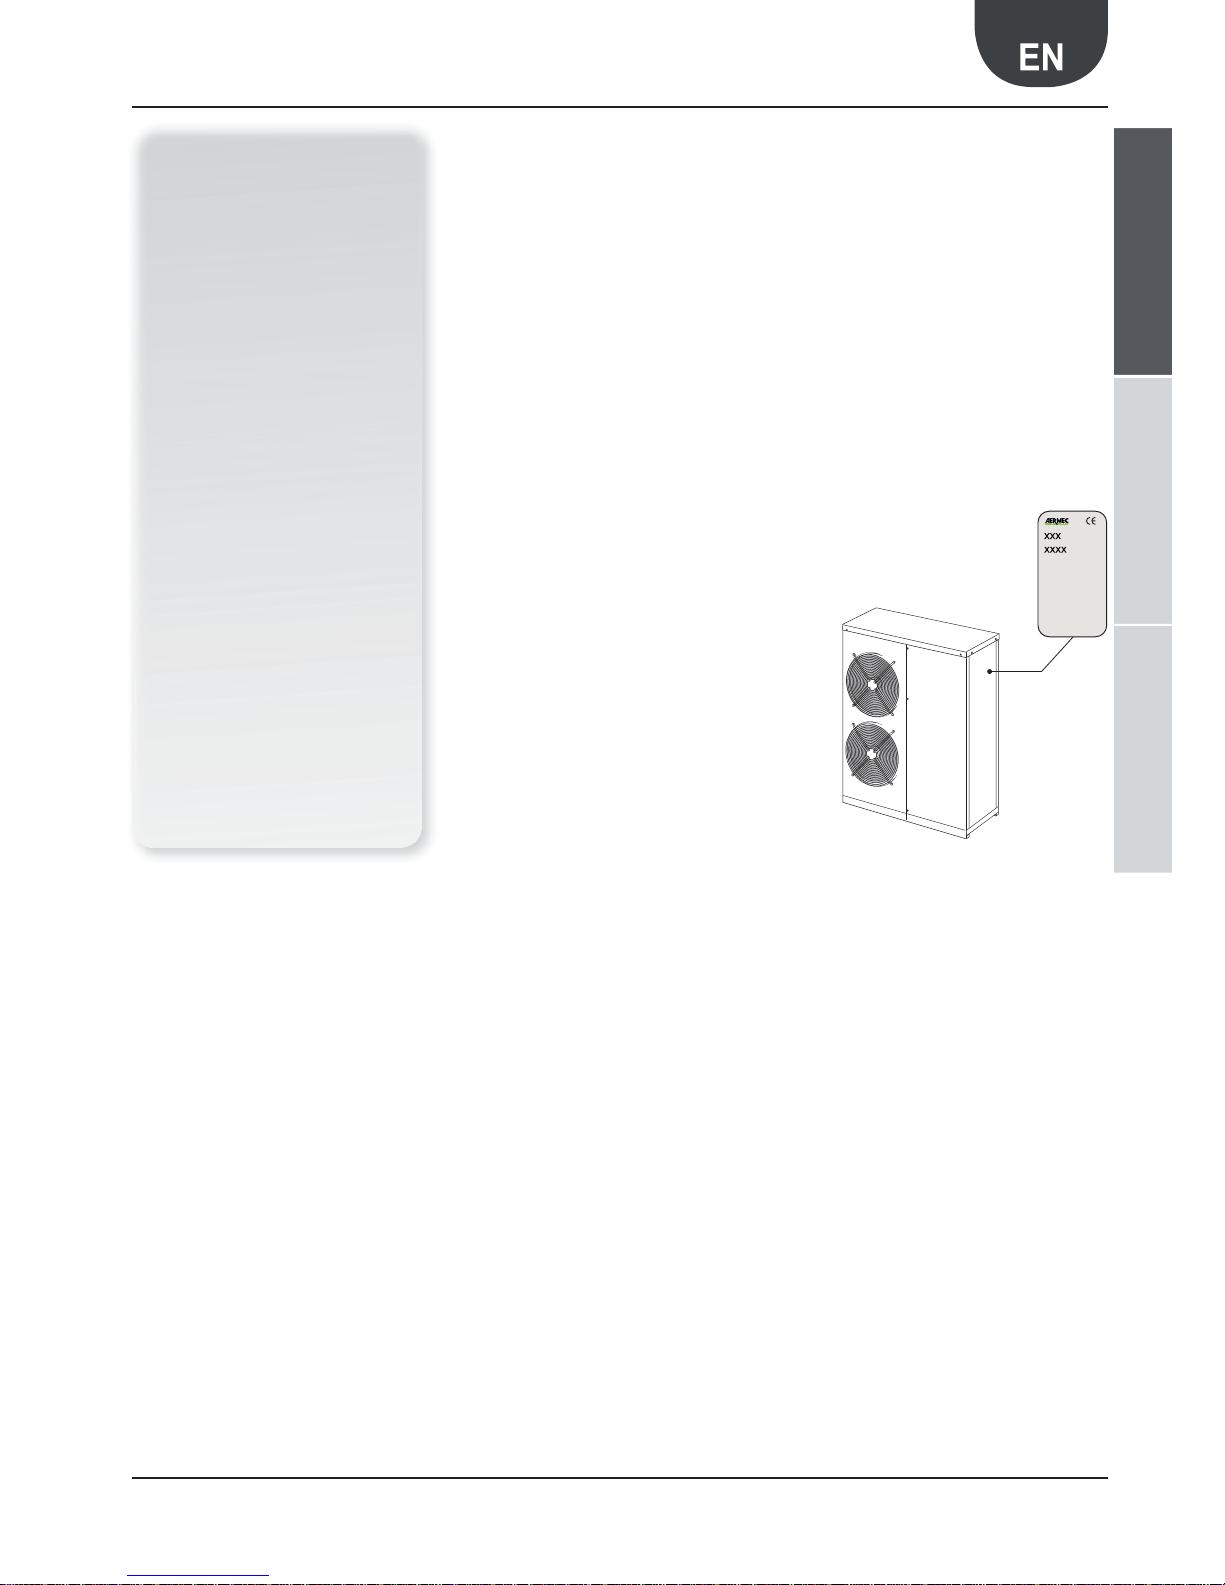
− PACKING LABEL, that shows the product
iden fi ca on data.
− TECHNICAL PLATE
Posi oned on the right lateral side-member
(see TAB.1)
(Tab.1)
TECHNICAL
PLATE
Possibility of D.H.W. production
(DCPX | VMF-DHW |MODU-485A
mandatory)
TECHNICAL SECTIONINSTALLATION SECTIONUSE
Page 6
6 Aermec code 6755521_01 11.11
ANK 025-085H
3. CONFIGURATOR
Field Description
1,2,3 ANK
4,5,6 SIZE
020 - 030 - 040 - 045 - 050 - 085
7 MODEL
H Heat Pump
8 VERSION
SDgr Standard
P Pump only
A With storage tank and pump
9 EXECUTION
SDgr Standard
10 COILS
SDgr Aluminium
R Copper
S Tinned copper
V In painted aluminium-copper (epoxy powders)
11 FIELD OF USE
SDgr Temperature of the water produced up to 4°C
Z Temperature of the water produced from 4 °C to 0 °C
Y Temperature of the water produced from 0 °C to -8 °C
12 EVAPORATOR
SDgr Standard
13 POWER SUPPLY
SDgr 400V/3N/50Hz
M 230V/1/50Hz for 020 - 030 - 040 - 045 models
Page 7
7Aermec code 6755521_01 11.11
ANK 025-085H
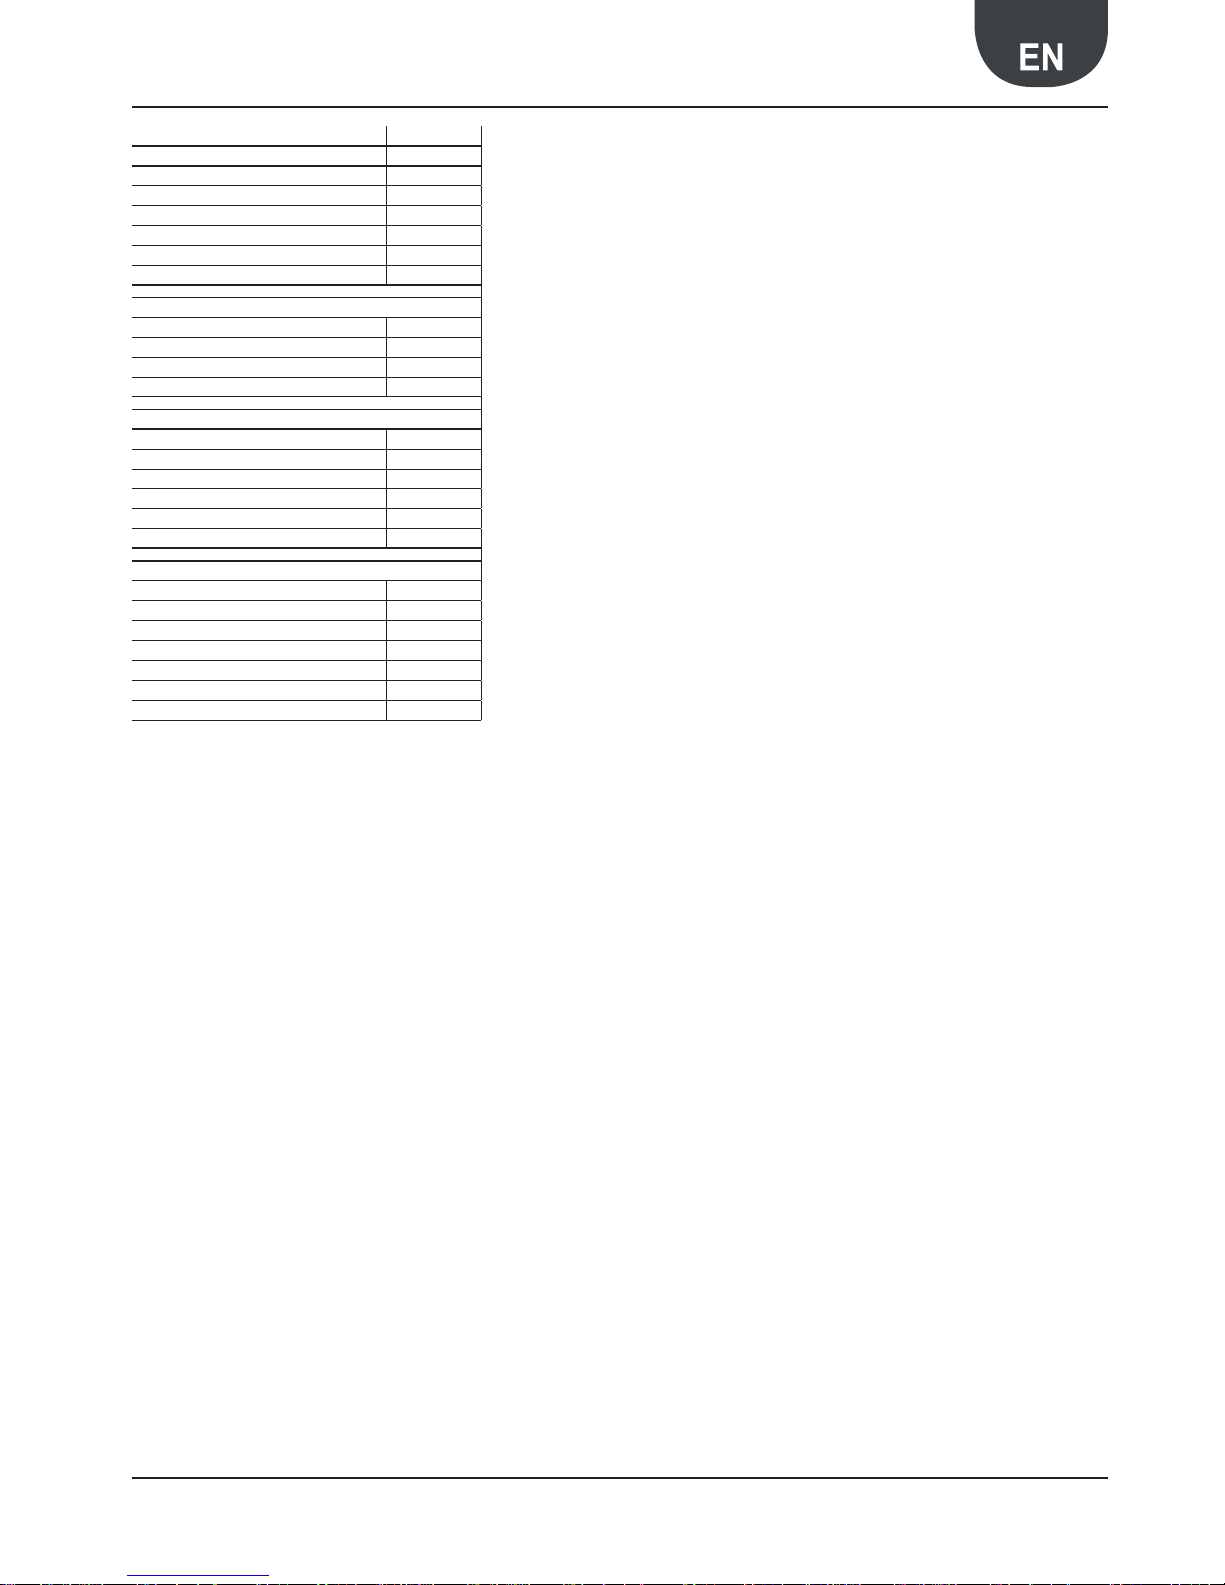
Circuit Components
Cooling circuit Model H
Compressors guard resistance •
High pressure switch •
Low pressure switch No
High pressure transducer •
Low pressure transducer •
Plate exchanger •
Hydraulic circuit "H" Versions
Water filter •
Flow switch •
Safety valve •
Air vent valve •
Hydraulic circuit "HP" Version
Water filter •
Flow switch •
Safety valve •
Air vent valve •
Pump •
Expansion vessel •
Hydraulic circuit "HA" Version
Water filter •
Flow switch •
Safety valve •
Air vent valve •
Pump (P) •
Expansion vessel •
Storage tank •
Page 8
8 Aermec code 6755521_01 11.11
ANK 025-085H
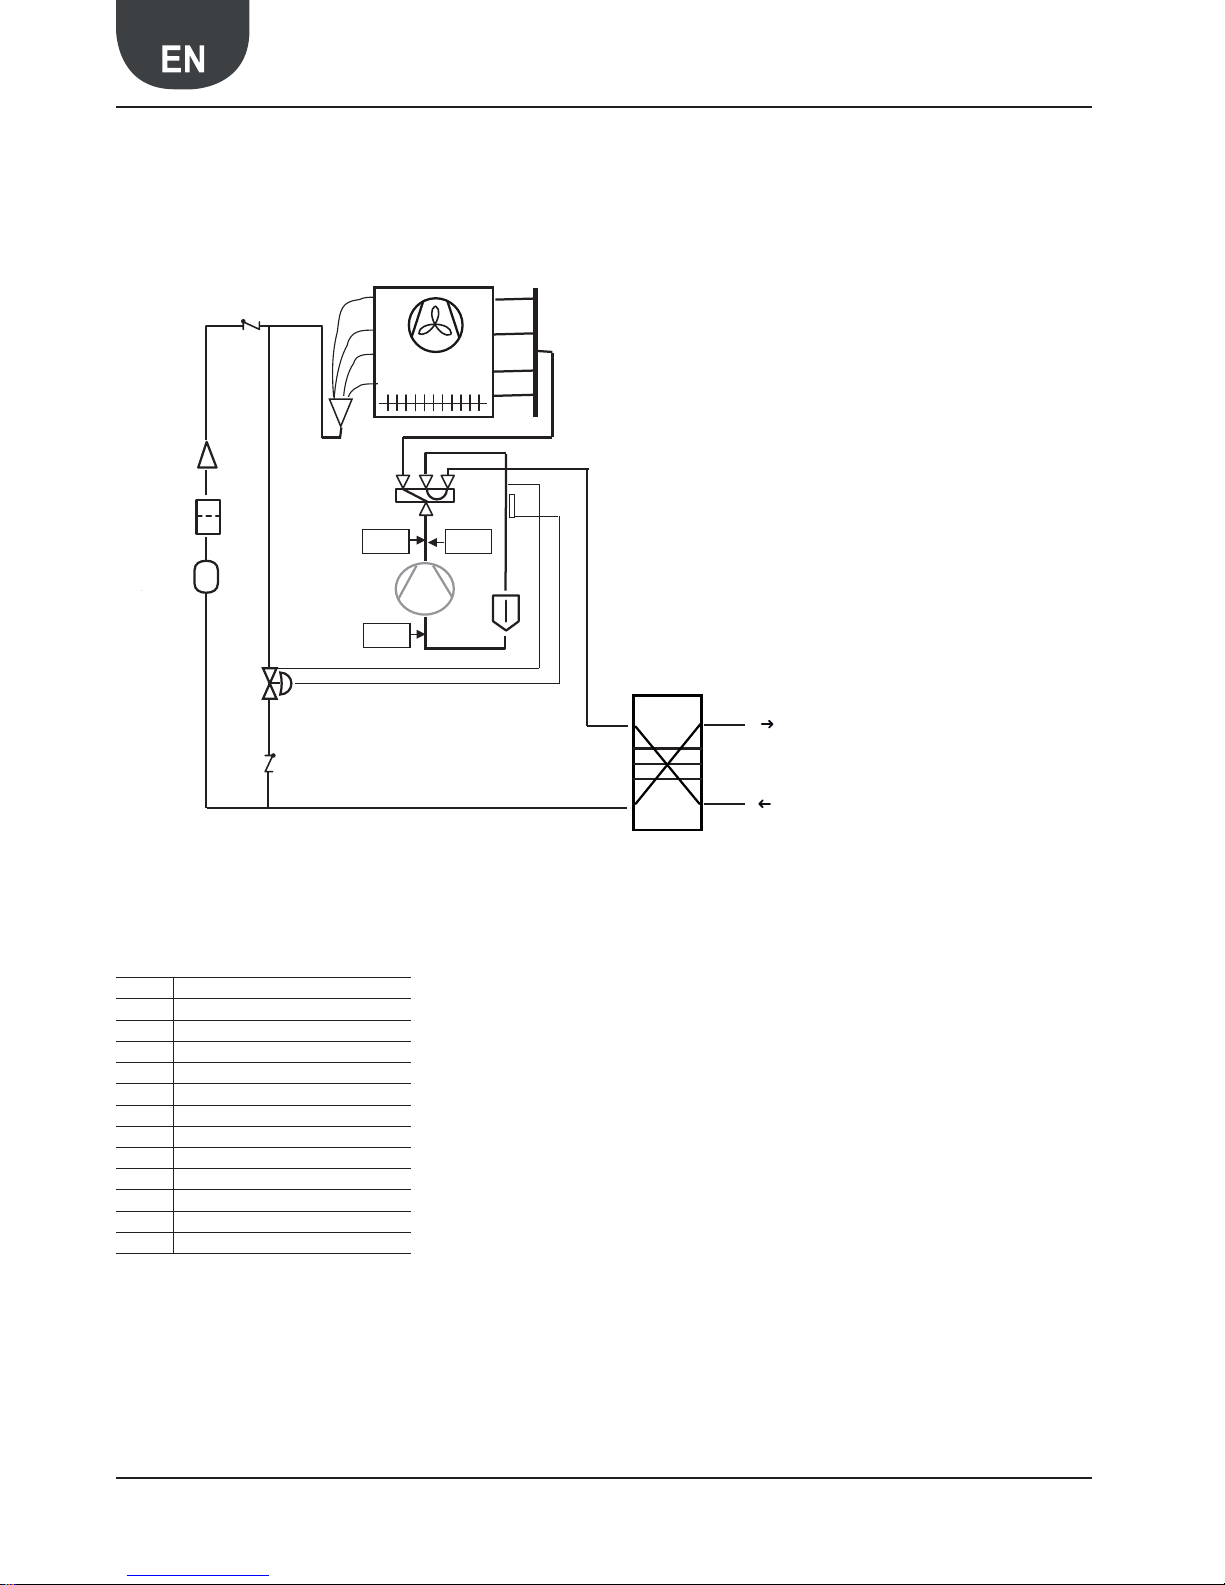
4. MAIN COOLING LAYOUT
TEV
F
CV
compressore
valvola
inversione
CV
BHE
CO
accumulo
liquido
HPSHPT
LPT
LS
KEY
CP Compressor
HPT High pressure transducer
HPS High pressure switch
LPT Low pressure transducer
VIC Cycle reversing valve
CN Finned coil
CV One-way valve
CO Calibrated orifice
F Dehydrator filter
AL Liquid storage tank
TEV Thermostatic valve
BHE Plate exchanger
V Fan/s
OUT
IN
CP
AL
VIC
CN
Page 9

9Aermec code 6755521_01 11.11
ANK 025-085H
5. DESCRIPTION OF COMPONENTS
5.1. COOLING CIRCUIT
COMPRESSORS
Rotary scroll hermetic compressors with 2-pole electric
motor. All compressors are fitted with guard resistance,
internal electronic circuit breaker protection with
centralised manual rearm.
SYSTEM SIDE HEAT EXCHANGER
Braze welded AISI 316 steel plate exchanger, insulated
externally with closed cell neoprene anti-condensation
material. It is fitted with an anti-freeze electric
resistance as per standard.
5.1.1. WATER FEATURES
PH 6-8
Electric conductivity Less than 200 mV/cm (25°C)
Chloride ions Less than 50 ppm
Sulphuric acid ions Less than 50 ppm
Total iron Less than 0.3 ppm
Alkalinity M Less than 50 ppm
Total hardness Less than 50 ppm
Sulphur ions none
Ammonia ions None
Silicone ions Less than 30 ppm
SOURCE SIDE EXCHANGER
Finned pack heat exchanger made with copper pipes
and aluminium fins adequately spaced to ensure high
efficiency.
CYCLE REVERSING VALVE
4-way cycle reversing valve. Inverts the flow of refrigerant fluid.
LIQUID STORAGE TANK
It compensates the difference in volume between
finned coil and plate exchanger, retaining excess liquid.
DEHYDRATOR FILTER
Hermetic with ceramic and hygroscopic material
cartridge, able to withhold impurities and any traces of
humidity present in the cooling circuit.
NON-RETURN VALVES
Allow one-way flow of the fluid.
THERMOSTATIC VALVe
Mechanical, with external equaliser positioned at
evaporator outlet, modulates the flow of gas to the
evaporator, depending on the heat load, in order to ensure a correct heating level of the gas in the intake line.
SOLENOID VALVE
The valve closes when the compressor switches off,
blocking the flow of refrigerant gas to the evaporator.
LIQUID INDICATOR LED
Used to check the correct power supply of the laminating element and any presence of humidity in the
cooling circuit.
LIQUID SEPARATOR
Positioned in the intake line, it protects the compressor
from any liquid return.
5.2. STRUCTURE AND FANS
STRUCTURE
Support structure made of hot-dipped galvanised
steel sheets, painted with polyester powders, built to
guarantee easy accessibility for service and
maintenance.
FAN UNIT
Fi ed with accident-protec on protec ve mesh and
made up from 6-pole motor axial fans with external
rotor with IP44 protec on ra ng. The motor is also
fi ed with internal manual-rearm circuit breaker
protec on. It is in compliance with the
IEC EN 60335-2-40 Standard.
5.3. HYDRAULIC CIRCUIT
WATER FILTER
Fitted with steel filtering mesh that keeps the
exchanger from clogging by impurities present in the
circuit.
FLOW SWITCH
It has the task of controlling the correct water
circulation inside the heat exchanger; if this is not the
case, they block the unit.
SAFETY VALVE
Calibrated at 6 bar, it has conveyable discharge and
intervenes by discharging over-pressure in the event of
anomalous pressures.
AIR VENT VALVE
Manual, it discharges any air bubbles present in the
hydraulic circuit. It is cut-off by a cock in order to
facilitate any replacement.
5.3.1. ADDITIONAL COMPONENTS ENVISIONED
BY THE CONFIGURATOR
PUMP
Offers a useful head to the system, net of the unit
pressure drops.
EXPANSION VESSEL
A membrane with factory-set nitrogen (see technical
data for capacity).
SYSTEM STORAGE TANK
Used to decrease the number of compressor peaks and
even out the temperature of the water to be sent to
the system.
Made of steel to reduce heat loss and to eliminate
the formation of condensation, insulated by thick
polyurethane.
It mounts a range of 200 W electric anti-freeze
resistances able to ensure a minimum temperature
of the stored water of +5°C with minimum outdoor
temperature of -20°C. The resistances are activated by
the anti-freeze probe inserted in the tank.
DRAIN COCK
Allows to drain circuit water.
5.4. SAFETY AND CONTROL
COMPONENTS
HIGH PRESSURE SWITCH
With fixed calibration, placed on high pressure side
Page 10

10 Aermec code 6755521_01 11.11
ANK 025-085H
of cooling circuit, inhibits compressor operation if
abnormal work pressure occurs.
LOW PRESSURE TRANSDUCER
Positioned on the low pressure side of the cooling
circuit, it informs the control board of the
work pressure, generating a pre-alarm
in the event of anomalous pressure.
HIGH PRESSURE TRANSDUCER
Positioned on the high pressure side of the cooling
circuit, it informs the control board of the
work pressure, generating a pre-alarm
in the event of anomalous pressure.
5.5. ELECTRIC CONTROL
AND POWER BOARD
ELECTRIC CONTROL BOARD
In compliance with the EN 60204-1/IEC 204-1
Standards, complete with:
- door lock main isolating switch,
- magnet circuit breakers and contactors for
compressors and fans,
- clamps for REMOTE PANEL (accessory),
- spring type control circuit terminal board,
- outdoor electric control board with panel and
gaskets,
- electronic controller,
- evaporator pump consent relay,
- all numbered cables.
DOORLOCK ISOLATING SWITCH
The electric control board can be accessed by removing
the voltage using the door lock isolating switch lever.
The isolating switch is fitted with a safety lock to
prevent voltage being applied to the machine
accidentally during maintenance operations.
CONTROL KEYBOARD
Allows complete control of the appliance. For a more
in-depth description please refer to the user manual.
Electronic modu control
ADJUSTMENT
Temperature control of the outlet water with propor onal-integral
algorithm: maintains average output temperature at value set
− Self-adap ng diff eren al switch: guarantees minimum opera ng
mes of the compressor in systems with low water content.
− Intelligent defros ng for pressure reduc on: op misa on of the
defros ng cycles in order to prevent useless defros ng and to
increase the effi ciency in hea ng mode.
− Set-point compensa on with external temperature (with external
air probe accessory): reduces energy consump on.
− Condensa on check based on the pressure rather than on
temperature for absolute stability (with DCPX fan revs. adjuster
accessory).
− Inverse condensa on check for the heat pump opera ng mode also
in summer, produc on of DHW (with DCPX fans revs. adjuster
accessory).
− Pre-alarms with automa c reset: in the case of alarm, a certain
number of re-starts are allowed before the defi ni ve block.
− Alarm on the ∆T: to iden fy wiring errors (reverse rota on) or
blocked cycle reversing valve.
− Compressor opera ng hours count.
− Compressor peak count.
− Historical alarms.
− Autostart a er voltage drop.
− Local or remote control.
Display of the start of the unit:
1. Voltage presence
2. Compressor ON/OFF
3. Opera ng mode (hot/cold)
4. Ac ve alarm
Probes, transducers and parameters display
1. Water outlet
2. Water inlet
3. Coil temperature (heat pumps)
4. Pressing line gas temperature
5. External air temperature (heat pumps, cooling only with DCPX
and probe)
6. Flow pressure (heat pumps)
7. Intake pressure (heat pumps)
8. Set-point temperature error (sum of the propor onal and
integral error)
9. Stand-by mes for start-up/switch-off of the compressor
10. Alarms/pre-alarms management
11. Low pressure
12. High pressure (primary alarm: the pressure switch directly blocks
supply to compressor)
13. High discharge temperature
14. An -freeze
15. Flow switch
16. Alarm on the ∆T:
17. Compressor magnet circuit breaker
18. Probes fault alarm
− Pre-alarms with automa c reset with limited number of re-start
a empts before blocking.
− ON/OFF from external contact.
− Season change from external contact.
For further informa on, refer to the user manual.
Page 11
11Aermec code 6755521_01 11.11
ANK 025-085H
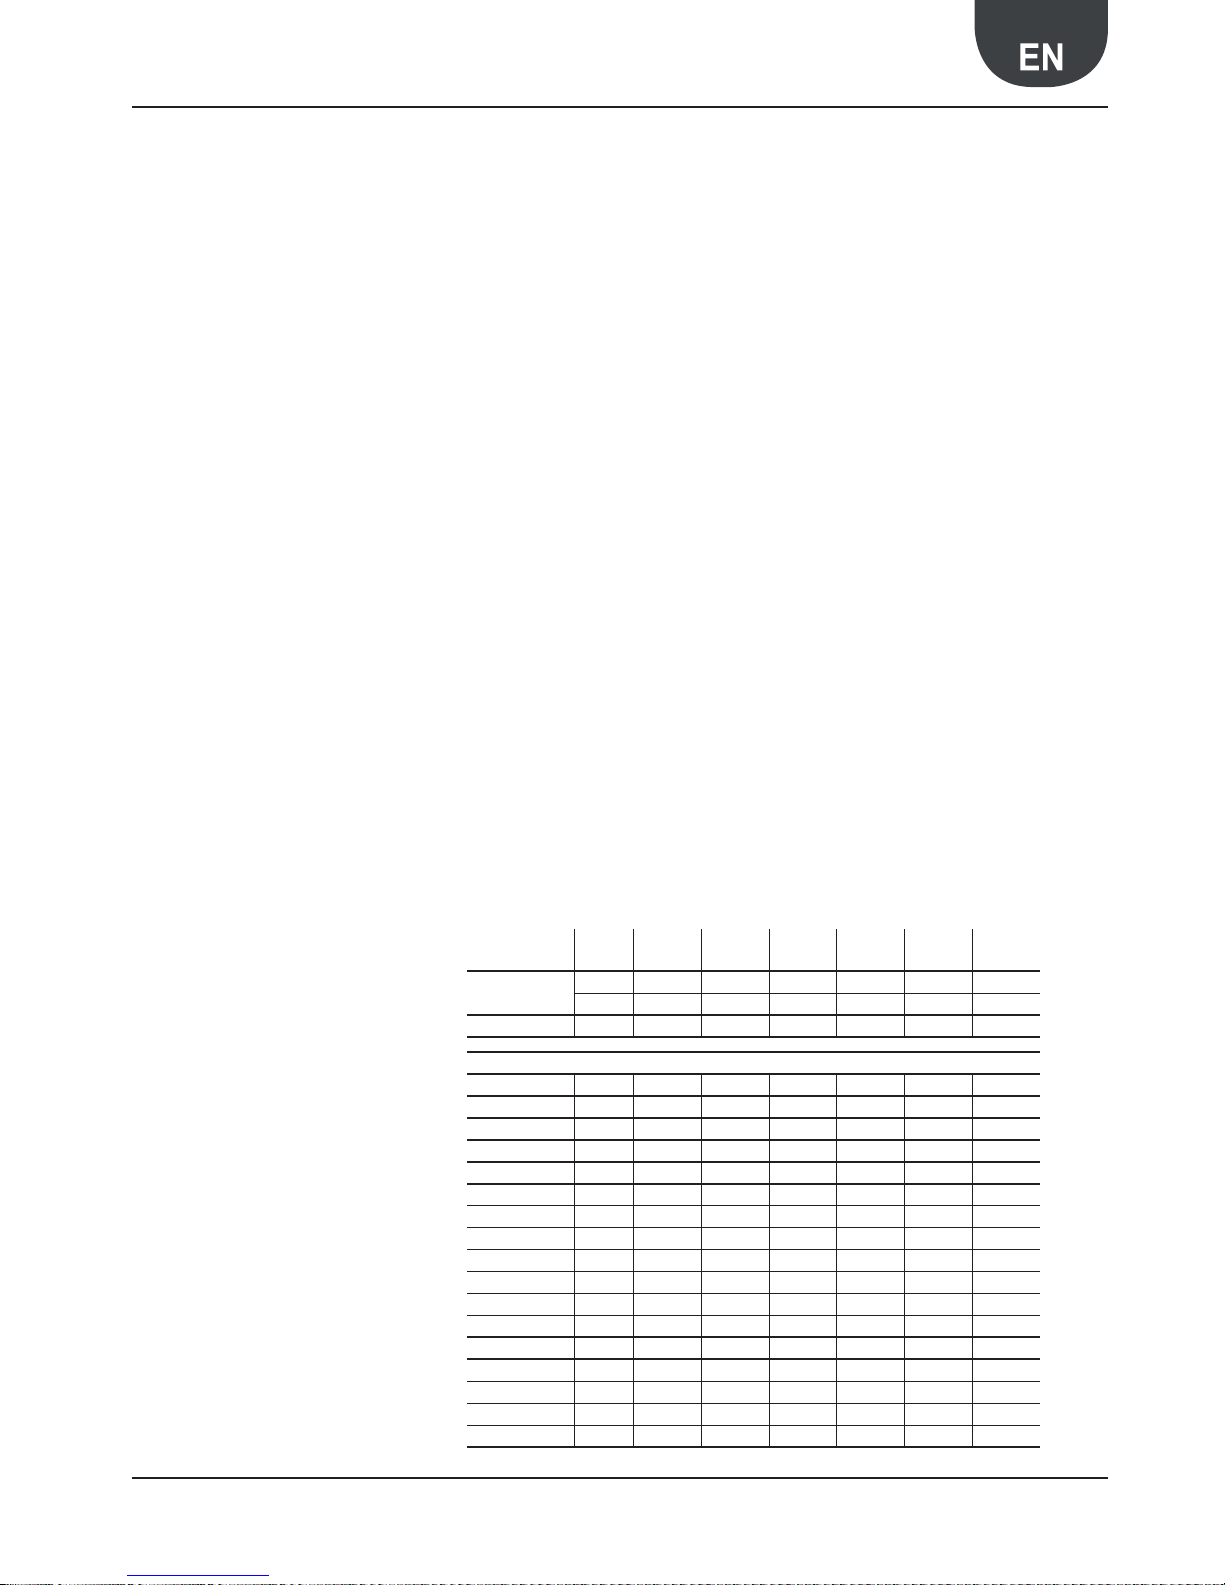
ANK
VERS. 020 030 040 045 050 085
VT
H-HP
VT9 VT9 VT9 VT9 VT9 VT9
HA
VT15A VT15A VT15A VT15A VT15A VT15A
BDX BDX8 BDX9 BDX9 BDX9 BDX9 BDX9
ELECTRIC ACCESSORIES
DRE5
ALL ••••••
DCPX51
ALL ••••••
MODU-485A ALL ••••••
VMF-CRP ALL ••••••
VMF-VOC ALL ••••••
VMF-E5B or N ALL ••••••
VMF-ACS3KM 230V-1 ••••
VMF-ACS3KTN 400V-3N ••••••
VMF-ACS6KTN 400V-3N ••••••
VMF-ACS8KTN 400V-3N ••••••
KRB1
ALL •
KRB2
ALL •••••
PR3
ALL ••••••
BS4KW230M
••••
BS6KW230M
••••
BS6KW400T
••••••
BS9KW400T
••••••
VT ANTI-VIBRATION MOUNTS
Group of anti-vibration mounts.
MODU-485A
RS-485 interface for supervising systems with MODBUS
protocol.
DCPX
Fan speed control devices allowing correct operation
of the cooling unit within the temperature range from
+20°C to -10°C, in heat pump mode, in the summer
period for the production of DHW up to +42°C (refer to
the operational limits graphics).
DRE
Electronic device for reduction of the peak current
(about 30% in the single circuit, 26% in the twin circuit
and 22% in the triple circuit).
KR B1/B2
Electric resistance kit for base; avoids the formation of
ice in the base.
BSKW
Electric resistances kit for installation outside the unit,
with single-phase and three-phase power supply:
- BS4KW230M (4 kW, 230V/1/50Hz)
- BS6KW230M (6 kW, 230V/1/50Hz)
- BS6KW400T (6 kW, 400V/3/50Hz)
- BS9KW400T (9 kW, 400V/3/50Hz)
BDX
Condensate collection tray.
PR3 Simplified remote panel.
Allows basic control of the machine (start-up/switchoff, change operating mode, alarms summary and
reset). The maximum installation distance admitted is
150 m with 7-pole cable plus minimum section shielding of 0.5 mm.
VMF-CRP
It is the additional module for the management of the
area pumps (up to 4 for every expansion) or to control
the switch-on/off of a boiler and up to 3 heat recovery
units simultaneously.
VMF-VOC
It is a probe that detects the quality of the air used to
activate the heat recovery unit.
VMF-ACS
Electric control board for the complete
command/control of a DHW storage tank:
1. 3-way control valve
2. anti-legionella
3. temperature probe
4. integrative resistance:
3 kW single-phase|three-phase
6 kW three-phase
8 kW three-phase
VMF-E5B|N
Black or white recessing panel, with back-lit graphical
LCD display and capacitive keyboard. It allows centralised command/control of:
1. a complete hydronic system made up from fan
coils with 1 master + maximum 5 slaves;
2. pump chiller (RS 485 INTERFACE AND RESPEC
TIVELY MODU485A MANDATORY ACCES
SORY;
3. pumps: maximum 12 configurable area pumps
(VMF-CRP accessory);
4. boiler: management of boiler consent for the
production of hot water (VMF-CRP accessory);
5. heat recovery units: maximum 3 consents for
programmable recovery units according to time
periods and/or via the detection of the air
quality obtained using the VMF-VOC accessory,
DHW module (VMF-CRP accessory);
6. complete management of the DHW production
(VMF-DHW ACCESSORY see above).
6. ACCESSORIES
The MODU-485A |DCPX |VMF-ACS |VMF E5
accessories are mandatory for the
management and production of DHW.
3 Available only with 400V/3N power supply.
Only applicable in the factory.
4
Only applicable in the factory.
Page 12
12 Aermec code 6755521_01 11.11
ANK 025-085H
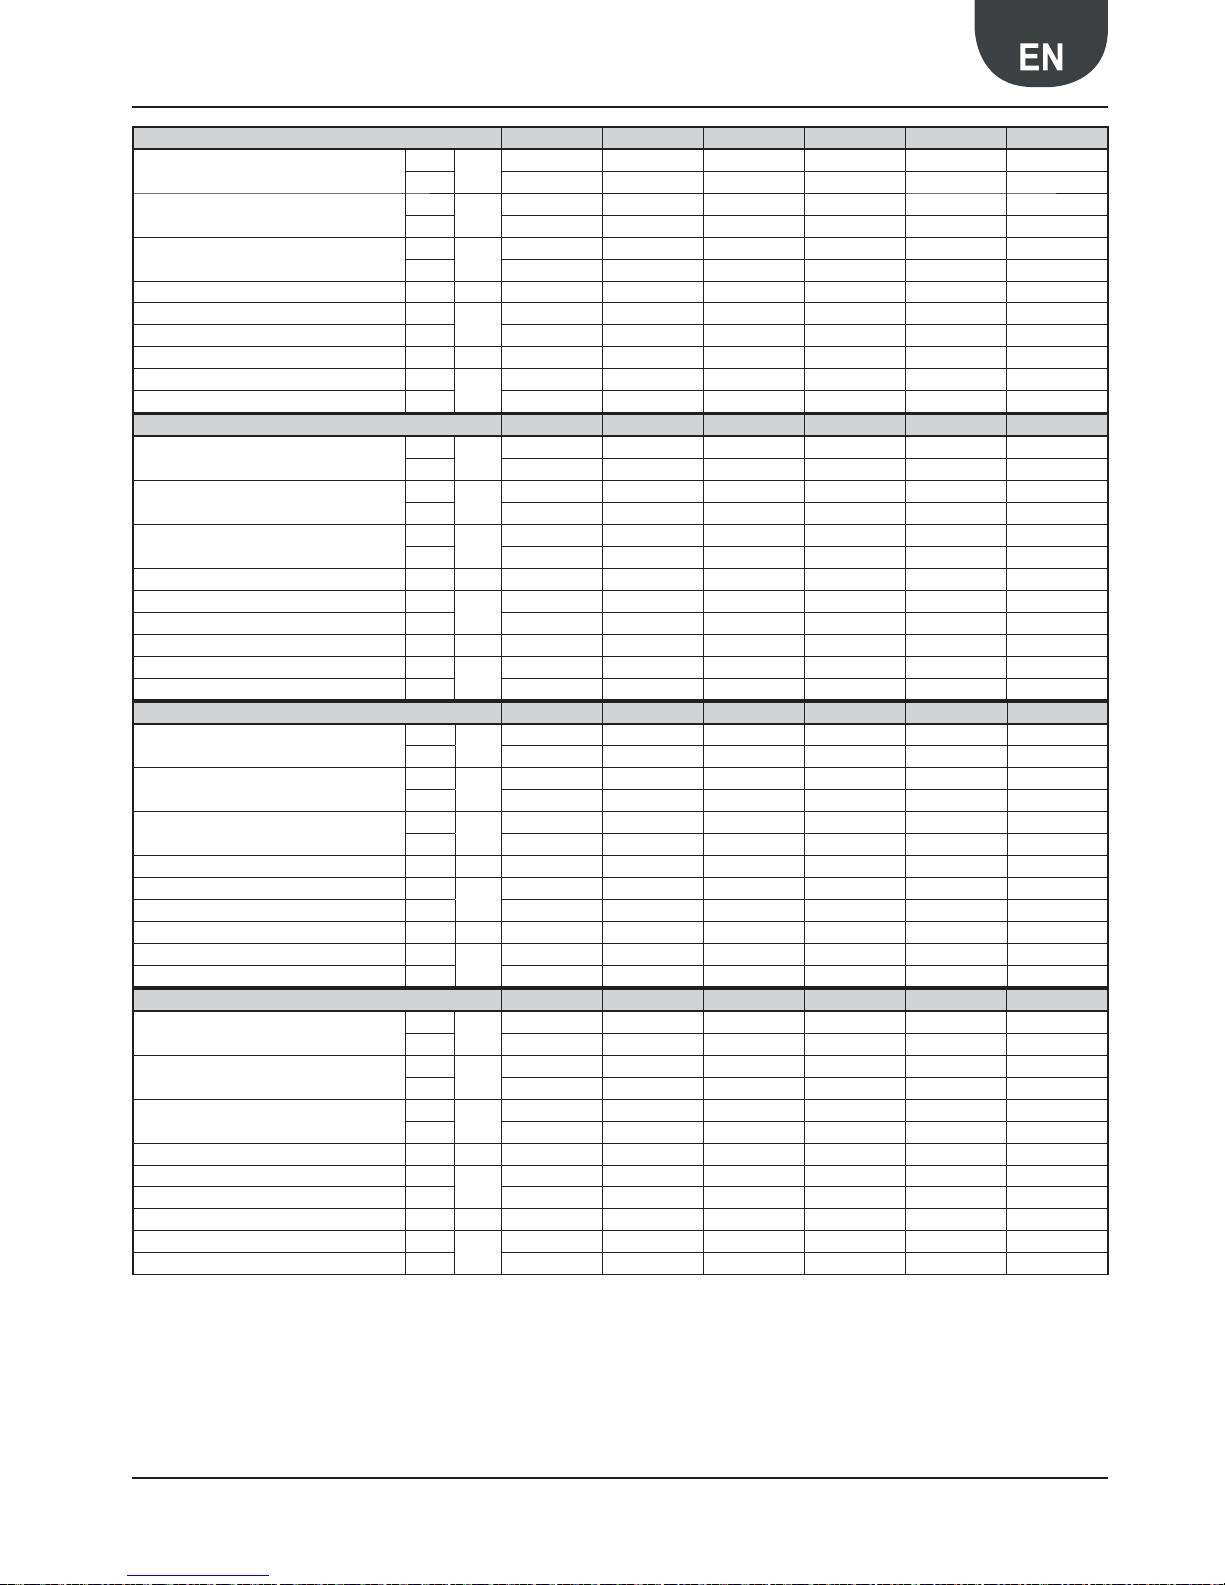
7. EHPA 400V/3N/50Hz TECHNICAL DATA
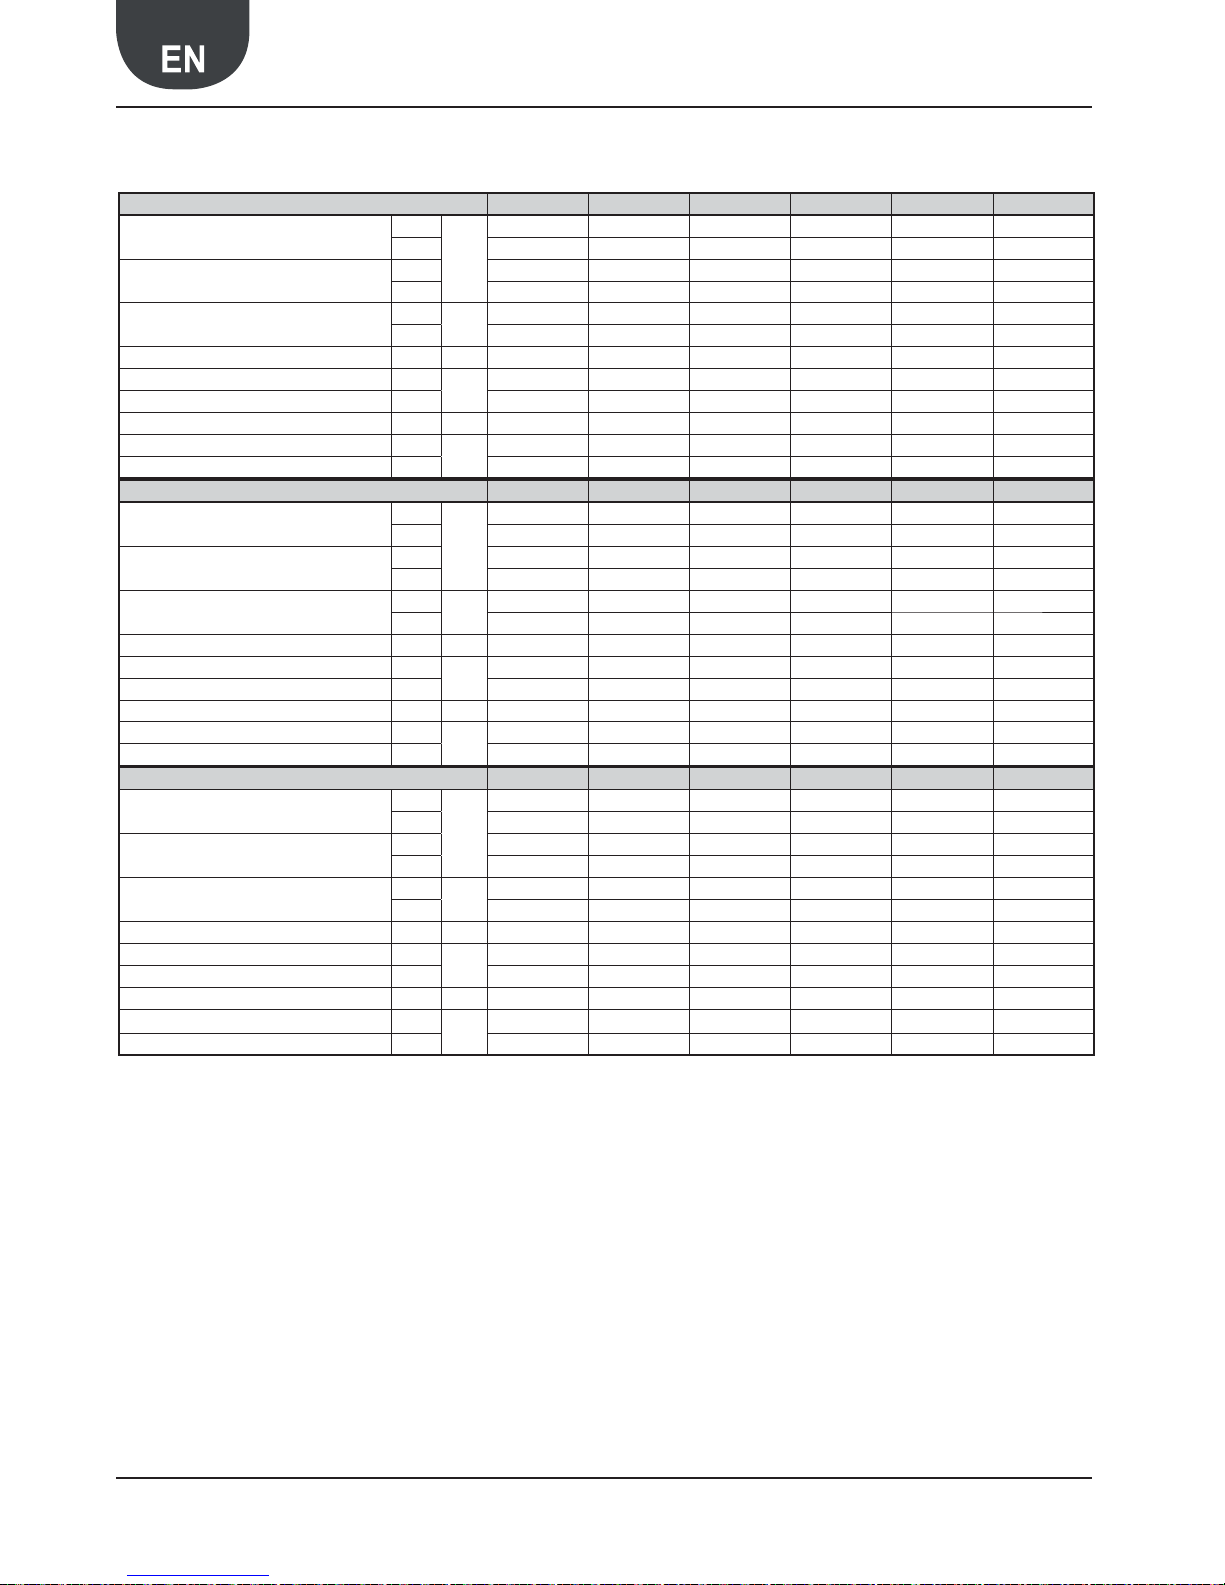
A 7/W 35 ANK020 ANK030 AN K040 ANK045 ANK050 ANK085
Hea ng capacity
H
kW
8.560 10.700 13.134 14.806 16.266 18.760
HP-HA
8.256 10.620 12.980 14.587 16.040 18.266
Input power
H 1.970 2.664 3.249 3.548 3.814 4.330
HP-HA 2.093 2.668 3.261 3.637
3.914 4.427
COP
H
W/W
4.345 4.017 4.042 4.173
4.265 4.333
HP-HA 3.945 3.981 3.980 4.011 4.098 4.126
Water flow rate ALL l/h 1470 1840 2260 2550
2800 3222
Pressure drops H
kPa
28 16 24 18 22 27
Useful head pressure HP-HA 55.0 63.0 51.0 74.3 65.7 56.2
Air flow rate ALL m
3
/h 3500 8000 8000 7500
7500 7500
Sound pressure ALL
dB(A)
37.0 39.5 39.5 39.5 39.5 39.5
Sound power ALL 68.0 70.5 70.5 70.5
70.5 70.5
A -7/W 35 ANK020 ANK030 AN K040 ANK045 ANK050 ANK085
Hea ng capacity
H
kW
4.810 5.872 7.300 8.136 9.524 10.480
HP-HA 4.897 5.748 7.208 7.936 9.316 10.364
Input power
H 1.850 2.573 3.102 3.334 3.596 4.030
HP-HA 1.926 2.612 3.121 3.422 3.696 4.160
COP
H
W/W
2.600 2.282 2.353 2.440 2.648 2.600
HP-HA 2.543 2.201 2.310 2.319 2.521 2.491
Water flow rate ALL l/h 1470 1840 2260 2550
2800 3222
Pressure drops H
kPa
28 16 24 18 22 27
Useful head pressure HP-HA 55.0 63.0 51.0 74.3 65.7 56.2
Air flow rate ALL m
3
/h 3500 8000 8000 7500
7500 7500
Sound pressure ALL
dB(A)
37.0 39.5 39.5 39.5 39.5 39.5
Sound power ALL 68.0 70.5 70.5 70.5
70.5 70.5
A 2/W 35 ANK020 ANK030 AN K040 ANK045 ANK050 ANK085
Hea ng capacity
H
kW
6.260 8.179 9.764 11.239 11.556 13.300
HP-HA
6.048 8.045 9.610 11.021 11.330 12.568
Input power
H 1.870
2.545
3.074 3.378 3.550 4.110
HP-HA 1.940
2.583
3.097 3.467
3.649 4.045
COP
H
W/W
3.348 3.214 3.176 3.327
3.255 3.236
HP-HA 3.118 3.115 3.103 3.179 3.105 3.107
Water flow rate ALL l/h 1470 1840 2260 2550
2800 3222
Pressure drops H
kPa
28 16 24 18 22 27
Useful head pressure HP-HA 55.0 63.0 51.0 74.3 65.7 56.2
Air flow rate ALL m
3
/h 3500 8000 8000 7500
7500 7500
Sound pressure ALL
dB(A)
37.0 39.5 39.5 39.5 39.5 39.5
Sound power ALL 68.0 70.5 70.5 70.5
70.5 70.5
Data in compliance with the EN 14511-2 Standard
Condenser inlet water temperature 30°C
Condenser outlet water temperature 35°C
External air temperature 7°C d.b./6° C w.b.
Sound power
Aermec determines sound power values on the basis of measurements made in compliance with the ISO 9614-2 Standard,
in agreement with that requested by Eurovent certification.
Sound pressure
Sound pressure in free field conditions on reflective surface
(directivity factor Q=2) at 10 mt from the external surface of
unit, in compliance with ISO 3744 regulations.
Page 13
13Aermec code 6755521_01 11.11
ANK 025-085H
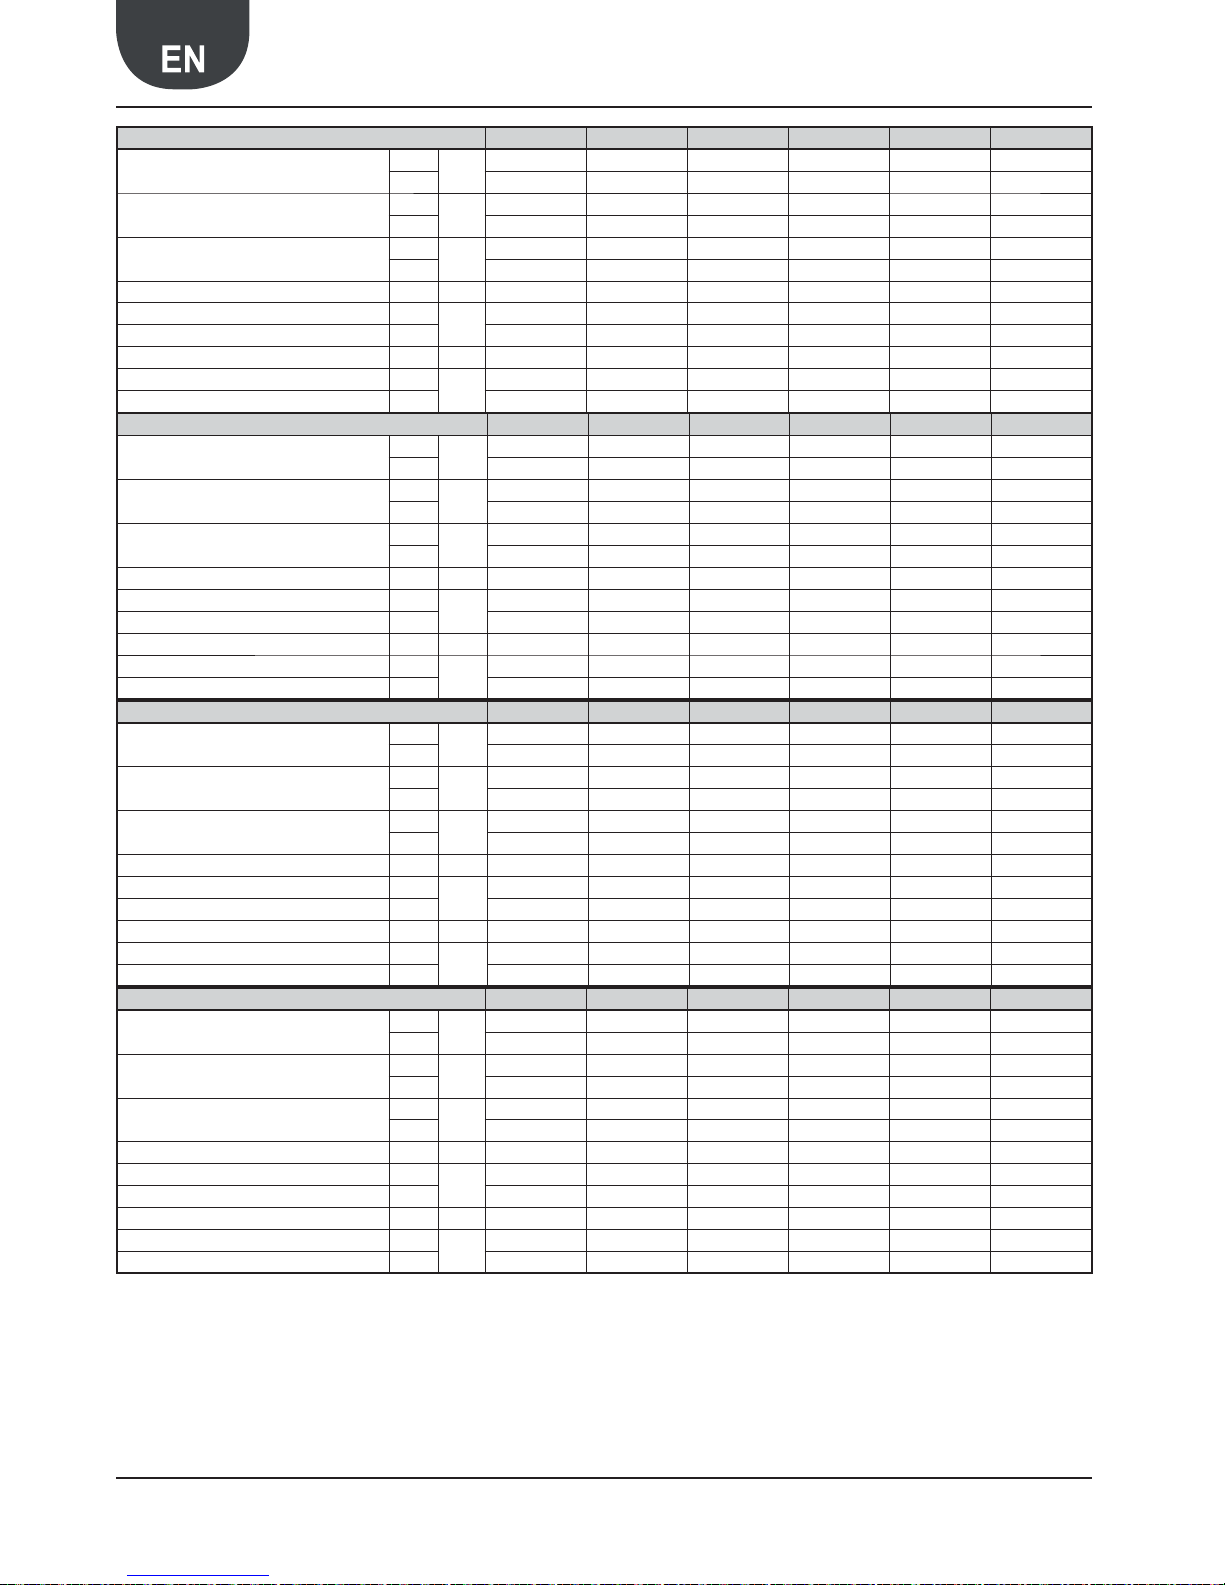
Data in compliance with the EN 14511-2 Standard
Condenser inlet water temperature 30°C
Condenser outlet water temperature 35°C
External air temperature 7°C d.b./6° C w.b.
Sound power
Aermec determines sound power values on the basis of measurements made in compliance with the 9614-2 Standard, in
agreement with that requested by Eurovent certification.
Sound pressure
Sound pressure in free field conditions on reflective surface
(directivity factor Q=2) at 10 mt from the external surface of
unit, in compliance with ISO 3744 regulations.
A -15/W 35 ANK020 ANK030 AN K040 ANK045 ANK050 ANK085
Hea ng capacity
H
kW
3.730 4.690 5.748 6.084 7.159 7.910
HP-HA 3.559 4.633 5.674 5.994 7.052 8.067
Input power
H
kW
1.840 2.555 3.111 3.323 3.565 4.030
HP-HA 1.890 2.586 3.131 3.394 3.646 4.108
COP
H
W/W
2.027 1.836 1.848 1.831 2.008 1.963
HP-HA 1.883 1.792 1.812 1.766 1.934 1.964
Water flow rate ALLES l/h 1470 1840 2260 2550
2800 3222
Pressure drops H
kPa
28 16 24 18 22 27
Useful head pressure HP-HA 55.0 63.0 51.0 74.3 65.7 56.2
Air flow rate ALLES m
3
/h 3500 8000 8000 7500
7500 7500
Sound pressure ALLES
dB(A)
37.0 39.5 39.5 39.5 39.5 39.5
Sound power ALLES 68.0 70.5 70.5 70.5
70.5 70.5
A 7/W 45
Hea ng capacity
H
kW
7.980 9.741 11.882 13.639 14.906 17.450
HP-HA
7.741 7.611 11.733 13.428 14.686 16.835
Input power
H
kW
2.310
3.112
3.792 4.182 4.436 5.120
HP-HA 2.373
3.150
3.815 4.271
4.536 5.172
COP
H
W/W
3.455 3.130 3.133 3.261
3.360 3.408
HP-HA 3.262 2.416 3.075 3.144 3.238 3.255
Water flow rate ALLES l/h 1470 1840 2260 2550
2800 3222
Pressure drops H
kPa
28 16 24 18 22 27
Useful head pressure HP-HA 55.0 63.0 51.0 74.3 65.7 56.2
Air flow rate ALLES m
3
/h 3500 8000 8000 7500
7500 7500
Sound pressure ALLES
dB(A)
37.0 39.5 39.5 39.5 39.5 39.5
Sound power ALLES 68.0 70.5 70.5 70.5
70.5 70.5
A 2/W 45
Hea ng capacity
H
kW
5.757 7.878 9.181 10.622 10.671 12.018
HP-HA
5.679 7.773 9.065 10.459 10.513 11.832
Input power
H
kW
2.236
3.006
3.674 4.031 4.263 4.843
HP-HA 2.285
3.043
3.697 4.147
4.359 4.931
COP
H
W/W
2.575 2.621 2.499 2.635
2.503 2.482
HP-HA 2.485 2.554 2.452 2.522 2.412 2.400
Water flow rate ALLES l/h 1470 1840 2260 2550
2800 3222
Pressure drops H
kPa
28 16 24 18 22 27
Useful head pressure HP-HA 55.0 63.0 51.0 74.3 65.7 56.2
Air flow rate ALLES m
3
/h 3500 8000 8000 7500
7500 7500
Sound pressure ALLES
dB(A)
37.0 39.5 39.5 39.5 39.5 39.5
Sound power ALLES 68.0 70.5 70.5 70.5
70.5 70.5
A -7/W 45
Hea ng capacity
H
kW
4.559 4.872 5.963 7.290 8.066 9.199
HP-HA
4.454 4.758 5.888 7.105 7.874 8.992
Input power
H
kW
2.205
2.928
3.575 3.971 4.180 4.774
HP-HA 2.255
2.966
3.597 4.058
4.279 4.865
COP
H
W/W
2.068 1.664 1.668 1.836
1.930 1.927
HP-HA 1.975 1.604 1.637 1.751 1.840 1.848
Water flow rate ALLES l/h 1470 1840 2260 2550
2800 3222
Pressure drops H
kPa
28 16 24 18 22 27
Useful head pressure HP-HA 55.0 63.0 51.0 74.3 65.7 56.2
Air flow rate ALLES m
3
/h 3500 8000 8000 7500
7500 7500
Sound pressure ALLES
dB(A)
37.0 39.5 39.5 39.5 39.5 39.5
Sound power ALLES 68.0 70.5 70.5 70.5
70.5 70.5
EHPA 400V/3N/50Hz technical data
Page 14
14 Aermec code 6755521_01 11.11
ANK 025-085H
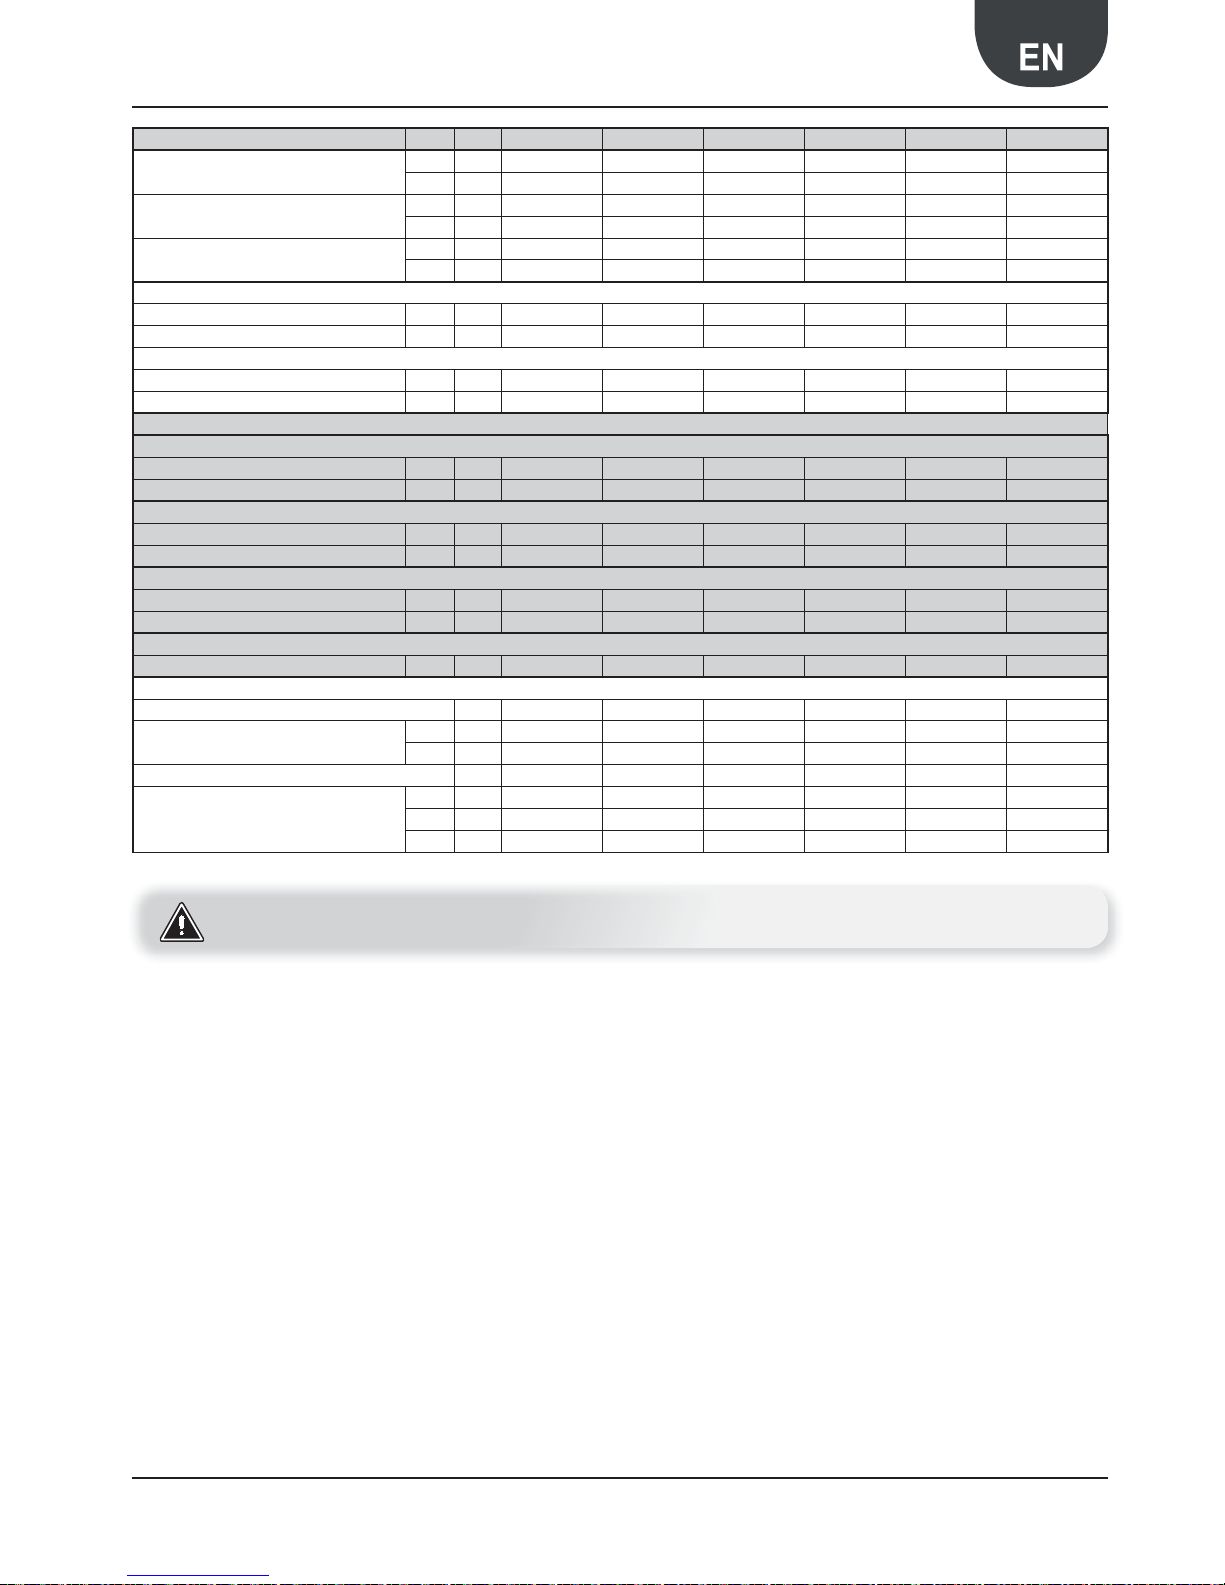
A -7/W 55
Hea ng capacity
H
kW
4.140 4.871 5.942 7.309 8.373 9.370
HP-HA 3.853 4.796 5.866 7.201 8.235 9.121
Input power
H
kW
2.630 3.467 4.253 4.886 5.037 5.770
HP-HA 2.732 3.570 4.279 5.094 5.233 5.893
COP
H
W/W
1.574 1.405 1.397 1.496 1.662 1.624
HP-HA 1.410 1.343 1.371 1.414 1.574 1.548
Water flow rate ALLES l/h 1470 1840 2260 2550
2800 3222
Pressure drops H
kPa
28 16 24 18 22 27
Useful head pressure HP-HA 55.0 63.0 51.0 74.3 65.7 56.2
Air flow rate ALLES m
3
/h 3500 8000 8000 7500
7500 7500
Sound pressure ALLES
dB(A)
37.0 39.5 39.5 39.5 39.5 39.5
Sound power ALLES 68.0 70.5 70.5 70.5
70.5 70.5
A 20/W 55
Hea ng capacity
H
kW
9.640 11.885 14.524 16.635 18.100 21.520
HP-HA 9.332 11.730 14.342 16.380 17.827 20.656
Input power
H
kW
2.930 3.940 4.810 5.310 5.640 6.540
HP-HA 2.983 3.990 4.840 5.420 5.760 6.433
COP
H
W/W
3.290 3.016 3.020 3.133 3.209 3.291
HP-HA 3.128 2.940 2.963 3.022 3.095 3.211
Water flow rate ALLES l/h 1470 1840 2260 2550
2800 3222
Pressure drops H
kPa
28 16 24 18 22 27
Useful head pressure HP-HA 55.0 63.0 51.0 74.3 65.7 56.2
Air flow rate ALLES m
3
/h 3500 8000 8000 7500
7500 7500
Sound pressure ALLES
dB(A)
37.0 39.5 39.5 39.5 39.5 39.5
Sound power ALLES 68.0 70.5 70.5 70.5
70.5 70.5
A 7/W 55
Hea ng capacity
H
kW
7.210 8.680 10.672 12.328 13.887 15.800
HP-HA 6.918 8.607 10.548 12.223 13.752 15.524
Input power
H
kW
2.710 3.562 4.445 5.015 5.238 6.020
HP-HA 2.817 3.665 4.473 5.223 5.435 6.146
COP
H
W/W
2.661 2.437 2.401 2.458 2.651 2.625
HP-HA 2.456 2.348 2.358 2.340 2.530 2.526
Water flow rate ALLES l/h 1470 1840 2260 2550
2800 3222
Pressure drops H
kPa
28 16 24 18 22 27
Useful head pressure HP-HA 55.0 63.0 51.0 74.3 65.7 56.2
Air flow rate ALLES m
3
/h 3500 8000 8000 7500
7500 7500
Sound pressure ALLES
dB(A)
37.0 39.5 39.5 39.5 39.5 39.5
Sound power ALLES 68.0 70.5 70.5 70.5
70.5 70.5
A -15/W 45 ANK020 ANK030 AN K040 ANK045 ANK050 ANK085
Hea ng capacity
H
kW
3.038 4.001 4.897 5.511 6.457 7.367
HP-HA
2.998 3.951 4.839 5.420 6.358 7.267
Input power
H
kW
2.163
2.910
3.550 3.950 4.150 4.726
HP-HA 2.209
2.950
3.580 4.030
4.250 4.816
COP
H
W/W
1.405 1.375 1.379 1.395
1.556 1.559
HP-HA 1.357 1.339 1.352 1.345 1.496 1.509
Water flow rate ALLES l/h 1470 1840 2260 2550
2800 3222
Pressure drops H
kPa
28 16 24 18 22 27
Useful head pressure HP-HA 55.0 63.0 51.0 74.3 65.7 56.2
Air flow rate ALLES m
3
/h 3500 8000 8000 7500
7500 7500
Sound pressure ALLES
dB(A)
37.0 39.5 39.5 39.5 39.5 39.5
Sound power ALLES 68.0 70.5 70.5 70.5
70.5 70.5
Data in compliance with the EN 14511-2 Standard
Condenser inlet water temperature 30°C
Condenser outlet water temperature 35°C
External air temperature 7°C d.b./6° C w.b.
Sound power
Aermec determines sound power values on the basis of measurements made in compliance with the ISO 9614-2 Standard,
in agreement with that requested by Eurovent certification.
Sound pressure
Sound pressure in free field conditions on reflective surface
(directivity factor Q=2) at 10 mt from the external surface of
unit, in compliance with ISO 3744 regulations.
EHPA 400V/3N/50Hz technical data
Page 15
15Aermec code 6755521_01 11.11
ANK 025-085H
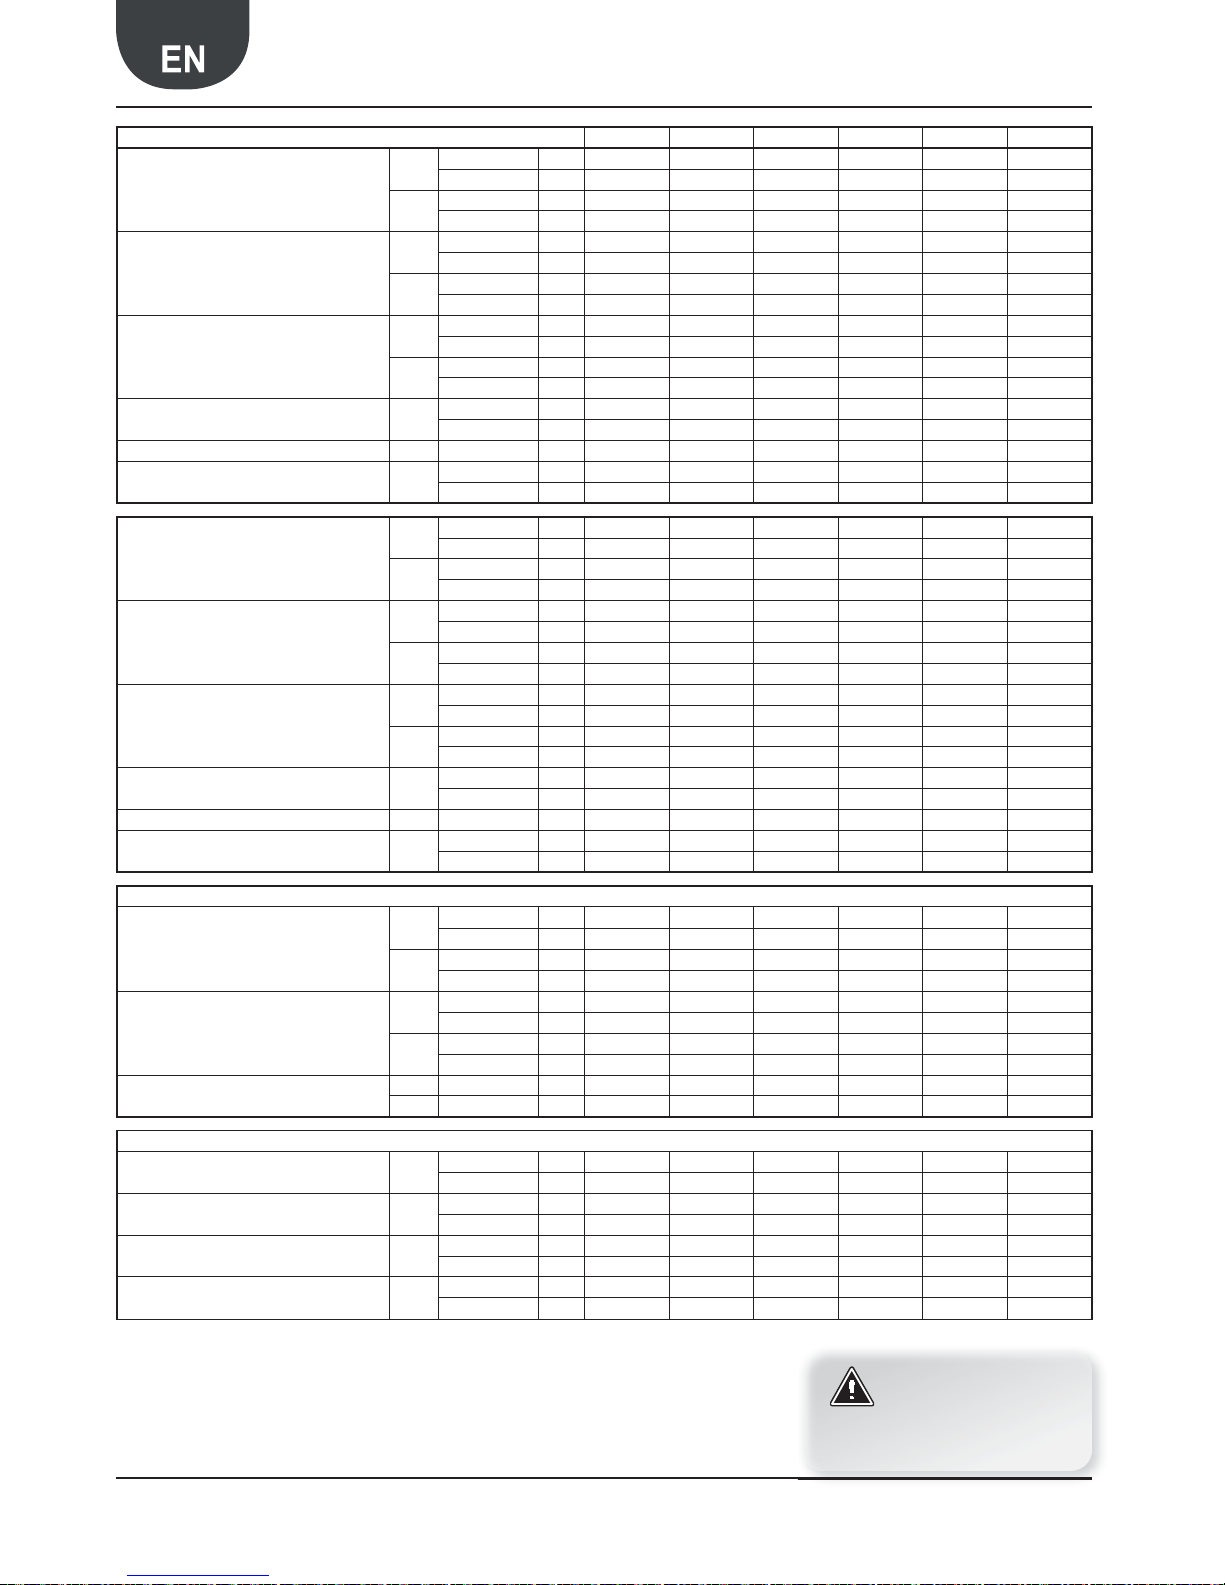
ELECTRICAL DATA ANK020 ANK030 ANK040 ANK045 ANK050 ANK085
Total input current
H A 4.6 6.1 7.5 7.9 8.8 10.2
HP-HA A 5.4 7.0 8.4 9.5 10.5 11.9
Maximum current (FLA)
H A 6.1 7.7 9.1 10.6 11.8 12.3
HP-HA A 6.93 8.58 10 12.15 13.45 14
Initial starting current (LRA)
H A 39.7 40.3 54.3 61.3 71.3 91.3
HP-HA A 40.5 41.2 55.2 62.8 73.0 93.0
SCROLL COMPRESSOR
n°. Compressor/n°. Circuit ALLES N°/n° 1/1 1/1 1/1 1/1 1/1 1/1
Par alisa on ALLES % 0-100 0-100 0-100 0-100 0-100 0-100
LOADS The declared data can be amended any time Aermec considers it necessary
R410A Gas ALLES kg
2.87 4.32 4.32 5.55 5.96 5.96
Oil ALLES kg
0.9 0.9 0.9 0.9 1.2 1.2
HYDRONIC KIT
STORAGE TANK
Capacity L 50 100 100 100 100 100
Resist n°/W 1/200 1/200 1/200 1/200 1/200 1/200
EXPANSION VESSEL
n°/capacity n°/l 1/2 1/5 1/5 1/5 1/5 1/5
Calibration bar 1.5 1.5 1.5 1.5 1.5 1.5
PUMP
Input power kW 0.16 0.17 0.18 0.31 0.33 0.34
Input current A 0.83 0.88 0.90 1.55 1.65 1.70
SAFETY VALVE
n°/calibra on n°/bar 1/6 1/6 1/6 1/6 1/6 1/6
DIMENSIONS
Height mm 1028 1281 1281 1281 1281 1281
Width
H-HP mm 1000 1000 1000 1000 1000 1000
HA mm 1358 1450 1450 1450 1450 1450
Depth mm 400 450 450 450 450 450
Weight
H
kg 118 149 152 165 172 174
HP kg 123 154 157 175 182 184
HA kg
160 211 214 232 238 241
ATTENTION
The capacities declared refer to the condition(7 A/W 35)
Data in compliance with the EN 14511-2 Standard
Condenser inlet water temperature 30°C
Condenser outlet water temperature 35°C
External air temperature 7°C K.T./6°C F.K.
Sound power
Aermec determines sound power values on the basis of measurements made in compliance with the 9614-2 Standard, in
agreement with that requested by Eurovent certification.
Sound pressure
Sound pressure in free field conditions on reflective surface
(directivity factor Q=2) at 10 mt from the external surface of
unit, in compliance with ISO 3744 regulations.
EHPA 400V/3N/50Hz technical data
Page 16
16 Aermec code 6755521_01 11.11
ANK 025-085H
8. EUROVENT TECHNICAL DATA
Model 020 030 040 045 050 085
Heating capacity
H
230V/1/50Hz kW
7.98 10.05 10.88 13.50 - -
400V/3N/50Hz kW
7.98 10.05 12.26 14.07 15.38 17.49
HP-HA
230/1/50Hz kW
7.87 9.91 10.74 13.29 - -
400V/3N/50Hz kW
7.87 9.91 12.10 13.85 15.15 17.25
Input power
H
230V/1/50Hz kW 2.54 3.11 3.47 3.88
--
400V/3N/50Hz kW 2.50 3.11 3.79 4.18 4.44 5.07
HP-HA
230/1/50Hz kW 2.59 3.15 3.51 3.98
--
400V/3N/50Hz kW 2.55 3.15 3.81 4.27 4.54 5.16
Water flow rate
H
230V/1/50Hz l/h 1370 1730 1870 2320
--
400V/3N/50Hz l/h 1370 1730 2110 2420 2650 3010
HP-HA
230/1/50Hz l/h 1350 1700 1850 2290
--
400V/3N/50Hz l/h 1350 1700 2080 2380 2610 2970
Exchanger | piping pressure drops H
230V/1/50Hz kPa 21 13 16 15
--
400V/3N/50Hz kPa 21 13 19 17 20 24
Water filter pressure drops H kPa 2 2 3 4 5 6
Useful head pressure HP-HA
230/1/50Hz kPa 61.5 67.0 63.0 80.0
--
400V/3N/50Hz kPa 61.5 67.0 57.0 78.5 71.0 64.0
Cooling capacity
H
230V/1/50Hz kW 6.82 8.15 9.55 11.69
--
400V/3N/50Hz kW 6.76 8.15 10.48 11.57 13.04 15.48
HP-HA
230/1/50Hz kW 6.91 8.25 9.67 11.85
--
400V/3N/50Hz kW 6.84 8.25 10.61 11.74 13.22 15.68
Input power
H
230V/1/50Hz kW 2.36 2.82 3.24 3.73
--
400V/3N/50Hz kW 2.33 2.82 3.55 3.98 4.34 5.22
HP-HA
230/1/50Hz kW 2.43 2.89 3.30 3.88
--
400V/3N/50Hz kW 2.41 2.89 3.61 4.12 4.49 5.35
Water flow rate
H
230V/1/50Hz l/h 1170 1400 1640 2010
--
400V/3N/50Hz l/h 1160 1400 1800 1990 2240 2660
HP-HA
230/1/50Hz l/h 1190 1420 1660 2040
--
400V/3N/50Hz l/h 1180 1420 1820 2020 2270 2700
Exchanger | piping pressure drops H
230V/1/50Hz kPa 15 8 12 11
--
400V/3N/50Hz kPa 15 8 14 11 15 20
Filter pressure drops H kPa 1.5 1.5 2 3 4 5
Useful head pressure HP-HA
230/1/50Hz kPa 68.0 74.0 68.0 86.0
--
400V/3N/50Hz kPa 68.0 74.0 63.0 86.0 79.0 71.0
ENERGY INDEX
COP
H
230V/1/50Hz W/W 3.14 3.23 3.14 3.48
--
400V/3N/50Hz W/W 3.19 3.23 3.23 3.37 3.46 3.45
HP-HA
230/1/50Hz W/W 3.04 3.15 3.06 3.34
--
400V/3N/50Hz W/W 3.09 3.15 3.18 3.24 3.34 3.34
EER
H
230V/1/50Hz W/W 2.89 2.89 2.95 3.13
--
400V/3N/50Hz W/W 2.90 2.89 2.95 2.91 3.00 2.97
HP-HA
230/1/50Hz W/W 2.84 2.85 2.93 3.06
--
400V/3N/50Hz W/W 2.84 2.85 2.94 2.85 2.94 2.93
ESEER
230/1/50Hz W/W 3.34 3.36 3.43 3.60 - -
400V/3N/50Hz W/W 3.37 3.34 3.43 3.38 3.57 3.52
ELECTRICAL DATA
Total input current in heating mode H
230V/1/50Hz A 12.0 14.3 16.8 18.8
--
400V/3N/50Hz A 4.6 6.1 7.5 7.9 8.8 10.2
Total input current in cooling mode H
230V/1/50Hz A 11.1 13.0 15.6 18.3
--
400V/3N/50Hz A 4.3 5.6 7.0 7.6 8.6 10.5
Maximum current (FLA) H
230V/1/50Hz A 13.9 19.4 22.2 25.0
--
400V/3N/50Hz A 6.1 7.7 9.1 10.6 11.8 12.3
Initial starting current (LRA) H
230V/1/50Hz A 45.0 45.0 45.0 45.0
--
400V/3N/50Hz A 39.7 40.3 54.3 61.3 71.3 91.3
HEATING
Condenser inlet water temperature 40°C
Condenser outlet water temperature 45°C
External air temperature 7°C d.b. 6°C w.b.
COOLING
Evaporator inlet water temperature 7°C
Evaporator outlet water temperature 12°C
External air temperature 35 °C
ATTENTION
1. The data refer to the version
without pump.
2. The 230V/1/50Hz versions
have soft-start as per standard.
DATA DECLARED ACCORDING TO UNI EN 145112
Page 17
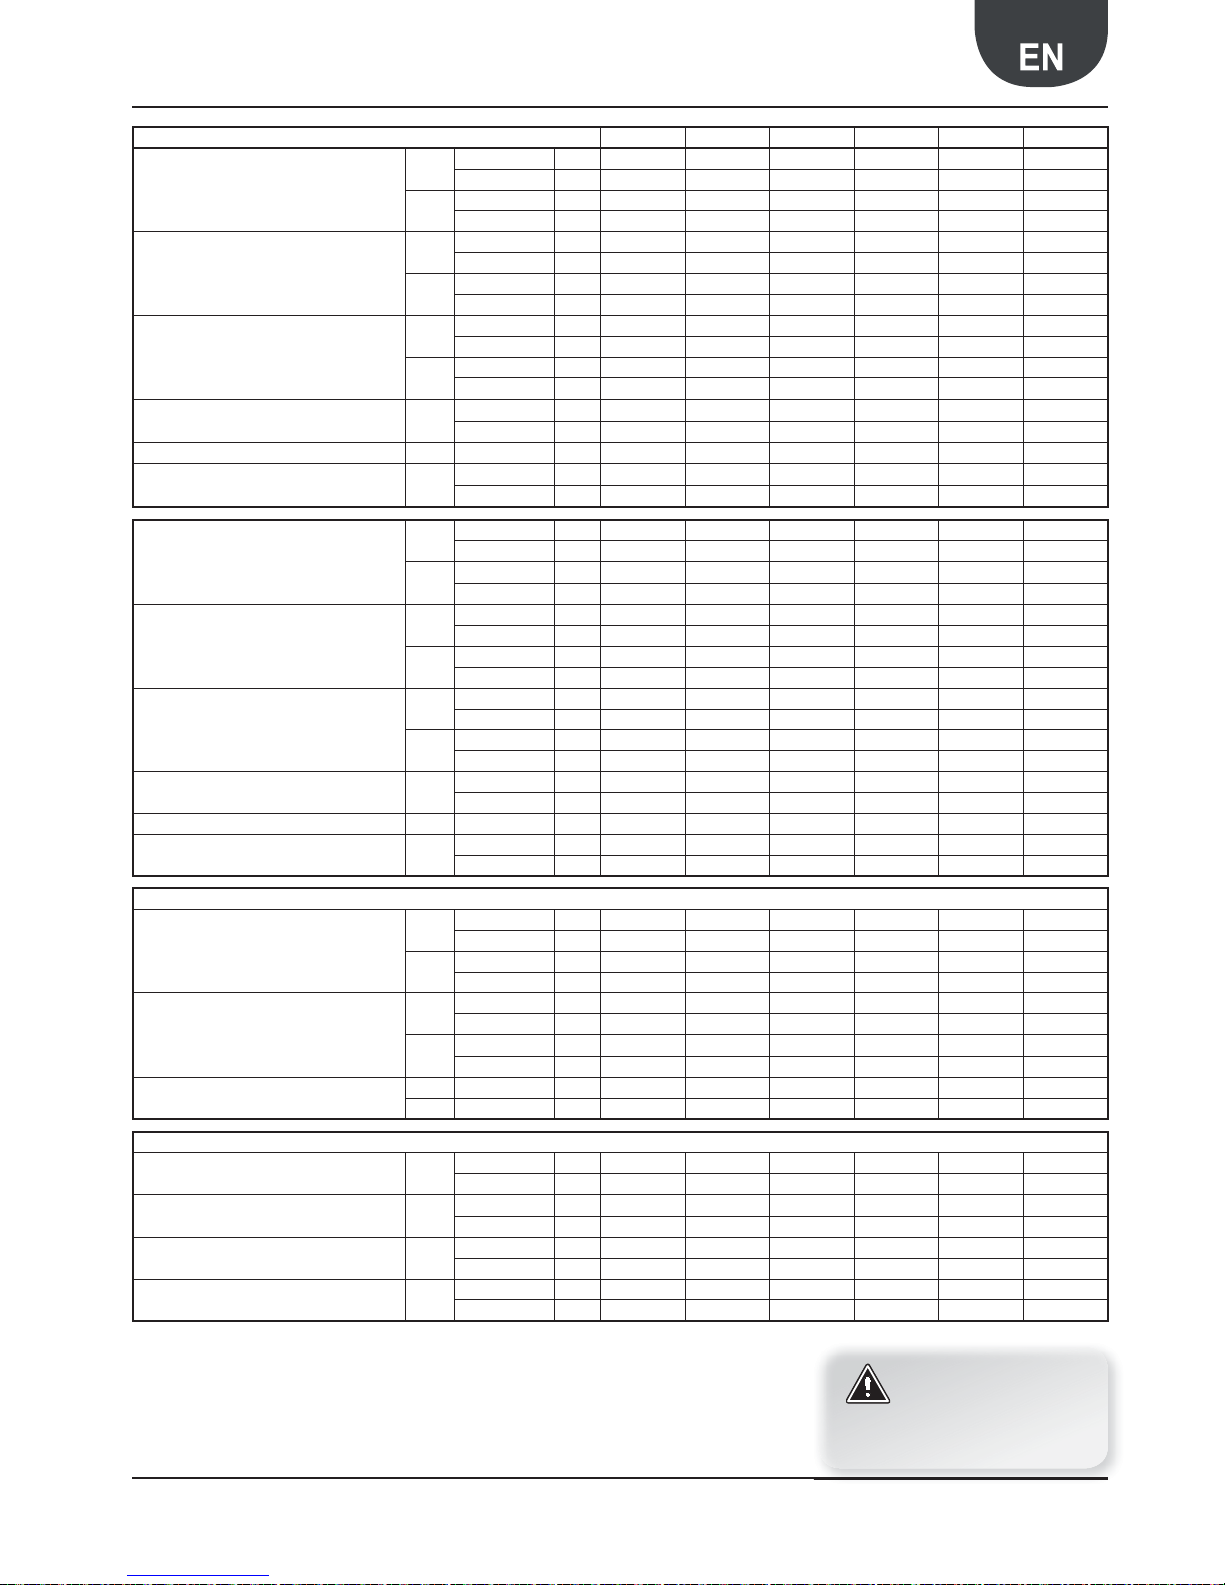
17Aermec code 6755521_01 11.11
ANK 025-085H
HEATING
Condenser inlet water temperature 30°C
Condenser outlet water temperature 35°C
External air temperature 7°C d.b. 6°C w.b.
COOLING
Evaporator inlet water temperature 23°C
Evaporator outlet water temperature 18°C
External air temperature 35 °C
Model 020 030 040 045 050 085
Heating capacity
H
230V/1/50Hz kW 8.67 10.92 11.93 14.04
--
400V/3N/50Hz kW 8.67 10.92 13.40 14.80 16.27 18.46
HP-HA
230/1/50Hz kW 8.58 10.84 11.90 13.84
--
400V/3N/50Hz kW 8.58 10.84 13.24 14.88 16.12 18.31
Input power
H
230V/1/50Hz kW 2.12 2.64 2.88 3.27
--
400V/3N/50Hz kW 2.12 2.64 3.22 3.55 3.81 4.36
HP-HA
230/1/50Hz kW 2.21 2.64 2.90 3.37
--
400V/3N/50Hz kW 2.18 2.64 3.23 3.60 3.91 4.45
Water flow rate
H
230V/1/50Hz l/h 1490 1880 2050 2410
400V/3N/50Hz l/h 1490 1880 2300 2550 2800 3180
HP-HA
230/1/50Hz l/h 1480 1860 2050 2380
400V/3N/50Hz l/h 1480 1860 2280 2560 2770 3150
Exchanger + piping pressure drops H
230V/1/50Hz kPa 25 15 19 16.2
--
400V/3N/50Hz kPa 25 15 23 18 22 26
Water filter pressure drops H 230/1/50Hz kPa 3 3 4 4
57
Useful head pressure HP-HA
230/1/50Hz kPa 56.0 63.0 58.0 78.0
--
400V/3N/50Hz kPa 56.0 63.0 51.0 74.0 67.0 58.0
Cooling capacity
H
230V/1/50Hz kW 9.44 11.30 13.23 16.30
--
400V/3N/50Hz kW 9.36 11.30 14.52 16.04 18.07 21.43
HP-HA
230/1/50Hz kW 9.57 11.43 13.38 16.54
--
400V/3N/50Hz kW 9.48 11.43 14.67 16.25 18.30 21.69
Input power
H
230V/1/50Hz kW 2.48 2.95 3.40 3.93
--
400V/3N/50Hz kW 2.45 2.95 3.73 4.18 4.56 5.50
HP-HA
230/1/50Hz kW 2.51 3.00 3.43 4.08
--
400V/3N/50Hz kW 2.48 3.00 3.76 4.27 4.66 5.59
Water flow rate
H
230V/1/50Hz l/h 1620 1940 2280 2800
400V/3N/50Hz l/h 1610 1940 2500 2760 3110 3690
HP-HA
230/1/50Hz l/h 1650 1970 2300 2840
400V/3N/50Hz l/h 1630 1970 2520 2800 3150 3730
Exchanger + piping pressure drops H
230V/1/50Hz kPa 28.0 15.0 22.0 20.0
--
400V/3N/50Hz kPa 28.0 15.0 26.0 20.0 28.0 37.0
Water filter pressure drops H 230/1/50Hz kPa 3 3 4.5 5 6.5 9
Useful head pressure HP-HA
230/1/50Hz kPa 47.5 68.0 50.5 68.0
--
400V/3N/50Hz kPa 48.0 60.0 43.0 68.0 56.0 40.0
ENERGY INDEX
COP
H
230V/1/50Hz 4.10 4.14 4.14 4.29
--
400V/3N/50Hz 4.10 4.14 4.17 4.17 4.27 4.23
HP-HA
230/1/50Hz 3.89 4.10 4.10 4.11
--
400V/3N/50Hz 3.94 4.10 4.10 4.13 4.12 4.11
EER
H
230V/1/50Hz 3.81 3.83 3.89 4.15
--
400V/3N/50Hz 3.82 3.82 3.89 3.84 3.96 3.89
HP-HA
230/1/50Hz 3.81 3.81 3.90 4.05
--
400V/3N/50Hz 3.82 3.81 3.90 3.81 3.93 3.88
ESEER
230/1/50Hz 3.34 3.36 3.43 3.60
--
400V/3N/50Hz 3.37 3.34 3.43 3.38
3.57 3.52
ELECTRICAL DATA
Total input current in heating mode H
230V/1/50Hz A 10.0 12.1 13.9 16.0
--
400V/3N/50Hz A 3.9 5.2 6.4 6.8 7.6 8.8
Total input current in cooling mode H
230V/1/50Hz A 11.7 13.6 16.4 19.3
--
400V/3N/50Hz A 4.5 5.8 7.4 7.9 9.1 11.0
Maximum current (FLA) H
230V/1/50Hz A 13.9 19.4 22.2 25.0
--
400V/3N/50Hz A 6.1 7.7 9.1 10.6 11.8 12.3
Initial starting current (LRA) H
230V/1/50Hz A 45.0 45.0 45.0 45.0
--
400V/3N/50Hz A 39.7 40.3 54.3 61.3 71.3 91.3
ATTENTION
1. The data refer to the version
without pump.
2. The 230V/1/50Hz versions
have soft-start as per standard.
DATA DECLARED ACCORDING TO UNI EN 145112
technical data
Page 18
18 Aermec code 6755521_01 11.11
ANK 025-085H
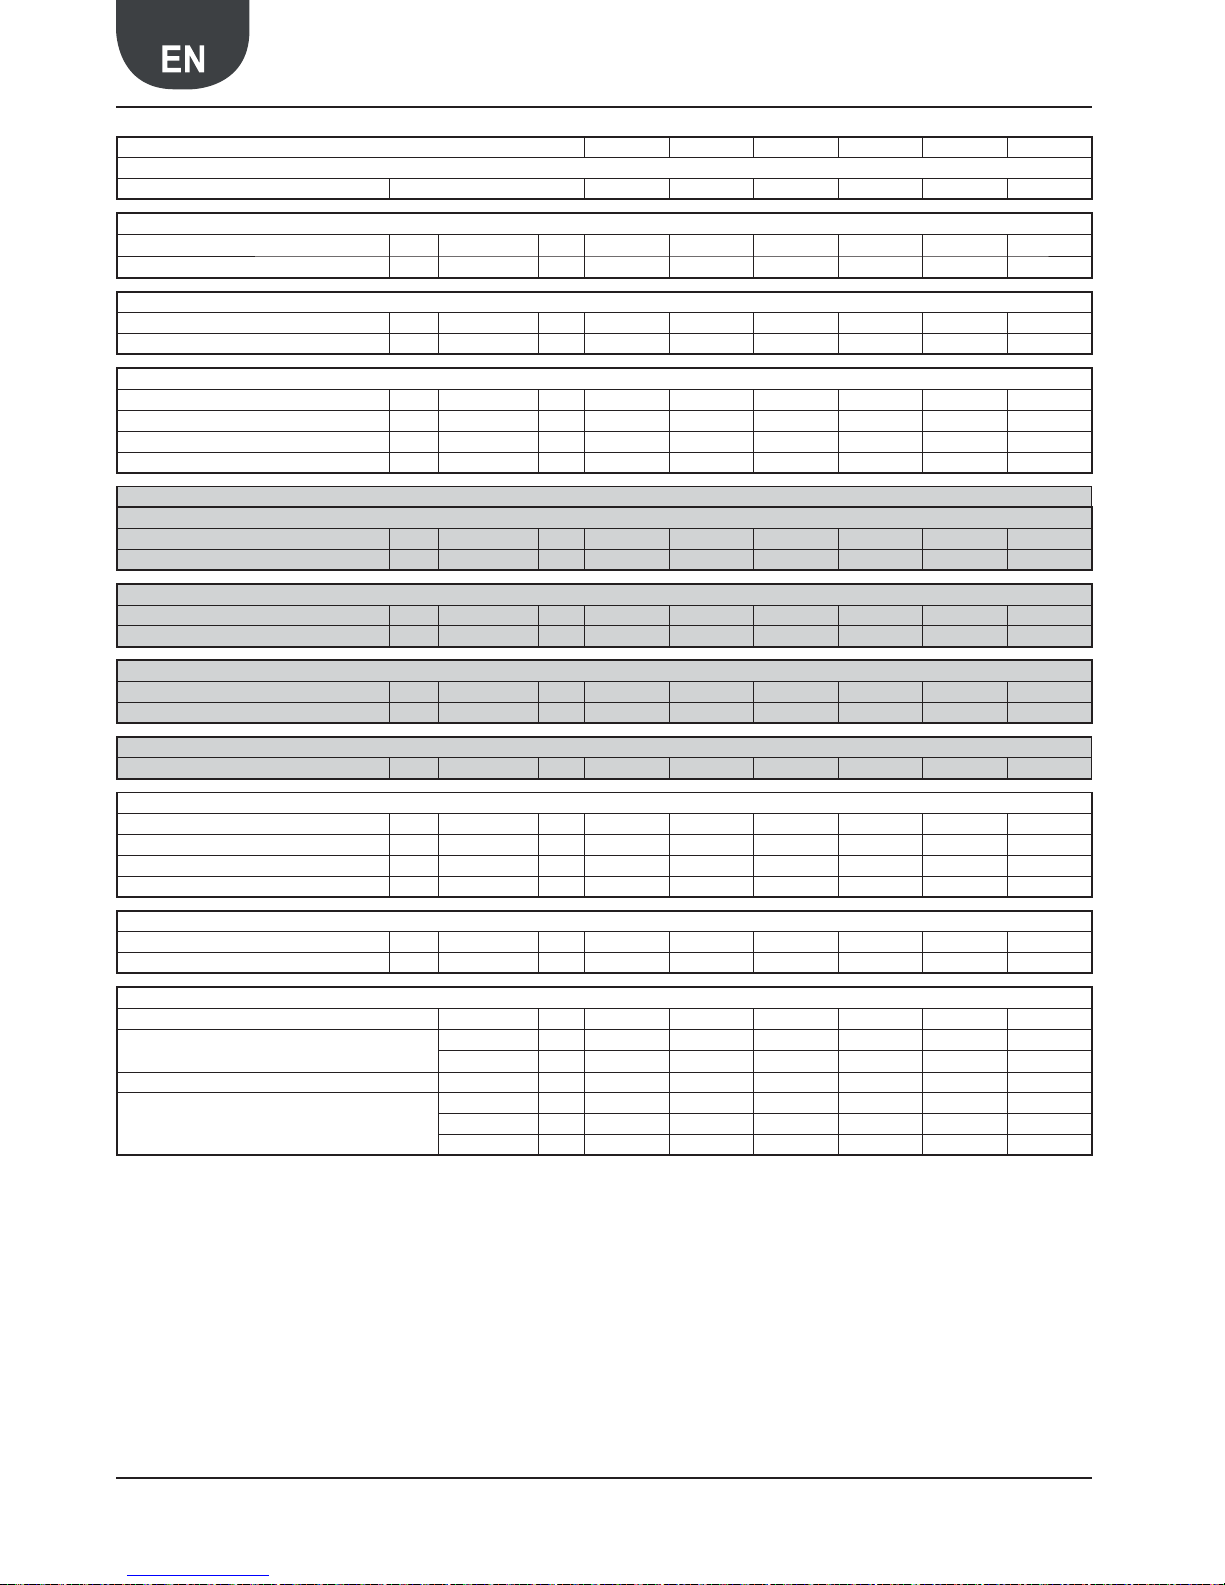
Model 020 030 040 045 050 085
UNIT PROTECTION RATING
IP 24 24 24 24 24 24
SCROLL COMPRESSOR
Quantity/circuit ALL n°/n° 1/1 1/1 1/1 1/1 1/1 1/1
Capacity control ALL % 0-100 0-100 0-100 0-100 0-100 0-100
LOADS The declared data can be amended any time Aermec considers it necessary
R410A Refrigerant ALL kg
2.87 4.32 4.32 5.55 5.96 5.96
Oil ALL kg
0.9 0.9 0.9 0.9 1.2 1.2
SYSTEM SIDE HEAT EXCHANGER
Quantity ALL n° 1 1 1 1 1 1
Electric resistances ALL n°/W 1/40 1/40 1/40 1/40 1/40 1/40
Water content ALL dm
3
Hydraulic connections (Victaulic) ALL Ø 1" 1/4 1" 1/4 1" 1/4 1" 1/4 1" 1/4 1" 1/4
SYSTEM SIDE HYDRONIC KIT
STORAGE TANK
Storage tank l 50 100 100 100 100 100
Storage tank resistances n°/W 1/200 1/200 1/200 1/200 1/200 1/200
EXPANSION VESSEL
Expansion vessel n°/l 1/2 1/5 1/5 1/5 1/5 1/5
Expansion vessel calibration bar 1.5 1.5 1.5 1.5 1.5 1.5
PUMP
Input power kW 0.16 0.17 0.18 0.31 0.33 0.34
Input current A 0.83 0.88 0.90 1.55 1.65 1.70
SAFETY VALVE
Safety valve n°/bar 1/6 1/6 1/6 1/6 1/6 1/6
AXIAL FANS
Quantity ALL n° 1 2 2 2 2 2
Air flow rate in cooling mode ALL m
3
/h 3500 8000 8000 7500 7500 7500
Input current ALL A 0.66 1.32 1.32 1.32 1.32 1.32
Input power ALL kW 0.15 0.3 0.3 0.3 0.3 0.3
SOUND DATA
Sound pressure dB(A) 37 39.5 39.5 39.5 39.5 39.5
Sound power dB(A) 68 70.5 70.5 70.5 70.5 70.5
DIMENSIONS WEIGHTS unit without packaging
Height mm 1028 1281 1281 1281 1281 1281
Width
H-HP mm 1000 1000 1000 1000 1000 1000
HA mm 1358 1450 1450 1450 1450 1450
Depth mm 400 450 450 450 450 450
Empty weight
H kg 118 149 152 165 172 174
HP kg 123 154 157 175 182 184
HA kg
160 211 214 232 238 241
Sound power
Aermec determines sound power values on the basis of measurements made in compliance with the ISO 9614-2 Standard,
in agreement with that requested by Eurovent certification.
Sound pressure
Sound pressure in free field conditions on reflective surface
(directivity factor Q=2) at 10 mt from the external surface of
unit, in compliance with ISO 3744 regulations.
technical data
Page 19
19Aermec code 6755521_01 11.11
ANK 025-085H
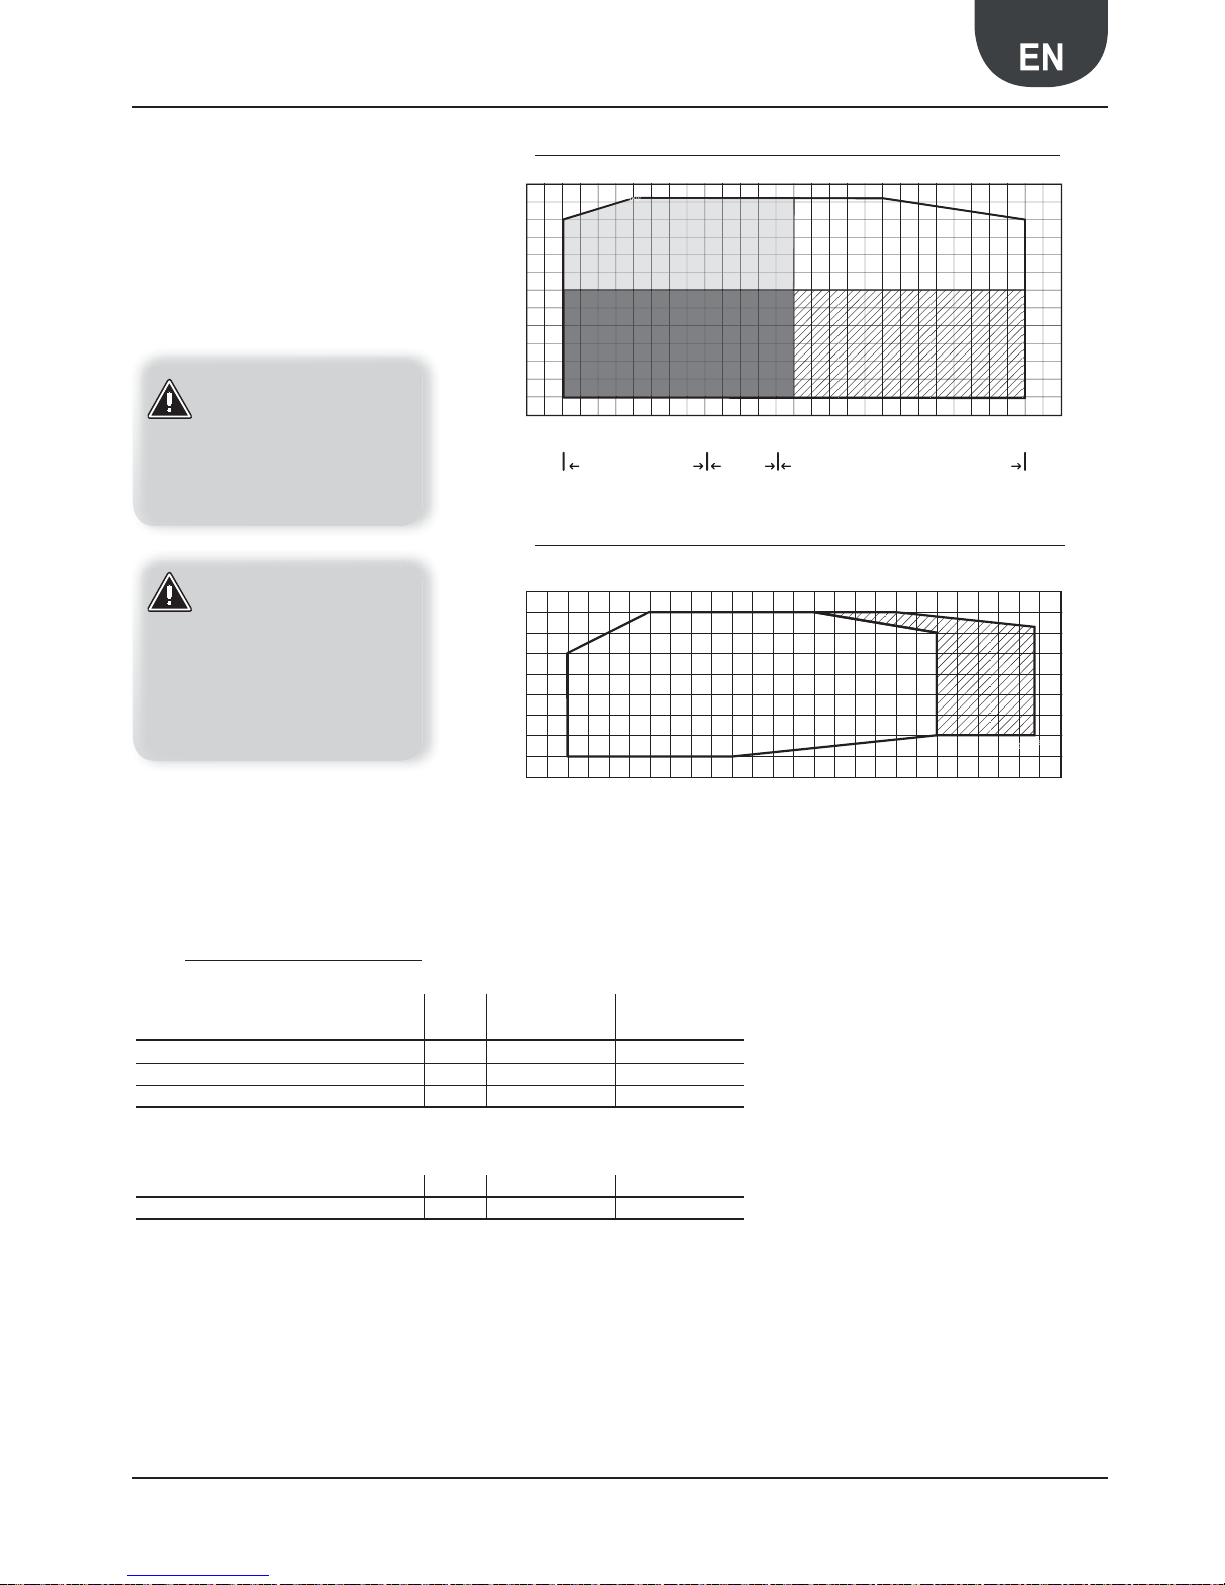
9. OPERATIONAL LIMITS
-10
-15
-10
-5
0
5
10
15
20
25
30
35
40
45
50
-9-8-7-6-5-4-3-2-1012345678910111213
14 15 16 17 18 19 20
46
25
20
30
35
40
45
50
55
60
65
-25 -20 -15 -10 -5 0 5 10 15 25 30 35 40
45
42 °C
In standard configuration, the appliances are not
suitable for installation in salty environments. For
operating limits, please refer to the diagram, valid
for ∆t = 5°C.
Standard
functioning
Standard
functioning
Functioning
Functioning
with DCPX accessory
with DCPX accessory
with
with
DCPX
DCPX
accessory
accessory
Temperature of the water
produced °C
External air temperature °C
External air temperature °C
Functioning
Functioning
with glycoled
with glycoled
water
water
Functioning
Functioning
with DCPX accessory
with DCPX accessory
glycoled water
glycoled water
9.1. OPERATING LIMITS IN COOLING MODE GRAPHICS
9.2. OPERATING LIMITS IN HEATING MODE GRAPHICS
REFRIGERANT SIDE
High pressure side Low pressure side
Maximum pressure allowed bar 22 16.5
Maximum temperature allowed °C 125 55
Minimum temperature allowed °C 10 -10
WATER SIDE Condensers Evaporator
Maximum pressure allowed bar 16 10.5
9.3. DESIGN DATA
ATTENTION
Whenever the unit is to be operated outside of the operating
limits, we recommend you contact
our commercial after-sales service
ATTENTION
If the unit is installed in particularly windy locations, the installation
of windbreaks is recommended to
prevent unit malfunctioning
Temperature of water produced EVAPORATOR°C
Thermosta c valve °
ZY
Page 20
20 Aermec code 6755521_01 11.11
ANK 025-085H
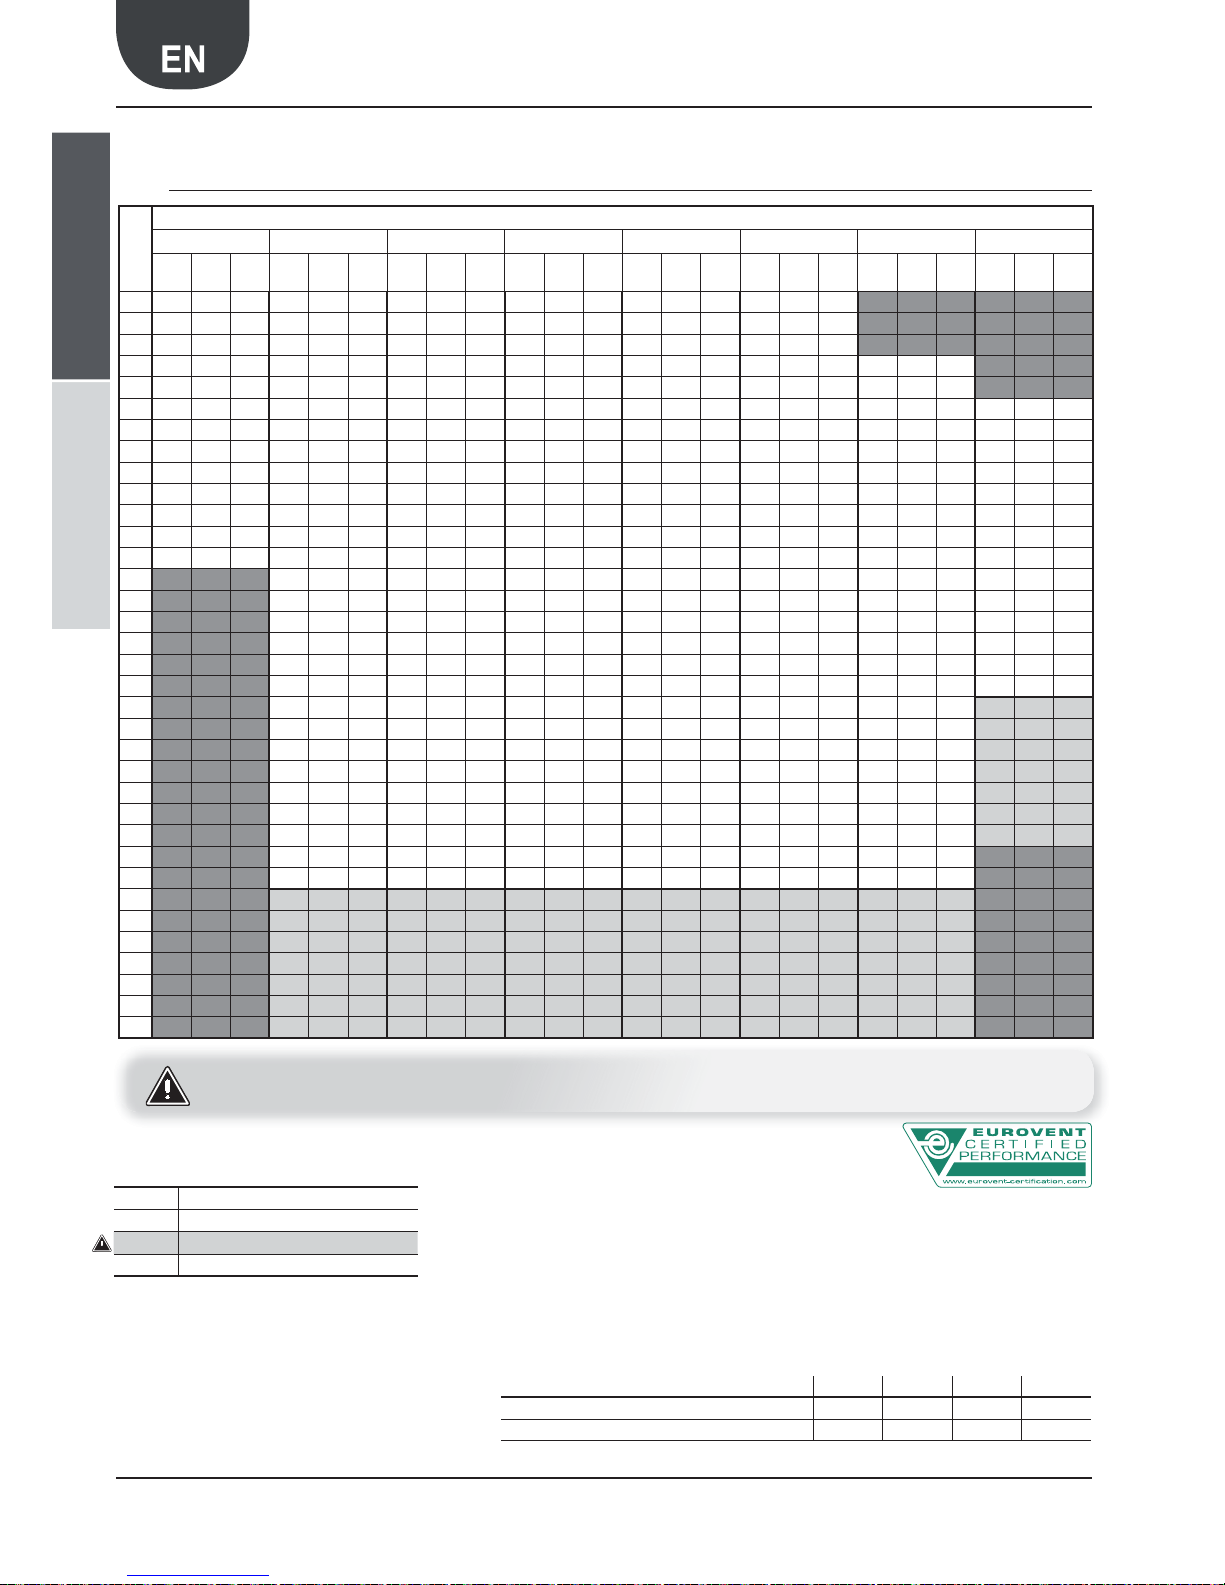
10. EFFICIENCIES AND TEMPERATURES DIFFERENT FROM THE NOMINAL VALUE IN HEATING MODE
10.1. ANK 020 H 230V/1/50Hz Hea ng capacity and input power
TAE °C
TEMPERATURE OF THE WATER PRODUCED °C
25 30 35 40 45 50 55 60
Ph
(kW)Pe(kW)
COP
Ph
(kW)Pe(kW)
COP
Ph
(kW)Pe(kW)
COP
Ph
(kW)Pe(kW)
COP
Ph
(kW)Pe(kW)
COP
Ph
(kW)Pe(kW)
COP
Ph
(kW)Pe(kW)
COP
Ph
(kW)Pe(kW)
COP
-20
4.54 1.57 2.89 4.24 1.83 2.32 3.89 2.04 1.91 3.51 2.21 1.59 3.08 2.36 1.31 2.61 2.51 1.04
-18
4.67 1.57 2.97 4.38 1.83 2.39 4.04 2.05 1.97 3.68 2.23 1.65 3.27 2.38 1.37 2.83 2.53 1.12
-16
4.82 1.56 3.09 4.54 1.83 2.48 4.22 2.05 2.06 3.87 2.23 1.74 3.48 2.39 1.46 3.06 2.55 1.20
-14
4.99 1.55 3.22 4.71 1.83 2.57 4.41 2.05 2.15 4.08 2.24 1.82 3.72 2.40 1.55 3.32 2.56 1.30 2.90 2.73 1.06
-12
5.18 1.55 3.34 4.91 1.83 2.68 4.61 2.05 2.25 4.30 2.24 1.92 3.96 2.40 1.65 3.60 2.56 1.41 3.20 2.73 1.17
-10
5.37 1.54 3.49 5.11 1.82 2.81 4.83 2.05 2.36 4.54 2.24 2.03 4.22 2.40 1.76 3.88 2.57 1.51 3.52 2.74 1.28 3.14 2.94 1.07
-8
5.56 1.53 3.63 5.31 1.82 2.92 5.05 2.05 2.46 4.78 2.24 2.13 4.49 2.41 1.86 4.18 2.57 1.63 3.85 2.75 1.40 3.50 2.95 1.19
-7
5.66 1.53 3.70 5.42 1.81 2.99 5.09 2.06 2.47 4.90 2.24 2.19 4.62 2.41 1.92 4.33 2.57 1.68 4.02 2.75 1.46 3.69 2.95 1.25
-6
5.76 1.52 3.79 5.52 1.81 3.05 5.28 2.04 2.59 5.02 2.24 2.24 4.75 2.41 1.97 4.48 2.57 1.74 4.18 2.75 1.52 3.87 2.96 1.31
-4
5.96 1.52 3.92 5.73 1.81 3.17 5.50 2.05 2.68 5.26 2.24 2.35 5.02 2.41 2.08 4.77 2.58 1.85 4.51 2.76 1.63 4.24 2.96 1.43
-2
6.14 1.53 4.01 5.93 1.82 3.26 5.71 2.05 2.79 5.50 2.25 2.44 5.29 2.42 2.19 5.07 2.59 1.96 4.84 2.77 1.75 4.61 2.97 1.55
0
6.32 1.54 4.10 6.12 1.83 3.34 5.92 2.06 2.87 5.73 2.26 2.54 5.54 2.43 2.28 5.35 2.60 2.06 5.17 2.78 1.86 4.97 2.98 1.67
1
6.41 1.54 4.16 6.21 1.84 3.38 6.02 2.07 2.91 5.84 2.27 2.57 5.66 2.44 2.32 5.49 2.61 2.10 5.32 2.79 1.91 5.15 2.99 1.72
2
6.51 1.85 3.52 6.15 1.92 3.20 5.96 2.28 2.61 5.76 2.27 2.54 5.63 2.62 2.15 5.46 2.80 1.95 5.24 3.00 1.75
4
7.58 1.87 4.05 7.24 2.11 3.43 6.98 2.30 3.03 6.76 2.48 2.73 6.56 2.64 2.48 6.34 2.82 2.25 6.06 3.02 2.01
6
8.52 1.91 4.46 8.16 2.14 3.81 7.87 2.34 3.36 7.62 2.51 3.04 7.39 2.67 2.77 7.12 2.85 2.50 6.78 3.05 2.22
7
8.94 1.93 4.63 8.67 2.12 4.09 8.27 2.36 3.50 7.98 2.54 3.14 7.76 2.69 2.88 7.47 2.87 2.60 7.11 3.07 2.32
8
9.33 2.04 4.57 8.95 2.23 4.01 8.65 2.40 3.60 8.38 2.57 3.26 8.10 2.74 2.96 7.79 2.92 2.67 7.41 3.11 2.38
10
10.03 2.13 4.71 9.64 2.32 4.16 9.32 2.49 3.74 9.02 2.66 3.39 8.72 2.82 3.09 8.38 3.00 2.79 7.95 3.18 2.50
12
10.61 2.21 4.80 10.22 2.40 4.26 9.89 2.57 3.85 9.58 2.73 3.51 9.25 2.90 3.19 8.88 3.07 2.89 8.41 3.25 2.59
14
11.09 2.28 4.86 10.70 2.47 4.33 10.37 2.64 3.93 10.05 2.80 3.59 9.70 2.96 3.28 9.30 3.13 2.97 8.81 3.31 2.66
16
11.30 2.35 4.81 10.98 2.53 4.34 10.70 2.70 3.96 10.43 2.86 3.65 10.11 3.02 3.35 9.73 3.18 3.06 9.23 3.36 2.75
18
11.60 2.40 4.83 11.29 2.58 4.38 11.02 2.75 4.01 10.74 2.91 3.69 10.43 3.07 3.40 10.04 3.23 3.11 9.54 3.40 2.81
20
11.85 2.45 4.84 11.54 2.63 4.39 11.27 2.79 4.04 11.00 2.95 3.73 10.69 3.11 3.44 10.29 3.27 3.15 9.79 3.44 2.85
22
12.04 2.48 4.85 11.74 2.66 4.41 11.47 2.83 4.05 11.20 2.99 3.75 10.89 3.14 3.47 10.49 3.30 3.18 9.98 3.47 2.88
24
12.18 2.51 4.85 11.89 2.69 4.42 11.63 2.86 4.07 11.36 3.02 3.76 11.04 3.17 3.48 10.64 3.33 3.20 10.12 3.50 2.89
26
12.27 2.54 4.83 11.99 2.72 4.41 11.74 2.88 4.08 11.47 3.04 3.77 11.15 3.19 3.50 10.75 3.35 3.21
28
12.33 2.55 4.84 12.06 2.74 4.40 11.81 2.90 4.07 11.54 3.06 3.77 11.23 3.21 3.50 10.83 3.37 3.21
30
12.37 2.57 4.81 12.10 2.75 4.40 11.85 2.91 4.07 11.59 3.07 3.78 11.28 3.22 3.50 10.87 3.38 3.22
32
12.37 2.57 4.81 12.12 2.75 4.41 11.88 2.92 4.07 11.62 3.08 3.77 11.30 3.23 3.50 10.89 3.38 3.22
34
12.36 2.57 4.81 12.11 2.75 4.40 11.88 2.92 4.07 11.62 3.08 3.77 11.31 3.23 3.50 10.90 3.39 3.22
36
12.34 2.57 4.80 12.10 2.75 4.40 11.87 2.92 4.07 11.62 3.08 3.77 11.31 3.23 3.50 10.90 3.39 3.22
38
12.32 2.56 4.81 12.09 2.75 4.40 11.86 2.91 4.08 11.62 3.07 3.79 11.31 3.23 3.50 10.89 3.39 3.21
40
12.30 2.55 4.82 12.07 2.74 4.41 11.86 2.91 4.08 11.61 3.07 3.78 11.30 3.22 3.51 10.89 3.38 3.22
42
12.28 2.53 4.85 12.07 2.72 4.44 11.86 2.90 4.09 11.62 3.06 3.80 11.31 3.21 3.52 10.90 3.37 3.23
DATA DECLARED ACCORDING TO UNI EN 145112
Key
Ph
Hea ng capacity (kW)
Pe
Input power (kW)
ATTENTION operation with DCPX
TAE
External air temperature (°C) d.b.
ATTENTION
For the intermediate points, refer to the operating limits graphics (§ 9.2)
HEATING MODECOOLING MODE
ΔT WATER DIFFERENT TO NOMINAL ΔT 5°C
35810
Heating capacity correction factors 0.99 1 1.01 1.02
Input power correction factors 1.01 1 0.98 0.96
Page 21
21Aermec code 6755521_01 11.11
ANK 025-085H
10.2. ANK 020 HP|H A 230V/1/50Hz Hea ng capacity and input power
DATA DECLARED ACCORDING TO UNI EN 14511-2
Key
Ph
Hea ng capacity (kW)
Pe
Input power (kW)
ATTENTION operation with DCPX
TAE
External air temperature (°C) d.b.
ATTENTION
For the intermediate points, refer to the operating limits graphics (§ 9.2)
TAE °C
TEMPERATURE OF THE WATER PRODUCED °C
25 30 35 40 45 50 55 60
Ph
(kW)Pe(kW)
COP
Ph
(kW)Pe(kW)
COP
Ph
(kW)Pe(kW)
COP
Ph
(kW)Pe(kW)
COP
Ph
(kW)Pe(kW)
COP
Ph
(kW)Pe(kW)
COP
Ph
(kW)Pe(kW)
COP
Ph
(kW)Pe(kW)
COP
-20
4.48 1.60 2.80 4.18 1.87 2.24 3.84 2.08 1.85 3.46 2.26 1.53 3.04 2.41 1.26 2.57 2.56 1.00
-18
4.61 1.60 2.88 4.31 1.87 2.30 3.99 2.09 1.91 3.63 2.27 1.60 3.23 2.43 1.33 2.79 2.58 1.08
-16
4.76 1.59 2.99 4.47 1.87 2.39 4.16 2.09 1.99 3.81 2.28 1.67 3.44 2.44 1.41 3.02 2.60 1.16
-14
4.93 1.58 3.12 4.65 1.87 2.49 4.35 2.09 2.08 4.02 2.28 1.76 3.66 2.45 1.49 3.28 2.61 1.26 2.86 2.78 1.03
-12
5.11 1.58 3.23 4.84 1.86 2.60 4.55 2.09 2.18 4.24 2.28 1.86 3.91 2.45 1.60 3.55 2.61 1.36 3.16 2.79 1.13
-10
5.29 1.57 3.37 5.04 1.86 2.71 4.76 2.09 2.28 4.47 2.28 1.96 4.16 2.45 1.70 3.83 2.62 1.46 3.47 2.80 1.24 3.09 3.00 1.03
-8
5.49 1.56 3.52 5.24 1.85 2.83 4.98 2.09 2.38 4.71 2.28 2.07 4.42 2.45 1.80 4.12 2.62 1.57 3.80 2.80 1.36 3.45 3.01 1.15
-7
5.59 1.56 3.58 5.34 1.85 2.89 4.98 2.12 2.35 4.83 2.28 2.12 4.57 2.47 1.85 4.27 2.62 1.63 3.96 2.80 1.41 3.64 3.01 1.21
-6
5.68 1.55 3.66 5.45 1.85 2.95 5.20 2.08 2.50 4.95 2.28 2.17 4.69 2.46 1.91 4.41 2.63 1.68 4.12 2.81 1.47 3.82 3.02 1.26
-4
5.87 1.55 3.79 5.65 1.85 3.05 5.42 2.09 2.59 5.19 2.29 2.27 4.95 2.46 2.01 4.71 2.63 1.79 4.45 2.81 1.58 4.19 3.02 1.39
-2
6.06 1.56 3.88 5.85 1.85 3.16 5.63 2.09 2.69 5.42 2.29 2.37 5.21 2.47 2.11 5.00 2.64 1.89 4.78 2.82 1.70 4.55 3.03 1.50
0
6.23 1.57 3.97 6.03 1.86 3.24 5.84 2.10 2.78 5.65 2.30 2.46 5.46 2.48 2.20 5.28 2.65 1.99 5.09 2.83 1.80 4.91 3.04 1.62
1
6.32 1.57 4.03 6.12 1.87 3.27 5.94 2.11 2.82 5.76 2.31 2.49 5.59 2.49 2.24 5.42 2.66 2.04 5.25 2.84 1.85 5.08 3.05 1.67
2
6.42 1.88 3.41 6.05 1.94 3.12 5.88 2.32 2.53 5.68 2.32 2.45 5.55 2.67 2.08 5.38 2.85 1.89 5.16 3.06 1.69
4
7.48 1.91 3.92 7.14 2.15 3.32 6.88 2.35 2.93 6.67 2.52 2.65 6.47 2.69 2.41 6.25 2.87 2.18 5.98 3.08 1.94
6
8.40 1.94 4.33 8.04 2.18 3.69 7.76 2.38 3.26 7.52 2.56 2.94 7.28 2.73 2.67 7.02 2.90 2.42 6.69 3.11 2.15
7
8.82 1.97 4.48 8.58 2.21 3.88 8.16 2.40 3.40 7.87 2.59 3.04 7.65 2.75 2.78 7.36 2.92 2.52 7.01 3.13 2.24
8
9.20 2.08 4.42 8.83 2.27 3.89 8.53 2.45 3.48 8.26 2.62 3.15 7.99 2.80 2.85 7.69 2.97 2.59 7.31 3.17 2.31
10
9.89 2.17 4.56 9.51 2.36 4.03 9.19 2.54 3.62 8.90 2.71 3.28 8.60 2.88 2.99 8.26 3.06 2.70 7.84 3.24 2.42
12
10.46 2.25 4.65 10.08 2.44 4.13 9.75 2.62 3.72 9.45 2.79 3.39 9.13 2.95 3.09 8.75 3.13 2.80 8.30 3.31 2.51
14
10.94 2.33 4.70 10.56 2.52 4.19 10.22 2.69 3.80 9.91 2.86 3.47 9.57 3.02 3.17 9.17 3.19 2.87 8.68 3.37 2.58
16
11.14 2.39 4.66 10.83 2.58 4.20 10.56 2.75 3.84 10.28 2.91 3.53 9.97 3.08 3.24 9.59 3.25 2.95 9.11 3.43 2.66
18
11.44 2.45 4.67 11.14 2.63 4.24 10.87 2.80 3.88 10.60 2.97 3.57 10.29 3.13 3.29 9.90 3.29 3.01 9.41 3.47 2.71
20
11.68 2.49 4.69 11.39 2.68 4.25 11.12 2.85 3.90 10.85 3.01 3.60 10.54 3.17 3.32 10.15 3.33 3.05 9.65 3.51 2.75
22
11.87 2.53 4.69 11.58 2.72 4.26 11.32 2.89 3.92 11.05 3.05 3.62 10.74 3.20 3.36 10.35 3.37 3.07 9.84 3.54 2.78
24
12.01 2.56 4.69 11.72 2.75 4.26 11.47 2.92 3.93 11.20 3.08 3.64 10.89 3.23 3.37 10.50 3.39 3.10 9.98 3.57 2.80
26
12.10 2.59 4.67 11.83 2.77 4.27 11.57 2.94 3.94 11.31 3.10 3.65 11.00 3.26 3.37 10.60 3.42 3.10
28
12.16 2.60 4.68 11.89 2.79 4.26 11.65 2.96 3.94 11.39 3.12 3.65 11.07 3.27 3.39 10.68 3.43 3.11
30
12.20 2.62 4.66 11.93 2.80 4.26 11.69 2.97 3.94 11.43 3.13 3.65 11.12 3.28 3.39 10.72 3.44 3.12
32
12.20 2.62 4.66 11.95 2.81 4.25 11.71 2.98 3.93 11.46 3.14 3.65 11.15 3.29 3.39 10.74 3.45 3.11
34
12.19 2.62 4.65 11.95 2.81 4.25 11.72 2.98 3.93 11.46 3.14 3.65 11.15 3.30 3.38 10.75 3.46 3.11
36
12.17 2.62 4.65 11.94 2.81 4.25 11.71 2.98 3.93 11.46 3.14 3.65 11.15 3.30 3.38 10.75 3.46 3.11
38
12.15 2.61 4.66 11.92 2.80 4.26 11.70 2.97 3.94 11.46 3.13 3.66 11.15 3.29 3.39 10.74 3.45 3.11
40
12.13 2.60 4.67 11.91 2.79 4.27 11.69 2.96 3.95 11.45 3.13 3.66 11.15 3.29 3.39 10.74 3.45 3.11
42
12.11 2.58 4.69 11.90 2.78 4.28 11.70 2.95 3.97 11.46 3.12 3.67 11.16 3.28 3.40 10.75 3.44 3.13
HEATING MODECOOLING MODE
ΔT WATER DIFFERENT TO NOMINAL ΔT 5°C
35810
Heating capacity correction factors 0.99 1 1.01 1.02
Input power correction factors 1.01 1 0.98 0.96
Page 22
22 Aermec code 6755521_01 11.11
ANK 025-085H
10.3. ANK 020 H 400V/3N/50Hz Hea ng capacity and input power
DATA DECLARED ACCORDING TO UNI EN 14511-2
Key
Ph
Hea ng capacity (kW)
Pe
Input power (kW)
ATTENTION operation with DCPX
TAE
External air temperature (°C) d.b.
ATTENTION
For the intermediate points, refer to the operating limits graphics (§ 9.2)
TAE °C
TEMPERATURE OF THE WATER PRODUCED °C
25 30 35 40 45 50 55 60
Ph
(kW)Pe(kW)
COP
Ph
(kW)Pe(kW)
COP
Ph
(kW)Pe(kW)
COP
Ph
(kW)Pe(kW)
COP
Ph
(kW)Pe(kW)
COP
Ph
(kW)Pe(kW)
COP
Ph
(kW)Pe(kW)
COP
Ph
(kW)Pe(kW)
COP
-20
4.54 1.54 2.95 4.24 1.80 2.36 3.89 2.01 1.94 3.51 2.18 1.61 3.08 2.33 1.32 2.61 2.47 1.06
-18
4.67 1.54 3.03 4.38 1.81 2.42 4.04 2.02 2.00 3.68 2.19 1.68 3.27 2.34 1.40 2.83 2.49 1.14
-16
4.82 1.54 3.13 4.54 1.81 2.51 4.22 2.02 2.09 3.87 2.20 1.76 3.48 2.35 1.48 3.06 2.51 1.22
-14
4.99 1.53 3.26 4.71 1.80 2.62 4.41 2.02 2.18 4.08 2.20 1.85 3.72 2.36 1.58 3.32 2.52 1.32 2.90 2.68 1.08
-12
5.18 1.52 3.41 4.91 1.80 2.73 4.61 2.02 2.28 4.30 2.20 1.95 3.96 2.36 1.68 3.60 2.52 1.43 3.20 2.69 1.19
-10
5.37 1.51 3.56 5.11 1.79 2.85 4.83 2.02 2.39 4.54 2.20 2.06 4.22 2.37 1.78 3.88 2.53 1.53 3.52 2.70 1.30 3.14 2.90 1.08
-8
5.56 1.51 3.68 5.31 1.79 2.97 5.05 2.01 2.51 4.78 2.20 2.17 4.49 2.37 1.89 4.18 2.53 1.65 3.85 2.70 1.43 3.50 2.90 1.21
-7
5.66 1.50 3.77 5.42 1.78 3.04 5.09 2.03 2.51 4.90 2.20 2.23 4.67 2.38 1.96 4.33 2.53 1.71 4.02 2.71 1.48 3.69 2.91 1.27
-6
5.76 1.50 3.84 5.52 1.78 3.10 5.28 2.01 2.63 5.02 2.20 2.28 4.75 2.37 2.00 4.48 2.53 1.77 4.18 2.71 1.54 3.87 2.91 1.33
-4
5.96 1.50 3.97 5.73 1.78 3.22 5.50 2.01 2.74 5.26 2.21 2.38 5.02 2.38 2.11 4.77 2.54 1.88 4.51 2.71 1.66 4.24 2.92 1.45
-2
6.14 1.50 4.09 5.93 1.79 3.31 5.71 2.02 2.83 5.50 2.21 2.49 5.29 2.38 2.22 5.07 2.55 1.99 4.84 2.72 1.78 4.61 2.93 1.57
0
6.32 1.51 4.19 6.12 1.80 3.40 5.92 2.03 2.92 5.73 2.22 2.58 5.54 2.39 2.32 5.35 2.56 2.09 5.17 2.73 1.89 4.97 2.94 1.69
1
6.41 1.52 4.22 6.21 1.81 3.43 6.02 2.04 2.95 5.84 2.23 2.62 5.66 2.40 2.36 5.49 2.57 2.14 5.32 2.74 1.94 5.15 2.94 1.75
2
6.51 1.82 3.58 6.15 1.89 3.25 5.96 2.24 2.66 5.76 2.24 2.57 5.63 2.58 2.18 5.46 2.75 1.99 5.24 2.95 1.78
4
7.58 1.84 4.12 7.24 2.07 3.50 6.98 2.27 3.07 6.76 2.44 2.77 6.56 2.60 2.52 6.34 2.77 2.29 6.06 2.98 2.03
6
8.52 1.88 4.53 8.16 2.11 3.87 7.87 2.30 3.42 7.62 2.47 3.09 7.39 2.63 2.81 7.12 2.80 2.54 6.78 3.00 2.26
7
8.94 1.90 4.71 8.67 2.12 4.09 8.27 2.32 3.56 7.98 2.50 3.19 7.76 2.65 2.93 7.47 2.82 2.65 7.11 3.02 2.35
8
9.33 2.00 4.67 8.95 2.19 4.09 8.65 2.37 3.65 8.38 2.53 3.31 8.10 2.70 3.00 7.79 2.87 2.71 7.41 3.06 2.42
10
10.03 2.09 4.80 9.64 2.28 4.23 9.32 2.45 3.80 9.02 2.62 3.44 8.72 2.78 3.14 8.38 2.95 2.84 7.95 3.13 2.54
12
10.61 2.18 4.87 10.22 2.36 4.33 9.89 2.53 3.91 9.58 2.69 3.56 9.25 2.85 3.25 8.88 3.02 2.94 8.41 3.20 2.63
14
11.09 2.25 4.93 10.70 2.43 4.40 10.37 2.60 3.99 10.05 2.76 3.64 9.70 2.92 3.32 9.30 3.08 3.02 8.81 3.26 2.70
16
11.30 2.31 4.89 10.98 2.49 4.41 10.70 2.66 4.02 10.43 2.81 3.71 10.11 2.97 3.40 9.73 3.13 3.11 9.23 3.31 2.79
18
11.60 2.36 4.92 11.29 2.54 4.44 11.02 2.71 4.07 10.74 2.86 3.76 10.43 3.02 3.45 10.04 3.18 3.16 9.54 3.35 2.85
20
11.85 2.41 4.92 11.54 2.59 4.46 11.27 2.75 4.10 11.00 2.90 3.79 10.69 3.06 3.49 10.29 3.22 3.20 9.79 3.39 2.89
22
12.04 2.44 4.93 11.74 2.62 4.48 11.47 2.79 4.11 11.20 2.94 3.81 10.89 3.09 3.52 10.49 3.25 3.23 9.98 3.42 2.92
24
12.18 2.47 4.93 11.89 2.65 4.49 11.63 2.81 4.14 11.36 2.97 3.82 11.04 3.12 3.54 10.64 3.28 3.24 10.12 3.44 2.94
26
12.27 2.50 4.91 11.99 2.67 4.49 11.74 2.84 4.13 11.47 2.99 3.84 11.15 3.14 3.55 10.75 3.30 3.26
28
12.33 2.51 4.91 12.06 2.69 4.48 11.81 2.85 4.14 11.54 3.01 3.83 11.23 3.16 3.55 10.83 3.31 3.27
30
12.37 2.53 4.89 12.10 2.70 4.48 11.85 2.87 4.13 11.59 3.02 3.84 11.28 3.17 3.56 10.87 3.32 3.27
32
12.37 2.53 4.89 12.12 2.71 4.47 11.88 2.87 4.14 11.62 3.03 3.83 11.30 3.18 3.55 10.89 3.33 3.27
34
12.36 2.53 4.89 12.11 2.71 4.47 11.88 2.88 4.13 11.62 3.03 3.83 11.31 3.18 3.56 10.90 3.34 3.26
36
12.34 2.53 4.88 12.10 2.71 4.46 11.87 2.87 4.14 11.62 3.03 3.83 11.31 3.18 3.56 10.90 3.34 3.26
38
12.32 2.52 4.89 12.09 2.70 4.48 11.86 2.87 4.13 11.62 3.03 3.83 11.31 3.18 3.56 10.89 3.33 3.27
40
12.30 2.51 4.90 12.07 2.69 4.49 11.86 2.86 4.15 11.61 3.02 3.84 11.30 3.17 3.56 10.89 3.33 3.27
42
12.28 2.49 4.93 12.07 2.68 4.50 11.86 2.85 4.16 11.62 3.01 3.86 11.31 3.16 3.58 10.90 3.32 3.28
HEATING MODECOOLING MODE
ΔT WATER DIFFERENT TO NOMINAL ΔT 5°C
35810
Heating capacity correction factors 0.99 1 1.01 1.02
Input power correction factors 1.01 1 0.98 0.96
Page 23
23Aermec code 6755521_01 11.11
ANK 025-085H
10.4. ANK 020 HP|H A 400V/3N/50Hz Hea ng capacity and input power
DATA DECLARED ACCORDING TO UNI EN 14511-2
Key
Ph
Hea ng capacity (kW)
Pe
Input power (kW)
ATTENTION operation with DCPX
TAE
External air temperature (°C) d.b.
ATTENTION
For the intermediate points, refer to the operating limits graphics (§ 9.2)
TAE °C
TEMPERATURE OF THE WATER PRODUCED °C
25 30 35 40 45 50 55 60
Ph
(kW)Pe(kW)
COP
Ph
(kW)Pe(kW)
COP
Ph
(kW)Pe(kW)
COP
Ph
(kW)Pe(kW)
COP
Ph
(kW)Pe(kW)
COP
Ph
(kW)Pe(kW)
COP
Ph
(kW)Pe(kW)
COP
Ph
(kW)Pe(kW)
COP
-20
4.48 1.57 2.85 4.18 1.84 2.27 3.84 2.05 1.87 3.46 2.22 1.56 3.04 2.37 1.28 2.57 2.52 1.02
-18
4.61 1.57 2.94 4.31 1.84 2.34 3.99 2.06 1.94 3.63 2.23 1.63 3.23 2.39 1.35 2.79 2.54 1.10
-16
4.76 1.57 3.03 4.47 1.84 2.43 4.16 2.06 2.02 3.81 2.24 1.70 3.44 2.40 1.43 3.02 2.56 1.18
-14
4.93 1.56 3.16 4.65 1.84 2.53 4.35 2.06 2.11 4.02 2.25 1.79 3.66 2.41 1.52 3.28 2.57 1.28 2.86 2.74 1.04
-12
5.11 1.55 3.30 4.84 1.83 2.64 4.55 2.06 2.21 4.24 2.25 1.88 3.91 2.41 1.62 3.55 2.57 1.38 3.16 2.75 1.15
-10
5.29 1.54 3.44 5.04 1.83 2.75 4.76 2.06 2.31 4.47 2.25 1.99 4.16 2.41 1.73 3.83 2.58 1.48 3.47 2.75 1.26 3.09 2.96 1.04
-8
5.49 1.54 3.56 5.24 1.82 2.88 4.98 2.05 2.43 4.71 2.25 2.09 4.42 2.42 1.83 4.12 2.58 1.60 3.80 2.76 1.38 3.45 2.96 1.17
-7
5.59 1.53 3.65 5.34 1.82 2.93 4.98 2.09 2.38 4.83 2.25 2.15 4.57 2.44 1.87 4.27 2.58 1.66 3.96 2.76 1.43 3.64 2.97 1.23
-6
5.68 1.53 3.71 5.45 1.82 2.99 5.20 2.05 2.54 4.95 2.25 2.20 4.69 2.42 1.94 4.41 2.58 1.71 4.12 2.76 1.49 3.82 2.97 1.29
-4
5.87 1.53 3.84 5.65 1.82 3.10 5.42 2.05 2.64 5.19 2.25 2.31 4.95 2.42 2.05 4.71 2.59 1.82 4.45 2.77 1.61 4.19 2.98 1.41
-2
6.06 1.53 3.96 5.85 1.82 3.21 5.63 2.06 2.73 5.42 2.26 2.40 5.21 2.43 2.14 5.00 2.60 1.92 4.78 2.78 1.72 4.55 2.98 1.53
0
6.23 1.54 4.05 6.03 1.84 3.28 5.84 2.07 2.82 5.65 2.27 2.49 5.46 2.44 2.24 5.28 2.61 2.02 5.09 2.79 1.82 4.91 3.00 1.64
1
6.32 1.55 4.08 6.12 1.84 3.33 5.94 2.08 2.86 5.76 2.28 2.53 5.59 2.45 2.28 5.42 2.62 2.07 5.25 2.80 1.88 5.08 3.00 1.69
2
6.42 1.85 3.47 6.05 1.94 3.12 5.88 2.29 2.57 5.68 2.28 2.49 5.55 2.63 2.11 5.38 2.81 1.91 5.16 3.01 1.71
4
7.48 1.88 3.98 7.14 2.11 3.38 6.88 2.31 2.98 6.67 2.48 2.69 6.47 2.65 2.44 6.25 2.83 2.21 5.98 3.03 1.97
6
8.40 1.91 4.40 8.04 2.15 3.74 7.76 2.35 3.30 7.52 2.52 2.98 7.28 2.68 2.72 7.02 2.86 2.45 6.69 3.06 2.19
7
8.82 1.94 4.55 8.58 2.18 3.94 8.16 2.37 3.44 7.87 2.55 3.09 7.65 2.70 2.83 7.36 2.88 2.56 7.01 3.08 2.28
8
9.20 2.04 4.51 8.83 2.24 3.94 8.53 2.41 3.54 8.26 2.58 3.20 7.99 2.75 2.91 7.69 2.93 2.62 7.31 3.12 2.34
10
9.89 2.14 4.62 9.51 2.33 4.08 9.19 2.50 3.68 8.90 2.67 3.33 8.60 2.84 3.03 8.26 3.01 2.74 7.84 3.19 2.46
12
10.46 2.22 4.71 10.08 2.41 4.18 9.75 2.58 3.78 9.45 2.74 3.45 9.13 2.91 3.14 8.75 3.08 2.84 8.30 3.26 2.55
14
10.94 2.29 4.78 10.56 2.48 4.26 10.22 2.65 3.86 9.91 2.81 3.53 9.57 2.97 3.22 9.17 3.14 2.92 8.68 3.32 2.61
16
11.14 2.35 4.74 10.83 2.54 4.26 10.56 2.71 3.90 10.28 2.87 3.58 9.97 3.03 3.29 9.59 3.20 3.00 9.11 3.37 2.70
18
11.44 2.41 4.75 11.14 2.59 4.30 10.87 2.76 3.94 10.60 2.92 3.63 10.29 3.08 3.34 9.90 3.24 3.06 9.41 3.42 2.75
20
11.68 2.45 4.77 11.39 2.64 4.31 11.12 2.80 3.97 10.85 2.96 3.67 10.54 3.12 3.38 10.15 3.28 3.09 9.65 3.45 2.80
22
11.87 2.49 4.77 11.58 2.67 4.34 11.32 2.84 3.99 11.05 3.00 3.68 10.74 3.15 3.41 10.35 3.31 3.13 9.84 3.49 2.82
24
12.01 2.52 4.77 11.72 2.70 4.34 11.47 2.87 4.00 11.20 3.03 3.70 10.89 3.18 3.42 10.50 3.34 3.14 9.98 3.51 2.84
26
12.10 2.55 4.75 11.83 2.73 4.33 11.57 2.89 4.00 11.31 3.05 3.71 11.00 3.20 3.44 10.60 3.36 3.15
28
12.16 2.56 4.75 11.89 2.75 4.32 11.65 2.91 4.00 11.39 3.07 3.71 11.07 3.22 3.44 10.68 3.38 3.16
30
12.20 2.58 4.73 11.93 2.76 4.32 11.69 2.92 4.00 11.43 3.08 3.71 11.12 3.23 3.44 10.72 3.39 3.16
32
12.20 2.58 4.73 11.95 2.76 4.33 11.71 2.93 4.00 11.46 3.09 3.71 11.15 3.24 3.44 10.74 3.40 3.16
34
12.19 2.58 4.72 11.95 2.77 4.31 11.72 2.93 4.00 11.46 3.09 3.71 11.15 3.24 3.44 10.75 3.40 3.16
36
12.17 2.58 4.72 11.94 2.76 4.33 11.71 2.93 4.00 11.46 3.09 3.71 11.15 3.24 3.44 10.75 3.40 3.16
38
12.15 2.57 4.73 11.92 2.76 4.32 11.70 2.93 3.99 11.46 3.09 3.71 11.15 3.24 3.44 10.74 3.40 3.16
40
12.13 2.56 4.74 11.91 2.75 4.33 11.69 2.92 4.00 11.45 3.08 3.72 11.15 3.24 3.44 10.74 3.39 3.17
42
12.11 2.54 4.77 11.90 2.73 4.36 11.70 2.91 4.02 11.46 3.07 3.73 11.16 3.23 3.46 10.75 3.39 3.17
HEATING MODECOOLING MODE
ΔT WATER DIFFERENT TO NOMINAL ΔT 5°C
35810
Heating capacity correction factors 0.99 1 1.01 1.02
Input power correction factors 1.01 1 0.98 0.96
Page 24
24 Aermec code 6755521_01 11.11
ANK 025-085H
10.5. ANK 030 H 230V/1/50Hz Hea ng capacity and input power
DATA DECLARED ACCORDING TO UNI EN 14511-2
Key
Ph
Hea ng capacity (kW)
Pe
Input power (kW)
ATTENTION operation with DCPX
TAE
External air temperature (°C) d.b.
ATTENTION
For the intermediate points, refer to the operating limits graphics (§ 9.2)
TAE °C
TEMPERATURE OF THE WATER PRODUCED °C
25 30 35 40 45 50 55 60
Ph
(kW)Pe(kW)
COP
Ph
(kW)Pe(kW)
COP
Ph
(kW)Pe(kW)
COP
Ph
(kW)Pe(kW)
COP
Ph
(kW)Pe(kW)
COP
Ph
(kW)Pe(kW)
COP
Ph
(kW)Pe(kW)
COP
Ph
(kW)Pe(kW)
COP
-20
5.79 1.97 2.94 5.38 2.29 2.35 4.92 2.53 1.94 4.40 2.72 1.62 3.84 2.89 1.33 3.25 3.07 1.06
-18
5.97 1.98 3.02 5.60 2.29 2.45 5.17 2.54 2.04 4.70 2.74 1.72 4.17 2.92 1.43 3.61 3.09 1.17
-16
6.12 1.97 3.11 5.78 2.29 2.52 5.39 2.55 2.11 4.95 2.75 1.80 4.46 2.93 1.52 3.94 3.11 1.27
-14
6.24 1.96 3.18 5.95 2.29 2.60 5.59 2.55 2.19 5.18 2.76 1.88 4.73 2.94 1.61 4.24 3.12 1.36 3.71 3.33 1.11
-12
6.36 1.95 3.26 6.10 2.29 2.66 5.78 2.55 2.27 5.41 2.76 1.96 4.99 2.95 1.69 4.53 3.13 1.45 4.04 3.34 1.21
-10
6.50 1.94 3.35 6.27 2.28 2.75 5.98 2.54 2.35 5.64 2.76 2.04 5.26 2.95 1.78 4.83 3.14 1.54 4.37 3.35 1.30 3.88 3.60 1.08
-8
6.65 1.92 3.46 6.46 2.27 2.85 6.21 2.54 2.44 5.90 2.76 2.14 5.55 2.95 1.88 5.15 3.14 1.64 4.72 3.35 1.41 4.26 3.61 1.18
-7
6.75 1.92 3.52 6.57 2.27 2.89 6.31 2.57 2.46 6.04 2.76 2.19 5.68 2.96 1.92 5.32 3.15 1.69 4.91 3.36 1.46 4.46 3.61 1.24
-6
6.85 1.91 3.59 6.69 2.26 2.96 6.47 2.54 2.55 6.19 2.76 2.24 5.87 2.96 1.98 5.51 3.15 1.75 5.11 3.36 1.52 4.68 3.62 1.29
-4
7.10 1.90 3.74 6.97 2.26 3.08 6.78 2.54 2.67 6.54 2.76 2.37 6.25 2.96 2.11 5.91 3.16 1.87 5.54 3.37 1.64 5.14 3.63 1.42
-2
7.42 1.90 3.91 7.32 2.26 3.24 7.16 2.54 2.82 6.95 2.77 2.51 6.69 2.97 2.25 6.38 3.16 2.02 6.04 3.38 1.79 5.67 3.64 1.56
0
7.82 1.90 4.12 7.76 2.26 3.43 7.63 2.55 2.99 7.44 2.78 2.68 7.21 2.98 2.42 6.93 3.18 2.18 6.62 3.39 1.95 6.28 3.65 1.72
1
8.06 1.90 4.24 8.01 2.27 3.53 7.89 2.55 3.09 7.72 2.79 2.77 7.51 2.99 2.51 7.24 3.19 2.27 6.94 3.40 2.04 6.61 3.66 1.81
2
8.47 2.27 3.73 8.18 2.54 3.22 8.11 2.79 2.91 7.88 3.01 2.62 7.59 3.20 2.37 7.23 3.41 2.12 6.79 3.67 1.85
4
9.46 2.29 4.13 9.25 2.58 3.59 9.01 2.82 3.20 8.73 3.02 2.89 8.40 3.22 2.61 7.99 3.44 2.32 7.49 3.70 2.02
6
10.41 2.32 4.49 10.17 2.61 3.90 9.90 2.85 3.47 9.58 3.06 3.13 9.20 3.26 2.82 8.75 3.47 2.52 8.20 3.73 2.20
7
10.88 2.34 4.65 10.92 2.64 4.14 10.33 2.87 3.60 10.05 3.11 3.23 9.60 3.28 2.93 9.12 3.50 2.61 8.56 3.75 2.28
8
11.33 2.46 4.61 11.06 2.71 4.08 10.76 2.93 3.67 10.41 3.14 3.32 9.99 3.34 2.99 9.50 3.56 2.67 8.91 3.79 2.35
10
12.20 2.58 4.73 11.91 2.83 4.21 11.58 3.05 3.80 11.21 3.25 3.45 10.76 3.45 3.12 10.23 3.66 2.80 9.61 3.89 2.47
12
13.01 2.68 4.85 12.70 2.93 4.33 12.36 3.14 3.94 11.96 3.34 3.58 11.49 3.54 3.25 10.93 3.75 2.91 10.28 3.98 2.58
14
13.73 2.77 4.96 13.42 3.02 4.44 13.06 3.23 4.04 12.65 3.43 3.69 12.16 3.62 3.36 11.59 3.83 3.03 10.91 4.05 2.69
16
14.12 2.85 4.95 13.86 3.09 4.49 13.55 3.31 4.09 13.18 3.50 3.77 12.74 3.69 3.45 12.21 3.89 3.14 11.59 4.12 2.81
18
14.49 2.92 4.96 14.24 3.16 4.51 13.95 3.37 4.14 13.59 3.57 3.81 13.16 3.75 3.51 12.64 3.95 3.20 12.02 4.17 2.88
20
14.78 2.98 4.96 14.54 3.22 4.52 14.26 3.43 4.16 13.91 3.62 3.84 13.49 3.81 3.54 12.98 4.00 3.25 12.36 4.22 2.93
22
14.99 3.02 4.96 14.77 3.26 4.53 14.50 3.47 4.18 14.16 3.66 3.87 13.75 3.85 3.57 13.24 4.04 3.28 12.62 4.26 2.96
24
15.15 3.06 4.95 14.94 3.30 4.53 14.68 3.51 4.18 14.35 3.70 3.88 13.94 3.88 3.59 13.43 4.07 3.30 12.82 4.29 2.99
26
15.26 3.09 4.94 15.06 3.33 4.52 14.80 3.53 4.19 14.48 3.72 3.89 14.07 3.91 3.60 13.56 4.10 3.31
28
15.32 3.11 4.93 15.13 3.35 4.52 14.88 3.56 4.18 14.56 3.74 3.89 14.15 3.93 3.60 13.65 4.12 3.31
30
15.35 3.12 4.92 15.17 3.36 4.51 14.92 3.57 4.18 14.61 3.76 3.89 14.20 3.94 3.60 13.70 4.13 3.32
32
15.36 3.13 4.91 15.18 3.37 4.50 14.94 3.58 4.17 14.62 3.77 3.88 14.22 3.95 3.60 13.72 4.14 3.31
34
15.35 3.13 4.90 15.18 3.37 4.50 14.94 3.58 4.17 14.63 3.77 3.88 14.22 3.95 3.60 13.71 4.14 3.31
36
15.34 3.12 4.92 15.17 3.37 4.50 14.93 3.58 4.17 14.62 3.77 3.88 14.21 3.95 3.60 13.70 4.14 3.31
38
15.33 3.11 4.93 15.17 3.36 4.51 14.93 3.57 4.18 14.61 3.76 3.89 14.20 3.95 3.59 13.68 4.14 3.30
40
15.34 3.10 4.95 15.18 3.35 4.53 14.94 3.56 4.20 14.62 3.76 3.89 14.20 3.94 3.60 13.68 4.14 3.30
42
15.37 3.08 4.99 15.21 3.33 4.57 14.97 3.55 4.22 14.65 3.75 3.91 14.22 3.93 3.62 13.69 4.13 3.31
HEATING MODECOOLING MODE
ΔT WATER DIFFERENT TO NOMINAL ΔT 5°C
35810
Heating capacity correction factors 0.99 1 1.01 1.02
Input power correction factors 1.01 1 0.98 0.96
Page 25
25Aermec code 6755521_01 11.11
ANK 025-085H
10.6. ANK 030 HP|H A 230V/1/50Hz Hea ng capacity and input power
DATA DECLARED ACCORDING TO UNI EN 14511-2
Key
Ph
Hea ng capacity (kW)
Pe
Input power (kW)
ATTENTION operation with DCPX
TAE
External air temperature (°C) d.b.
ATTENTION
For the intermediate points, refer to the operating limits graphics (§ 9.2)
TAE °C
TEMPERATURE OF THE WATER PRODUCED °C
25 30 35 40 45 50 55 60
Ph
(kW)Pe(kW)
COP
Ph
(kW)Pe(kW)
COP
Ph
(kW)Pe(kW)
COP
Ph
(kW)Pe(kW)
COP
Ph
(kW)Pe(kW)
COP
Ph
(kW)Pe(kW)
COP
Ph
(kW)Pe(kW)
COP
Ph
(kW)Pe(kW)
COP
-20
5.71 2.00 2.86 5.31 2.32 2.29 4.85 2.56 1.89 4.34 2.76 1.57 3.79 2.93 1.29 3.20 3.11 1.03
-18
5.89 2.00 2.95 5.52 2.32 2.38 5.10 2.57 1.98 4.63 2.78 1.67 4.11 2.95 1.39 3.56 3.13 1.14
-16
6.03 2.00 3.02 5.70 2.32 2.46 5.32 2.58 2.06 4.88 2.79 1.75 4.40 2.97 1.48 3.88 3.15 1.23
-14
6.16 1.99 3.10 5.86 2.32 2.53 5.51 2.58 2.14 5.11 2.79 1.83 4.66 2.98 1.56 4.18 3.16 1.32 3.66 3.37 1.09
-12
6.28 1.98 3.17 6.02 2.31 2.61 5.70 2.58 2.21 5.33 2.80 1.90 4.92 2.99 1.65 4.47 3.17 1.41 3.98 3.38 1.18
-10
6.41 1.96 3.27 6.18 2.31 2.68 5.90 2.58 2.29 5.56 2.80 1.99 5.18 2.99 1.73 4.76 3.18 1.50 4.31 3.39 1.27 3.82 3.65 1.05
-8
6.56 1.95 3.36 6.37 2.30 2.77 6.12 2.57 2.38 5.82 2.80 2.08 5.47 2.99 1.83 5.08 3.18 1.60 4.65 3.40 1.37 4.20 3.66 1.15
-7
6.65 1.94 3.43 6.48 2.29 2.83 6.18 2.61 2.37 5.96 2.80 2.13 5.54 3.00 1.85 5.25 3.19 1.65 4.84 3.40 1.42 4.40 3.66 1.20
-6
6.75 1.94 3.48 6.59 2.29 2.88 6.38 2.57 2.48 6.11 2.80 2.18 5.79 2.99 1.94 5.43 3.19 1.70 5.04 3.40 1.48 4.61 3.66 1.26
-4
7.00 1.93 3.63 6.87 2.29 3.00 6.69 2.57 2.60 6.45 2.80 2.30 6.16 3.00 2.05 5.83 3.20 1.82 5.47 3.41 1.60 5.07 3.67 1.38
-2
7.32 1.92 3.81 7.22 2.29 3.15 7.06 2.57 2.75 6.85 2.80 2.45 6.59 3.01 2.19 6.29 3.21 1.96 5.96 3.42 1.74 5.59 3.68 1.52
0
7.72 1.92 4.02 7.65 2.29 3.34 7.52 2.58 2.91 7.34 2.81 2.61 7.11 3.02 2.35 6.84 3.22 2.12 6.53 3.44 1.90 6.19 3.70 1.67
1
7.95 1.93 4.12 7.90 2.29 3.45 7.78 2.58 3.02 7.62 2.82 2.70 7.40 3.03 2.44 7.14 3.23 2.21 6.85 3.45 1.99 6.52 3.71 1.76
2
8.35 2.30 3.63 8.04 2.58 3.12 8.00 2.83 2.83 7.77 3.04 2.56 7.48 3.24 2.31 7.13 3.46 2.06 6.70 3.72 1.80
4
9.32 2.32 4.02 9.12 2.61 3.49 8.89 2.85 3.12 8.61 3.06 2.81 8.28 3.27 2.53 7.88 3.48 2.26 7.39 3.75 1.97
6
10.27 2.35 4.37 10.03 2.65 3.78 9.76 2.89 3.38 9.45 3.10 3.05 9.07 3.30 2.75 8.62 3.52 2.45 8.09 3.78 2.14
7
10.73 2.37 4.53 10.84 2.64 4.11 10.19 2.91 3.50 9.91 3.15 3.15 9.47 3.32 2.85 9.00 3.54 2.54 8.44 3.80 2.22
8
11.18 2.49 4.49 10.91 2.75 3.97 10.61 2.97 3.57 10.26 3.18 3.23 9.85 3.39 2.91 9.37 3.60 2.60 8.79 3.84 2.29
10
12.03 2.61 4.61 11.75 2.86 4.11 11.42 3.08 3.71 11.05 3.29 3.36 10.61 3.49 3.04 10.09 3.71 2.72 9.47 3.94 2.40
12
12.82 2.72 4.71 12.52 2.97 4.22 12.18 3.19 3.82 11.79 3.39 3.48 11.33 3.59 3.16 10.78 3.80 2.84 10.14 4.03 2.52
14
13.54 2.81 4.82 13.23 3.06 4.32 12.88 3.27 3.94 12.47 3.47 3.59 11.99 3.67 3.27 11.43 3.88 2.95 10.76 4.10 2.62
16
13.92 2.89 4.82 13.66 3.13 4.36 13.36 3.35 3.99 13.00 3.55 3.66 12.56 3.74 3.36 12.04 3.94 3.06 11.43 4.17 2.74
18
14.28 2.96 4.82 14.04 3.20 4.39 13.75 3.41 4.03 13.40 3.61 3.71 12.97 3.80 3.41 12.46 4.00 3.12 11.85 4.23 2.80
20
14.57 3.01 4.84 14.34 3.26 4.40 14.06 3.47 4.05 13.72 3.66 3.75 13.30 3.85 3.45 12.79 4.05 3.16 12.19 4.27 2.85
22
14.79 3.06 4.83 14.57 3.30 4.42 14.30 3.52 4.06 13.97 3.71 3.77 13.55 3.90 3.47 13.05 4.09 3.19 12.45 4.31 2.89
24
14.94 3.10 4.82 14.73 3.34 4.41 14.47 3.55 4.08 14.15 3.74 3.78 13.74 3.93 3.50 13.24 4.13 3.21 12.64 4.34 2.91
26
15.05 3.13 4.81 14.85 3.37 4.41 14.60 3.58 4.08 14.27 3.77 3.79 13.87 3.96 3.50 13.38 4.15 3.22
28
15.11 3.15 4.80 14.92 3.39 4.40 14.67 3.60 4.08 14.36 3.79 3.79 13.96 3.98 3.51 13.46 4.17 3.23
30
15.14 3.16 4.79 14.96 3.40 4.40 14.72 3.62 4.07 14.40 3.81 3.78 14.00 3.99 3.51 13.51 4.18 3.23
32
15.14 3.17 4.78 14.97 3.41 4.39 14.73 3.62 4.07 14.42 3.81 3.78 14.02 4.00 3.51 13.52 4.19 3.23
34
15.14 3.17 4.78 14.97 3.41 4.39 14.73 3.63 4.06 14.42 3.82 3.77 14.02 4.00 3.51 13.52 4.20 3.22
36
15.13 3.16 4.79 14.96 3.41 4.39 14.73 3.62 4.07 14.42 3.82 3.77 14.01 4.00 3.50 13.51 4.20 3.22
38
15.12 3.15 4.80 14.95 3.40 4.40 14.72 3.62 4.07 14.41 3.81 3.78 14.01 4.00 3.50 13.49 4.19 3.22
40
15.13 3.14 4.82 14.96 3.39 4.41 14.73 3.61 4.08 14.42 3.80 3.79 14.01 3.99 3.51 13.49 4.19 3.22
42
15.16 3.12 4.86 15.00 3.37 4.45 14.76 3.59 4.11 14.44 3.79 3.81 14.03 3.98 3.53 13.50 4.18 3.23
HEATING MODECOOLING MODE
ΔT WATER DIFFERENT TO NOMINAL ΔT 5°C
35810
Heating capacity correction factors 0.99 1 1.01 1.02
Input power correction factors 1.01 1 0.98 0.96
Page 26
26 Aermec code 6755521_01 11.11
ANK 025-085H
10.7. ANK 030 H 400V/3N/50Hz Hea ng capacity and input power
DATA DECLARED ACCORDING TO UNI EN 14511-2
Key
Ph
Hea ng capacity (kW)
Pe
Input power (kW)
ATTENTION operation with DCPX
TAE
External air temperature (°C) d.b.
ATTENTION
For the intermediate points, refer to the operating limits graphics (§ 9.2)
TAE °C
TEMPERATURE OF THE WATER PRODUCED °C
25 30 35 40 45 50 55 60
Ph
(kW)Pe(kW)
COP
Ph
(kW)Pe(kW)
COP
Ph
(kW)Pe(kW)
COP
Ph
(kW)Pe(kW)
COP
Ph
(kW)Pe(kW)
COP
Ph
(kW)Pe(kW)
COP
Ph
(kW)Pe(kW)
COP
Ph
(kW)Pe(kW)
COP
-20
5.79 1.97 2.94 5.38 2.29 2.35 4.92 2.53 1.94 4.40 2.72 1.62 3.84 2.89 1.33 3.25 3.07 1.06
-18
5.97 1.98 3.02 5.60 2.29 2.45 5.17 2.54 2.04 4.70 2.74 1.72 4.17 2.92 1.43 3.61 3.09 1.17
-16
6.12 1.97 3.11 5.78 2.29 2.52 5.39 2.55 2.11 4.95 2.75 1.80 4.46 2.93 1.52 3.94 3.11 1.27
-14
6.24 1.96 3.18 5.95 2.29 2.60 5.59 2.55 2.19 5.18 2.76 1.88 4.73 2.94 1.61 4.24 3.12 1.36 3.71 3.33 1.11
-12
6.36 1.95 3.26 6.10 2.29 2.66 5.78 2.55 2.27 5.41 2.76 1.96 4.99 2.95 1.69 4.53 3.13 1.45 4.04 3.34 1.21
-10
6.50 1.94 3.35 6.27 2.28 2.75 5.98 2.54 2.35 5.64 2.76 2.04 5.26 2.95 1.78 4.83 3.14 1.54 4.37 3.35 1.30 3.88 3.60 1.08
-8
6.65 1.92 3.46 6.46 2.27 2.85 6.21 2.54 2.44 5.90 2.76 2.14 5.55 2.95 1.88 5.15 3.14 1.64 4.72 3.35 1.41 4.26 3.61 1.18
-7
6.75 1.92 3.52 6.57 2.27 2.89 6.31 2.57 2.46 6.04 2.76 2.19 5.68 2.96 1.92 5.32 3.15 1.69 4.91 3.36 1.46 4.46 3.61 1.24
-6
6.85 1.91 3.59 6.69 2.26 2.96 6.47 2.54 2.55 6.19 2.76 2.24 5.87 2.96 1.98 5.51 3.15 1.75 5.11 3.36 1.52 4.68 3.62 1.29
-4
7.10 1.90 3.74 6.97 2.26 3.08 6.78 2.54 2.67 6.54 2.76 2.37 6.25 2.96 2.11 5.91 3.16 1.87 5.54 3.37 1.64 5.14 3.63 1.42
-2
7.42 1.90 3.91 7.32 2.26 3.24 7.16 2.54 2.82 6.95 2.77 2.51 6.69 2.97 2.25 6.38 3.16 2.02 6.04 3.38 1.79 5.67 3.64 1.56
0
7.82 1.90 4.12 7.76 2.26 3.43 7.63 2.55 2.99 7.44 2.78 2.68 7.21 2.98 2.42 6.93 3.18 2.18 6.62 3.39 1.95 6.28 3.65 1.72
1
8.06 1.90 4.24 8.01 2.27 3.53 7.89 2.55 3.09 7.72 2.79 2.77 7.51 2.99 2.51 7.24 3.19 2.27 6.94 3.40 2.04 6.61 3.66 1.81
2
8.47 2.27 3.73 8.18 2.54 3.22 8.11 2.79 2.91 7.88 3.01 2.62 7.59 3.20 2.37 7.23 3.41 2.12 6.79 3.67 1.85
4
9.46 2.29 4.13 9.25 2.58 3.59 9.01 2.82 3.20 8.73 3.02 2.89 8.40 3.22 2.61 7.99 3.44 2.32 7.49 3.70 2.02
6
10.41 2.32 4.49 10.17 2.61 3.90 9.90 2.85 3.47 9.58 3.06 3.13 9.20 3.26 2.82 8.75 3.47 2.52 8.20 3.73 2.20
7
10.88 2.34 4.65 10.92 2.64 4.14 10.33 2.87 3.60 10.05 3.11 3.23 9.60 3.28 2.93 9.12 3.50 2.61 8.56 3.75 2.28
8
11.33 2.46 4.61 11.06 2.71 4.08 10.76 2.93 3.67 10.41 3.14 3.32 9.99 3.34 2.99 9.50 3.56 2.67 8.91 3.79 2.35
10
12.20 2.58 4.73 11.91 2.83 4.21 11.58 3.05 3.80 11.21 3.25 3.45 10.76 3.45 3.12 10.23 3.66 2.80 9.61 3.89 2.47
12
13.01 2.68 4.85 12.70 2.93 4.33 12.36 3.14 3.94 11.96 3.34 3.58 11.49 3.54 3.25 10.93 3.75 2.91 10.28 3.98 2.58
14
13.73 2.77 4.96 13.42 3.02 4.44 13.06 3.23 4.04 12.65 3.43 3.69 12.16 3.62 3.36 11.59 3.83 3.03 10.91 4.05 2.69
16
14.12 2.85 4.95 13.86 3.09 4.49 13.55 3.31 4.09 13.18 3.50 3.77 12.74 3.69 3.45 12.21 3.89 3.14 11.59 4.12 2.81
18
14.49 2.92 4.96 14.24 3.16 4.51 13.95 3.37 4.14 13.59 3.57 3.81 13.16 3.75 3.51 12.64 3.95 3.20 12.02 4.17 2.88
20
14.78 2.98 4.96 14.54 3.22 4.52 14.26 3.43 4.16 13.91 3.62 3.84 13.49 3.81 3.54 12.98 4.00 3.25 12.36 4.22 2.93
22
14.99 3.02 4.96 14.77 3.26 4.53 14.50 3.47 4.18 14.16 3.66 3.87 13.75 3.85 3.57 13.24 4.04 3.28 12.62 4.26 2.96
24
15.15 3.06 4.95 14.94 3.30 4.53 14.68 3.51 4.18 14.35 3.70 3.88 13.94 3.88 3.59 13.43 4.07 3.30 12.82 4.29 2.99
26
15.26 3.09 4.94 15.06 3.33 4.52 14.80 3.53 4.19 14.48 3.72 3.89 14.07 3.91 3.60 13.56 4.10 3.31
28
15.32 3.11 4.93 15.13 3.35 4.52 14.88 3.56 4.18 14.56 3.74 3.89 14.15 3.93 3.60 13.65 4.12 3.31
30
15.35 3.12 4.92 15.17 3.36 4.51 14.92 3.57 4.18 14.61 3.76 3.89 14.20 3.94 3.60 13.70 4.13 3.32
32
15.36 3.13 4.91 15.18 3.37 4.50 14.94 3.58 4.17 14.62 3.77 3.88 14.22 3.95 3.60 13.72 4.14 3.31
34
15.35 3.13 4.90 15.18 3.37 4.50 14.94 3.58 4.17 14.63 3.77 3.88 14.22 3.95 3.60 13.71 4.14 3.31
36
15.34 3.12 4.92 15.17 3.37 4.50 14.93 3.58 4.17 14.62 3.77 3.88 14.21 3.95 3.60 13.70 4.14 3.31
38
15.33 3.11 4.93 15.17 3.36 4.51 14.93 3.57 4.18 14.61 3.76 3.89 14.20 3.95 3.59 13.68 4.14 3.30
40
15.34 3.10 4.95 15.18 3.35 4.53 14.94 3.56 4.20 14.62 3.76 3.89 14.20 3.94 3.60 13.68 4.14 3.30
42
15.37 3.08 4.99 15.21 3.33 4.57 14.97 3.55 4.22 14.65 3.75 3.91 14.22 3.93 3.62 13.69 4.13 3.31
HEATING MODECOOLING MODE
ΔT WATER DIFFERENT TO NOMINAL ΔT 5°C
35810
Heating capacity correction factors 0.99 1 1.01 1.02
Input power correction factors 1.01 1 0.98 0.96
Page 27
27Aermec code 6755521_01 11.11
ANK 025-085H
10.8. ANK 030 HP|H A 400V/3N/50Hz Hea ng capacity and input power
TAE °C
TEMPERATURE OF THE WATER PRODUCED °C
25 30 35 40 45 50 55 60
Ph
(kW)Pe(kW)
COP
Ph
(kW)Pe(kW)
COP
Ph
(kW)Pe(kW)
COP
Ph
(kW)Pe(kW)
COP
Ph
(kW)Pe(kW)
COP
Ph
(kW)Pe(kW)
COP
Ph
(kW)Pe(kW)
COP
Ph
(kW)Pe(kW)
COP
-20
5.71 2.00 2.86 5.31 2.32 2.29 4.85 2.56 1.89 4.34 2.76 1.57 3.79 2.93 1.29 3.20 3.11 1.03
-18
5.89 2.00 2.95 5.52 2.32 2.38 5.10 2.57 1.98 4.63 2.78 1.67 4.11 2.95 1.39 3.56 3.13 1.14
-16
6.03 2.00 3.02 5.70 2.32 2.46 5.32 2.58 2.06 4.88 2.79 1.75 4.40 2.97 1.48 3.88 3.15 1.23
-14
6.16 1.99 3.10 5.86 2.32 2.53 5.51 2.58 2.14 5.11 2.79 1.83 4.66 2.98 1.56 4.18 3.16 1.32 3.66 3.37 1.09
-12
6.28 1.98 3.17 6.02 2.31 2.61 5.70 2.58 2.21 5.33 2.80 1.90 4.92 2.99 1.65 4.47 3.17 1.41 3.98 3.38 1.18
-10
6.41 1.96 3.27 6.18 2.31 2.68 5.90 2.58 2.29 5.56 2.80 1.99 5.18 2.99 1.73 4.76 3.18 1.50 4.31 3.39 1.27 3.82 3.65 1.05
-8
6.56 1.95 3.36 6.37 2.30 2.77 6.12 2.57 2.38 5.82 2.80 2.08 5.47 2.99 1.83 5.08 3.18 1.60 4.65 3.40 1.37 4.20 3.66 1.15
-7
6.65 1.94 3.43 6.48 2.29 2.83 6.18 2.61 2.37 5.96 2.80 2.13 5.54 3.00 1.85 5.25 3.19 1.65 4.84 3.40 1.42 4.40 3.66 1.20
-6
6.75 1.94 3.48 6.59 2.29 2.88 6.38 2.57 2.48 6.11 2.80 2.18 5.79 2.99 1.94 5.43 3.19 1.70 5.04 3.40 1.48 4.61 3.66 1.26
-4
7.00 1.93 3.63 6.87 2.29 3.00 6.69 2.57 2.60 6.45 2.80 2.30 6.16 3.00 2.05 5.83 3.20 1.82 5.47 3.41 1.60 5.07 3.67 1.38
-2
7.32 1.92 3.81 7.22 2.29 3.15 7.06 2.57 2.75 6.85 2.80 2.45 6.59 3.01 2.19 6.29 3.21 1.96 5.96 3.42 1.74 5.59 3.68 1.52
0
7.72 1.92 4.02 7.65 2.29 3.34 7.52 2.58 2.91 7.34 2.81 2.61 7.11 3.02 2.35 6.84 3.22 2.12 6.53 3.44 1.90 6.19 3.70 1.67
1
7.95 1.93 4.12 7.90 2.29 3.45 7.78 2.58 3.02 7.62 2.82 2.70 7.40 3.03 2.44 7.14 3.23 2.21 6.85 3.45 1.99 6.52 3.71 1.76
2
8.35 2.30 3.63 8.04 2.58 3.12 8.00 2.83 2.83 7.77 3.04 2.56 7.48 3.24 2.31 7.13 3.46 2.06 6.70 3.72 1.80
4
9.32 2.32 4.02 9.12 2.61 3.49 8.89 2.85 3.12 8.61 3.06 2.81 8.28 3.27 2.53 7.88 3.48 2.26 7.39 3.75 1.97
6
10.27 2.35 4.37 10.03 2.65 3.78 9.76 2.89 3.38 9.45 3.10 3.05 9.07 3.30 2.75 8.62 3.52 2.45 8.09 3.78 2.14
7
10.73 2.37 4.53 10.84 2.64 4.11 10.19 2.91 3.50 9.91 3.15 3.15 9.47 3.32 2.85 9.00 3.54 2.54 8.44 3.80 2.22
8
11.18 2.49 4.49 10.91 2.75 3.97 10.61 2.97 3.57 10.26 3.18 3.23 9.85 3.39 2.91 9.37 3.60 2.60 8.79 3.84 2.29
10
12.03 2.61 4.61 11.75 2.86 4.11 11.42 3.08 3.71 11.05 3.29 3.36 10.61 3.49 3.04 10.09 3.71 2.72 9.47 3.94 2.40
12
12.82 2.72 4.71 12.52 2.97 4.22 12.18 3.19 3.82 11.79 3.39 3.48 11.33 3.59 3.16 10.78 3.80 2.84 10.14 4.03 2.52
14
13.54 2.81 4.82 13.23 3.06 4.32 12.88 3.27 3.94 12.47 3.47 3.59 11.99 3.67 3.27 11.43 3.88 2.95 10.76 4.10 2.62
16
13.92 2.89 4.82 13.66 3.13 4.36 13.36 3.35 3.99 13.00 3.55 3.66 12.56 3.74 3.36 12.04 3.94 3.06 11.43 4.17 2.74
18
14.28 2.96 4.82 14.04 3.20 4.39 13.75 3.41 4.03 13.40 3.61 3.71 12.97 3.80 3.41 12.46 4.00 3.12 11.85 4.23 2.80
20
14.57 3.01 4.84 14.34 3.26 4.40 14.06 3.47 4.05 13.72 3.66 3.75 13.30 3.85 3.45 12.79 4.05 3.16 12.19 4.27 2.85
22
14.79 3.06 4.83 14.57 3.30 4.42 14.30 3.52 4.06 13.97 3.71 3.77 13.55 3.90 3.47 13.05 4.09 3.19 12.45 4.31 2.89
24
14.94 3.10 4.82 14.73 3.34 4.41 14.47 3.55 4.08 14.15 3.74 3.78 13.74 3.93 3.50 13.24 4.13 3.21 12.64 4.34 2.91
26
15.05 3.13 4.81 14.85 3.37 4.41 14.60 3.58 4.08 14.27 3.77 3.79 13.87 3.96 3.50 13.38 4.15 3.22
28
15.11 3.15 4.80 14.92 3.39 4.40 14.67 3.60 4.08 14.36 3.79 3.79 13.96 3.98 3.51 13.46 4.17 3.23
30
15.14 3.16 4.79 14.96 3.40 4.40 14.72 3.62 4.07 14.40 3.81 3.78 14.00 3.99 3.51 13.51 4.18 3.23
32
15.14 3.17 4.78 14.97 3.41 4.39 14.73 3.62 4.07 14.42 3.81 3.78 14.02 4.00 3.51 13.52 4.19 3.23
34
15.14 3.17 4.78 14.97 3.41 4.39 14.73 3.63 4.06 14.42 3.82 3.77 14.02 4.00 3.51 13.52 4.20 3.22
36
15.13 3.16 4.79 14.96 3.41 4.39 14.73 3.62 4.07 14.42 3.82 3.77 14.01 4.00 3.50 13.51 4.20 3.22
38
15.12 3.15 4.80 14.95 3.40 4.40 14.72 3.62 4.07 14.41 3.81 3.78 14.01 4.00 3.50 13.49 4.19 3.22
40
15.13 3.14 4.82 14.96 3.39 4.41 14.73 3.61 4.08 14.42 3.80 3.79 14.01 3.99 3.51 13.49 4.19 3.22
42
15.16 3.12 4.86 15.00 3.37 4.45 14.76 3.59 4.11 14.44 3.79 3.81 14.03 3.98 3.53 13.50 4.18 3.23
DATA DECLARED ACCORDING TO UNI EN 14511-2
Key
Ph
Hea ng capacity (kW)
Pe
Input power (kW)
ATTENTION operation with DCPX
TAE
External air temperature (°C) d.b.
ATTENTION
For the intermediate points, refer to the operating limits graphics (§ 9.2)
HEATING MODECOOLING MODE
ΔT WATER DIFFERENT TO NOMINAL ΔT 5°C
35810
Heating capacity correction factors 0.99 1 1.01 1.02
Input power correction factors 1.01 1 0.98 0.96
Page 28
28 Aermec code 6755521_01 11.11
ANK 025-085H
10.9. ANK 040 H 230V/1/50Hz Hea ng capacity and input power
DATA DECLARED ACCORDING TO UNI EN 14511-2
Key
Ph
Hea ng capacity (kW)
Pe
Input power (kW)
ATTENTION operation with DCPX
TAE
External air temperature (°C) d.b.
ATTENTION
For the intermediate points, refer to the operating limits graphics (§ 9.2)
TAE °C
TEMPERATURE OF THE WATER PRODUCED °C
25 30 35 40 45 50 55 60
Ph
(kW)Pe(kW)
COP
Ph
(kW)Pe(kW)
COP
Ph
(kW)Pe(kW)
COP
Ph
(kW)Pe(kW)
COP
Ph
(kW)Pe(kW)
COP
Ph
(kW)Pe(kW)
COP
Ph
(kW)Pe(kW)
COP
Ph
(kW)Pe(kW)
COP
-20
6.03 2.27 2.66 5.69 2.58 2.21 5.26 2.83 1.86 4.76 3.03 1.57 4.19 3.23 1.30 3.56 3.42 1.04
-18
6.32 2.27 2.78 5.98 2.59 2.31 5.57 2.84 1.96 5.08 3.06 1.66 4.53 3.26 1.39 3.92 3.46 1.13
-16
6.57 2.26 2.91 6.24 2.59 2.41 5.84 2.85 2.05 5.37 3.08 1.74 4.84 3.28 1.48 4.26 3.49 1.22
-14
6.80 2.24 3.04 6.48 2.58 2.51 6.09 2.85 2.14 5.64 3.08 1.83 5.14 3.30 1.56 4.57 3.51 1.30 3.97 3.73 1.06
-12
7.02 2.21 3.18 6.71 2.56 2.62 6.34 2.84 2.23 5.91 3.08 1.92 5.42 3.30 1.64 4.89 3.52 1.39 4.31 3.75 1.15
-10
7.23 2.18 3.32 6.94 2.54 2.73 6.58 2.83 2.33 6.17 3.08 2.00 5.71 3.30 1.73 5.21 3.52 1.48 4.66 3.76 1.24 4.08 4.03 1.01
-8
7.46 2.15 3.47 7.18 2.52 2.85 6.84 2.81 2.43 6.45 3.07 2.10 6.02 3.30 1.82 5.54 3.52 1.57 5.03 3.76 1.34 4.49 4.04 1.11
-7
7.58 2.14 3.54 7.30 2.50 2.92 6.98 2.81 2.48 6.60 3.06 2.16 6.18 3.30 1.87 5.72 3.52 1.63 5.23 3.76 1.39 4.70 4.04 1.16
-6
7.70 2.12 3.63 7.44 2.49 2.99 7.12 2.80 2.54 6.76 3.06 2.21 6.35 3.29 1.93 5.91 3.52 1.68 5.43 3.76 1.44 4.93 4.04 1.22
-4
7.98 2.09 3.82 7.73 2.47 3.13 7.43 2.79 2.66 7.10 3.05 2.33 6.72 3.29 2.04 6.31 3.52 1.79 5.87 3.77 1.56 5.41 4.04 1.34
-2
8.30 2.07 4.01 8.07 2.46 3.28 7.79 2.78 2.80 7.48 3.05 2.45 7.14 3.29 2.17 6.76 3.53 1.92 6.36 3.77 1.69 5.94 4.05 1.47
0
8.67 2.05 4.23 8.46 2.45 3.45 8.21 2.77 2.96 7.93 3.05 2.60 7.61 3.30 2.31 7.27 3.54 2.05 6.91 3.79 1.82 6.53 4.06 1.61
1
8.88 2.05 4.33 8.68 2.45 3.54 8.44 2.78 3.04 8.17 3.06 2.67 7.87 3.31 2.38 7.55 3.54 2.13 7.21 3.79 1.90 6.86 4.07 1.69
2
9.13 2.45 3.73 8.69 2.71 3.21 8.51 3.06 2.78 8.20 3.27 2.51 7.85 3.55 2.21 7.47 3.80 1.97 7.04 4.08 1.73
4
10.34 2.46 4.20 10.00 2.80 3.57 9.66 3.08 3.14 9.30 3.34 2.78 8.91 3.58 2.49 8.48 3.83 2.21 7.99 4.11 1.94
6
11.46 2.49 4.60 11.10 2.83 3.92 10.73 3.12 3.44 10.34 3.38 3.06 9.91 3.62 2.74 9.43 3.88 2.43 8.89 4.15 2.14
7
11.99 2.61 4.59 11.93 2.88 4.14 11.24 3.23 3.48 10.88 3.47 3.14 10.38 3.73 2.78 9.88 3.97 2.49 9.31 4.24 2.20
8
12.49 2.67 4.68 12.12 2.99 4.05 11.72 3.28 3.57 11.30 3.53 3.20 10.83 3.77 2.87 10.31 4.01 2.57 9.72 4.27 2.28
10
13.42 2.78 4.83 13.04 3.10 4.21 12.63 3.38 3.74 12.18 3.62 3.36 11.69 3.85 3.04 11.13 4.09 2.72 10.50 4.34 2.42
12
14.25 2.89 4.93 13.86 3.20 4.33 13.45 3.47 3.88 12.98 3.71 3.50 12.47 3.93 3.17 11.88 4.16 2.86 11.22 4.41 2.54
14
14.97 3.00 4.99 14.59 3.30 4.42 14.17 3.56 3.98 13.70 3.79 3.61 13.17 4.01 3.28 12.56 4.23 2.97 11.86 4.47 2.65
16
15.35 3.09 4.97 15.02 3.39 4.43 14.66 3.64 4.03 14.26 3.87 3.68 13.78 4.08 3.38 13.22 4.30 3.07 12.54 4.53 2.77
18
15.73 3.18 4.95 15.43 3.47 4.45 15.09 3.72 4.06 14.70 3.94 3.73 14.23 4.14 3.44 13.68 4.36 3.14 13.01 4.59 2.83
20
16.04 3.26 4.92 15.75 3.54 4.45 15.43 3.79 4.07 15.05 4.00 3.76 14.59 4.21 3.47 14.04 4.42 3.18 13.38 4.65 2.88
22
16.27 3.33 4.89 16.00 3.61 4.43 15.69 3.85 4.08 15.32 4.06 3.77 14.87 4.26 3.49 14.33 4.47 3.21 13.66 4.70 2.91
24
16.43 3.39 4.85 16.17 3.67 4.41 15.88 3.90 4.07 15.52 4.11 3.78 15.08 4.31 3.50 14.54 4.52 3.22 13.88 4.74 2.93
26
16.54 3.44 4.81 16.30 3.72 4.38 16.01 3.95 4.05 15.66 4.15 3.77 15.23 4.35 3.50 14.69 4.56 3.22
28
16.61 3.48 4.77 16.38 3.75 4.37 16.10 3.98 4.05 15.75 4.19 3.76 15.32 4.39 3.49 14.78 4.59 3.22
30
16.64 3.51 4.74 16.42 3.78 4.34 16.15 4.01 4.03 15.81 4.22 3.75 15.38 4.41 3.49 14.84 4.62 3.21
32
16.65 3.53 4.72 16.43 3.80 4.32 16.17 4.03 4.01 15.83 4.23 3.74 15.40 4.43 3.48 14.86 4.64 3.20
34
16.64 3.54 4.70 16.43 3.81 4.31 16.17 4.04 4.00 15.83 4.24 3.73 15.40 4.44 3.47 14.86 4.65 3.20
36
16.63 3.53 4.71 16.42 3.80 4.32 16.16 4.03 4.01 15.83 4.24 3.73 15.39 4.44 3.47 14.84 4.65 3.19
38
16.62 3.51 4.74 16.42 3.78 4.34 16.16 4.02 4.02 15.82 4.23 3.74 15.39 4.43 3.47 14.83 4.65 3.19
40
16.63 3.48 4.78 16.43 3.75 4.38 16.17 3.99 4.05 15.83 4.20 3.77 15.38 4.41 3.49 14.82 4.63 3.20
42
16.66 3.44 4.84 16.47 3.71 4.44 16.20 3.95 4.10 15.86 4.17 3.80 15.40 4.38 3.52 14.82 4.60 3.22
HEATING MODECOOLING MODE
ΔT WATER DIFFERENT TO NOMINAL ΔT 5°C
35810
Heating capacity correction factors 0.99 1 1.01 1.02
Input power correction factors 1.01 1 0.98 0.96
Page 29
29Aermec code 6755521_01 11.11
ANK 025-085H
10.10. ANK 040 HP|HA 230V/1/50Hz Hea ng capacity and input power
TAE °C
TEMPERATURE OF THE WATER PRODUCED °C
25 30 35 40 45 50 55 60
Ph
(kW)Pe(kW)
COP
Ph
(kW)Pe(kW)
COP
Ph
(kW)Pe(kW)
COP
Ph
(kW)Pe(kW)
COP
Ph
(kW)Pe(kW)
COP
Ph
(kW)Pe(kW)
COP
Ph
(kW)Pe(kW)
COP
Ph
(kW)Pe(kW)
COP
-20
5.96 2.3 2.59 5.61 2.61 2.15 5.19 2.86 1.81 4.7 3.07 1.53 4.14 3.26 1.27 3.51 3.46 1.01
-18
6.24 2.30 2.71 5.90 2.62 2.25 5.49 2.88 1.91 5.02 3.10 1.62 4.47 3.30 1.35 3.87 3.50 1.11
-16
6.49 2.29 2.83 6.16 2.62 2.35 5.76 2.89 1.99 5.30 3.11 1.70 4.78 3.32 1.44 4.20 3.53 1.19
-14
6.71 2.27 2.96 6.40 2.61 2.45 6.01 2.88 2.09 5.57 3.12 1.79 5.07 3.33 1.52 4.52 3.55 1.27 3.91 3.78 1.03
-12
6.93 2.24 3.09 6.62 2.59 2.56 6.26 2.88 2.17 5.83 3.12 1.87 5.35 3.34 1.60 4.83 3.56 1.36 4.26 3.79 1.12
-10
7.14 2.21 3.23 6.85 2.57 2.67 6.50 2.86 2.27 6.09 3.11 1.96 5.64 3.34 1.69 5.14 3.56 1.44 4.60 3.80 1.21 4.03 4.08 0.99
-8
7.36 2.18 3.38 7.08 2.54 2.79 6.75 2.85 2.37 6.37 3.10 2.05 5.94 3.34 1.78 5.47 3.56 1.54 4.97 3.80 1.31 4.43 4.08 1.09
-7
7.48 2.16 3.46 7.21 2.53 2.85 6.89 2.84 2.43 6.52 3.10 2.10 6.10 3.33 1.83 5.65 3.56 1.59 5.16 3.81 1.35 4.64 4.08 1.14
-6
7.60 2.15 3.53 7.34 2.52 2.91 7.03 2.83 2.48 6.67 3.09 2.16 6.27 3.33 1.88 5.83 3.56 1.64 5.36 3.81 1.41 4.87 4.09 1.19
-4
7.88 2.12 3.72 7.63 2.50 3.05 7.34 2.82 2.60 7.00 3.09 2.27 6.63 3.33 1.99 6.23 3.56 1.75 5.80 3.81 1.52 5.34 4.09 1.31
-2
8.19 2.09 3.92 7.96 2.49 3.20 7.69 2.81 2.74 7.39 3.08 2.40 7.04 3.33 2.11 6.67 3.57 1.87 6.28 3.82 1.64 5.86 4.10 1.43
0
8.56 2.08 4.12 8.35 2.48 3.37 8.10 2.81 2.88 7.82 3.09 2.53 7.51 3.34 2.25 7.18 3.58 2.01 6.82 3.83 1.78 6.45 4.11 1.57
1
8.76 2.07 4.23 8.57 2.48 3.46 8.33 2.81 2.96 8.07 3.09 2.61 7.77 3.34 2.33 7.46 3.59 2.08 7.12 3.84 1.85 6.77 4.12 1.64
2
9.01 2.48 3.63 8.55 2.74 3.12 8.40 3.10 2.71 8.10 3.37 2.45 7.74 3.60 2.15 7.37 3.85 1.91 6.95 4.13 1.68
4
10.21 2.49 4.10 9.87 2.83 3.49 9.54 3.12 3.06 9.18 3.38 2.72 8.79 3.62 2.43 8.37 3.88 2.16 7.89 4.16 1.90
6
11.31 2.52 4.49 10.96 2.86 3.83 10.59 3.16 3.35 10.20 3.42 2.98 9.78 3.66 2.67 9.30 3.92 2.37 8.77 4.20 2.09
7
11.83 2.64 4.48 11.90 2.90 4.10 11.09 3.26 3.40 10.74 3.51 3.06 10.25 3.77 2.72 9.75 4.02 2.43 9.19 4.28 2.15
8
12.33 2.70 4.57 11.96 3.03 3.95 11.57 3.31 3.50 11.15 3.57 3.12 10.69 3.81 2.81 10.18 4.06 2.51 9.60 4.32 2.22
10
13.25 2.81 4.72 12.87 3.14 4.10 12.47 3.41 3.66 12.03 3.66 3.29 11.54 3.90 2.96 10.99 4.13 2.66 10.37 4.39 2.36
12
14.06 2.93 4.80 13.68 3.24 4.22 13.27 3.51 3.78 12.82 3.75 3.42 12.31 3.98 3.09 11.73 4.21 2.79 11.07 4.46 2.48
14
14.77 3.03 4.87 14.40 3.34 4.31 13.99 3.60 3.89 13.52 3.83 3.53 13.00 4.05 3.21 12.40 4.28 2.90 11.71 4.52 2.59
16
15.15 3.13 4.84 14.83 3.43 4.32 14.47 3.68 3.93 14.07 3.91 3.60 13.61 4.13 3.30 13.05 4.35 3.00 12.38 4.58 2.70
18
15.53 3.22 4.82 15.23 3.51 4.34 14.89 3.76 3.96 14.51 3.98 3.65 14.05 4.19 3.35 13.50 4.41 3.06 12.84 4.64 2.77
20
15.83 3.30 4.80 15.55 3.58 4.34 15.23 3.83 3.98 14.85 4.05 3.67 14.41 4.25 3.39 13.86 4.47 3.10 13.21 4.70 2.81
22
16.06 3.37 4.77 15.79 3.65 4.33 15.48 3.89 3.98 15.12 4.11 3.68 14.68 4.31 3.41 14.14 4.52 3.13 13.49 4.75 2.84
24
16.22 3.43 4.73 15.97 3.71 4.30 15.67 3.95 3.97 15.32 4.16 3.68 14.89 4.36 3.42 14.35 4.57 3.14 13.70 4.80 2.85
26
16.33 3.48 4.69 16.09 3.76 4.28 15.81 3.99 3.96 15.46 4.20 3.68 15.03 4.40 3.42 14.50 4.61 3.15
28
16.39 3.52 4.66 16.16 3.80 4.25 15.89 4.03 3.94 15.55 4.24 3.67 15.13 4.44 3.41 14.59 4.64 3.14
30
16.43 3.55 4.63 16.21 3.83 4.23 15.94 4.06 3.93 15.60 4.27 3.65 15.18 4.46 3.40 14.65 4.67 3.14
32
16.43 3.57 4.60 16.22 3.84 4.22 15.96 4.08 3.91 15.63 4.28 3.65 15.20 4.48 3.39 14.67 4.69 3.13
34
16.42 3.58 4.59 16.22 3.85 4.21 15.96 4.08 3.91 15.63 4.29 3.64 15.20 4.49 3.39 14.67 4.70 3.12
36
16.41 3.57 4.60 16.21 3.85 4.21 15.96 4.08 3.91 15.62 4.29 3.64 15.20 4.49 3.39 14.65 4.71 3.11
38
16.41 3.55 4.62 16.21 3.83 4.23 15.95 4.06 3.93 15.62 4.28 3.65 15.19 4.48 3.39 14.64 4.70 3.11
40
16.41 3.52 4.66 16.22 3.80 4.27 15.96 4.04 3.95 15.63 4.25 3.68 15.19 4.46 3.41 14.63 4.68 3.13
42
16.45 3.47 4.74 16.25 3.75 4.33 15.99 4.00 4.00 15.65 4.22 3.71 15.21 4.43 3.43 14.63 4.66 3.14
DATA DECLARED ACCORDING TO UNI EN 14511-2
Key
Ph
Hea ng capacity (kW)
Pe
Input power (kW)
ATTENTION operation with DCPX
TAE
External air temperature (°C) d.b.
ATTENTION
For the intermediate points, refer to the operating limits graphics (§ 9.2)
HEATING MODECOOLING MODE
ΔT WATER DIFFERENT TO NOMINAL ΔT 5°C
35810
Heating capacity correction factors 0.99 1 1.01 1.02
Input power correction factors 1.01 1 0.98 0.96
Page 30
30 Aermec code 6755521_01 11.11
ANK 025-085H
10.11. ANK 040 H 400V/3N/50Hz Hea ng capacity and input power
DATA DECLARED ACCORDING TO UNI EN 14511-2
Key
Ph
Hea ng capacity (kW)
Pe
Input power (kW)
ATTENTION operation with DCPX
TAE
External air temperature (°C) d.b.
ATTENTION
For the intermediate points, refer to the operating limits graphics (§ 9.2)
TAE °C
TEMPERATURE OF THE WATER PRODUCED °C
25 30 35 40 45 50 55 60
Ph
(kW)Pe(kW)
COP
Ph
(kW)Pe(kW)
COP
Ph
(kW)Pe(kW)
COP
Ph
(kW)Pe(kW)
COP
Ph
(kW)Pe(kW)
COP
Ph
(kW)Pe(kW)
COP
Ph
(kW)Pe(kW)
COP
Ph
(kW)Pe(kW)
COP
-20
6.80 2.48 2.74 6.41 2.82 2.27 5.93 3.09 1.92 5.36 3.31 1.62 4.72 3.52 1.34 4.01 3.73 1.08
-18
7.12 2.48 2.87 6.74 2.83 2.38 6.27 3.11 2.02 5.72 3.34 1.71 5.11 3.56 1.44 4.42 3.78 1.17
-16
7.41 2.47 3.00 7.03 2.82 2.49 6.58 3.12 2.11 6.05 3.36 1.80 5.46 3.59 1.52 4.79 3.81 1.26
-14
7.67 2.45 3.13 7.30 2.81 2.60 6.87 3.11 2.21 6.36 3.37 1.89 5.79 3.60 1.61 5.15 3.83 1.34 4.47 4.08 1.10
-12
7.91 2.42 3.27 7.56 2.80 2.70 7.14 3.10 2.30 6.66 3.37 1.98 6.11 3.61 1.69 5.51 3.84 1.43 4.86 4.09 1.19
-10
8.15 2.39 3.41 7.82 2.77 2.82 7.42 3.09 2.40 6.96 3.36 2.07 6.44 3.61 1.78 5.87 3.85 1.52 5.25 4.10 1.28 4.60 4.40 1.05
-8
8.41 2.35 3.58 8.09 2.75 2.94 7.71 3.07 2.51 7.27 3.35 2.17 6.78 3.60 1.88 6.25 3.85 1.62 5.67 4.11 1.38 5.06 4.41 1.15
-7
8.54 2.33 3.67 8.23 2.74 3.00 7.86 3.07 2.56 7.44 3.35 2.22 6.97 3.60 1.94 6.45 3.85 1.68 5.89 4.11 1.43 5.30 4.41 1.20
-6
8.68 2.32 3.74 8.38 2.72 3.08 8.02 3.06 2.62 7.61 3.34 2.28 7.16 3.60 1.99 6.66 3.85 1.73 6.12 4.11 1.49 5.55 4.41 1.26
-4
8.99 2.29 3.93 8.71 2.70 3.23 8.38 3.04 2.76 8.00 3.33 2.40 7.57 3.59 2.11 7.11 3.85 1.85 6.62 4.11 1.61 6.09 4.42 1.38
-2
9.35 2.26 4.14 9.09 2.68 3.39 8.78 3.03 2.90 8.43 3.33 2.53 8.04 3.60 2.23 7.62 3.85 1.98 7.17 4.12 1.74 6.69 4.43 1.51
0
9.77 2.24 4.36 9.53 2.67 3.57 9.25 3.03 3.05 8.93 3.33 2.68 8.58 3.60 2.38 8.19 3.86 2.12 7.79 4.13 1.89 7.36 4.44 1.66
1
10.00 2.24 4.46 9.78 2.67 3.66 9.51 3.03 3.14 9.21 3.34 2.76 8.87 3.61 2.46 8.51 3.87 2.20 8.13 4.14 1.96 7.73 4.45 1.74
2
10.29 2.68 3.84 9.76 3.07 3.18 9.59 3.35 2.86 9.18 3.67 2.50 8.84 3.88 2.28 8.41 4.16 2.02 7.94 4.46 1.78
4
11.65 2.69 4.33 11.27 3.06 3.68 10.89 3.37 3.23 10.48 3.65 2.87 10.04 3.91 2.57 9.55 4.19 2.28 9.00 4.49 2.00
6
12.92 2.72 4.75 12.51 3.09 4.05 12.09 3.41 3.55 11.65 3.69 3.16 11.16 3.96 2.82 10.62 4.23 2.51 10.01 4.54 2.20
7
13.51 2.85 4.74 13.40 3.22 4.16 12.66 3.52 3.60 12.26 3.79 3.23 11.70 4.07 2.87 11.13 4.34 2.56 10.49 4.63 2.27
8
14.07 2.91 4.84 13.65 3.27 4.17 13.21 3.58 3.69 12.73 3.86 3.30 12.21 4.12 2.96 11.62 4.38 2.65 10.96 4.66 2.35
10
15.12 3.04 4.97 14.69 3.39 4.33 14.23 3.69 3.86 13.73 3.95 3.48 13.17 4.21 3.13 12.54 4.46 2.81 11.83 4.74 2.50
12
16.05 3.16 5.08 15.62 3.50 4.46 15.15 3.79 4.00 14.63 4.05 3.61 14.05 4.29 3.28 13.39 4.54 2.95 12.64 4.81 2.63
14
16.87 3.27 5.16 16.44 3.60 4.57 15.97 3.89 4.11 15.44 4.14 3.73 14.84 4.38 3.39 14.15 4.62 3.06 13.37 4.88 2.74
16
17.29 3.38 5.12 16.92 3.70 4.57 16.52 3.98 4.15 16.07 4.22 3.81 15.53 4.45 3.49 14.89 4.69 3.17 14.13 4.95 2.85
18
17.73 3.47 5.11 17.38 3.79 4.59 17.00 4.06 4.19 16.56 4.30 3.85 16.04 4.53 3.54 15.41 4.76 3.24 14.66 5.01 2.93
20
18.07 3.56 5.08 17.75 3.87 4.59 17.38 4.13 4.21 16.96 4.37 3.88 16.44 4.59 3.58 15.83 4.82 3.28 15.07 5.07 2.97
22
18.33 3.64 5.04 18.02 3.94 4.57 17.67 4.20 4.21 17.26 4.43 3.90 16.76 4.65 3.60 16.15 4.88 3.31 15.40 5.13 3.00
24
18.52 3.70 5.01 18.23 4.01 4.55 17.89 4.26 4.20 17.49 4.49 3.90 16.99 4.71 3.61 16.38 4.93 3.32 15.64 5.18 3.02
26
18.64 3.76 4.96 18.37 4.06 4.52 18.04 4.31 4.19 17.65 4.54 3.89 17.16 4.75 3.61 16.55 4.98 3.32
28
18.72 3.81 4.91 18.45 4.10 4.50 18.14 4.35 4.17 17.75 4.58 3.88 17.27 4.79 3.61 16.66 5.01 3.33
30
18.75 3.84 4.88 18.50 4.13 4.48 18.19 4.38 4.15 17.81 4.61 3.86 17.33 4.82 3.60 16.72 5.04 3.32
32
18.76 3.86 4.86 18.52 4.15 4.46 18.22 4.40 4.14 17.84 4.63 3.85 17.35 4.84 3.58 16.74 5.07 3.30
34
18.75 3.87 4.84 18.51 4.16 4.45 18.22 4.41 4.13 17.84 4.63 3.85 17.36 4.85 3.58 16.74 5.08 3.30
36
18.73 3.86 4.85 18.51 4.15 4.46 18.21 4.40 4.14 17.84 4.63 3.85 17.35 4.85 3.58 16.73 5.08 3.29
38
18.73 3.84 4.88 18.50 4.13 4.48 18.21 4.39 4.15 17.83 4.62 3.86 17.34 4.84 3.58 16.71 5.07 3.30
40
18.74 3.80 4.93 18.51 4.10 4.51 18.22 4.36 4.18 17.84 4.59 3.89 17.34 4.82 3.60 16.70 5.06 3.30
42
18.78 3.75 5.01 18.55 4.05 4.58 18.26 4.31 4.24 17.87 4.55 3.93 17.36 4.78 3.63 16.70 5.03 3.32
HEATING MODECOOLING MODE
ΔT WATER DIFFERENT TO NOMINAL ΔT 5°C
35810
Heating capacity correction factors 0.99 1 1.01 1.02
Input power correction factors 1.01 1 0.98 0.96
Page 31
31Aermec code 6755521_01 11.11
ANK 025-085H
10.12. ANK 040 HP|HA 400V/3N/50Hz Hea ng capacity and input power
TAE °C
TEMPERATURE OF THE WATER PRODUCED °C
25 30 35 40 45 50 55 60
Ph
(kW)Pe(kW)
COP
Ph
(kW)Pe(kW)
COP
Ph
(kW)Pe(kW)
COP
Ph
(kW)Pe(kW)
COP
Ph
(kW)Pe(kW)
COP
Ph
(kW)Pe(kW)
COP
Ph
(kW)Pe(kW)
COP
Ph
(kW)Pe(kW)
COP
-20
6.71 2.49 2.69 6.32 2.83 2.23 5.85 3.10 1.89 5.29 3.33 1.59 4.66 3.54 1.32 3.96 3.75 1.06
-18
7.03 2.49 2.82 6.65 2.84 2.34 6.19 3.12 1.98 5.65 3.36 1.68 5.04 3.58 1.41 4.36 3.80 1.15
-16
7.31 2.48 2.95 6.94 2.84 2.44 6.49 3.13 2.07 5.97 3.38 1.77 5.38 3.61 1.49 4.73 3.83 1.23
-14
7.57 2.46 3.08 7.21 2.83 2.55 6.78 3.13 2.17 6.28 3.39 1.85 5.71 3.62 1.58 5.09 3.85 1.32 4.41 4.10 1.08
-12
7.81 2.43 3.21 7.46 2.81 2.65 7.05 3.12 2.26 6.57 3.39 1.94 6.03 3.62 1.67 5.44 3.86 1.41 4.79 4.12 1.16
-10
8.05 2.40 3.35 7.72 2.79 2.77 7.32 3.11 2.35 6.86 3.38 2.03 6.35 3.62 1.75 5.79 3.87 1.50 5.19 4.13 1.26 4.54 4.42 1.03
-8
8.30 2.36 3.52 7.98 2.76 2.89 7.61 3.09 2.46 7.18 3.37 2.13 6.69 3.62 1.85 6.17 3.87 1.59 5.60 4.13 1.36 4.99 4.43 1.13
-7
8.43 2.35 3.59 8.12 2.75 2.95 7.76 3.08 2.52 7.34 3.36 2.18 6.87 3.62 1.90 6.36 3.87 1.64 5.82 4.13 1.41 5.23 4.43 1.18
-6
8.57 2.33 3.68 8.27 2.74 3.02 7.92 3.07 2.58 7.51 3.36 2.24 7.06 3.62 1.95 6.57 3.87 1.70 6.04 4.13 1.46 5.48 4.44 1.23
-4
8.87 2.30 3.86 8.60 2.71 3.17 8.27 3.06 2.70 7.89 3.35 2.36 7.47 3.61 2.07 7.02 3.87 1.81 6.53 4.14 1.58 6.01 4.44 1.35
-2
9.23 2.27 4.07 8.97 2.70 3.32 8.67 3.05 2.84 8.32 3.35 2.48 7.94 3.61 2.20 7.52 3.87 1.94 7.07 4.14 1.71 6.61 4.45 1.49
0
9.64 2.25 4.28 9.41 2.69 3.50 9.13 3.05 2.99 8.81 3.35 2.63 8.46 3.62 2.34 8.09 3.88 2.09 7.69 4.16 1.85 7.27 4.46 1.63
1
9.87 2.25 4.39 9.65 2.69 3.59 9.39 3.05 3.08 9.09 3.36 2.71 8.76 3.63 2.41 8.40 3.89 2.16 8.02 4.17 1.92 7.63 4.47 1.71
2
10.15 2.69 3.77 9.61 3.10 3.10 9.46 3.36 2.82 9.07 3.70 2.45 8.73 3.90 2.24 8.30 4.18 1.99 7.83 4.48 1.75
4
11.50 2.70 4.26 11.12 3.07 3.62 10.74 3.39 3.17 10.34 3.67 2.82 9.91 3.93 2.52 9.43 4.21 2.24 8.89 4.52 1.97
6
12.75 2.73 4.67 12.35 3.11 3.97 11.94 3.43 3.48 11.50 3.71 3.10 11.02 3.98 2.77 10.48 4.26 2.46 9.88 4.56 2.17
7
13.33 2.86 4.66 13.24 3.23 4.10 12.50 3.54 3.53 12.10 3.81 3.18 11.54 4.09 2.82 10.98 4.36 2.52 10.36 4.65 2.23
8
13.89 2.93 4.74 13.47 3.29 4.09 13.04 3.60 3.62 12.57 3.88 3.24 12.05 4.14 2.91 11.47 4.40 2.61 10.81 4.69 2.30
10
14.92 3.06 4.88 14.50 3.41 4.25 14.05 3.71 3.79 13.55 3.98 3.40 13.00 4.23 3.07 12.38 4.49 2.76 11.68 4.76 2.45
12
15.84 3.18 4.98 15.42 3.52 4.38 14.95 3.81 3.92 14.44 4.07 3.55 13.87 4.32 3.21 13.21 4.57 2.89 12.47 4.84 2.58
14
16.65 3.29 5.06 16.22 3.62 4.48 15.76 3.91 4.03 15.24 4.16 3.66 14.64 4.40 3.33 13.97 4.64 3.01 13.19 4.91 2.69
16
17.07 3.40 5.02 16.70 3.72 4.49 16.31 4.00 4.08 15.86 4.24 3.74 15.33 4.48 3.42 14.70 4.72 3.11 13.95 4.98 2.80
18
17.50 3.49 5.01 17.16 3.81 4.50 16.78 4.08 4.11 16.35 4.32 3.78 15.83 4.55 3.48 15.21 4.78 3.18 14.47 5.04 2.87
20
17.84 3.58 4.98 17.52 3.89 4.50 17.16 4.16 4.13 16.73 4.39 3.81 16.23 4.62 3.51 15.62 4.85 3.22 14.88 5.10 2.92
22
18.09 3.66 4.94 17.79 3.96 4.49 17.44 4.22 4.13 17.04 4.46 3.82 16.54 4.68 3.53 15.93 4.91 3.24 15.20 5.16 2.95
24
18.28 3.72 4.91 17.99 4.03 4.46 17.66 4.28 4.13 17.26 4.51 3.83 16.77 4.73 3.55 16.17 4.96 3.26 15.43 5.21 2.96
26
18.40 3.78 4.87 18.13 4.08 4.44 17.81 4.33 4.11 17.42 4.56 3.82 16.93 4.78 3.54 16.34 5.00 3.27
28
18.47 3.83 4.82 18.21 4.12 4.42 17.90 4.37 4.10 17.52 4.60 3.81 17.04 4.82 3.54 16.44 5.04 3.26
30
18.51 3.86 4.80 18.26 4.15 4.40 17.96 4.40 4.08 17.58 4.63 3.80 17.10 4.85 3.53 16.50 5.07 3.25
32
18.51 3.88 4.77 18.27 4.17 4.38 17.98 4.42 4.07 17.60 4.65 3.78 17.13 4.87 3.52 16.53 5.09 3.25
34
18.50 3.89 4.76 18.27 4.18 4.37 17.98 4.43 4.06 17.61 4.66 3.78 17.13 4.88 3.51 16.52 5.10 3.24
36
18.49 3.88 4.77 18.26 4.17 4.38 17.98 4.43 4.06 17.60 4.66 3.78 17.12 4.88 3.51 16.51 5.11 3.23
38
18.48 3.86 4.79 18.26 4.16 4.39 17.97 4.41 4.07 17.60 4.64 3.79 17.11 4.87 3.51 16.49 5.10 3.23
40
18.49 3.82 4.84 18.27 4.12 4.43 17.98 4.38 4.11 17.60 4.62 3.81 17.11 4.84 3.54 16.48 5.08 3.24
42
18.53 3.77 4.92 18.31 4.07 4.50 18.02 4.34 4.15 17.63 4.58 3.85 17.13 4.81 3.56 16.49 5.06 3.26
DATA DECLARED ACCORDING TO UNI EN 14511-2
Key
Ph
Hea ng capacity (kW)
Pe
Input power (kW)
ATTENTION operation with DCPX
TAE
External air temperature (°C) d.b.
ATTENTION
For the intermediate points, refer to the operating limits graphics (§ 9.2)
HEATING MODECOOLING MODE
ΔT WATER DIFFERENT TO NOMINAL ΔT 5°C
35810
Heating capacity correction factors 0.99 1 1.01 1.02
Input power correction factors 1.01 1 0.98 0.96
Page 32
32 Aermec code 6755521_01 11.11
ANK 025-085H
10.13. ANK 045 H 230V/1/50Hz Hea ng capacity and input power
DATA DECLARED ACCORDING TO UNI EN 14511-2
Key
Ph
Hea ng capacity (kW)
Pe
Input power (kW)
ATTENTION operation with DCPX
TAE
External air temperature (°C) d.b.
ATTENTION
For the intermediate points, refer to the operating limits graphics (§ 9.2)
TAE °C
TEMPERATURE OF THE WATER PRODUCED °C
25 30 35 40 45 50 55 60
Ph
(kW)Pe(kW)
COP
Ph
(kW)Pe(kW)
COP
Ph
(kW)Pe(kW)
COP
Ph
(kW)Pe(kW)
COP
Ph
(kW)Pe(kW)
COP
Ph
(kW)Pe(kW)
COP
Ph
(kW)Pe(kW)
COP
Ph
(kW)Pe(kW)
COP
-20
7.32 2.32 3.16 6.93 2.73 2.54 6.42 3.07 2.09 5.80 3.37 1.72 5.08 3.63 1.40 4.26 3.87 1.10
-18
7.40 2.34 3.16 7.09 2.75 2.58 6.67 3.09 2.16 6.15 3.39 1.81 5.52 3.65 1.51 4.80 3.90 1.23
-16
7.54 2.35 3.21 7.31 2.76 2.65 6.97 3.11 2.24 6.52 3.40 1.92 5.98 3.67 1.63 5.35 3.92 1.36
-14
7.74 2.36 3.28 7.57 2.77 2.73 7.30 3.11 2.35 6.92 3.41 2.03 6.45 3.68 1.75 5.90 3.93 1.50 5.26 4.18 1.26
-12
7.99 2.36 3.39 7.87 2.77 2.84 7.65 3.12 2.45 7.33 3.42 2.14 6.93 3.69 1.88 6.43 3.94 1.63 5.87 4.19 1.40
-10
8.29 2.36 3.51 8.21 2.77 2.96 8.03 3.12 2.57 7.75 3.42 2.27 7.39 3.69 2.00 6.95 3.95 1.76 6.44 4.20 1.53 5.86 4.48 1.31
-8
8.61 2.36 3.65 8.56 2.77 3.09 8.41 3.12 2.70 8.17 3.42 2.39 7.84 3.69 2.12 7.44 3.95 1.88 6.97 4.21 1.66 6.43 4.49 1.43
-7
8.79 2.36 3.72 8.74 2.77 3.16 8.60 3.12 2.76 8.37 3.42 2.45 8.06 3.69 2.18 7.67 3.95 1.94 7.21 4.21 1.71 6.70 4.49 1.49
-6
8.96 2.36 3.80 8.92 2.77 3.22 8.79 3.12 2.82 8.56 3.42 2.50 8.26 3.69 2.24 7.89 3.95 2.00 7.45 4.22 1.77 6.95 4.50 1.54
-4
9.33 2.36 3.95 9.29 2.77 3.35 9.16 3.12 2.94 8.94 3.42 2.61 8.65 3.70 2.34 8.29 3.96 2.09 7.87 4.22 1.86 7.39 4.51 1.64
-2
9.70 2.37 4.09 9.64 2.78 3.47 9.50 3.13 3.04 9.29 3.43 2.71 8.99 3.71 2.42 8.64 3.97 2.18 8.22 4.24 1.94 7.75 4.52 1.71
0
10.06 2.38 4.23 9.98 2.79 3.58 9.83 3.14 3.13 9.59 3.45 2.78 9.28 3.72 2.49 8.91 3.99 2.23 8.49 4.26 1.99 8.02 4.54 1.77
1
10.24 2.39 4.28 10.15 2.80 3.63 9.97 3.15 3.17 9.72 3.45 2.82 9.40 3.73 2.52 9.03 4.00 2.26 8.59 4.27 2.01 8.11 4.56 1.78
2
10.11 2.81 3.60 10.16 3.17 3.21 9.87 3.47 2.84 9.02 3.66 2.46 9.17 4.01 2.29 8.67 4.28 2.03 8.10 4.57 1.77
4
11.89 2.84 4.19 11.80 3.19 3.70 11.57 3.50 3.31 11.23 3.78 2.97 10.78 4.04 2.67 10.24 4.31 2.38 9.61 4.61 2.08
6
13.46 2.89 4.66 13.34 3.23 4.13 13.09 3.54 3.70 12.71 3.82 3.33 12.22 4.09 2.99 11.64 4.36 2.67 10.97 4.66 2.35
7
14.18 2.91 4.87 14.04 3.27 4.29 13.78 3.56 3.87 13.50 3.88 3.48 12.88 4.11 3.13 12.27 4.39 2.79 11.58 4.68 2.47
8
14.85 3.06 4.85 14.71 3.37 4.36 14.43 3.66 3.94 14.02 3.92 3.58 13.50 4.18 3.23 12.87 4.45 2.89 12.16 4.73 2.57
10
16.07 3.21 5.01 15.90 3.51 4.53 15.60 3.79 4.12 15.16 4.06 3.73 14.61 4.31 3.39 13.95 4.58 3.05 13.21 4.85 2.72
12
17.11 3.34 5.12 16.93 3.64 4.65 16.61 3.92 4.24 16.15 4.18 3.86 15.58 4.43 3.52 14.89 4.69 3.17 14.11 4.96 2.84
14
18.00 3.46 5.20 17.81 3.76 4.74 17.47 4.03 4.33 17.00 4.28 3.97 16.41 4.53 3.62 15.70 4.78 3.28 14.89 5.05 2.95
16
18.60 3.56 5.22 18.43 3.85 4.79 18.13 4.12 4.40 17.69 4.37 4.05 17.13 4.62 3.71 16.43 4.87 3.37 15.62 5.13 3.04
18
19.18 3.65 5.25 19.01 3.94 4.82 18.70 4.20 4.45 18.25 4.45 4.10 17.68 4.69 3.77 16.98 4.94 3.44 16.16 5.20 3.11
20
19.65 3.72 5.28 19.47 4.01 4.86 19.15 4.27 4.48 18.70 4.51 4.15 18.12 4.75 3.81 17.41 5.00 3.48 16.58 5.26 3.15
22
20.01 3.78 5.29 19.82 4.07 4.87 19.50 4.33 4.50 19.05 4.57 4.17 18.46 4.81 3.84 17.75 5.05 3.51 16.91 5.31 3.18
24
20.27 3.83 5.29 20.09 4.11 4.89 19.76 4.37 4.52 19.31 4.61 4.19 18.72 4.85 3.86 18.00 5.09 3.54 17.16 5.35 3.21
26
20.46 3.87 5.29 20.27 4.15 4.88 19.95 4.41 4.52 19.49 4.65 4.19 18.89 4.88 3.87 18.17 5.12 3.55
28
20.58 3.90 5.28 20.39 4.18 4.88 20.06 4.43 4.53 19.60 4.67 4.20 19.01 4.91 3.87 18.29 5.15 3.55
30
20.64 3.92 5.27 20.46 4.20 4.87 20.13 4.45 4.52 19.67 4.69 4.19 19.07 4.92 3.88 18.35 5.16 3.56
32
20.67 3.93 5.26 20.48 4.21 4.86 20.15 4.46 4.52 19.69 4.70 4.19 19.10 4.93 3.87 18.38 5.17 3.56
34
20.66 3.93 5.26 20.47 4.21 4.86 20.15 4.46 4.52 19.69 4.70 4.19 19.10 4.94 3.87 18.38 5.18 3.55
36
20.63 3.92 5.26 20.45 4.21 4.86 20.13 4.46 4.51 19.68 4.70 4.19 19.09 4.94 3.86 18.37 5.18 3.55
38
20.60 3.91 5.27 20.43 4.20 4.86 20.11 4.45 4.52 19.66 4.69 4.19 19.08 4.93 3.87 18.36 5.17 3.55
40
20.58 3.90 5.28 20.41 4.18 4.88 20.10 4.44 4.53 19.66 4.68 4.20 19.08 4.92 3.88 18.37 5.16 3.56
42
20.58 3.87 5.32 20.41 4.16 4.91 20.11 4.42 4.55 19.67 4.67 4.21 19.10 4.91 3.89 18.40 5.16 3.57
HEATING MODECOOLING MODE
ΔT WATER DIFFERENT TO NOMINAL ΔT 5°C
35810
Heating capacity correction factors 0.99 1 1.01 1.02
Input power correction factors 1.01 1 0.98 0.96
Page 33
33Aermec code 6755521_01 11.11
ANK 025-085H
10.14. ANK 045 HP|HA 230V/1/50Hz Hea ng capacity and input power
TAE °C
TEMPERATURE OF THE WATER PRODUCED °C
25 30 35 40 45 50 55 60
Ph
(kW)Pe(kW)
COP
Ph
(kW)Pe(kW)
COP
Ph
(kW)Pe(kW)
COP
Ph
(kW)Pe(kW)
COP
Ph
(kW)Pe(kW)
COP
Ph
(kW)Pe(kW)
COP
Ph
(kW)Pe(kW)
COP
Ph
(kW)Pe(kW)
COP
-20
7.21 2.38 3.03 6.83 2.80 2.44 6.32 3.15 2.01 5.71 3.45 1.66 5.00 3.72 1.34 4.20 3.97 1.06
-18
7.28 2.40 3.03 6.98 2.82 2.48 6.57 3.17 2.07 6.05 3.48 1.74 5.44 3.75 1.45 4.73 4.00 1.18
-16
7.42 2.41 3.08 7.19 2.83 2.54 6.86 3.19 2.15 6.42 3.49 1.84 5.89 3.76 1.57 5.27 4.02 1.31
-14
7.62 2.42 3.15 7.45 2.84 2.62 7.18 3.19 2.25 6.81 3.50 1.95 6.35 3.77 1.68 5.81 4.03 1.44 5.18 4.29 1.21
-12
7.87 2.42 3.25 7.75 2.84 2.73 7.53 3.20 2.35 7.22 3.51 2.06 6.82 3.78 1.80 6.33 4.04 1.57 5.78 4.30 1.34
-10
8.16 2.42 3.37 8.08 2.84 2.85 7.90 3.20 2.47 7.63 3.51 2.17 7.28 3.78 1.93 6.84 4.05 1.69 6.34 4.31 1.47 5.77 4.59 1.26
-8
8.48 2.42 3.50 8.43 2.84 2.97 8.28 3.20 2.59 8.04 3.51 2.29 7.72 3.79 2.04 7.32 4.05 1.81 6.86 4.32 1.59 6.33 4.60 1.38
-7
8.65 2.42 3.57 8.60 2.84 3.03 8.46 3.20 2.64 8.24 3.51 2.35 7.93 3.79 2.09 7.55 4.05 1.86 7.10 4.32 1.64 6.60 4.61 1.43
-6
8.82 2.42 3.64 8.78 2.84 3.09 8.65 3.20 2.70 8.43 3.51 2.40 8.13 3.79 2.15 7.77 4.06 1.91 7.33 4.32 1.70 6.84 4.61 1.48
-4
9.18 2.42 3.79 9.14 2.84 3.22 9.01 3.20 2.82 8.80 3.51 2.51 8.52 3.79 2.25 8.16 4.06 2.01 7.74 4.33 1.79 7.27 4.62 1.57
-2
9.54 2.43 3.93 9.49 2.85 3.33 9.36 3.21 2.92 9.14 3.52 2.60 8.85 3.80 2.33 8.50 4.07 2.09 8.09 4.35 1.86 7.63 4.64 1.64
0
9.90 2.44 4.06 9.83 2.86 3.44 9.67 3.22 3.00 9.44 3.53 2.67 9.14 3.82 2.39 8.78 4.09 2.15 8.36 4.37 1.91 7.89 4.66 1.69
1
10.08 2.45 4.11 9.99 2.87 3.48 9.82 3.23 3.04 9.57 3.54 2.70 9.26 3.83 2.42 8.89 4.10 2.17 8.46 4.38 1.93 7.99 4.67 1.71
2
9.96 2.89 3.45 10.00 3.21 3.12 9.72 3.56 2.73 8.86 3.71 2.39 9.02 4.11 2.19 8.53 4.39 1.94 7.97 4.69 1.70
4
11.70 2.92 4.01 11.61 3.27 3.55 11.39 3.59 3.17 11.06 3.87 2.86 10.61 4.15 2.56 10.08 4.43 2.28 9.46 4.73 2.00
6
13.25 2.96 4.48 13.14 3.32 3.96 12.89 3.63 3.55 12.51 3.92 3.19 12.03 4.19 2.87 11.46 4.47 2.56 10.79 4.78 2.26
7
13.96 2.99 4.67 13.84 3.37 4.11 13.57 3.66 3.71 13.29 3.98 3.34 12.68 4.22 3.00 12.08 4.50 2.68 11.40 4.80 2.38
8
14.62 3.14 4.66 14.48 3.46 4.18 14.20 3.75 3.79 13.80 4.02 3.43 13.29 4.29 3.10 12.67 4.57 2.77 11.97 4.85 2.47
10
15.82 3.29 4.81 15.66 3.61 4.34 15.36 3.89 3.95 14.93 4.16 3.59 14.38 4.43 3.25 13.74 4.69 2.93 13.00 4.98 2.61
12
16.85 3.43 4.91 16.67 3.74 4.46 16.35 4.02 4.07 15.90 4.28 3.71 15.34 4.54 3.38 14.66 4.81 3.05 13.90 5.09 2.73
14
17.72 3.55 4.99 17.53 3.85 4.55 17.20 4.13 4.16 16.74 4.39 3.81 16.15 4.65 3.47 15.45 4.91 3.15 14.66 5.18 2.83
16
18.31 3.65 5.02 18.15 3.95 4.59 17.85 4.23 4.22 17.42 4.48 3.89 16.86 4.74 3.56 16.18 4.99 3.24 15.37 5.26 2.92
18
18.88 3.74 5.05 18.71 4.04 4.63 18.41 4.31 4.27 17.97 4.56 3.94 17.41 4.81 3.62 16.72 5.07 3.30 15.90 5.33 2.98
20
19.34 3.82 5.06 19.16 4.11 4.66 18.85 4.38 4.30 18.41 4.63 3.98 17.84 4.88 3.66 17.14 5.13 3.34 16.33 5.39 3.03
22
19.69 3.88 5.07 19.51 4.17 4.68 19.20 4.44 4.32 18.75 4.69 4.00 18.18 4.93 3.69 17.47 5.18 3.37 16.65 5.44 3.06
24
19.96 3.93 5.08 19.77 4.22 4.68 19.46 4.48 4.34 19.00 4.73 4.02 18.43 4.97 3.71 17.72 5.22 3.39 16.89 5.48 3.08
26
20.14 3.97 5.07 19.96 4.26 4.69 19.64 4.52 4.35 19.18 4.77 4.02 18.60 5.01 3.71 17.89 5.25 3.41
28
20.26 4.00 5.07 20.07 4.29 4.68 19.75 4.55 4.34 19.30 4.79 4.03 18.71 5.03 3.72 18.00 5.28 3.41
30
20.32 4.02 5.05 20.14 4.31 4.67 19.82 4.57 4.34 19.36 4.81 4.02 18.78 5.05 3.72 18.07 5.30 3.41
32
20.35 4.03 5.05 20.16 4.32 4.67 19.84 4.58 4.33 19.39 4.82 4.02 18.80 5.06 3.72 18.09 5.31 3.41
34
20.34 4.03 5.05 20.16 4.32 4.67 19.84 4.58 4.33 19.39 4.82 4.02 18.80 5.06 3.72 18.10 5.31 3.41
36
20.31 4.02 5.05 20.13 4.31 4.67 19.82 4.58 4.33 19.37 4.82 4.02 18.79 5.06 3.71 18.09 5.31 3.41
38
20.28 4.01 5.06 20.11 4.30 4.68 19.80 4.57 4.33 19.36 4.81 4.02 18.78 5.06 3.71 18.08 5.31 3.40
40
20.26 4.00 5.07 20.09 4.29 4.68 19.79 4.55 4.35 19.35 4.80 4.03 18.78 5.05 3.72 18.08 5.30 3.41
42
20.26 3.97 5.10 20.10 4.27 4.71 19.80 4.54 4.36 19.37 4.79 4.04 18.81 5.03 3.74 18.11 5.29 3.42
DATA DECLARED ACCORDING TO UNI EN 14511-2
Key
Ph
Hea ng capacity (kW)
Pe
Input power (kW)
ATTENTION operation with DCPX
TAE
External air temperature (°C) d.b.
ATTENTION
For the intermediate points, refer to the operating limits graphics (§ 9.2)
HEATING MODECOOLING MODE
ΔT WATER DIFFERENT TO NOMINAL ΔT 5°C
35810
Heating capacity correction factors 0.99 1 1.01 1.02
Input power correction factors 1.01 1 0.98 0.96
Page 34
34 Aermec code 6755521_01 11.11
ANK 025-085H
10.15. ANK 045 H 400V/3N/50Hz Hea ng capacity and input power
TAE °C
TEMPERATURE OF THE WATER PRODUCED °C
25 30 35 40 45 50 55 60
Ph
(kW)Pe(kW)
COP
Ph
(kW)Pe(kW)
COP
Ph
(kW)Pe(kW)
COP
Ph
(kW)Pe(kW)
COP
Ph
(kW)Pe(kW)
COP
Ph
(kW)Pe(kW)
COP
Ph
(kW)Pe(kW)
COP
Ph
(kW)Pe(kW)
COP
-20
6.72 2.90 2.32 6.56 3.04 2.16 6.31 3.28 1.92 5.93 3.58 1.66 5.39 3.92 1.38 4.64 4.25 1.09
-18
6.96 2.91 2.39 6.79 3.06 2.22 6.55 3.30 1.98 6.20 3.61 1.72 5.71 3.95 1.45 5.02 4.29 1.17
-16
7.30 2.91 2.51 7.11 3.07 2.32 6.88 3.31 2.08 6.55 3.62 1.81 6.10 3.97 1.54 5.47 4.32 1.27
-14
7.71 2.91 2.65 7.51 3.07 2.45 7.27 3.32 2.19 6.97 3.63 1.92 6.55 3.98 1.65 5.98 4.34 1.38 5.22 4.67 1.12
-12
8.18 2.90 2.82 7.96 3.07 2.59 7.72 3.32 2.33 7.43 3.64 2.04 7.05 3.99 1.77 6.53 4.35 1.50 5.84 4.69 1.25
-10
8.70 2.90 3.00 8.45 3.06 2.76 8.21 3.32 2.47 7.93 3.64 2.18 7.58 4.00 1.90 7.11 4.36 1.63 6.49 4.70 1.38 5.68 4.99 1.14
-8
9.26 2.90 3.19 8.98 3.06 2.93 8.72 3.32 2.63 8.45 3.64 2.32 8.12 4.00 2.03 7.70 4.37 1.76 7.14 4.71 1.52 6.41 5.00 1.28
-7
9.54 2.90 3.29 9.25 3.06 3.02 8.99 3.32 2.71 8.72 3.64 2.40 8.40 4.00 2.10 8.00 4.37 1.83 7.47 4.71 1.59 6.78 5.01 1.35
-6
9.83 2.90 3.39 9.52 3.07 3.10 9.25 3.32 2.79 8.98 3.65 2.46 8.67 4.00 2.17 8.29 4.37 1.90 7.79 4.72 1.65 7.14 5.02 1.42
-4
10.41 2.91 3.58 10.06 3.07 3.28 9.77 3.33 2.93 9.50 3.65 2.60 9.22 4.01 2.30 8.87 4.38 2.03 8.43 4.73 1.78 7.85 5.03 1.56
-2
10.98 2.93 3.75 10.59 3.09 3.43 10.28 3.34 3.08 10.00 3.66 2.73 9.73 4.02 2.42 9.42 4.39 2.15 9.03 4.74 1.91 8.52 5.04 1.69
0
11.52 2.96 3.89 11.09 3.11 3.57 10.75 3.36 3.20 10.47 3.68 2.85 10.21 4.04 2.53 9.92 4.41 2.25 9.58 4.76 2.01 9.14 5.06 1.81
1
11.78 2.98 3.95 11.32 3.13 3.62 10.97 3.38 3.25 10.68 3.70 2.89 10.42 4.05 2.57 10.15 4.42 2.30 9.83 4.77 2.06 9.42 5.07 1.86
2
11.71 3.15 3.72 11.24 3.38 3.33 10.97 3.71 2.96 10.62 4.06 2.62 10.37 4.43 2.34 10.00 4.78 2.09 9.53 5.08 1.88
4
13.16 3.20 4.11 12.72 3.44 3.70 12.35 3.75 3.29 12.01 4.11 2.92 11.65 4.47 2.61 11.23 4.81 2.33 10.68 5.11 2.09
6
14.51 3.26 4.45 14.05 3.50 4.01 13.65 3.81 3.58 13.27 4.16 3.19 12.86 4.52 2.85 12.38 4.86 2.55 11.77 5.16 2.28
7
15.15 3.30 4.59 14.80 3.55 4.17 14.27 3.84 3.72 14.07 4.18 3.37 13.44 4.55 2.95 12.93 4.89 2.64 12.29 5.18 2.37
8
15.76 3.36 4.69 15.28 3.64 4.20 14.86 3.94 3.77 14.44 4.26 3.39 13.99 4.58 3.05 13.46 4.91 2.74 12.79 5.24 2.44
10
16.89 3.51 4.81 16.41 3.79 4.33 15.97 4.08 3.91 15.53 4.38 3.55 15.04 4.69 3.21 14.46 5.01 2.89 13.73 5.33 2.58
12
17.92 3.65 4.91 17.43 3.92 4.45 16.97 4.20 4.04 16.51 4.49 3.68 16.00 4.80 3.33 15.38 5.10 3.02 14.60 5.41 2.70
14
18.82 3.78 4.98 18.34 4.04 4.54 17.88 4.31 4.15 17.40 4.60 3.78 16.86 4.89 3.45 16.21 5.19 3.12 15.39 5.48 2.81
16
19.22 3.89 4.94 18.90 4.14 4.57 18.55 4.41 4.21 18.15 4.69 3.87 17.64 4.97 3.55 17.01 5.26 3.23 16.21 5.55 2.92
18
19.77 3.99 4.95 19.47 4.24 4.59 19.14 4.50 4.25 18.74 4.77 3.93 18.24 5.05 3.61 17.60 5.33 3.30 16.79 5.60 3.00
20
20.24 4.08 4.96 19.95 4.32 4.62 19.63 4.57 4.30 19.24 4.84 3.98 18.73 5.11 3.67 18.09 5.39 3.36 17.27 5.66 3.05
22
20.62 4.15 4.97 20.35 4.39 4.64 20.03 4.64 4.32 19.64 4.90 4.01 19.13 5.17 3.70 18.48 5.44 3.40 17.64 5.70 3.09
24
20.92 4.21 4.97 20.66 4.44 4.65 20.35 4.69 4.34 19.96 4.95 4.03 19.45 5.22 3.73 18.78 5.48 3.43 17.93 5.74 3.12
26
21.16 4.26 4.97 20.91 4.49 4.66 20.60 4.74 4.35 20.21 5.00 4.04 19.69 5.26 3.74 19.02 5.52 3.45
28
21.34 4.29 4.97 21.10 4.53 4.66 20.80 4.77 4.36 20.40 5.03 4.06 19.87 5.29 3.76 19.18 5.55 3.46
30
21.47 4.32 4.97 21.24 4.55 4.67 20.94 4.80 4.36 20.54 5.05 4.07 20.00 5.31 3.77 19.29 5.57 3.46
32
21.58 4.33 4.98 21.35 4.56 4.68 21.04 4.81 4.37 20.63 5.07 4.07 20.08 5.33 3.77 19.35 5.58 3.47
34
21.65 4.33 5.00 21.42 4.57 4.69 21.12 4.82 4.38 20.70 5.08 4.07 20.13 5.34 3.77 19.38 5.59 3.47
36
21.71 4.32 5.03 21.48 4.56 4.71 21.17 4.81 4.40 20.74 5.08 4.08 20.15 5.34 3.77 19.38 5.60 3.46
38
21.76 4.29 5.07 21.53 4.54 4.74 21.21 4.80 4.42 20.77 5.07 4.10 20.16 5.33 3.78 19.37 5.59 3.47
40
21.81 4.26 5.12 21.58 4.51 4.78 21.25 4.78 4.45 20.79 5.05 4.12 20.17 5.32 3.79 19.35 5.59 3.46
42
21.88 4.22 5.18 21.64 4.48 4.83 21.30 4.75 4.48 20.83 5.02 4.15 20.18 5.30 3.81 19.33 5.57 3.47
DATA DECLARED ACCORDING TO UNI EN 14511-2
Key
Ph
Hea ng capacity (kW)
Pe
Input power (kW)
ATTENTION operation with DCPX
TAE
External air temperature (°C) d.b.
ATTENTION
For the intermediate points, refer to the operating limits graphics (§ 9.2)
HEATING MODECOOLING MODE
ΔT WATER DIFFERENT TO NOMINAL ΔT 5°C
35810
Heating capacity correction factors 0.99 1 1.01 1.02
Input power correction factors 1.01 1 0.98 0.96
Page 35
35Aermec code 6755521_01 11.11
ANK 025-085H
10.16. ANK 045 HP|HA 400V/3N/50Hz Hea ng capacity and input power
TAE °C
TEMPERATURE OF THE WATER PRODUCED °C
25 30 35 40 45 50 55 60
Ph
(kW)Pe(kW)
COP
Ph
(kW)Pe(kW)
COP
Ph
(kW)Pe(kW)
COP
Ph
(kW)Pe(kW)
COP
Ph
(kW)Pe(kW)
COP
Ph
(kW)Pe(kW)
COP
Ph
(kW)Pe(kW)
COP
Ph
(kW)Pe(kW)
COP
-20
6.61 2.96 2.23 6.46 3.11 2.08 6.21 3.35 1.85 5.84 3.66 1.60 5.31 4.00 1.33 4.57 4.34 1.05
-18
6.85 2.97 2.31 6.69 3.12 2.14 6.45 3.37 1.91 6.11 3.69 1.66 5.62 4.03 1.39 4.94 4.38 1.13
-16
7.18 2.97 2.42 7.00 3.13 2.24 6.77 3.39 2.00 6.45 3.70 1.74 6.00 4.05 1.48 5.39 4.41 1.22
-14
7.59 2.97 2.56 7.39 3.13 2.36 7.16 3.39 2.11 6.86 3.71 1.85 6.45 4.07 1.58 5.89 4.43 1.33 5.14 4.77 1.08
-12
8.05 2.97 2.71 7.83 3.13 2.50 7.60 3.39 2.24 7.31 3.72 1.97 6.94 4.08 1.70 6.43 4.45 1.44 5.75 4.79 1.20
-10
8.57 2.96 2.90 8.32 3.13 2.66 8.08 3.39 2.38 7.81 3.72 2.10 7.46 4.08 1.83 7.00 4.45 1.57 6.39 4.80 1.33 5.59 5.10 1.10
-8
9.11 2.96 3.08 8.84 3.13 2.82 8.59 3.39 2.53 8.32 3.72 2.24 8.00 4.09 1.96 7.58 4.46 1.70 7.03 4.81 1.46 6.31 5.11 1.23
-7
9.39 2.96 3.17 9.10 3.13 2.91 8.85 3.39 2.61 8.58 3.72 2.31 8.27 4.09 2.02 7.87 4.46 1.76 7.35 4.82 1.52 6.67 5.12 1.30
-6
9.68 2.97 3.26 9.37 3.13 2.99 9.11 3.39 2.69 8.84 3.72 2.38 8.54 4.09 2.09 8.16 4.47 1.83 7.67 4.82 1.59 7.03 5.12 1.37
-4
10.24 2.97 3.45 9.90 3.14 3.15 9.62 3.40 2.83 9.35 3.73 2.51 9.07 4.10 2.21 8.73 4.47 1.95 8.30 4.83 1.72 7.73 5.14 1.50
-2
10.80 2.99 3.61 10.42 3.15 3.31 10.12 3.41 2.97 9.85 3.74 2.63 9.58 4.11 2.33 9.27 4.49 2.06 8.89 4.84 1.84 8.39 5.15 1.63
0
11.34 3.02 3.75 10.91 3.18 3.43 10.58 3.44 3.08 10.30 3.76 2.74 10.05 4.13 2.43 9.77 4.50 2.17 9.43 4.86 1.94 8.99 5.17 1.74
1
11.59 3.04 3.81 11.14 3.20 3.48 10.80 3.45 3.13 10.52 3.78 2.78 10.26 4.14 2.48 9.99 4.52 2.21 9.68 4.87 1.99 9.27 5.18 1.79
2
11.53 3.22 3.58 11.02 3.47 3.18 10.79 3.79 2.85 10.46 4.15 2.52 10.20 4.53 2.25 9.85 4.88 2.02 9.38 5.19 1.81
4
12.96 3.27 3.96 12.52 3.52 3.56 12.16 3.83 3.17 11.83 4.19 2.82 11.47 4.57 2.51 11.05 4.92 2.25 10.52 5.22 2.02
6
14.29 3.33 4.29 13.83 3.58 3.86 13.44 3.89 3.46 13.07 4.25 3.08 12.66 4.61 2.75 12.19 4.96 2.46 11.58 5.27 2.20
7
14.91 3.37 4.42 14.88 3.60 4.13 14.04 3.92 3.58 13.85 4.27 3.24 13.23 4.64 2.85 12.73 4.99 2.55 12.09 5.29 2.29
8
15.51 3.43 4.52 15.04 3.72 4.04 14.62 4.03 3.63 14.22 4.35 3.27 13.78 4.68 2.94 13.25 5.02 2.64 12.59 5.35 2.35
10
16.63 3.59 4.63 16.15 3.87 4.17 15.72 4.17 3.77 15.28 4.48 3.41 14.80 4.80 3.08 14.23 5.12 2.78 13.52 5.44 2.49
12
17.64 3.73 4.73 17.15 4.00 4.29 16.71 4.29 3.90 16.26 4.59 3.54 15.75 4.90 3.21 15.13 5.21 2.90 14.37 5.52 2.60
14
18.53 3.86 4.80 18.05 4.12 4.38 17.60 4.40 4.00 17.13 4.70 3.64 16.60 5.00 3.32 15.95 5.30 3.01 15.15 5.60 2.71
16
18.92 3.97 4.77 18.60 4.23 4.40 18.26 4.50 4.06 17.86 4.79 3.73 17.37 5.08 3.42 16.75 5.37 3.12 15.96 5.66 2.82
18
19.47 4.08 4.77 19.17 4.33 4.43 18.84 4.59 4.10 18.45 4.87 3.79 17.95 5.16 3.48 17.33 5.44 3.19 16.53 5.72 2.89
20
19.92 4.16 4.79 19.64 4.41 4.45 19.32 4.67 4.14 18.93 4.94 3.83 18.44 5.22 3.53 17.80 5.50 3.24 17.00 5.78 2.94
22
20.29 4.24 4.79 20.03 4.48 4.47 19.72 4.74 4.16 19.33 5.01 3.86 18.83 5.28 3.57 18.19 5.55 3.28 17.37 5.82 2.98
24
20.59 4.30 4.79 20.34 4.54 4.48 20.03 4.80 4.17 19.65 5.06 3.88 19.15 5.33 3.59 18.49 5.60 3.30 17.65 5.86 3.01
26
20.83 4.35 4.79 20.58 4.59 4.48 20.28 4.84 4.19 19.89 5.10 3.90 19.38 5.37 3.61 18.72 5.64 3.32
28
21.00 4.38 4.79 20.77 4.62 4.50 20.47 4.88 4.19 20.08 5.14 3.91 19.56 5.40 3.62 18.88 5.67 3.33
30
21.14 4.41 4.79 20.91 4.65 4.50 20.61 4.90 4.21 20.22 5.16 3.92 19.69 5.43 3.63 18.99 5.69 3.34
32
21.24 4.42 4.81 21.01 4.66 4.51 20.71 4.92 4.21 20.31 5.18 3.92 19.77 5.44 3.63 19.05 5.71 3.34
34
21.31 4.42 4.82 21.09 4.67 4.52 20.79 4.92 4.23 20.37 5.19 3.92 19.82 5.45 3.64 19.08 5.71 3.34
36
21.37 4.41 4.85 21.14 4.66 4.54 20.84 4.92 4.24 20.41 5.18 3.94 19.84 5.45 3.64 19.08 5.72 3.34
38
21.42 4.39 4.88 21.19 4.64 4.57 20.88 4.90 4.26 20.44 5.18 3.95 19.85 5.45 3.64 19.07 5.71 3.34
40
21.47 4.35 4.94 21.24 4.61 4.61 20.92 4.88 4.29 20.47 5.16 3.97 19.85 5.43 3.66 19.04 5.71 3.33
42
21.54 4.31 5.00 21.31 4.57 4.66 20.97 4.85 4.32 20.5 5.13 4.00 19.87 5.41 3.67 19.03 5.69 3.34
DATA DECLARED ACCORDING TO UNI EN 14511-2
Key
Ph
Hea ng capacity (kW)
Pe
Input power (kW)
ATTENTION operation with DCPX
TAE
External air temperature (°C) d.b.
ATTENTION
For the intermediate points, refer to the operating limits graphics (§ 9.2)
HEATING MODECOOLING MODE
ΔT WATER DIFFERENT TO NOMINAL ΔT 5°C
35810
Heating capacity correction factors 0.99 1 1.01 1.02
Input power correction factors 1.01 1 0.98 0.96
Page 36
36 Aermec code 6755521_01 11.11
ANK 025-085H
10.17. ANK 050 H 400V/3N/50Hz Hea ng capacity and input power
TAE °C
TEMPERATURE OF THE WATER PRODUCED °C
25 30 35 40 45 50 55 60
Ph
(kW)Pe(kW)
COP
Ph
(kW)Pe(kW)
COP
Ph
(kW)Pe(kW)
COP
Ph
(kW)Pe(kW)
COP
Ph
(kW)Pe(kW)
COP
Ph
(kW)Pe(kW)
COP
Ph
(kW)Pe(kW)
COP
Ph
(kW)Pe(kW)
COP
-20
7.31 2.73 2.68 7.43 3.16 2.35 7.22 3.53 2.05 6.72 3.84 1.75 5.98 4.13 1.45 5.04 4.43 1.14
-18
7.64 2.74 2.79 7.78 3.18 2.45 7.60 3.55 2.14 7.16 3.87 1.85 6.48 4.17 1.55 5.63 4.47 1.26
-16
8.05 2.74 2.94 8.20 3.19 2.57 8.04 3.56 2.26 7.64 3.88 1.97 7.03 4.19 1.68 6.25 4.49 1.39
-14
8.52 2.74 3.11 8.66 3.18 2.72 8.52 3.56 2.39 8.15 3.89 2.10 7.59 4.20 1.81 6.89 4.51 1.53 6.08 4.85 1.25
-12
9.02 2.73 3.30 9.15 3.18 2.88 9.02 3.56 2.53 8.68 3.89 2.23 8.16 4.20 1.94 7.52 4.52 1.66 6.79 4.86 1.40
-10
9.54 2.72 3.51 9.65 3.17 3.04 9.52 3.55 2.68 9.20 3.89 2.37 8.71 4.20 2.07 8.12 4.52 1.80 7.47 4.87 1.53 6.80 5.27 1.29
-8
10.06 2.71 3.71 10.15 3.16 3.21 10.01 3.54 2.83 9.69 3.88 2.50 9.23 4.20 2.20 8.69 4.52 1.92 8.10 4.88 1.66 7.50 5.28 1.42
-7
10.32 2.70 3.82 10.38 3.16 3.28 10.24 3.54 2.89 9.92 3.88 2.56 9.47 4.20 2.25 8.95 4.52 1.98 8.38 4.88 1.72 7.83 5.29 1.48
-6
10.56 2.70 3.91 10.61 3.16 3.36 10.46 3.54 2.95 10.14 3.88 2.61 9.70 4.20 2.31 9.19 4.53 2.03 8.65 4.88 1.77 8.13 5.29 1.54
-4
11.03 2.70 4.09 11.04 3.16 3.49 10.85 3.54 3.06 10.52 3.88 2.71 10.09 4.20 2.40 9.61 4.53 2.12 9.12 4.89 1.87 8.66 5.30 1.63
-2
11.45 2.72 4.21 11.40 3.17 3.60 11.17 3.55 3.15 10.83 3.89 2.78 10.40 4.22 2.46 9.94 4.54 2.19 9.48 4.90 1.93 9.08 5.32 1.71
0
11.79 2.74 4.30 11.67 3.19 3.66 11.41 3.58 3.19 11.03 3.92 2.81 10.60 4.24 2.50 10.14 4.57 2.22 9.72 4.92 1.98 9.36 5.34 1.75
1
11.92 2.76 4.32 11.78 3.21 3.67 11.48 3.59 3.20 11.09 3.93 2.82 10.65 4.25 2.51 10.20 4.58 2.23 9.78 4.94 1.98 9.44 5.36 1.76
2
11.85 3.23 3.67 11.56 3.55 3.26 11.12 3.95 2.82 10.67 4.26 2.50 10.22 4.60 2.22 9.81 4.96 1.98 9.49 5.37 1.77
4
14.19 3.28 4.33 13.60 3.66 3.72 13.16 4.00 3.29 12.77 4.32 2.96 12.35 4.65 2.66 11.81 5.01 2.36 11.07 5.42 2.04
6
16.05 3.36 4.78 15.45 3.74 4.13 14.97 4.07 3.68 14.54 4.39 3.31 14.07 4.72 2.98 13.47 5.07 2.66 12.66 5.49 2.31
7
16.88 3.51 4.81 16.27 3.81 4.27 15.78 4.13 3.82 15.38 4.44 3.46 14.84 4.77 3.11 14.21 5.12 2.78 13.37 5.50 2.43
8
17.65 3.58 4.93 17.03 3.89 4.38 16.53 4.20 3.94 16.07 4.51 3.56 15.55 4.83 3.22 14.90 5.18 2.88 14.03 5.55 2.53
10
19.02 3.72 5.11 18.39 4.03 4.56 17.87 4.33 4.13 17.37 4.63 3.75 16.82 4.95 3.40 16.12 5.28 3.05 15.20 5.65 2.69
12
20.16 3.85 5.24 19.52 4.16 4.69 18.99 4.45 4.27 18.47 4.75 3.89 17.89 5.06 3.54 17.15 5.38 3.19 16.18 5.74 2.82
14
21.09 3.97 5.31 20.46 4.27 4.79 19.92 4.56 4.37 19.39 4.85 4.00 18.78 5.15 3.65 18.01 5.47 3.29 17.00 5.82 2.92
16
21.59 4.08 5.29 21.07 4.37 4.82 20.63 4.66 4.43 20.17 4.95 4.07 19.60 5.24 3.74 18.83 5.55 3.39 17.76 5.89 3.02
18
22.24 4.17 5.33 21.71 4.47 4.86 21.26 4.75 4.48 20.79 5.03 4.13 20.21 5.32 3.80 19.44 5.63 3.45 18.36 5.96 3.08
20
22.75 4.25 5.35 22.22 4.55 4.88 21.76 4.83 4.51 21.29 5.11 4.17 20.71 5.39 3.84 19.92 5.69 3.50 18.84 6.01 3.13
22
23.15 4.32 5.36 22.61 4.61 4.90 22.15 4.90 4.52 21.68 5.17 4.19 21.09 5.46 3.86 20.30 5.75 3.53 19.21 6.06 3.17
24
23.44 4.37 5.36 22.91 4.67 4.91 22.45 4.95 4.54 21.96 5.23 4.20 21.37 5.51 3.88 20.58 5.80 3.55 19.49 6.11 3.19
26
23.65 4.42 5.35 23.11 4.72 4.90 22.65 5.00 4.53 22.17 5.28 4.20 21.57 5.55 3.89 20.77 5.84 3.56
28
23.78 4.45 5.34 23.25 4.75 4.89 22.78 5.04 4.52 22.30 5.31 4.20 21.70 5.59 3.88 20.90 5.87 3.56
30
23.86 4.47 5.34 23.32 4.78 4.88 22.86 5.07 4.51 22.37 5.34 4.19 21.78 5.62 3.88 20.98 5.90 3.56
32
23.88 4.48 5.33 23.35 4.79 4.87 22.89 5.08 4.51 22.40 5.36 4.18 21.81 5.64 3.87 21.01 5.92 3.55
34
23.87 4.48 5.33 23.34 4.80 4.86 22.89 5.09 4.50 22.41 5.37 4.17 21.81 5.65 3.86 21.02 5.93 3.54
36
23.84 4.47 5.33 23.32 4.79 4.87 22.87 5.09 4.49 22.39 5.37 4.17 21.80 5.65 3.86 21.01 5.93 3.54
38
23.81 4.45 5.35 23.29 4.78 4.87 22.84 5.08 4.50 22.37 5.37 4.17 21.79 5.65 3.86 21.00 5.93 3.54
40
23.78 4.42 5.38 23.27 4.75 4.90 22.83 5.06 4.51 22.37 5.35 4.18 21.79 5.64 3.86 21.01 5.92 3.55
42
23.78 4.37 5.44 23.28 4.72 4.93 22.84 5.03 4.54 22.39 5.33 4.20 21.82 5.62 3.88 21.04 5.90 3.57
DATA DECLARED ACCORDING TO UNI EN 14511-2
Key
Ph
Hea ng capacity (kW)
Pe
Input power (kW)
ATTENTION operation with DCPX
TAE
External air temperature (°C) d.b.
ATTENTION
For the intermediate points, refer to the operating limits graphics (§ 9.2)
HEATING MODECOOLING MODE
ΔT WATER DIFFERENT TO NOMINAL ΔT 5°C
35810
Heating capacity correction factors 0.99 1 1.01 1.02
Input power correction factors 1.01 1 0.98 0.96
Page 37
37Aermec code 6755521_01 11.11
ANK 025-085H
10.18. ANK 050 HP|HA 400V/3N/50Hz Hea ng capacity and input power
TAE °C
TEMPERATURE OF THE WATER PRODUCED °C
25 30 35 40 45 50 55 60
Ph
(kW)Pe(kW)
COP
Ph
(kW)Pe(kW)
COP
Ph
(kW)Pe(kW)
COP
Ph
(kW)Pe(kW)
COP
Ph
(kW)Pe(kW)
COP
Ph
(kW)Pe(kW)
COP
Ph
(kW)Pe(kW)
COP
Ph
(kW)Pe(kW)
COP
-20
7.20 2.79 2.58 7.32 3.23 2.27 7.11 3.61 1.97 6.62 3.93 1.68 5.89 4.23 1.39 4.96 4.53 1.09
-18
7.53 2.80 2.69 7.66 3.25 2.36 7.49 3.63 2.06 7.05 3.96 1.78 6.39 4.26 1.50 5.54 4.57 1.21
-16
7.93 2.80 2.83 8.07 3.26 2.48 7.92 3.64 2.18 7.53 3.97 1.90 6.92 4.28 1.62 6.16 4.60 1.34
-14
8.39 2.80 3.00 8.53 3.26 2.62 8.40 3.64 2.31 8.03 3.98 2.02 7.48 4.29 1.74 6.79 4.61 1.47 5.99 4.96 1.21
-12
8.88 2.79 3.18 9.01 3.25 2.77 8.89 3.64 2.44 8.55 3.98 2.15 8.04 4.30 1.87 7.41 4.62 1.60 6.69 4.97 1.35
-10
9.40 2.78 3.38 9.51 3.24 2.94 9.38 3.63 2.58 9.06 3.97 2.28 8.58 4.30 2.00 8.00 4.62 1.73 7.36 4.98 1.48 6.70 5.39 1.24
-8
9.91 2.77 3.58 9.99 3.23 3.09 9.86 3.62 2.72 9.54 3.97 2.40 9.10 4.30 2.12 8.56 4.62 1.85 7.98 4.99 1.60 7.39 5.40 1.37
-7
10.16 2.77 3.67 10.23 3.23 3.17 10.08 3.62 2.78 9.77 3.97 2.46 9.33 4.29 2.17 8.81 4.63 1.90 8.26 4.99 1.66 7.71 5.41 1.43
-6
10.41 2.76 3.77 10.45 3.23 3.24 10.30 3.62 2.85 9.98 3.97 2.51 9.55 4.30 2.22 9.05 4.63 1.95 8.52 4.99 1.71 8.01 5.41 1.48
-4
10.87 2.76 3.94 10.87 3.23 3.37 10.69 3.62 2.95 10.36 3.97 2.61 9.94 4.30 2.31 9.47 4.63 2.05 8.98 5.00 1.80 8.53 5.42 1.57
-2
11.27 2.78 4.05 11.22 3.24 3.46 11.01 3.63 3.03 10.67 3.98 2.68 10.24 4.31 2.38 9.79 4.65 2.11 9.34 5.01 1.86 8.94 5.44 1.64
0
11.61 2.80 4.15 11.50 3.26 3.53 11.24 3.66 3.07 10.87 4.00 2.72 10.44 4.33 2.41 9.99 4.67 2.14 9.57 5.04 1.90 9.22 5.46 1.69
1
11.75 2.82 4.17 11.60 3.28 3.54 11.31 3.67 3.08 10.93 4.02 2.72 10.49 4.35 2.41 10.05 4.68 2.15 9.63 5.05 1.91 9.30 5.48 1.70
2
11.67 3.30 3.54 11.33 3.65 3.10 10.96 4.04 2.71 10.51 4.36 2.41 10.06 4.70 2.14 9.66 5.07 1.91 9.35 5.50 1.70
4
13.97 3.36 4.16 13.40 3.75 3.57 12.96 4.09 3.17 12.58 4.42 2.85 12.16 4.75 2.56 11.63 5.12 2.27 10.91 5.55 1.97
6
15.81 3.44 4.60 15.22 3.82 3.98 14.75 4.16 3.55 14.32 4.49 3.19 13.86 4.82 2.88 13.27 5.19 2.56 12.47 5.61 2.22
7
16.63 3.59 4.63 16.12 3.91 4.12 15.55 4.22 3.68 15.15 4.54 3.34 14.61 4.88 2.99 14.00 5.23 2.68 13.17 5.62 2.34
8
17.39 3.66 4.75 16.78 3.98 4.22 16.29 4.29 3.80 15.83 4.61 3.43 15.32 4.94 3.10 14.68 5.29 2.78 13.82 5.67 2.44
10
18.73 3.81 4.92 18.11 4.12 4.40 17.60 4.43 3.97 17.11 4.74 3.61 16.57 5.06 3.27 15.88 5.40 2.94 14.97 5.77 2.59
12
19.86 3.94 5.04 19.23 4.25 4.52 18.71 4.55 4.11 18.20 4.86 3.74 17.62 5.17 3.41 16.90 5.50 3.07 15.94 5.86 2.72
14
20.78 4.06 5.12 20.16 4.37 4.61 19.63 4.67 4.20 19.10 4.96 3.85 18.50 5.27 3.51 17.74 5.60 3.17 16.75 5.95 2.82
16
21.27 4.17 5.10 20.76 4.47 4.64 20.32 4.77 4.26 19.87 5.06 3.93 19.30 5.36 3.60 18.54 5.68 3.26 17.50 6.02 2.91
18
21.90 4.26 5.14 21.39 4.57 4.68 20.94 4.86 4.31 20.48 5.15 3.98 19.91 5.44 3.66 19.14 5.75 3.33 18.09 6.09 2.97
20
22.41 4.34 5.16 21.89 4.65 4.71 21.44 4.94 4.34 20.97 5.22 4.02 20.40 5.52 3.70 19.62 5.82 3.37 18.56 6.15 3.02
22
22.80 4.41 5.17 22.28 4.72 4.72 21.82 5.01 4.36 21.35 5.29 4.04 20.77 5.58 3.72 19.99 5.88 3.40 18.93 6.20 3.05
24
23.09 4.47 5.17 22.57 4.78 4.72 22.11 5.07 4.36 21.64 5.35 4.04 21.05 5.63 3.74 20.27 5.93 3.42 19.20 6.25 3.07
26
23.30 4.52 5.15 22.77 4.82 4.72 22.31 5.11 4.37 21.84 5.40 4.04 21.25 5.68 3.74 20.46 5.97 3.43
28
23.43 4.55 5.15 22.90 4.86 4.71 22.44 5.15 4.36 21.97 5.43 4.05 21.38 5.72 3.74 20.59 6.01 3.43
30
23.50 4.57 5.14 22.97 4.89 4.70 22.52 5.18 4.35 22.04 5.46 4.04 21.45 5.74 3.74 20.66 6.03 3.43
32
23.52 4.59 5.12 23.00 4.90 4.69 22.54 5.20 4.33 22.07 5.48 4.03 21.48 5.76 3.73 20.70 6.05 3.42
34
23.52 4.59 5.12 22.99 4.91 4.68 22.54 5.21 4.33 22.07 5.49 4.02 21.49 5.78 3.72 20.70 6.06 3.42
36
23.49 4.57 5.14 22.97 4.90 4.69 22.52 5.21 4.32 22.06 5.50 4.01 21.48 5.78 3.72 20.69 6.07 3.41
38
23.45 4.55 5.15 22.94 4.89 4.69 22.50 5.20 4.33 22.04 5.49 4.01 21.46 5.78 3.71 20.69 6.06 3.41
40
23.43 4.52 5.18 22.92 4.86 4.72 22.49 5.17 4.35 22.03 5.47 4.03 21.46 5.76 3.73 20.69 6.05 3.42
42
23.42 4.47 5.24 22.93 4.82 4.76 22.50 5.15 4.37 22.05 5.45 4.05 21.49 5.74 3.74 20.73 6.04 3.43
DATA DECLARED ACCORDING TO UNI EN 14511-2
Key
Ph
Hea ng capacity (kW)
Pe
Input power (kW)
ATTENTION operation with DCPX
TAE
External air temperature (°C) d.b.
ATTENTION
For the intermediate points, refer to the operating limits graphics (§ 9.2)
HEATING MODECOOLING MODE
ΔT WATER DIFFERENT TO NOMINAL ΔT 5°C
35810
Heating capacity correction factors 0.99 1 1.01 1.02
Input power correction factors 1.01 1 0.98 0.96
Page 38
38 Aermec code 6755521_01 11.11
ANK 025-085H
10.19. ANK 085 H 400V/3N/50Hz Hea ng capacity and input power
TAE °C
TEMPERATURE OF THE WATER PRODUCED °C
25 30 35 40 45 50 55 60
Ph
(kW)Pe(kW)
COP
Ph
(kW)Pe(kW)
COP
Ph
(kW)Pe(kW)
COP
Ph
(kW)Pe(kW)
COP
Ph
(kW)Pe(kW)
COP
Ph
(kW)Pe(kW)
COP
Ph
(kW)Pe(kW)
COP
Ph
(kW)Pe(kW)
COP
-20
8.19 2.81 2.91 8.39 3.48 2.41 8.18 4.00 2.05 7.63 4.40 1.73 6.79 4.73 1.44 5.74 5.04 1.14
-18
8.66 2.86 3.03 8.87 3.52 2.52 8.70 4.03 2.16 8.19 4.42 1.85 7.42 4.76 1.56 6.45 5.07 1.27
-16
9.15 2.91 3.14 9.37 3.56 2.63 9.23 4.05 2.28 8.77 4.44 1.98 8.06 4.77 1.69 7.17 5.08 1.41
-14
9.65 2.95 3.27 9.88 3.58 2.76 9.76 4.07 2.40 9.34 4.46 2.09 8.69 4.79 1.81 7.87 5.10 1.54 6.93 5.44 1.27
-12
10.14 2.98 3.40 10.38 3.61 2.88 10.28 4.09 2.51 9.89 4.47 2.21 9.30 4.80 1.94 8.54 5.11 1.67 7.69 5.46 1.41
-10
10.62 3.01 3.53 10.86 3.63 2.99 10.77 4.10 2.63 10.42 4.48 2.33 9.87 4.80 2.06 9.18 5.12 1.79 8.41 5.47 1.54 7.63 5.91 1.29
-8
11.07 3.04 3.64 11.30 3.65 3.10 11.23 4.12 2.73 10.91 4.49 2.43 10.40 4.81 2.16 9.77 5.13 1.90 9.07 5.49 1.65 8.38 5.93 1.41
-7
11.28 3.06 3.69 11.51 3.66 3.14 11.44 4.12 2.78 11.13 4.50 2.47 10.64 4.82 2.21 10.04 5.14 1.95 9.38 5.50 1.71 8.73 5.94 1.47
-6
11.48 3.07 3.74 11.70 3.67 3.19 11.64 4.13 2.82 11.34 4.50 2.52 10.87 4.82 2.26 10.29 5.14 2.00 9.67 5.51 1.75 9.06 5.96 1.52
-4
11.83 3.10 3.82 12.05 3.69 3.27 11.98 4.15 2.89 11.70 4.52 2.59 11.27 4.84 2.33 10.75 5.16 2.08 10.19 5.53 1.84 9.67 5.99 1.61
-2
12.13 3.14 3.86 12.32 3.72 3.31 12.26 4.17 2.94 11.99 4.53 2.65 11.59 4.86 2.38 11.11 5.18 2.14 10.62 5.56 1.91 10.17 6.02 1.69
0
12.34 3.18 3.88 12.52 3.75 3.34 12.45 4.20 2.96 12.19 4.56 2.67 11.82 4.88 2.42 11.38 5.21 2.18 10.95 5.59 1.96 10.57 6.07 1.74
1
12.42 3.20 3.88 12.58 3.77 3.34 12.51 4.21 2.97 12.26 4.57 2.68 11.89 4.90 2.43 11.47 5.23 2.19 11.07 5.61 1.97 10.73 6.09 1.76
2
12.51 4.22 2.96 12.66 4.23 2.99 12.32 4.59 2.68 12.02 4.84 2.48 11.64 5.25 2.22 11.18 5.64 1.98 10.55 6.12 1.72
4
15.61 3.84 4.07 15.15 4.27 3.55 14.75 4.63 3.19 14.38 4.96 2.90 13.95 5.29 2.64 13.42 5.69 2.36 12.71 6.19 2.05
6
17.79 3.89 4.57 17.28 4.33 3.99 16.85 4.68 3.60 16.42 5.01 3.28 15.94 5.35 2.98 15.33 5.76 2.66 14.55 6.26 2.32
7
18.46 4.36 4.23 18.23 4.36 4.18 17.78 4.71 3.77 17.49 5.07 3.45 16.81 5.39 3.12 16.18 5.79 2.79 15.36 6.31 2.43
8
19.63 4.14 4.74 19.10 4.49 4.25 18.63 4.82 3.87 18.16 5.15 3.53 17.62 5.50 3.20 16.96 5.87 2.89 16.11 6.30 2.56
10
21.18 4.33 4.89 20.63 4.66 4.43 20.13 4.98 4.04 19.62 5.30 3.70 19.03 5.63 3.38 18.32 5.99 3.06 17.41 6.39 2.72
12
22.46 4.50 4.99 21.89 4.82 4.54 21.37 5.13 4.17 20.83 5.43 3.84 20.21 5.74 3.52 19.45 6.08 3.20 18.49 6.47 2.86
14
23.50 4.65 5.05 22.92 4.96 4.62 22.39 5.26 4.26 21.82 5.55 3.93 21.17 5.85 3.62 20.38 6.17 3.30 19.37 6.54 2.96
16
24.07 4.78 5.04 23.59 5.08 4.64 23.14 5.37 4.31 22.64 5.65 4.01 22.05 5.93 3.72 21.29 6.25 3.41 20.30 6.60 3.08
18
24.76 4.89 5.06 24.30 5.19 4.68 23.86 5.47 4.36 23.37 5.74 4.07 22.78 6.01 3.79 22.01 6.31 3.49 21.00 6.65 3.16
20
25.33 4.98 5.09 24.89 5.28 4.71 24.46 5.55 4.41 23.97 5.81 4.13 23.37 6.08 3.84 22.59 6.37 3.55 21.57 6.69 3.22
22
25.78 5.06 5.09 25.36 5.35 4.74 24.94 5.62 4.44 24.45 5.88 4.16 23.85 6.14 3.88 23.06 6.42 3.59 22.02 6.73 3.27
24
26.14 5.12 5.11 25.73 5.42 4.75 25.32 5.68 4.46 24.83 5.93 4.19 24.22 6.19 3.91 23.42 6.46 3.63 22.36 6.76 3.31
26
26.42 5.17 5.11 26.02 5.47 4.76 25.61 5.73 4.47 25.12 5.98 4.20 24.50 6.23 3.93 23.68 6.50 3.64
28
26.63 5.21 5.11 26.24 5.51 4.76 25.83 5.77 4.48 25.34 6.02 4.21 24.70 6.27 3.94 23.86 6.53 3.65
30
26.78 5.24 5.11 26.40 5.54 4.77 25.98 5.80 4.48 25.49 6.05 4.21 24.84 6.30 3.94 23.98 6.56 3.66
32
26.89 5.25 5.12 26.51 5.56 4.77 26.10 5.83 4.48 25.59 6.08 4.21 24.92 6.33 3.94 24.04 6.59 3.65
34
26.98 5.26 5.13 26.59 5.57 4.77 26.17 5.85 4.47 25.65 6.11 4.20 24.97 6.36 3.93 24.06 6.62 3.63
36
27.04 5.26 5.14 26.66 5.58 4.78 26.23 5.87 4.47 25.69 6.13 4.19 24.99 6.38 3.92 24.05 6.64 3.62
38
27.11 5.25 5.16 26.72 5.59 4.78 26.28 5.88 4.47 25.73 6.15 4.18 25.00 6.41 3.90 24.03 6.67 3.60
40
27.18 5.24 5.19 26.79 5.59 4.79 26.34 5.89 4.47 25.77 6.17 4.18 25.01 6.44 3.88 24.01 6.71 3.58
42
27.28 5.22 5.23 26.88 5.59 4.81 26.42 5.90 4.48 25.82 6.19 4.17 25.04 6.47 3.87 24.00 6.74 3.56
DATA DECLARED ACCORDING TO UNI EN 145112
Key
Ph
Hea ng capacity (kW)
Pe
Input power (kW)
ATTENTION operation with DCPX
TAE
External air temperature (°C) d.b.
ATTENTION
For the intermediate points, refer to the operating limits graphics (§ 9.2)
HEATING MODECOOLING MODE
ΔT WATER DIFFERENT TO NOMINAL ΔT 5°C
35810
Heating capacity correction factors 0.99 1 1.01 1.02
Input power correction factors 1.01 1 0.98 0.96
Page 39
39Aermec code 6755521_01 11.11
ANK 025-085H
10.20. ANK 085 HP|HA 400V/3N/50Hz Hea ng capacity and input power
TAE °C
TEMPERATURE OF THE WATER PRODUCED °C
25 30 35 40 45 50 55 60
Ph
(kW)Pe(kW)
COP
Ph
(kW)Pe(kW)
COP
Ph
(kW)Pe(kW)
COP
Ph
(kW)Pe(kW)
COP
Ph
(kW)Pe(kW)
COP
Ph
(kW)Pe(kW)
COP
Ph
(kW)Pe(kW)
COP
Ph
(kW)Pe(kW)
COP
-20
8.08 2.86 2.83 8.27 3.54 2.34 8.07 4.07 1.98 7.52 4.48 1.68 6.70 4.82 1.39 5.66 5.13 1.10
-18
8.54 2.91 2.93 8.75 3.59 2.44 8.58 4.10 2.09 8.08 4.50 1.80 7.32 4.84 1.51 6.36 5.16 1.23
-16
9.02 2.96 3.05 9.25 3.62 2.56 9.10 4.13 2.20 8.65 4.52 1.91 7.95 4.86 1.64 7.07 5.18 1.36
-14
9.51 3.00 3.17 9.74 3.65 2.67 9.62 4.15 2.32 9.21 4.54 2.03 8.57 4.87 1.76 7.76 5.19 1.50 6.84 5.54 1.23
-12
10.00 3.03 3.30 10.24 3.67 2.79 10.13 4.16 2.44 9.76 4.55 2.15 9.17 4.88 1.88 8.42 5.20 1.62 7.59 5.55 1.37
-10
10.47 3.07 3.41 10.71 3.69 2.90 10.62 4.18 2.54 10.28 4.56 2.25 9.73 4.89 1.99 9.05 5.21 1.74 8.30 5.57 1.49 7.52 6.01 1.25
-8
10.91 3.10 3.52 11.15 3.71 3.01 11.07 4.19 2.64 10.76 4.57 2.35 10.26 4.90 2.09 9.63 5.22 1.84 8.95 5.58 1.60 8.27 6.04 1.37
-7
11.12 3.11 3.58 11.35 3.72 3.05 11.28 4.20 2.69 10.98 4.58 2.40 10.50 4.90 2.14 9.90 5.23 1.89 9.25 5.59 1.65 8.61 6.05 1.42
-6
11.32 3.13 3.62 11.54 3.74 3.09 11.48 4.21 2.73 11.18 4.58 2.44 10.72 4.91 2.18 10.15 5.23 1.94 9.54 5.60 1.70 8.94 6.06 1.48
-4
11.67 3.16 3.69 11.88 3.76 3.16 11.82 4.22 2.80 11.54 4.60 2.51 11.12 4.92 2.26 10.60 5.25 2.02 10.05 5.63 1.79 9.53 6.09 1.56
-2
11.96 3.19 3.75 12.15 3.79 3.21 12.09 4.24 2.85 11.83 4.61 2.57 11.43 4.94 2.31 10.96 5.27 2.08 10.47 5.65 1.85 10.03 6.13 1.64
0
12.17 3.23 3.77 12.35 3.82 3.23 12.28 4.27 2.88 12.03 4.64 2.59 11.65 4.97 2.34 11.22 5.30 2.12 10.80 5.69 1.90 10.43 6.18 1.69
1
12.25 3.25 3.77 12.41 3.84 3.23 12.34 4.29 2.88 12.09 4.65 2.60 11.73 4.98 2.36 11.32 5.32 2.13 10.91 5.71 1.91 10.58 6.20 1.71
2
12.26 4.23 2.90 12.48 4.30 2.90 12.15 4.67 2.60 11.83 4.93 2.40 11.48 5.34 2.15 11.02 5.74 1.92 10.41 6.23 1.67
4
15.40 3.90 3.95 14.94 4.35 3.43 14.55 4.71 3.09 14.18 5.04 2.81 13.76 5.39 2.55 13.23 5.79 2.28 12.53 6.30 1.99
6
17.54 3.96 4.43 17.05 4.40 3.88 16.62 4.77 3.48 16.19 5.10 3.17 15.72 5.45 2.88 15.12 5.86 2.58 14.35 6.38 2.25
7
18.31 4.45 4.11 17.98 4.43 4.06 17.53 4.80 3.65 17.25 5.16 3.34 16.58 5.48 3.03 15.96 5.90 2.71 15.15 6.42 2.36
8
19.36 4.21 4.60 18.84 4.57 4.12 18.37 4.90 3.75 17.91 5.24 3.42 17.38 5.59 3.11 16.73 5.98 2.80 15.89 6.41 2.48
10
20.89 4.41 4.74 20.34 4.75 4.28 19.85 5.07 3.92 19.35 5.39 3.59 18.77 5.73 3.28 18.07 6.09 2.97 17.17 6.50 2.64
12
22.15 4.58 4.84 21.59 4.91 4.40 21.07 5.22 4.04 20.54 5.53 3.71 19.93 5.85 3.41 19.18 6.19 3.10 18.23 6.58 2.77
14
23.18 4.73 4.90 22.61 5.05 4.48 22.08 5.35 4.13 21.52 5.64 3.82 20.88 5.95 3.51 20.10 6.28 3.20 19.10 6.65 2.87
16
23.74 4.86 4.88 23.27 5.17 4.50 22.82 5.46 4.18 22.33 5.75 3.88 21.74 6.04 3.60 20.99 6.36 3.30 20.02 6.71 2.98
18
24.42 4.97 4.91 23.97 5.28 4.54 23.53 5.56 4.23 23.05 5.84 3.95 22.46 6.12 3.67 21.70 6.42 3.38 20.72 6.76 3.07
20
24.98 5.07 4.93 24.54 5.37 4.57 24.12 5.65 4.27 23.64 5.91 4.00 23.05 6.19 3.72 22.28 6.48 3.44 21.28 6.81 3.12
22
25.43 5.15 4.94 25.01 5.45 4.59 24.59 5.72 4.30 24.12 5.98 4.03 23.52 6.25 3.76 22.74 6.53 3.48 21.72 6.85 3.17
24
25.78 5.21 4.95 25.38 5.51 4.61 24.97 5.78 4.32 24.49 6.04 4.05 23.89 6.30 3.79 23.09 6.57 3.51 22.05 6.88 3.20
26
26.06 5.26 4.95 25.66 5.56 4.62 25.26 5.83 4.33 24.78 6.09 4.07 24.16 6.34 3.81 23.35 6.61 3.53
28
26.26 5.30 4.95 25.88 5.60 4.62 25.47 5.87 4.34 24.99 6.13 4.08 24.36 6.38 3.82 23.53 6.65 3.54
30
26.42 5.33 4.96 26.03 5.64 4.62 25.63 5.91 4.34 25.14 6.16 4.08 24.50 6.41 3.82 23.65 6.68 3.54
32
26.53 5.35 4.96 26.15 5.66 4.62 25.74 5.93 4.34 25.24 6.19 4.08 24.58 6.44 3.82 23.71 6.70 3.54
34
26.61 5.35 4.97 26.23 5.67 4.63 25.81 5.96 4.33 25.30 6.22 4.07 24.62 6.47 3.81 23.73 6.73 3.53
36
26.67 5.35 4.99 26.29 5.68 4.63 25.87 5.97 4.33 25.34 6.24 4.06 24.65 6.50 3.79 23.72 6.76 3.51
38
26.74 5.35 5.00 26.35 5.69 4.63 25.92 5.99 4.33 25.38 6.26 4.05 24.66 6.52 3.78 23.70 6.79 3.49
40
26.81 5.33 5.03 26.42 5.69 4.64 25.98 6.00 4.33 25.41 6.28 4.05 24.67 6.55 3.77 23.68 6.83 3.47
42
26.91 5.32 5.06 26.51 5.68 4.67 26.05 6.01 4.33 25.47 6.30 4.04 24.70 6.58 3.75 23.67 6.86 3.45
DATA DECLARED ACCORDING TO UNI EN 145112
Key
Ph
Hea ng capacity (kW)
Pe
Input power (kW)
ATTENTION operation with DCPX
TAE
External air temperature (°C) d.b.
ATTENTION
For the intermediate points, refer to the operating limits graphics (§ 9.2)
HEATING MODECOOLING MODE
ΔT WATER DIFFERENT TO NOMINAL ΔT 5°C
35810
Heating capacity correction factors 0.99 1 1.01 1.02
Input power correction factors 1.01 1 0.98 0.96
Page 40
40 Aermec code 6755521_01 11.11
ANK 025-085H
11. EFFICIENCIES AND TEMPERATURES DIFFERENT FROM THE NOMINAL OPERATING VALUE IN COOLING MODE
11.1. ANK 020 H 230V/1/50Hz Cooling capacity and input power
DATA DECLARED ACCORDING TO UNI EN 145112
Key
Pc
Cooling capacity (kW)
Pe input power (kW)
TAE External air temperature (°C) d.b.
ATTENTION
For the intermediate points, refer to the operating limits graphics (§ 9.1)
TAE °C
TEMPERATURE OF THE WATER PRODUCED °C
8 5 0 5 7 10 15 18
Pc
(kW)Pe(kW)
EER
Pc
(kW)Pe(kW)
EER
Pc
(kW)Pe(kW)
EER
Pc
(kW)Pe(kW)
EER
Pc
(kW)Pe(kW)
EER
Pc
(kW)Pe(kW)
EER
Pc
(kW)Pe(kW)
EER
Pc
(kW)Pe(kW)
EER
-10
6.40 3.39 1.89 7.11 3.41 2.09 8.22 3.45 2.38 9.29 3.48 2.67 9.72 3.50 2.78 10.39 3.52 2.95 11.60 3.56 3.26 12.41 3.58 3.47
-8
6.25 3.07 2.04 6.97 3.09 2.26 8.08 3.13 2.58 9.15 3.16 2.90 9.58 3.17 3.02 10.25 3.20 3.20 11.46 3.24 3.54 12.27 3.26 3.76
-6
6.12 2.78 2.20 6.84 2.80 2.44 7.95 2.84 2.80 9.02 2.88 3.13 9.45 2.89 3.27 10.12 2.91 3.48 11.33 2.95 3.84 12.13 2.98 4.07
-4
6.00 2.53 2.37 6.71 2.55 2.63 7.82 2.59 3.02 8.89 2.63 3.38 9.32 2.64 3.53 9.99 2.66 3.76 11.20 2.70 4.15 12.00 2.73 4.40
-2
5.88 2.31 2.55 6.59 2.34 2.82 7.70 2.38 3.24 8.77 2.41 3.64 9.20 2.42 3.80 9.87 2.45 4.03 11.08 2.49 4.45 11.88 2.52 4.71
0
5.76 2.13 2.70 6.48 2.15 3.01 7.59 2.19 3.47 8.66 2.23 3.88 9.09 2.24 4.06 9.76 2.26 4.32 10.96 2.30 4.77 11.77 2.33 5.05
2
5.65 1.97 2.87 6.37 2.00 3.19 7.48 2.04 3.67 8.54 2.07 4.13 8.98 2.09 4.30 9.64 2.11 4.57 10.85 2.15 5.05 11.65 2.18 5.34
4
5.54 1.85 2.99 6.26 1.87 3.35 7.37 1.91 3.86 8.44 1.95 4.33 8.87 1.96 4.53 9.54 1.98 4.82 10.74 2.03 5.29 11.54 2.05 5.63
6
5.44 1.75 3.11 6.15 1.77 3.47 7.26 1.81 4.01 8.33 1.85 4.50 8.76 1.86 4.71 9.43 1.89 4.99 10.63 1.93 5.51 11.44 1.96 5.84
8
5.33 1.67 3.19 6.05 1.70 3.56 7.16 1.74 4.11 8.22 1.77 4.64 8.66 1.79 4.84 9.32 1.81 5.15 10.53 1.85 5.69 11.33 1.88 6.03
10
5.23 1.62 3.23 5.94 1.65 3.60 7.05 1.69 4.17 8.12 1.72 4.72 8.55 1.74 4.91 9.22 1.76 5.24 10.42 1.80 5.79 11.23 1.83 6.14
12
5.12 1.59 3.22 5.84 1.62 3.60 6.95 1.66 4.19 8.01 1.69 4.74 8.45 1.71 4.94 9.11 1.73 5.27 10.32 1.78 5.80 11.12 1.80 6.18
14
5.02 1.58 3.18 5.73 1.61 3.56 6.84 1.65 4.15 7.91 1.69 4.68 8.34 1.70 4.91 9.00 1.72 5.23 10.21 1.77 5.77 11.01 1.79 6.15
16
4.91 1.59 3.09 5.62 1.62 3.47 6.73 1.66 4.05 7.80 1.69 4.62 8.23 1.71 4.81 8.89 1.73 5.14 10.10 1.78 5.67 10.90 1.80 6.06
18
4.79 1.62 2.96 5.51 1.64 3.36 6.62 1.68 3.94 7.68 1.72 4.47 8.11 1.73 4.69 8.78 1.76 4.99 9.98 1.80 5.54 10.79 1.83 5.90
20
4.67 1.66 2.81 5.39 1.68 3.21 6.50 1.72 3.78 7.56 1.76 4.30 7.99 1.77 4.51 8.66 1.80 4.81 9.86 1.84 5.36 10.67 1.87 5.71
22
4.55 1.71 2.66 5.26 1.73 3.04 6.37 1.77 3.60 7.44 1.81 4.11 7.87 1.83 4.30 8.54 1.85 4.62 9.74 1.89 5.15 10.54 1.92 5.49
24
4.42 1.77 2.50 5.13 1.80 2.85 6.24 1.84 3.39 7.31 1.88 3.89 7.74 1.89 4.10 8.40 1.91 4.40 9.61 1.96 4.90 10.41 1.99 5.23
26
4.28 1.84 2.33 4.99 1.87 2.67 6.10 1.91 3.19 7.17 1.95 3.68 7.60 1.96 3.88 8.26 1.99 4.15 9.47 2.03 4.67 10.27 2.06 4.99
28
4.13 1.93 2.14 4.84 1.95 2.48 5.95 1.99 2.99 7.02 2.03 3.46 7.45 2.04 3.65 8.11 2.07 3.92 9.32 2.11 4.42 10.12 2.14 4.73
30
3.97 2.01 1.98 4.69 2.04 2.30 5.79 2.08 2.78 6.86 2.12 3.24 7.29 2.13 3.42 7.96 2.16 3.69 9.16 2.20 4.16 9.96 2.23 4.47
32
3.80 2.10 1.81 4.52 2.13 2.12 5.62 2.17 2.59 6.69 2.21 3.03 7.12 2.22 3.21 7.79 2.25 3.46 8.99 2.29 3.93 9.79 2.32 4.22
34
3.62 2.20 1.65 4.33 2.22 1.95 5.44 2.26 2.41 6.51 2.30 2.83 6.94 2.32 2.99 7.61 2.34 3.25 8.81 2.38 3.70 9.61 2.41 3.99
35
3.52 2.25 1.56 4.24 2.27 1.87 5.35 2.31 2.32 6.41 2.35 2.73 6.82 2.36 2.89 7.51 2.39 3.14 8.71 2.43 3.58 9.44 2.48 3.81
36
3.43 2.29 1.50 4.14 2.32 1.78 5.25 2.36 2.22 6.32 2.40 2.63 6.75 2.41 2.80 7.41 2.44 3.04 8.62 2.48 3.48 9.42 2.51 3.75
38
3.22 2.39 1.35 3.93 2.41 1.63 5.04 2.45 2.06 6.11 2.49 2.45 6.54 2.51 2.61 7.21 2.53 2.85 8.41 2.57 3.27 9.21 2.60 3.54
40
2.99 2.48 1.21 3.71 2.50 1.48 4.82 2.54 1.90 5.89 2.58 2.28 6.32 2.60 2.43 6.98 2.62 2.66 8.19 2.66 3.08 8.99 2.69 3.34
42
3.47 2.59 1.34 4.58 2.63 1.74 5.65 2.67 2.12 6.08 2.68 2.27 6.75 2.71 2.49 7.95 2.75 2.89
44
3.22 2.67 1.21 4.33 2.71 1.60 5.39 2.75 1.96 5.82 2.76 2.11 6.49 2.79 2.33
46
4.05 2.79 1.45 5.12 2.82 1.82 5.55 2.84 1.95 6.22 2.86 2.17
HEATING MODECOOLING MODE
ΔT WATER DIFFERENT TO NOMINAL ΔT 5°C
35810
Cooling capacity correction factors 0.99 1 1.02 1.03
Input power correction factors 0.99 1 1.01 1.02
DEPOSIT FACTORS [K*m2]/[W] 0.00005 0.0001 0.0002
Cooling capacity correction factors 1 0.98 0.94
Input power correction factors 1 0.98 0.95
Page 41
41Aermec code 6755521_01 11.11
ANK 025-085H
11.2. ANK 020 HP|H A 230V/1/50Hz Cooling capacity and input power
DATA DECLARED ACCORDING TO UNI EN 145112
Key
Pc
Cooling capacity (kW)
Pe Input power (kW)
TAE External air temperature (°C) d.b.
ATTENTION
For the intermediate points, refer to the operating limits graphics (§ 9.1)
TAE
TEMPERATURE OF THE WATER PRODUCED °C
8 5 0 5 7 10 15 18
Pc
(kW)Pe(kW)
EER
Pc
(kW)Pe(kW)
EER
Pc
(kW)Pe(kW)
EER
Pc
(kW)Pe(kW)
EER
Pc
(kW)Pe(kW)
EER
Pc
(kW)Pe(kW)
EER
Pc
(kW)Pe(kW)
EER
Pc
(kW)Pe(kW)
EER
-10
6.48
3.49 1.86
7.21
3.51 2.05
8.33
3.55 2.35
9.41
3.58 2.63
9.85
3.60 2.74
10.53
3.62 2.91
11.76
3.66 3.21
12.57
3.69 3.41
-8
6.34
3.16 2.01
7.06
3.18 2.22
8.19
3.22 2.54
9.27
3.25 2.85
9.71
3.27 2.97
10.39
3.29 3.16
11.61
3.33 3.49
12.43
3.36 3.70
-6
6.20
2.86 2.17
6.93
2.89 2.40
8.05
2.93 2.75
9.14
2.96 3.09
9.57
2.98 3.21
10.25
3.00 3.42
11.48
3.04 3.78
12.29
3.07 4.00
-4
6.08
2.60 2.34
6.80
2.63 2.59
7.93
2.67 2.97
9.01
2.70 3.34
9.45
2.72 3.47
10.12
2.74 3.69
11.35
2.78 4.08
12.16
2.81 4.33
-2
5.95
2.38 2.50
6.68
2.41 2.77
7.80
2.45 3.18
8.89
2.48 3.58
9.32
2.50 3.73
10.00
2.52 3.97
11.22
2.56 4.38
12.04
2.59 4.65
0
5.84
2.19 2.67
6.56
2.22 2.95
7.69
2.26 3.40
8.77
2.29 3.83
9.21
2.31 3.99
9.88
2.33 4.24
11.11
2.37 4.69
11.92
2.40 4.97
2
5.73
2.03 2.82
6.45
2.06 3.13
7.57
2.10 3.60
8.66
2.13 4.07
9.09
2.15 4.23
9.77
2.17 4.50
10.99
2.21 4.97
11.81
2.24 5.27
4
5.62
1.90 2.96
6.34
1.93 3.28
7.47
1.97 3.79
8.55
2.00 4.28
8.98
2.02 4.45
9.66
2.04 4.74
10.88
2.09 5.21
11.70
2.12 5.52
6
5.51
1.80 3.06
6.23
1.83 3.40
7.36
1.87 3.94
8.44
1.90 4.44
8.88
1.92 4.63
9.55
1.94 4.92
10.77
1.98 5.44
11.59
2.01 5.77
8
5.40
1.72 3.14
6.13
1.75 3.50
7.25
1.79 4.05
8.33
1.83 4.55
8.77
1.84 4.77
9.45
1.87 5.05
10.67
1.91 5.59
11.48
1.94 5.92
10
5.30
1.67 3.17
6.02
1.70 3.54
7.15
1.74 4.11
8.23
1.77 4.65
8.66
1.79 4.84
9.34
1.81 5.16
10.56
1.86 5.68
11.37
1.89 6.02
12
5.19
1.64 3.16
5.92
1.67 3.54
7.04
1.71 4.12
8.12
1.75 4.64
8.56
1.76 4.86
9.23
1.78 5.19
10.45
1.83 5.71
11.27
1.86 6.06
14
5.08
1.63 3.12
5.81
1.66 3.50
6.93
1.70 4.08
8.01
1.74 4.60
8.45
1.75 4.83
9.12
1.77 5.15
10.34
1.82 5.68
11.16
1.85 6.03
16
4.97
1.64 3.03
5.70
1.67 3.41
6.82
1.71 3.99
7.90
1.74 4.54
8.34
1.76 4.74
9.01
1.78 5.06
10.23
1.83 5.59
11.04
1.86 5.94
18
4.86
1.66 2.93
5.58
1.69 3.30
6.70
1.73 3.87
7.78
1.77 4.40
8.22
1.79 4.59
8.90
1.81 4.92
10.11
1.85 5.46
10.93
1.88 5.81
20
4.73
1.70 2.78
5.46
1.73 3.16
6.58
1.77 3.72
7.66
1.81 4.23
8.10
1.83 4.43
8.77
1.85 4.74
9.99
1.89 5.29
10.81
1.92 5.63
22
4.61
1.76 2.62
5.33
1.79 2.98
6.46
1.83 3.53
7.54
1.87 4.03
7.97
1.88 4.24
8.65
1.91 4.53
9.87
1.95 5.06
10.68
1.98 5.39
24
4.47
1.82 2.46
5.20
1.85 2.81
6.32
1.89 3.34
7.40
1.93 3.83
7.84
1.95 4.02
8.51
1.97 4.32
9.73
2.02 4.82
10.55
2.04 5.17
26
4.33
1.90 2.28
5.06
1.93 2.62
6.18
1.97 3.14
7.26
2.01 3.61
7.70
2.02 3.81
8.37
2.05 4.08
9.59
2.09 4.59
10.40
2.12 4.91
28
4.18
1.98 2.11
4.91
2.01 2.44
6.03
2.05 2.94
7.11
2.09 3.40
7.55
2.11 3.58
8.22
2.13 3.86
9.44
2.17 4.35
10.25
2.20 4.66
30
4.02
2.07 1.94
4.75
2.10 2.26
5.87
2.14 2.74
6.95
2.18 3.19
7.39
2.20 3.36
8.06
2.22 3.63
9.28
2.26 4.11
10.09
2.29 4.41
32
3.85
2.17 1.77
4.58
2.19 2.09
5.70
2.23 2.56
6.78
2.27 2.99
7.22
2.29 3.15
7.89
2.31 3.42
9.11
2.36 3.86
9.92
2.39 4.15
34
3.67
2.26 1.62
4.39
2.29 1.92
5.52
2.33 2.37
6.60
2.37 2.78
7.03
2.39 2.94
7.71
2.41 3.20
8.93
2.45 3.64
9.74
2.48 3.93
35
3.57
2.31 1.55
4.30
2.34 1.84
5.42
2.38 2.28
6.50
2.42 2.69
6.91
2.43 2.84
7.61
2.46 3.09
8.83
2.50 3.53
9.57 2.51 3.81
36
3.47
2.36 1.47
4.20
2.39 1.76
5.32
2.43 2.19
6.40
2.47 2.59
6.84
2.48 2.76
7.51
2.51 2.99
8.73
2.55 3.42
9.54
2.58 3.70
38
3.26
2.46 1.33
3.99
2.48 1.61
5.11
2.53 2.02
6.19
2.56 2.42
6.63
2.58 2.57
7.30
2.60 2.81
8.52
2.65 3.22
9.33
2.68 3.48
40
3.03
2.55 1.19
3.76
2.58 1.46
4.88
2.62 1.86
5.96
2.66 2.24
6.40
2.67 2.40
7.08
2.70 2.62
8.29
2.74 3.03
9.11
2.77 3.29
42
3.52
2.67 1.32
4.64
2.71 1.71
5.72
2.75 2.08
6.16
2.76 2.23
6.83
2.79 2.45
8.05
2.83 2.84
44
3.26
2.75 1.19
4.38
2.79 1.57
5.46
2.83 1.93
5.90
2.85 2.07
6.58
2.87 2.29
46
4.11
2.87 1.43
5.19
2.91 1.78
5.63
2.92 1.93
6.30
2.95 2.14
HEATING MODECOOLING MODE
ΔT WATER DIFFERENT TO NOMINAL ΔT 5°C
35810
Cooling capacity correction factors 0.99 1 1.02 1.03
Input power correction factors 0.99 1 1.01 1.02
DEPOSIT FACTORS [K*m2]/[W] 0.00005 0.0001 0.0002
Cooling capacity correction factors 1 0.98 0.94
Input power correction factors 1 0.98 0.95
Page 42
42 Aermec code 6755530_03 9.2011
ANK 025-085H
11.3. ANK 020 H 400V/3N/50Hz Cooling capacity and input power
TAE °C
TEMPERATURE OF THE WATER PRODUCED °C
8 5 0 5 7 10 15 18
Pc
(kW)Pe(kW)
EER
Pc
(kW)Pe(kW)
EER
Pc
(kW)Pe(kW)
EER
Pc
(kW)Pe(kW)
EER
Pc
(kW)Pe(kW)
EER
Pc
(kW)Pe(kW)
EER
Pc
(kW)Pe(kW)
EER
Pc
(kW)Pe(kW)
EER
-10
6.34 3.34 1.90 7.05 3.37 2.09 8.15 3.40 2.40 9.21 3.44 2.68 9.64 3.45 2.79 10.30 3.47 2.97 11.50 3.51 3.28 12.30 3.54 3.47
-8
6.20 3.03 2.05 6.91 3.05 2.27 8.01 3.09 2.59 9.07 3.12 2.91 9.50 3.13 3.04 10.16 3.16 3.22 11.36 3.19 3.56 12.16 3.22 3.78
-6
6.07 2.74 2.22 6.78 2.77 2.45 7.88 2.80 2.81 8.94 2.84 3.15 9.37 2.85 3.29 10.03 2.87 3.49 11.23 2.91 3.86 12.02 2.94 4.09
-4
5.94 2.50 2.38 6.65 2.52 2.64 7.75 2.56 3.03 8.81 2.59 3.40 9.24 2.61 3.54 9.90 2.63 3.76 11.10 2.67 4.16 11.90 2.70 4.41
-2
5.82 2.28 2.55 6.53 2.31 2.83 7.63 2.34 3.26 8.69 2.38 3.65 9.12 2.39 3.82 9.78 2.42 4.04 10.98 2.46 4.46 11.78 2.48 4.75
0
5.71 2.10 2.72 6.42 2.13 3.01 7.52 2.16 3.48 8.58 2.20 3.90 9.01 2.21 4.08 9.67 2.23 4.34 10.86 2.27 4.78 11.66 2.30 5.07
2
5.60 1.95 2.87 6.31 1.97 3.20 7.41 2.01 3.69 8.47 2.05 4.13 8.90 2.06 4.32 9.56 2.08 4.60 10.75 2.12 5.07 11.55 2.15 5.37
4
5.49 1.82 3.02 6.20 1.85 3.35 7.30 1.89 3.86 8.36 1.92 4.35 8.79 1.94 4.53 9.45 1.96 4.82 10.65 2.00 5.33 11.44 2.03 5.64
6
5.39 1.73 3.12 6.10 1.75 3.49 7.20 1.79 4.02 8.26 1.82 4.54 8.68 1.84 4.72 9.35 1.86 5.03 10.54 1.90 5.55 11.34 1.93 5.88
8
5.29 1.65 3.21 6.00 1.68 3.57 7.09 1.72 4.12 8.15 1.75 4.66 8.58 1.77 4.85 9.24 1.79 5.16 10.44 1.83 5.70 11.23 1.86 6.04
10
5.18 1.60 3.24 5.89 1.63 3.61 6.99 1.67 4.19 8.05 1.70 4.74 8.48 1.72 4.93 9.14 1.74 5.25 10.33 1.78 5.80 11.13 1.81 6.15
12
5.08 1.57 3.24 5.79 1.60 3.62 6.89 1.64 4.20 7.94 1.67 4.75 8.37 1.69 4.95 9.03 1.71 5.28 10.23 1.75 5.85 11.02 1.78 6.19
14
4.97 1.56 3.19 5.68 1.59 3.57 6.78 1.63 4.16 7.84 1.66 4.72 8.26 1.68 4.92 8.93 1.70 5.25 10.12 1.74 5.82 10.91 1.77 6.16
16
4.86 1.57 3.10 5.57 1.60 3.48 6.67 1.64 4.07 7.73 1.67 4.63 8.15 1.69 4.82 8.82 1.71 5.16 10.01 1.75 5.72 10.80 1.78 6.07
18
4.75 1.60 2.97 5.46 1.62 3.37 6.56 1.66 3.95 7.61 1.70 4.48 8.04 1.71 4.70 8.70 1.74 5.00 9.89 1.78 5.56 10.69 1.81 5.91
20
4.63 1.63 2.84 5.34 1.66 3.22 6.44 1.70 3.79 7.50 1.74 4.31 7.92 1.75 4.53 8.58 1.77 4.85 9.78 1.82 5.37 10.57 1.85 5.71
22
4.51 1.69 2.67 5.22 1.71 3.05 6.32 1.75 3.61 7.37 1.79 4.12 7.80 1.80 4.33 8.46 1.83 4.62 9.65 1.87 5.16 10.45 1.90 5.50
24
4.38 1.75 2.50 5.09 1.77 2.88 6.18 1.81 3.41 7.24 1.85 3.91 7.67 1.87 4.10 8.33 1.89 4.41 9.52 1.93 4.93 10.32 1.96 5.27
26
4.24 1.82 2.33 4.95 1.85 2.68 6.05 1.89 3.20 7.10 1.92 3.70 7.53 1.94 3.88 8.19 1.96 4.18 9.38 2.00 4.69 10.18 2.03 5.01
28
4.09 1.90 2.15 4.80 1.93 2.49 5.90 1.97 2.99 6.96 2.00 3.48 7.38 2.02 3.65 8.04 2.04 3.94 9.24 2.08 4.44 10.03 2.11 4.75
30
3.93 1.99 1.97 4.64 2.01 2.31 5.74 2.05 2.80 6.80 2.09 3.25 7.23 2.10 3.44 7.89 2.13 3.70 9.08 2.17 4.18 9.87 2.20 4.49
32
3.77 2.08 1.81 4.48 2.10 2.13 5.57 2.14 2.60 6.63 2.18 3.04 7.06 2.19 3.22 7.72 2.22 3.48 8.91 2.26 3.94 9.71 2.29 4.24
34
3.59 2.17 1.65 4.30 2.20 1.95 5.40 2.24 2.41 6.45 2.27 2.84 6.88 2.29 3.00 7.54 2.31 3.26 8.73 2.35 3.71 9.53 2.38 4.00
35
3.49 2.22 1.57 4.20 2.24 1.88 5.30 2.28 2.32 6.36 2.32 2.74 6.76 2.33 2.90 7.45 2.36 3.16 8.64 2.40 3.60 9.36 2.45 3.82
36
3.39 2.26 1.50 4.10 2.29 1.79 5.20 2.33 2.23 6.26 2.37 2.64 6.69 2.38 2.81 7.35 2.40 3.06 8.54 2.45 3.49 9.33 2.48 3.76
38
3.19 2.36 1.35 3.90 2.38 1.64 5.00 2.42 2.07 6.05 2.46 2.46 6.48 2.47 2.62 7.14 2.50 2.86 8.33 2.54 3.28 9.13 2.57 3.55
40
2.97 2.45 1.21 3.68 2.47 1.49 4.78 2.51 1.90 5.83 2.55 2.29 6.26 2.56 2.45 6.92 2.59 2.67 8.11 2.63 3.08 8.91 2.66 3.35
42
3.44 2.56 1.34 4.54 2.60 1.75 5.60 2.63 2.13 6.03 2.65 2.28 6.69 2.67 2.51 7.88 2.71 2.91
44
3.19 2.64 1.21 4.29 2.68 1.60 5.35 2.71 1.97 5.77 2.73 2.11 6.43 2.75 2.34
46
4.02 2.75 1.46 5.08 2.79 1.82 5.50 2.80 1.96 6.16 2.82 2.18
DATA DECLARED ACCORDING TO UNI EN 145112
Key
Pc
Cooling capacity (kW)
Pe Input power (kW)
TAE External air temperature (°C) d.b.
ATTENTION
For the intermediate points, refer to the operating limits graphics (§ 9.1)
HEATING MODECOOLING MODE
ΔT WATER DIFFERENT TO NOMINAL ΔT 5°C
35810
Cooling capacity correction factors 0.99 1 1.02 1.03
Input power correction factors 0.99 1 1.01 1.02
DEPOSIT FACTORS [K*m2]/[W] 0.00005 0.0001 0.0002
Cooling capacity correction factors 1 0.98 0.94
Input power correction factors 1 0.98 0.95
Page 43
43Aermec code 6755530_03 9.2011
ANK 025-085H
11.4. ANK 020 HP|H A 400V/3N/50Hz Cooling capacity and input power
TAE °C
TEMPERATURE OF THE WATER PRODUCED °C
8 5 0 5 7 10 15 18
Pc
(kW)Pe(kW)
EER
Pc
(kW)Pe(kW)
EER
Pc
(kW)Pe(kW)
EER
Pc
(kW)Pe(kW)
EER
Pc
(kW)Pe(kW)
EER
Pc
(kW)Pe(kW)
EER
Pc
(kW)Pe(kW)
EER
Pc
(kW)Pe(kW)
EER
-10
6.41 3.46
1.85
7.13 3.48
2.05
8.25 3.52
2.34
9.32 3.56
2.62
9.75 3.57
2.73
10.42 3.59
2.90
11.64 3.63
3.21
12.45 3.66
3.40
-8
6.27 3.13
2.00
6.99 3.15
2.22
8.11 3.19
2.54
9.18 3.23
2.84
9.61 3.24
2.97
10.28 3.26
3.15
11.49 3.30
3.48
12.30 3.33
3.69
-6
6.14 2.84
2.16
6.86 2.86
2.40
7.97 2.90
2.75
9.04 2.94
3.07
9.48 2.95
3.21
10.15 2.97
3.42
11.36 3.01
3.77
12.17 3.04
4.00
-4
6.01 2.58
2.33
6.73 2.61
2.58
7.85 2.65
2.96
8.92 2.68
3.33
9.35 2.70
3.46
10.02 2.72
3.68
11.23 2.76
4.07
12.04 2.79
4.32
-2
5.89 2.36
2.50
6.61 2.39
2.77
7.72 2.43
3.18
8.80 2.46
3.58
9.23 2.48
3.72
9.90 2.50
3.96
11.11 2.54
4.37
11.92 2.57
4.64
0
5.78 2.17
2.66
6.50 2.20
2.95
7.61 2.24
3.40
8.68 2.27
3.82
9.11 2.29
3.98
9.78 2.31
4.23
10.99 2.35
4.68
11.80 2.38
4.96
2
5.67 2.02
2.81
6.39 2.04
3.13
7.50 2.08
3.61
8.57 2.12
4.04
9.00 2.13
4.23
9.67 2.15
4.50
10.88 2.20
4.95
11.69 2.23
5.24
4
5.56 1.89
2.94
6.28 1.91
3.29
7.39 1.95
3.79
8.46 1.99
4.25
8.89 2.00
4.45
9.56 2.03
4.71
10.77 2.07
5.20
11.58 2.10
5.51
6
5.45 1.79
3.04
6.17 1.81
3.41
7.28 1.85
3.94
8.35 1.89
4.42
8.79 1.90
4.63
9.46 1.93
4.90
10.66 1.97
5.41
11.47 2.00
5.74
8
5.35 1.71
3.13
6.07 1.74
3.49
7.18 1.77
4.06
8.25 1.81
4.56
8.68 1.83
4.74
9.35 1.85
5.05
10.56 1.89
5.59
11.37 1.92
5.92
10
5.24 1.66
3.16
5.96 1.68
3.55
7.07 1.72
4.11
8.14 1.76
4.63
8.58 1.78
4.82
9.25 1.80
5.14
10.45 1.84
5.68
11.26 1.87
6.02
12
5.14 1.63
3.15
5.86 1.65
3.55
6.97 1.69
4.12
8.04 1.73
4.65
8.47 1.75
4.84
9.14 1.77
5.16
10.35 1.81
5.72
11.15 1.84
6.06
14
5.03 1.62
3.10
5.75 1.64
3.51
6.86 1.68
4.08
7.93 1.72
4.61
8.36 1.74
4.80
9.03 1.76
5.13
10.24 1.80
5.69
11.04 1.83
6.03
16
4.92 1.63
3.02
5.64 1.65
3.42
6.75 1.69
3.99
7.82 1.73
4.52
8.25 1.75
4.71
8.92 1.77
5.04
10.13 1.81
5.60
10.93 1.84
5.94
18
4.81 1.65
2.92
5.52 1.68
3.29
6.63 1.72
3.85
7.70 1.76
4.38
8.14 1.77
4.60
8.81 1.80
4.89
10.01 1.84
5.44
10.82 1.87
5.79
20
4.69 1.69
2.78
5.40 1.72
3.14
6.52 1.76
3.70
7.58 1.80
4.21
8.02 1.81
4.43
8.69 1.84
4.72
9.89 1.88
5.26
10.70 1.91
5.60
22
4.56 1.74
2.62
5.28 1.77
2.98
6.39 1.81
3.53
7.46 1.85
4.03
7.89 1.87
4.22
8.56 1.89
4.53
9.77 1.93
5.06
10.57 1.96
5.39
24
4.43 1.81
2.45
5.15 1.84
2.80
6.26 1.88
3.33
7.33 1.92
3.82
7.76 1.93
4.02
8.43 1.95
4.32
9.63 2.00
4.82
10.44 2.03
5.14
26
4.29 1.88
2.28
5.01 1.91
2.62
6.12 1.95
3.14
7.19 1.99
3.61
7.62 2.01
3.79
8.29 2.03
4.08
9.49 2.07
4.58
10.30 2.10
4.90
28
4.14 1.97
2.10
4.86 1.99
2.44
5.97 2.03
2.94
7.04 2.07
3.40
7.47 2.09
3.57
8.14 2.11
3.86
9.34 2.16
4.32
10.15 2.19
4.63
30
3.98 2.06
1.93
4.70 2.08
2.26
5.81 2.12
2.74
6.88 2.16
3.19
7.31 2.18
3.35
7.98 2.20
3.63
9.19 2.25
4.08
9.99 2.27
4.40
32
3.81 2.15
1.77
4.53 2.18
2.08
5.64 2.22
2.54
6.71 2.25
2.98
7.14 2.27
3.15
7.81 2.29
3.41
9.02 2.34
3.85
9.82 2.37
4.14
34
3.63 2.24
1.62
4.35 2.27
1.92
5.46 2.31
2.36
6.53 2.35
2.78
6.96 2.37
2.94
7.63 2.39
3.19
8.83 2.43
3.63
9.64 2.46
3.92
35
3.53 2.29
1.54
4.25 2.32
1.83
5.36 2.36
2.27
6.43 2.40
2.68
6.84 2.41
2.84
7.53 2.44
3.09
8.74 2.48
3.52
9.48 2.48 3.82
36
3.44 2.34
1.47
4.15 2.37
1.75
5.26 2.41
2.18
6.33 2.45
2.58
6.77 2.46
2.75
7.43 2.49
2.98
8.64 2.53
3.42
9.44 2.56
3.69
38
3.23 2.44
1.32
3.95 2.46
1.61
5.06 2.50
2.02
6.13 2.54
2.41
6.56 2.56
2.56
7.23 2.58
2.80
8.43 2.63
3.21
9.24 2.66
3.47
40
3.00 2.53
1.19
3.72 2.56
1.45
4.83 2.60
1.86
5.90 2.64
2.23
6.34 2.65
2.39
7.00 2.68
2.61
8.21 2.72
3.02
9.01 2.75
3.28
42
3.48 2.65
1.31
4.60 2.69
1.71
5.66 2.73
2.07
6.10 2.74
2.23
6.77 2.76
2.45
7.97 2.81
2.84
44
3.23 2.73
1.18
4.34 2.77
1.57
5.41 2.81
1.93
5.84 2.82
2.07
6.51 2.85
2.28
46
4.07 2.84
1.43
5.14 2.88
1.78
5.57 2.90
1.92
6.24 2.92
2.14
DATA DECLARED ACCORDING TO UNI EN 145112
Key
Pc
Cooling capacity (kW)
Pe Input power (kW)
TAE External air temperature (°C) d.b.
ATTENTION
For the intermediate points, refer to the operating limits graphics (§ 9.1)
HEATING MODECOOLING MODE
ΔT WATER DIFFERENT TO NOMINAL ΔT 5°C
35810
Cooling capacity correction factors 0.99 1 1.02 1.03
Input power correction factors 0.99 1 1.01 1.02
DEPOSIT FACTORS [K*m2]/[W] 0.00005 0.0001 0.0002
Cooling capacity correction factors 1 0.98 0.94
Input power correction factors 1 0.98 0.95
Page 44
44 Aermec code 6755530_03 9.2011
ANK 025-085H
11.5. ANK 030 H 230V/1/50Hz Cooling capacity and input power
TAE °C
TEMPERATURE OF THE WATER PRODUCED °C
8 5 0 5 7 10 15 18
Pc
(kW)Pe(kW)
EER
Pc
(kW)Pe(kW)
EER
Pc
(kW)Pe(kW)
EER
Pc
(kW)Pe(kW)
EER
Pc
(kW)Pe(kW)
EER
Pc
(kW)Pe(kW)
EER
Pc
(kW)Pe(kW)
EER
Pc
(kW)Pe(kW)
EER
-10
7.64 4.05 1.89 8.50 4.08 2.08 9.83 4.12 2.39 11.10 4.16 2.67 11.62 4.18 2.78 12.42 4.20 2.96 13.86 4.25 3.26 14.83 4.28 3.46
-8
7.47 3.66 2.04 8.33 3.69 2.26 9.66 3.73 2.59 10.94 3.78 2.89 11.45 3.79 3.02 12.25 3.82 3.21 13.69 3.87 3.54 14.66 3.90 3.76
-6
7.32 3.32 2.20 8.17 3.35 2.44 9.50 3.39 2.80 10.78 3.44 3.13 11.29 3.45 3.27 12.09 3.48 3.47 13.53 3.53 3.83 14.50 3.56 4.07
-4
7.17 3.02 2.37 8.02 3.05 2.63 9.35 3.10 3.02 10.62 3.14 3.38 11.14 3.15 3.54 11.94 3.18 3.75 13.38 3.23 4.14 14.34 3.26 4.40
-2
7.02 2.76 2.54 7.88 2.79 2.82 9.20 2.84 3.24 10.48 2.88 3.64 11.00 2.90 3.79 11.80 2.92 4.04 13.24 2.97 4.46 14.20 3.01 4.72
0
6.89 2.54 2.71 7.74 2.57 3.01 9.07 2.62 3.46 10.34 2.66 3.89 10.86 2.68 4.05 11.66 2.70 4.32 13.10 2.75 4.76 14.06 2.79 5.04
2
6.75 2.36 2.86 7.61 2.39 3.18 8.93 2.43 3.67 10.21 2.48 4.12 10.73 2.49 4.31 11.52 2.52 4.57 12.96 2.57 5.04 13.93 2.60 5.36
4
6.62 2.21 3.00 7.48 2.24 3.34 8.81 2.28 3.86 10.08 2.33 4.33 10.60 2.34 4.53 11.39 2.37 4.81 12.83 2.42 5.30 13.80 2.45 5.63
6
6.50 2.09 3.11 7.35 2.12 3.47 8.68 2.17 4.00 9.95 2.21 4.50 10.47 2.23 4.70 11.27 2.25 5.01 12.71 2.30 5.53 13.67 2.34 5.84
8
6.37 2.00 3.19 7.23 2.03 3.56 8.55 2.08 4.11 9.83 2.12 4.64 10.34 2.14 4.83 11.14 2.17 5.13 12.58 2.22 5.67 13.54 2.25 6.02
10
6.25 1.94 3.22 7.10 1.97 3.60 8.43 2.02 4.17 9.70 2.06 4.71 10.22 2.08 4.91 11.02 2.11 5.22 12.46 2.16 5.77 13.42 2.19 6.13
12
6.12 1.90 3.22 6.98 1.93 3.62 8.30 1.98 4.19 9.58 2.03 4.72 10.09 2.04 4.95 10.89 2.07 5.26 12.33 2.12 5.82 13.29 2.16 6.15
14
5.99 1.89 3.17 6.85 1.92 3.57 8.17 1.97 4.15 9.45 2.01 4.70 9.96 2.03 4.91 10.76 2.06 5.22 12.20 2.11 5.78 13.16 2.14 6.15
16
5.86 1.90 3.08 6.72 1.93 3.48 8.04 1.98 4.06 9.32 2.02 4.61 9.83 2.04 4.82 10.63 2.07 5.14 12.07 2.12 5.69 13.03 2.16 6.03
18
5.73 1.93 2.97 6.58 1.96 3.36 7.91 2.01 3.94 9.18 2.05 4.48 9.70 2.07 4.69 10.49 2.10 5.00 11.93 2.15 5.55 12.89 2.19 5.89
20
5.58 1.98 2.82 6.44 2.01 3.20 7.76 2.06 3.77 9.04 2.10 4.30 9.55 2.12 4.50 10.35 2.15 4.81 11.79 2.20 5.36 12.75 2.23 5.72
22
5.43 2.04 2.66 6.29 2.07 3.04 7.61 2.12 3.59 8.89 2.16 4.12 9.40 2.18 4.31 10.20 2.21 4.62 11.64 2.26 5.15 12.60 2.30 5.48
24
5.28 2.12 2.49 6.13 2.15 2.85 7.46 2.20 3.39 8.73 2.24 3.90 9.25 2.26 4.09 10.04 2.29 4.38 11.48 2.34 4.91 12.44 2.37 5.25
26
5.11 2.20 2.32 5.97 2.24 2.67 7.29 2.28 3.20 8.56 2.33 3.67 9.08 2.35 3.86 9.87 2.37 4.16 11.31 2.43 4.65 12.27 2.46 4.99
28
4.93 2.30 2.14 5.79 2.33 2.48 7.11 2.38 2.99 8.39 2.43 3.45 8.90 2.44 3.65 9.70 2.47 3.93 11.13 2.52 4.42 12.09 2.56 4.72
30
4.74 2.40 1.98 5.60 2.44 2.30 6.92 2.48 2.79 8.20 2.53 3.24 8.71 2.55 3.42 9.51 2.58 3.69 10.94 2.63 4.16 11.90 2.66 4.47
32
4.54 2.51 1.81 5.40 2.55 2.12 6.72 2.59 2.59 7.99 2.64 3.03 8.51 2.66 3.20 9.31 2.68 3.47 10.74 2.74 3.92 11.70 2.77 4.22
34
4.32 2.63 1.64 5.18 2.66 1.95 6.50 2.71 2.40 7.78 2.75 2.83 8.29 2.77 2.99 9.09 2.80 3.25 10.53 2.85 3.69 11.49 2.88 3.99
35
4.21 2.68 1.57 5.07 2.71 1.87 6.39 2.76 2.32 7.67 2.81 2.73 8.15 2.82 2.89 8.98 2.85 3.15 10.41 2.90 3.59
11.30 2.95
3.82
36
4.09 2.74 1.49 4.95 2.77 1.79 6.27 2.82 2.22 7.55 2.86 2.64 8.06 2.88 2.80 8.86 2.91 3.04 10.30 2.96 3.48 11.25 3.00 3.75
38
3.84 2.85 1.35 4.70 2.88 1.63 6.03 2.93 2.06 7.30 2.98 2.45 7.81 2.99 2.61 8.61 3.02 2.85 10.05 3.07 3.27 11.01 3.11 3.54
40
3.58 2.96 1.21 4.43 2.99 1.48 5.76 3.04 1.89 7.03 3.08 2.28 7.55 3.10 2.44 8.35 3.13 2.67 9.78 3.18 3.08 10.74 3.22 3.34
42
4.15 3.10 1.34 5.48 3.14 1.75 6.75 3.19 2.12 7.27 3.21 2.26 8.06 3.24 2.49 9.50 3.29 2.89
44
3.85 3.19 1.21 5.17 3.24 1.60 6.45 3.29 1.96 6.96 3.30 2.11 7.76 3.33 2.33
46
4.85 3.33 1.46 6.12 3.37 1.82 6.64 3.39 1.96 7.43 3.42 2.17
DATA DECLARED ACCORDING TO UNI EN 145112
Key
Pc
Cooling capacity (kW)
Pe Input power (kW)
TAE External air temperature (°C) d.b.
ATTENTION
For the intermediate points, refer to the operating limits graphics (§ 9.1)
HEATING MODECOOLING MODE
ΔT WATER DIFFERENT TO NOMINAL ΔT 5°C
35810
Cooling capacity correction factors 0.99 1 1.02 1.03
Input power correction factors 0.99 1 1.01 1.02
DEPOSIT FACTORS [K*m2]/[W] 0.00005 0.0001 0.0002
Cooling capacity correction factors 1 0.98 0.94
Input power correction factors 1 0.98 0.95
Page 45
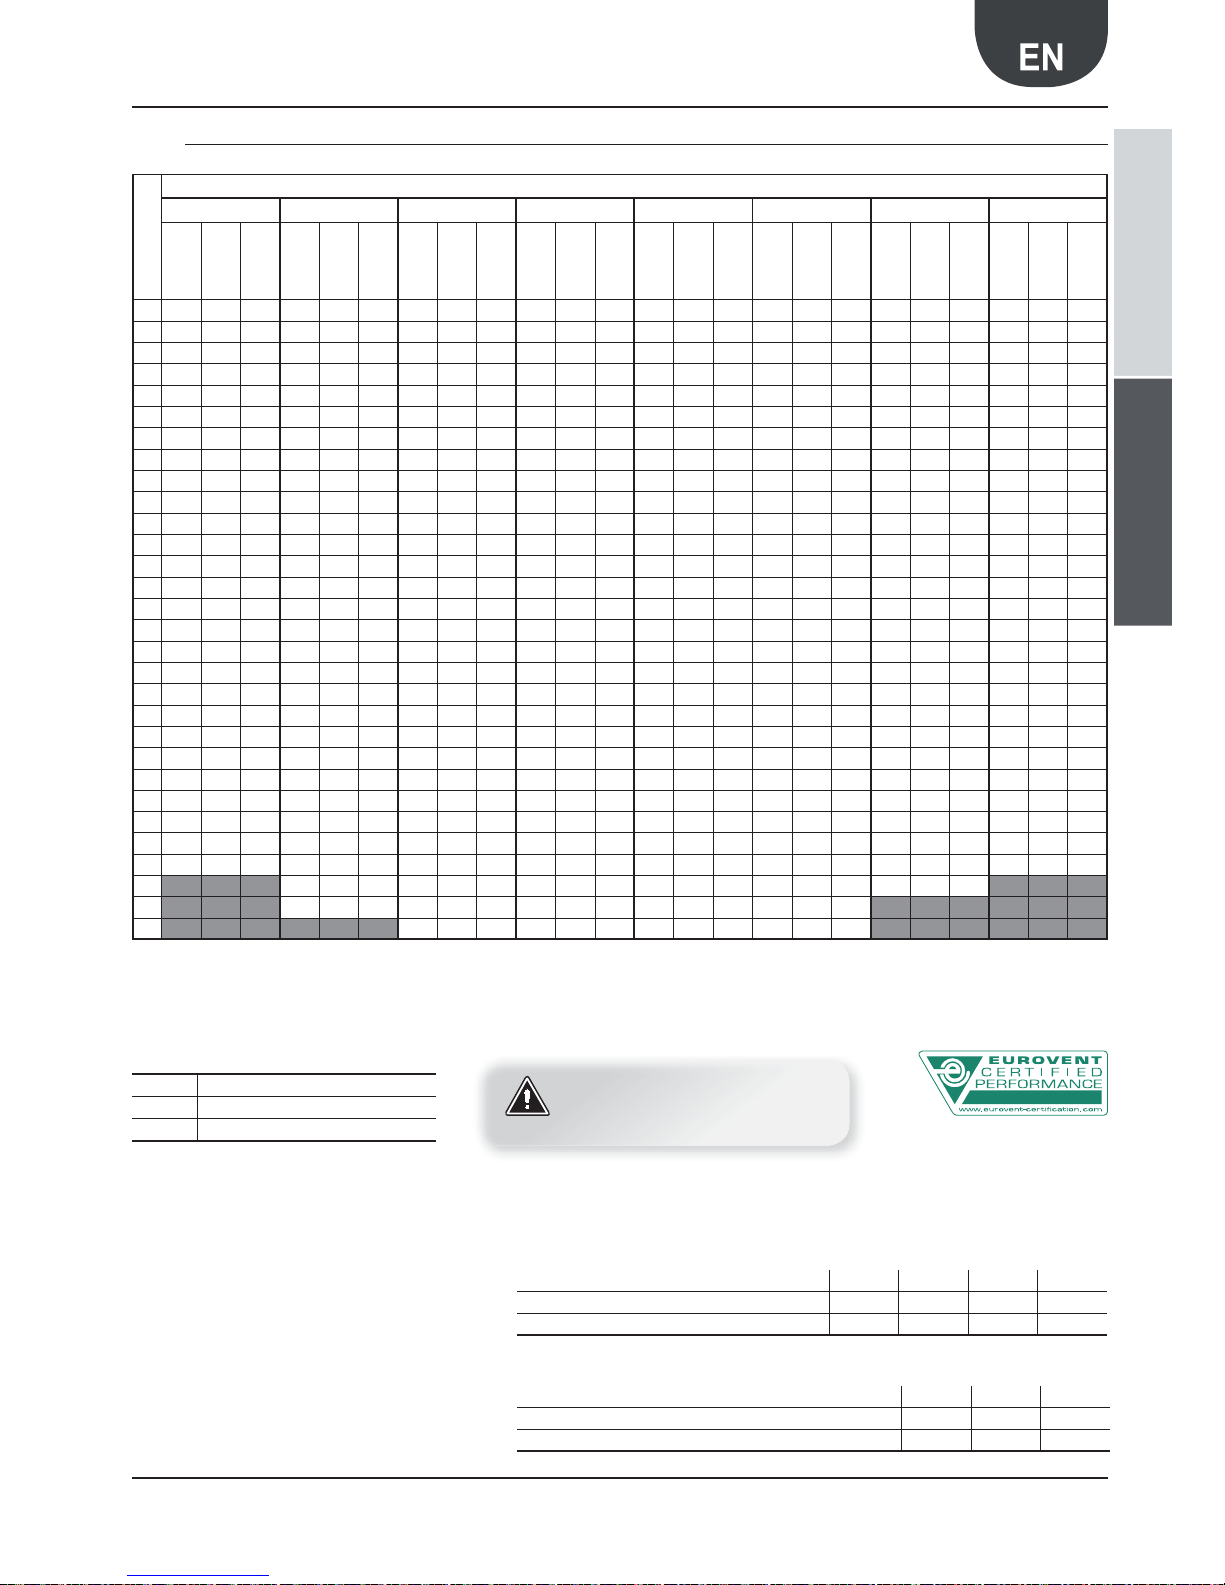
45Aermec code 6755530_03 9.2011
ANK 025-085H
11.6. ANK 030 HP|H A 230V/1/50Hz Cooling capacity and input power
TAE °C
TEMPERATURE OF THE WATER PRODUCED °C
8 5 0 5 7 10 15 18
Pc
(kW)Pe(kW)
EER
Pc
(kW)Pe(kW)
EER
Pc
(kW)Pe(kW)
EER
Pc
(kW)Pe(kW)
EER
Pc
(kW)Pe(kW)
EER
Pc
(kW)Pe(kW)
EER
Pc
(kW)Pe(kW)
EER
Pc
(kW)Pe(kW)
EER
-10
7.74 4.15 1.87 8.60 4.18 2.06 9.95 4.22 2.36 11.24 4.26 2.64 11.76 4.28 2.75 12.57 4.31 2.92 14.04 4.36 3.22 15.01 4.39 3.42
-8
7.57 3.75 2.02 8.43 3.78 2.23 9.78 3.83 2.55 11.07 3.87 2.86 11.59 3.89 2.98 12.40 3.91 3.17 13.86 3.96 3.50 14.84 4.00 3.71
-6
7.41 3.40 2.18 8.27 3.43 2.41 9.61 3.48 2.76 10.91 3.52 3.10 11.43 3.54 3.23 12.24 3.57 3.43 13.70 3.61 3.80 14.68 3.65 4.02
-4
7.25 3.10 2.34 8.12 3.13 2.59 9.46 3.17 2.98 10.75 3.22 3.34 11.28 3.23 3.49 12.09 3.26 3.71 13.55 3.31 4.09 14.52 3.34 4.35
-2
7.11 2.83 2.51 7.98 2.86 2.79 9.32 2.91 3.20 10.61 2.95 3.60 11.13 2.97 3.75 11.94 3.00 3.98 13.40 3.05 4.39 14.37 3.08 4.67
0
6.97 2.61 2.67 7.84 2.64 2.97 9.18 2.68 3.43 10.47 2.73 3.84 10.99 2.74 4.01 11.80 2.77 4.26 13.26 2.82 4.70 14.23 2.86 4.98
2
6.84 2.42 2.83 7.70 2.45 3.14 9.04 2.49 3.63 10.34 2.54 4.07 10.86 2.56 4.24 11.67 2.58 4.52 13.12 2.63 4.99 14.10 2.67 5.28
4
6.71 2.26 2.97 7.57 2.29 3.31 8.91 2.34 3.81 10.20 2.38 4.29 10.73 2.40 4.47 11.53 2.43 4.74 12.99 2.48 5.24 13.97 2.52 5.54
6
6.58 2.14 3.07 7.44 2.17 3.43 8.79 2.22 3.96 10.08 2.26 4.46 10.60 2.28 4.65 11.41 2.31 4.94 12.86 2.36 5.45 13.84 2.40 5.77
8
6.45 2.05 3.15 7.32 2.08 3.52 8.66 2.13 4.07 9.95 2.17 4.59 10.47 2.19 4.78 11.28 2.22 5.08 12.74 2.27 5.61 13.71 2.31 5.94
10
6.33 1.99 3.18 7.19 2.02 3.56 8.53 2.07 4.12 9.82 2.11 4.65 10.34 2.13 4.85 11.15 2.16 5.16 12.61 2.21 5.71 13.58 2.24 6.06
12
6.20 1.95 3.18 7.06 1.98 3.57 8.40 2.03 4.14 9.69 2.08 4.66 10.22 2.09 4.89 11.02 2.12 5.20 12.48 2.17 5.75 13.45 2.21 6.09
14
6.07 1.94 3.13 6.93 1.97 3.52 8.27 2.02 4.09 9.56 2.06 4.64 10.09 2.08 4.85 10.89 2.11 5.16 12.35 2.16 5.72 13.32 2.20 6.05
16
5.93 1.95 3.04 6.80 1.98 3.43 8.14 2.03 4.01 9.43 2.07 4.56 9.95 2.09 4.76 10.76 2.12 5.08 12.21 2.17 5.63 13.19 2.21 5.97
18
5.80 1.98 2.93 6.66 2.01 3.31 8.00 2.06 3.88 9.29 2.11 4.40 9.81 2.12 4.63 10.62 2.15 4.94 12.08 2.20 5.49 13.05 2.24 5.83
20
5.65 2.03 2.78 6.52 2.06 3.17 7.86 2.11 3.73 9.15 2.15 4.26 9.67 2.17 4.46 10.48 2.20 4.76 11.93 2.25 5.30 12.90 2.29 5.63
22
5.50 2.09 2.63 6.37 2.12 3.00 7.71 2.17 3.55 9.00 2.22 4.05 9.52 2.24 4.25 10.32 2.27 4.55 11.78 2.32 5.08 12.75 2.35 5.43
24
5.34 2.17 2.46 6.21 2.20 2.82 7.55 2.25 3.36 8.84 2.30 3.84 9.36 2.32 4.03 10.17 2.34 4.35 11.62 2.40 4.84 12.59 2.43 5.18
26
5.17 2.26 2.29 6.04 2.29 2.64 7.38 2.34 3.15 8.67 2.39 3.63 9.19 2.40 3.83 10.00 2.43 4.12 11.45 2.49 4.60 12.42 2.52 4.93
28
4.99 2.36 2.11 5.86 2.39 2.45 7.20 2.44 2.95 8.49 2.49 3.41 9.01 2.50 3.60 9.82 2.53 3.88 11.27 2.59 4.35 12.24 2.62 4.67
30
4.80 2.46 1.95 5.67 2.50 2.27 7.01 2.55 2.75 8.30 2.59 3.20 8.82 2.61 3.38 9.62 2.64 3.64 11.08 2.69 4.12 12.05 2.73 4.41
32
4.60 2.58 1.78 5.46 2.61 2.09 6.80 2.66 2.56 8.09 2.70 3.00 8.61 2.72 3.17 9.42 2.75 3.43 10.87 2.80 3.88 11.85 2.84 4.17
34
4.38 2.69 1.63 5.24 2.72 1.93 6.58 2.77 2.38 7.87 2.82 2.79 8.40 2.84 2.96 9.20 2.87 3.21 10.66 2.92 3.65 11.63 2.95 3.94
35
4.26 2.75 1.55 5.13 2.78 1.85 6.47 2.83 2.29 7.76 2.88 2.69 8.25 2.89 2.85 9.09 2.92 3.11 10.54 2.98 3.54
11.43 3.00
3.81
36
4.14 2.81 1.47 5.01 2.84 1.76 6.35 2.89 2.20 7.64 2.93 2.61 8.16 2.95 2.77 8.97 2.98 3.01 10.42 3.03 3.44 11.39 3.07 3.71
38
3.89 2.92 1.33 4.76 2.95 1.61 6.10 3.00 2.03 7.39 3.05 2.42 7.91 3.07 2.58 8.72 3.10 2.81 10.17 3.15 3.23 11.14 3.19 3.49
40
3.62 3.03 1.19 4.49 3.07 1.46 5.83 3.12 1.87 7.12 3.16 2.25 7.64 3.18 2.40 8.45 3.21 2.63 9.90 3.26 3.04 10.87 3.30 3.29
42
4.20 3.17 1.32 5.54 3.22 1.72 6.83 3.27 2.09 7.35 3.29 2.23 8.16 3.32 2.46 9.61 3.37 2.85
44
3.89 3.27 1.19 5.23 3.32 1.58 6.52 3.37 1.93 7.05 3.39 2.08 7.85 3.41 2.30
46
4.90 3.41 1.44 6.20 3.46 1.79 6.72 3.48 1.93 7.52 3.50 2.15
DATA DECLARED ACCORDING TO UNI EN 145112
Key
Pc
Cooling capacity (kW)
Pe Input power (kW)
TAE External air temperature (°C) d.b.
ATTENTION
For the intermediate points, refer to the operating limits graphics (§ 9.1)
HEATING MODECOOLING MODE
ΔT WATER DIFFERENT TO NOMINAL ΔT 5°C
35810
Cooling capacity correction factors 0.99 1 1.02 1.03
Input power correction factors 0.99 1 1.01 1.02
DEPOSIT FACTORS [K*m2]/[W] 0.00005 0.0001 0.0002
Cooling capacity correction factors 1 0.98 0.94
Input power correction factors 1 0.98 0.95
Page 46
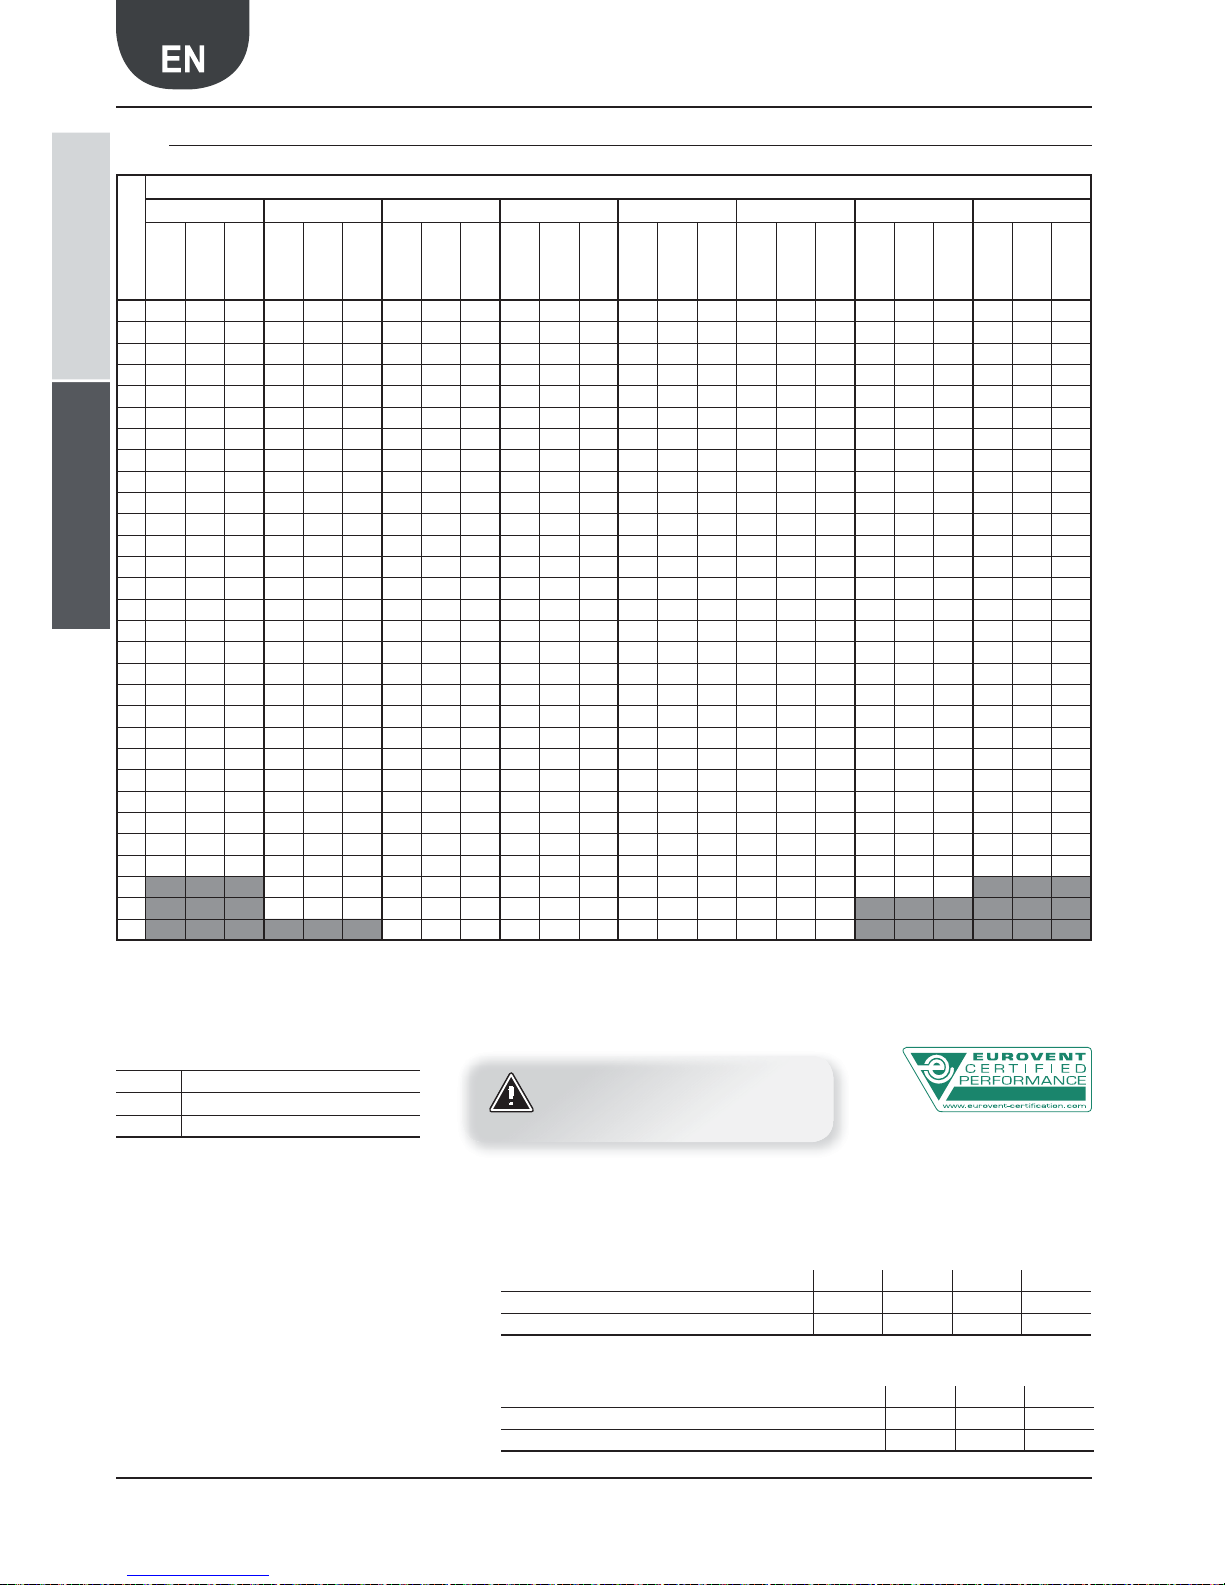
46 Aermec code 6755530_03 9.2011
ANK 025-085H
11.7. ANK 030 H 400V/3N/50Hz Cooling capacity and input power
TAE °C
TEMPERATURE OF THE WATER PRODUCED °C
8 5 0 5 7 10 15 18
Pc
(kW)Pe(kW)
EER
Pc
(kW)Pe(kW)
EER
Pc
(kW)Pe(kW)
EER
Pc
(kW)Pe(kW)
EER
Pc
(kW)Pe(kW)
EER
Pc
(kW)Pe(kW)
EER
Pc
(kW)Pe(kW)
EER
Pc
(kW)Pe(kW)
EER
-10
7.64 4.05 1.89 8.50 4.08 2.08 9.83 4.12 2.39 11.10 4.16 2.67 11.62 4.18 2.78 12.42 4.20 2.96 13.86 4.25 3.26 14.83 4.28 3.46
-8
7.47 3.66 2.04 8.33 3.69 2.26 9.66 3.73 2.59 10.94 3.78 2.89 11.45 3.79 3.02 12.25 3.82 3.21 13.69 3.87 3.54 14.66 3.90 3.76
-6
7.32 3.32 2.20 8.17 3.35 2.44 9.50 3.39 2.80 10.78 3.44 3.13 11.29 3.45 3.27 12.09 3.48 3.47 13.53 3.53 3.83 14.50 3.56 4.07
-4
7.17 3.02 2.37 8.02 3.05 2.63 9.35 3.10 3.02 10.62 3.14 3.38 11.14 3.15 3.54 11.94 3.18 3.75 13.38 3.23 4.14 14.34 3.26 4.40
-2
7.02 2.76 2.54 7.88 2.79 2.82 9.20 2.84 3.24 10.48 2.88 3.64 11.00 2.90 3.79 11.80 2.92 4.04 13.24 2.97 4.46 14.20 3.01 4.72
0
6.89 2.54 2.71 7.74 2.57 3.01 9.07 2.62 3.46 10.34 2.66 3.89 10.86 2.68 4.05 11.66 2.70 4.32 13.10 2.75 4.76 14.06 2.79 5.04
2
6.75 2.36 2.86 7.61 2.39 3.18 8.93 2.43 3.67 10.21 2.48 4.12 10.73 2.49 4.31 11.52 2.52 4.57 12.96 2.57 5.04 13.93 2.60 5.36
4
6.62 2.21 3.00 7.48 2.24 3.34 8.81 2.28 3.86 10.08 2.33 4.33 10.60 2.34 4.53 11.39 2.37 4.81 12.83 2.42 5.30 13.80 2.45 5.63
6
6.50 2.09 3.11 7.35 2.12 3.47 8.68 2.17 4.00 9.95 2.21 4.50 10.47 2.23 4.70 11.27 2.25 5.01 12.71 2.30 5.53 13.67 2.34 5.84
8
6.37 2.00 3.19 7.23 2.03 3.56 8.55 2.08 4.11 9.83 2.12 4.64 10.34 2.14 4.83 11.14 2.17 5.13 12.58 2.22 5.67 13.54 2.25 6.02
10
6.25 1.94 3.22 7.10 1.97 3.60 8.43 2.02 4.17 9.70 2.06 4.71 10.22 2.08 4.91 11.02 2.11 5.22 12.46 2.16 5.77 13.42 2.19 6.13
12
6.12 1.90 3.22 6.98 1.93 3.62 8.30 1.98 4.19 9.58 2.03 4.72 10.09 2.04 4.95 10.89 2.07 5.26 12.33 2.12 5.82 13.29 2.16 6.15
14
5.99 1.89 3.17 6.85 1.92 3.57 8.17 1.97 4.15 9.45 2.01 4.70 9.96 2.03 4.91 10.76 2.06 5.22 12.20 2.11 5.78 13.16 2.14 6.15
16
5.86 1.90 3.08 6.72 1.93 3.48 8.04 1.98 4.06 9.32 2.02 4.61 9.83 2.04 4.82 10.63 2.07 5.14 12.07 2.12 5.69 13.03 2.16 6.03
18
5.73 1.93 2.97 6.58 1.96 3.36 7.91 2.01 3.94 9.18 2.05 4.48 9.70 2.07 4.69 10.49 2.10 5.00 11.93 2.15 5.55 12.89 2.19 5.89
20
5.58 1.98 2.82 6.44 2.01 3.20 7.76 2.06 3.77 9.04 2.10 4.30 9.55 2.12 4.50 10.35 2.15 4.81 11.79 2.20 5.36 12.75 2.23 5.72
22
5.43 2.04 2.66 6.29 2.07 3.04 7.61 2.12 3.59 8.89 2.16 4.12 9.40 2.18 4.31 10.20 2.21 4.62 11.64 2.26 5.15 12.60 2.30 5.48
24
5.28 2.12 2.49 6.13 2.15 2.85 7.46 2.20 3.39 8.73 2.24 3.90 9.25 2.26 4.09 10.04 2.29 4.38 11.48 2.34 4.91 12.44 2.37 5.25
26
5.11 2.20 2.32 5.97 2.24 2.67 7.29 2.28 3.20 8.56 2.33 3.67 9.08 2.35 3.86 9.87 2.37 4.16 11.31 2.43 4.65 12.27 2.46 4.99
28
4.93 2.30 2.14 5.79 2.33 2.48 7.11 2.38 2.99 8.39 2.43 3.45 8.90 2.44 3.65 9.70 2.47 3.93 11.13 2.52 4.42 12.09 2.56 4.72
30
4.74 2.40 1.98 5.60 2.44 2.30 6.92 2.48 2.79 8.20 2.53 3.24 8.71 2.55 3.42 9.51 2.58 3.69 10.94 2.63 4.16 11.90 2.66 4.47
32
4.54 2.51 1.81 5.40 2.55 2.12 6.72 2.59 2.59 7.99 2.64 3.03 8.51 2.66 3.20 9.31 2.68 3.47 10.74 2.74 3.92 11.70 2.77 4.22
34
4.32 2.63 1.64 5.18 2.66 1.95 6.50 2.71 2.40 7.78 2.75 2.83 8.29 2.77 2.99 9.09 2.80 3.25 10.53 2.85 3.69 11.49 2.88 3.99
35
4.21 2.68 1.57 5.07 2.71 1.87 6.39 2.76 2.32 7.67 2.81 2.73 8.15 2.82 2.89 8.98 2.85 3.15 10.41 2.90 3.59
11.30 2.95
3.82
36
4.09 2.74 1.49 4.95 2.77 1.79 6.27 2.82 2.22 7.55 2.86 2.64 8.06 2.88 2.80 8.86 2.91 3.04 10.30 2.96 3.48 11.25 3.00 3.75
38
3.84 2.85 1.35 4.70 2.88 1.63 6.03 2.93 2.06 7.30 2.98 2.45 7.81 2.99 2.61 8.61 3.02 2.85 10.05 3.07 3.27 11.01 3.11 3.54
40
3.58 2.96 1.21 4.43 2.99 1.48 5.76 3.04 1.89 7.03 3.08 2.28 7.55 3.10 2.44 8.35 3.13 2.67 9.78 3.18 3.08 10.74 3.22 3.34
42
4.15 3.10 1.34 5.48 3.14 1.75 6.75 3.19 2.12 7.27 3.21 2.26 8.06 3.24 2.49 9.50 3.29 2.89
44
3.85 3.19 1.21 5.17 3.24 1.60 6.45 3.29 1.96 6.96 3.30 2.11 7.76 3.33 2.33
46
4.85 3.33 1.46 6.12 3.37 1.82 6.64 3.39 1.96 7.43 3.42 2.17
DATA DECLARED ACCORDING TO UNI EN 145112
Key
Pc
Cooling capacity (kW)
Pe Input power (kW)
TAE External air temperature (°C) d.b.
ATTENTION
For the intermediate points, refer to the operating limits graphics (§ 9.1)
HEATING MODECOOLING MODE
ΔT WATER DIFFERENT TO NOMINAL ΔT 5°C
35810
Cooling capacity correction factors 0.99 1 1.02 1.03
Input power correction factors 0.99 1 1.01 1.02
DEPOSIT FACTORS [K*m2]/[W] 0.00005 0.0001 0.0002
Cooling capacity correction factors 1 0.98 0.94
Input power correction factors 1 0.98 0.95
Page 47
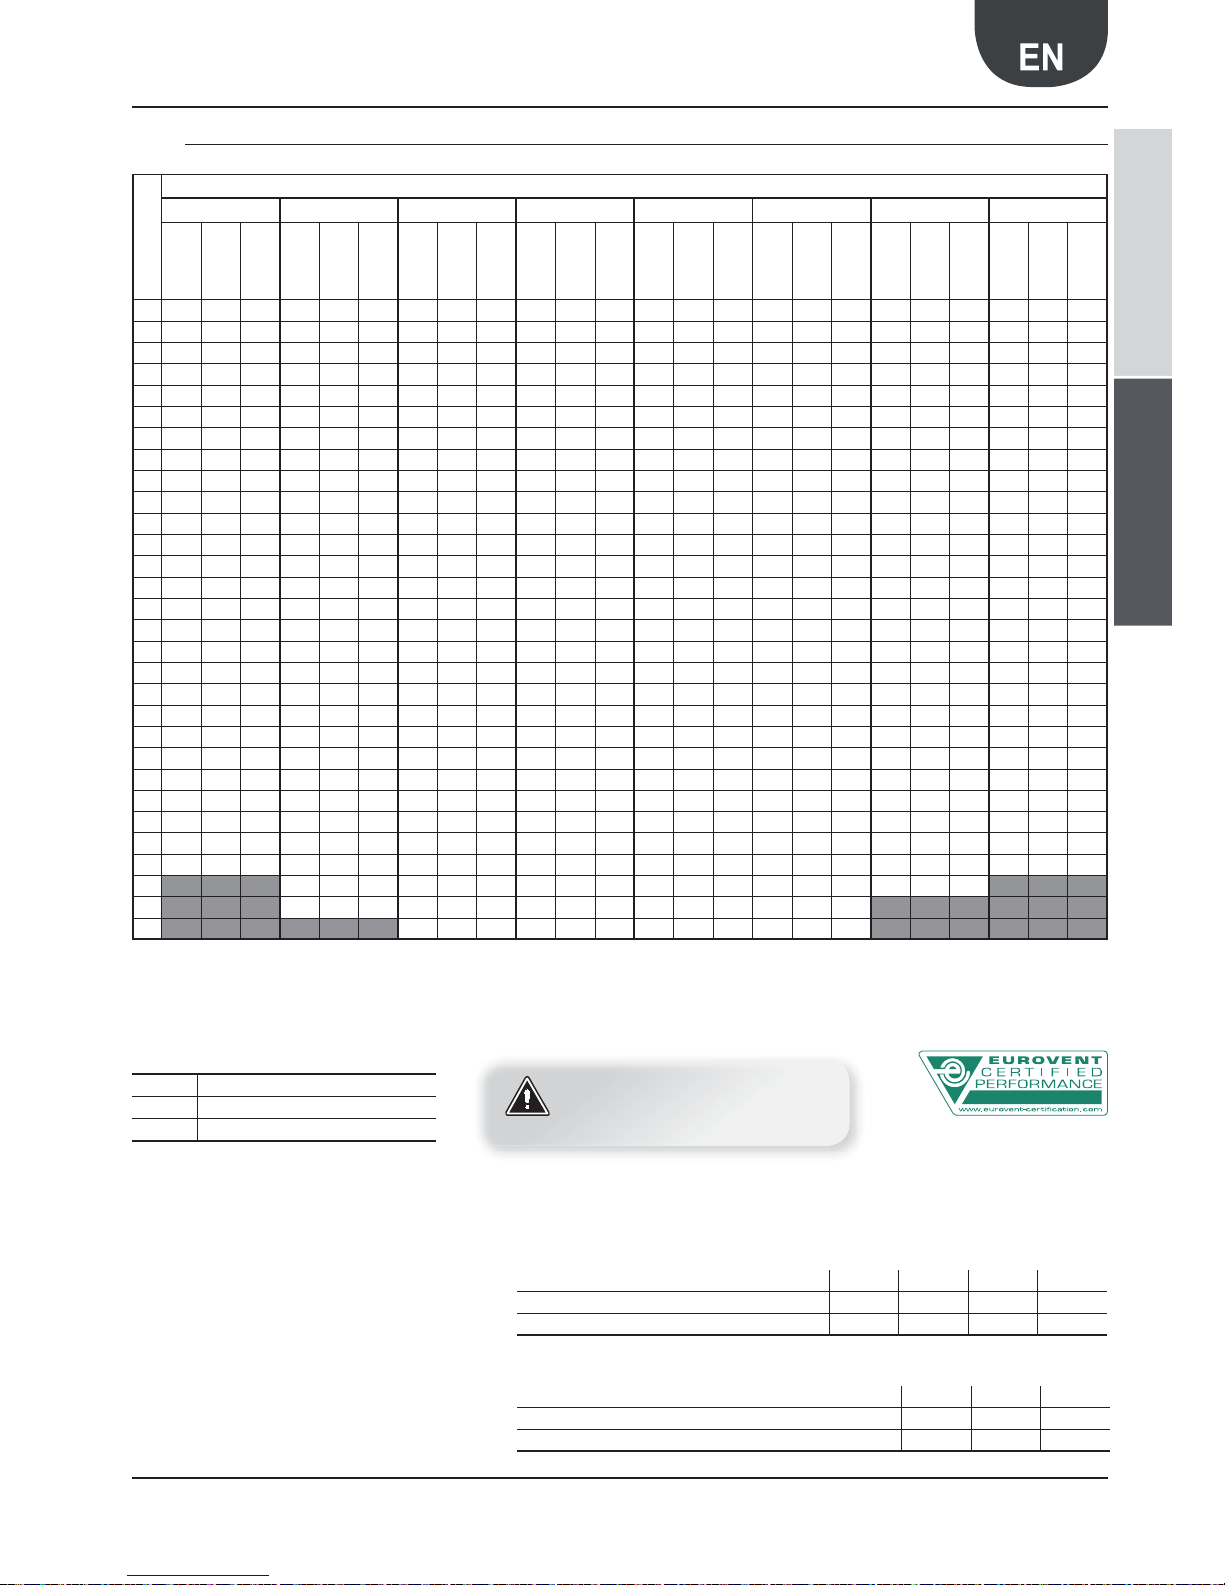
47Aermec code 6755530_03 9.2011
ANK 025-085H
11.8. ANK 030 HP|H A 400V/3N/50Hz Cooling capacity and input power
TAE °C
TEMPERATURE OF THE WATER PRODUCED °C
8 5 0 5 7 10 15 18
Pc
(kW)Pe(kW)
EER
Pc
(kW)Pe(kW)
EER
Pc
(kW)Pe(kW)
EER
Pc
(kW)Pe(kW)
EER
Pc
(kW)Pe(kW)
EER
Pc
(kW)Pe(kW)
EER
Pc
(kW)Pe(kW)
EER
Pc
(kW)Pe(kW)
EER
-10
7.74 4.15 1.87 8.60 4.18 2.06 9.95 4.22 2.36 11.24 4.26 2.64 11.76 4.28 2.75 12.57 4.31 2.92 14.04 4.36 3.22 15.01 4.39 3.42
-8
7.57 3.75 2.02 8.43 3.78 2.23 9.78 3.83 2.55 11.07 3.87 2.86 11.59 3.89 2.98 12.40 3.91 3.17 13.86 3.96 3.50 14.84 4.00 3.71
-6
7.41 3.40 2.18 8.27 3.43 2.41 9.61 3.48 2.76 10.91 3.52 3.10 11.43 3.54 3.23 12.24 3.57 3.43 13.70 3.61 3.80 14.68 3.65 4.02
-4
7.25 3.10 2.34 8.12 3.13 2.59 9.46 3.17 2.98 10.75 3.22 3.34 11.28 3.23 3.49 12.09 3.26 3.71 13.55 3.31 4.09 14.52 3.34 4.35
-2
7.11 2.83 2.51 7.98 2.86 2.79 9.32 2.91 3.20 10.61 2.95 3.60 11.13 2.97 3.75 11.94 3.00 3.98 13.40 3.05 4.39 14.37 3.08 4.67
0
6.97 2.61 2.67 7.84 2.64 2.97 9.18 2.68 3.43 10.47 2.73 3.84 10.99 2.74 4.01 11.80 2.77 4.26 13.26 2.82 4.70 14.23 2.86 4.98
2
6.84 2.42 2.83 7.70 2.45 3.14 9.04 2.49 3.63 10.34 2.54 4.07 10.86 2.56 4.24 11.67 2.58 4.52 13.12 2.63 4.99 14.10 2.67 5.28
4
6.71 2.26 2.97 7.57 2.29 3.31 8.91 2.34 3.81 10.20 2.38 4.29 10.73 2.40 4.47 11.53 2.43 4.74 12.99 2.48 5.24 13.97 2.52 5.54
6
6.58 2.14 3.07 7.44 2.17 3.43 8.79 2.22 3.96 10.08 2.26 4.46 10.60 2.28 4.65 11.41 2.31 4.94 12.86 2.36 5.45 13.84 2.40 5.77
8
6.45 2.05 3.15 7.32 2.08 3.52 8.66 2.13 4.07 9.95 2.17 4.59 10.47 2.19 4.78 11.28 2.22 5.08 12.74 2.27 5.61 13.71 2.31 5.94
10
6.33 1.99 3.18 7.19 2.02 3.56 8.53 2.07 4.12 9.82 2.11 4.65 10.34 2.13 4.85 11.15 2.16 5.16 12.61 2.21 5.71 13.58 2.24 6.06
12
6.20 1.95 3.18 7.06 1.98 3.57 8.40 2.03 4.14 9.69 2.08 4.66 10.22 2.09 4.89 11.02 2.12 5.20 12.48 2.17 5.75 13.45 2.21 6.09
14
6.07 1.94 3.13 6.93 1.97 3.52 8.27 2.02 4.09 9.56 2.06 4.64 10.09 2.08 4.85 10.89 2.11 5.16 12.35 2.16 5.72 13.32 2.20 6.05
16
5.93 1.95 3.04 6.80 1.98 3.43 8.14 2.03 4.01 9.43 2.07 4.56 9.95 2.09 4.76 10.76 2.12 5.08 12.21 2.17 5.63 13.19 2.21 5.97
18
5.80 1.98 2.93 6.66 2.01 3.31 8.00 2.06 3.88 9.29 2.11 4.40 9.81 2.12 4.63 10.62 2.15 4.94 12.08 2.20 5.49 13.05 2.24 5.83
20
5.65 2.03 2.78 6.52 2.06 3.17 7.86 2.11 3.73 9.15 2.15 4.26 9.67 2.17 4.46 10.48 2.20 4.76 11.93 2.25 5.30 12.90 2.29 5.63
22
5.50 2.09 2.63 6.37 2.12 3.00 7.71 2.17 3.55 9.00 2.22 4.05 9.52 2.24 4.25 10.32 2.27 4.55 11.78 2.32 5.08 12.75 2.35 5.43
24
5.34 2.17 2.46 6.21 2.20 2.82 7.55 2.25 3.36 8.84 2.30 3.84 9.36 2.32 4.03 10.17 2.34 4.35 11.62 2.40 4.84 12.59 2.43 5.18
26
5.17 2.26 2.29 6.04 2.29 2.64 7.38 2.34 3.15 8.67 2.39 3.63 9.19 2.40 3.83 10.00 2.43 4.12 11.45 2.49 4.60 12.42 2.52 4.93
28
4.99 2.36 2.11 5.86 2.39 2.45 7.20 2.44 2.95 8.49 2.49 3.41 9.01 2.50 3.60 9.82 2.53 3.88 11.27 2.59 4.35 12.24 2.62 4.67
30
4.80 2.46 1.95 5.67 2.50 2.27 7.01 2.55 2.75 8.30 2.59 3.20 8.82 2.61 3.38 9.62 2.64 3.64 11.08 2.69 4.12 12.05 2.73 4.41
32
4.60 2.58 1.78 5.46 2.61 2.09 6.80 2.66 2.56 8.09 2.70 3.00 8.61 2.72 3.17 9.42 2.75 3.43 10.87 2.80 3.88 11.85 2.84 4.17
34
4.38 2.69 1.63 5.24 2.72 1.93 6.58 2.77 2.38 7.87 2.82 2.79 8.40 2.84 2.96 9.20 2.87 3.21 10.66 2.92 3.65 11.63 2.95 3.94
35
4.26 2.75 1.55 5.13 2.78 1.85 6.47 2.83 2.29 7.76 2.88 2.69 8.25 2.89 2.85 9.09 2.92 3.11 10.54 2.98 3.54
11.43 3.00
3.81
36
4.14 2.81 1.47 5.01 2.84 1.76 6.35 2.89 2.20 7.64 2.93 2.61 8.16 2.95 2.77 8.97 2.98 3.01 10.42 3.03 3.44 11.39 3.07 3.71
38
3.89 2.92 1.33 4.76 2.95 1.61 6.10 3.00 2.03 7.39 3.05 2.42 7.91 3.07 2.58 8.72 3.10 2.81 10.17 3.15 3.23 11.14 3.19 3.49
40
3.62 3.03 1.19 4.49 3.07 1.46 5.83 3.12 1.87 7.12 3.16 2.25 7.64 3.18 2.40 8.45 3.21 2.63 9.90 3.26 3.04 10.87 3.30 3.29
42
4.20 3.17 1.32 5.54 3.22 1.72 6.83 3.27 2.09 7.35 3.29 2.23 8.16 3.32 2.46 9.61 3.37 2.85
44
3.89 3.27 1.19 5.23 3.32 1.58 6.52 3.37 1.93 7.05 3.39 2.08 7.85 3.41 2.30
46
4.90 3.41 1.44 6.20 3.46 1.79 6.72 3.48 1.93 7.52 3.50 2.15
DATA DECLARED ACCORDING TO UNI EN 145112
Key
Pc
Cooling capacity (kW)
Pe Input power (kW)
TAE External air temperature (°C) d.b.
ATTENTION
For the intermediate points, refer to the operating limits graphics (§ 9.1)
HEATING MODECOOLING MODE
ΔT WATER DIFFERENT TO NOMINAL ΔT 5°C
35810
Cooling capacity correction factors 0.99 1 1.02 1.03
Input power correction factors 0.99 1 1.01 1.02
DEPOSIT FACTORS [K*m2]/[W] 0.00005 0.0001 0.0002
Cooling capacity correction factors 1 0.98 0.94
Input power correction factors 1 0.98 0.95
Page 48
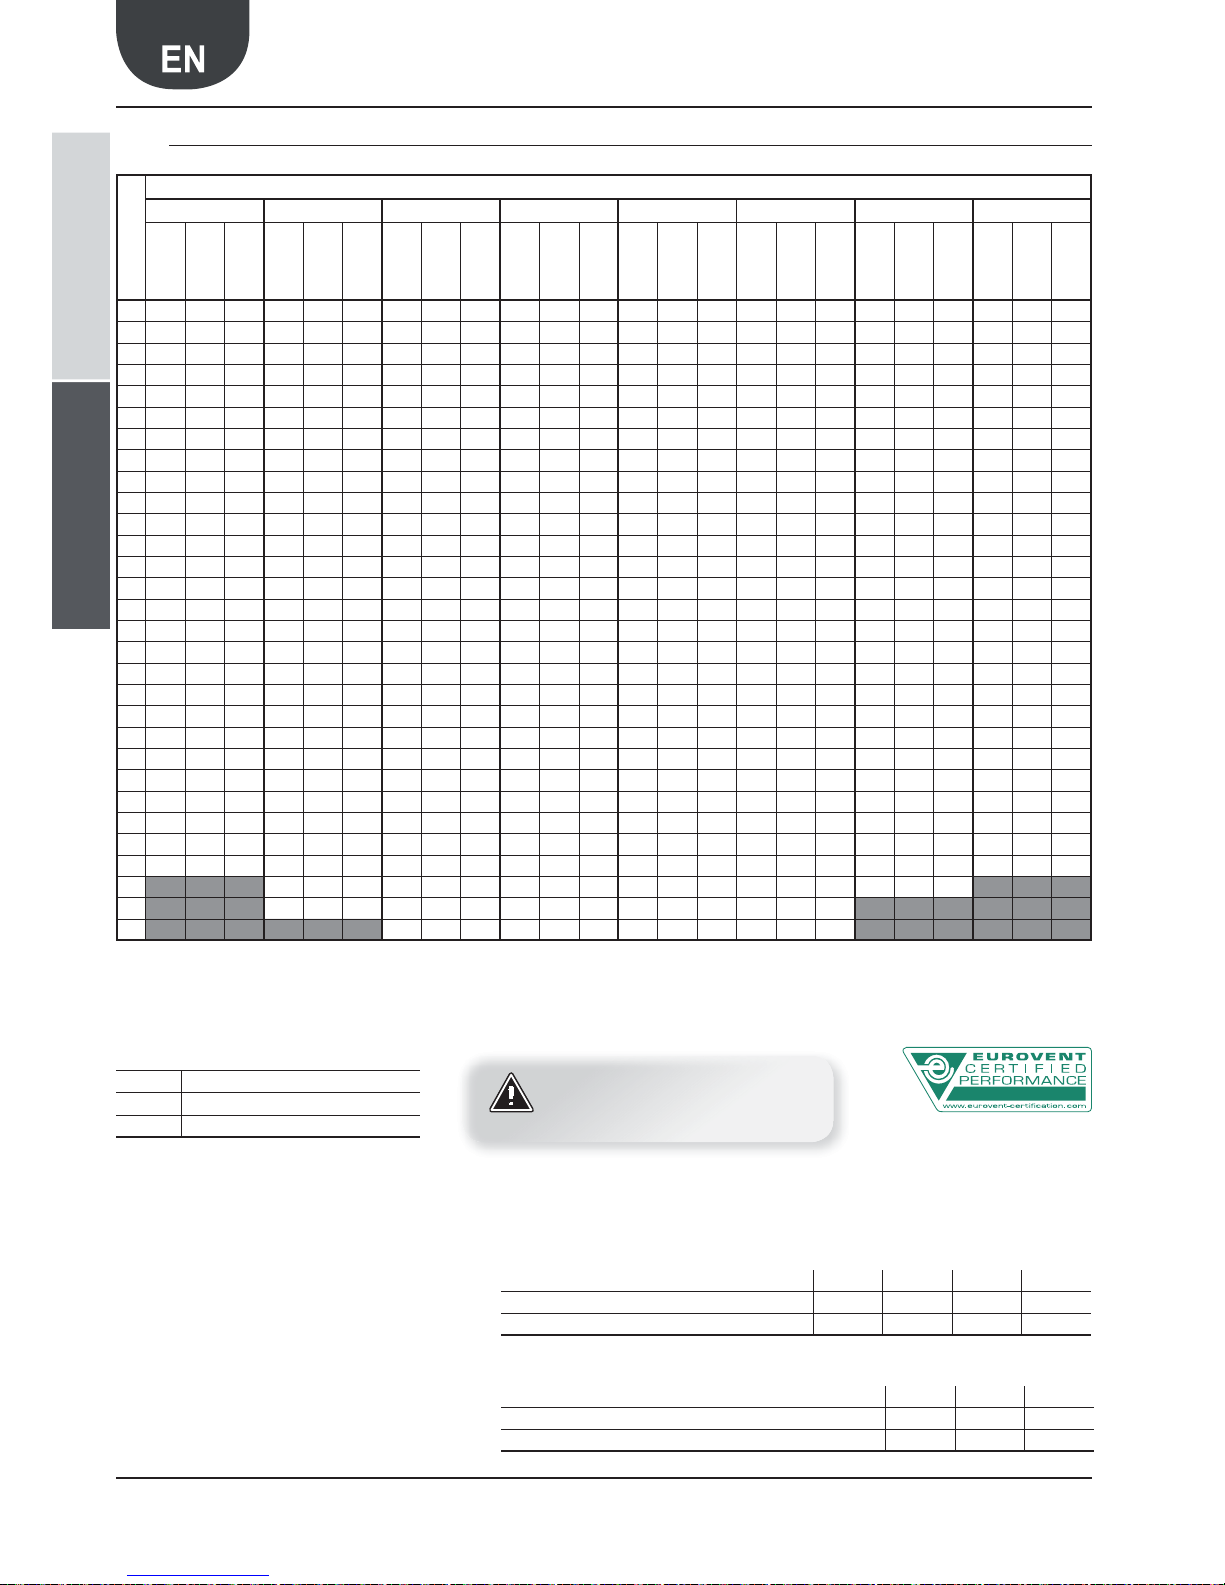
48 Aermec code 6755530_03 9.2011
ANK 025-085H
11.9. ANK 040 H 230V/1/50Hz Cooling capacity and input power
TAE °C
TEMPERATURE OF THE WATER PRODUCED °C
8 5 0 5 7 10 15 18
Pc
(kW)Pe(kW)
EER
Pc
(kW)Pe(kW)
EER
Pc
(kW)Pe(kW)
EER
Pc
(kW)Pe(kW)
EER
Pc
(kW)Pe(kW)
EER
Pc
(kW)Pe(kW)
EER
Pc
(kW)Pe(kW)
EER
Pc
(kW)Pe(kW)
EER
-10
8.96 4.65 1.93 9.96 4.68 2.13 11.51 4.73 2.43 13.01 4.78 2.72 13.62 4.80 2.84 14.55 4.83 3.01 16.25 4.88 3.33 17.38 4.92 3.53
-8
8.76 4.21 2.08 9.76 4.24 2.30 11.32 4.29 2.64 12.81 4.34 2.95 13.42 4.36 3.08 14.36 4.39 3.27 16.05 4.44 3.61 17.18 4.48 3.83
-6
8.57 3.82 2.24 9.58 3.85 2.49 11.13 3.90 2.85 12.63 3.95 3.20 13.23 3.97 3.33 14.17 4.00 3.54 15.86 4.05 3.92 16.99 4.09 4.15
-4
8.40 3.47 2.42 9.40 3.51 2.68 10.95 3.56 3.08 12.45 3.61 3.45 13.05 3.62 3.60 13.99 3.66 3.82 15.68 3.71 4.23 16.81 3.75 4.48
-2
8.23 3.18 2.59 9.23 3.21 2.88 10.79 3.26 3.31 12.28 3.31 3.71 12.89 3.33 3.87 13.82 3.36 4.11 15.51 3.42 4.54 16.64 3.45 4.82
0
8.07 2.92 2.76 9.07 2.96 3.06 10.62 3.01 3.53 12.12 3.06 3.96 12.72 3.08 4.13 13.66 3.11 4.39 15.35 3.16 4.86 16.48 3.20 5.15
2
7.91 2.71 2.92 8.92 2.74 3.26 10.47 2.80 3.74 11.96 2.85 4.20 12.57 2.87 4.38 13.50 2.90 4.66 15.19 2.95 5.15 16.32 2.99 5.46
4
7.76 2.54 3.06 8.77 2.57 3.41 10.32 2.62 3.94 11.81 2.67 4.42 12.42 2.69 4.62 13.35 2.72 4.91 15.04 2.78 5.41 16.17 2.82 5.73
6
7.61 2.40 3.17 8.62 2.43 3.55 10.17 2.49 4.08 11.66 2.54 4.59 12.27 2.56 4.79 13.20 2.59 5.10 14.89 2.65 5.62 16.02 2.69 5.96
8
7.47 2.30 3.25 8.47 2.33 3.64 10.02 2.39 4.19 11.52 2.44 4.72 12.12 2.46 4.93 13.06 2.49 5.24 14.74 2.55 5.78 15.87 2.58 6.15
10
7.32 2.23 3.28 8.32 2.26 3.68 9.88 2.32 4.26 11.37 2.37 4.80 11.97 2.39 5.01 12.91 2.42 5.33 14.59 2.48 5.88 15.72 2.52 6.24
12
7.17 2.19 3.27 8.18 2.22 3.68 9.73 2.28 4.27 11.22 2.33 4.82 11.83 2.35 5.03 12.76 2.38 5.36 14.45 2.44 5.92 15.57 2.48 6.28
14
7.02 2.17 3.24 8.03 2.21 3.63 9.58 2.26 4.24 11.07 2.31 4.79 11.68 2.33 5.01 12.61 2.37 5.32 14.29 2.42 5.90 15.42 2.46 6.27
16
6.87 2.19 3.14 7.87 2.22 3.55 9.42 2.27 4.15 10.92 2.33 4.69 11.52 2.35 4.90 12.45 2.38 5.23 14.14 2.44 5.80 15.26 2.48 6.15
18
6.71 2.22 3.02 7.71 2.25 3.43 9.26 2.31 4.01 10.76 2.36 4.56 11.36 2.38 4.77 12.29 2.41 5.10 13.98 2.47 5.66 15.10 2.51 6.02
20
6.54 2.27 2.88 7.55 2.31 3.27 9.10 2.36 3.86 10.59 2.41 4.39 11.19 2.44 4.59 12.13 2.47 4.91 13.81 2.53 5.46 14.94 2.57 5.81
22
6.37 2.34 2.72 7.37 2.38 3.10 8.92 2.44 3.66 10.41 2.49 4.18 11.02 2.51 4.39 11.95 2.54 4.70 13.64 2.60 5.25 14.76 2.64 5.59
24
6.18 2.43 2.54 7.19 2.47 2.91 8.74 2.52 3.47 10.23 2.57 3.98 10.83 2.60 4.17 11.77 2.63 4.48 13.45 2.69 5.00 14.57 2.73 5.34
26
5.99 2.53 2.37 6.99 2.57 2.72 8.54 2.62 3.26 10.03 2.68 3.74 10.64 2.70 3.94 11.57 2.73 4.24 13.26 2.79 4.75 14.38 2.83 5.08
28
5.78 2.64 2.19 6.78 2.68 2.53 8.33 2.73 3.05 9.83 2.79 3.52 10.43 2.81 3.71 11.36 2.84 4.00 13.05 2.90 4.50 14.17 2.94 4.82
30
5.56 2.76 2.01 6.56 2.80 2.34 8.11 2.85 2.85 9.60 2.91 3.30 10.21 2.93 3.48 11.14 2.96 3.76 12.83 3.02 4.25 13.95 3.06 4.56
32
5.32 2.89 1.84 6.32 2.92 2.16 7.88 2.98 2.64 9.37 3.03 3.09 9.97 3.05 3.27 10.90 3.08 3.54 12.59 3.14 4.01 13.71 3.18 4.31
34
5.07 3.02 1.68 6.07 3.05 1.99 7.62 3.11 2.45 9.11 3.16 2.88 9.72 3.18 3.06 10.65 3.21 3.32 12.33 3.27 3.77 13.46 3.31 4.07
35
4.93 3.08 1.60 5.94 3.12 1.90 7.49 3.17 2.36 8.98 3.23 2.78 9.55 3.24 2.95 10.52 3.28 3.21 12.20 3.34 3.65
13.23 3.40
3.89
36
4.80 3.15 1.52 5.80 3.18 1.82 7.35 3.24 2.27 8.84 3.29 2.69 9.45 3.31 2.85 10.38 3.34 3.11 12.06 3.40 3.55 13.19 3.44 3.83
38
4.51 3.28 1.38 5.51 3.31 1.66 7.06 3.37 2.09 8.55 3.42 2.50 9.16 3.44 2.66 10.09 3.47 2.91 11.77 3.53 3.33 12.90 3.57 3.61
40
4.19 3.40 1.23 5.20 3.44 1.51 6.75 3.49 1.93 8.24 3.54 2.33 8.85 3.57 2.48 9.78 3.60 2.72 11.46 3.66 3.13 12.59 3.70 3.40
42
4.86 3.56 1.37 6.42 3.61 1.78 7.91 3.66 2.16 8.51 3.68 2.31 9.45 3.72 2.54 11.13 3.78 2.94
44
4.51 3.67 1.23 6.06 3.72 1.63 7.55 3.77 2.00 8.16 3.80 2.15 9.09 3.83 2.37
46
5.68 3.82 1.49 7.17 3.88 1.85 7.78 3.90 1.99 8.71 3.93 2.22
DATA DECLARED ACCORDING TO UNI EN 145112
Key
Pc
Cooling capacity (kW)
Pe Input power (kW)
TAE External air temperature (°C) d.b.
ATTENTION
For the intermediate points, refer to the operating limits graphics (§ 9.1)
HEATING MODECOOLING MODE
ΔT WATER DIFFERENT TO NOMINAL ΔT 5°C
35810
Cooling capacity correction factors 0.99 1 1.02 1.03
Input power correction factors 0.99 1 1.01 1.02
DEPOSIT FACTORS [K*m2]/[W] 0.00005 0.0001 0.0002
Cooling capacity correction factors 1 0.98 0.94
Input power correction factors 1 0.98 0.95
Page 49
49Aermec code 6755530_03 9.2011
ANK 025-085H
11.10. ANK 040 HP|HA 230V/1/50Hz Cooling capacity and input power
TAE °C
TEMPERATURE OF THE WATER PRODUCED °C
8 5 0 5 7 10 15 18
Pc
(kW)Pe(kW)
EER
Pc
(kW)Pe(kW)
EER
Pc
(kW)Pe(kW)
EER
Pc
(kW)Pe(kW)
EER
Pc
(kW)Pe(kW)
EER
Pc
(kW)Pe(kW)
EER
Pc
(kW)Pe(kW)
EER
Pc
(kW)Pe(kW)
EER
-10
9.07 4.74 1.91 10.08 4.77 2.11 11.66 4.82 2.42 13.18 4.87 2.71 13.79 4.89 2.82 14.74 4.92 3.00 16.45 4.97 3.31 17.59 5.01 3.51
-8
8.87 4.29 2.07 9.88 4.32 2.29 11.46 4.37 2.62 12.97 4.42 2.93 13.59 4.44 3.06 14.54 4.47 3.25 16.25 4.52 3.60 17.39 4.56 3.81
-6
8.68 3.89 2.23 9.70 3.92 2.47 11.27 3.97 2.84 12.79 4.02 3.18 13.40 4.04 3.32 14.35 4.07 3.53 16.06 4.13 3.89 17.20 4.17 4.12
-4
8.50 3.54 2.40 9.52 3.57 2.67 11.09 3.62 3.06 12.61 3.67 3.44 13.22 3.69 3.58 14.17 3.72 3.81 15.88 3.78 4.20 17.02 3.82 4.46
-2
8.33 3.23 2.58 9.35 3.27 2.86 10.92 3.32 3.29 12.44 3.37 3.69 13.05 3.39 3.85 14.00 3.42 4.09 15.71 3.48 4.51 16.85 3.52 4.79
0
8.17 2.98 2.74 9.18 3.01 3.05 10.76 3.06 3.52 12.27 3.11 3.95 12.88 3.13 4.12 13.83 3.16 4.38 15.54 3.22 4.83 16.68 3.26 5.12
2
8.01 2.76 2.90 9.03 2.79 3.24 10.60 2.85 3.72 12.11 2.90 4.18 12.73 2.92 4.36 13.67 2.95 4.63 15.38 3.01 5.11 16.52 3.05 5.42
4
7.86 2.58 3.05 8.88 2.62 3.39 10.45 2.67 3.91 11.96 2.72 4.40 12.57 2.74 4.59 13.52 2.77 4.88 15.23 2.83 5.38 16.37 2.87 5.70
6
7.71 2.44 3.16 8.73 2.48 3.52 10.30 2.53 4.07 11.81 2.58 4.58 12.42 2.61 4.76 13.37 2.64 5.06 15.08 2.70 5.59 16.22 2.74 5.92
8
7.56 2.34 3.23 8.58 2.38 3.61 10.15 2.43 4.18 11.66 2.48 4.70 12.27 2.50 4.91 13.22 2.53 5.23 14.93 2.59 5.76 16.07 2.63 6.11
10
7.41 2.27 3.26 8.43 2.30 3.67 10.00 2.36 4.24 11.51 2.41 4.78 12.12 2.43 4.99 13.07 2.46 5.31 14.78 2.52 5.87 15.92 2.56 6.22
12
7.26 2.23 3.26 8.28 2.26 3.66 9.85 2.32 4.25 11.36 2.37 4.79 11.97 2.39 5.01 12.92 2.42 5.34 14.63 2.48 5.90 15.77 2.52 6.26
14
7.11 2.21 3.22 8.13 2.25 3.61 9.70 2.30 4.22 11.21 2.36 4.75 11.82 2.38 4.97 12.77 2.41 5.30 14.47 2.47 5.86 15.61 2.51 6.22
16
6.96 2.23 3.12 7.97 2.26 3.53 9.54 2.32 4.11 11.05 2.37 4.66 11.67 2.39 4.88 12.61 2.42 5.21 14.32 2.48 5.77 15.46 2.52 6.13
18
6.79 2.26 3.00 7.81 2.30 3.40 9.38 2.35 3.99 10.89 2.40 4.54 11.50 2.43 4.73 12.45 2.46 5.06 14.15 2.52 5.62 15.29 2.56 5.97
20
6.63 2.32 2.86 7.64 2.35 3.25 9.21 2.41 3.82 10.72 2.46 4.36 11.33 2.48 4.57 12.28 2.51 4.89 13.99 2.57 5.44 15.12 2.61 5.79
22
6.45 2.39 2.70 7.46 2.42 3.08 9.03 2.48 3.64 10.55 2.53 4.17 11.16 2.55 4.38 12.10 2.59 4.67 13.81 2.65 5.21 14.95 2.69 5.56
24
6.26 2.48 2.52 7.28 2.51 2.90 8.85 2.57 3.44 10.36 2.62 3.95 10.97 2.64 4.16 11.91 2.68 4.44 13.62 2.74 4.97 14.76 2.78 5.31
26
6.06 2.58 2.35 7.08 2.62 2.70 8.65 2.67 3.24 10.16 2.72 3.74 10.77 2.75 3.92 11.72 2.78 4.22 13.42 2.84 4.73 14.56 2.88 5.06
28
5.85 2.69 2.17 6.87 2.73 2.52 8.44 2.79 3.03 9.95 2.84 3.50 10.56 2.86 3.69 11.51 2.89 3.98 13.21 2.95 4.48 14.35 2.99 4.80
30
5.63 2.81 2.00 6.64 2.85 2.33 8.21 2.91 2.82 9.73 2.96 3.29 10.34 2.98 3.47 11.28 3.01 3.75 12.99 3.07 4.23 14.12 3.11 4.54
32
5.39 2.94 1.83 6.40 2.98 2.15 7.97 3.03 2.63 9.49 3.09 3.07 10.10 3.11 3.25 11.04 3.14 3.52 12.75 3.20 3.98 13.88 3.24 4.28
34
5.13 3.07 1.67 6.15 3.11 1.98 7.72 3.17 2.44 9.23 3.22 2.87 9.84 3.24 3.04 10.79 3.27 3.30 12.49 3.33 3.75 13.63 3.37 4.04
35
5.00 3.14 1.59 6.01 3.18 1.89 7.58 3.23 2.35 9.09 3.28 2.77 9.67 3.30 2.93 10.65 3.34 3.19 12.35 3.40 3.63
13.38 3.43
3.90
36
4.86 3.21 1.51 5.87 3.24 1.81 7.44 3.30 2.25 8.95 3.35 2.67 9.57 3.37 2.84 10.51 3.41 3.08 12.22 3.47 3.52 13.35 3.51 3.80
38
4.56 3.34 1.37 5.58 3.37 1.66 7.15 3.43 2.08 8.66 3.48 2.49 9.27 3.50 2.65 10.22 3.54 2.89 11.92 3.60 3.31 13.06 3.64 3.59
40
4.25 3.46 1.23 5.26 3.50 1.50 6.83 3.56 1.92 8.35 3.61 2.31 8.96 3.63 2.47 9.90 3.66 2.70 11.61 3.72 3.12 12.74 3.76 3.39
42
4.92 3.62 1.36 6.50 3.68 1.77 8.01 3.73 2.15 8.62 3.75 2.30 9.56 3.79 2.52 11.27 3.85 2.93
44
4.56 3.74 1.22 6.14 3.79 1.62 7.65 3.84 1.99 8.26 3.87 2.13 9.20 3.90 2.36
46
5.75 3.89 1.48 7.26 3.95 1.84 7.87 3.97 1.98 8.82 4.00 2.21
DATA DECLARED ACCORDING TO UNI EN 145112
Key
Pc
Cooling capacity (kW)
Pe Input power (kW)
TAE External air temperature (°C) d.b.
ATTENTION
For the intermediate points, refer to the operating limits graphics (§ 9.1)
HEATING MODECOOLING MODE
ΔT WATER DIFFERENT TO NOMINAL ΔT 5°C
35810
Cooling capacity correction factors 0.99 1 1.02 1.03
Input power correction factors 0.99 1 1.01 1.02
DEPOSIT FACTORS [K*m2]/[W] 0.00005 0.0001 0.0002
Cooling capacity correction factors 1 0.98 0.94
Input power correction factors 1 0.98 0.95
Page 50
50 Aermec code 6755530_03 9.2011
ANK 025-085H
11.11. ANK 040 H 400V/3N/50Hz Cooling capacity and input power
TAE °C
TEMPERATURE OF THE WATER PRODUCED °C
8 5 0 5 7 10 15 18
Pc
(kW)Pe(kW)
EER
Pc
(kW)Pe(kW)
EER
Pc
(kW)Pe(kW)
EER
Pc
(kW)Pe(kW)
EER
Pc
(kW)Pe(kW)
EER
Pc
(kW)Pe(kW)
EER
Pc
(kW)Pe(kW)
EER
Pc
(kW)Pe(kW)
EER
-10
9.83 5.10 1.93 10.93 5.13 2.13 12.64 5.19 2.44 14.28 5.24 2.73 14.94 5.26 2.84 15.97 5.29 3.02 17.83 5.35 3.33 19.07 5.39 3.54
-8
9.61 4.61 2.08 10.71 4.65 2.30 12.42 4.70 2.64 14.06 4.75 2.96 14.73 4.77 3.09 15.75 4.81 3.27 17.61 4.87 3.62 18.85 4.91 3.84
-6
9.41 4.18 2.25 10.51 4.22 2.49 12.21 4.27 2.86 13.86 4.33 3.20 14.52 4.35 3.34 15.55 4.38 3.55 17.40 4.44 3.92 18.64 4.48 4.16
-4
9.21 3.81 2.42 10.31 3.84 2.68 12.02 3.90 3.08 13.66 3.95 3.46 14.33 3.97 3.61 15.35 4.00 3.84 17.21 4.07 4.23 18.45 4.11 4.49
-2
9.03 3.48 2.59 10.13 3.52 2.88 11.84 3.57 3.32 13.48 3.63 3.71 14.14 3.65 3.87 15.17 3.68 4.12 17.02 3.74 4.55 18.26 3.78 4.83
0
8.85 3.20 2.77 9.95 3.24 3.07 11.66 3.30 3.53 13.30 3.35 3.97 13.96 3.37 4.14 14.99 3.40 4.41 16.84 3.47 4.85 18.08 3.51 5.15
2
8.68 2.97 2.92 9.78 3.01 3.25 11.49 3.06 3.75 13.13 3.12 4.21 13.79 3.14 4.39 14.82 3.17 4.68 16.67 3.24 5.15 17.91 3.28 5.46
4
8.52 2.78 3.06 9.62 2.82 3.41 11.32 2.87 3.94 12.96 2.93 4.42 13.63 2.95 4.62 14.65 2.99 4.90 16.50 3.05 5.41 17.74 3.09 5.74
6
8.36 2.63 3.18 9.46 2.67 3.54 11.16 2.73 4.09 12.80 2.78 4.60 13.46 2.80 4.81 14.49 2.84 5.10 16.34 2.90 5.63 17.58 2.94 5.98
8
8.20 2.52 3.25 9.30 2.56 3.63 11.00 2.61 4.21 12.64 2.67 4.73 13.30 2.69 4.94 14.33 2.73 5.25 16.18 2.79 5.80 17.41 2.83 6.15
10
8.04 2.44 3.30 9.13 2.48 3.68 10.84 2.54 4.27 12.48 2.59 4.82 13.14 2.62 5.02 14.17 2.65 5.35 16.02 2.71 5.91 17.25 2.76 6.25
12
7.87 2.40 3.28 8.97 2.43 3.69 10.68 2.49 4.29 12.31 2.55 4.83 12.98 2.57 5.05 14.00 2.61 5.36 15.85 2.67 5.94 17.09 2.71 6.31
14
7.71 2.38 3.24 8.81 2.42 3.64 10.51 2.48 4.24 12.15 2.54 4.78 12.81 2.56 5.00 13.84 2.59 5.34 15.69 2.66 5.90 16.92 2.70 6.27
16
7.54 2.39 3.15 8.64 2.43 3.56 10.34 2.49 4.15 11.98 2.55 4.70 12.64 2.57 4.92 13.67 2.61 5.24 15.52 2.67 5.81 16.75 2.71 6.18
18
7.36 2.43 3.03 8.46 2.47 3.43 10.17 2.53 4.02 11.80 2.59 4.56 12.47 2.61 4.78 13.49 2.64 5.11 15.34 2.71 5.66 16.57 2.75 6.03
20
7.18 2.49 2.88 8.28 2.53 3.27 9.98 2.59 3.85 11.62 2.65 4.38 12.28 2.67 4.60 13.31 2.70 4.93 15.16 2.77 5.47 16.39 2.81 5.83
22
6.99 2.57 2.72 8.09 2.61 3.10 9.79 2.67 3.67 11.43 2.73 4.19 12.09 2.75 4.40 13.12 2.78 4.72 14.96 2.85 5.25 16.20 2.89 5.61
24
6.79 2.66 2.55 7.89 2.70 2.92 9.59 2.76 3.47 11.23 2.82 3.98 11.89 2.84 4.19 12.91 2.88 4.48 14.76 2.94 5.02 15.99 2.99 5.35
26
6.57 2.77 2.37 7.67 2.81 2.73 9.37 2.87 3.26 11.01 2.93 3.76 11.67 2.95 3.96 12.70 2.99 4.25 14.55 3.05 4.77 15.78 3.10 5.09
28
6.34 2.90 2.19 7.44 2.94 2.53 9.15 3.00 3.05 10.78 3.05 3.53 11.45 3.08 3.72 12.47 3.11 4.01 14.32 3.18 4.50 15.55 3.22 4.83
30
6.10 3.03 2.01 7.20 3.07 2.35 8.90 3.13 2.84 10.54 3.18 3.31 11.20 3.21 3.49 12.23 3.24 3.77 14.07 3.31 4.25 15.31 3.35 4.57
32
5.84 3.16 1.85 6.94 3.20 2.17 8.64 3.26 2.65 10.28 3.32 3.10 10.94 3.34 3.28 11.97 3.38 3.54 13.81 3.44 4.01 15.05 3.49 4.31
34
5.56 3.31 1.68 6.66 3.35 1.99 8.36 3.41 2.45 10.00 3.46 2.89 10.67 3.49 3.06 11.69 3.52 3.32 13.54 3.59 3.77 14.77 3.63 4.07
35
5.41 3.38 1.60 6.51 3.42 1.90 8.22 3.48 2.36 9.86 3.53 2.79 10.48 3.55 2.95 11.54 3.59 3.21 13.39 3.66 3.66
14.52 3.73
3.89
36
5.26 3.45 1.52 6.36 3.49 1.82 8.07 3.55 2.27 9.71 3.60 2.70 10.37 3.63 2.86 11.39 3.66 3.11 13.24 3.73 3.55 14.47 3.77 3.84
38
4.94 3.59 1.38 6.04 3.63 1.66 7.75 3.69 2.10 9.39 3.75 2.50 10.05 3.77 2.67 11.07 3.80 2.91 12.92 3.87 3.34 14.15 3.91 3.62
40
4.60 3.73 1.23 5.70 3.77 1.51 7.41 3.83 1.93 9.05 3.88 2.33 9.71 3.91 2.48 10.73 3.94 2.72 12.58 4.01 3.14 13.81 4.05 3.41
42
5.34 3.90 1.37 7.04 3.96 1.78 8.68 4.01 2.16 9.34 4.04 2.31 10.37 4.07 2.55 12.21 4.14 2.95
44
4.94 4.02 1.23 6.65 4.08 1.63 8.29 4.14 2.00 8.95 4.16 2.15 9.97 4.19 2.38
46
6.23 4.19 1.49 7.87 4.25 1.85 8.53 4.27 2.00 9.56 4.30 2.22
DATA DECLARED ACCORDING TO UNI EN 145112
Key
Pc
Cooling capacity (kW)
Pe Input power (kW)
TAE External air temperature (°C) d.b.
ATTENTION
For the intermediate points, refer to the operating limits graphics (§ 9.1)
HEATING MODECOOLING MODE
ΔT WATER DIFFERENT TO NOMINAL ΔT 5°C
35810
Cooling capacity correction factors 0.99 1 1.02 1.03
Input power correction factors 0.99 1 1.01 1.02
DEPOSIT FACTORS [K*m2]/[W] 0.00005 0.0001 0.0002
Cooling capacity correction factors 1 0.98 0.94
Input power correction factors 1 0.98 0.95
Page 51
51Aermec code 6755530_03 9.2011
ANK 025-085H
11.12. ANK 040 HP|HA 400V/3N/50Hz Cooling capacity and input power
TAE °C
TEMPERATURE OF THE WATER PRODUCED °C
8 5 0 5 7 10 15 18
Pc
(kW)Pe(kW)
EER
Pc
(kW)Pe(kW)
EER
Pc
(kW)Pe(kW)
EER
Pc
(kW)Pe(kW)
EER
Pc
(kW)Pe(kW)
EER
Pc
(kW)Pe(kW)
EER
Pc
(kW)Pe(kW)
EER
Pc
(kW)Pe(kW)
EER
-10
9.95 5.18 1.92 11.06 5.22 2.12 12.79 5.27 2.43 14.46 5.33 2.71 15.13 5.35 2.83 16.17 5.38 3.01 18.05 5.44 3.32 19.30 5.48 3.52
-8
9.73 4.69 2.07 10.85 4.73 2.29 12.57 4.78 2.63 14.24 4.83 2.95 14.91 4.86 3.07 15.95 4.89 3.26 17.83 4.95 3.60 19.08 4.99 3.82
-6
9.52 4.25 2.24 10.64 4.29 2.48 12.37 4.35 2.84 14.03 4.40 3.19 14.70 4.42 3.33 15.74 4.45 3.54 17.62 4.51 3.91 18.87 4.56 4.14
-4
9.33 3.87 2.41 10.44 3.91 2.67 12.17 3.96 3.07 13.83 4.02 3.44 14.50 4.04 3.59 15.54 4.07 3.82 17.42 4.13 4.22 18.67 4.18 4.47
-2
9.14 3.54 2.58 10.26 3.58 2.87 11.98 3.63 3.30 13.64 3.69 3.70 14.32 3.71 3.86 15.36 3.74 4.11 17.23 3.81 4.52 18.49 3.85 4.80
0
8.96 3.26 2.75 10.08 3.29 3.06 11.80 3.35 3.52 13.46 3.41 3.95 14.14 3.43 4.12 15.18 3.46 4.39 17.05 3.52 4.84 18.30 3.57 5.13
2
8.79 3.02 2.91 9.91 3.06 3.24 11.63 3.12 3.73 13.29 3.17 4.19 13.96 3.19 4.38 15.00 3.23 4.64 16.88 3.29 5.13 18.13 3.33 5.44
4
8.62 2.83 3.05 9.74 2.86 3.41 11.46 2.92 3.92 13.12 2.98 4.40 13.80 3.00 4.60 14.83 3.04 4.88 16.71 3.10 5.39 17.96 3.14 5.72
6
8.46 2.67 3.17 9.57 2.71 3.53 11.30 2.77 4.08 12.96 2.83 4.58 13.63 2.85 4.78 14.67 2.88 5.09 16.54 2.95 5.61 17.79 2.99 5.95
8
8.30 2.56 3.24 9.41 2.60 3.62 11.14 2.66 4.19 12.80 2.71 4.72 13.47 2.74 4.92 14.50 2.77 5.23 16.38 2.84 5.77 17.63 2.88 6.12
10
8.13 2.48 3.28 9.25 2.52 3.67 10.97 2.58 4.25 12.63 2.64 4.78 13.30 2.66 5.00 14.34 2.69 5.33 16.21 2.76 5.87 17.47 2.80 6.24
12
7.97 2.44 3.27 9.08 2.48 3.66 10.81 2.54 4.26 12.47 2.59 4.81 13.14 2.62 5.02 14.18 2.65 5.35 16.05 2.72 5.90 17.30 2.76 6.27
14
7.80 2.42 3.22 8.92 2.46 3.63 10.64 2.52 4.22 12.30 2.58 4.77 12.97 2.60 4.99 14.01 2.64 5.31 15.88 2.70 5.88 17.13 2.75 6.23
16
7.63 2.43 3.14 8.75 2.47 3.54 10.47 2.53 4.14 12.13 2.59 4.68 12.80 2.61 4.90 13.84 2.65 5.22 15.71 2.72 5.78 16.96 2.76 6.14
18
7.45 2.47 3.02 8.57 2.51 3.41 10.29 2.57 4.00 11.95 2.63 4.54 12.62 2.65 4.76 13.66 2.69 5.08 15.53 2.75 5.65 16.78 2.80 5.99
20
7.27 2.53 2.87 8.38 2.57 3.26 10.11 2.63 3.84 11.77 2.69 4.38 12.44 2.71 4.59 13.47 2.75 4.90 15.34 2.82 5.44 16.59 2.86 5.80
22
7.08 2.61 2.71 8.19 2.65 3.09 9.91 2.71 3.66 11.57 2.77 4.18 12.24 2.79 4.39 13.28 2.83 4.69 15.15 2.90 5.22 16.40 2.94 5.58
24
6.87 2.71 2.54 7.98 2.75 2.90 9.71 2.81 3.46 11.37 2.87 3.96 12.04 2.89 4.17 13.07 2.93 4.46 14.94 2.99 5.00 16.19 3.04 5.33
26
6.65 2.82 2.36 7.77 2.86 2.72 9.49 2.92 3.25 11.15 2.98 3.74 11.82 3.00 3.94 12.86 3.04 4.23 14.73 3.11 4.74 15.97 3.15 5.07
28
6.42 2.95 2.18 7.53 2.99 2.52 9.26 3.05 3.04 10.92 3.10 3.52 11.59 3.13 3.70 12.62 3.16 3.99 14.50 3.23 4.49 15.74 3.27 4.81
30
6.18 3.08 2.01 7.29 3.12 2.34 9.01 3.18 2.83 10.67 3.24 3.29 11.34 3.26 3.48 12.38 3.30 3.75 14.25 3.36 4.24 15.50 3.41 4.55
32
5.91 3.22 1.84 7.03 3.26 2.16 8.75 3.32 2.64 10.41 3.38 3.08 11.08 3.40 3.26 12.12 3.44 3.52 13.99 3.50 4.00 15.23 3.55 4.29
34
5.63 3.36 1.68 6.74 3.40 1.98 8.47 3.46 2.45 10.13 3.52 2.88 10.80 3.54 3.05 11.83 3.58 3.30 13.70 3.65 3.75 14.95 3.69 4.05
35
5.48 3.43 1.60 6.60 3.47 1.90 8.32 3.54 2.35 9.98 3.59 2.78 10.61 3.61 2.94 11.69 3.65 3.20 13.56 3.72 3.65 14.80
3.76
3.94
36
5.33 3.51 1.52 6.44 3.55 1.81 8.17 3.61 2.26 9.83 3.67 2.68 10.50 3.69 2.85 11.53 3.73 3.09 13.40 3.79 3.54 14.65 3.84 3.82
38
5.01 3.65 1.37 6.12 3.69 1.66 7.84 3.75 2.09 9.50 3.81 2.49 10.17 3.83 2.66 11.21 3.87 2.90 13.08 3.93 3.33 14.33 3.98 3.60
40
4.66 3.79 1.23 5.77 3.83 1.51 7.50 3.89 1.93 9.16 3.95 2.32 9.83 3.97 2.48 10.86 4.01 2.71 12.73 4.07 3.13 13.98 4.12 3.39
42
5.40 3.96 1.36 7.13 4.02 1.77 8.79 4.08 2.15 9.46 4.11 2.30 10.49 4.14 2.53 12.36 4.21 2.94
44
5.01 4.09 1.22 6.73 4.15 1.62 8.39 4.21 1.99 9.06 4.23 2.14 10.10 4.26 2.37
46
6.31 4.26 1.48 7.97 4.32 1.84 8.64 4.34 1.99 9.67 4.38 2.21
DATA DECLARED ACCORDING TO UNI EN 145112
Key
Pc
Cooling capacity (kW)
Pe Input power (kW)
TAE External air temperature (°C) d.b.
ATTENTION
For the intermediate points, refer to the operating limits graphics (§ 9.1)
HEATING MODECOOLING MODE
ΔT WATER DIFFERENT TO NOMINAL ΔT 5°C
35810
Cooling capacity correction factors 0.99 1 1.02 1.03
Input power correction factors 0.99 1 1.01 1.02
DEPOSIT FACTORS [K*m2]/[W] 0.00005 0.0001 0.0002
Cooling capacity correction factors 1 0.98 0.94
Input power correction factors 1 0.98 0.95
Page 52
52 Aermec code 6755530_03 9.2011
ANK 025-085H
11.13. ANK 045 H 230V/1/50Hz Cooling capacity and input power
TAE °C
TEMPERATURE OF THE WATER PRODUCED °C
8 5 0 5 7 10 15 18
Pc
(kW)Pe(kW)
EER
Pc
(kW)Pe(kW)
EER
Pc
(kW)Pe(kW)
EER
Pc
(kW)Pe(kW)
EER
Pc
(kW)Pe(kW)
EER
Pc
(kW)Pe(kW)
EER
Pc
(kW)Pe(kW)
EER
Pc
(kW)Pe(kW)
EER
-10
10.96 5.35 2.05 12.19 5.39 2.26 14.09 5.45 2.59 15.93 5.50 2.90 16.67 5.52 3.02 17.82 5.56 3.21 19.89 5.62 3.54 21.27 5.66 3.76
-8
10.72 4.84 2.21 11.95 4.88 2.45 13.85 4.94 2.80 15.68 4.99 3.14 16.43 5.02 3.27 17.57 5.05 3.48 19.64 5.11 3.84 21.02 5.16 4.07
-6
10.49 4.39 2.39 11.72 4.43 2.65 13.62 4.49 3.03 15.46 4.54 3.41 16.20 4.57 3.54 17.34 4.60 3.77 19.41 4.67 4.16 20.79 4.71 4.41
-4
10.28 4.00 2.57 11.51 4.04 2.85 13.41 4.10 3.27 15.24 4.15 3.67 15.98 4.17 3.83 17.13 4.21 4.07 19.19 4.27 4.49 20.58 4.32 4.76
-2
10.07 3.66 2.75 11.30 3.69 3.06 13.20 3.75 3.52 15.03 3.81 3.94 15.77 3.83 4.12 16.92 3.87 4.37 18.99 3.93 4.83 20.37 3.98 5.12
0
9.88 3.36 2.94 11.10 3.40 3.26 13.00 3.46 3.76 14.84 3.52 4.22 15.58 3.54 4.40 16.72 3.58 4.67 18.79 3.64 5.16 20.17 3.69 5.47
2
9.69 3.12 3.11 10.91 3.16 3.45 12.81 3.22 3.98 14.64 3.28 4.46 15.39 3.30 4.66 16.53 3.33 4.96 18.60 3.40 5.47 19.98 3.44 5.81
4
9.50 2.92 3.25 10.73 2.96 3.63 12.63 3.02 4.18 14.46 3.08 4.69 15.20 3.10 4.90 16.34 3.14 5.20 18.41 3.20 5.75 19.79 3.25 6.09
6
9.32 2.76 3.38 10.55 2.80 3.77 12.45 2.86 4.35 14.28 2.92 4.89 15.02 2.94 5.11 16.16 2.98 5.42 18.23 3.05 5.98 19.61 3.09 6.35
8
9.14 2.65 3.45 10.37 2.69 3.86 12.27 2.75 4.46 14.10 2.80 5.04 14.84 2.83 5.24 15.98 2.86 5.59 18.05 2.93 6.16 19.42 2.98 6.52
10
8.96 2.56 3.50 10.19 2.60 3.92 12.09 2.67 4.53 13.92 2.72 5.12 14.66 2.75 5.33 15.80 2.78 5.68 17.87 2.85 6.27 19.24 2.90 6.63
12
8.78 2.52 3.48 10.01 2.56 3.91 11.91 2.62 4.55 13.74 2.68 5.13 14.48 2.70 5.36 15.62 2.74 5.70 17.68 2.81 6.29 19.06 2.85 6.69
14
8.60 2.50 3.44 9.82 2.54 3.87 11.72 2.61 4.49 13.55 2.66 5.09 14.29 2.69 5.31 15.43 2.72 5.67 17.50 2.79 6.27 18.88 2.84 6.65
16
8.41 2.52 3.34 9.64 2.56 3.77 11.54 2.62 4.40 13.36 2.68 4.99 14.10 2.70 5.22 15.25 2.74 5.57 17.31 2.81 6.16 18.68 2.85 6.55
18
8.21 2.55 3.22 9.44 2.60 3.63 11.34 2.66 4.26 13.17 2.72 4.84 13.91 2.74 5.08 15.05 2.78 5.41 17.11 2.85 6.00 18.49 2.89 6.40
20
8.01 2.62 3.06 9.24 2.66 3.47 11.14 2.72 4.10 12.96 2.78 4.66 13.70 2.80 4.89 14.84 2.84 5.23 16.91 2.91 5.81 18.28 2.95 6.20
22
7.80 2.70 2.89 9.02 2.74 3.29 10.92 2.80 3.90 12.75 2.86 4.46 13.49 2.89 4.67 14.63 2.92 5.01 16.69 2.99 5.58 18.07 3.04 5.94
24
7.57 2.80 2.70 8.80 2.84 3.10 10.70 2.90 3.69 12.52 2.96 4.23 13.26 2.99 4.43 14.40 3.03 4.75 16.47 3.09 5.33 17.84 3.14 5.68
26
7.33 2.92 2.51 8.56 2.96 2.89 10.46 3.02 3.46 12.28 3.08 3.99 13.02 3.10 4.20 14.16 3.14 4.51 16.23 3.21 5.06 17.60 3.25 5.42
28
7.08 3.04 2.33 8.30 3.08 2.69 10.20 3.15 3.24 12.03 3.21 3.75 12.77 3.23 3.95 13.91 3.27 4.25 15.97 3.34 4.78 17.35 3.38 5.13
30
6.80 3.18 2.14 8.03 3.22 2.49 9.93 3.29 3.02 11.76 3.35 3.51 12.50 3.37 3.71 13.64 3.41 4.00 15.70 3.47 4.52 17.07 3.52 4.85
32
6.51 3.32 1.96 7.74 3.37 2.30 9.64 3.43 2.81 11.47 3.49 3.29 12.21 3.51 3.48 13.35 3.55 3.76 15.41 3.62 4.26 16.78 3.66 4.58
34
6.20 3.47 1.79 7.43 3.51 2.12 9.33 3.58 2.61 11.16 3.64 3.07 11.90 3.66 3.25 13.04 3.70 3.52 15.10 3.77 4.01 16.47 3.81 4.32
35
6.04 3.55 1.70 7.27 3.59 2.03 9.17 3.65 2.51 10.99 3.71 2.96 11.69 3.73 3.13 12.88 3.77 3.42 14.94 3.84 3.89 16.30 3.93 4.15
36
5.87 3.62 1.62 7.10 3.66 1.94 9.00 3.73 2.41 10.83 3.79 2.86 11.56 3.81 3.03 12.71 3.85 3.30 14.77 3.92 3.77 16.14 3.96 4.08
38
5.51 3.77 1.46 6.74 3.81 1.77 8.64 3.88 2.23 10.47 3.94 2.66 11.21 3.96 2.83 12.35 4.00 3.09 14.41 4.07 3.54 15.79 4.11 3.84
40
5.13 3.92 1.31 6.36 3.96 1.61 8.26 4.02 2.05 10.09 4.08 2.47 10.83 4.10 2.64 11.97 4.14 2.89 14.03 4.21 3.33 15.41 4.25 3.63
42
5.95 4.10 1.45 7.85 4.16 1.89 9.68 4.22 2.29 10.42 4.24 2.46 11.56 4.28 2.70 13.62 4.35 3.13
44
5.52 4.22 1.31 7.42 4.29 1.73 9.25 4.35 2.13 9.98 4.37 2.28 11.13 4.41 2.52
46
6.95 4.40 1.58 8.78 4.46 1.97 9.52 4.49 2.12 10.66 4.52 2.36
DATA DECLARED ACCORDING TO UNI EN 145112
Key
Pc
Cooling capacity (kW)
Pe Input power (kW)
TAE External air temperature (°C) d.b.
ATTENTION
For the intermediate points, refer to the operating limits graphics (§ 9.1)
HEATING MODECOOLING MODE
ΔT WATER DIFFERENT TO NOMINAL ΔT 5°C
35810
Cooling capacity correction factors 0.99 1 1.02 1.03
Input power correction factors 0.99 1 1.01 1.02
DEPOSIT FACTORS [K*m2]/[W] 0.00005 0.0001 0.0002
Cooling capacity correction factors 1 0.98 0.94
Input power correction factors 1 0.98 0.95
Page 53
53Aermec code 6755530_03 9.2011
ANK 025-085H
11.14. ANK 045 HP|HA 230V/1/50Hz Cooling capacity and input power
TAE °C
TEMPERATURE OF THE WATER PRODUCED °C
8 5 0 5 7 10 15 18
Pc
(kW)Pe(kW)
EER
Pc
(kW)Pe(kW)
EER
Pc
(kW)Pe(kW)
EER
Pc
(kW)Pe(kW)
EER
Pc
(kW)Pe(kW)
EER
Pc
(kW)Pe(kW)
EER
Pc
(kW)Pe(kW)
EER
Pc
(kW)Pe(kW)
EER
-10
11.11 5.57 1.99 12.36 5.61 2.20 14.29 5.67 2.52 16.15 5.72 2.82 16.90 5.75 2.94 18.06 5.78 3.12 20.16 5.85 3.45 21.56 5.89 3.66
-8
10.87 5.04 2.16 12.11 5.08 2.38 14.04 5.14 2.73 15.90 5.20 3.06 16.65 5.22 3.19 17.81 5.25 3.39 19.91 5.32 3.74 21.31 5.36 3.98
-6
10.64 4.57 2.33 11.88 4.61 2.58 13.81 4.67 2.96 15.67 4.73 3.31 16.42 4.75 3.46 17.58 4.79 3.67 19.68 4.85 4.06 21.08 4.90 4.30
-4
10.42 4.16 2.50 11.66 4.20 2.78 13.59 4.26 3.19 15.45 4.32 3.58 16.20 4.34 3.73 17.36 4.38 3.96 19.46 4.44 4.38 20.86 4.49 4.65
-2
10.21 3.80 2.69 11.46 3.84 2.98 13.38 3.90 3.43 15.24 3.96 3.85 15.99 3.99 4.01 17.15 4.02 4.27 19.25 4.09 4.71 20.65 4.14 4.99
0
10.01 3.50 2.86 11.26 3.54 3.18 13.18 3.60 3.66 15.04 3.66 4.11 15.79 3.68 4.29 16.95 3.72 4.56 19.05 3.79 5.03 20.44 3.83 5.34
2
9.82 3.25 3.02 11.06 3.29 3.36 12.99 3.35 3.88 14.85 3.41 4.35 15.60 3.43 4.55 16.76 3.47 4.83 18.85 3.54 5.32 20.25 3.58 5.66
4
9.63 3.04 3.17 10.88 3.08 3.53 12.80 3.14 4.08 14.66 3.20 4.58 15.41 3.23 4.77 16.57 3.26 5.08 18.66 3.33 5.60 20.06 3.38 5.93
6
9.45 2.87 3.29 10.69 2.92 3.66 12.62 2.98 4.23 14.47 3.04 4.76 15.22 3.06 4.97 16.38 3.10 5.28 18.48 3.17 5.83 19.87 3.22 6.17
8
9.27 2.75 3.37 10.51 2.79 3.77 12.44 2.86 4.35 14.29 2.92 4.89 15.04 2.94 5.12 16.20 2.98 5.44 18.29 3.05 6.00 19.69 3.10 6.35
10
9.09 2.67 3.40 10.33 2.71 3.81 12.25 2.77 4.42 14.11 2.83 4.99 14.86 2.86 5.20 16.02 2.90 5.52 18.11 2.97 6.10 19.51 3.01 6.48
12
8.90 2.62 3.40 10.15 2.66 3.82 12.07 2.73 4.42 13.92 2.79 4.99 14.67 2.81 5.22 15.83 2.85 5.55 17.93 2.92 6.14 19.32 2.97 6.51
14
8.72 2.60 3.35 9.96 2.65 3.76 11.88 2.71 4.38 13.74 2.77 4.96 14.49 2.80 5.18 15.65 2.83 5.53 17.74 2.90 6.12 19.13 2.95 6.48
16
8.52 2.62 3.25 9.77 2.66 3.67 11.69 2.72 4.30 13.55 2.79 4.86 14.30 2.81 5.09 15.45 2.85 5.42 17.54 2.92 6.01 18.94 2.97 6.38
18
8.33 2.66 3.13 9.57 2.70 3.54 11.49 2.76 4.16 13.35 2.83 4.72 14.10 2.85 4.95 15.25 2.89 5.28 17.35 2.96 5.86 18.74 3.01 6.23
20
8.12 2.72 2.99 9.36 2.76 3.39 11.29 2.83 3.99 13.14 2.89 4.55 13.89 2.92 4.76 15.05 2.96 5.08 17.14 3.03 5.66 18.53 3.07 6.04
22
7.90 2.81 2.81 9.15 2.85 3.21 11.07 2.92 3.79 12.92 2.98 4.34 13.67 3.00 4.56 14.83 3.04 4.88 16.92 3.11 5.44 18.31 3.16 5.79
24
7.67 2.91 2.64 8.92 2.96 3.01 10.84 3.02 3.59 12.69 3.08 4.12 13.44 3.11 4.32 14.60 3.15 4.63 16.69 3.22 5.18 18.09 3.27 5.53
26
7.43 3.03 2.45 8.67 3.08 2.81 10.60 3.14 3.38 12.45 3.20 3.89 13.20 3.23 4.09 14.36 3.27 4.39 16.45 3.34 4.93 17.84 3.39 5.26
28
7.17 3.17 2.26 8.42 3.21 2.62 10.34 3.27 3.16 12.19 3.34 3.65 12.94 3.36 3.85 14.10 3.40 4.15 16.19 3.47 4.67 17.58 3.52 4.99
30
6.90 3.31 2.08 8.14 3.35 2.43 10.07 3.42 2.94 11.92 3.48 3.43 12.67 3.50 3.62 13.82 3.54 3.90 15.91 3.61 4.41 17.31 3.66 4.73
32
6.60 3.46 1.91 7.85 3.50 2.24 9.77 3.57 2.74 11.62 3.63 3.20 12.37 3.66 3.38 13.53 3.69 3.67 15.62 3.76 4.15 17.01 3.81 4.46
34
6.29 3.61 1.74 7.53 3.66 2.06 9.46 3.72 2.54 11.31 3.78 2.99 12.06 3.81 3.17 13.22 3.85 3.43 15.31 3.92 3.91 16.70 3.97 4.21
35
6.12 3.69 1.66 7.37 3.73 1.98 9.29 3.80 2.44 11.14 3.86 2.89 11.85 3.88 3.06 13.05 3.93 3.32 15.14 4.00 3.79 16.54 4.08 4.05
36
5.95 3.77 1.58 7.20 3.81 1.89 9.12 3.88 2.35 10.97 3.94 2.78 11.72 3.97 2.95 12.88 4.00 3.22 14.97 4.07 3.68 16.36 4.12 3.97
38
5.59 3.92 1.43 6.83 3.97 1.72 8.76 4.03 2.17 10.61 4.09 2.59 11.36 4.12 2.76 12.52 4.16 3.01 14.61 4.23 3.45 16.00 4.28 3.74
40
5.20 4.07 1.28 6.45 4.12 1.57 8.37 4.18 2.00 10.23 4.24 2.41 10.98 4.27 2.57 12.13 4.31 2.81 14.22 4.38 3.25 15.62 4.43 3.53
42
6.03 4.26 1.42 7.96 4.33 1.84 9.81 4.39 2.23 10.56 4.41 2.39 11.72 4.45 2.63 13.81 4.52 3.06
44
5.59 4.39 1.27 7.52 4.46 1.69 9.37 4.52 2.07 10.12 4.55 2.22 11.28 4.58 2.46
46
7.04 4.58 1.54 8.90 4.64 1.92 9.65 4.67 2.07 10.81 4.70 2.30
DATA DECLARED ACCORDING TO UNI EN 145112
Key
Pc
Cooling capacity (kW)
Pe Input power (kW)
TAE External air temperature (°C) d.b.
ATTENTION
For the intermediate points, refer to the operating limits graphics (§ 9.1)
HEATING MODECOOLING MODE
ΔT WATER DIFFERENT TO NOMINAL ΔT 5°C
35810
Cooling capacity correction factors 0.99 1 1.02 1.03
Input power correction factors 0.99 1 1.01 1.02
DEPOSIT FACTORS [K*m2]/[W] 0.00005 0.0001 0.0002
Cooling capacity correction factors 1 0.98 0.94
Input power correction factors 1 0.98 0.95
Page 54
54 Aermec code 6755530_03 9.2011
ANK 025-085H
11.15. ANK 045 H 400V/3N/50Hz Cooling capacity and input power
TAE °C
TEMPERATURE OF THE WATER PRODUCED °C
8 5 0 5 7 10 15 18
Pc
(kW)Pe(kW)
EER
Pc
(kW)Pe(kW)
EER
Pc
(kW)Pe(kW)
EER
Pc
(kW)Pe(kW)
EER
Pc
(kW)Pe(kW)
EER
Pc
(kW)Pe(kW)
EER
Pc
(kW)Pe(kW)
EER
Pc
(kW)Pe(kW)
EER
-10
10.85 5.71 1.90 12.07 5.75 2.10 13.95 5.81 2.40 15.76 5.87 2.68 16.50 5.89 2.80 17.63 5.93 2.97 19.68 6.00 3.28 21.05 6.04 3.49
-8
10.61 5.17 2.05 11.83 5.21 2.27 13.71 5.27 2.60 15.52 5.33 2.91 16.26 5.35 3.04 17.39 5.39 3.23 19.44 5.46 3.56 20.81 5.50 3.78
-6
10.39 4.69 2.22 11.60 4.73 2.45 13.48 4.79 2.81 15.30 4.85 3.15 16.03 4.87 3.29 17.17 4.91 3.50 19.21 4.98 3.86 20.58 5.02 4.10
-4
10.17 4.27 2.38 11.39 4.31 2.64 13.27 4.37 3.04 15.08 4.43 3.40 15.82 4.45 3.56 16.95 4.49 3.78 19.00 4.56 4.17 20.36 4.60 4.43
-2
9.97 3.90 2.56 11.18 3.94 2.84 13.07 4.01 3.26 14.88 4.06 3.67 15.61 4.09 3.82 16.75 4.13 4.06 18.79 4.20 4.47 20.16 4.24 4.75
0
9.78 3.59 2.72 10.99 3.63 3.03 12.87 3.69 3.49 14.68 3.75 3.91 15.42 3.78 4.08 16.55 3.82 4.33 18.60 3.89 4.78 19.96 3.93 5.08
2
9.59 3.33 2.88 10.80 3.37 3.20 12.68 3.43 3.70 14.49 3.50 4.14 15.23 3.52 4.33 16.36 3.56 4.60 18.41 3.63 5.07 19.77 3.67 5.39
4
9.40 3.12 3.01 10.62 3.16 3.36 12.50 3.22 3.88 14.31 3.28 4.36 15.04 3.31 4.54 16.18 3.35 4.83 18.22 3.42 5.33 19.59 3.46 5.66
6
9.23 2.95 3.13 10.44 2.99 3.49 12.32 3.06 4.03 14.13 3.12 4.53 14.86 3.14 4.73 16.00 3.18 5.03 18.04 3.25 5.55 19.40 3.30 5.88
8
9.05 2.82 3.21 10.26 2.87 3.57 12.14 2.93 4.14 13.95 2.99 4.67 14.69 3.02 4.86 15.82 3.06 5.17 17.86 3.13 5.71 19.22 3.18 6.04
10
8.87 2.74 3.24 10.08 2.78 3.63 11.97 2.85 4.20 13.77 2.91 4.73 14.51 2.93 4.95 15.64 2.97 5.27 17.68 3.04 5.82 19.05 3.09 6.17
12
8.69 2.69 3.23 9.91 2.73 3.63 11.79 2.80 4.21 13.60 2.86 4.76 14.33 2.88 4.98 15.46 2.92 5.29 17.50 2.99 5.85 18.87 3.04 6.21
14
8.51 2.67 3.19 9.72 2.71 3.59 11.60 2.78 4.17 13.41 2.84 4.72 14.14 2.87 4.93 15.28 2.91 5.25 17.32 2.98 5.81 18.68 3.03 6.17
16
8.32 2.68 3.10 9.54 2.73 3.49 11.42 2.79 4.09 13.23 2.86 4.63 13.96 2.88 4.85 15.09 2.92 5.17 17.13 2.99 5.73 18.49 3.04 6.08
18
8.13 2.73 2.98 9.34 2.77 3.37 11.22 2.84 3.95 13.03 2.90 4.49 13.76 2.92 4.71 14.89 2.96 5.03 16.94 3.04 5.57 18.30 3.09 5.92
20
7.93 2.79 2.84 9.14 2.84 3.22 11.02 2.90 3.80 12.83 2.97 4.32 13.56 2.99 4.54 14.69 3.03 4.85 16.73 3.10 5.40 18.10 3.15 5.75
22
7.72 2.88 2.68 8.93 2.92 3.06 10.81 2.99 3.62 12.62 3.06 4.12 13.35 3.08 4.33 14.48 3.12 4.64 16.52 3.19 5.18 17.88 3.24 5.52
24
7.49 2.99 2.51 8.71 3.03 2.87 10.59 3.10 3.42 12.39 3.16 3.92 13.13 3.19 4.12 14.26 3.23 4.41 16.30 3.30 4.94 17.66 3.35 5.27
26
7.25 3.11 2.33 8.47 3.16 2.68 10.35 3.22 3.21 12.16 3.29 3.70 12.89 3.31 3.89 14.02 3.35 4.19 16.06 3.42 4.70 17.42 3.47 5.02
28
7.00 3.25 2.15 8.22 3.29 2.50 10.10 3.36 3.01 11.91 3.42 3.48 12.64 3.45 3.66 13.77 3.49 3.95 15.81 3.56 4.44 17.17 3.61 4.76
30
6.73 3.39 1.99 7.95 3.44 2.31 9.83 3.51 2.80 11.64 3.57 3.26 12.37 3.60 3.44 13.50 3.64 3.71 15.54 3.71 4.19 16.90 3.76 4.49
32
6.45 3.55 1.82 7.66 3.59 2.13 9.54 3.66 2.61 11.35 3.72 3.05 12.08 3.75 3.22 13.21 3.79 3.49 15.25 3.86 3.95 16.61 3.91 4.25
34
6.14 3.71 1.65 7.35 3.75 1.96 9.23 3.82 2.42 11.04 3.88 2.85 11.77 3.91 3.01 12.90 3.95 3.27 14.94 4.02 3.72 16.30 4.07 4.00
35
5.98 3.79 1.58 7.19 3.83 1.88 9.07 3.90 2.33 10.88 3.96 2.75 11.57 3.98 2.91 12.74 4.03 3.16 14.78 4.10 3.60 16.04 4.18 3.84
36
5.81 3.87 1.50 7.03 3.91 1.80 8.91 3.98 2.24 10.71 4.04 2.65 11.45 4.07 2.81 12.58 4.11 3.06 14.62 4.18 3.50 15.98 4.23 3.78
38
5.46 4.02 1.36 6.67 4.07 1.64 8.55 4.14 2.07 10.36 4.20 2.47 11.09 4.23 2.62 12.22 4.27 2.86 14.26 4.34 3.29 15.62 4.39 3.56
40
5.08 4.18 1.22 6.30 4.22 1.49 8.18 4.29 1.91 9.99 4.35 2.30 10.72 4.38 2.45 11.85 4.42 2.68 13.89 4.49 3.09 15.25 4.54 3.36
42
5.89 4.37 1.35 7.77 4.44 1.75 9.58 4.50 2.13 10.31 4.53 2.28 11.44 4.57 2.50 13.48 4.64 2.91
44
5.46 4.51 1.21 7.34 4.57 1.61 9.15 4.64 1.97 9.88 4.66 2.12 11.01 4.70 2.34
46
6.88 4.70 1.46 8.69 4.76 1.83 9.42 4.79 1.97 10.55 4.83 2.18
DATA DECLARED ACCORDING TO UNI EN 145112
Key
Pc
Cooling capacity (kW)
Pe Input power (kW)
TAE External air temperature (°C) d.b.
ATTENTION
For the intermediate points, refer to the operating limits graphics(§ 9.1)
HEATING MODECOOLING MODE
ΔT WATER DIFFERENT TO NOMINAL ΔT 5°C
35810
Cooling capacity correction factors 0.99 1 1.02 1.03
Input power correction factors 0.99 1 1.01 1.02
DEPOSIT FACTORS [K*m2]/[W] 0.00005 0.0001 0.0002
Cooling capacity correction factors 1 0.98 0.94
Input power correction factors 1 0.98 0.95
Page 55
55Aermec code 6755530_03 9.2011
ANK 025-085H
11.16. ANK 045 HP|HA 400V/3N/50Hz Cooling capacity and input power
TAE °C
TEMPERATURE OF THE WATER PRODUCED °C
8 5 0 5 7 10 15 18
Pc
(kW)Pe(kW)
EER
Pc
(kW)Pe(kW)
EER
Pc
(kW)Pe(kW)
EER
Pc
(kW)Pe(kW)
EER
Pc
(kW)Pe(kW)
EER
Pc
(kW)Pe(kW)
EER
Pc
(kW)Pe(kW)
EER
Pc
(kW)Pe(kW)
EER
-10
11.01 5.91 1.86 12.24 5.96 2.05 14.15 6.02 2.35 16.00 6.08 2.63 16.74 6.10 2.74 17.89 6.14 2.91 19.97 6.21 3.22 21.36 6.26 3.41
-8
10.77 5.35 2.01 12.00 5.39 2.23 13.91 5.46 2.55 15.75 5.52 2.85 16.50 5.54 2.98 17.65 5.58 3.16 19.73 5.65 3.49 21.11 5.70 3.70
-6
10.54 4.85 2.17 11.77 4.90 2.40 13.68 4.96 2.76 15.52 5.02 3.09 16.27 5.04 3.23 17.42 5.08 3.43 19.50 5.15 3.79 20.88 5.20 4.02
-4
10.32 4.42 2.33 11.56 4.46 2.59 13.47 4.52 2.98 15.30 4.58 3.34 16.05 4.61 3.48 17.20 4.65 3.70 19.28 4.72 4.08 20.66 4.77 4.33
-2
10.12 4.04 2.50 11.35 4.08 2.78 13.26 4.15 3.20 15.10 4.21 3.59 15.84 4.23 3.74 16.99 4.27 3.98 19.07 4.34 4.39 20.45 4.39 4.66
0
9.92 3.72 2.67 11.15 3.76 2.97 13.06 3.82 3.42 14.90 3.89 3.83 15.64 3.91 4.00 16.79 3.95 4.25 18.87 4.02 4.69 20.25 4.07 4.98
2
9.73 3.45 2.82 10.96 3.49 3.14 12.87 3.56 3.62 14.71 3.62 4.06 15.45 3.64 4.24 16.60 3.68 4.51 18.68 3.76 4.97 20.06 3.80 5.28
4
9.54 3.23 2.95 10.77 3.27 3.29 12.68 3.34 3.80 14.52 3.40 4.27 15.26 3.42 4.46 16.41 3.46 4.74 18.49 3.54 5.22 19.87 3.59 5.53
6
9.36 3.05 3.07 10.59 3.10 3.42 12.50 3.16 3.96 14.34 3.23 4.44 15.08 3.25 4.64 16.23 3.29 4.93 18.30 3.37 5.43 19.69 3.41 5.77
8
9.18 2.92 3.14 10.41 2.97 3.51 12.32 3.03 4.07 14.16 3.10 4.57 14.90 3.12 4.78 16.05 3.16 5.08 18.12 3.24 5.59 19.51 3.29 5.93
10
9.00 2.83 3.18 10.23 2.88 3.55 12.14 2.95 4.12 13.98 3.01 4.64 14.72 3.04 4.84 15.87 3.08 5.15 17.94 3.15 5.70 19.33 3.20 6.04
12
8.82 2.78 3.17 10.05 2.83 3.55 11.96 2.89 4.14 13.80 2.96 4.66 14.54 2.98 4.88 15.69 3.03 5.18 17.76 3.10 5.73 19.14 3.15 6.08
14
8.63 2.76 3.13 9.87 2.81 3.51 11.77 2.88 4.09 13.61 2.94 4.63 14.35 2.97 4.83 15.50 3.01 5.15 17.57 3.08 5.70 18.96 3.13 6.06
16
8.45 2.78 3.04 9.68 2.82 3.43 11.58 2.89 4.01 13.42 2.96 4.53 14.16 2.98 4.75 15.31 3.02 5.07 17.38 3.10 5.61 18.76 3.15 5.96
18
8.25 2.82 2.93 9.48 2.87 3.30 11.39 2.94 3.87 13.22 3.00 4.41 13.97 3.03 4.61 15.11 3.07 4.92 17.18 3.14 5.47 18.57 3.19 5.82
20
8.04 2.89 2.78 9.28 2.94 3.16 11.18 3.01 3.71 13.02 3.07 4.24 13.76 3.10 4.44 14.91 3.14 4.75 16.98 3.21 5.29 18.36 3.26 5.63
22
7.83 2.98 2.63 9.06 3.03 2.99 10.97 3.10 3.54 12.80 3.16 4.05 13.55 3.19 4.25 14.69 3.23 4.55 16.76 3.30 5.08 18.14 3.36 5.40
24
7.60 3.09 2.46 8.83 3.14 2.81 10.74 3.21 3.35 12.58 3.27 3.85 13.32 3.30 4.04 14.47 3.34 4.33 16.54 3.42 4.84 17.92 3.47 5.16
26
7.36 3.22 2.29 8.59 3.27 2.63 10.50 3.34 3.14 12.34 3.40 3.63 13.08 3.43 3.81 14.22 3.47 4.10 16.29 3.54 4.60 17.68 3.60 4.91
28
7.11 3.36 2.12 8.34 3.41 2.45 10.24 3.48 2.94 12.08 3.54 3.41 12.82 3.57 3.59 13.97 3.61 3.87 16.04 3.69 4.35 17.42 3.74 4.66
30
6.83 3.51 1.95 8.06 3.56 2.26 9.97 3.63 2.75 11.81 3.70 3.19 12.55 3.72 3.37 13.70 3.76 3.64 15.77 3.84 4.11 17.15 3.89 4.41
32
6.54 3.67 1.78 7.77 3.72 2.09 9.68 3.79 2.55 11.52 3.85 2.99 12.26 3.88 3.16 13.41 3.92 3.42 15.47 4.00 3.87 16.86 4.05 4.16
34
6.23 3.84 1.62 7.46 3.88 1.92 9.37 3.95 2.37 11.21 4.02 2.79 11.95 4.05 2.95 13.09 4.09 3.20 15.16 4.16 3.64 16.54 4.21 3.93
35
6.07 3.92 1.55 7.30 3.97 1.84 9.21 4.04 2.28 11.04 4.10 2.69 11.74 4.12 2.85 12.93 4.17 3.10 15.00 4.24 3.54 16.25 4.27 3.81
36
5.90 4.00 1.48 7.13 4.05 1.76 9.04 4.12 2.19 10.87 4.18 2.60 11.61 4.21 2.76 12.76 4.25 3.00 14.83 4.33 3.42 16.21 4.38 3.70
38
5.54 4.17 1.33 6.77 4.21 1.61 8.68 4.28 2.03 10.51 4.35 2.42 11.26 4.37 2.58 12.40 4.42 2.81 14.47 4.49 3.22 15.85 4.54 3.49
40
5.16 4.33 1.19 6.39 4.37 1.46 8.30 4.44 1.87 10.13 4.51 2.25 10.87 4.53 2.40 12.02 4.57 2.63 14.09 4.65 3.03 15.47 4.70 3.29
42
5.98 4.52 1.32 7.89 4.59 1.72 9.72 4.66 2.09 10.47 4.69 2.23 11.61 4.73 2.45 13.68 4.80 2.85
44
5.54 4.67 1.19 7.45 4.73 1.58 9.28 4.80 1.93 10.03 4.83 2.08 11.17 4.87 2.29
46
6.98 4.86 1.44 8.82 4.93 1.79 9.56 4.95 1.93 10.71 5.00 2.14
DATA DECLARED ACCORDING TO UNI EN 145112
Key
Pc
Cooling capacity (kW)
Pe Input power (kW)
TAE External air temperature (°C) d.b.
ATTENTION
For the intermediate points, refer to the operating limits graphics (§ 9.1)
HEATING MODECOOLING MODE
ΔT WATER DIFFERENT TO NOMINAL ΔT 5°C
35810
Cooling capacity correction factors 0.99 1 1.02 1.03
Input power correction factors 0.99 1 1.01 1.02
DEPOSIT FACTORS [K*m2]/[W] 0.00005 0.0001 0.0002
Cooling capacity correction factors 1 0.98 0.94
Input power correction factors 1 0.98 0.95
Page 56
56 Aermec code 6755530_03 9.2011
ANK 025-085H
11.17. ANK 050 H 400V/3N/50Hz Cooling capacity and input power
TAE °C
TEMPERATURE OF THE WATER PRODUCED °C
8 5 0 5 7 10 15 18
Pc
(kW)Pe(kW)
EER
Pc
(kW)Pe(kW)
EER
Pc
(kW)Pe(kW)
EER
Pc
(kW)Pe(kW)
EER
Pc
(kW)Pe(kW)
EER
Pc
(kW)Pe(kW)
EER
Pc
(kW)Pe(kW)
EER
Pc
(kW)Pe(kW)
EER
-10
12.23 6.23 1.96 13.60 6.27 2.17 15.72 6.34 2.48 17.77 6.40 2.78 18.59 6.43 2.89 19.87 6.47 3.07 22.18 6.54 3.39 23.73 6.59 3.60
-8
11.96 5.64 2.12 13.33 5.68 2.35 15.45 5.75 2.69 17.50 5.81 3.01 18.32 5.84 3.14 19.60 5.88 3.33 21.91 5.95 3.68 23.45 6.00 3.91
-6
11.71 5.11 2.29 13.08 5.16 2.53 15.20 5.22 2.91 17.24 5.29 3.26 18.07 5.31 3.40 19.35 5.35 3.62 21.65 5.43 3.99 23.20 5.48 4.23
-4
11.47 4.65 2.47 12.83 4.70 2.73 14.96 4.76 3.14 17.00 4.83 3.52 17.83 4.86 3.67 19.10 4.90 3.90 21.41 4.97 4.31 22.95 5.02 4.57
-2
11.24 4.25 2.64 12.61 4.30 2.93 14.73 4.37 3.37 16.77 4.43 3.79 17.60 4.46 3.95 18.87 4.50 4.19 21.18 4.57 4.63 22.72 4.63 4.91
0
11.02 3.91 2.82 12.39 3.96 3.13 14.51 4.03 3.60 16.55 4.09 4.05 17.37 4.12 4.22 18.65 4.16 4.48 20.96 4.24 4.94 22.50 4.29 5.24
2
10.81 3.63 2.98 12.17 3.68 3.31 14.29 3.75 3.81 16.34 3.81 4.29 17.16 3.84 4.47 18.44 3.88 4.75 20.74 3.96 5.24 22.28 4.01 5.56
4
10.60 3.40 3.12 11.97 3.44 3.48 14.09 3.51 4.01 16.13 3.58 4.51 16.95 3.61 4.70 18.23 3.65 4.99 20.54 3.73 5.51 22.07 3.78 5.84
6
10.40 3.21 3.24 11.77 3.26 3.61 13.89 3.33 4.17 15.93 3.40 4.69 16.75 3.43 4.88 18.03 3.47 5.20 20.33 3.54 5.74 21.87 3.60 6.08
8
10.20 3.08 3.31 11.57 3.12 3.71 13.69 3.20 4.28 15.73 3.26 4.83 16.55 3.29 5.03 17.83 3.33 5.35 20.13 3.41 5.90 21.67 3.46 6.26
10
10.00 2.98 3.36 11.37 3.03 3.75 13.49 3.10 4.35 15.53 3.17 4.90 16.35 3.20 5.11 17.63 3.24 5.44 19.93 3.32 6.00 21.47 3.37 6.37
12
9.80 2.93 3.34 11.16 2.98 3.74 13.28 3.05 4.35 15.32 3.12 4.91 16.15 3.14 5.14 17.42 3.19 5.46 19.73 3.26 6.05 21.26 3.32 6.40
14
9.59 2.91 3.30 10.96 2.96 3.70 13.08 3.03 4.32 15.12 3.10 4.88 15.94 3.13 5.09 17.22 3.17 5.43 19.52 3.25 6.01 21.05 3.30 6.38
16
9.38 2.93 3.20 10.75 2.97 3.62 12.87 3.05 4.22 14.91 3.12 4.78 15.73 3.14 5.01 17.01 3.19 5.33 19.31 3.26 5.92 20.84 3.32 6.28
18
9.16 2.97 3.08 10.53 3.02 3.49 12.65 3.09 4.09 14.69 3.16 4.65 15.51 3.19 4.86 16.79 3.23 5.20 19.09 3.31 5.77 20.62 3.36 6.14
20
8.93 3.04 2.94 10.30 3.09 3.33 12.42 3.17 3.92 14.46 3.23 4.48 15.28 3.26 4.69 16.56 3.31 5.00 18.86 3.38 5.58 20.39 3.44 5.93
22
8.70 3.14 2.77 10.06 3.19 3.15 12.18 3.26 3.74 14.22 3.33 4.27 15.04 3.36 4.48 16.32 3.40 4.80 18.62 3.48 5.35 20.15 3.53 5.71
24
8.44 3.26 2.59 9.81 3.31 2.96 11.93 3.38 3.53 13.97 3.45 4.05 14.79 3.48 4.25 16.07 3.52 4.57 18.37 3.60 5.10 19.90 3.65 5.45
26
8.18 3.39 2.41 9.54 3.44 2.77 11.66 3.51 3.32 13.70 3.58 3.83 14.53 3.61 4.02 15.80 3.65 4.33 18.10 3.73 4.85 19.63 3.79 5.18
28
7.89 3.54 2.23 9.26 3.59 2.58 11.38 3.66 3.11 13.42 3.73 3.60 14.24 3.76 3.79 15.52 3.80 4.08 17.81 3.88 4.59 19.35 3.94 4.91
30
7.59 3.70 2.05 8.96 3.75 2.39 11.08 3.82 2.90 13.12 3.89 3.37 13.94 3.92 3.56 15.21 3.96 3.84 17.51 4.04 4.33 19.05 4.10 4.65
32
7.27 3.87 1.88 8.63 3.92 2.20 10.75 3.99 2.69 12.79 4.06 3.15 13.62 4.09 3.33 14.89 4.13 3.61 17.19 4.21 4.08 18.72 4.26 4.39
34
6.92 4.04 1.71 8.29 4.09 2.03 10.41 4.16 2.50 12.45 4.23 2.94 13.27 4.26 3.12 14.54 4.30 3.38 16.84 4.38 3.84 18.38 4.44 4.14
35
6.74 4.13 1.63 8.11 4.18 1.94 10.23 4.25 2.41 12.26 4.32 2.84 13.04 4.34 3.00 14.36 4.39 3.27 16.66 4.47 3.73 18.07 4.56 3.96
36
6.55 4.22 1.55 7.92 4.26 1.86 10.04 4.34 2.31 12.08 4.41 2.74 12.90 4.44 2.91 14.17 4.48 3.16 16.47 4.56 3.61 18.01 4.61 3.91
38
6.15 4.39 1.40 7.52 4.44 1.69 9.64 4.51 2.14 11.68 4.58 2.55 12.50 4.61 2.71 13.78 4.65 2.96 16.08 4.73 3.40 17.61 4.78 3.68
40
5.73 4.56 1.26 7.10 4.61 1.54 9.22 4.68 1.97 11.25 4.75 2.37 12.08 4.78 2.53 13.35 4.82 2.77 15.65 4.90 3.19 17.18 4.95 3.47
42
6.64 4.77 1.39 8.76 4.84 1.81 10.80 4.91 2.20 11.62 4.94 2.35 12.90 4.98 2.59 15.20 5.06 3.00
44
6.15 4.91 1.25 8.27 4.99 1.66 10.31 5.06 2.04 11.14 5.08 2.19 12.41 5.13 2.42
46
7.75 5.12 1.51 9.79 5.19 1.89 10.62 5.22 2.03 11.89 5.26 2.26
DATA DECLARED ACCORDING TO UNI EN 145112
Key
Pc
Cooling capacity (kW)
Pe Input power (kW)
TAE External air temperature (°C) d.b.
ATTENTION
For the intermediate points, refer to the operating limits graphics (§ 9.1)
HEATING MODECOOLING MODE
ΔT WATER DIFFERENT TO NOMINAL ΔT 5°C
35810
Cooling capacity correction factors 0.99 1 1.02 1.03
Input power correction factors 0.99 1 1.01 1.02
DEPOSIT FACTORS [K*m2]/[W] 0.00005 0.0001 0.0002
Cooling capacity correction factors 1 0.98 0.94
Input power correction factors 1 0.98 0.95
Page 57
57Aermec code 6755530_03 9.2011
ANK 025-085H
11.18. ANK 050 HP|HA 400V/3N/50Hz Cooling capacity and input power
TAE °C
TEMPERATURE OF THE WATER PRODUCED °C
8 5 0 5 7 10 15 18
Pc
(kW)Pe(kW)
EER
Pc
(kW)Pe(kW)
EER
Pc
(kW)Pe(kW)
EER
Pc
(kW)Pe(kW)
EER
Pc
(kW)Pe(kW)
EER
Pc
(kW)Pe(kW)
EER
Pc
(kW)Pe(kW)
EER
Pc
(kW)Pe(kW)
EER
-10
12.40 6.45 1.92 13.79 6.49 2.12 15.94 6.56 2.43 18.01 6.62 2.72 18.85 6.65 2.83 20.15 6.69 3.01 22.49 6.77 3.32 24.05 6.82 3.53
-8
12.12 5.83 2.08 13.51 5.88 2.30 15.67 5.95 2.63 17.74 6.01 2.95 18.58 6.04 3.08 19.87 6.08 3.27 22.21 6.16 3.61 23.78 6.21 3.83
-6
11.87 5.29 2.24 13.26 5.33 2.49 15.41 5.40 2.85 17.48 5.47 3.20 18.32 5.50 3.33 19.61 5.54 3.54 21.95 5.62 3.91 23.52 5.67 4.15
-4
11.62 4.81 2.42 13.01 4.86 2.68 15.16 4.93 3.08 17.23 5.00 3.45 18.07 5.02 3.60 19.37 5.07 3.82 21.71 5.14 4.22 23.27 5.19 4.48
-2
11.39 4.40 2.59 12.78 4.45 2.87 14.93 4.52 3.30 17.00 4.59 3.70 17.84 4.61 3.87 19.13 4.66 4.11 21.47 4.73 4.54 23.03 4.79 4.81
0
11.17 4.05 2.76 12.56 4.10 3.06 14.71 4.17 3.53 16.78 4.24 3.96 17.61 4.26 4.13 18.91 4.31 4.39 21.25 4.38 4.85 22.81 4.44 5.14
2
10.95 3.76 2.91 12.34 3.80 3.25 14.49 3.87 3.74 16.56 3.94 4.20 17.40 3.97 4.38 18.69 4.01 4.66 21.03 4.09 5.14 22.59 4.15 5.44
4
10.75 3.52 3.05 12.13 3.56 3.41 14.28 3.64 3.92 16.35 3.70 4.42 17.19 3.73 4.61 18.48 3.78 4.89 20.82 3.85 5.41 22.38 3.91 5.72
6
10.54 3.33 3.17 11.93 3.37 3.54 14.08 3.45 4.08 16.15 3.52 4.59 16.98 3.54 4.80 18.28 3.59 5.09 20.61 3.67 5.62 22.17 3.72 5.96
8
10.34 3.18 3.25 11.73 3.23 3.63 13.87 3.31 4.19 15.94 3.38 4.72 16.78 3.40 4.94 18.07 3.45 5.24 20.41 3.53 5.78 21.97 3.58 6.14
10
10.14 3.09 3.28 11.52 3.14 3.67 13.67 3.21 4.26 15.74 3.28 4.80 16.58 3.31 5.01 17.87 3.35 5.33 20.20 3.43 5.89 21.76 3.49 6.23
12
9.93 3.03 3.28 11.32 3.08 3.68 13.47 3.15 4.28 15.53 3.22 4.82 16.37 3.25 5.04 17.66 3.30 5.35 20.00 3.38 5.92 21.56 3.43 6.29
14
9.72 3.01 3.23 11.11 3.06 3.63 13.26 3.14 4.22 15.33 3.21 4.78 16.16 3.24 4.99 17.45 3.28 5.32 19.79 3.36 5.89 21.35 3.41 6.26
16
9.51 3.03 3.14 10.90 3.08 3.54 13.04 3.15 4.14 15.11 3.22 4.69 15.95 3.25 4.91 17.24 3.30 5.22 19.57 3.38 5.79 21.13 3.43 6.16
18
9.29 3.08 3.02 10.68 3.12 3.42 12.82 3.20 4.01 14.89 3.27 4.55 15.73 3.30 4.77 17.02 3.34 5.10 19.35 3.43 5.64 20.91 3.48 6.01
20
9.06 3.15 2.88 10.44 3.20 3.26 12.59 3.27 3.85 14.66 3.35 4.38 15.50 3.38 4.59 16.79 3.42 4.91 19.12 3.50 5.46 20.68 3.56 5.81
22
8.82 3.25 2.71 10.20 3.30 3.09 12.35 3.37 3.66 14.42 3.45 4.18 15.25 3.48 4.38 16.54 3.52 4.70 18.88 3.60 5.24 20.43 3.66 5.58
24
8.56 3.37 2.54 9.95 3.42 2.91 12.09 3.50 3.45 14.16 3.57 3.97 15.00 3.60 4.17 16.29 3.64 4.48 18.62 3.72 5.01 20.18 3.78 5.34
26
8.29 3.51 2.36 9.68 3.56 2.72 11.82 3.64 3.25 13.89 3.71 3.74 14.73 3.74 3.94 16.02 3.78 4.24 18.35 3.86 4.75 19.90 3.92 5.08
28
8.00 3.66 2.19 9.39 3.71 2.53 11.54 3.79 3.04 13.60 3.86 3.52 14.44 3.89 3.71 15.73 3.94 3.99 18.06 4.02 4.49 19.62 4.07 4.82
30
7.69 3.83 2.01 9.08 3.88 2.34 11.23 3.95 2.84 13.30 4.03 3.30 14.13 4.06 3.48 15.42 4.10 3.76 17.75 4.18 4.25 19.31 4.24 4.55
32
7.37 4.00 1.84 8.75 4.05 2.16 10.90 4.13 2.64 12.97 4.20 3.09 13.80 4.23 3.26 15.10 4.27 3.54 17.43 4.36 4.00 18.98 4.41 4.30
34
7.02 4.18 1.68 8.40 4.23 1.99 10.55 4.31 2.45 12.62 4.38 2.88 13.45 4.41 3.05 14.74 4.45 3.31 17.08 4.53 3.77 18.63 4.59 4.06
35
6.83 4.27 1.60 8.22 4.32 1.90 10.37 4.40 2.36 12.43 4.47 2.78 13.22 4.49 2.94 14.56 4.54 3.21 16.89 4.62 3.66 18.30 4.66 3.93
36
6.64 4.36 1.52 8.03 4.41 1.82 10.18 4.49 2.27 12.24 4.56 2.68 13.08 4.59 2.85 14.37 4.63 3.10 16.70 4.71 3.55 18.25 4.77 3.83
38
6.24 4.54 1.37 7.62 4.59 1.66 9.77 4.67 2.09 11.84 4.74 2.50 12.68 4.77 2.66 13.97 4.81 2.90 16.30 4.89 3.33 17.85 4.95 3.61
40
5.81 4.71 1.23 7.19 4.76 1.51 9.34 4.84 1.93 11.41 4.91 2.32 12.25 4.94 2.48 13.54 4.99 2.71 15.87 5.07 3.13 17.42 5.12 3.40
42
6.73 4.93 1.37 8.88 5.01 1.77 10.95 5.08 2.16 11.78 5.11 2.31 13.08 5.15 2.54 15.41 5.23 2.95
44
6.24 5.08 1.23 8.39 5.16 1.63 10.46 5.23 2.00 11.29 5.26 2.15 12.58 5.30 2.37
46
7.86 5.30 1.48 9.93 5.37 1.85 10.76 5.40 1.99 12.05 5.44 2.22
DATA DECLARED ACCORDING TO UNI EN 145112
Key
Pc
Cooling capacity (kW)
Pe Input power (kW)
TAE External air temperature (°C) d.b.
ATTENTION
For the intermediate points, refer to the operating limits graphics (§ 9.1)
HEATING MODECOOLING MODE
ΔT WATER DIFFERENT TO NOMINAL ΔT 5°C
35810
Cooling capacity correction factors 0.99 1 1.02 1.03
Input power correction factors 0.99 1 1.01 1.02
DEPOSIT FACTORS [K*m2]/[W] 0.00005 0.0001 0.0002
Cooling capacity correction factors 1 0.98 0.94
Input power correction factors 1 0.98 0.95
Page 58
58 Aermec code 6755530_03 9.2011
ANK 025-085H
11.19. ANK 085 H 400V/3N/50Hz Cooling capacity and input power
TAE °C
TEMPERATURE OF THE WATER PRODUCED °C
8 5 0 5 7 10 15 18
Pc
(kW)Pe(kW)
EER
Pc
(kW)Pe(kW)
EER
Pc
(kW)Pe(kW)
EER
Pc
(kW)Pe(kW)
EER
Pc
(kW)Pe(kW)
EER
Pc
(kW)Pe(kW)
EER
Pc
(kW)Pe(kW)
EER
Pc
(kW)Pe(kW)
EER
-10
14.52 7.49 1.94 16.14 7.55 2.14 18.66 7.63 2.45 21.09 7.70 2.74 22.07 7.73 2.86 23.59 7.78 3.03 26.33 7.87 3.35 28.17 7.93 3.55
-8
14.20 6.78 2.09 15.82 6.83 2.32 18.34 6.91 2.65 20.77 6.99 2.97 21.75 7.02 3.10 23.27 7.07 3.29 26.01 7.16 3.63 27.84 7.22 3.86
-6
13.90 6.15 2.26 15.52 6.20 2.50 18.04 6.28 2.87 20.47 6.36 3.22 21.45 6.39 3.36 22.97 6.44 3.57 25.71 6.53 3.94 27.54 6.59 4.18
-4
13.61 5.60 2.43 15.24 5.65 2.70 17.75 5.73 3.10 20.18 5.81 3.47 21.16 5.84 3.62 22.68 5.89 3.85 25.42 5.98 4.25 27.25 6.04 4.51
-2
13.34 5.12 2.61 14.96 5.17 2.89 17.48 5.25 3.33 19.91 5.33 3.74 20.89 5.36 3.90 22.40 5.41 4.14 25.14 5.50 4.57 26.97 5.56 4.85
0
13.08 4.71 2.78 14.70 4.76 3.09 17.22 4.85 3.55 19.65 4.92 3.99 20.63 4.96 4.16 22.14 5.01 4.42 24.88 5.10 4.88 26.71 5.16 5.18
2
12.83 4.37 2.94 14.45 4.42 3.27 16.97 4.50 3.77 19.39 4.58 4.23 20.37 4.62 4.41 21.89 4.67 4.69 24.63 4.76 5.17 26.45 4.82 5.49
4
12.58 4.09 3.08 14.21 4.14 3.43 16.72 4.23 3.95 19.15 4.31 4.44 20.13 4.34 4.64 21.64 4.39 4.93 24.38 4.48 5.44 26.20 4.54 5.77
6
12.34 3.87 3.19 13.97 3.92 3.56 16.48 4.01 4.11 18.91 4.09 4.62 19.89 4.12 4.83 21.40 4.17 5.13 24.14 4.26 5.67 25.96 4.33 6.00
8
12.11 3.70 3.27 13.73 3.76 3.65 16.25 3.84 4.23 18.67 3.92 4.76 19.65 3.96 4.96 21.16 4.01 5.28 23.90 4.10 5.83 25.72 4.16 6.18
10
11.87 3.59 3.31 13.49 3.65 3.70 16.01 3.73 4.29 18.43 3.81 4.84 19.41 3.85 5.04 20.92 3.90 5.36 23.66 3.99 5.93 25.48 4.05 6.29
12
11.63 3.52 3.30 13.25 3.58 3.70 15.77 3.67 4.30 18.19 3.75 4.85 19.17 3.78 5.07 20.68 3.83 5.40 23.42 3.93 5.96 25.24 3.99 6.33
14
11.39 3.50 3.25 13.01 3.56 3.65 15.53 3.65 4.25 17.95 3.73 4.81 18.93 3.76 5.03 20.44 3.81 5.36 23.17 3.91 5.93 24.99 3.97 6.29
16
11.14 3.52 3.16 12.76 3.58 3.56 15.27 3.66 4.17 17.70 3.75 4.72 18.67 3.78 4.94 20.19 3.83 5.27 22.92 3.93 5.83 24.74 3.99 6.20
18
10.88 3.58 3.04 12.50 3.63 3.44 15.02 3.72 4.04 17.44 3.80 4.59 18.41 3.84 4.79 19.93 3.89 5.12 22.66 3.98 5.69 24.48 4.05 6.04
20
10.61 3.66 2.90 12.23 3.72 3.29 14.75 3.81 3.87 17.17 3.89 4.41 18.14 3.92 4.63 19.66 3.98 4.94 22.39 4.07 5.50 24.21 4.13 5.86
22
10.32 3.78 2.73 11.95 3.84 3.11 14.46 3.92 3.69 16.88 4.01 4.21 17.86 4.04 4.42 19.37 4.09 4.74 22.10 4.19 5.27 23.93 4.25 5.63
24
10.02 3.92 2.56 11.65 3.98 2.93 14.16 4.06 3.49 16.58 4.15 4.00 17.56 4.18 4.20 19.07 4.23 4.51 21.80 4.33 5.03 23.63 4.39 5.38
26
9.71 4.08 2.38 11.33 4.14 2.74 13.85 4.23 3.27 16.27 4.31 3.77 17.24 4.34 3.97 18.76 4.40 4.26 21.49 4.49 4.79 23.31 4.56 5.11
28
9.37 4.26 2.20 10.99 4.32 2.54 13.51 4.41 3.06 15.93 4.49 3.55 16.91 4.52 3.74 18.42 4.58 4.02 21.15 4.67 4.53 22.97 4.73 4.86
30
9.01 4.45 2.02 10.63 4.51 2.36 13.15 4.60 2.86 15.57 4.68 3.33 16.55 4.72 3.51 18.06 4.77 3.79 20.79 4.86 4.28 22.61 4.93 4.59
32
8.63 4.65 1.86 10.25 4.71 2.18 12.77 4.80 2.66 15.19 4.88 3.11 16.16 4.92 3.28 17.68 4.97 3.56 20.40 5.06 4.03 22.23 5.13 4.33
34
8.21 4.86 1.69 9.84 4.92 2.00 12.36 5.01 2.47 14.77 5.09 2.90 15.75 5.12 3.08 17.27 5.18 3.33 19.99 5.27 3.79 21.81 5.34 4.08
35
8.00 4.97 1.61 9.62 5.02 1.92 12.14 5.11 2.38 14.56 5.20 2.80 15.48 5.22 2.97 17.05 5.28 3.23 19.78 5.38 3.68 21.43 5.50 3.89
36
7.77 5.07 1.53 9.40 5.13 1.83 11.92 5.22 2.28 14.34 5.30 2.71 15.31 5.33 2.87 16.83 5.39 3.12 19.55 5.48 3.57 21.38 5.55 3.85
38
7.30 5.28 1.38 8.93 5.34 1.67 11.44 5.42 2.11 13.86 5.51 2.52 14.84 5.54 2.68 16.36 5.59 2.93 19.08 5.69 3.35 20.90 5.75 3.63
40
6.80 5.48 1.24 8.42 5.54 1.52 10.94 5.63 1.94 13.36 5.71 2.34 14.34 5.74 2.50 15.85 5.80 2.73 18.58 5.89 3.15 20.40 5.95 3.43
42
7.88 5.73 1.38 10.40 5.82 1.79 12.82 5.90 2.17 13.80 5.94 2.32 15.31 5.99 2.56 18.04 6.08 2.97
44
7.30 5.91 1.24 9.82 6.00 1.64 12.24 6.08 2.01 13.22 6.12 2.16 14.73 6.17 2.39
46
9.20 6.16 1.49 11.62 6.24 1.86 12.60 6.28 2.01 14.12 6.33 2.23
ΔT WATER DIFFERENT TO NOMINAL ΔT 5°C
35810
Cooling capacity correction factors 0.99 1 1.02 1.03
Input power correction factors 0.99 1 1.01 1.02
DEPOSIT FACTORS [K*m2]/[W] 0.00005 0.0001 0.0002
Cooling capacity correction factors 1 0.98 0.94
Input power correction factors 1 0.98 0.95
DATA DECLARED ACCORDING TO UNI EN 145112
Key
Pc
Cooling capacity (kW)
Pe Input power (kW)
TAE External air temperature (°C) d.b.
ATTENTION
For the intermediate points, refer to the operating limits graphics (§ 9.1)
HEATING MODECOOLING MODE
Page 59
59Aermec code 6755530_03 9.2011
ANK 025-085H
ΔT WATER DIFFERENT TO NOMINAL ΔT 5°C
35810
Cooling capacity correction factors 0.99 1 1.02 1.03
Input power correction factors 0.99 1 1.01 1.02
DEPOSIT FACTORS [K*m2]/[W] 0.00005 0.0001 0.0002
Cooling capacity correction factors 1 0.98 0.94
Input power correction factors 1 0.98 0.95
11.20. ANK 085 HP|HA 400V/3N/50Hz Cooling capacity and input power
TAE °C
TEMPERATURE OF THE WATER PRODUCED °C
8 5 0 5 7 10 15 18
Pc
(kW)Pe(kW)
EER
Pc
(kW)Pe(kW)
EER
Pc
(kW)Pe(kW)
EER
Pc
(kW)Pe(kW)
EER
Pc
(kW)Pe(kW)
EER
Pc
(kW)Pe(kW)
EER
Pc
(kW)Pe(kW)
EER
Pc
(kW)Pe(kW)
EER
-10
14.70 7.68 1.91 16.35 7.73 2.12 18.90 7.82 2.42 21.36 7.89 2.71 22.36 7.92 2.82 23.90 7.97 3.00 26.68 8.06 3.31 28.53 8.12 3.51
-8
14.38 6.95 2.07 16.03 7.00 2.29 18.58 7.09 2.62 21.04 7.16 2.94 22.03 7.20 3.06 23.57 7.24 3.26 26.35 7.33 3.59 28.20 7.40 3.81
-6
14.08 6.30 2.23 15.72 6.36 2.47 18.27 6.44 2.84 20.73 6.52 3.18 21.73 6.55 3.32 23.26 6.60 3.52 26.04 6.69 3.89 27.89 6.75 4.13
-4
13.79 5.73 2.41 15.43 5.79 2.66 17.98 5.87 3.06 20.44 5.95 3.44 21.43 5.99 3.58 22.97 6.04 3.80 25.75 6.13 4.20 27.60 6.19 4.46
-2
13.51 5.24 2.58 15.16 5.30 2.86 17.71 5.38 3.29 20.16 5.46 3.69 21.16 5.50 3.85 22.69 5.55 4.09 25.47 5.64 4.52 27.32 5.70 4.79
0
13.25 4.82 2.75 14.89 4.88 3.05 17.44 4.97 3.51 19.90 5.05 3.94 20.89 5.08 4.11 22.43 5.13 4.37 25.20 5.22 4.83 27.05 5.29 5.11
2
12.99 4.47 2.91 14.64 4.53 3.23 17.19 4.62 3.72 19.64 4.70 4.18 20.64 4.73 4.36 22.17 4.78 4.64 24.94 4.88 5.11 26.79 4.94 5.42
4
12.75 4.19 3.04 14.39 4.25 3.39 16.94 4.33 3.91 19.39 4.41 4.40 20.39 4.45 4.58 21.92 4.50 4.87 24.69 4.59 5.38 26.54 4.66 5.70
6
12.50 3.96 3.16 14.15 4.02 3.52 16.70 4.11 4.06 19.15 4.19 4.57 20.14 4.22 4.77 21.68 4.28 5.07 24.45 4.37 5.59 26.30 4.43 5.94
8
12.26 3.79 3.23 13.91 3.85 3.61 16.46 3.94 4.18 18.91 4.02 4.70 19.90 4.06 4.90 21.44 4.11 5.22 24.21 4.20 5.76 26.05 4.27 6.10
10
12.02 3.68 3.27 13.67 3.74 3.66 16.22 3.82 4.25 18.67 3.91 4.77 19.66 3.94 4.99 21.19 3.99 5.31 23.96 4.09 5.86 25.81 4.15 6.22
12
11.78 3.61 3.26 13.42 3.67 3.66 15.97 3.76 4.25 18.43 3.84 4.80 19.42 3.88 5.01 20.95 3.93 5.33 23.72 4.02 5.90 25.57 4.09 6.25
14
11.53 3.59 3.21 13.18 3.65 3.61 15.73 3.74 4.21 18.18 3.82 4.76 19.17 3.85 4.98 20.70 3.91 5.29 23.47 4.00 5.87 25.32 4.07 6.22
16
11.28 3.61 3.12 12.92 3.67 3.52 15.47 3.76 4.11 17.92 3.84 4.67 18.92 3.87 4.89 20.45 3.93 5.20 23.22 4.02 5.78 25.06 4.09 6.13
18
11.02 3.66 3.01 12.66 3.72 3.40 15.21 3.81 3.99 17.66 3.90 4.53 18.65 3.93 4.75 20.19 3.98 5.07 22.95 4.08 5.63 24.80 4.15 5.98
20
10.74 3.75 2.86 12.39 3.81 3.25 14.94 3.90 3.83 17.39 3.99 4.36 18.38 4.02 4.57 19.91 4.08 4.88 22.68 4.17 5.44 24.52 4.24 5.78
22
10.46 3.87 2.70 12.10 3.93 3.08 14.65 4.02 3.64 17.10 4.11 4.16 18.09 4.14 4.37 19.62 4.19 4.68 22.39 4.29 5.22 24.23 4.36 5.56
24
10.15 4.02 2.52 11.80 4.08 2.89 14.35 4.17 3.44 16.80 4.25 3.95 17.79 4.29 4.15 19.32 4.34 4.45 22.09 4.44 4.98 23.93 4.50 5.32
26
9.83 4.18 2.35 11.48 4.24 2.71 14.02 4.33 3.24 16.48 4.42 3.73 17.47 4.45 3.93 19.00 4.51 4.21 21.76 4.60 4.73 23.61 4.67 5.06
28
9.49 4.37 2.17 11.14 4.42 2.52 13.68 4.52 3.03 16.13 4.60 3.51 17.13 4.64 3.69 18.66 4.69 3.98 21.42 4.79 4.47 23.27 4.85 4.80
30
9.13 4.56 2.00 10.77 4.62 2.33 13.32 4.71 2.83 15.77 4.80 3.29 16.76 4.83 3.47 18.29 4.89 3.74 21.06 4.98 4.23 22.90 5.05 4.53
32
8.74 4.77 1.83 10.38 4.83 2.15 12.93 4.92 2.63 15.38 5.01 3.07 16.37 5.04 3.25 17.90 5.09 3.52 20.67 5.19 3.98 22.51 5.26 4.28
34
8.32 4.98 1.67 9.97 5.04 1.98 12.51 5.13 2.44 14.97 5.22 2.87 15.96 5.25 3.04 17.49 5.31 3.29 20.25 5.40 3.75 22.10 5.47 4.04
35
8.10 5.09 1.59 9.75 5.15 1.89 12.30 5.24 2.35 14.75 5.33 2.77 15.68 5.35 2.93 17.27 5.41 3.19 20.03 5.51 3.64 21.69 5.59 3.88
36
7.87 5.20 1.51 9.52 5.26 1.81 12.07 5.35 2.26 14.52 5.43 2.67 15.51 5.47 2.84 17.04 5.52 3.09 19.81 5.62 3.52 21.65 5.68 3.81
38
7.40 5.41 1.37 9.04 5.47 1.65 11.59 5.56 2.08 14.04 5.65 2.48 15.03 5.68 2.65 16.57 5.73 2.89 19.33 5.83 3.32 21.17 5.90 3.59
40
6.89 5.62 1.23 8.53 5.68 1.50 11.08 5.77 1.92 13.53 5.85 2.31 14.52 5.89 2.47 16.06 5.94 2.70 18.82 6.04 3.12 20.66 6.10 3.39
42
7.98 5.87 1.36 10.53 5.96 1.77 12.99 6.05 2.15 13.98 6.08 2.30 15.51 6.14 2.53 18.27 6.23 2.93
44
7.40 6.06 1.22 9.95 6.15 1.62 12.40 6.23 1.99 13.39 6.27 2.14 14.92 6.32 2.36
46
9.32 6.31 1.48 11.77 6.40 1.84 12.77 6.43 1.99 14.30 6.49 2.20
DATA DECLARED ACCORDING TO UNI EN 145112
Key
Pc
Cooling capacity (kW)
Pe Input power (kW)
TAE External air temperature (°C) d.b.
ATTENTION
For the intermediate points, refer to the operating limits graphics (§ 9.1)
HEATING MODECOOLING MODE
Page 60
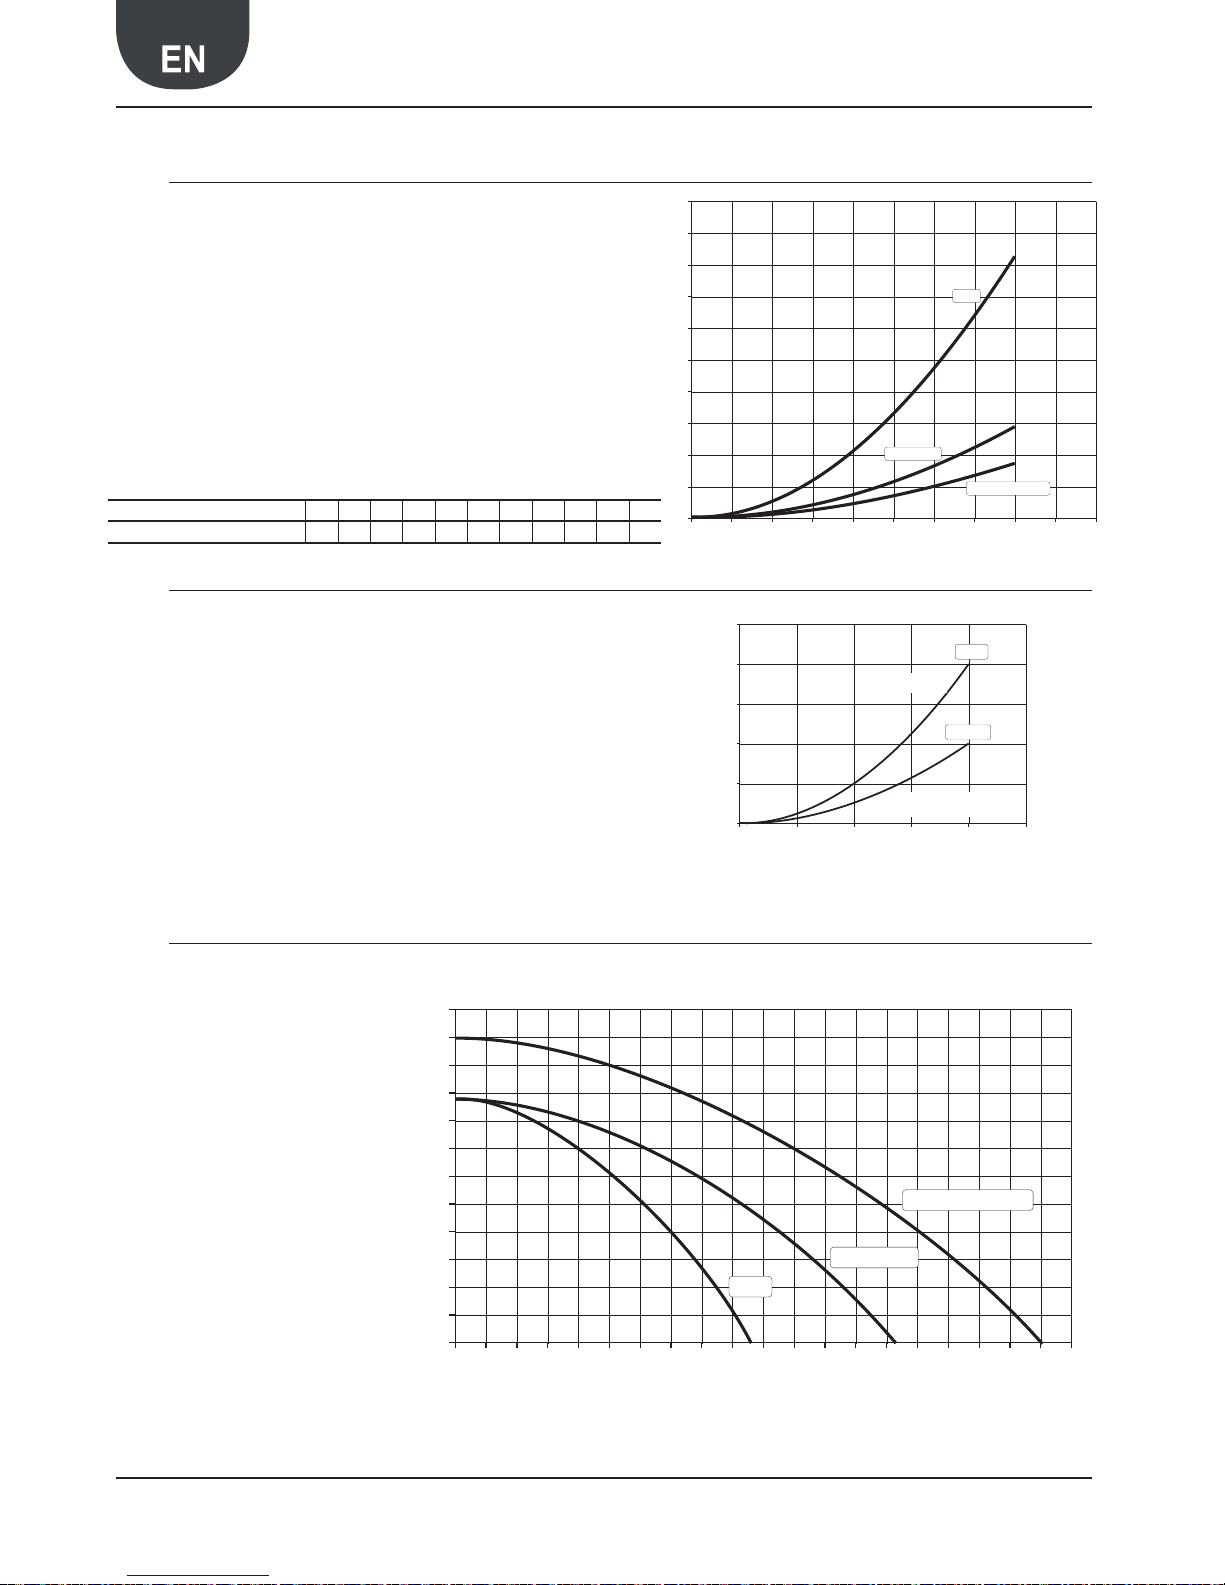
60 Aermec code 6755530_03 9.2011
ANK 025-085H
0 1000 2000 3000 4000 5000500 1500 2500 3500 4500
0
50
100
150
200
250
25
75
125
175
225
020
030 - 040
045 - 050 - 085
0
5
10
15
20
25
0 1000 2000 3000 4000 5000
Ø 1"
1"
1/4
Ø
0 500 1000 1500 2000 2500 3000 3500 4000 4500 5000
0
20
40
60
80
10 0
12 0
10
30
50
70
90
110
020
030 - 040
045 - 050 - 085
12. PRESSURE DROPS|USEFUL HEADS TO THE SYSTEM
12.1. SYSTEM + PIPES SIDE EXCHANGER PRESSURE DROPS
12.2. FILTER PR ESSURE DROPS
12.3. USEFUL HEADS TO THE SYSTEM
Water flow rate l/h
Water flow rate l/h
Water flow rate l/h
CORRECTION FACTORS TABLE
Average water temperature 10 13 18 23 28 33 38 43 48 53 58
Multiplicative coefficient
1.07 1.06 1.05 1.04 1.03 1.02 1.01 1.00 0.99 0.98 0.97
Inlet water temperature 40°C
Condenser outlet water temperature 45°C
Average water temperature 43° C
For temperatures other than 43°C, use the correction
factors table
030-040-045-050-085
Plate exchanger pressure drops (kPa)
Water filter pressure drops (kPa)
Useful heads to the system (kPa)
ANK 020
Page 61
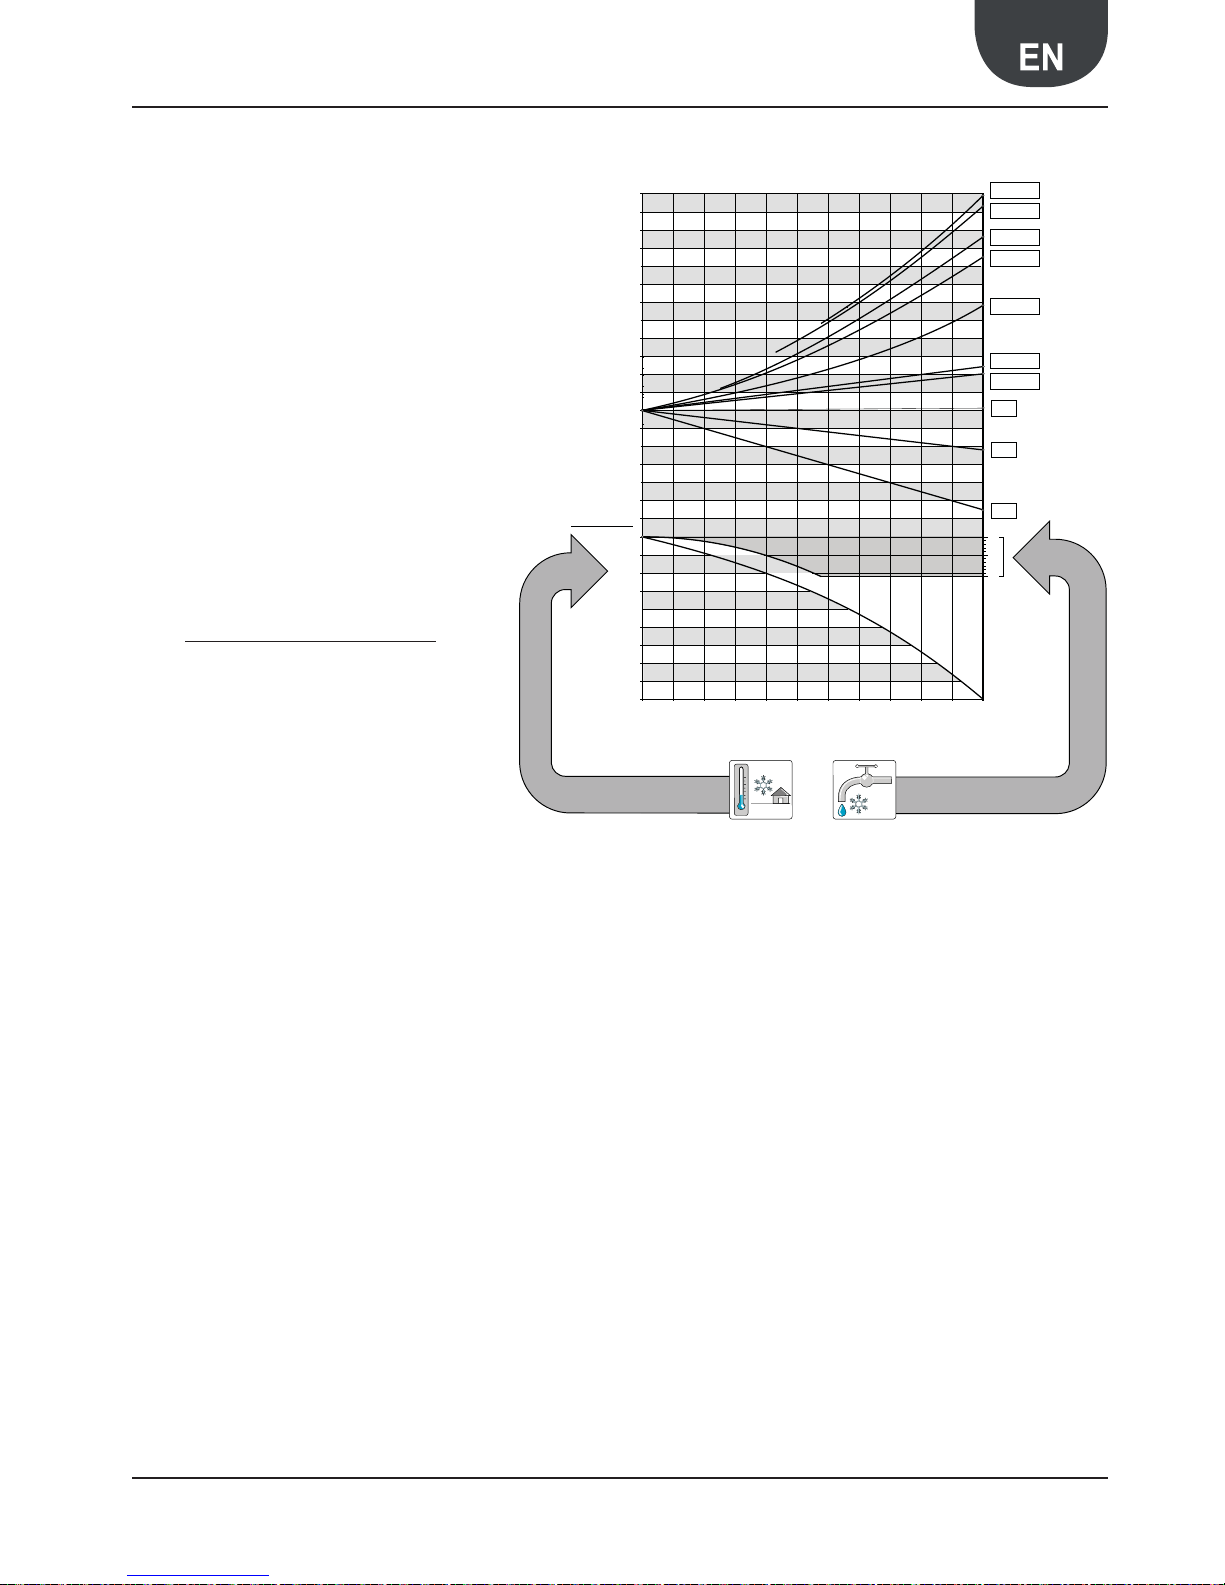
61Aermec code 6755530_03 9.2011
ANK 025-085H
13. ETHYLENE GLYCOL SOLUTION
− The cooling capacity and input power correc on
factors take the presence of glycol and the diff er-
ent evapora on temperature into account.
− The pressure drop correc on factor considers the
diff erent fl ow rate resul ng from the applica on of
the water fl ow rate correc on factor.
− The water fl ow rate correc on factor is calculated
in a way to keep the same ∆t that would be present
with the absence of glycol.
NOTE
An example is given on the next page to help graph
reading.
The diagram below can be used to establish the percentage of glycol necessary; this percentage can be
calculated by taking one of the following factors into
consideration:
Depending on which fluid is considered (water or air),
the graph is interpreted from the right or left side. A
point is obtained from the intersection point of the
external temperature line or the water produced line
and the relative curves, through which the vertical line
must pass that will identify both the glycol percentage
and the relative correction coefficients.
13.1. HOW TO INTERPRET GLYCOL CURVES
The curves shown in the diagram summarise a significant number of data, each of which is represented by a
specific curve. In order to use these curves correctly it
is first necessary to make some initial reflections:
− If you wish to calculate the percentage of glycol
on the basis of the external air temperature, enter
from the le axis and on reaching the curve draw
a ver cal line, which in turn will intercept all the
other curves; the points obtained from the upper curves represent the coeffi cients for the cor-
rec on of the cooling capacity and input power,
the fl ow rates and the pressure drops (remember
that these coeffi cients must be mul plied by the
nominal value of the size in ques on); while the
glycol percentage value recommended to produce
desired water temperature is on the lower axis.
− If you wish to calculate the percentage of glycol
on the basis of the temperature of the water produced, enter from the right axis and on reaching
the curve draw a ver cal line, which in turn will
intercept all the other curves; the points obtained
from the upper curves represent the coeffi cients
for the correc on of the cooling capacity and input
power, the fl ow rates and the pressure drops (re-
member that these coeffi cients must be mul plied
by the nominal value of the size in ques on); while
the lower axis recommends the glycol percentage
value necessary to produce water at the desired
temperature.
− Remember that the initial “EXTERNAL AIR TEM
PERATURE” and “TEMPERATURE OF PRODUCED
WATER” values are not directly related, therefore
it is not possible to refer to the curve of one of
these values and obtain corresponding point on
the other curve.
2.20
2.10
2.00
1.9 0
1.8 0
1.7 0
1.6 0
1.5 0
1.4 0
1.3 0
1.2 0
1.10
1.0 0
0.99
0.98
0.97
0.96
0.95
0.94
5
0
-5
-10
-15
-20
-25
-30
-35
-40
05101520
25 30 35 40 45 50 55
-6
0
5
Pc
Ph
Qw (2)
Qw (1)
ΔP (5)
ΔP (4)
ΔP (3)
ΔP (2)
ΔP (1)
Pe
Temperature of produced water
External air temperature
Glycol %
Correction factors
KEY:
Pc Cooling capacity correction factor
Pe Input power correction factor
Ph Heating capacity correction factor
DP (1) Correction factor for pressure drops with an average fluid temp. = 3.5 °C
DP (2) Correction factor for pressure drops with an average fluid temp. = 0.5 °C
DP (3) Correction factor for pressure drops with an average fluid temp. = 5.5 °C
DP (4) Correction factor for pressure drops with an average fluid temp. = 9.5 °C
DP (5) Correction factor for pressure drops with an average fluid temp. = 47.5 °C
Qw (1) Correction factor for flow rates (evap) with an average fluid temp= 9.5 °C
Qw (2) Correction factor of flow rates (condenser) with an average fluid temp. = 47.5°C
NOTE
Although the graph shows an external air temperature of -40°C, the unit operational limits must
be complied with.
Page 62
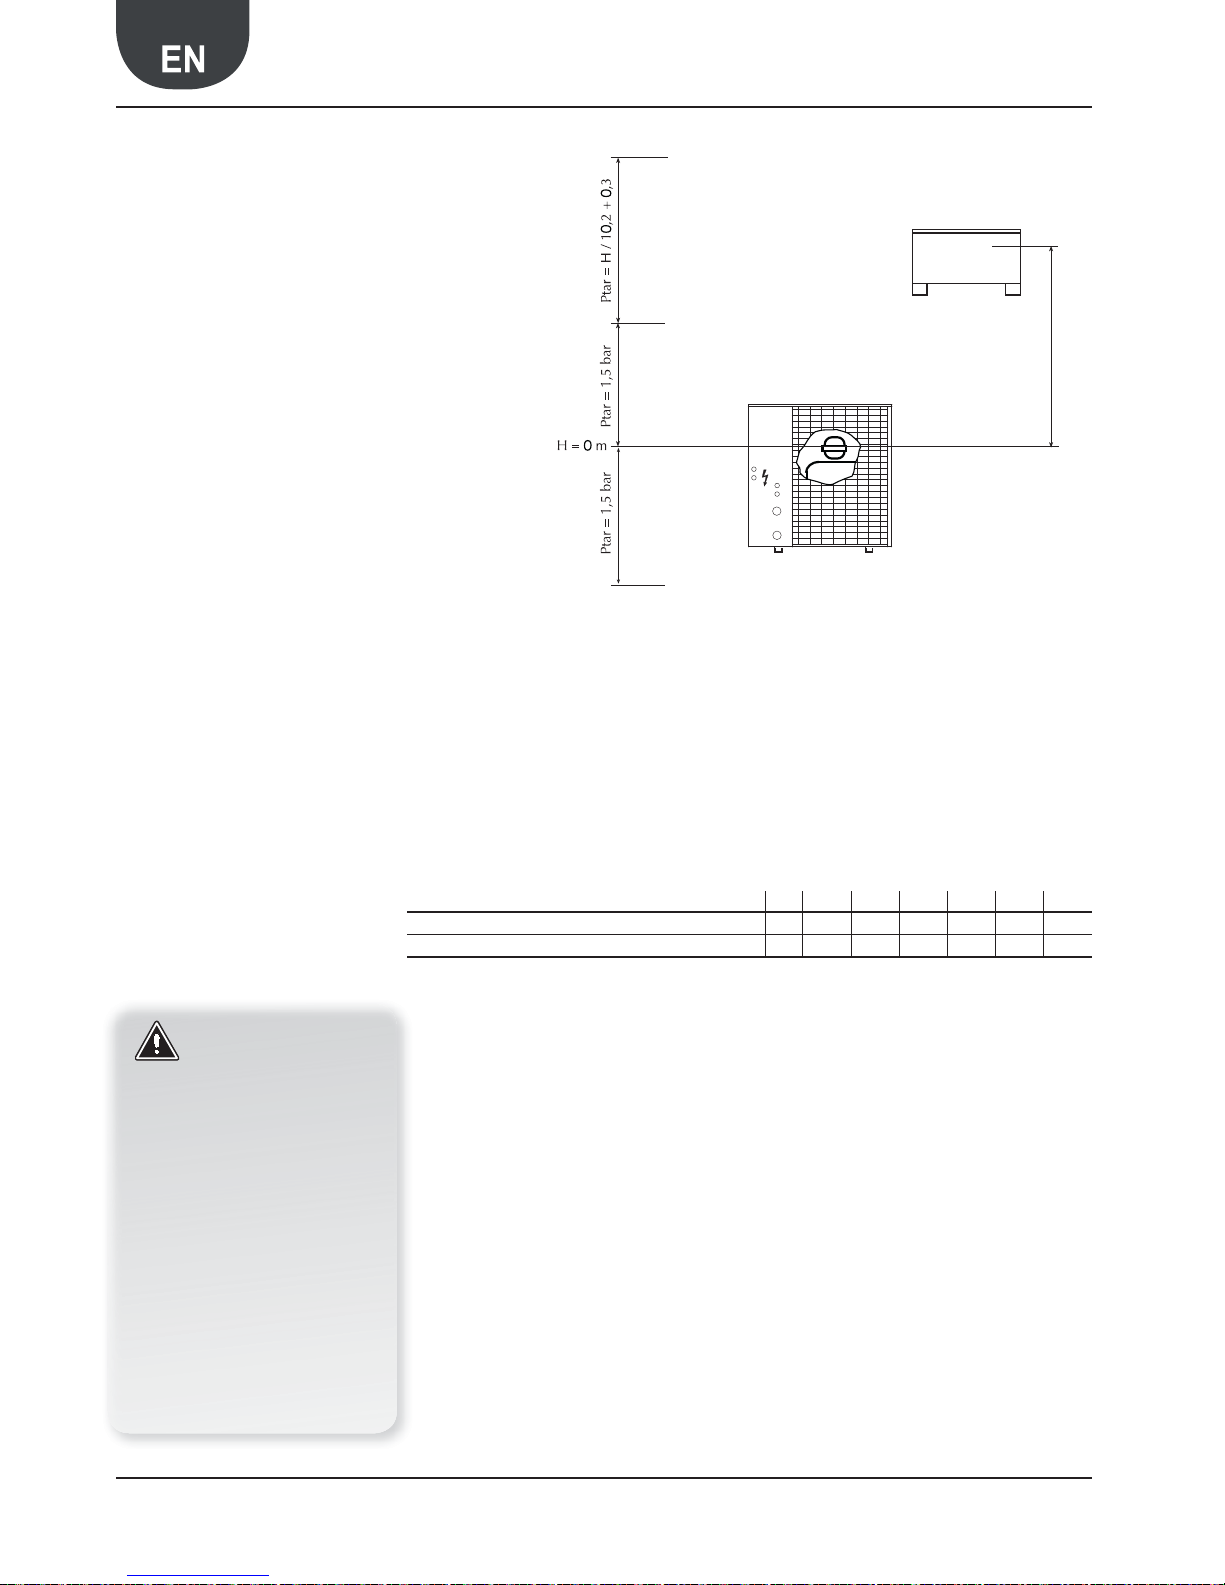
62 Aermec code 6755530_03 9.2011
ANK 025-085H
Standard factory-set pressure value of expansion
vessel is 1.5 bar, maximum value is 6 bar.
Vessel calibration must be regulated depending on
the maximum level difference (H) of the user (see
figure) in agreement with the following formula:
p (calibration) [bar] = H [m] / 10.2 + 0.3.
For example: if level difference (H) is equal to 20 m,
the calibration value of the vessel will be 2.3 bar.
If the calibration value obtained from formula is
less than 1.5 bar (i.e. for H < 12.25), keep standard
calibration.
14. EXPANSION VESSEL CALIBRATION
KEY
(1) Check that highest installation is not high-
er than 55 metres.
(2) Ensure that lowest installation can with-
stand global pressure in that position.
15. MINIMUM WATER CONTENT
ANK 020 030 040 045 050 085
Number of compressors
n°111111
Recommended minimum water content l/kW 10 10 10 10 10 10
ATTENTION
It is recommended to design
systems with high water content
(minimum recommended values
shown in table), in order to limit:
1. The hourly number of
inversions between operating
modes.
2. Drop in water temperature
during winter defrost cycles.
3. Use of a value lower than
that recommended causes a
greater reduction of the water
temperature. Without compromising correct operation of
the unit IT IS RECOMMENDED
NOT TO DROP BELOW 4l/kW.
Hmax1 = 55m
H = 12,25m
Hmin
2
H
Page 63
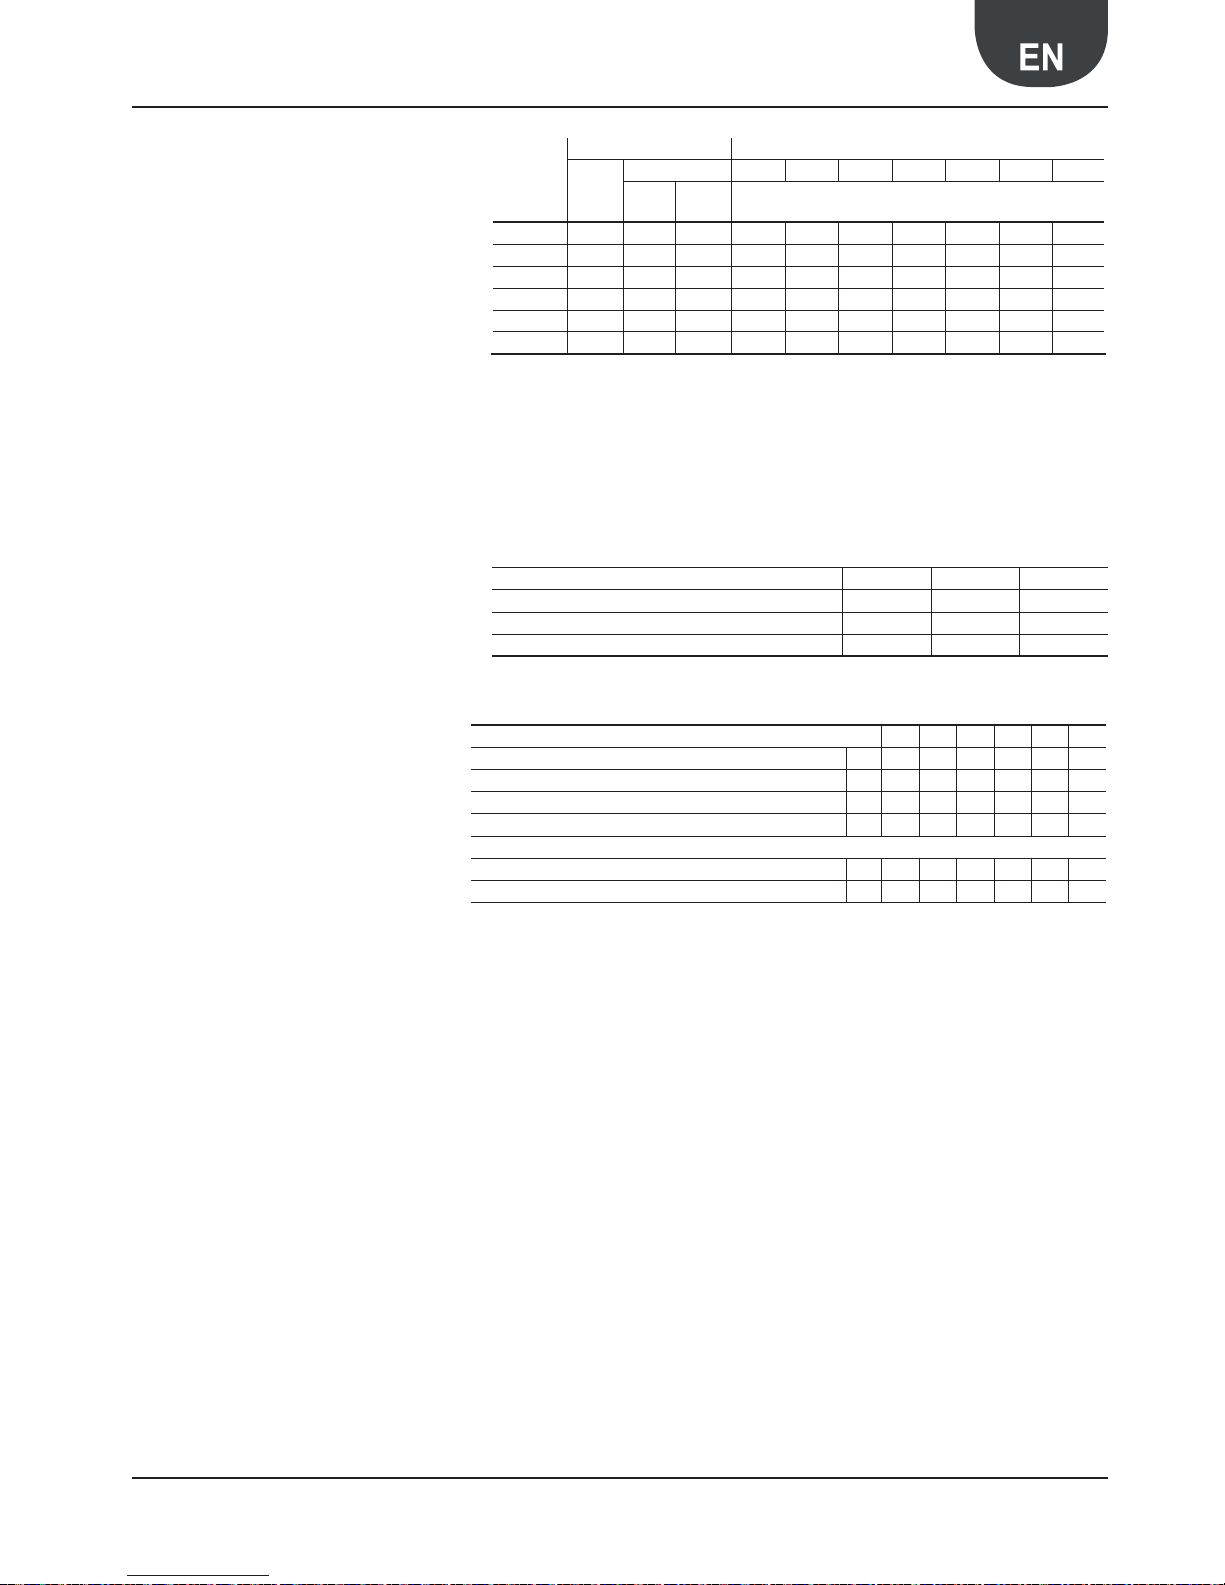
63Aermec code 6755530_03 9.2011
ANK 025-085H
16. SOUND DATA
Sound power
Aermec determines sound power values on the basis
of measurements made in compliance with the ISO
9614-2 Standard, in agreement with that requested by
Eurovent certification.
Sound pressure
Sound pressure in free field conditions with reflective
surface (directivity factor Q=2), in compliance with ISO
3744 Standard.
17. CALIBRATIONS OF SAFETY AND CONTROL PARAMETERS
min Max. default
Setting DHW temperature 25 °C 60 °C 45° C
Differential thermostat in heating mode 5 °C 5 °C 5 °C
Cooling water temperature -8 °C 7 °C 18 °C
020 030 040 045 050 085
COMPRESSOR MAGNET CIRCUIT BREAKERS
A 5.5 6.5 8 9.5 10.5 11
MANUAL RESET HIGH PRESSURE SWITCH bar 42 42 42 42 42 42
LOW PRESSURE TRANSDUCER bar222222
HIGH PRESSURE TRANSDUCER bar 40 40 40 40 40 40
AUX. + PUMP MAGNET CIRCUIT BREAKERS
230V/1/50Hz A 16 20 25 25 - 400V/3N/50Hz A 5.5 6.5 8 9.5 10.5 11
ANK
Total sound levels Octave band [Hz]
Pow.
dB(A)
Pressure. 125 250 500 1000 2000 4000 8000
dB(A)
10 m
dB(A)
1 m
Sound potential for band central frequency [dB]
ANK020 68.0 36.0 48.0 62.1 61.4 61.9 61.0 57.7 49.8 38.9
ANK030 70.5 38.5 50.5 64.1 63.4 64.2 63.6 61.0 52.7 41.4
ANK040 70.5 38.5 50.5 64.1 63.4 64.2 63.6 61.0 52.7 41.4
ANK045 70.5 38.5 50.5 64.1 63.4 64.2 63.6 61.0 52.7 41.4
ANK050 70.5 38.5 50.5 64.1 63.4 64.2 63.6 61.0 52.7 41.4
ANK085 70.5 38.5 50.5 64.1 63.4 64.2 63.6 61.0 52.7 41.4
Condenser inlet water temperature 30°C
Condenser outlet water temperature 35°C
External air temperature 7°C d.b. 6°C w.b.
Page 64

64 Aermec code 6755530_03 9.2011
ANK 025-085H
TECHNICAL SECTIONINSTALLER SECTIONUSER SECTION
Standards complied with
WHEN DESIGNING and MANUFAC
TURING the unit:
SAFETY
1. Machinery Directive
2006/42/CE
2. Low Voltage Directive
LVD 2006/95/CE
3. Electromagnetic Compatibility
Directive EMC 2004/108/EC
4. Directive regarding pressurised
devices
PED 97/23/CE, EN 378,
5. UNI12735, UNI14276
ELECTRIC PART
1. IEC E N 60335240,
2. IEC E N 6100061/2/3/4
ACOUSTIC PART
1. ISO DIS 9614/2
intensimetric method
PROTECTION RATING
IP24
EUROVENT EHPA
REFRIGERANT GAS
This unit contains fluoride gases with
greenhouse effect covered by the Kyoto
Protocol. Maintenance and disposal
must only be performed by qualified
staff, in compliance with standards in
force.
ATTENTION
1. The refrigerant fluid circuit is
pressurised. Interventions must
only be performed on the appliance by ATS (Authorised Technical
Service) or a qualified technician.
2. GAS R410A
The chiller is delivered with
a sufficient amount of R410A
refrigerant fluid for operation. It
is a chlorine-free refrigerant fluid
that does not damage the ozone
layer. R410A is not inflammable.
However, all maintenance must
be performed exclusively by a
specialised technician with suitable protective equipment.
3. Danger of electric shock!
The appliance must be
disconnected from the mains
power supply before the chiller
is opened.
18. GENERAL WARNINGS FOR THE INSTALLER
AERMEC ANK are constructed according to the acknowledged technical standards and safety regulations.
They have been designed for air conditioning and the
production of domestic hot water (DHW) and must be
used compatibility with their technical features. Any
contractual or extracontractual liability of the Company
is excluded for injury/damage to persons, animals or
objects owing to installation, regulation and maintenance errors or improper use. All uses not expressly
indicated in this manual are prohibited.
18.1. PRESERVATION OF THE DOCUMENTA
TION
1. The instructions and all related documentation
must be given to the user of the system, who is
responsible for preserving the same so that they
are always on hand when required.
2. Read this file carefully; the execution of all jobs
must be performed by qualified staff, according
to the Standards in force on this subject in the
different countries.
3. The appliance warranty does not cover the
costs for ladders, scaffolding, or other elevation
systems that may become necessary for carrying
out servicing under warranty.
4. Do not modify or tamper with the appliance as
dangerous situations can be created and the
manufacturer will not be liable for any damage
caused. The warranty shall be become null and
void if the above-mentioned indications are not
respected.
18.2. WARNINGS REGARDING SAFETY AND
INSTALLATION STANDARDS
1. The appliance must be installed by a qualified
and suitably trained technician, in compliance
with the national legislation in force in the country of destination.
AERMEC will not assume any liability for damage
if these instructions are not respected.
2. Before beginning any operation, READ THESE
INSTRUCTIONS CAREFULLY AND CARRY OUT
THE SAFETY CHECKS IN ORDER TO REDUCE ALL
HAZARDS TO MINIMUM. All the staff involved
must have thorough knowledge of the operations and any dangers that may arise at the
moment in which the installation operations are
carried out.
Page 65
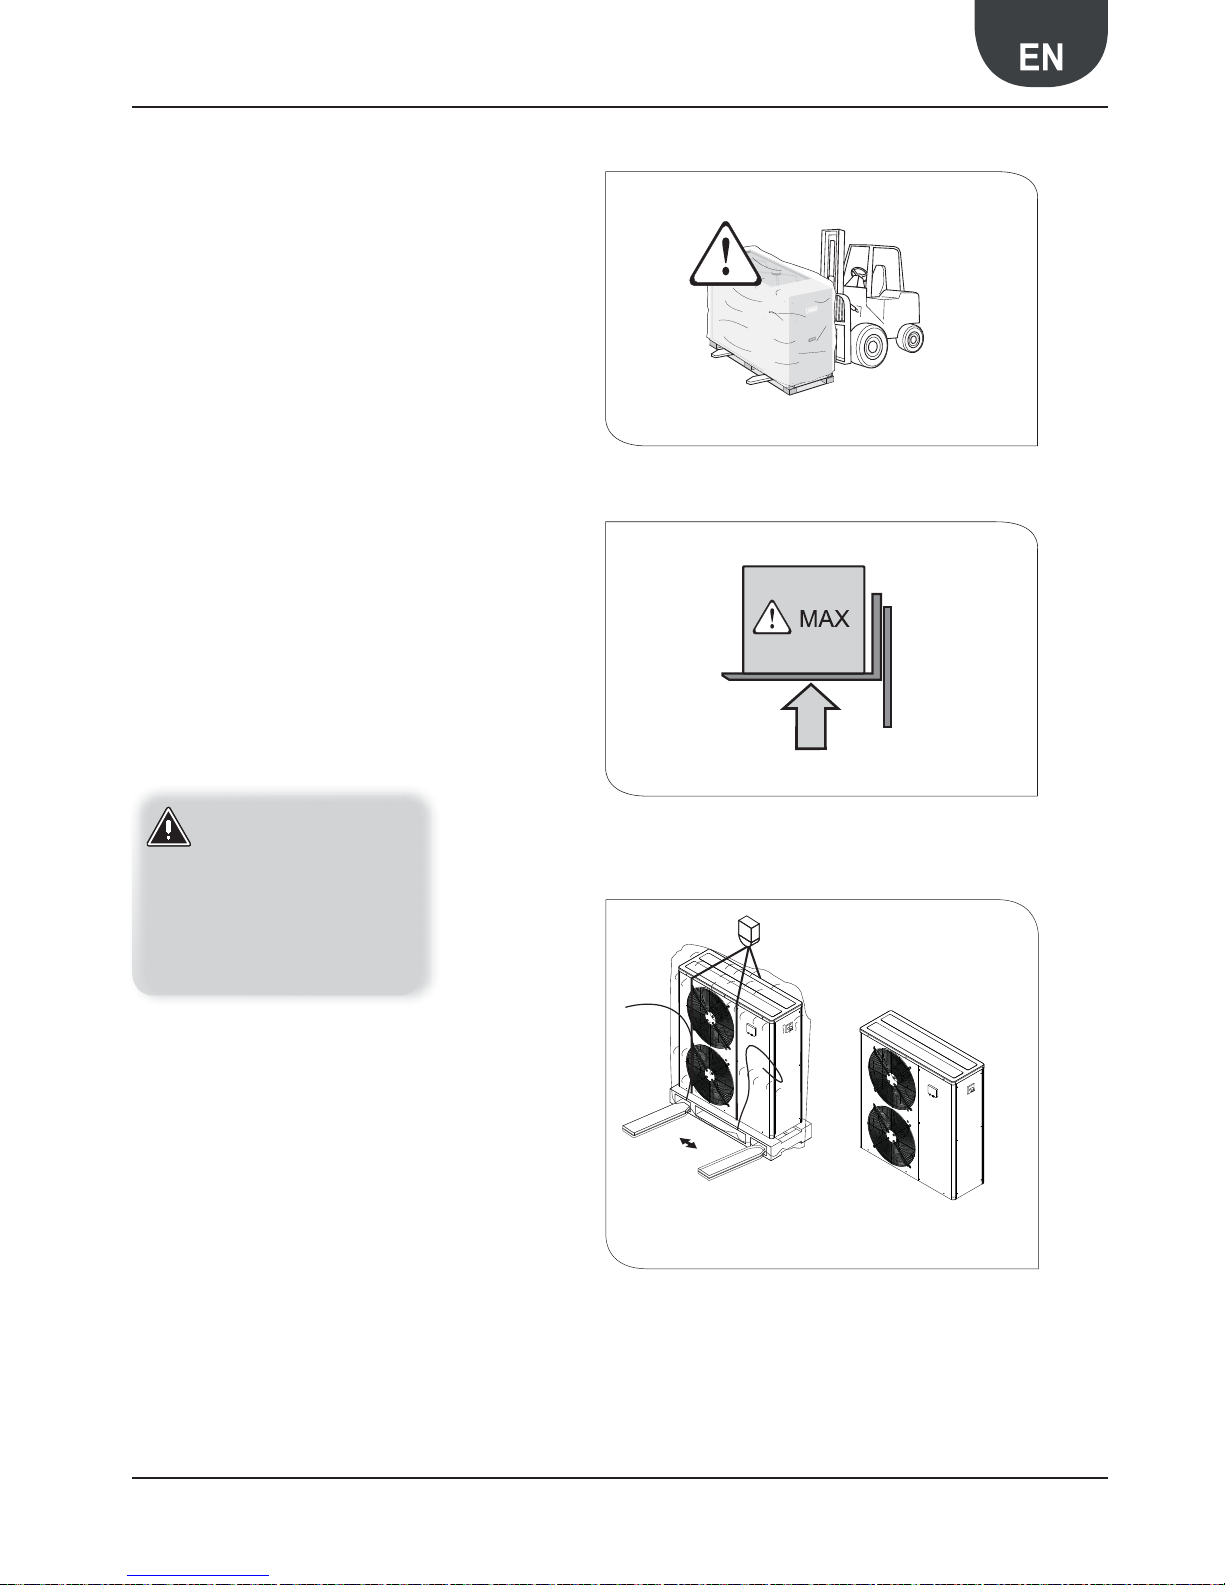
65Aermec code 6755530_03 9.2011
ANK 025-085H
ANK 020 - 030 - 040 - 045 - 050 - 085
HANDLING EXAMPLE
19. SELECTION AND PLACE OF INSTALLATION
Before beginning the installa on process, decide with the customer where the ap-
pliance is to be installed, whilst paying a en on to the following:
1. the support surface must be capable of suppor ng the unit weight;
2. the safety diff erences between the unit and other appliances or structures
must be scrupulously respected so that the inlet and outlet air from the fans
is free to circulate;
3. the unit must be installed by an enabled technician in compliance with the
na onal legisla on in force in the country of des na on, respec ng the mini-
mum technical spaces in order to allow maintenance.
20. POSITIONING
Before handling the unit, verify the li ing capacity of the machines used,
respec ng the indica ons given on the packaging.
To handle the machine (ANK 020-085) on horizontal surfaces, use fork li
trucks or similar in the most appropriate manner, paying a en on to the
distribu on of the unit weight.
Posi on the unit in the place indicated by the customer, placing a rubber
covering between the base and the support (min. thickness 10 mm.) or
alterna vely an -vibra on feet (ACCESSORIES).
For further informa on, refer to the dimensional tables
Fix the unit checking that it is level. Make sure that the hydraulic and electric part can be easily reached.
In the event of installa on in places where gusts of wind are frequent, fi x
the unit suitably using e-rods. Envision the installa on of the condensate
drain tray in the versions where envisioned (as ACCESSORY).
ATTENTION
If the unit is installed in particularly windy locations, the installation
of windbreaks is recommended to
prevent unit malfunctioning
Page 66
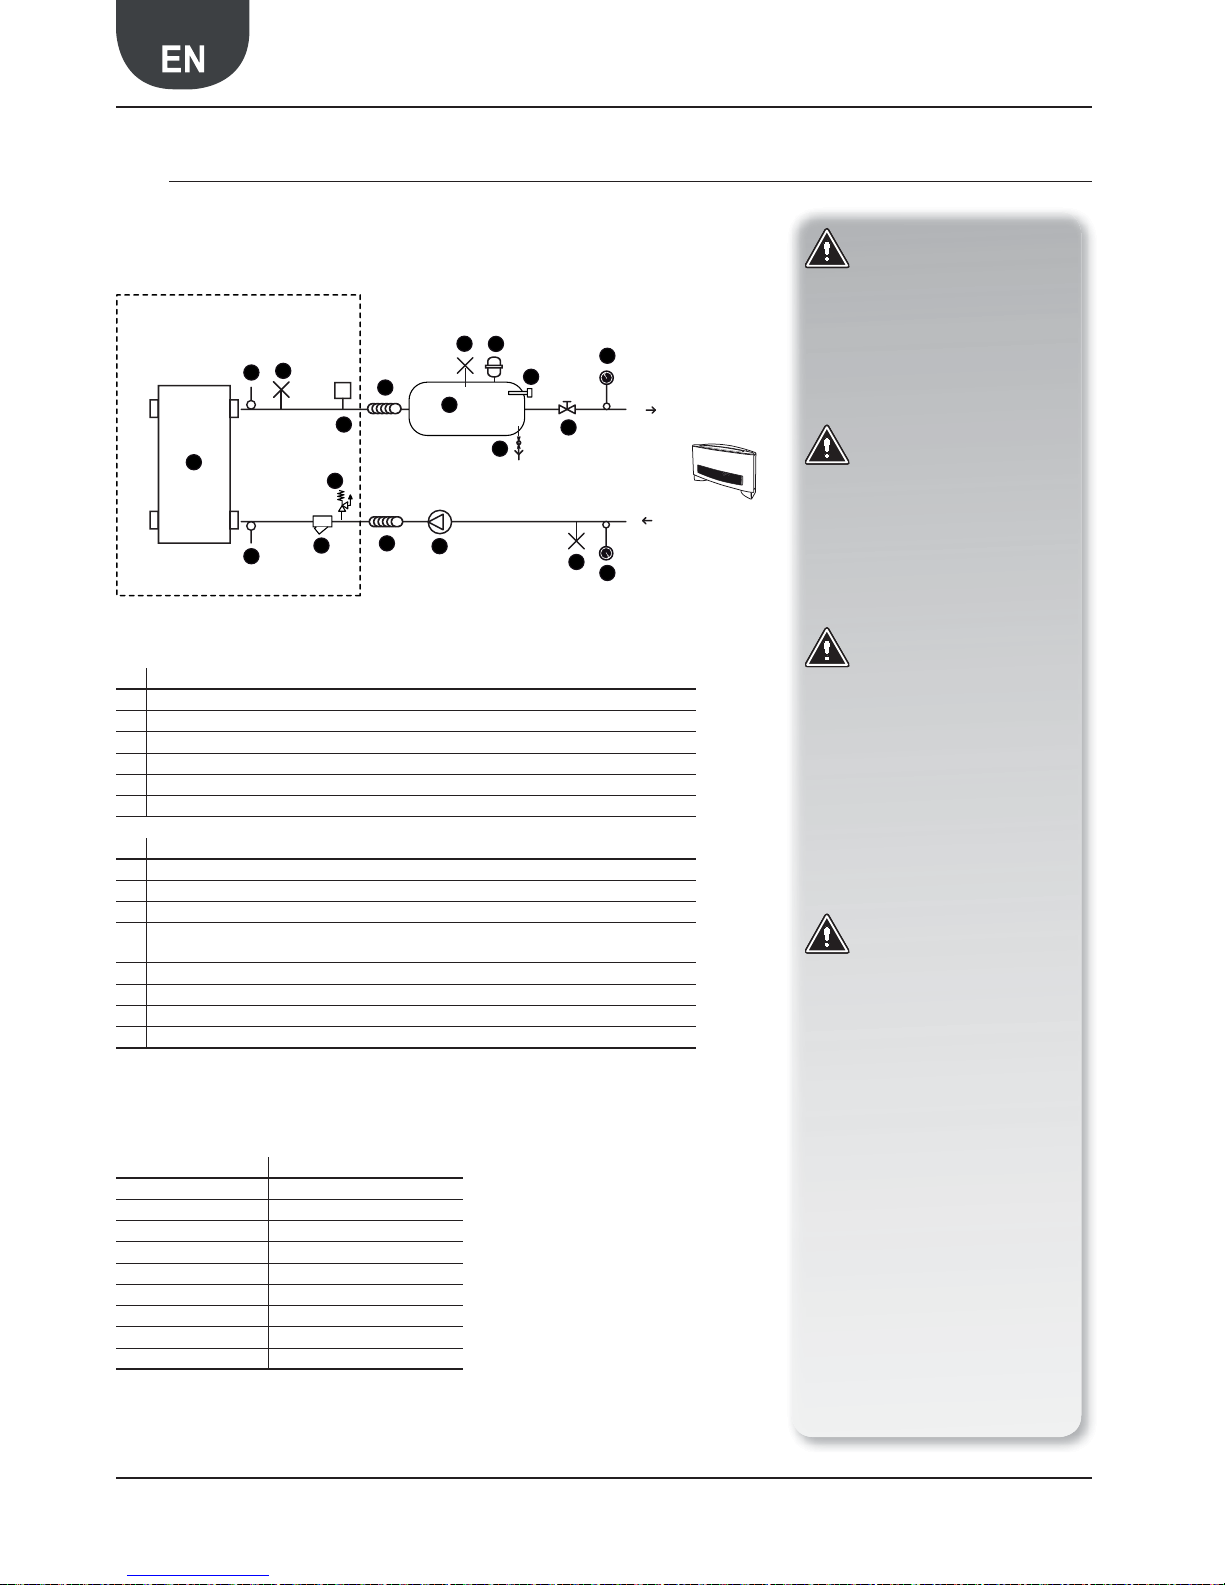
66 Aermec code 6755530_03 9.2011
ANK 025-085H
21. MAIN HYDRAULIC CIRCUITS
21.1. INTERNAL AND EXTERNAL HYDRAULIC CIRCUIT TO ANK “H”standard
STANDARD ANK COMPONENTS SUPPLIED AS PER STANDARD
1 Plate exchanger
2 Water filter
3 Flow switch
4 Air vent valve
5 Water temperature probes (IN/OUT)
8 Safety valve
RECOMMENDED COMPONENTS NOT SUPPLIED FOR WHICH INSTALLER IS RESPONSIBLE
6 Anti-vibration joints
7 Cut-off cocks
9 Expansion vessel
10
System storage tank (installation recommended whenever the system water content is
less than that indicated in TAB. 2).
11 Manometer
12 Pump
13 Resistance
14 Drain cock
ANK H HYDRAULIC
COMPONENTS
HYDRAULIC COMPONENTS
RECOMMENDED OUTSIDE THE UNIT
ATTENTION
The choice and installation of
components outside the NRP unit
is the installer's responsibility, who
must operate according to the
code of practice and in compliance
with the Standard in force in the
country of destination.
ATTENTION
The hydraulic connection pipes to
the appliance must be suitably dimensioned for the effective water
flow rate requested by the system
when running. The water flow rate
to the heat exchanger must always
be constant.
ATTENTION
Wash the system thoroughly
before connecting the unit. This
cleaning operation will eliminate
any residues such as welding drips,
scale, rust, or other impurities
from the piping. These substances
can also deposit inside and cause
appliance malfunctioning. The connection piping must be adequately
supported so that its weight is not
borne by the appliance.
ATTENTION
SYSTEM DRAINING
If the system should stop during
the winter period, the water
present in the exchanger may
freeze, causing irreparable damage
to the exchanger itself.
There are three solutions possible
for the prevention of freezing:
1. Drain the water from the ap-
pliance completely.
2. Operation with glycoled wa-
ter, with a percentage of glycol
selected on the basis of the
minimum external temperature envisioned.
3. Use of resistances.
In this case, the resistances
must be live for the entire
period that freezing may occur
(machine in stand-by).
1
FL
3
5
5
12
6
6
2
4
4
11
11
9
7
8
4
10
13
14
PH 6-8
Electric conductivity Less than 200 mV/cm (25°C)
Chloride ions Less than 50 ppm
Sulphuric acid ions Less than 50 ppm
Total iron Less than 0.3 ppm
Alkalinity M Less than 50 ppm
Total hardness Less than 50 ppm
Sulphur ions None
Ammonia ions None
Silicone ions Less than 30 ppm
Page 67
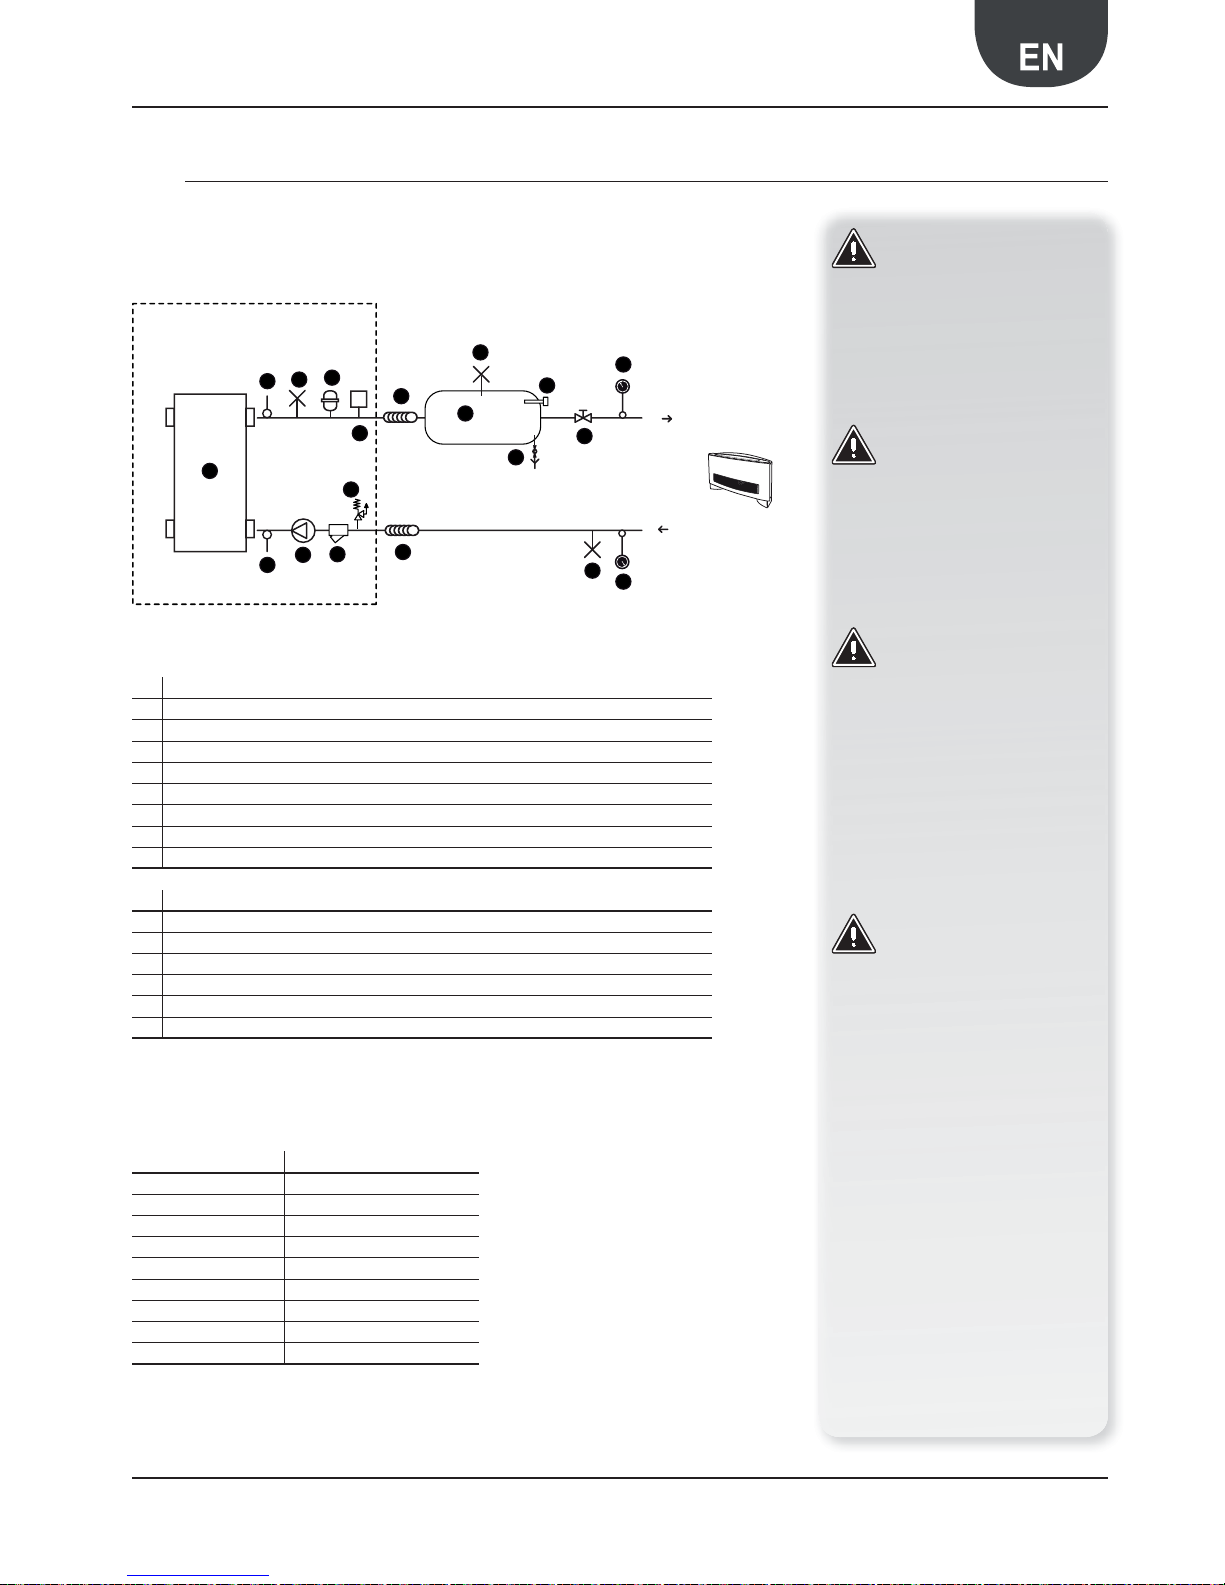
67Aermec code 6755530_03 9.2011
ANK 025-085H
21.2. INTERNAL AND EXTERNAL HYDRAULIC CIRCUIT TO ANK “HP”
STANDARD ANK COMPONENTS SUPPLIED AS PER STANDARD
1 Plate exchanger
2 Water filter
3 Flow switch
4 Air vent valve
5 Water temperature probes (IN/OUT)
8 Safety valve
9 Expansion vessel
12 Pump
RECOMMENDED COMPONENTS NOT SUPPLIED FOR WHICH INSTALLER IS RESPONSIBLE
6 Anti-vibration joints
7 Cut-off cocks
10 System storage tank
11 Manometer
13 Resistance
14 Drain cock
ANK HP HYDRAULIC
COMPONENTS
HYDRAULIC COMPONENTS
RECOMMENDED OUTSIDE THE UNIT
1
FL
3
5
5
12
6
6
2
4
4
11
11
9
7
8
4
10
13
14
PH 6-8
Electric conductivity Less than 200 mV/cm (25°C)
Chloride ions Less than 50 ppm
Sulphuric acid ions Less than 50 ppm
Total iron Less than 0.3 ppm
Alkalinity M Less than 50 ppm
Total hardness Less than 50 ppm
Sulphur ions None
Ammonia ions None
Silicone ions Less than 30 ppm
ATTENTION
The choice and installation of
components outside the NRP unit
is the installer's responsibility, who
must operate according to the
code of practice and in compliance
with the Standard in force in the
country of destination.
ATTENTION
The hydraulic connection pipes to
the appliance must be suitably dimensioned for the effective water
flow rate requested by the system
when running. The water flow rate
to the heat exchanger must always
be constant.
ATTENTION
Wash the system thoroughly
before connecting the unit. This
cleaning operation will eliminate
any residues such as welding drips,
scale, rust, or other impurities
from the piping. These substances
can also deposit inside and cause
appliance malfunctioning. The connection piping must be adequately
supported so that its weight is not
borne by the appliance.
ATTENTION
SYSTEM DRAINING
If the system should stop during
the winter period, the water
present in the exchanger may
freeze, causing irreparable damage
to the exchanger itself.
There are three solutions possible
for the prevention of freezing:
1. Drain the water from the ap-
pliance completely.
2. Operation with glycoled wa-
ter, with a percentage of glycol
selected on the basis of the
minimum external temperature envisioned.
3. Use of resistances.
In this case, the resistances
must be live for the entire
period that freezing may occur
(machine in stand-by).
Page 68
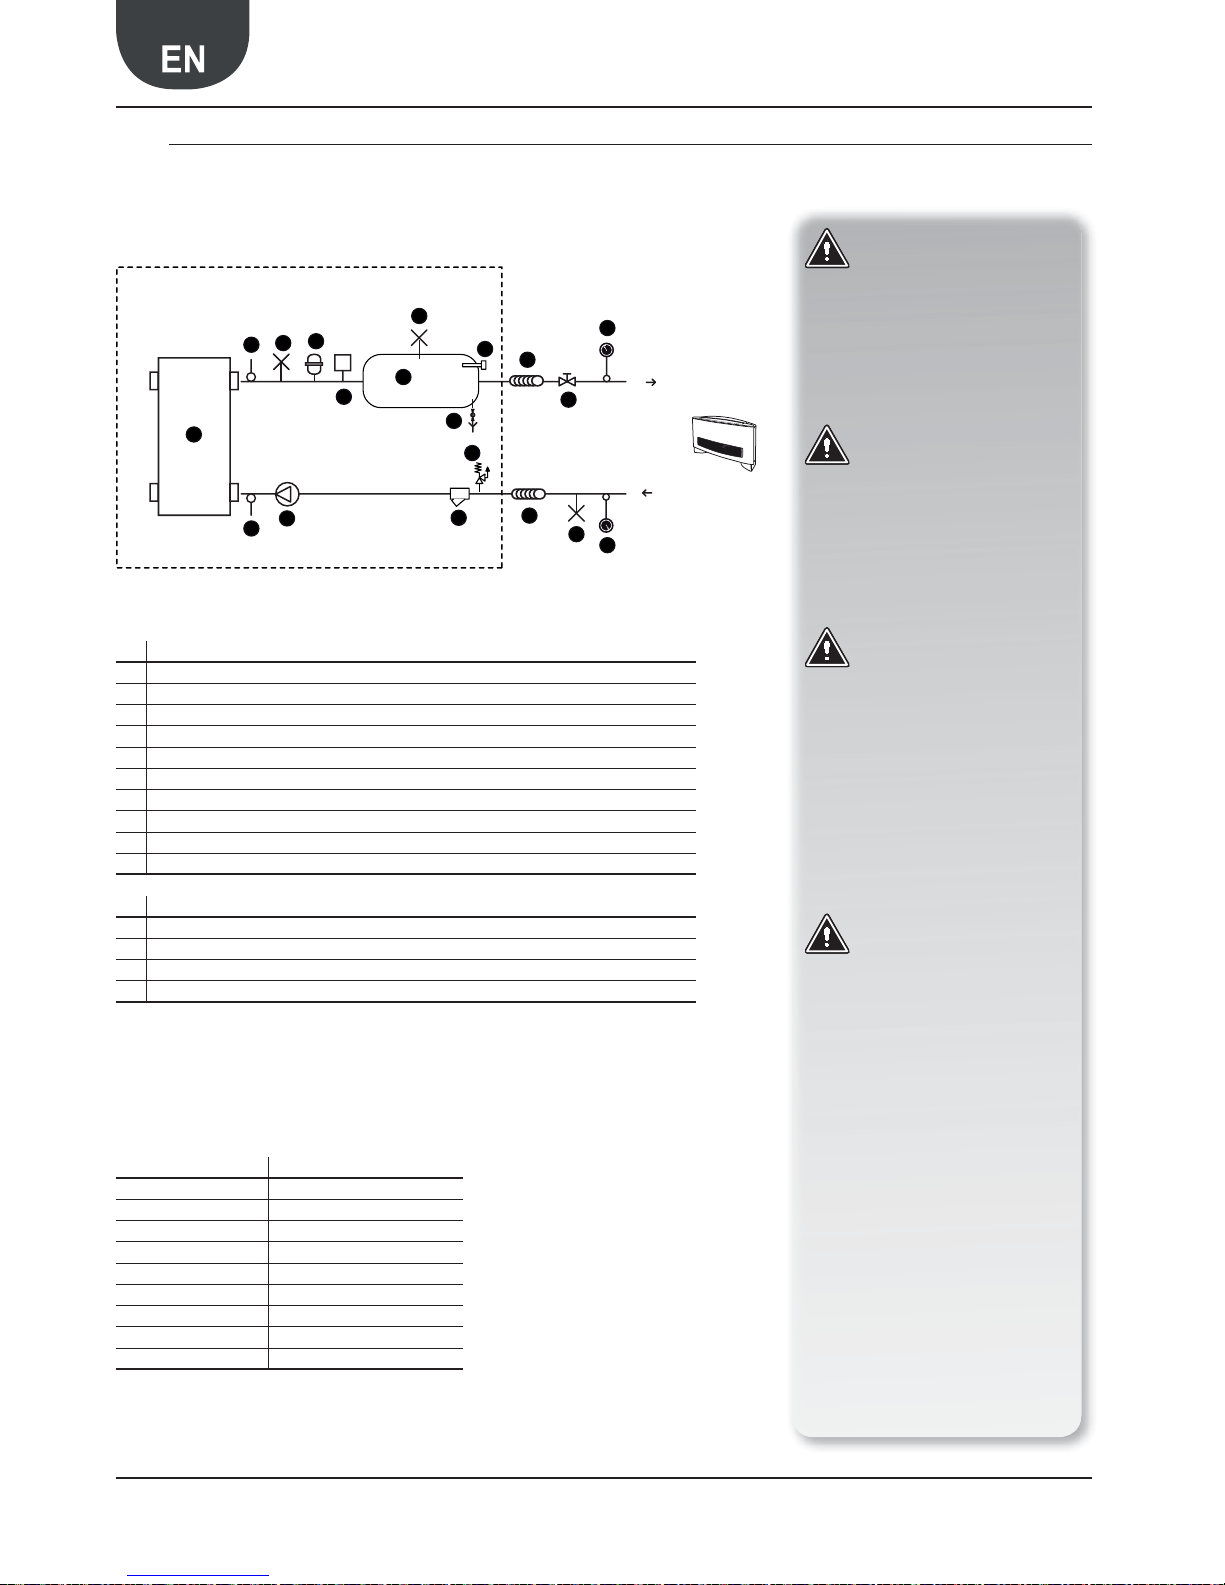
68 Aermec code 6755530_03 9.2011
ANK 025-085H
21.3. INTERNAL AND EXTERNAL HYDRAULIC CIRCUIT TO ANK “HA”
STANDARD ANK COMPONENTS SUPPLIED AS PER STANDARD
1 Plate exchanger
2 Water filter
3 Flow switch
4 Air vent valve
5 Water temperature probes (IN/OUT)
8 Safety valve
9 Expansion vessel
12 Pump
13 300 W resistance
14 Drain cock
RECOMMENDED COMPONENTS NOT SUPPLIED FOR WHICH INSTALLER IS RESPONSIBLE
6 Anti-vibration joints
7 Cut-off cocks
10 System storage tank
11 Manometer
ANK HA HYDRAULIC
COMPONENTS
HYDRAULIC COMPONENTS
RECOMMENDED OUTSIDE THE UNIT
1
FL
3
5
5
12
6
6
2
4
4
11
11
9
7
8
4
10
13
14
PH 6-8
Electric conductivity Less than 200 mV/cm (25°C)
Chloride ions Less than 50 ppm
Sulphuric acid ions Less than 50 ppm
Total iron Less than 0.3 ppm
Alkalinity M Less than 50 ppm
Total hardness Less than 50 ppm
Sulphur ions None
Ammonia ions None
Silicone ions Less than 30 ppm
ATTENTION
The choice and installation of
components outside the NRP unit
is the installer's responsibility, who
must operate according to the
code of practice and in compliance
with the Standard in force in the
country of destination.
ATTENTION
The hydraulic connection pipes to
the appliance must be suitably dimensioned for the effective water
flow rate requested by the system
when running. The water flow rate
to the heat exchanger must always
be constant.
ATTENTION
Wash the system thoroughly
before connecting the unit. This
cleaning operation will eliminate
any residues such as welding drips,
scale, rust, or other impurities
from the piping. These substances
can also deposit inside and cause
appliance malfunctioning. The connection piping must be adequately
supported so that its weight is not
borne by the appliance.
ATTENTION
SYSTEM DRAINING
If the system should stop during
the winter period, the water
present in the exchanger may
freeze, causing irreparable damage
to the exchanger itself.
There are three solutions possible
for the prevention of freezing:
1. Drain the water from the ap-
pliance completely.
2. Operation with glycoled wa-
ter, with a percentage of glycol
selected on the basis of the
minimum external temperature envisioned.
3. Use of resistances.
In this case, the resistances
must be live for the entire
period that freezing may occur
(machine in stand-by).
Page 69
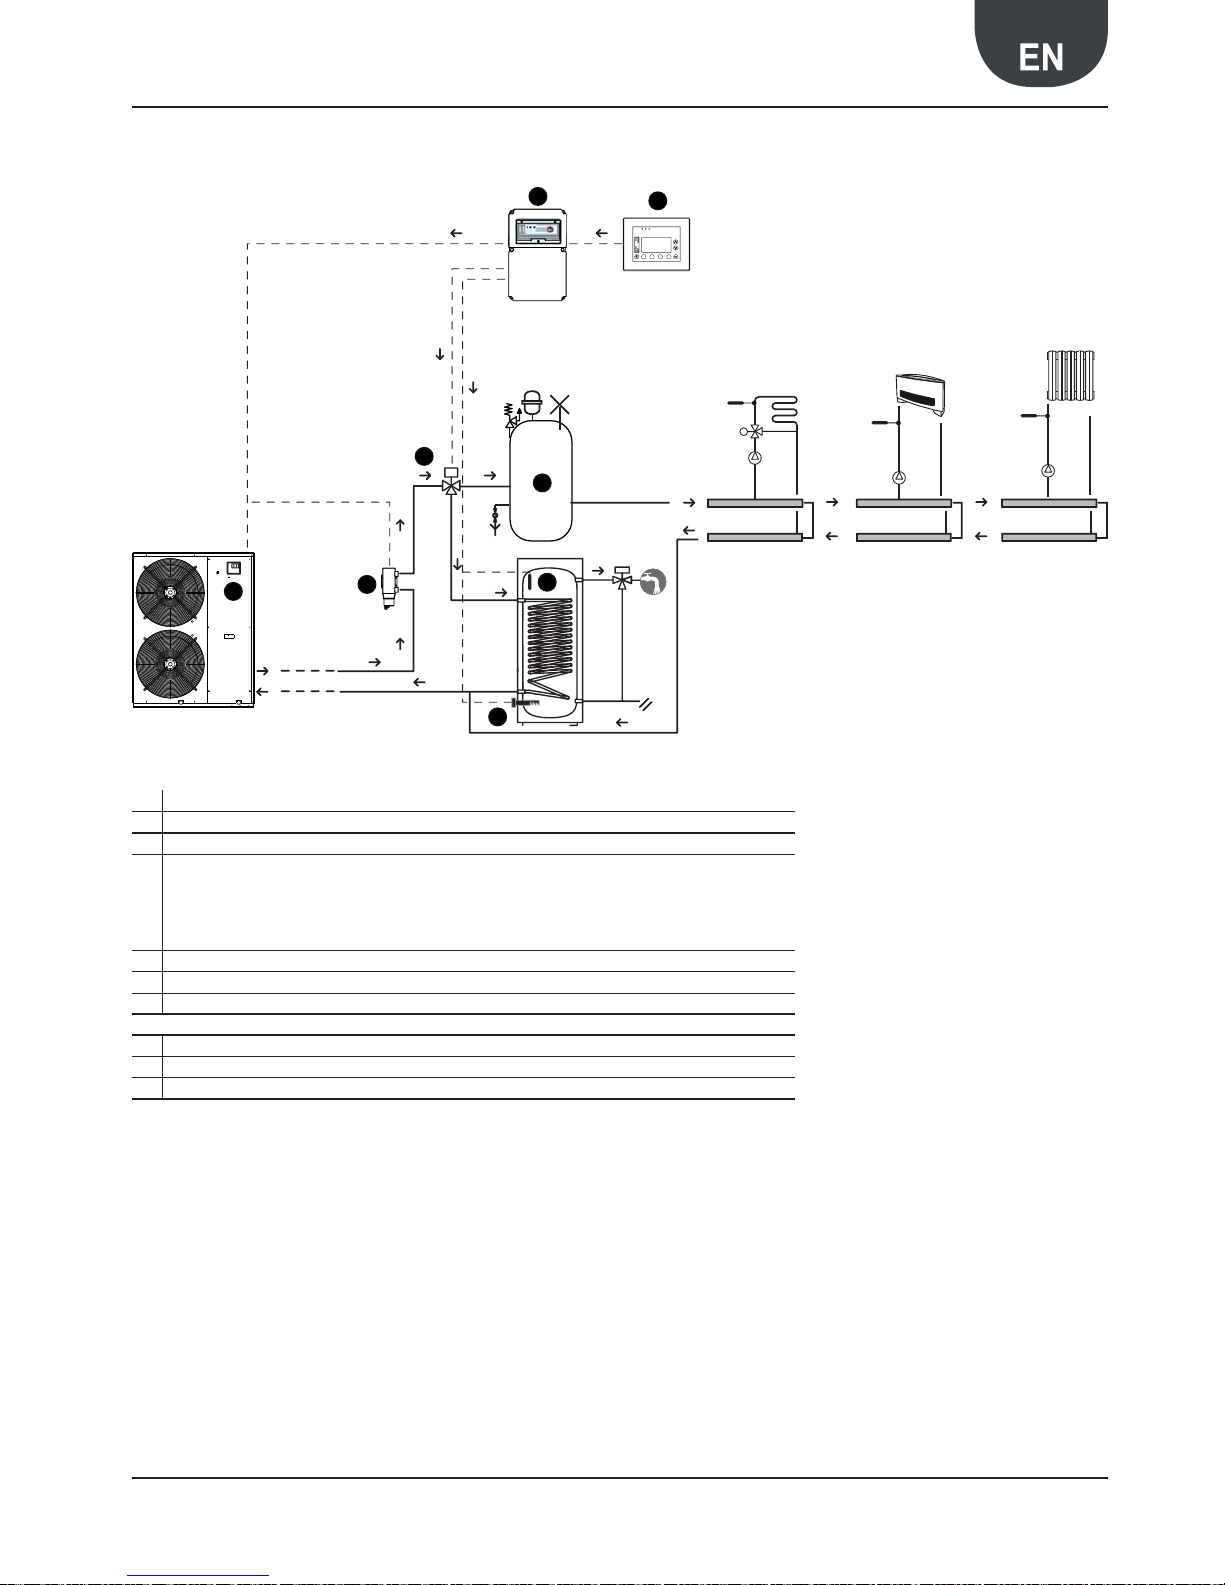
69Aermec code 6755530_03 9.2011
ANK 025-085H
ANK050HP
VMF SYSTEM FOR THE PRODUCTION AND MANAGEMENT OF THE HOT WATER AND DHW (accessory)
1 E5 (black and white)
2
VMF-ACS3KTN | 6KTN |8KTN
- 3-way valve (not supplied)
- DHW temperature probe (supplied)
- Resistance for DHW storage tank (anti-legionella cycle management)
3 3-way valve (not supplied)
4 Electrical resistance for DHW storage tank (not supplied) (anti-legionella cycle management)
5 RS-485 MOD-BUS interface (MODU-485A ACCESSORY)
6 DHW storage tank (not supplied)
7 Electrical resistance (BSKW ACCESSORY)
8 System storage tank (not supplied)
22. EXAMPLE OF ANK 50 HP SYSTEM WITH DHW PRODUCTION with VMF-DHW ACCESSORY
M
8
1
2
3
4
5
6
7
9 For further information regarding the VMF
system, refer to the documentation available
on the website: www . aermec . com
10 The accessory is necessary for the VMF
system to communicate wit the heat pump.
Page 70
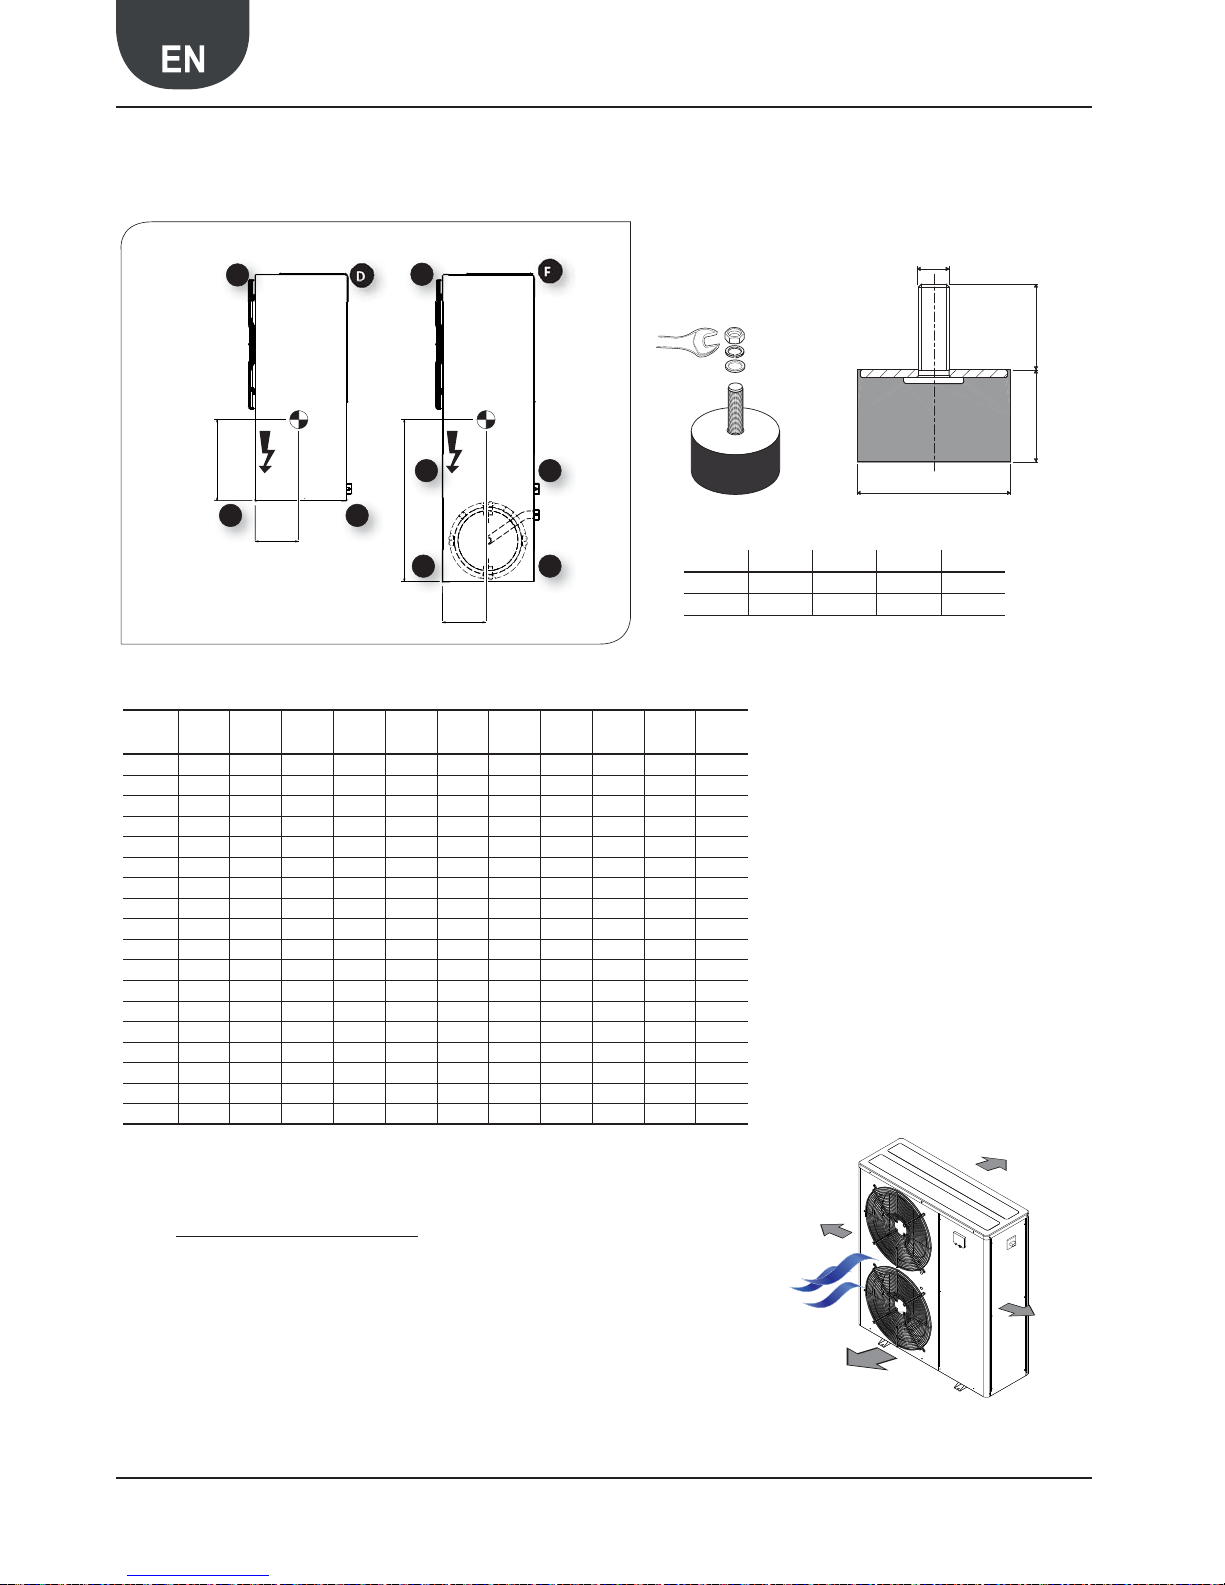
70 Aermec code 6755530_03 9.2011
ANK 025-085H
Yg
Xg
Yg
Xg
A
A
B
Y
B
A
D
CB
23. BARYCENTRE AND ANTIVIBRATION MOUNT POSITION
Mod. A B C D
VT9 40 30 23 M8
VT15A 50 30 28.5 M10
Barycentre and weight distribu on
ANK vers Weight
Xg
(mm)
Yg
(mm)
A B C D E F KIT
ANK020 H 118 169 332 36.7% 30.1% 18.3% 15.0%
--
VT9
ANK020 HP 123 169 326 37.0% 30.4% 17.9% 14.7%
--
VT9
ANK030 H 149 199 365 35.4% 28.1% 20.4% 16.2%
--
VT9
ANK030 HP 154 199 359 35.7% 28.4% 20.0% 15.9%
--
VT9
ANK040 H 152 199 365 35.4% 28.1% 20.4% 16.2%
--
VT9
ANK040 HP 157 199 359 35.7% 28.4% 20.0% 15.9%
--
VT9
ANK045 H 165 204 362 34.9% 28.9% 19.8% 16.4%
--
VT9
ANK045 HP 175 203 352 35.6% 29.2% 19.3% 15.9%
--
VT9
ANK050 H 172 204 362 34.9% 28.9% 19.8% 16.4%
--
VT9
ANK050 HP 182 203 352 35.6% 29.2% 19.3% 15.9%
--
VT9
ANK085 H 174 204 362 34.9% 28.9% 19.8% 16.4%
--
VT9
ANK085 HP 184 203 352 35.6% 29.2% 19.3% 15.9%
--
VT9
ANK020 HA 160 192 594 9.5% 9.0% 24.2% 23.0% 17.6% 16.7%
VT15A
ANK030 HA 211 217 633 12.0% 11.7% 22.6% 22.0% 16.1% 15.6%
VT15A
ANK040 HA 214 217 633 12.0% 11.7% 22.6% 22.0% 16.1% 15.6%
VT15A
ANK045 HA 232 220 643 10.7% 10.8% 23.8% 24.0% 15.3% 15.4%
VT15A
ANK050 HA 238 220 643 10.7% 10.8% 23.8% 24.0% 15.3% 15.4%
VT15A
ANK085 HA 241 220 643 10.7% 10.8% 23.8% 24.0% 15.3% 15.4%
VT15A
23.1. MINIMUM TECHNICAL SPACES mm
ANK H-HP
ANK HA
C D
C D
E
F
300
200
500
FREE FIELD
Page 71
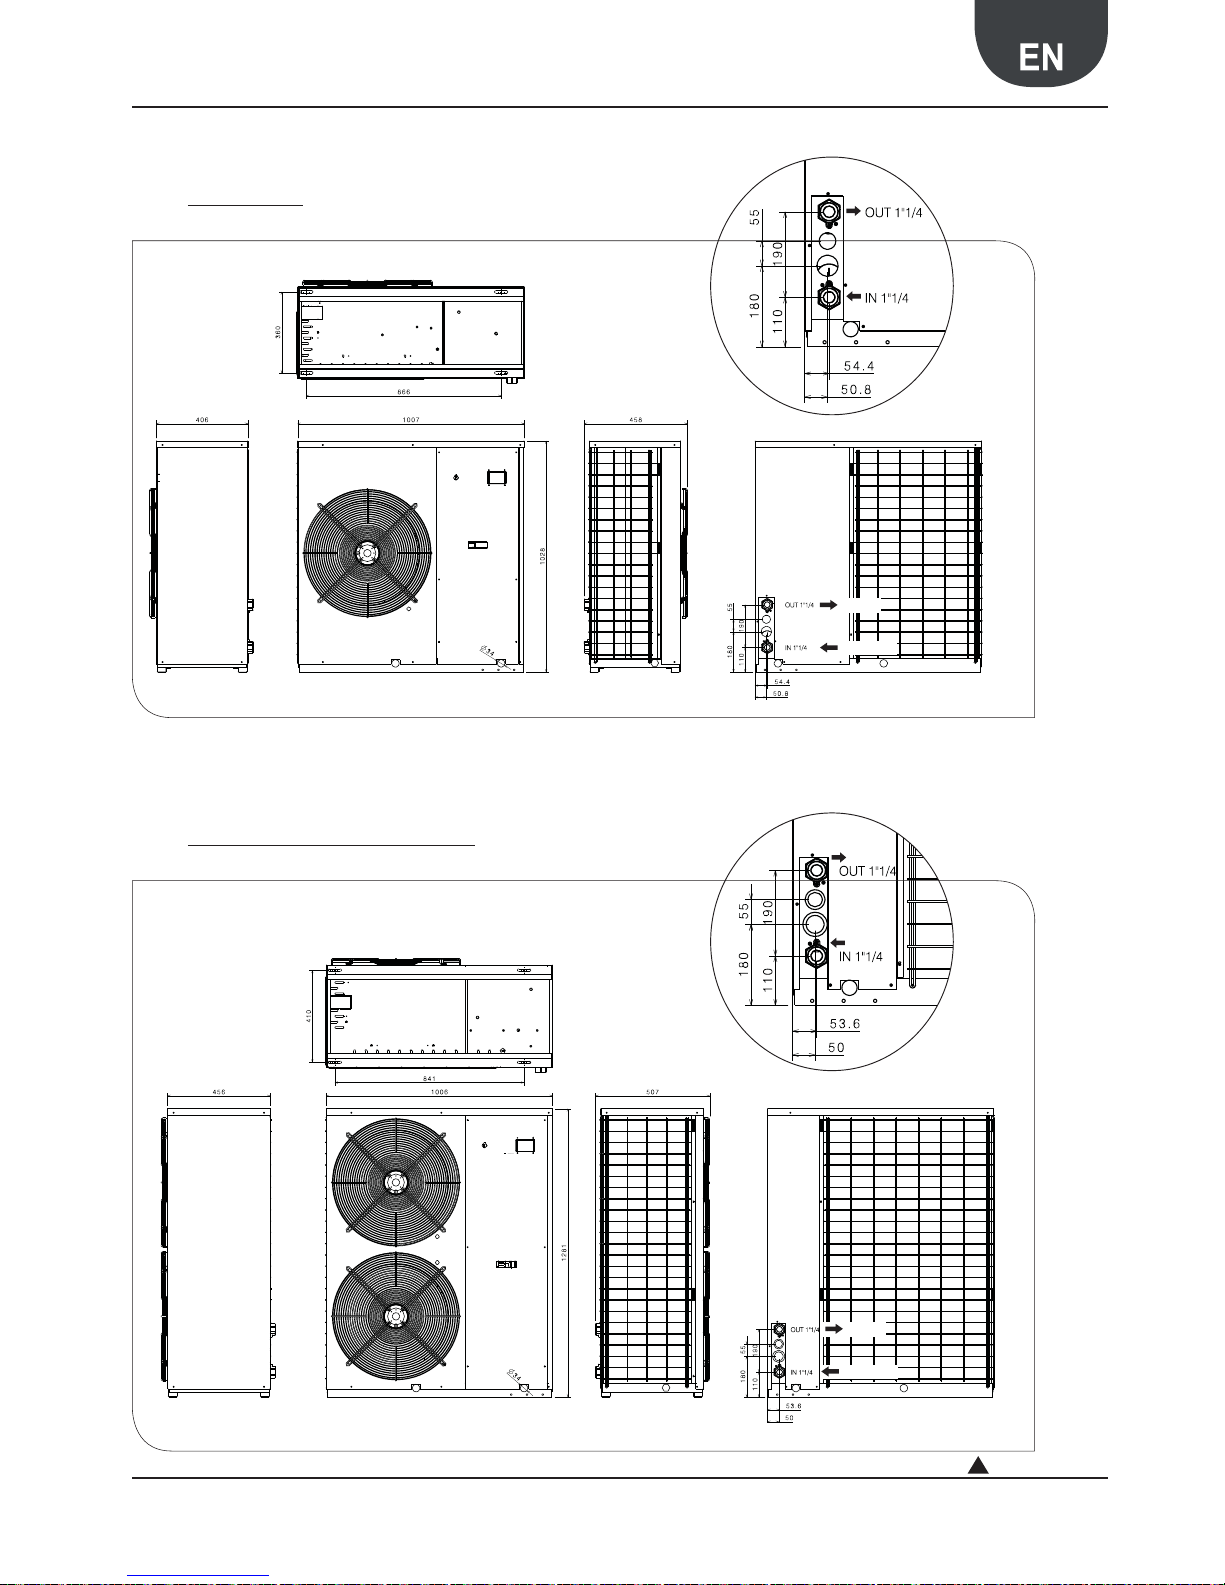
71Aermec code 6755530_03 9.2011
ANK 025-085H
Output
Input
TAB.19
24. POSITION OF HYDRAULIC CONNECTIONS
24.1. ANK 020 H HP
24.2. ANK 030 040 045 050 085 H HP
Output
Input
ANTI-VIBRATION MOUNT POSITIONS
ANTI-VIBRATION MOUNT POSITIONS
Page 72
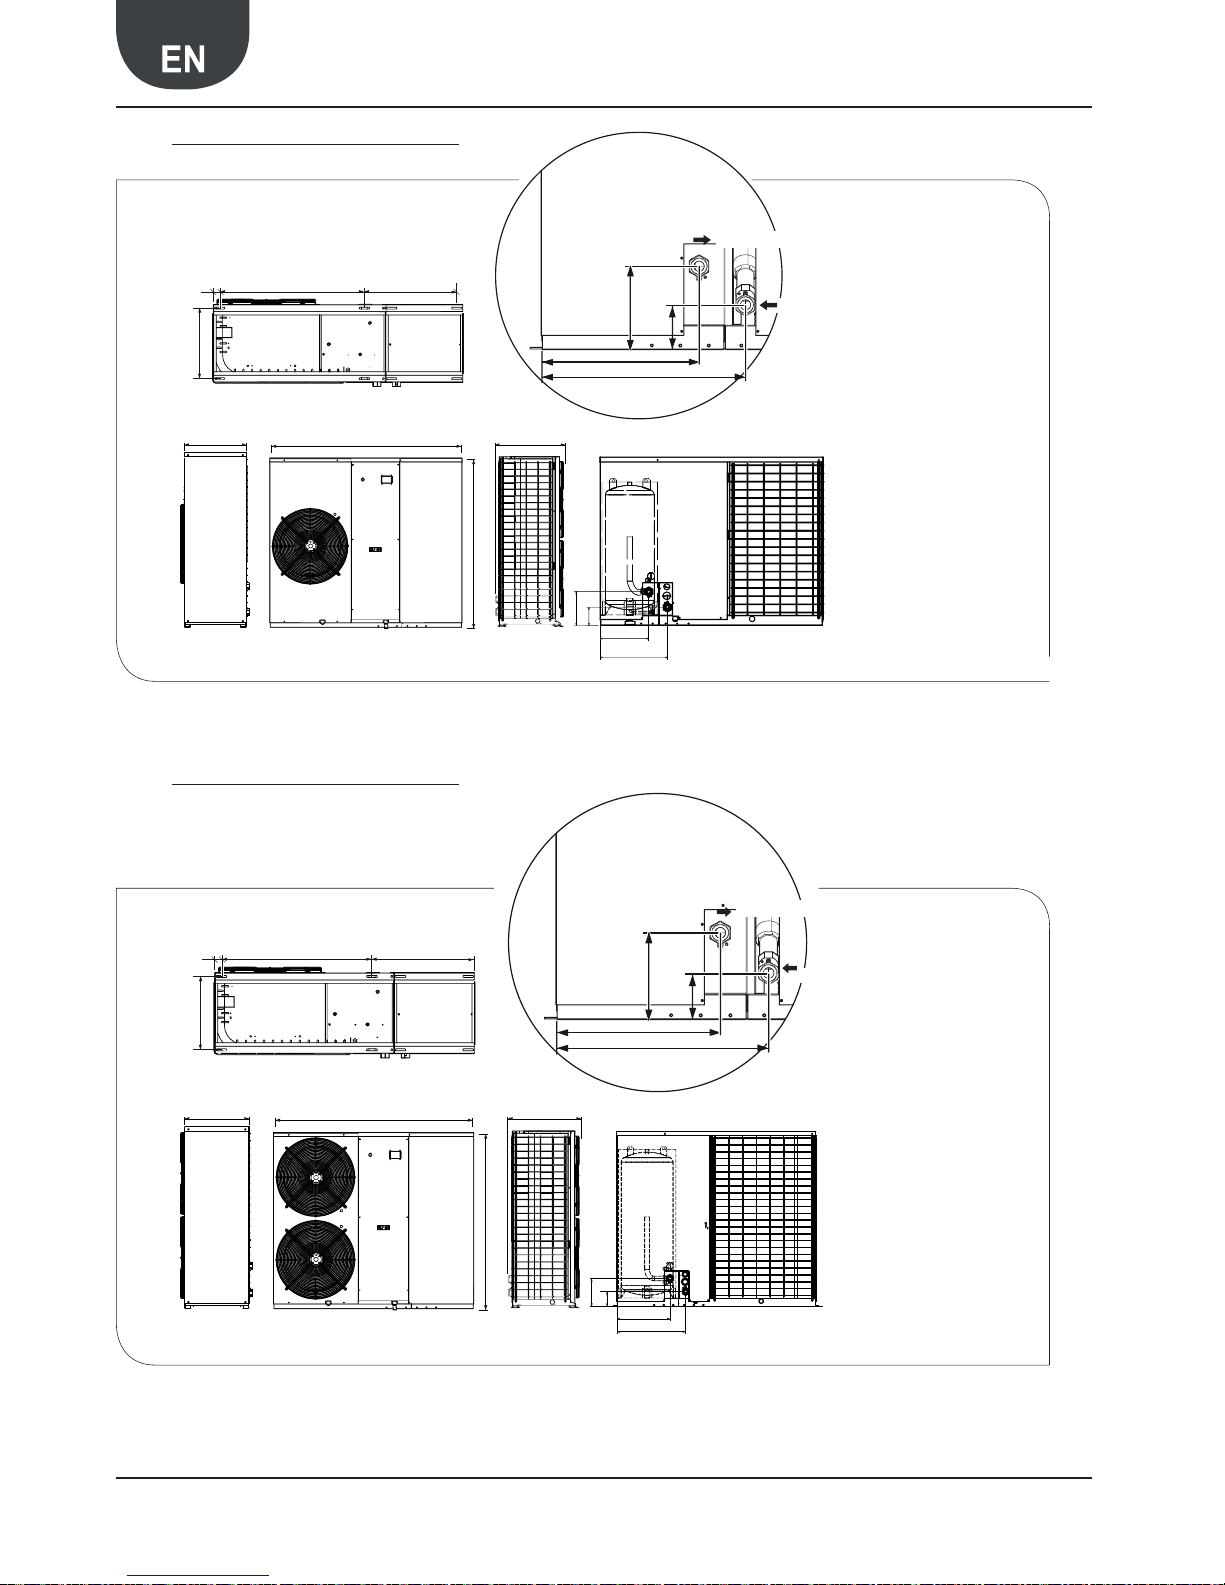
72 Aermec code 6755530_03 9.2011
ANK 025-085H
406 458
1358
1028
205
110
205
110
411
411
297
297
360
35,5 866 421
456 507
1450
1281
205
110
503
503
389
389
360
46 841 569
205
110
1" 1/4 outlet
1" 1/4 outlet
1" 1/4 inlet
1" 1/4 inlet
24.3. ANK 020 H A
24.4. ANK 030 040 045 050 085 H A
ANTI-VIBRATION MOUNT POSITIONS
ANTI-VIBRATION MOUNT POSITIONS
Page 73
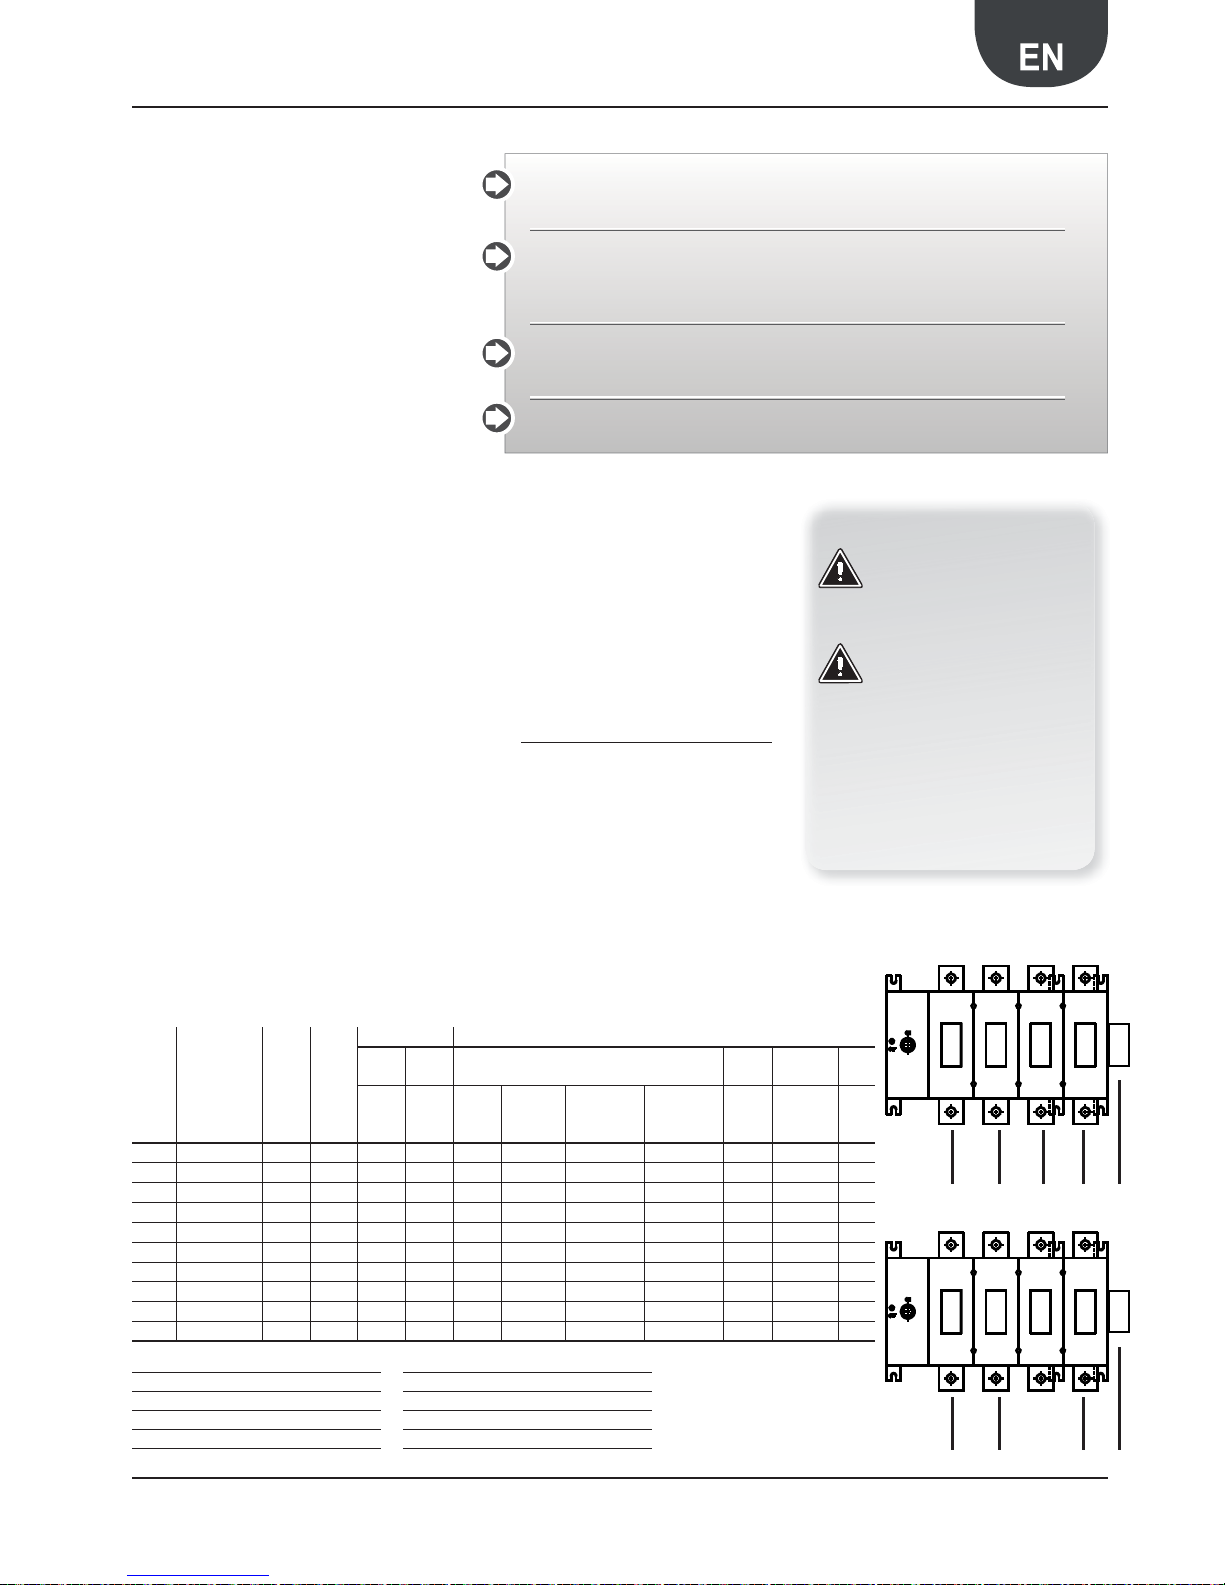
73Aermec code 6755530_03 9.2011
ANK 025-085H
PE
25. ELECTRIC CONNECTIONS
The ANK heat pumps are completely wired at the
factory and only require connec on to the electrical
mains, downstream from a unit switch, according
to that envisioned by the Standards in force on this
subject in the country of installation.
It is also advised to check that:
1. the electrical mains features are suitable for the
absorption values indicated in the electrical data
table.
2. The unit must only be powered when installation
has been completed (hydraulic and electric).
3. Respect the connection indications of the phase
and earth wires.
4. The power supply line must have a relevant protection against short circuits mounted upstream
and dispersions to earth, which isolate the
system with respect to other utilities.
5. The voltage must be within a tolerance of ±10%
of the nominal power supply voltage of the
machine (for unbalanced three-phase unit max
3% between the phases). Whenever these parameters are not respected, contact the electric
energy public body.
6. For electric connections, use the cables with
double isolation according to the Standards in
force on this subject in the different countries.
THE FOLLOWING ARE MANDATORY
1. The use of an omnipolar magnet circuit breaker
switch is mandatory, in compliance with the
IEC-EN Standards (contact opening at least 3
mm), with suitable cut-off power and differential
protection on the basis of the electric data table
shown below, installed as near as possible to the
appliance.
2. It is mandatory to make an effective earth
connection. The manufacturer is not liable for
any damage caused by the lack of or ineffective
appliance earth connection.
3. For units with three-phase power supply, check
the correct connection of the phases.
The cable sections shown in the table are recommend-
ed for maximum lengths of 50 m.
For longer lengths or different cable laying, it is up
to the DESIGN ENGINEER to dimension the appropriate line switch, the power supply line as well as the
connection to the earth wire and connection cables
depending on:
• the length;
• the type of cable;
• the absorption of the unit and the physical location and also the environment temperature.
25.1. ELECTRIC POWER CONNECTION TO
THE ELECTRICAL MAINS
1. Before connec ng the unit to the power supply
mains, make sure that the isola ng switch is
open.
2. Open the front panel
3. Use the holes in the lower part of the framework for the main electric power supply cable
and the cables of the other ex ternal connec ons under the responsibility of the installer.
4. It is prohibited to access posi ons not specifi -
cally envisioned in this manual with elec tric
cables.
All the electrical opera ons must be carried out bySTAF F IN POSSESSION OF THE NECES
SARY QUALIFICATIONS BY LAW, suitably trained and informed on the risks related to these
opera ons.
The features of the electrical lines and of the related components must be determined by STAFF
QUALIFIED TO DESIGN ELECTRICAL SYSTEMS, in compliance with the interna onal and na onal
regula ons of the place of installa on of the unit and in compliance with the regula ons in force at
the me of installa on.
For the installa on requirements refer only to the wiring diagram supplied with the appliance. The
wiring diagram along with the manuals must be kept in good condi on and ALWAYS BE AVAILABLE
FOR ANY FUTURE INTERVENTIONS ON THE UNIT.
It is mandatory to verify that the machine is water ght before making the electrical connec ons and it
must only be powered a er the hydraulic and electrical works have been completed.
ATTENTION
Check the tightness of all power
wire clamps on commissioning
and after 30 days from start-up.
Successively check them every six
months.
Loose terminals can cause
overheating of the cables and
components.
ATTENTION
It is prohibited to use the water
pipes to earth the appliance.
ANK SIZE
Power supply
Compressors [n°]
Fans [n°]
TOTAL ABSORPTION
RECOMMENDED CABLE SECTION x 50 mt. max. length
L.R.A.: F.L.A.: SEC. A SEC. B
EARTH
(PE)
IL
[A] [A]
phases
[n°]
cables
for single
phase [n°]
Cable section
[mm
2
]
Total cables
[n°]
[mm
2
] [mm2] [A]
020
230V/1/50Hz
1145113.9 1 1 4 2 1.5 4 25
030
230V/1/50Hz
1245119.4 1 1 6 2 1.5 6 25
040
230V/1/50Hz
1245122.2 1 1 6 2 1.5 6 40
045
230V/1/50Hz
1245125 1 1 6 2 1.5 6 40
020
400V/3N/50Hz
1 2 39.7 6.1 3+N 1 2.5 4 1.5 2.5 16
030
400V/3N/50Hz
1 2 40.3 7.7 3+N 1 2.5 4 1.5 2.5 16
040
400V/3N/50Hz
1 2 54.3 9.1 3+N 1 2.5 4 1.5 2.5 16
045
400V/3N/50Hz
1 2 61.3 10.6 3+N 1 2.5 4 1.5 2.5 16
050
400V/3N/50Hz
1 2 71.3 11.8 3+N 1 4 4 1.5 4 25
080
400V/3N/50Hz
1 2 91.3 12.3 3+N 1 4 4 1.5 4 25
KEY
F.L.I.: Maximum input power
F.L.A.: Maximum input current
L.R.A.: Peak current
Sec A: Power supply
3+N: 3 phases + neutral
Sec B:
Controls and safety device connection
EARTH: Earth wire to connect to unit
IL: Master switch
phase
phase
phase
neu
tral
phase
phase
phase
neu
tral
PE
400V/3N/50Hz
230/1/50Hz
1. The 230V/1/50Hz versions
have so -start as per
standard.
ELECTRIC DATA TABLE
Page 74

74 Aermec code 6755530_03 9.2011
ANK 025-085H
5. Avoid direct contact with non-insulated copper
piping and with the compressor.
6. Iden f y the clamps for the electric connec-
on and always refer exclusively to the wiring
diagram supplied with the unit.
7. For the opera onal connec on of the unit, take
the power supply cable to the electric control
board inside the unit and connect it to the
U-N and PE clamps, respec ng (U) phase, (N)
neutral, (PE) earth in the event of single-phase
power supply (230V/50Hz),
8. U-V-W as phases N as neutral and PE as ear th
in the event of three-phase power supply
(400V/3N/50Hz).
9. Re-posi on the inspec on panels.
10. Ensure that all protec ons removed for the
electric connec on have been restored before
powering the unit electrically.
11. Posi on the system master switch (outside the
appliance) at “ON”.
25.2. AUXILIARY CONNECTIONS UNDER
THE RESPONSIBILITY OF THE USER/
INSTALLER
All clamps to which reference is made in the
following explana ons are part of the 13 POLE
removable terminal board situated inside the
electric control board and connected to the
MODUCONTROL.
25.2.1. SUMMER/WINTER REMOTE
CONTROL C/F
To prepare a remote summer/winter switch-over
device, connect the device contact to clamps 3
and 5 of the 13 POLE terminal board.
25.2.2. ON/O FF CONTROL IA
To prepare a remote ON/OFF switch-over device,
connect the device contact to clamps 4 and 5 of
the 13 POLE terminal board.
25.2.3. REMOTE ALARM AE
If it should be necessary to display the machine block in a remote point due to opera ng
anomaly, clamps 6 and 7 of the 13 POLE terminal
board can be used to connect a visual or acous c
alarm signal.
25.2.4. REMOTE PANEL TRA
To prepare a remote summer/winter switch-over
device, connect the device contact to clamps 8
and 9 of the 13 POLE terminal board.
25.2.5. CONTACT FOR THERMOSTATING DOMES
TIC HOT WATER DHW TWS
To prepare a stand-alone thermosta ng device,
connect to clamps 10 and 11 of the 13 POLE
terminal board.
25.2.6. CONTACT FOR BOILER CONTROL
To prepare a boiler control, connect to clamps 12
and 13 of the 13 POLE terminal board.
25.2.7. PR3 CONNECTION ACCESSORY
If you should have the PR3 accessory, always
connect it to the 13 POLE terminal board as
shown in the wiring diagram. Remember that
the maximum distance accepted is 150 mt.
REMEMBER THAT THE PR3 AS WELL AS BEING
CONNECTED MUST BE ENABLED (see subsequent pages).
26. CONTROL AND
COMMISSIONING
26.1. PREPARATION FOR COMMISSIONING
Please note that, on request by the Aermec customer
or the legi mate owner of the machine, the units in
this series can be started up by the Aermec A er-Sales
Service in your area (valid only on ITALIAN territory).
The start of opera on must be scheduled in advance
agreed on the basis of the me frame regarding the
realisa on of the system. Prior to the interven on,
all other works (electrical and hydraulic connec ons,
priming and bleeding of air from the system) must
have been completed.
26.2. COMMISSIONING
26.2.1. PRELIMINARY OPERATIONS TO BE PER
FORMED WITH NO VOLTAGE PRESENT
Control:
1. All safety condi ons have been respected.
2. The unit is correctly fi xed to the suppor t surface.
3. The minimum technical spaces have been
respected.
4. That the main power supply cables have ap-
propriate cross-sec on, which can support the
total absorp on of the unit. (see electric data
sec ons) and that the unit has been duly con-
nected to ear th.
5. That all the electrical connec ons have been
made correctly and all the clamps adequately
ghtened.
26.2.2. THE FOLLOWING OPERATIONS ARE TO BE
CARRIED OUT WHEN THE UNIT IS LIVE.
1. Supply power to the unit by turning the master
switch to the ON position. The display will switch
on a few seconds after voltage has been supplied; check that the operating status is on OFF.
(OFF BY KEY B on lower side of the display).
2. Use a tester to verify that the value of the power
supply voltage to the U.V.W. phases is equal
to 400V ±10%; also verify that the unbalance
between phases is no greater than 3%.
3. Check that the connections made by the installer
are in compliance with the documentation.
4. Verify that the compressor sump resistance/s is/
are operating by measuring the increase in temperature of the oil pan. The resistance/s must
function for at least 12 hours before start-up of
the compressor and in any event, the temperature of the oil pan must be 10-15°C higher than
room temperature.
HYDRAULIC CIRCUIT
1. Check that all hydraulic connections are made
correctly, that the plate indications are complied
with and that a mechanical filter has been
installed at the evaporator inlet. (Mandatory
component for warranty to be valid).
2. Make sure that the circulation pump/s is/are operating and that the water flow rate is sufficient
to close the flow switch contact.
3. Check the water flow rate, measuring the
pressure difference between evaporator inlet
and outlet and calculate the flow rate using the
evaporator pressure drop diagram present in this
documentation.
4. Check correct operation of the flow switches,
if installed; on closing the cut-off valve at the
heat exchanger outlet, the unit must display
the block. Finally, open the valve and rearm the
block.
26.3. MACHINE COMMISSIONING
The unit can be used after all of the above-mentioned
controls have been performed.
1. Close the electric control board hatch.
2. Position the appliance master switch at ON.
3. Press the ON key for 3 sec to switch the
machine on.
By pressing the ON key , the display will show
the temperature of the water and the type
of machine operation. Check the operating
parameters set (set-point) and reset any alarms
present. The unit will begin operating after a few
minutes.
26.3.1. WITH THE MACHINE ON, CHECK
COOLING CIRCUIT
CHECK:
- That the compressor input current is lower than the
maximum indicated in the technical data table.
- That in models with three-phase power supply, the
compressor noise level is not abnormal, symptom of
inverse rotation. If this is the case, invert a phase.
- That the voltage value lies within the pre-fixed
limits and that unbalance between the three phases
(three-phase power supply) is not above 3%.
- The presence of any refrigerant GAS leaks, par-
cularly in correspondence with the manometers
pressure transducers and pressure switches pressure points. (vibra ons during transporta on could
loosen the fi ngs).
- Overheating
Comparing the temperature read using a contact
thermostat positioned on the compressor intake
with the temperature shown on the low pressure
manometer (saturation temperature corresponding
to the evaporation pressure). The difference between these two temperatures gives the overheating value. Optimal values are between 4 and 8°C.
- Pressing line temperature. If the subcooling and
overheating values are regular, the temperature
measured in the pressing line pipe at the outlet of
the compressor must be 30/40°C above the condensation temperature.
Page 75
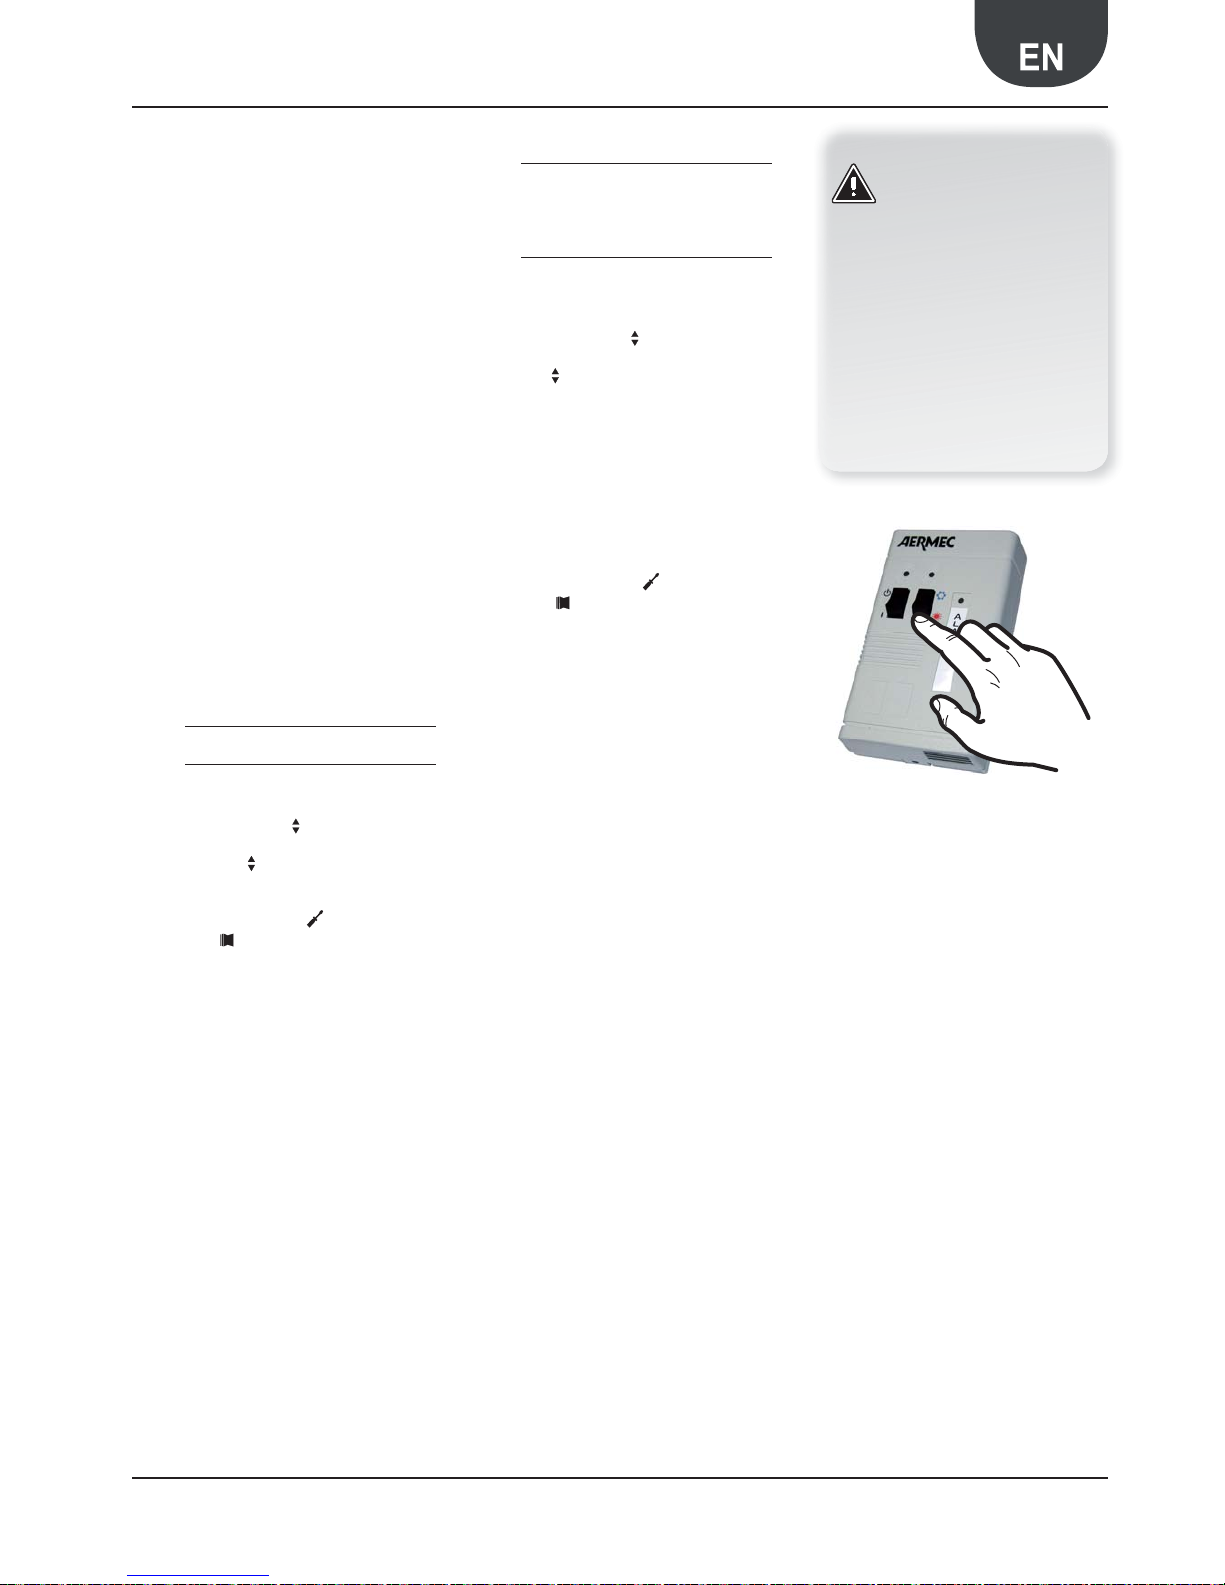
75Aermec code 6755530_03 9.2011
ANK 025-085H
CONTROL AND SAFETY DEVICES
CHECK:
- The manual reset high pressure switch.
That stops the compressor, generating the respec-
tive alarm, when the flow pressure exceeds the setpoint value. Its correct operation can be controlled
by closing the air intake to the exchanger (in cooling
mode) and keeping the high pressure manometer
under control, check the intervention in correspondence of the calibration value. Attention: if there is
no intervention at the calibration value, stop the
compressor immediately and check the cause.
Reset is manual and can only take place when the
pressure drops below the differential value. (For
the set and differential values, consult the technical
manual).
- The anti-freeze control
The anti-freeze control managed by electronic
regulation and by the temperature probe located
at the evaporator outlet is to prevent the formation
of ice when the water flow rate is too low. Correct
operation can be checked by progressively increasingly the anti-freeze set-point until it exceeds the
outlet water temperature and keeping the water
temperature controlled with a high precision thermometer. Verify that the unit is off and generates
the respective alarm After this operation, take the
anti-freeze set-point back to its original value.
26.4. SEASON CHANGEOVER
26.5. SEASON CHANGEOVER ON MACHINE
Access the SET USER list using the key and conform
the password 000 using the same key.
Use the arrow keys to display the STA parameter 0
index of the menu, select it using the key and set it
using the arrow keys on the desired value, VALUE 0
operating in cooling mode VALUE 1 operating in heat-
ing mode.
Confirm the selection using the key and exit the
menu using the key.
26.6. SEASON CHANGEOVER FROM PR3
ACCESSORY
If in possession of the PR3, it must be enabled after
electric connection.
26.6.1. ENABLING OF REMOTE PANEL
Access the INSTALLER SET list using the .key, enter the
password for access to the menu:
installer password 030.
Use the arrow keys to display the PA N parameter
index 9 of the menu, select it using the..key, set it using
the arrow keys on the desired value:
VALUE 1:
• SEASON CHANGE piloted by the appliance.
• ON/OFF CONTROL from PR3
VALUE 2:
• SEASON CHANGE piloted from PR3
• ON/OFF CONTROL from the appliance
VALUE 3:
• SEASON CHANGE piloted from PR3
• ON/OFF CONTROL piloted from PR3
Confirm the selection using the key and exit the
menu using the key.
Once the PR3 remote panel is enabled, just operate
directly on the switch to change the season (fig.1). The
machine will switch off automatically and switch back
on with the operating mode selected.
For further information refer to the USER MANUAL
ATTENTION
Commissioning must be performed
with standard settings. Only when
the inspection has been completed
can the operating Set-Point values
be changed.
Before start-up, power the unit
for at least 12 hours, positioning
the magnet circuit breaker switch
and the door lock isolating switch
at ON
(fig.1)
Page 76
76 Aermec code 6755530_03 9.2011
ANK 025-085H
27. OPERATING FEATURES
27.1. SETPOINT IN COOLING MODE
(Factory set) = 7°C, ∆t = 5°C.
27.2. SETPOINT IN HEATING MODE
(Factory set) = 45°C, ∆t = 5°C.
If the unit power supply is restored a er a temporary
interrup on, the mode set will be kept in the memory.
27.3. COMPRESSOR
STARTUP DELAY
Two func ons have been set-up to prevent compressor
start-ups that are too close.
- Minimum time from last switch-off 60 seconds in
cooling mode.
- Minimum time from last switch-on 300 seconds in
heating mode.
27.4. CIRCULATION PUMPS
The circuit board envisions outputs for the management of the circula on pumps.
The u li es side pump starts immediately and a er
the fi rst 30 seconds of opera ng, when the water fl ow
rate has gone into normal working condi ons, the dif-
feren al pressure switch/fl ow switch control func ons
are ac vated.
Whenever alarms do not occur, the appliance starts.
27.5. ANTIFREEZE ALARM
The alarm11 is always ac ve even in stand-by mode. In
order to prevent damage to the plate heat exchanger
due to the water it contains freezing, on reaching
a water temperature value below the minimum
an -freeze set of 3°C, the unit will be switched off
immediately and the rela ve alarm is given. The unit
can only re-start a er manual reset and the an -freeze
probe measures a water temperature over 4°C 12.
With the unit off and with water temperature below
4°C, the heat exchanger an -freeze electric resistance,
mounted as per standard, is ac vated. It is switched off
when the water temperature exceeds 5°C. The water
pump is always ac ve.
27.6. WATER FLOW RATE ALARM
The unit manages a water fl ow rate alarm control-
led by a diff eren al pressure switch or fl ow switch,
installed as per standard on the machine. This type of
safety device can intervene a er the fi rst 30 seconds of
pump opera on, if the water fl ow rate is not suffi cient.
The interven on of this alarm determines compressor
and pump block.
ATTENTION
11
This anti-freeze set tempera-
ture can only be varied by an
authorised after-sales centre
and only after having checked
that there is a suitable %
anti-freeze solution in the
hydraulic circuit.
12
Whenever this alarm inter-
venes, call an authorised
after-sales service immediately.
Page 77
77Aermec code 6755530_03 9.2011
ANK 025-085H
28. ROUTINE MAINTENANCE
All cleaning is prohibited until the unit has been disconnected from the electric power supply mains
1
.
Make sure there is no voltage present before operating.
Periodic maintenance is fundamental to keep the unit
perfectly efficient under an operational and energy
point of view.
It is therefore essential to carry out periodic yearly
controls on the:
28.1. HYDRAULIC CIRCUIT
CHECK:
1. Water circuit filling.
2. Water filter cleaning.
3. Pressure switch or flow switch control.
4. The absence of air in the circuit (bleeding).
5. That the water flow rate to the evaporator is
constant.
6. The thermal insulation of the hydraulic piping.
7. The percentage of glycol, when envisioned.
28.2. ELECTRIC CIRCUIT
CHECK:
8. Safety device efficiency.
9. The electric power supply voltage.
10. Electrical absorption.
11. Connections tightness.
12. The operation of the compressor guard resist-
ance.
28.3. COOLING CIRCUIT
CHECK:
13. State of compressor.
14. Plate exchanger resistance efficiency.
15. Work pressure.
16. Leak test for water tightness control of the cool-
ing circuit.
17. Operation of high and low pressure switches.
18. Carry out the appropriate checks on the filter
dryer to check efficiency.
28.4. MECHANICAL CHECKS
CHECK:
1. The tightening of the screws, the compressors
and the electrical box, as well as the exterior
panelling of the unit. Bad fixing can cause abnormal noises and vibrations.
2. The state of the structure.
If there are any oxidised parts, treat with paint
suitable to eliminate or reduce oxidation.
29. EXTRAORDINARY MAINTENANCE
the ANKs are filled with R410A gas and are inspected
at the factory. Under normal conditions they do not
require Technical Assistance related to control of refrigerant gas. Through time gas leakage may be generated,
causing refrigerant to escape and discharge the circuit,
causing appliance malfunctioning. In these cases the
refrigerant leakage points must be detected, repaired
and the refrigerant load is to be replenished, respecting Law n°549 law dated 28 December 1993.
30. DISPOSAL
Envisions that disposal of the unit is carried out in
conformity with the Standards in force in the different
countries
ATTENTION
In the cooling circuit it is prohibited
to use oxygen or acetylene or other
inflammable or poisonous gases
because they are a cause of explosions or intoxication. We recommend
to envision a machine book (not
supplied, but the user's responsibility), which allows to keep track of the
interventions performed on the unit.
In this way it will be easy to suitably
organise the interventions making
research and the prevention of any
machine breakdowns easier.
Use the date to record date, type
of intervention made (routine
maintenance, inspection or repairs),
description of the intervention,
measures actuated…
ATTENTION
In the 230V/1/50Hz versions with
soft-start, in the event of a power
cut due to technical problems or for
maintenance, in order to preserve
good operation of the appliance
it is mandatory to wait 5 minutes
before re-applying voltage to the
heat pump.
ATTENTION
It is forbidden to LOAD the cooling
circuit with a refrigerant different
to that indicated. Using a different
refrigerant gas can cause serious
damage to the unit.
Page 78
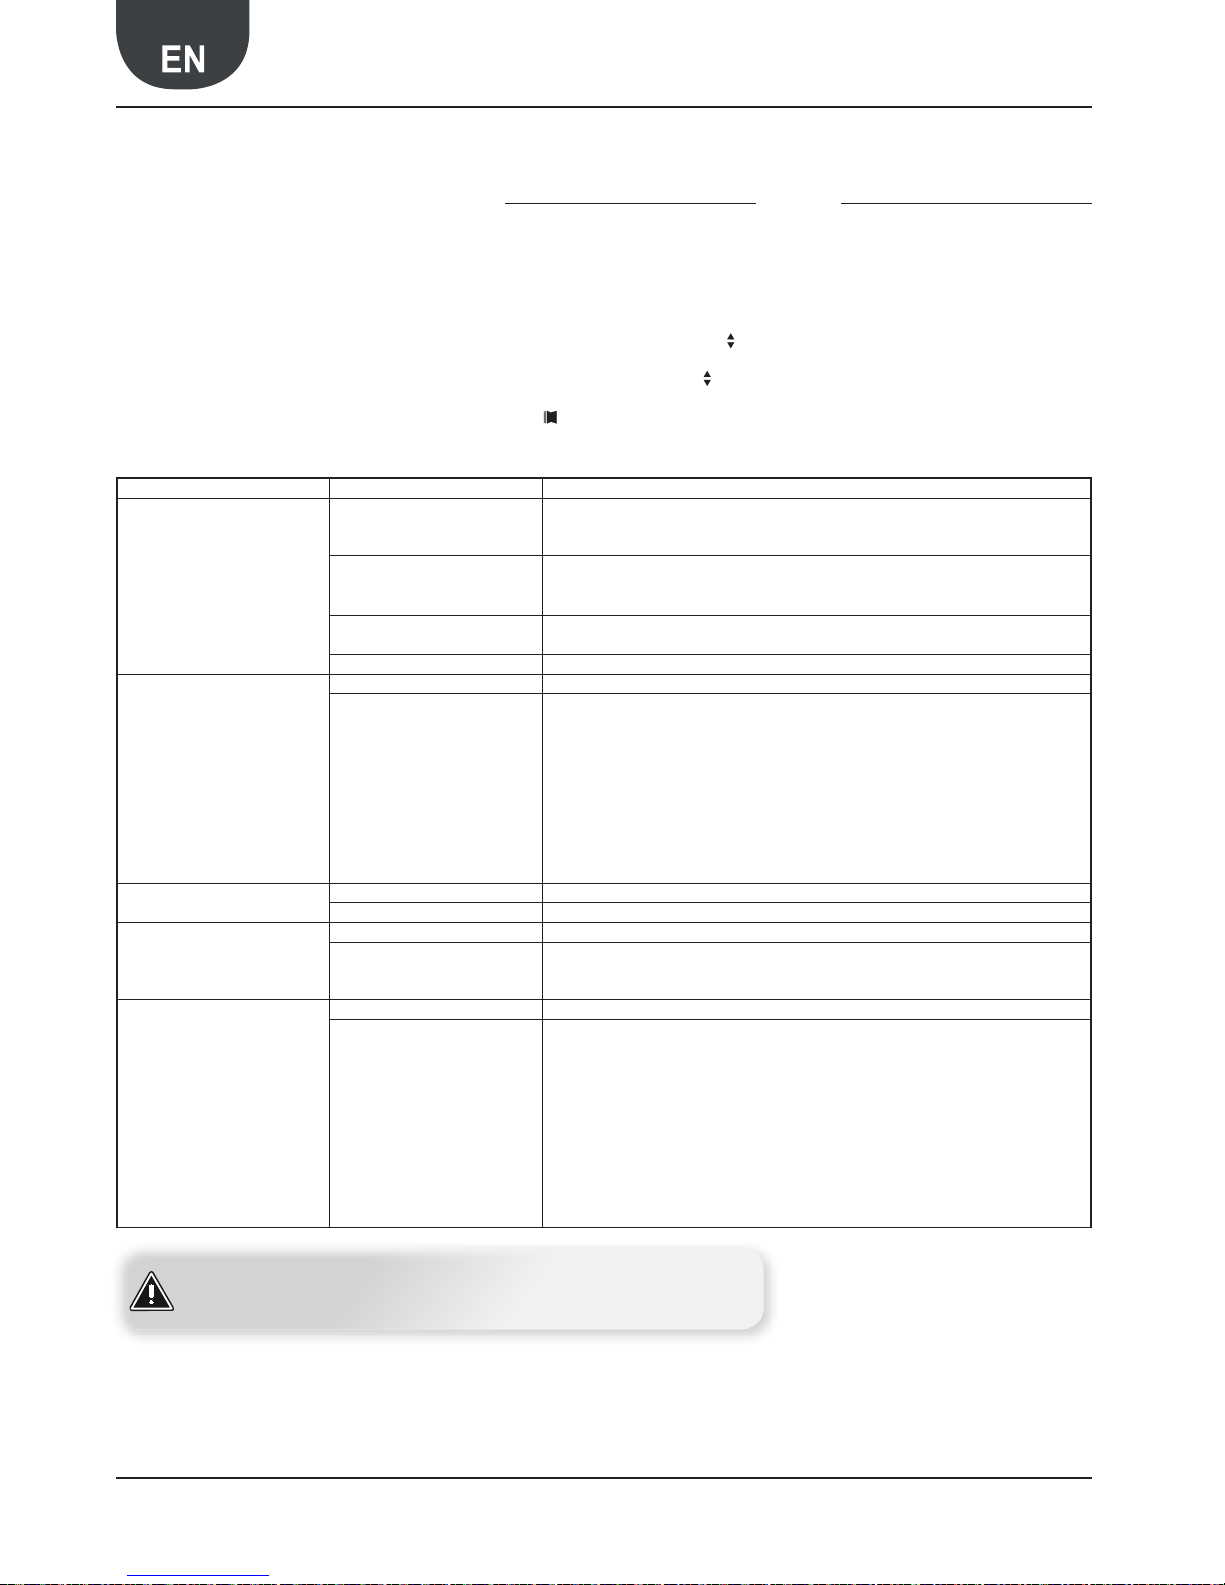
78 Aermec code 6755530_03 9.2011
ANK 025-085H
31. PROCEDURE FOR SELECTION OF THE TYPE OF SYSTEM
Some parameters in the MODUCONTROL board must
be set appropriately on the basis of the type of system
in which the unit is installed.
These modifications, performed by the installer, are
summarised and organised in the following guided
procedures, with which to correctly set the unit circuit
board parameters.
31.1. HOW TO MODIFY A PARAMETER FROM
THE USER MENU
To access the USER SET list, press the key and confirm
the password 000 using the same key. The index of
the USER parameter is displayed along with a string
of three characters that identifies it; the sting remains
displayed for one second, after which it is replaced by
the value relative to the parameter itself.
To pass to the next parameter, use the arrow keys . To
modify a parameter, just select it by pressing the key,
modify the value assigned via the arrow keys and
confirm the modification using the key. To exit the
menu, press the key.
31.2. HOW TO MODIFY A PARAMETER FROM
THE INSTALLER MENU
To enter and modify the INSTALLER menu, follow the
same procedure as for the user menu.
Installer menu password: 030
QUESTION ANSWER WHAT TO DO
(1) What type of system terminals
are used in the heating circuit?
• The unit is a cooling only model • Go to question 2
• Radiant panels • Set the parameter StC (index 3 USER menu) with the value of 35 °C
• Low temperature fan coils or
radiators
• Set the StC parameter (index 3 USER menu) with the value of 45°C (default value)
• Other applications • Set the parameter StC (index 3 USER menu) with the value of 55 °C
(2) Is the remote panel accessory
installed (PR3) ?
• Not installed • Go to question 3
• Installed • Set the PA N parameter (index 9 INSTALLER menu) with the appropriate value:
Value (1):
• Season control piloted from the circuit board
• ON/OFF control enabled from PR3
Value (2):
• Season control enabled from PR3
• ON/OFF control from panel on machine
Value (3):
• Season control enabled from PR3
• ON/OFF control enabled from PR3
(3) Is the production of DHW
envisioned?
• Not envisioned • Go to question 5
• Envisioned • Set the ASA parameter (INSTALLER MENU with the value (1)
(4) Is a 3-way diverter valve envi-
sioned in the DHW production
circuit?
• Not envisioned • Go to question 5
• Envisioned • Set the AAS parameter (index C INSTALLER menu) with the appropriate value (in seconds). This
parameter indicates the stand-by time for inversion of the 3-way diverter valve on the DHW
production system.
(5) Is a room thermostat installed?
• Not envisioned • No operation
• Envisioned • This parameter enables a digital clamp ID (indicated on the circuit board with the code TRA) to
which a room thermostat must be connected, used to disable the compressors and the integrative resistances. Set the trA parameter( index D INSTALLER menu), with the appropriate value,
selecting from:
1. Value (1 or 2): ENABLED
2. Value (0 or 3): DISABLED
3. Remember that the OPEN state on the clamp represents:
• the compressors and resistances block operation if the parameter is set at 1
• the compressors, pumps and resistances block operation if the parameter is set at 2
• represents the pump alarm (as in the previous software version), if the parameter is set at
the value 3
ATTENTION
For further information, refer to the USER manual supplied with the chiller and also available on www.
aermec.com
Page 79
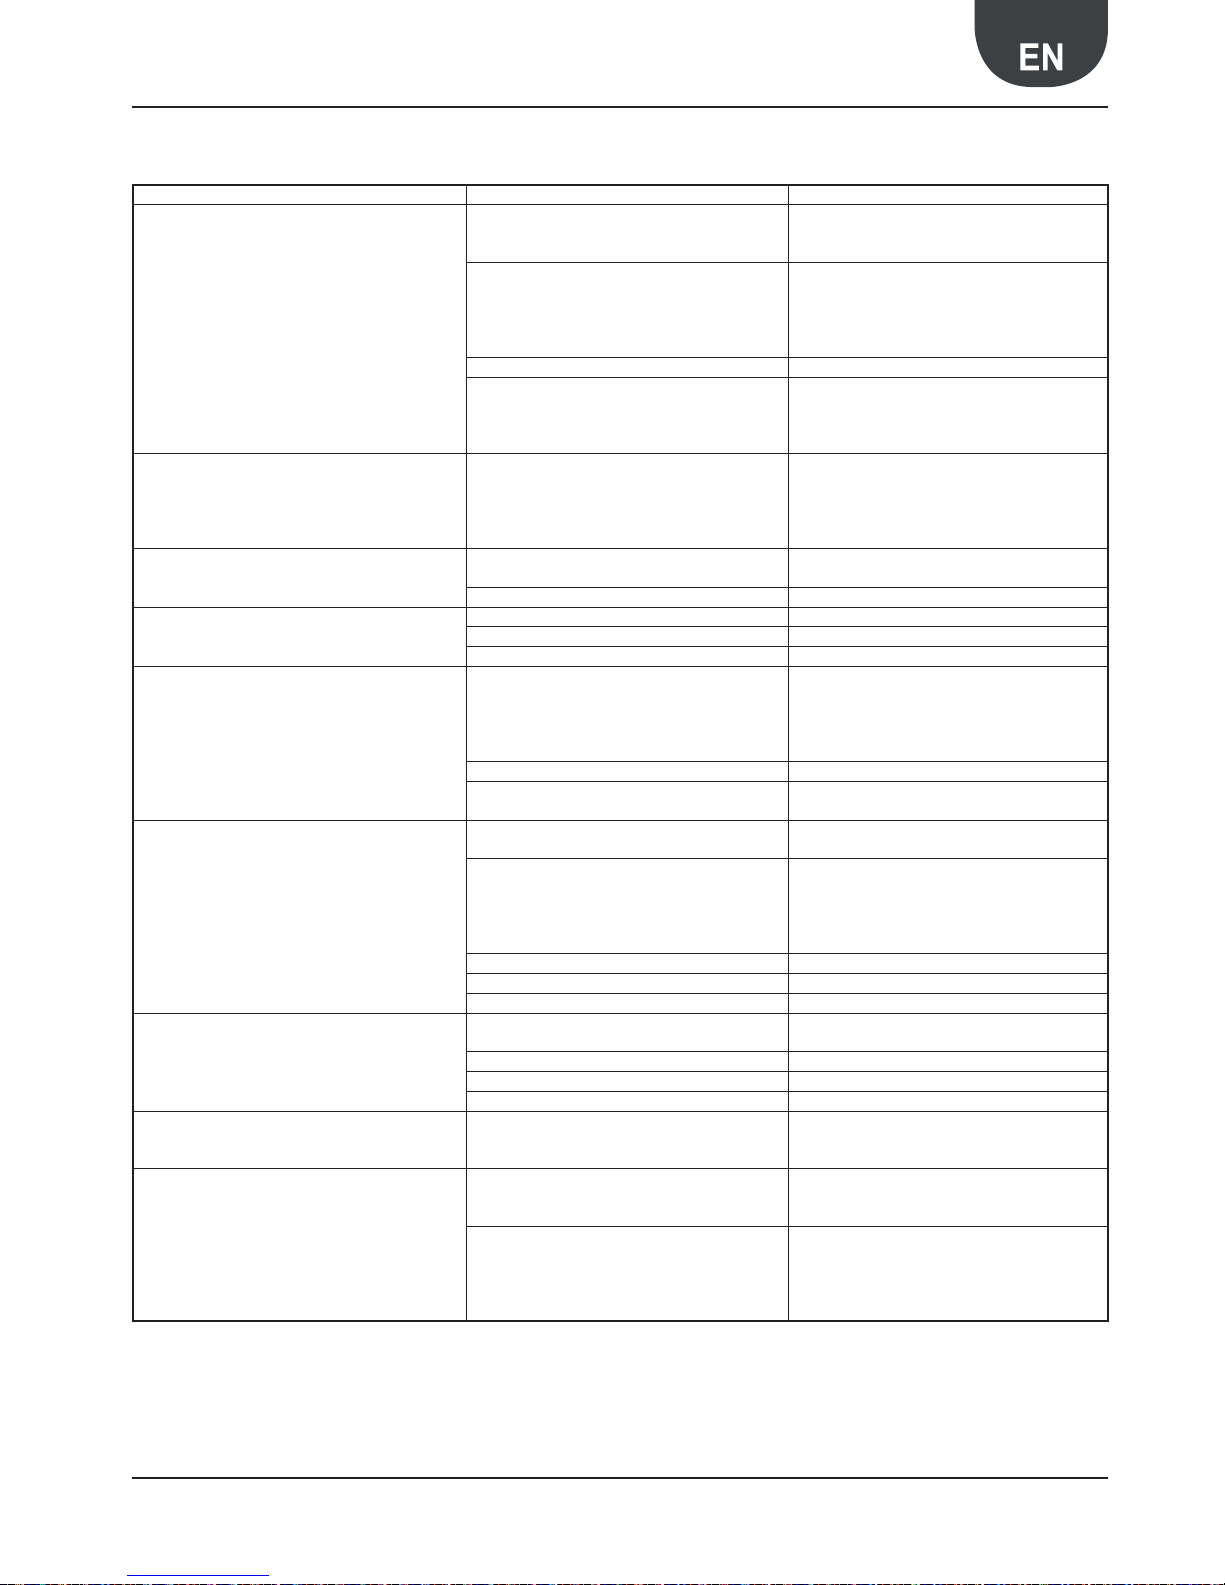
79Aermec code 6755530_03 9.2011
ANK 025-085H
32. TROUBLESHOOTING
ANOMALY CAUSE REMEDY
The unit does not start
• No electric voltage
• Check the presence of voltage
• Check the safety systems upstream
from the appliance
• Master switch at OFF
• Remote switch at OFF (if present)
• Control panel at OFF
• Main switch at OFF
• Compressor magnet circuit breaker at OFF
• Position at ON
• Power supply voltage too low • Check power supply line
• Remote control switch coil broken
• Circuit board broken
• Peak condenser broken
• Compressor broken
• Replace the component
Insufficient yield
• No refrigerant
• Dirty coils
• Water filter clogged
• Appliance dimensioning
• Operation outside of operational limits
• Check the load and any leaks
• Clean the coils
• Clean the filter
• Check performance
• Check the operational limits using the graphics
Noisy compressor
• Liquid return to the compressor
• Inadequate fixing
• Check
• Inverted phase • Invert a phase (400V/3N/50Hz)
Noise and vibrations
• Contacts between metal bodies • Check
• Weak support • Strengthen
• Loose screws • Tighten the screws
The compressor stops due to intervention
of the protections
• Excessive flow pressure
• Low intake pressure
• Low power supply voltage
• Electric connections fastened badly
• Operation outside of operational limits
• Check the operational limits using the graphics
• Pressure switch malfunctioning • Replace the component
• Circuit breaker protection intervention
• Check power supply voltage and calibration
• Check electric isolation of the windings
Compressor high discharge pressure
• High external air temperature
• High utility inlet water temperature
• Check the operational limits using the graphics
• Insufficient air flow
• Insufficient water flow
• Check:
1. Fan operation
2. Cleanliness of the coils
3. Pump operation (speed)
4. Filter cleanliness
• Fan regulation anomalous operation • Check or replace if broken
• Air in the hydraulic system • Bleed the circuit
• Excessive refrigerant gas load • Restore the correct load
Low discharge pressure
• Low external air temperature
• Low input water temperature
• Check the operational limits using the graphics, as
above
• Humidity in the cooling circuit • Empty and restore the gas load
• Air in the hydraulic system • Bleed the circuit
• Insufficient gas load • Restore the correct load
High intake pressure
• High external air temperature
• High utility inlet water temperature
• Thermostatic expansion valve too open or damaged
• Check the operational limits using the graphics
• Adjust or replace if damaged
Low intake pressure
• Low utility water inlet temperature
• Low external air temperature
• Thermostatic expansion valve damaged or blocked
• Check the operational limits using the graphics
• Adjust or replace if damaged
• Insufficient water flow
• Insufficient air flow
• Check:
1. Fan operation
2. Cleanliness of the coils
3. Pump operation (speed)
4. Filter cleanliness
Page 80
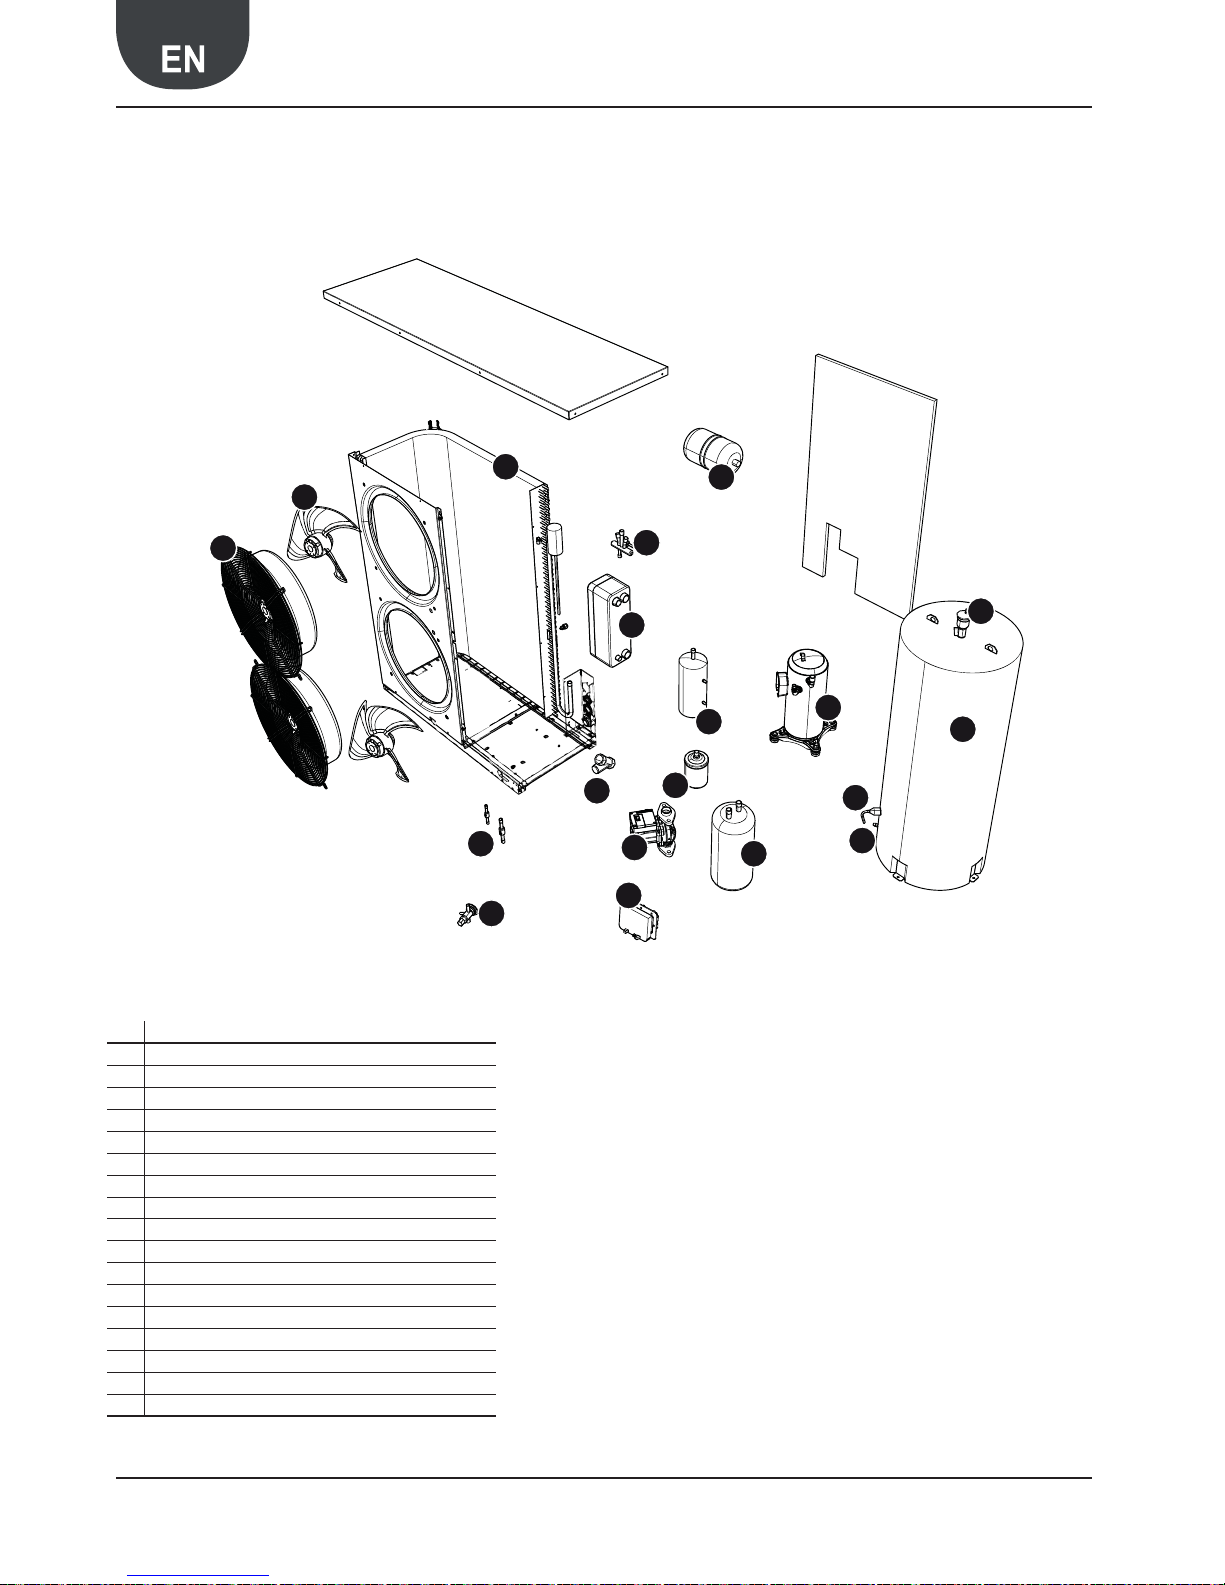
80 Aermec code 6755530_03 9.2011
ANK 025-085H
33. SPARE PARTS
KEY
1. Compressor
2. Cycle reversing valve
3. Plate exchanger
4. Thermostatic valve
5. Liquid separator
6. Dehydrator fi lter
7. Liquid storage tank
8. Finned exchanger
9. One-way valves
10. Water fi lter
11. Pump
12. Expansion vessel
13. System storage tank
14. Cut-off vent valve
15. 200 W resistance
16. Water drain
17. MODU_CONTROL interface
1
2
3
4
5
6
7
8
9
10
11
12
13
14
15
16
17
18
17
Page 81

81Aermec code 6755530_03 9.2011
ANK 025-085H
Page 82

82 Aermec code 6755530_03 9.2011
ANK 025-085H
Page 83

83Aermec code 6755530_03 9.2011
ANK 025-085H
Page 84

The technical data given in this documentation is not binding. Aermec reserves the right to make all modifications deemed necessary for improving the product at any time.
AERMEC S.p.A.
37040 Bevilacqua (VR) Italy–Via Roma, 996
Tel. (+39) 0442 633111
Telefax 0442 93730–(+39) 0442 93566
www . aermec . com - info @ aermec . com
 Loading...